
PE 12175 - Polisher METABO - Free user manual and instructions
Find the device manual for free PE 12175 METABO in PDF.
| Type de produit | Polisher sander |
| Marque | Metabo |
| Modèle | PE 12175 |
| Utilisation principale | Sanding of wood, plastics, coated and painted surfaces, polishing |
| Plage de vitesses | 700 – 2,200 rpm (continuously adjustable in 6 positions) |
| Alimentation | Mains (power cord) |
| Système électronique | VTC (Vario-Tacho-Constamatic): nearly constant speed under load, current limiting startup, soft start, winding temperature monitoring |
| Moteur | Marathon motor: enhanced dust protection, improved longevity by nearly 50% |
| Balais | Autostop brushes: automatic shutdown at end of life to protect the armature |
| Protection contre le redémarrage | Prevents unintentional restart after power interruption |
| Blocage de broche | For easy accessory change |
| Classe de protection | II (double insulation) |
| Équipement de sécurité recommandé | Safety glasses, dust mask (class 2), hearing protection, gloves |
| Nettoyage | Regularly blow compressed air through the rear ventilation slots |
| Entretien | Check brush condition, clean motor, have repairs done by a specialist |
| Accessoires compatibles | Polishing pads, abrasive discs, polishing bonnets, etc. (see manual) |
| Poignée supplémentaire | Mounted on the hand guard for better control |
| Protège-mains | Supplied for polishing operations with polishing pad |
| Réparations | By a qualified specialist; contact the Metabo representative |
| Élimination | Comply with national regulations for recycling the machine, packaging and accessories |
Frequently Asked Questions - PE 12175 METABO
User questions about PE 12175 METABO
0 question about this device. Answer the ones you know or ask your own.
Ask a new question about this device
Download the instructions for your Polisher in PDF format for free! Find your manual PE 12175 - METABO and take your electronic device back in hand. On this page are published all the documents necessary for the use of your device. PE 12175 by METABO.
USER MANUAL PE 12175 METABO
Operating Instructions
1. Specified Use
The machine is suitable for sanding wood, plastic, filled or painted surfaces and polishing applications.
The user bears sole responsibility for damage caused by improper use.
Generally accepted accident prevention regulations and the enclosed safety information must be observed.
2. General Safety Instructions

WARNING - To reduce the risk of injury, user must read instruction manual.

For your own protection and for the protection of your power tool pay attention to all parts of the text that are marked with this symbol!
General Power Tool SafetyWarnings

WARNING Read all safety warnings and all instructions. Failure to follow the warnings
and instructions may result in electric shock, fire and/or serious injury. Save all warnings and instructions for future reference! The term "power tool" in the warnings refers to your mains-operated (corded) power tool or battery-operated (cordless) power tool.
1) Work area safety
a) Keep work area clean and well lit. Cluttered or dark areas invite accidents.
b) Do not operate power tools in explosive atmospheres, such as in the presence of flammable liquids, gases or dust. Power tools create sparks which may ignite the dust or fumes.
c) Keep children and bystanders away while operating a power tool. Distractions can cause you to lose control.
2) Electrical safety
a) Power tool plugs must match the outlet. Never modify the plug in any way. Do not use any adapter plugs with earthed (grounded) power tools. Unmodified plugs and matching outlets will reduce risk of electric shock.
b) Avoid body contact with earthed or grounded surfaces, such as pipes, radiators, ranges and refrigerators. There is an increased risk of electric shock if your body is earthed or grounded.
c) Do not expose power tools to rain or wet conditions. Water entering a power tool will increase the risk of electric shock.
d) Do not abuse the cord. Never use the cord for carrying, pulling or unplugging the power tool. Keep cord away from heat, oil, sharp edges or moving parts. Damaged or
entangled cords increase the risk of electric shock.
e) When operating a power tool outdoors, use an extension cord suitable for outdoor use. Use of a cord suitable for outdoor use reduces the risk of electric shock.
f) If operating a power tool in a damp location is unavoidable, use a residual current device (RCD) protected supply. Use of an RCD reduces the risk of electric shock.
3) Personal safety
a) Stay alert, watch what you are doing and use common sense when operating a power tool. Do not use a power tool while you are tired or under the influence of drugs, alcohol or medication. A moment of inattention while operating power tools may result in serious personal injury.
b) Use personal protective equipment. Always wear eye protection. Protective equipment such as dust mask, non-skid safety shoes, hard hat, or hearing protection used for appropriate conditions will reduce personal injuries.
c) Prevent unintentional starting. Ensure the switch is in the off-position before connecting to power source and/or battery pack, picking up or carrying the tool. Carrying power tools with your finger on the switch or energising power tools that have the switch on invites accidents.
d) Remove any adjusting key or wrench before turning the power tool on. A wrench or a key left attached to a rotating part of the power tool may result in personal injury.
e) Do not overreach. Keep proper footing and balance at all times. This enables better control of the power tool in unexpected situations.
f) Dress properly. Do not wear loose clothing or jewellery. Keep your hair, clothing and gloves away from moving parts. Loose clothes, jewellery or long hair can be caught in moving parts.
g) If devices are provided for the connection of dust extraction and collection facilities, ensure these are connected and properly used. Use of dust collection can reduce dust-related hazards
4) Power tool use and care
a) Do not force the power tool. Use the correct power tool for your application.
The correct power tool will do the job better and safer at the rate for which it was designed.
b) Do not use the power tool if the switch does not turn it on and off. Any power tool that cannot be controlled with the switch is dangerous and must be repaired.
c) Disconnect the plug from the power source and/or the battery pack from the
ENGLISHen
power tool before making any adjustments, changing accessories, or storing power tools. Such preventive safety mea ure reduces the risk of starting the power tool accidentally.
d) Store idle power tools out of the reach of children and do not allow persons unfamiliar with the power tool or these instructions to operate the power tool. Power tools are dangerous in the hands of untrained users.
e) Maintain power tools. Check for misalignment or binding of moving parts, breakage of parts and any other condition that may affect the power tool's operation. If damaged, have the power tool repaired before use. Many accidents are caused by poorly maintained power tools.
f) Keep cutting tools sharp and clean. Properly maintained cutting tools with sharp cutting edges are less likely to bind and are easier to control.
g) Use the power tool, accessories and tool bits etc. in accordance with these instructions, taking into account the working conditions and the work to be performed. Use of the power tool for operations different from those intended could result in a hazardous situation.
5) Service
a) Have your power tool serviced by a qualified repair person using only identical replacement parts. This will ensure that the safety of the power tool is maintained.
3. Special Safety Instructions
3.1 SafetyWarnings Common for Grinding, Sanding, Wire Brushing, Polishing or Abrasive Cutting-Off Operations:
a) This power tool is intended to function as a sander or polisher. Read all safety warnings, instructions, illustrations and specifications provided with this power tool. Failure to follow all instructions listed below may result in electric shock, fire and/or serious injury.
b) This electric power tool is not suitable for grinding, wire brushing and cutting-off operations. Operations for which the power tool was not designed may create a hazard and cause personal injury.
c) Do not use accessories which are not specifically designed and recommended by the tool manufacturer. Just because the accessory can be attached to your power tool, it does not assure safe operation.
d) The rated speed of the accessory must be at least equal to the maximum speed marked on the power tool. Accessories running faster than their rated speed can break and fly apart.
e) The outside diameter and the thickness of your accessory must be within the capacity rating of your power tool. Incorrectly sized
accessories cannot be adequately guarded or controlled.
f) The arbour size of wheels, flanges, backing pads or any other accessory must properly fit the spindle of the power tool. Accessories with arbour holes that do not match the mounting hardware of the power tool will run out of balance, vibrate excessively and may cause loss of control.
g) Do not use a damaged accessory. Before each use inspect the accessory such as abrasive wheels for chips and cracks, backing pad for cracks, tear or excess wear, wire brush for loose or cracked wires. If a power tool or accessory is dropped, inspect for damage or install an undamaged accessory. After inspecting and installing an accessory, position yourself and bystanders away from the plane of the rotating accessory and run the power tool at maximum no-load speed for one minute. Damaged accessories will normally break apart during this test time.
h) Wear personal protective equipment. Depending on application, use face shield, safety goggles or safety glasses. As appropriate, wear dust mask, hearing protectors, gloves and workshop apron capable of stopping small abrasive or workpiece fragments. The eye protection must be capable of stopping flying debris generated by various operations. The dust mask or respirator must be capable of filtering particles generated by your operation. Prolonged exposure to high intensity noise may cause hearing loss.
i) Keep bystanders a safe distance away from work area. Anyone entering the work area must wear personal protective equipment. Fragments of workpiece or of a broken accessory may fly away and cause injury beyond immediate area of operation.
j) Hold power tool by insulated gripping surfaces only, when performing an operation where the cutting accessory may contact hidden wiring or its own cord. Cutting accessory contacting a "live" wire may make exposed metal parts of the power tool "live" and shock the operator.
k) Position the cord clear of the spinning accessory. If you lose control, the cord may be cut or snagged and your hand or arm may be pulled into the spinning accessory.
1) Never lay the power tool down until the accessory has come to a complete stop. The spinning accessory may grab the surface and pull the power tool out of your control.
m) Do not run the power tool while carrying it at your side. Accidental contact with the spinning accessory could snag your clothing, pulling the accessory into your body.
n) Regularly clean the power tool's air vents. The motor's fan will draw the dust inside the housing and excessive accumulation of powdered metal may cause electrical hazards.
o) Do not operate the power tool near flammable materials. Sparks could ignite these materials.
p) Do not use accessories that require liquid coolants. Using water or other liquid coolants may result in electrocution or shock.
3.2 Kickback and RelatedWarnings
Kickback is a sudden reaction to a pinched or snagged rotating wheel, backing pad, brush or any other accessory. Pinching or snagging causes rapid stalling of the rotating accessory which in turn causes the uncontrolled power tool to be forced in the direction opposite of the accessory's rotation at the point of the binding.
For example, if an abrasive wheel is snagged or pinched by the workpiece, the edge of the wheel that is entering into the pinch point can dig into the surface of the material causing the wheel to climb out or kick out. The wheel may either jump toward or away from the operator, depending on direction of the wheel's movement at the point of pinching. Abrasive wheels may also break under these conditions.
Kickback is the result of power tool misuse and/or incorrect operating procedures or conditions and can be avoided by taking proper precautions as given below.
a) Maintain a firm grip on the power tool and position your body and arm to allow you to resist kickback forces. Always use the auxiliary handle, if provided, for maximum control over kickback or torque reaction during start-up.
The operator can control torque reactions or kickback forces, if proper precautions are taken.
b) Never place your hand near the rotating accessory. Accessory may kickback over your hand.
c) Do not position your body in the area where power tool will move if kickback occurs.
Kickback will propel
the tool in direction opposite to the wheel's movement at the point of snagging.
d) Use special care when working corners, sharp edges etc. Avoid bouncing and snagging the accessory. Corners, sharp edges or bouncing have a tendency to snag the rotating accessory and cause loss of control or kickback.
e) Do not attach a saw chain woodcarving blade or toothed saw blade. Such blades create frequent kickback and loss of control.
3.3 SafetyWarnings Specific for Sanding Operations:
a) Do not use excessively oversized sanding disc paper. Follow manufacturers recommendations when selecting sanding paper. Larger sanding paper extending beyond the sanding pad presents a laceration hazard and may cause snagging, tearing of the disc or kickback.
3.4 SafetyWarnings Specific for Polishing: Loose parts on the polishing guard, especially the fastening cords, are not permitted. Tuck away or shorten the fastening cords. Loose, spinning fastening cords may make contact with your fingers or become caught in the workpiece.
Accessories must be rated for at least the speed recommended on the tool warning label.
Wheels and other accessories running over ratedspeed can fly apart and cause injury.
Hold tool by insulated gripping surfaces when performing an operation where the cutting tool may contact hidden wiring or its own cord.
Contact with a "live" wire will make exposed metal parts of the tool "live" and shock the operator.
Use elastic cushioning layers if they have been supplied with the abrasive and if required.
Observe the specifications of the tool or accessory manufacturer!
Accessories must be stored and handled with care in accordance with the manufacturer's instructions.
Ensure that accessories are installed in accordance with the manufacturer's instructions.
The tool continues running after the machine has been switched off.
When sanding and working with the lambskin polishing disc with cord drive always work with the hand protection guard installed.
Do not use separate reducing bushings or adapters to adapt tools with a large hole.
The tool must lay flat and be secured against slipping, e.g. using clamps. Large workpieces must be sufficiently supported.
If accessories with threaded inserts are used, the end of the spindle may not touch the base of the hole on the grinding tool. Make sure that the thread in the accessory is long enough to accommodate the full length of the spindle. The thread in the accessory must match the thread on the spindle.
See page 3 and chapter 14. Technical Specifications for more information on the spindle length and thread.

Always wear protective goggles.

During machining, of metals in particular, conductive dust can form
deposits inside the machine. This can lead to the transfer of electrical energy onto the machine housing. This can mean a temporary danger of electric shocks. This is why it is necessary when the machine is running to blow compressed air through the rear ventilation slots of the machine regularly, frequently and thoroughly. Here, the machine must be held firmly.
We recommend using a stationary extractor system and connecting a residual current circuit-breaker (FI) upstream. When the machine is shut down via the
FI circuit-breaker, it must be checked and cleaned. See chapter 9. Cleaning for more information on cleaning the motor.
Dust from material such as paint containing lead, some wood species, minerals and metal may be harmful. Contact with or inhalation of the dust may cause allergic reactions and/or respiratory diseases to the operator or bystanders.
ENGLISHen
Certain kinds of dust are classified as carcinogenic such as oak and beech dust especially in conjunction with additives for wood conditioning (chromate, wood preservative). Material containing asbestos must only be treated by specialists.
- Where the use of a dust extraction device is possible it shall be used.
- The work place must be well ventilated.
- The use of a dust mask of filter class P2 is recommended.
Follow national requirements for the materials you want to work with.
Materials that generate dusts or vapours that may be harmful to health (e.g. asbestos) must not be processed.
When working in dusty conditions, ensure that ventilation openings are not blocked. If it becomes necessary to remove dust, first disconnect the power tool from the mains supply (use non-metallic objects) and avoid damaging internal components.
Damaged, eccentric or vibrating tools must not be used.
Connect a FI circuit-breaker with max. release current (30 mA) upstream when using the machine outdoors!
Pull the plug out of the socket before making any adjustments, converting or servicing the machine.
A damaged or cracked additional handle must be replaced. Never operate a machine with a defective additional handle.
A damaged or cracked hand guard must be replaced. Never operate a machine with a defective hand guard.
SYMBOLS ON THE TOOL:
Class II Construction
V.....volts
A.......amperes
Hz......hertz
W.....watts
.../min . . . . . . . . . . . . . . . . . . . . . . . . . . . . . . . . . . . . . . . . . . . . . . . . . . . . . . . . . . . . . . . . . . . . . . . . . . . . . . . ...
...alternating current
n............no load speed
4. Overview
See page 2.
1 Spindle locking button
2 Sliding on/off switch
3 Speed adjustment wheel
4 Electronic signal indicator
5 Hand protection
6 Additional handle
5. Special Product Features
Marathon Motor
The dust-proof Metabo Marathon motor guarantees an up to 50% longer service life thanks to the Metabo winding protective grille and powder-coated field winding.
Autostop carbon brushes
When the Autostop carbon brushes are worn, the power tool switches off automatically, thus preventing armature damage.
VTC electronics
The VTC electronics make material-compatible work possible and an almost constant speed, even under load. The Vario-Tacho Constamatic Electronics (VTC) also includes starting current limitation, electronic smooth start, monitoring of the winding temperature and electronic restart protection.
Restart protection
The restart protection prevents the tool from starting unintentionally when being plugged in again or when power is restored after a power failure.
Ergonomic front cap
Ergonomic front cap for excellent machine guidance during continuous operation.
Spindle lock
Spindle lock for simple tool change.
6. Commissioning
Before plugging in, check to see that the rated mains voltage and mains frequency, as specified on the rating label, match your power supply.
7. Installing the tools
Press in the spindle locking knob (1) only when the spindle is stationary!
Locking the spindle
Press in the spindle locking button (1) and turn the spindle by hand until the spindle locking button engages.
Attaching the hand guard (for work with the support plate and sanding sheet, or sheepskin polishing disc with cord drive)
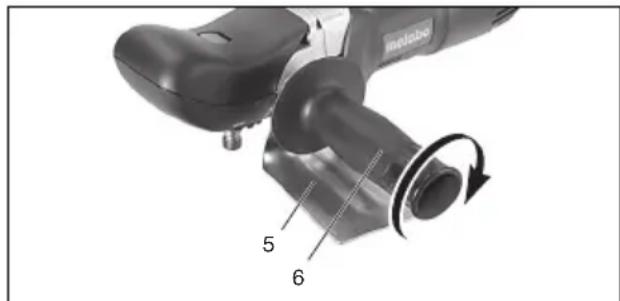
Slide the hand guard (5) over the threaded fitting on the additional handle (6). Align hand protection and install with additional handle.
7.1 Installing support plate and sanding sheet

Only use the adjusting nut supplied with the support plate.
Place the support plate on the spindle as shown in the illustration. Screw on sanding sheet with adjusting nut supplied with support plate. Lock the spindle. Tighten sanding sheet with support plate manually in a clockwise direction.
Release by hand or with a two-hole spanner if necessary.
8. Use
8.1 Setting speed
The speed can be preset via the setting wheel (3) and is infinitely variable.
Positions 1-6 correspond approximately to the following no-load speeds:
1.700 rpm 4 .1800 rpm
2.....1100 rpm 5 ....2000 rpm
3.1500 rpm 6 .2200 rpm
The VTC electronics make material-compatible work possible and an almost constant speed, even under load.
8.2 Switching On and Off

Switch on first, then guide the accessory towards the workpiece.

The machine must not be allowed to draw in additional dust and shavings. When switching the machine on and off, keep it away from dust deposits. After switching off the machine, only places known when the motor has come to a standstill.

In continuous operation, the machine continues running if it is forced out of your.
ls.Therefore, always hold the machine with
hands using the handles provided, stand in a
position and concentrate.
To switch on: Push the slide switch (2) forward.
For continuous activation, now tilt downwards until it engages.
To switch off: Press the rear end of the slide switch (2) and release it.
9. Cleaning
Motor cleaning: blow compressed air through the rear ventilation slots of the machine regularly, frequently and thoroughly. Here, the machine must be held firmly.
10. Troubleshooting
The electronic signal display (4) lights up and the load speed decreases. The coil temperature is too high! Run the machine in idling until the electronics signal indicator switches off.
The electronic signal display (4) flashes and the machine does not start. The restart protection is active. If the mains plug is inserted with the machine switched on, or if the current supply is restored following an interruption, the machine does not start up. Switch the machine off and on again.
11. Accessories
Use only genuine Metabo accessories.
If you need any accessories, check with your dealer.
For dealers to select the correct accessory, they need to know the exact model designation of your power tool.
See page 4.
A Polishing and sanding pads with Velcro fasteners (for attaching polishing and sanding accessories)
B Foam polishing pad, coarse with Velcro fasteners (for buffing weathered paint)
C Foam polishing pad, fine with Velcro fasteners (for polishing paint)
D Foam polishing pad, profiled with Velcro fasteners (for polishing paint)
E Felt polishing disc, hard with Velcro fasteners (for buffing paint, non-ferrous metals and stainless steel sheets)
F Felt polishing disc, soft with Velcro fasteners (for buffing paint, non-ferrous metals and stainless steel sheets)
G Sheepskin polishing disc with Velcro fasteners (for high-gloss polishing)
H Sheepskin polishing disc with cord drive (for high-gloss polishing)
I Sanding cloth with Velcro sanding, cleaning, degreasing)
J Cushioning disc with Velcro fasteners (for sanding curved surfaces)
K Felt polishing disc with internal thread M 14
L Moltopren polishing disc with internal thread M 14
M Buffering disc 200 × 20 ~mm (for general polishing work)
N Buffering disc 200 × 20 ~mm (for high gloss polishing)
O Mounting shank for 2 buffing discs with flanges and clamping nut
P Polishing paste (for metal and plastic)
For a complete range of accessories, see www.metabo.com or the main catalogue.
ENGLISHen
12. Repairs

Repairs to electrical tools must be carried out by qualified electricians ONLY!
If you have Metabo electrical tools that require repairs, please contact your Metabo service centre. For addresses see www.metabo.com.
You can download spare parts lists from www.metabo.com.
13. Environmental Protection
Observe national regulations on environmentally compatible disposal and on the recycling of disused machines, packaging and accessories.
14. Technical Specifications
Explanation of details on page 3. Subject to changes serving technical progress.
D_max = Maximum support plate diameter
M_t, = Maximum torque
M= S p i n d I e t h r e a d 1 L e n g t h o f t h e
n^* = No-load speed (maximum speed)
n_^ = Speed at rated load
P1 =Nominal power input
P2 =Power output
m = Weight without mains cable

Wear ear protectors!
- High-energy, high-frequency interference can cause speed fluctuations of up to 20%, which subside when the interference disappears.
Machine in protection class II
The technical specifications quoted are subject to tolerances (in compliance with the relevant valid standards).
Mode d'emploi
P1 =Puissance absorbée
No实用性, no design, no quality. No实用性, no design, no adaptation, no adhesion, no design, no adaptation, no adhesion, no adaptation, no adaptation, no adaptation, no adaptation, no adaptation, no adaptation, no adaptation, no adaptation, no adaptation, no adaptation, no adaptation, no adaptation, no adaptation, no adaptation, no adaptation, no adaptation, no adaptation, no adaptation, no adaptation, no adaptation, no adaptation, no adaptation, no adaptation, no adaptation, no adaptation, no adaptation, no adaptation, no adaptation, no adaptation, no adaptation, no adaptation, no adaptation, no adaptation, no adaptation


- Operating Instructions
- Specified Use
- General Safety Instructions
- General Power Tool SafetyWarnings
- 1) Work area safety
- 2) Electrical safety
- 3) Personal safety
- 4) Power tool use and care
- ENGLISHen
- Special Safety Instructions
- SafetyWarnings Common for Grinding, Sanding, Wire Brushing, Polishing or Abrasive Cutting-Off Operations:
- Kickback and RelatedWarnings
- SafetyWarnings Specific for Sanding Operations:
- Overview
- Special Product Features
- Marathon Motor
- Autostop carbon brushes
- VTC electronics
- Restart protection
- Ergonomic front cap
- Spindle lock
- Commissioning
- Installing the tools
- Locking the spindle
- Installing support plate and sanding sheet
- Only use the adjusting nut supplied with the support plate.
- Use
- Setting speed
- Switching On and Off
- To switch on: Push the slide switch (2) forward.
- Cleaning
- Troubleshooting
- Accessories
- See page 4.
- Repairs
- Environmental Protection
- Technical Specifications
- Wear ear protectors!
- Mode d'emploi
Brand : METABO
Model : PE 12175
Category : Polisher