
BS 1300 N - Vacuum Cleaner CLATRONIC - Free user manual and instructions
Find the device manual for free BS 1300 N CLATRONIC in PDF.
| Product type | Canister vacuum cleaner |
| Brand | Clatronic |
| Model | BS 1300 N |
| Power supply | 220-240 V ~, 50/60 Hz |
| Nominal power | 700 W |
| Annual energy consumption | 26.9 kWh/year |
| Energy efficiency class | A |
| Carpet cleaning performance class | D |
| Hard floor cleaning performance class | A |
| Dust re-emission class | D |
| Noise level | 79 dB(A) |
| Power cord | With automatic rewinder (length not specified) |
| Suction hose | Telescopic with regulator |
| Included nozzles | Floor nozzle (with adjustable brush), crevice tool, articulated nozzle |
| Filters | Motor protection filter and exhaust filter (washable) |
| Full bag indicator | Yes, red indicator |
| Dust bag capacity | Not specified (standard Swirl® Y 298 bag) |
| Dimensions (W x D x H) | Not specified |
| Weight | Not specified |
Frequently Asked Questions - BS 1300 N CLATRONIC
User questions about BS 1300 N CLATRONIC
0 question about this device. Answer the ones you know or ask your own.
Ask a new question about this device
Download the instructions for your Vacuum Cleaner in PDF format for free! Find your manual BS 1300 N - CLATRONIC and take your electronic device back in hand. On this page are published all the documents necessary for the use of your device. BS 1300 N by CLATRONIC.
USER MANUAL BS 1300 N CLATRONIC
Poids net :............envviron 3,0 kg
Sachet de filtré :............SSB 98 / Swirl®, Y 298®
Thank you for selecting our product. We hope that you will enjoy use of the appliance.
Symbols in these Instructions for Use
Important information for your safety is specially marked. It is essential to comply with these instructions in order to avoid accidents and prevent damage to the machine:
WARNING:
This warns you of dangers to your health and indicates possible injury risks.
CAUTION:
This refers to possible hazards to the machine or other objects.
i NOTE:
This highlights tips and information.
General Notes
Read the operating instructions carefully before putting the appliance into operation and keep the instructions including the warranty, the receipt and, if possible, the box with the internal packing. If you give this device to other people, please also pass on the operating instructions.
- The appliance is designed exclusively for private use and for the envisaged purpose. This appliance is not fit for commercial use.
- Do not use the appliance outdoors. Keep it away from sources of heat, direct sunlight, humidity (never dip it into any liquid) and sharp edges. Do not use the appliance with wet hands. If the appliance is humid or wet, unplug it immediately.
- When cleaning or putting it away, switch off the appliance and always pull out the plug from the socket (pull the plug itself, not the lead) if the appliance is not being used and remove the attached accessories.
- Do not operate the machine without supervision. If you leave the room you should always turn the device off. Remove the plug from the socket.
- The device and the mains lead have to be checked regularly for signs of damage. If damage is found the device must not be used.
- Use only original spare parts.
- In order to ensure your children's safety, please keep all packaging (plastic bags, boxes, polystyrene etc.) out of their reach.
WARNING:
Do not allow small children to play with the foil. There is a danger of suffocation!
Special Safety Instructions for this appliance
- Do not try to repair the appliance on your own. Always contact an authorized technician. To avoid the exposure to danger, always have a faulty cable be replaced only by the manufacturer, by our customer service or by a qualified person and with a cable of the same type.
- This appliance can be used by children aged from 8 years and above and persons with reduced physical, sensory or mental capabilities or lack of experience and knowledge if they have been given supervision or instruction concerning use of the appliance in a safe way and understand the hazards involved.
Children shall not play with the appliance. -
Cleaning and user maintenance shall not be made by children without supervision.
-
Do not suck up liquids!
- Do not suck up hot ashes or pointed or sharp objects!
- Do not use the device in damp rooms!
- Never use without the filter. Check that the filter is inserted correctly!
- Hair, clothing and body parts away from the vacuum nozzle during use!
- Keep the vacuum cleaner away from sources of heat like radiators, ovens, etc.!
Overview of the Components
1 Telescopic suction pipe
2 Slide for telescopic suction pipe
3 Floor nozzle (with hook (not shown))
4 Lever for extending and retracting the brushes
5 On/off button
6 Cover for extraction filter
7 Stowage clip
8 Power cord with plug
9 Cable-winding button
10 Dust bag filling display
11 Connection head of the vacuum hose
12 Hose connection
13 Opener dust bag compartment
14 Suction hose
Start-up
- Insert the connection head part of the suction hose into the hose connector of the device and then turn it clockwise by a quarter turn.
- To disconnect the hose, turn it anticlockwise by a quarter turn und remove it in an upwards direction.
- Insert the vacuum tube into the handle if required.
- Then assemble the floor nozzle and/or the accessories.
Nozzle Attachment
Floor nozzle (3)
The floor nozzle features castors for easier movement
You can clean smooth surfaces and carpets with the floor nozzle.
- Adjust the brushes outwards or inwards using the lever (4).
Best use of the appliance depends on the texture of the floor covering. We recommend the following use:
Use without brushes:
For vacuuming floor coverings with a deep pile
- Use with trushes:
For vacuuming smooth floors and carpets with a shallow pile
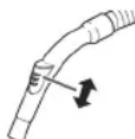
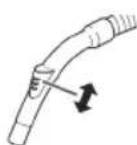
Crevice and jointed nozzle
For vacuuming upholstery, curtains and in corners and crevices etc.
iNOTE:
When folded, use it as a crevice nozzle. If you want to use the brush nozzle, pull the brush tool towards the arrow marking until it locks into place.
To detach the nozzle attachments from the suction pipe, pull them off by turning them slightly.
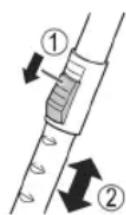
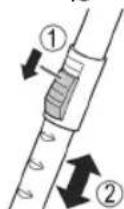
Telescopic suction pipe
The length of the telescopic suction pipe can be adjusted individually:
- Loosen the locking mechanism by sliding and holding the button (2) in the direction of the arrow marking.
- Extract one tube from the other to the desired length.
- Release the button in order to lock the connection.
Mains cable
Pull the mains cable from the cable compartment.
A
CAUTION:
- Pull out the cable up to the maximum length indicated with the yellow mark.
- Never pull the cable out up to the red mark as the cable winding can be damaged.
iNOTE:
If the red mark is visible, pull in the cable with the help of the cable winding button back to the yellow mark.
Electrical connection
- Before connecting the plug to the wall socket, check whether the mains voltage is correct. Refer to the information on the rating plate of the device.
- Connect the device to a certified wall socket only.
Using the Appliance
- Insert the mains plug into a correctly installed power socket.
- Turn the device on by the on/off switch by pressing down the button.
- Set the "carpet/hard floor" switch, depending on the floor covering.
- Vacuum at a steady speed. There is no need to exert pressure.
i NOTE:
Pay attention to the range that can be covered with the cable length!
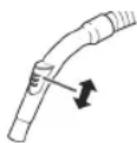
Air Slide
Open the air slide on the hose handle in order to regulate the airflow or to clear any particles sticking to the nozzle.
Switching off and Winding up the Mains Lead
- Turn the vacuum cleaner off by the on/off switch and remove the plug from the socket.
- Keep the plug in your hand.
- Press the cable winding button and guide the cable. Hold the cable to avoid wrapping.
Maintenance
Dust bag replacement display (10)
Hold the hose up into air. If the display for the vacuum bag change shows "red", the dust bag is full. Please change it.
Changing the dust bag
-
Pull the plug out of the socket.
-
Use the opener (13) to open the lid of the dust bag compartment.

NOTE:
The lid can be locked in upright position. Do not push the lid beyond the locking mechanism! Otherwise the mounting could break away.
- Lift up and remove the dust bag holder. Remove the dust bag by taking it from the holder.
- Insert a new bag. Please ensure that the bag is located correctly in the guide mechanism.
- Insert the dust bag with the holder into the designated slot. The bag must be located completely in the dust bag compartment. Close the cover so that it snaps into place.
Filter
Your appliance has two filters.
Motor protection filter (inlet filter)
The inlet filter is located in the dust bag compartment. The filter is located vertically in the rear section of the dust housing. Remove the filter by pulling upwards.
Cleaning the Filter Element
Clean the engine protection filter after 10 dust bag changes. If necessary, the filter can also be washed in warm water without any additives. Place it back into place only once it is completely dry!
Outlet filter (6)
The appliance is also equipped with an outlet filter.
It is located on the back of the device behind the cover.
- Push the lever towards the left and remove the ventilation grid.
- Remove the filter insert and clean it as described above.
- Once dried completely, reinstall the filter insert.
- Refit the ventilation grid in the device. Pay attention to the guide tabs. The ventilation grid must audiably click into place.
Cleaning

WARNING:
- Before cleaning remove the mains lead from the socket.
- Under no circumstances should you immerse the device in water for cleaning purposes. Otherwise this might result in an electric shock or fire.

CAUTION:
- Do not use a wire brush or any abrasive items.
- Do not use any acidic or abrasive detergents.
Clean the housing with a soft, dry cloth without additives.
Storage
- Let the device cool down completely.
- Wind the cable completely.
- Please insert the hook of the floor nozzle into the parking assistant on the rear of the device.
- If you want to stand the appliance vertically: Insert the hook of the floor nozzle into the parking assistant on the bottom of the appliance.
Troubleshooting
The Device Does Not Work.
Remedy:
Check the connection to the mains.
- The device does not suck up anything.
Possible Cause:
The dust bag is full.
Remedy:
Renew the dust bag.
or
Possible Cause:
The filters are dirty.
Remedy:
Clean the components.
Possible Cause:
There is a foreign body in the suction tube or the nozzle.
Remedy:
Check the accessories for foreign bodies.
Technical Data
Model: BS 1300 N
Power supply: 220-240 V ~, 50/60 Hz
Protection class: 11
Net weight: approx. 3.0 kg
Dust filter bag: SSB 98 / Swir® Y 298®
Swirl®, Y 298® is a registered trademark of a company of the Melitta Group which is not associated with the company Clatronic International GmbH.
The right to make technical and design modifications in the course of continuous product development remains reserved.
COMMISSION DELEGATED REGULATION (EU) Nr. 665/2013
| Trade mark Clatronic | ||
| Model BS 1300 N |
| Energy efficiency class1) | A | |
| Energy consumption | ||
| Annual energy consumption2) | kWh/year | 26.9 |
| Cleaning performance class | ||
| Carpet cleaning performance class | D | |
| Hard floor cleaning performance class | A | |
| Dust re-emission class D | ||
| Sound power level | dB(A)re1pW | 79 |
| Rated input power W 700 |
1) A (highest efficiency) to G (lowest efficiency).
2) Indicative annual energy consumption (kWh per year), based on 50 cleaning tasks.
Actual annual energy consumption will depend on how the appliance is used.
The device meets the European standards and directives in the current version at delivery:
Low Voltage Directive (LVD) 2014/35/EU
- Electromagnetic Compatibility (EMC) Legislation Directive 2014/30/EU
RoHS-directive 2011/65/EU
- Ecodesign-directive (ErP) 2009/125/EC
- Ecodesign requirements for vacuum cleaners COMMISSION REGULATION (EU) No 666/2013
Disposal
Meaning of the "Dustbin" Symbol
Protect our environment: do not dispose of electrical equipment in the domestic waste.
Please return any electrical equipment that you will no longer use to the collection points provided for their disposal.
This helps avoid the potential effects of incorrect disposal on the environment and human health.
This will contribute to the recycling and other forms of reutilisation of electrical and electronic equipment.
Information concerning where the equipment can be disposed of can be obtained from your local authority.
Instrukcja obstugi
CTC Clatronic Sp. z o.o
Ul. Brzeska 1
45-960 Opole
Usuwanie
6paaet BnHMaHHe Ha peKOMeHdaUIM IN HOpopMaJIO.
067a HOpMaun
Ipeed nCnOlb30BaHmE npBopA BnHMaTeIbHo npOHTe IHCTpyKmN IO 3KcPnyatauM N COxpaHNTe INHCTpyKmN BMe-CTe C rapaHTne I KBrTaHmE N,IO BO3MOXHOCTN, yNaKOBky C BHyTpeHHM cOdePxMbIM. Ppi nepeaue npBopA dpYrIM TaKepedaTe INHCTpyKmN IO 3KcPnyatauM.
- Pnp6op npedHa3nueH nckJIOHTeBHO nIcN0b3oBAHnB 6bity nIpyCMOTpeHHx ceJIe. OH hepaccu TaH Ha KOMMepueCKoe NcN0b3OBAHne.
He noIb3yItecb bHb NOpMeUeHn. IpeOxpaHnTe np6op OT nCTOuHKnOB TePnla, npMbx COJIHeuHbIX LyueH, BO3deIcTBnBn BnAaXHOCTN (HnKOrda He nOprpyKaIte B XnIKoCTb) n OCTpbIX KpOMok. He pa6oTaIe C np6opom MOKpbIM pykAm. Ecn np6op cTahET BnAaXhBIM nIM MOKpbIM, HEmeJeHHO OTKIOHHTe ERO OT CETn.
ДячNTииуборкHa xpaHHe BbIKIOHTe np6Op n BbIHbTe BILKy N3po3ETKn(BbIHMaIte BILKy 3a KOpNyc, a He 3a npOBoD).EcIn np6Op He 6ydet NcNoIb3ObaTbcr, OTcoEINHITe BCE npHaIaNEXHOCTN.
He octabJnTe np6op 6e3 npncmOtpa.Ecn Bbl BbIXoJTe n3 KOMHaTbI,TO BcERda BbIKIOuAte np6op.BbHbTe BNkY n3 pO3eTKN. - PeryIaHNo npOBepRte np6Op nCeTeBOi Ka6eBHa np3nKn NOBpeKDeHn. Ppi o6hApUkeHn NOBpeKDeHn He pOJIb3yITecb np6Opom.
- Историческая мелaneous Достigated and the history of the development of the system of political education.
-ДябзогасоctиBaux DeTei DePKeTte BCE yanaKOBOHyBIE MaTePnaJIbI (Пл actNKobBie MeUKN, Kopo6Kn, NOINCTnPoN I T.D.) B HeIoCTyHOM ДЯн HIX MecTe.
PTEyTNPEKDEHNE:
He no3BOJnIe TeTm INpTaB c nOINaTHneHOBoI nIeHKO. Onachocb ydyuBa!
CpeuaJIbHbIe IHcTpkyKznn IO TexHnke 6e3OnaCHOCTN
He nbitaTeCb peMOHTnpOBaTb np6Op camocToTbHo. Bcerda obpaataTeCb K cneuaJIncTy. Bon36eXaHne onacbIX cnTuaIIN Bcerda 3aMeHnTe NOBpeJdeHHbI KabeIb TOnbKO y N3rOToBNTeJI, B peMOHTHOcLyKBe nIIy cneuaJIncTa Ha Ka6eIb TORo Je TnPa.
- ΘТИМ Рпбором могут полььоться DeTи CTapшe 8 Лет И Лиca C OгразиЧьим ФиЗИчЕСКIMN, OCSaTeЛьнБIMN I NCSIXИчЕСКIMN CПОСБНOCТЯМN ИЛ И ИМЕЮШе ONbIТА ИЛ N3HaHIN, EСЛ И OHI HAXODЯТСЯ ПОД НадзOPOM ИЛ ПОННСТPyKТИРОВаHBi B OTHOШЕHIN 6БЗОПАСHOrO ПОЛьЗOBAHЯ РпборOM IN 3HaIOT O CBЯ3aHHbIX C 3ТИМ ONaCHOCTYX.
He no3BOJnTe DeTm nIgpaTb c np6opom.
-ЧИстka и ухов за прибором неdoesнпьп робODиТьсдTeБМи 6e3 NaДЗopa.
He BcacbBaIe XndKoCTn!
He BcacbBaIte ropeu nn enn octpokonehhe nnn octpbie npedmetbl!
He nCnoJIb3yIte yCTPOIcTBO B CbIPbIX NOMEUeHnX!
- Hikorda He nCnoIb3yIte yCTpoiCTBO 6e3 φnIbTpa. ПрOBepaIte, npaBnIbHO JI N BCTaBJIeH φnIbTp!
Bo BpemnncnoB3OBaHnA depXnTe BOLOcbl, OeJy n Yactn TeNa noaJIbwe OT BCacbIBaHOoero conna!
He npnbjkaTe nbineCoc K nCTOHHkam TePna, TaKIM KaK baTapeN OToJIeHnI, neu NT. d!.
063op detaen npnbopa
1 Teneckonuuecka BcacbIbaHouza Tpyba
2ПОТЗУнКДЯТЕСКОПИССКОВ BCaCbIBAHOUSE Tpy6bl
3 HacdaKa dna nola (c KpOkOM, KOtOpb He noka3aH)
4PbUaXOKDnBBydBnXeHnIeTOKIOBTBeHeHnIXHa3aI
5 KhoNka BKn./BbIK
6 KpbIiKa BbIyckHOro qnIbTpa
7 3aKIM yklaqkn
8UHyp3JnEKTponITaHmC BUNKoI
9 KhoNka cMaTbIbAHnI Zhypa
10 Okho 3aONHeHn NaKeTa dIy IbII
11 CoeHInTeJbHa rOIOBka BakyMHO OJNaHra
12IopKlnHcHneUHaHra
13 PyuKa dIy OTKpbITNa OTcKa c naketOM dIy IbJIIN
14 Bcacbibaiouui uHa
HauaNo pa6oTbI
BCTaBBte pa6Ouyu qactb coeHInTeIbHOro 3IeMeHTa BCacbIBaIOUe IHaRa B CoeHNITeIbHbI 3IeMeHT IHaHa rYcTpoiCTBa N NOBepHInTe ero no YacOBoi CTpeJIke Ha YetBeptb OobopoTa.
ДяOTcoeHHeHЯшAnHaTnaOBepHnTe erO npOTNB YacOBONCTpeKNHaYETBepTbOBOpotaN BblbTeNo HApabJIeHnIO BBepx.
BCTabbTe BakyymHyIpy6By b pyky,ecnHHeo6xOdmo.
- 3aTeM yCTaHOBInTe HacaIky Inna N/Inn DpyTne Akcecc cyapbl.
Hacapkn
Hacapka npna nona (3)
KoIeScnHa hacaKe Ia nona npouaioT ee nepemeeHne.
C NOMOJIbH HacdKn DnI POJa MOKHO YIcTNTb TlaKHe NOBepxHOCTN KOBpbI.
- PbHaKKOM (4) MOKHO NOBOPaHbTa b ⅢeTkn HapyKu nIN BHyTpB.
MaKcImaHbHa 3ΦΦeKTHBHOCTb annapata 3aBNCIT OT TEKCTyPbI NOIOBOrO pOKpbITn. Haun peKOMeHdaZm 3akNIOuAOTcB CNeDyUoE: - HcnoIb3ObaHne 6e3 ueToK
ДячNTКIпblneCOCOM NIOOBbIX NOKpbITN C BblCOKM BOPCOM.
mmnnmNcnoJb30BaHHe CO UeTKaM:
ДячNTКипьлесOCOMгадкИXПОВИΚOBРСКОТКIMВOPCOM.
Hacika co ueTko
Iy IyIyIyIyIyIyIyIyIyIyIyIyIyIyIyIyIyIyIyIyIyIyIy
ITPIMEYAHNA:
B cnoKeHHOM COCTOHN HcNoJIb3yIte KaK IeNeByIO HacAdKy. EcN Bbl XOTnTe NcNoJIb3OBaTb HacAdKy-TeKy, NotHInTE pbUar 5eTKN B HapPabJIeHN HapICOBaHHo CTpeKN Do UeJIuKa fIKCaun.
IpyKa Heo6xOIMO IN CnEKA NOePTbIBaTb.
TeJeckonnueckaBcacbBaHouaTpy6a
IImeTcB O3MOxHocbpeyINpOBKn DnHbTeNeckOInueckOn BCacbIBaHOSe Tpy6bl:
1.CdBnHbTe B HnPaBHeHH CTpeJIKN uDepxBaIte NOn3yHOK (2)YTO6bl OTKNIQUHTb MExAHIN3M 6NOKIPOBKN.
2. BbIbINbTe Tpy6y Ha Tpe6yemoe pacCTOHNHe.
3. OTnyCTnTe NOJ3yHOK, YTO6bI 3aФNKCuPOBaTb Tpy6y.

UHyp 3JIeKtpoNtTaHn
BbITaHHTe 7Hyp 3JekTpOmTaHnI 3 OTeKa dJa 7Hypa.

BHIMAHINE:
- BbIaCKBaIe TUnHyp TOnbKO Do MaKcMaJIbHOJ dINHbI, yka3aHHoJ XeJIToM MeTKOI.
He BbITaBaiTe Ka6eIaJIbIe KpaCHoM MeTKn, HHaHae MOxHO NOBpeiNt b YcTpoIcTB O CBopaYBaHry IHHypa.

ПИМЕЧАнЯ:
EcnBnHa KpaCha MeTKa, BdBnHbTe SHyP BHyTp b C NMOuH KOHN CbOpauBaHna SHypa BnIOTb Do JeJIToI METK.
3Jektpnueckoe noKnIOeHne
- Pénéi noДКИоЧЕнEM BUNK CeTeBOrO 乌HypaВpo3Etky cETN 3JIeKTPoNITAHNY y6eIITecb, YTO HAnpRJaKeHneB CEtN COOTBeTCTByeT xapaKTePncIcNKam yCTpoIcTBa. CM. dAHHbIe Ha nacnopTHoN Ta6nUHke yCTpoIcTBa.
-ПодкночаTe yCtpoiCTBO TOnbko K cepTnФицИрOBaHNoH NaCTeHHoI po3eTKe.
IcnojI3OBAHnE np6opa
- BCTaBbTe BnIKy 3JIeKTPoNtAHmB B npaBnIbHo yCTaHOJIeHHyIO 3JIeKTPuYeCKyIO pO3ETKy.
- BkIIOHTe yctpoiCTBO nepeKIIHOaTeJIeM BKN/BBIKN, HauKaBero KHOJky.
- YctaHOBHTepeKIOHATeJIb "KOBep/NOI" B 3aBNCIMOCTN OT MecTa OUHCTKn.
4.ПовodиTe YIcTky C NOCTOYHNO ChKOpocTbHO.He Tpe6yETCn npunaraTb 3HaUHTeJIbHOro yCmNIA.

ПИМЕЧАЙ:
O6paTnTe BHHMaHHe Ha pacCToHMe, KOtOpoe o6ecneuBaETcDmHOn Hhypa!
Beryhok Bo3dyxa
OTkpOte 6eryHOK BO3dyxa Ha pyyke IJNAHra, TObIpeRyInpOBaTb NOTOK BO3dyxa INydaNtB ppeMTebl, npinlnnne K HacaKe.
BbIKIOueHHe n CBOpaunBaHnE 3NKeKTPoNTaHn
- BbIKIIOHnTE nbIeNecO nepeKIIHOuATeNeEM BKl/BbIKn n 3BNEKITBEuNKU n3JIeKTPnuCeCKo p03eTKI.
2.ДеркптБВИКУВpykaX. - HaxmTe KhoNky CBopauMBAHnIshypa I HaPpAByIte shHyp B nbilecoc. DepkTe shHyp pykAmn I He doNyckaTe 6bpa3OBAHne neTeb.
06cnykmbaHne
Okho 3aMeHbI MeuKa dnn nbn (10)
ДерхитЕшланг, He npxkmaK nony. EcIn B Okhe 3amehbl MeuKa nbIneCoca BnHa KpaChra MeTKa, 3HaHT MeWOK noJIoH. PoxkaNyIcTa, 3AmEHnteero.
3ameHa Meuka nIy nbinn
1.ИЗВЕКINTE BИЛКИ ИЗ рОЗТКИ.
2.Испльзугу (13)чтбbl OTkpblkpblikyOTceka MEшкдлпblIN.

ПИМЕЧАнЯ:
KpbIuKy MoXHO 3aФнКСИРОВaTb B OTKpbITOM nONoxKeHm. He npIXmAJTe KpbIuKy B 3aKpbITOM nONoxKeHm! nHaue MoXHO CnOMaTb ee KpenJIeHne.
3.ПОДИМЛТЕ И ВИHBTE DEРЖATEЛБ MEUKA DЯ ПьИN.CHIMITe MEUOK DЯ ПьИN, BByHB ERO N3 DEPJATeIЯ.
4. BCTaBbTe HObI MeUOK. IoxKaanyIcTa, oBeCneYbTe npabNtBHOe NIOXKeHHe MeUka B HnapBaJIPOxIX.
5. BCTaBbTe MeIOK IJIy IBIJN C IepKAteIeM B npEHa-3HaueHHoe OTBepCTne. MeIOK IOnKeH 6bITb IOnHOCTbIO B CBOEM OTCeKe. 3aKpOte KpbIuKy Do 3aUeKNBaHn Ha MecTe.
ΦnIbTp
Pn6bOpImeetDbaΦnIbTa.
I P E D U N P E X D E H N E:
- Перацякови3ВлжITEвлкуи3po3eTKN.
- Hn npi KaKnx o6cTo8eTbCTBax He dOnyckaIte nOrgyKeHny yCtpoiCTBa B Body C c9IbIO OChCTKn. INaue BO3MOxKeH yJaap 3JIeKTPnueCKm TOKOM nII NBO3rOpaHne.

BHIMAHINE:
He npimehaTe npoBOJouHyIO ueKu nn a6pa3nBhble MaTePnaJIbI.
He nCIOJIb3yIte KNCIOIbI Ia6pa3INBIIe YnCTraIue cpeIcTBA.
OuHCTnTe KOpNc MmKoC cyXo TkaHbIO 6e3 YnCTaIux CpeDCTB.
XpaHeHne
- Oecneuebte nonHoe octbIbHaHe ycTpoIcTba.
- PoiHocTbO CBepHnTe uHyp.
- PtoxanyiCTa, BCTaBbTe KpOK HacaKn DnI Na HbI CTyn npxpaHemn Ha 3aHei CTopoHe yCtpoiCTBa.
- EcnH NyKHO NOCTaBnTB NbIeCoc BepTKaJIbHo: BcTaBbTe KpOCHK HacaIK IINI POJIA B NOMOuHK napKOvKn Ha dHe yCTpoiCTBa.
DnaHocTnKa
- YCTPOINCTBO He pa6oTaET.
YcTaPaHeHnE:
IpoBepbTe IOpKJIouHeHMe K cTeN 3JIeKTPoPNTaHnA.
- YCTPOBCTBO HE BCaCbIbAeT.
Bo3MOxHna npuHa:
3anonHe MeoK TnIbIM.
YcTaPaHeHnE:
3aMeHHTe MeWOK nIy nbIi.
NIM
Bo3MOxHnA npuHnHa:
Pra3HbIeΦnJIbTpa.
YCTpaHeHHe:
OCHNTTE 3TN KOMNOHEHTbl.
Bo3MOxHnA npuHa:
IocToPOHHn IpeDmET HaxOJNTc8 BO BCaCbBaHOUe TpyBe NIN B HacaKe.
YcTaPaHeHne:
PpOBepbTe 3TN pINHaIeXHocTn Ha NoCTOpOHHe npeMetbl.
TexHnueckne daHHbIe
Modelb: BS 1300 N
3JIeKtpoNTaHHe: 220-240 B\~,50/60 T
Klacc 3aunTbI
Bec 6e3 ypaKOBkn: npn5n.3,0 K
Mewok dny nbJn: .SSB 98 / Swirl@ Y 298
Swirl®, Y 298®яльетса Зерпострювьим TOВарьIM 3нakом komпани Melitta Group, КOTOPа He CBЯза c Komпани Clatronic International GmbH.
CoxpaHEno npaBO Ha TexHnueckme IN KOHCTpyKUOnHHbIe n3-MeHEnB paMKaX npoDOnKaIOuEcnca pa3pa6Otn npOdykTa.
JenrnpoBaHbI PerJaMeT Komnccm (EC) No 665/2013
| Toproвая марka Clatronic | ||
| Мо德尔 BS 1300 N |
aill ylll lally llllllll
2013/666 5 (g) 21
#
S OBC = S ABC + S_ BOC
()
i 1
gauu gaaa gaaal aabbi yaa J 2
JdsS Kdy d 2y jilll y Sj .3
J 4
a 1
1.5c.5_0
aagaae
Jai /1jai /iJIaI Jia 1
.
.2
A. ai ≤ aj ( i j)
a
(10)
aaii aiee
0 1
J
.1
Jell a o 0e e (13) 2l (1) .2
:abaa
clll lbcicaiy. piaiina gai y clll jaa
Jiaolai Jiaiue 21, g! jiaoi all
3
Jolal jao 450
4
a
Jzaiy.aaiaaiiaaii g Jalll, jaiil sJai5 .5
g j 11
a_i S 。
a
:
J 1
1
.
4.2.1.1 g j 1
jai jia
:J
a
.
Joooll
Jaa Jaaal
山
J 1
91
:Jai
Aaia aaiy
:
44
AaBIs 10000
aaii i 1
#
Lalai 2 jll gssd aljil
JSLy JSL
gall gll cluaa 1 1 1 1
jgl 1
a#
jua jajy jay gaaa aai aia
j_k = 1
aikaiiae gne jn aiey jnlll lalg w gwlldg.
1
i 1
1
gssu 1
Jaaia Kya Jaua
(2) jilie baiill Jia jiai jial 1
aolal jai
Jzal 21 Jzg jzj .2
2
aill jil 3
1
a a a a a a a a a a a a a a a
44
aodally aill jiall lglall gai jll
| j1| = | j2|
JSLI 1
:
1 1
aJzalldoJIz
y
aill aiee eae eae eae eae eae eae eae eae eae eae eae eae eae eae eae eae eae eae eae eae eae eae eae eae eae eae eae eae eae eae eae eae eae eae eae eae eae eae eae eae eae eae eae eae
1
jaiyiaalll iayill aylgla jgsall clogd
j4z11 p123
a a 1
Jzj 1/ jzjj Jzj.2
C
1
aaiiia aiaiaaae aie 4
:
1JSLI JgAaBaaJgSaaJIgalllll
glglb jia jia 1