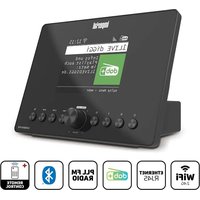
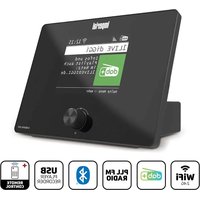
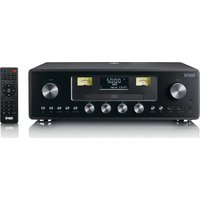
Dabman i550 CD - Radio Imperial - Free user manual and instructions
Find the device manual for free Dabman i550 CD Imperial in PDF.

| Product type | All-in-one Hi-Fi radio with DAB+/FM reception, Internet radio, CD player, Bluetooth |
| Brand | Imperial |
| Model | Dabman i550 CD |
| Dimensions (W x H x D) | 430 x 80 x 355 mm |
| Weight | 3.9 kg |
| Power supply | External power supply 21 V DC / 2.1 A; mains 100-240 V AC 50/60 Hz |
| Power consumption | Max. 40 W operation, < 1 W standby |
| Radio reception | DAB/DAB+ (Band III 174-240 MHz), FM (74-108.1 MHz), Internet radio (Wi-Fi) |
| CD player | CD, CD-R/RW, MP3 (ISO 9660 level 1/2) |
| Bluetooth | Version 5.0, profiles A2DP and AVRCP |
| Network connectivity | Wi-Fi 802.11 b/g/n, LAN Ethernet RJ45 10/100 Mbps |
| Audio inputs | 2 optical (SPDIF), 2 coaxial (SPDIF), 1 analog RCA (Line In) |
| Audio outputs | 1 analog RCA (L+R + Subwoofer), 1 digital coaxial, 1 optical, stereo speaker terminals |
| USB port | USB 2.0 (front), max. charging current 1 A |
| Headphone jack | 3.5 mm jack (front) |
| Included antennas | Telescopic FM/DAB+, external Wi-Fi, external Bluetooth |
| Remote control | Yes, with 2 AAA batteries |
| Streaming services | TIDAL, Napster, Deezer, Qobuz (subject to availability) |
| Cleaning | Dry, soft cloth; do not use solvents or liquid products |
| Warranty and support | Legal warranty; TELESTAR hotline (02676/95 20 101, service@telestar.de) |
Frequently Asked Questions - Dabman i550 CD Imperial
User questions about Dabman i550 CD Imperial
0 question about this device. Answer the ones you know or ask your own.
Ask a new question about this device
Download the instructions for your Radio in PDF format for free! Find your manual Dabman i550 CD - Imperial and take your electronic device back in hand. On this page are published all the documents necessary for the use of your device. Dabman i550 CD by Imperial.
USER MANUAL Dabman i550 CD Imperial
8.14 CD Player....40
8.14.1. Allgemeine Informationen zu CD's/MP3 CD's 40
TELESTAR Service Center,
Am Weiher 14,
56766 Ulmen
e-mail: service@telestar.de
text_image
Diagram showing audio connection setup with speaker, audio jack, and audio device connections1. LINE OUT
text_image
Diagram showing audio connection setup with speaker, audio jack, and audio receiver components2. COAXIAL OUT /SPDIF OUT
text_image
Diagram showing audio equipment connections to a monitor and three speakers, with labeled components and connectors.4. COAXIAL IN / SPDIF IN
natural_image
Diagram of two speakers connected to a central speaker block (no text or symbols visible)6. SPEAKER
text_image
Grid of app icons including Spotify, Deezer, Qobuz, music, and FM with logos and names

text_image
Napster Streamingdienst
text_image
deezer deezer Streamingdienst
text_image
qobuz qobuz Streamingdienst
text_image
TIDAL Streamingdienst
text_image
music AMAZON Streamingdienst
text_image
SPOTIFY Streamingdienst
text_image
DAB+ Radio FM Radio
text_image
Mobile app interface displaying eight app icons with Chinese labels, including 'BlueBook' and 'Open-Go'


UTC +00:00: Dublin, Lon..*
UTC +00:30:
UTC +01:00: Madrid, Amst
UTC +01:30:
UTC +02:00: Athen, Kairo
text_image
SSID [WPS]Smarthometext_image
Internet Radio doozer qobuz music Watts MHz FM Hi Radiotext_image
SSID [WPS]Smarthome
text_image
Schlüssel: 0 1 2 3 4 5 6 7 8 9 . _ - @ , a b c d e f g h i j k l m n o p q r s Z U R Ü C K O K A B B R.
text_image
Verbundentext_image
Sleeptimer 15 MINtext_image
Sprache German Italian Norwegian Polish PortugueseNapster, Deezer, Qobuz, Tidal, Amazon Music, SPOTIFY
text_image
Internet Radio deezer qobuz music Multi-Player C48 Radio FM Hi Radio NapsterOperating Instructions
text_image
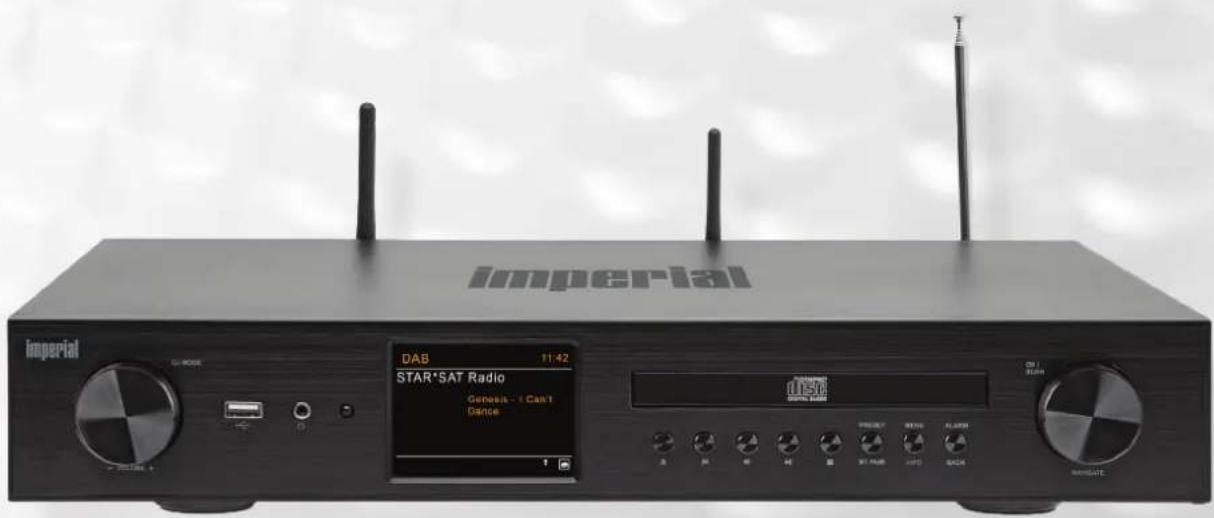
imperial DAB 11.42 STAR'SAT Radio Genesis - Can't Dance ILS6 01/08/2017 01/08/2017 01/08/2017 01/08/2017 01/08/2017 01/08/2017 01/08/2017 01/08/2017 01/08/2017 01/08/2017Thank you for choosing this product.
Please read this manual carefully and keep them for future reference.
These operating instructions are part of the device! If you sell or pass on the device, please make sure you also hand over the operating manual.
Intended use
This product is a consumer electronics device.
The device serves as a receiver for Internet / FM and DAB+ radio signals and for playing back audio files stored on a USB data carrier, a CD or on a network drive.
Any other operation or use of the device is considered improper and can lead to personal injury or property damage.
Do not use this device for any other purpose.
Only use the device indoors.
The device is intended for private use, and thus non-commercial use, only.
We assume that the user of the device has some general knowledge about using electronic entertainment equipment. Liability expires in the event of improper use.
1.
PREFACE
Intended use....61
2.
SAFETY INSTRUCTIONS
2.1. Explanation of symbols....65
2.2. Safety notice 66
2.3. Operational safety....66
2.4. Connect device....67
2.5. Protecting the device from defects 68
2.6. Risk of injury 68
2.7. Notes on the radio interface....68
2.8. Handling batteries 69
2.9. Cleaning the device 70
3.
SCOPE OF DELIVERY
4.
Overview of controls / connections
4.1. Front 71
4.2. Back....72
4.3. Possible connections....73
4.4 Remote Control 76
5.
KEY FUNCTIONS
5.1 Volume....78
5.2 Switch operating mode 78
5.3 Menu operation....79
5.4 Mute device....79
6.
FIRST START-UP 80
7.
7.1 NETWORK SETTINGS
7.1. The network assistant 85
7.2. WiFi connection....87
7.3. Setting up the wireless connection on the radio....88
7.3. Manually setting up the wireless connection on the radio....88
7.4.WPS 88
8.
GENERAL OPERATION
8.1 Display....89
8.2 List view....90
8.3 Playback display....90
8.3 Receiving DAB/DAB+ stations....90
8.4 Store DAB/DAB+....91
8.4.1. Selecting saved stations 92
TABLE OF CONTENTS
8.4.2. Adjust station order 92
8.5 Receive FM stations....93
8.6 Receive Internet radio....94
8.6.1. Internet radio station selection....94
8.6.2.Add internet radio favourites 95
8.6.3.Open internet radio favourites 95
8.6.4.Add a new Internet radio URL 95
8.7 Music player (UPnP)....96
(Playback from a UPnP server)....96
8.8 Favourites....97
8.9 Podcasts....97
8.10 History 97
8.11 Sleep timer / snooze....97
8.12 ALARM 98
8.13 Receiving time information via DAB, FM or Internet 98
8.14 CD Player....98
8.14.1.General Information about CDs/MP3 CDs....98
8.14.2.Play a CD 99
8.14.3 Set a track....99
8.14.4 Quick scan 100
8.14.5. Repeat function 100
8.14.6.Shuffle playback....100
8.14.7. Notes on the CD....100
SYSTEM SETTINGS....101
BLUETOOTH
10.1 Establish a Bluetooth connection.... 105
10.2 Play media via Bluetooth....105
AUDIO INPUTS
11.1 Selecting a connected audio device.... 106
MUSIC STREAMING SERVICES....107
USING THE APP 107
TROUBLESHOOTING....108
TRADEMARK NOTICE....109
STORAGE 109
9.
10.
11.
12.
13.
14.
15.
16.
TABLE OF CONTENTS
17.
DISPOSAL
17.1. Disposing of the packaging.... 110
17.2.Device disposal 110
17.3. Disposing of the batteries.... 110
18.
TECHNICAL SPECIFICATIONS....111
19.
SERVICE AND SUPPORT....112
20.
CE marking....113
21.
GLOSSARY 114
2. SAFETY INSTRUCTIONS
2.1. Explanation of symbols

DANGER!
This signal word describes a hazard with a high level of risk, that may lead to death or severe injury if not followed.

WARNING!
This signal word describes a hazard with a medium level of risk, that may lead to death or severe injury if not properly followed.

CAUTION!
This signal word describes a hazard with a low level of risk, that may lead to to minor or moderate injuries if not properly followed.

NOTE!
This signal word warns of against possible material damages and indicates specific instructions to operate the device.

This symbol warns of dangers.


Products labelled with this symbol meet the requirements of the guideline of the European Community.

For devices with hollow plugs, this symbol indicates the polarity of the plug.
Outside minus / inside plus
Protection class II
Electric devices with a protection class
Il have an increased or double insulation at the rated insulation voltage between the active and touchable parts (VDE 0100 component 410, 412.1). They usually have no connection to the protective conductor. Even if they have electrically conductive surfaces, they are protected from contact with other live parts by reinforced or double insulation.

Devices with this symbol may only be used indoors in a dry environment.
2. SAFETY INSTRUCTIONS
2.2. Safety notice

WARNING!
Inspect the device prior to use.
In the event of damage or a defect, the device must not be put into operation.
Risk of injury!
Risk of injury to children and people with reduced physical, sensory or mental abilities (e.g. partially handicapped people, elderly people with limited physical and mental abilities) or a lack of experience and knowledge.
Only keep the device in places inaccessible to children.
This device can be used by children aged from 8 years and above and persons with reduced physical, sensory or mental capabilities or lack of experience and/or knowledge if they have been given supervision or instruction concerning use of the device in a safe way and understand the hazards involved.Never let children use the device unsupervised.
Danger of suffocation!
Packaging material is not a toy!
Do not store the packaging materials used (bags, polystyrene pieces, etc.) within the reach of children. Children are not allowed to play with the packaging. There is a special danger of suffocation with packaging film.
2.3. Operational safety

DANGER!
Risk of injury!
Risk of injury from electric shock from live parts.
There is a risk of electric shock or fire due to accidental short circuits.
Check the device for damage before each use.
If you notice visible damage or if the device shows visible damage, do not use it anymore.
If you discover a technical or mechanical problem, please contact TELESTAR service.
Only use the power adapter included in the scope of delivery! Never use any other power adapter
Never open the casing of the device.
Immediately disconnect the device from the power source in the event of malfunction. To do this, disconnect the power adapter from the mains socket and from the device immediately .
Only use replacement parts and accessories that have been supplied or approved by us.
Do not convert the device and do not use any additional devices or replacement parts that have not been explicitly approved or supplied by us.
2. SAFETY INSTRUCTIONS
Do not use the device in potentially explosive areas.
These include, for example, fuel storage areas, tank systems, or areas in which solvents are stored or processed.
Do not operate the device in areas with air contaminated with particles (e.g. flour or wood dust)
Malfunctions can take the form of heating of the device or smoke development from the device or the device's power adapter.
Loud or unusual noises can also be a sign of a malfunction.
In this case, pull the power adapter out of the power socket immediately.
Only touch the power adapter by the housing.
Never pull the power adapter out of the socket by the cable.
After a malfunction, the device must not be used until it has been checked or repaired by a qualified person.
If you bring the device from a cold to a warm environment, moisture can form inside the device.
In such an event, wait approximately one hour before using the device again.
Unplug the device from the power socket if you are absent for a longer period or during a thunderstorm.
Take care to avoid contact with moisture, water or splashing water and do not place objects filled with liquids -
e.g. vases - on or near the unit or the power supply.
If foreign bodies or liquids get into the device or the power adapter, pull the power adapter out of the socket immediately. Have the device checked by qualified personnel before you use it again.
Otherwise, there is a risk of electric shock.
Make sure that the device or the power adapter is not exposed to dripping or splashing water and that there are no open sources of fire (e.g. burning candles) near the device or the power adapter.
The power adapter must never be touched or handled with wet or damp hands.
2.4. Connect device
Only connect the device to a properly installed, earthed and electrically protected socket.
Please ensure that the power source (socket) is easily accessible.
Do not kink or crush any cable connections.
Before putting the device into operation, check whether the voltage information on the device matches the local mains voltage.
The specifications on the power unit must correspond to the local power grid.
Only connect the radio to a properly installed socket of 220-240 V AC, 50-60 Hz.
Place the radio on a firm, level surface.
The device consumes power in standby mode. To completely disconnect the device from the mains, the power adapter must be unplugged from the socket.
2. SAFETY INSTRUCTIONS
2.5. Protecting the device from defects

NOTE!
Unfavourable environmental conditions such as moisture, excessive heat or lack of ventilation can damage the device.
Only use the device in dry rooms.
Avoid direct proximity to: heat sources, such as radiators, open flames, such as candles, equipment with strong magnetic fields, such as loudspeakers.
Do not expose the unit to extreme conditions, e.g. direct sunlight, high humidity, moisture, extremely high or low temperatures, open fire.
Ensure that there is sufficient distance to other objects so that the device is not covered so that adequate ventilation is always guaranteed.
Avoid direct sunlight and locations with an unusually large amount of dust.
Do not place any heavy objects on the device or the power adapter.
Do not use the device in potentially explosive areas.
These include, for example, fuel storage areas, tank systems, or areas in which solvents are stored or processed.
Do not operate the device in areas with air contaminated with particles (e.g. flour or wood dust)
2.6. Risk of injury

WARNING!
Excessive sound pressure when using earphones or headphones can cause damage or loss of hearing.
Listening with earphones or headphones at a high volume for a long period of time can cause injury to the user.
Please check the volume before putting the earphones or headphones in or onto the ears.
Set the volume to a low value and only increase the volume enough that you still find it comfortable.
2.7. Notes on the radio interface
The device generates an electromagnetic field.
Please pay attention to notices in your area that prohibit or restrict the operation of electronic
This may be the case, for example, in hospitals, at petrol stations and tank farms or at airports.
If there are corresponding warnings, disconnect the device from the power immediately.
The components contained in the device
generate electromagnetic energy and magnetic fields. These can affect medical devices such as pacemakers or defibrillators.
Therefore, please keep a safe and sufficient distance between medical devices and the radio.
If you have reason to believe that the radio is causing interference with a medical device, immediately turn off or unplug the radio.
2. SAFETY INSTRUCTIONS
2.8. Handling batteries
In principle, only use the type of battery included in the scope of delivery.

DANGER!
Risk of injury!
Improper handling of batteries poses a risk of injury!
Never open batteries, short-circuit them or throw them into open flames.
Never charge batteries. Attempting to charge batteries can create a risk of explosion.
The polarity must be respected! Make sure that the plus (+) and minus (-) poles are inserted correctly to avoid a short circuit.
Use only batteries specified for this product.
Remove batteries from the device if it is not going to be used for a long time.
Remove exhausted or leaking batteries from the device immediately.
If batteries have leaked, there is a risk of burns if they come into contact with the skin.
Keep both new and used batteries out of the reach of children.
There is a risk of internal injury if batteries are swallowed. The battery acid in the batteries can cause injuries if it comes into contact with the skin.
In the event of accidental ingestion or if there are signs of skin burns, rinse the affected areas with plenty of clean water and seek medical attention immediately.
Batteries are not toys! Always keep new and used batteries away from
from children.
Remove leaking batteries from the device immediately and clean the contacts before inserting new batteries.

WARNING!

There is a risk of explosion if batteries are used improperly!
Only use new batteries of the same type.
Please never use new and old batteries together in one device.
Pay attention to the correct polarity when inserting the batteries.
Never charge batteries.
Batteries should only be stored in cool and dry places.
Never throw batteries into fire.
If the device is not used for a long time, please remove the batteries from the device.Never expose batteries to extreme heat or direct sunlight.
Batteries must not be deformed or opened.
Stop using the remote control if the battery door no longer closes properly.
2. SAFETY INSTRUCTIONS
2.9. Cleaning the device
Before cleaning, unplug the device from the socket.
Use a dry, soft cloth to clean the device. Please do not use any liquids to clean the device.
Do not use any solvents or cleaning agents as these can damage the surface and/or the writing on the device.
Children should not clean the device.
3. SCOPE OF DELIVERY
Please remove all parts from the packaging and remove all packaging materials completely.
If one or more of the specified parts are missing, please contact:
TELESTAR Service Center,
Am Weiher 14,
56766 Ulmen
Email: service@telestar.de
DABMAN i550 CD radio device
Remote control including 2 x AAA batteries
External power adapter
WIFI antenna
Bluetooth antenna
UKW/DAB antenna
Digital optical connection cable
Cinch audio connection cable
Warranty card
Operating Instructions
4. OVERVIEW OF CONTROLS / CONNECTIONS
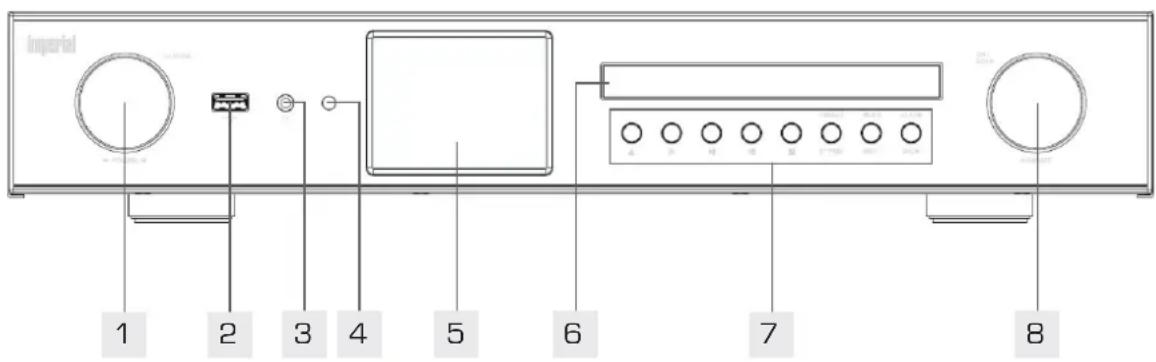
4.1. Front
text_image
Imperial 1 2 3 4 5 6 7 81. Volume control, navigation dial and confirmation key OK
Change the volume via the dial or navigate in the menu of the device via this dial. Press this button to enter the overview of music sources and streaming services.
2. USB connection
Connect the device to a USB data carrier such as
a USB hard drive or USB stick to play music files from this.
3. Headphone jack
Insert headphones here to listen to the music played back from the radio through your headphones. If headphones are connected, the playback of music through the loudspeakers of the device will be interrupted.
4. Infrared sensor for remote control
Through this sensor, the device receives the signals from the remote control.
5. Display
6. CD drive drawer
Insert a CD into the CD drawer with the label facing up.
7. Control buttons
Start or stop CD or USB playback, perform
fast search, or select the previous or next track using these buttons.
8. Navigation/ confirmation key
Navigate the device's menu by using this dial. Press the key to confirm an entry.
4. OVERVIEW OF CONTROLS / CONNECTIONS
4.2. Back
text_image
109 11 12 13 14 15 16 17 189. FM/DAB antenna
Extend the telescopic antenna for optimum FM/DAB+ reception.
10. Analogue audio output right/left
Connect the radio to a Hi-Fi amplifier or active speakers if you do not want to use the DABMAN i550 CD's speaker outputs
to route the music received from the radio to a sound system. An active subwoofer can be connected via the SUB output.
11. Optical / electrical digital output
If you are using an external Hi-Fi amplifier and it has a corresponding optical or electrical digital input, connect the SPDIF OUT or COAXIAL OUT jack of the i550 CD to the optical or electrical SPDIF input of that amplifier.
12. Analogue audio input right/left
Connect the analogue audio output of an external device here if required.
13. Digital SPDIF IN audio input
Connect the digital SPDIF audio output of an external device here if required. You can establish the digital input both with an optical cable or via an electrical cable.
14. Bluetooth antenna
This antenna allows the DABMAN i550 CD to receive Bluetooth signals from a mobile device such as a smartphone or tablet.
15. LAN connection
Integrate the unit into an existing network via a network cable to use the Internet radio function. Alternatively, the device can also be connected via WIFI.
4. OVERVIEW OF CONTROLS / CONNECTIONS
16. Speaker connections
Connect speakers to the device here if needed.
17. Power adapter connector
Connect the device to the power adapter (supplied) at this socket to establish the power supply for the device.
18. WIFI antenna
Connect the included WIFI antenna here to connect the device to your home WIFI network via WIFI.
4.3. Possible connections

text_image
Diagram showing audio connection setup with speaker, audio jack, and audio device connections1. LINE OUT
This configuration is recommended if the sound from the DABMAN i550 CD is to be played from an existing sound system with analogue audio inputs. You can connect e.g. an audio HiFi amplifier to these analogue audio outputs. Use the Cinch sockets R and L. In addition, you can operate an active subwoofer via the SUB socket.
text_image
Diagram showing audio connection setup with speaker, audio jack, and audio monitor components2. COAXIAL OUT /SPDIF OUT
This configuration is recommended if the sound from the DABMAN i550 CD is to be played from an existing sound system with digital audio inputs.
Use this digital output of the DABMAN i550 CD if your existing HiFi amplifier has an optical or coaxial digital input.
4. OVERVIEW OF CONTROLS / CONNECTIONS
text_image
E.g. CD player, DVD player3. LINE IN
If you want to play analogue audio signals from an external device through the speakers connected to the DABMAN i550 CD, connect the audio output of the external device to these connections.
text_image
Diagram showing audio equipment connections to a monitor and three speakers, with labeled components and connectors.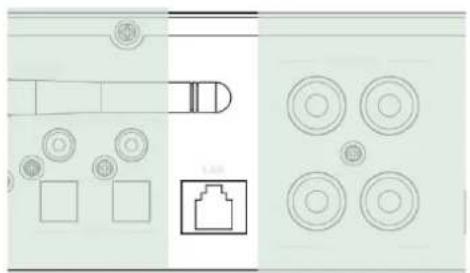
natural_image
Top-down architectural floor plan showing room layouts and circular elements (no text or labels)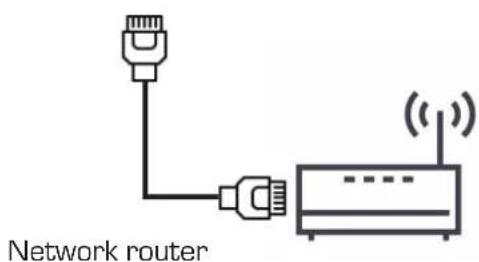
text_image
Network router4. COAXIAL IN / SPDIF IN
If you want to play digital audio from an external device through the speakers connected to the DABMAN i550 CD, connect the digital audio output of the external device to these connections. The digital audio signal can be transmitted via a coaxial cable or an optical fibre cable.
5. LAN
Connect the device here with a network cable to an existing network router to be able to use the Internet radio function. Alternatively, the device can also be connected via W-LAN.
4. OVERVIEW OF CONTROLS / CONNECTIONS
natural_image
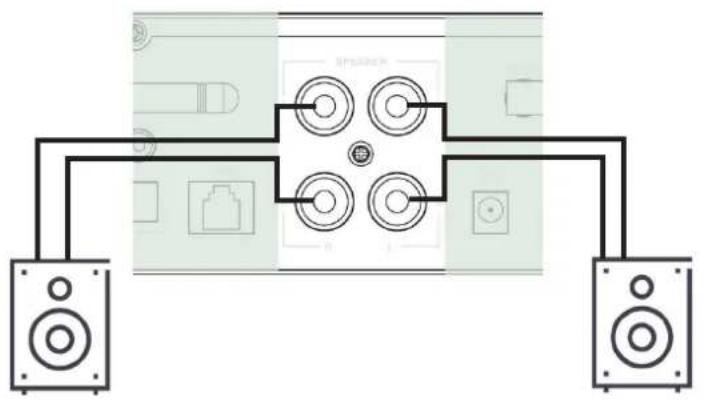
Diagram of two speakers connected to a central speaker block (no text or symbols visible)6. SPEAKER
Connect your existing speakers to these amplifier outputs.
4.4. REMOTE CONTROL
text_image
1 2 3 4 5 6 7 8 9 10 11 12 13 14 15 16 17 18 19 1 2 ABC 3 DEF 4 GHI 5 6 MNO 7 PQRS 8 TUV 9 WXYZ FAM BT 10/0 SHARE / REPEAT 20 21 22Tip:
Many of the radio's functions can be controlled via an app for mobile devices in addition to the remote control, provided you have a mobile device with an Android
or IOS operating system.
Please also read
chapter 13.
UNDOK APP

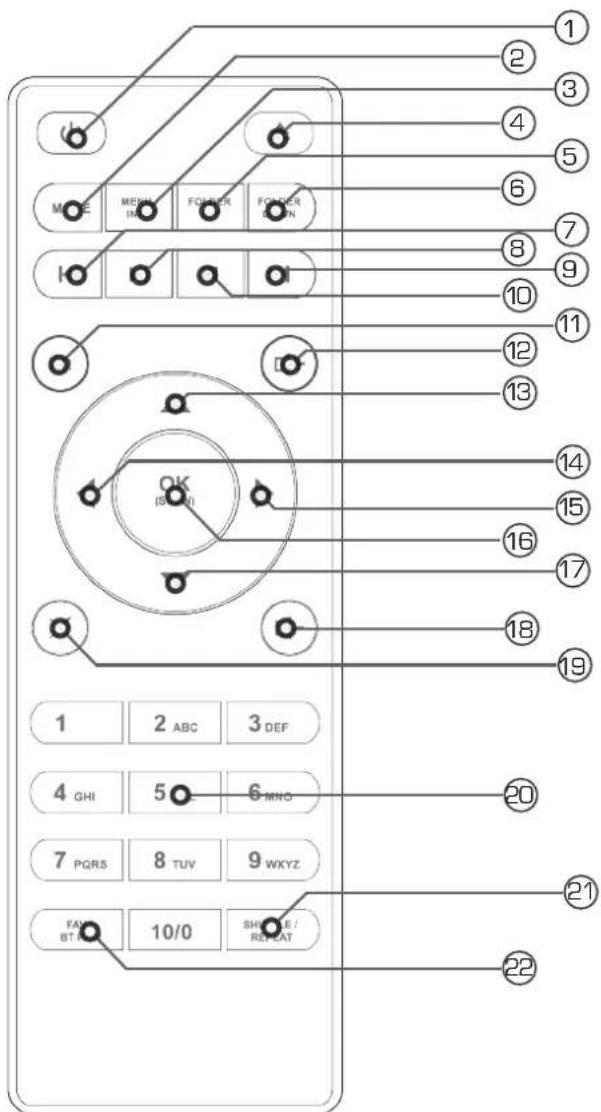
1. Standby button
Switch the device on or off using this button.
2. Mode
Switch between different modes.
3. Menu/Info
Press and hold the button to open the menu.
Press this button briefly in radio mode to call up information about the tuned station.
4. Eject button
Press this button to open and close the CD tray.
5. FOLDER UP
Navigate to the next folder while playing music with this button.
6. FOLDER DOWN
Navigate to the previous folder when playing music with this button.
7. Select previous track/ quick rewind
Use this button to select the previous track or fast rewind.
4.4. REMOTE CONTROL
8. Play/Pause
Starts or pauses playback.
9. Select next track/ fast forward
Use this button to select the next track or perform fast forward.
10. Stop
Stops the playback.
11. EQ equaliser function
Use this button to activate the equaliser function and make individual sound settings.
12. Increase volume
Use this button to increase the volume.
13. Navigation upwards
This button allows you navigate upwards through the menu.
14. Back
Goes back one step within a menu or cancels a setting.
15. Navigate forwards
Switches one step forward within a menu.
16. OK
Confirm an entry with this button.
17. Navigation downwards
This button allows you navigate downwards through the menu.
18. Decrease volume
Use this button to decrease the volume.
19. Mute
Mutes the sound of the device.
20. Numeric keypad
21. Shuffle/Repeat - Repeat
Activate random playback here or set a repeat interval during music playback.
21. FAV+ / BT Pair
Select a stored favorite station here or press this button in Bluetooth mode to establish a connection to your mobile device.
22. PRESET button
Switch to one of the individually stored favourite stations here.
5. KEY FUNCTIONS
5.1 Volume
Adjust the volume using the VOL+/VOL- buttons on the remote control or on the device.
5.2 Switch operating mode
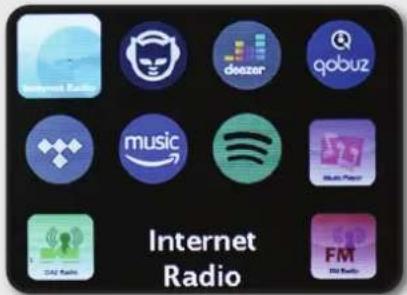
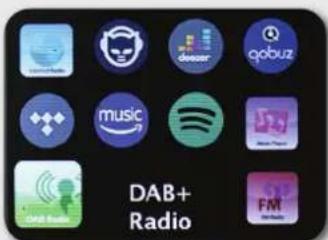
Press the MODE button on the remote control or on the device to switch between the following operating modes. Switch to the desired function using the forward/backward navigation keys.
text_image
Grid of app icons including Deezer, qobuz, music, and FM with logos and names
Internet radio

Napster

deezer

qobuz
Streaming service Streaming service Streaming service

TIDAL

AMAZON

SPOTIFY

Music player
Streaming service Streaming service Streaming service

DAB+ radio FM Radio
text_image
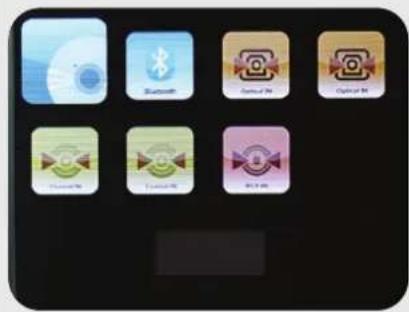
Icon set displaying eight different media app icons with Chinese labels, including CD, NFL, and TV.
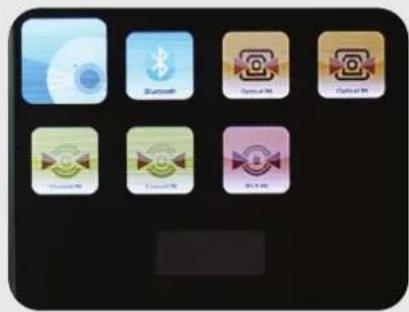
CD Player Bluetooth Optical input 1 Optical input 2


Coaxial input 1
Coaxial input 2
Analogue Cinch input

5. KEY FUNCTIONS
5.3 Menu operation
The menu is divided into the main menu, the submenu of the currently selected source and the system settings that apply to all sources.
The operation within the menu is done with the dial (4) on the device or with the up/down arrow buttons (13/17) and the OK button (16) on the remote control.
To open the submenu of the currently selected source, press and hold the MENU button on the device for approx. 2 seconds, or press and hold the MENU button on the remote control for 2 seconds.
The submenu of the currently selected source contains source-specific settings and options. From here, you can access the
main menu and from there the >System settings.
You can move the marker up and down by turning the NAVIGATE dial right and left or by pressing the arrow keys on the remote control.
By pressing the SCROLL&SELECT dial or the OK button on the remote control, you can confirm your selection. If a value has been changed, it is saved by pressing the NAVIGATE dial or the OK button. If there is an arrow (>) next to a menu item, you can access further settings or functions by pressing the NAVIGATE dial or the OK button.
To exit the menu, press the MENU button. Depending on the current submenu or option you are in, you may have to press the MENU button several tiems.
If you want to cancel a setting without saving, press the Back (14) button on the remote control.
5.4 Mute device
You can mute the volume with the mute (19). "Mute" will be shown in the display and the status bar.
A repeat button press switches the sound back on.
6. FIRST START-UP
Your DABMAN i550 CD is a network device, which should be integrated into your network like all such devices.
By connecting to a home network with an internet connection, you have access to over 25,000 radio stations. By integrating the device into a home network, you can also control it from a tablet or smartphone via an app.
However, you can also just use your radio as a DAB+ receiver.
Information about the DAB+ reception in your region can be found on www.digitalradio.de for example.
To connect the device to the Internet, you need the following:
- An Internet connection (e.g. DSL, ideally with a flat rate).
- A router for Internet access, for wireless operation a so-called W-LAN router (Wireless LAN/WIFI).
- For WIFI integration: Your network key (WEP, WPA or WPA2)
This, like any key, is used to secure against unauthorised access and has been set up with your network. To access a network secured in this way, the key
must be entered into the radio later on. If your network does not have a key,
the device can connect to the Internet without entering it.

NOTE!
If you are not sure whether you are using such a key in your network, just try it without entering it first! If the device does not work afterwards, repeat the setup procedure. You should know the key then, however, if necessary, ask the person who set up your network for help.
The WIFI password can often be found on the router's bottom side,
unless the key has been changed manually.
Alternatively, the device can also be connected to the internet router via a LAN cable.
The radio can be controlled using both the device buttons as well as the remote control. The remote control is the more convenient and easier way to operate the DABMAN i550 CD. For this reason, this manual mainly explains how to set up and operate the radio using the included remote control.
Connect the radio to the supplied power adapter (chapter 4.2 Connection 17)
and establish the power supply.
During the first start-up, a setup wizard starts to guide you through the one-time setup.
text_image
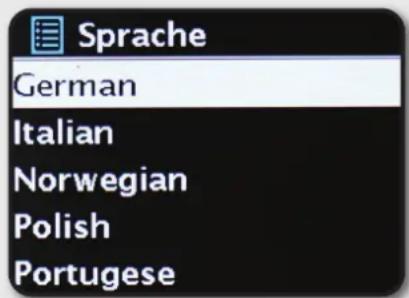
Sprache German Italian Norwegian Polish PortugueseDuring the first start-up, a setup wizard starts to guide you through the one-time setup.
Select the answer using the navigation dial or the
‘Left’ and ‘Right’ buttons on the remote control.
In the first step, select the menu language.
6. FIRST START-UP
Datenschutzhinweis
In this step, confirm the
privacy notes shown in the display. Only when they are confirmed can you connect the device to the Internet to receive Internet radio stations.
Einrichtungsass.
Jetzt ausführen?
JA
NEIN
Select "Yes" to start the setup wizard.
Datum/Zeit
12/24-Stundenformat
12
24*
Select the time format
12 h or 24 h in the next step.

Autom. Update
Update von DAB+
Update von UKW
Update von NET
Kein Update
You can retrieve the current time from the Internet or from a DAB+ station.
This ensures that the radio is always set to the correct and current time.
In this case please select 'Update by the Internet' or 'Update by DAB'. If you prefer to manually set the time, please select 'No update'. In the next step, please select your time zone.
6. FIRST START-UP
text_image
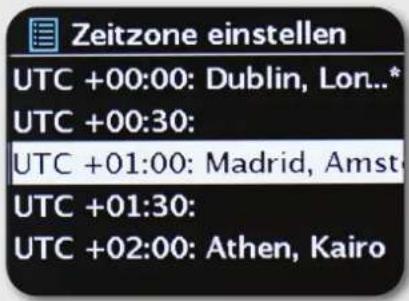
Zeitzone einstellen UTC +00:00: Dublin, Lon..* UTC +00:30: UTC +01:00: Madrid, Amst UTC +01:30: UTC +02:00: Athen, KairoIn the next step, please select the time zone you are in. For Germany, please select UTC + 1:00 and confirm with OK.
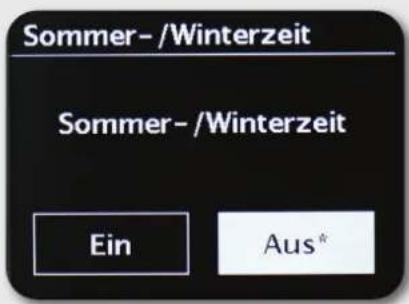
Then select whether the device should automatically switch the time from summer to winter time or from winter to summer time.
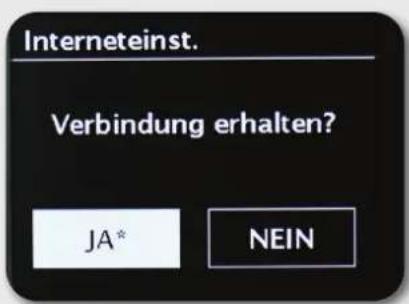
If you confirm this step with "Yes", the Internet connection that you set in the next steps will be automatically re-established every time the device is switched off and on.
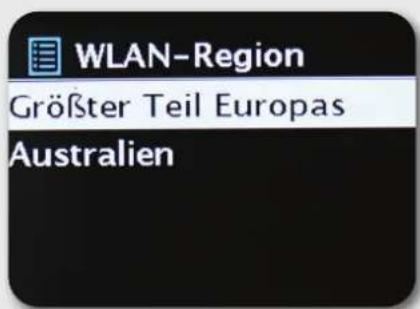
In the next step, select whether you want the radio to connect to the network automatically the next time it is turned on. To connect to the Internet, in the next step confirm that you live in 'most of Europe'.
6. FIRST START-UP
text_image
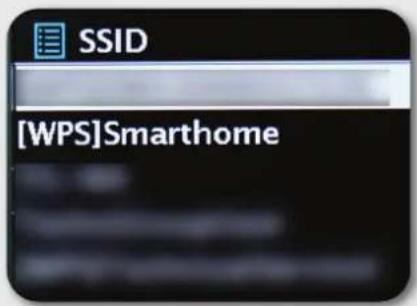
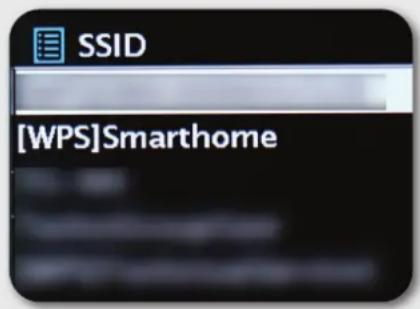
SSID [WPS]SmarthomeThe device then searches for all available networks. Please select your WIFI network on the display and confirm with OK.
If your router, to which you want to register the radio, has a WPS function, you can select the line "Press button" in this item. Then press the WPS function of your router. This will automatically establish the connection. For information on the WPS function of your router, please refer to the user manual of your router. Select the "Skip WPS" line if your router does not support WPS function.
text_image
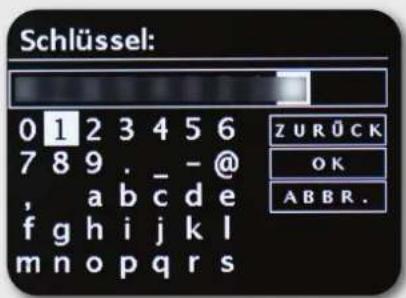
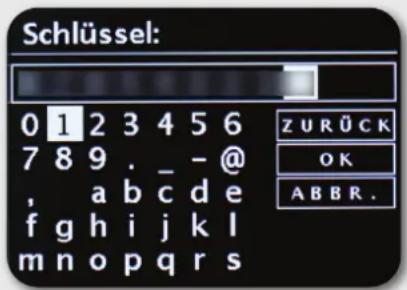
Schlüssel: 0 1 2 3 4 5 6 7 8 9 . _ - @ , a b c d e f g h i j k l m n o p q r s Z U R Ž C K O K A B B R.If your router does not support WPS function and you have selected "Skip WPS" in the previous step, you still need to enter the password to connect to the WIFI. Navigate the selection as usual using the navigation dial. Confirm the completed key with OK. The "OK" field can also be reached via the navigation dial.

text_image
VerbundenIf the connection was successful, this message appears.
6. FIRST START-UP
text_image
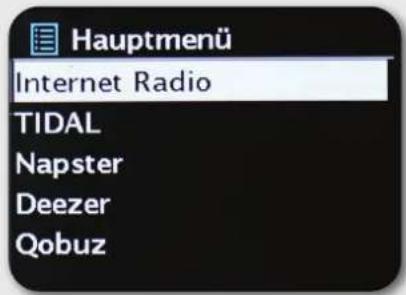
Hauptmenü Internet Radio TIDAL Napster Deezer QobuzFollowing a successful setup, internet radio stations will be available.
Select "Internet Radio" from the main menu and confirm your selection.
In the menu that follows, you can either jump directly to one of the last stations you listened to, display the complete station list, go to the system settings
or - if you change your mind - return to the main menu.
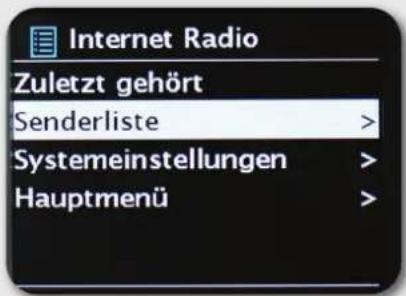
If you decide to use the station list, navigate to the station of your choice in the following submenu – depending on your personal taste.
Due to the large number of available stations worldwide, our database is clearly
sorted by countries, genres, popular stations, etc. and is always kept up to date.
bar
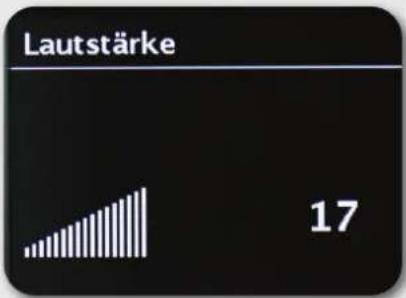
Lautstärke | Label | Value | |---|---| | Bar Chart (White Bar) | 17 |The playback screen provides information about the station being played and, if transmitted, the station or artist and title of the song being played.
To adjust the volume during playback, use the volume control on the device or the buttons on the remote control.
7. NETWORK SETTINGS
7.1 The network assistant
In order for the device to function as an Internet radio, the radio must be connected to a network with Internet access.
If you have not already done so in the initial installation, you can call the Network Wizard at any time to establish a network connection.
text_image
Internet Radio deozer qobuz music FM GUI RadioPress the MODE button to enter the source menu of the device.
Use the right/left arrow buttons to select the internet radio source here and confirm with OK.
Press and hold the Menu button until the main menu appears.
Switch to the System Settings menu item and confirm with OK.
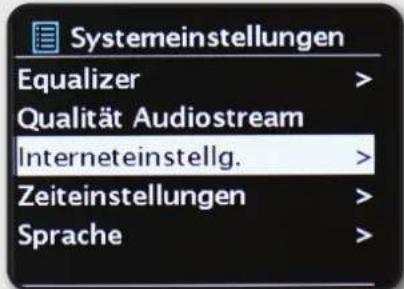
Then select the Internet Settings item and confirm with OK.
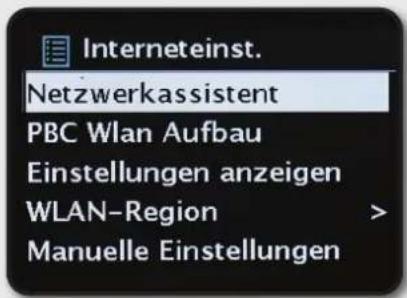
Select the Network Wizard item and confirm with OK. The radio then displays all available WIFI networks.
If desired or necessary, you can choose a different network here. In the case of WIFI networks that you have previously logged into, you will not have to enter any password.
7. NETWORK SETTINGS
In the Internet Settings you will find more menu items under which you can change the network settings of your radio.
PBC WIFI setup
PBC stands for Push Button Configuration. Here you can connect your DABMAN i550 CD
via WPS (WIFI protected setup) to a router, if this is supported. Further relevant information is provided in your router's manual.
Display settings
This shows all the relevant information about the current connection of your DABMAN i550 CD with the network. There you can check whether the WIFI or DHCP is active or see your MAC address, SSID, IP address or the primary DNS.
WIFI region
In part, other countries (or hemispheres) use different WIFI frequencies
or broadcasting levels. So should you take your device to the United States, for example, it is sensible to inform your DABMAN i550 CD about this.
Manual settings
Here you can switch between 'Cable' and 'wireless', activate or deactivate DHCP or do a few other things.
PIN for apps
Here you can change the PIN for the remote access to your DABMAN i550 CD.
The default setting is '1234'.
Should you use this function, we highly recommend changing this rather unoriginal password.
Delete profile
Would you like to lend your DABMAN i550 CD to someone else but remove access to your network beforehand? You can easily do that here.
Maintain connection
In standby mode, the DABMAN i550 CD can maintain or disconnect from an Internet connection. If you do not maintain the internet connection in standby mode, the DABMAN i550 CD must reconnect to the internet when you turn it on.
The DABMAN i550 CD thus needs a bit more time until you can hear the first station. If you maintain an Internet connection, the switching on process is significantly faster.
7. NETWORK SETTINGS
7.2 WIFI connection
A wireless signal is always transmitted directly from point to point or from antenna to antenna. The quality of a wireless connection therefore depends on any obstacles that have to be overcome in the air or on the way from the DABMAN to the opposite device. This means that a setup position with a shorter distance can in fact result in a poorer connection.
text_image
SSID [WPS]SmarthomeTo connect the device to your network, the DABMAN i550 CD will start the wizard to connect to your network. It starts by listing all the networks found.
You should find yours among them, too.
Now please select the network which you would like to connect to. If the network you are looking for does not appear, you can use the 'Rescan' menu item to repeat the search.
After selecting the network, you must now enter the network password. At the least if your WIFI router has been encrypted.
text_image
Schlüssel: 0 1 2 3 4 5 6 7 8 9 . _ -@ , a b c d e f g h i j k l m n o p q r s Z U R Ü C K O K A B B R .The passwords for your WIFI router are entered via the navigation dial: By turning the dial you select the letters and numbers; by pressing the dial you confirm
your entry, You can find the special characters by scrolling on with the dial.
Once the password has been completely entered, go to the [ok] field. Please do not confirm each letter with [ok] as this would lead to cancelling the entry.
text_image
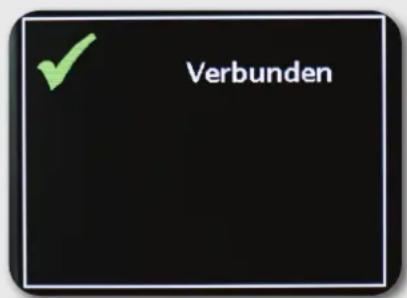
VerbundenAfter confirming with the OK button, the DABMAN i550 CD sends the password to the router ("Please wait" is displayed), which - after successful adjustment - logs in the DABMAN i550 CD ("Connected" is displayed).
If everything was successful, the network setup wizard will display the message "Connected". Pressing the navigation dial takes you back to the main menu. Your entries and settings are stored in the device and do not have to be made a second time.
The next time you switch on the
DABMAN i550 CD, it will automatically find your router and connect to the network.
7. NETWORK SETTINGS
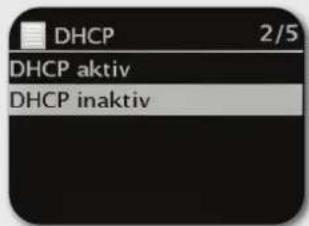
7.3 Manually setting up the wireless connection on the radio
text_image
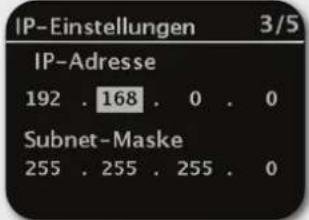
DHCP 2/5 DHCP aktiv DHCP inaktivIn some networks, static IP addresses are distributed for certain access conditions – the administrator will tell you what these should be.
text_image
IP-Einstellungen 3/5 IP-Adresse 192 . 168 . 0 . 0 Subnet-Maske 255 . 255 . 255 . 0See "static IP"
Please select Switch off DHCP in the following menu. Here you can enter the corresponding values with the navigation dial.
To reach large numbers (e.g. 192) faster, turn the dial to the left. To move to the next window, press the dial or the OK button on your remote control once.
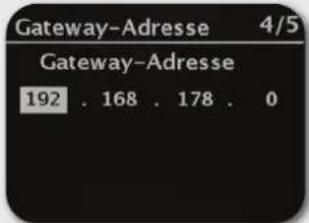
After that, the gateway address must be specified.
Now just enter the DNS address.
Now a connection is established and the settings are saved in the DABMAN.
text_image
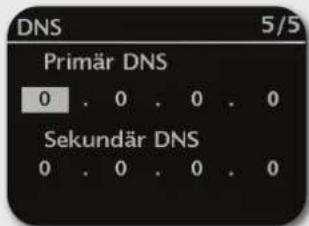
Gateway-Adresse 4/5 Gateway-Adresse 192 . 168 . 178 . 07.4 WPS
text_image
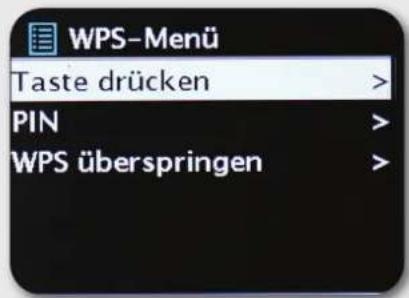
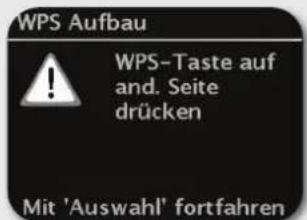
DNS 5/5 Primär DNS 0 . 0 . 0 . 0 Sekundär DNS 0 . 0 . 0 . 0WPS is an easy way to set up the DABMAN i550 CD in a network.
For the connection to work, please note that your router must also support this protocol.
To use this connection setup, please press the WPS button (PBC) on your router and then press OK on your DABMAN i550 CD.
Regarding your router's configuration, please refer to the corresponding manual.
In this chapter we would like to familiarise you with the display of the DABMAN so that you always have an overview.
Status bar
The status bar is at the bottom of the screen.
There you will see the current directory you are currently in.
If you have selected a playback mode, the current time is displayed in addition to the mode.
If you have stored the station on a station button in Internet radio mode,
the respective number is displayed in the footer (e.g. P3). If you play music from the network, you will see the message 'UPNP'. In addition, you will also find the currently selected connection type in the lower right corner.

Connection type: WIFI (with signal strength)

1 station selected on station button 1.

Sleep timer active (10 more minutes)

Alarm 1 active

UPNP - Operation (music from the network)

Repeat all tracks.

Shuffle playback
There is a list view in all selection menus.
Further navigation levels are indicated by
an arrow symbol (>). For orientation purposes the status bar displays the name of the menu you are currently in.
8.3 Playback display

text_image
Internetradio 09:29 103.7 UnserDing Ihr hört "Red Hot Chili Peppers" mit "Dani California".After successful selection of a source, the playback starts and the display changes:
Now you will be shown information such as the station name, artist and track. For more information, press the [Info] button at the top of your DABMAN i550 CD. This then displays additional information about the reception quality, the technical data of the stream, the programme and the music genre preferred and the utilisation of the playback buffer.
8.3 Receiving DAB/DAB+ stations
text_image
DAB+ RadioPress the MODE button and switch to the DAB+ field. Confirm with OK.
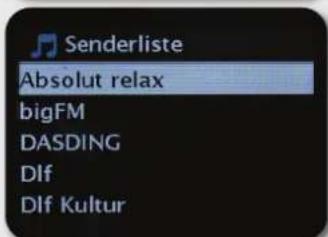
Station list
In the DAB menu you will find the sub-item "Station list". By pressing the navigation dial, you can select from the stations found by the scan there.
You can call up the next or previous station with the navigation dial directly on the radio or on the remote control, without first having to return to the station list.
Scan / full scan
Use the navigation dial to select 'DAB' from the main menu and confirm by pressing the navigation dial. Then select 'Full scan' and the radio will find all DAB and DAB+ stations available in your reception area.
text_image
Senderliste Absolut relax bigFM DASDING Dlf Dlf Kultur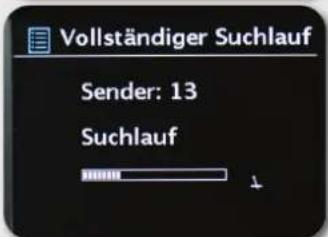
In this area you can change the DAB reception frequencies manually.
Clean up transmitter
If a question mark appears before the station name in the station list, the DABMAN i550 CD cannot receive this station. This may be due to a poor reception, but also to a change on the part of the broadcasters. To prevent unavailable stations from being displayed in the station list in a confusing way, select the submenu item 'Clean up station list' in the DAB menu and confirm the security prompt with 'Yes'.
DRC
DRC is short for Dynamic Range Control. This function allows
you to adjust volume differences between different DAB+/DAB stations, resulting in a more homogeneous listening experience.
Press and hold MENU, then choose > DRC to select the desired compression ratio .
Use the navigation dial to select the compression rate:
DRC high - high compression
DRC low - low compression
DRC off - compression switched off.
Confirm using the OK button.
Station order
The sub-item “Station order” in the DAB menu leaves it up to you to decide whether you prefer to have the broadcast stations in the station list sorted in alphanumeric order or by individual ensembles (these are groups of stations broadcast together in a “package”) or by valid (stations without a question mark in front of the station name).
8.4 Store DAB/DAB+
The favourites memory can store up to 30 stations in the DAB range.
The stored station are retained even after a power failure.
Set the desired stations.
Press and hold the PRESET button on the device until the
Favourites Memory List appears.
Use the SCROLL&SELECT dial to select a memory location 1...30 and press the SCROLL&SELECT dial. [saved] appears in the display.
Alternatively:
Press and hold one of the number buttons on the remote control until [saved] appears in the display.
Repeat the procedure to save more stations.
8.4.1. Selecting saved stations
Briefly press the PRESET button on the device.
Use the SCROLL&SELECT dial to select a memory location 1...30 and press the SCROLL&SELECT dial to play the station stored on it.
Alternatively:
Press the desired number button 1 ... 12 on the remote control.
If you have not stored a station on the selected programme slot,
[save slot empty] appears in the display.
Press the INFO button repeatedly until the signal strength is displayed:
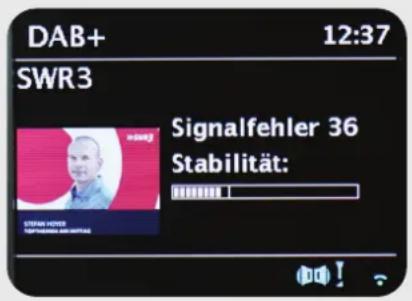
The level of the bar indicates the current level.
Stations whose signal strength is below the required minimum signal strength do not send a sufficient signal.
If necessary, adjust the antenna again.
Under the menu item Manual Setting, you can select the reception stations individually and display their signal strength.
This way, you can optimally align the telescopic antenna towards stations that are difficult to receive at your radio's location. This means that stations that have not yet been found in a scan can still be found and played.
To do so, select MENU > Set Manually and then select a station frequency. The signal strength of this frequency will be displayed.
Pressing the INFO button several times switches through different information such as programme type, multiplex name, frequency, signal error rate, data bit rate programme format, date, DLS.
8.4.2. Adjust station order
Press and hold the MENU key, and then select "Station order".
Select a sorting type and confirm your selection with OK.
8.5 Receiving FM stations
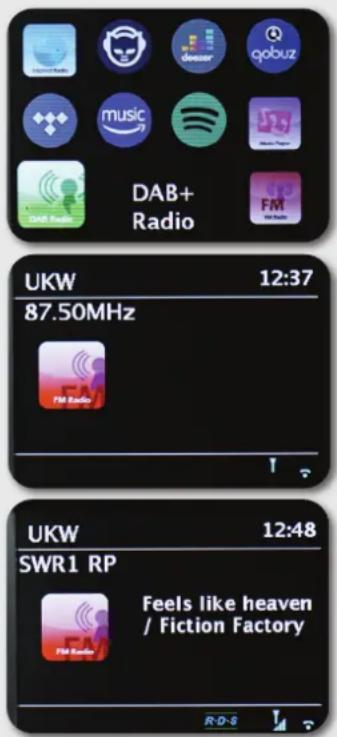
text_image
DAB+ Radio UKW 12:37 87.50MHz FM Radio UKW 12:48 SWR1 RP Feels like heaven / Fiction FactoryScan
Press the MODE button and switch to the FM Radio field.
Confirm with OK.
The device switches to the last reception frequency set.
To start a frequency scan to the next available station, briefly press and hold the up arrow key.
The radio searches for the next receivable station.
As soon as a station has been found, the search will stop.
Manual station search
As an alternative to a scan, you can use the Skip Back/Skip
Forward buttons either directly on the radio or on the remote control to select specific frequencies
and thus find the stations located there.
Scan settings
If you press the Back button of your radio (optionally of the remote control) while the FM radio is playing, you can specify in the submenu 'Scan setting' whether the device should only consider stations with good transmission quality for the scan.
Audio settings
If FM reception is generally poor, you can specify in the 'Audio setting' sub-item that the stations are only to be played back in mono and no longer in stereo. This can significantly reduce the noise in the signal.
8.6 Receive Internet radio
In the previous section we already explained the impressive possibilities of the Internet radio function of your DABMAN i550 CD. The big advantage over the traditional way of listening to Internet radio via your computer's web browser is that your DABMAN i550 CD accesses the Internet WITHOUT the computer running – simply via your router, which establishes the connection to the Internet.
The list of Internet radio stations is constantly updated and expanded. This ensures that, with all the changes that the Internet is constantly subject to, there is always an up-to-the-minute and, above all, reliably functioning range of Internet radio stations. When accessing the Internet radio menu, the radio automatically calls up the current version directly online, thus ensuring that it is always up to date. Use the usual navigation to zap through the station list, which is already sorted.
If you come across a station that you would like to find again, simply press one of the station keys during playback for approx. 2 seconds to store the station and call it up again later if necessary using the same number key.
An asterisk (*) then appears in the bottom line of the display, followed by the respective station key - e.g. ‘*1’. Further options for managing favourites will also be presented later.
8.6.1. Internet radio station selection

There are various ways to find the right station here from the abundance of stations. Under [Local Stations Germany] you will only find national stations.
And since there are a lot of them, we have sorted them for you again according music style and content.
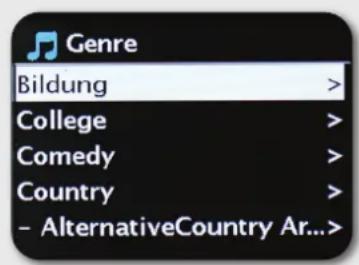
text_image
Genre Bildung > College > Comedy > Country > - AlternativeCountry Ar...>TIP:
Many of the radio's functions can be controlled via an app for mobile devices in addition to the remote control, provided you have a mobile device with an Android or IOS operating system.
Please also read chapter ??
UNDOK APP

Press and hold the PRESET button on the device until [save presettings] appears in the display.
You can now use the SCROLL&SELECT dial or the up/down arrow buttons on the remote control to select one of 30 favourites save slots.
To save the station, press the OK button when the marker is in the desired Favourites save slot. The display then shows [saved].
Alternatively:
Press and hold a number button on the remote control to store a station on one of the corresponding number buttons.
Press the INFO button to obtain additional information about the current station.
8.6.3. Open internet radio favourites
Briefly press the PRESET button on the device and use the
SCROLL&SELECT dial or the up/down arrow keys on the remote control to select a station from the station memory list.
Press the OK button to play that station.
Alternatively:
Press and hold one of the number buttons on the remote control to select the station directly.
8.6.4. Add a new Internet radio URL
In order to add a new URL of a radio station, please register your
DABMAN i550 CD on www.wifiradio-frontier.com. You can request your personal access code under the Help menu item on the radio. With the access code you can then register your radio and add a new URL. The new station appears on your radio under "My added stations".
8.7 Music player (UPnP)
(Playback from a UPnP server)
Server software running on a computer or other device lets you share music files
for network playback. In the case of the DABMAN i550 CD, it must be a UPnP compatible server [UPnP:
Universal Plug and Play) which provides the data.
A simple file share, as known from the Windows network world, is not readable this way.
In contrast to an inflexible static file sharing, the DABMAN i550 CD offers flexible sorting via a virtual UPnP media server, which makes the manageability of your library more flexible by comparison: a track can be found via the artist, the genre, the album and even by means of the folder structure.
UPnP allows the user to receive data from the network. For example, if you have shared your music collection on your computer with a UPnP programme (e.g. Windows Media Player 11/12), you can access and play tracks from the living room or kitchen with the DABMAN i550 CD. If the music library is stored centrally on a network hard drive (NAS), this even works without a computer.
text_image
Musikabspieler 09:36 Battery Park My Music 0:06 6:27As a network player, your radio then directly accesses the music tracks on the drive.
The [Music player] menu item can be accessed via either the main menu or the Mode button, which can be found both on your DABMAN i550 CD and on the remote control.
If you choose this option, you will be offered two icons:
Internet radio and music player.
In the music player menu, you can access media shared on your network and also set the playback mode.
Make your choice using the navigation dial or the 'Left/right' buttons of the
remote control. If you wait for too long, the screen with return to the main menu.
Your DABMAN i550 CD has its own favourites list, which can be found in the menu under "InternetRadio". To create favourites, press and hold the navigation dial or OK button on the remote control for a few seconds. Once a favourite is stored, the radio acknowledges it in the display with the message "Favourite added". To remove a favourite, select it from the Favourites menu (highlighted in white) and press and hold the navigation dial or OK button on the remote control for a few seconds. A "Remove favourite" menu will appear. Please note that contents of UPnP servers cannot be saved as favourites because they are not permanently available.
8.9 Podcasts
text_image
Podcasts Länder > Formate > Suchen podcasts >With your DABMAN i550 CD, you can subscribe not only to radio stations and broadcasts, but also to podcasts from around the world. As you can see, the podcasts in [Countries] are sorted by continent.
Under [Formats] you can also search for a specific topic. You can also - as with radio stations - search for a podcast you know by entering its name.
8.10 History
The recently played tracks and received radio stations are listed under the menu item “Last listened to”. That way, even those stations can be found without any problems that are believed to be lost forever following a brief memory loss.
8.11 Sleep timer / snooze

text_image
Sleeptimer 15 MINOnce activated, it ensures that the DABMAN i550 CD automatically turns off after the preset time, which is especially beneficial if you have fallen asleep in the meantime. You can extend the snooze time up to one hour in 15-minute increments; the default setting, of course, is "Snooze off".
Your radio features 2 integrated alarm clocks. The alarm can be activated and the time set in the menu. An alarm sound, the last station you listened to or your favourites are available as the source. To adjust the volume, the source is played and you can adjust the desired level by using the navigation dial.
8.13 Receiving time information via DAB, FM or Internet
You do not need to set the integrated clock of the DABMAN i550 CD yourself, as many broadcasters transmit a coded time signal together with their programme. However, this only works if you receive the corresponding stations in sufficient quality.
Use the navigation dial to select "System settings" in the main menu, then "Date/Time" and finally "Auto update". Now you can choose whether you want to receive the time signal from radio stations via DAB/DAB+, FM or the Internet.
8.14 CD Player
8.14.1. General Information about CDs/MP3 CDs
The DABMAN i550 CD is suitable for music CDs recorded with audio data
(CD-DA or MP3 for CD-R and CD-RW). MP3 formats must be created with ISO 9660 Level 1 or Level 2.
Multisession CDs cannot be read.
In MP3 mode, the terms "Folder" = album and 'track' are decisive. "Album" corresponds to the folder on the PC, "track" to the file on the PC or a CD-DA title.
The device alphabetically sorts the albums or tracks of an album by name. If you prefer a different order, change the name of the track or album and put a number in front of the name.
When burning audio data onto a CD-R and CD-RW, a number of problems can arise that can sometimes interfere with a smooth playback.
This is caused by faulty software and hardware settings
or the blank CD used. If such errors occur, you should contact the customer service of your CD burner/burning software manufacturer or look for appropriate information - e.g. on the Internet.
When you make audio CDs, follow the law and do not infringe the copyrights of third parties.
The device can play CDs with MP3 data and normal audio CDs (CD-DA). Do not use other extensions, such as
*.doc, *.txt, *.pdf, etc. when converting audio files to MP3. Music files with the extension
*.AAC, *.DLF, *.M3U and *.PLS or *.WMA cannot be played.
Due to the variety of different encoder software, it cannot be guaranteed that every MP3 file can be played without problems.
In case of faulty tracks/files, the playback will be continued at the next track/file.
It is advantageous to burn at low speed when burning the CD and to create the CD as single session and finalised.
The CD player is compatible with CD, CD-R/RW and MP3 CD media. You can play all the discs mentioned here (disc size 12 cm CDs, playing time 74 min.) on this device.
When transporting the device, remove the disc from the drive.
This will prevent damage to the CD player and the disc.
The playback quality of MP3 CDs depends on the bit rate setting and the burning software used.
8.14.2. Play a CD
Press the MENU button, and then select Main Menu > CD.
To insert a CD, press the eject button on the device or on the remote control and carefully insert the CD with the label pointed up on the CD tray. Make sure that the CD is not crooked.To insert or remove the CD, please only touch the edge of the CD.
Wait until the CD contents have been completely read before operating to ensure that all the required information has been read from the CD. Especially with MP3 CDs this process can take some time.
Press the Play/Pause button on the remote control (8) to start/pause playback (the play time flashed in the display).
Press the STOP button on the remote control (6) to stop playback.
The display shows the total number of tracks.
Always stop playback before removing a CD.
If there is no playback, the DABMAN i550 CD will enter standby mode after approx. 15 minutes.
8.14.3 Set a track
You can select folders/albums using the arrow buttons on the remote control.
Use the skip forward/backward buttons (7, 9) on the remote control to skip to the next or previous track.
The display shows the track number set in each case (F = folder/album, T = track).
You can run a fast forward or backward search in the current track to find a specific part. Playback does not occur during the search.
Press and hold the track skip forward/back buttons (7, 9) on the remote control to perform fast forward/reverse within the track for the duration of the press.
8.14.5. Repeat function
You can choose to repeat a track, the entire folder/album (MP3 CDs only), or all tracks on the CD.
To do this, press the Back button on your remote control (21) again. The selected mode will be shown on the display (Repeat Track ①, Repeat Folder/Album ⑤ Repeat All Tracks ).
To turn the function off again, press the Back key (21). Repeat until the Repeat indicator is no longer displayed.
8.14.6. Shuffle playback
With the random function you can play the tracks of a CD in any mixed order.
During playback, press the Shuffle button [22] on the remote control repeatedly until the shuffle character ✗ appears in the display.
To switch the function off again, press the Shuffle button (22) again.
8.14.7. Notes on the CD
Always store the CD in its case and only touch the edges.
The surface shimmering in rainbow colours must not be touched and should always be clean. Do not stick paper or tape on the label side of the disc.
The CD should be kept away from direct sunlight and heat sources such as radiators.
A CD must also not be placed in a car parked directly in the sun, as the inside temperature in the car can rise extremely high. Clean fingerprints and dust on the recorded side with a clean, dry cleaning cloth.
Do not use disc care products such as disc spray, cleaning fluids, antistatic spray or solvents such as petrol, thinner or other commercially available chemicals to clean CDs.
Stubborn stains can potentially be removed with a damp chamois leather.
Wipe from the centre towards the disc's edges. Circular movements during cleaning cause scratches. These can cause playback errors.
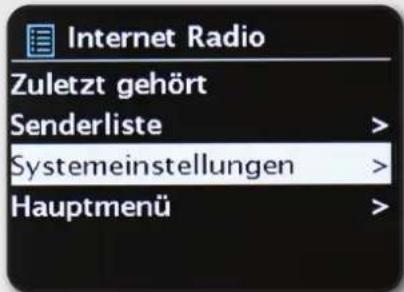
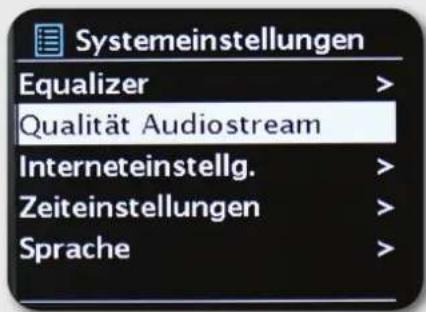
9. SYSTEM SETTINGS
In the System Settings menu, you can find information about your DABMAN i550 CD and make and save settings on the device.
text_image
Hauptmenü Coaxial In 2 RCA in Schlummer Wecker Systemeinstellungen >To enter the system settings, press and hold the MENU/INFO button.
Switch to the System Settings field and confirm with OK. Now select the desired item to make settings.
9.1 Equaliser
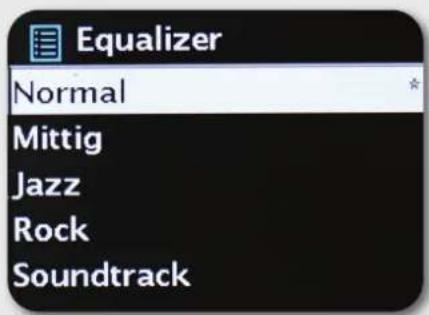
text_image
Equalizer Normal Mittig Jazz Rock SoundtrackThe equaliser allows you to adjust the sound of the DABMAN to your
The different programs balance the bass, midrange and treble differently, so there is something for every ear. For the outputs that are
not amplified (analog, digital) the equaliser is of course not considered, the sound is reproduced here without alteration in any case. The following equaliser options are available:
Normal, Middle, Jazz, Rock, Soundtrack, Classic, Pop, News.
If you do not like any of the presets, you can create and store your own under "Configuration My Equaliser", where bass and treble can be raised or lowered by 14 dB each. You can then retrieve your saved settings by selecting "My Equaliser".
9.2 Audio stream quality
In this menu item you can set the audio quality of Internet radio streams. The "High quality" setting is recommended here. This setting uses the highest possible transmission rate provided by the Internet radio provider.
9. SYSTEM SETTINGS
9.3 Settings
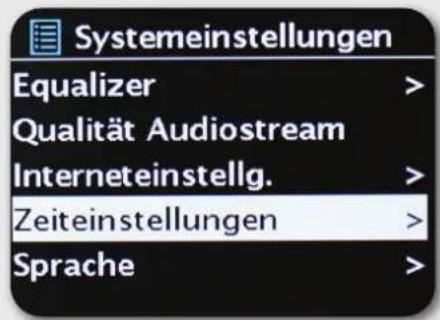
You can adjust the date and time settings in this menu option. After successful entry, the clock and the date are set.
Auto. Update.
It is recommended to use the Auto Update setting. In this case, the time is synchronised from a selected source and is thus always set correctly.
Set the format
Should you wish to change the time format, this can be done under [Set format]. Choose between the 24- and American 12-hour format.
Please note that the AM and PM addition is not displayed in the 12-hr format.
Set time zone
Under [Set time zone] you can choose your current time zone.
Starting with CET (Central European Time) you can choose any zone around the globe! If you live in
Germany, "Berlin" is likely the right option. Even if you live in a different city.
Summer/winter time
Do you live in a summer daylight savings zone? Tell your
DABMAN i550 CD in this menu item, so you always have the right time – even if you forget to change it in spring and autumn.
9.4 Language
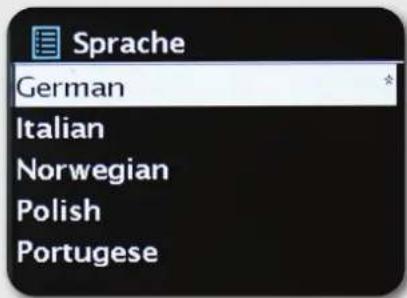
text_image
Sprache German Italian Norwegian Polish PortugueseHere you can select the language for the menu in the DABMAN i550 CD. The following languages are available: German, English, Spanish, French, Italian and
Dutch.
Use the navigation dial to scroll through the list and confirm with the push function.
With the i550 CD Back button you can return to the system settings.
9. SYSTEM SETTINGS
Default settings
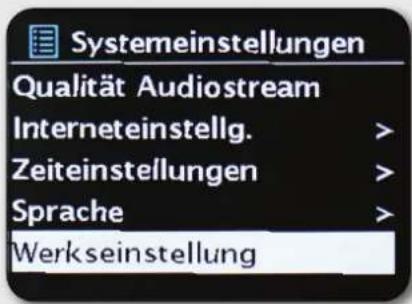
Here you ran restore the radio's factory settings. This comes in handy is you have changed settings that may prevent the device's optimal functioning. The device is returned to its factory settings with this option.
Please note that all custom settings will be lost by restoring the factory settings.
You can confirm the security question by choosing Yes. Select No if you would like to cancel the process.
9.6 Update software
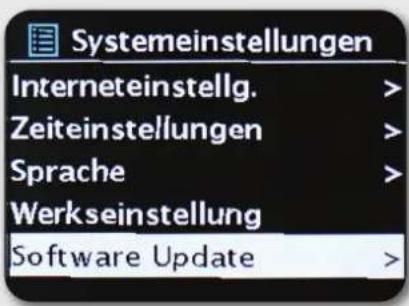
There is nothing that cannot be improved! That is why you should feel free to update the DABMAN i550 CD's firmware.
When calling up this menu, the DABMAN i550 CD will connect to the update server to check whether an update is available.
After that you can install it or view even more additional information. The system will restart after a successful installation.
If you prefer to not do this manually all the time, please select 'Automatic updates'. If you prefer doing this yourself from time to time, then click on "Search for updates".

NOTE!
All settings made by you are lost during a firmware update. (e.g. network profiles, station favourites, equaliser settings). These have to be made again after the update.
9.7 Info
This menu displays all information relevant to the device. There you will find the installed firmware version and the hardware ID of your DABMAN i550 CD.
The information found here is also very helpful should you require support.
Press the Back button to return to the settings.
9. SYSTEM SETTINGS
9.8 Display brightness
Here you can set when to automatically switch off the lighting of the colour
display. You can either switch off the automatic mode completely [On] or select between 10 and 180 seconds.
You can also adjust the contrast of the display both in standby and in operation.
Three levels are available: [High], [Medium] and [Low]. The default setting is [High]
9.9 Standby clock
Set the display of the time in standby mode here.
You can choose an analogue or digital display.
Via the Bluetooth connection, the radio can play media
(locally stored MP3 files, streamed music, web radio) on an external device.
The Bluetooth mode is recommended if you are near the radio with a device to be connected and no network connection is available.
Select Bluetooth from the menu.
A Bluetooth connection must be established before you can send audio files to the radio via Bluetooth.
10. BLUETOOTH
10.1 Establish a Bluetooth connection
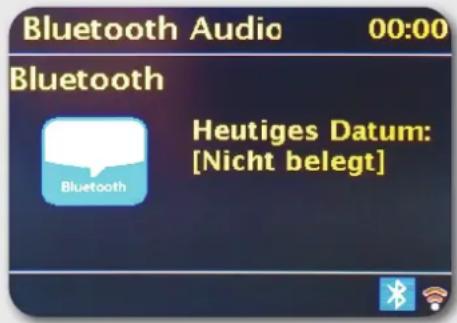
text_image
Bluetooth Audio 00:00 Bluetooth Heutiges Datum: [Nicht belegt]If you have selected Bluetooth mode on the radio, it is in pairing mode and will search for Bluetooth devices to connect to. Now activate the Bluetooth function of the external device to be connected (for further details, please refer to the operating manual of that device). Search for “DABMAN i550 CD” in the list of available devices, select it and establish the connection. In the radio display, a Bluetooth symbol appears in the lower left corner.
10.2 Playing media via Bluetooth
If you have established a Bluetooth connection as described in Chapter 10.1, you can play music files stored on an external device via the
DABMAN i550 CD. To do this, proceed as follows:
Start playback of the music on the external device by switching to the corresponding playback function (MP3 player, etc.) or select a track from the respective playlist and start playback.
You can play the sound of an external device on the DABMAN i 300 CD.
The device has one analog audio input, two digital-electrical inputs and two digital-optical inputs.
Connect the external device to the audio input on the rear panel of the radio.
Press the MODE button repeatedly until [AUX IN] appears on the display.
Alternatively:
Press and hold the MENU button, then select AUX IN from the main menu.
To optimally set the volume, use both the volume adjuster on the radio as well as the connected device.
Please note that a very low volume setting of the connected device and a correspondingly higher volume setting of the radio will also amplify annoying noise/interference to a greater extent and thus be heard more clearly. We thus recommend adjusting the volume of the DABMAN i550 CD e.g. on a DAB+ or FM station, switching to the audio input and then adjusting the volume of the connected device so that the total volume of the audio input roughly corresponds to the volume of the DAB+/FM station. This way you can also avoid major volume differences when switching between the DABMAN i550 CD functions.
11. AUDIO INPUTS
11.1 Selecting a connected audio device
To play the sound of a connected audio device, use the MODE button to select the audio input through which you want to play the sound of a connected device.

Select Optical In 1 if you want to play the sound of an audio device connected via optical digital input 1 (SPDIF IN).

Select Optical In 2 if you want to play the sound of an audio device connected via optical digital input 2 (SPDIF IN).

Select Coaxial In 1 if you want to play the sound of an audio device connected via the electrical digital input 1 (COAXIAL IN).

Select Coaxial In 2 if you want to play the sound of an audio device connected via the electrical digital input 2 (COAXIAL IN).

Select RCA IN if you want to play the sound of an audio device connected via the analogue stereo RCA input. (LINE).
To adjust the volume optimally, use the volume control on the radio as well as on the connected device.
Please note that a very low volume setting of the connected device and a correspondingly higher volume setting of the radio will also amplify annoying noise/interference to a greater extent and thus be heard more clearly.
We thus recommend adjusting the volume of the DABMAN i550 CD e.g. on a DAB+ or FM station, switching to the audio input and then adjusting the volume of the connected device so that the total volume of the audio input roughly corresponds to the volume of the DAB+/FM station. This way you can also avoid major volume differences when switching between the DABMAN i550 CD functions.
12. MUSIC STREAMING SERVICES
With the i550 CD you can use Internet and DAB radio stations as well as numerous Internet music streaming services. The radio supports the offerings of the following streaming providers:
Napster, Deezer, Qobuz, Tidal, Amazon Music, SPOTIFY
(As of printing, subject to change at any time.)
If you want to use one or more streaming services, you need to register with the respective provider. For more information on registration, please contact the respective provider.

text_image
Internet Radio deezer qobuz music Multi-Play S45 Radio FM Hi Radio NapsterSelect your music streaming provider via the MODE button and confirm with OK.
Enter your credentials in the next window.
13. USING THE APP
You can control your DABMAN i550 CD radio conveniently via an app available for Android and IOS, in addition to the proximity and remote controls.
Download the UNDOK app from the google play store for Android OS, or via iTunes for IOS and install the app on your Smartphone/Tablet.
Make sure that the radio and your mobile tablet are registered on the same network.
When starting the app, it automatically detects the i550 CD if it is registered in the same network.
Example:
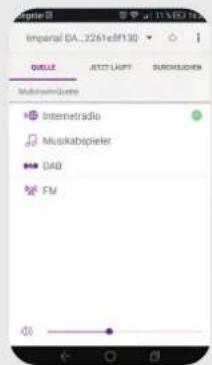
text_image
Imperial DA...2261e8f130 QUILE JETT LAUT SÜCHLUOEN Multisym Guide Internetradio Musikabpieler DAB FMChoose
reception mode of the radio.
text_image
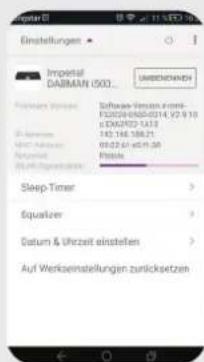
Einstellungen Imperial DABMAN (50) UNBEINNANCH Features Options Software Version 1.0000-0000-0014, V2 910 v2 CM2F2 1433 143,144,168,21 03:22:47,47:51,58 Balance Sleep Timer > Equalizer > Datum & Urzeit einstellen > Auf Werkseinstellungen zurücksetzenMake your settings.
text_image
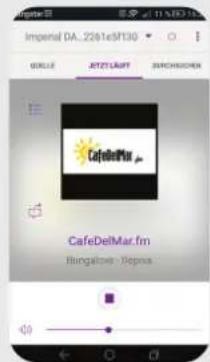
Imperial DA: 2261e5F130 GOLLE JETZILAKT SACHSCHEN CafeDelMar Bungaline: SepusThe information of the radio stations is displayed.
This description corresponds to the app as at time of printing.
Functions or the appearance may change in the course of software updates of the app!
14. TROUBLESHOOTING
| Symptom Possible cause and remedy | |
| No display, radio not responding during operation. | Connect to power using the included power adapter. |
| Operation via remote control is not possible. | Battery is empty or not inserted properly. Please check that the batteries have been inserted the right way around. |
| DAB+ reception disturbed. | No stations available Perform a search.Antenna not fully extended.Change the radio's location (e.g. near a window), run another scan search. |
| FM reception interrupted | Antenna not fully extended, pull the FM antenna out to its full length. Change the location of the radio |
| Poor audio quality when playing music. | Low bit rate file. Check the audio file.Tip: For MP3 files, the bit rate should be 192Kbit/s or higher. |
| Volume too low Check the | volume setting on the i550 CDCheck the volume setting on the paired device you are playing music from. |
| Network connection cannot be established. | Check the WIFI function.Activate the DHCP function of the router to which the radio is to be registered.A firewall may be active in the network. |
| The CD does not play or jumps during playback. | The device is not in CD mode. Wrong CD inserted.The CD compartment is not closed. Close the CD compartment.The CD is inserted incorrectly. Insert a CD with the labelled side facing up.The CD must be centred in the CD tray.The CD is dirty or defective. Clean the CD, use another CD. Moisture has settled in the CD compartment.Remove the CD and leave the CD compartment open for approx. 1 hour to dry. |
| No sound can be heard. | Increase the volume. The wrong source may have been selected.The sound mute function may be active. |
| There is noise. A mobile phone or other device in the vicinity of the device is emitting interfering radio waves. Remove the mobile phone or the device from the environment of the device. | |
15. STORAGE
When not in use, please unplug the power adapter from the socket, disconnect the power adapter cable from the radio and store the device in a dry place protected from dust.
If the device is not in use for a longer period of time, the battery must be removed from the remote control.
16. TRADEMARK NOTICE
Google Play Store® and Android® are registered trademarks of Google Inc.
iTunes Store is a service mark of Apple Inc.
iOS® is a registered trademark of Cisco in the US and other countries and is used under license.
Other product and company names mentioned herein are trademarks or registered trademarks of their respective owners.
17. DISPOSAL
17.1. Disposing of the packaging
The packaging of your device consists exclusively of recyclable materials.
Please dispose of these properly according to the
"Dual system".
17.2. Device disposal
The symbol on the right of a crossed out waste bin
indicates that this device is subject to Directive 2012 / 19 /
EU.
This directive specifies that this device,
at the end of its
service life but must be taken to specific collection centres,
recycling centres or waste disposal companies.
This type of disposal is free of charge. Protect the environment and ensure a proper disposal.
For more information, please contact your local waste disposal company or the city or local authority.


17.3. Disposing of the batteries
Batteries and power units may not be disposed of with household waste.
The symbol on the right means that you as a consumer
are required to dispose of all batteries and battery packs
separately. Suitable collection bins are provided at specialist retailers and
numerous public facilities. Information on the disposal of old batteries and power adapters
is also available from waste management companies, municipal and local authorities.
This type of disposal is free of charge. Protect the environment and ensure a proper disposal.
An additional chemical symbol Pb (lead) or Hg (mercury) beneath the crossed-out waste bin indicates that the battery/ power unit contains a share of more than 0.0005% mercury or 0.004% lead.

18. TECHNICAL SPECIFICATIONS
| Internet radio | |
| Chip set | Frontier silicon chip setapprox. 25,000 Internet radio stations availableMP3 (bit rate up to 320 Kbits/s, sampling rate up to 48 KHz) |
| Audio codecs | AAC/AAC+ (bit rate up to 320 Kbits/s, sampling rate up to 48 KHz)WMA (bit rate up to 320 Kbits/s, sampling rate up to 48 KHz)UPnP/ DLNA compatibleIEEE 802.11b/gWPA/WPA2/WEP (64/128 bit key) |
| WiFi | |
| DAB/DAB+/FM | |
| DAB | |
| DAB+ | |
| FM | |
| Decoding | DAB Band III 174 MHz- 240 MHz |
| Reception range | FM 74 MHz - 108.1 Mhz |
| Network | |
| Communication interfaces | WiFi IEEE 802.11b/g/n wireless;Bluetooth (BT V5.0, Supports A2DP, AVRCP profiles) |
| Frequencies | WIFI: 2.400 ~ 2.4835 GHz |
| WIFI / Bluetooth | Bluetooth 2.4GHz - 2.48 GHz |
| Transmission power | WiFi: <20dBm;Bluetooth Max. 8dBm |
| WIFI | WEP, WPA, WPA2 (PSK), WPS |
| Encryption | |
| Connections | |
| Front | USB socket (USB 2.0) Max. 1 A charging current3.5mm jack headphone jack |
| Back | 1 x Analog audio output RCA L+R + subwoofer1 x Coaxial digital electrical audio output1 x Optical digital audio output2 x Coaxial digital electrical audio input2 x Optical digital audio input#1 x LAN socket 10/100 Mbps (RJ45)1 x DC input for power supply (5.5 mm)1 x Speaker output stereo R/L1 x antennas |
| Power supply | |
| Primary | 100-240 V AC 50 /60 Hz |
| Secondary | 21.0 V DC 2.1 A |
| output | |
| power | |
| Power adapter max. | 44.1 W |
| Power adapter Manufacturer | Dongguan Guanjin Electronics Technology Co.,LtdBlock 16 Qiantou New Industrial Park, Niushan, Dongcheng District,523128 Dongguan City, Guangdong Province, PRC |
| Power adapter model number | K48V210210G |
18. TECHNICAL SPECIFICATIONS
| Current consumption | |
| Operation Standby | Max. 40 Watts< 1 Watt |
| Size and weight | |
| Dimensions Wx-HxD Weight | 430mm x 80mm x 355mm3.9 kg |
| Remote control battery | |
| Type AAA | |
19. SERVICE AND SUPPORT
Dear customer,
Thank you for choosing a product from our company. Our product meets the legal requirements and has been manufactured under constant quality control. The technical data correspond to the current status at the time of printing. Changes are reserved.
The warranty period for the DABMAN i550 CD corresponds to the legal regulations at the time of purchase.
We also offer a HOTLINE telephone service with professional support.
Professional specialists are ready to offer their assistance in our service area. Here you can ask any questions you may have about IMPERIAL products and get suggestions on troubleshooting.
Our technical staff is available to answer you questions from Mondays - Fridays from 08:00 - 16:45 under the following phone number:
02676 / 95 20 101
or at the email address: service@telestar.de
If the Service Hotline is unable to assist you, please send your DABMAN i300 CD to the following address, preferably in its
original packaging but packed for safe transport:
TELESTAR - DIGITAL GmbH
Service Center
Your device is labelled with the CE mark and complies with all required EU standards.
TELESTAR DIGITAL GmbH hereby declares that the device DABMAN i550 CD
complies with the basic and
other relevant provisions
of RoHS Directive 2011/65/EU, RE Directive 2014/53/EU as well as the
ErP Directive 2009/125/EC.
The declaration of conformity for this product is available at:
An access point is a network component to which
the WIFI clients (terminal devices) connect in order to exchange data with the Internet or other clients. It is identified by means of the SSID. The DABMAN can connect to an AP to receive data from various other computers in the local network or audio streams from the internet.
DHCP
An abbreviation that stands for Dynamic Host Configuration Protocol and enables
the dynamic assignment of IP addresses and configuration parameters of a computer using a suitable server. DHCP enables the integration of an additional network component without configuration. The configuration assistant of the DABMAN enables DHCP so that no further configuration parameters are required.
IEEE 802.11 b/g
Describes the industry standard for wireless networks.
The Institute of Electrical and Electronics Engineers is the publisher. Within this context, b denotes a maximum data transfer rate of 11 Mbit/s and g 54 Mbit/s. Our DABMAN supports these two standards. IP (IP address) — (Internet Protocol)
refers to a transmission protocol commonly used in computer networks.
Each client receives an IP address (like a house number) which occurs as a sequence of four pairs of numbers separated by a period (e.g. 127.80.1.34).
This assignment is done automatically with DHCP. If the DABMAN is not configured via DHCP, the IP address can be entered manually.
LAN
A LAN (Local Area Network) is a computer network in a limited area (usually a cable-based network).
MAC address
(Media Access Control Address) is the hardware address of each network component that is used for unique identification. It is fixed and cannot be changed.
Since the DABMAN is a network component, it also has a fixed MAC address. This can be found on the underside of the device.
Router
A router is a connection computer that ensures that data packages sent within a network are forwarded to the correct target computer [client]. A router often links different networks with each other, for example WIFI and LAN. The DABMAN is also such a client that receives its data packages in this way.
21. GLOSSARY
SSID (ESSID)
Service Set Identifier (SSID) or Network Name is a radio
network identifier based on IEEE 802.11. Each wireless LAN has a configurable SSID or ESSID (Extended Service Set Identifier) to uniquely identify the wireless network. Hence it represents the network's name.
The radio automatically detects all found networks, but also offers the option to enter an SSID manually.
UPnP
This abbreviation stands for Universal Plug and Play and is based on a number
of standardised network protocols. It is used for the manufacturer-independent control of devices (stereo system, printer, router, house systems) via an IP-based network. The radio is a UPnP device that can receive data by means of the appropriate software.
WEP encryption
(Wired-Equivalent-Privacy) describes an encryption standard
for WIFIs. Of course, DABMAN WEP can also receive and interpret WEP-encrypted data.
WPA encryption
Like WEP, WPA is a standard for encryption and
authentication. WPA was developed to address the basic weaknesses of WEP encryption. WPA can therefore be regarded as the safe successor to WEP.
WPS WIFI Protected Setup is a standard for a simple and secure way of connecting in a wireless network.
WIFI
Certificate for WIFI products that comply with IEEE802.11 standards and are compatible with other products. The radio also meets the technical standards of the WIFI consortium.
WLAN
Also known as Wireless LAN or Wireless Local Area Network, it is a wireless local area network used to transmit data.
All technical data and functions described in these operating instructions are correct at the time of printing
and are subject to change without prior notice.
We assume no liability for misprints or errors.
Copying and reproduction only permitted with the express permission of TELESTAR-DIGITAL GmbH.
As of: December 2020
imperial®
DABMAN i550 CD
INDICATIONS RELATIVES AUX MARQUES 167
STOCKAGE 167
9.
10.
11.
12.
13.
14.
15.
16.
TABLE DES MATIÈRES
17.
ÉLIMINATION
DONNÉES TECHNIQUES....169
19.
SERVICE ET ASSISTANCE....170
20.
MARQUAGE CE 171
21.
GLOSSAIRE 172
2. CONSIGNES DE SÉCURITÉ
2.1. Explication des signes

DANGER!
TELESTAR Service Center,
Am Weiher 14,
56766 Ulmen
Courriel : service@telestar.de
Appareil radio DABMAN i550 CD
text_image
Diagram showing audio connection setup with speaker, audio jack, and amplifier components connected to a display unit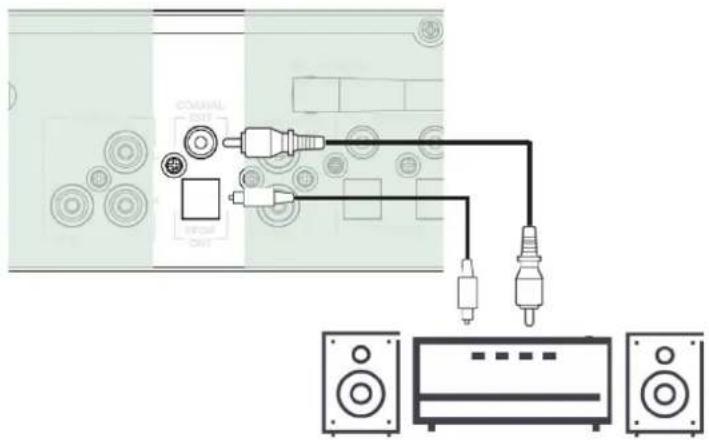
text_image
Diagram showing audio connection setup with audio jack, amplifier, and speaker components1. LINE OUT
text_image
Diagram showing audio equipment connections between a monitor, audio amplifiers, and speakers with labeled components.4. COAXIAL IN/SPDIF IN
natural_image
Diagram of two speakers connected to a central speaker block (no text or symbols visible)6. SPEAKER
text_image
Grid of app icons including Deezer, qobuz, music, and FM with logos and namesInternet Radio Radio Internet

Tidal
Services de
streaming


Lecteur

Radio DAB+ Radio FM

text_image
Mobile app icons displaying various functions like Bluetooth, Camera 2.4, and Open of WebUTC +00:00: Dublin, Lon..*
UTC +00:30:
UTC +01:00: Madrid, Amst
UTC +01:30:
UTC +02:00: Athen, Kairo
text_image
SSID [WPS]Smarthometext_image
Internet Radio deezer qobuz music FM GAS Radio BIS Radiotext_image
SSID [WPS]Smarthome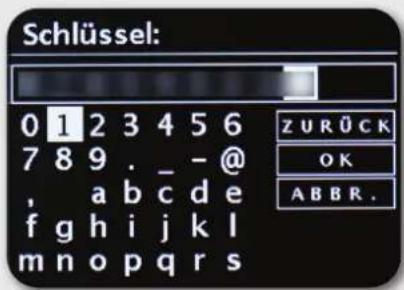
text_image
Schlüssel: 0 1 2 3 4 5 6 7 8 9 . _ -@ , a b c d e f g h i j k l m n o p q r s Z U R Ü C K O K A B B R .
text_image
Verbundentext_image
Sleeptimer 1 5 M I Ntext_image
Sprache German Italian Norwegian Polish PortugueseNapster, Deezer, Qobuz, Tidal, Amazon Music, SPOTIFY
text_image
Internet Radio doozer qobuz music Music Power 340 Radio FM Hot Radio Napster13. FONCTIONNEMENT AVEC APPLICATION
16. INDICATIONS RELATIVES AUX MARQUES
8.14 CD Player....214
TELESTAR Service Center,
Am Weiher 14,
56766 Ulmen
E-mail: service@telestar.de
Radio DABMAN i550 CD
text_image
Diagram showing audio connection setup with speaker, audio jack, and audio device connections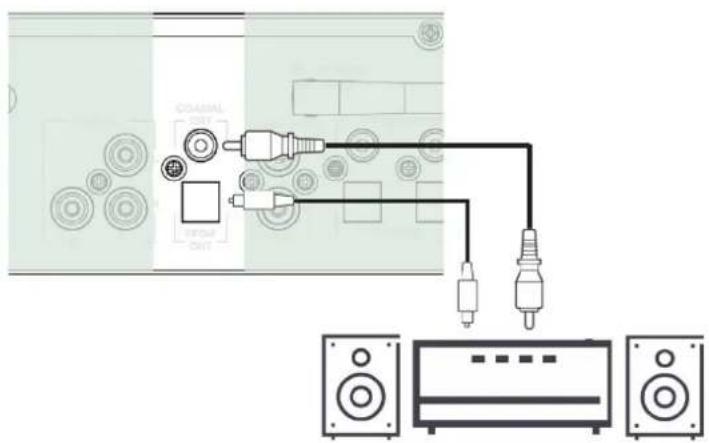
text_image
Diagram showing audio connection setup with speaker, audio jack, and audio device connections1. LINE OUT
text_image
ad es. player CD, player DVD3. LINE IN
text_image
Diagram showing audio equipment connections with speakers, amplifiers, and a monitor displaying a video interface.4. COAXIAL IN / SPDIF IN
natural_image
Diagram of two speakers connected to a central speaker block (no text or symbols visible)6. SPEAKER
text_image
Screenshot of a mobile app interface displaying various music and audio service icons with labels.Internet radio

text_image
Mobile app icons displaying various device categories including Bluetooth, Camera 24, and Smart TV

UTC +00:00: Dublin, Lon..*
UTC +00:30:
UTC +01:00: Madrid, Amst
UTC +01:30:
UTC +02:00: Athen, Kairo
text_image
SSID [WPS]Smarthometext_image
Internet Radio deozer qobuz music FM GUI Radiotext_image
SSID [WPS]Smarthome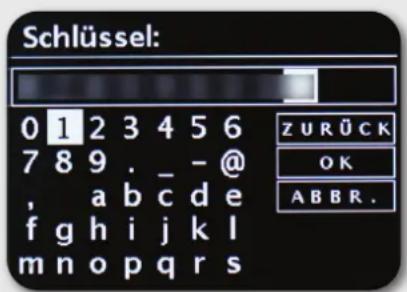
text_image
Schlüssel: 0 1 2 3 4 5 6 7 8 9 . _ -@ , a b c d e f g h i j k l m n o p q r s Z U R Ü C K O K A B B R.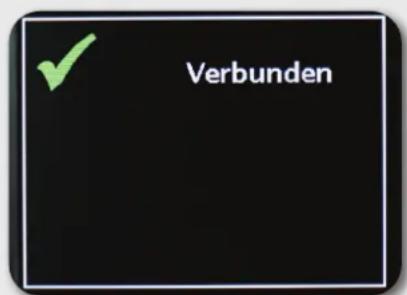
text_image
Verbundentext_image
Sleeptimer 1 5 MIN*.AAC, *.DLF, *.M3U e *.PLS o *.WMA.
text_image
Sprache German Italian Norwegian Polish PortugueseNapster, Deezer, Qobuz, Tidal, Amazon Music, SPOTIFY
text_image
Internet Radio deezer qobuz music Multi-Player S45 Radio FM Hi Radio NapsterFOUTOPLOSSING....282
OPSLAG....283
MERKENRECHT 283
9.
10.
11.
12.
13.
14.
15.
16.
INHOUDSOPGAVE
17.
WEGGOOIEN
TELESTAR Service Center,
Am Weiher 14,
56766 Ulmen
e-mail: service@telestar.de
Radio-apparaat DABMAN i550 CD
Afstandsbediening inclusief 2 x AAA-batterijen
Externe netstekker
W-LAN-antenne
Bluetooth-antenne
FM/DAB-antenne
natural_image
Diagram showing audio connection setup with speakers, audio/video equipment, and a monitor (no text or labels)1. LINE OUT
text_image
Diagram showing audio connection setup with speaker, audio jack, and audio device connections2. COAXIAL OUT/SPDIF OUT
text_image
Diagram showing audio equipment connections between a monitor, audio amplifiers, and speakers with labeled components.
natural_image
Top-down architectural floor plan showing room layouts and circular elements (no text or labels)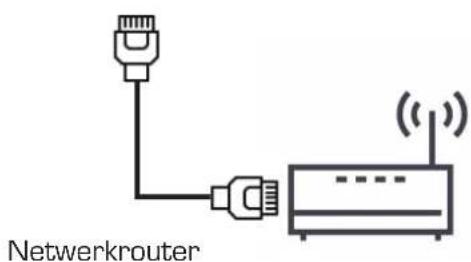
text_image
Netwerkrouter4. COAXIAL IN/SPDIF IN
natural_image
Diagram of two speakers connected to a central speaker block with four circular components (no text or symbols)6. LUIDSPREKER
text_image
Internet Radio deezer qobuz music Multi-Pane Crip Radio FM Del AudioInternet Radio
Internetradio
Napster
eamingdienst
deezer
deezer
Streamingdienst
qobuz
qobuz
eamingdienst
TIDAL Streamingdienst
music
AMAZON
earningdienst
SPOTIFY Streamingdienst
Music Player
luziekspeler
FM Radio
Radio DAB+ FM-radio
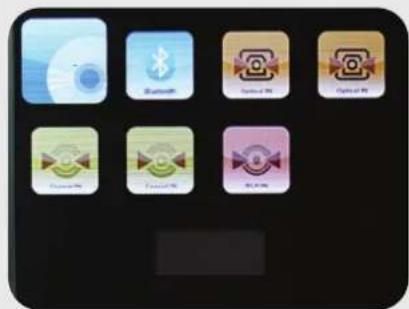
text_image
Mobile app icons including CD, Bluetooth, SoundCloud, and others with corresponding labels


Coaxiale ingang 1
Coaxiale ingang 2
Analoge cinch-tingang
5. BELANGRIJKSTE FUNCTIES
5.3 Menu bediening
UTC +00:00: Dublin, Lon..*
UTC +00:30:
UTC +01:00: Madrid, Amst
UTC +01:30:
UTC +02:00: Athen, Kairo
text_image
SSID [WPS]Smarthometext_image
Internet Radio deozer qobuz music FM FM Radiotext_image
SSID [WPS]Smarthome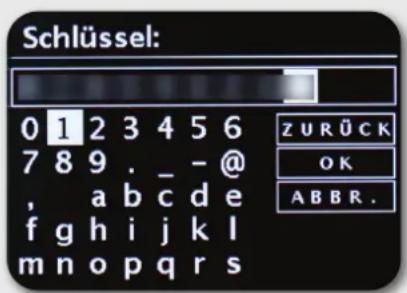
text_image
Schlüssel: 0 1 2 3 4 5 6 7 8 9 . _ - @ , a b c d e f g h i j k l m n o p q r s Z U R Ü C K O K A B B R .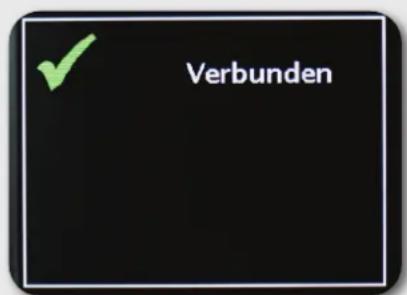
text_image
Verbundentext_image
Sleeptimer 15 MINtext_image
Sprache German Italian Norwegian Polish PortugueseNapster, Deezer, Qobuz, Tidal, Amazon Music, SPOTIFY
text_image
Internet Radio deezer qobuz music Multi-Play S45 Radio FM Hi Radio Napsterof via mail op: service@telestar.de