
Trolleysprayer - Sprayer Eurom - Free user manual and instructions
Find the device manual for free Trolleysprayer Eurom in PDF.
| Product type | Cart sprayer |
| Brand | Eurom |
| Model | Trolleysprayer |
| Dimensions (L x W x H) | 44.5 x 30 x 93 cm |
| Net weight | 3.8 kg |
| Tank capacity | 16 litres |
| Maximum working pressure | 3 bar |
| Water consumption (at 2 bar) | 0.35 l/min |
| Hose length | 2.5 m |
| Operation | Manual (hand pump) |
| Included nozzles | Flat jet, misting, double misting, adjustable four-hole, spray shield |
| Recommended use | Weed treatment, pests, sanitary facilities, stables |
| Daily professional use | Not recommended |
| Maximum liquid temperature | 45 °C |
| Chemical resistance | Acids, alkalis, corrosion (except vinegar) |
| Maintenance after use | Drain, rinse with clean water, dry |
| Storage | Indoors, empty, clean, dry, protected from frost and sunlight |
| Safety instructions | Wear PPE, do not spray against the wind, do not open under pressure, etc. |
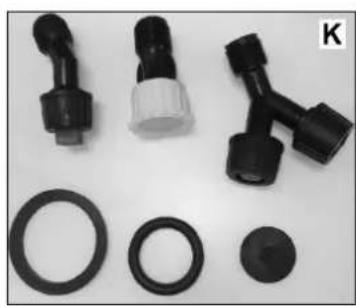
| Spare parts supplied | Seals and replacement rings |
| Accessories | Filling funnel, carrying strap |
| Pump locking system | Handle rotation |
Frequently Asked Questions - Trolleysprayer Eurom
User questions about Trolleysprayer Eurom
0 question about this device. Answer the ones you know or ask your own.
Ask a new question about this device
Download the instructions for your Sprayer in PDF format for free! Find your manual Trolleysprayer - Eurom and take your electronic device back in hand. On this page are published all the documents necessary for the use of your device. Trolleysprayer by Eurom.
USER MANUAL Trolleysprayer Eurom
Thank you very much for choosing for a EUROM device. You have made a good choice! We hope you will be satisfied about its functioning.
To get maximum profit from your product, it is important to read this manual attentive and totally before use, and to understand what is written. Read especially the safety instructions: they are there to protect you and your environment.
Keep the manual in a safe place for future reference. Store also the package: that is the best protection for your product in times of no-use. And if you at any time pass the appliance on, pass on the manual and package too.
We wish you a lot of fun with the Trolleysprayer!
Eurom
Kokosstraat 20
8281 JC Genemuiden (NL)
info@eurom.nl
www.eurom.nl
This manual has been complied with the utmost care. Nevertheless, we reserve the right to optimize this manual at any time and to adjust it technically. The image used may differ.
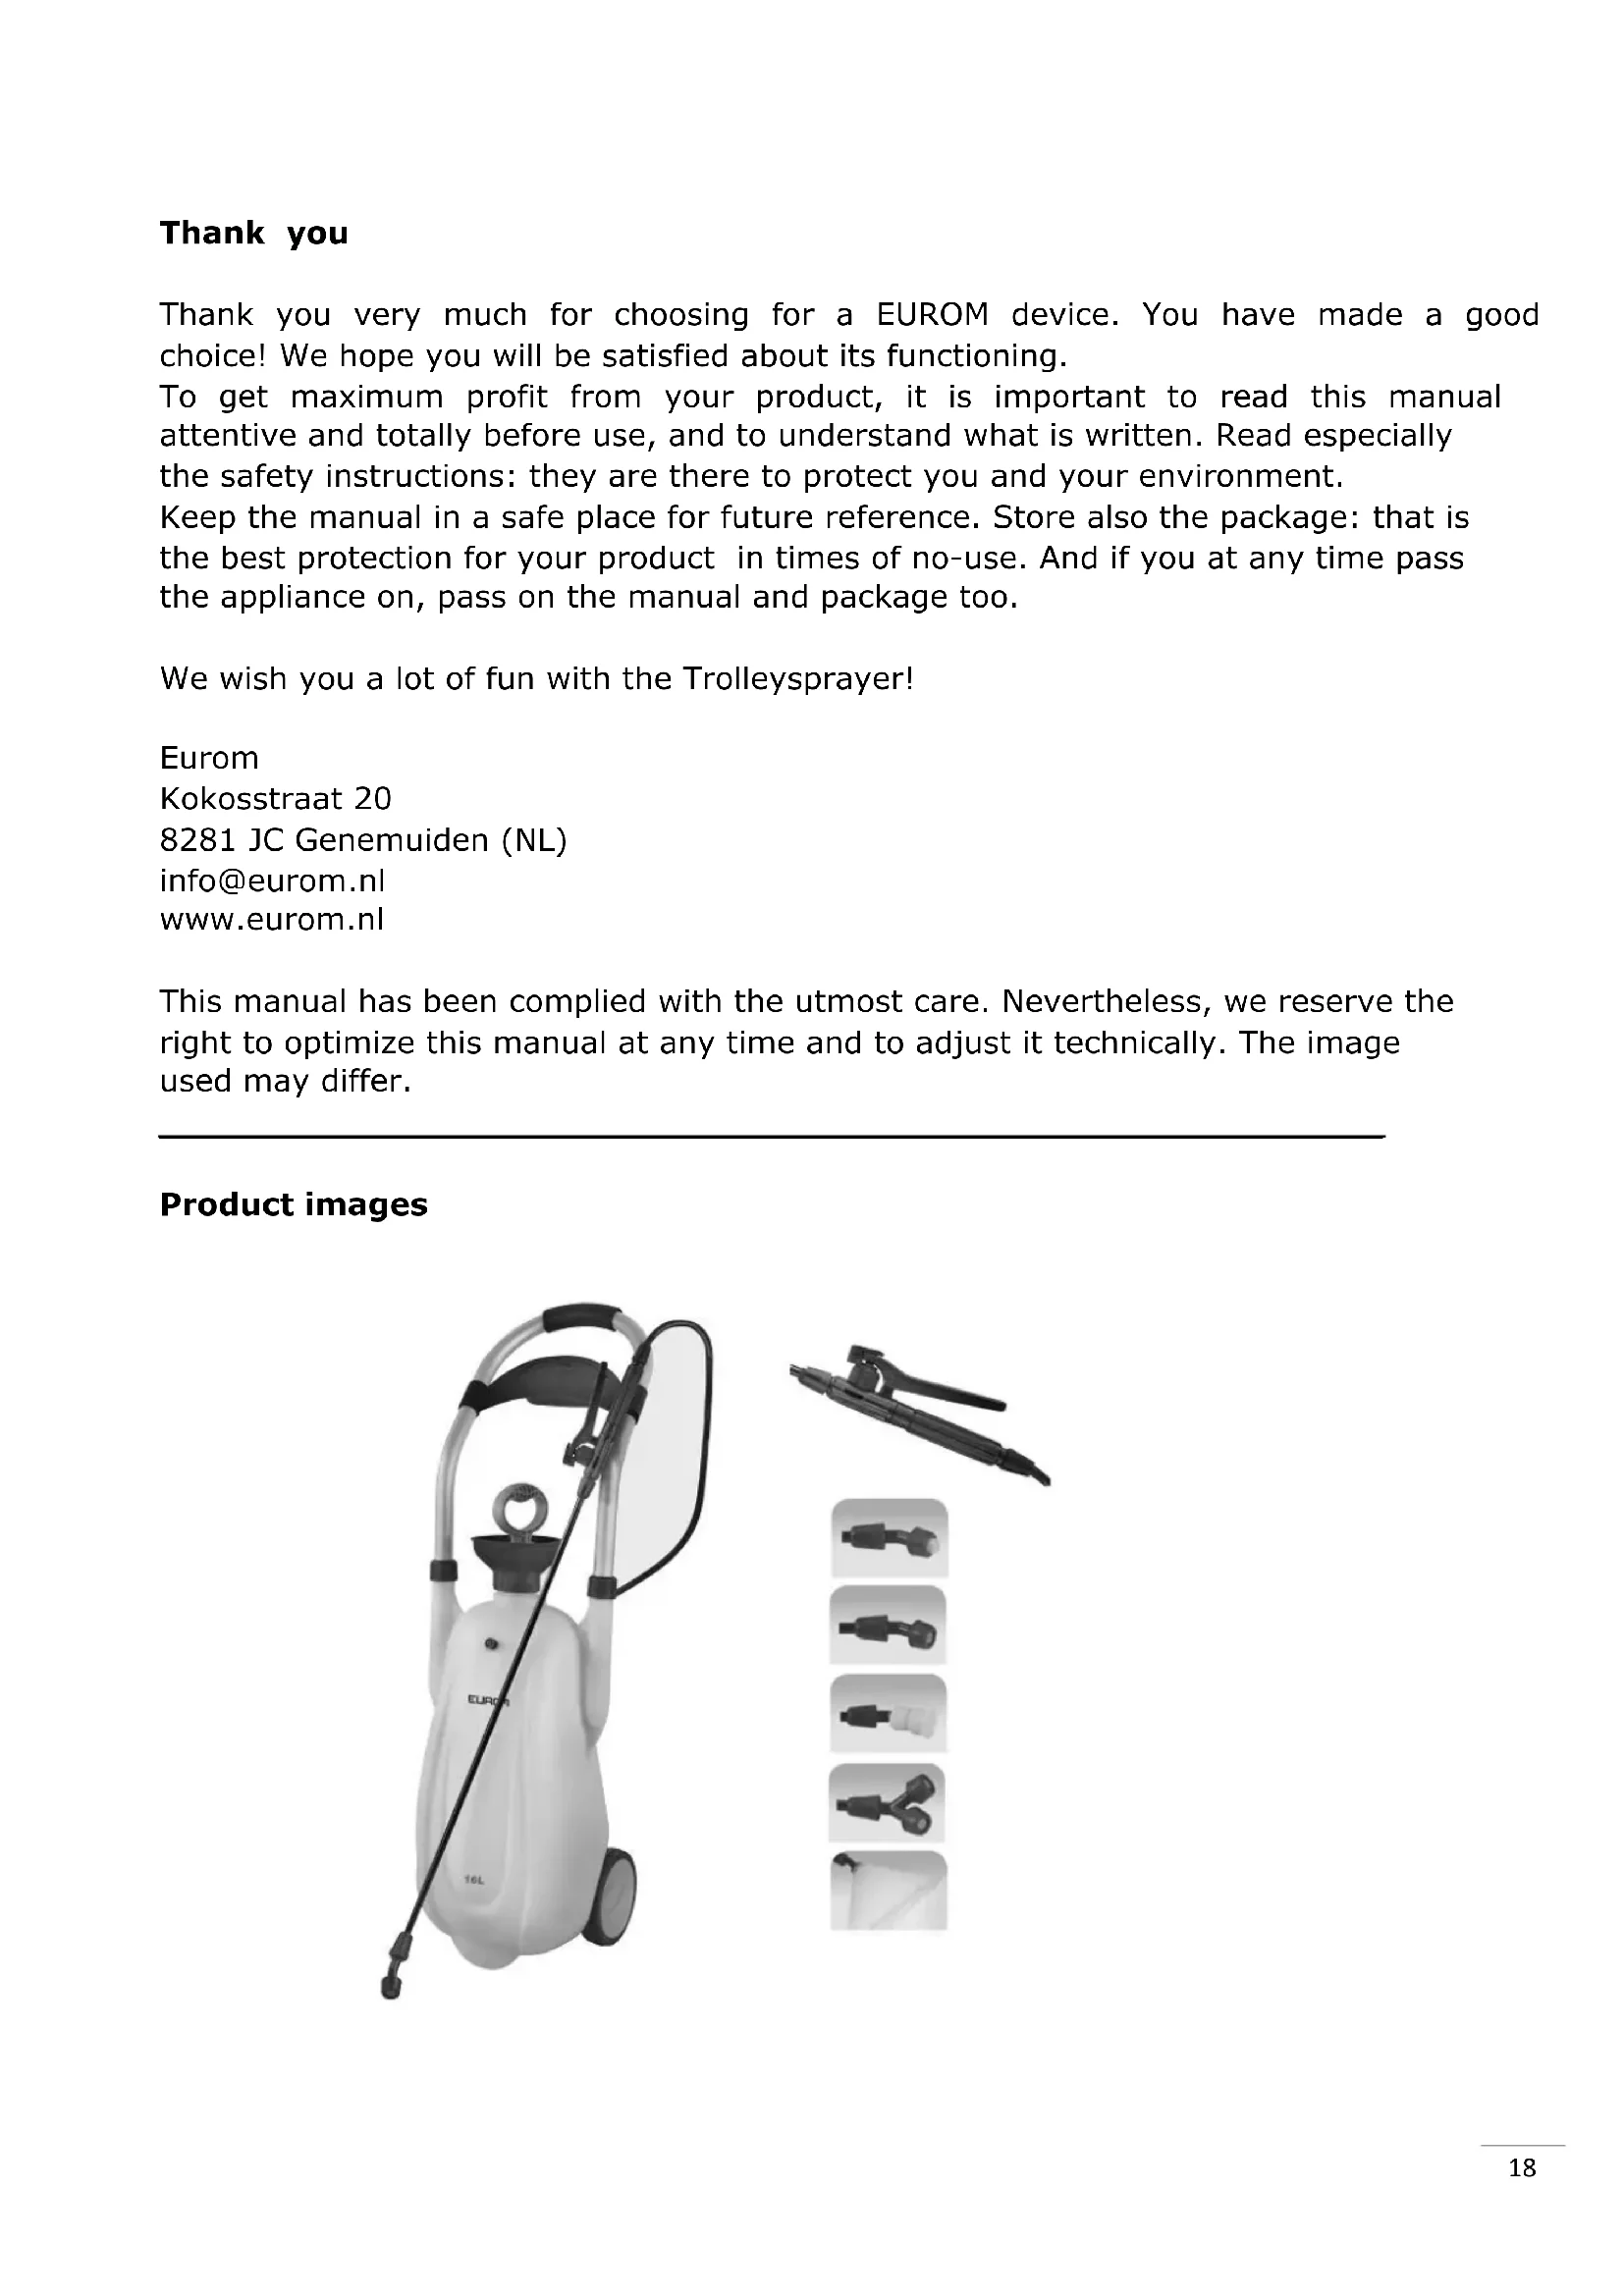
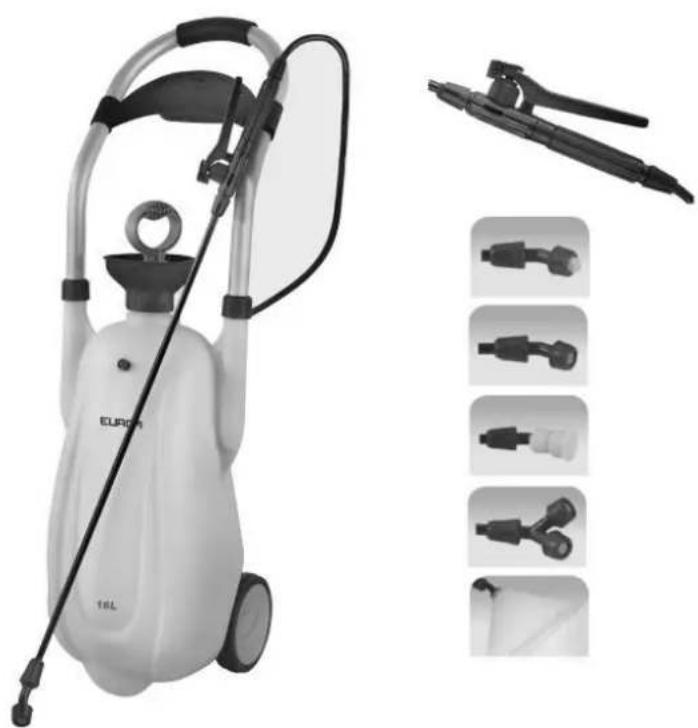
Product images
Introduction
The EUROM trolleys prayer is a safe and efficient sprayer-on-wheels which means you don't have to lug the weight around yourself. The trolley sprayer is designed for spraying (thinned) weed-killers, pesticides and similar and carrying out preventative treatments on sanitary areas, stables etc. It is also perfectly suitable for household use. Daily, professional use is not recommended.
Technical data
| Operating pressure | Maximum 3 bar |
| Tank capacity | 16 litres |
| Water consumption | 0,35 l/min (2 bar) |
| Hose length | 2,5 m |
| Dimensions | 44,5 x 30 x 93 cm |
| Net weight | 3,8 kg |
Warnings
- Before each use, check the device for damage, leakage, etc. First, spray once with clean water.
- This device is not suitable for spraying flammable materials. These materials can cause explosions, fire or damage to the device!
- Do not leave the device filled (whether or not pressurised) without supervision.
- Release the pressure if you take a break during the work activities. Leaving the device too long without operating it can cause damage!
- When spraying pesticides, the user must wear protective clothing, a mask and gloves to prevent pesticides from coming into contact with the skin and causing injury.
- Never spray pesticides against the direction of the wind! Never spray pesticides towards people, animals or food items. Always closely follow the safety regulations related to the agent that you are spraying.
- Do not work for a long time at high ambient temperatures.
- It is strictly forbidden to spray toxic agents on food items!
- The device does not tolerate hot liquids (maximum 45^ ) and no (cleaning)vinegar.
- Do not open the device as long as it is pressurised!
- Stop using the device immediately, if you observe damage or wear & tear to the container or hose or if the device leaks.
- After use, you should release the pressure, clean the device and flush it with clean water to prevent aggressive contents from
impairing the device or blocking the nozzle. This way, you also prevent residual materials from getting mixed with new and/or other contents, which may cause a chemical reaction that impacts the operation or damages the crops. Dry the device before storing it.
- Keep the device (and the agents that you spray, of course) out of reach of children!
- Follow the instructions of the manufacturer when using or storing pesticides. Deviating from these instructions can result in serious consequences for people, animals and plants!
- Residual chemicals may never wind up in the environment. Collect them in a tank and drop them at a collection point. Never pour and mix different agents!
-
If by accident you
-
inhale the hazardous agents: leave the hazardous area, look for a well-ventilated room and consult a doctor (taking the packaging along).
- come into contact with the hazardous agents: rinse with plenty of water immediately.
-
swallow the hazardous agents: try to vomit using clean or salty water and go as soon as possible to a hospital (taking the packaging along).
-
People, who are tired, have poor health, are injured, are allergic to pesticides, have consumed alcohol or drugs or are pregnant, may not come into contact with pesticides. Do not drink alcohol immediately after spraying pesticides.
- Never use to strong hazardous agents on food items and make sure that the period between spraying and harvesting is sufficiently long.
- After working with pesticides, you should change clothing and wash yourself and the clothing thoroughly.
- If the device is not used for a long period or if it is used almost continuously for several days, grease the sealing rings and the moving parts with some Vaseline to reduce the wear & tear and to ease the operation of the device.
- After use, the device should be stored in a dry place inside a building.
Note:
> a lot of liquid in the tank > pump less > shorter working time
a little liquid in the tank > pump more > longer working time
Description
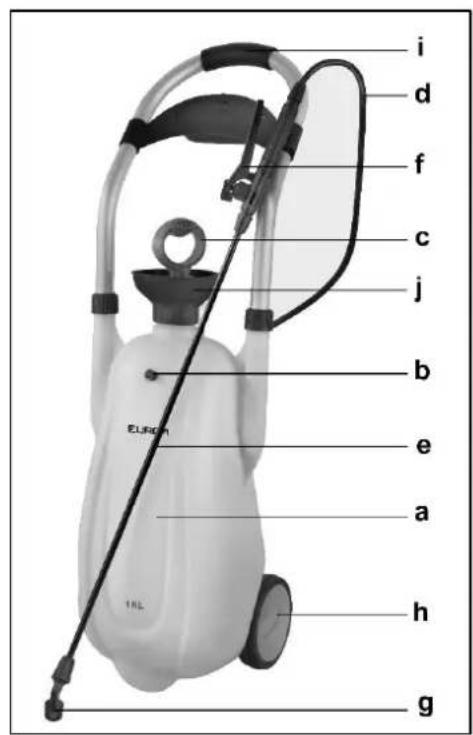
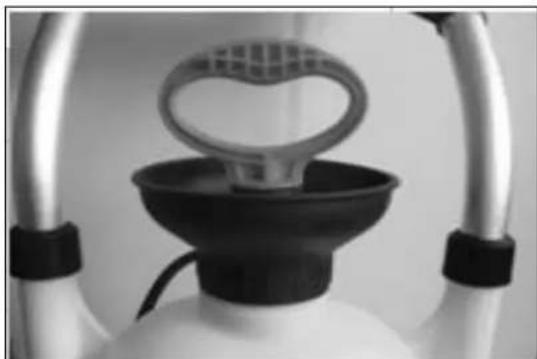
a. Liquid container (16 l)
b. Safety valve
c. Pump with pump handle
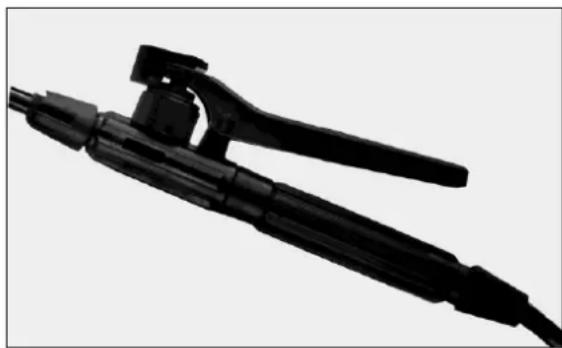
d. Hose (2,5 m)
e. Spraying tube
f. Handle with fixing system
g. Nozzle
h. 2 Transport wheels
i. Push handle with storage space
j. Filling funnel
k. Operating rings and rubbers
The materials used in the device are acid, alkaline and corrosion resistant. The device is not suitable for use with (cleaning) vinegar. The device closes hermetically and is very durable.
You can attach various nozzles to the lance for different tasks to obtain a very fine spray or a sprinkler effect, for example (see: Operating procedure).
The spray cap can be attached on the flat jet nozzle to prevent atomizing pesticides, etc.
Operating instruction
Remove all the packaging material and keep it away from children. check that all he parts are present. Screw the lance onto the operating handle. Select a nozzle that is suitable for the job at hand. The device is supplied including four different nozzles:
- Flat jet nozzle
- Single atomization nozzle
- Double atomization nozzle
- 4-holes nozzle
A spray cap is also included.
| Flat jet nozzle: Sprays uniformly and is suitable for spraying low-growing, short and creeping crops and for spraying pesticides. Hold the jet lance steady and spray in the same direction as the wind is blowing. You can use the spray cap with this nozzle. | |
| Single atomization nozzle and double atomization nozzle: Are suitable for spraying pesticides (against diseases) and insect repellents. Spray in the same direction as the wind is blowing! | |
| 4-holes nozzle (adjustable): Is suitable for spraying high-growing climbing crops, fruit trees, etc. Monitor that the liquid continues to come out of the nozzle uniformly! By rotating the nozzle, you can adjust the jet from a straight jet to a spray mode. | |
| Spray cap: It is intended only for use on the flat jet nozzle and it prevents spray-drifting of the liquid. The spray cap simply slides over the nozzle. Pay attention that the slot of the flat jet nozzle is aligned with the wide outlet of the spray cap! |
Filling:
- Open the tank by firmly unscrewing the filler cap (including the pump) anticlockwise off the tank (with the spray gun in the locked position).
Note: the funnel can be found in the cap, it must stay in place!
- Now fill the tank with the required liquid (following manufacturer's instructions!) and screw the filling cap with pump back into place. When the pump is replaced, the liquid
must remain under the safety level. If there is too much liquid the pump will be unable to build up pressure.
Pressurising:
- Unlock the pump by turning the handle 45^ in an anti-clockwise direction.
- Now pressurise the liquid by pulling the pump handle upwards as far as it will go and then pushing back down. Repeat this about 25 times in order to obtain sufficient pressures. Lock the pump by rotating the handle 45^ clockwise. The device is now ready for use. If too much pressure has been built up, the air will
escape via the safety valve.
Spraying:
- Spraying will begin when you depress the lever on the handle and liquid will be released via the nozzle.
- The spray gun can be locked by sliding the red slide on the spray gun backwards so that you can spray continuously.
After use:
Release the remaining pressure after each use by pulling on the safety ventilator. Ensure the trolley sprayer is upright when doing so!
- Carefully remove the filling cap (pump locked!) but be aware that residual air may need to be released slowly.
- Remove any remaining liquid and rinse the tank, tube and hose with clean water. Note the instructions in relation to the liquid! Leave the tank to dry.
- Ensure the trolley sprayer is always empty, clean and dry before storing indoors. Ensure that it is not exposed to direct sunlight or frost.
Trouble shooting
If the equipment fails to work correctly, make sure the nozzle and the internal parts of the handle are clean and that the membrane (underneath the pump section) is not stuck.
