
Smile - Camera KODAK - Free user manual and instructions
Find the device manual for free Smile KODAK in PDF.
| Product type | Instant print digital camera |
| Brand | Kodak |
| Model | Smile |
| Dimensions (W x D x H) | 12.35 cm x 8 cm x 2.5 cm |
| Weight | 204 g |
| Available colors | Black/White, White/Yellow, Blue, Green, Red |
| Battery type | Lithium polymer (700 mAh) |
| Battery life (photos per charge) | Approximately 40 photos |
| Compatible paper type | KODAK ZINK 2" x 3" adhesive photo paper |
| Compatible memory cards | MicroSD™ up to 256 GB |
| Image resolution | Equivalent 10 megapixels |
| Main functions | Gallery, Filters, Frames, Photobooth, Built-in flash, Self-timer, Auto print |
| Maintenance and cleaning | Clean with a soft dry cloth. Do not use alcohol, gasoline or organic solvents. Avoid exposure to dust, humidity and extreme temperatures. |
| Safety | Do not disassemble, do not expose to water or liquids, do not use with wet hands. Risk of epileptic seizure due to flashing LEDs. |
| Spare parts and repairability | Contact customer support for repair or replacement under the one-year limited warranty. Unauthorized repair voids the warranty. |
| Box contents | Camera, charging cable, ZINK paper starter kit, user manual |
Frequently Asked Questions - Smile KODAK
User questions about Smile KODAK
0 question about this device. Answer the ones you know or ask your own.
Ask a new question about this device
Download the instructions for your Camera in PDF format for free! Find your manual Smile - KODAK and take your electronic device back in hand. On this page are published all the documents necessary for the use of your device. Smile by KODAK.
USER MANUAL Smile KODAK
Thank you for purchasing the KODAK SMILE Instant Print Digital Camera. This User Guide is intended to provide you with guidelines to ensure that operation of this product is safe and does not pose risk to the user. Any use that does not conform to the guidelines described in this User Guide may void the limited warranty.
Please read all directions before using the product and retain this guide for reference. This product is intended for household use only. It is not intended for commercial use. This product is covered by a limited one-year warranty. Coverage is subject to limits and exclusions. See warranty for details.
SPECIFICATIONS
- Dimensions: 4.875" L x 3.125" W x 0.938" H (12.35 x 8 x 2.5 cm)
• Weight: 7.2 oz (204 g) -
Colors Available: Black/White, White/Yellow, Blue, Green, Red
• Supported Storage: MicroSD™ cards up to 256GB
• Images: 10MP equivalent
• Battery Capacity: 700mAh -
Battery Type: Lithium-polymer
- Prints Per Charge: \~40
• Supported Photo Paper: KODAK ZINK 2" x 3" sticky-back photo paper
BOX CONTENTS
KODAK SMILE Instant Digital Camera Charging Cable
Starter Pack of KODAK ZINK Paper User Guide
SAFETY PRECAUTIONS
- Seizure warning: This device repeatedly utilizes flashing LED lights which may
potentially trigger seizures for people with photosensitive epilepsy and/or other seizure disorders. User discretion is advised.
- Do not attempt to disassemble this device for any reason.
- Never leave your camera or the ZINK® paper in an area that might become extremely hot or where it will be exposed to direct sunlight for a long time. This can cause your camera to overheat or suffer other problems.
- Never handle the camera with damp or wet hands. This could damage the camera or
create the risk of electric shock.
- Do not use products such as alcohol, gasoline, diluent, or any other organic solvent when cleaning or attempting to clean this product.
- Do not use this device in an environment where it will be exposed to heavy dust or humidity/moisture.
- Never drop or shake the camera, as this could cause it to malfunction or permanently damage the inside parts.
- Do not use this camera while bathing or in a shower.
- Do not place or store the camera where it
6 | ENEN | 7
can fall or be pulled into a tub or sink.
- Do not place, drop, or submerge the camera in water or any other liquid.
• Take care that objects do not fall and liquids are not spilled onto the camera.
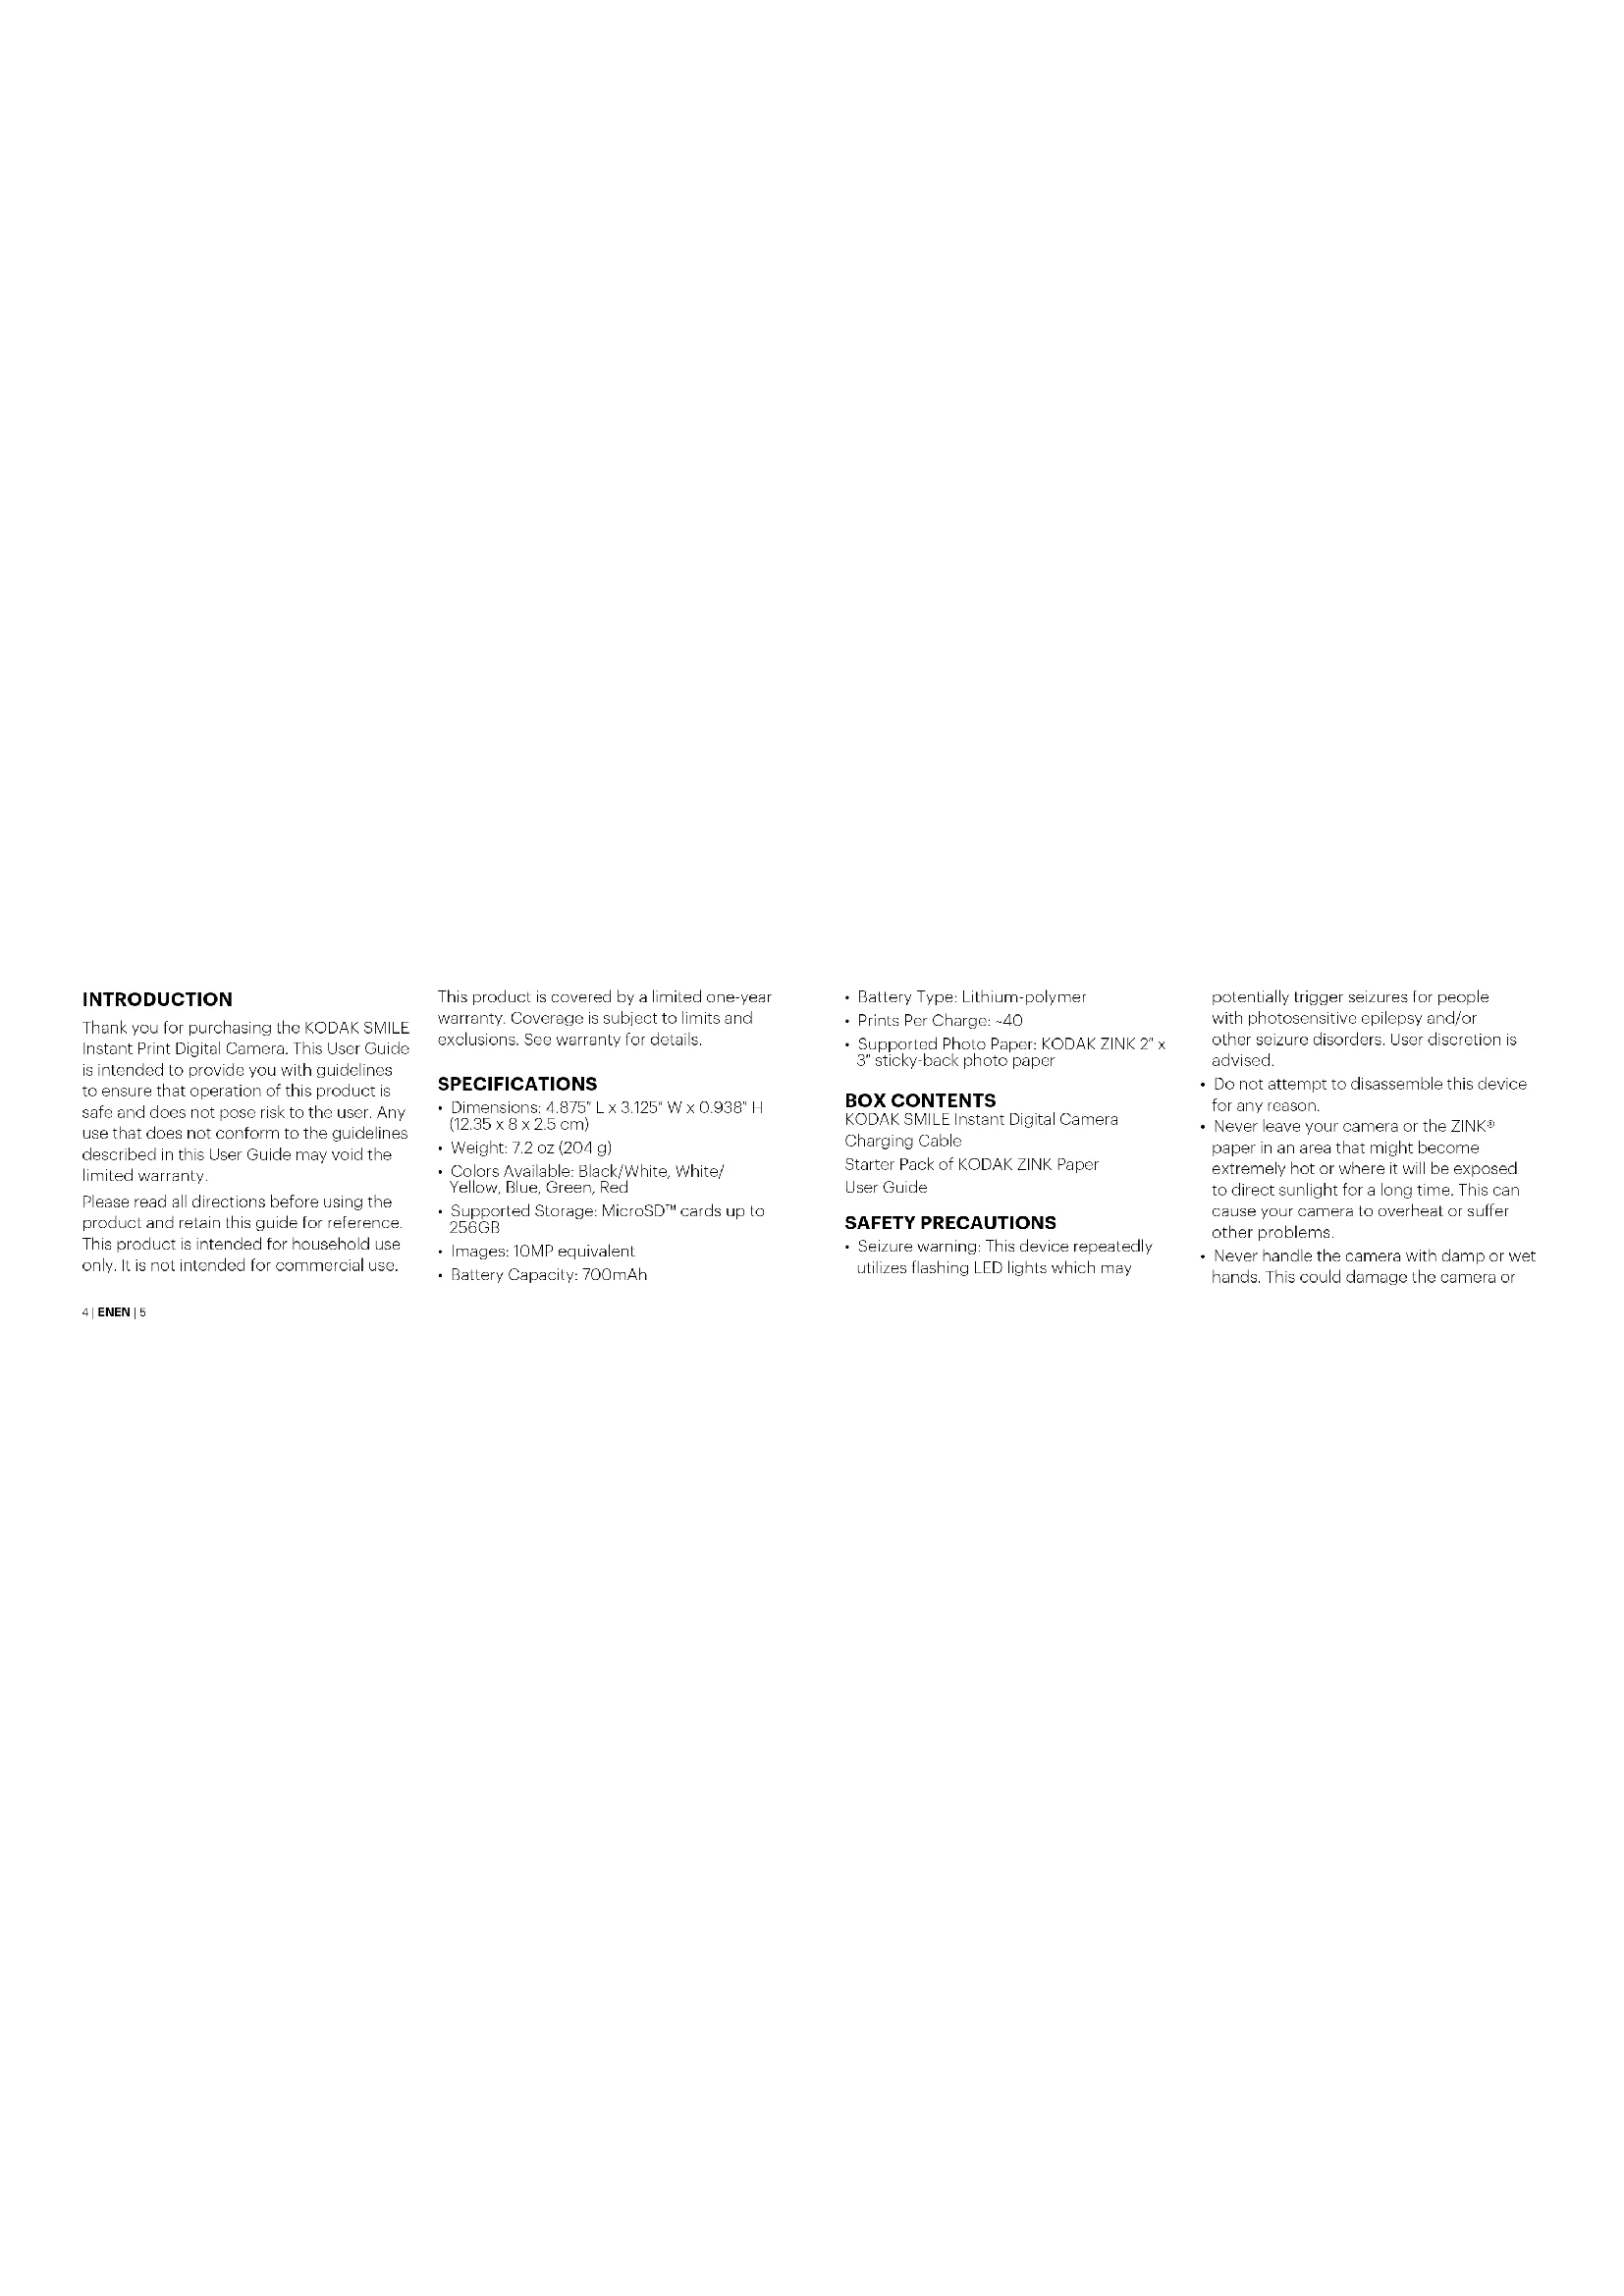
PRODUCT OVERVIEW
8 | ENEN | 9
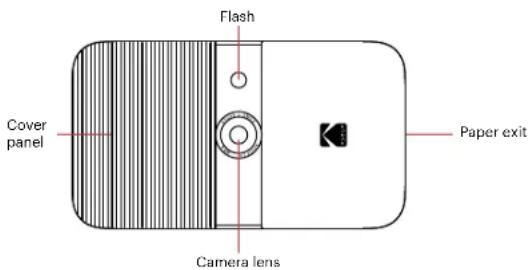
NAVIGATION PANEL OVERVIEW
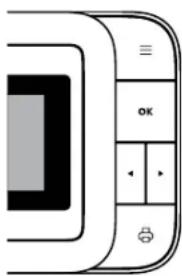
Buttons:
Menu ≡: Pressing this button will take you to the main menu, from which you can access the gallery, filter, border, photobooth, flash, and settings menus. The menu button also works as a back button. Press it from any screen to go back by one screen. Pressing it while on the main menu will return you to the live viewfinder.
OK: Press this button to confirm a choice or take a picture. In certain scenarios, the OK button will also operate as a function button (e.g., right after taking a picture, pressing the OK button will take you to the edit screen).
◀▶: Use these arrow keys to navigate between options in menus,
as well as between photos in the gallery.
Print ⚙️: Press this button while viewing a photo to be taken to the print menu to begin the process of printing your picture.
GETTING READY FOR USE
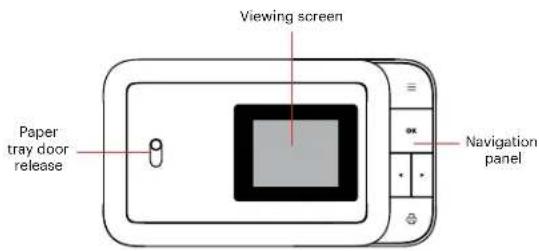
Charge the SMILE
Before using the camera, connect it to the charger by plugging the micro USB cable into the designated micro USB charging port on the bottom and allow it to fully charge. Always use the original charger that was
provided to ensure proper charging. If the red indicator LED light is flashing, this means that the battery is low and you should plug the camera in for it to recharge. While the camera is charging, the indicator LED will be a solid red light. Once the process has completed, the indicator LED will change to a solid green light.
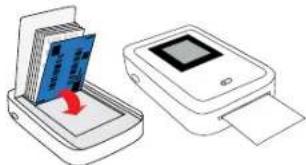
Load the Paper
Load your ZINK® paper into the camera: Follow the steps below to quickly and easily get your new camera loaded with ZINK® sticky-back paper so you can start printing
photos!
- Open the paper tray in the back by pressing down on the latch and pulling it toward you.

- Place the blue calibration sheet in the tray with the barcode facing down. Place the other plain sheets on top, with the glossy side facing you. Try to avoid touching the
12 | ENEN | 13
glossy side to prevent getting fingerprints on the paper.
-
When you print your first photo after loading the ZINK® paper, the blue calibration sheet will be slowly ejected from the printing slot.
-
Your photo will print after the calibration sheet finishes.
natural_image
Illustration of a digital scanner with a blue card being inserted into an open case, showing the printer's screen (no text or symbols present)Note: Only KODAK ZINK paper will work in your KODAK SMILE camera. Other branded papers are not compatible.
Power it On/Off
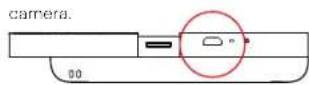
To turn the camera on, slide the ridged panel away from the center. This will expose the navigation panel, camera lens, and flash, and the LCD screen on the back will light up. The camera will also beep a musical tune to let you know it is powered on.
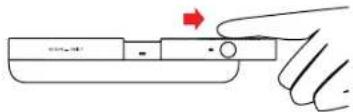
To turn the camera off, simply slide the panel back toward the center.
Insert a MicroSD™ Card
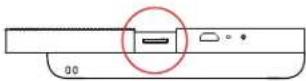
The camera has limited internal memory and can only store three photos at a time; a microSD ^™ card is necessary if you wish to edit and save more than three photos to print out later. The SMILE can perform without a microSD ^™ card, but using one is strongly recommended.
Insert the microSD™ card into the slot at the bottom when the camera lens is exposed, with the metal pins facing the front of the camera.
To remove, press the card in gently with your fingernail, and it should pop out.
The SMILE supports microSD ^™ cards up to 256GB.
NAVIGATING THE MENU
There are six options on the KODAK SMILE Camera menu, which is accessed by pressing the top button on the navigation panel ≡ and using the arrow keys to move between options. This section will review those options and their usage.
GALLERY
Select the Gallery 📄 icon from the main menu to view your photos. From the Gallery
you can edit and print any photos you've previously taken with your SMILE camera, or any existing images already on your microSD™ card.
After selecting Gallery from the main menu, you will need to choose between photos stored in internal memory and the SD card. Make your selection, then use the arrow keys to cycle through the photos you've taken. The pictures will have two options at the bottom: EDIT, and PRINT.
Press the OK button to enter the EDIT menu, which will give you three options: filter 📄.
border ☐, and delete ☑ Select Filter ☐ pick between filter options for your photo. Select Border ☐ to add a white border to your photo, or keep it borderless. Select Delete ☐ and you will be prompted one more time to be certain you want to delete the photo. I hit OK to delete the photo from your SD card.
Hit PRINT at any time to print the photo as is from your gallery. You will be asked to confirm by hitting the OK button before the photo prints out.
NOTE: Without a microSD ^™ card, the camera
can only save the 3 most recent photos that were taken. We highly recommend using a microSD™ card to get the most out of your KODAK SMILE Camera.
FILTER
The Filter 📄 menu offers a variety of filters to choose from that will be applied to your photo. Press the OK button and then use the arrows to navigate through the filters available. The LCD screen will give you a live preview of that filter, press the OK button again to confirm and apply the filter.
BORDERS
The Borders □ menu offers the option to add a border to your photo. Press the OK button to open the Borders menu.
The Borders menu gives you two options to choose from: Off and On.
- Off: a photo with no border. If you choose this option, you'll be taken back to the live viewfinder.
- On: a photo with a border. If you choose this, you'll be taken to the live viewfinder with a solid white border around the image. There will be an icon on the bottom
right side of the status bar in the live viewfinder to indicate your border status as well. The border will stay applied until you manually re-enter the border menu and deactivate it, or until you turn the camera off.
PHOTOBOOTH
The Photobooth menu allows you to print out two photos side-by-side in the same image.
- The live viewfinder will give you guidelines to make sure your image fits within the space allotted, and there will be an
icon on the bottom right side of the status bar in the live viewfinder to indicate both mode status.
- Tap the shutter button once and you'll see guidelines for you to take your first shot on the screen. For the second shot, the other side of the screen will be active, and the first image you captured will be visible on the left side of the image...
- The camera will stay in photobooth mode until you return to the border menu and deactivate it, or until you turn the camera off, so you can take as many photobooth
style shots as you want!
FLASH
Use the arrows to highlight the Flash icon and press the OK button to open the Flash menu.
Use the arrows to cycle through the options: Flash On, Flash Off and Auto Flash.
SETTINGS
The Settings ✿ menu allows you to access and adjust multiple camera settings. The options available in the settings menu are as follows:
TIMER
Select the Timer 🔒 icon from the settings menu to set a timer for your next picture (great for sellies and group shots!) Choose from timer settings of off, three (3) seconds, or ten (10) seconds. When you take a photo with the timer applied, the camera flash will blink once each second as a countdown.
The timer will remain applied until you manually re-enter the timer menu and turn it off, or until you turn the camera off, so take as many timed shots as you want!
VOLUME
Select the Volume 📋 icon from the settings menu to open the volume menu. Use the arrow keys to raise and lower the volume of key presses and the shutter sound when taking a picture.
AUTO-PRINT
Select the Auto-Print icon from the settings menu to turn auto-print on or off. If auto-print is turned on, your pictures will print out immediately after being taken. The option will stay enabled until you disable it from this menu.
LANGUAGE
Select the Language 📋 icon from the settings menu to change the language displayed on your camera. You may choose from English, Spanish, and German language options.
PRODUCT INFO
Select the Product Info 📋 icon from the settings menu to view information about your camera. The firmware version, serial number, and color table version will all be displayed here. You can press the menu button to exit this page and return to the
settings menu.
THE LIVE VIEWFINDER AND STATUS BAR
The main screen of the live viewfinder will show a live feed of the image as it will be captured (including filters or a border) once you press the shutter button. The status bar at the bottom will display various icons as well, depending on the options you have selected and other factors:
- Battery: the battery icon is fixed in the bottom left corner of the status bar, and
displays four bars or less depending on its charge status.
a. White icon with four bars displayed battery is 76-100% charged
b. White icon with three bars displayed Battery is 51-75% charged.
c. White icon with two bars displayed ☐: battery is 26-50% charged.
d. White icon with one bar displayed battery is 6-25% charged.
e. Red blinking icon battery has 5% charge or less remaining Charge
ASAP.
- Flash status:
a. Lightning with an A next to it. A flash set to automatic
b. Lightning by itself : flash turned on for all photos
c. Lightning with a slash through flash turned off for all photos
- microSD ^™ card status:
a. microSD™ card icon is inserted
- Timer status: if the timer icon 🔒 appears
in the status bar, there is a timer applied to your photos, meaning there will be a delay between when you press the shutter and when the photo is captured. The camera flash light will blink in a countdown when the shutter button is pressed.
- Border status:
a. Border icon □ a border has been applied, and should be visible on the live viewfinder.
- Photobooth status:
a. Photobooth icon 12: the camera is in
photobooth mode (two photos side-by-side). Guidelines in the viewfinder will help you line up your photobooth shot.
- Auto Print status:
a. Auto Print icon auto print mode has been activated, and your camera will immediately print an image after capturing it.
- Tray status:
a. Icon with black background
currently loaded in camera
b. Icon with blue background
: paper
paper
loaded with blue calibration sheet ready to print
c. Icon with red background loaded
: no paper
TAKING A PICTURE
-
Power the camera on by sliding the ridged panel away from the center and exposing the navigation panel.
-
Clickthe ≡ button to access the main menu.
-
Use the arrows to go through the main menu options and choose your filters,
flash and general camera settings, and the options for a border, or photobooth mode. Or, choose none of those and just proceed with the default settings.
-
Line up your shot (or shots) in the live viewfinder.
-
When you're ready, press the yellow shutter button to capture your picture, or press the OK button on the navigation panel.
-
After you take the picture, the image you've captured will appear on the screen with two options at the bottom: Edit, and
Print. If you press the OK button to edit, you'll be taken to a screen to add a filter or border to the picture and then have the option to print or delete it. If you press Print, you'll be able to print the photo immediately. If you want to return to the live viewfinder, press the shutter button once, or press the ≡ button.
PRINTING A PICTURE
From Gallery
-
Select Gallery from the main menu and press the OK button.
-
Use the arrows to choose either internal memory or microSD™ card, then press the OK button.
- Use the arrows to find the photo you want to print.
- OPTIONAL: To edit the photo further press the OK button, and then use the arrows to select filter (add a filter), and/or border (add a border).
- Press the print button.
-
Use the arrow keys to increase/decrease the number of copies to print out.
-
Press the OK button to confirm.
- Wait for the photo(s) to print.
After Taking a Photo
- Press the Print 🔊 button.
- Use the arrow keys to increase/decrease the number of copies to print out.
- PressOK to confirm.
- Wait for the photo to print.
TRANSFER PHOTOS TO YOUR COMPUTER
If you have a microSD™ card installed in your KODAK SMILE camera, you can easily download and view higher-resolution copies of your photos from any laptop or personal computer. Follow these steps to access and save your photos from your computer/laptop.
1. Plug the USB connector end of your charging cable into any USB port on your computer (or laptop). Plug the micro USB connector into the charging port of your
- Slide open the camera to power it on.
- The first time you connect your camera, it will take a few minutes to automatically download the drivers and recognize the camera as an external storage device. Do not disconnect your camera during this process.
- After the camera is plugged in and drivers have been installed, you can access the
pictures you've taken by going to your computer's menu and viewing it as an external storage device (usually defaults to E1). You will see a folder called DCIM, and inside that folder will be another folder called SMILE_CAM. This is where you will find copies of all your photos.
- Have fun with viewing, editing, printing, and/or posting these higher-resolution versions of your KODAK SMILE photos from your computer!
- When you're finished, be sure to choose the option to "eject removable storage
device" to prevent any issues with your microSD™ card.
NOTE: Please note that while the camera is plugged into the computer, you will not be able to use it to take or edit photos on the microSD™ card.
FIRMWARE UPDATES
From time to time, we will release updates that will improve the quality and/or performance of the software on your KODAK SMILE camera. Follow these instructions to download and install those updates.
- Visit our website at www.kodakphotoplus.com/pages/Kodak-Smile-Series and look for your camera, the KODAK SMILE Instant Print Digital Camera.
- If the site has a firmware update available, download the file and save it to a location you will remember.
- Connect the camera to your computer via the micro USB cable.
- Visit the location where you saved the firmware update file, and run the update program (will end in .exe).
- The update should detect the installed
camera, but if it asks, direct it to the removable storage location of the camera (usually defaults to E:).
- Do not disconnect the camera while the update installs.
- When finished, make sure to choose the option to "eject removable storage device" to prevent any issues with your camera.
WARRANTY INFORMATION
LIMITED WARRANTY ON KODAK SMILE INSTANT PRINT DIGITAL CAMERA
THIS LIMITED WARRANTY GIVES YOU SPECIFIC LEGAL RIGHTS AND YOU MAY ALSO HAVE OTHER RIGHTS, WHICH VARY FROM STATE TO STATE.
WE WARRANT THAT DURING THE WARRANTY PERIOD, THE PRODUCT WILL BE FREE FROM DEFECTS IN MATERIALS AND WORKMANSHIP.
LIMITATION OF LIABILITY
TO THE EXTENT NOT PROHIBITED BY LAW, THIS WARRANTY IS EXCLUSIVE AND IN LIEU
OF ALL OTHER WARRANTIES, ORAL, WRITTEN, STATUTORY, EXPRESS OR IMPLIED, EXCEPT FOR THE EXPRESS WARRANTIES CONTAINED IN THIS LIMITED WARRANTY STATEMENT AND TO THE EXTENT NOT PROHIBITED BY LAW, WE DISCLAIM ALL OTHER WARRANTIES, EXPRESSED OR IMPLIED, STATUTORY OR OTHERWISE, INCLUDING WITHOUT LIMITATION, THE WARRANTIES OF MERCHANTABILITY AND FITNESS FOR A PARTICULAR PURPOSE. SOME STATES DO NOT ALLOW DISCLAIMERS OF IMPLIED WARRANTIES, SO THIS DISCLAIMER MAY NOT APPLY TO YOU. TO THE EXTENT SUCH WARRANTIES CANNOT BE DISCLAIMED UNDER THE LAWS OF YOUR JURISDICTION, WE LIMIT THE DURATION AND REMEDIES OF
SUCH WARRANTIES TO THE DURATION OF THIS EXPRESS LIMITED WARRANTY.
OUR RESPONSIBILITY FOR DEFECTIVE GOODS IS LIMITED TO REPAIR, REPLACEMENT OR REFUND AS DESCRIBED BELOW IN THIS WARRANTY STATEMENT.
WHO MAY USE THIS WARRANTY? C&A Marketing, Inc. located at 114 Tived Lane East, Edison, NJ ("we") extend this limited warranty only to the consumer who originally purchased the product ("you"). It does not extend to any subsequent owner or other transferee of the product.
WHAT DOES THIS WARRANTY COVER? This limited warranty covers defects in materials and
workmanship of the KODAK SMILE Instant Digital Camera (the "product") for the Warranty Period as defined below.
WHAT DOES THIS WARRANTY NOT COVER?
This limited warranty does not cover any damage due to: (a) transportation; (b) storage; (c) improper use; (d) failure to follow the product instructions or to perform any preventive maintenance; (e) modifications; (f) unauthorized repair; (g) normal wear and tear; or (h) external causes such as accidents, abuse, or other actions or events beyond our reasonable control.
WHAT IS THE PERIOD OF COVERAGE? This limited warranty starts on the date of your purchase and lasts for one year (the "Warranty
Period"). The Warranty Period is not extended if we repair or replace the product. We may change the availability of this limited warranty at our discretion, but any changes will not be retroactive.
WHAT ARE YOUR REMEDIES UNDER THIS WARRANTY? With respect to any defective product during the Warranty Period, we will, at our sole discretion, either: (a) repair or replace such product (or the defective part) free of charge or (b) refund the purchase price of such product if an exchange unit cannot be provided.
HOW DO YOU OBTAIN WARRANTY SERVICE? To obtain warranty service, you must contact us at 844-516-1539 or by email at kodak@camarketing.com during the Warranty Period to obtain a
Defective Merchandise Authorization ("DMA") number. No warranty service will be provided without a DMA number and return shipping costs to our facilities shall be assumed by you, the purchaser. Shipping costs of the replacement unit to you shall be assumed by us.
CUSTOMER SERVICE CONTACT INFORMATION
Should you experience any problems with your product, please contact us before returning the item to the place of purchase. WE'RE HERE TO HELP!
U.S. Support:
kodak@camarketing.com 844-516-1539
International Support:
kodakintl@camarketing.com 844-516-1540
kodakphotoplus.com
The Kodak trademark, logo, and trade dress are used under license from Eastman Kodak Company. Android is a trademark of Google Inc.
IOS is a trademark of Cisco in the U.S. and other countries and is used under license.
All other products, brand names, company names, and logos are trademarks of their respective owners, used merely to identify their respective products, and are not meant to connote any sponsorship, endorsement or approval.
Distributed by: C&A Marketing, Inc., 114 Tived Lane East, Edison, NJ 08837, USA
C&A Marketing UK LTD, 167 Hermitage Road, Crusader Industrial Estate, London N4 11.7, UK
©2019. All Rights Reserved. Made in Vietnam.
INTRODUCTION
38 FRFR 39
Boutons :
natural_image
Illustration of a printer with a blue cover and red arrow, next to an open base (no text or symbols)INFORMATIONS DU PRODUIT
INFORMATIONS DE GARANTIE
GARANTIE LIMITÉE DE L'APPAREIL PHOTO NUMÉRIQUE À IMPRESSION INSTANTANÉE KODAK SMILE
CETTE GARANTIE LIMITÉE VOUS CONFÈRE DES DROITS SPÉCIFIQUES RECONNUS PAR LA LOI. VOUS POURRIEZ DISPOSER DE DROITS SUPPLÉMENTAIRES QUI VARIENT D'UN PAYS À UN AUTRE.
NOUS GARANTISSONS QUE CE PRODUIT SERA EXEMPT DE TOUT DÉFAUT DE FABRICATION ET DE MATÉRIAUX PENDANT LA PÉRIODE DE GARANTIE.
LIMITATION DE RESPONSABILITÉ
Support technique international :
kodakintl@camarketing.com 844-516-1540
kodakphotoplus.com
C&A Marketing UK LTD, 167 Hermitage Road, Crusader Industrial Estate, London N4 1L7, UK
68 ITIT 69
Pulsanti:
natural_image
Illustration of a printer with a blue cover and red arrow, next to an open scanner (no text or symbols)C&A Marketing UK LTD, 167 Hermitage Road, Crusader Industrial Estate, London N4 1L7, UK
Tasten:
PRODUKTINFORMATIONEN
130 | ESES | 131
Botones:
natural_image
Illustration of a printer with a blue cover being inserted into a paper holder (no text or symbols present)kodak@camarketing.com
844-516-1539
Distribuido por: C&A Marketing, Inc., 114 Tived Lane East, Edison, NJ 08837, USA C&A Marketing UK LTD, 167 Hermitage Road,