
HLF 1864XMN - Fridge HOOVER - Free user manual and instructions
Find the device manual for free HLF 1864XMN HOOVER in PDF.

User questions about HLF 1864XMN HOOVER
0 question about this device. Answer the ones you know or ask your own.
Ask a new question about this device
Download the instructions for your Fridge in PDF format for free! Find your manual HLF 1864XMN - HOOVER and take your electronic device back in hand. On this page are published all the documents necessary for the use of your device. HLF 1864XMN by HOOVER.
USER MANUAL HLF 1864XMN HOOVER
natural_image
3D mechanical assembly diagram showing a component before and after modification, with no visible text or symbols.natural_image
3D mechanical component before and after assembly, showing a bracket with mounting holes and a curved bracket (no text or symbols)natural_image
3D CAD model of a computer monitor rear panel showing internal components and a close-up view of the lock mechanism (no text or symbols)natural_image
3D rendering of a stainless steel cabinet with two blue doors, no visible text or symbolsCerniera inferiore
natural_image
3D technical illustration of a mechanical or electronic device interior with no visible text or symbolsnatural_image
3D rendering of a computer tower with red circles highlighting the front panel (no text or symbols visible)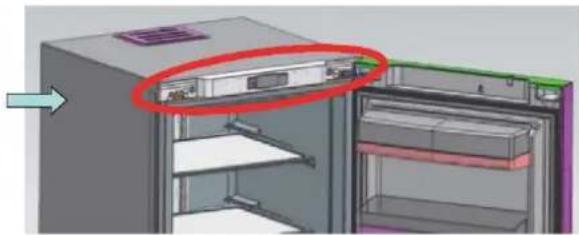
natural_image
3D diagram of a refrigerator with a red circle highlighting the interior panel (no text or symbols present)natural_image
Two-panel diagram showing a server rack with labeled components, no text or symbols present.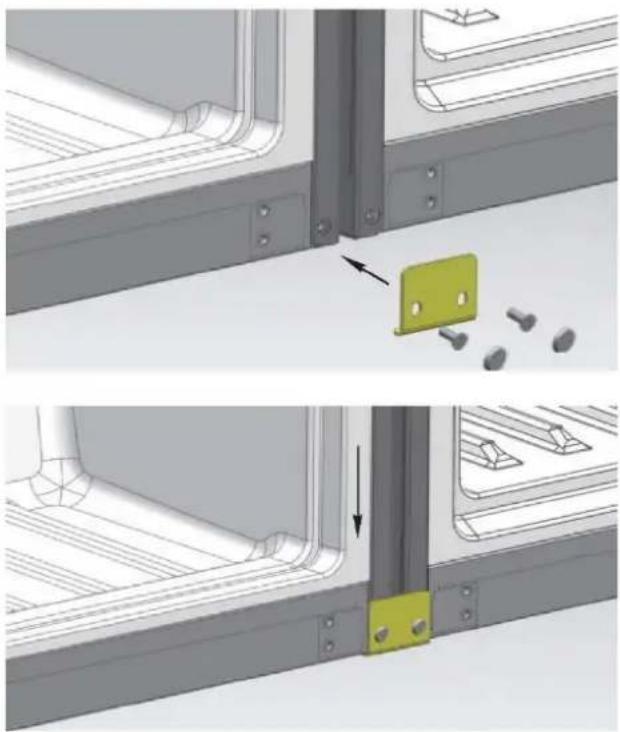
natural_image
Technical illustration of a mechanical bracket assembly with two views showing alignment and mounting details (no text or symbols)natural_image
3D rendering of a server rack cabinet with multiple shelves and ventilation grilles (no visible text or labels)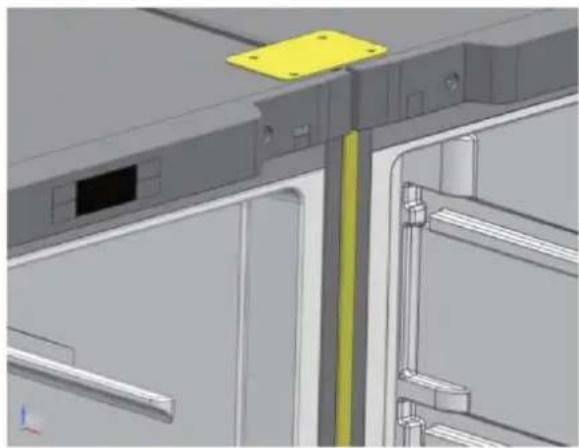
natural_image
3D CAD model of a mechanical assembly with yellow and green components, no visible text or symbols
natural_image
3D diagram of a refrigerator interior showing internal compartments and storage racks (no text or labels)Thank you for purchasing this product.
Before using your refrigerator, please carefully read this instruction manual in order to maximize its performance. Store all documentation for subsequent use or for other owners. This product is intended solely for household use or similar applications such as:
- the kitchen area for personnel in shops, offices and other working environments
- on farms, by clientele of hotels, motels and other environments of a residential type
- at bed and breakfasts (B & B)
- for catering services and similar applications not for retail sale.
This appliance must be used only for purposes of storage of food, any other use is considered dangerous and the manufacturer will not be responsible for any omissions. Also, it is recommended that you take note of the warranty conditions. Please, to obtain the best possible performance and trouble free operation from your appliance it is very important to carefully read these instructions. Failure to observe these instructions may invalidate your right to free service during the guarantee period.
SAFETY INFORMATION
This guide contains many important safety information. Please, we suggest you keep these instructions in a safe place for easy reference and a good experience with the appliance.
The refrigerator contains a refrigerant gas (R600a: isobutane) and insulating gas (cyclopentane), with high compatibility with the environment, that are, however, inflammable.

Caution: risk of fire
If the refrigerant circuit should be damaged:
- Avoid opening flames and sources of ignition.
Thoroughly ventilate the room in which the appliance is situated.
WARNING!
- Care must be taken while cleaning/carrying the appliance to avoid touching the condenser metal wires at the back of the appliance, as you might injure your fingers and hands or damage your product.
- This appliance is not designed for stacking with any other appliance. Do not attempt to sit or stand on top of your appliance as it is not designed for such use. You could injure yourself or damage the appliance.
- Make sure that mains cable is not caught under the appliance during and after carrying/moving the appliance, to avoid the mains cable becoming cut or damaged.
- When positioning your appliance take care not to damage your flooring, pipes, wall coverings etc. Do not move the appliance by pulling by the lid or handle. Do not allow children to play with the appliance or tamper with the controls. Our company declines to accept any liability should the instructions not be followed.
- Do not install the appliance in humid, oily or dusty places, nor expose it to direct sunlight and to water.
- Do not install the appliance near heaters or inflammable materials.
-
If there is a power failure do not open the lid. Frozen food should not be affected if the failure lasts for less than 20 hours. If the failure is longer, then the food should be checked and eaten immediately or cooked and then refrozen.
-
If you find that the lid of the chest freezer is difficult to open just after you have closed it, don't worry. This is due to the pressure difference which will equalize and allow the lid to be opened normally after a few minutes.
- Do not connect the appliance to the electricity supply until all packing and transit protectors have been removed.
- Leave to stand for at least 4 hours before switching on to allow compressor oil to settle if transported horizontally.
- This freezer must only be used for its intended purpose (i.e. storing and freezing of edible foodstuff).
- Do not store medicine or research materials in the Wine Coolers. When the material that requires a strict control of storage temperatures is to be stored, it is possible that it will deteriorate or an uncontrolled reaction may occur that can cause risks.
- Before performing any operation, unplug the power cord from the power socket.
- On delivery, check to make sure that the product is not damaged and that all the parts and accessories are in perfect condition.
- If in the refrigeration system a leak is noted, do not touch the wall outlet and do not use open flames. Open the window and let air into the room. Then call a service center to ask for repair.
- Do not use extension cords or adapters.
- Do not excessively pull or fold the power cord or touch the plug with wet hands.
- Do not damage the plug and/or the power cord; this could cause electrical shocks or fires.
- If the supply cord is damaged, it must be replaced by the manufacturer, its service agent or similarly qualified person in order to avoid a hazard.
- Do not place or store inflammable and highly volatile materials such as ether, petrol, LPG, propane gas, aerosol spray cans, adhesives, pure alcohol, etc. These materials may cause an explosion.
- Do not use or store inflammable sprays, such as spray paint, near the Wine Coolers. It could cause an explosion or fire.
- Do not place objects and/or containers filled with water on the top of the appliance.
- We do not recommend the use of extension leads and multi-way adapters.
- Do not dispose of the appliance on a fire. Take care not to damage, the cooling circuit/pipes of the appliance in transportation and in use. In case of damage do not expose the appliance to fire, potential ignition source and immediately ventilate the room where the appliance is situated.
- The refrigeration system positioned behind and inside the Wine Coolers contains refrigerant. Therefore, avoid damaging the tubes.
- Do not use electrical appliances inside the food storage compartments of the appliance, unless they are of the type recommended by the manufacturer.
-
Do not damage the refrigerant circuit.
-
Do not use mechanical devices or other means to accelerate the defrosting process, other than those recommended by the manufacturer.
- Do not use electrical appliances inside the food storage compartments, unless they are of the type recommended by the manufacturer.
- Do not touch internal cooling elements, especially with wet hands, to avoid cracks or injuries.
- Maintain the ventilation openings in the appliance enclosure or in the built-in structure, free of obstruction.
- Do not use pointed or sharp-edged objects such as knives or forks to remove the frost.
- Never use hairdryers, electrical heaters or other such electrical appliances for defrosting.
- Do not scrape with a knife or sharp object to remove frost or ice that occurs. With these, the refrigerant circuit can be damaged, the spill from which can cause a fire or damage your eyes.
- Do not use mechanical devices or other equipment to hasten the defrosting process.
- Absolutely avoid the use of open flame or electrical equipment, such as heaters, steam cleaners, candles, oil lamps and the like in order to speed up the defrosting phase.
- Never use water wash the compressor position, wipe it with a dry cloth thoroughly after cleaning to prevent rust.
- It is recommended to keep the plug clean, any excessive dust residues on the plug can be the cause fire.
- The product is designed and built for domestic household use only.
- The guarantee will be void if the product is installed or used in commercial or non-residential domestic household premises.
- The product must be correctly installed, located and operated in accordance with the instructions contained in the User Instructions Booklet provided.
- The guarantee is applicable only to new products and is not transferable if the product is resold.
- Our company disclaims any liability for incidental or consequential damages.
- The guarantee does not in any way diminish your statutory or legal rights.
- Do not perform repairs on this Wine Coolers. All interventions must be performed solely by qualified personnel.
SAFETY CHILDREN!
- If you are discarding an old product with a lock or latch fitted to the door, ensure that it is left in a safe condition to prevent the entrapment of children.
- This appliance can be used by children aged from 8 years and above and by persons with reduced physical, sensory or mental capabilities or with a lack of experience and knowledge; provided that they have been given adequate supervision or instruction concerning how to use the appliance in a safe way and understand the hazards involved.
Children should not play with the appliance. Cleaning and user maintenance should not be made by children without supervision.
Names of the components
Apologizing for some features and accessories of the refrigerator you brought might not accord with the illustrations, refer to the packing list in the refrigerator please.
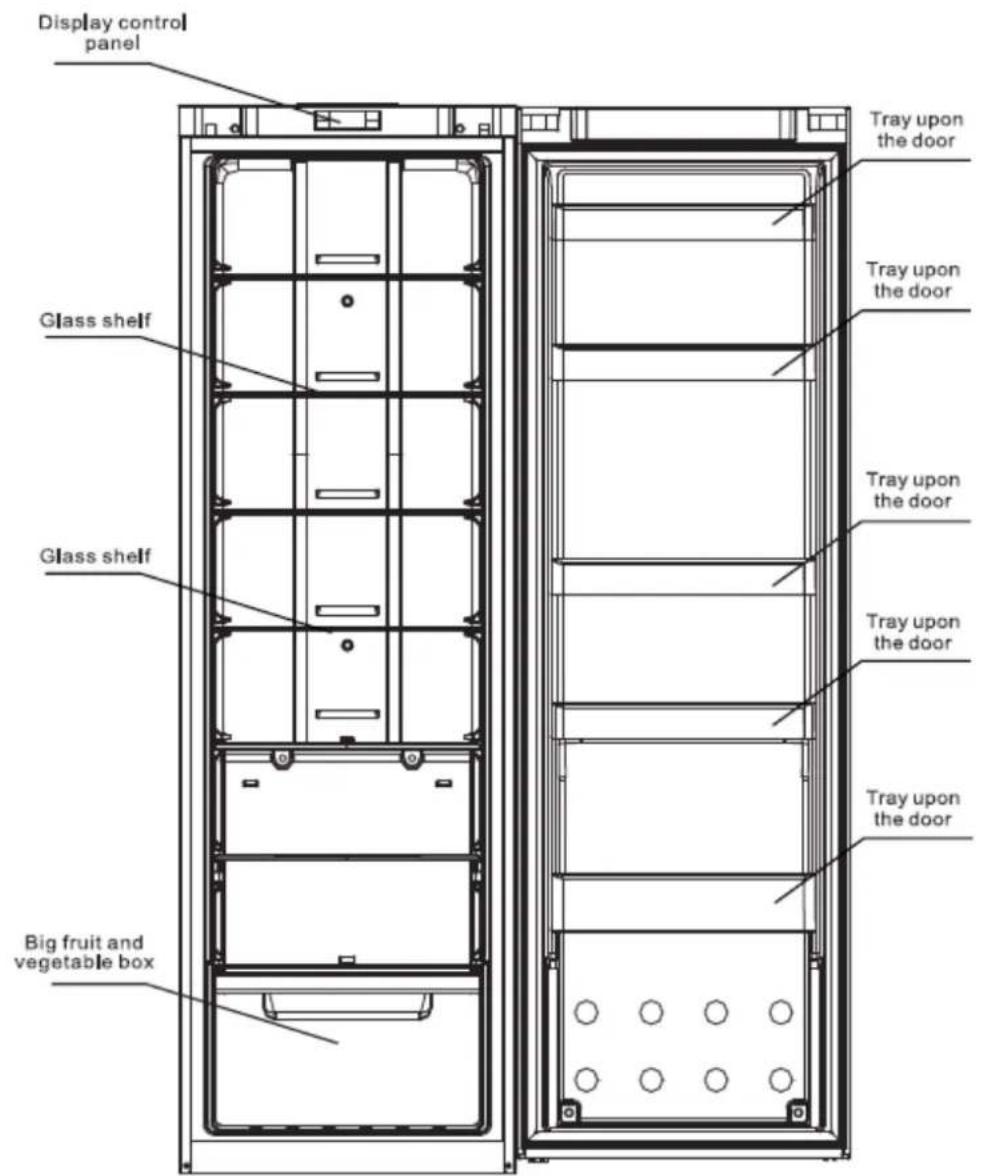
text_image
Display control panel Glass shelf Glass shelf Big fruit and vegetable box Tray upon the door Tray upon the door Tray upon the door Tray upon the door Tray upon the door Tray upon the doorThe most energy-saving configuration requires drawers, food box and shelves to be positioned in the product, please refer to the above pictures.
Preparation before using
Warning
- Except the solutions recommended by the manufacturer, do not use mechanical equipment or other means to accelerate defrosting.
- Except the types recommended by the manufacturer, do not use electrical appliance inside food closet.
- The refrigerator is provided with R600a refrigerant and cyclopentane foaming material, and both are combustible materials. Obsolete refrigerator should be isolated from fire and combustion treatment is forbidden.
New refrigerator
- Remove all packing materials before using, including bottom seating washer and foam pads and gummed paper inside;
- Use warm and wet cleaning cloth to wipe the refrigerator's interior and exterior (add a little detergent in the warm water and use clean water to clean up);
- Prepare a separating grounding receptacle with both polarities. Do not share multi-purpose socket with other electrical appliances;
- Connect earth wire. Earth electrode of the socket must be equipped with a reliable grounding wire.
Transportation and placement of the refrigerator
Transportation
- Do not invert, traverse, press and shake the refrigerator. When moving the refrigerator, angle of inclination shall not be larger than 45^ .
- When moving, do not make excessive pressure to the door or top cover, otherwise deformation will occur.
- Slightly remove the refrigerator backward (less than 20^ ) to rear truckle roll a short distance.
Placement
- Place the refrigerator at a ventilative place, far away from heat source and direct sunlight. In order to avoid rust or reduce insulation result, please do not place it at damp and watered place.
- Top space for the refrigerator shall not be less than 30cm. Distance against two sides shall not be less than 10cm, Distance against to the wall shall not exceed 75mm, providing convenience to open and close the door and disperse the heat.
- Place the refrigerator on a flat and solid floor. (if it is not stable, you can regulate the regulating legs)
Energy saving tips
- The appliance should be located in the coolest area of the room, away from heat producing appliances or heating ducts, and out of the direct sunlight.
- Let hot foods cool to room temperature before placing in the appliance. Overloading thwe spoil.
- Be sure to wrap foods properly, and wipe containers dry before placing them in the appliance. This cuts down on frost build-up inside the appliance. Appliance storage bin should not be lined with aluminium foil, wax paper or paper toweling.
- Liners interfere with cold air circulation, making the appliance less efficient.
- Organize and label food to reduce door openings and extended searches. Remove as many items as needed at one time, and close the door as soon as possible.
Correct application of the refrigerator
Attention
Make sure the power line is not pressed by the refrigerator or other articles. Before connect the power line, make sure the voltage range of the refrigerator accord with that of the power supply.
Ensure that the refrigerator is placed correctly and stably. Be aware of all safety matters needing attention.
4. Connect the electricity
After connecting electricity, it will enter into ex-factory state.
5. Put food into the refrigerator
Suggestion: after working a time, the refrigerator will arrive store temperature or after the first stop of the compressor, put food into it, which is beneficial to retain freshness.
Γ ____
: Note: if the set temperature is altered or new food is put in, temperature:
: inside the box will achieve the balance after a time, which is determined by
: the temperature alteration degree, temperature of ambient environment,
: opening frequency, quantity of the food inside and so on.
Function introduction
text_image
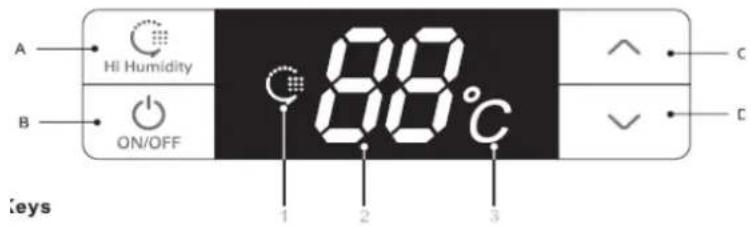
A HI Humidity B ON/OFF 88°C 1 2 3 C C Keys1. Keys
A. Hi Humidity: High Humidity Mode
B. ON/OFF: start up or shut down the system
C.∧: increase temperature of the cooling chamber
D. V: decrease temperature of the cooling chamber
2. Names of functions of display screen
- High Humidity figure
2, Temperature region digitron
3, Temperature (°C) figure
3. Display control
- Power on for the first time: all shines for three seconds with ringing of start bell. Defaulting temperature of the cooling chamber is 5°C.
• Normal operation display:
Temperature display region: when there is a failure, it will show failure codes by turn at a priority order; without failure, it will show the set temperature.
High Humidity figure: shine when the system is under High Humidity Mode.
- Display control:
- Under the normal pattern, it will not shine any more after thirty seconds without opening and key operation;
- When the door is under open state, the display will shine all the time and it will stop shining thirty seconds after the door is closed.
- When a failure happens and it is within "Failure Code", the screen will shine for one time and stop to shine after thirty seconds (if the buzzer has been ringing for a long time, press any key to cancel the failure bell);
4. User Mode operation
- Start-up and shutdown
Under start-up mode, press and hold ON/OFF key (B key) for three seconds, the start bell will ring and the system will be shut down immediately; Under shutdown mode, press and hold ON/OFF key (B key) for three seconds, the start bell will ring and the system will be started immediately.
Press ON/OFF key for three seconds to shut down the system and the display screen will not show any more. Except ON/OFF key (B key), other keys will stop responding, and compressor, door lamp and other loads will be shut down immediately;
Press ON/OFF key for three seconds to start up the system. Before starting, if the
system is at High Humidity Mode, the High Humidity figure will shine, otherwise the system will only shine the set temperature and all loads will run the mode having been set before shutdown.
The temperature of the refrigerator is controlled by the display control panel. It is recommended to set at 5°C.
All following functions must be worked under start state.
● High Humidity Mode
When the system is not at High Humidity Mode, press and hold Hi Humidity key (A key) for three seconds to start the High Humidity Mode and High Humidity figure will be lit up. When the system is at High Humidity Mode, press and hold Hi Humidity key (A key) for three seconds to exit from the High Humidity Mode and High Humidity figure will not shine any more.
When starting High Humidity Mode, cooling chamber will work under High Humidity state to improve relative humidity of the air inside the cooling chamber.
● Set the temperature of the cooling chamber
Press temperature regulation keys (C key) and (D key) to set the temperature inside the chamber and the set temperature will shine. The setting range is between 2^ to 8^ (non-periodic temperature regulation); it will exit from the system in five seconds and the setting will take effect. (within five seconds after finishing the setting, press A key or B key to affirm the setting state manually and make the setting valid.)
5. Illuminating lamp control
When open cooling chamber's door, cooling chamber's illuminating lamp will shine. When close cooling chamber's door, cooling chamber's illuminating lamp will not shine any more.
6. Door-opening hint and door-opening alarming control
If refrigerator chamber door has been open for 120 seconds, it will ring warning bell, and the bell will ring per 2 seconds till the door is closed. Press any key to cancel the door-opening warning.
7. Power-interruption memory and initial power-up state
- When meet power interruption, the refrigerator can memory operating mode and state before automatically; When power up, it will recover to the state before interruption and run the mode having been set before interruption.
- Initial power-up state: the set temperature of cooling chamber is +5°C and the system is not at High Humidity Mode.
● Memory: include set temperature of cooling chamber, "High Humidity" Mode and cumulative working hours of compressor.
For example, if the system has a power failure under High Humidity state, it will continue to work at "High Humidity" mode after recovery.
Function introduction
8. High temperature warning of the cooling chamber
When the temperature of the cooling chamber has been above 15^ C for six hours, high temperature warning will ring. The buzzer will ring per second for ten times and then ten times every thirty minutes, and temperature display region will show failure code (E9); the ringing will stop when the temperature of the cooling chamber is below 10^ C. Press any key to cancel the warning buzzer (if it does not buzz after thirty minutes). But the failure code display state is not canceled, until the failure is solved.
9. Failure hint
| Failure code | Hint | Failure code | Hint |
| E1 | Cooling sensor failure | E6 | Communication failure |
| E4 | Cooling defrosting sensor failure | E9 | High temperature warning of the cooling chamber |
| E7 | Ambient temperature sensor failure | EC | EEPROM circuit failure |
Note: when there is a failure, the system will display all machine failures' codes by turn. The warning will be automatically canceled after recovery of the failure or press any key to cancel the warning. When failure happens, it is a priority to show failure code till failure recovery, otherwise the set temperature and High Humidity state cannot be displayed.
If a failure has been displayed all the time and automatic recovery fails, please contact After-sale Department or professional maintenance personnel.
10. Force defrosting
Press and hold "temperature regulation" keys and V for three seconds to enter into Force Defrosting Mode. High position of LED temperature region always shows "3" with no display in the low position. When entering into Force Defrosting Mode, the compressor will be stopped immediately. When working under Force Defrosting Mode or the exiting condition is satisfied, press and hold "temperature regulation" keys A and V for three seconds to exit form the Force Defrosting Mode.
Do not arbitrarily dismantle or repair. Choose the repair shops designated by the manufacturer to replace the accessories.
natural_image
Simple line drawing of a smiling face next to a vertical line with a hand pointing to the right (no text or symbols)Use standard professional three-hole power socket (above 1OA). Socket grounding must be good.
In order to avoid fire, please do not use combustible solvents nearby the refrigerator.

In order to avoid destroy, fire and other accidents, please do not put anything combustible, explosive, volatile and strongly corrosive into the refrigerator. In order to avoid freezing, rupture and other losses,
please do not put the bottles with fluids or sealing containers into the refrigerating box.
natural_image
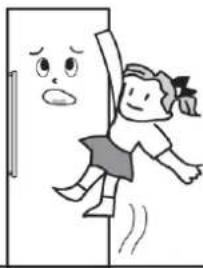
Cartoon illustration of a girl running away from behind a door, with a sad face on the left (no text or symbols)In order to avoid accidental harm caused by closing a child inside or refrigerator falling, do not allow the children to enter into or climb the refrigerator.
Do not put the heavy things on the refrigerator, otherwise it will easily fall and cause harm.
natural_image
Cartoon illustration of a bottle character with a sad face and a small object on the left (no text or symbols)
Do not put too much food into the refrigerator.
Do not open the door and drawers for a long time or frequently open the door and drawers, otherwise it would weaken the efficiency of the complete machine and increase operating load.
When the refrigerator is not at normal operation or is destroyed, please cut off the power and inform local service center.

natural_image
Simple line drawing of a wall with a power outlet and a plug, no text or symbols presentDo not splash the water on the top or back of the refrigerator, otherwise it would reduce insulation effect.
Attention:
The product is a household refrigerator. According to the national standards, household refrigerator is only applicable to store food and cannot be used for other purpose such as storing blood, drugs, biological products, etc.
L Refrigerator maintenance
Cleaning
Fingerprints are easily left on its exterior. Use a dry towel to wipe up. Periodically clean the dust both at the back of and under the refrigerator. Refrigerator interior should be cleaned frequently so as to avoid foreign odor. After the power is cut off, use soft towel and neutral detergent to clean and wipe with the clean water.
Do not use the following products to clean refrigerator interior:
- Alkaline or alkalescent detergents; (may cause the inner liner and plastic components to crack)
- Soap powder, benzine, amyl acetate, alcohol, etc.; (may destroy the plastic components)
Lamps and replacement
If the illuminating lamp occur failure, please contact professional personnel for home service.
Halt
Non-use within a long time
Please plug off the power to avoid electric shock or fire due to power line aging; clean up refrigerator interior; open the door for a time and close it after the interior become completely dry.
Power failure: ... Reduce opening times as many as possible; you'd better not to put fresh food in it.
Discard: ...When discard unused refrigerator, door seal must be dismantled off, so that the children would not be closed in it by accident.
Door Right-Left Change
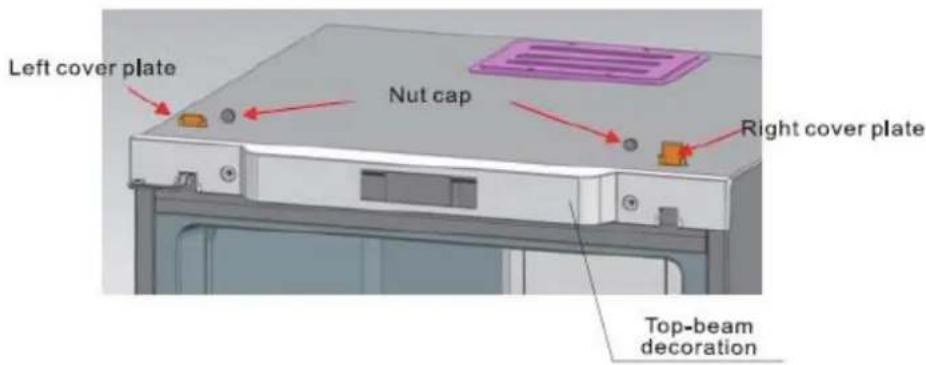
1._Remove the two nut caps and two hinge cover plates from the top beam (open the door toward right)
text_image
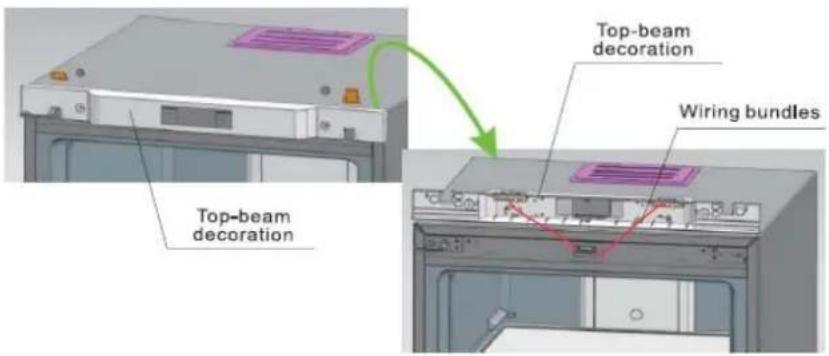
Left cover plate Nut cap Right cover plate Top-beam decoration2._ Remove decorating components from the top beam
text_image
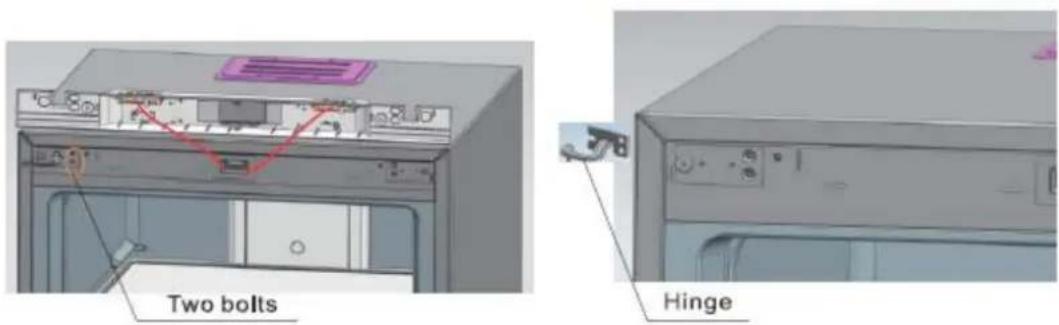
Top-beam decoration Top-beam decoration Wiring bundles3._Remove the two bolts fixed with hinges, pull the hinges out from one side and dismantle the door at the same time. As last, take the hinges out from the door.
text_image
Two bolts HingeDoor Right-Left Change
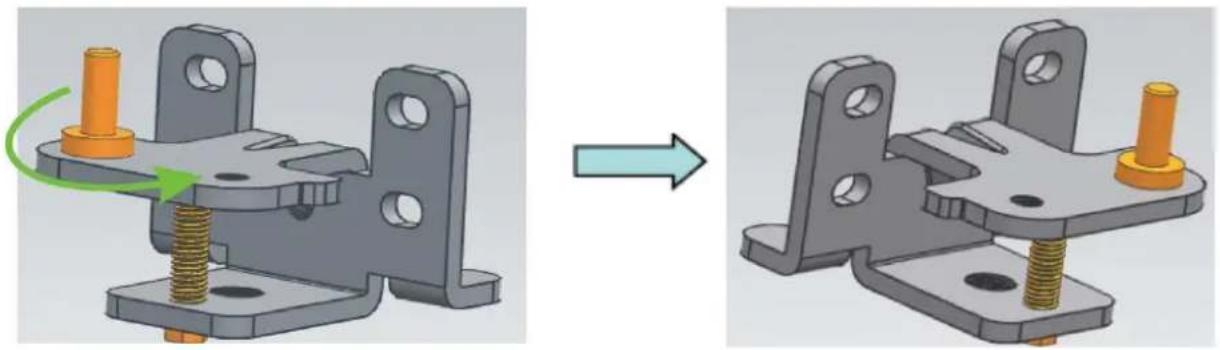
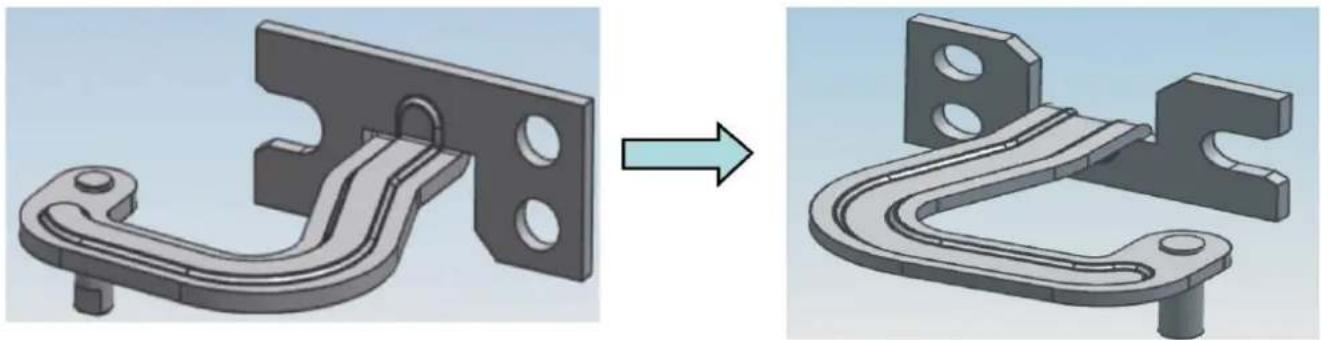
4, Reassemble the lower hinge axis: dismantle the original hinge axis and assemble it at the graphic position.
natural_image
3D mechanical assembly diagram showing a component before and after modification, with no visible text or symbols.- Reassemble the upper hinges axis: dismantle the hinge axis and assemble by rotating it from the other end of the screw hole.
natural_image
3D mechanical component before and after modification, showing a bracket with mounting holes (no text or symbols)6, Install the upper hinges fixed leg (on the left) at the right side.
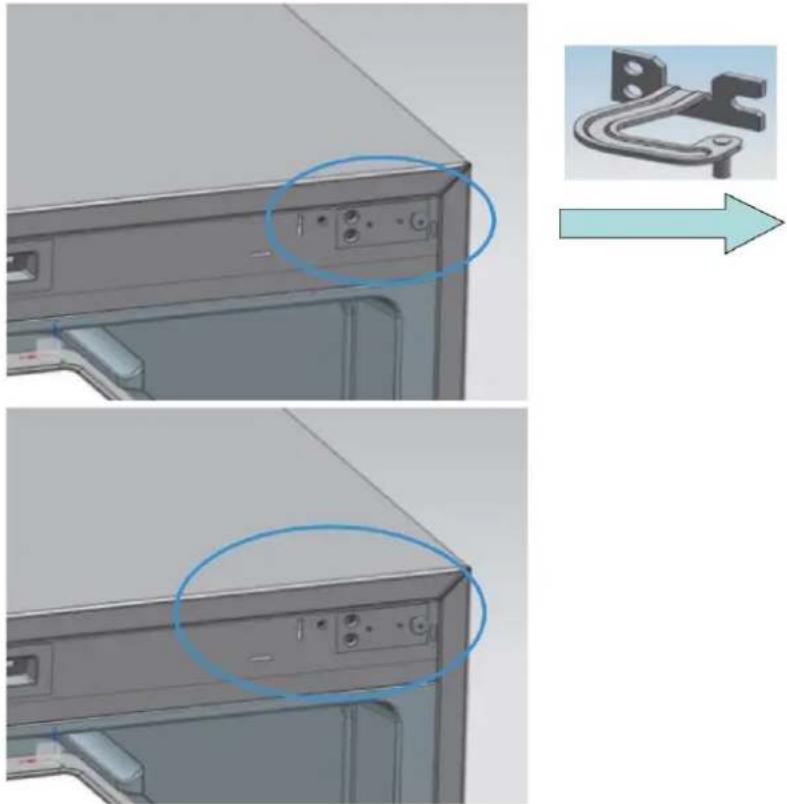
text_image
Technical diagram showing front panel and side view with labeled ports and a magnified inset of a mechanical component.- Install the lower hinge at the right side of the refrigerator
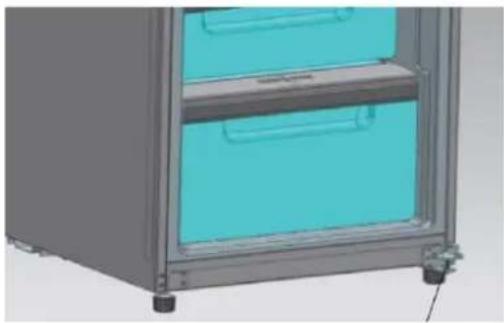
natural_image
3D rendering of a stainless steel storage cabinet with two blue-lit doors and metal casing (no text or symbols visible)Lower hinge
Door Right-Left Change
8 Install the upper hinges into the relative axle holes on the right (upon the door) at first, then place the door on the lower hinges, press upper hinges into hinge fixed legs and fix the upper hinges at last.
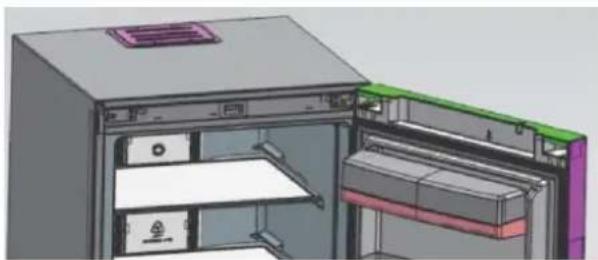
natural_image
3D technical illustration of a mechanical or electronic device interior showing internal components and housing (no text or symbols visible)9 Install top-beam decoration, nut caps and hinge cover plates

natural_image
3D rendering of a server rack with a red circle highlighting the front panel (no text or symbols visible)
natural_image
3D diagram of a refrigerator interior showing internal compartments and storage racks (no text or symbols)Handle Installation
Step 1: Preassemble the components and fix to the door during general assembly. Step 2: Install the slide plate into the mounting base of the handle. Step 3: Fix the handle deco part on the mounting base of the handle. Step 4: Cover the handle deco part on the base fixed with screws.

flowchart
graph TD
    A["Step 1"] --> B["Step 2"]
    B --> C["Step 3"]
    C --> D["Step 4"]
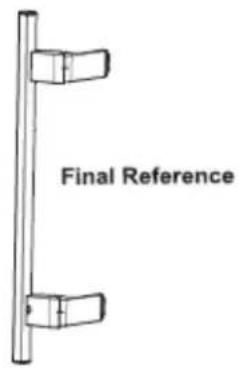
text_image
Final Reference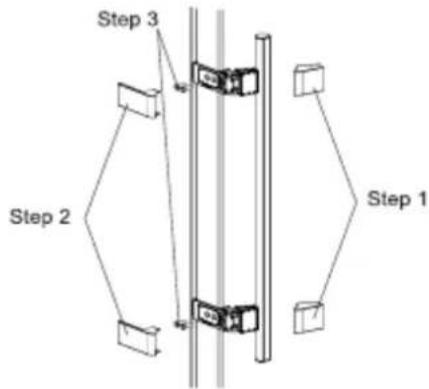
flowchart
graph TD
    A["Step 1"] --> B["Step 2"]
    B --> C["Step 3"]
    C --> D["End"]
Step 1: Remove the cover 1
Step 2: Remove the cover 2
Step 3: Remove the screw and uninstall the handle.
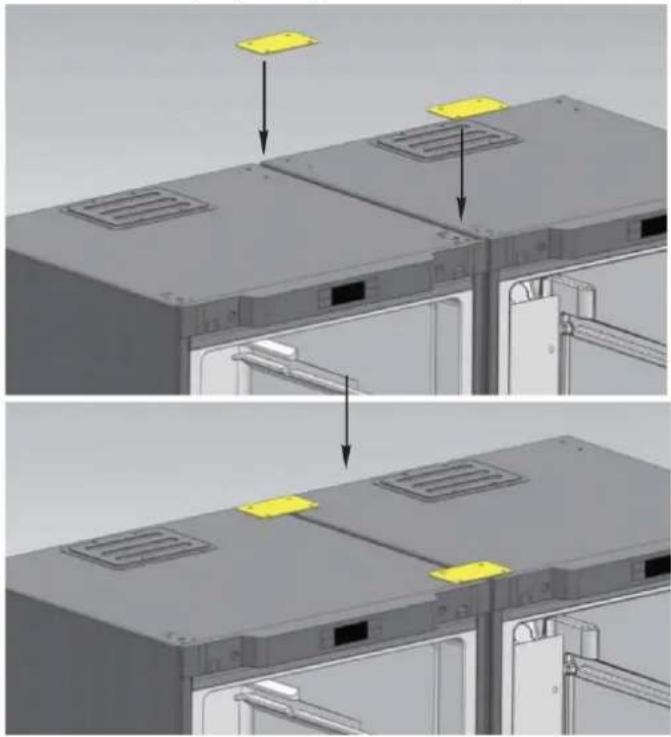
CONNECTING GUIDE for REFRIGERATOR AND FREEZER CABINETS
1st Step: Put two cabinets together with only 10mm gap. Fix the connecting hinge to the place as shown in the picture.
natural_image
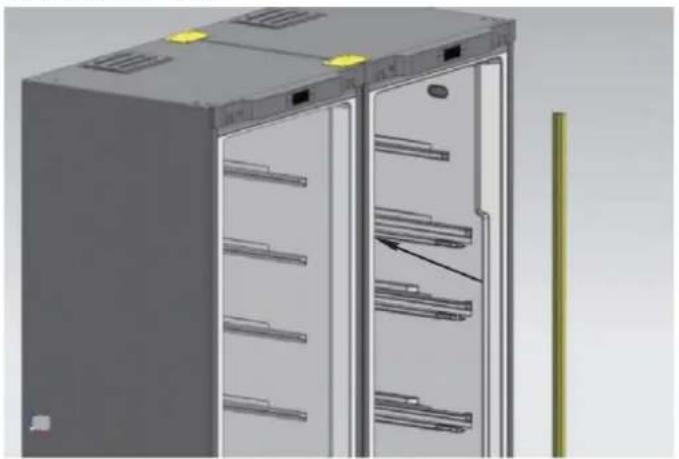
Three-panel diagram showing a device interior with labeled components and arrows indicating assembly or installation (no text or symbols present)3" Step: Put the bar inside the gap between two cabinets. The connecting Step finished.
natural_image
3D rendering of a server rack cabinet with multiple shelves and ventilation slots (no text or symbols visible)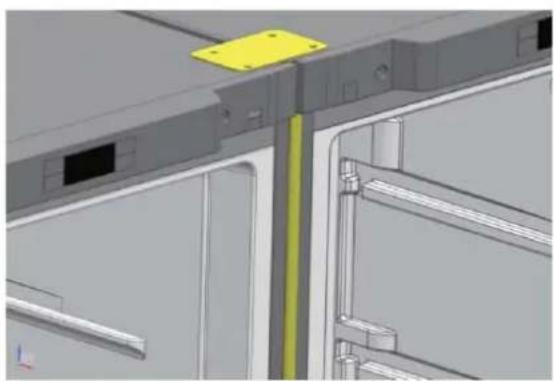
natural_image
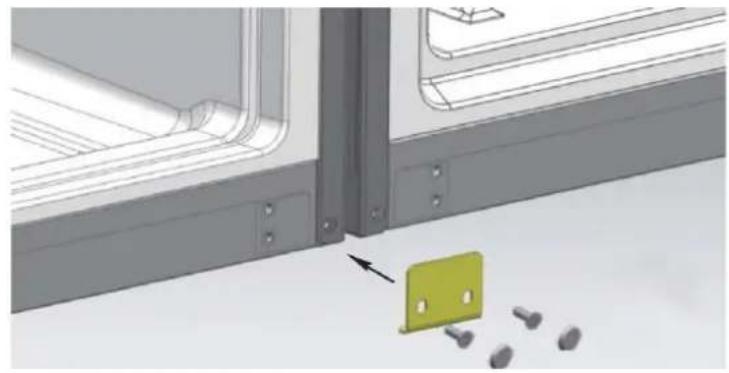
3D CAD model of a mechanical assembly with no visible text or symbols2" Step: Fit the lower connecting hinge at the bottom of two cabinets.
natural_image
3D diagram of a window frame with a green folder and scattered objects, no text or symbols present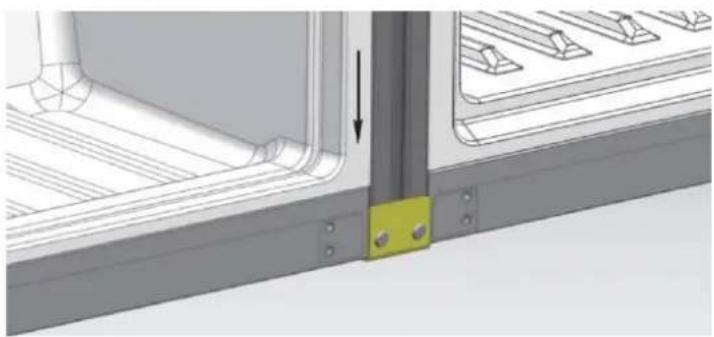
natural_image
Technical diagram showing a mechanical assembly with a highlighted component and an arrow indicating direction (no text or symbols present)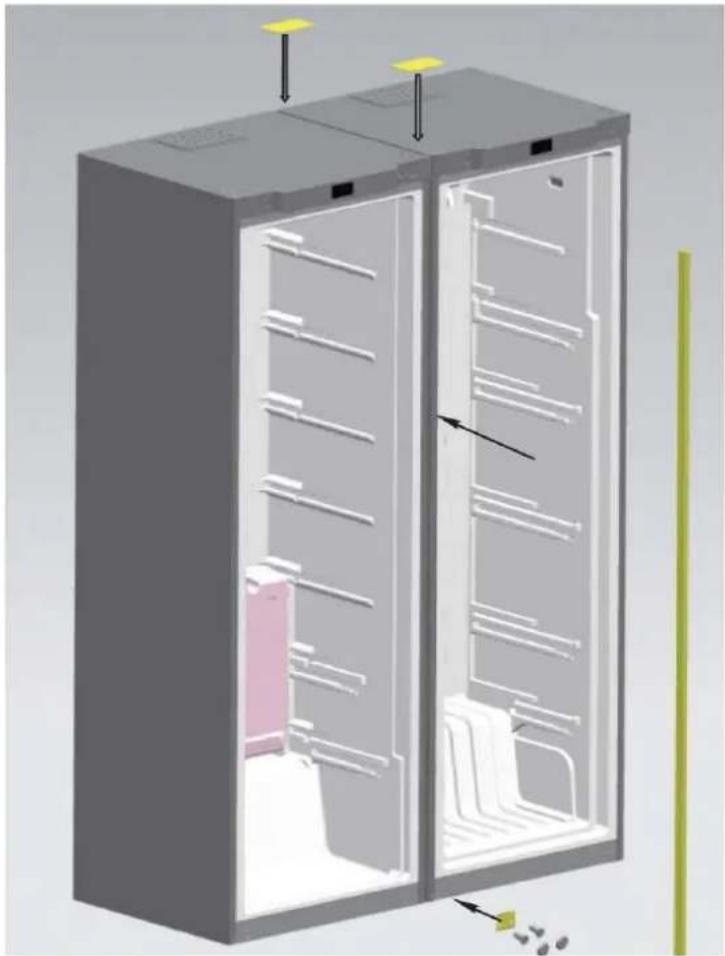
natural_image
3D cutaway diagram of a refrigerator showing internal compartments and storage racks (no text or labels)Trouble shooting
Before overhaul, please read following content carefully
| Phenomenon | Possible reasons and matters needing check |
| Inoperation | Not charged with electricity or loose pluggingExcessively low voltage |
| Poor freshness | High temperature regulationToo much foodHot foodFrequent door operation (open and close)Incomplete door closingHeat source nerby |
| High noises | Uneven floor and unsteady placementRight placement of accessories |
| Foreign odor | Unsealed wrapping of odorous foodSour foodUncleanliness interior |
If the situation still exist after checking all above matters, please contact our company's After-sale Department.
The damaged power cord must be replaced by maintenance personnel appointed by our company for the sake of safety.
Non-failure phenomenon
Within the capillary tubes, refrigerant fluid flows very fast, sometimes carries few air bubbles, which might cause irregular noises at the entrance.
When air humidity is relatively high, areas around the door may be damp and you can clean it with a dry cloth.
SCRAPPING OLD APPLIANCES
This appliance is marked according to the European directive 2012/19/EU on Waste Electrical and Electronic Equipment (WEEE).
WEEE contains both polluting substances (which can cause negative consequences for the environment) and basic components (which can be re-used). It is important to have WEEE subjected to specific treatments, in order to remove and dispose properly all pollutants, and recover and recycle all materials. Individuals can play an important role in ensuring that WEEE does not become an environmental issue; it is essential to follow some basic rules:
WEEE should not be treated as household waste.
WEEE should be handed over to the relevant collection points managed by the municipality or by registered companies. In many countries, for large WEEE, home collection could be present.
In many countries, when you buy a new appliance, the old one may be returned to the retailer who has to collect it free of charge on a one-to-one basis, as long as the equipment is of equivalent type and has the same functions as the supplied equipment.
Conformity
By placing the mark C€ on this product, we are confirming compliance to all relevant European safety, health and environmental requirements which are applicable in legislation for this product.
natural_image
3D mechanical assembly diagram showing a component before and after modification, with no visible text or symbols.natural_image
3D mechanical component before and after assembly, showing a bracket and mounting plate (no text or symbols)natural_image
Technical illustration of a computer monitor rear panel showing internal components and a close-up view of the lock mechanism (no text or symbols present)natural_image
3D rendering of a stainless steel cabinet with two blue doors, no visible text or symbolsnatural_image
3D technical illustration of a mechanical device with internal compartments and mounting features (no text or symbols)natural_image
3D model of a computer tower with red circles highlighting the front panel (no text or symbols visible)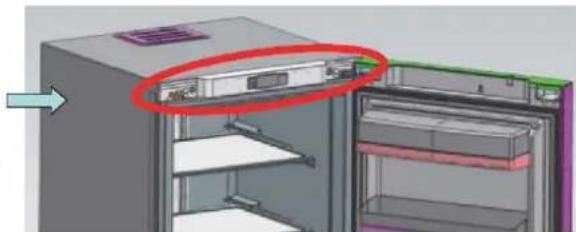
natural_image
3D diagram of a refrigerator with a red circle highlighting the interior panel (no text or symbols present)natural_image
3D CAD model of a server rack with mounting holes and ventilation slots, showing two views of the rack (no text or symbols present)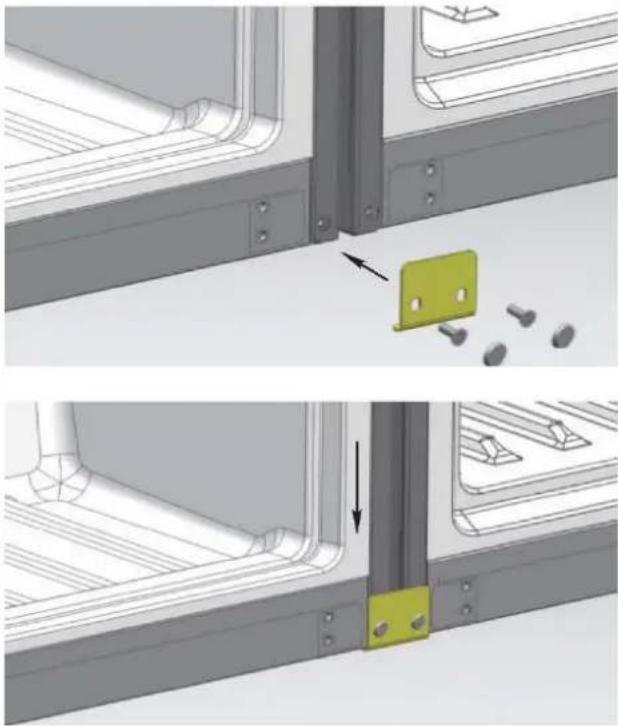
natural_image
Technical diagram showing two views of a mechanical bracket with a highlighted green component and bolted pins (no text or symbols)natural_image
3D rendering of a server rack cabinet with multiple shelves and a door, showing no text or symbols.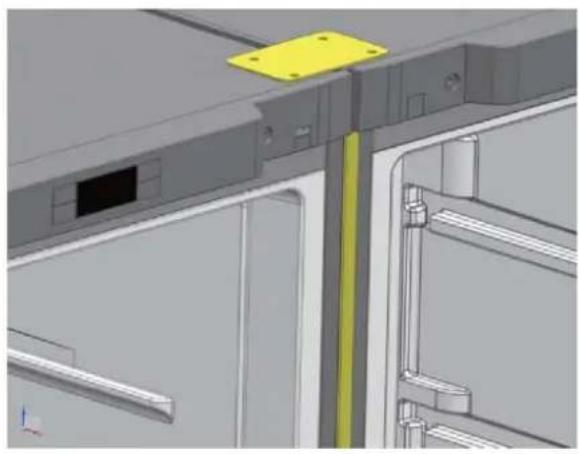
natural_image
3D CAD model of a mechanical assembly with yellow mounting bracket and structural elements (no text or symbols visible)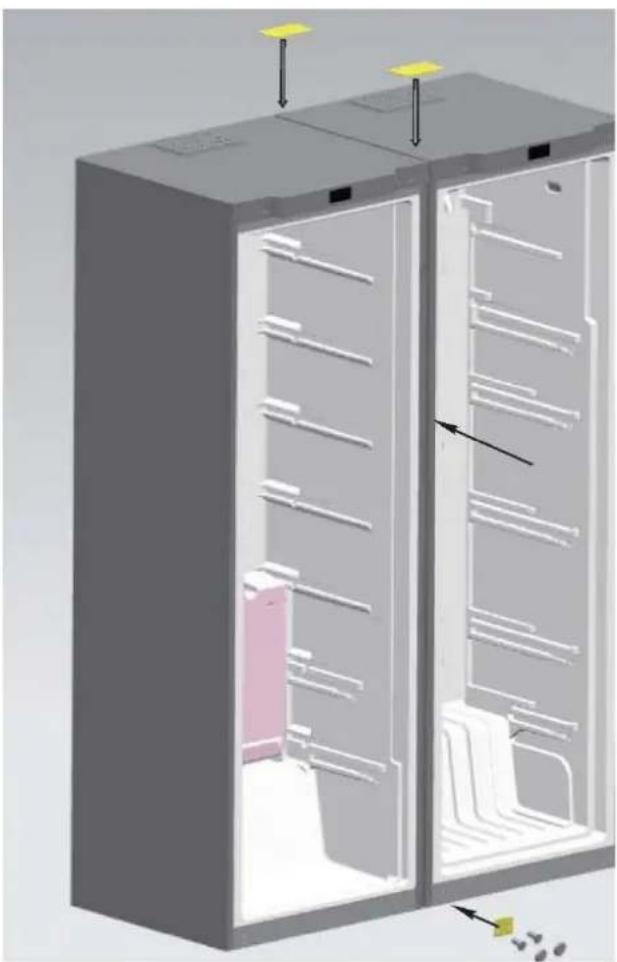
natural_image
3D cutaway diagram of a refrigerator showing internal compartments and ventilation ducts (no text or labels)natural_image
3D mechanical assembly diagram showing a component before and after modification, with no visible text or symbols.natural_image
3D mechanical component before and after modification, showing a bracket with mounting holes and a curved bracket (no text or symbols)natural_image
3D model of a computer monitor rear panel showing internal components and a close-up view of the lock mechanism (no text or symbols)natural_image
3D rendering of a stainless steel cabinet with two blue drawers and metal casing (no text or symbols visible)Bisagra inferior
natural_image
3D technical illustration of a mechanical or electronic device interior with no visible text or symbolsnatural_image
3D rendering of a computer tower with red circles highlighting the front panel (no text or symbols visible)
natural_image
3D diagram of a refrigerator interior showing internal compartments and storage racks (no text or symbols)natural_image
3D CAD model of a server rack with two yellow components, shown from top and side views (no text or symbols)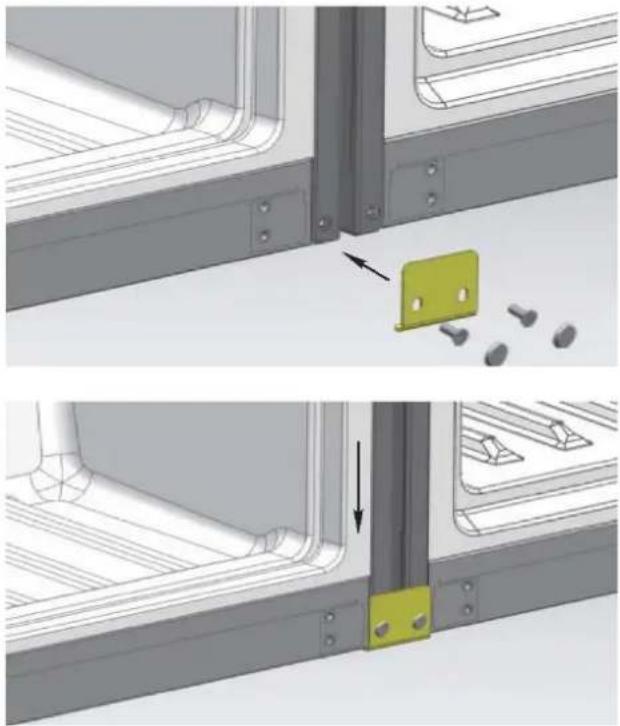
natural_image
Technical diagram showing two views of a metal bracket assembly with a highlighted green component and bolted pins (no text or symbols present)natural_image
3D rendering of a server rack cabinet with multiple shelves and ventilation grilles (no text or symbols visible)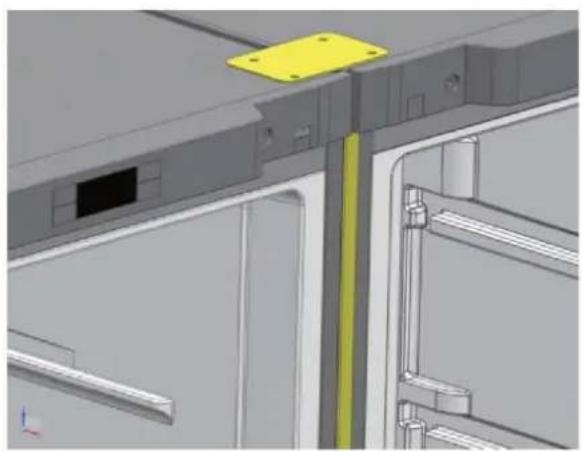
natural_image
3D CAD model of a mechanical assembly with highlighted components (no text or symbols visible)
natural_image
3D diagram of a refrigerator interior showing internal compartments and storage racks (no text or labels)text_image
Warning symbols including a trash bin with crossbones and a flame symbolnatural_image
3D mechanical assembly diagram showing a component before and after modification, with no visible text or symbols.natural_image
3D mechanical component before and after assembly, showing a bracket with mounting holes and a curved bracket (no text or symbols)natural_image
Technical illustration of a computer monitor rear panel showing internal components and a close-up view of the lock mechanism (no text or symbols present)natural_image
3D rendering of a stainless steel cabinet with two blue doors, no visible text or symbolsUnteres Scharnier
natural_image
3D CAD model of a modular electronic device with internal compartments and mounting points (no text or symbols visible)natural_image
3D model of a computer tower with red circles highlighting the front panel (no text or symbols visible)
natural_image
3D diagram of a refrigerator interior showing internal compartments and storage racks (no text or symbols)Installation
natural_image
3D CAD model of a server rack with mounting holes and ventilation slots, shown from top and side views (no text or symbols)
natural_image
Technical illustration showing two views of a metal bracket assembly with a highlighted green component and bolt holes (no text or symbols)natural_image
3D rendering of a server rack cabinet with multiple shelves and a door, showing internal structure and mounting points (no text or symbols visible)
natural_image
3D CAD model of a mechanical assembly with yellow bracket and metal components (no visible text or symbols)
natural_image
3D diagram of a refrigerator interior showing internal compartments and storage racks (no text or labels)natural_image
3D mechanical assembly diagram showing a component before and after modification, with no visible text or symbols.natural_image
3D mechanical component before and after assembly, showing a bracket and mounting plate (no text or symbols)natural_image
Diagram showing a computer monitor rear panel with a close-up view of its internal components, no text or symbols present.natural_image
3D rendering of a stainless steel cabinet with two blue doors, showing internal compartments and mounting feet (no text or symbols visible)Dobradiça inferior
natural_image
3D technical illustration of a mechanical device with internal compartments and mounting features (no text or symbols)9 Instale as tampas decorativas, tampas da porca e as coberturas das dobradiças
natural_image
3D model of a computer tower with red circles highlighting a component (no text or symbols visible)
natural_image
3D diagram of a refrigerator interior showing internal compartments and storage areas (no text or symbols)Instalação da pega
natural_image
3D CAD model of a server rack with two yellow-labeled components, shown from top and side views (no text or symbols)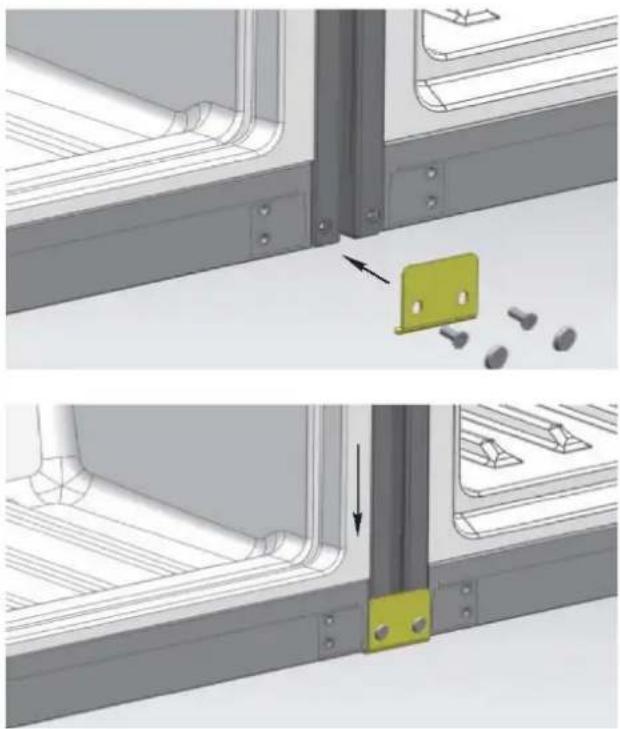
natural_image
Technical illustration showing two views of a metal bracket assembly with a highlighted green component and bolted pins (no text or symbols)natural_image
3D rendering of a server rack cabinet with multiple compartments and a highlighted internal panel (no text or symbols visible)
natural_image
3D CAD model of a mechanical assembly with highlighted components (no text or symbols visible)
natural_image
3D diagram of a refrigerator interior showing internal compartments and storage racks (no text or labels)- in bed and breakfasts (B & B)
natural_image
3D mechanical assembly diagram showing a component before and after modification, with no visible text or symbols.natural_image
3D mechanical component before and after assembly, showing a bracket and mounting plate (no text or symbols)natural_image
3D CAD model of a computer monitor showing front panel and side view with mounting holes, alongside a close-up of the internal mechanical bracket (no text or symbols visible)natural_image
3D rendering of a stainless steel cabinet with two blue doors and metal frame (no text or symbols visible)Onderste scharnier
natural_image
3D technical illustration of a mechanical or electronic device interior with no visible text or symbolsnatural_image
3D rendering of a server rack with a red circle highlighting the front panel (no text or symbols visible)
natural_image
3D diagram of a refrigerator interior showing internal compartments and storage racks (no text or symbols)Deurhandgreep installeren
text_image
Stap 3 Stap 2 Stap 1natural_image
3D diagram of a server rack with two yellow-labeled components and mounting holes (no text or symbols)
natural_image
Technical illustration of a mechanical assembly with a green plastic clip and bolted pins, no visible text or symbols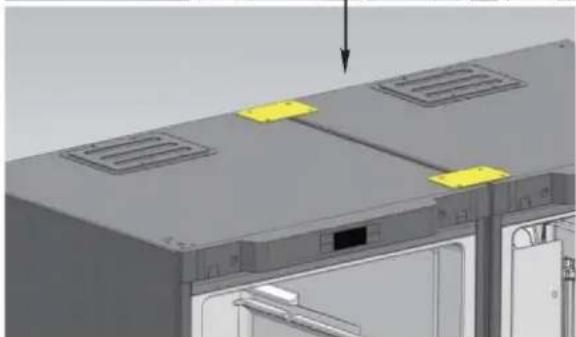
natural_image
3D rendering of a server rack with ventilation grilles and a door, showing no text or symbols
natural_image
Technical diagram showing a structural joint with a yellow component and an arrow indicating direction (no text or symbols present)natural_image
3D rendering of a server rack cabinet with multiple compartments and a highlighted door (no text or symbols visible)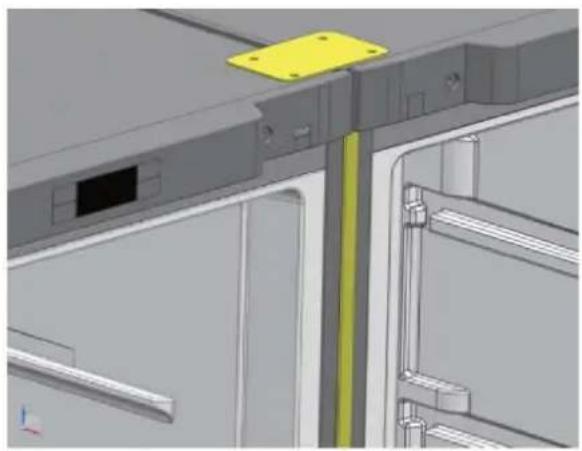
natural_image
3D CAD model of a mechanical assembly with highlighted components (no text or symbols visible)
natural_image
3D diagram of a refrigerator interior showing internal compartments and storage racks (no text or labels)- farmy, v hotely, motely a jiné typy residencí
- noclehárny (B & B)
natural_image
3D mechanical assembly diagram showing a component before and after modification, with no visible text or symbols.natural_image
3D mechanical component before and after assembly, showing a bracket and mounting plate (no text or symbols)natural_image
3D model of a computer monitor rear panel showing internal components and a close-up view of the lock mechanism (no text or symbols)natural_image
3D rendering of a stainless steel kitchen drawer with two blue drawers and a handle (no text or symbols visible)Dolní závěs
natural_image
3D technical illustration of a cabinet interior with labeled compartments and storage areas (no text or symbols)natural_image
3D rendering of a computer tower with red circles highlighting the front panel (no text or symbols visible)
natural_image
3D diagram of a refrigerator interior showing internal compartments and storage racks (no text or symbols)Montáž madla
natural_image
3D diagram of a server rack with two yellow-labeled components and ventilation grilles (no text or symbols)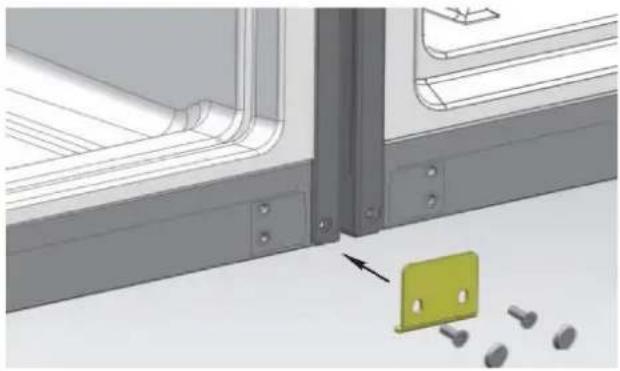
natural_image
Technical illustration of a mechanical assembly with a green plastic clip and bolted pins, no visible text or symbols
natural_image
3D rendering of a server rack with ventilation grilles and a door, showing no text or symbols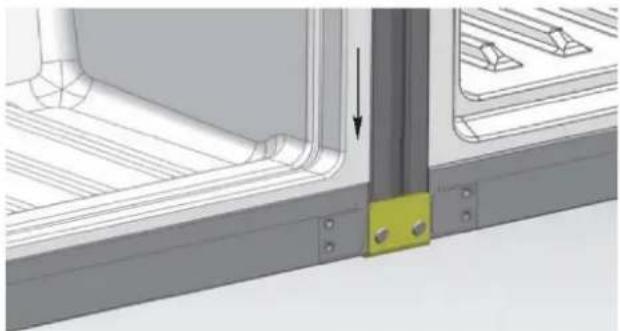
natural_image
Technical diagram showing a structural joint with a yellow component and an arrow indicating direction (no text or symbols present)natural_image
3D rendering of a server rack cabinet with multiple compartments and a highlighted door (no text or symbols visible)
natural_image
3D CAD model of a mechanical assembly with highlighted components (no text or symbols visible)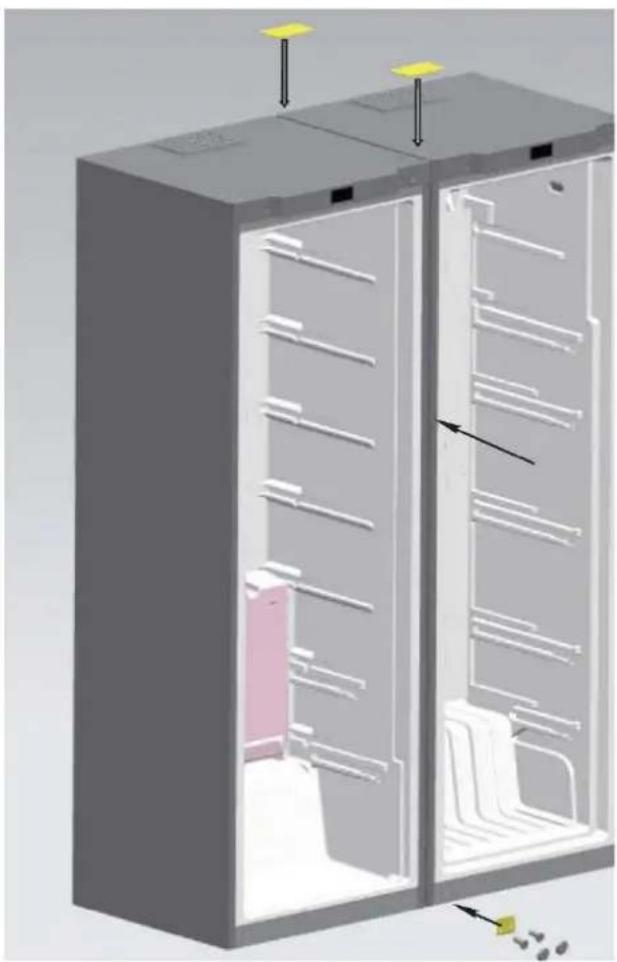
natural_image
3D diagram of a refrigerator interior showing internal compartments and storage racks (no text or labels)natural_image
Simple line drawing of a smiling rectangular character with a pointing hand (no text or symbols)natural_image
Cartoon illustration of a girl running away from a door while looking sad (no text or symbols)natural_image
Cartoon illustration of a spray can with a sad face and a small mouth, no text or symbols present
natural_image
Cartoon illustration of a door with a sad face and a bandaged handle (no text or symbols)natural_image
Simple line drawing of a door with a power outlet and a plug, no text or symbols presentnatural_image
3D mechanical assembly diagram showing a component before and after modification, with no visible text or symbols.natural_image
3D mechanical component before and after assembly, showing a bracket with mounting holes and a curved bracket (no text or symbols)natural_image
Technical illustration of a computer monitor rear panel showing internal components and a close-up view of the lock mechanism (no text or symbols present)natural_image
3D rendering of a stainless steel cabinet with two blue-lit doors open, showing internal compartments (no text or symbols visible)Dolny zawias
natural_image
3D technical illustration of a mechanical or electronic device interior with no visible text or symbolsnatural_image
3D rendering of a server rack with a highlighted cable (no text or symbols visible)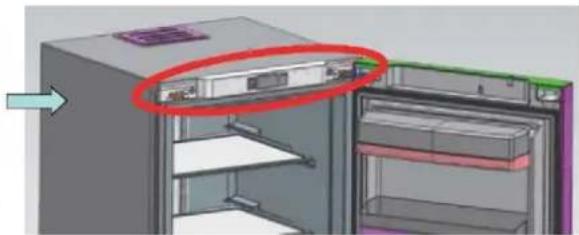
natural_image
3D model of a refrigerator with a red-circled opening and arrow indicating direction (no text or symbols)Instalacja uchwytu
natural_image
3D diagram of a server rack with two yellow-labeled components and mounting holes (no text or symbols)
natural_image
Technical illustration of a mechanical assembly with a green plastic clip and bolted pins, no visible text or symbols
natural_image
3D rendering of a server rack with ventilation grilles and a door, showing no text or symbols
natural_image
Technical diagram showing a structural joint with a yellow component and an arrow indicating direction (no text or symbols present)natural_image
3D rendering of a server rack cabinet with multiple compartments and a highlighted internal panel (no text or symbols visible)
natural_image
3D CAD model of a mechanical assembly with highlighted components (no text or symbols visible)
natural_image
3D diagram of a refrigerator interior showing internal compartments and storage racks (no text or labels)FOR appliances without a 4-star compartment: this refrigerating appliance is not suitable for freezing foodstuffs
FOR a free standing appliance: this refrigerating appliance is not intended to be used as a built-in appliance
FOR Wine Coolers: this appliance is intended to be used exclusively for the storage of wine
FOOD STORAGE
Position different food in different compartments according to be below table
| Refrigerator compartment | Type of food |
| Door or balconies of fridge compartment | ·Foods with natural preservatives, such as jams, juices, drinks, condiments.·Do not store perishable foods |
| Crisper drawers (salad drawer) | ·Fruits, herbs and vegetables should be placed separately in the crisper bin·Do not store bananas, onions, potatoes, garlic in the refrigerator |
| Fridge shelf – middle | ·Dairy products, eggs |
| Fridge shelf – top | ·Foods that do no need coocking, such as ready-to-eat foods, deli meats, leftovers. |
| Freezer drawer(s)/tray | ·Foods for long-term storage·Bottom drawer for raw meet, poultry, fish·Middle drawer for frozen vegetables, chips.·Top tray for ice cream, frozen fruit, frozen baked goods. |
- It's suggested to set the temperature at 4^ in the fridge compartment, and, whether possible, at -18^ in the freezer compartment.
- For most food categories, the longest storage time in the fridge compartment is achieved with colder temperatures. Since some particular products (as fresh fruits and vegetables) may be damaged with colder temperatures, it is suggested to keep them in the crisper drawers, whenever present. If not present, maintain an average setting of the thermostat.
- For frozen food, refer to the storage time written on the food packaging. This storage time is achieved whenever the setting respects the reference temperatures of the compartment (one-star -6°C, two stars -12°C, three stars -18°
POSITIONING
Install the appliance at a location where the ambient temperature corresponds to the climate class indicated on the rating plate of the appliance:
- Extended temperate (SN): ‘this refrigerating appliance is intended to be used at ambient temperatures ranging from 10 °C to 32 °C’
- Temperate (N): ‘this refrigerating appliance is intended to be used at ambient temperatures ranging from 16 °C to 32 °C’
- Subtropical (ST): ‘this refrigerating appliance is intended to be used at ambient temperatures ranging from 16 °C to 38 °C’
- Tropical (T): ‘this refrigerating appliance is intended to be used at ambient temperatures ranging from 16 °C to 43 °C’
AVAILABILITY OF SPARE PARTS
“Thermostats, temperature sensors, printed circuit boards and light sources are available for a minimum period of seven years after placing the last unit of the model on the market. Door handles, door hinges, trays and baskets for a minimum period of seven years and door gaskets for a minimum period of 10 year, after placing the last unit of the model on the market”.
GUARANTEE
Minimum guarantee is: 2 years for EU Countries, 3 years for Turkey, 1 year for UK, 1 year for Russia, 3 years for Sweden, 2 years for Serbia, 5 years for Norway, 1 year for Morocco, 6 months for Algeria, Tunisia no legal warranty required.
TECHNICAL ASSISTANCE
To contact the technical assistance, visit our website: https://corporate.haier-europe.com/en/ Under the section “website”, choose the brand of your product and your country. You will be redirected to the specific website where you can find the telephone number and form to contact the technical assistance
For further information about the product, please consult https://eprel.ec.europa.eu/ or scan the QR on the energy label supplied with the appliance