
BM1645 - Desktop computer ASUS - Free user manual and instructions
Find the device manual for free BM1645 ASUS in PDF.
| Product Type | Desktop Computer |
| Brand | ASUS |
| Model | BM1645 / BM1845 / MD250 |
| Operating System | Windows® 7 Pre-installed |
| Processor | Socket LGA1155, compatible Intel® Core™ i7/i5/i3/Pentium®/Celeron® |
| RAM Memory | 2 x DDR3 DIMM, max 16 GB |
| Hard Drive | 3.5-inch bays, SATA |
| Optical Drive | DVD-ROM / CD-RW / DVD-RW (depending on model) |
| Front Panel Connectors | 1 x microphone, 1 x headphone, 2 x USB 2.0, 2 x USB 3.0 |
| Rear Panel Connectors | 1 x PS/2, 4 x USB 2.0, 2 x USB 3.0, 1 x HDMI, 1 x DVI-D, 1 x VGA, 1 x RJ-45, 1 x S/PDIF optical, 6 x audio |
| Network | Gigabit LAN |
| Audio | 8-channel High Definition Audio |
| Power Supply | Internal power supply, voltage selector 115V/230V |
| Included Software | ASUS AI Suite II, AI Manager, WebStorage, Easy Update, Secure Delete, Nero 9 |
| Key Features | System monitoring (Probe II), energy management (EPU), system recovery, wired Internet connection |
| Maintenance and Cleaning | Disconnect power before cleaning; use a non-abrasive damp cloth; do not block ventilation openings |
| Security | BIOS and Windows password protection, AI Security for USB devices |
| Operating Temperature | 0 °C to 40 °C |
| Country of Origin | Taiwan |
| Standards | FCC Class B, ICES-003, REACH |
Frequently Asked Questions - BM1645 ASUS
User questions about BM1645 ASUS
0 question about this device. Answer the ones you know or ask your own.
Ask a new question about this device
Download the instructions for your Desktop computer in PDF format for free! Find your manual BM1645 - ASUS and take your electronic device back in hand. On this page are published all the documents necessary for the use of your device. BM1645 by ASUS.
USER MANUAL BM1645 ASUS
Copyright © 2012 ASUSTeK Computer Inc. All Rights Reserved.
No part of this manual, including the products and software described in it, may be reproduced, transmitted, transcribed, stored in a retrieval system, or translated into any language in any form or by any means, except documentation kept by the purchaser for backup purposes, without the express written permission of ASUSTeK Computer Inc. ("ASUS").
Product warranty or service will not be extended if: (1) the product is repaired, modified or altered, unless such repair, modification of alteration is authorized in writing by ASUS; or (2) the serial number of the product is defaced or missing.
ASUS PROVIDES THIS MANUAL "AS IS" WITHOUT WARRANTY OF ANY KIND, EITHER EXPRESS OR IMPLIED, INCLUDING BUT NOT LIMITED TO THE IMPLIED WARRANTYES OR CONDITIONS OF MERCHANTABILITY OR FITNESS FOR A PARTICULAR PURPOSE. IN NO EVENT SHALL ASUS, ITS DIRECTORS, OFFICERS, EMPLOYEES OR AGENTS BE LIABLE FOR ANY INDIRECT, SPECIAL, INCIDENTAL, OR CONSEQUENTIAL DAMAGES (INCLUDING DAMAGES FOR LOSS OF PROFITS, LOSS OF BUSINESS, LOSS OF USE OR DATA, INTERRUPTION OF BUSINESS AND THE LIKE), EVEN IF ASUS HAS BEEN ADVISED OF THE POSSIBILITY OF SUCH DAMAGES ARISING FROM ANY DEFECT OR ERROR IN THIS MANUAL OR PRODUCT.
SPECIFICATIONS AND INFORMATION CONTAINED IN THIS MANUAL ARE FURNISHED FOR INFORMATIONAL USE ONLY, AND ARE SUBJECT TO CHANGE AT ANY TIME WITHOUT NOTICE, AND SHOULD NOT BE CONSTRUED AS A COMMITMENT BY ASUS. ASUS ASSUMES NO RESPONSIBILITY OR LIABILITY FOR ANY ERRORS OR INACCURACIES THAT MAY APPEAR IN THIS MANUAL, INCLUDING THE PRODUCTS AND SOFTWARE DESCRIBED IN IT.
Products and corporate names appearing in this manual may or may not be registered trademarks or copyrights of their respective companies, and are used only for identification or explanation and to the owners' benefit, without intent to infringe.
Contents
Notices 5
Safety information 7
Conventions used in this guide 8
Where to find more information 8
Package contents 9
Chapter 1 Getting started
Welcome! 11
Getting to know your computer 11
Setting up your computer 17
Turning your computer ON/OFF 19
Chapter 2 Using Windows 7
Starting for the first time. 21
Using Windows 7 desktop 22
Managing your files and folders 24
Restoring your system settings 26
Protecting your computer 27
Getting Windows® Help and Support 28
Chapter 3 Connecting devices to your computer
Connecting a USB storage device 29
Connecting microphone and speakers 30
Chapter 4 Using your computer
Proper posture when using your Desktop PC 33
Using the optical drive (on selected models only) 34
Configuring the USB ports using the BIOS 35
Chapter 5 Connecting to the Internet
Wired connection 37
Chapter 6 Using the utilities
ASUS AI Suite II 39
ASUS AI Manager 46
ASUS Webstorage. 49
ASUS Easy Update 51
ASUS Secure Delete 52
Contents
Nero 9 53
Recovering your system 54
Chapter 7 Troubleshooting
Troubleshooting 57
ASUS contact information 64
Notices
ASUS Recycling/Takeback Services
ASUS recycling and takeback programs come from our commitment to the highest standards for protecting our environment. We believe in providing solutions for you to be able to responsibly recycle our products, batteries, other components, as well as the packaging materials. Please go to http://csr.asus.com/english/Takeback.htm for the detailed recycling information in different regions.
REACH
Complying with the REACH (Registration, Evaluation, Authorisation, and Restriction of Chemicals) regulatory framework, we published the chemical substances in our products at ASUS REACH website at http://csr.asus.com/english/REACH.htm
Federal Communications Commission Statement
This device complies with Part 15 of the FCC Rules. Operation is subject to the following two conditions:
- This device may not cause harmful interference; and
- This device must accept any interference received including interference that may cause undesired operation.
This equipment has been tested and found to comply with the limits for a Class B digital device, pursuant to Part 15 of the FCC Rules. These limits are designed to provide reasonable protection against harmful interference in a residential installation. This equipment generates, uses and can radiate radio frequency energy and, if not installed and used in accordance with manufacturer's instructions, may cause harmful interference to radio communications. However, there is no guarantee that interference will not occur in a particular installation. If this equipment does cause harmful interference to radio or television reception, which can be determined by turning the equipment off and on, the user is encouraged to try to correct the interference by one or more of the following measures:
- Reorient or relocate the receiving antenna.
- Increase the separation between the equipment and receiver.
- Connect the equipment to an outlet on a circuit different from that to which the receiver is connected.
- Consult the dealer or an experienced radio/TV technician for help.

The use of shielded cables for connection of the monitor to the graphics card is required to assure compliance with FCC regulations. Changes or modifications to this unit not expressly approved by the party responsible for compliance could void the user's authority to operate this equipment.
RF exposure warning
This equipment must be installed and operated in accordance with provided instructions and the antenna(s) used for this transmitter must be installed to provide a separation distance of at least 20~cm from all persons and must not be co-located or operating in conjunction with any other antenna or transmitter. End-users and installers must be provide with antenna installation instructions and transmitter operating conditions for satisfying RF exposure compliance.
Canadian Department of Communications Statement
This digital apparatus does not exceed the Class B limits for radio noise emissions from digital apparatus set out in the Radio Interference Regulations of the Canadian Department of Communications.
This class B digital apparatus complies with Canadian ICES-003.
Macrovision Corporation Product Notice
This product incorporates copyright protection technology that is protected by method claims of certain U.S. patents and other intellectual property rights owned by Macrovision Corporation and other rights owners. Use of this copyright protection technology must be authorized by Macrovision Corporation, and is intended for home and other limited viewing uses only unless otherwise authorized by Macrovision Corporation. Reverse engineering or disassembly is prohibited.
Lithium-Ion Battery Warning
CAUTION: Danger of explosion if battery is incorrectly replaced. Replace only with the same or equivalent type recommended by the manufacturer. Dispose of used batteries according to the manufacturer's instructions.
Safety information

Disconnect the AC power and peripherals before cleaning. Wipe the Desktop PC using a clean cellulose sponge or chamos cloth dampened with solution of nonabrasive detergent and a few drops of warm water then remove any extra moisture with a dry cloth.
- DO NOT place on uneven or unstable work surfaces. Seek servicing if the casing has been damaged.
DO NOT expose to dirty or dusty environments. DO NOT operate during a gas leak. - DO NOT place or drop objects on top and do not shove any foreign objects into the Desktop PC.
- DO NOT expose to strong magnetic or electrical fields.
DO NOT expose to or use near liquids, rain, or moisture. DO NOT use the modem during electrical storms. - Battery safety warning: DO NOT throw the battery in fire. DO NOT short circuit the contacts. DO NOT disassemble the battery.
- Use this product in environments with ambient temperatures between 0^ ( 32^ ) and 40^ ( 104^ ).
- DO NOT cover the vents on the Desktop PC to prevent the system from getting overheated.
- DO NOT use damaged power cords, accessories, or other peripherals.
- To prevent electrical shock hazard, disconnect the power cable from the electrical outlet before relocating the system.
- Seek professional assistance before using an adapter or extension cord. These devices could interrupt the grounding circuit.
- Ensure that your power supply is set to the correct voltage in your area. If you are not sure about the voltage of the electrical outlet you are using, contact your local power company.
- If the power supply is broken, do not try to fix it by yourself. Contact a qualified service technician or your retailer.
Conventions used in this guide
To ensure that you perform certain tasks properly, take note of the following symbols used throughout this manual.

DANGER/WARNING: Information to prevent injury to yourself when trying to complete a task.

CAUTION: Information to prevent damage to the components when trying to complete a task.

PORTANT: Instructions that you MUST follow to complete a task.

NOTE: Tips and additional information to help you complete a ask.
Where to find more information
Refer to the following sources for additional information and for product and software updates.
ASUS websites
The ASUS website provides updated information on ASUS hardware and software products. Refer to the ASUS website www.asus.com.
ASUS Local Technical Support
Visit ASUS website at http://support.asus.com/contact for the contact information of local Technical Support Engineer.
Package contents
| ASUS Desktop PC Keyboard x1 Mouse x1 | ||
| Power cord x1 Suppor | DVD x1 (Optional) Recovery DVD x1 (Optional) | |
| Installation Guide | Warranty Card | |
| Nero 9 burning software DVD x1 (Optional) | Installation Guide x1 Warranty card x1 | |

- If any of the above items is damaged or missing, contact your retailer.
- The illustrated items above are for reference only. Actual product specifications may vary with different models.
Chapter 1
Getting started
Welcome!
Thank you for purchasing the ASUS Desktop PC!
The ASUS Desktop PC provides cutting-edge performance, uncompromised reliability, and user-centric utilities. All these values are encapsulated in a stunningly futuristic and stylish system casing.

Read the ASUS Warranty Card before setting up your ASUS Desktop PC.
Getting to know your computer

Illustrations are for reference only. The ports and their locations, and the chassis color vary with different models.
BM1845
Front panel

- 5.25 inch optical disk drive bay. The 5.25 inch optical disk drive bay is for 5.25 inch DVD-ROM / CD-RW / DVD-RW devices.
- Optical disk drive eject button. Press this button to eject the optical disk drive tray.
- Optical disk drive bay (empty). You may install an additional optical disk drive in this bay.
- HDD LED. This LED lights up when the hard disk drive operates.
- Power button. Press this button to turn on your computer.
- Microphone. This port connects to a microphone.
- Headphone port. This port connects to a headphone or speaker.
- USB 3.0 ports. These two 9-pin Universal Serial Bus (USB) ports connect to USB 3.0/2.0 devices.

- DO NOT connect a keyboard / mouse to any USB 3.0 port when installing Windows ^ operating system.
- Due to USB 3.0 controller limitation, USB 3.0 devices can only be used under Windows OS environment and after the USB 3.0 driver installation.
- USB 3.0 devices can only be used as data storage only.
-
We strongly recommend that you connect USB 3.0 devices to USB 3.0 ports for faster and better performance for your USB 3.0 devices.
-
USB 2.0 ports. These Universal Serial Bus 2.0 (USB 2.0) ports connect to USB 2.0 devices such as a mouse, printer, scanner, camera, PDA, and others.
BM1645/MD250
Front panel
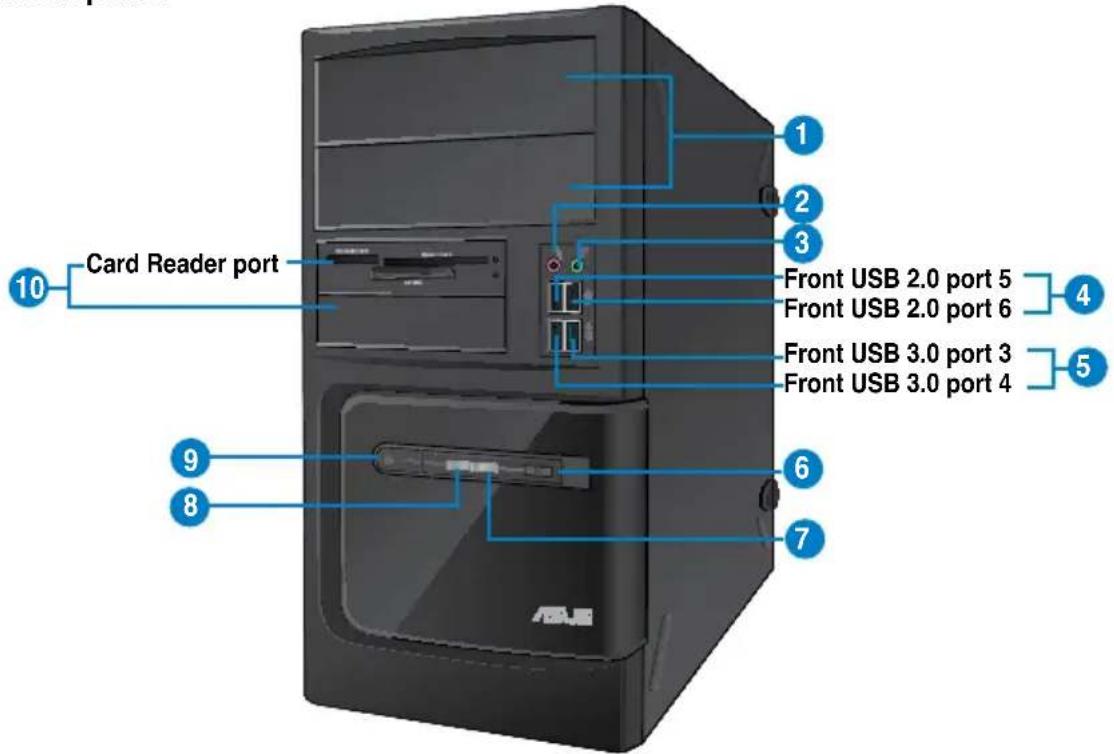
- 2 x 5.25 inch optical disk drive bays. The 5.25 inch optical disk drive bays are for 5.25 inch DVD-ROM / CD-RW / DVD-RW devices.
- Microphone port (pink). This port connects to a microphone.
- Headphone port (lime). This port connects to a headphone or speaker.
- USB 2.0 ports. These Universal Serial Bus 2.0 (USB 2.0) ports connect to USB 2.0 devices such as a mouse, printer, scanner, camera, PDA, and others.
- USB 3.0 ports. These Universal Serial Bus 3.0 (USB 3.0) ports connect to USB 3.0 devices such as a mouse, printer, scanner, camera, PDA, and others.

- DO NOT connect a keyboard / mouse to any USB 3.0 port when installing Windows® operating system.
- Due to USB 3.0 controller limitation, USB 3.0 devices can only be used under Windows OS environment and after the USB 3.0 driver installation.
- USB 3.0 devices can only be used as data storage only.
-
We strongly recommend that you connect USB 3.0 devices to USB 3.0 ports for faster and better performance for your USB 3.0 devices.
-
Reset button. Press this button to reboot your computer.
- HDD LED. This LED lights up when the hard disk drive operates.
- Power LED. This LED lights up when you turn on your computer.
- Power button. Press this button to turn on your computer.
- 2 x 3.5 inch drive bays. The 3.5 inch drive bays are for 3.5 inch hard disk drives / memory card readers.
Rear panel
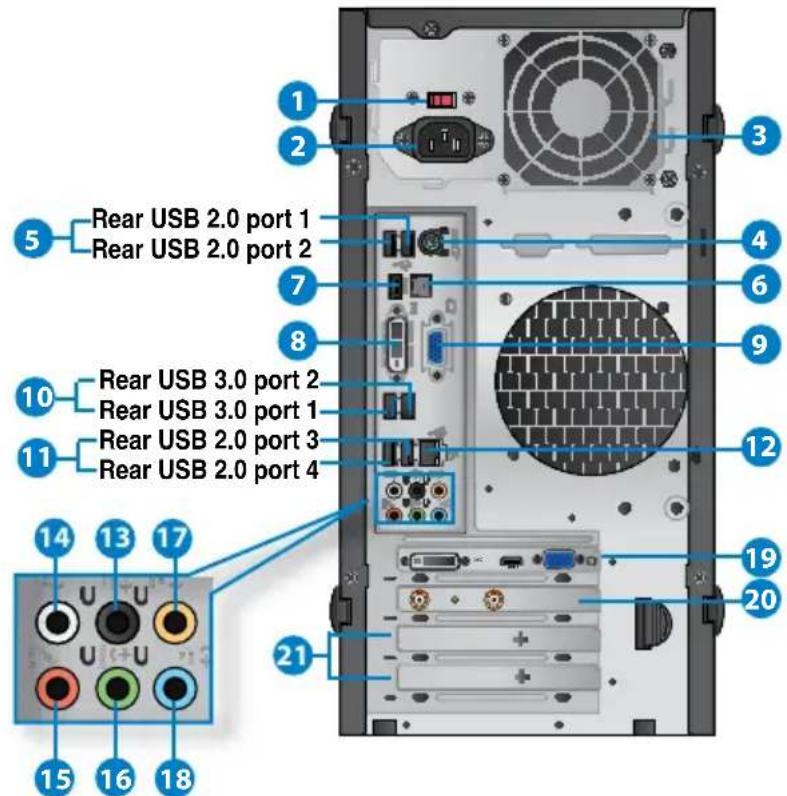
- Voltage selector switch. Use this switch to select the appropriate system input voltage according to the voltage supply in your area. If the voltage supply in your area is 100-127V, set the switch to 115V. If the voltage supply in your aear is 200-240V, set the swtch to 230V.

Setting the switch to 115V in a 230V environment or 230V in a 115V environment will seriously damage the system!
- Power connector. Plug the power cord to this connector.
- Air vents.Air vents. These vents allow air ventilation.

DO NOT block the air vents on the chassis. Always provide proper ventilation for your computer.
- PS/2 Keyboard / Mouse Combo port (purple/green). This port is for a PS/2 keyboard or PS/2 mouse.
- USB 2.0 ports. These Universal Serial Bus 2.0 (USB 2.0) ports connect to USB 2.0 devices such as a mouse, printer, scanner, camera, PDA, and others.
- Optical S/PDIF output port. This port connects to an external audio output device via an optical S/PDIF cable.
- HDMI port. This port is for a High-Definition Multimedia Interface (HDMI) connector, and is HDCP compliant allowing playback of HD DVD, Blu-ray, and other protected content.
- DVI-D port. This port is for any DVI-D compatible device and is HDCP compliant allowing playback of HD DVD, Blu-ray, and other protected content.
- VGA port.VGA port. This port is for VGA-compatible devices such as a VGA monitor.
- USB 3.0 ports. These Universal Serial Bus 3.0 (USB 3.0) ports connect to USB 3.0 devices such as a mouse, printer, scanner, camera, PDA, and others.

- DO NOT connect a keyboard / mouse to any USB 3.0 port when installing Windows® operating system.
- Due to USB 3.0 controller limitation, USB 3.0 devices can only be used under Windows® OS environment and after the USB 3.0 driver installation.
- USB 3.0 devices can only be used as data storage only.
-
We strongly recommend that you connect USB 3.0 devices to USB 3.0 ports for faster and better performance for your USB 3.0 devices.
-
USB 2.0 ports. These Universal Serial Bus 2.0 (USB 2.0) ports connect to USB 2.0 devices such as a mouse, printer, scanner, camera, PDA, and others.
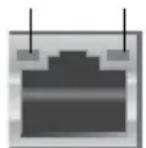
- LAN (RJ-45) port. This port allows Gigabit connection to a Local Area Network (LAN) through a network hub.
LAN port LED indications
| Activity/Link LED Speed LED | ||
| Status Description Status Description | ||
| OFF No link OFF 10Mbps connection | ||
| ORANGE Linked ORANGE 100Mbps connection | ||
| BLINKING Data activity GREEN 1Gbps connection | ||

- Rear Speaker Out port (black). This port connects to the rear speakers in a 4, 6, and 8-channel audio configuration.
- Side Speaker Out port (gray). This port connects to the side speakers in an 8-channel audio configuration.
- Microphone port (pink). This port connects to a microphone.
- Line Out port (lime). This port connects to a headphone or speaker. In a 4, 6, or 8-channel configuration, the function of this port becomes Front Speaker Out.
- Center/Subwoofer port (orange). This port connects to the center/subwoofer speakers.
- Line In port (light blue). This port connects to a tape, CD, DVD player, or other audio sources.

Refer to the audio configuration table below for the function of the audio ports in a 2, 4, 6, or 8-channel configuration.
Audio 2, 4, 6, or 8-channel configuration
| Port | Headset 2-channel | 4-channel 6-channel 8-channel | ||
| Light Blue Line | In Line In Line In | Line In | ||
| Lime | Line Out | Front Speaker Out | Front Speaker Out | Front Speaker Out |
| Pink | Mic In | Mic In | Mic In | Mic In |
| Orange | - | - | Center/Subwoofer | Center/Subwoofer |
| Black | - | Rear Speaker Out | Rear Speaker Out | Rear Speaker Out |
| Gray | - | - | - | Side Speaker Out |
- ASUS Graphics Card (on selected models only). The display output ports on this optional ASUS Graphics Card may vary with different models.
- ASUS WLAN Card (on selected models only). This optional WLAN card allows your computer to connect to a wireless network.
- Expansion slot bracket. Remove the expansion slot bracket when installing an expansion card.
Setting up your computer
This section guides you through connecting the main hardware devices, such as the external monitor, keyboard, mouse, and power cord, to your computer.
Using the onboard display output ports
Connect your monitor to the onboard display output port.
To connect an external monitor using the onboard display output ports:
- Connect your monitor to the VGA port, DVI-D port, or display port of your computer.
- Plug your monitor to a power source.
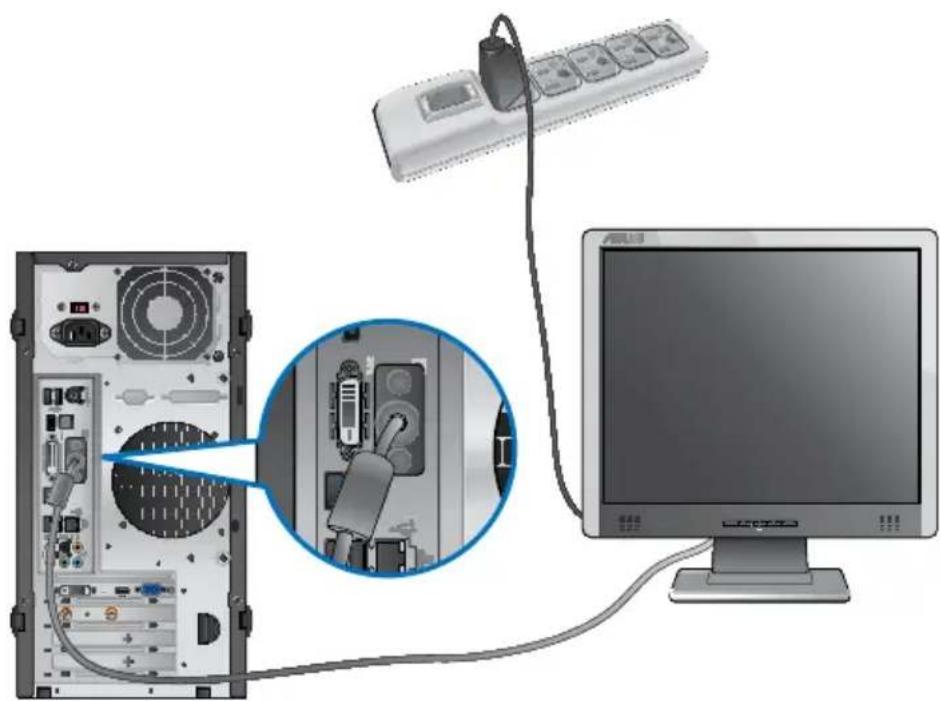

If your computer comes with an ASUS Graphics Card, the graphics card is set as the primary display device in the BIOS. Hence, connect your monitor to a display output port on the graphics card.
Connecting a USB keyboard and a USB mouse
Connect a USB keyboard and a USB mouse to the USB ports on the rear panel of your computer.

Connecting the power cord
Connect one end of the power cord to the power connector on the rear panel of your computer and the other end to a power source.

Turning your computer ON/OFF
This section describes how to turn on/off your computer after setting up your computer.
Turning your computer ON
To turn your computer ON:
- Turn your monitor ON.
- Turn the power switch ON (for BM6630/MD510 and BM6330 only).
- Press the power button on your computer.

- Wait until the operating system loads automatically.
Turning your computer OFF
To turn your computer OFF:
- Close all running applications.
- Click on the Windows desktop.
- Click to shut down the operating system.
Chapter 2
Using Windows® 7
Starting for the first time
When you start your computer for the first time, a series of screens appear to guide you in configuring the basic settings of your Windows® 7 operating system.
To start for the first time:
- Turn your computer on. Wait for a few minutes until the Set Up Windows screen appears.
- From dropdown list, select your language, then click Next.
- From the dropdown lists, select your Country or region, Time and currency, and Keyboard layout, then click Next.
- Key in uniques names for the user name and computer name, then click Next.
- Key in the necessary information to set up your password, then click Next. You may also click Next to skip this step without entering any information.

If you want to set up a password for your account later, refer to the section Setting up a user account and password in this chapter.
- Carefully read the license terms. Tick I accept the license terms and click Next.
- Select Use recommended settings or Install important updates only to set up the security settings for your computer. To skip this step, select Ask me later.
- Review your date and time settings. Click Next. The system loads the new settings and restarts. You may now start using your computer.
Using Windows® 7 desktop

Click the Start icon >Help and Support to obtain more information about Windows
37.
Using the Start menu
The Start menu gives you access to programs, utilities, and other useful items on your computer. It also provides you with more information about Windows 7 through its Help and Support feature.
Launching items from the Start menu
To launch items from the Start menu:
1.From the Windows 包 taskbar, click the Start icon
2. From the Start menu, select the item that you want to launch.

You may pin programs that you want constantly displayed on the Start menu. For more details, refer to the section Pinning programs on the Start menu or taskbar on this chapter.
Using the Getting Started item
The Getting Started item on the Start menu contains information about some basic tasks such as personalizing Windows, adding new users, and transferring files to help you to familiarize yourself with using Windows 7.
To use the Getting Started item:
- From the Windows 串 taskbar, click the Start icon to launch the Start menu.
- Select Getting Started. The list of available tasks appears.
- Select the task that you want to do.
Using the taskbar
The taskbar allows you to launch and manage programs or items installed on your computer.
Launching a program from the taskbar
To launch a program from the taskbar:
- From the Windows taskbar, click an icon to launch it. Click the icon again to hide the program.

You may pin programs that you want constantly displayed on the taskbar. For more details, refer to the section Pinning programs on the Start menu or taskbar on this chapter.
Pinning items on the jumplists
When you right-click an icon on the taskbar, a jumplist launches to provide you with quick-access to the program's or item's related links. You may pin items on the jumplist such as favorite websites, often-visited folders or drives, or recently played media files.
To pin items to the jumper:
- From the taskbar, right-click an icon.
- From the jumplist, right-click the item that you want to pin, then select Pin to this list.
Unpinning items from the jumlist
To unpin items from the jumplist:
- From the taskbar, right-click an icon.
- From the jumplist, right-click the item that you want to remove from the jumplist, then select Unpin from this list.
Pinning programs on the Start menu or taskbar
To pin programs on the Start menu or taskbar:
- From the Windows 忍 taskbar, click the Start icon to launch the Start menu.
- Right-click the item that you want to pin on the Start menu or taskbar.
- Select Pin to Taskbar or Pin to Start menu.

You may also right-click on the icon of a running program on the taskbar, then select Pin this program to taskbar.
Unpinning programs from the Start menu
To unpin programs from the Start menu:
- From the Windows 假 taskbar, click the Start icon to launch the Start menu.
- From the Start menu, right-click the program that you want to unpin, then select Remove from this list.
Unpinning programs from the taskbar
To unpin programs from the taskbar:
- From the taskbar, right-click the program that you want to remove from the taskbar, then select Unpin this program from taskbar.
Using the notification area
By default, the notification area shows these three icons:
| Action Center notification Click this icon to display all the alert messages/alerts and launch the Windows® Action Center. | |
| Network connection This icon displays the connection status and signal strength of the wired or wireless network connection. | |
| Volume Click this icon to adjust the volume. |
Displaying an alert notification
To display an alert notification:
- Click the Notification icon, then click the message to open it.

For more details, refer to the section Using Windows® Action Center in this chapter.
Customizing icons and notifications
You may choose to display or hide the icons and notifications on the taskbar or on the notification area.
To customize icons and notifications:
- From the notification area, click on the arrow icon.
- Click Customize.
- From the dropdown list, select the behaviors for the icons or items that you want to customize.
Managing your files and folders
Using Windows Explorer
Windows Explorer allows you to view, manage, and organize your files and folders.
Launching Windows® Explorer
To launch Windows Explorer:
- From the Windows 假 taskbar, click the Start icon to launch the Start menu.
- Click Computer to launch Windows Explorer.
Exploring files and folders
To explore files and folders:
- Launch Windows Explorer.
- From the navigation or view pane, browse for the location of your data.
- From the breadcrumb bar, click the arrow to display the contents of the drive or folder.
Customizing the file/folder view
To customize the file/folder view:
-
Launch Windows Explorer.
-
From the navigation pane, select the location of your data.
-
From the toolbar, click the View icon.

- From the View menu, move the slider to select how you want to view the file/folder.

You may also right-click anywhere on the View pane, click View, and select the view type that you want.
Arranging your files
To arrange your files:
- Launch Windows Explorer.
- From the Arrange by field, click to display the dropdown list.
- Select your preferred arrangement type.
Sorting your files
To sort your files:
- Launch Windows Explorer.
- Right-click anywhere on the View pane.
- From the menu that appears, select Sort by, then select your preferred sorting type.
Grouping your files
To group your files:
- Launch Windows Explorer.
- Right-click anywhere on the View pane.
- From the menu that appears, select Group by, then select your preferred grouping type.
Adding a new folder
To add a new folder:
- Launch Windows Explorer.
- From the toolbar, click New folder.
- Key in a name for the new folder.

You may also right-click anywhere on the View pane, click New > Folder.
Backing up your files
Setting up a backup
To set up a backup:
- Click >All Programs > Maintenance > Backup and Restore.
- Click Set up backup. Click Next.
- Select your backup destination. Click Next.
- Select Let Windows choose (recommended) or Let me choose as your backup mode.

If you select Let Windows choose, Windows will not back up your programs, FAT-formatted files, Recycle Bin files, or temporary files that are 1GB or more.
- Follow the onscreen instructions to finish the process.
Restoring your system settings
The Windows® System Restore feature creates a restore point where the computer's system settings are stored at certain time and date. It allows you to restore or undo changes to your computer's system settings without affecting your personal data.
To restore your system:
- Close all running applications.
- Click >All Programs >Accessories > System Tools > System Restore.
- Follow the onscreen instructions to complete the process.
Protecting your computer
Using Windows® 7 Action Center
Windows® 7 Action Center provides you with alert notifications, security information, system maintenance information, and the option to automatically troubleshoot and fix some common computer problems.

You may customize the notifications. For more details, refer to the previous section Customizing icons and notifications in this chapter.
Launching Windows® 7 Action Center
To launch Windows® 7 Action Center:
- To launch Windows 7 Action Center, click the Notification icon , then click Open Action Center.
- From Windows 7 Action Center, click the task that you want to do.
Using Windows® Update
Windows Update allows you to check and install the latest updates to enhance the security and performance of your computer.
Launching Windows® Update
To launch Windows Update:
- From the Windows 包 taskbar, click the Start icon to launch the Start menu.
- Select All Programs > Windows Update.
- From the Windows Update screen, click the task that you want to do.
Setting up a user account and password
You may create user accounts and passwords for people who will use your computer.
Setting up a user account
To set up a user account:
- From the Windows © taskbar, click >Getting Started > Add new users.
- Select Manage another account.
- Select Create a new account.
- Key in the name of the new user.
- Select either Standard user or Administrator as the user type.
- When done, click Create Account.
Setting up a user's password
To set up a user's password:
- Select the user that you would like to set a password.
- Select Create a password.
- Key in a password and confirm it. Key in your password's hint.
- When done, click Create password.
Activating the anti-virus software
Trend Micro Internet Security is pre-installed on your computer. It is a third-party anti-virus software protecting your computer from virus. It is purchased separately. You have a 30-day trial period after activating it.
To activate Trend Micro Internet Security:
- Run the Trend Micro Internet Security application.
- Carefully read the license terms. Click Agree & Activate.
- Input your e-mail address and select your location. Click Next.
- Click Finish to complete the activation.
Getting Windows® Help and Support
Windows® Help and Support provides you with guides and answers in using the applications in Windows® 7 platform.
To launch Windows® Help and Support, click >Help and Support.

Ensure that you are connected to the Internet to obtain the latest Windows® online help.
Chapter 3
Connecting devices to your computer
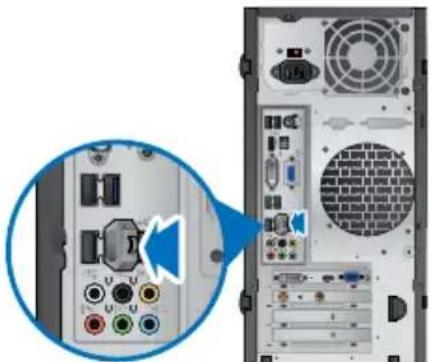
Connecting a USB storage device
This desktop PC provides USB 2.0/1.1 ports on both the front and rear panels. The USB ports allow you to connect USB devices such as storage devices.
To connect a USB storage device:
- Insert the USB storage device to your computer.
Front panel

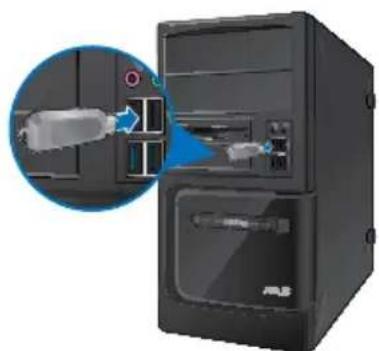
BM1845 BM1645/MD250
Rear panel
To remove a USB storage device:
- Click from the Windows notification area on your computer, then click Eject USB2.0 FlashDisk.
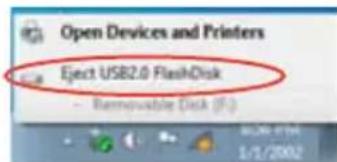
- When the Safe to Remove Hardware message pops up, remove the USB storage device from your computer.
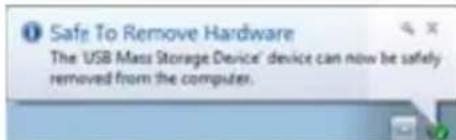

DO NOT remove a USB storage device when data transfer is in progress. Doing so may cause data loss or damage the USB storage device.
Connecting microphone and speakers
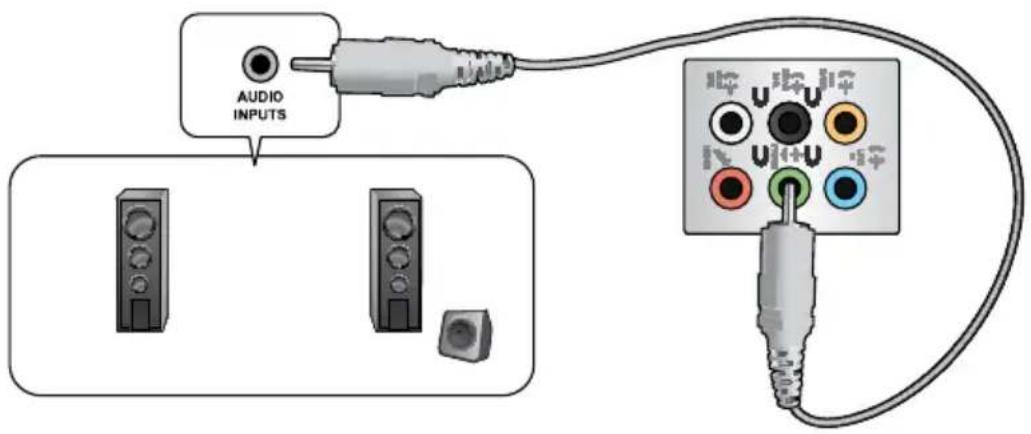
This desktop PC comes with microphone ports and speaker ports on both the front and rear panels. The audio I/O ports located on the rear panel allow you to connect 2-channel, 4-channel, 6-channel, and 8-channel stereo speakers.
Connecting Headphone and Mic
BM1845
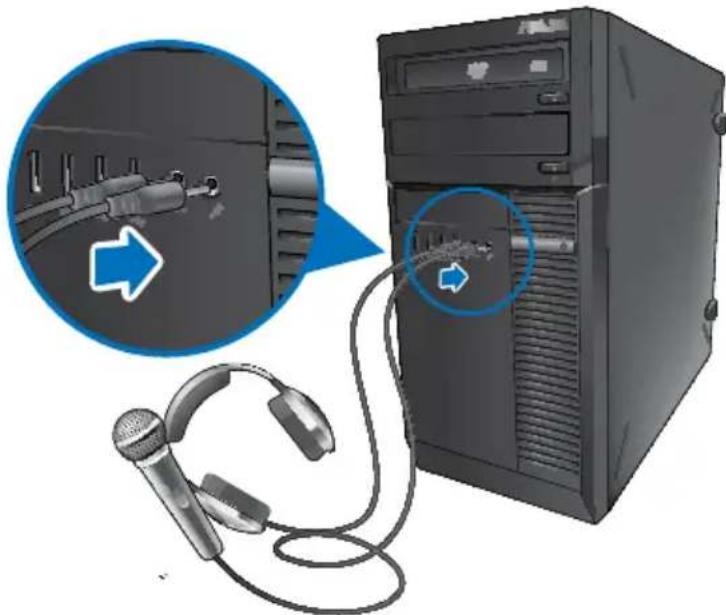
BM1645/MD250

Connecting 2-channel Speakers
Connecting 4-channel Speakers
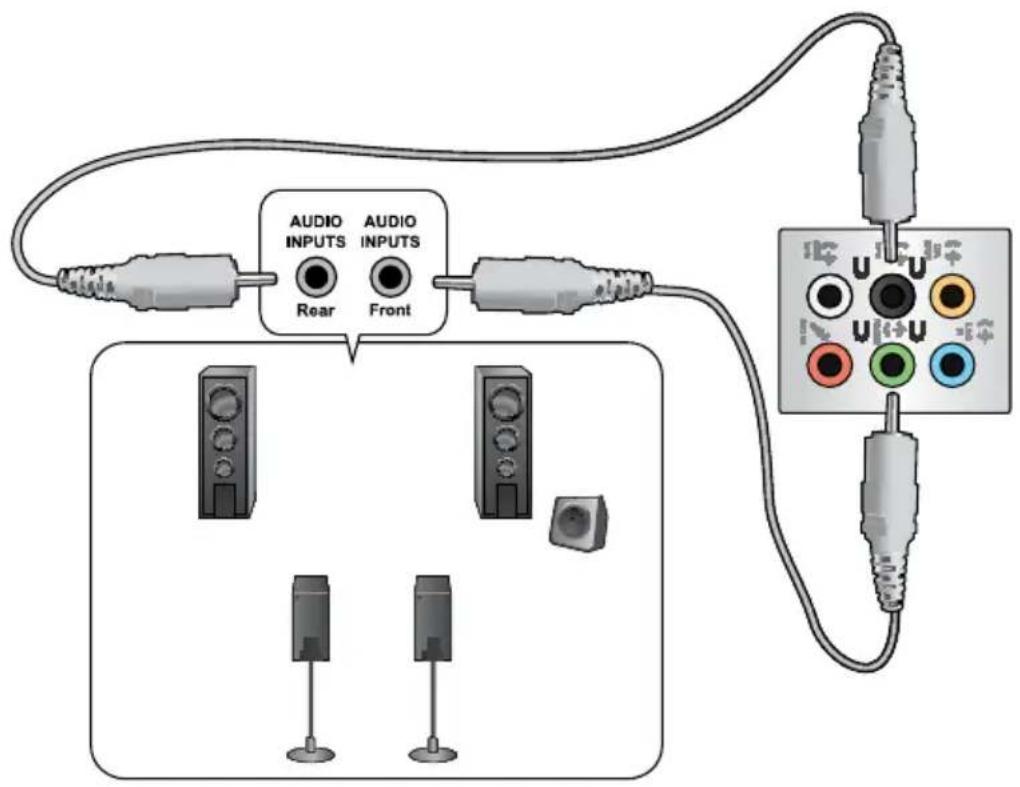
Connecting 6-channel Speakers

Connecting 8-channel Speakers

Chapter 4
Using your computer
Proper posture when using your Desktop PC
When using your Desktop PC, maintaining the proper posture is necessary to prevent strain to your wrists, hands, and other joints or muscles. This section provides you with tips on avoiding physical discomfort and possible injury while using and fully enjoying your Desktop PC.
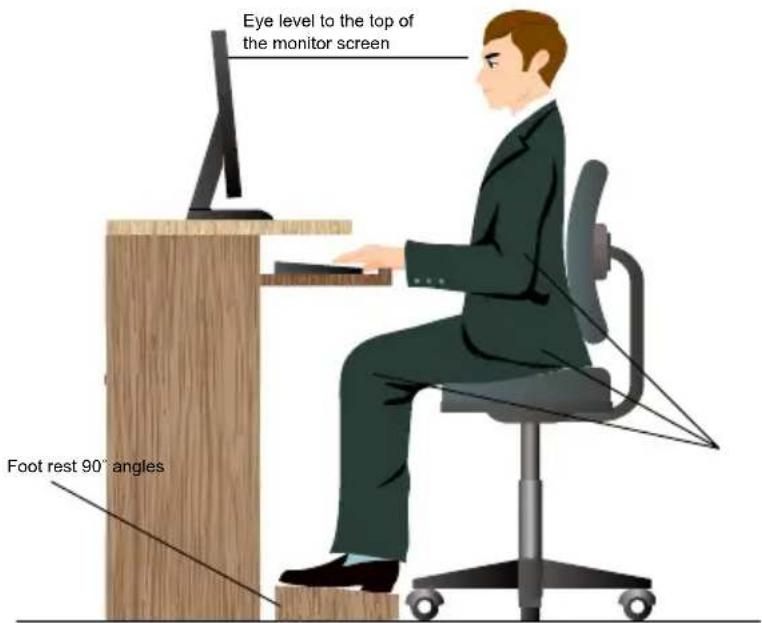
To maintain the proper posture:
- Position your computer chair to make sure that your elbows are at or slightly above the keyboard to get a comfortable typing position.
- Adjust the height of your chair to make sure that your knees are slightly higher than your hips to relax the backs of your thighs. If necessary, use a footrest to raise the level of your knees.
- Adjust the back of your chair so that the base of your spine is firmly supported and angled slightly backward.
- Sit upright with your knees, elbows and hips at an approximately 90^ angle when you are at the PC.
- Place the monitor directly in front of you, and turn the top of the monitor screen even with your eye level so that your eyes look slightly downward.
- Keep the mouse close to the keyboard, and if necessary, use a wrist rest for support to reduce the pressure on your wrists while typing.
- Use your Desktop PC in a comfortably-lit area, and keep it away from sources of glare such as windows and straight sunlight.
- Take regular mini-breaks from using your Desktop PC.
Using the optical drive (on selected models only)

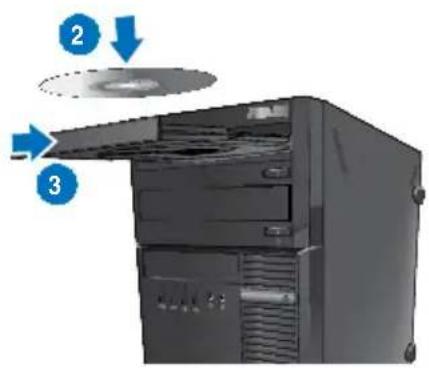
Inserting an optical disc
To insert an optical disc:
- While your system is on, press the eject button below the drive bay cover to open the tray.
- Place the disc to the optical drive with the label side facing up.
- Push the tray to close it.
- Select a program from the AutoPlay window to access your files.

If AutoPlay is NOT enabled in your computer, click Windows® 7 Start button on the taskbar, click Computer, and then double-click the CD/DVD drive icon to access the data on it.
Removing an optical disc
To remove an optical disc:
-
While the system is on, do either of the following to eject the tray:
-
Press the eject button below the drive bay cover.
-
Right-click the CD/DVD drive icon on the Computer screen, and then click Eject.
-
Remove the disc from the disc tray.
Configuring the USB ports using the BIOS
You can enable or disable the front and rear USB 2.0 and USB 3.0 ports from the BIOS Setup.
To disable or enable the USB ports:
- Press
to enter the BIOS Setup at startup. - From the BIOS Setup screen, click Advanced > USB Configuration.
- Select the USB port that you want to enable or disable.
- Press
to enable or disable the selected USB port. - Click Exit and select Save Changes & Reset to save the changes made.
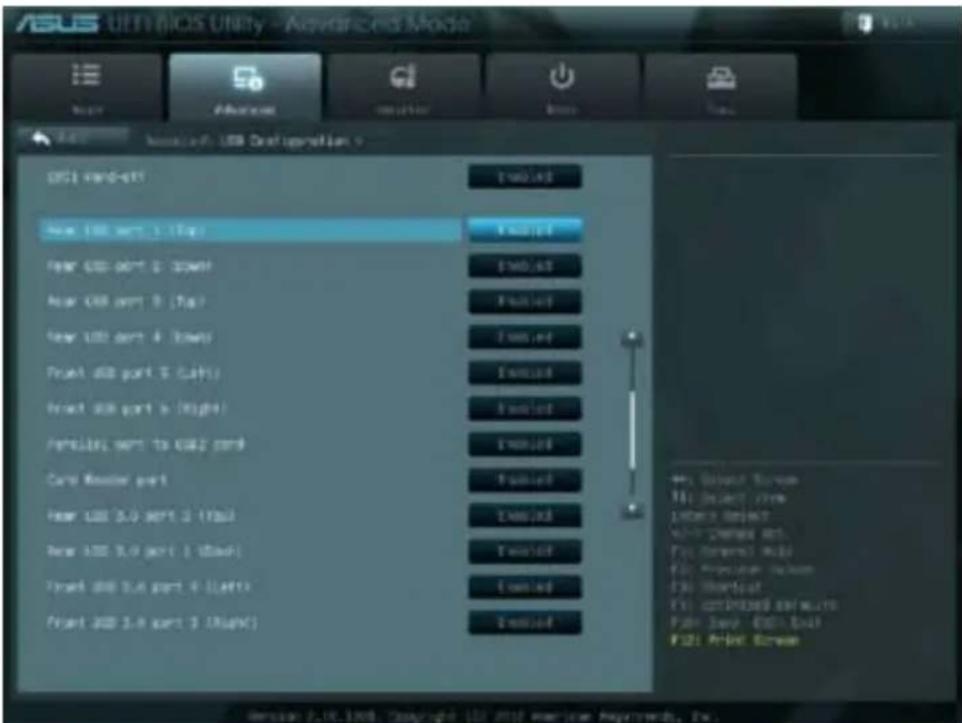

Refer to Chapter 1 for the locations of the USB ports.
Chapter 5
Connecting to the Internet
Wired connection
Use an RJ-45 cable to connect your computer to a DSL/cable modem or a local area network (LAN).
Connecting via a DSL/cable modem
To connect via a DSL/cable modem:
- Set up your DSL/cable modem.

Refer to the documentation that came with your DSL/cable modem.
- Connect one end of an RJ-45 cable to the LAN (RJ-45) port on the rear panel of your computer and the other end to a DSL/cable modem.

- Turn on the DSL/cable modem and your computer.
- Configure the necessary Internet connection settings.

Contact your Internet Service Provider (ISP) for details or assistance in setting up your Internet connection.
Connecting via a local area network (LAN)
To connect via a LAN:
- Connect one end of an RJ-45 cable to the LAN (RJ-45) port on the rear panel of your computer and the other end to your LAN.
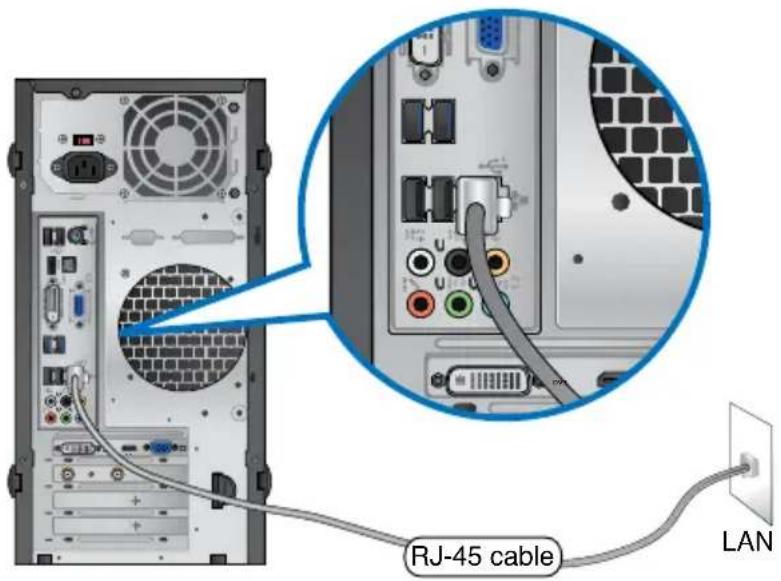
- Turn on your computer.
- Configure the necessary Internet connection settings.

Contact your network administrator for details or assistance in setting up your Internet connection.
Chapter 6
Using the utilities

The Support DVD and Recovery DVD may not be included in the package. You may use the Recovery Partition feature to create the Support DVD and Recovery DVD. For details, refer to Recovering your system in this chapter.
ASUS AI Suite II
ASUS AI Suite II is an all-in-one interface that integrates several ASUS utilities and allows users to launch and operate these utilities simultaneously.

This utility is pre-installed on some models. For models without an operating system, follow the steps below to install this utility.
Installing AI Suite II
To install AI Suite II:
- Place the support DVD in the optical drive. The Drivers installation tab appears if Autorun is enabled.
- Click the Utilities tab, then click ASUS AI Suite II.
- Follow the onscreen instructions to complete the installation.
Using Al Suite II
Al Suite II automatically starts when you enter the Windows® operating system. The Al Suite II icon appears in the Windows® notification area. Click the icon to open the Al Suite II main menu bar.
Click each button to select and launch a utility, to monitor the system, to update the motherboard BIOS, to display the system information, and to customize the settings of AI Suite II.


- The applications in the Tool menu vary with models.
- The screenshots of AI Suite II in this user manual are for reference only. The actual screenshots vary with models.
The Tool menu
The Tool menu includes the EPU, Probe II, and Sensor Recorder panels.
Launching and configuring EPU
EPU is an energy-efficient tool that provides you with a total power-saving solution. It detects the current loading and intelligently adjusts the power usage in real-time. When you select the Auto mode, the system changes modes automatically according to the current system status. It allows you to customize each mode through configuring the settings such as CPU frequency, vCore Voltage, and Fan Control.
To launch EPU:
- Click Tool > EPU on the AI Suite II main menu bar.
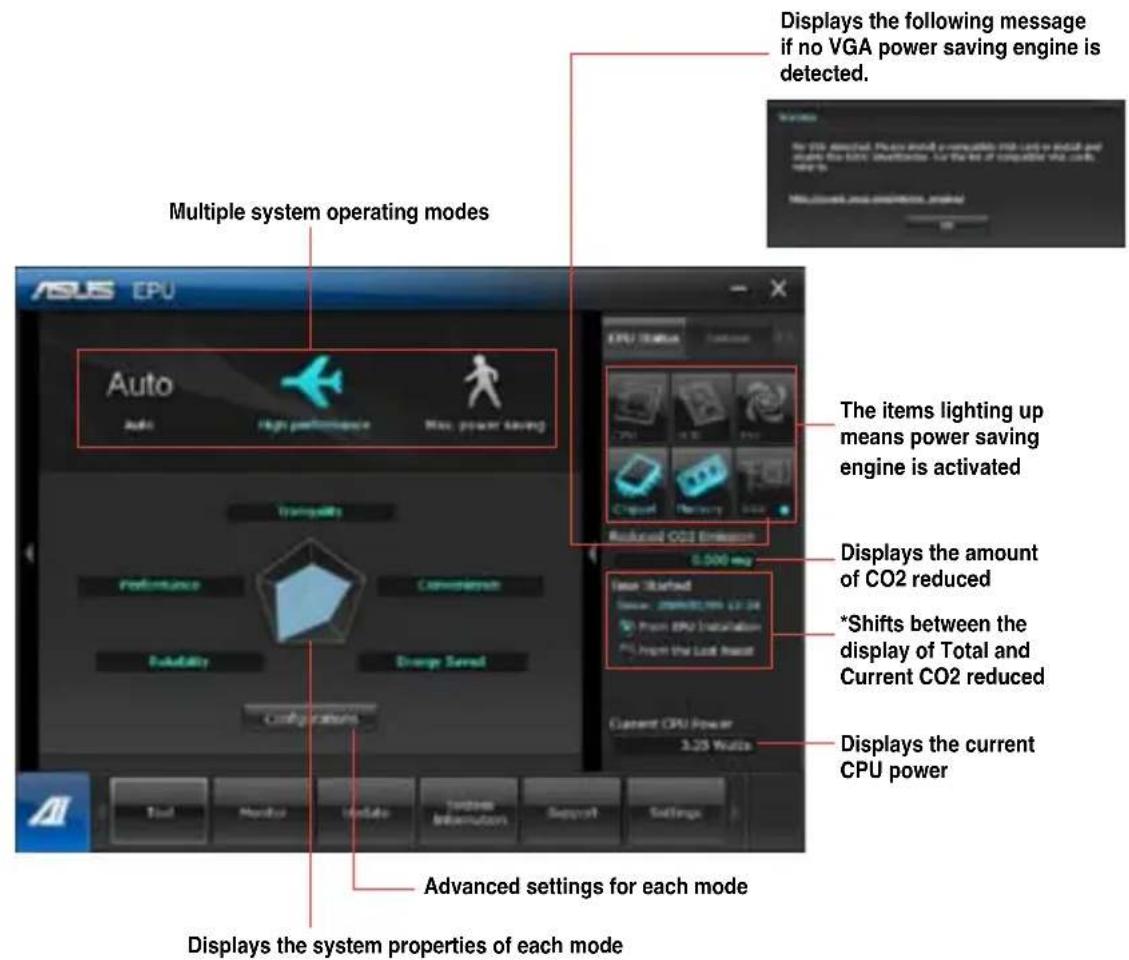

-
- Select From EPU Installation to show the CO2 that has been reduced since you installed EPU.
- Select From the Last Reset to show the total CO2 that has been reduced since you click the Clear button
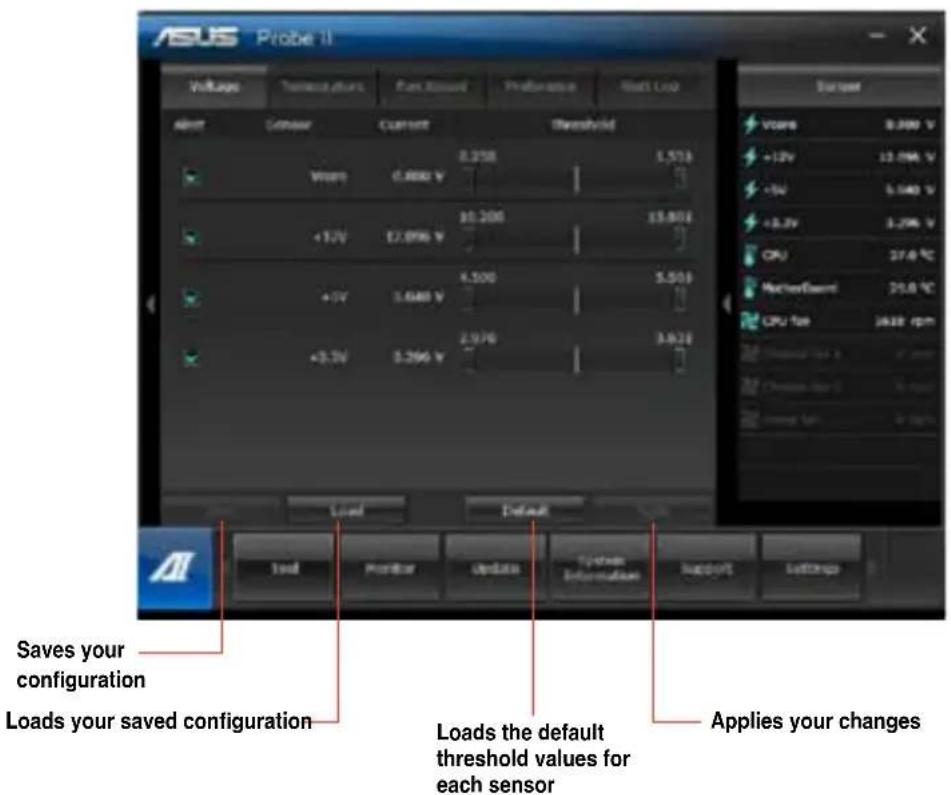
Launching and configuring Probe II
Probe II is a utility that monitors the computer's vital components, and detects and alerts you of any problem with these components. Probe II senses fan rotations, CPU temperature, and system voltages, among others. With this utility, you are assured that your computer is always at a healthy operating condition.
To launch Probe II:
- Click Tool > Probe II on the AI Suite II main menu bar.
To configure Probe II:
- Click the Voltage/Temperature/Fan Speed tabs to activate the sensors or to adjust the sensor threshold values.
The Preference tab allows you to customize the time interval of sensor alerts, or change the temperature unit.
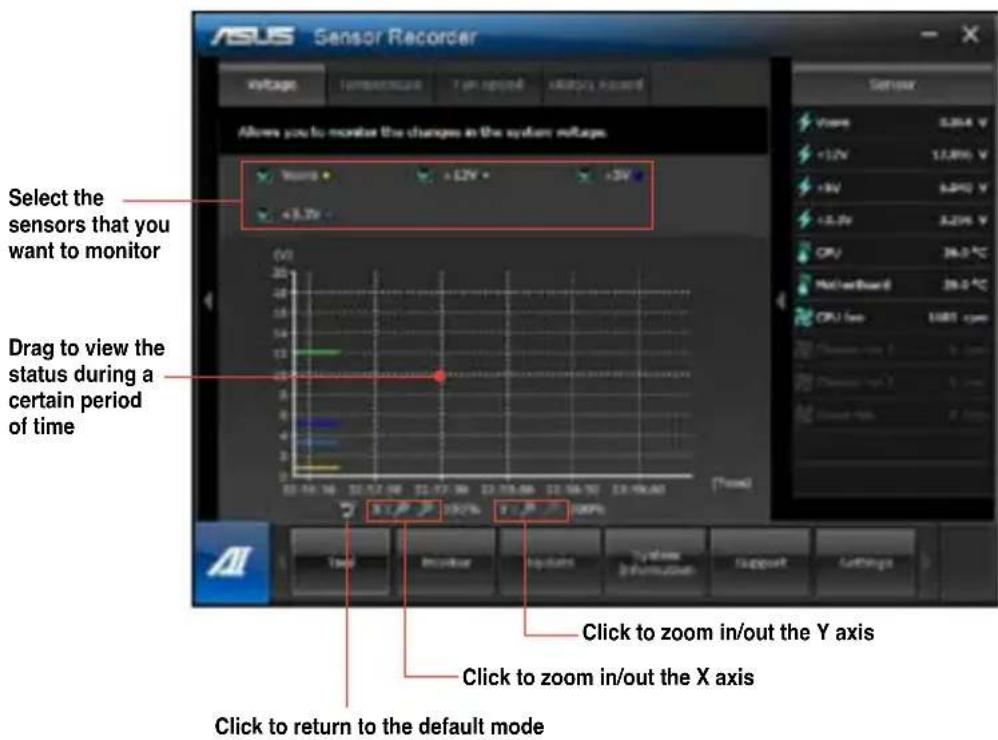
Launching and configuring Sensor Recorder
Sensor Recorder allows you to monitor the changes in the system voltage, temperature, and fan speed, as well as recording the changes.
To launch Sensor Recorder:
- Click Tool > Sensor Recorder on the AI Suite II main menu bar.
To configure Sensor Recorder:
- Click the Voltage/Temperature/Fan Speed tabs and select the sensors that you want to monitor.
- The History Record tab allows you to record the changes in the sensors that you enable.
The Monitor menu
The Monitor menu includes the Sensor and CPU Frequency panels.
Launching Sensor
The Sensor panel displays the current value of a system sensor such as fan rotation, CPU temperature, and voltages.
To launch Sensor:
- Click Monitor > Sensor on the AI Suite II main menu bar.
Launching CPU Frequency
The CPU Frequency panel displays the current CPU frequency and CPU usage.
To launch CPU frequency:
- Click Monitor > CPU Frequency on the AI Suite II main menu bar.
The Update menu
The Update menu allows you to update the motherboard BIOS and the BIOS boot logo with the ASUS designed update utilities.
ASUS Update
The ASUS Update is a utility that allows you to manage, save, and update the motherboard BIOS in Windows® OS. The ASUS Update utility allows you to update the BIOS directly from the Internet, download the latest BIOS file from the Internet, update the BIOS from an updated BIOS file, save the current BIOS file or view the BIOS version information.
Updating the BIOS through the Internet
To update the BIOS through the Internet:
- From the ASUS Update screen, select Update BIOS from Internet, then click Next.
- Select the ASUS FTP site nearest you to avoid network traffic.
Tick the two items if you want to enable the BIOS downgradable and Auto-BIOS backup functions.
- Select the BIOS version that you want to download, then click Next.
When no updated version is detected, a message is displayed informing you that there is no new BIOS file from the BIOS server.
- Click Yes if you want to change the boot logo, which is the image appearing on screen during the Power-On Self-Tests (POST). Otherwise, click No.
- Follow the onscreen instructions to complete the update process.
Updating the BIOS through a BIOS file To update the BIOS through a BIOS file:
- From the ASUS Update screen, select Update BIOS from file, then click Next.
- Locate the BIOS file from the Open window, click Open, and click Next.
- Click Yes if you want to change the boot logo, which is the image appearing on screen during the Power-On Self-Tests (POST). Otherwise, click No.
- Follow the onscreen instructions to complete the update process.
MyLogo
ASUS MyLogo allows you to customize the boot logo. The boot logo is the image that appears on screen during the Power-On Self-Tests (POST). ASUS MyLogo allows you to:
- Change the current BIOS boot logo of your motherboard
- Change the boot logo of a downloaded BIOS file and update this BIOS to your motherboard
- Change the boot logo of a downloaded BIOS file without updating this BIOS to your motherboard

Ensure that the BIOS item Full Screen Logo is set to [Enabled] to display the boot logo. See the section Boot Settings Configuration of the BIOS Setup chapter in the user manual.
Changing the BIOS boot logo
- From the AI Suite II main menu bar, click Update > MyLogo.
-
Select any of these three options, then click Next:
-
Change the BIOS boot logo of my motherboard
- Change the boot logo of a downloaded BIOS file and update this BIOS to my motherboard
- Change the boot logo of a downloaded BIOS file (But do not update this BIOS to my motherboard)

Before using the last two options, ensure that you download a BIOS file to your computer using ASUS Update.
- Locate the picture file that you want to use as the boot logo (and the downloaded BIOS if required) and then click Next.
- Move the Resolution slider or click Auto Tune for the system to automatically adjusts the screen resolution.
- Click the Booting Preview button to preview the way the picture is displayed during the POST. Left-click the mouse to return to the setting screen.
- Click Next when the adjustment is finished.
- Click Flash and follow the onscreen instructions to complete the process.
The System Information screen
The System Information screen displays the information about the motherboard, CPU, and memory slots.
- Click the MB tab to see the details on the motherboard manufacturer, product name, version, and BIOS.
- Click the CPU tab to see the details on the processor and the Cache.
- Click the Memory tab and then select the memory slot to see the details on the memory module installed on the corresponding slot.
- Click the Disk tab and then select each disk to see the details on it.
The Support screen
The Support screen displays the information about the ASUS website, technical support website, download support website, or contact information.
The Settings screen
The Settings screen allows you to customize the main menu bar settings and the interface's skin.
- Application allows you to select the application that you want to enable.
- Bar allows you to modify the bar setting,
- Skin allows you to customize the interface's contrast, brightness, saturation, hue, and gamma.
ASUS AI Manager
ASUS AI Manager is a utility which gives you quick and easy access to frequently-used applications.
Installing AI Manager
To install AI Manager:
- Place the support DVD in the optical drive. If Autorun is enabled, the Drivers installation wizard appears.

If Autorun is disabled, double-click the setup.exe file from the ASUS AI Manager folder in the support DVD.
- Click the Utilities tab, then click ASUS AI Manager.
- Follow the onscreen instructions to complete the installation.
Launching Al Manager
To launch the AI Manager from the Windows desktop, click Start > All Programs > ASUS > AI Manager > AI Manager 1.xx.xx. The AI Manager quick bar appears on the desktop.
After launching the application, the AI Manager icon appears in the Windows® taskbar.
Right-click this icon to switch between the quick bar and the main window, and to launch the AI Manager either from the quick bar or taskbar.
AI Manager quick bar
The AI Manager quick bar saves the desktop space and allows you to launch the ASUS utilities or display system information easily. Click any of the Main, My Favorites, Support or Information tab to display the menu's contents.
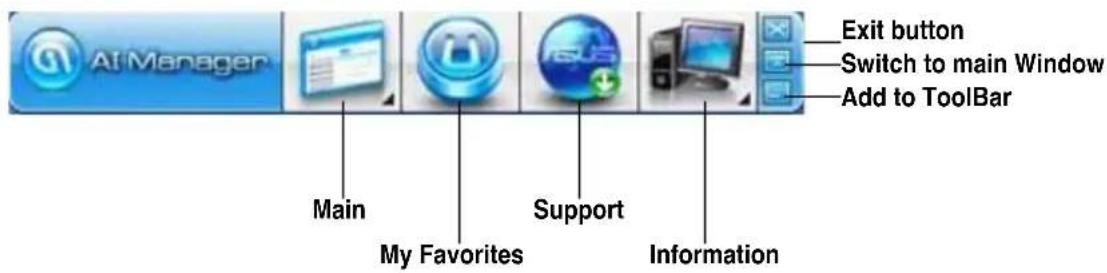
Click the Maximize/restore button to switch between full window and quick bar. Click the Minimize button to keep the AI Manager on the taskbar. Click the Close button to quit the AI Manager.
Main
The Main menu contains three utilities: Al Disk, Al Security, and Al Booting. Click the arrow on the Main menu icon to browse through the utilities in the main menu.
AI Disk
AI Disk allows you to easily clear temporary IE files, IE cookies, IE URLs, IE history, or the Recycle Bin. Click the AI Disk icon on the quick bar to display the full AI Disk window and select the items you want to clear. Click Apply when done.
AI Security
AI Security enables you to set a password to secure your devices, such as USB flash disks and CD/DVD disks, from unauthorized access.
To lock a device:
- When using AI Security for the first time, you are asked to set a password. Key in a password with at most 20 alphanumeric characters.
- Confirm the password.
- Key in the password hint (recommended).
- When done, click Ok.
- Select the device you want to lock, then click Apply.
- Key in the password you have set previously, then click Ok.
To unlock the device:
- Deselect the locked device, then click Apply.
- Key in the password you have set previously, then click Ok.
To change the password:
- Click Change Password, then follow the onscreen instructions to change password.
AI Booting
AI Booting allows you to specify the boot device priority sequence.
To specify the boot sequence:
- Select a device, then click the left/right button to specify the boot sequence.
- When done, press Apply.
My Favorites
My Favorites allows you to add applications that you frequently use, saving you from searching for the applications throughout your computer.
To add an application:
- Click Add, then locate the application you want to add to My Favorites.
- Click Open on the file location window. The application is added to My Favorites list.
Right click on the application icon to launch, delete, or rename the selected application. You can also double click to launch the selected application.
Support
Click any links on the Support window to go to the ASUS website, technical support website, download support website, or contact information.
Information
Click the tab on the Information window to see the detailed information about your system, motherboard, CPU, BIOS, installed device(s), and memory.
ASUS Webstorage
ASUS webstorage is designed to help you retrieve your data to your notebooks, smartphones or tablets wherever there is internet connection.
Installing webstorage
To install webstorage:
Place the support DVD in the optical drive. Double-click the setup.exe file from the ASUS WebStorage folder in the Software folder in the support DVD.
Launching Webstorage
To launch the WebStorage from the Windows desktop, click Start > All Programs > ASUS
Webstorage. The webstorage quick bar appears in the Windows taskbar. Right-click this icon to switch between the quick bar and the main window

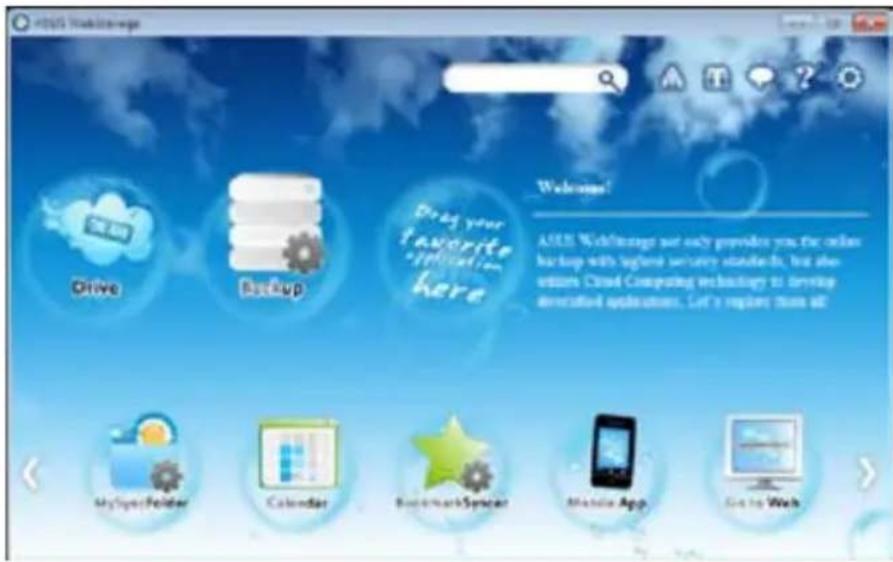
Drive
Allows your to retrieve all your backups,ynced files,share groups and password protected data from here. Right-click the mouse to preview files before downloading or generating a sharing URL.
Backup
To backup your most important data with simple steps: preset a backup shedule with your preferences in cloud storage; or select "Auto Backup" for complete data backup.
MySyncFolder
To store the updated files to MySyncFolder for easy access and share of all types of files without the limitation of location or device.
Calendar
ASUS WebStorage automatically syncs the most updated calendar events to all personal computers so that you know the exact events no matter which PC is in use.
BookmarkSyncer
The convenient BookmarkSyncer keeps our browser preference and bookmark to the cloud automatically synchronized in multiple computer.
MobileApp
ASUS WebStorage mobile applications sync your files between multiple devices. It also supports transcoding technology that allows preview and files streaming on your mobile phone.
Go to Web
Experience the value-added cloud service through ASUS WebStorage, without the risk of losing data.
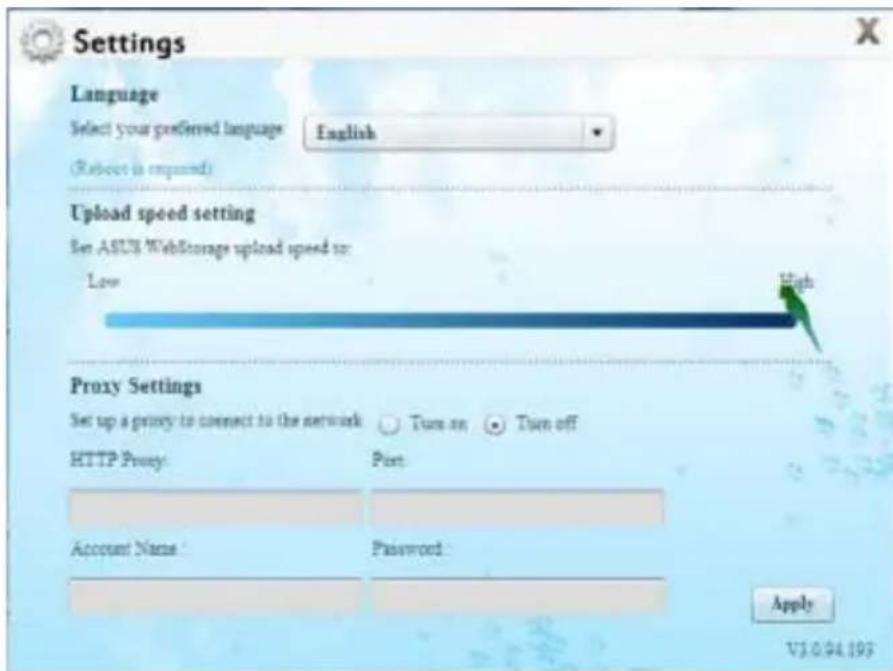
Settings
- Click the Settings icon, the settings interface appears.
- Follow the onscreen instructions to complete the configuration.
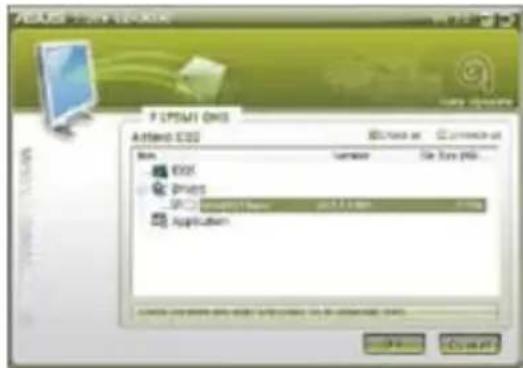
ASUS Easy Update
ASUS Easy Update is a software tool that automatically detects the latest drivers and applications for your system.
1.From the Windows 密 notification area, right-click the ASUS Easy Update icon.
2. Select Schedule to set how often you want to update your system.
3. Select Update to activate the update.

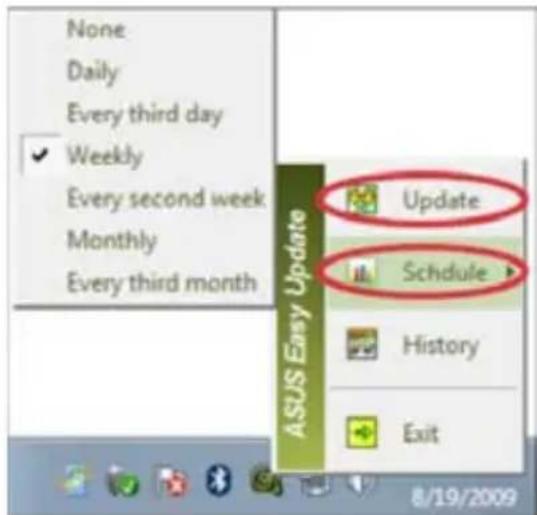
- Click OK to display the items you can download.
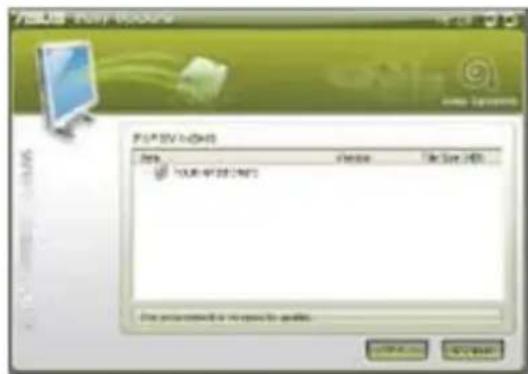
- Check the item(s) you want to download, and then click OK.
ASUS Secure Delete
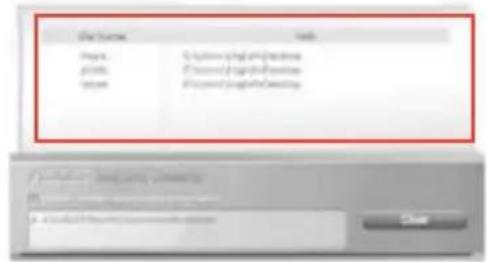
ASUS Secure Delete makes deleted files completely irrecoverable via a simple drag-and-drop interface, thus protecting your data security.
To Use ASUS Secure Delete
-
Do either of the following to launch ASUS Secure Delete:
-
Click the ASUS Secure Delete shortcut on the Windows desktop,
-
Click Start > All Programs > ASUS > ASUS Secure Delete.
-
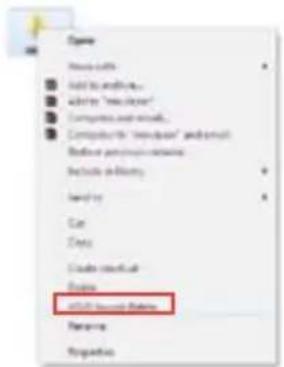
Do any of the following to add files to the deletion box:
-
Drag and drop the files to the box.
-
Right-click the file then select ASUS Secure Delete.
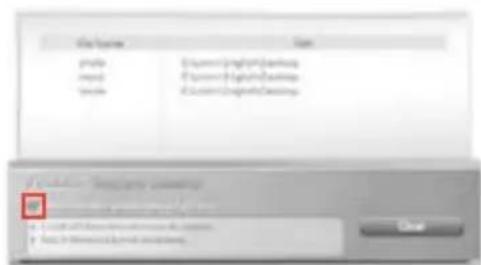
-
To remove a file from the deletion list, select the file then click
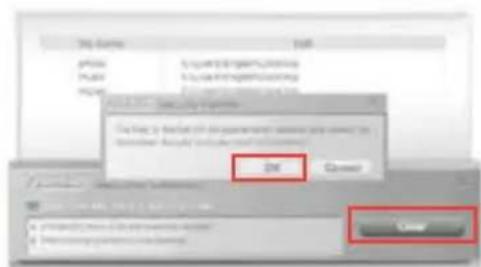
- Tick Delete the files listed in the recycle bin if you want to permanently delete all the files in the recycle bin.
- Click Clear, and then click OK on the confirmation message to permanently delete all the files listed in the deletion box and the recycle bin (if selected in step 3).

Nero 9
Nero 9 allows you to create, copy, burn, edit, share, and update different kinds of data.
Installing Nero 9
To install Nero 9:
- Insert the Nero 9 DVD into your optical drive.
- If Autorun is enabled, the main menu appears automatically.

If Autorun is disabled, double-click the SeupX.exe file from the main directory of your Nero 9 DVD.
- From the main menu, click Nero 9 Essentials.
- Select the language you want to use for Installation Wizard. Click Next.
- Click Next to continue.
- Tick I accept the License Conditions. When done, click Next.
- Select Typical then click Next.
- Tick Yes, I want to help by sending anonymous application data to Nero then click Next.
- When done, click Exit.
Burning files
To burn files:
- From the main menu, click Data Burning > Add.
- Select the files that you want to burn. When done, click Add.
- After selecting files that you want to burn, click Burn to burn the files to a disc.

For more details about using Nero 9, refer to the Nero website at www.nero.com
Recovering your system
Using the system recovery partition
The system recovery partition quickly restores your Desktop PC's software to its original working state. Before using the system recovery partition, copy your data files (such as Outlook PST files) to USB storage devices or to a network drive and make note of any customized configuration settings (such as network settings).
About the system recovery partition
The system recovery partition is a reserved space on your hard disk drive used to restore the operating system, drivers, and utilities installed on your Desktop PC at the factory.

DO NOT delete the system recovery partition, which is the partition without volume label on Disk 0. The system recovery partition is created at the factory and cannot be restored if deleted. Take your Desktop PC to an authorized ASUS service center if you have problems with the recovery process.
Using the system recovery partition:
- Press <F9> during bootup.
- Highlight Windows Setup [EMS Enabled] and press
. - From the Recover system to a partition screen, click
. - Follow the onscreen instructions to complete the recovery process.

Visit the ASUS website at www.asus.com for updated drivers and utilities.
Using the Recovery DVD (on selected models)

Remove the external hard disk drive before performing system recovery on your Desktop PC. According to Microsoft, you may lose important data because of setting up Windows on the wrong disk drive or formatting the incorrect drive partition.
To use the Recovery DVD:
- Insert the Recovery DVD into the optical drive. Your Desktop PC needs to be powered ON.
- Restart the Desktop PC and press <F8> on bootup and select the optical drive (may be labeled as "CD/DVD") and press <Enter> to boot from the Recovery DVD.
- Select OK to start to restore the image.
- Select OK to confirm the system recovery.
Restoring will overwrite your hard drive. Ensure to back up all your important data before the system recovery.
- Follow the onscreen instructions to complete the recovery process.

DO NOT remove the Recovery disc, unless instructed to do so, during the recovery process or else your partitions will be unusable.

Visit the ASUS website at www.asus.com for updated drivers and utilities.
Chapter 7
Troubleshooting
Troubleshooting
This chapter presents some problems you might encounter and the possible solutions.
? My computer cannot be powered on and the power LED on the front panel does not light up
- Check if your computer is properly connected.
- Check if the wall outlet is functioning.
- Check if the Power Supply Unit is switched on. Refer to the section Turning your computer ON/OFF in Chapter 1.
My computer hangs.
- Do the following to close the programs that are not responding:
- Simultaneously press
+ + keys on the keyboard, then click Start Task Manager. - Click Applications tab.
- Select the program that is not responding, then click End Task.
- If the keyboard is not responding. Press and hold the Power button on the top of your chassis until the computer shuts down. Then press the Power button to turn it on.
? I cannot connect to a wireless nestwork using the ASUS WLAN Card (on selected models only)?
- Ensure that you enter the correct network security key for the wireless network you want to connect to.
- Connect the external antennas (optional) to the antenna connectors on the ASUS WLAN Card and place the antennas on the top of your computer chassis for the best wireless performance.
? The arrow keys on the number key pad are not working.
Check if the Number Lock LED is off. When the Number Lock LED is on, the keys on the number key pad are used to input numbers only. Press the Number Lock key to turn the LED off if you want to use the arrow keys on the number key pad.
? No display on the monitor.
- Check if the monitor is powered on.
- Ensure that your monitor is properly connected to the video output port on your computer.
- If your computer comes with a discrete graphics card, ensure that you connect your monitor to a video output port on the discrete graphics card.
- Check if any of the pins on the monitor video connector is bent. If you discover bent pins, replace the monitor video connector cable.
- Check if your monitor is plugged to a power source properly.
- Refer to the documentation that came with your monitor for more troubleshooting information.
? When using multiple monitors, only one monitor has display.
- Ensure that the both monitors are powered on.
- During POST, only the monitor connected to the VGA port has display. The dual display function works only under Windows.
- When a graphics card is installed on your computer, ensure that you connect the monitors to the output port on the graphics card.
- Check if the multiple displays settings are correct. Refer to section Connecting multiple external displays in Chapter 3 for details.
My computer cannot detect my USB storage device.
- The first time you connect your USB storage device to your computer, Windows automatically installs a driver for it. Wait for a while and go to My Computer to check if the USB storage device is detected.
- Connect your USB storage device to another computer to test if the USB storage device is broken or malfunctions.
I want to restore or undo changes to my computer's system settings without affecting my personal files or data.
The Windows System Restore feature allows you to restore or undo changes to your computer's system settings without affecting your personal data such as documents or photos. For more details, refer to the section Restoring your system in Chapter 2.
? The picture on the HDTV is distorted.
-
It is caused by the different resolutions of your monitor and your HDTV. Adjust the screen resolution to fit your HDTV. To change the screen resolution:
-
Do any of the following to open the Screen Resolution setting screen:
-
Click > Control Panel > Appearance and Personalization > Display > Change display settings.
-
Right click anywhere on your Windows desktop. When the pop-up menu appears, click Personalize > Display > Change display settings.
-
Adjust the resolution. Refer to the documentation came with your HDTV for the resolution.
-
Click Apply or OK. Then click Keep Changes on the confirmation message.
My speakers produce no sound.
- Ensure that you connect your speakers to the Line out port (lime) on the front panel or the rear panel.
- Check if your speak is connected to a electrical source and turned on.
- Adjust your speakers' volume.
-
Ensure that your computer's system sounds are not Muted.
-
If it is muted, the volume icon is displayed as . To enable the system sounds, click from the Windows notification area, then click.
-
If it is not muted, click and drag the slider to adjust the volume.
-
Connect your speakers to another computer to test if the speakers are working properly.
? The DVD drive cannot read a disc.
- Check if the disc is placed with the label side facing up.
- Check if the disc is centered in the tray, especially for the discs with non-standard size or shape.
- Check if the disc is scratched or damaged.
? The DVD drive eject button is not respond.
- Click >Computer.
- Right-click, then click Eject from the menu.
Power
| Problem Possible Cause Action | ||
| No power (The power indicator is off) | Incorrect power voltage | · Set your computer's power voltage switch to your area's power requirements. · Adjust the voltage settings. Ensure that the power cord is unplugged from the power outlet. |
| Your computer is not turned on. | Press the power key on the front panel to ensure that your computer is turned on. | |
| Your computer's power cord is not properly connected. | · Ensure that the power cord is properly connected. · Use other compatible power cord. | |
| PSU (Power supply unit) problems | Try installing another PSU on your computer. | |
Display
| Problem Possible Cause Action | ||
| No display output after turning the computer on (Black screen) | The signal cable is not connected to the correct VGA port on your computer. | • Connect the signal cable to the correct display port (onboard VGA or discrete VGA port). • If you are using a discrete VGA card, connect the signal cable to the discrete VGA port. |
| Signal cable problems Try connecting to another monitor. | ||
LAN
| Problem Possible Cause Action | ||
| Cannot access the Internet | The LAN cable is not connected. | Connect the LAN cable to your computer. |
| LAN cable problems | Ensure the LAN LED is on. If not, try another LAN cable. If it still does not work, contact the ASUS service center. | |
| Your computer is not properly connected to a router or hub. | Ensure that your computer is properly connected to a router or hub. | |
| Network settings | Contact your Internet Service Provider (ISP) for the correct LAN settings. | |
| Problems caused by the anti-virus software | Close the anti-virus software. | |
| Driver problems Reinstall the | LAN driver | |
Audio
| Problem Possible Cause Action | ||
| No Audio | Speaker or headphone is connected to the wrong port. | Refer to your computer's user manual for the correct port. Disconnect and reconnect the speaker to your computer. |
| Speaker or headphone does not work. | Try using another speaker or headphone. | |
| The front and back audio ports do not work. | Try both the front and back audio ports. If one port failed, check if the port is set to multi-channel. | |
| Driver problems Reinstall the audio driver | ||
System
| Problem Possible Cause Action | ||
| System speed is too slow | Too many programs are running. | Close some of the programs. |
| Computer virus attack | ·Use an anti-virus software to scan for viruses and repair your computer. ·Reinstall the operating system. | |
| The system often hangs or freezes. | Hard disk drive failure | ·Send the damaged hard disk drive to ASUS Service Center for servicing. ·Replace with a new hard disk drive. |
| Memory module problems | ·Replace with compatible memory modules. ·Remove the extra memory modules that you have installed, then try again. | |
| There is not enough air ventilation for your computer. | Move your computer to an area with better air flow. | |
| Incompatible softwares are installed. | Reinstall the OS and reinstall compatible softwares. | |
CPU
| Problem Possible Cause Action | ||
| Too noisy right after turning on the computer. | Your computer is booting up. | It is normal. The fan runs on its full speed when the computer is powering on. The fan slows down after entering the OS. |
| The BIOS settings have been changed. | Restore the BIOS to its default settings. | |
| Old BIOS version | Update the BIOS to the latest version. Visit the ASUS Support site at http://support.asus.com to download the latest BIOS versions. | |
| Computer is too noisy when in use. | The CPU fan has been replaced. | Ensure that you are using a compatible or ASUS-recommended CPU fan. |
| There is not enough air ventilation for the computer. | Ensure that your computer is working in an area with good air flow. | |
| The system temperature is too high. | • Update the BIOS. • If you know how to reinstall the motherboard, try to clean the inner space of the chassis. | |

If the problem still persists, refer to your Desktop PC's warranty card and contact the ASUS Service Center. Visit the ASUS Support site at http://support.asus.com for the service center information.
ASUS contact information
ASUSTeK COMPUTER INC.
Address 15 Li-Te Road, Peitou, Taipei, Taiwan 11259
Telephone +886-2-2894-3447
Fax +886-2-2890-7798
E-mail info@asus.com.tw
Online support support.asus.com
ASUS COMPUTER INTERNATIONAL (America)
Address 800 Corporate Way, Fremont, CA 94539, USA
Telephone +1-510-739-3777
Fax +1-510-608-4555
Web site www.asus.com
Technical Support
Telephone +1-812-282-2787
Support fax +1-812-284-0883
Online support support.asus.com
ASUS COMPUTER GmbH (Germany and Austria)
Address Harkort Str. 21-23, D-40880 Ratingen, Germany
Fax +49-2102-959911
Web site www.asus.de
Online support support.asus.com
- EUR 0.14/minute from a German fixed landline; EUR 0.42/minute from a mobile phone.
| Manufacturer: | ASUSTeK Computer Inc. |
| Address: | No.150, LI-TE RD., PEITOU, TAIPEI 112, TAIWAN |
| Authorised representative in Europe: | ASUS Computer GmbH |
| Address: | HARKORT STR. 21-23, 40880 RATINGEN, GERMANY |
ASUS Desktop PC

BM1845

BM1645/MD250
Benutzerhandbuch
G7330
Erste Ausgabe
Juni 2012
ASUS Secure Delete 116
Nero 9 117
CAUTION: Danger of explosion if battery is incorrectly replaced. Replace only with the same or equivalent type recommended by the manufacturer. Dispose of used batteries according to the manufacturer's instructions.
Online-Support support.asus.com
ASUS COMPUTER INTERNATIONAL (Amerika)
Adresse 800 Corporate Way, Fremont, CA 94539, USA
Telefon +1-510-739-3777
Fax +1-510-608-4555
Website usa.asus.com
Online-Support support.asus.com
Adresse Harkort Str. 21-23, D-40880 Ratingen, Germany
Fax +49-2102-959911
Website www.asus.de
Online-Support support.asus.com
Support technique ASUS local
LED ACT/ LED LIEN VITESSE
Port reseau
Lancer Windows® Update
Installer AI Manager
ASUS Secure Delete 246
Nero 9 247
Ripristino delsystema. 248
Dichiarazione FCC (Federal Communications Commission)
ASUS Secure Delete 310
Nero 9 311
Para utilizes OSUS Secure Delete:
ASUS Secure Delete 502
Nero 9 503
Adres 15 Li-Te Road, Peitou, Taipei, Taiwan
11259
Telefon +886-2-2894-3447
Faks +886-2-2890-7798
E-mail info@asus.com.tw
Strona internetowa www.asus.com.tw
Pomoc techniczna
Telefon +86-21-38429911
Wsparcie online support.asus.com
Adres 800 Corporate Way, Fremont, CA
94539, USA
Telefon +1-510-739-3777
Telif Hakki © 2012 ASUSTeK Computer Inc. Her Hakki Saklidir.
ASUS AI Manager. 560
ASUS Webstorage. 563
ASUS Easy Update 565
ASUS Secure Delete 566
Nero 9 567
Sisteminizi kurtarmav 568
Lityum-Iyon Pil Uyarisi
Visit the ASUS website at www.asus.com for updated drivers and utilities.
Online yardim support.asus.com
ASUS COMPUTER INTERNATIONAL (Amerika)
Adres 800 Corporate Way, Fremont, CA 94539, USA
Telefon +1-510-739-3777
Online yardim support.asus.com
Online yardim support.asus.com
PykoBODCTBO NOIb3OBaTeJIa
R7330
IepBoe n3dahne
Anpenb 2012
Copyright © 2012 ASUSTeK Computer Inc. Bce npaba 3aunuhebl.
JIO6a yactb 3TO rO pyKOBODCTBA, BKNIOUa OBOPyOBAHne H pOporpAMHoe OeCneueHne, ONHCANHbE B He, He MoKeT 6bIb TdyBnPOBaHa, NpeDaHa, Npeo6pa3ObaHa, COXPAHeA B CnCTMe NOnCKa HN NpeBeDeHa Ha Dpyro J3bIK B IIO60 fOpme HIN JIO6bIMn CpeDCTBaMn, KPOME DOKUMENTaMn, XpaHaeJeCn POKynatEnm C cIeMb pe3epBnPOBaHna, Be3 CneuaJIbHorO INCbMeHHoro pa3peWeHn ASUSTeK COMPUTER INC. ("ASUS").
IapaTnI pIeKpaAaETcEcn: (1)H3dJIne OTpeMOHTpOBAHO, MoHfNtnpoBaHO HIN 3MeHeO 6e3 NcBMeHHoro pa3peHennr ASUS; (2)cepnHbI HoMEp H3dII NaOBpeKJDeH, Hepa36OpuNB IIO 0TCYCTByET.
ASUS npedoctabnetaD aHHoe pykoBodCTBO "kac cctb" 63 rapaHTnn IIO6O Tnna, YBHO BbipaeHHo Hn NpOpa3yMeBaemOB, BKIOUaYr HeBHBie rapaHTn nIyCNOBn NOUYeHn KOMpeuecko BbIRObl nn pnproHOCTn PnKOKPteHOn ceHN, HO He ORpaHnYBaBcB 3TmM rapaTHMaN yCNOBMAH. Hn pN KAKX O6CToTeNbCTBax KOMNAHNA ASUS, ee dIpeKToPA, DOnJHOCThbIe Nua, Cnykaune Nn areHTbI He Hecyt OTBeCTBEHHOCTH 3a IIO6bIE KOCBeHHbIe, CneuaJIbHbIe, CnyauHbIe Nn ABIIouNceC nEcdTBm eero-NIO6 y6bITKn (BKIOUaYy6bITKN 13-3a Notepu np6blnn, Notepu 6n3Heca, Notepu daHHbIX, pnoCTaHOBKn 6n3Heca n T.n.), DaKe ecnn ASUS coo6unna O BO3MOKHOCTn TaKHX y6bIKOB, BO3HNaIoXh 3-3a IIO60 HeOpapBoTK Nn OOW6Kn B daHHom pyKOBOdCTBe Nn IpOdyKTe.
TexHueckne XapaKTePncTnKn n CbeHnna, codepKaunecB DaHHom pyKOBOcTBe, npedCTabHebl TOnbko dnn HhOpMaTHBHO rONb3OBAHn, mOryr 6bIb N3MeHeHb B IIOObE BpeM 6e3 yBeDOMHeHn, H He DOnJHKbI 6bITb hCtONKBaHbIKo8aTeNbCTBa ASUS. ASUS He 6epeT Ha ce6ra HnKaKoN OTBeTcBHeHOCTN nn O83aTeNbCTB 3a IIObIe Ow6Kn HnH HeTOyHcTn B daHOM pyKOBOcTBe, BKIOUaH3dEHN Hn IpOrpAMMHoe oecneueHne, OINcaHHbI E HEM.
Ipoodytbi HnHa3BaHnna KOpnpaun, HmeoounecB 3TOM pyKOBOcTBe MOryT ABJrTbc3apeHCTpnpoBAHbIMN TOPROBbIMN 3HaKaAMn HnABTOPCKHMn PpaBAMn COOTBeTcByOuNX KOMNaHm NHCNoJIb3yOTc TOnbKO B cIeJX NdENTHnKauu.
Copepkanme
Ybeomleny 583
HnfoMaun O npabnax beoanachoctn 585
3Nauchn, nCnoJIb3yeMbIe B pyKOBoDCTBe 586
Ie haHTn 6oJIbwe HOpMaunu .586
KoMnJIeKT noCTaBKn 587
Глaba 1 Hayano pa6oTbI
Dobpo noxanobatb! 589
3HaKOMCTBO C KOMIbIOTepom 589
Iodrotobka KombIoTepa K paBoTe. 595
BkIIOueHHe/OTKIOueHHe KOMnbIOTepa 597
Глaba 2 Исторьанne Windows 7
IepBoe BkJIOueHne 599
HcnoIb3OBAHne pa6oeryo cTona Windows 7. 600
YnpabIeHne faiIamn nnKamn 602
C6poc K HacTpoKam No yMOnuHaHIO 604
3aunTa KOMnBIOTepa 605
IonyeHne cnpaBKn n nopepKKn Windows 606
Iana 3 IopKIOueHne ycTpoiCTB K KOMNbIOTepy
IopknueHne USB-hakonnte.. 607
IopKIOueHHe MUKPOOHa N KOLOHOK 608
Iana6 IcnoB3ObaHne yTuNt
ASUS AI Suite II. 617
ASUS AI Manager 624
ASUS Webstorage 627
ASUS Easy Update 629
ASUS Secure Delete 630
Nero 9 631
BocctaHOBHeHne CnCTeMbI 632
Tnaba 7 YctpaHHe HEnCnpaBHOCTe
YcTpaHHe HEnCnPaBHOCTeI 635
KoHTaKTHa HOpMaunr ASUS 642
yBeDOMJIeHnIa
ytnn3aun n nepepaotka
Kompana ASUS 6epet Ha c6b 63aTeBCTBa no yTnH3aun CTaporo o6opydoBaHna, HcxOJa n3 npHnIOB BceCTOpOHHe 3auHTbI OKpyKaIOSe Cpebl. Mbl npedocTabnem peweHna HauM KIneHTam dnnpepeabotKn HauNX npoYkTOB, AKKymyTAtoPob N dpyrnx KOMnoHEToB, a TaKke yNaKOBKn. IJn pOnyuHn NoDpObHn HnFopMaun O b yTnH3aun n nepepaBOTke B pa3nHuBX perNohax IocHTte http://csr.asus.com/english/Takeback.htm.
REACH
Cornacno permamenty EC REACH (Registration, Evaluation, Authorization, and Restriction of Chemicals - Perictpaun, Ouekka, Pa3peuhenia n OrpaHueHHa Ha mCnObl3OBaHne XmMuecknx Beuectb), Ha caite ASUS REACH pa3meuen cncOK XmMuecknx BeueCTB codepXaunxcr B npodyktax ASUS: http://csr.asus.com/english/REACH.htm
YdoctOBepeHne DeepaIbHOJ KOMnCCnn no CBr3n CLLA
JaHHe yctpoiCTBO COOTBeTcTByeT qactn 15 PpaBn FCC. 3Kcnnyatauny o6OpydoBaHna dOnycTmna npn co6nIOeHN nCleNyUOuX yCNOBn:
JaHHoe yctpoCTBO He donxHo co3daBaTb NOMEX
Ha pa60ry yctpoiCTBa MoryT OKa3bIBaTB BnHnHne BHeuHHe NOMxN, BKnIOyA rOMexN, Bbl3bIbAOuNE HexeNaTeBhIe peKmbl erO pa60tbl.
DaHHe ObopyoBaHne 6bIIO npoteCTnpoBaHO n COUteHO COOTBETCTBYOUM ORpaHueHnM NOuΦpOBbIM yCTPOINCTBAM KNaCCa B B COOTBETCTBm C qAcTbIO 15 IpaBn FCC. 3TN ORpaHnueHnPaCCHTaHbHa OeocneueHne 3auNTbI B pa3ymhblx PpeJax OT BpeDOHcBIX BO3deNCTBnPnYCTAHOBKe B XINOM NOMeHm. DaHHe ObopyoBaHne rHeepnpyET m3nyaet paNOaCTOTHyO3heprno, KOtOpA MoKet CO3daBaTb NOMx B paNOCBz3n, ecnn yCTPOINCTBO YCTAOBNeHO NnNCNoB3yETcH E B COOTBETCTBm C INCHtpKzmaH NPOIN3BOInTeJI. Tem He Mehee, HeBO3MOXHO rapaHTpOBaTb OTCYCTBHe NOMex B KaKdOM KOHKpeTHOM cNyae. B cNyae, ecnn daHHe ObopyoBaHne DeiCTBnTEbHO Bbl3bBAe T NOMEx B paINO NN TeNEBu3NOHHom pInMe, yTO MOxHO pOBepntb, BKIOuHB N BkIKIOuHB DaHHe ObopyoBaHne, NOnb3OBeTlIO peKOMeHdyETcN ONbITaTBcYDAHNTb NOMEX CNedIyOuHM CpeDCTBAMN:
- IpeopnentnpoBaTb Hnn NepemecnttB npHnMaioyU o aHTehny.
- yBennuHTb paCCToHHe MEXdY daHHbIM npHbOpOM nPnEMHKOM.
IopKnIOuHTb daHoe obOpyObaHne K po3eTke apyro 3neKtpouen,Hexen Ta, K Kotopo npKnIOueH npemnK. - PpokohcylbTnpoBaTbCn pOaBcHm KBaJIHΦHIpObaHHbIM paHNo/ TB-TexHkOM.

Ncnonb3yte 3KpaHnpoBaHHbIe Ka6eIIN PnnoKnIOueHm MOHTopa K BHeOKeapTe -3To rapaHTnpyET COBMeCTMOCtB C Tpe6oBaHmIM FCC. NImmeHn Hnn DoonHHeHn K daHOMy nyHKTy, He cOrnaocBaHHbe HEnocpeCTBeHHo Co CTopoHO, OTBeTCTBeHHOH 3a COOTBeTCTBne IpabHnAm, MoryT CdenaT HeJeCTBnteHbIM npabo NOnb3ObaTeHa NOnb3ObaHne daHHbIM ObopyoBaHHem.
Tpe6oBaHnno BO3dEeCTBnIO paNoocToTbI
3TO 6OBpyOBOAHHe DOJHXHO 6bITb yCTAHOBNEHO n paB0TaTb B COOTBETCTBN C NHCPTyKUAMn, n aHTEHbI, NCNoJIb3yEMbIe C 3TNM nepeDaTuNKOM DOJHXHbI 6bITb yCTAHOBNeHbI Ha pacCToRHN He MeHee 20 CM OT IIODeH H DoJHXHbI 6bITb pACNOJIOKeHbI prdOM C dpyrHMn aHTEHAMn IIN pepeDaTuHKaMn. KOeYhbie NOJb3OBATeH NDOJHXHbI CNEIOBaTb HHCTpyKUaMn IO 3KcNlNyatauHn DnA yMeHbWeHn BO3dEhCTBnra PaDnoOAcToTHoH 3HEprnn.
YdoctOBepenHe IenapTaMeHTa no cpeCTBaM CBra3n KaHaBbI
JaHoe uHpOBoe yCTpoNcTBO He npeBbIaET orpaHnueHna KNaCCa B no BbIeNeHnO padNoWyma ot UΦPOBbIX yCTpoNcTB, YCTaHOBnEHHbIX B npabNJax No paHnONomExAM dApTaMeHTa NO cpeiCTBaM CBA3N KaHaDbI.
Данhoe uнфpoBoe yctpoNCTBO Knacca B COOTBETCTByeT cTahapTy ICES-003.
HΦopMaun o6 n3denn KOpnpauu Macrovision
JaHHe N3dJeHne BKnOuaeB Ce6a TexHONOrn 3aunntb ABTOPCKnx npab, 3aunueHHyIO nATEHTAMN CLUA, u Hhble npaba HNTeNtKeTsyalbHOI CO6CTBeHHOCTH, npHnAdNeJXaUne KOpnpauuM Macrovision n dpyrnm nucam. Ucnonb3OBaHne daHNO TExHONOrn 3aunntb ABTOPCKnx npab BO3MOxHO TOnkO C corlacn KOpnpauuM Macrovision n npedycmOTpeHo TOnk OJra DomauHero N Horo OrpaHueHHORo Ucnonb3OBaHn, ecnn HHOe ne npedncaHo KOpnpauuN Macrovision. HxkeHepbI aHaHN3 n pa3bOpka 3anpeueHbl.
BHIMAHNE, HHTHeBO-MOHbHbAKKyMylrTOP
BHIMAHHE: Pnp 3amehe akkymyIaTopa Ha akkymyIaTop npyroTO hna BO3MOxeh B3pbIB. BbINOJIHnIe 3ameHy akkymyIaTopa Ha TAKO JKe Hnn aHaONrHuHbI, peKOMeHNIOBaHHbI npOn3BOJTeJeM. YTHIN3HpyIte NcNoJIb3OBaHHbIe akkymyIaTopbl B COOTBETCTBm C HHCtpyKUmaN IpOn3BOJTeJIa.
HΦopMaζη o npabnλx 6e3oNaCHOCTN

Ipeed ouhctkou OTKIOUHTe nHTaHne H Bce NOKIOUeHHbIe nepHepnHbIe yCTPOcTBa. IpoTpnte NOBepxHOCTb KOMbIoTepa YrTOI r6KOII NII KycOcKOM 3aMUN, CMOueHOM B BOe IIIN Hea6pa3HBOM qHCTraeem cpeCTBe, 3aTeM ydaJIte IINWHIO Bnary cyXoT prnKoI.
HE yctahabnbaTe yctpoNCTBO Ha HEPOBHyIO IIN HeYCTOuNByIO NOBepxHocTb. B Cnyae nobpekdeHna Kopnyca, He BKNIOyAR yctpoNCTBO, O6paNTecb B cepBnchbl ueTp.
HE nomeaute yctpoictBO B nbInbHyIO nn rpa3HyIO cpey. HE nonb3yntecb ycTPOIcTBOM BO Bpemr yTeKn ra3a.
HE CTaBbTe HHe poHnTe npEdMeTb Ha NOBepxHOCTb KOMNBIOTepa H He 3acOBbBaIe B Hero noCTOpOHnE npEdMeTb.
HE noDBepraTte KOMbIOpTe B03dEeCTBnIO CnIbHbIX MarHHTbIX IIN 3NeKtpuYeCKNX Nonei.
HE NOBBepraTe BO3dEChTBnO XnKoCTe H He NCNoB3yIe B yCNOBnx IOBbIweHHO BnaXHOCTN. HE NOB3yItecMoDEMOM BO Bpemr rpo3bl.
- IpeynpeJeHne 6e3oNaChocTu: HE 6pOcaIte aKKymyIaTOp B OROh. HE 3aMbIkaIte KOHTaKtbl aKKymyIaTopa. HE pa3bnpaIte aKKymyIaTOp.
- IcnoIb3yIte yctpoIcTBO npu TemnepaType oT 0^(32^) do 40^ (104^) .
HE He nepeKpbIbAte BeHTnIaHIOHHbIe OTBepCTNa KOMNbIOTepa, TAK KaK 3TO MOKeT Bbl3BaTb neperpeB yctpOcTba.
HE nCnoB3yIte NOBpeKdHbIe Ka6en, Akceccyapbl npyrne nepnepnHbIe yctpoiCTBa.
Ipy npedotBpaueHn npaKeHH 3neKtpueCTBOM OTKnIOHTe nHTaIOUne Ka6HN npn nepemeeHH yCTpOCTBA.
- PpeKde yem BOCnONb3OBaTbCra aadntepom nn yDnnHInTeNEM, npOKOHcyIbTHpyHTecb CO CneuaHnCTOM. 3Tu yCtpoNCTBa MOrTy npePBAtb KOHTyp 3a3eMNeHn.
Y6eNTecb, B TOM, 4TO yCTAHOBKn HAnpJxHnBaWero 6Noka NITaHn COOTBETCTBYOT MecTHbIM npabnam HOpMaTnBaM. EcnB Bi He yBepeHb I B BeINuHHe HApJxHn, CBXHTecb C BaWei 3HEPretUeCKoKOMnaHne.
Ecn 3nKpOnHHe HncPabHO, He nItaeTecb HanaNTb erO camocToTeNbHO. C8xntecb C MeCTHO cnXboB O6cnykBaHna.
3Ha4K, HcNoJIb3YeMbIe B pyKOBoDCTBe
B pykoBDCTBE HMeIOTc npmeuHn n npedynpeKdEHH, c KOtOpbIMn Bam HyXHO 03HaKOMTbcra dnycneHoro BblONHeHH 3aada.
OIIACHO/BHIMAHHE: INHΦopMaun O DeiCTBnX, KOToPbIe MOryT IpnBeCTN K 6bITOBbIM TpaBMam.
OCTOPOXHO: INΦopMaŋaŋ O DeɪctBnʌx, KOTOpbIe MOrγT npNbEcT N NOBpeKdEHHIO 6obopydOBaHn.
BAKHO: HCTpykun, KOToPbIM Bbl OJINKbI CneIOBaT npu BblONHeHH 3aHa.
PIMMEAHHE: CObetbI ndoonHntenbHa HOpmaunn IIOMOuN.
Ie haTn 60JIbWe HOpMaun
06patntecb K cneyuouim nctouHnKam 3a dononHHTeBHOHnHOpMaueH n dno 06HOBHeHH nporpamMhoro obeceyeHn.
CaiTbI ASUS
CaT ASUS npedocTabnreT obHOBHeHHyIO nHΦopMaunO npodykTx nIporpaMMHom obeceyneHN ASUS. IocetHTe caT ASUS www.asus.com.
JokalbHaTexHnueckaNoepkKaASUS
Iocertte caT ASUS http://support.asus.com/contact pnyeHn KOHTaKTHOH HΦopMaun IokalhoN texnoepKKn.
KOMNNEKT NOCTABKN
| ASUS ПК Кльватура | x1 Мьшь x1 | |
| Шнун птыних x1 Support | DVD x1 (ДОПОНNTЕЛьно) | Recovery DVD x1 (ДОПОНNTЕЛьно) |
| InstallationGuide | Warranly Card | |
| Прогамma Nero 9 DVD x1 (ДОПOLNTЕЛьно) | РУKKOBODSTВО NO yCTAHOBKE x1 Гаразний талон x1 | |

- Ecn KaKHe-Jn6o 3neMeHbI KOMTNeKTa NOCTABKn OTCyTCTBYOT NnIOBpeXKeHbI, ObpaTNTecb K npodabuy.
- NIIIOCTpaun npedctabneHbI TOnbKO dIa CnpaBKn. CneuΦnKaun npOdykTa MOKe OTNauTbcB 3aBNCMOCTOn OT MoeHN.
Глaba 1
Hauano pa6oTbI
Dopno noxanaBb!
Bnaoradapum Bac 3a npno6peTeHne HactoIbHoro IK ASUS!
HactonbHbI PIK ASUS oecneuBaet Bbcokyo npOn3BodnteHocTb, 6eCKOMnpomccHyo HndexKHOCTb H opnentpoBaH Naonb3OBaTeN. Bce 3TO nOmeueHO B cytypncTneckn H cTnbHbIK Kopnyc.

Ipey yctahOBKO hactoBHO rN npouHTaTe rapaHTnHbT aTOH.
3HaKOMCTBO C KOMNbIOTepOM

NIIIOCTpaunn TOnbKO dnn cnpabKn. IopTbI Hx pacnoJooKeHne MOKe T3MeHrTbcR B 3aBcHMOCTn OT moJIeN.
BM1845
Ipeednnaheb
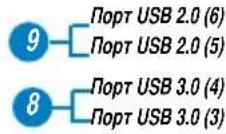

- 5.25 -ДIOIMOBBI OTCEK ДЯ ONTNueCKORO npHBODA. 5,25-ДIOIMOBBI OTCEK ppeHa3NaYeH DnY yCTaHOBKN ONTNueCKORO npHBODA, HapnpMep DVD-ROM/CD-RW/DVD-RW.
- Khonka n3BneueHn oNTHueCKoro dNcKa. HaxMnte 3Ty KhONky nIa N3BneueHn IOTka ONTHueCKoro npNbOda.
- OTeCk ONTuYeCKOrO npBODa (nycTo). N03BOJrE yCTAHOBHT DOONHHTeHBHbI ONTuYeCKn npBOD.
4.Индикатор кессткого дисka.3aropaetca npu obpauehen K kecstkomу dncky. - Khonka nHTaHnHaXMMTe 3Ty KhoNky dR BkLIOyEHnKoMnblOtepa.
- MnkpofoH. IodKIOueHHe MnkpofoHa.
- Pa3bem HayuHKOB. NpKIOueHne HayuHKOB INN KOHOK.
- NopTb USB 3.0. 3TN 9-KoHTaKTHbIe nopTb yHMBepCaIbHOI NOcJeIOBaTeIbHOI uHHbI (USB) npedHa3NaYeHbI dnn noKnIOueHnry ycToPOJCTB USB 3.0/2.0.

HE npKIOuAte KnaBnAtpy/MbIb KnpTy USB 3.0 npyycTahOBKe onepaunHOHCHCTeMbI Windows.
- YCTPOINCTBA USB 3.0 MORYT 6bITb HcNoIb3OBAHbI B OC Windows TOnbKO nocne yCTaHOBKn dpaiBepa USB 3.0.
- YctpoiCTBa USB 3.0 Moryt 6bItb NcNoJIb3OBAHbI TOnbKO B KaueCTBe yCTpOoiCTB XpaHeHnA.
-ДляпolyeHЯ BBICOKО npOn3BODHTeNBHOCTN yCtpoIcTB USB 3.0, Mbl HactoTaeNbHo peKOMeHnyEM NOKIOUaTb N K nOpTaM USB 3.0.
- NopTb USB 2.0. NpKnIOueHne USB-ycTroCB HApnMep, KnaBnAtypbl, MbIuN, npHTepa, cKaHepa, PDA u npyrux ycTroCB.
BM1645/MD250
IpeepnnaheB

- 2x5,25-IOHMOBbIXOTcKa.5,25-IOHMOBbIeOTcKINpeHa3HaueHbI INy UCTaHOBKn ONTtueckoro npHBoJa, HapnmuEp DVD-ROM/CD-RW/DVD-RW.
- Pa3bem MUKPOOHa (p03OBbl).IOpKIOUeHHe MUKPOOHa.
- Pa3bem nIyHayuHKnOB (canaTobbi). NpKIOUeHne HayuHKnOB HIN KOHOK.
- NopTb USB 2.0. NpKIOueHne USB-ycToB HApnMep, KnaBnAtypbl, MbIuN, npHTepa, cKaHepa, PDA u dpyrux ycToBtB.
- NopTb USB 3.0. NpdknueHne USB-ycTroB Hapmep, KnaBnatypbl, Mbiu, npHTepa, cKahepa, PDA u npyrx yctpoCTB.

- HE podknioyate knabnatypy/MbIb K nopTy USB 3.0 npn yctahOBke onepauHHOHCHCTeMbI Windows.
- YCTPOHCTBA USB 3.0 MoryT 6bITb HcNoB3ObaHbI B OC Windows TOnbKO Nocne yCTaHOBKn DpaHBepa USB 3.0.
-
YctpoNCTBa USB 3.0 MoryT 6bIb NcNoJIb3OBAHbI TOnbKO B KaueCTBe yCTpoNCTB XpaHeHnA.
-Дяплuyehнь ВсICOKО ПОИЗБОДТЕЛБHOCTH yCTPOICTB USB 3.0, Mbl HAcTOrTeNbHo peKOMeHdYEM NOKIIHOATb Hx K NOPTaM USB 3.0. -
Khonka c6poca. Haxmnte 3ty Khonky dner nepe3arpy3kn KOMnbioTepa.
7.Индкаторжсткогдда.3aropaetcn npo obpaueHnK Jcctkomydcky. - INHdkatop nHTAHn. 3TOT INHdkatop 3aropaetc npu BkIIOueHHN KOMNbIbTepe.
- KhoNka nHTaHn. HaxMnte 3Ty KhoNky dR BKnIOUeHn KOMNbItepa.
- 2 x 3.5-IOHMOBbIX OTceKa. 3,5-IOHMOBbIe OTcEKn IpeHa3HaueHbI dRy YCTaHOBKn JecTKoro DNCKa/Kapdpnepa.
3aHnaHeIb
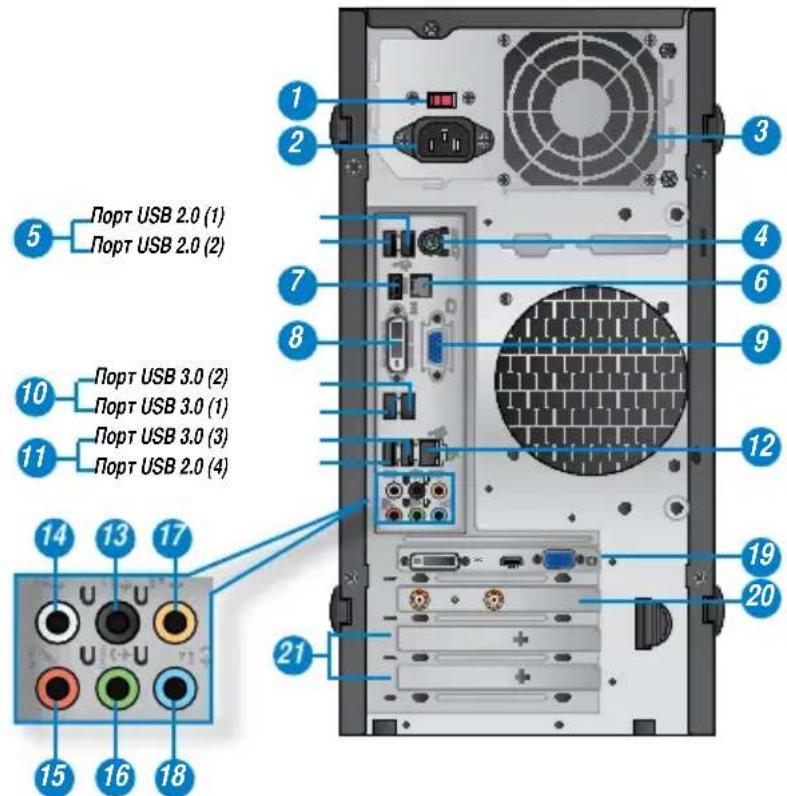
- NepeknioateBn HapxHn. NcnoB3yIe daHHbI nepeKnIOaTeB dnn Bb6opa BXoHoro HapxHn CnCTeMb, COOTBeTCTByIOUe HapxHnIO nHTAHN B BaWem perNoHe. Ecn HapxHne MeTHOH 3NeKTPocETn CoCTABnER 100-127B, yCTaHOBtne pekeKnIOaTeB B noJoxHne 115V. Ecn HapxHne MeTHOH 3NeKTPocETn CoCTABnER 200~240 B, yCTaHOBtne nepeKnIOaTeB B noJoxHne 230V.

YcTaHOBKa nepeKnIOuTeTn B noLoXeHne 115V npn BxOHOH HapXeHn 230V nobpeHt CnCTemy!
- Pa3bem NITaHnI. NpOKnIOuHTe K 3TOMy pa3bemy Hyp NItAHnI.
- BeHTnIaHNoHHbI OTBepCTNa. BeHTnIaHNoHHbI OTBepCTNa IpeHa3NaYeHbI IJIaOxJaXeHm yCTpOJCTBa.

He 6nokpyte BHTnnaHbIe OTBepTnHa KOpnyce. Bcerda ObecneuBaIe Heo6xOaMyIO BEHTnraUIO dN KOMIbIOTepa.
- KomboHnpobAHbI npT PS/2 nraKnaBnAtpyb/MbIu (nypnypHbI/3eJIeHbI). 3ToT npT npedHa3NaYeH dR Ps/2MbIu mN Ps/2 KnaBnAtpybl.
- NopTB USB 2.0. NpKIOueHne USB-ycTroCB HApPIMep, KNaBHaTpybl, Mbiu, npHTepa, cKahepa, PDA u dpynx ycTroCB.
- ONTHUeCKn S/PDIF-BbIXoJ. K 3TOMy NOpTy NOkNIOuOTc uHPOBbIe aydnoycpOCTBa c nOmoaio ONTHUeCKoro S/PDIF KaBeJa.
- Pa3bem HDMI. 3TOT npot npedha3hauen an na noeknoueHn K MOHTOPy nnn TeneBn3Opy n no3BOJraR Bocnpo3BODntb coepxHmoe HD DVD n Blu-Ray.
- Pa3bem DVI-D. 3TOT npot npedha3hauen dny noeknoueHna K IIO6omy DVI-D-COBmOmy yctpoiCTBy n no3BOJraT BOCpON3BODntb codepxmoe HD DVD n Blu-Ray.
- Pa3bEM VGA. 3TO pa3bem nIpaKIOueHnVGA-COBmBix yCTpoIcTB, HApIMep VGA MOHITOPa.
- NopTb USB 3.0. NodKIOueHne USB-ycToPcTB HApnMep, KnaBnAtpybl, Mbiu, npHTepa, cKaHepa, PDA n dpyrux ycToPcTB.

HE noKIOuAaTe KnaBnAtpy/MbIb K npTy USB 3.0 npu yctahOBKe onepauHOHcHCTeMbI Windows.
- YcTpoIcTBa USB 3.0 MOryT 6bITb HcNOnb3ObaHb I BC Windows TOnbKO nocne yctaHOBKn dpaIbepa USB 3.0.
- YcTpoIcbTa USB 3.0 Moryt 6bItb HcNOb3ObaHbToJbKo B KaueCTBe yCtpoIcbTB XpaHeHnA.
ДлгпolyeHньВICOKОнрOn3BODHTeNbHOCTNcYCTpoIcTBUSB3.0,МыHactToTeMbHOpeKOMeHdyEM noKnIOuOaTbXKnopTaM USB3.0.
- IopTb USB 2.0. IopKnIOueHne USB-ycTroPcTB HApnpMep, KnaBnAtypbl, MbIiH, npHTepa, cKaHepa, PDA u dpyrHx ycTroPcTB.
- Pa3bEM LAN. 3To pa3bem nIy noKnIOUeHnK IOKaJIbHOcTn (LAN).
HndkaTopbI LAN npota
HdHKaTOP aKTHBHOCTN
HnHnKaTOp CKOpocTn
IIOKNoeHHBHeHrO MOHTopA K INTePnpOBaHHo BnDeokapTe:
- Podknoyte MOHTop K pa3bemy VGA Hnn DVI-D Hnn DisplayPort Ha 3aHei naHenn KOMIbIOTepa.
- IodKnIOuHTe MOHHTOP K NCTOCHNYIITAHNA.
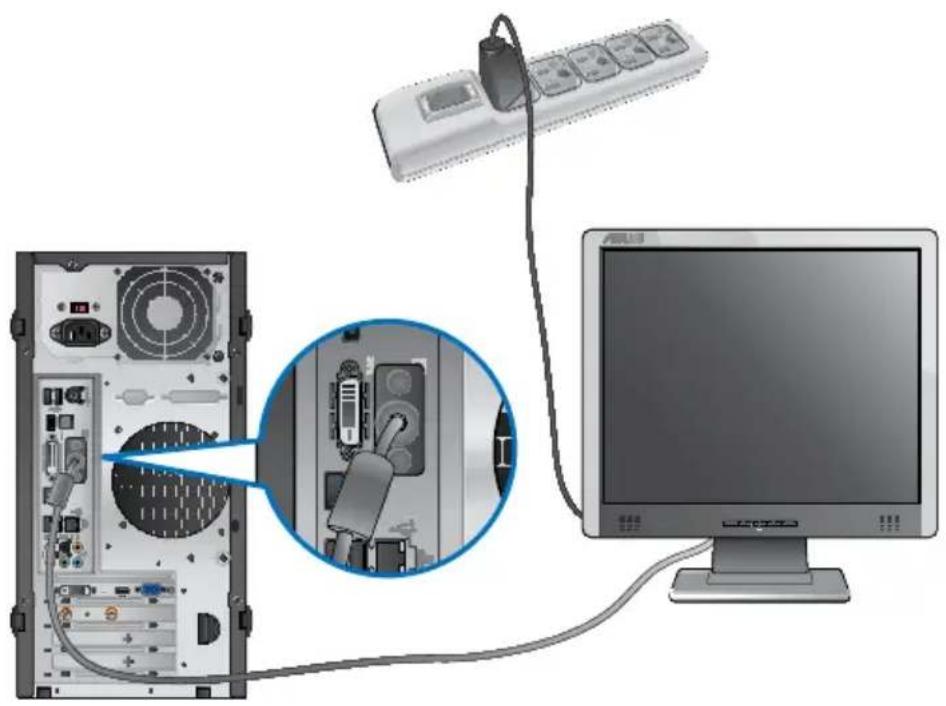

EcnKOMTbOp OChaen DnckpeTHo BNdeOKapTO, OHa yCTaHABNBAeTCB KaucctBe OCHOBHOYcTPOCTBa OTbopaxehn B BIOS. Cneobatelho, noKnIOHTe MOHITOP K BbIXOy BNdeOKapTbI.
IopKIOueHne USB KnaBnataypbIMbIiM
IopKIOHHTe USB KnaBnAtpy u USB MbIb K USB-nOpTaHa 3aIHe nNaHEn KOMMbItepa.

IopKIOueHne shHpa nHTaHna
IopKIOUHTe OINH KOHeu IHypa NHTAHN K pa3bemy NHTAHN Ha 3aHHe N aHEn KOMNbIOTepa, a npyroKoHeu K po3eTke.
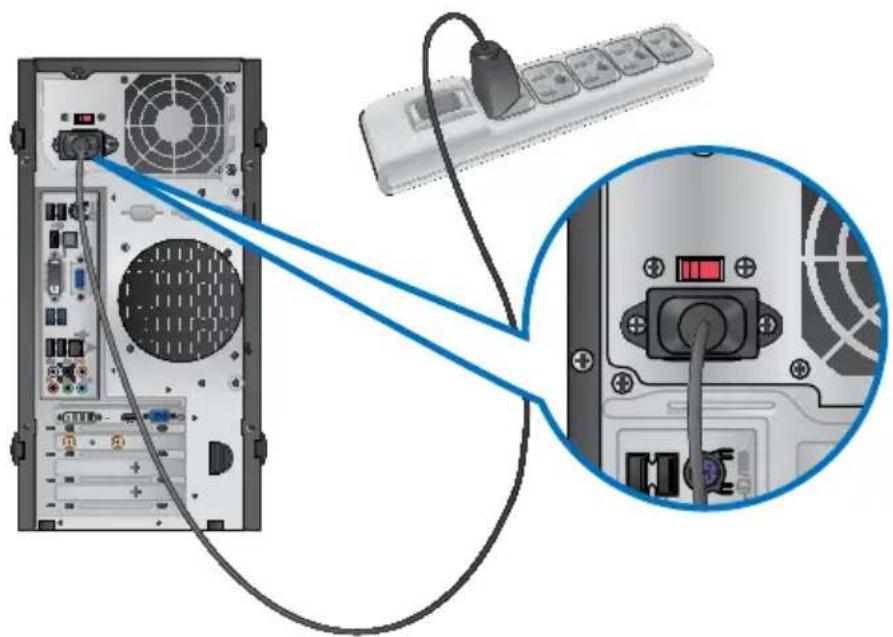
BkIIOueHne/OTKIOueHne KOMNbIOTepa
B 3TOM pa3dene ONHcIbAeTc BkIIOUeHne I OTKIOUeHne KOMNbIOTepa.
Bknouehne kOmnbioTepa
AINBKNIOeHnKOMNbIOTepa:
- BKNIOUHTe MOHHTOp.
- BknoHTe Tymbep nHTaHn (Tolbko JnB BM6630/MD510 u BM6330).
- Haxmte KhoNky NtHaHa KaMnbiTepe.

3.Дохдntecb 3arpy3kn OnepaunHOHcNCTeMbI.
OTKJIIOUeHne KOMNbIOTepa
Ara OTKIOUeyHn KOMNbIOTepa:
1.3akpoTe Bce 3anyeHHbIe npnoKeHnA.
2. Haxmte Ha paobem cTone Windows.
3. Haxmte Iy BbKIOeHn KOMnbItepa.
Глaba 2
IcnoB30BaHne MeHIO 'TycK'
Mehio 'Iyck' npedocabnaret doctyn K nporpaMMam, yTNHTAM n Hactpoikam kOMnbIOTepa. Oho TaKke npedocabnaret dononHnteBHyIO HHphiOpMaunO Windows 7 c nomoubIO fYHKuN CnpabKa n nopejka.
3anyck 3nemeHToB n3 MeHIO 'TysK'
ДлгЗдусka ЗемeнтOBи3 MeHIO 'Пуck':
- B nahenn 3apaq Windows haxmnte KhoNky Pnyck .
- Bb6epuTe 3IeMeHT dIy 3aNycka B MeHIO Tlyck'.


Bb moke Te Bb6paTb nporpamMb, OTo6paKaemble B MeHIO Tnyck. Noppo6HyIO HnΦoMaHIO CMOTPte B pa3dene DoabLeHne nporpamMb B MeHIO Nyck Hn nn NaHeB 3aay B 3toi rnaBe.
IcnoB3OBAHne nyHKta Haayapo pa60TbI
IyHKT MeHIO Hauano pa6oTbIB MeHIO T'YCK' CopeKNT HhOpMauio O HeKOTopbIX OCHOBbIX 3aauax, HapnMep nepcoHaun3aunr Windows, doabneHn HObIX nOJIb3OBaTeeN nepeDa ypaHIOB, YTO MoKeT NOMOy Bam o3NaKOMtbc r cncnbl3ObaHnem Windows 7.
IINCnONb3OBAHNAyHKTaHauAno pa60tbl:
- B nane 3aay Windows haxmte KhoK y NcK dny otkpbyr MeHIO 'Ncyk'.
- Bb6epnte Hauano paobtbi. NOBNTC cncoK doctynbIX 3aau.
- BbI6epnte HxKHyIO 3aNaHy.
UcnoIb3OBaHne naHeJI 3aJaay
Panae3aanau no3BONrReT 3anyckTaH ynpabJrTa IporpamMa, yctaHOBneHHbIMHa KOMIbItepe.
3anyck nporpamM n3 naHeN 3aaday
Дязалусяк nporpaMMbI n3 naHJIY 3aJaU:
B naHn 3aau Windows ueknte nKohky dny 3anyca nporpaMMbl. HxMnte epe pa3 dna cKpbTn nporpaMMbl.

Bb moke Te Bb6paTb nporpamMbI, OTO6paKaembl B naHEn 3aAau. POpbo6HyIO HfOpMaunio CMOTPte B pa3dene DoabneHne nporpamMbI B MeHIO NcK nn NaHEn 3aAau B 3toI rnaBe.
3aKpennneHne 3nEmeHTOB CnncKe nepexOda
Pn 9eKne npaBOH KhoNkOHa NkOHKe B NaHeN 3aDaay 3aNyckaTcra CncoK nepeXoOB, PnpocTabnIOuIb6bIcTpbl DoCTyn K nporpaMMam Hnn 3JeMeHTam. Bbl MoKeTe 3akpenntb 3JeMeNTbl B CnCKe nepexOda, Hapmep IIObMbIe caNTbl, YacTo NocceaaMble naKN Hn DnCKN, Hn HeabHO BOCpON3BODMbIe MednaFaiNbI.
Ia3akpenneHn 3nemehTa B cnncke nepexoJa:
- B nahan 3aadau zeKHTe npaBoi KhoNko NKoHky.
- B cnncke nepexoda, ueKNHnTe npaBOn KhoNkoHa 3neMeHTe, KOToPbI Bbl XOTnTe 3akpenntb, 3aTeM Bbl6epnte 3akpenntb B cnncke.
N3bTne 3nemEnTa n3 cnncKa nepeXoJa
IINH3bTn3neMeHTa H3 CNNcKa nepeXoJa:
- B nahan 3aadau zepknte npabO KhoNko NKOHky.
- B cnncke nepexoja, uenknhte npabO Knonko Ha 3neMeHTe, KOtOpBb Bbl XOTHTe N3bTb, 3aTeM Bbl6epnte N3bTb N3 cnNcKa.
3aKpeHHeHne nporpaMMbI B MeHIO Pnyck HnHa nHaHeHn 3aJa4
ДлэзakpenneHn nporpaMbI B MeHIO Nyck nHn Ha naHEn 3a4a:
- B nahenn 3adaq Windows haxmnte Khonky Iyck dno oKpbTna MeHIO Iyck'.
- ⅡeKNHTe npabO KnHKOHa 3nemeHTe, KOtOpB BbXOTNe 3aKpeNTb B MeHIO NcK Hn Ha naHeN 3aJa4.
- Bb6epnte 3akpenntb Ha naHenn 3aauu nn 3akpenntb MeHIO Tnyck'.

BbMOKTe TaKHe 9eKNHyTb npABoN KOnKOHa NkOHKe 3aNyEHHo IporpMMbIB NaHEn 3aDa4, 3aTEM Bb6paTb 3aKpenNTb 3Ty IporpMMy Ha NaHEn 3aDa4.
I3bTne nporpaMmbi n3 MeHIO NycK
IIN3bTnI nporpaMmbI IN3 MeHIO Iyck:
- B nahan 3aay Windows haxmte Khonky Pyck dny oKpbTna MeHIO Pyck'.
- B MeHIO Nyck ueKNHTe npABoN KHOKoN NO nporpaMMe, KOtopyHO HxHNO 3bA rB, 3aTeMBbI6epnte YdaNTb N3 3TOrO cnNcKa.
I3bTne npoPpAMMbI n3 naHeJI 3aJa4
IIN3bTn nporpaMmbi n3 naHenn 3aana:
- Ha naHenn 3aJaU uenKnHTe npABoN KHONKOHa nporpamme, KOtOpyIO HxKHO N3bAryb N3 naHenn 3aJaU, 3aTeM Bbl6epnte N3bAryb 3Ty nporpammy N3 naHenn 3aJaU.
IcnoIb3OBAHne oBnactn yBeDomJIeHn
No yMOnuahHIO, B O6NaCTn YBeDOMneHn NOKa3Ahbl 3TN TPN KOKHN
| YbeDomLeHnA ΚeHtpa NoidepKKn HajMMte 3ty uKohKny dlya otobpaJKeHnB Bcex coo6eHn/YbeDomLeHn N 3aynsKa ZeHTpa NoidepKKn. |
| CetEBoe NoidKlOuHne 3ta uKOHkA otobpaJAcT cOstOHNHe NoidKlOuHne N MoUHocTb CnHana IpoBOHOro NII BeCnpOBODH NoidKlOuHne. |
| ГROMKoCTb HajMMte 3ty uKOHky dlya peRyHnPobKN YromKoCTH. |
PpocMToP yBeOmneHn
IpynpocmOtpa yBedeomneHHa:
Haxmte HkOHky yBeOMnHeNna , 3aTeM ueknte no cooohnno dner erO OTKpbTnA.

Iopno6HyIO HOpmaio CmOtpTe B pa3dene NcNoIb3oBaHne LeHTpa IodepKKn Windows 30n rnaBbl.
Hactpoika nkoHOK u yBeDomJIeHn
BbMOKeTe BbIpaTb OTo6paXeHHe Hn cKpbITne NKOHOK N yBeOMnEHn B nHaHn 3aDaY Hn B o6NaCTN yBeOMnEHn.
HACPTPOKNUKOHOKuYBEOMneHH:

- B obnaCTn yBeDOMJIeHn HaKMITE NKOHky CTpeKNK
- Haxmte Hacptponka.
- B Bbinaaioem cnncke Bbibepnte nobedeHne nkoHok nn nyHKTOB, KOtOpble Bbl XOTNTe HacTpOHTb.
YnpabIeHne paJ lamn n panKamn
IcnoIb30BaHne IpoBODnka Windows
PpOboDnK Windows no3BONReT npocMatpnbAtb N npapBnTb faJnAmn nIaKaMn.
3nyck IpoBOnnka Windows
IopraHn3aunn faJnoB:
- 3anyctne IpoobodnK Windows.
- Haxmte none Ynpaoyntb no nla oToobpaeHn Bbnaiaouero cnncka.
- Bb6epnt Tn pa3MeueHna.
Coptnopobka paJIOB
Ди copTnpoBkn faHnoB:
IIIBOCCTAHOBNEHNACTEMbl:
- 3aKpOte Bce 3anyeHHbIe npnNoxHnIa.
- Haxmte >PpOpaMMbI > CtaHapThbIe > CnyXe6HbIe > BocTaHOBneHneCnCTembl.
- Cnedynte HNCTpyKUyMaH Ha 3kpaHe IJRA 3aBepWeHHIpocecca.
3aunta KOMnIbIOTepa
IcnoB30BaHne LcHTpa noDepKKn Windows 7
UeHTp noDepkKn Windows 7 npedocTabnreYbEdomneHn, HhOpMauno o 6e3onachoctn, HhOpMauno 6 obcnyKbAHnn CnCTembl N BO3MOXHOCTb ABToMaTHueCKORO YCTpaHeHn HEKOTOpbIX Hanboonee yacto BCTpeaioxncn npobm c KOMnbIOTepom.

Bb moKTe HAcTpoNTb yBeOMnHn. IOnONHTenbHyIO nHΦopMauNcMOrTpHe B pa3dene HAcTpoNk AkoHOK N yBeOMnHn 3ToI rnaBbl.
3anyck Ljentpa nopeppkn Windows 7
ДлэзусякLaentpa noDpepKKn Windows 7:
1.ДЯЗANyCKaLHeHTpaNoDEpKKNWindows7HaxMnTeNkoHkyOBnactynBvBeDOMnEHn,3aTEM HAXMnTe OTKpbItb ueHTpNoDEpKKn.
2. BbIbePHTe HxKHyIO 3aauy B UeHTpe NOpdepKKn.
IcnoB3ObaHne LcHTpa o6HOBHeHn Windows
LcHTp 06HOBHeHm Windows no3BOJrE npOBepaTb u yCTaHaBnBaTb nocJeHme 06HOBHeHn dIe NOBbIeHn 6e3OanachOCTn I pON3BOJntelbHOCTu KOMNbIOTEpa.
3anyck LcHtpa o6HOBHeHn Windows
Дязamycka ZeHTpa obHOBNeHn Windows:
- B nahenn 3aau Windows haxmnte Khonky Pyck dny oKpbTna MeHIO Pyck'.
- Bb6epnte PporpaMMbl>LeHTp 06HOBHeHHa Windows.
- Bb6epnte Hxkhyo 3aayy B LcHtpe o6HOBneHn.
Co3dahne yueTHoJ 3annc noJIb3OBaTeJI npOJIa
Bb moke t co3daT b yte hble 3aHn cnn noIb3OBaTee n npOnn dnn IIOe, KOToPbIe 6ydyT HcNoIb3OBA Tb KOMNbIOTeP.
Co3dHHe yeTHoN 3aHcN noJIb3OBaTeNa
Igno3aHnYyehTHoN 3aHNCn NOB3ObaTeNa:
- B naheHn 3aay Windows haxmte >PncTynar K pa6ote >Iobabntb HOBOro noJb30BaTeHn.
- Bb6epnte Ynpabnene npyro yteTHo 3aHncbI.
- Bb6epTe Co3daTb HOByIO yUeTHyIO 3aNNCb.
4.BBeIte HMa HOBOro IOnb3ObaTeJra. - Bb6epnte Oobiyhbl doctynnnn AdmnHcTpaTOp kak Tn nn nb3oBaTeNa
- KOrda 3aKoHnTe Haxmnte Co3dTa b yEtHyO 3aIInCb.
3aahanne nponno noJb3oBaTeTn
ДлэздагиnapoI nonb3OBaTeIa:
- Bb6epnte non30BaTeTn, dnn KOTOPORo HxKHO yCTaHOBtB npObn.
- Bb6epnte Co3daTb npoJb.
- BBeInTe npoIb n noTbePnTe erO. BBeInTe noDcKa3K npoIIO.
- Korda 3aKOHHTe, HaxMHTe Co3daTb napoIb.
AknBaun aHTnBnpycho nporpaMMHoro oecneueHna
PpnoNoxehne Trend Micro Internet Security yxe ycTaHOBNeHo Ha KOMnbIOTpe. 3To nporpaMMHoe oBeecneueHne oBeCneuBaet 3aunTy KOMnbIOTepa ot BnpyChbix aTak. Ppno6peTaetc rOdJIbHo. Iocne AKTHBaau N Bi MoKeTe HcNoIb30BaTb ero 30 dHei.
ДяakTBAuNn Trend Micro Internet Security:
- 3anyctnte npnloxene Trend Micro Internet Security.
- Пожunate Лученьонhoe cornaeHne. Habmte Agree & Activate.
- BBeHrTe aApE 3NeKToHHoN noTyI N BbIepePte CBOB perNoH. HaxMHTe Danee.
- Haxmte IOTOBO pna 3aBepweHn aKTNBaun.
IonyeHne cnpaBkn n noDepKKn Windows
Cnpabka n noepkka npedoctabnaret Hnctpykunn OTBetbno HCnOsb3OBaHIO npnOKeHHB Windows 7.
IcnoJb30BaHne yTnJIHT

Support DVD u DVD-BOCCTAHOBNEHMA MORYT 6b1b He BKNIOYEHb B KOMNNEKT NOCTABK. IIN CO3aHHA Support DVD u DVD-BOCCTAHOBNEHMA MOKHO HcNOJb3ObaT ba3dEe BOCCTAHOBNEHNA. NpOboHyo INHOpMaHIO CMOTPte B pa3dene BOCCTAHOBNEHne CnCTeMb 3ToI rnaBbl.
ASUS AI Suite II
ASUS AI Suite II ABNIEcra ydo6bIM INHTeppeHcOM, KOtOpBIOObBeHNReT HeCKoNbKO ASUS yTNnT n NO3BOJAEr HcONb3OBA Tb 3Tu yTNnTbI ODNHOpeMeHo.

3Ta yTuNTa yKe npEbpntenbHO yCTAHOBHeHa HeKOTOpBix MoedJx. DnMa moDene 6e3 onepauHooHcNCTembl dya TcAHOBKn 3ToI yTuNTbI cneyTe HHXeCneDyoUHM HhCTpykunM.
YctaHObKa AI Suite II
Mehio Monitor Bknoaet Ccepa naHn Sensor n CPU Frequency.
3anyck Sensor
HaHEnb DaTynKOB OTo6paKaAe TKeUee 3HaueHHe CNCTEmhIx DaTynKOB, HAnpMep CKOpocBb BpaueHnBEHTNIArTOPOB, Tempepatya npoueccopa HAnpJxHHe NHTAHn.
Диязanycka Sensor:
- Haxmnte Monitor > Sensor B rnaBHOM MeHIO AI Suite II.
3anyck CPU Frequency
Pahenb cactoToB npouecoppa oTo6paKaet YacTOTy upoBeHb 3arpy3Kn npouecoppa B npoueHTax.
Дия зamycka CPU frequency:
- Haxmte Monitor > CPU Frequency B rnaBHom MeHIO AI Suite II.
MeHIO Update
MeHIO Update no3BONrEo6HOBnTb BIOS MaTePNHcKo nnatbl n NorOTn C nomoubO yTNNT ASUS.
ASUS Update
ASUS Update - ytuneta, no3BolnoaBar Coxpanr b N obHOBnrtb BIOS MaTePHckO nPaTb B Windows. Ytuneta ASUS Update no3Bolraet obHOBnrtb BIOS HenocpeActBeHHo n3 cTeN VHTepHET, cKaHBA t nocIeHIO BepCNO BIOS n3 cTeN VHTepHET, obHOBnrtb BIOS n3 faIIa, coXpanr b TekyuiuBIOS B fain n CMOTpeB HhOpMaUHO o BepCIN BIOS.
06HOBNeHneBIOSuepe3 INHTepHer
ДлгобногпнгBIOS uepe3 HHTepHET:
- Ha 3Kpahe ASUS Update BbIbepnte O6HOBHTb BIOS n3 INHTepHET, 3aTeM HaxMnTe Daane.
2.ДЯумьшенисетeвог罗tpaфнka bblбepиte6nkaanASUS FTP cepbep.
YcTahOBHTe fPnAaKKn ecnn XOTnTe BkNIOuHTb FyHKcMn BIOS downgradable n Auto-BIOS backup.
3. BbIbePte BepcuB BIOS 3aRpy3K, 3aTeM hXMMte Next.
Ecnno HOBa Bepn He oBapykeHa, noBntc COOTBeTCTByIOuee coo6uHne.
- HaxMnte Yes, ecnXOTHe n3MeHnTb NorOTn, OTO6paXaEmbI BO BpeMa camOTecTHpOBaHn (POST).B npotNBHom cnYae, HaxMnte No.
- CnedyTe HNCTpyKUHm Ha 3kpaHe pIra 3aBepueHH npOeCC aOBHeHn.
OsbHbJIeHHeBIOSn3ΦaIIa
Ha 3kpae Settings MoXHO HAcTpOntb npaMeTpbl rnaBHOro MeHIO BnIHTepeCa
Application no3B0JrT Bb6paT hCnOJIb3yEmble npInNOKeHna.
Bar No3BONJeT 3MeHHTb HAcTpOKn NaHeN
- Skin no3B0JAEHACTpOHTb KOHTpAcTHOCTb, RPKOCTb, HAcbIeHHOCTb, UBeT n RamMy HHTepFeica.
ASUS AI Manager
ASUS AI Manager - yTuNHTa, npedoctabnauoaa 6bictpbI K qacto nCnoB3yeMbIM npINOxHeHm.
YctaHOBka AI Manager
IyraYCTaHOBKn AI Manager:
- Bctabte Support DVD B ONTnueckn npHBOD. Ecnn ABTO3aynck BKIOueH, NOABNTcMACTep yCTAHOBKn.

Ecnn abTo3anyck He BkHoueH, DbaKdbI ueKNHTe no paay setup.exe, HaxoJaemycB dIpeKTopnn ASUS AI Manager Ha Komnakt-dncke.
- BbIbepuTe BknaDky Utilities, 3aTeM haxMnte ASUS AI Manager.
- CnedyTe MHCTpyKuYMaHa 3kpaHe.
3anyck AI Manager
Дяллуа Al Managerнхмпглськ > Поррамь > ASUS > Al Manager 1.xx.xx > Al Manager. Ha paбочem CTone NOBNTcnaHelenb b6bICTporo zanycka Al Manager.
Pocne 3anycka npnloxhen B nahen 3a daq Windows noBntcK konka AI Manager.
UeKnHte npabO Knonkno no nKoHke I napeKnIOyehnaJe naHeIbIO b6ictporo 3anycka m rnaBbIM OKHom, a TAKKe Ira BbIbopa cNoocoba 3anycka AI Manager.
Al Manager naheB 6bictporo 3anycka
Pahenb 6bictporo 3anycka AI Manager no3B0nreT Bam 3anyckaTb ASUS yTuNtbl nn OTObpaXaTb cnCTeMHyIO HOpMaUIO. Ipy OTObpaXeHHaC OedePKMOrO BbIepeHTe BknaKy INaBHaa, N36paHHOe, POndePkaII INHOpMaUIA.

HaKMnte KhoNky Pa3BepHyb npeKIOueHm MExy NaHEnbIO 6bICTpO 3aNyCkA rNaBHBIM OKHOM. HaxMnte KhoNky Cbepyt Dnna CBeptbIBAHn AI Manager B naHEnb 3aDaY. HaXMnte KhoNky 3aKpbItb nBaBixOda n3 AI Manager.
Main
B rnaBHOM MeHIO haxoHTcra Tpr yTnNTbI: Al Disk, AI Security n AI Boosting. Ira BbIbopa yTnNTbI HaxMITE cTpEly B npabom HxHHe m yrny.
AI Disk
Al Disk no3BONrEt Bam ydaHtB BpemeHHbIe paHbI, KyKN, nCTOpHIO, aDpeca IE nn OuncHTb Kop3nHy. UeKHNTE NO NkOHKe Al Disk Ira oTo6paKeHn OKHa Al Disk u BbIbopa npaMeTPOB. KOrda 3aKoHHTe, HaxMnte PpImeHTb.
AI Security
AI Security no3BONJET Bam yCTaHOBnTB napoI 3aunTbI ycTPOcTB, HApPmep USB, CD/ DVD-DCCKOB OT HecaHKUHOHPOBaHHoro doctyna.
ДлбнokpoBкуctpoiCTBa BbINOJIHnTe CneIyIoUe:
- Pn npBOM 3anycke Al Security Bam npepnoKAT yctaHOBTb napOB. BBeHrTe npoB, codepkaun do 20 anpaBTHO-ynpOBBix CMBONOB.
- NpTBePnte npoNb.
- BBeIe nOdcka3ky (peKoMeHnyeTcY).
- KOrda 3aKoHHTe, HaxMHTe OK.
- Bb6epTe yctpoIcTBo IJI 6NOKIpOBKn HnaxMnte PpIMHeHtB.
- BBeInTe yctAHOBnHbI npOJIb, 3aTeM HaxMnTe OK.
Дя pa36nOKpOBKN yCtpoNCTBa:
- CHMNTe fnaXOK c 3a6nKOpOBaHHoro yctpoHCTBa, 3aTeMaHXMNTe PpImHeHTb.
- BBeDte yCtAHOBHeHHbI npOJIb, 3aTeM HAXMITE OK.
ДЯИЗМЕHENNA napONA:
- Haxmte Change Password, 3atem cneyuTe nHctpyKzmaM Ha 3kpaHe dIa CMeHbI napoJ.
AI Booting
AI Booting no3B0n8e Bam yctahOBntb npnoptet yctpoicTB np 3aRpy3ke.
IaN3MeHHe npOpHTeTa 3arpy3Kn BbINONHInTe CneDyIOoee:
- Bb6epnte yctpoiCTBO, 3aTeM HaxMMTE KONky BnpBO/BneBO nra CMeHb IpnopTeTa npu 3arpy3Ke.
- Korda 3aKOHHTe, HaxMHTe PpIMHeHtB.
U36paHHoe
N36paHHOE NO3BONJET Bam do6abntb yacto HcnoJIb3yEmble npINOKeHH, N03BOJIra C9KOHOMHTb BpeMa Haix nonck.
ДяdoбаьненпрлwxкеньвионнITEcneуioоe:
- Haxmnte Do6abntb, 3aTe m Hainnte npnIOxKeHne, KOtOpoe Bbi XOTnTe Do6aBntb B V36paHHoe.
- Haxmte Open B OKhe nonka. PpHIOKeHne IO6aBHeo B N36paHHoe.
UeKHTe npaBOn KhoNkO no NkOHKe npnOKeHna 3anycka, ydaJeHna, nepeMeHOBaHna BbIpaHHoro npnOKeHna. DBOHOn 7eJyOK npNBEdT K 3anycky BbIpaHHoro npnOKeHna.
Iopdepkka
LcIeHcK no IIObO BcBInke B OkHe Support npuBeTe Bac Ha caT texHnuecko noDepKKN ASUS n NOKaXeT KOHTAKTHyIO MHOpMaUIO.
Hhopmaun
HaKMnTe BknaKy B OkHe NHΦopMaqura Ipy npocMoTa nOpboHoN HΦopMaun O BaWei cnCTeme, MaTePNcko nnate, npoueccope, BIOS, yctaHOBneHHbIX ycTPOcTBax n Namrtn.
ASUS Webstorage
Iporpma ASUS WebStorage npedha3hauheHa dna cHxpoHn3aun daHHbIX Ha HOY6yKax, cMaprfoHax nn nanns tax yepe3 INTepHeT.
YcTaHOBka WebStorage
- BrnabHom MeHIO haxmte Nero 9 Essentials.
- Bb6epnte 33bik, nCnObn3yEmbB Mactpe yctahOBKn. HaxMMTe Daane.
- Haxmte daee npoQxehna.
- YcTahOBnTe fIaJok I accept the License Conditions. Korda 3akOnHte, Haxmnte Next.
- BbIbepuTe Typical, 3aTeM haxMnte Next.
- YcTahOBHTe pJAAKOK Yes, I want to help by sending anonymous application data to Nero, 3aTeM HAXMMTE Next.
- Korgda 3akOHHTe, HaxMHTe Exit.
3aHcB paJIOB
Диэлнсфайnob:
- B rIaBHom MeHIO HaxMITE Data Burning > Add.
- Bb6epnte faaIbI dna 3anncn. Korga 3akOHHTe, HaxMTe Add.
- Посné Вьбopa сайноь нахмite Burn зашис сайноь на дис.

DOnonHnTeIbHyIO HnΦopMaunio no nCnONb3OBaHNIO Nero 9 cmOpnte Ha caTne Nero Ha www.nero. com
BocctaHOBJeHne cncTeMbI
UcnoIb3OBaHne pa3dela BocCTaHOBnEHHa
Pa3den BOCCTaHOBNEHnI IpeoctabnEe BO3MOXHOCTb 6bICTpOBO C0CtAHOBNeHnI nporpaMMHOro ObecneueHnHa KOMNBItepe B erO opnHHaHbHoe paOooe coCToHHe.Ipeed HcNoJIb3OBAHNem pa3dena BOCCTaHOBNEHnCKOnpyuTBe Baun daHHbIe Ha USB-HakONTeB nn CeTeBOI dNck n 3aNNHTe napametpbI KOHfNHypaun (HanpIMep cTeBbIe napameTpbl).
Opa3dene BocctaHOBHeHHA
Pa3dien BOCCTAHOBNEHn - 3ape3epBnpoBaHHoe MeTo Ha JecTKOM DnCKe, HcNOJb3yEmOE IIN BOCCTAHOBNEHn CnCTembl, dpaBepOB N yTtNNT, yCTAHOBNEHbIX HA 3aBOde.

He ydaIyte pa3den C BOCCTAHOBNEHnna (pa3den 6e3 MeKN Ha nepBOM nncke). Pa3den BOCCTAHOBNEHnna Co3dah Ha 3aBOde H He MoKeT 6bItb BOCCTAHOBNEH NOJb3ObaTeMe. Ecny y Bac npo6neMb c npouecCOM BOCCTAHOBNEHnna, OTHeCtBe Baw HactOnbHbN Pk B cepBcHbN ceHTp ASUS.
NcnoIb3ObaHne pa3dena BocCTaHOBNeHHa:
- HaxmTe < F9> npn 3arpy3ke.
- BbIbepuTe Windows Setup
n haxMute . - Ha 3kpahe Recover system to a partition haxmte
. - CnedyTe HNCTpyKuYMaH Ha 3KpaHe Ira 3abepweHH npouecca.

Дяобовеня дайBEROB u yTuNT nocerte caT ASUS www.asus.com.
IcnoJb30BaHne DVD-BOcctaHOBJIeHnna (Ha HeKOToPbIX MoJeJx)
Ipeep BoCCTaHOBHeHem CnCTeMbI OTKnIOHTe BHeuHm JeCTKm DnCK. Bbl MoKeTe nOtePrtb BaXhble daHHbIe npu yCTaHOBKe Windows Ha dpyro DNck Hnn FopMaTHPOBaHN pa3dena.
Длнспьзовань DVD-ВOCCTahOBJIeHHa:
- BCTaBbTe DVD-BOcctahOBnEHHB ONTHueckn npNBOD. Baw HAcToIbHbI PIK DoJxH e 6bITb BKIOUeyH.
- Ipe3arpy3nte HactoBbHnIK, npu 3arpy3ke HaxMnte F8> n BbIbePte ONTUeCKn npBOd (MOKET 6bITb 06O3haueh KaK "CD/DVD"), 3aTeM HaxMnte
dnn 3arpy3Kn C DVD-BOcCTAHOBJIeHHN. - Bb6epnte OK npna 3anycka npoecca BocctahOBneHnA.
- Bb6epnte OK nnoTbepeKdene HBOcTaHOBJeHn CHCTembl.
Ipocecc BocctaHOBHeHna ydaNT BCE daHHbIe Ha JcKcKm DnCKe. IpeE BdINOnHeHMe BOCCTaHOBHeHn CnCTeMbI, y6dntecb, yTO BCE BaXHbIe DaHHbIe CoXpaHeHbI Ha BHeHNx HocHTenJx.
5.CnedyTe HNCTpyKUmHa 3KpaH JaBepuHn npouecca.

He n3Bnekaite dNCK BOCCTaHOBNEHn (MacTeP BOCCTaHOBNEHn He nonpocnt 3TO cEHaTb) BO BpeMa npouecca BOCCTaHOBNEHn, Hnue BaW pa3den 6yDen HCnpuH.

Дяобовеня дайBEROB u yTuNT nocetute caT ASUS www.asus.com.
Глaba 7
YcTpaHHeHHeNCnPaBHOCTe
YctpaHHe HeCnPaBHOCTe
B 30n rnaBe npedctabJIeHbI HeKOTOpbIe npo6JIembl, KOtOpblc MoryT BO3HnKHyTb N BO3MOxHbIe nTyN nx peuHn.
? Moi KOMNBIOTep He BKNIOaETcH IN HNDKATOp NHTAHHa NepeDHei NaHeHn He RopUT
- PpOBepe Te npaBnIbHocTb NOKJIIOueHn KOMIbIOTepa.
- IpoBepbTe po3eTKy.
- PpOBepe, 706nK nTahnB KKnOueH. NpOp6HyIO HΦopMaunio CMOTPte B pa3dene BKnOueHne/OTKnOueHne KOMTbIOpTepa B rnaBe 1.
MOMKOMNbIOTeP3aBncaeT.
-Дязakpbityn nporpamM, KOTOpbIe He OTBeuaiOT BblONHHTe CnedyUOuNe DeNCTBnA:
1. OndOBpeMeHHo HaxMMte KnaBnwn
2. Bb6epTe BknaKy PnnoXeHnA.
3. BbIbePHTe IporpAMMy, KOtOpA He OTBeaet, 3aTEM HaxMnte ChrTb 3aauy.
- Ecn knabnataype He OTBeaet. Haxmte u yepxnbate HaKaToK hONky nHTAHNA BePxHe qactn Kopnyca, noka KOMbIOTep He BbIKNoHTcra. 3aTeM Haxmte KONky nHTAHNA IIN erO BKIOUeHna.
? He Mory noiknoHTbcK beCnpoBHOcTn cNoMoIbO ASUS Wlan Card (ToNbKO Ha HEKOTOpBX Modenax)?
Y6eHTecb, YTO Bbl BBen npabnBHyk NIOUd nnoKNOueHn K 6ecnpoBHOcM.
- IyueuweHnBecnpoBODHO CB3N NOKNOHTe BHeHne aHTEHbI (NoCTaBnTcOnnoHaJIbHO) K ASUS WLAN Card n pacnoJoxnTe Hx Ha BepxHe yactn KopnyCaKOMMbItepa.
He pa6oTaIOT KnaBnH co cTePknAMn Ha uΦpOBoN KnabHnatype.
Y6eHntecb, yTo HnDnKatop Number Lock He rOpNT. KOrda HnDnKatop Number Lock rOpNT, KnabuHn Ha uΦpOBoN KnabHnAtype nCNoB3yETcT OIbKO dIa BBOda YIceN. Ecn Bbl XOTNE uCNOB3OBaTB KnabuHn CO cTpeKNaMn Ha uΦpOBoN KnabHnAType, Haxmnte KnabuHny Number Lock dIra BbIKNoyeHn HnDnKatopa.
? Het n3o6paXeHnHa MOHHTope.
- Y6eHNTecb, yTO MOHITOp BKNIOueH.
- Y6eHNTecb, yTO MOHHTOp npaBnIbHO nOaKnIOueH K BnDeOBbIXOy KOMNbIbTepa.
- ECNI KOMNBIOTep OCHaueH INCKpeTHOH BnDEOKAPTOI, y6eINTecb, YTO BtIO NODKNIOHN MOHNTOP K BnDEOBbIXOyD INCKpeTHOH BnDEOKAPTbI.
PpOBepbTe, He n3OrHyTbI nn KOHTaKTbHa pa3beMe. PpN o6HapyKeHHn NorHyTbIX KOHTaKTOB 3ameHIne Ka6enb. - y6eHTecb, yTO MOHITOp npabMbHO IOKIOUOeH K ICTOUYHKY NtTaHnA.
- DOnONHHTeNbHyIO INHΦopMaUHIO NO yCTpaHEHIO HEnCnPaBHOCTe CMOTpTe B DOKymENTaUN, NOCTABJREMO C MOHTOPOM.
? Ipn HcnoB30BaHn HeCKoBkX MOHHTOpOB H3O6paXeHne TOnbKO Ha OdHOM MOHHTope.
- Y6eHntecb, yTo 06a MoHtOpa BkIIOueHbI.
- Bo Bpem POST, n3o6paXeHne HmeeTcra ToIbko Ha MOHTope, noKJIIOueHHOM K VGA pa3bemy. IBa MoHTopa pa60aIOT ToIbko no Windows.
- Pn HauHn nnckpeTHoB BndeOkaTbI, y6eNTecb, YTO MOHHTOpbl NOKNIOueHbI K ee BblXOy.
- PpOBePbTe npaBnBHOCTb HAcTpoEk DnA HeCKoNbKnx DnCnIeEB. IopDpO6HyIO HΦOpMaHIO CMOTpTE B pa3DeNe IopKnIOueHne HeCKoNbKnx MOHTopoB rnaBb 3.
MouKoMTbIOTep He MoXeT oBhApXHTb USB-HaKoNTeJIb.
- Pn noKIOeHm USB-haONTeB K KOMNbIOTepy, Windows aBtOMaTneCKN yCTaHabINBaET nra Hero npaBep. Hemoro noOxDte n OTKpoT e MoN KOMNbIOTep n y6eITecb, 7TO USB-haONTeB oBhApYKeH.
- PnKnHHTe USB-HakOnntenb K npyromy KOMNbIOTepy n y6eHNTecb, 70 OH nCnpabEn.
? XOuy BOCCTAHOBHTb HIN OTMeHHTb H3MeHeHnB CnCTeMe He 3aTpaHnBaMOnx faHIOB N daHHbIX.
BocctaHOBHeHne CnCTeMbI Windows No3BOJAEr BOCCTaHOBHTb NIM OTMeHHTb N3MeHHeNBA CnCTeMe, He 3aTpaNBa BAuN DaHHbIe, HApPmep DOKyMeHTb NIN FOToRpaHm. Ioppo6HyIO HHΦOpMaUIO CMOTpHte B pa3dJe BocCTaHOBHeHne CnCTeMbI rnaBbl 2.
? NckaKeHo n3o6paXeHne Ha HDTV.
3to obycnoBneho pa3hblm pa3peweHem Baawero MOHTopa n HDTV. HactpoTe pa3peweHne 3KpaHa B COOTBeTcBn c HDTV. IJRA N3MeHeHHa pa3peweHna 3KpaHa:
1.ДЯOTKpbITNg3KpHaPaPa3peWeHne3KpHa BbINONHHTe OHO u3 CNeDyUOxN DeICTBn:
HaKMTe > NaHeIb ynpaBneHn > OOpMneHne n nepcoHaUN3aun> Dncnne> N3MeHeHne npaMetpoB dncnpe.
- ⅢeKHTe npaBoH KhoNkOHa Cbo6oHOM MeCTe pa6oyero cTOna. Ipn NOBHeHH BCnIbBAIOUeR MoHIO HaxMHTe NepcoHaHn3aun > DcPnei> U3MeHHe napaMeTpOB dncnnna.
2. HactpoTe pa3peWeHne. O6paTHeCb K DOKymeHTaun npnlaerMoN K HDTV.
3. HaxMMTe IpMHeHb Nn OK. 3aTe M HaxMMTe CoXpaHHTb N3MeHeHHa nnoqTBePKeDeHH.
DVD npBOD He moKet npOHTaTb dNCK.
- PpOBepe, TTo DnCK BCTaBHeN 3TuKekTko BBepx.
y6eHNTecb, yTO DNCK HAXOHTcB UeHTpe NOTka, OCOEHHo IIN DNCKOB HECTaHapTHbIX pa3MepOB HnNΦOpMbI.
-y6eHTEcB,TO DnCK He noqapanah H He nobpeKdH.
He yHKUHOHPyET KHOIIKa H3BNeueHmI dNcKa.
- HaxmTe KOMnbIbTeP.
2.Дeнкнite npabOи KhoNkoI
3aTeM B MeHIO HAXMMTe N3BNeYb.
Пианнe
Aapec Harkort Str. 21-23, D-40880 Ratingen, Germany
a k c +49-2102-959911
Cañr www.asus.de