
Camedia C120 - Camera OLYMPUS - Free user manual and instructions
Find the device manual for free Camedia C120 OLYMPUS in PDF.

User questions about Camedia C120 OLYMPUS
0 question about this device. Answer the ones you know or ask your own.
Ask a new question about this device
Download the instructions for your Camera in PDF format for free! Find your manual Camedia C120 - OLYMPUS and take your electronic device back in hand. On this page are published all the documents necessary for the use of your device. Camedia C120 by OLYMPUS.
USER MANUAL Camedia C120 OLYMPUS
These instructions are only for quick reference. For more details on the functions described here, refer to the “Reference Manual” on CD-ROM.
For customers in Europe

“CE” mark indicates that this product complies with the European requirements for safety, health, environment and customer protection. “CE” mark cameras are intended for sales in Europe.
For customers in North and South America
For customers in USA
Declaration of Conformity
Model Number : C-120/D-380
Trade Name : OLYMPUS
Responsible Party : Olympus America Inc.
Address : 2 Corporate Center Drive, Melville, New York
11747-3157 U.S.A.
Telephone Number : 631-844-5000
Tested To Comply With FCC Standards
FOR HOME OR OFFICE USE
This device complies with Part 15 of the FCC rules. Operation is subject to the following two conditions:
(1) This device may not cause harmful interference.
(2) This device must accept any interference received, including interference that may cause undesired operation.
For customers in Canada
This Class B digital apparatus meets all requirements of the Canadian Interference-Causing Equipment Regulations.
Trademarks
• IBM is a registered trademark of International Business Machines Corporation.
- Microsoft and Windows are registered trademarks of Microsoft Corporation.
• Macintosh is a trademark of Apple Computer Inc.
- All other company and product names are registered trademarks and/or trademarks of their respective owners.
- The standards for camera file systems referred to in this manual are the “Design Rule for Camera File System/DCF” standards stipulated by the Japan Electronics and Information Technology Industries Association (JEITA).
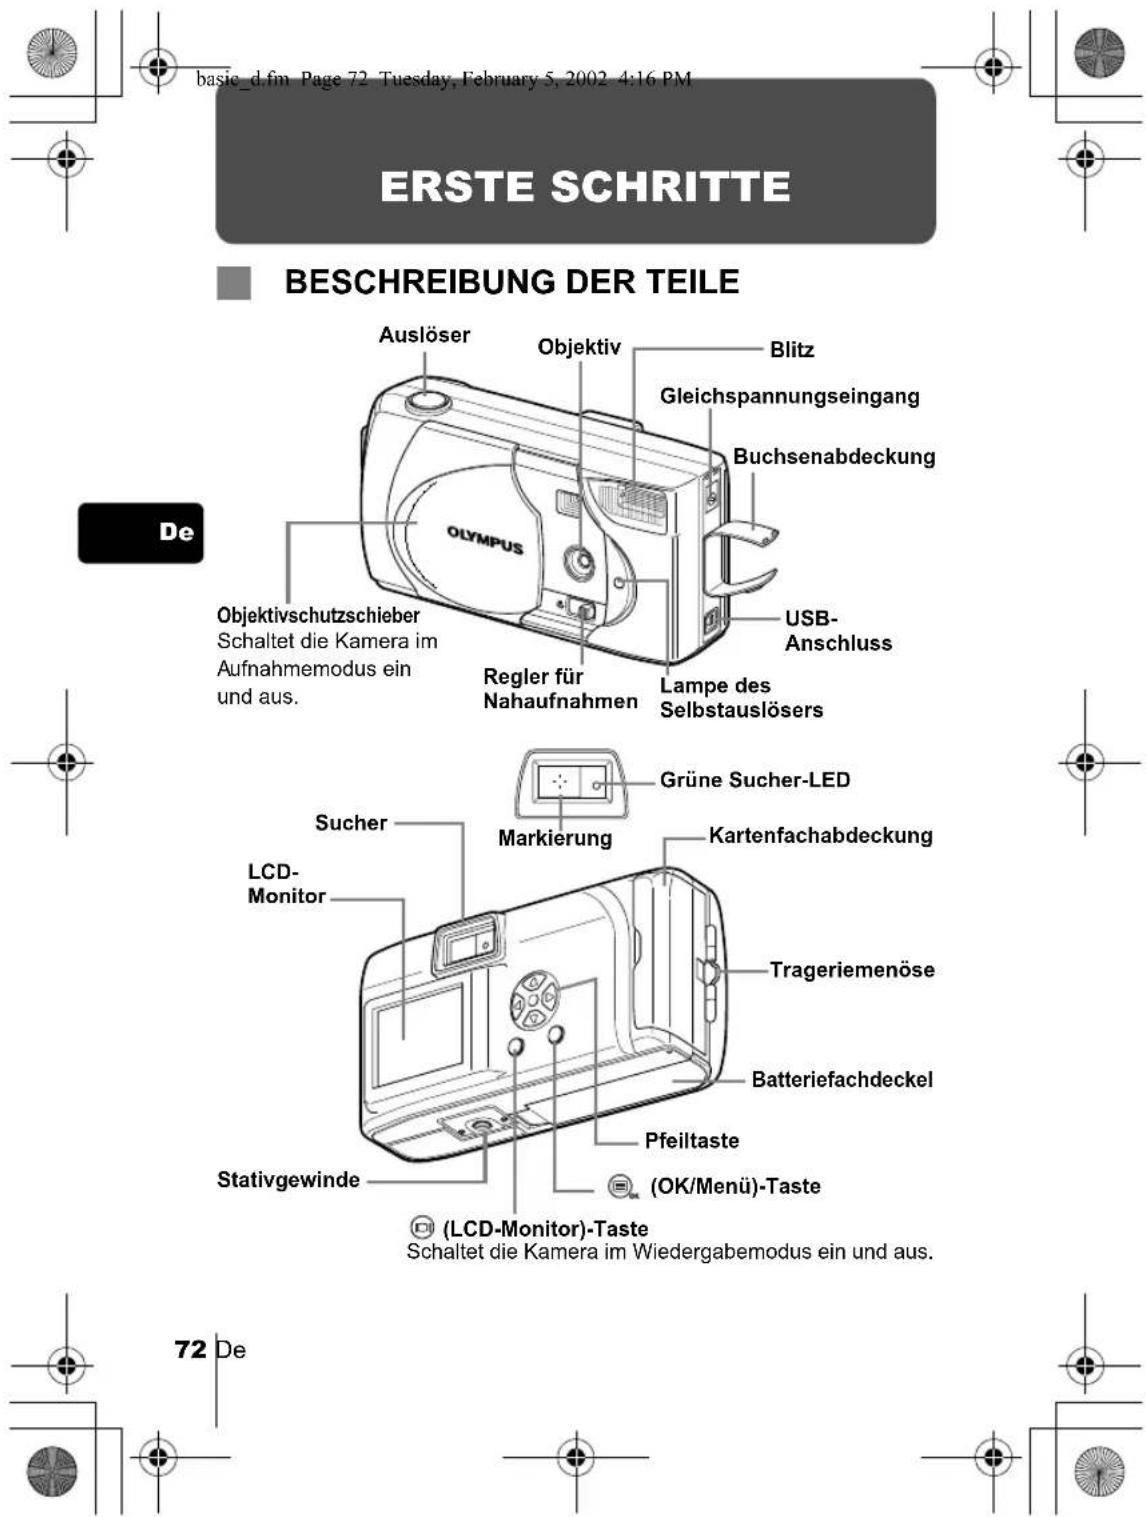
GETTING STARTED
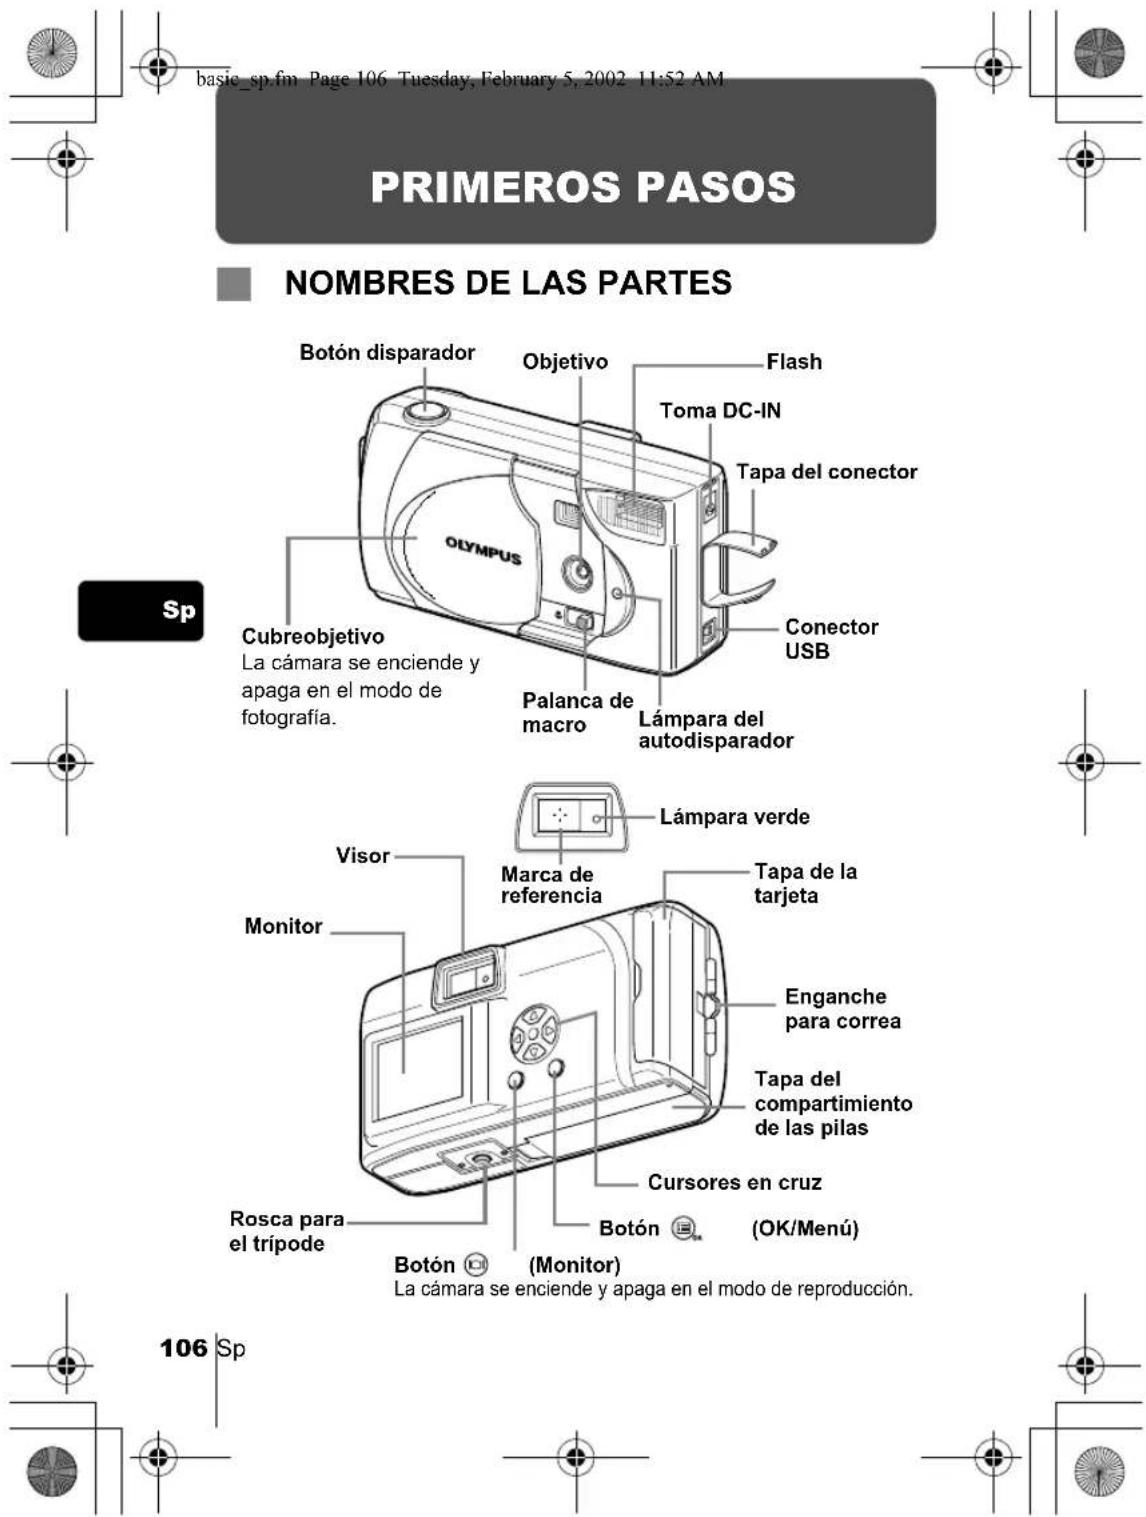
NAMES OF PARTS
En
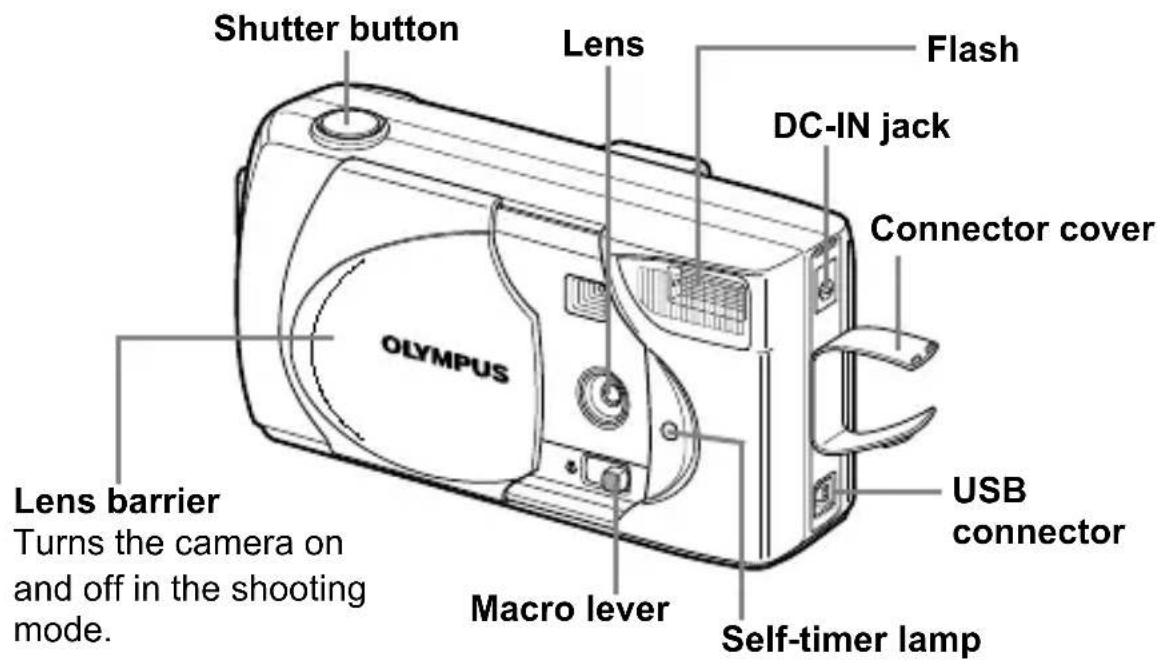
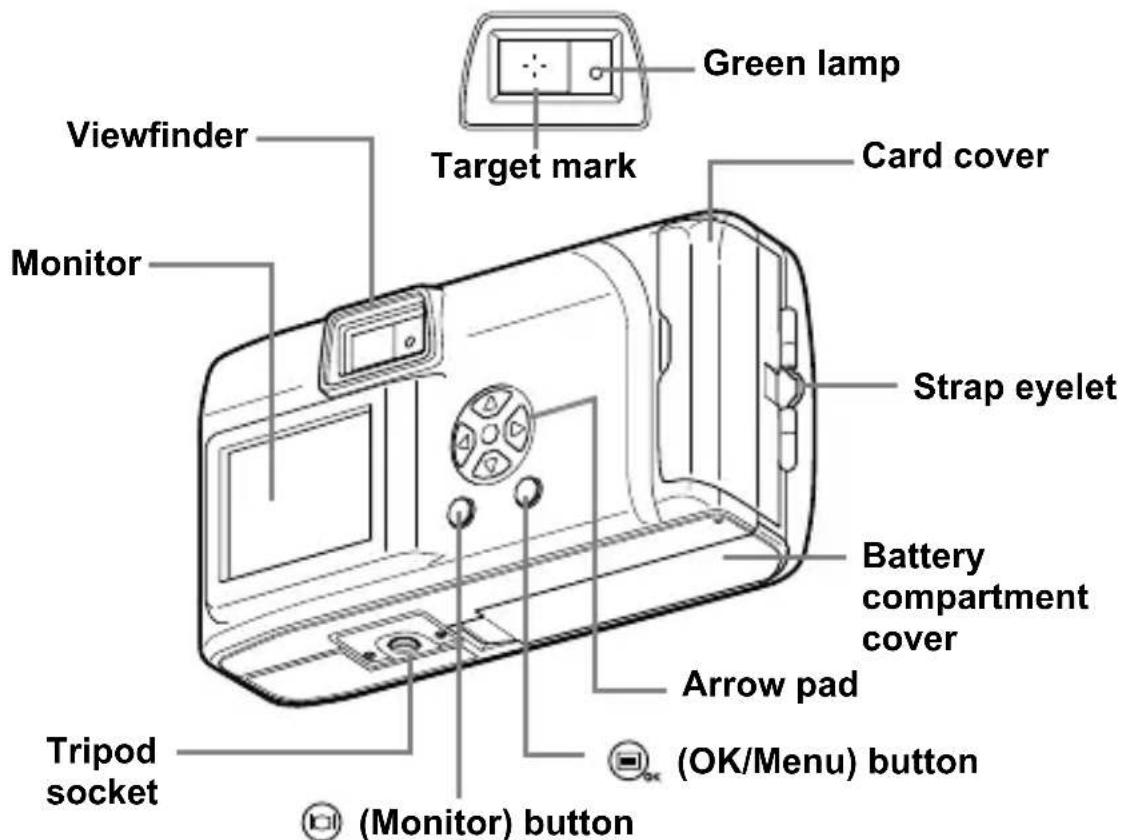
(Monitor) button
Turns the camera on and off in the playback mode.
MONITOR INDICATIONS
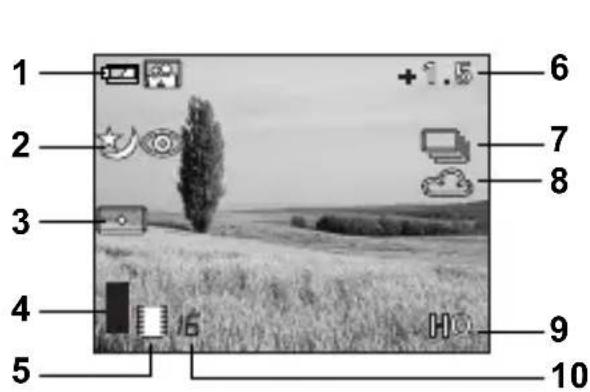
Shooting mode
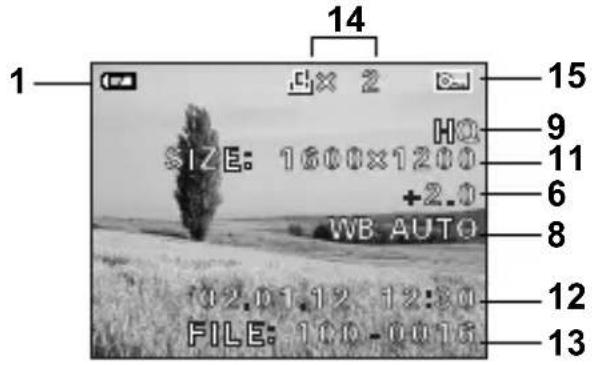
Playback mode
En
| Item Indication | ||
| 1 | Battery check , |   |
| 2 | Flash , , , , |   |
| 3 | Spot metering |  |
| 4 | Memory gauge |  |
| 5 | Internal memory |  |
| 6 | Exposure compensation -2.0, -1.5, +1.0, -0.5, +0.5, +1.0, +1.5, +2.0 | |
| 7 | Self-timer/Drive , , |   |
| 8 | White balance WB AUTO, , , , |     |
| 9 | Record mode SHQ, HQ, SQ1, SQ2 | |
| 10 | Number of storable still pictures/Seconds remaining | 16/16" |
| 11 | Number of pixels | 1600 × 1208, 1600 × 1200, 1024 × 768, 640 × 480 |
| 12 | Date and time '02.01.12 12:30 | |
| 13 | File number, Frame number/Playing time | 100-0016, 16/16" |
| 14 | Print reservation, Number of prints | × 2 |
| 15 | Protect | |

- The indicator is displayed when you are storing pictures in the camera's internal memory. It does not appear when you insert a card.
- You can view shooting information details of the recorded picture in the playback mode.
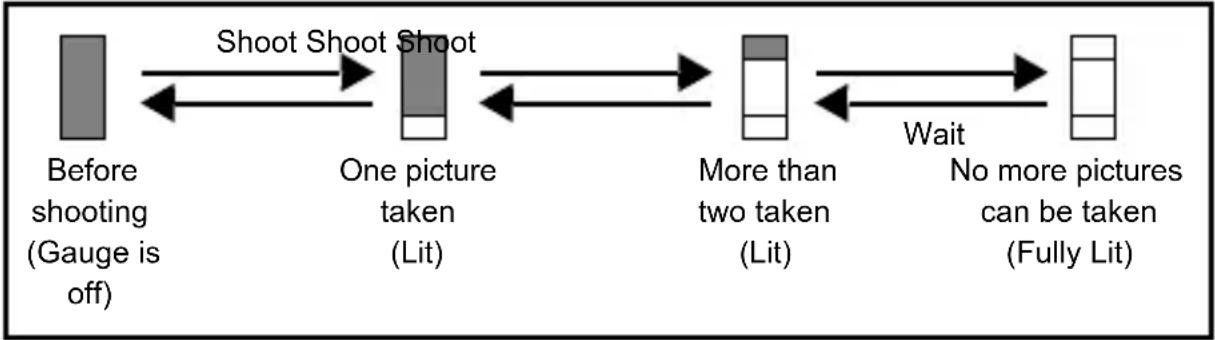
Memory gauge
The memory gauge lights up when you take a picture. While the gauge is lit, the camera is storing the picture on the card. The memory gauge indication changes as shown below depending on the shooting status. When the memory gauge is full, wait a few moments before taking the next shot.
En
When taking still pictures
flowchart
graph LR
    A["Before shooting (Gauge is off)"] --> B["One picture taken (Lit)"]
    B --> C["More than two taken (Lit)"]
    C --> D["No more pictures can be taken (Fully Lit)"]
    D -->|Wait| C
    B <-->|Shoot Shoot Shoot| B
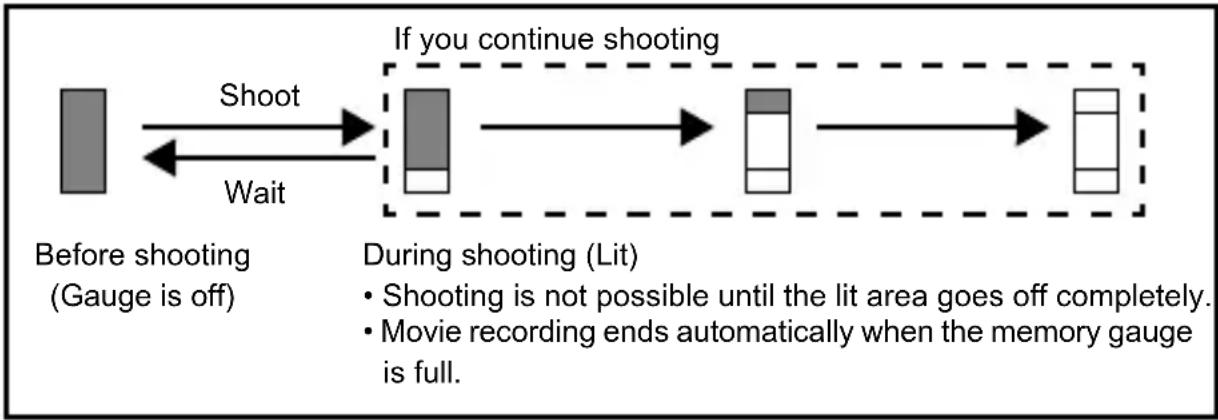
When recording movies
flowchart
graph LR
    A["Before shooting (Gauge is off)"] -->|Shoot| B["During shooting (Lit)"]
    B --> C["When live still hits"]
    C --> D["When live is completely lit"]
    D --> E["When live is fully lit"]
    style A fill:#ccc,stroke:#333
    style B fill:#ccc,stroke:#333
    style C fill:#ccc,stroke:#333
    style D fill:#ccc,stroke:#333
    note right of B "If you continue shooting"
    note left of B "After shooting"
    note right of B "During shooting (Lit)" indicates the last stage of the film.
    note right of C "Shooting is not possible until the lit area goes off completely."
    note right of C "Movie recording ends automatically when the memory gauge is full."
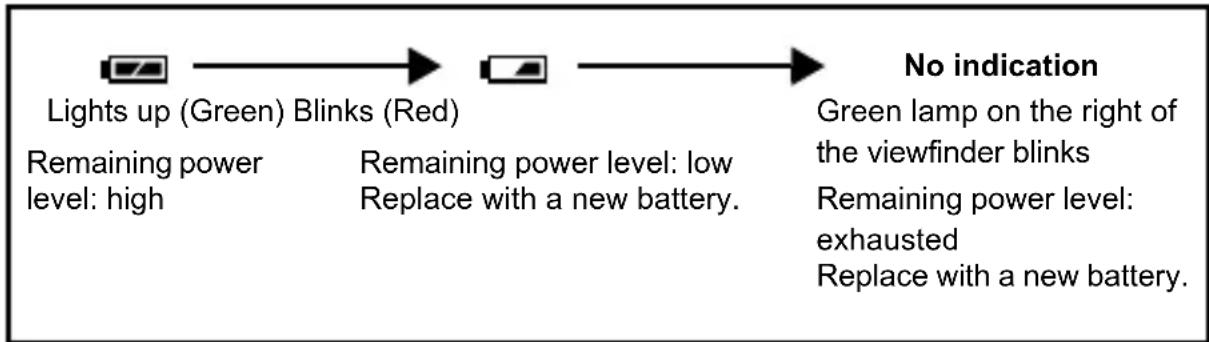
Battery check
If the remaining battery power is low, the battery check indication on the monitor changes as follows while the camera is turned on.
flowchart
graph LR
    A["Lights up (Green) Blinks (Red)"] --> B["Remaining power level: high"]
    B --> C["Remaining power level: low Replace with a new battery."]
    C --> D["No indication\nGreen lamp on the right of the viewfinder blinks\nRemaining power level: exhausted\nReplace with a new battery."]
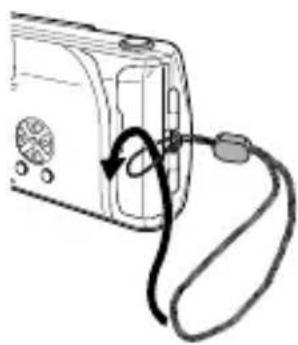
ATTACHING THE STRAP
1 Thread the short end of the strap through the strap eyelet.
2 Thread the long end of the strap through the loop that has already gone through the eyelet.
3 Pull the strap tight, making sure that it is securely fastened and will not come loose.
natural_image
Line drawing of a camera with attached cable and ear (no text or symbols)En
LOADING THE BATTERIES
1 Make sure that:
• The monitor is off.
• The lens barrier is closed.
• The green lamp is off.
2 Slide the battery compartment cover in the direction of Ⓐ(the direction indicated by the mark on the cover), and lift it up in the direction of Ⓑ.
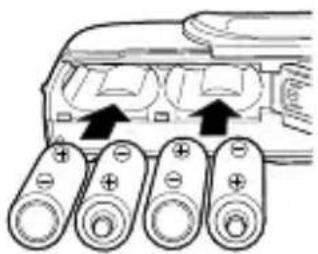
3 Insert the batteries, making sure that they are correctly oriented as shown in the illustration.
When using
AA (R6)
batteries
natural_image
Diagram of a device with four battery terminals and directional arrows indicating movement (no text or symbols)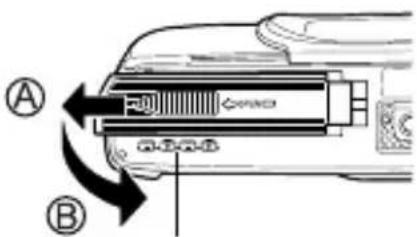
Battery insertion direction mark
When using lithium battery packs

natural_image
Diagram of two batteries with labeled terminals and arrows indicating internal components (no text or symbols present)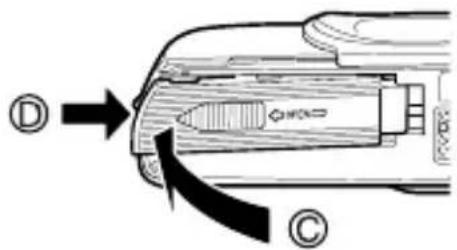
4 Close the battery compartment cover in the direction of ⒶWhile pressing the mark, slide the cover in the direction of Ⓓ
If the battery compartment cover will not close easily, do not force it. Try pressing [OPEN] and the ▶mark with both hands.
When you need batteries in a hurry, you can use AA (R6) alkaline batteries, which are easy to get anywhere. However, the number of pictures that you can store in the camera may vary considerably with AA batteries, depending on the battery manufacturer, camera shooting conditions, etc. Use this type of battery only when you have no other choices available. Turn off the monitor whenever possible to save power.
INSERTING THE CARD (SmartMedia)
The card is convenient, for example, when you are traveling and you want to take a lot of pictures. When the card is inserted, the pictures you have taken are stored on the card. When no card is inserted, the pictures are stored in the camera's internal memory.
1 Make sure that:
- The monitor is off.
- The lens barrier is closed.
- The green lamp is off.
2 Open the card cover.
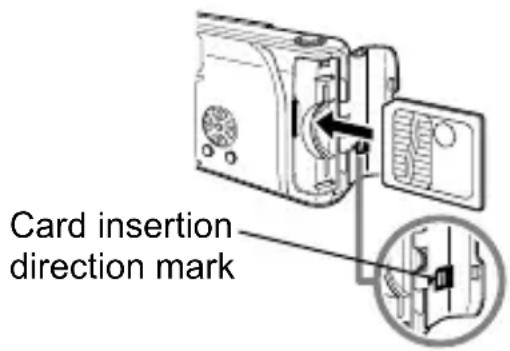
3 Insert the card as far as it will go in the direction shown in the illustration.
There is an arrow inside the card cover, indicating the direction in which the card should be inserted.
4 Close the card cover securely until it clicks.
When shooting pictures
Power on: Open the lens barrier.
The camera turns on in the shooting mode.
Power off: Close the lens barrier.
The camera turns off.
Power on Power off

En
When playing back pictures on the camera
Power on: Press the (monitor) button with the lens barrier closed.
The camera turns on in the playback mode (the monitor turns on).
Power off: Press the (monitor) button.
The camera turns off (the monitor turns off).
Power on Power off
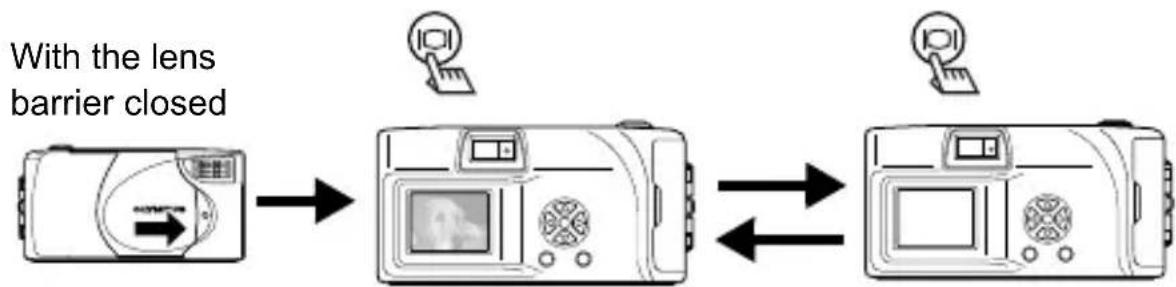
flowchart
graph LR
    A["Device with lens barrier closed"] --> B["Light bulb icon"]
    B --> C["Device with lamp icon"]
    C --> D["Device with lamp icon"]

If you open the lens barrier without the card inside the camera, NO CARD appears on the monitor. In this case, you can record pictures in the camera's internal memory.

SETTING THE DATE AND TIME
1 Open the lens barrier.
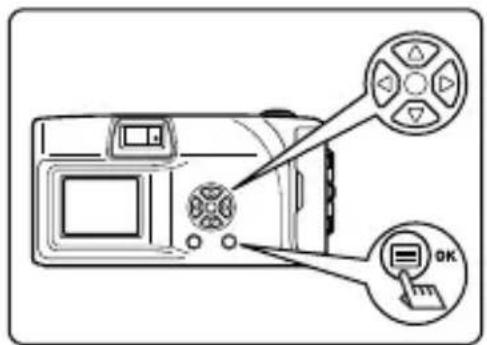
2 Press OK.
The shooting mode top menu is displayed.
3 Press on the arrow pad to select MODE MENU.
4 Press to select the SETUP tab, then press.
5 Press to select, then press.
6 Press to select one of the following date formats:
Y-M-D (Year/Month/Day)
M-D-Y (Month/Day/Year)
D-M-Y (Day/Month/Year)
Then press
The cursor moves to the next setting field.
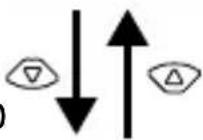
7 Press to set the first field, then press to move to the next field.
Press to move back to the previous setting field.
8 Repeat the above steps until the date and time are completely set.
9 Press ☑ OK.
For a more accurate setting, press when the clock hits 00 seconds.
The clock starts when you press
10Close the lens barrier.
The camera turns off.

If the camera is left for about 1 hour with the batteries removed, or if the battery power is exhausted, the date and time settings may be canceled or become incorrect. Before taking important pictures, check that the date and time settings are correct.
MENU FUNCTIONS
USING THE MENUS AND TABS
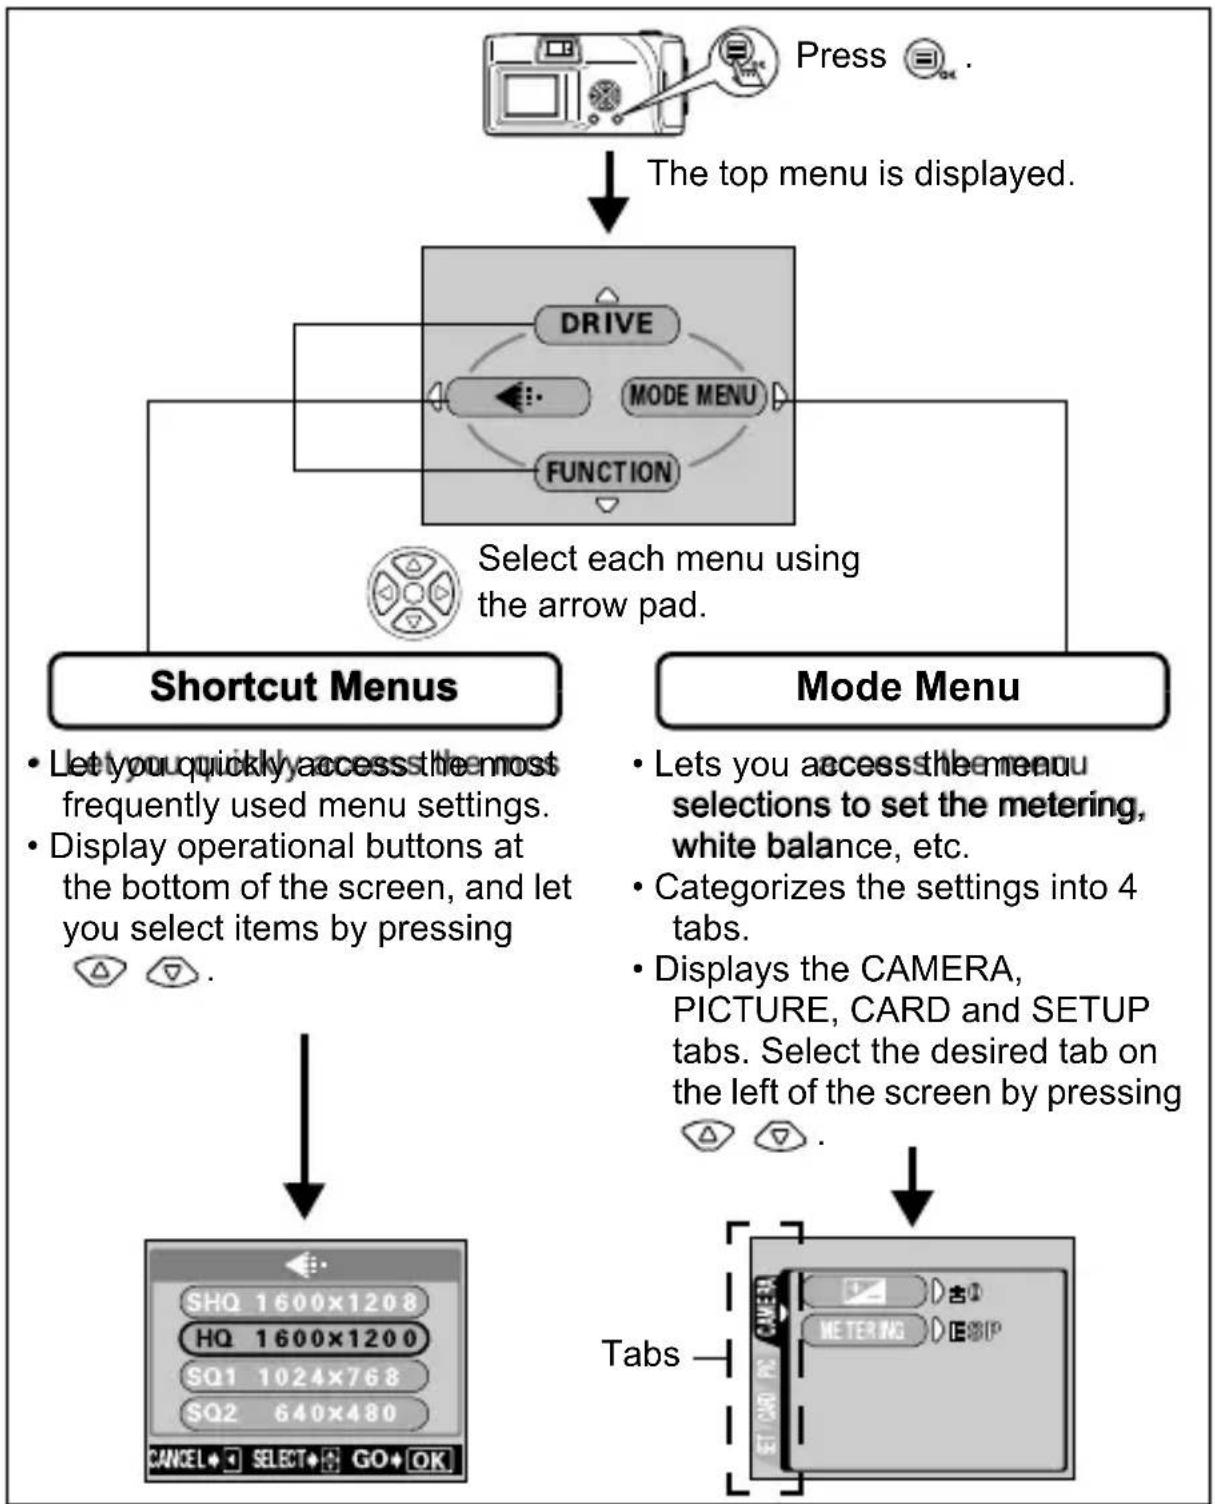
When you turn on the camera and press the (OK/Menu) button, the top menu is displayed on the monitor. The functions of this camera are set from the menus. This chapter explains how the menus work, using the shooting mode screens.
En
flowchart
graph TD
A["Press"] --> B["The top menu is displayed."]
B --> C["DRIVE"]
C --> D["MODE MENU"]
D --> E["FUNCTION"]
E --> F["Select each menu using the arrow pad."]
F --> G["Shortcut Menus"]
G --> H["Let you quickly access the most frequently used menu settings."]
G --> I["Display operational buttons at the bottom of the screen, and let you select items by pressing △ ▼ ▽."]
F --> J["Mode Menu"]
J --> K["Lets you access the menu selections to set the metering, white balance, etc."]
J --> L["Categorizes the settings into 4 tabs."]
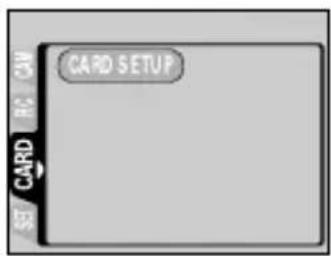
J --> M["Displays the CAMERA, PICTURE, CARD and SETUP tabs. Select the desired tab on the left of the screen by pressing △ ▼ ▽."]
G --> N["Tabs"]
N --> O["SET CARD PC CAMERA"]
1 Press to display the top menu, then press
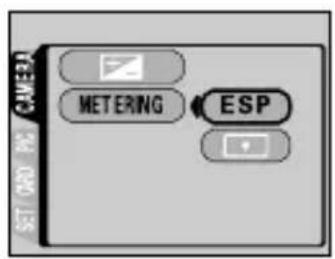
2 Press to select to select a tab, then press to display the menu.
En
Top menu CAMERA tab
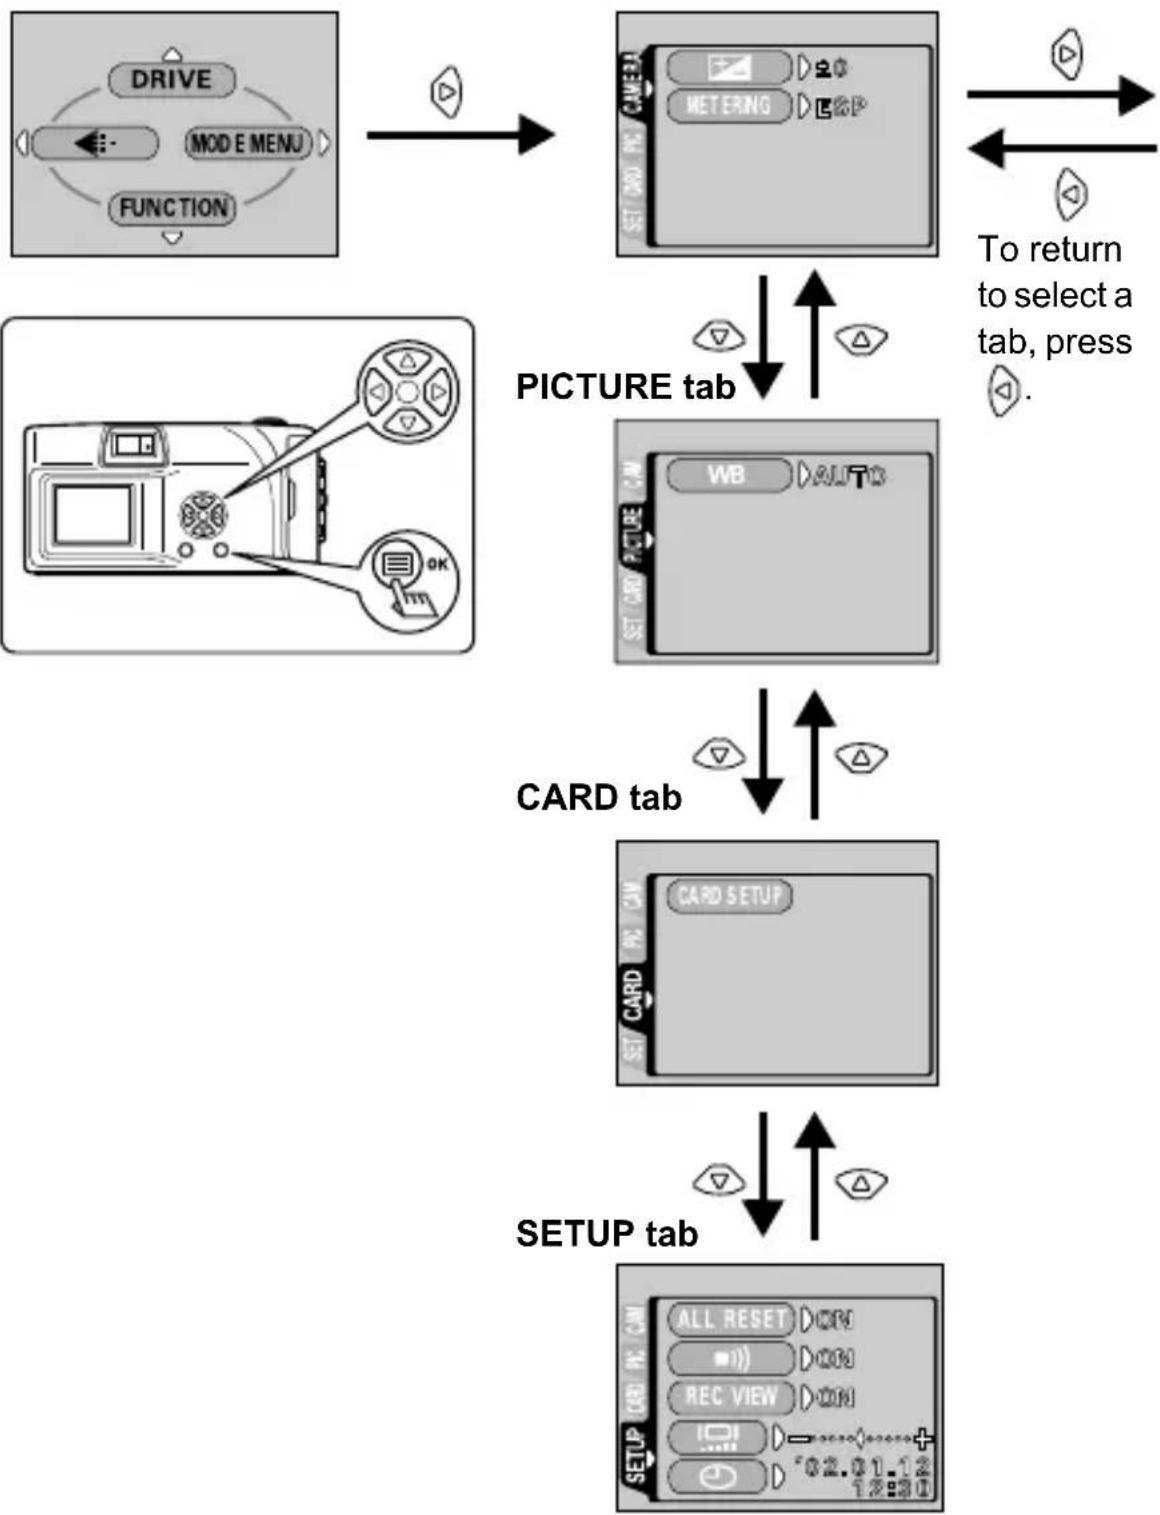
To return to select a tab, press
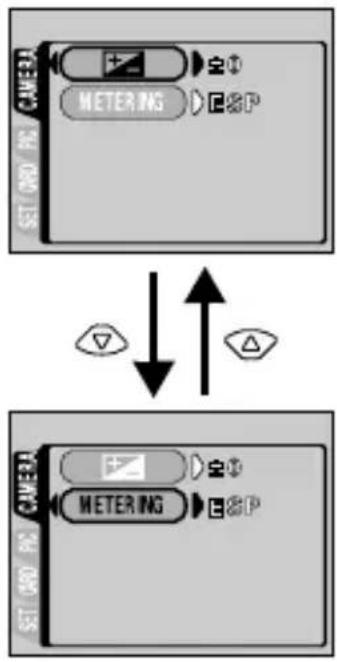
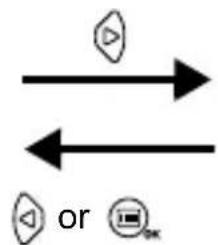
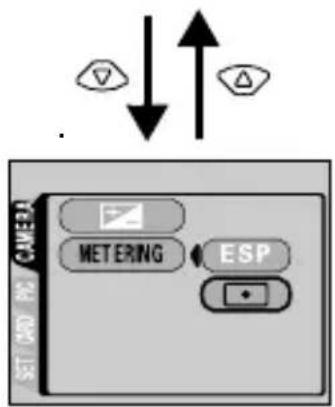
3 Press to select the desired item, then press to display the available setting selections.
flowchart
graph TD
    A["SET/OK/PG"] --> B["METERING"]
    B --> C["↓"]
    C --> D["Eye Detection"]
    D --> E["Output"]
    F["SET/OK/PG"] --> G["METERING"]
    G --> H["↓"]
    H --> I["Eye Detection"]
The green frame moves to the selected item.
flowchart
graph TD
    A["Play Icon"] --> B["Right Arrow"]
    C["or Symbol"] --> D["Left Arrow"]
To return to select an item, press
4 Press △ ▽ t to select the setting.
Setting is completed when the setting has been changed.
To close the menu, press ☐ twice.

- Not all items can be selected depending on the status of the camera and the setting performed. For example, when the movie mode is selected, you cannot select SEPIA, BLACK&WHITE or in the EDIT tab category.
- By pressing the shutter button to take a picture while the menu is displayed, you can take pictures with the currently selected settings.
- If you want to save the settings after the camera is turned off, set All Reset to OFF.
Shooting mode
DRIVE

Lets you shoot one frame at a time (normal shooting).

Lets you shoot pictures in succession.

Lets you shoot movies.

Lets you select the resolution and the quality of the image.
Still picture : SHQ, HQ, SQ1, SQ2
Movie : HQ, SQ
FUNCTION
| 2 IN 1 | Lets you combine two still pictures taken in succession into one picture. |
 | Self-Portrait mode:Lets you take a picture of yourself while holding the camera. |
| PANORAMA | Allows panorama pictures to be taken with Olympus CAMEDIA-brand SmartMedia cards. |
Playback mode

Displays all recorded pictures in slide-show fashion.
MOVIE PLAYBACK
Plays back a movie.
INFO
Displays all the shooting information on the monitor.

ERASE
Erases a selected picture.
Mode menu functions are categorized into 4 tabs. Use to select a tab and display the respective functions.
These instructions are only for quick reference. For more details on the functions described here, refer to the "Reference Manual" on CD-ROM.

If you display the mode menu without the card inside the camera, a MEMORY tab will be displayed instead of the CARD tab.
En
Shooting mode
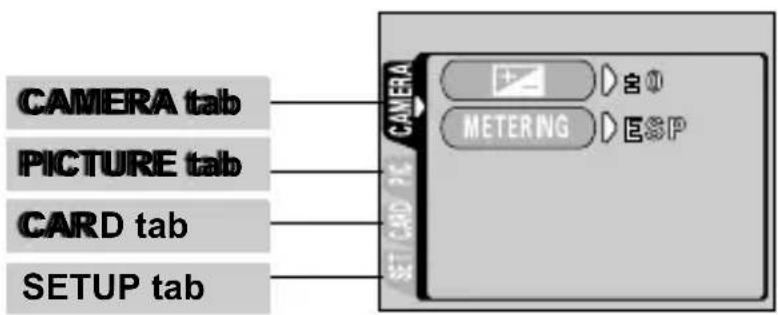
| CAMERA tab | |
| Adjusts the brightness of the image (Exposure compensation). | |
| METERING | Selects the area of the image that will be used to determine exposure or image brightness from the two available settings: ESP or (spot metering). |
| PICTURE tab | |
| WB | Sets the appropriate white balance according to the light source. |
| CARD tab | |
| CARD SETUP Formats a card. | |
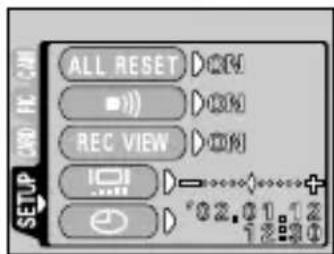
| SETUP tab | |
| ALL RESET | Selects whether to save the current camera settings when you turn off the power. |
| ■)Turns the beep | sound (used for warnings, etc.) on and off. |
| REC VIEW | Selects whether to display pictures on the monitor while saving them. |
| Adjusts the brightness of the monitor. | |
| Sets the date and time. | |
En
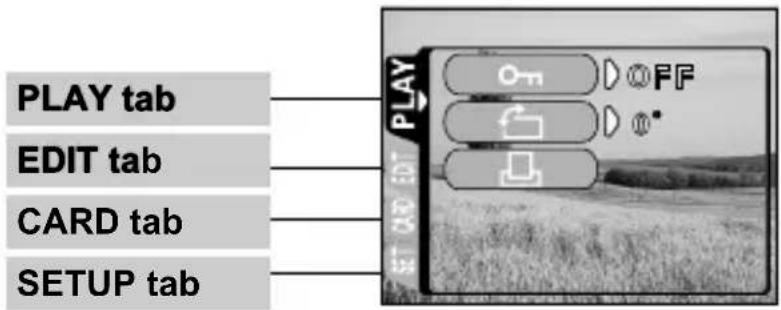
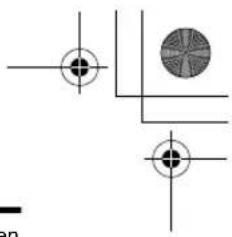
| PLAY tab | |
| Protects pictures from accidental erasure. | |
| Rotates pictures 90 degrees clockwise or counter-clockwise. | |
| Stores printing information on the card required for DPOF printers. | |
| EDIT tab | |
| BLACK & WHITE Creates black and white pictures. | |
| SEPIA Creates sepia-toned pictures. | |
| Makes the file size smaller. | |
| INDEX Creates an index picture of a movie in 9 frames. | |
| CARD tab | |
| CARD SETUP | Formats a card.Erases all image data stored on the card. |
| BACKUP Copies images stored in the internal memory to the card. | |
| SETUP tab | |
| ALL RESET | Selects whether to save the current camera settings when you turn off the power. |
| Turns the beep sound (used for warnings, etc.) on and off. | |
| Selects the number of frames in the index display. | |
| Adjusts the brightness of the monitor. | |
| Sets the date and time. |
SHOOTING BASICS
TAKING STILL PICTURES
You can take still pictures using either the viewfinder or the monitor. Both methods are easy as all you have to do is to press the shutter button. The recorded picture will be stored on the card if you have inserted one, or in the internal memory if you have not inserted a card.
En
Taking still pictures using the viewfinder
1 Open the lens barrier.
Slide the lens barrier open until it clicks.
2 Position the target mark over the subject in the viewfinder.
When the distance from the camera to the subject is less than 60 cm/2 ft, select the macro mode.
3 Press the shutter button gently (halfway).
The green lamp on the right of the viewfinder lights up.
The exposure is locked as long as the shutter button is kept pressed halfway.
4 Press the shutter button all the way (fully).
The camera takes the picture.
Taking still pictures using the monitor
1 Open the lens barrier.
2 Press ☐.
The monitor turns on.
3 Determine the image composition while observing your subject on the monitor.
4 Take the picture by following the same procedure as for shooting using the viewfinder.
Press the shutter button all the way (fully) to take the picture.
When you want to take pictures with the monitor off, press 📄 again.

Never open the card cover, remove the batteries or disconnect the AC adapter while the green lamp is blinking. Doing so could destroy stored pictures and prevent storage of pictures you have just taken.
RECORDING MOVIES
You can record movies with this camera. Recorded movies can be played back or stored separately as still pictures using the index function.
1 Display the top menu in the shooting mode.
- Open the lens barrier.
- Press
2 Press to select DRIVE.
3 Press to select, then press.
Movie recording is set and the menu is closed.
The total recordable time and the 🔗 mark are displayed on the monitor.
4 Record the movie while observing your subject on the monitor.
Press the shutter button fully to start recording and the number of seconds remaining for one record is displayed. Press the shutter button fully again to stop recording.
● ● To cancel movie mode
Press ☐.
The monitor turns off and the movie mode is canceled.
Note
- During movie recording, the flash is disabled.
- It takes longer to store movies than still pictures.
- The seconds remaining varies depending on the record mode, whether the movie is stored on the card or in the internal memory, and the amount of space available on the card or in the internal memory.
- You cannot record movies with sound.
• USING THE FLASH
1 Open the lens barrier.
The camera turns on in the shooting mode.
2 Press ▶.
The current flash setting is displayed.
3 Press while the current flash setting is displayed.
Each time you press the flash mode is switched in the following
sequence: AUTO - - 📄 - - ♣ ⬤ ★ ★ ⚡
4 Take the picture.
Auto-flash (No indication)
The flash fires automatically in low light or backlight conditions.
Red-eye reduction flash ( )
The red-eye reduction flash mode reduces this phenomenon by emitting pre-flashes before firing the regular flash.

Fill-in flash ( )
The flash always fires every time the shutter button is released.
Flash off ( )
The flash does not fire even in low light conditions.
Night scene ( ★ )
Use this mode when shooting a subject against a night background.
Night scene with red-eye reduction ( ★ )
Use this mode when shooting a portrait against a night background to reduce the red-eye phenomenon.
ZOOMING IN ON A SUBJECT (DIGITAL ZOOM)
The maximum possible magnification is 5x.
Record mode and zoom magnification
When the record mode is set to SHQ, HQ or SQ1: 1x - 2.5x
When the record mode is set to SQ2: 1x - 5x
1 Open the lens barrier.
The camera turns on in the shooting mode.
2 Press △.
The monitor turns on automatically.
3 Press while observing your subject on the monitor.
4 Take the picture while observing your subject on the monitor.

Pictures taken with the digital zoom may appear grainy.
En
TAKING CLOSE-UP PICTURES (MACRO MODE)
The macro mode allows you to shoot a subject at a distance of 25 - 60 cm/0.8 - 2 ft. You can also use the macro mode to shoot a subject at a distance of more than 60 cm/2 ft. This camera uses a smaller lens aperture in this mode, making it useful for taking pictures in bright surroundings, such as snow-covered mountains in bright sunshine.
1 Open the lens barrier.
The camera turns on in the shooting mode.
2 Slide the macro lever on the front of the camera toward
To cancel the macro mode, slide the lever back to its original position.
3 Press ☐.
The monitor turns on.
4 Take the picture while observing your subject on the monitor.
USING THE SELF-TIMER
This function is useful for taking pictures with yourself included in the photograph. Fix the camera securely on a tripod for self-timer shooting.
1 Open the lens barrier.
The camera turns on in the shooting mode.
2 Press
The monitor turns on and the current self-timer setting is displayed.
3 Press while the current self-timer setting is displayed.
The setting changes between ON and OFF each time is pressed.
4 Press the shutter button fully.
The self-timer lamp lights up for approximately 10 seconds, then starts blinking. After blinking for 2 seconds with beep sound, the picture is taken.
SELECTING THE IMAGE QUALITY (RECORD MODE)
Choose the best record mode for your purposes (printing, editing on a computer, website editing, etc.).
Still picture record modes
| Record mode | Description | Resolution(No. of pixels) | Quality | File size |
| SHQ(Super High Quality) | •Use this mode when you want to print out an image with high quality or on large paper such as A4 (8.3" × 11.7"/21 cm × 29.7 cm), or you want to process images on a PC.•The image quality is higher, but the number of storable images is fewer. It takes longer to store the images. | 1600 × 1208 pixels* | Clearer | Larger |
| HQ(High Quality) | •Use this mode when you want to edit images on a PC or print them out on postcard size paper.• This mode is the factory default setting. | 1600 × 1200 pixels* | ||
| SQ(Standard Quality) | •Use this mode when you want to attach images to e-mail or simply view them on a PC.•This is the standard quality mode, and the number of storable images is increased. | 1024× 768 pixels* in SQ1 mode640 × 480 pixels* in SQ2 mode |
En
Movie record modes
| Record mode | Description | Resolution(No. of pixels) | Quality File size | |
| HQ(High Quality) | You can record continuously for 15 seconds at a time. | 320 × 240 pixels* | Clearer Larger Normal Smaller Normal Smaller | |
| SQ(Standard Quality) | You can record continuously for 60 seconds at a time. | 160 × 120 pixels* | ||
* Pixels are the unit used to express the resolution.
1 Display the top menu in the shooting mode.
- Open the lens barrier.
- Press _ck
2 Press ◇ to select .
3 Press to select one of the record modes, then press

The record modes for still pictures are SHQ, HQ, SQ1 and SQ2; and for movies are HQ and SQ.
The record mode is set and the menu is closed.
4 Take the picture.
You can play back pictures one by one on the monitor.
1 Press with the lens barrier closed.
The monitor turns on and displays the last picture taken. (Single-frame playback)
2 Press ◇ ◇.
: Displays the previous picture.
: Displays the next picture.
3 Press to cancel playback.
The monitor and camera turn off.
Quick View (Double-click playback)
This function lets you play back pictures during shooting with the lens barrier open. It is useful when you want to check shooting results and resume shooting quickly.
1 Press twice quickly (double-click) in the shooting mode.
The camera enters the playback mode and displays the last picture taken. (Single-frame playback)
2 Press the shutter button gently (halfway).
The camera returns to the shooting mode and you can resume shooting.
Close-up playback
Pictures displayed on the monitor can be enlarged 1.5, 2, 2.5 or 3 times. This function is useful when you want to check the details of a picture.
1 Press with the lens barrier closed.
Press to select the picture you want to enlarge.
2 Press △.
Each time you press, the picture is enlarged in the sequence 1.5x 2x 2.5x 3x .
3 To enter scroll mode, press ☑ while the enlarged picture is displayed.
Press to scroll in the corresponding direction and display the section of the picture you want to see. To exit scroll mode, press ☑ again.
4 To return to single-frame playback (1x), press after exiting the scroll mode.
Index display
This function lets you show several pictures at the same time on the monitor. It is useful for quickly finding the picture you want to view. The number of pictures shown can be 4, 9 or 16.
1 Press with the lens barrier closed.
2 Press to enter the index display mode.
3 Pressing moves the green frame to the next picture, and pressing moves it to the previous picture.
4 To return to single-frame playback, press
PLAYING BACK MOVIES
1 Press with the lens barrier closed.
The monitor turns on.
2 Press to display the desired picture with a indicator, then press ☐
The top menu is displayed.
3 Press to select MOVIE PLAYBACK.
The movie is played back after the green lamp on the right of the viewfinder blinks and the movie data is downloaded to the camera. When the movie reaches the end, the display returns automatically to the beginning of the movie.
4 Press ☐.
The MOVIE PLAYBACK menu is displayed.
PLAYBACK : Plays back the entire movie again.
FRAME BY FRAME : Plays back the movie manually one frame at a time.
EXIT : Leaves the movie playback mode.
5 Press to select the desired operation, then press. Operations when FRAME BY FRAME is selected

: Displays the first frame of the movie.
: Displays the last frame of the movie.
: Displays the next frame. The movie can be displayed continuously by holding the button down.
: Displays the previous frame. The movie can be displayed continuously in reverse by holding the button down.
: Displays the MOVIE PLAYBACK menu.
En
PROTECTING PICTURES
You are recommended to protect important pictures to avoid accidentally erasing them.
1 Press with the lens barrier closed.
The monitor turns on.
2 Press to select the picture you want to protect.
3 Press ; then press .
The mode menu is displayed.
4 Press to select the PLAY tab, then press.
5 Press to select, then press.
6 Press to select ON.
The selected picture is protected.
To close the menu, press twice.


Protected pictures cannot be erased by the single-frame/all-frame erase function, but they can be all erased with the format function.
ERASING PICTURES
Recorded pictures can also be erased. This can be done either one frame or all the pictures stored in the internal memory or on the card at a time.

Once erased, pictures cannot be restored. Check each picture before erasing to avoid accidentally erasing pictures you want to keep.
En
Single-frame erase
1 Press with the lens barrier closed.
The monitor turns on.
2 Press to select the picture you want to erase.
3 Press ☒ _OK .
The top menu is displayed.
4 Press to select ERASE.
5 Press △ to select YES, then press .
The picture is erased and the menu is closed.

All-frame erase
1 Display the top menu in the playback mode.
- Press with the lens barrier closed.
- Press
2 Press to select MODE MENU.
3 Press to select the CARD tab, then press.
4 Press to select CARD SETUP, then press.
5 Press to select ALL ERASE, then press.
6 Press to select YES, then press.
All the pictures are erased.


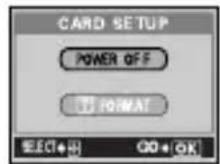
FORMATTING
This function lets you format cards or the internal memory. Formatting prepares cards to receive data. Before using non-Olympus cards or cards which have been formatted on a PC, you must format them with this camera.

- All existing data, including protected data is erased when the card or the internal memory is formatted. Once erased, pictures cannot be restored, so make sure that you do not erase important data.
• To format the internal memory, do not insert the card.
- To format the card, insert the card before starting formatting.
1 Display the top menu in the shooting mode.
- Open the lens barrier.
- Press.
2 Press to select MODE MENU.
3 Press to select CARD tab, then press.

4 Press ▶.
5 Press to select YES, then press.

PRINT SETTINGS
En
By specifying the desired number of prints of each picture on the card and whether or not the date and time are to be printed, you can print out the desired pictures according to the print reservation data with a DPOF-compatible printer or at a DPOF photo lab.
What is DPOF?
DPOF is short for Digital Print Order Format. DPOF is a format used to record automatic print information from cameras.
By specifying which pictures are to be printed, the pictures can be printed easily by DPOF-compatible printing service labs or on a personal DPOF-compatible printer.
Confirm the print reservation data
If a print reservation data is already stored on the card, the PRINT ORDER SETTING screen appears, giving you the choice of resetting the data or keeping it. If there is no print reservation data, this screen does not appear and you can proceed to the next operation.
Select single-frame or all-frame reservation
Select whether you want to specify the number of prints for a selected frame, or if you want one print of all the frames.
Set the number of prints (only for single-frame reservation)
Display the frame to be printed and set the desired number of prints.
Set the date/time printing data
You can include the shooting date or time on the print.
Confirm the reservation data
Check the number of ordered frames, the total number of prints, and the date/time printing data.
For more details, refer to the "Reference Manual" on CD-ROM.
DOWNLOADING PICTURES TO A COMPUTER
By connecting the camera to a computer with the provided USB cable, images on a card can be transferred to the computer. Some OS's (operating systems) may need a special setup when connecting to the camera for the first time. Follow the chart below. For details of the procedures in the chart, refer to the "Reference Manual" on the software CD.

flowchart
graph TD
    A["Identifying the OS"] --> B["Windows 98/98 SE (Second Edition)"]
    A --> C["Windows Me/2000/XP"]
    A --> D["Mac OS 9.0 - 9.1/OS X (10.0)"]
    B --> E["Installing the USB driver for Windows 98"]
    C --> F["Connecting the camera to the computer using the provided USB cable"]
    D --> G["Confirming the computer recognizes the camera"]
    E --> H["Downloading image files"]
    F --> I["Disconnecting the USB cable"]
    G --> I
    H --> I
Even if your computer has a USB connector, data transfer may not function correctly if you are using one of the operating systems listed below or if you have an add-on USB connector (extension card, etc.).
- Windows 95/NT 4.0
• Windows 98/98 SE upgrade from Windows 95
• Mac OS 8.6 or lower (except Mac OS 8.6 equipped with USB MASS Storage Support 1.3.5 installed at the factory) - Data transfer is not guaranteed on a home-built PC system or PCs with no factory installed OS.

- You can view images using: graphics applications that support the JPEG file format (Paint Shop Pro, Photoshop, etc.); Internet browsers (Netscape Communicator, Microsoft Internet Explorer, etc.); CAMEDIA Master software; or other software. For details on using commercial graphics applications, refer to their instruction manuals.
- QuickTime is needed for playing back movies. QuickTime is included on the provided software CD.
- If you want to process images, make sure to download them to your computer first. Depending on the software, image files may be destroyed if the images are processed (rotated, etc.) while they are on the card.
FOR OTHER OS USERS
Users running other OS cannot connect the camera directly to a computer.
● Windows 95 ● Windows NT ● Mac OS before OS 9
You can download images directly to your computer using an optional floppy disk adapter or PC card adapter.
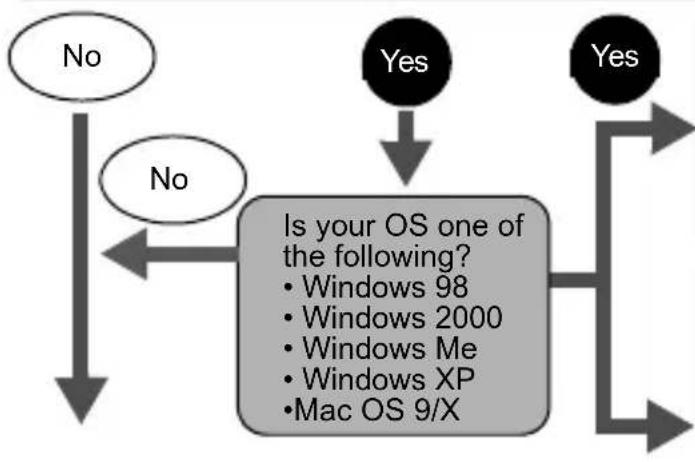
Does your computer have a USB interface? Is there a port marked · OH your computer?
flowchart
graph TD
    A["No"] --> B{Is your OS one of the following?}
    B --> C["Windows 98"]
    B --> D["Windows 2000"]
    B --> E["Windows Me"]
    B --> F["Windows XP"]
    B --> G["Mac OS 9/X"]
    H["Yes"] --> I["Is your OS one of the following?"]
    I --> J["Windows 98"]
    I --> K["Windows 2000"]
    I --> L["Windows Me"]
    I --> M["Windows XP"]
    I --> N["Mac OS 9/X"]
    O["Yes"] --> P["Is your OS one of the following?"]
    P --> Q["Windows 98"]
    P --> R["Windows 2000"]
    P --> S["Windows Me"]
    P --> T["Windows XP"]
    P --> U["Mac OS 9/X"]
Connect the camera directly to your computer using the provided USB cable.

Use the optional USB SmartMedia reader/writer. *Not compatible with Mac OS X. Depending on the model, you can download the driver from the Olympus website. For details, visit our website.
Does your computer have a built-in PC card slot?


Use the optional PC card adapter.
*Not supported by Windows NT4.0 or lower.
Does your computer have a built-in floppy disk drive?


Use the optional FlashPath floppy disk adapter.

Consult your nearest Olympus representative.
For more details, refer to the "Reference Manual" on CD-ROM.
OPTIONAL ACCESSORIES
As of February 2002
- Camera case
- AC adapter
• Standard SmartMedia card (8/16/32/64/128MB) - Floppy disk adapter
- PC card adapter
- Olympus-brand removable media reader/writer
- NiMH battery
- NiMH battery charger
• CR-V3 long life lithium batteries
• P-400 and P-200 photo printers for Olympus digital cameras
Visit the Olympus home page for the latest information on optional items. http://www.olympus.com/
ERROR CODES
En
| Monitor Possible cause Corrective action | ||
 | The card is not inserted, or it cannot be recognized. | Insert a card, or reinsert the card correctly.Pictures can be stored in the internal memory if no card is inserted. |
 | Cannot record, play back or erase pictures on this card. | Wipe the gold contacts with a piece of cleaning paper (commercially available) and insert the card again. If the problem is still not corrected, format the card. If the card cannot be formatted, this card cannot be used. |
 | Writing to the card is prohibited. | If you are taking pictures, remove the write-protect seal attached to the card. For more details, refer to the provided instruction manual for the card. |
 | There is no empty space on the card, so no more pictures can be taken. | Replace the card or erase unwanted pictures. Before erasing, download important images to a PC. |
| There is no empty space on the card, so it cannot record new information such as print reservation data and other functions. | Replace the card or erase unwanted pictures. Before erasing, download important images to a PC. | |
 | There is no empty space in the internal memory, so no more pictures can be taken. | Insert the card and copy the pictures to the card, or erase unwanted pictures. |
| There is no empty space in the internal memory, so it cannot record new information such as print reservation data and other functions. | Replace the card or erase unwanted pictures. Before erasing, download important images to a PC. | |
 | There are no pictures on the card. | The card contains no pictures. Record pictures. |
 | There are no pictures in the internal memory. | The internal memory contains no pictures. Record pictures. |
 | The selected picture cannot be played back on this camera. | Use image processing software on a PC to view it. If that cannot be done, the image file is partially damaged. |
 | The card is not formatted. | Format the card. |
En
SPECIFICATIONS
En
| Product type Digital camera (for shooting and displaying) | |
| Recording systemStill Digital recording, JPEG (in accordance with Design rule for Camera File system (DCF)), Digital Print Order Format (DPOF)Movie QuickTime Motion JPEG support | |
| Memory Internal memory (1 MB), SmartMedia (4 MB - 128 MB)*All cards except 2 MB and 5 V. | |
| Recording image resolution | 1600 × 1208 pixels (SHQ)1600 × 1200 pixels (HQ)1024 × 768 pixels (SQ1)640 × 480 pixels (SQ2) |
| No. of storable pictures(When an 8 MB card is used) | Approx. 5 frames (SHQ)Approx. 16 frames (HQ)Approx. 29 frames (SQ1)Approx. 47 frames (SQ2) |
| No. of effective pixels 1,960,000 pixels | |
| Image pickup device 1/3.2" CCD solid-state image pickup, 2,110,000 pixels (gross) | |
| Lens Olympus lens 4.5 mm, f4, 5 elements in 5 groups(equivalent to 35 mm lens on 35 mm camera) | |
| Photometric system Digital ESP metering | |
| Aperture f4, f8 | |
| Shutter speed 1/2 to 1/2000 sec. (Night scene mode: 1 sec.) | |
| Shooting range 0.6 m to (2 ft to ∅(normal)∞0.25 m to 0.6 m (0.8 ft to 2 ft) (macro mode) | |
| Viewfinder Optical real image viewfinder (with target mark) | |
| Monitor | 1.6" TFT color LCD display, 60,000 pixels |
| Flash charging time | Approx. 6 sec. |
| Outer connector | DC-IN jack, USB connector (mini-B) |
| Automatic calendar system | 2000 to 2099 |
| Operating environmentTemperatureHumidity 30% | 0°C to 40°C (32°F to 104°F) (operation)-20°C to 60°C (-4°F to 140°F) (storage)to 90% (operation)10% to 90% (storage) |
| Power supply Four AA (R6) alkaline batteries, lithium batteries,NiMH batteries or NiCd batteriesOr two lithium CR-V3 battery packsOr AC adapter (optional)* Manganese (zinc-carbon) batteries cannot be used. | |
| Dimensions | 124 mm (W) × 65 mm (H) × 44.5 mm (D)(4.9" × 2.6" × 1.6")(excluding protrusions) |
| Weight 190 g (0.4 lb) (without batteries or card) | |
Specifications are subject to change without any notice or obligation on the part of the manufacturer.
TABLE DES MATIÈRES
GUIDE RAPIDE DE DÉMARRAGE 38
FONCTIONS DES MENUS 45
PRINCIPES DE BASE DE LA PRISE DE VUE ..... 51
SÉLECTION DE LA QUALITÉ ET DE LA TAILLE DE
L'IMAGE (MODE D'ENREGISTREMENT).... 55
AFFICHAGE 57
RÉGLAGES D'IMPRESSION.... 62
TRANSFERT DES PHOTOS VERS UN ORDINATEUR 63
ACCESSOIRES EN OPTION 65
CODES D'ERREUR 66
FICHE TECHNIQUE 68
Adresse : 2 Corporate Center Drive, Melville, New York
11747-3157 U.S.A.
natural_image
Line drawing of a camera with a cable and earplifier attached (no text or symbols)Fr
MISE EN PLACE DES PILES
natural_image
Diagram of a device with four buttons and directional arrows indicating movement or operation (no text or symbols present)
MISE SOUS/HORS TENSION
flowchart
graph TD
    A["Top Left Arrow"] --> B["Right Arrow"]
    C["Bottom Left Arrow"] --> D["Left Arrow"]
    E["Bottom Right Arrow"] --> F["Right Arrow"]
Languette PICTURE

Languette CARD
Languette SETUP

flowchart
graph TD
    A[" "] --> B[" "]
    C[" "] --> D[" "]
    E[" "] --> F["box"]
    style A fill:#fff,stroke:#000
    style B fill:#fff,stroke:#000
    style C fill:#fff,stroke:#000
    style D fill:#fff,stroke:#000
    style E fill:#fff,stroke:#000
    style F fill:#fff,stroke:#000
flowchart
graph TD
    A["SET/ORD PC CAUER"] --> B["METERING ESP"]
    C["SET/ORD PC CAUER"] --> D["METERING ESP"]
Still picture record modes
basic_d.fm Page 71 Tuesday, February 5, 2002 4:16 PM

natural_image
Pure geometric lines and symbols without any text, numbers, or symbolsnatural_image
Pure geometric lines and shapes without any text, numbers, or symbols
De

natural_image
Pure geometric diagram with intersecting lines and circles, no text or symbols present
basic_d.fm Page 75 Tuesday, February 5, 2002 4:16 PM

natural_image
Pure geometric lines and symbols without any text, numbers, or labelsANBRINGEN DES TRAGERIEMENS
natural_image
Pure geometric lines and shapes without any text, numbers, or symbols
De 75
basic_d.fm Page 76 Tuesday, February 5, 2002 4:16 PM

natural_image
Pure geometric lines and symbols without any text, numbers, or symbolsAA (R6) Alkalibatterien
natural_image
Pure geometric diagram with intersecting lines and circles, no text or symbols present
basic_d.fm Page 77 Tuesday, February 5, 2002 4:16 PM
natural_image
Pure geometric diagram with intersecting lines and circles, no text or symbols presentnatural_image
Pure geometric lines and shapes without any text, numbers, or symbols
basic_d.fm Page 78 Tuesday, February 5, 2002 4:16 PM

natural_image
Pure geometric lines and symbols without any text, numbers, or symbolsnatural_image
Pure geometric diagram with intersecting lines and circles, no text or symbols present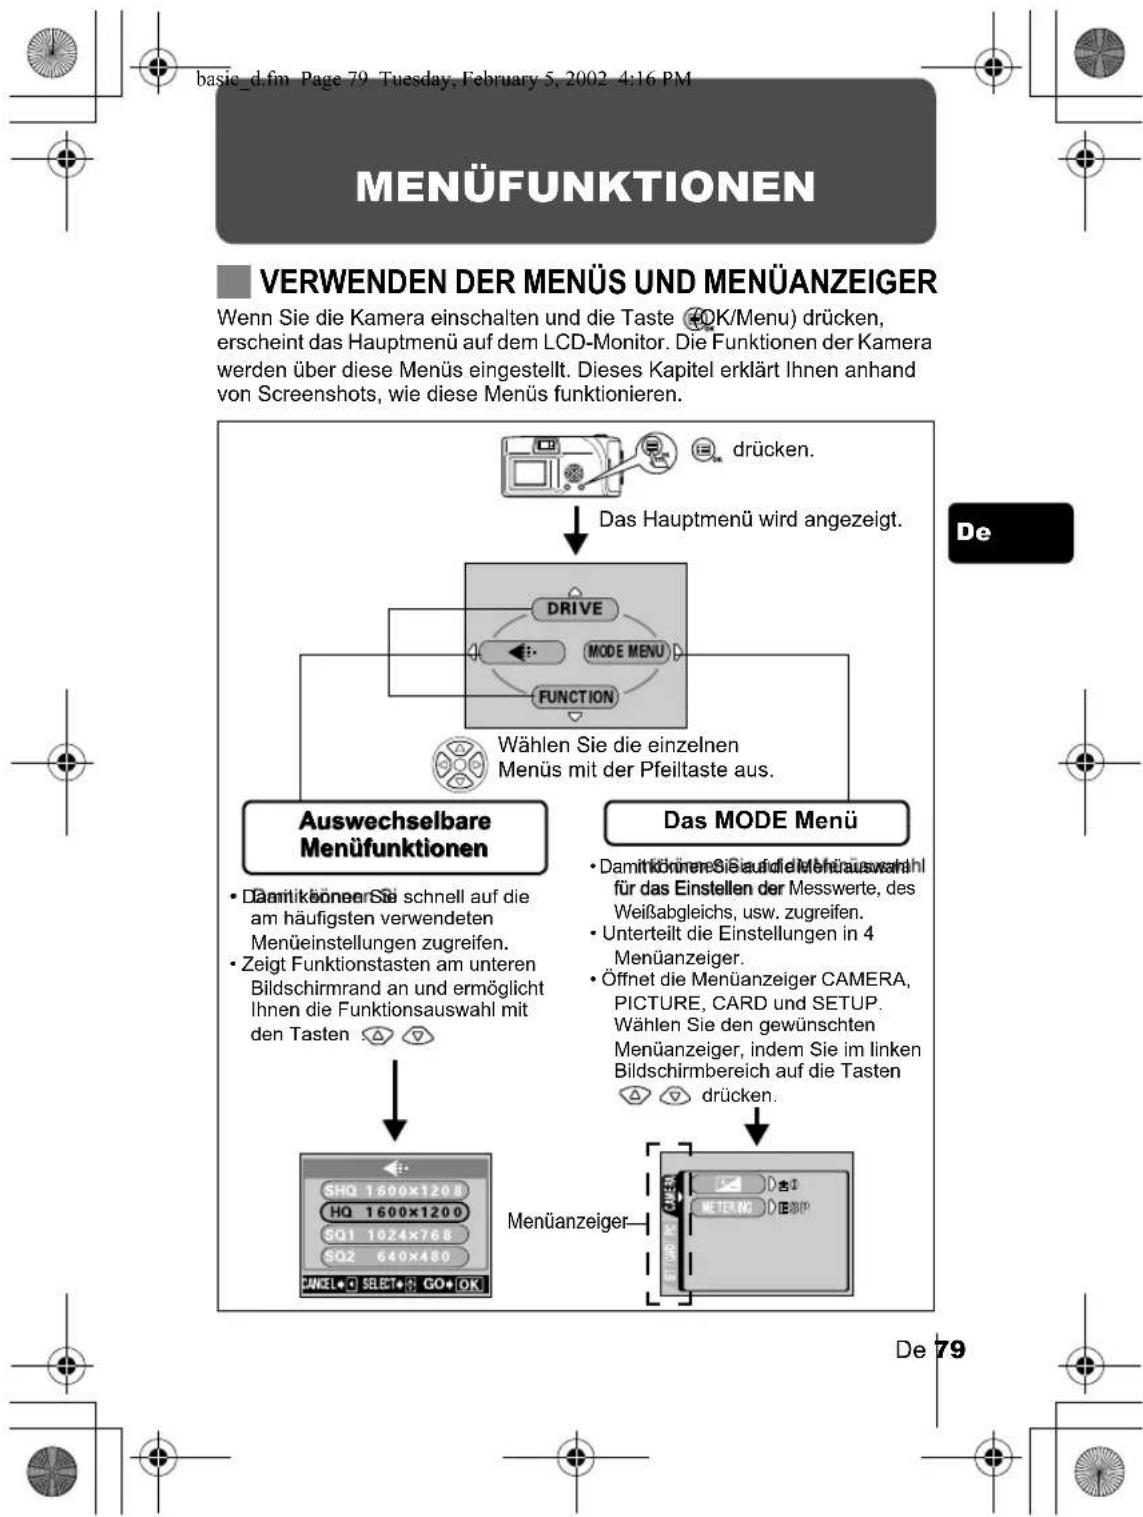
basic_d.fm Page 82 Tuesday, February 5, 2002 4:16 PM

natural_image
Pure geometric diagram with intersecting lines and circles, no text or symbols presentnatural_image
Pure geometric diagram with intersecting lines and circles, no text or symbols present
natural_image
Pure electrical circuit lines without any symbolsbasic_d.fm Page 83 Tuesday, February 5, 2002 4:16 PM
natural_image
Pure geometric diagram with intersecting lines and circles, no text or symbols presentDie MODE Menüs
natural_image
Pure geometric lines and shapes without any text, numbers, or symbolsDe 83
natural_image
Pure geometric lines and shapes without any text, numbers, or symbols

basic_d.fm Page 86 Tuesday, February 5, 2002 4:16 PM

natural_image
Pure geometric lines and symbols without any text, numbers, or labelsMOVIE-AUFNAHME
natural_image
Pure geometric lines and shapes without any text, numbers, or symbols
basic_d.fm Page 87 Tuesday, February 5, 2002 4:16 PM
natural_image
Pure geometric lines and symbols without any text, numbers, or labels4 Aufnahme tätigen.

natural_image
Pure geometric lines and shapes without any text, numbers, or symbols
De
87

basic_d.fm Page 88 Tuesday, February 5, 2002 4:16 PM

natural_image
Pure geometric lines and symbols without any text, numbers, or symbolsnatural_image
Pure electrical circuit lines without any symbols
basic_d.fm Page 90 Tuesday, February 5, 2002 4:16 PM

natural_image
Pure geometric lines and symbols without any text, numbers, or labelsMovie-Aufnahmemodi
natural_image
Pure geometric diagram with intersecting lines and circles, no text or symbols present
natural_image
Pure geometric lines and shapes without any text, numbers, or symbols
basic_d.fm Page 92 Tuesday, February 5, 2002 4:16 PM

natural_image
Pure geometric lines and symbols without any text, numbers, or symbolsnatural_image
Pure electrical circuit lines without any symbols
basic_d.fm Page 93 Tuesday, February 5, 2002 4:16 PM

natural_image
Pure geometric diagram with intersecting lines and circles, no text or symbols presentnatural_image
Pure electrical circuit lines without any symbols


basic_d.fm Page 94 Tuesday, February 5, 2002 4:16 PM
natural_image
Pure geometric lines and symbols without any text, numbers, or symbolsBILDLÖSCHUNG
natural_image
Pure geometric diagram with intersecting lines and circles, no text or symbols present
basic_d.fm Page 95 Tuesday, February 5, 2002 4:16 PM

natural_image
Pure geometric lines and symbols without any text, numbers, or symbolsFORMATIEREN
natural_image
Pure geometric lines and shapes without any text, numbers, or symbols
Stand: Februar 2002
natural_image
Pure electrical circuit lines without any symbolsbasic_d.fm Page 101 Tuesday, February 5, 2002 4:16 PM
natural_image
Pure geometric diagram with intersecting lines and circles, no text or symbols presentnatural_image
Pure geometric lines and crosshair symbols without any text or labels

TECHNISCHE DATEN
natural_image
Pure geometric diagram with intersecting lines and circles, no text or symbols present
natural_image
Pure geometric diagram with concentric circles and crosshairs, no text or symbols presentbasic_d.fm Page 103 Tuesday, February 5, 2002 4:16 PM
natural_image
Pure geometric diagram with intersecting lines and circles, no text or symbols presentDe
natural_image
Pure geometric lines and shapes without any text, numbers, or symbols


basic_sp.fm Page 104 Tuesday, February 5, 2002 11:52 AM
natural_image
Pure geometric lines and symbols without any text, numbers, or symbolsCONTENIDO
PRIMEROS PASOS 106
FUNCIONES DE MENÚS. 113
natural_image
Pure geometric diagram with intersecting lines and circles, no text or symbols present
basic_sp.fm Page 105 Tuesday, February 5, 2002 11:52 AM

natural_image
Pure geometric diagram with intersecting lines and circles, no text or symbols presentnatural_image
Pure geometric lines and shapes without any text, numbers, or symbols

natural_image
Pure geometric diagram with concentric circles and crosshairs, no text or symbols presentbasic_sp.fm Page 107 Tuesday, February 5, 2002 11:52 AM

natural_image
Pure geometric diagram with intersecting lines and circles, no text or symbols presentnatural_image
Pure geometric lines and shapes without any text, numbers, or symbols

Sp
basic_sp.fm Page 108 Tuesday, February 5, 2002 11:52 AM
natural_image
Pure geometric diagram with intersecting lines and circles, no text or symbols presentnatural_image
Pure geometric diagram with intersecting lines and circles, no text or symbols present
basic_sp.fm Page 109 Friday, February 8, 2002 9:59 AM

natural_image
Pure geometric lines and symbols without any text, numbers, or labelsnatural_image
Pure geometric lines and shapes without any text, numbers, or symbols
Sp 109
basic_sp.fm Page 110 Tuesday, February 5, 2002 11:52 AM
natural_image
Pure geometric diagram with intersecting lines and circles, no text or symbols presentnatural_image
Pure geometric diagram with intersecting lines and circles, no text or symbols present
basic_sp.fm Page 111 Tuesday, February 5, 2002 11:52 AM

natural_image
Pure geometric lines and symbols without any text, numbers, or labelsENCENDER/APAGAR LA CÁMARA
flowchart
graph LR
    A["Con el cubreobjetivo cerrado"] --> B["Arrow pointing to the button"]
    B --> C["Arrow pointing to the button"]
    C --> D["Arrow pointing to the button"]


natural_image
Pure geometric diagram with intersecting lines and circles, no text or symbols present

basic_sp.fm Page 112 Tuesday, February 5, 2002 11:52 AM

natural_image
Pure geometric lines and symbols without any text, numbers, or labelsAJUSTAR LA FECHA Y HORA
natural_image
Pure geometric diagram with intersecting lines and circles, no text or symbols present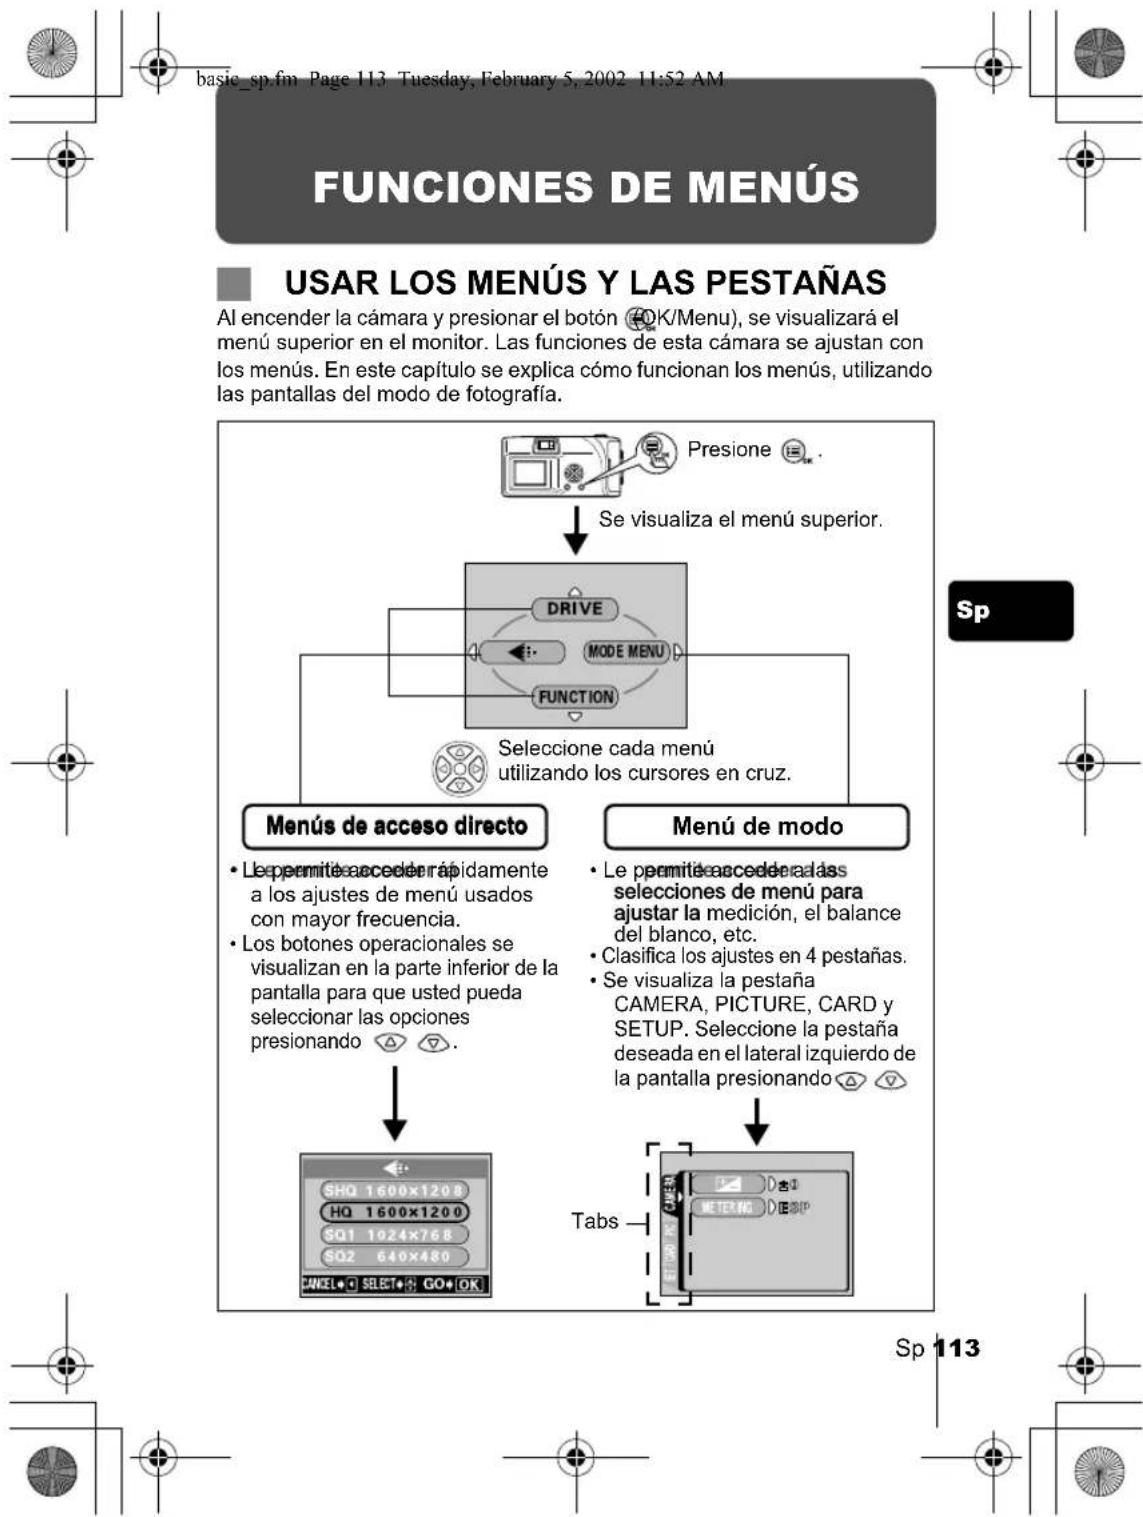
natural_image
Pure geometric diagram with concentric circles and crosshairs, no text or symbols presentbasic_sp.fm Page 117 Tuesday, February 5, 2002 11:52 AM

natural_image
Pure geometric lines and symbols without any text, numbers, or symbolsMenús de modo
natural_image
Pure geometric lines and shapes without any text, numbers, or symbolsSp
117


natural_image
Pure geometric diagram with concentric circles and crosshairs, no text or symbols presentbasic_sp.fm Page 118 Tuesday, February 5, 2002 11:52 AM

natural_image
Pure geometric diagram with intersecting lines and circles, no text or symbols presentnatural_image
Pure geometric diagram with intersecting lines and circles, no text or symbols present
FOTOGRAFIAR IMÁGENES FIJAS
basic_sp.fm Page 120 Tuesday, February 5, 2002 11:52 AM

natural_image
Pure geometric lines and symbols without any text, numbers, or symbols• GRABAR VÍDEOS
natural_image
Pure geometric diagram with intersecting lines and circles, no text or symbols present
basic_sp.fm Page 121 Tuesday, February 5, 2002 11:52 AM

natural_image
Pure geometric lines and symbols without any text, numbers, or symbols4 Tome la foto.

natural_image
Pure geometric diagram with intersecting lines and circles, no text or symbols present
Sp
121


basic_sp.fm Page 122 Tuesday, February 5, 2002 11:52 AM

natural_image
Pure geometric lines and symbols without any text, numbers, or symbolsnatural_image
Pure electrical circuit lines without any symbols
natural_image
Pure geometric lines and shapes without any text, numbers, or symbols
basic_sp.fm Page 124 Tuesday, February 5, 2002 11:52 AM

natural_image
Pure geometric lines and symbols without any text, numbers, or symbolsnatural_image
Pure electrical circuit lines without any symbols
REPRODUCIR IMÁGENES FIJAS
basic_sp.fm Page 126 Tuesday, February 5, 2002 11:52 AM

natural_image
Pure geometric lines and symbols without any text, numbers, or symbolsnatural_image
Pure geometric diagram with intersecting lines and circles, no text or symbols present
basic_sp.fm Page 127 Tuesday, February 5, 2002 11:52 AM

natural_image
Pure geometric lines and symbols without any text, numbers, or labelsnatural_image
Pure geometric lines and crosshair symbols without any text or labels

basic_sp.fm Page 128 Tuesday, February 5, 2002 11:52 AM
natural_image
Pure geometric lines and symbols without any text, numbers, or symbolsBORRAR IMÁGENES
natural_image
Pure geometric diagram with intersecting lines and circles, no text or symbols present
basic_sp.fm Page 129 Wednesday, February 6, 2002 11:36 AM
natural_image
Pure geometric diagram with intersecting lines and circles, no text or symbols presentnatural_image
Pure geometric lines and shapes without any text, numbers, or symbols
Febrero 2002
natural_image
Pure geometric diagram with intersecting lines and shapes, no text or symbols presentESPECIFICACIONES
natural_image
Pure geometric diagram with intersecting lines and circles, no text or symbols present
natural_image
Pure geometric diagram with concentric circles and crosshairs, no text or symbols presentbasic_sp.fm Page 137 Tuesday, February 5, 2002 11:52 AM
natural_image
Pure geometric diagram with intersecting lines and circles, no text or symbols presentSp
natural_image
Pure geometric lines and shapes without any text, numbers, or symbols
目錄
準備 140
選單功能 147
拍攝基礎知識 153
natural_image
Line drawing of a digital camera with attached cable (no text or symbols)安裝電池
1 確認:
4 沿 ©. 方向關閉電池艙蓋。按住
標誌,沿⑭ 方向滑動蓋子。
San-Ei Building, 22-2, Nishi Shinjuku 1-chome, Shinjuku-ku, Tokyo, Japan Customer support (Japanese language only): Tel. 0426-42-7499 Tokyo
OLYMPUS AMERICA INC.
Two Corporate Center Drive, Melville, NY 11747-3157, U.S.A. Tel. 631-844-5000
Technical Support (USA)
24/7 online automated help: http://support.olympusamerica.com/Phone customer support: Tel. 888-553-4448 (Toll-free)
Our phone customer support is available from 8 am to 10 pm (Monday to Friday) ET
E-Mail: distec@olympus.com
Olympus software updates can be obtained at: http://olympus.com/digital/
OLYMPUS OPTICAL CO. (EUROPA) GMBH.
Premises/Goods delivery: Wendenstraße 14-18, 20097 Hamburg, Germany Tel. 040-237730
Letters: Postfach 10 49 08, 20034 Hamburg, Germany
Hotline Numbers for customers in Europe:
Tel. 01805-67 10 83 for Germany
Tel. 00800-67 10 83 00 for Austria, Belgium, Denmark, France, Netherlands, Norway, Sweden, Switzerland, United Kingdom
Tel. +49 180 5-67 10 83 for Finland, Italy, Luxembourg, Portugal, Spain, Czech Republic
Tel. +49 40-237 73 899 for Greece, Croatia, Hungary, and the rest of Europe
Our Hotline is available from 9 am to 6 pm (Monday to Friday)
E-Mail: di.support@olympus-europa.com
- For customers in Europe
- For customers in North and South America
- For customers in USA
- For customers in Canada
- Trademarks
- GETTING STARTED
- NAMES OF PARTS
- MONITOR INDICATIONS
- Memory gauge
- Battery check
- ATTACHING THE STRAP
- LOADING THE BATTERIES
- INSERTING THE CARD (SmartMedia)
- Make sure that:
- Open the card cover.
- Insert the card as far as it will go in the direction shown in the illustration.
- Close the card cover securely until it clicks.
- When shooting pictures
- When playing back pictures on the camera
- SETTING THE DATE AND TIME
- MENU FUNCTIONS
- USING THE MENUS AND TABS
- Shooting mode
- DRIVE
- FUNCTION
- Playback mode
- MOVIE PLAYBACK
- INFO
- ERASE
- SHOOTING BASICS
- TAKING STILL PICTURES
- Taking still pictures using the viewfinder
- Taking still pictures using the monitor
- RECORDING MOVIES
- Note
- • USING THE FLASH
- Auto-flash (No indication)
- Red-eye reduction flash ( )
- Fill-in flash ( )
- Flash off ( )
- Night scene ( ★ )
- Night scene with red-eye reduction ( ★ )
- ZOOMING IN ON A SUBJECT (DIGITAL ZOOM)
- Record mode and zoom magnification
- En
- TAKING CLOSE-UP PICTURES (MACRO MODE)
- USING THE SELF-TIMER
- SELECTING THE IMAGE QUALITY (RECORD MODE)
- Display the top menu in the shooting mode.
- Press to select one of the record modes, then press
- Take the picture.
- Press with the lens barrier closed.
- Press ◇ ◇.
- Press to cancel playback.
- Quick View (Double-click playback)
- Press twice quickly (double-click) in the shooting mode.
- Press the shutter button gently (halfway).
- Close-up playback
- Press △.
- Index display
- PLAYING BACK MOVIES
- Press to select the desired operation, then press. Operations when FRAME BY FRAME is selected
- PROTECTING PICTURES
- ERASING PICTURES
- Single-frame erase
- All-frame erase
- FORMATTING
- PRINT SETTINGS
- What is DPOF?
- Confirm the print reservation data
- Select single-frame or all-frame reservation
- Set the number of prints (only for single-frame reservation)
- Set the date/time printing data
- Confirm the reservation data
- DOWNLOADING PICTURES TO A COMPUTER
- FOR OTHER OS USERS
- OPTIONAL ACCESSORIES
- ERROR CODES
- SPECIFICATIONS
- TABLE DES MATIÈRES
- MISE EN PLACE DES PILES
- MISE SOUS/HORS TENSION
- ANBRINGEN DES TRAGERIEMENS
- AA (R6) Alkalibatterien
- Die MODE Menüs
- MOVIE-AUFNAHME
- Aufnahme tätigen.
- BILDLÖSCHUNG
- FORMATIEREN
- CONTENIDO
- ENCENDER/APAGAR LA CÁMARA
- AJUSTAR LA FECHA Y HORA
- Menús de modo
- FOTOGRAFIAR IMÁGENES FIJAS
- • GRABAR VÍDEOS
- Tome la foto.
- REPRODUCIR IMÁGENES FIJAS
- BORRAR IMÁGENES
- 目錄
- 安裝電池
- OLYMPUS AMERICA INC.
- Technical Support (USA)
- OLYMPUS OPTICAL CO. (EUROPA) GMBH.
- Hotline Numbers for customers in Europe:
Brand : OLYMPUS
Model : Camedia C120
Category : Camera