
GT610SL1GD3L - Graphic card ASUS - Free user manual and instructions
Find the device manual for free GT610SL1GD3L ASUS in PDF.

| Product Type | Graphics Card |
| Brand | ASUS |
| Model | GT610SL1GD3L |
| Video Memory | 1 GB DDR3 |
| Interface | PCI Express 2.0 |
| Video Outputs | DVI, VGA, HDMI |
| Maximum Resolution | 2560 x 1600 |
| Supported APIs | DirectX 11, OpenGL 4.3 |
| Recommended Power Supply | 300 W |
| Supported Operating Systems | Windows 8.1, 8, 7, Vista (32/64-bit) |
| Included Software | ASUS GPU Tweak, ASUS APRP, ASUS Streaming |
| Cooling Type | Passive cooling (fanless) |
| Certifications | FCC Class B, CE, C-Tick |
| Box Contents | Graphics card, support CD, installation guide |
| Electrical Safety | Disconnect before adding components; respect local voltage |
| Maintenance | Clean dust with a dry cloth; avoid moisture and extreme temperatures |
| Warranty | See conditions provided by the retailer |
Frequently Asked Questions - GT610SL1GD3L ASUS
User questions about GT610SL1GD3L ASUS
0 question about this device. Answer the ones you know or ask your own.
Ask a new question about this device
Download the instructions for your Graphic card in PDF format for free! Find your manual GT610SL1GD3L - ASUS and take your electronic device back in hand. On this page are published all the documents necessary for the use of your device. GT610SL1GD3L by ASUS.
USER MANUAL GT610SL1GD3L ASUS
Drivers and Utilities
Installation Guide
Index
English. 1
繁體中文 22
簡体中文 42
Čestina 62
Nederlands 82
Francais 102
Deutsch 122
Elambdaviká 142
Italiano 162
日本語 183
日 203
Polski 223
Portugues 243
Espanol 263
yKpaHcbKa. 283
Hrvatski 303
E9733
Third Edition
September 2014
Copyright © 2014 ASUSTeK Computer Inc. All Rights Reserved.
No part of this manual, including the products and software described in it, may be reproduced, transmitted, transcribed, stored in a retrieval system, or translated into any language in any form or by any means, except documentation kept by the purchaser for backup purposes, without the express written permission of ASUSTeK Computer Inc. ("ASUS").
Product warranty or service will not be extended if: (1) the product is repaired, modified or altered, unless such repair, modification of alteration is authorized in writing by ASUS; or (2) the serial number of the product is defaced or missing.
ASUS PROVIDES THIS MANUAL "AS IS" WITHOUT WARRANTY OF ANY KIND, EITHER EXPRESS OR IMPLIED, INCLUDING BUT NOT LIMITED TO THE IMPLIED WARRANTYES OR CONDITIONS OF MERCHANTABILITY OR FITNESS FOR A PARTICULAR PURPOSE. IN NO EVENT SHALL ASUS, ITS DIRECTORS, OFFICERS, EMPLOYEES OR AGENTS BE LIABLE FOR ANY INDIRECT, SPECIAL, INCIDENTAL, OR CONSEQUENTIAL DAMAGES (INCLUDING DAMAGES FOR LOSS OF PROFITS, LOSS OF BUSINESS, LOSS OF USE OR DATA, INTERRUPTION OF BUSINESS AND THE LIKE), EVEN IF ASUS HAS BEEN ADVISED OF THE POSSIBILITY OF SUCH DAMAGES ARISING FROM ANY DEFECT OR ERROR IN THIS MANUAL OR PRODUCT.
SPECIFICATIONS AND INFORMATION CONTAINED IN THIS MANUAL ARE FURNISHED FOR INFORMATIONAL USE ONLY, AND ARE SUBJECT TO CHANGE AT ANY TIME WITHOUT NOTICE, AND SHOULD NOT BE CONSTRUED AS A COMMITMENT BY ASUS. ASUS ASSUMES NO RESPONSIBILITY OR LIABILITY FOR ANY ERRORS OR INACCURACIES THAT MAY APPEAR IN THIS MANUAL, INCLUDING THE PRODUCTS AND SOFTWARE DESCRIBED IN IT.
Products and corporate names appearing in this manual may or may not be registered trademarks or copyrights of their respective companies, and are used only for identification or explanation and to the owners' benefit, without intent to infringe.
Contents
Notices. 4
Safety information 5
About this guide 6
- Support CD information 7
- VGA drivers 8
2.1 Installing the VGA driver 8
2.2 Uninstalling the VGA driver 9
- ASUS GPU Tweak utility 10
3.1 Installing ASUS GPU Tweak 10
3.2 Uninstalling ASUS GPU Tweak 11
- ASUSAPRP 12
4.1 Installing ASUS APRP 12
4.2 Uninstalling ASUS APRP 13
- ASUS Streaming 14
5.1 Installing ASUS Streaming 14
5.2 Uninstalling ASUS Streaming 15
- Other information 16
6.1 Browse the Support CD 16
6.2 Contact Information 16
6.3 Viewing the Read Me file 17
Appendix: Basic troubleshooting 18
Notices
Federal Communications Commission Statement
This device complies with Part 15 of the FCC Rules. Operation is subject to the following two conditions:
- This device may not cause harmful interference
- This device must accept any interference received including interference that may cause undesired operation.
This equipment has been tested and found to comply with the limits for a Class B digital device, pursuant to Part 15 of the FCC Rules. These limits are designed to provide reasonable protection against harmful interference in a residential installation. This equipment generates, uses, and can radiate radio frequency energy and, if not installed and used in accordance with manufacturer's instructions, may cause harmful interference to radio communications. However, there is no guarantee that interference will not occur in a particular installation. If this equipment does cause harmful interference to radio or television reception, which can be determined by turning the equipment off and on, the user is encouraged to try to correct the interference by one or more of the following measures:
- Reorient or relocate the receiving antenna.
- Increase the distance between the equipment and receiver.
- Connect the equipment to an outlet on a circuit different from that to which the receiver is connected.
- Consult the dealer or an experienced radio/TV technician for help.

The use of shielded cables for connection of the monitor to the graphics card is required to assure compliance with FCC regulations. Changes or modifications to this unit not expressly approved by the party responsible for compliance could void the user's authority to operate this equipment.
Canadian Department of Communication Statement
This digital apparatus does not exceed the Class B limits for radio noise emissions from digital apparatus set out in the Radio Interference Regulations of the Canadian Department of Communications.
This class B digital apparatus complies with Canadian ICES-003.
REACH
Complying with the REACH (Registration, Evaluation, Authorisation, and Restriction of Chemicals) regulatory framework, we published the chemical substances in our products at ASUS REACH website at http://green.asus.com/ english/REACH.htm.
Macrovision Corporation Product Notice
This product incorporates copyright protection technology that is protected by method claims of certain U.S. patents and other intellectual property rights owned by Macrovision Corporation and other rights owners. Use of this copyright protection technology must be authorized by Macrovision Corporation, and is intended for home and other limited viewing uses only, unless otherwise authorized by Macrovision Corporation. Reverse engineering or disassembly is prohibited.
Safety information
Electrical safety
- When adding or removing devices to or from the system, ensure that the power cables for the devices are unplugged before the signal cables are connected. If possible, disconnect all power cables from the existing system before you add a device.
- Make sure that your power supply is set to the correct voltage in your area. If you are not sure about the voltage of the electrical outlet you are using, contact your local power company.
- If the power supply is broken, do not try to fix it by yourself. Contact a qualified service technician or your retailer.
Operation safety
- Before installing devices on your motherboard, carefully read all the manuals that came with the package.
- Before using the product, make sure all cables are correctly connected and the power cables are not damaged. If you detect any damage, contact your dealer immediately.
- To avoid short circuits, keep paper clips, screws, and staples away from connectors, slots, sockets and circuitry.
- Avoid dust, humidity, and extreme temperature. Do not place the product in any area where it may be exposed to moisture.
- Place the product on a stable surface.
- If you encounter technical problems with the product, contact a qualified service technician or your retailer.
About this guide
Conventions used in this guide
To make sure that you perform certain tasks properly, take note of the following symbols used throughout this manual.

WARNING: Information to prevent injury to yourself when completing a task.

CAUTION: Information to prevent damage to the components when completing a task.
IMPORTANT: Information that you MUST follow to complete a task.

NOTE: Useful tips and additional information for completing a task.
Where to find more information
Refer to the following sources for additional information and for product and software updates.
1. ASUS Websites
The ASUS websites worldwide provide updated information on ASUS hardware and software products. The ASUS websites are listed in the ASUS Contact Information on the inside front cover of this installation guide.
2. Optional Documentation
Your product package may include optional documentation, such as warranty flyers, that may have been added by your dealer. These documents are not part of the standard package.
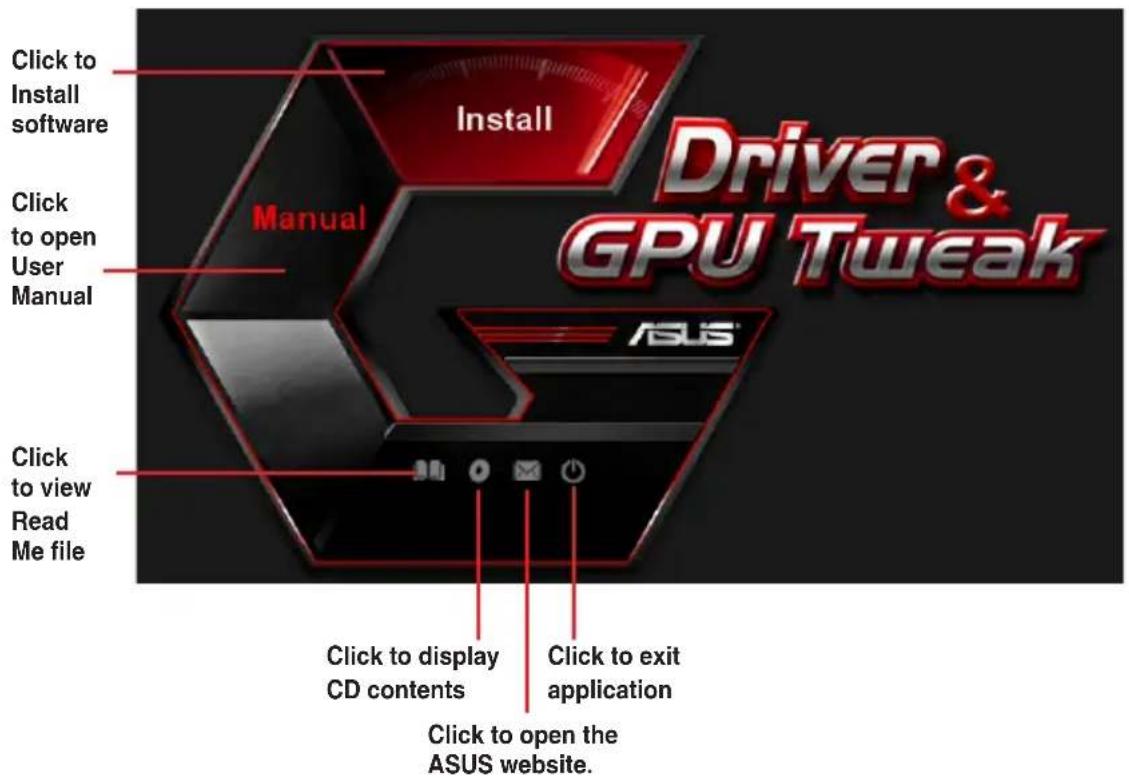
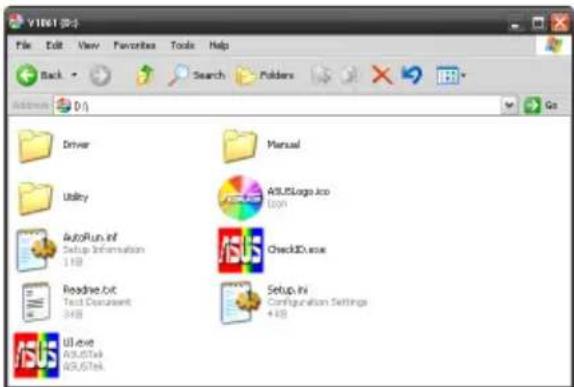
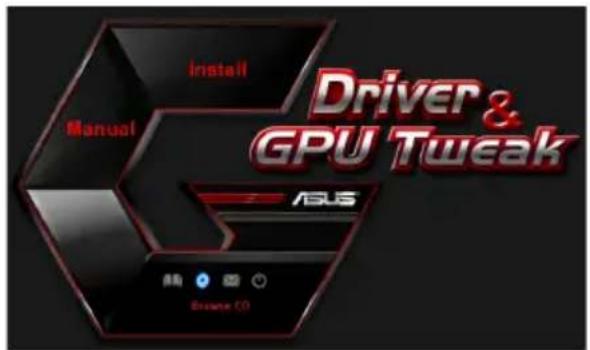
1. Support CD information
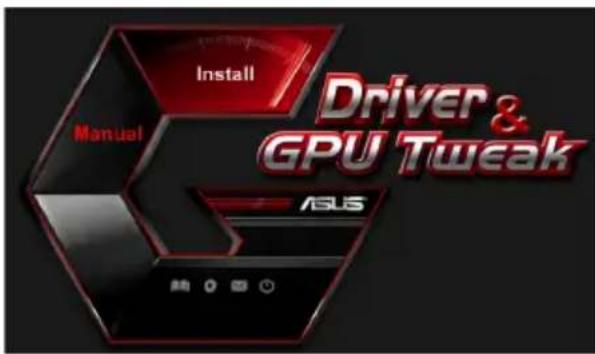
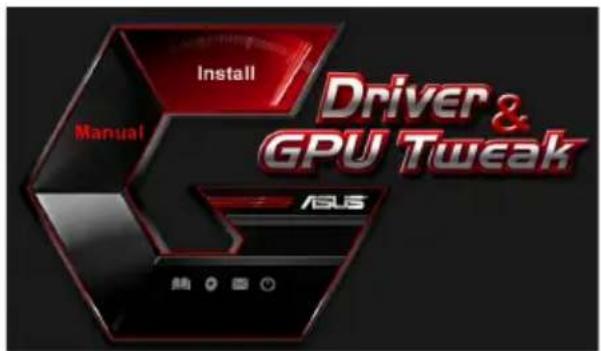
The support CD contains the drivers and utilities for your VGA card. Click the icons on the support CD's main menu to install software, obtain ASUS contact information, browse CD contents, or view the Read Me file.
- The screens in this manual are for reference only and may not exactly match what you see on your screen.
- The device driver and utility in the support CD apply only to specific ASUS VGA card models.
- You may need administrator rights to install the drivers and utilities. See your Windows® 8.1 / 8 / 7 / Vista documentation for details.
- The contents of the support CD are subject to change at any time without notice. Visit the ASUS website at www.asus.com for updates.
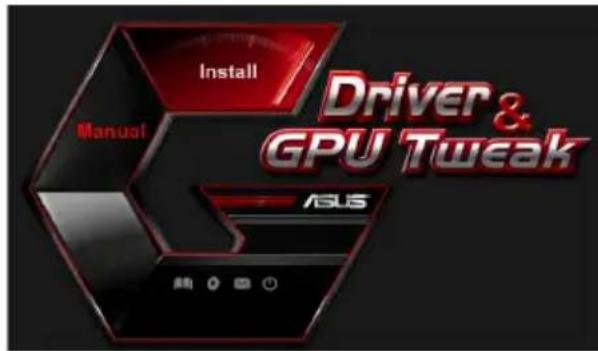
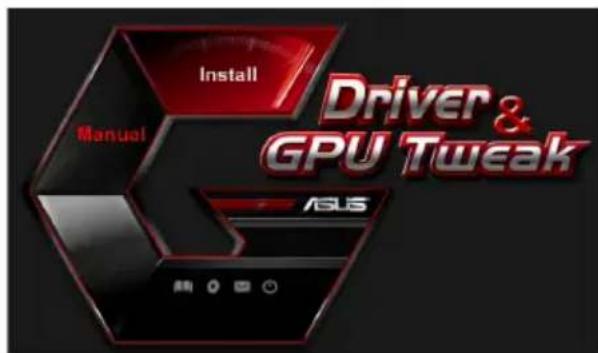
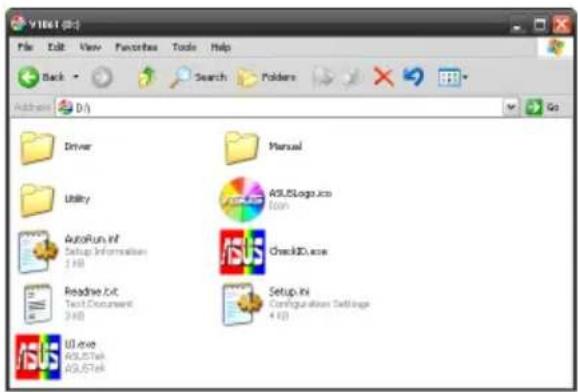
Insert the CD into your computer's optical drive. If Autorun is enabled, the Main Menu launches automatically.

If Autorun is NOT enabled on your computer, browse the contents of the support CD to locate the file UI.exe. Double-click the UI.exe to run the support CD installation program.
2. VGA drivers
The VGA driver is the software program that makes the device work with your operating system. After physically installing your graphics card, use any of the recommended methods in this section to install, update, or remove the VGA driver.
If you are replacing an old graphics card with a new ASUS graphics card, uninstall the old display driver from your system.
2.1 Installing the VGA driver
2.1.1 Installing the VGA Drivers in Windows Vista and Windows® 8.1 / 8 / 7 (32/64 bit)
To install the VGA driver in Windows® 8.1 / 8 / 7 / Vista:
-
Insert the support CD into your optical drive.
-
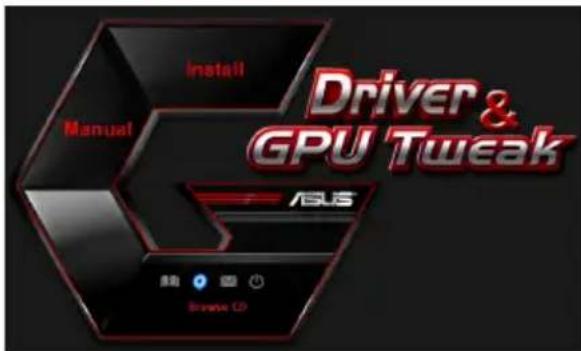
If Autorun is enabled, the main menu appears automatically. If Autorun is disabled, run UI.exe from the root directory of your support CD.
-
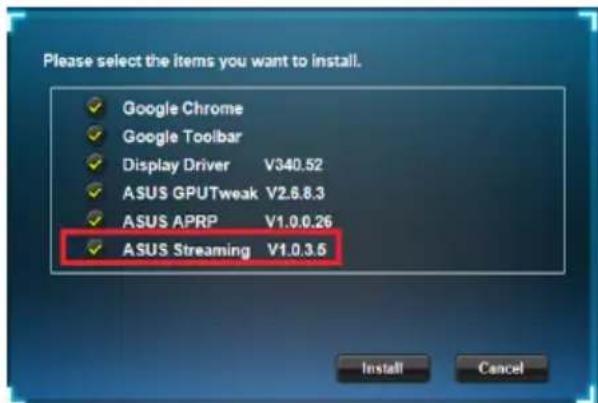
From the main menu, click Install.
-
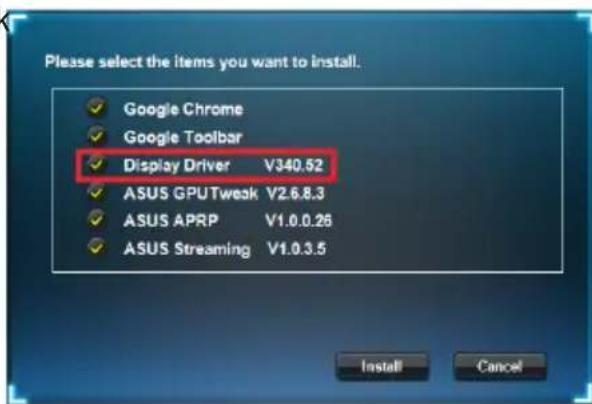
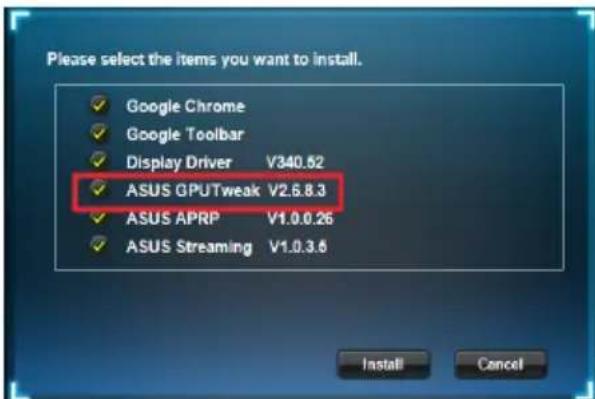
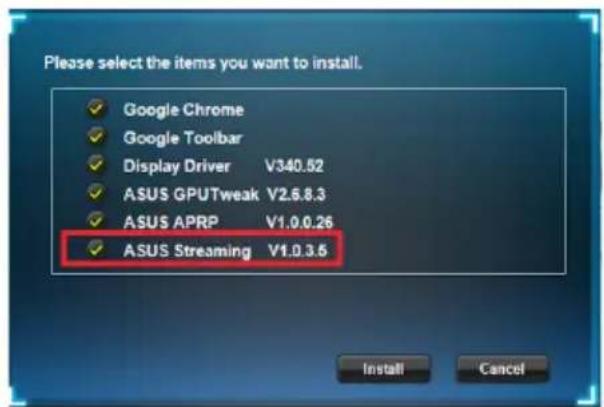
Select Display Driver and click the Install button.
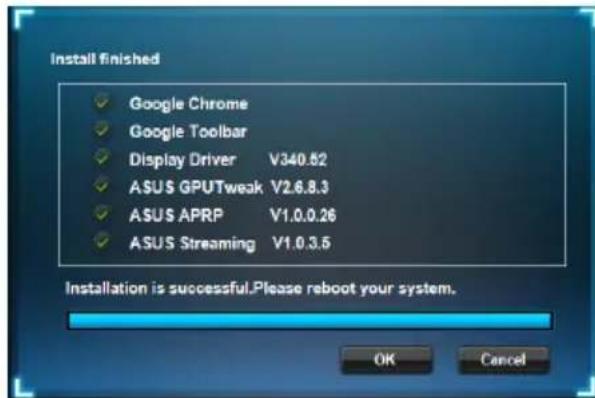
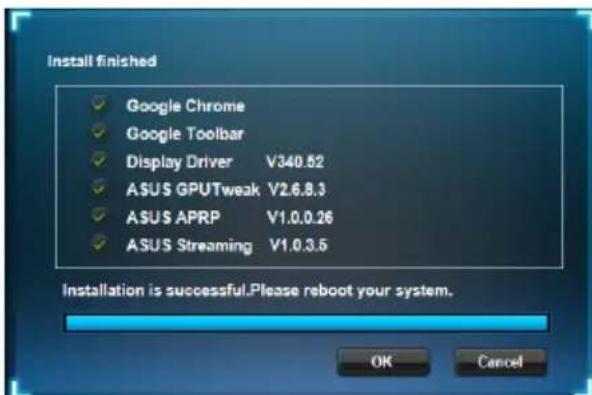
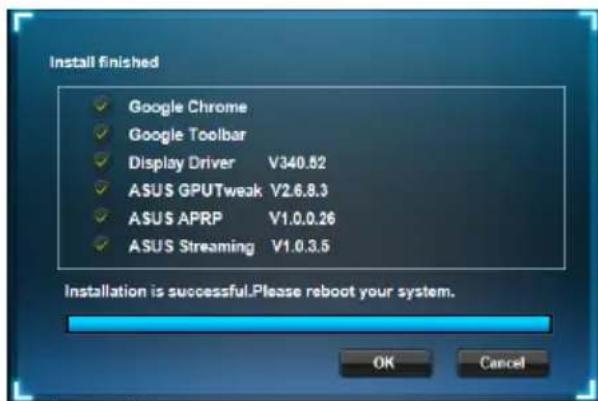
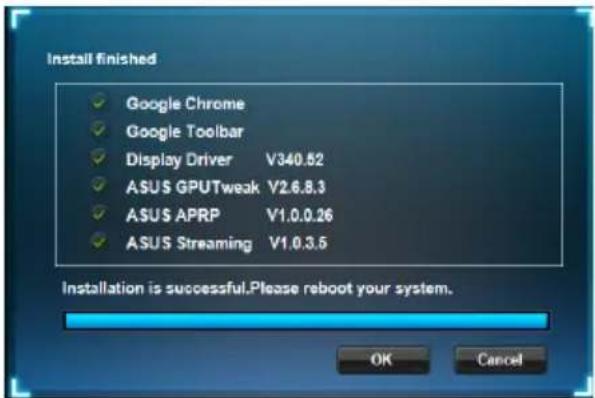
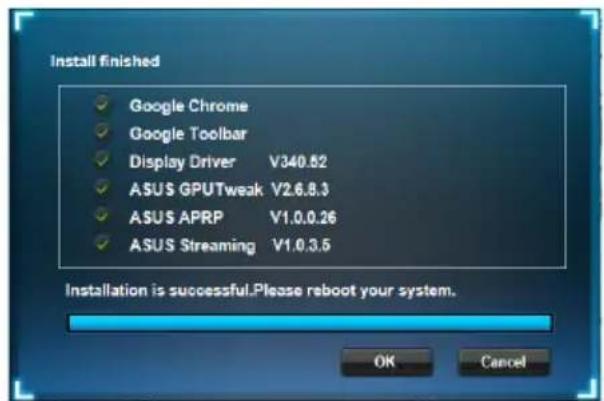
- Once installation is complete, click OK to reboot the system.
2.2 Uninstalling the VGA driver
2.2.1 Uninstalling VGA drivers in Windows 8.1 / 8 / 7 Vista
To remove the VGA driver in Windows® 8.1 / 8 / 7 / Vista:
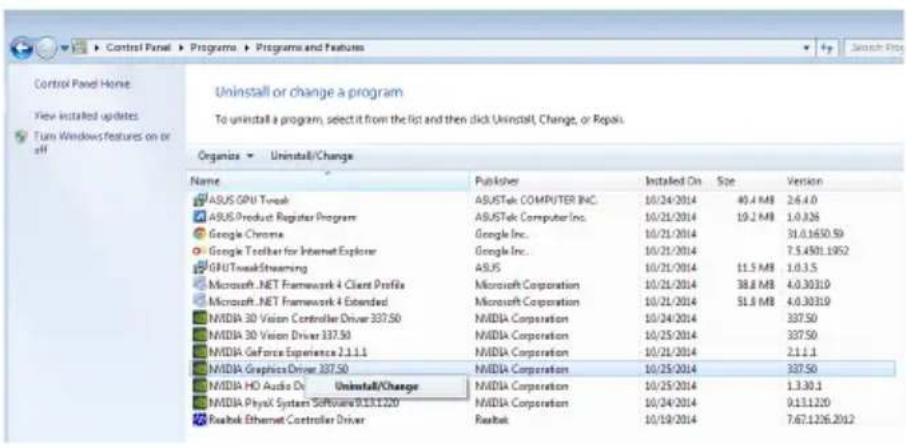
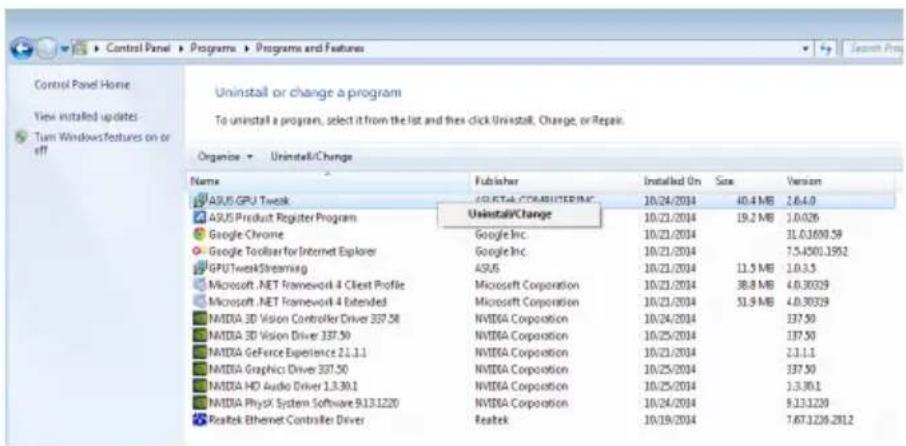
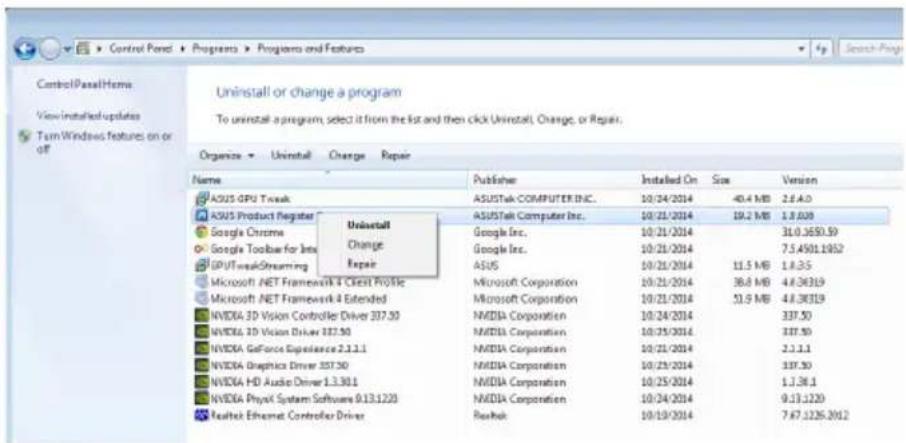
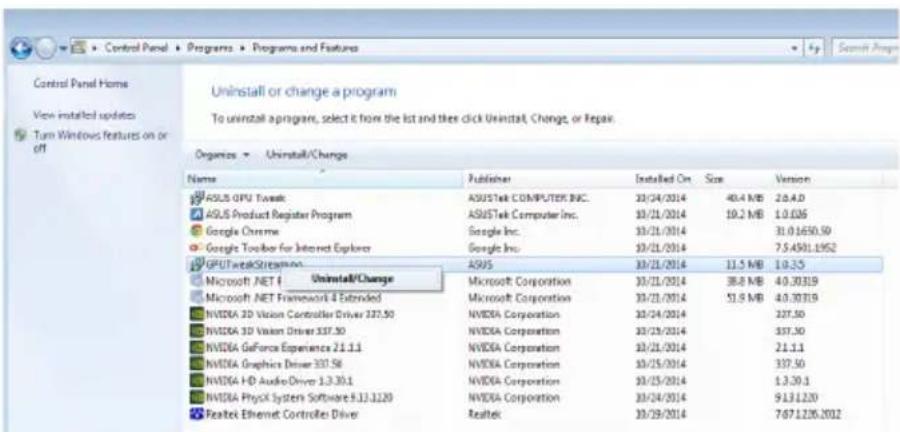
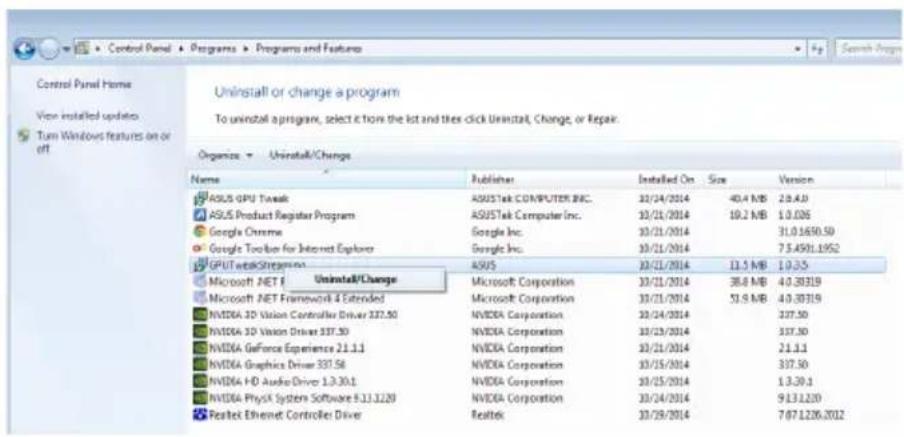
- Click Start > Control Panel > Programs > Programs and Features, select graphics driver. Click Uninstall.
3. ASUS GPU Tweak utility
ASUS GPU Tweak utility allows you to monitor and optimize the settings of your ASUS Graphics card.
3.1 Installing ASUS GPU Tweak
3.1.1 Installing ASUS GPU Tweak in Windows Vista and Windows 8.1 / 8 / 7 (32/64 bit)
To install ASUS GPU Tweak:
- Insert the support CD into your optical drive.
- If Autorun is enabled, the main menu appears automatically. If Autorun is disabled, run UI.exe from the root directory of your support CD.
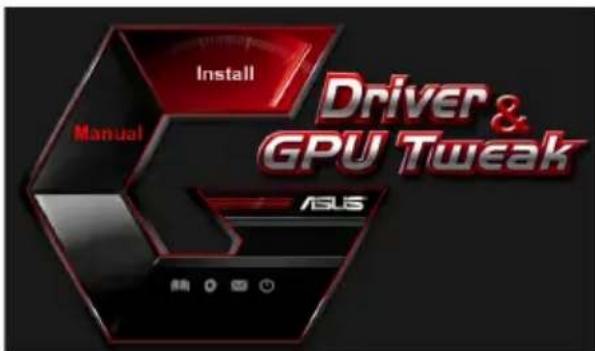
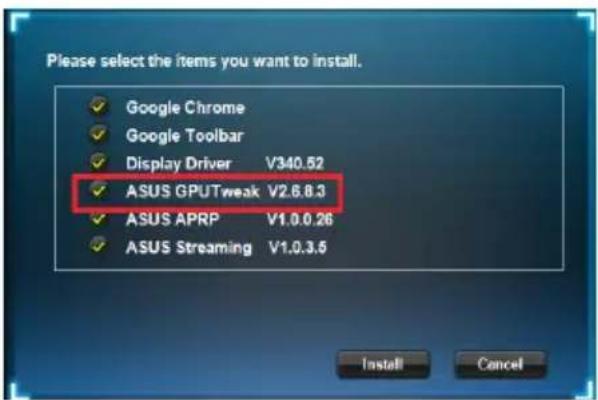
- From the main menu, click Install. Select ASUS GPU Tweak and click the Install button.
- Once installation is complete, click OK.
3.2 Uninstalling ASUS GPU Tweak
3.2.1 Removing ASUS GPU Tweak in Windows 8.1/8/7/Vista
To remove ASUS GPU Tweak in Windows® 8.1 / 8 / 7 / Vista:
- Click Start > Control Panel > Programs > Programs and Features, select ASUS GPU Tweak. Click Uninstall.
4. ASUS APRP
4.1 Installing ASUS APRP
4.1.1 Installing ASUS APRP in Windows /8/7 (32/64 bit)
Vista and Windows 8.1
To install ASUS APRP:
- Insert the support CD into your optical drive.
- If Autorun is enabled, the main menu appears automatically. If Autorun is disabled, run UI.exe from the root directory of your support CD.
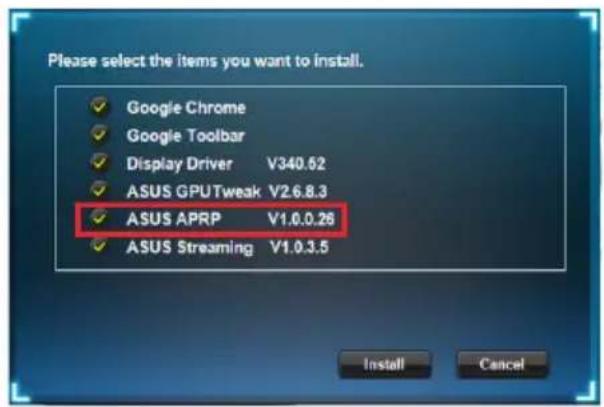
- From the main menu, click Install.
Select ASUS GPU Tweak and click the Install button.
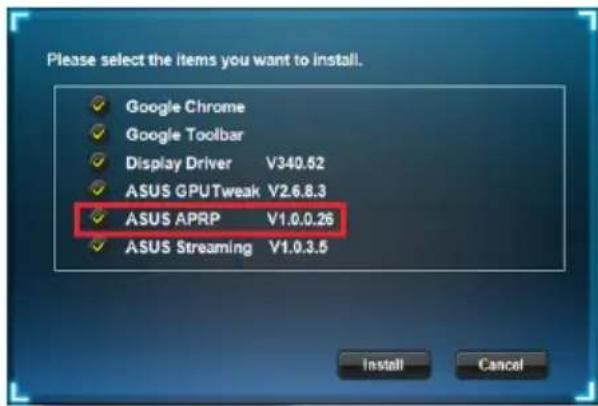
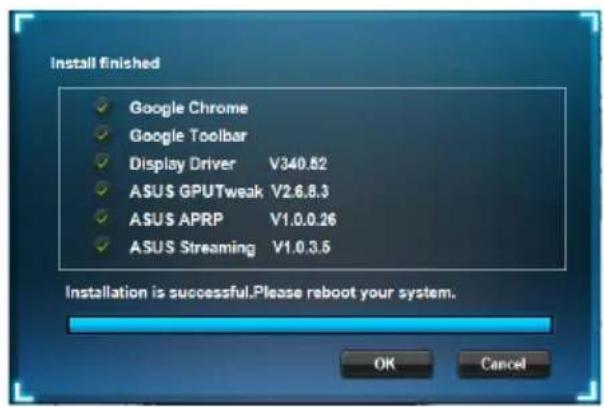
- Once installation is complete, click OK.

4.2 Uninstalling ASUS APRP
4.2.1 Removing ASUS APRP in Windows 8.1/8/7/Vista
To remove ASUS APRP in Windows® 8.1 / 8 / 7 / Vista:
- Click Start > Control Panel > Programs > Programs and Features, select ASUS APRP. Click Uninstall.
5. ASUS Streaming
5.1 Installing ASUS Streaming
5.1.1 Installing ASUS Streaming in Windows Windows® 8.1 / 8 / 7 (32/64 bit)
Vista and
To install ASUS Streaming:
- Insert the support CD into your optical drive.
- If Autorun is enabled, the main menu appears automatically. If Autorun is disabled, run UI.exe from the root directory of your support CD.
- From the main menu, click Install.
Select ASUS GPU Tweak and click the Install button.
- Once installation is complete, click OK.
5.2 Uninstalling ASUS Streaming
5.2.1 Removing ASUS Streaming in Windows 8.1/8/7/Vista
To remove ASUS Streaming in Windows® 8.1 / 8 / 7 / Vista:
- Click Start > Control Panel > Programs > Programs and Features, select GPU Tweak Streaming. Click Uninstall.
6. Other information
6.1 Browse the Support CD
To browse the support CD:
- Insert the support CD into your optical drive.
- If Autorun is enabled, the main menu appears automatically. If Autorun is disabled, run UI.exe from the root directory of your support CD.
- From the main menu, click Browse CD to view the contents of the CD.
6.2 Contact Information
- Insert the support CD into your optical drive.
- If Autorun is enabled, the main menu appears automatically.
If Autorun is disabled, run UI.exe from the root directory of your support CD.
- From the main menu, click Contact Us to open the ASUS website for additional information.
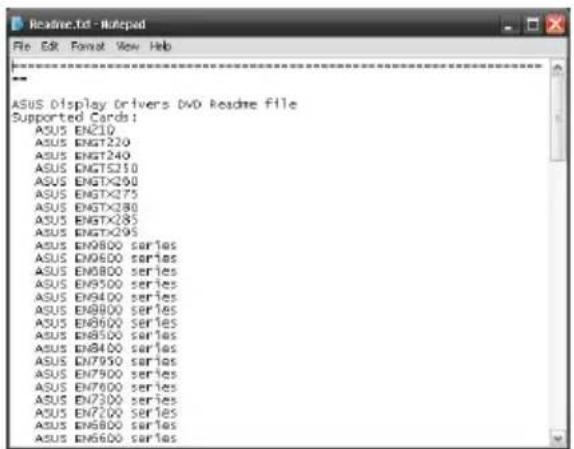
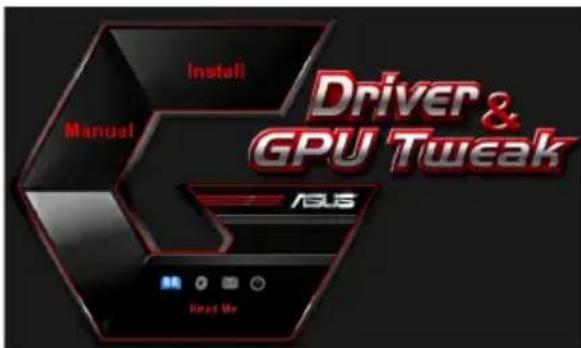
6.3 Viewing the Read Me file
To view the readme file:
- Insert the support CD into your optical drive.
- If Autorun is enabled, the main menu appears automatically. If Autorun is disabled, run UI.exe from the root directory of your support CD.

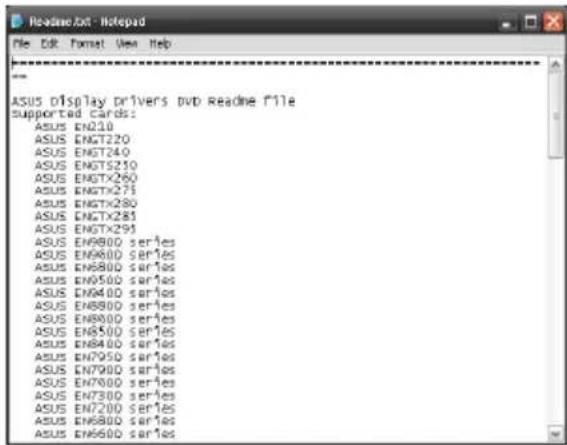
- From the main menu, click Read Me to display the Readme text file.
Appendix: Basic troubleshooting
If you encounter any of the following scenarios after installing your graphics card, try performing one of the possible solutions before calling for technical support.
| Problem No display after the card is installed | |
| Cause Your card might not be properly installed. Solution Make sure that the card is not tilted or skewed on the slot. | |
| Cause Your monitor might not be properly connected. Solution Make sure that the signal cable is properly connected to your monitor and graphics card. | |
| Cause Your graphics card is not supported by your motherboard. Solution Check the technical documentation that came with your motherboard and check the required specifications for your graphics card (e.g. AGP voltage requirement). | |
| Cause The graphics card's auxiliary power is not connected. Solution Make sure that the auxiliary power cables are properly connected with the power supply unit. | |
| Cause Insufficient power supply. Solution Make sure that your power supply unit can provide the minimum power requirement to your system. | |
| Cause Incorrect motherboard hardware system settings (e.g. system control panel connections). Solutions • Make sure that the system control panel cables are connected properly (e.g. power switch, reset). • Make sure that your CPU, CPU fan and/or memory DIMMs are in good working condition and are connected properly. | |
| Problem Wrong color balance | |
| Cause Your card might not be properly installed. Solution Make sure that the card is not tilted or skewed on the slot. | |
| Cause Your video controls might not be properly set. Solution • Manually configure your video controls to your desired settings. • Configure your graphics card display resolution in Dis-play properties. | |
| Cause There may be unsupported graphics card drivers installed in your system. Conflicts may occur with graphics card drivers from different vendors. Solution • Remove any unused graphics card drivers installed on your system. • Install the graphics card driver from the support CD that came with your graphics card package. | |
| Cause The graphics card's auxiliary power is not connected. Solution Make sure that the auxiliary power cables are properly connected to the power supply unit. | |
| Cause If your monitor comes with BNC connectors, the port con-nections may be incorrect. Solution Make sure that all BNC connectors are connected properly to its corresponding port. | |
| Cause Your monitor software settings might be incorrect. Solution Configure your monitor to supported display settings. | |
| Cause Your monitor might not be properly connected. Solution Make sure that the signal cable is properly connected to your monitor and graphics card. | |
| Problem The screen image is garbled | |
| Cause Your monitor cannot support the selected display setting. Solution Make sure that your monitor can support your desired display setting. Refer to the technical documentation that came with your monitor. | |
| Cause Your graphics card cannot support the desired system setting. Solution Make sure that your graphics card can support your desired display setting. See the specifications table that came with this graphics card package. | |
| Cause Some graphics driver files might be corrupt. Solution Remove your current graphics drivers and reinstall the graphics drivers from the support CD. | |
| Cause Poor heat dissipation inside the chassis. Solution Make sure that the chassis fan, CPU, and heatsink with fan, and/or the graphics card GPU fan are working properly. | |
| Cause GPU or VGA memory overclocked beyond optimal working conditions. Solutions Restore default frequency settings of GPU and VGA memory. |

Other problems that you might encounter can be related to other parts or accessories (e.g., motherboard, power supply unit, LCD/CRT) of your system.
ASUS
顯示卡
驅動程式與公用程式
安装指南
T9733
第三版
2014年9月發行
版權所有·不得翻印©2014華碩電腦
This product incorporates copyright protection technology that is protected by method claims of certain U.S. patents and other intellectual property rights owned by Macrovision Corporation and other rights owners. Use of this copyright protection technology must be authorized by Macrovision Corporation, and is intended for home and other limited viewing uses only, unless otherwise authorized by Macrovision Corporation. Reverse engineering or disassembly is prohibited.
- Aaaaec nI npopoopoe c 16
6.1 PAnoynon oTo CD YIooTnpIeNc.. 16
Iapapntma: Avtmuetwnion baokwv npoalnuatov 18
Vwotooioεic
Copyright © 2014 ASUSTeK Computer, Inc.
Dichiarazione FCC (Federal Communications Commission)
Copyright © 2014 ASUSTeK COMPUTER INC. All Rights Reserved.
Federal Communications Commission Statement (原文)
This device complies with Part 15 of the FCC Rules. Operation is subject to the following two conditions:
- This device may not cause harmful interference, and
- This device must accept any interference received including interference that may cause undesired operation.
This equipment has been tested and found to comply with the limits for a Class B digital device, pursuant to Part 15 of the FCC Rules. These limits are designed to provide reasonable protection against harmful interference in a residential installation. This equipment generates, uses and can radiate radio frequency energy and, if not installed and used in accordance with manufacturer's instructions, may cause harmful interference to radio communications. However, there is no guarantee that interference will not occur in a particular installation. If this equipment does cause harmful interference to radio or television reception, which can be determined by turning the equipment off and on, the user is encouraged to try to correct the interference by one or more of the following measures:
- Reorient or relocate the receiving antenna.
- Increase the separation between the equipment and receiver.
- Connect the equipment to an outlet on a circuit different from that to which the receiver is connected.
- Consult the dealer or an experienced radio/TV technician for help.

The use of shielded cables for connection of the monitor to the graphics card is required to assure compliance with FCC regulations. Changes or modifications to this unit not expressly approved by the party responsible for compliance could void the user's authority to operate this equipment.
Canadian Department of Communication Statement (原文)
This digital apparatus does not exceed the Class B limits for radio noise emissions from digital apparatus set out in the Radio Interference Regulations of the Canadian Department of Communications.
This class B digital apparatus complies with Canadian ICES-003.
REACH (原文)
Complying with the REACH (Registration, Evaluation, Authorisation, and Restriction of Chemicals) regulatory framework, we published the chemical substances in our products at ASUS REACH website at http://green.asus.com/ english/REACH.htm.
Macrovision Corporation Product Notice (原文)
This product incorporates copyright protection technology that is protected by method claims of certain U.S. patents and other intellectual property rights owned by Macrovision Corporation and other rights owners. Use of this copyright protection technology must be authorized by Macrovision Corporation, and is intended for home and other limited viewing uses only, unless otherwise authorized by Macrovision Corporation. Reverse engineering or disassembly is prohibited.
安全上のご注意
電気の取り挃い
This man has a lot of experience.
Copyright © 2014 ASUSTeK Computer Inc. All Rights Reserved.
<|im_start|>assistant
-
-
-
-
-
-
-
-
-
-
-
-
-
-
-
-
-
-
-
-
-
-
-
-
-
- 連同公號中間站的音容,請選擇使用。
安前
·
JiRCD=VGAKHTG 3RAIITFJHJL1E 100000000000000000000000000000000000000000000000000000000000000000000000
Copyright © 2014 ASUSTeK Computer Inc. All Rights Reserved.
No part of this manual, including the products and software described in it, may be reproduced, transmitted, transcribed, stored in a retrieval system, or translated into any language in any form or by any means, except documentation kept by the purchaser for backup purposes, without the express written permission of ASUSTeK Computer Inc. ("ASUS").
Product warranty or service will not be extended if: (1) the product is repaired, modified or altered, unless such repair, modification of alteration is authorized in writing by ASUS; or (2) the serial number of the product is defaced or missing.
ASUS PROVIDES THIS MANUAL "AS IS" WITHOUT WARRANTY OF ANY KIND, EITHER EXPRESS OR IMPLIED, INCLUDING BUT NOT LIMITED TO THE IMPLIED WARRANTY OR CONDITIONS OF MERCHANTABILITY OR FITNESS FOR A PARTICULAR PURPOSE. IN NO EVENT SHALL ASUS, ITS DIRECTORS, OFFICERS, EMPLOYEES OR AGENTS BE LIABLE FOR ANY INDIRECT, SPECIAL, INCIDENTAL, OR CONSEQUENTIAL DAMAGES (INCLUDING DAMAGES FOR LOSS OF PROFITS, LOSS OF BUSINESS, LOSS OF USE OR DATA, INTERRUsION OF BUSINESS AND THE LIKE), EVEN IF ASUS HAS BEEN ADVISED OF THE POSSIBILITY OF SUCH DAMAGES ARISING FROM ANY DEFECT OR ERROR IN THIS MANUAL OR PRODUCT.
SPECIFICATIONS AND INFORMATION CONTAINED IN THIS MANUAL ARE FURNISHED FOR INFORMATIONAL USE ONLY, AND ARE SUBJECT TO CHANGE AT ANY TIME WITHOUT NOTICE, AND SHOULD NOT BE CONTRUED AS A COMMITMENT BY ASUS. ASUS ASSUMES NO RESPONSIBILITY OR LIABILITY FOR ANY ERRORS OR INACCURACIES THAT MAY APPEAR IN THIS MANUAL, INCLUDING THE PRODUCTS AND SOFTWARE DESCRIBED IN IT.
Products and corporate names appearing in this manual may or may not be registered trademarks or copyrights of their respective companies, and are used only for identification or explanation and to the owners' benefit, without intent to infringe.
Contents
Adnotacja 225
Bezpieczestewo 226
O tym Informatorze 227
Посiologicals yctaHOBKN
UA9733
TpTeC BnJlaHn
BepeceHb 2014
KonipaT© 2014 ASUSTeK COMPUTER INC. Bci npaba 3actepekeHo.
KoIIHaacTHIIHbOIOIOcIbIKKa, BcIOaIOHNBPO6n Ta IIpOgPAMc 3a6c3neCIIIB II, 6c3 IIHCbMOBoI 3ROIN KOMIIAH ASUSTeK COMPUTER INC. (JJI "ASUS") He MoKe 6yTH BiITBOpEHa, IpeJaHa, IpeHHcHa, 36peKeHa B IIUYKOBI CHCTcMI a60 IpcKJIaDCHa 6yIb-IAIO IO MOBOIO B 6yIb-AKIIΦOpMI, 6yIb-AKHMM HHHOM, 3a BHKIOCHHM JOKMeHTaII, kYIOKHyIeB 36epiAe IINIOaJIbHIOTOPKOpCTyBaHHB NPO6OM.
TapaHIO HA Bnpi6 a6o 06cIyTOBByaHH He 6yJe IPOIOBKeHO y BnIIaIKy, kIIIO: (1) Bnpi6 6yIO peMOHTOBAHO, MoIHΦIKOBaHO YH BIOCKOHJIeHO 6e3 IIHCbMOBOrO IO3BOJy KOMHaII ASUS a6o (2) cepiHH HOMcp Ha Bnp6i BiCyTHI a6o CTepTH 3 HbTO.
ASUS HADAEIIEIOCBHIKK,BE3 KOHNX TAPAHINBNCJIOBJEHNX ABO TAKNX,IIOMAIOTBCHA VBA3I,BKJIIOUAOUH,AJE HE OBMEKXYOUCHBAPAHTIAMN ABO YMOBAMTOBAPHOTOCTAHY TABIDIOBIHOCTIIEBHIMIJIIM.3A KOHNX OCECTABIH N ASUS,IINPEKTOPN,OFIIEPHNPOBITHKNUAIEHTKOMILAHHEHECYTBIBIOIAJBHOCT13A BYIb-RIPIRMHABMICHUYBNIADKOBI,ABIO IOBIPHI 3BHTKN (BKJIIOAUOHN 3BHTKN,IIIO CIPNUHHIN BTPATY IINBYKV,BTPATY B3HECV,BTPATV FVHKIOHAJBHOCTI ABO DAHIX,IIPEPHBAHHB3HECV TOIIIO),HABITIKIO ASUS BYJIOIIOPEJKEHO IIPO IIOJBHI 3BHTKN,AKI EPE3YJbTATOM DEEKETV ABO IOMNIJKV UIXIIOCBHKNV ABO BNPOBI.
TEXHUII XAPAKTEPHCTIKN TA IHOPMAUJI, IIO MICTHTBCB U bOMY IOCIBHKV, IIITOTOBAHII JINIE KJKEPEIIO IHOPMAUII; BOHN IINIJIRAIOTb 3MIHI BYb-KOJIIN I BE3 IOTPEJXEHHRIXMOKHA PO3IJAATN IK 3OBOB'3AHHH ASUS. ASUS HE BUN3HAC JOOHNX 3OBOB'3AHb ABO BIINIOBIJAJBHOCTTI 3A BYb-RIIOMNJIKUH HETOUHOCTI, RIKMOKYTB 3'RBHTNCB IICOMY IOCIBHKV, BKJIOAUOHN BIPOBH TA IPOPGPAMHE 3ABE3IIEEHHR, OINCAHI BHBOMY.
Ha3Bn Bnpo6i Ta Kopnpauii, HabeJeH B IIbOmy KepBHNITBI, MoKyTB 6yTH HHe 6yTH 3apeCtPOBAHMN ToproBMn Mapkamn a06 yTH 3axHHeHMn ABTOPCbKMn IpaAMn BiIOIbIINHX KOJIaHI. BOHn BxKNaOTbcra JIIA BH3HaehHH i IonocheHH y TeKci, Ha KopHCTb BlacHHkIB i 6e3 Hamipy NopyuHTn Ppaba BlaacHoctri.
3mict
IIpHmItKu 285
InΦopMaiz3TexHikn6e3neKu 286
IIpo daHnn Ioci6HHK 287
- InΦopMaIIa IIpo IIOIOMIXH N KOMIIaKT-ⅡNcK 288
- Драиверн VGA 289
2.1 IInctaJIaIIIgIpaIbepa VGA 289
2.2IeinctaJIauiaIpaaiBepaVGA 290
- 3actocy Hok ASUS GPU Tweak 291
3.1 InctalniasusususGupTwcak 291
3.2 DeiHCTaJIuaIg ASUS GPU Tweak 292
- ASUSAPRP 293
4.1 InctaIIIAIg ASUSAPRP 293
4.2IeinctaJiausASUSAPRP 294
- ASUS Streaming 295
5.1 InctaiaASUS Streaming 295
5.2 DeiHcTaJIaIciAASUS Streaming 296
- IodatkoBa inΦopMauiia 297
6.1 IOnomixHHKOMIIaKT-ⅡNCK 297
6.2KoHTaKaTHa iHΦopMaIIa 297
6.3 OzhainomuHnI a 298
IodatoK.BHnBJIeHHOcHOBHNX HecnpaBHoCTei 299
Приимитки
3aBaΦeepaJIbHoI Komicii 3B'ЯЗкy (CIIIA)
IeH IIpncTpi BiiIOBiaac BmOram YacTHHH 15 IpaBII PheIEpaJIbHOi Komicii 3B'3Ky. EKcIIiyataaII npHaIy IIpHInCyTHMa 3a BHKOHHaII BDOX HAcTyIHHX yMOB:
Ie npnctpi HIOBHNH BKNKNaTH 6yNb-kaNX paiaionepiIKoN; Ta
- IeH npHcTpi HOBHHen c6epiratn po6oTo3aTHicTb IIpr HaaBHOCTi 6yIb-RAKx paioIIpeIIKOJ, HabIT TaKHX, IO MOKytb 3aBAHTN HopMaJIbHIpo60TI.
Ie o6laHaHn IpoiHIO Bnnpo6yBaHH i 6yIO BN3HaHe BiIOBIHNM OMeJcHnM JII
IuΦpOBHX IIpcIPOIB KJIacy B 3rIIO YacTHHH 15 PpaBNI ΦepeaIbHOi Komici 3B'3Ky. Ii
OBeMeJcHn PO3pOJIeHi 3 MeTOIO HaATN DoUJIbHH 3axHCT IIPOTH IIKIDINBHX paiaiopeiKOy y jHTIOBOMy cektopi. Ie o6laHaHn CTBOpIOE, BHKOPNCOTBye Ta MoKe BnIpOMIHOBaTH
paioactOTHy ehePiIO Ta, kIO BCtAHOBJIeHE Ta BHKOPNCOTBycTBcH Ye B iIOBIIOHOCti IO
IHCTpykII INPbO6HnKa, MoKe CTBOpHTN IIKiDINBi paiaiopeiKOOn PAIO-3B83Ky. Ipote Ie He
e rapaHTieIO, IIIO paiaiopeiIKoI He BHNKHe y IIeBHOMy po3TAUYBaHH. kIIIO ne O6laHaHH
CTBOpIO CpeiKOOn IIpnHOMy paio afo TeJIe6aueHH, IIIO MOKHa BCTAHOBHTN
BKIIIOaIOH Ta BHKIIIOaIOOH O6laHaHH, KOpHCtYBaueBi BapTO Cnpo6yBaTH BHNpaBHTN
IpeiKOOn ODNHM 3 TaKNX cnocO6IB:
- NepehaIIpaBHTn a60 3MiHHTn po3aIyBaHHaAHTeHN.
36iJIbIHTN BiCTaHb MxO6JaHaHHMa Ta OdepKyBaUeM. - IIi'eHaTH O6IIaHaHHaNo pO3cTKH 3i cTpyMOM, IIO BiIpi3HaeTbcra BII TOHO III'eHaHH OepKByBa.
3BepHyTcHg IO IOIOOMOry IO INHepa a6o IOocBiIueHoro paio- a6o TeJIeBi3iHoro iHexeHepa.

BHKOPHCTAHHnE KpaHObAHOrKa6JIIO IJ3 3cHaHHMoHITopa 3 rpaΦiHOIO KapTOO c Heo6XiIHMMIa3a6c3IIeEHnB iINOBiIHOCti IIpaBHJaFCC.3MiHN a60 IOHOBJeHH NbOro IprHJAy, kI He 6yInuTko 3aTBePJIkeHHMn CTOpHOIO, BiINOIBaJIbHOIO 3a TAKe IOTpHMaHH, MoKytb IIO36abHTN KopHCTyBaYa IIpaBa Ha BHKOPHCTaHHIbOro O6JIaIHaHH.
IeHnHpOBH IIpHJaI He IpeBHHuc MeK KJIacy B IIpaio IpeEIKoI IIpr IIpeJaYi 3 HNpOBOrO IIpHJAdy, BCTaHOBJIeHOrO 3IIO HnepeKTINb Ipo PaioIIpeEIKoIN KaHaIcBkoI OIIapTaMeHTy 3B'3Ky.
IeH nHpOBn IIpnlaKJIacy B BiIOIOBIAc KaHaIcBKOmy cTaNApTy CAN ICES-3(B)/ NMB-3(B).
REACH
3riIHO 3 BHMOrAMn peRyJIIOUOoi MepeKi REACH (PeecTpaIIa, OiiHka, CepTHphiKaIIa, O6MeKeHHra BHKOpHCTaHHx xiIMiYHnx peYOBHH) Mn oIPnIIIOHIOEMO cKlaI xIMiYHnx peYOBHH y haIIHX BHPo6ax Ha Be6-caTI ASUS REACH http://green.asus.com/english/REACH.htm.
3ayBaJKeHnKopnpauii Macrovision 0oO Bnpo6y
Данн Вириб містпь Тхнолгіо 3axнсту abTocbKnx IIpaB,якazaxицеHa 3aRbKaMH IIpo MeToH, IIIO MICTaBcBIIeBHIX IIaTeHTax CIIIA, Ta iHINMH IIpaBaMH IHTeJIekTyajbHoI BJIacHocTi,Яki HaJIeKaTb KOpnapii Macrovision Ta iHINMH BJIacHnKaM IIpaB.ВИКОрнCTAHнIciI TExHOJIOIT 3axHcTу abTocbKnx IIpaB MaC 6yTH Do3BOJIeHe KOpnapiEIO Macrovision i inn3NaueHe IJIa 3aCtOcyBaHHN IJIa DomaIIHBOrO IpePJIaIy Ta iHIIrO 06MeKeHOrO BHKOpHCTaHH, TiJbKN JIKIIO IHIe He Do3BOJIeHe KOpnapiEIO Macrovision. IHKeHepHn aHaJI3 Ta II3aceM6JIHOBaHH 3a6OpOHeHi.
Ihopmaia 3 Texhikn 6e3nekn
EJIeKtpnHa 6e3IeKa
-Доланчин Вдалянои 3снctemпрntpoi,пepkeоньтсяdo пдкючня ChHаьнх KabeJIIB,ПО KaBeJIжNBJIeHHЯ BiKJIIOUeHi.ЯКIO можЛИВО,пepeД IOДаВaHHЯн HOBOrO ПрntpoIbIKJIIOHITb yci KaBeJIжNBJIeHHЯ BiI icHyIooi ChCTemn.
- IpekeHaiTeCg, IIIO JKNBJIeHH BcTaHOBJIeHe Ha IIpaBnIbHy HAppyTu, IIIO Iic y BaIIi MiciEBOCTI. KIIIO BN He BnEBHeHi IIIO HO HAnpyrN B eJKeKtpnHiPi03eTtI, IKOIO KOpNCteYTeCb, 3BepHITbcI DO MiciEBoI KOMHaII3 eJKeKpOIOCTaHaHH.
Bpaiz HeepipabHocti Mepeki KINBJIeHHHe HaMaraiTecB BiIpeMOHTyBaTHi caMoCTiHo. 3BepHITbcIIO KBaJIiΦIKOBaHOrO cneiaJicTa Hn IpoJaBII.
Be3neKa ekCnIyataaii
- IepH HIX BCTaHOBIOBATN IIpHcTPOI B MaTePnHCbKy IIIaTy, yBaJHo IIpoHTaIe Bci IIOciOHHKN, YKI BXoJrTb DO CKJIaIy IIaKeTy.
- IepcI 3actocyBaHHM Bnpo6y IpeKoHaTecB I npaBnIbHocTi IIIKIOUChHRA BCIX Ka6JIIB Ta BiCyTHOCTI IOIIKOJKeHb Ka6JIIB XHBJIeHH. Y pa3i BnABJIeHH 6yNb-IAKOI IOIIKOJKeHH HeraHHO 3BepHIbCdoCBORO INJIepa.
- IIo6 He IOnIyCTHTN KOpOTKHX 3aMHKaHb, TpHMaIte cKpiIKn, TBHHTN Ta cKO6KN IIOJaJI Bii Po3'cMIB, rHi3I i eJIeKTpOHHNx CXem.
He IOnyckaIte HaeBIOcTi IIJIy, BOJIIOcTi Ta KpaHIX 3HaueHb TeMIIepaTyPi. He KJIaITb Bnpi6 y Micix, De BiH MoKe HAMOKHHTN.
Klaitb Bnpi6 na ctiKi IOBepxhi. - Y pa3i BHHNKHeHHaTexHicHHX IIpo6JIeM i3 Bnpo6om 3BepHiTbcra lo KBaJIiΦIKOBaHOcneiaJIicTa qH IO cBOrO IIpoJABIIa.
Ipo daHn Ioci6HnK
YMOBHI IIO3HaueHHa, IIIO BHKOpHcTOByIOTbcra B DaHomy Noci6HHKy.
IIO6 3a6e3IeHTN IpaBnJIbHicTb BHKoHaHHa IeBHHX 3aJaU, IIpHiMiTb IO yBaHn HacTyIIHcHMBOJH, IIO BHKOpHCTOByOTbcra B DaHOMy Ioci6HNky.

IIOIIPEJXEHHa: IOpMaui, np3HaueHa 3aNo6irAHn TJIecHnx yIKoJKeHb npcnpoBi BHKOHaHHa3aJaqi.

YBAΓA: IHΦopMaIIa, IIpN3NaYeHa IJIa 3aIIO6iRaHHaIIKoJKeHHO KOMIOHeHTiB IIpN cIpiObi BHKoHaHHa3aJaHi.
BAJKJINBO: InΦopMaizia, kky BN IIOBHHI B3aTH Do yBaHn IJIY BHKoHaHHa 3aJaqi.

IIPIHMITKA: IopaIITa Ta IoIaTKOba iHΦopMaIiJ, Ja Ka IIOIOMaIe BHKOHyBaTH 3aIauY.
Ie 3HaHTN IoTaTKOBy iHΦopMaio
IJIa OJepkaHHa IOnaTKOBoi iHΦopMaII Ta OHOBJIeHHBHpOBy Ta IIporpaMHoro 3a6e3neHHH 3BeptaHTecb IO TAKHX JKepeJI.
1. Bc6-caHTN kOMnHaHII ASUS.
Be6-caHTN KOMIIAIII ASUS IO BCbOMy cBiTOBi 3a6e3IeYIOb OHOBJEHy iHΦopMaIIO IIOIO aIIapATnIX Ta IIporpaMnIX IIpoJyKTIB ASUS.
- Y roJIOBHOmy McHHO HaTNCiTB Ha Install (IhctaJIHObaTH).
Bn6epiTb ASUS GPU Tweak iHaTNCiTb Ha KHOII Install (IhctaJIIOBaTH).
- Kojin iHctajia 3aBepuJaac, HATNCITb Ha OK.
3.2 DeiHcTaJaIaIaIg ASUS GPU Tweak
3.2.1 BvdaJIeHnAsUS GPU Tweaky Windows 8.1/8/7/Vista
IIO6 BnDaJIHTN ASUS GPU Tweaky Windows8.1/8/7/Vista:
- Hatncitb Ha Start (Iyck) > Control Panel (KoHTpoJIbHa IaHeJIb) > Programs (IIporpamH) > Programs and Features (IIporpamH ta 3ac06H), Bn6epiTb ASUS GPU Tweak. Hatncitb Ha Uninstall (JeinctaIOBAtH).

4. ASUS APRP
4.1 IInctaJIaIciA ASUSAPRP
4.1.1 IuctaiausASUSAPRPyWindows Vista/Windows8.1/8/7 (32/646it)
IIO6 iHCTaJIIOBaTH ASUSAPRP:
- BcTaBTe CD IIITpHMKn lo OINTHNOI INCKOBOy.
2.Як immaKTHBOBaHO aBTO3aIYCK, TIOOBHe MeHIO 3'ABHTbcra ABTOMaTHUHO.
JIKIO aBTO3aIyck BHMKHeHO, 3aIycITb UI.exe 3 KopeHeBOr MeHIO Ha CD IIITpHMKn.

- Y roJIOBHOmy McHHO HAHTCHITb Ha Install (IhctaJIHObaTH).
Bn6epiAsUSAPRPiHaTncHItb HaKHOIIInstall(IncraJIOBaTH).
- Koln iHctaJIaIa 3aBepuHaac, HATNCiTB Ha OK.
4.2 DeiHcTaJIaIciA ASUS APRP
4.2.1 BuaJIeHnA ASUSAPRPyWindows 8.1/8/7/Vista
IIo6 BndaJIHTN ASUSAPRPyWindows8.1/8/7/Vista:
- Hatncihb Ha Start (Ilyck) > Control Panel (KoHTpoJIbHa IaHeJIb) > Programs (IIporpaH) > Programs and Features (IIporpaM Ta 3acobH), BNoepiB ASUS APRP. Hatncihb Ha Uninstall (JeinctaIOBaTH).

5. ASUS Streaming
5.1 Inctajus ASUS Streaming
5.1.1 Inceta ASUS Streaming y Windows Vista / Windows 8.1/8/7 (32/64 6ir)
IIO6 iHCTaJIHOBAtN ASUS Streaming:
- BcTaBTe CD IIITpHMKn lo OINTHNOI INCKOBOy.
- JIIO aKTHBOBAHO aBTO3aIyck, TIOBHC MCHO 3'ABHTbcra ABTOMATHHO.
KIO aBTO3aIyck BHMKHeHO, 3aIyctITb UI.exe 3 KopeHeBOro MeHIO Ha CD IIITpHMKn.
- Y roIOBHOmy McHHO HaTnCHiTB Ha Install (IhctaJIIOBaTH).
Bn6epiTb ASUS Streaming i HaTncHITb Ha KHOII Install (IhctaJIIOBaTH).
- Koln i nctajia 3aBepuuaac, HATNCITb Ha OK.
5.2 DeiHcTaJaIaIg ASUS Streaming
5.2.1 BuaJIeHnAsUS Streaming y Windows 8.1/8/7/Vista
IIO6 BnJaJIHTN ASUS Streaming y Windows® 8.1 / 8 / 7 / Vista:
- Hatncitb Ha Start (Iyck) > Control Panel (KoHTpoJIbHa IaHeJIb) > Programs (IporpaMn) > Programs and Features (IporpaMn Ta 3ac06H), BIn6epiTb ASUS Streaming. Hatncitb Ha Uninstall (JeinctaIOBATn).
JaKIO aBTOMaTHHn 3aIyck He HaJIaHTOBaHH, 3aIyCTiTb faiSetup.exe 3 KopeHeBOrO KaTajory IOIIOMIXHO KOMIIaKT-ITCKY.
- Y FOIOBHOmy MeHHO HATNCHTb Ha Browse CD (IpeperJHyTH CD), 106 IpeperJHyTH 3Mict CD.
6.2 KoHTaKTHa iHΦopMaui
- BCTABTE KOMIIaKT-ⅡHCK IIITpHMKN IO OHTHNO HNCKOBOJy.
2.ЯкшоakTNBOBaHO aBTO 3aIyck,abTOMaTHUHO 3'ABJIeTBcEkpaH iHCTaJIaII III dpaibepa ASUS VGA.
aKIO aBTOMaTHUHn 3aIyck He HaJIaHTOBaHH, 3aIyctITb faiJ Setup.exe 3 KopeHeBOrO KaTajORY IOnOMIXHO KOMIIaKT-HNCKY.
- Y roIOBHOmy MeHIO HaTHcHITb Ha Contact Us (3BepHyTcHs IIO hac), IIo6 IpeHTn IO Be6-caIry ASUS i Ii3HaTHc6iJIbIe.
6.3 O3haHOMnI paJI
IIO6 IpeerJHyTH O3HaHOMHJ ai:
- BcTaBTe KOMIIaKT-ДИСК IIITpHMKN IO OINTHNO IINCKOBOJY.
- KaHo aKTHBOBaHO aBTO 3aIyck, aBTOMaTHUHO 3'ABJIaCTbc8 eKpaH iHaTajua II paIbepa ASUS VGA.
KIO aBTOMaTHUHn 3aNyck He HaJIaITOBaHH, 3aNyctIb paJI Setup.exe 3 KopeHeBOrKaTajIory IOIIOMIXHO KOMIIaKT-DHcKy.
- Y T O J I O B H O M Y M E H H O H A T N C H I T b H a Read Me (UHTaT).
Ha ekpahi 3'YBHTbcra TaKe BIKHO.
Iodatok. BnBJIeHnOcHOBHnx HecnpaBHoTei
KIO IIICJI BCTAHOBJIeHHI rpaHIO aHaITepa BNHNKAOTb 6yNb-RAI 3 HabeJeHNX IIpo6JIem, cIpO6yIte IpeE THM, k BHKJINKaTH TexHiCy HITpHMky, BHKOHATN ODNY 3 MOJKJINBX onepaui.
Copyright © 2014 ASUSTeK Computer Inc. All Rights Reserved.
No part of this manual, including the products and software described in it, may be reproduced, transmitted, transcribed, stored in a retrieval system, or translated into any language in any form or by any means, except documentation kept by the purchaser for backup purposes, without the express written permission of ASUSTeK Computer Inc. ("ASUS").
Product warranty or service will not be extended if: (1) the product is repaired, modified or altered, unless such repair, modification of alteration is authorized in writing by ASUS; or (2) the serial number of the product is defaced or missing.
ASUS PROVIDES THIS MANUAL "AS IS" WITHOUT WARRANTY OF ANY KIND, EITHER EXPRESS OR IMPLIED, INCLUDING BUT NOT LIMITED TO THE IMPLIED WARRANTYES OR CONDITIONS OF MERCHANTABILITY OR FITNESS FOR A PARTICULAR PURPOSE. IN NO EVENT SHALL ASUS, ITS DIRECTORS, OFFICERS, EMPLOYEES OR AGENTS BE LIABLE FOR ANY INDIRECT, SPECIAL, INCIDENTAL, OR CONSEQUENTIAL DAMAGES (INCLUDING DAMAGES FOR LOSS OF PROFITS, LOSS OF BUSINESS, LOSS OF USE OR DATA, INTERRUsION OF BUSINESS AND THE LIKE), EVEN IF ASUS HAS BEEN ADVISED OF THE POSSIBILITY OF SUCH DAMAGES ARISING FROM ANY DEFECT OR ERROR IN THIS MANUAL OR PRODUCT.
SPECIFICATIONS AND INFORMATION CONTAINED IN THIS MANUAL ARE FURNISHED FOR INFORMATIONAL USE ONLY, AND ARE SUBJECT TO CHANGE AT ANY TIME WITHOUT NOTICE, AND SHOULD NOT BE CONTRUED AS A COMMITMENT BY ASUS. ASUS ASSUMES NO RESPONSIBILITY OR LIABILITY FOR ANY ERRORS OR INACCURACIES THAT MAY APPEAR IN THIS MANUAL, INCLUDING THE PRODUCTS AND SOFTWARE DESCRIBED IN IT.
Products and corporate names appearing in this manual may or may not be registered trademarks or copyrights of their respective companies, and are used only for identification or explanation and to the owners' benefit, without intent to infringe.
Sadržaji


- Drivers and Utilities
- Index
- Copyright © 2014 ASUSTeK Computer Inc. All Rights Reserved.
- Contents
- Notices
- Federal Communications Commission Statement
- Canadian Department of Communication Statement
- REACH
- Macrovision Corporation Product Notice
- Safety information
- Electrical safety
- Operation safety
- About this guide
- Conventions used in this guide
- Where to find more information
- ASUS Websites
- Optional Documentation
- Support CD information
- VGA drivers
- Installing the VGA driver
- Installing the VGA Drivers in Windows Vista and Windows® 8.1 / 8 / 7 (32/64 bit)
- Uninstalling the VGA driver
- Uninstalling VGA drivers in Windows 8.1 / 8 / 7 Vista
- ASUS GPU Tweak utility
- Installing ASUS GPU Tweak
- Installing ASUS GPU Tweak in Windows Vista and Windows 8.1 / 8 / 7 (32/64 bit)
- Uninstalling ASUS GPU Tweak
- Removing ASUS GPU Tweak in Windows 8.1/8/7/Vista
- ASUS APRP
- Installing ASUS APRP
- Installing ASUS APRP in Windows /8/7 (32/64 bit)
- Uninstalling ASUS APRP
- Removing ASUS APRP in Windows 8.1/8/7/Vista
- ASUS Streaming
- Installing ASUS Streaming
- Installing ASUS Streaming in Windows Windows® 8.1 / 8 / 7 (32/64 bit)
- Uninstalling ASUS Streaming
- Removing ASUS Streaming in Windows 8.1/8/7/Vista
- Other information
- Browse the Support CD
- Contact Information
- Viewing the Read Me file
- Appendix: Basic troubleshooting
- ASUS
- 顯示卡
- 驅動程式與公用程式
- 版權所有·不得翻印©2014華碩電腦
- Vwotooioεic
- Dichiarazione FCC (Federal Communications Commission)
- Federal Communications Commission Statement (原文)
- Canadian Department of Communication Statement (原文)
- REACH (原文)
- Macrovision Corporation Product Notice (原文)
- 安全上のご注意
- 電気の取り挃い
- This man has a lot of experience.
- <|im_start|>assistant
- -
- 安前
- ·
- KonipaT© 2014 ASUSTeK COMPUTER INC. Bci npaba 3actepekeHo.
- 3mict
- Приимитки
- 3aBaΦeepaJIbHoI Komicii 3B'ЯЗкy (CIIIA)
- 3ayBaJKeHnKopnpauii Macrovision 0oO Bnpo6y
- Ihopmaia 3 Texhikn 6e3nekn
- EJIeKtpnHa 6e3IeKa
- Be3neKa ekCnIyataaii
- Ipo daHn Ioci6HnK
- Ie 3HaHTN IoTaTKOBy iHΦopMaio
- Bc6-caHTN kOMnHaHII ASUS.
- DeiHcTaJaIaIaIg ASUS GPU Tweak
- BvdaJIeHnAsUS GPU Tweaky Windows 8.1/8/7/Vista
- IInctaJIaIciA ASUSAPRP
- IuctaiausASUSAPRPyWindows Vista/Windows8.1/8/7 (32/646it)
- DeiHcTaJIaIciA ASUS APRP
- BuaJIeHnA ASUSAPRPyWindows 8.1/8/7/Vista
- Inctajus ASUS Streaming
- Inceta ASUS Streaming y Windows Vista / Windows 8.1/8/7 (32/64 6ir)
- DeiHcTaJaIaIg ASUS Streaming
- BuaJIeHnAsUS Streaming y Windows 8.1/8/7/Vista
- KoHTaKTHa iHΦopMaui
- O3haHOMnI paJI
- Iodatok. BnBJIeHnOcHOBHnx HecnpaBHoTei
- Sadržaji
Brand : ASUS
Model : GT610SL1GD3L
Category : Graphic card