USER MANUAL DVD3800BDCI DENON
The lightning flash with arrowhead symbol, within an equilateral triangle, is intended to alert the user to the presence of uninsulated "dangerous voltage" within the product's enclosure that may be of sufficient magnitude to constitute a risk of electric shock to persons.

The exclamation point within an equilateral triangle is intended to alert the user to the presence of important operating and maintenance (servicing) instructions in the literature accompanying the appliance.
WARNING:
TO REDUCE THE RISK OF FIRE OR ELECTRIC SHOCK, DO NOT EXPOSE THIS APPLIANCE TO RAIN OR MOISTURE.
Laser Safety
CAUTION:
VISIBLE AND INVISIBLE LASER RADIATION WHEN OPEN.
DO NOT STARE INTO BEAM.
LOCATION: INSIDE, NEAR THE DECK MECHANISM.
CAUTION:
USE OF CONTROLS OR ADJUSTMENTS OR PERFORMANCE OF
PROCEDURES OTHER THAN THOSE SPECIFIED HEREIN MAY RESULT IN HAZARDOUS RADIATION EXPOSURE.
THIS PRODUCT SHOULD NOT BE ADJUSTED OR REPAIRED BY ANYONE EXCEPT PROPERLY QUALIFIED SERVICE PERSONNEL.
SAFETY INSTRUCTIONS
- Read Instructions - All the safety and operating instructions should be read before the product is operated.
- Retain Instructions - The safety and operating instructions should be retained for future reference
- Heed Warnings - All warnings on the product and in the operating instructions should be adhered to.
- Follow Instructions - All operating and use instructions should be followed.
- Cleaning - Unplug this product from the wall outlet before cleaning. Do not use liquid cleaners or aerosol cleaners.
- Attachments - Do not use attachments not recommended by the product manufacturer as they may cause hazards.
- Water and Moisture - Do not use this product near water - for example, near a bath tub, wash bowl, kitchen sink, or laundry tub; in a wet basement; or near a swimming pool; and the like.
- Accessories - Do not place this product on an unstable cart, stand, tripod, bracket, or table. The product may fall, causing serious injury to a child or adult, and
serious damage to the product. Use only with a cart, stand, tripod, bracket, or table recommended by the manufacturer, or sold with the product. Any mounting of the product should follow the manufacturer's instructions, and should use a mounting accessory recommended by the manufacturer.
- A product and cart combination should be moved with care. Quick stops, excessive force, and uneven surfaces may cause the product and cart combination to overturn
- Ventilation - Slots and openings in the cabinet are provided for ventilation and to ensure reliable operation of the product and to protect it from overheating, and these openings must not be blocked or covered. The openings should never be blocked by placing the product other similar surface. This product should not be placed in such as a bookcase or rack unless proper ventilation is pro manufacturer's instructions have been adhered to.
- Power Sources - This product should be operated only from the type of power source indicated on the marking label. If you are not sure of the type of power supply to your home, consult your product dealer or local power company. For products intended to operate from battery power, or other sources, refer to the operating instructions.
- Grounding or Polarization - This product may be equipped with a polarized alternating current line plug (a plug having one blade wider than the other). This plug will fit into the power outlet only one way. This is a safety feature. If you are unable to insert the plug fully into the outlet, try reversing the plug. If the plug should still fail to fit, contact your electrician to replace your obsolete outlet. Do not defeat the safety purpose of the polarized plug.
- Power-Cord Protection - Power-supply cords should be routed so that they are not likely to be walked on or pinched by items placed upon or against them, paying particular attention to cords at plugs, convenience receptacles, and the point where they exit from the product.
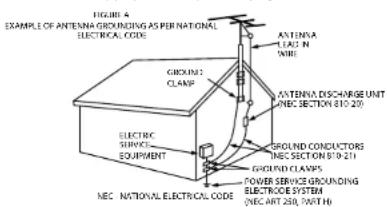
- Outdoor Antenna Grounding - If an outside antenna or cable system is connected to the product, be sure the antenna or cable system is grounded so as to provide some protection against voltage surges and built-up static charges. Article 810 of the National Electrical Code, ANSI/NFPA 70, provides information with regard to proper grounding of the mast and supporting structure, grounding of the lead-in wire to an antenna discharge unit, size of grounding conductors, location of antenna-discharge unit, connection to grounding electrodes, and requirements for the grounding electrode. See Figure A.
- Lightning - For added protection for this product during a lightning storm, or when it is left unattended and unused for long periods of time, unplug it from the wall outlet. This will prevent damage to the product due to lightning and power-line surges.
- Power lines - An outside antenna system should not be located in the vicinity of overhead power lines or other electric light or power circuits, or where it can fall into such power lines or circuits. When installing an outside antenna system, extreme care should be taken to keep from touching such power lines or circuits as contact with them might be fatal.
- Overloading - Do not overload wall outlets, extension cords, or integral
convenience receptacles as this can result in a risk of fire or electric shock. 18. Object and Liquid Entry - Never push objects of any kind into this product.
through openings as they may touch dangerous voltage points or short-out parts that could result in a fire or electric shock. Never spill liquid of any kind on the product.
- Servicing - Do not attempt to service this product yourself as opening or removing covers may expose you to dangerous voltage or other hazards. Refer all servicing to qualified service personnel.
- Damage Requiring Service - Unplug this product from the wall outlet and refer servicing to qualified service personnel under the following conditions: a) When the power-supply cord or plug is damaged.
b) If liquid has been spilled, or objects have fallen into the product.
c) If the product has been exposed to rain or water.
d) If the product does not operate normally by following the operating instructions. Adjust only those controls that are covered by the operating instructions as an improper adjustment of other controls may result in damage and will often require extensive work by a qualified technician to restore the product to its normal operation.
c) If the product has been dropped or damaged in any way.
f) When the product exhibits a distinct change in performance - this indicates a need for service.
- Replacement Parts - When replacement parts are required, be sure the service technician has used replacement parts specified by the manufacturer or have the same characteristics as the original part. Unauthorized substitutions may result in fire, electric shock, or other hazards.
- Safety Check - Upon completion of any service or repairs to this product, ask the service technician to perform safety checks to determine that the product is in proper operating condition.
- Wall or Ceiling Mounting – The product should be mounted to a wall or ceiling only as recommended by the manufacturer.
- Heat - The product should be situated away from heat sources such as radiators, heat registers, stoves, or other products (including amplifiers) that produce heat.
Introduction Introduction
1. PRODUCT
This product complies with Part 15 of the FCC Rules. Operation is subject to the following two conditions: (1) this product may not cause harmful interference, and (2) this product must accept any interference received, including interference that may cause undesired operation.
2. IMPORTANT NOTICE: DO NOT MODIFY THIS PRODUCT
This product, when installed as indicated in the instructions contained in this manual, meets FCC requirements. Modification not expressly approved by DENON may void your authority, granted by the FCC, to use the product.
3. NOTE
This product has been tested and found to comply with the limits for a Class B digital device, pursuant to Part 15 of the FCC Rules. These limits are designed to provide reasonable protection against harmful interference in a residential installation.
This product generates, uses and can radiate radio frequency energy and, if not installed and used in accordance with the instructions, may cause harmful interference to radio communications. However, there is no guarantee that interference will not occur in a particular installation. If this product does cause harmful interference to radio or television reception, which can be determined by turning the product OFF and ON, the user is encouraged to try to correct the interference by one or more of the following measures:
• Reorient or relocate the receiving antenna.
• Increase the separation between the equipment and receiver.
- Connect the product into an outlet on a circuit different from that
to which the receiver is connected.
- Consult the local retailer authorized to distribute this type of product or an experienced radio/TV technician for help.

* (For apparatuses with ventilation holes)
- Do not obstruct the ventilation holes.
- Ne pas obstruer les trous d'aération.
- No obstruya los orificios de ventilación.

Installation Location 2
Cautions on Installation 2
Caution on Handling 3
Dew Warning 3
Avoid the Hazards of Electrical Shock and Fire 3
Before Using 3
About Copyright 3
Supplied Accessories 3
Trademark Information 3
About Discs 4
Disc Handling 4
Cleaning Discs 4
Playable Discs and Files 4
Unplayable Discs 5
Color Systems 5
Region Codes ....5
Structure of Disc/SD Memory Card Contents ....5
Symbols Used in this Operating Instructions ....5
About the Remote Control 6
Loading the Batteries 6
Using a Remote Control 6
Setting this Unit not React to Other DENON's DVD Player's
Remote Control 6
Changing the Signal Code of a Remote Control 6
Part Names and Functions 7
Front Panel 7
Rear Panel 7
Remote Control 8
Front Panel Display 9
Adjusting the Brightness of the Display 9
Examples of Displays during Operation 9
Connections
Connecting to a TV 10
Connecting to a Display Device with HDMI Cable 10
Connecting to a Display Device and an Amplifier/
Receiver with HDMI Cable 10
HDMI Output Mode and Actual Output Signals 11
Audio Setting 11
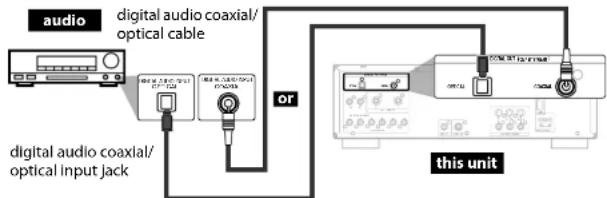
Digital Connection to an AV Amplifier with Built-in
Decoder 12
Connection to a Device with 2-channels of Analog
Audio Inputs 13
Surround Connections to a Device with 7.1/5.1-channels of
Analog Audio Inputs 13
Connecting the AC cord 13
Playback
Turning the Power On 14
Direct Playback 14
Operations Using Disc Menu, Title Menu, and
Popup Menu 15
Playing Back a VR mode DVD-RW/-R 15
Pause 15
Resume Playback 16
Fast Forward / Fast Reverse Playback ....16
Slow Forward Playback 16
Step by Step Playback 16
Dialog Speed 17
Repeat Playback ....17
A-B Repeat 17
Program Playback 18
Random Playback 18
Zoom 19
Camera Angle 19
Search 19
On-Screen Display 20
Selecting the Format of Audio and Video 22
Selecting Audio Streams/Channels 22
Selecting Subtitle Language 22
Virtual Surround 23
Pure Direct Mode 23
Setting the BD Audio Mode 23
Adjusting the Picture 24
Playing Back an MP3, Windows Media™ Audio,
PEG and DivX® File 25
Kodak Picture CD 27
Reading the SD Memory Card 27
Function Setup
Using the Setup Menu 29
Quick 29
Custom 29
Initialize ....37
Others
Troubleshooting 38
Language Code 39
Specifications 40
●HDMI (High-Definition Multimedia Interface)
You can enjoy clearer video output when connecting this unit to a display device with an HDMI-compatible port.
- Dialog Speed
Playback in slightly faster speed while keeping the sound output.
Dialog speed is available only on discs recorded in the Dolby Digital format.
●Still/Fast/Slow/Step Playback
Various playback modes are available including still pictures, fast forward/reverse, slow motion and step frames.
●Still Mode
The resolution of pictures while in the still (pause) mode can be adjusted.
●Random Playback for audio CD, MP3, JPEG, and Windows
Media™ Audio
This unit can shuffle the playback order of tracks/files.
●Program Playback for audio CD, MP3, JPEG, and Windows
Media™ Audio
You can program the playback order of tracks/files in a desired order.
●BD/DVD Menus in a Desired Language
You can display BD/DVD menus in a desired language, if
available on a BD/DVD.
●Auto Power Off
The power turns off automatically if there is no activity at the unit or its remote control for more than 30 minutes (refer to page 37).
●Subtitles in a Desired Language
You can select a desired language for subtitles if that language is available on the BD/DVD and DivX ^4 .
- Selecting a Camera Angle
You can select a desired camera angle if a disc contains
sequences recorded from different angles.
●Choices for Audio Language and Sound Mode
You can select a desired audio language and sound mode if different languages and modes are available on a disc.
●Ratings Control (Parental Lock)
You can set the control level to limit playback of discs which may not be suitable for children.
●Automatic Detection of Discs
This unit automatically detects if a loaded disc is BD, DVD, audio CD, MP3, JPEG, Windows Media™ Audio or DivX®.
●Pure Direct
The sound quality of analog audio output is improved by stop output of video signals, etc.
ENGLISH
Introduction Introduction
●On-Screen Display
Information about the current operation can be displayed on a screen, allowing you to confirm the currently active functions (such as program playback) using the remote control.
- Dimmer
The brightness of the front panel display can be adjusted.
•Screen Saver
The screen saver program starts if there is no activity at the unit or its remote for more than 5 minutes. The brightness of the display is darken by 75%. The program is deactivated when there is any activity.
●Picture Control
Picture control adjusts the picture quality of the specific display.
-Search
Chapter search: Search for a desired chapter.
Title search: Search for a desired title.
Track search: Search for a desired track/file.
Time search: Search for a desired time point or a title or a track/file.
- Repeat
Chapter: Repeated playback of a chapter of the disc.
Title: Repeated playback of a title of the disc.
Track: Repeated playback of a track/file of the disc.
All: Repeated playback of the entire disc.
(not available for BD, DVD-video)
A-B: Repeated playback of a part between two points.
Group: Repeated playback of a folder of the MP3/JPEG/
Windows Media™ Audio/DivX® disc being played back is possible.
Zoom
x1.2, x1.5, x2.0, x4.0 magnified image can be displayed. (not available for BD)
Marker
Electric reference points designated by user can be called back.
-Resume Playback
User can resume playback from the point at which the playback has been stopped even if the power is turned off.
●Bit Rate Indication
The bit rate (the amount of video data currently being read) can be displayed during the playback of video contents. (not available for BD)
●DRC (Dynamic Range Control)
Use this procedure to set the dynamic range of the output signals when playing back DVD/BD recorded in Dolby Digital/Dolby Digital Plus/Dolby TrueHD.
●Displaying a JPEG picture
Kodak Picture CD can be played back. Still images stored in JPEG format on DVD-RW/-R, CD-RW/-R or SD Memory Card can also be played back.
You can enjoy Windows Media™ Audio files which are recorded on DVD-RW/-R, CD-RW/-R or SD Memory Card.
●Playing Back an MP3 File
You can enjoy MP3 files which are recorded on DVD-RW/-R, CD-RW/-R or SD Memory Card.
- Playing Back DivX ^ File
You can enjoy DivX ^® files which are recorded on DVD-RW/-R or CD-RW/-R.
• Official DivX® Certified product
- Plays all versions of DivX ^ video (including DivX ^ 6) with standard playback of DivX ^ media files.
●Playing Back the Contents in SD Memory Card
- You can playback MP3, Windows Media™ Audio, or JPEG stored in an SD Memory Card.
- You can store picture-in-picture commentary, subtitles or other extras for BD-ROM Profile 1.1 files in an SD Memory Card and playback with the BD-ROM.
●BD-J Application
- With some BD that supports Java applications (BD-J), you can enjoy interactive function (e.g., game).
●Analog 7.1ch Surround Output
This player is equipped with analog 7.1-channel surround audio out jacks for playback.
Advanced AL24 Processing
"Advanced AL24 Processing" which greatly increases the amount of information in the time axis area using unique high speed signal detection and processing technology for the PCM signal BD/DVD/CD playback circuitry is provided for 2-channel output. In addition to expansion of data to 24 bits, natural signal correction without marring the original data is performed with upconversion sampling.
In addition, DENON's original analog waveform reproduction technology, "AL24 Processing PLUS", is used for the 7.1-channel audio output, resulting in high sound quality for all PCM signal sources.
The "Advanced AL24" indicator lights on the front panel when Advanced AL24 Processing is activated.
Important
Use only discs marked with logos listed on page 4.
Power Supply
The main power supply is engaged when the main plug is plugged in a 120V, 60Hz AC outlet. To operate the unit, press
to turn on the unit.
Warning
To avoid fire or electric shock, do not expose this unit to rain or moisture.
WARNING:
LIVE PARTS INSIDE.
DO NOT REMOVE ANY SCREWS.
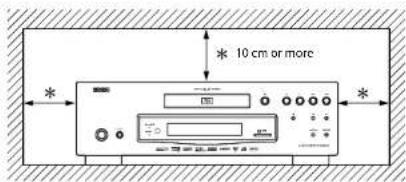
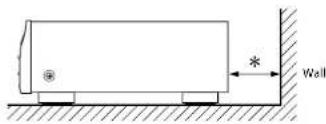
Installation Location
For safety and optimum performance of this unit:
- Do not stand the unit up vertically. Install the unit in a horizontal and stable position. Do not place anything directly on top of the unit. Do not place the unit directly on top of the TV.
- Shield it from direct sunlight and keep it away from sources of intense heat. Avoid dusty or humid places. Avoid places with insufficient ventilation for proper heat dissipation. Do not block the ventilation holes on the sides of the unit. Avoid locations subject to strong vibration or strong magnetic fields.
- Be sure to remove a disc and unplug the AC cord from the outlet before carrying the unit.
Non-use periods - Turn off the unit when it is not in use. Unplug the unit from the household AC outlet if it is not to be used for a long time. Unplug the unit during lightning storms.
Please read this operating instructions carefully before using the unit, and keep it for future reference.
Cautions on Installation
Noise or disturbance of the picture may be generated if this unit or any other electronic equipment using microprocessors is used near a tuner or TV.
If this happens, take the following steps:
• Install this unit as far as possible from the tuner or TV.
- Set the antenna wires from the tuner or TV away from this unit's AC cord and input/output connection cords.
- Noise or disturbance tends to occur particularly when using indoor antennas or 300/ ohms feeder wires. We recommend using outdoor antennas and 75/ ohms coaxial cables.
Note
- For heat dispersal, do not install this equipment in a confined space such as a book case or similar unit.
ENGLISH
Introduction Introduction
Caution on Handling
●Cautions on using mobile phones.
Using a mobile phone near this unit may result in noise. If so, move the mobile phone away from this unit when it is in use.
●Before turning the power operation button on.
Check once again that all connections are correct and that there are not problems with the connection cables. Always set the power operation button to the standby position before connecting and disconnecting connection cables.
●Sufficiently ventilate the place of installation.
If the unit is left in a room full of the smoke from cigarettes, etc., for long periods of time, the surface of the optical pickup could get dirty, in which case it will not be able to read the signals properly.
Dew Warning
Moisture condensation may occur inside the unit when it is moved from a cold place to a warm place, or after heating a cold room or under conditions of high humidity. Do not use the unit at least for 2 hours until its Inside is dry.
Avoid the Hazards of Electrical Shock and Fire
- Do not handle the AC cord with wet hands.
- Do not pull on the AC cord when disconnecting it from AC wall outlet. Grasp it by the plug.
- If, by accident, water is spilled on this unit, unplug the AC cord immediately and take the unit to our authorized service center for servicing.
Before Using
Pay attention to the following before using this unit:
● Moving the unit.
To prevent short-circuits or damaged wires in the connection cables, always unplug the power supply cord and disconnect the connection cables between all other audio components when moving the unit.
●Store the operating instructions in a safe place.
After reading the operating instructions, store them in a safe place as they could come in handy in the future.
- Whenever is in the STANDBY state, the unit is still connected to AC line voltage.
Please be sure to press to turn off the power or unplug the cord when you leave home for, say, a vacation.
- Note that the illustrations in these instructions may differ from the actual unit for explanation purposes.
The serial number of this product may be found on the back of the unit. No others have the same serial number as yours. You should record the number and other vital information here and retain this book as a permanent record of your purchase to aid identification in case of theft.
| Date of Purchase | |
| Dealer Purchase from | |
| Dealer Address | |
| Dealer Phone No. | |
| Model No. | |
| Serial No. | |
About Copyright
Unauthorized copying, broadcasting, public performance and lending of discs are prohibited.
This product incorporates copyright protection technology that is protected by U.S. patents and other intellectual property rights. Use of this copyright protection technology must be authorized by Macrovision, and is intended for home and other limited viewing uses only unless otherwise authorized by Macrovision. Reverse engineering or disassembly is prohibited.
U. S. Patent No's, 4,631,603; 4,819,098; 4,907,093; 5,315,448 and 6,516,132.
Supplied Accessories
Please check to make sure the following items are included with the main unit in the carton.
remote control (RC-1090) "AA" (R6P) batteries x2


AC cord operating instructions


service station list warranty card

RCA audio cable RCA video cable


HDMI ^TM
HDMI, the HDMI logo and High-Definition Multimedia Interface are trademarks or registered trademarks of HDMI Licensing LLC.
DOLBY DIGITAL·PLUS
DOLBY
TRUEHD
Manufactured under license from Dolby Laboratories. Dolby and the double-D symbol are trademarks of Dolby Laboratories.

dts
Manufactured under license under U.S. Patent #'s: 5,451,942; 5,956,674; 5,974,380; 5,978,762; 6,487,535 & other U.S. and worldwide patents issued & pending. DTS and DTS Digital Surround are registered trademarks and the DTS logos and Symbol are trademarks of DTS, Inc. © 1996-2007 DTS, Inc. All Rights Reserved.
Introduction Introduction


POWERED
Java and all other trademarks and logos are trademarks or registered trademarks of Sun Microsystems, Inc. in the United States and/or other countries.

DivX, DivX Certified, and associated logos are trademarks of DivX, Inc. and are used under license.
Windows Media and the Windows logo are trademarks or registered trademarks of Microsoft Corporation in the United States and/or other countries.
"Blu-ray Disc" and are trademarks.
DVD is a trademark of DVD Format/Logo Licensing Corporation.

is trademark of Eastman Kodak Company.
About Discs
Disc Handling
- Handle the discs so that fingerprints and dust do not adhere to the surfaces of the discs.
• Always store the disc in its protective case when it is not used.
- Note that discs with special shapes cannot be played on this product. Do not attempt to play back such discs, as they may damage the unit.
Cleaning Discs
- When a disc becomes dirty, clean it with a cleaning cloth. Wipe the disc from the center to out. Do not wipe in a circular motion.
- Do not use solvents such as benzine, thinner, commercially available cleaners, detergent, abrasive cleaning agents or antistatic spray intended for analog records.
playable Discs and Files
This unit is compatible to play back the following discs. To play back a BD or DVD, make sure that it meets the requirements for region codes and color systems as described on page 5. You can play back discs that have the following logos on the disc. Other disc types are not guaranteed to play back.
playable discs Logos
Blu-ray Disc
-BD-video
- BD-RE (ver.3.0)
(Recorded in BDMV format)
- BD-R (ver.2.0)
(Recorded in BDMV format)
(Unclosed discs may not be played back.)

DVD-video


DVD-RW (Finalized discs only)


DVD-R


DVD-R DL

CD-DA (audio CD)


CD-RW


CD-R

Kodak Picture CD
一
playable files Logos Media
| MP3 | — | DVD-RW/-R |
| Windows MediaTMAudio | [IMAGE] | CD-RW/-RSD Memory Card(including SDHC)miniSD CardmicroSD Card |
| JPEG | — |
| DivX® | [IMAGE] | DVD-RW/-RCD-RW/-R |
4
ENGLISH
ENGLISH
Note
- Discs containing the DivX ^ files with the DivX ^ GMC (Global Motion Compensation) playback feature, which is DivX ^ supplemental function, cannot be played back on this unit.
- This unit cannot play back the disc contents protected by Windows Media™ Digital Rights Management (DRM).
- "WMA" (Windows Media™ Audio) is an audio codec developed by Microsoft® in the United States of America.
Readable cards Playable files / data
SD Memory Card (8MB - 2GB) MP3, Windows Media™ Audio, SDHC Memory Card (4GB) JPEG, Picture-in-picture
miniSD Card (8MB - 2GB) commentary, subtitles or other
microSD Card (8MB - 2GB) extras for BD-ROM Profile 1.1
Note for SD Memory Cards
- Do not remove the SD Memory Card or turn off the unit while the contents of the card is in playback. It may result in malfunction or loss of the card's data.
- Please keep the SD Memory Cards in their cases when you are not using them.
- Do not try to open or modify the card.
- Do not touch the terminal surface with your fingers or any metals.
- Do not attach additional labels or stickers to cards.
- Do not remove the label of the SD Memory Cards.
- This unit supports SD Memory Card with FAT12/FAT16 file system, and SDHC Memory Card with FAT32 file system.
- This unit may not read the SD Memory Cards formatted on computer. If that is the case, please reformat the SD Memory Cards on this unit and try again.
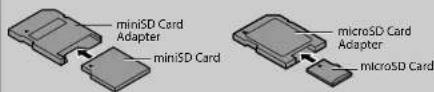
• This unit does not supports mini SDHC and micro SDHC Memory Card.
- For miniSD Card and microSD Card adapter is necessary.
- Portions of this product are protected under copyright law and are provided under license by ARIS/SOLANA/4C.
ENGLISH
Introduction Introduction
Unplayable Discs
The following discs will not play back on this unit.
• BD-RE Ver.1.0 (BD-disc with cartridge)
• BD-RE (Ver.2.0) (Recorded in BDAV format)
• BD-R (Ver.1.0) (Recorded in BDAV format)
• BD contains MP3/ Windows Media™ Audio/ JPEG/ DivX® files
• BD/DVD hybrid disc (e.g., Total Hi Def hybrid disc)
- BD-video that does not include "A" on its region code.
- DVD-video that does not include either "1" nor "ALL" on its region code.
• DVD-ROM/RAM (For DVD-ROM discs, data files in DivX ^® 3.11, 4.x, 5.x and 6 can be played)
• DVD-RW/-R recorded in non-compatible recording format
- CD-ROM (Data files in DivX ^ 3.11, 4.x, 5.x and 6 can be played)
• CDV (Only the audio part can be played)
- CD-G (Only the audio signals can be output)
• CompactDisc-Interactive (CD-I)
• Video Single Disc (VSD)
• Video CD, Super Video CD
- Super audio CD (Only the sound on the CD layer can be heard. The sound on the high-density super audio CD layer cannot be heard.)
• DVD-audio
• HD DVD
• Disc with recording area less than 55mm in diameter
- Unauthorized disc (Pirated disc)
• Unfinalized disc
Color Systems
BD and DVD are recorded in different color systems throughout the world. The most common color system is NTSC (which is used primarily in the United States and Canada).
This unit uses NTSC, so BD or DVD you play back must be recorded in the NTSC system. You cannot play back BD or DVD recorded in other color systems.
Region Codes
This unit has been designed to play back BD with region A and DVD-video with region 1. You cannot play back BD or DVD-video that are labeled for other regions. Look for the symbols on the right on your BD or DVD-video. If these region symbols do not appear on your BD or DVD-video, you cannot play back the disc in this unit. The letter or number inside the globe refers to region of the world. A BD or DVD-video labeled for a specific region can only play back on the unit with the same region code.
BD-video

DVD-video


Structure of Disc/SD Memory Card Contents
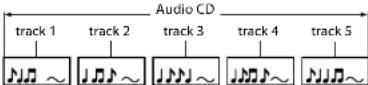
The contents of BD / DVD are generally divided into titles. Titles may be further subdivided into chapters.
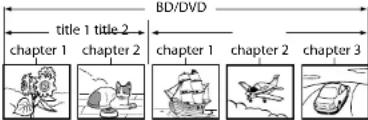
Audio CDs are divided into tracks.
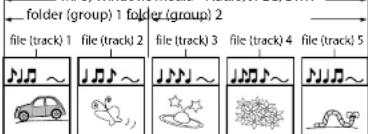
Data discs or SD Memory Cards containing MP3/Windows Media™ Audio/JPEG/DivX® is divided into folders, and the folders are subdivided into files.
MP3, Windows Media™ Audio, JPEG, DivX®
5
ENGLISH
Symbols Used in this Operating Instructions
To specify for which media type each function is, we put the following symbols at the beginning of each item to operate.
Symbol
Description
BD-V
Description refers to BD-video and BD-RE (ver. 3.0)/BD-R (ver.2.0) recorded in BDMV format
DVD-V
Description refers to DVD-video and DVD-RW/-R recorded in video mode
DVD-VR
Description refers to DVD-RW/-R recorded in VR mode
CD
Description refers to audio CD and DTS-CD
MP3
Description refers to DVD-RW/-R, CD-RW/-R and SD Memory Card with MP3 files
WMA
Description refers to DVD-RW/-R, CD-RW/-R and SD Memory Card with Windows Media™ Audio files
JPEG
Description refers to DVD-RW/-R, CD-RW/-R and SD Memory Card with JPEG files
DivX®
Description refers to DVD-RW/-R and CD-RW/-R with DivX ^16 files
If you do not find any of the symbols listed above under the function heading, the operation is applicable to all media.
About the button names in this explanation
<>: Buttons on the main unit
[ ] : Buttons on the remote control
Button name only:
Buttons on the main unit and remote control
Introduction Introduction
About the Remote Control
Loading the Batteries
①Open the battery compartment cover.

③Close the cover.
②Insert two "AA" (R6P) batteries, with each one oriented correctly.

Cautions on Batteries
- Use "AA" (R6P) batteries in this remote control.
- Replace the batteries with new ones approximately once a year, though this depends on the frequency with which the remote control is used.
- If the remote control does not operate within a close proximity of the main unit, replace the batteries with new ones, even if less than a year has passed.
- The included batteries serve only for verifying operation. Replace them with new batteries as soon as possible.
- When inserting the batteries, be careful to do so in the proper direction, following the and marks in the remote control's battery compartment.
• To prevent damage or battery fluid leakage:
- Do not mix a new battery with an old one.
- Do not mix two different types of batteries such as alkaline and manganese.
- Do not short-circuit, disassemble, heat or dispose of batteries in flames.
- Remove the batteries when not planning to use the remote control for a long period of time.
- If the batteries should leak, carefully wipe off the fluid from the inside of the battery compartment, then insert new batteries.
Using a Remote Control
Keep in mind the following when using the remote control:
- Make sure that there are no obstacles between the remote control and infrared sensor window on the unit.
- Remote operation may become unreliable if strong sunlight or fluorescent light is shining on infrared sensor window of the unit.
- Remote control for different devices can interfere with each other. Avoid using remote control for other equipment located close to the unit.
- Replace the batteries when you notice a fall off in the operating range of the remote control.
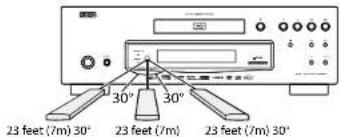
- The maximum operable ranges from the unit are as follows.
- Line of sight: approx. 23 feet (7m)
- Either side of the center: approx. 23 feet (7m) within 30°
Setting this Unit not React to Other DENON's DVD Player's Remote Control
If you have other DENON's DVD players around this unit, this unit reacts to the commands you made for DVD players through its remote control. To avoid this situation, you can set this unit not react to other DENON's DVD player's remote control.
1) In stop mode, press [SETUP].
2) Press [7], [8], [9], [2].
3) Press [SETUP].
- "Only Attached Remocon" will be displayed on the upper right corner of the screen and this unit only react to the commands from this unit's remote control.
- To set back to default, press [7],[8],[9],[1] at step 2. "Normal Remocon" will be displayed on the upper right corner of the screen and this unit react to both the commands from this unit's remote control and the other DENON's DVD players' remote control.
Note
- The setting remains after you turn off this unit or unplug the AC cord.
- If you try to operate this unit with the other DENON's DVD players' remote control, some of the operation may not be available depending on the manufactured year or type of the remote control.
ENGLISH
Changing the Signal Code of a Remote Control
To avoid the other DENON's BD players responding the remote signal of this unit, you can change the signal code of the remote control. If the signal code of the remote control does not match to the signal code of the unit, you cannot control the unit with the remote control.
■Change the signal code of the unit
1) In stop mode, press [SETUP].
2) Use [◀/▶] to select ☐, then press [ENTER].
3) Use [◀/▶] to select Other, then press [ENTER].
4) Use [△/▽] to select "Remote Control Setting".
5) Press [ENTER] to select "DENON1" or "DENON2".
![DENON DVD3800BDCI - 1) In stop mode, press [SETUP]. - 1](/content/2026/03/506471/images/83ac743c7717207b7b2b4f9957669a41dd492b158d26ff78032992cac73b2da5.jpg)
6) Press [SETUP] to exit.
- At this point the new signal code of the unit is effective. Please change the signal code of the remote control to match to the signal code of the unit with following procedure.
■Change the signal code of the remote control
Set to "DENON1"
Press and hold [RETURN], and press [3], [2], [1].
Set to "DENON2"
Press and hold [RETURN], and press [1], [2], [3].
- If the signal code does not match, the signal code of the remote control will be displayed on the front panel display.
- The default setting and the setting after you change the batteries is "DENON1".
Introduction Introduction
Part Names and Functions
Front Panel
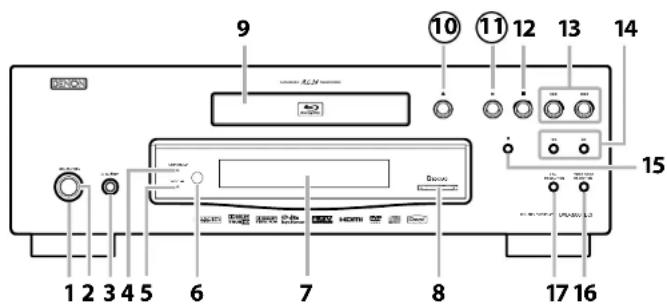
The unit can also be turned on by pressing the buttons with circled numbers.
1. Power indicator
This indicator lights up in green when the power is on, and lights up in red in standby mode.
Press to turn the unit to standby mode. In standby mode, this unit still consumes small amount of power.
3. ON / OFF (POWER) switch
Press to turn the unit on and off. If you turn off the unit using this switch, the unit does not consume power. In this condition, this unit does not accept any button except this switch.
4. Advanced AL24 indicator
Indicates that audio signals of a BD, DVD, etc., are being processed digitally with the Advanced AL24 Processing.
5. VIDEO NR indicator
Indicates that video signals of a BD, DVD, etc., are being processed digitally with the DNR (Digital Noise Reduction) processing.
6. Infrared sensor window
Receives signals from your remote control so that you can control the unit from a distance.
7. Display
Refer to "Front Panel Display" on page 9.
8. SD CARD slot
Insert an SD Memory Card, and play back the contents in it.
9. Disc tray
Place a disc when opening the disc tray.
Press to open or close the disc tray.
Press to start or resume playback.
Press to stop playback.
Press to skip down/up titles/chapters/tracks/files.
Press to search forward / backward through a disc.
Press to pause playback
Press repeatedly to reduce the overall level of noise on the picture (DNR). Each time you press the button, the level of the DNR switches "Off" → "+1" → "+2" → "+3" → "Off".
Press to set the HDMI jack's video signal output mode.
Rear Panel
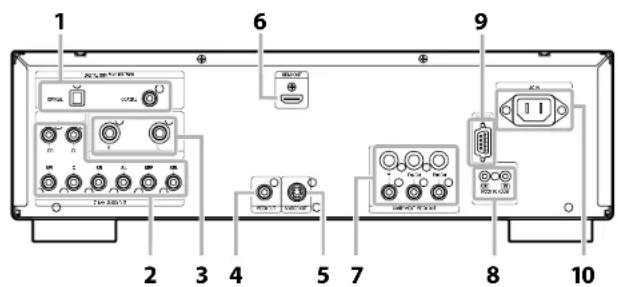
1. DIGITAL OUT (OPTICAL/COAXIAL) jack
Use digital audio coaxial/optical cable to connect to an AV receiver, Dolby Digital decoder or other device with a digital audio coaxial/optical input jack.
2.7.1ch AUDIO OUT jacks
Use an RCA audio cable to connect these jacks to the 7.1-channel audio input jacks of your amplifier with 7.1-channel input terminals.
3. 2ch AUDIO OUT jacks
Use an RCA audio cable to connect these jacks to the 2-channel audio input jacks of your amplifier with 2-channel input terminals.
4. VIDEO OUT jack
Use an RCA video cable to connect to a TV monitor, AV receiver or other device.
5. S VIDEO OUT jack
Use an S-video cable to connect to the S-video input jack of external device.
6. HDMI OUT jack
Use an HDMI cable to connect to a display with an HDMI input jack.
7. COMPONENT VIDEO OUT jacks
Use a component video cable to connect to a display device with component input jacks.
8. REMOTE CONTROL OUT / IN jacks
Connecting the DENON Satellite Remote Control to these jacks enables you to operate more than one DENON components with one remote control.
9. CONTROL CONNECTOR (RS-232C)
This is a terminal for future system extension.
10. AC IN Terminal
Use to connect the AC cord to supply the power.
Note
- Do not touch the inner pins of the jacks on the rear panel. Electrostatic discharge may cause permanent damage to the unit.
Remote Control
The unit can also be turned on by pressing the buttons with circled numbers.
- POWER ON button
- Press to turn the unit on.
- POWER OFF button
- Press to turn the unit to standby mode.
- A-B REPEAT button
- Press to mark a segment between A and B for A-B repeat playback.
- REPEAT button
- Press to select the repeat mode.
- RANDOM button
- Press to display the random playback screen for shuffling the playback order of tracks/files.
- ZOOM button
- During playback, press to enlarge the picture on the screen.
- CLEAR button
- Press to clear the information once entered, to clear the marker settings, or to cancel the programming for CD, etc.
- RED/GRN/BLU/YEL button
- Press to select item on some BD menus.
- TOP MENU button
- Press to display the top menu.
- Cursor △ / ∇ / ◀ / ▷ buttons
- Press to select items or settings.
- ENTER button
- Press to confirm or select menu items.
- SETUP button
- Press to display the setup menu.
- ANGLE button
- Press to access various camera angles on the disc.
- Press to rotate the JPEG/Kodak Picture Images clockwise by 90 degrees.
- SUBTITLE button
- Press to display the subtitle menu.
- PURE DIRECT button
- Press to stop output of video signals, etc., and output only the analog audio signals to achieve high quality sound from analog audio outputs.
- DISPLAY button
- Press to display the On-Screen display menu.
- SKIP |◀◀ button
- During playback, press to return to the beginning of the current title chapter, track or file.
- SKIP ▶▶| button
- During playback, press to skip the next chapter, track or file.
- STOP ■ button
- Press to stop playback.
- Press to exit from the title menu.
- REW ◀ button
- During playback, press to fast reverse the playback.
- STILL/PAUSE || button
- Press to pause playback.
- When playback is in pause, press repeatedly to forward the playback step by step.
22.FFW▶▶ button
- During playback, press to fast forward the playback.
- When playback is in pause, press to slow forward the playback.
- PLAY▶ button
- Press to start playback or resume playback.
- MODE button
- During playback, press to display the picture adjustment menu, and rapid playback.
- During the JPEG playback, press to display menus for changing the visual effect for switching the image or changing the size of the image.
- In stop mode with BD inserted, press to display a menu for setting the BD audio mode.
- In stop mode with BD or DVD inserted, press to display a menu for setting the virtual surround.
- In stop mode with audio CD, or disc with MP3, Windows Media™ Audio, JPEG files inserted, press to display menus for program and random playback.
- AUDIO button
- Press to display the audio menu.
- RETURN button
- Press to return to the previously displayed menu screen.
- POP UP MENU / MENU button
- Press to display the pop-up menu/disc menu/file list.
- Press to change "Original" and "Playlist" on the TV screen.
- SEARCH MODE button
- Press to display the search menu.
- Number buttons
- Press to enter the title/chapter/track/file numbers.
- OPEN/CLOSE ▲ button
- Press to open or close the disc tray.
- DIMMER button
- Press to adjust the brightness of the front panel display.
Note
- [ZOOM] and [RANDOM] are not available for BD.
ENGLISH
Introduction Introduction
Front Panel Display
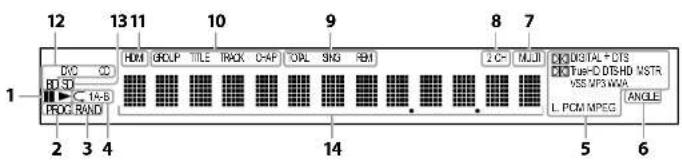
- ▶: Appears when playing back a disc.
II: Appears when playback is paused.
- Appears during program playback
- Appears during random playback.
- Appears during repeat playback.
- These indicate the format being decoded.
• This is not a indication of the recorded format or the format that will be output.
- Appears when playing back a multi angle disc.
- Appears when playing back a multi-channel audio disc.
- Appears when playing back a 2-channel audio disc.
- Indicates the time display mode.
TOTAL : Appears when displaying the total remain/elapsed time of audio CD.
SING : Appears when sound data is being played or sound data is highlighted in program menu.
REM : Appears when displaying remaining time.
- These indicate the type of the different sections of the currently playing disc.
- Appears when HDMI video or audio signals are being output.
Does not appear when HDMI connection is not verified.
- Indicates the type of the currently playing disc.
- Appears when inserting an SD Memory Card.
- Appears various type of information on the disc, the elapsed playing time, etc.
Adjusting the Brightness of the Display
You can adjust the brightness of the display by the pressing [DIMMER] repeatedly. The brightness changes as bright → dimmer → auto each time you press [DIMMER]. If you select auto, the display gets dimmer during playback.
Note
- [DIMMER] is not available when the setup menu is displayed.
Examples of Displays during Operation
| Display | Description |
| POWER-ON | Power on |
| POWER-OFF | Standby mode |
| OPEN | Tray open |
| CLOSE | Tray is closing |
| LOADING | Loading the disc |
| NO DISC | No disc inserted |
| NO SD MEMORY | No SD Memory Card inserted |
| This unit cannot read the disc or SD Memory Card inserted. |
| STOP | Stop mode. |
| 480.P | HDMI output mode(480p) is selected. |
| 720.P | HDMI output mode(720p) is selected. |
| 1080.i | HDMI output mode(1080i) is selected. |
| 1080.P | HDMI output mode(1080p) is selected. |
| 1080.P24 | HDMI output mode(1080p24 frame) is selected. |
| Normal | Pure direct mode is set to pure direct off. |
| Display Off | Pure direct mode is set to front panel display off. |
| Video Off | Pure direct mode is set to video signal off. |
| All Off | Pure direct mode is set to video signal and front panel off. |
| P00 01 | The total number of the track that has been registered for the program playback and track number currently selected. |
| P00 F001-0002 | The total number of the files that has been registered for the program playback and folder/file number currently selected. |
| P00 ROOT-0002 | When the root folder is selected "ROOT" is displayed. |
| ALL CLEAR | "All Clear" for program playback setting is selected. |
Note
- When playing back the disc that contains more than 100 titles, display of the chapter and time on the front panel display will be moved a few dots to the right.
Connections
ENGLISH
Connections
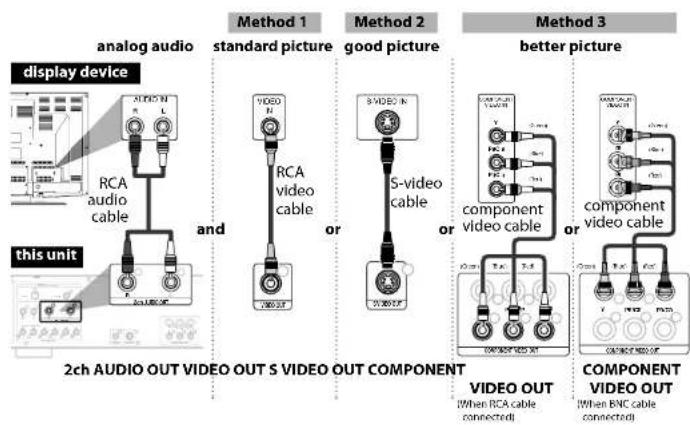
Connecting to a TV
Make one of the following connections, depending on the capabilities of your existing device.
flowchart
graph TD
    A["display device"] --> B["analog audio"]
    B --> C["2ch AUDIO OUT VIDEO OUT S VIDEO OUT COMPONENT"]
    C --> D["method 1 standard picture"]
    D --> E["and"]
    E --> F["video cable"]
    F --> G["8VIDEO R"]
    G --> H["or"]
    H --> I["S-video cable"]
    I --> J["8VIDEO R"]
    J --> K["or"]
    K --> L["component video cable"]
    L --> M["or"]
    M --> N["component video cable"]
    N --> O["8VIDEO OUT"]
    O --> P["VIDEO OUT (When RCA cable connected)"]
    O --> Q["COMPONENT VIDEO OUT (When BNC cable connected)"]
Supplied cables used in this connection are as follows:
• RCA audio cable (L/R) x 1
- RCA video cable x 1
Please purchase the rest of the necessary cables at your local store.
Note
- Connect this unit directly to the TV. If the RCA audio/video cables are connected to a VCR, pictures may be distorted due to the copy protection system.
- If the display device to which the player is to be connected is compatible with progressive scan video, connect to the component video input.
- This unit's COMPONENT VIDEO OUT jacks are compatible for 480i/480p/720p/1080i video resolution. If the connected display device is not compatible for 480p/720p/1080i video resolution, set "Component Output" to "480i". (For playing back BD, 480i video resolution is not available.)
- If the picture is not output properly to the display device because of the "HDMI Video Resolution" or "Component Output" setting, press and hold ▶ on the front panel for more than 5 seconds. The "HDMI Video Resolution" setting will be reset to the default automatically.
- If you are using HDMI connection and set "HDMI Video Resolution" to "1080p" or "1080p24", picture may not be output properly to the display device. In that case, set "HDMI Video Resolution" to "480p", "720p" or "1080l".
Connecting to a Display Device with HDMI Cable
Connecting this unit to device with an HDMI jack using an HDMI cable enables digital transfer of both digital video signals and multi-channel audio signals.
After making the connection, please make HDMI settings on setup menu according to your display device. Refer to page 30-32.
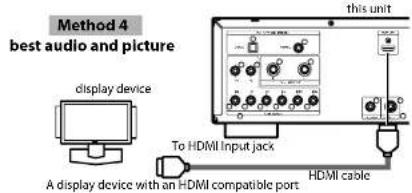
Cables not included.
Please purchase the necessary cables at your local store.
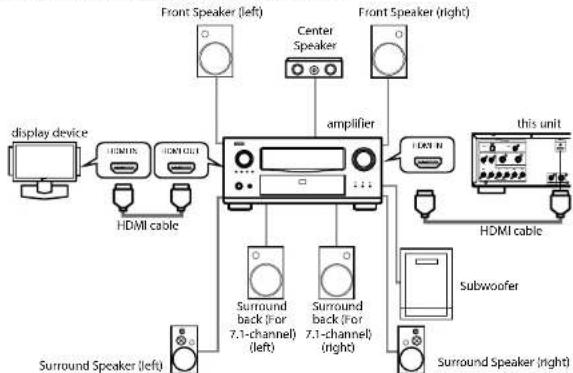
Connecting to a Display Device and an Amplifier/Receiver with HDMI Cable
Connecting this unit to display device and an amplifier/receiver with an HDMI jack using HDMI cables enables digital surround sound with high quality video.
flowchart
graph TD
    A["display device"] --> B["HDMI15"]
    B --> C["HDMI101"]
    C --> D["amplifier"]
    D --> E["Front Speaker (left)"]
    D --> F["Center Speaker"]
    D --> G["Front Speaker (right)"]
    D --> H["Subwoofer"]
    H --> I["HDMI cable"]
    I --> J["Subwoofer"]
    J --> K["Surround Speaker (right)"]
    K --> L["Surround Speaker (left)"]
    L --> M["Surround back (for 7.1-channel) (left)"]
    L --> N["Surround back (for 7.1-channel) (right)"]
    D --> O["Current display unit"]
Cables not included.
Please purchase the necessary cables at your local store.
ENGLISH
Connections Connections
HDMI Output Mode and Actual Output Signals
Press to select the HDMI output mode. HDMI video resolution changes as following.
Front Panel Display HDMI Video Resolution
| 480.P | 480 Progressive |
| Press↓ |
| 720.P | 720 Progressive |
| Press↓ |
| 1080.i | 1080 Interlaced |
| Press↓ |
| 1080.P | 1080 Progressive |
| Press↓ |
| 1080.P24 | 1080 Progressive 24 frame |
| Press↓ |
Note
- You can change the HDMI output mode with during playback as well.
- After you select a HDMI output mode, the supported HDMI video resolution will be output.
- Video and audio signals may be distorted temporarily when switching to/from the HDMI output mode.
- You can also change the HDMI output mode from "HDMI Video Resolution" in the "Video" menu on the setup menu. In this menu, you can confirm what HDMI video resolutions are supported by connected display device. Refer to page 31.
- In order to get natural and high quality film reproduction of 24-frame film material, use HDMI cable (High Speed HDMI cable is recommended) and select "1080p24" if the connected display device is compatible with 1080p24 frame input.
- For BD, with the 1080p24 frame, you can enjoy natural and high quality film production of 24-frame film material. If the connected display device is not compatible for 1080p24 frame, you cannot set "HDMI Video Resolution" to "1080p24".
- Even when "HDMI Video Resolution" is set to "1080p24", if "I/P Direct" is set to "Off" or for playing back DVD, a video resolution supported by the disc and the display device will be output instead of 1080p24 frame.
- There is no output from VIDEO OUT, S VIDEO OUT and COMPONENT VIDEO OUT jacks when you play back a BD that recorded 24-frame film material.
- COMPONENT VIDEO OUT jacks may not output any signals when you set "HDMI Select" to "RGB" or "HDMI Deep Color" to "Auto" during BD playback.
- When both HDMI OUT and COMPONENT VIDEO OUT jacks are connected to display device, and HDMI output is "1080p", the video signal may not be output properly from the COMPONENT VIDEO OUT jacks.
- If you change the HDMI output mode with during BD playback, it may take 2 to 10 seconds to change, and while changing the HDMI output mode, sound and video will be stopped.
- "HDMI Deep Color" is available only when the display device is connected by HDMI cable and supports HDMI Deep Color.
- For "Auto" in "HDMI Deep Color" and for "1080p" or "1080p24" in "HDMI Video Resolution", using the High Speed HDMI cable is recommended.
Audio Setting
When using HDMI connections make the "HDMI Audio Out" settings in the "Audio" menu on the setup menu according to the specifications of the device or monitor to be connected.
| Device to be connected | “HDMI Audio Out” setting | Output HDMI audio signal |
| Device compatible with DTS, DTS-HD, Dolby Digital, Dolby Digital Plus or Dolby TrueHD decoding | HDMI Multi(Normal) Dolby Digital | Dolby Digital Plus, Dolby TrueHD, DTS, or DTS-HD bitstream are output from HDMI OUT. Make the speaker settings on the connected AV amplifier, etc. |
| Device compatible with 3 or more channels of audio inputs (not DTS, DTS-HD, Dolby Digital, Dolby Digital Plus or Dolby TrueHD compatible) | HDMI Multi(LPCM) Multi-channel | audio signals are output from the HDMI terminal. Make the speaker settings with the speaker setting items appear after you select “HDMI Multi(LPCM)”. Refer to page 32. |
| Device compatible with 2-channel audio input or device not compatible with audio input | HDMI 2ch Down-mixed 2-channel | audio signals are output from HDMI OUT. |
| HDMI connection to a display device, and digital audio connection (coaxial/optical) to an AV amplifier. | Audio Mute HDMI audio will be muted, and Dolby Digital/DTS bitstream or LPCM will be output from DIGITAL OUT depending on the “Digital Out” setting. Refer to page 12. |
■Audio signals output from HDMI OUT
| Disc type Audio recording format | "HDMI Audio Out" setting |
| HDMI Multi(Normal) | HDMI Multi(LPCM) | HDMI 2ch |
| BD-video | Dolby Digital | Dolby Digital^*1 | Multi LPCM | 2ch Downmix LPCM |
| Dolby Digital Plus | Dolby Digital Plus^*1 | Multi LPCM | 2ch Downmix LPCM |
| Dolby TrueHD | Dolby TrueHD^*1 | Multi LPCM | 2ch Downmix LPCM |
| DTS | DTS^*1 | Multi LPCM | 2ch Downmix LPCM |
| DTS-HD | DTS-HD^*1 | Multi LPCM | 2ch Downmix LPCM |
| LPCM | Multi LPCM | Multi LPCM | 2ch Downmix LPCM |
| DVD-video | Dolby Digital | Dolby Digital | Multi LPCM | 2ch Downmix LPCM |
| DTS | DTS | Multi LPCM | 2ch Downmix LPCM |
| LPCM | Multi LPCM | Multi LPCM | 2ch Downmix LPCM |
| DivX® | Dolby Digital | Dolby Digital | Multi LPCM | 2ch Downmix LPCM |
| MP3/MP2 | 2ch LPCM | 2ch LPCM | 2ch LPCM |
| audio CD/ MP3/Windows MediaTM Audio | 2ch LPCM | 2ch LPCM | 2ch LPCM |
| DTS-CD | DTS | Multi LPCM | 2ch Downmix LPCM |
* If "BD Audio Mode" is set to "Mix Audio Output" audio will be output as Multi LPCM. Refer to page 23.
ENGLISH
Connections
- If the connected device is not compatible with the HDMI BITSTREAM, audio will be output as Multi LPCM or 2ch Downmix LPCM depending on the capability of the connected device, even if you select "HDMI Multi(Normal)" in "HDMI Audio Out" setting. Refer to page 32.
Copyright protection system
To play back the digital video images of a BD/DVD via an HDMI connection, it is necessary that both the unit and the display device (or an AV amplifier) support a copyright protection system called HDCP (high-bandwidth digital content protection system). HDCP is copy protection technology that comprises data encryption and authentication of the connected AV device. This unit supports HDCP. Please read the operating instructions of your display device (or AV amplifier) for more information.
* HDMI: High-Definition Multimedia Interface
Note
- When using HDCP-incompatible display device, the image will not be viewed properly.
- Among the devices that support HDMI, some devices can control other devices via the HDMI jack, this unit cannot be controlled by another device via the HDMI jack.
- The audio signals from the HDMI Jack (Including the sampling frequency, the number of channels and bit length) maybe limited by the device that is connected.
- Among the monitors that support HDMI, some do not support audio output (e.g., projectors). In connections with device such as this unit, audio signals are not output from the HDMI output jack.
Digital Connection to an AV Amplifier with Built-in Decoder
■Audio signals output from DIGITAL OUT (OPTICAL/COAXIAL)
When both HDMI and DIGITAL OUT is connected to other devices, the audio signals currently output from the HDMI OUT will be output from the DIGITAL OUT jack as well, except that Dolby Digital signal will be output instead of Dolby Digital Plus and Dolby TrueHD, and DTS signal will be output instead of DTS-HD.
When HDMI is not connected or the "Audio Mute" is selected in "HDMI Audio Out" setting, the audio signals output from DIGITAL OUT changes depending on the "Digital Out" setting. Refer to the following table.
To set "Digital Out", press [SETUP], then select "Quick" → "HDMI Audio Out" → "Audio Mute" or "Custom" → "Audio" → "HDMI Audio Out" → "Audio Mute".
Connections
| Disc type Audio recording format "Digital Out" setting |
| | Bitstream LPCM | |
| BD-video | Dolby Digital Dolby Digital | 2ch Downmix LPCM | |
| Dolby Digital Plus Dolby Digital | | 2ch Downmix LPCM*2 |
| Dolby TrueHD Dolby Digital | | 2ch Downmix LPCM*2 |
| DTS | DTS^*1 | 2ch Downmix LPCM |
| DTS-HD | DTS^*1 | 2ch Downmix LPCM*2 |
| LPCM | 2ch Downmix LPCM*1 | 2ch Downmix LPCM |
| DVD-video | Dolby Digital Dolby Digital | 2ch Downmix LPCM | |
| DTS | DTS | 2ch Downmix LPCM |
| LPCM | 2ch Downmix LPCM | 2ch Downmix LPCM |
| DivX® | Dolby Digital Dolby Digital | 2ch Downmix LPCM | |
| MP3/MP2 | 2ch LPCM | 2ch LPCM |
| audio CD/ MP3/Windows MediaTM Audio | 2ch LPCM | 2ch LPCM |
| DTS-CD | DTS | 2ch Downmix LPCM |
^*1 For the BD title with secondary or interactive audio, these audio will be output as Dolby Digital when all the conditions listed below are met;
- When "BD Audio Mode" is set to "Mix Audio Output".
- When "HDMI Audio Out" is set to "Audio Mute".
- When "Digital Out" is set to "Bitstream".
If the BD title does not have secondary or interactive audio, the audio will be output as shown in the table.
*2 In order to output LPCM signal from DIGITAL OUT jack, set "BD Audio Mode" to "Mix Audio Output". (Bitstream signal will be output when "HD Audio Output" is selected.) Refer to page 23 and 32.
- This table applies only when HDMI is not connected or the "Audio Mute" is selected in "HDMI Audio Out" setting.
Note
- In order to output LPCM signal from DIGITAL OUT jack while outputting the HDMI audio signal, set "BD Audio Mode" to "Mix Audio Output" and set "HDMI Audio Out" to "HDMI Multi(LPCM)".
Note for Optical Cable
- Optical cable may be damaged when bent at sharp angles. Ensure cables are coiled in loops with a diameter of 6 inches (15cm) or more when storing them.
- Use a cable which is 9.8 feet (3m) or shorter.
- Insert cable plugs firmly into the jacks when making connections.
- If a plug has dust or is dirty, clean it with a soft cloth before inserting it into a jack.
Cables not included.
Please purchase the necessary cables at your local store.
ENGLISH
Connections Connections
Connection to a Device with 2-channels of Analog Audio Inputs
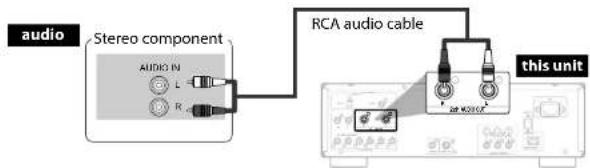
Supplied cables used in this connection are as follows:
• RCA audio cable (L/R) x 1
Note
- When connecting to a 2-channel audio stereo device, use the 2ch AUDIO OUT jacks. If the 7.1ch AUDIO OUT jacks are used, set "7.1ch Audio Out" in the "Audio" menu to "2 Channel" (Refer to page 33). For software recorded in multi-channel, analog signals that have been down-mixed into 2 channels are output. (For sources which are prohibited from down-mixing, only the FL/FR signals are output.)
Surround Connections to a Device with 7.1/5.1-channels of Analog Audio Inputs
Analog 7.1ch/5.1ch audio signals can be output from 7.1ch AUDIO OUT jacks.
flowchart
graph TD
    A["this unit"] --> B["AV amplifier"]
    B --> C["FRONT L R"]
    B --> D["SURROUND L R"]
    B --> E["SURROUND BACK L R"]
    B --> F["CENTER"]
    B --> G["3μF/WOOFER"]
    style A fill:#f9f,stroke:#333
    style B fill:#ccf,stroke:#333
    style C fill:#cfc,stroke:#333
    style D fill:#cfc,stroke:#333
    style E fill:#cfc,stroke:#333
    style F fill:#cfc,stroke:#333
    style G fill:#cfc,stroke:#333
Supplied cables used in this connection are as follows:
• RCA audio cable (L/R) x 1
Please purchase the rest of the necessary cables at your local store.
13
ENGLISH
Note
- If you connect to 5.1-channel surround system, do not connect to SBR/SBL (surround back R/L) jacks, then set "Surround Back" in "Speaker Configuration" to "None".
Connecting the AC cord
After you made all necessary connections, connect the AC cord to the AC IN. Then connect the AC cord to the AC outlet.

Supplied cables used in this connection are as follows:
- AC cord x 1
Note
- Insert the plugs securely. Incomplete connections will result in the generation of noise.
Playback
![[POWER OFF] [POWER ON] [△/▽/] [ENTER]](/content/2026/03/506471/images/9ff0548b178623872870d3eaadd70e629be06e9783047a35712480a3061042e5.jpg)
<>: Buttons on the main unit
[ ] : Buttons on the remote control
Buttons on the main unit and remote control
Turning the Power On
1 Press . The power indicator lights red and the power is set to the standby mode.
2 Press or [POWER ON]. The power indicator lights green and the power turns on.
■Turning the power off
Press or [POWER OFF].
• The power is set to the standby mode.
Press
• The power indicator turns off, and so does the power.
Note
- Power continues to be supplied to some of the circuitry even when the power is in the standby mode. When leaving home for long periods of time or when traveling, either press to turn off the power, or unplug the AC cord from the AC outlet.
Direct Playback
BD-V DVD-V DVD-VR CD
1 Turn on the power of this unit. (Refer to "Turning the Power On" on this page.)
2 Turn on the display device and select the appropriate input on the device to which the unit is connected.
3 Press ▲ to open the disc tray.
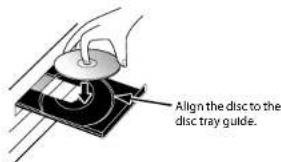
4 Place the disc on the disc tray with its label side facing up.
Press ▲ to close the disc tray.
It may take a while to load the disc.
Some discs may start playback automatically.
Press▶ to start playback.
For many of BD-video and DVD-video, a menu screen may appear.
In this case, use [///] to select the desired item, then press [ENTER].
7 Press ■ once to stop playback temporarily.
Refer to "Resume Playback" on page 16.
To eject the disc:
Press ▲ to open the disc tray, then remove the disc before turning off the unit.
Note
• May appear at the top-right on the screen when the operation is prohibited by the disc or this unit.
- During the playback of 2-layered disc, pictures may stop for a moment. This happens when the 1st layer switches to the 2nd layer. This is not a malfunction.
- The operation may vary when you play back BD/DVD with disc menu. Refer to the manual accompanying the disc for details.
ENGLISH
Playback
ENGLISH
Playback Playback
![[TOP MENU] [POP UP MENU / MENU] [△/▽/◇/◇] [ENTER] II](/content/2026/03/506471/images/25e756f56b724c5d8d5ad94568c12665c32a926f62876e4dc21315b7f9a667dd.jpg)
<>: Buttons on the main unit
[ ] : Buttons on the remote control
Buttons on the main unit and remote control
Operations Using Disc Menu, Title Menu, and Popup Menu
BD-V DVD-V
Many of BD and DVD disc contains Disc menu (DVD), Title menu (BD/DVD) or Pop-up menu (BD-video) which describes the contents of the disc, or a disc menu, which guides you through the available functions in the disc. The contents of the menus may differ depending on the discs.
1) Press [POP UP MENU / MENU].
• The disc menu will appear.
2) Use [///] to select an item, then press [ENTER].
1) Press [TOP MENU].
2) Use [///] to select an item, then press [ENTER].
This is a special feature available for some BD. When you press [POP UP MENU / MENU], a menu pops out on the screen while the contents still play back.
1) During BD playback, press [POP UP MENU / MENU].
2) Use [///] to select an item, then press [ENTER].
Note
- If the feature is not available, may appear on the TV screen.
- Contents of menus and corresponding menu operations may vary among discs. Refer to the manual accompanying the disc for details.
Playing Back a VR mode DVD-RW/-R
DVD-VR
When you are playing back a VR mode DVD-RW/-R, you can choose "Original" or "Playlist" if the disc contains a "Playlist".
1) In stop mode, press [POP UP MENU / MENU] to call up the DVD menu.
2) Use [◀/▶] to select "Original" or "Playlist".
3) Use [/] to select desired title, then press [ENTER].
Note
- "Original" is the title which is actually recorded on the disc.
- Playlist is edited version of the Original.
• DVD menu varies depending on discs.
- If the disc does not contain Playlist, Playlist will not be displayed on the DVD menu.
Pause
1) During playback, press II.
Playback will be paused.
2) Press▶ to return to normal playback.
Note
- For BD, DVD and DivX ^25 , set "Still Mode" to "Field" in the "Video" menu if pictures in the pause mode are blurred (refer to page 31).
Playback Playback
Resume Playback
1) During playback, press ■.
- Resume message will appear on the screen.

2) Press ▶.
In a few seconds, playback will resume from the point at which it stopped last. To cancel the resume playback and start playing back the disc from the beginning, press ■ again while the playback is stopped.
Note
- For MP3, JPEG or Windows Media™ Audio, playback will resume from the beginning of the current file.
- The resume information will be saved even when the power is in standby mode.
- If you open the disc tray or press ■ again in stop mode, the resume information will be cleared.
- If you switch between "Disc" mode and "SD Memory" mode, the resume information will be cleared.
- Resume playback may not be available for the BD that supports Java applications (BD-J).
Fast Forward / Fast Reverse Playback

1) During playback, press ◀◀ or ▶▶ repeatedly to select a desired forward or reverse speed.
flowchart
graph LR
    A["Button"] --> B["Step 1"]
    B --> C["Step 2"]
    C --> D["Step 3"]
    D --> E["Step 4"]
    E --> F["Step 5"]
    F --> G["Step 6"]
    G --> H["Step 7"]
    H --> I["Step 8"]
    I --> J["Step 9"]
    J --> K["Step 10"]
2) Press▶ to return to normal playback.
- For BD and DVD, speed changes in 5 different levels. For audio CD, MP3, Windows Media™ Audio, and DivX ^60 , speed changes in 3 different levels.
- For audio CD, MP3 and Windows Media™ Audio, sound will be output at any speed of fast forward and reverse search.
Note
- For MP3 and Windows Media™ Audio, fast forward/fast reverse search between different files are not available.
- For audio CD, fast forward/fast reverse search between different tracks are not available during the program and random playback.
- For some e ^® files fast forward/fast reverse search may not function.
Slow Forward Playback

1) During playback, press II.
2) Press ▶▶.
- Slow motion playback will begin and sound will be muted.
3) Press▶▶ repeatedly to select a desired speed.
- Slow forward speed changes in 3 different levels.

4) Press▶ to return to normal playback.
Note
- Set "Still Mode" to "Field" in the "Video" menu if pictures in the slow playback mode are blurred (refer to page 31).
- Slow reverse is not available.
ENGLISH
Step by Step Playback

1) During playback, press II.
- Playback will pause and sound will be muted. The disc advances frame by frame each time is pressed.
2) Press▶ to return to normal playback.
Note
- Set "Still Mode" to "Field" in the "Video" menu if pictures in the pause mode are blurred (refer to page 31).
- Only step by step forward is available.
ENGLISH
Playback Playback
![[A-B REPEAT] [REPEAT] [RANDOM] [CLEAR] [△/▽/▽/▽] [ENTER] [RETURN] [MODE] ▶▶▶▶▶▶▶▶▶▶▶▶▶▶▶▶▶▶▶▶▶▶▶▶▶▶▶▶▶▶▶▶▶▶▶▶▶▶▶▶▶▶▶▶▶▶▶▶▶▶▶▶▶▶▶▶▶▶▶▶▶▶▶▶▶▶▶▶▶▶▶▶▶▶▶▶▶▶▶▶▶▶▶▶▶▶▶▶▶▶▶▶▶▶▶▶▶▶▶▶> ■](/content/2026/03/506471/images/f6cd691701a8ff53bf5e8c2599b42ade20ba35065f980209b1c6f4f5eef81039.jpg)
<>: Buttons on the main unit
[ ] : Buttons on the remote control
Buttons on the main unit and remote control
Dialog Speed
BD-V DVD-V DVD-VR
This function plays back approximately at 1.3 times of normal playback while keeping the sound output. This function is available only on discs recorded in the Dolby Digital format.
1) During playback, press [MODE] repeatedly until the dialog speed setting appears.

2) Press [ENTER] or [◀/▶] to switch ⬇ (x1.3), or off.
"Off": Plays back in normal speed.
“♪”: Plays back approximately at 1.3 times of normal playback.
3) Press▶ to return to normal playback.
Note
- Every time you press ■, the setting will be turned "Off".
- Subtitle can be viewed during this function.
• Picture adjustment, and audio language setting cannot be changed during this function.
• Virtual surround does not function during this function.
• This function may not work at some points on a disc.
- During this function, Multi/2ch LPCM will be output from HDMI output, 2ch LPCM will be output from digital audio output, or 2ch analog sound will be output from analog audio out.
Repeat Playback
Available repeat function may vary depending on the discs.
1) During playback, press [REPEAT] repeatedly until desired repeat mode appears on the screen.
The following repeat modes are available.
Repeat mode Available media
| Chapter repeat | |
| The current chapter will be played back repeatedly. | BD-V | DVD-V | DVD-VR |
| Title repeat | |
| The current title will be played back repeatedly. | BD-V | DVD-V | DVD-VR |
| Track repeat | CD | MP3 | WMA |
| The current track or file will be played back repeatedly. | JPEG | DivX® | |
| Group repeat | MP3 | WMA | JPEG |
| The current folder will be played back repeatedly. | DivX® | | |
| All repeat | |
| All titles, tracks or files in the media will be played back repeatedly. | DVD-VR | CD | MP3 |
| WMA | JPEG | DivX® |
A-B Repeat
BD-V DVD-V DVD-VR CD DivX®
Desired section can be played back repeatedly.
1) Press [A-B REPEAT] at the desired starting point A.
2) Press [A-B REPEAT] at the desired ending point B.
• The repeat sequence begins.
3) Press [A-B REPEAT] to exit the sequence.
Playback Playback
Note
- The chapter/title/track/group repeat setting will be cleared when moving to other chapter, title, track/file or folder.
- Repeat playback does not function during A-B repeat playback.
- Repeat chapter/title is not available with some scenes.
- A-B Repeat can only be set within the current title or current track/file.
• A-B Repeat is not available with some scenes.
• To cancel the A point which was set, press [CLEAR].
- A-B Repeat playback does not function during chapter, title, track, group or all repeat playback.
- For some ^90 ILES; A-B Repeat playback may not function.
Program Playback

You can program the disc to play back in your desired order.
1) In stop mode, press [MODE].
The program screen will appear.
2) Use [/] to select a track/file, then press [ENTER].
- For MP3, Windows Media™ Audio, and JPEG, use [△ / ▽] to select a folder, then press [ENTER] first, and then use [△ / ▽] to select a track/file, then press [ENTER].
- Press [CLEAR] to erase the last track/file of the program.
- Select "All Clear" at the bottom of the list to erase all the tracks/files in the program.
- The programmed track/file is displayed in the right hand screen.
- If the entire program cannot be displayed on the screen, "▼" or "▲" appears.
- Use [ / ] to go back forward between the hierarchy of folders.
- If eight or more tracks/files were set in a program, use the ◀◀◀/▶▶ to see all the tracks/files.
3) Press▶ to start program playback.
- Program playback will start.
Note
- During the program playback, press ■ once to set the resume point, and then press ▶ to resume the program playback from where ■ was pressed (audio CD) or from beginning of the file where ■ was pressed (MP3, Windows Media™ Audio, or JPEG).
- During the program playback, press ■ twice to display the program screen. To go back to the normal program playback, press [RETURN] to exit from the program screen, then press
- Your program is still stored until either the disc tray is open or power is turned off.
- Up to 99 tracks/files can be entered.
• To repeat the current track/file in the program, press
[REPEAT] repeatedly until "track" appears during play back. To repeat the entire program press [REPEAT] repeatedly until "##appears during playback.
- Even if an Inserted disc contains mixed MP3, JPEG and Windows Media™ Audio files, program function allows 99 files in combination of MP3, JPEG and Windows Media™ Audio files.
- The current selected number on the front panel display blinks while setting the program playback.
- "F****" is displayed in the front panel display while selecting the folder. (*** is folder number.), and file is displayed as “_****” after the folder indication.
- Playback from a desired track/ file and random playback are not available during program playback.
Random Playback

This function shuffles the play back order of tracks/files.
1) In stop mode, press [RANDOM].
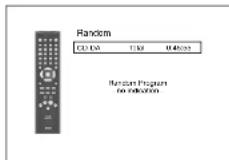
2) Press▶ to start random playback.
Note
- During the random playback, press ■ once to set the resume point, and then press ▶ to resume the random playback from where ■ was pressed (audio CD) or from beginning of the file where ■ was pressed (MP3, Windows Media™ Audio, or JPEG).
- During the random playback, press ■ twice to display the random playback screen. To cancel the random playback, press [RANDOM] when the random playback screen is displayed.
- To repeat the current track/file in the random selection, press [REPEAT] repeatedly until "Track" appears during playback. To repeat the entire random selection press [REPEAT] repeatedly until "Abit" appears during playback.
- You cannot go back to the previous track/file during random playback.
- For a disc containing mixed MP3, JPEG and Windows Media™ Audio files, random playback of those files will be performed
- "RAND" is displayed on the front panel display.
ENGLISH
Playback Playback
natural_image
Front view of a CD-ROM drive with buttons and ports (no visible text or labels)
![[the Number buttons] [ZOOM] [CLEAR] [SEARCH MODE] [△/▽/◄/►] [ENTER] [RETURN] [ANGLE] [DISPLAY] [◀]](/content/2026/03/506471/images/126812669b686a0e57c0de1ad44fc3039b74e8ba62515768b109b4b3564349c7.jpg)
<>: Buttons on the main unit
]: Buttons on the remote control unit
Button name only:
Buttons on the main unit and remote control unit
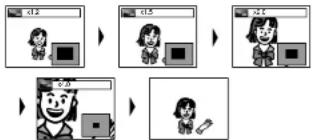
Zoom
DVD-V DVD-VR JPEG DivX®
This function allows you to enlarge the video image and to pan through the zoomed image.
1) Press [ZOOM] during playback.
- Playback will continue.
2) Press [ZOOM] repeatedly to select a desired zoom factor:
x1.2, x1.5, x2.0, x4.0 or off.
- "x4.0" zoom is not available for JPEG and DivX ^® .
flowchart
graph TD
    A["Start"] --> B["Step 1: User Interaction"]
    B --> C["Step 2: Data Input"]
    C --> D["Step 3: User Interface"]
    D --> E["Step 4: Data Collection"]
    E --> F["End"]
3) Use [///] to move the zoomed picture across the screen.
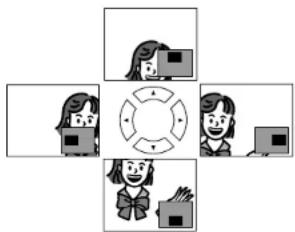
natural_image
Four cartoon-style icons showing people around a central circular device, no text or symbols present
4) Press [ZOOM] to exit zoom mode.
Note
- For BD, zoom function is not available.
- Zoom function does not work while disc menu is shown.
- Navigation screen is not available on JPEG.
- You cannot pan through the zoomed picture on some JPEG files.
- For some DVD, "x4.0" zoom is not available.
- For D files with small image, zoom function is not available.
- For D, depending on the size of the image, some zoom factor may not be available.
Camera Angle
BD-V DVD-V
Some BD and DVD contain scenes which have been shot simultaneously from various angles. You can change the camera angle when appears on the screen.
1) Press [ANGLE] during playback.
- The selected angle will be displayed on the display bar at the top of the screen.
2) Use [ / ] to select your desired angle.
Note
- If the "Angle Icon" setting is "Off" in the "Others" menu, will not appear. Refer to page 37.
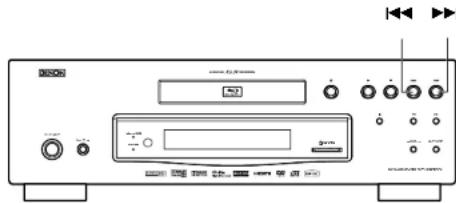
Search
■Using|◄◄/►►|
1) Press▶▶| to skip to the next chapter, track or file during playback.
To go back to the previous chapter, track or file, press twice in quick successions.
Note
- If title contains no chapters, ◀◀/▶▶ changes the title.
■Using [SEARCH MODE]
By using the [SEARCH MODE], you can select following search options.
| Search mode Available media |
| Title / Chapter search | BD-V | DVD-V | DVD-VR |
| Track Search | CD | MP3 | WMA |
| JPEG | DivX ^® | |
| Time Search | BD-V | DVD-V | DVD-VR |
| CD | DivX ^® | |
| Marker Search | BD-V | DVD-V | DVD-VR |
| CD | | |
Playback Playback
1) Select a type of search by pressing [SEARCH MODE].
- Every time you press [SEARCH MODE], type of search changes.
2) Enter the desired chapter, track, file, title number or time
to search for using [the Number buttons].
• Chapter, title, track or time search will start.
e.g.
- For the disc with less than 10 titles, press the title number directly.
- For discs with 10 or more but less than 100 titles, to play back a single-digit title, press [0] first, then the title number (e.g. for title 3, press [0], [3]). To play back a double-digit title, press the title number.
- For discs with 100 or more titles, to play back a single or a double-digit title, press [0] first, then the title number (e.g. for title 3, press [0], [0], [3] and for title 26, press [0], [2], [6]). To play back a triple-digit title, press the title number.
Note
- During program and random playback, search functions are not available except the search using ◀◀/▶▶.
- Time search function is available only in the same track, file or title.
- For some ^® tiles, time search may not function.
- For BD, chapter and time search are available only during playback.
Marker search
This feature allows you to assign a specific point on a title or track to be called back later.
1) During playback, press [SEARCH MODE] repeatedly until marker setting appears.
2) Use [ / ] to select a marker number (1-9).
3) When the disc reaches the point you want to set a marker, press [ENTER].
- The title or track and elapsed playback time will appear on the screen.
4) Press [SEARCH MODE] or [RETURN] to exit.
5) To return to the marker later, call the marker setting by pressing [SEARCH MODE] repeatedly during playback or in stop mode, and use [◀/▶] to choose a desired marker, then press [ENTER].
Note
- Opening the disc tray, turning off the power or selecting "AC" at step 2 and pressing [ENTER] will erase all markers.
- To clear a marker, use [◀/▶] to select the marker number to be cleared and press [CLEAR].
- You can mark up to 9 points.
- For BD-video, marker search between different titles is not available.
- For BD, you can return to the maker only during playback.
On-Screen Display
You can check information about the current disc by pressing [DISPLAY].
To call the On-Screen Display, press [DISPLAY] during playback. Each time you press [DISPLAY], the information changes. Depending on the media, available information varies.
BD-V
OFF → Title/Chapter information → Title information(elapsed time) → Title information(remaining time) → HDMI information → OFF
DVD-V DVD-VR
OFF → Chapter information (elapsed time)
→ Chapter information (remaining time) → Title information (elapsed time) → Title information (remaining time)
→ Bit rate information → HDMI information → OFF
CD
OFF Track information (elapsed time) Track information (remaining time) Disc Information* (elapsed time) Disc Information* (remaining time) HDMI Information OFF (*not available during the program/random playback)
MP3 JPEG
OFF → File name information → File information (elapsed time*)
→ HDMI information → OFF
(*not available for JPEG)
WMA
OFF → File name information → Tag information (title name)
→ Tag information (artist name) → File information (elapsed time)
→ HDMI information → OFF
DivX®
OFF → File name information → File information (elapsed time)
→ File information (remaining time) → HDMI information → OFF
- For audio CD, MP3, Windows Media™ Audio and JPEG, during the program or random playback, the indication will be displayed after the track/file information.
■Chapter information
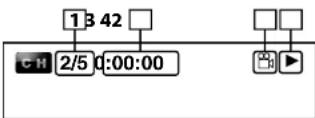
</p>
<p><img alt="" src="images/8060b4886284bc7830daa3806a0c8bcb644d930009c55eef989360a3926f287a.jpg" /></p>
<ol>
<li>Current chapter number/total number of chapters </li>
<li>Elapsed time/remaining time of the current chapter </li>
<li>Indicates that the multi camera angle images are available on the scene </li>
<li>Current playback status </li>
<li>Current title number </li>
<li>Current repeat setting (Only when repeat setting is active)
(C: Chapter repeat, T: Title repeat, AB : A-B repeat)</li>
</ol>
<p>■Title information <br />
<img alt="" src="images/94327097eaf3c4623eb22136f9b2de6212eb4f307b2342c218a102e098c8cc71.jpg" /></p>
<ol>
<li>Current title number/total number of titles </li>
<li>Elapsed time/remaining time of the current title</li>
</ol>
<h1 id="english-11">ENGLISH</h1>
<p>Playback Playback <br />
<img alt="" src="images/b6b81ede1f4e1c6f19d0212211bde884e7512c0fb429e4e55ea915e057147e7b.jpg" /></p>
<details>
<summary>natural_image</summary>
Front view of a CD-ROM electronic device with control knobs and buttons (no visible text or labels)
</details>
<p><img alt="" src="images/1be3fb164afe10782e73589ee53f7ae2a41259a8823435ad3d590846840baa6b.jpg" /></p>
<details>
<summary>text_image</summary>
[TOP MENU]
[△ / ▽ / ◀ / ▶]
[SUBTITLE]
[DISPLAY]
[POP UP MENU / MENU]
[ENTER]
[AUDIO]
</details>
<p>About the button names in this explanation <br />
<>: Buttons on the main unit <br />
[ ] : Buttons on the remote control <br />
Button name only: <br />
Buttons on the main unit and remote control</p>
<p>Bit rate information <br />
<img alt="" src="images/905b4a00991b545cd2c1f2c9e85c654d55facf323a874445d6761ef91b4da66a.jpg" /></p>
<details>
<summary>flowchart</summary>
<pre><code class="language-mermaid">graph LR
A["9"] --> B["A"]
B --> C["B"]
C --> D["L1"]
D --> E["→"]
</code></pre>
</details>
<p><For VR mode DVD-RW/-R></p>
<p><img alt="" src="images/42d91de46fbbc59b942f9e8cf06481254691cc67d68a3ac2ecc89933e5f03758.jpg" /></p>
<details>
<summary>text_image</summary>
11
AORG
</details>
<ol>
<li>Bit rate (the amount of video data currently being read) </li>
<li>Layer number (Only for 2-layered discs) <br />
(L0: Layer 0 is played back. L1: Layer 1 is played back) </li>
<li>Type of title (ORG: original, PL: playlist)</li>
</ol>
<p>Track/File information <br />
<img alt="" src="images/4850a6ac181d0cfb7b391cbb9f75095cd729077c54329e817b19f5004e32d63c.jpg" /></p>
<details>
<summary>text_image</summary>
12
13
14
15
T R 2/5 0:00:00 SD T ▶
</details>
<ol>
<li>Current track (file) number/total number of track (file) </li>
<li>Elapsed time/remaining time of the current track (file) </li>
<li>Indication of SD Memory Card playback </li>
<li>Current repeat setting (Only when repeat setting is active) <br />
(T: Track/file repeat, G: Group repeat, A: All repeat)</li>
</ol>
<p>■Disc information <br />
<img alt="" src="images/f98fef735262dd3f7f3a195449774ad6d305b258bf5ed265635f0f92c50d2def.jpg" /><br />
16. Current track number/Total number of tracks <br />
17. Elapsed time/remaining time of the current disc</p>
<p>21</p>
<p>ENGLISH</p>
<p>■File name information <br />
<img alt="" src="images/d74fa92fc7a6c44460c51f7ff55fdd585f28dd45d400e413a06f3f001fc15d79.jpg" /><br />
18. Media icon and File name <br />
: MP3 file : Windows Media™ Audio file <br />
: JPEG file : DivX® file</p>
<p>Tag information <br />
<img alt="" src="images/a5a53efa7548005c044555970d4135edfd03a21fa5612bbbba489b6f35d11139.jpg" /></p>
<details>
<summary>flowchart</summary>
<pre><code class="language-mermaid">graph TD
A["19"] --> B["TITLE"]
C["20"] --> D["ARTIST NAME"]
style A fill:#f9f,stroke:#333
style B fill:#ccf,stroke:#333
style C fill:#cfc,stroke:#333
style D fill:#fcc,stroke:#333
</code></pre>
</details>
<ol>
<li>Title name based on tag information of current Windows Media™ Audio file </li>
<li>Artist name based on tag information of current Windows Media™ Audio file</li>
</ol>
<p>HDMI information <br />
<img alt="" src="images/5b0257543595375bf07d180ca04e22135c2a6bc982f55452754eddc82dc85d9e.jpg" /></p>
<details>
<summary>text_image</summary>
Video Info. : YCbCr / 10801
Audio Info. : Dolby Digital
Max Channel : 6ch
</details>
<p>Playback Playback</p>
<ol>
<li>HDMI video format </li>
<li>Resolution of the HDMI output image </li>
<li>HDMI audio format </li>
<li>Maximum numbers of audio channels that can be accepted by the connected device</li>
</ol>
<h1 id="note-32">Note</h1>
<p>- If HDMI is not connected, “---” will be displayed for HDMI information.</p>
<h1 id="selecting-the-format-of-audio-and-video">Selecting the Format of Audio and Video</h1>
<h1 id="selecting-audio-streamschannels">Selecting Audio Streams/Channels</h1>
<h1 id="bd-v-dvd-v-dvd-vr-cd-divx-2">BD-V DVD-V DVD-VR CD DivX®</h1>
<p>Some BD and DVD contain multiple audio streams. Those are often in different audio languages or audio formats. For BD available audio varies depending on the "BD Audio Mode" setting. Refer to page 23 for more information.</p>
<h1 id="bd-v-2">BD-V</h1>
<p>1) During playback, press [AUDIO].</p>
<p>2) Use [/] to select "Primary" or "Secondary" audio to set, then press [ENTER].</p>
<table><tr><td colspan="5">Primary</td></tr><tr><td>1</td><td>ENG</td><td>Dolby D</td><td>Multi-ch</td><td>/3</td></tr><tr><td colspan="5">Secondary</td></tr><tr><td>2</td><td>ENG</td><td>Dolby D +</td><td>Multi-ch</td><td>/3</td></tr></table>
<p>"Primary": Sets the audio for the main picture. <br />
"Secondary": Sets the audio for the sub-picture. When sub-picture is on, the "Secondary" audio will be output with the sub-picture. <br />
- In order to listen to the secondary audio, the "BD Audio Mode" must be set to "Mix Audio Output". Refer to page 23. <br />
3) Use [/] to select your desire audio stream/channel.
4) Press [AUDIO] to exit.</p>
<h1 id="dvd-v-dvd-vr-cd-divx">DVD-V DVD-VR CD DivX®</h1>
<p>1) During playback, press [AUDIO].</p>
<p>2) Use [/] to select your desired audio stream/channel.</p>
<p><img alt="" src="images/41e7f39c94f6e0491f42aa93a910553f2e37ef7e9dd416a78d9b0c58e007aeae.jpg" /></p>
<p>- For audio CD, you can select following options.</p>
<p>"Stereo": Both right and left channels are active (stereo)</p>
<p>"L-ch": Only left channel is active</p>
<p>"R-ch": Only right channel is active</p>
<p>3) Press [AUDIO] to exit.</p>
<h1 id="note-33">Note</h1>
<ul>
<li>For VR mode DVD-RW/-R with MTS (Multi-channel Television Sound) system, you can switch between "1.Main" (main audio), "1. Sub" (sub audio), and "1.Main/Sub" (main and sub audio). </li>
<li>For some BD, secondary audio will be output even when sub-picture is off. </li>
<li>The sound mode cannot be changed during playback of discs not recorded in multiple sound. </li>
<li>Some discs allow to change audio language setting on the disc menu. (Operation varies between discs. Refer to the manual accompanying the disc.) </li>
<li>Pressing [AUDIO] may not work on some discs with multiple audio Streams/Channels (e.g. DVD which allow to change audio setting on the disc menu). </li>
<li>If you choose a language that has a 3-letter-language code, the code will be displayed every time you change the Audio Language setting. If you choose any other Languages, "—" will be displayed instead (refer to page 39). </li>
<li>Audio Language selection cannot be made during dialog speed (refer to page 17). </li>
<li>If the disc has no audio language, "Not Available" will be displayed. </li>
<li>For discs with DivX ^ files, only MP3, MP2 or Dolby Digital audio is displayed. Other audio will be displayed with “---”. </li>
<li>For DTS-CD(5.1 music disc), selecting audio streams or channels is not available.</li>
</ul>
<h1 id="selecting-subtitle-language">Selecting Subtitle Language</h1>
<h1 id="bd-v-dvd-v-divx">BD-V DVD-V DivX®</h1>
<p>BD, DVD-video and DivX ^® may have subtitles in 1 or more languages. Available subtitle languages can be found on the disc case. You can switch subtitle languages anytime during playback.</p>
<h1 id="bd-v-3">BD-V</h1>
<p>1) During playback, press [SUBTITLE].</p>
<p>2) Use [/] to select "Primary Subtitle", "Secondary Subtitle" or "Subtitle Style", then press [ENTER].</p>
<p><img alt="" src="images/4931da5984e8315c68858be42de6d386cbc46aaaa3ddba2c05214070d83492a7.jpg" /></p>
<p>"Primary Subtitle": Sets the subtitle for the main picture. <br />
"Secondary Subtitle": Sets the subtitle for the sub-picture. <br />
"Subtitle Style": Sets style of the subtitle. <br />
3) Use [△ / ∇] to select your desired subtitle. <br />
4) Press [SUBTITLE] to exit.</p>
<h1 id="dvd-v-divx">DVD-V DivX®</h1>
<p>1) During playback, press [SUBTITLE].</p>
<p>2) Use [ / ] to select your desired subtitle.</p>
<p><img alt="" src="images/ca11738b2f5b98aea5be64e47846a3a4504cd3d68d65f4fb4199ea3d6aefbbf8.jpg" /></p>
<p>3) Press [SUBTITLE] to exit.</p>
<h1 id="note-34">Note</h1>
<p>• Some discs will only allow you to change the subtitle from <br />
the disc menu. Press [TOP MENU] or [POP UP MENU] <br />
MENU] to display the disc menu. <br />
- If 4 digit language code appears in the subtitle menu, refer to "Language Code" on page 39. <br />
- If the disc has no subtitle language or subtitle style, "Not Available" will be displayed. <br />
- For DivX ^ , the screen only displays the number of subtitle languages.</p>
<p>ENGLISH</p>
<h1 id="english-12">ENGLISH</h1>
<p>Playback Playback <br />
<img alt="" src="images/c0598bb2ce454adddfef924fc80ac6726c456a7c294693e3cb24c814b67eae9a.jpg" /></p>
<details>
<summary>text_image</summary>
CD-ROM
502
6-
</details>
<p><img alt="" src="images/cb74cff266e2eaaf974ef6f185a7e754dcd80d5cda63c1fbcdc21c85737c93c1.jpg" /></p>
<details>
<summary>text_image</summary>
[Δ/▽/◇/◇]
[PURE DIRECT]
[MODE]
[ENTER]
[RETURN]
</details>
<h1 id="about-the-button-names-in-this-explanation-5">About the button names in this explanation</h1>
<p><>: Buttons on the main unit</p>
<p>]: Buttons on the remote control</p>
<h1 id="button-name-only-4">Button name only:</h1>
<p>Buttons on the main unit and remote control</p>
<h1 id="virtual-surround">Virtual Surround</h1>
<h1 id="bd-v-dvd-v-dvd-vr-2">BD-V DVD-V DVD-VR</h1>
<p>You can enjoy stereo phonic virtual space through your existing 2-channel stereo system.</p>
<p>1) In stop mode, press [MODE] repeatedly until the virtual surround setting appears.</p>
<p><img alt="" src="images/9769e1866c93d89f5b7fd1d45972cfc9c2e9818bc3861a4bb44f9944d5df39f2.jpg" /></p>
<p><img alt="" src="images/86cf08e0815efd77a99cb22ff87a0e8b7f83d4fcd10c9b0a6375a7ea579378d9.jpg" /></p>
<p>2) Use [/] to select "1" (Natural effect), "2" (Emphasized effect) or "Off".</p>
<p>3) Press [RETURN] to exit.</p>
<h1 id="note-35">Note</h1>
<ul>
<li>Select virtual surround "Off" or lower the volume if the sound is distorted. </li>
<li>This function cannot be used during dialog speed (refer to page 17). </li>
<li>For the virtual surround, audio signal will always be 2-channel LPCM.</li>
</ul>
<h1 id="pure-direct-mode">Pure Direct Mode</h1>
<p>BD-V DVD-V DVD-VR CD MP3 WMA</p>
<h1 id="divx-2">DivX®</h1>
<p>Use this function to shut down unused circuitry to achieve high quality analog sound.</p>
<p>1) Press [PURE DIRECT] repeatedly to select your desired pure direct mode.</p>
<p>- Each time you press [PURE DIRECT], the pure direct mode changes as "Normal" "Video Off" "Display Off" "All Off" "Normal". The modes will be displayed on the front panel display.</p>
<h1 id="video-audio-outputs-for-each-mode">Video / audio outputs for each mode</h1>
<p>"Normal": Normal playback mode (pure direct mode is off). <br />
"Video Off": Video signal will not be output. <br />
"Display Off": Circuitry for front panel display and indicators will be shut down. <br />
"All Off": Video signal will not be output and circuitry for front panel display and indicators will be shut down.</p>
<h1 id="note-36">Note</h1>
<p>- If you turn off the unit or put this unit to standby mode, the pure direct mode will go back to "Normal".</p>
<h1 id="setting-the-bd-audio-mode">Setting the BD Audio Mode</h1>
<h1 id="bd-v-4">BD-V</h1>
<p>BD audio mode is to choose between two ways; you could output the secondary and interactive audio accompanied by the primary audio or you could output the primary audio only. Depending on the setting of the mode, Dolby Digital, DTS, Dolby Digital Plus, Dolby TrueHD, or DTS-HD output changes between Multi LPCM and bitstream.</p>
<p>1) In stop mode with BD inserted, press [MODE].</p>
<p>2) Use [ / ] to select desired setting.</p>
<h1 id="mix-audio-output">■"Mix Audio Output"</h1>
<p>If it is available, BD video's secondary and interactive audio will be output with the primary audio.</p>
<p>- The secondary audio is the audio for the sub picture (Director's comment etc.) and the interactive audio is the audio for the interactive application (Button click sounds etc.).</p>
<h1 id="hd-audio-output">■"HD Audio Output"</h1>
<p>Only the primary audio will be output. Set this mode in order to output Dolby Digital, Dolby Digital Plus, Dolby TrueHD, DTS or DTS-HD sound of BD through HDMI connection.</p>
<h1 id="3-press-return-to-exit">3) Press [RETURN] to exit.</h1>
<p>- You can also set "BD Audio Mode" from the setup menu. Refer to page 32.</p>
<h1 id="note-37">Note</h1>
<ul>
<li>In "Mix Audio Output" mode, even you set "HDMI Multi(Normal)" in "HDMI Audio Out" setting, multi LPCM will be output from HDMI OUT for BD audio. Refer to page 11. </li>
<li>In "Mix Audio Output" mode with HDMI audio being output, 2-channel downmix LPCM will be output from DIGITAL OUT for BD audio. </li>
<li>In "Mix Audio Output" mode with "HDMI Audio Out" set to "Audio Mute" and "Digital Out" set to "Bitstream", DTS, DTS-HD and LPCM will be output as Dolby Digital for BD audio. Refer to page 12. </li>
<li>In "Mix Audio Output" mode, from 7.1ch AUDIO OUT, Dolby Digital Plus, Dolby TrueHD and DTS-HD will be output as multi LPCM decoded from its corresponding core stream.</li>
</ul>
<h1 id="playback-playback-4">Playback Playback</h1>
<h1 id="adjusting-the-picture">Adjusting the Picture</h1>
<h1 id="bd-v-dvd-v-dvd-vr-divx">BD-V DVD-V DVD-VR DivX®</h1>
<p>You can adjust the picture quality and store the setting you have adjusted on memory 1-5.</p>
<h1 id="1-during-playback-press-mode-repeatedly-until-the-picture-adjustment-menu-appears">1) During playback, press [MODE] repeatedly until the picture adjustment menu appears.</h1>
<p>• Picture adjustment menu:</p>
<p><img alt="" src="images/57b236e5a18fbf4b5009d1e1d5793824467a124674c32aec91002ef815d9fe37.jpg" /></p>
<p>Memory 1</p>
<p>2) Use [/] to select a memory from "Memory 1" to "Memory 5" to store your setting, then press [ENTER]. <br />
3) Use [/] to select a item to be adjusted, then use [/] to adjust the setting.</p>
<p><img alt="" src="images/666cffa8105da1e38eee223da46314ee4de233573265de3f15f9a1e9b2f53573.jpg" /></p>
<p>- To reset to the default setting, press [RETURN], use [ / ] to select "STD", then press [ENTER].</p>
<h1 id="gamma-correction">■Gamma correction</h1>
<p>- To adjust "Gamma Correction", after selecting the item at step 3, press [ENTER], then use [ / / < / I >] to adjust the setting.
- In the graph of gamma correction, the horizontal axis indicates the brightness level of the image that is recorded on the disc, and the vertical axis indicates the brightness level of the image when it is output from this unit.</p>
<p><img alt="" src="images/d0c7a07c6550f0f14a44b6aab5603d99a635d9137f5ba112ecb18b0de9442dfd.jpg" /></p>
<details>
<summary>line</summary>
| x | y |
| ---- | ---- |
| 0 | 0 |
| 255 | 255 |
</details>
<p>- When bright points of the disc side are adjusted to the "dark" of the output side, the fine parts of the bright portion that normally become hard to see, become an easily discerned image.</p>
<p><img alt="" src="images/8a960a3f9250b441a80bf50c225435046b17cad1ed2e9e738d324d2d9bc46803.jpg" /></p>
<details>
<summary>line</summary>
PICT Memory 1 5 Gamma Correction
| X | Y |
|---|---|
| 0 | 0 |
| 255 | 255 |
GO: 0.24
</details>
<p>- When dark points of the disc side are adjusted to the "bright" of the output side, the fine parts of the dark portion that normally become hard to see, become an easily discerned image.</p>
<h1 id="4-press-return-repeatedly-to-exit">4) Press [RETURN] repeatedly to exit.</h1>
<h1 id="note-38">Note</h1>
<ul>
<li>This setting is not effective for the picture output from VIDEO OUT and S VIDEO OUT jack. <br />
• The setting remains even you turn off the unit. </li>
<li>You cannot adjust the setting during the rapid playback, or when the pure direct is set to "Video Off" or "All Off". </li>
<li>DNR can also be adjusted by pressing <VIDEO NOISE REDUCTION> on the front panel. (refer to page 7.)</li>
</ul>
<p>List of picture adjustment item/values </p>
<table><tr><td colspan="2">Item Description Adjustment range (default)</td><td></td></tr><tr><td>1. Contrast</td><td>Adjusts the difference between the bright and dark parts of the picture.</td><td>-6 to +6 (0)</td></tr><tr><td colspan="2">2. Brightness Adjusts the brightness of the picture. 0 to +12 (0)</td><td></td></tr><tr><td>3. Enhancer*1</td><td>Strengthens the contours of the picture.</td><td>0 to +11 (0)</td></tr><tr><td>4. DNR*1</td><td>Reduces the overall level of noise on the picture.</td><td>Off to +3 (Off)</td></tr><tr><td>5. Gamma Correction</td><td>Detailed adjustment of the picture's brightness.</td><td>16 to 235 (G0=24/G1=32/G2=48/G3=64/ G4=80/G5=96/ G6=128/G7=160/ G8=192/G9=224)</td></tr><tr><td>6. Sharpness Mid*2</td><td>Adjusts the sharpness of the picture for the medium frequency range.</td><td>-6 to +6 (0)</td></tr><tr><td>7. Sharpness High*1</td><td>Adjusts the sharpness of the picture for the high frequency range.</td><td>-6 to +6 (0)</td></tr><tr><td>8. Hue*1</td><td>Adjusts the balance between the green and red.</td><td>-6 to +6 (0)</td></tr><tr><td>9. White Level</td><td>Adjusts the white level.</td><td>-5 to +5 (0)</td></tr><tr><td>10.Black Level*1</td><td>Adjusts the black level.</td><td>-5 to +5 (0)</td></tr><tr><td>11.Chroma Level</td><td>Adjusts the density of the colors.</td><td>-6 to +6 (0)</td></tr><tr><td>12.Setup Level</td><td>Makes the black parts of the pictures brighter.</td><td>0 IRE : Shows the original picture as recorded.7.5 IRE : Makes the dark parts brighter.(7.5 IRE)</td></tr><tr><td>13.H_Position Control*1</td><td>Adjusts the left/right position.</td><td>-7 to +7 (0)</td></tr><tr><td>14.V_Position Control*1</td><td>Adjusts the top/bottom position.</td><td>-7 to +7 (0)</td></tr></table>
<p>* Effective for the video signal of COMPONENT VIDEO OUT (except for 480i) and HDMI OUT jacks. <br />
^x2 Not effective for the video signal of HDMI OUT jack.</p>
<p>ENGLISH</p>
<h1 id="english-13">ENGLISH</h1>
<p>Playback Playback <br />
<img alt="" src="images/7c9d25089b5e3a8d1d879ab265b0e2cab311f908f4b4ab65a17aad6c437019e0.jpg" /></p>
<details>
<summary>natural_image</summary>
Front view of a CD-ROM drive with buttons and ports (no visible text or labels)
</details>
<p><img alt="" src="images/8568e3403b2510833db07f86e3bc1dca223b693ea06d2a79ca9e0b526162268c.jpg" /></p>
<details>
<summary>text_image</summary>
[TOP MENU]
[POP UP MENU / MENU]
[△/▽/▽/▽]
[ENTER]
SONCH
EN 1024
</details>
<h1 id="about-the-button-names-in-this-explanation-6">About the button names in this explanation</h1>
<p><>: Buttons on the main unit</p>
<p>| | : Buttons on the remote control</p>
<h1 id="button-name-only-5">Button name only:</h1>
<p>Buttons on the main unit and remote control</p>
<h1 id="playing-back-an-mp3-windows-media-audio-jpeg-and-divx-file">Playing Back an MP3, Windows Media™ Audio, JPEG and DivX® File</h1>
<h1 id="mp3-wma-jpeg-divx">MP3 WMA JPEG DivX®</h1>
<p>1 Insert a DVD-RW/-R or CD-RW/-R with MP3, Windows Media™ Audio, JPEG, DivX® files.</p>
<p>• The file list will appear on the screen.</p>
<p>- If file list does not appear automatically, press</p>
<p>[POP UP MENU / MENU]</p>
<p>- Press [POP UP MENU / MENU] to exit and resume</p>
<p>the file list.</p>
<p>2 Use [△/▽] to select a desired folder or file, then press [ENTER]. Use [◀/▷] to go back and forward between the hierarchies.</p>
<p>- If you press [ENTER] on the files playback will start.</p>
<p><img alt="" src="images/4e4d83c8bd15eda9481e42093b7f0bce7a3f77fd014f883c07f8d38e356648cf.jpg" /></p>
<details>
<summary>flowchart</summary>
<pre><code class="language-mermaid">graph TD
A["1"] --> B["2"]
B --> C["3"]
C --> D["4"]
D --> E["5"]
style A fill:#f9f,stroke:#333
style B fill:#ccf,stroke:#333
style C fill:#cfc,stroke:#333
style D fill:#fcc,stroke:#333
style E fill:#ffc,stroke:#333
</code></pre>
</details>
<ol>
<li>
<p>Current folder name (Disc or SD Memory Card name will be displayed for the top of the hierarchies.)</p>
</li>
<li>
<p>List of the file/folder names in the current folder/disc</p>
</li>
<li>
<p>Selected file/folder name</p>
</li>
<li>
<p>Current page / total page number</p>
</li>
<li>
<p>Indication of previous/next page</p>
</li>
</ol>
<p>- Use ◀◀/▶▶ to go back and forward between the pages.</p>
<p>- Press [TOP MENU] to return to the first item.</p>
<h1 id="icons">Icons:</h1>
<p>: Folders</p>
<p>: MP3 files</p>
<p>: Windows Media™ Audio files</p>
<p>: JPEG files</p>
<p>: DivX® files</p>
<p>It is recommended that files to be played back in this unit are recorded under the following specifications:</p>
<p><MP3 / Windows Media™ Audio></p>
<p>• Sampling frequency : 44.1 kHz or 48 kHz</p>
<p>- Constant bit rate : 112 kbps - 320 kbps (MP3), 48 kbps - 192 kbps (Windows Media™ Audio)</p>
<h1 id="jpeg"><JPEG></h1>
<p>• Upper limit : 2,560 x 1,900 dots</p>
<p>(sub sampling is 4:4:4)</p>
<p>5,120 x 3,840 dots</p>
<p>(sub sampling is up to 4:2:2)</p>
<p>- Lower limit : 32 x 32 dots</p>
<p>- File size of image maximum : 12 MB</p>
<h1 id="divx-0"><DivX ^0 ></h1>
<p>Official DivX® Certified product</p>
<p>- Playable codec of AVI files : DivX ^35 3.x, DivX ^36 4.x, DivX ^37 5.x, DivX ^38 6.0</p>
<p>• Maximum size of image : 720 x 480 @30 fps, 720 x 576 @25 fps</p>
<p>• Sampling frequency of audio : 8 kHz - 48 kHz</p>
<p>• Audio type : MPEG1 audio layer 3 (MP3), MPEG1 audio layer 2, Dolby Digital</p>
<h1 id="note-39">Note</h1>
<ul>
<li>The system can recognize up to 255 folders/999 files for CD, 999 folders/9999 files for DVD and SD Memory Card. </li>
<li>The name of folder and file can be displayed up to 28 characters. Unrecognizable characters will be replaced with asterisks. <br />
• The 9th and deeper hierarchies cannot be displayed for CD and the 10th and deeper hierarchies cannot be displayed for DVD and SD Memory Card. </li>
<li>Files whose extension is other than ".mp3(MP3)" ".wma(Windows Media™ Audio)", ".jpg / .jpeg(JPEG)" or ".avi/.divx" will not be listed. </li>
<li>Some unplayable folders or files may be listed due to the recording status. </li>
<li>High-resolution JPEG files take longer to be displayed.</li>
<li>Progressive JPEG files (JPEG files saved in progressive format) cannot be played back on this unit. </li>
<li>This unit recognize up to 8 characters of file name in the SD Memory Card. Characters after 9th will not be displayed.</li>
</ul>
<h1 id="playback-playback-5">Playback Playback</h1>
<h1 id="to-play-back-the-divx-subtitle-created-by-the-user">To Play Back the DivX ^® Subtitle Created by the User.</h1>
<p>The subtitle created by the user can be displayed during DivX ^® playback.</p>
<p>1) After selecting the DivX ^® file, the "Subtitle List" will appear when "DivX Subtitle" is set to anything other than "Off". (Refer to page 30.) <br />
2) Use [/] to select the desired extension of the subtitle file you want to display, then press [ENTER].</p>
<p><img alt="" src="images/e26b1412af330db52b1f33373f0f707cfdf377ccb39e6ffc6f7e8e3a4cbd758c.jpg" /></p>
<p>DivX ^® with the subtitle starts playback. The subtitle cannot be displayed when the setting is "Off".</p>
<p>- If there is more than one extension, the extension selection appears in the subtitle list.</p>
<p>- If you insert a DVD-RW/-R, CD-RW/-R with DivX® files that are mixed with MP3/Windows Media™ Audio/JPEG files, the playback media selection screen will be displayed. Use [△ / ▽] to select your desired media to play back then press [ENTER].</p>
<p><img alt="" src="images/5b5a3707af9cf153a7c3d94ff452381a70417bee0842d6e3a0e27e4832c65f6f.jpg" /></p>
<p>- Press [TOP MENU] to call up the playback media selection screen in stop mode.</p>
<p>Hint for the purchased or rental official DivX® Certified product</p>
<p>- When you purchased or rented a DivX ^® file through the official site of DivX ^® video which is called DivX ^® Video-On-Demand (VOD) services, a registration code is required every time you get the new file from the DivX ^® VOD services. Refer to "DivX(R) VOD" on page 37.</p>
<ul>
<li>Some DivX ^® VOD files are restricted with the limited playable times (you cannot play them back beyond the limit). If your DivX ^® VOD file has such limit, the playback confirmation screen will appear. </li>
<li>Use [◀/▶] to select "Yes" if you want to play back the file, or to select "No" if you do not wish to play it back. Then, press [ENTER] to confirm the selection. </li>
<li>You cannot play back the DivX ^45 VOD files, of which rental period has been expired. In such case, press [POP UP MENU / MENU] and select other files that can be played back. </li>
<li>You cannot play back the DivX® VOD files obtained with different registration codes on this unit. Press [POP UP MENU / MENU] and select other files that can be played back. </li>
<li>You cannot playback the DivX ^ file that has the resolution which this unit does not support. This unit does not support the DivX ^ files that have the image size that exceeds 720 x 480 @ 30fps or 720 x 576 @ 25fps.</li>
</ul>
<p><img alt="" src="images/4dc38b5bfd935212b1d169aa86822055ed156fc67e9fdd593d6497abc1280513.jpg" /></p>
<p><img alt="" src="images/7694a9f75a8e635d09e70c37a9035c31349eaf8de173f742b014ee2aa285017d.jpg" /></p>
<p><img alt="" src="images/c6bb927c76f31298190a571af876320c81c812c080ad4fad4d7d243f5d0dc51e.jpg" /></p>
<p><img alt="" src="images/d11cb8b8fe655c47d4b95124c6488596dea80d7ba636ad7f21cf7c9532119c00.jpg" /></p>
<p>ENGLISH</p>
<h1 id="what-is-divx">What is DivX®?</h1>
<ul>
<li>D i √ ^15 % a codec (compression/decompression) that can compress images to a very small amount of data. The software can compress video data from almost any devices to the size that can be sent on the Internet without compromising visual quality of the images. </li>
<li>A file with an extension of ".avi" and ".divx" is called an DivX ^16 file. All files with the DivX ^8 extension are recognized as MPEG4. </li>
<li>For more information for DivX ^® , please visit http://www.divx.com.</li>
</ul>
<h1 id="note-for-divx">Note for DivX ^®</h1>
<ul>
<li>Even if the file has an extension of either ".avi" and ".divx", this unit cannot play it back if it is recorded in the format other than DivX ^8 . </li>
<li>It may take a while for audio and images to be output after you inserted a disc and pressed ▶. </li>
<li>When playing back the files recorded in high bit rates, the images can be interrupted in some occasions. </li>
<li>Although DivX ^® logo has been obtained for this unit, it may not be able to play back some data, depending on the characteristics, bit rates, or audio format settings, etc. <br />
• A D i v fNe whose file size exceeds 2 GB cannot be played back. </li>
<li>If a large-sized DivX ^® file is selected, it may take awhile to start the playback (over 20 seconds sometimes). </li>
<li>If you try to playback the DivX ^® file that has the screen resolution which this unit does not support, the playback will be stopped and error message will appear. </li>
<li>Some D ^if k cannot be played back on this unit due to the configuration and characteristics of the disc, or due to the condition of recording and authoring software. </li>
<li>Multi-session burn DivX ^ DVD cannot be played back on this unit.</li>
</ul>
<h1 id="note-for-divx-subtitle">Note for DivX® Subtitle</h1>
<p>• To utilize this function, the following conditions must meet. <br />
- "DivX Subtitle" must be activated in "Language" setting. (Refer to "DivX Subtitle" on page 30.) <br />
- Playback file and the subtitle file must have the same name. <br />
- Playback file and the subtitle file must locate in the same folder.
- Only the subtitle files with the following extensions are supported; .smi (.SMI), .srt (.SRT), .sub (.SUB), .ass (.ASS), .ssa (.SSA), .txt (.TXT). (.sub (.SUB) and .txt (.TXT) files may not be recognized.) <br />
- The subtitles that exceeds the playback time of the DivX ^® file will not be displayed.</p>
<p>Playback Playback <br />
<img alt="" src="images/33b0dc733d3638da9662a5af8b8143c2174c398445c3e0fe27912fbafd468a81.jpg" /></p>
<details>
<summary>text_image</summary>
CD-ROM
+01
-
-
-
-
-
-
-
-
-
-
-
-
-
-
-
-
-
-
-
-
-
-
-
-
-
-
-
-
-
-
-
-
-
-
-
-
-
-
-
-
-
-
-
-
-
-
-
-
-
-
-
-
-
-
-
-
-
-
-
-
-
-
-
-
-
-
-
-
-
-
-
-
-
-
-
-
-
-
-
-
-
-
-
-
-
-
-
-
</details>
<p><img alt="" src="images/7d74a285dc373de3cd8518ae40fda01c2214ca1c02448335e34450a66880e581.jpg" /></p>
<details>
<summary>text_image</summary>
[POP UP MENU / MENU]
[△/▽/▽/▽]
[ENTER]
[SETUP]
[ANGLE]
[MODE]
</details>
<p>About the button names in this explanation</p>
<p><>: Buttons on the main unit</p>
<p>[ ] : Buttons on the remote control</p>
<p>Button name only:</p>
<p>Buttons on the main unit and remote control</p>
<h1 id="kodak-picture-cd">Kodak Picture CD</h1>
<h1 id="jpeg-2">JPEG</h1>
<p>This unit can also run JPEG files stored on Kodak Picture CD. You can enjoy picture images on the display device set by playing back the Picture CD. This unit confirms to ver.7.0 of Kodak Picture CD. For details of Kodak Picture CD, contact a shop that provides developing service of Kodak Inc.</p>
<h1 id="1-when-kodak-picture-cd-is-inserted-in-this-unit-kodak-picture-cd-menu-appear-automatically-on-the-screen">1 When Kodak Picture CD is inserted in this unit, Kodak Picture CD menu appear automatically on the screen.</h1>
<p><img alt="" src="images/fa94bf4bcf4847e3ea05f64dc2483edf5c742f18d20d408ad7646f619855dfa4.jpg" /></p>
<details>
<summary>text_image</summary>
Picture1
Picture2
Picture3
Picture4
Picture5
Picture6
5/32
2
1
2
</details>
<h1 id="1-current-track-numberthe-total-number-of-tracks">1. Current track number/the total number of tracks</h1>
<ol>
<li>Indication of previous/next page</li>
</ol>
<p>- In stop mode, press [POP UP MENU / MENU] to call Kodak Picture CD menu.</p>
<h1 id="2-use-to-select-a-desired-track-to-be-played-back-then-press-or-enter">2 Use [△/▽/◀/▶] to select a desired track to be played back, then press▶ or [ENTER].</h1>
<p>- An image will be played back from the selected track and go to the next one in turn.</p>
<h1 id="3-press-to-stop-playback">3 Press ■ to stop playback.</h1>
<h1 id="tips-for-jpegkodak-picture-playback">Tips for JPEG/Kodak Picture Playback</h1>
<ul>
<li>Every press on [ANGLE] will turn the image clockwise by 90 degrees when an image is displayed. </li>
<li>To change the visual effect for switching the playback image, press [MODE] once, then use [ / ] or [ENTER] to switch between "Cut In/Out" and "Fade In/Out". The size change may have no effect on some files (e.g. files with a small picture size). </li>
<li>To change the size of the playback image, during the JPEG/Kodak Picture playback. Press [MODE] twice, then use [ / / / ] or [ENTER] to switch between "Normal" (100%) and "Small" (93%). The size change may have no effect on some files (e.g. files with a small picture size).</li>
</ul>
<h1 id="reading-the-sd-memory-card">Reading the SD Memory Card</h1>
<h1 id="mp3-wma-jpeg">MP3 WMA JPEG</h1>
<p>You can play back the MP3, Windows Media™ Audio and JPEG files in an SD Memory Card. With the SD Memory Card, you can also enjoy the special additional contents for BD-ROM Profile 1.1 which can be downloaded from the internet. You can store the contents on an SD Memory Card via computer and play them back with the BD-video. For more information about the special additional contents, please refer to the instruction book that came with the disc.</p>
<p><img alt="" src="images/8f3c6f081f2b421c62c8a3a6cba9cfc8272d416756d9bff2642add9c447fdcdc.jpg" /></p>
<details>
<summary>text_image</summary>
CD-ROM
-1.0
</details>
<h1 id="setting-the-media-mode">■Setting the media mode</h1>
<h1 id="1-press-setup-in-stop-mode">1 Press [SETUP] in stop mode.</h1>
<h1 id="2-use-to-select-then-press-enter">2 Use [◀/▶] to select 📄, then press [ENTER].</h1>
<h1 id="3-use-to-select-other-then-press-enter">3 Use [◀/▶] to select other, then press [ENTER].</h1>
<h1 id="4-use-trianglenabla-to-select-media-select">4 Use [/] to select "Media Select".</h1>
<h1 id="5-press-enter-repeatedly-to-select-sd-memory">5 Press [ENTER] repeatedly to select "SD Memory".</h1>
<p><img alt="" src="images/abc6157a4ff3c097c2816d30266e1d0a6b455c07cab15070722b6de6202a980f.jpg" /></p>
<p>- This will set the unit to "SD Memory" mode. To play back the contents in any discs, exit "SD Memory" mode by selecting "Disc".</p>
<h1 id="6-press-setup-to-exit-2">6 Press [SETUP] to exit.</h1>
<h1 id="playback-playback-6">Playback Playback</h1>
<h1 id="inserting-the-sd-memory-card-and-playback">■Inserting the SD Memory Card and playback</h1>
<p>1 Insert an SD Memory Card into the SD CARD slot until it clicks with the label facing up.
File list will appear.</p>
<p><img alt="" src="images/56d0589512871bd0387bf0efed6afd5943394e8dae81450282a253875d1ce173.jpg" /></p>
<p>2 Follow the step 2 in "Playing Back an MP3, Windows Media™ Audio, JPEG and DivX® File" on page 25.</p>
<h1 id="removing-the-sd-memory-card">■Removing the SD Memory Card</h1>
<p>1 In stop mode, push the SD Memory Card and then slowly remove your finger.</p>
<p>2 Grasp the card and pull it out from the SD CARD slot.</p>
<h1 id="compatible-cards">Compatible Cards:</h1>
<ul>
<li>SD Memory Card (8MB - 2GB) </li>
<li>SDHC Memory Card (4GB) </li>
<li>mini5D Card (8MB - 2GB) </li>
<li>microSD Card (8MB - 2GB) </li>
<li>For miniSD Card and microSD Card, adapter will be required.</li>
</ul>
<h1 id="note-40">Note</h1>
<ul>
<li>Do not remove the card during its playback. </li>
<li>This unit supports SD Memory Card with FAT12/FAT16 file system, and SDHC Memory Card with FAT32 file system. </li>
<li>Do not delete the folders or files in the SD Memory Card with your computer. This unit might not read the SD Memory Card. </li>
<li>This unit recognizes up to 8 characters of file name in the SD Memory Card. Characters after 9th will not be displayed.</li>
</ul>
<h1 id="function-setup-2">Function Setup</h1>
<p><img alt="" src="images/8bf61854065969472d03ca02c23cd925542c26fee613e3a20ca738d6e5681d01.jpg" /></p>
<details>
<summary>text_image</summary>
CD-ROM
120
DC
DC
DC
DC
DC
DC
DC
DC
DC
DC
DC
DC
DC
DC
DC
DC
DC
DC
DC
DC
DC
DC
DC
DC
DC
DC
DC
DC
DC
DC
DC
DC
DC
DC
DC
DC
DC
DC
DC
DC
DC
DC
DC
DC
DC
DC
DC
DC
DC
DC
DSC
DSC
DSC
DSC
DSC
DSC
DSC
DSC
DSC
DSC
DSC
DSC
DSC
DSC
DSC
DSC
DSC
DSC
DSC
DSC
DSC
DSC
DSC
DSC
DSC
DSC
DSC
DSC
DSC
DSC
DSC
DSC
DSC
DSC
</details>
<p><img alt="" src="images/f98a50fb967a0c6223ec833c64a61aa5c81e77766ece8e61da5ef24848b9e6f8.jpg" /></p>
<details>
<summary>text_image</summary>
[the Number buttons]
[CLEAR]
[△/▽/◀/▶]
[SETUP]
[ENTER]
[RETURN]
DENON
AC-1000
</details>
<p>About the button names in this explanation <br />
<>: Buttons on the main unit <br />
[ ] : Buttons on the remote control <br />
Button name only: <br />
Buttons on the main unit and remote control</p>
<h1 id="using-the-setup-menu">Using the Setup Menu</h1>
<p>In the setup menu you can change the setting for audio, video, language, etc. You cannot change the setting during playback.</p>
<h1 id="quick-quick">Quick Quick</h1>
<p>Quick setting menu contains setting items extracted from custom setting menu which may be used frequently.</p>
<p>1 Press [SETUP] in stop mode.</p>
<p>2 Use [◀/▶] to select QUICK, then press [ENTER].</p>
<p><img alt="" src="images/a2577158480695aafddb6412cd4d858e58acd55b755e28c92407548b99aa2520.jpg" /></p>
<details>
<summary>text_image</summary>
QUICK
CUSTOM
INITIATLIZE
Quick
A
B
BD Audio Mode
HDMI Audio Out
HDMI Video Resolution
Component Output
7.1ch Audio Out
DSD Language
TV Aspect
Mix Audio Output
HDMI Multi (Normal)
Auto
48Bl
Multi Channel
English
16:9 Wide
</details>
<p>3 Use [/] to select setting items.</p>
<p>4 Follow the procedure below depending on the setting items.</p>
<p>For setting Item A:</p>
<p>Press [ENTER] repeatedly to change options.</p>
<p>For setting item B:</p>
<p>1) Press [ENTER].</p>
<p>2) Use [△ / ∇] to select options, then press [ENTER].</p>
<p>- Use [◀] or [RETURN] to go back to the previous screen.</p>
<p>5 Press [SETUP] to exit.</p>
<h1 id="custom">Custom</h1>
<p>Custom menu contains all the setting items.</p>
<p>1 Press [SETUP] in stop mode.</p>
<p>2 Use [◀/▶] to select ☐, then press [ENTER].</p>
<p>3 Use [◀/▶] to select your desired setting category, then press [ENTER].</p>
<p><img alt="" src="images/dfcec739834daca42282cc8c6f6c000de8ffd4c7df69e783a448eb8a4e6841ce.jpg" /></p>
<p><img alt="" src="images/528513f4df587b9f7ee27aaf271f75350bd00f68785e84ff62247ab489d10ac8.jpg" /></p>
<p>• For "Ratings", follow the procedure on page 36.</p>
<p>Use [/] to select setting items.</p>
<p>- The setting items which are not available with current situation of this unit will be displayed in gray and you cannot select the items.</p>
<p>5 Follow the procedure below depending on the setting items.</p>
<p>For setting item A:</p>
<p>Press [ENTER] repeatedly to change options.</p>
<p>For "DivX(R) VOD", press [ENTER] to display your registration code.</p>
<p>For setting item B:</p>
<p>1) Press [ENTER].</p>
<p>2) Use [ / ] to select options, then press [ENTER].</p>
<p>- Use [◀] or [RETURN] to go back to the previous screen.</p>
<p>6 Press [SETUP] to exit.</p>
<p>Function Setup Function Setup</p>
<p>Language</p>
<p><img alt="" src="images/c15adf35c0688b2f088bde4b6acb2c09c670ed9b5f2ba6ade3136f5c6791a2c5.jpg" /></p>
<details>
<summary>text_image</summary>
Language
Dialog Original
Subtitle Off
Disc Menu English
OSD Language English
DivX Subtitle Off
</details>
<ul>
<li>For how to select the setting items and options, refer to "Custom" on page 29.</li>
</ul>
<table><tr><td colspan="2">Setting items Options</td></tr><tr><td>DialogSets the language for audio.</td><td>Original*/English/French/Spanish/German/Italian/Swedish/Dutch/Russian/Chinese/Japanese/Korean/Danish/Finnish/Norwegian/Icelandic/Hungarian/Romanian/Turkish/Greek/Irish/Portuguese/Polish/Czech/Slovak/Bulgarian/Other</td></tr><tr><td>SubtitleSets the language for subtitle.</td><td>Off*/English/French/Spanish/German/Italian/Swedish/Dutch/Russian/Chinese/Japanese/Korean/Danish/Finnish/Norwegian/Icelandic/Hungarian/Romanian/Turkish/Greek/Irish/Portuguese/Polish/Czech/Slovak/Bulgarian/Other</td></tr><tr><td>Disc MenuSets the language for disc menu.</td><td>English*/French/Spanish/German/Italian/Swedish/Dutch/Russian/Chinese/Japanese/Korean/Danish/Finnish/Norwegian/Icelandic/Hungarian/Romanian/Turkish/Greek/Irish/Portuguese/Polish/Czech/Slovak/Bulgarian/Other</td></tr><tr><td>OSD LanguageSets the language for OSD(on-screen display).</td><td>English*/Français/Espanol</td></tr><tr><td>DivX Subtitle Off* / English / FrenchSets the language for DivX ^® Subtitle.</td><td>Spanish</td></tr></table>
<ul>
<li>Settings with (*) are the default. </li>
<li>Quick menu consists of the setting menus frequently used, and they are accompanied with mark. </li>
<li>If you select "Other", enter the 4-digit number code for the desired language (refer to "Language Code" on page 39). Only the languages supported by the disc can be selected.</li>
</ul>
<p>Video</p>
<p><img alt="" src="images/d1e95bc536650353aa6b7e873cadb74c6bc00f7d47cdf442bf3b065dc18be707.jpg" /></p>
<details>
<summary>text_image</summary>
Language
Other
Video
B
A
- TV Aspect 16:9 Wide
HDMI Select YCbCr
HDMI RGB Setting Normal
HDMI Auto Format Max
HDMI Video Resolution Auto
B
A
HDMI Deep Color Auto
VP Direct Off
</details>
<p><img alt="" src="images/f42c323e6f66a7b062999d9bbe6d5c06cbe77d35ba9aa51529a6e788a7689e52.jpg" /></p>
<details>
<summary>text_image</summary>
Long
Image
Other
B
Component Output 480x
Progressive Mode Auto
AudioVideo Sync HDMI
Still Mode Auto
A
TV Active Area Full
B
Wall Paper Picture
</details>
<ul>
<li>For how to select the setting items and options, refer to "Custom" on page 29. </li>
</ul>
<table><tr><td colspan="2">Setting items Options</td></tr><tr><td rowspan="5">TV AspectSets a picture size according to aspect ratio of the connected display device.</td><td>16:9 Wide*:Select this when a wide-screen TV is connected.Disc recorded in wide screen format is played over the entire screen.</td></tr><tr><td>4:3 Pan & Scan:Select this to play back the disc recorded in wide screen format with 4:3 TV in the pan & scan mode (with the sides of the picture cut off). Discs which pan & scan is not specified are played in the letter box mode.</td></tr><tr><td>4:3 Letter Box:Select this to play back the disc recorded in wide screen format with 4:3 TV in the letter box mode. (with black strips at the top and bottom).</td></tr><tr><td>4:3 Squeeze Auto:When playing 4:3 images, the picture is displayed in the center of the 16:9 screen with a 4:3 aspect ratio.</td></tr><tr><td>4:3 Squeeze On:The picture is displayed in the center of the 16:9 TV screen with a 4:3 aspect ratio, regardless of the original image size.</td></tr><tr><td rowspan="2">HDMI SelectSelect an HDMI output mode between "YCbCr" and "RGB".</td><td>YCbCr*:Component format video signals and audio signals are output from the HDMI OUT.</td></tr><tr><td>RGB:RGB format video signals and audio signals are output from the HDMI OUT.</td></tr></table>
<p>ENGLISH</p>
<h1 id="english-14">ENGLISH</h1>
<p>Function Setup Function Setup </p>
<table><tr><td>Setting items Options</td><td></td></tr><tr><td rowspan="2">HDMI RGB SettingSets the digital RGB image range (data range) output from the HDMI OUT.</td><td>Normal*:Output as "16 (black)" to "235 (white)".</td></tr><tr><td>Enhanced:Output as "0 (black)" to "246 (white)".Depending on the display device you are using, the black colors may seem to stand out when using HDMI connections. If so, set to "Enhanced".</td></tr><tr><td rowspan="2">HDMI Auto FormatMakes the setting of the "Auto" for "HDMI Video Resolution".</td><td>Max*:The maximum resolution that can be input to the connected HDMI device is detected and the HDMI output resolution is selected automatically.</td></tr><tr><td>Panel:The number of pixels of the connected HDMI device's panel is detected and the HDMI output resolution is selected automatically.</td></tr><tr><td rowspan="6">HDMI Video ResolutionSets the HDMI video resolution.</td><td>Auto*:HDMI video resolution will be selected automatically depending on the connected HDMI device and setting of the "HDMI Auto Format".</td></tr><tr><td>480p</td></tr><tr><td>720p</td></tr><tr><td>1080i</td></tr><tr><td>1080p</td></tr><tr><td>1080p24:Gives a natural and high quality film reproduction of 24-frame film material. The connected display device has to be compatible with 1080p24 frame input.</td></tr><tr><td rowspan="2">HDMI Deep ColorSets whether output the picture from HDMI with the Deep Color or not.</td><td>Auto*:The picture through the HDMI will be output with Deep Color if the connecting device supports Deep Color.</td></tr><tr><td>Off:The picture through the HDMI will be output without Deep Color.</td></tr><tr><td rowspan="2">I/P DirectSets whether output the 24-frame material directly from the HDMI OUT or not. This setting is for BD only.</td><td>Off*:24 frame material will be converted to 60 frame and output 1080p60 frame from the HDMI OUT.</td></tr><tr><td>On :24 frame material will be output directly 1080p24 frame from the HDMI OUT.</td></tr><tr><td rowspan="4">Component OutputSets the video resolution for component output.</td><td>480i*</td></tr><tr><td>480p</td></tr><tr><td>720p</td></tr><tr><td>1080i</td></tr></table>
<table><tr><td>Setting items Options</td><td></td></tr><tr><td rowspan="3">Progressive ModeSets the optimum progressive mode for the image material output from HDMI OUT jack and COMPONENT VIDEO Jacks.</td><td>Auto*:The progressive mode will be selected automatically depending on the material type (film or video).</td></tr><tr><td>Video1:Suited for playing video material discs.</td></tr><tr><td>Video2:Suited for playing video material discs and 30-frame film material discs.</td></tr><tr><td rowspan="4">Audio/Video SyncSets which video signal to synchronize the audio signal with.</td><td>HDMI*:Synchronizes the audio with the video signal from HDMI OUT.</td></tr><tr><td>Progressive:Synchronizes the audio with the progressive video signal from COMPONENT VIDEO OUT.</td></tr><tr><td>Interlace:Synchronizes the audio with the Interlace video signal from COMPONENT VIDEO OUT(480i),VIDEO OUT or S VIDEO OUT.</td></tr><tr><td>Other:Select this when you want to view progressive, interlaced and HDMI pictures simultaneously. The audio signals are set to the optimum timing for the respective pictures. (They are not synchronized.)</td></tr><tr><td rowspan="3">Still ModeAdjusts picture resolution and quality in still mode.</td><td>Auto*:Automatically selects the best resolution setting ("Frame" or "Field") based on the data characteristics of the pictures.</td></tr><tr><td>Field:Stabilizes the pictures, although the picture quality may become coarse due to the limited amount of data. Select "Field" when the pictures are still unstable even if "Auto" is selected.</td></tr><tr><td>Frame:Displays relatively motionless pictures in higher resolution. "Frame" improves the picture quality, although it may unstabilize the pictures due to alternate output of two field data.</td></tr><tr><td rowspan="2">TV Active AreaSets the horizontal display area for interlace (480i) output.</td><td>Normal:Select this if the image is not stable with connecting to professional-use display.</td></tr><tr><td>Full*:Select this for connecting to commonly-marketed display.</td></tr></table>
<p>Function Setup Function Setup </p>
<table><tr><td>Setting items Options</td><td></td></tr><tr><td rowspan="4">Wall PaperSets the picture to be displayed on the screen for stop mode or audio playback mode.</td><td>Picture*</td></tr><tr><td>Blue</td></tr><tr><td>Black</td></tr><tr><td>Gray</td></tr></table>
<ul>
<li>Settings with (*) are the default. </li>
<li>Quick menu consists of the setting menus frequently used, and they are accompanied with mark. </li>
<li>For "HDMI RGB Setting", select "Enhanced" if the black-white contrast is not clear. The setting is effective only for HDMI RGB output. </li>
<li>Even if "HDMI Video Resolution" is set to "1080p24" and "I/P Direct" is set to "On", for the BD that is not recorded by 1080p24 frame or for DVD, a video resolution supported by the disc and the display device will be output instead of 1080p24 frame. </li>
<li>An individual picture on the screen is called as "Frame", which consists of two separate images called as "Field". Some pictures may be blurred at the auto setting in "Still Mode" due to their data characteristics. </li>
<li>If the picture is not output properly to the display device because of the "HDMI Video Resolution" or "Component Output" setting, press and hold ▶ on the front panel for more than 5 seconds. Both settings will be reset to the default automatically. </li>
<li>If "Component Output" is set to "480i", "4:3 Squeeze Auto" and "4:3 Squeeze On" in "TV Aspect" are not available. </li>
<li>If HDMI is connected, for video resolution for the component output, you can only select video resolution that currently output from HDMI OUT or 480i. </li>
<li>If the video resolution for the component output and HDMI video resolution does not match, the video resolution for the component output will be switched to current HDMI output resolution. COMPONENT VIDEO OUT jacks may not output any signals depend on the disc material. </li>
<li>If you play back copy-protected DVD video, 480p signal will be output from the COMPONENT VIDEO OUT jacks, when "Component Output" is set to "720p" or "1080i". </li>
<li>If connected display device does not support 1080p24 frame or "I/P Direct" is set to "Off", "1080p24" in "HDMI Video Resolution" will be displayed in gray and you can not select the item. </li>
<li>For playing back BD, if you set "Component Output" to "480i", 480p signal will be output from the COMPONENT VIDEO OUT jacks. </li>
<li>The setting items which are not available with current situation of this unit will be displayed in gray and you cannot select the items. </li>
<li>Even if "HDMI Select" is set to "YCbCr", if the display device does not support YCbCr, RGB will be output. </li>
<li>If "HDMI Video Resolution" is set to "1080p" or "1080p24", you cannot set "Component Output".</li>
</ul>
<p>Audio <br />
<img alt="" src="images/9f89fddf89a501d6dc27691c4ca536d614dec311c2d653f2eff2ab3319ca86de.jpg" /></p>
<details>
<summary>text_image</summary>
Audio
BD Audio Mode
HDMI Audio Out
7.1ch Audio Out
Down Sampling
DRC
Source Direct
Base Enhancer
Mix Audio Output
HDMI Multi (Normal)
Multi Channel
Off
Auto
Off
Off
</details>
<p><img alt="" src="images/106db4014e93a42b408edd869601322faf7eb92e56dc3a4081f3d1ca934f1bd6.jpg" /></p>
<details>
<summary>text_image</summary>
Audio
Audio Adjust
Virtual Surround
0ms
Off
</details>
<ul>
<li>For how to select the setting items and options, refer to "Custom" on page 29.</li>
</ul>
<p>Setting items Options </p>
<table><tr><td rowspan="2">BD Audio ModeFor BD, select whether to output the secondary and interactive audio with primary audio if it is available or only the primary audio. Refer to "Setting the BD Audio Mode" on page 23.</td><td>Mix Audio Output*:Output the secondary and interactive audio with primary audio if it is available.</td></tr><tr><td>HD Audio Output:Output only the primary audio. Set this mode in order to output Dolby Digital, Dolby Digital Plus, Dolby TrueHD, DTS or DTS-HD sound of BD through HDMI connection.</td></tr><tr><td rowspan="4">HDMI Audio OutSets the audio format for the audio output from the HDMI OUT.</td><td>HDMI Multi(Normal):The multi-channel audio signals are output from the HDMI OUT with a bitstream or LPCM.</td></tr><tr><td>HDMI Multi(LPCM):The multi-channel audio signals are output from the HDMI OUT with a LPCM.Refer to pages 34-35 for setting options.</td></tr><tr><td>HDMI 2ch:The audio signals are output from the HDMI OUT with a downmixed to 2ch LPCM.</td></tr><tr><td>Audio Mute:Mutes the HDMI audio signal, and set the signal format of the DIGITAL OUT.Refer to the "Digital Out Setting" on page 33 for setting options.</td></tr></table>
<ul>
<li>The default setting of the "BD Audio Mode" is "Mix Audio Output". If you want to output only the high quality primary audio, set "BD Audio Mode" to "HD Audio Output".</li>
</ul>
<h1 id="english-15">ENGLISH</h1>
<p>Function Setup Function Setup </p>
<table><tr><td>Setting items Options</td><td></td></tr><tr><td rowspan="2">7.1ch Audio OutSets the audio format for the audio output from the 7.1ch AUDIO OUT.</td><td>Multi Channel*:The multi-audio signals are output from the 7.1ch AUDIO OUT. Refer to pages 34-35 for setting options.</td></tr><tr><td>2 Channel:Down-mixed 2-channel audio signals are output from the 7.1ch AUDIO OUT jacks.</td></tr><tr><td rowspan="2">Down SamplingSets the digital audio output when playing BD or DVD recorded in LPCM.</td><td>On:LPCM signals are converted to 48 kHz for output.• Set to "On" when using digital connections to an AV amplifier that is not compatible with sampling frequencies of 96 kHz.</td></tr><tr><td>Off*:For BD or DVD recorded in LPCM without copyright protection, 2-channel audio signals up to 96 kHz are output as LPCM signals with no conversion.</td></tr><tr><td rowspan="3">DRCSets whether to compress the range of sound volume (Dynamic Range Control) when Dolby Digital, Dolby Digital Plus or Dolby TrueHD audio is played back.</td><td>Auto*:When the discs that are recorded In the Dolby TrueHD format is in playback, this unit detects DRC setting of the disc and set the DRC setting of this unit to "On" or "Off" automatically.</td></tr><tr><td>Off</td></tr><tr><td>On</td></tr><tr><td rowspan="2">Source DirectSets to output the audio without adding speaker settings to the audio signals from the disc.</td><td>On:Select this to output the audio without any effect of speaker setting.</td></tr><tr><td>Off*:Select this to output the audio with the effect of speaker setting.</td></tr><tr><td rowspan="2">Bass EnhancerSets whether to output the subwoofer when playing back content that does not have LFE (Low Frequency Effect) signal. (e.g. content with only 2 channel audio signal.)</td><td>On:Audio signal will be output from the subwoofer. (Please set "Subwoofer" in the "Speaker Configuration" to "On".)</td></tr><tr><td>Off*:No audio signal will be output from the subwoofer.</td></tr><tr><td>Audio AdjustSets the amount of the delay time between the picture and audio signal.</td><td>0ms to 200ms (0ms*)The audio signal will be delayed for the amount of time you set.</td></tr></table>
<table><tr><td>Setting items Options</td><td></td></tr><tr><td rowspan="3">Virtual SurroundSets to create a surround effect in a system with 2 speakers connected.</td><td>Off*:Virtual surround is set to off.</td></tr><tr><td>1:A natural surround effect in a system with 2 speakers connected.</td></tr><tr><td>2:A stronger surround effect in a system with 2 speakers connected than "1".</td></tr></table>
<ul>
<li>Settings with (*) are the default. </li>
<li>Quick menu consists of the setting menus frequently used, and they are accompanied with mark. </li>
<li>If you set "Source Direct" to "On", "HDMI Audio Out" to "HDMI 2ch" or "7.1ch Audio Out" to "2 Channel", "Bass Enhancer" is not available. </li>
<li>Under following circumstances, "HDMI Multi(Normal)", "HDMI Multi(LPCM)" and "HDMI 2ch" is not available. </li>
<li>HDMI cable is not connected to HDMI OUT jack. </li>
<li>Connected display device is off. </li>
<li>Connected display device is not compatible with audio output. </li>
<li>When "Source Direct" is set to "On", "Bass Enhancer" and "Speaker Configuration" are not available.</li>
</ul>
<h1 id="digital-out-setting">Digital Out Setting</h1>
<p>When the "Audio Mute" is selected in "HDMI Audio Out" setting, audio signal of the HDMI is muted and the audio signals output from DIGITAL OUT changes depending on the "Digital Out" setting.</p>
<p>< "Digital Out" setting></p>
<p>Audio → HDMI Audio Out → Audio Mute</p>
<table><tr><td>Bitstream*:When playing back discs recorded in Dolby Digital, Dolby Digital Plus, Dolby TrueHD, DTS or DTS-HD, the corresponding core stream (Dolby Digital or DTS) are output.</td></tr><tr><td>LPCM:LPCM signal will be output from DIGITAL OUT.</td></tr></table>
<p>• This setting is not effective when the HDMI audio signal is output. <br />
- When both HDMI and DIGITAL OUT is connected to other devices, the audio signals currently output from the HDMI OUT will be output from the DIGITAL OUT jack as well, except that Dolby Digital signal will be output instead of Dolby Digital Plus and Dolby TrueHD, and DTS signal will be output instead of DTS-HD. <br />
- When "BD Audio Mode" is set to "HD Audio Output", Dolby Digital Plus, Dolby TrueHD, or DTS-HD will be output as core stream (Dolby Digital or DTS). If the audio source is Dolby Digital, DTS, or LPCM, the same audio stream type set in the "HDMI Audio Out" will be output. (When outputting Multi LPCM from HDMI OUT, 2ch Downmix LPCM will be output from DIGITAL OUT.) <br />
- When "BD Audio Mode" is set to "Mix Audio Output", the audio output from DIGITAL OUT will follow the setting in the "HDMI Audio Out". (When outputting Multi LPCM from HDMI OUT, 2ch Downmix LPCM will be output from DIGITAL OUT.)</p>
<h1 id="function-setup-function-setup">Function Setup Function Setup</h1>
<h1 id="speaker-setting">Speaker Setting</h1>
<p>This unit allows you to enjoy multi-channel surround sound such as 7.1-channel / 5.1-channel surround.</p>
<p><Example of basic layout with 7.1ch surround system></p>
<p><img alt="" src="images/7eae3108b9fc4f6ee72542d4885c3d7c8ec60a228bb6b686b34f4358f78bf594.jpg" /></p>
<details>
<summary>text_image</summary>
Front speaker (left)
Subwoofer
Surround speaker (left) Surround speaker (right)
Surround back speaker (left) Surround back speaker (right)
Center speaker
Front speaker (right)
</details>
<p>To make the most of its feature, set up your speakers appropriately by referring to the table below.</p>
<p>Speaker setting options are available at the following locations;</p>
<p><Speaker setting for the audio signal output from the HDMI OUT jack ></p>
<p>(Available when you have HDMI cable connected to the HDMI OUT jack)</p>
<p>Setup → Quick → HDMI Audio Out → HDMI Multi(LPCM)</p>
<p>Setup → Custom → Audio → HDMI Audio Out → HDMI Multi(LPCM)</p>
<p><Speaker setting for the audio signal output from the 7.1ch AUDIO OUT jacks ></p>
<p>Setup → Quick → 7.1ch Audio Out → Multi Channel</p>
<p>Setup → Custom → Audio → 7.1ch Audio Out → Multi Channel</p>
<p>How to navigate through the "HDMI Multi(LPCM)" and "Multi Channel" setting</p>
<p>1) Use [/] to select the menu item.</p>
<p>2) Use [/] to select setting items.</p>
<p>- Use [RETURN] to go back to the previous screen.</p>
<p>3) Use [◀/▶] to select desired options.(Except for "Test Tone" and "Default".)</p>
<p>For "Test Tone":</p>
<p>Use [◀/▶] to select "Manual" or "Auto", then press [ENTER].</p>
<p>- The test tone will be output. If you select "Manual", use [ / ] to select desired speaker, then use [ / ] to adjust the volume. If you select "Auto", use [ / ] to adjust the volume of the speaker that output the test tone.</p>
<p>If you want to stop the test tone, press [RETURN].</p>
<p>For "Default":</p>
<p>Press [ENTER] to reset the "Delay Time" setting to the default.</p>
<p>4) Press [SETUP] to exit.</p>
<table><tr><td>Menu</td><td>Setting items</td><td>Options</td><td>Descriptions</td></tr><tr><td rowspan="11">Speaker ConfigurationSelect the desired speaker to set. Then change the setting appropriately by referring to the descriptions.</td><td rowspan="2">Front</td><td>Large*</td><td rowspan="10">Large:For the large speakers with strong low frequency reproduction capabilities. Small:For the small speakers which do not provide strong bass sound.None:No speakers.For "Subwoofer" there is only "On" or "Off".</td></tr><tr><td>Small</td></tr><tr><td rowspan="2">Center</td><td>Large*</td></tr><tr><td>Small/None</td></tr><tr><td rowspan="2">Subwoofer</td><td>On*</td></tr><tr><td>Off</td></tr><tr><td rowspan="2">Surround</td><td>Large*</td></tr><tr><td>Small/None</td></tr><tr><td rowspan="2">Surround Back</td><td>Large*</td></tr><tr><td>Small/None</td></tr><tr><td>Crossover Freq: For speakers set to "Small", the sound with frequencies below that of this frequency are cut. This bass sound that has been cut is output from the subwoofer or a speaker for which "Large" is set.</td><td>40/60/80*/100/120Hz</td><td>Select according to the low frequency reproduction capabilities of the connected speaker.</td></tr></table>
<ul>
<li>For "Speaker Configuration", the settings of each speaker sizes may be adjusted automatically corresponding to each setting. (e.g. If the "Front" is set to "Small", the "Subwoofer" will automatically set to "On" and also you cannot set "Center", "Surround", and "Surround Back", to "Large".) </li>
<li>If you connect to 5.1-channel surround system, set "Surround Back" in "Speaker Configuration" to "None". </li>
<li>"None" for "Center", "Surround" and "Surround Back" is not available for the speaker setting for the audio signal output from the HDMI OUT jack. </li>
<li>"Off" for "Subwoofer" is not available for the speaker setting for the audio signal output from the HDMI OUT jack.</li>
</ul>
<h1 id="english-16">ENGLISH</h1>
<p>Function Setup Function Setup </p>
<table><tr><td>Menu Setting</td><td colspan="2">Items Options Descriptions</td><td></td></tr><tr><td rowspan="12">Channel LevelTests or sets the volume for each speaker.</td><td rowspan="3">Test Tone:“Test Tone” is the test tone which can be output from the speakers so that you can adjust the volume for each speaker.</td><td>Off* Select “Off*</td><td rowspan="3">to deactivate the “Test Tone” feature.Select “Manual”, then press [ENTER] to manually set the volume for the desired speaker.Select “Auto”,then press [ENTER] to automatically output the test tone from each speakers.</td></tr><tr><td>Manual</td></tr><tr><td>Auto</td></tr><tr><td>Front Lch 0 dB to -12 dB</td><td>(0 dB*)</td><td rowspan="8">If you have selected “Manual” in “Test Tone”, select the desired speaker to set and adjust the volume for the selected speaker.If you have selected “Auto” in “Test Tone”, test tone will be output automatically in order.Adjust the volume of the speaker that output the test tone.</td></tr><tr><td>Center</td><td>0 dB to -12 dB(0 dB*)</td></tr><tr><td>Front Rch</td><td>0 dB to -12 dB(0 dB*)</td></tr><tr><td>Surround Rch</td><td>0 dB to -12 dB(0 dB*)</td></tr><tr><td>Surround Back Rch</td><td>0 dB to -12 dB(0 dB*)</td></tr><tr><td>Surround Back Lch</td><td>0 dB to -12 dB(0 dB*)</td></tr><tr><td>Surround Lch</td><td>0 dB to -12 dB(0 dB*)</td></tr><tr><td>Subwoofer</td><td>0 dB to -12 dB(0 dB*)</td></tr><tr><td>SW + 10 dB(Not available for HDMI)</td><td>On/Off*</td><td>Set “On” to Increases the volume level that is output from the subwoofer by 10 dB.</td></tr></table>
<table><tr><td>Menu</td><td>Setting items</td><td>Options</td><td>Descriptions</td></tr><tr><td rowspan="11">Delay TimeThis is a parameter for optimizing the timing at which the sound is output from the speakers according to their distance from the listening position.</td><td rowspan="2">Distance</td><td>Feet*</td><td rowspan="2">Set the desired measure system. This measure system will be used for "Delay Time" setting. Press [ENTER] to switch the setting.</td></tr><tr><td>Meters</td></tr><tr><td>Front Lch 0ft to 60ft</td><td>(12ft*) (0m to 18m (3.6m*))</td><td rowspan="8">Select the distance from the listening point to the speaker to get the ideal delay time.</td></tr><tr><td>Front Rch 0ft to 60ft</td><td>(12ft*) (0m to 18m (3.6m*))</td></tr><tr><td>Center 0ft to 60ft (12ft*)</td><td>(0m to 18m (3.6m*))</td></tr><tr><td>Surround Lch 0ft to 60ft</td><td>(10ft*) (0m to 18m (3.0m*))</td></tr><tr><td>Surround Rch 0ft to 60ft</td><td>(10ft*) (0m to 18m (3.0m*))</td></tr><tr><td>Surround Back Lch</td><td>0ft to 60ft (10ft*) (0m to 18m (3.0m*))</td></tr><tr><td>Surround Back Rch</td><td>0ft to 60ft (10ft*) (0m to 18m (3.0m*))</td></tr><tr><td>Subwoofer</td><td>0ft to 60ft (12ft*) (0m to 18m (3.6m*))</td></tr><tr><td colspan="2">Default</td><td>Select "Default", then press [ENTER], to reset the "Delay Time" setting to the default.</td></tr></table>
<ul>
<li>Settings with (*) are the default. </li>
<li>For HDMI, "None" and "Off" options for "Speaker Configuration" are not available. </li>
<li>For "Delay Time", the difference among the value of the each speaker cannot exceed 15 ft (4.5m).</li>
</ul>
<h1 id="function-setup-function-setup-2">Function Setup Function Setup</h1>
<h1 id="ratings">Ratings</h1>
<p>Ratings control allows you to set a limit, which prevents your children from viewing inappropriate materials. Playback will stop if the ratings exceed the levels you set, and it will require you to enter a password before the disc will play back.</p>
<p><img alt="" src="images/a336c5ee628d2c7036d3a5a17b9145e098759f30f619936b407df37de3410d0f.jpg" /></p>
<details>
<summary>text_image</summary>
Language
Other
Ratings
BD Rating Level All
DVD Rating Level All
Password Change
</details>
<h1 id="1-use-to-select-then-press-enter">1) Use [◀/▶] to select 🔍, then press [ENTER].</h1>
<p>2) Press [the Number buttons] to enter your 4-digit password.</p>
<p>For the first time use: Press [the Number buttons] to enter any 4-digit number (except for 4737), then press [ENTER]. That number will be used as the password from the second time. Record your password in case you forget it.</p>
<p>- If you forgot the password, enter [4], [7], [3], [7]. The password will be cleared and rating level will be set to "All".</p>
<p>- While you input the password, press [CLEAR] to clear the number, then re-enter the password.</p>
<h1 id="proceed-to-a-c">Proceed to A - C</h1>
<h1 id="a-bd-rating-level">A) BD Rating Level</h1>
<p>1) Use [/] to select "BD Rating Level", then press [ENTER].</p>
<p>2) Use [/] to select your desired option, then press [ENTER].</p>
<p>"All": To release the limitation.</p>
<p>"Age Setting": To set the age limitation.</p>
<p>- After selecting "Age Setting", use [the Number buttons] to enter the age from 0 – 254, then press [ENTER].</p>
<p>(e.g. for age 15, press [0], [1], [5])</p>
<p>3) Press [SETUP] to exit.</p>
<h1 id="b-dvd-rating-level">B) DVD Rating Level</h1>
<p>1) Use [/] to select "DVD Rating Level", then press [ENTER]. <br />
2) Use [/] to select a desired level, then press [ENTER]. <br />
3) Press [SETUP] to exit.</p>
<h1 id="rating-explanations">RATING EXPLANATIONS</h1>
<ul>
<li>All : Parental control is inactive; all discs can play back. </li>
<li>8 [Adult] : DVD software of any grades (adult/general/children) can be played back. </li>
<li>7 [NC-17]: No one under 17 admitted. <br />
• 6 [R] : Restricted; under 17 requires accompanying parent or adult guardian. </li>
<li>5 [PGR]: Parental guidance recommended. </li>
<li>4 [PG13] : Unsuitable for children under 13. <br />
• 3 [PG] : Parental guidance suggested. <br />
• 2 [G] ; General audience. <br />
• 1 [Kid Safe] : Suitable for children.</li>
</ul>
<h1 id="c-password-change">C) Password Change</h1>
<p>1) Use [/] to select "Password Change", then press [ENTER]. <br />
2) Enter a new 4-digit password, then press [ENTER]. <br />
3) Press [SETUP] to exit.</p>
<h1 id="english-17">ENGLISH</h1>
<p>Function Setup Function Setup</p>
<p>Others</p>
<p><img alt="" src="images/e22c0ebb99eaec519a5f2ec1c9e9cc702d708c6b9797bce8f6c4ff4a937e0dd7.jpg" /></p>
<details>
<summary>text_image</summary>
Lang
edge
Other
Others
Angle Icon Off
Screen Saver On
Auto Power Off On
Panel Display Bright
Slide Show 5sec
DivX(R) VOD
Closed Caption Off
</details>
<p><img alt="" src="images/6cf127e91e70f66737614f9dff23bded3df1f710bae8742471c21a808bae9d1e.jpg" /></p>
<details>
<summary>text_image</summary>
Losing
onset
Other
Others
Power Saving On
Remote Control Setting DENON1
Media Select Disc
</details>
<p>- For how to select the setting items and options, refer to "Custom" on page 29.</p>
<table><tr><td>Setting items Options</td><td></td></tr><tr><td rowspan="2">Angle Icon On:</td><td>The angle icon appears on the screen when playback the scene with various angle.</td></tr><tr><td>Off*: The angle icon disappears on the screen.</td></tr><tr><td rowspan="2">Screen Saver On*:</td><td>If this unit is left with no activity for more than 5 minutes, the screen saver will be activated.</td></tr><tr><td>Off: Sets off the screen saver.</td></tr><tr><td rowspan="2">Auto Power Off On*:</td><td>If this unit is left with no activity for more than 30 minutes, this unit turns off automatically.</td></tr><tr><td>Off: Sets off the auto power off.</td></tr><tr><td rowspan="3">Panel Display Sets the brightness of the front panel display.</td><td>Bright*: Front panel display gets brighter.</td></tr><tr><td>Dimmer: Front panel display gets darker.</td></tr><tr><td>Auto: Front panel gets darker during playback.</td></tr><tr><td rowspan="2">Slide Show Sets the display time for the still picture (in JPEG format) playback</td><td>5sec*</td></tr><tr><td>10sec</td></tr><tr><td>DivX(R) VOD Provides DivX® VOD registration code.</td><td>For more information about DivX® VOD visit www.divx.com/vod</td></tr></table>
<table><tr><td>Setting items Options</td><td></td></tr><tr><td rowspan="2">Closed CaptionSets whether display the closed caption or not using the caption decoder (commercially available).</td><td>On</td></tr><tr><td>Off*</td></tr><tr><td rowspan="2">Power SavingLower the power consumption for standby mode by denying the command from RS-232C during standby mode.</td><td>On*:Denies the command from RS-232C when the power is in standby mode.</td></tr><tr><td>Off:Accepts the command from RS-232C when the power is in standby mode.</td></tr><tr><td rowspan="2">Remote Control SettingChanges the signal code of a remote control. (Refer to page 6)</td><td>DENON1*</td></tr><tr><td>DENON2</td></tr><tr><td rowspan="2">Media SelectSelect the media to playback.</td><td>Disc*:Select this when you play back a disc.</td></tr><tr><td>SD Memory:Select this when you play back a SD Memory Card.</td></tr></table>
<p><img alt="" src="images/36b077be8779f52da25ac9aa1c44e18d64f5fc55687869897a7d2f33a81a74f5.jpg" /></p>
<h1 id="initialize">Initialize</h1>
<p>Initialize the setting or SD Memory Card.</p>
<p><img alt="" src="images/4b9ff86cb5e61328f816caf384d7c4ecc921435e8d7781bc9f1b7393293ca368.jpg" /></p>
<details>
<summary>text_image</summary>
QUICK CUS TOM INITIALIZE
Initialize
Initiie?
No
Setup
Memory Device
</details>
<p>1) Press [SETUP] in stop mode.</p>
<p>2) Use [◀/▶] to select "Initialize", then press [ENTER].</p>
<p>3) Use [ / ] to select a desired option, then press [ENTER].</p>
<p>"No": Exit without any initialization.</p>
<p>"Setup": Reset the SETUP setting to the factory default.</p>
<p>"Memory Device": Initializes the SD Memory Card. After confirmation message appears, use</p>
<p>[△ / ▽] to select "Yes", then press [ENTER].</p>
<p>4) Press [ENTER]. (for "Setup" and "Memory Device" only)</p>
<p>5) Press [SETUP] to exit.</p>
<h1 id="note-41">Note</h1>
<p>- The setting for "Ratings" will not be reset.</p>
<h1 id="others-2">Others</h1>
<p>ENGLISH</p>
<p>Others</p>
<h1 id="troubleshooting">Troubleshooting</h1>
<p>If the unit does not perform properly when operated as instructed in this Operating Instruction, check the unit, consulting the following checklist.</p>
<table><tr><td colspan="2">Problem Solution Page</td><td></td></tr><tr><td rowspan="2">No power - Check if the AC cord is properly connected.</td><td>-</td><td></td></tr><tr><td>- Unplug the AC cord once, and wait for 5-10 seconds and then plug it in again.</td><td>-</td></tr><tr><td rowspan="8">No sound or picture - Check if the connected display device is turned on.</td><td>-</td><td></td></tr><tr><td>- Check the HDMI connection. (Check the status of the HDMI related indications.)</td><td>10</td></tr><tr><td>- Check the RCA audio/video cable connections.</td><td>10, 13</td></tr><tr><td>- Check if the pure direct mode is set to "Video Off" or "All Off". If it is the case, set it to "Display Off" or "Normal".</td><td>23</td></tr><tr><td>- Check whether the connected display device or other device supports HDCP. (This unit will not output a video signal unless the other device supports HDCP.)</td><td>12</td></tr><tr><td>- Check whether the output format of this unit (HDMI FORMAT) matches the supported input format of other connected device.</td><td>10,30,31</td></tr><tr><td>- Check if the "HDMI Deep Color" is set to "Auto". If it is the case, set it to "Off".</td><td>31</td></tr><tr><td>- Check if the "I/P Direct" is set to "On". If it is the case, set it to "Off".</td><td>31</td></tr><tr><td rowspan="2">Distorted picture - Sometimes a small amount of picture distortion may appear. This is not a malfunction.</td><td>-</td><td></td></tr><tr><td>- Connect this unit directly to the TV. If the RCA audio/video cables are connected to a VCR, pictures may be distorted due to the copy protection system.</td><td>10</td></tr><tr><td>Completely distorted picture or black/white picture with BD/DVD</td><td>- Make sure the disc is compatible with this unit. 4</td><td></td></tr><tr><td rowspan="4">No sound or distorted sound - Adjust the volume.</td><td>-</td><td></td></tr><tr><td>- Check that the speakers are connected correctly.</td><td>10,12,13</td></tr><tr><td>- Check the HDMI connections.</td><td>10</td></tr><tr><td>- Check the "Audio" settings.</td><td>32,33</td></tr><tr><td rowspan="2">Picture freezes momentarily during playback</td><td>- Check the disc for fingerprints/scratches and clean with a soft cloth wiping from center to edge.</td><td>4</td></tr><tr><td>- Clean the disc.</td><td>4</td></tr><tr><td rowspan="5">Disc cannot be played back - Clean the disc.</td><td>- Ensure the disc label is facing up.</td><td>4</td></tr><tr><td>- Check if the disc is defective by trying another disc.</td><td>14</td></tr><tr><td>- Cancel the ratings control or change the control level.</td><td>-</td></tr><tr><td rowspan="2">- Insert a correct disc that can be played back on this unit.</td><td>36</td></tr><tr><td>4</td></tr><tr><td>SD Memory Card cannot be read. - The format of the card does not match to this unit or the card is not compatible.</td><td>-</td><td></td></tr><tr><td>No return to start-up screen when disc is removed</td><td>- Reset this unit by turning it off, then on again. -</td><td></td></tr><tr><td rowspan="5">The unit does not respond to the remote control</td><td>- Aim the remote control directly at infrared sensor window on the front of the unit.</td><td>6</td></tr><tr><td>- Reduce the distance to infrared sensor window.</td><td>-</td></tr><tr><td>- Replace the batteries in the remote control.</td><td>6</td></tr><tr><td>- Re-insert the batteries with their polarities (+/- signs) as indicated.</td><td>6</td></tr><tr><td>- Make the signal code of the remote control match to the signal code of the unit.</td><td>6</td></tr></table>
<table><tr><td colspan="2">Problem Solution Page</td><td></td></tr><tr><td>Buttons do not work or the unit stops responding</td><td>- To completely reset the unit, unplug the AC cord from the AC outlet for 5-10 seconds.</td><td>-</td></tr><tr><td>The unit does not respond to some operating commands during playback</td><td>- Operations may not be permitted by the disc. Refer to the instructions of the disc.</td><td>14</td></tr><tr><td>The unit cannot read BD/DVD/CD - Condensation ? (Let sit 1 or 2 hours) - You are attempting to play a disc other than one with one of the marks on page 4. - Wipe the dirt off the disc or replace the disc.</td><td>344</td><td>344</td></tr><tr><td>Angle does not switch - The angle cannot be switched for BD/DVD which do not contain multiple angles. In some cases multiple angles are only recorded for specific scenes.</td><td>19</td><td></td></tr><tr><td>Playback does not start when the title is selected</td><td>- Check the "Ratings" setting.</td><td>36</td></tr><tr><td>The password for rating level has been forgotten</td><td>- Enter the default password *4737*, then your forgotten password will be cleared.</td><td>36</td></tr></table>
<h1 id="note-42">Note</h1>
<ul>
<li>Some functions are not available in specific modes, but this is not a malfunction. Read the description in this Operating Instructions for details on correct operations. </li>
<li>Some functions are prohibited on some discs.</li>
</ul>
<h1 id="english-18">ENGLISH</h1>
<p>Others Others</p>
<p>Language Code </p>
<table><tr><td>Language Cod</td><td></td><td>Language Cod</td><td></td><td>Language</td><td>Code</td><td>Language</td><td>Code</td><td>Language</td><td>Code</td></tr><tr><td colspan="2">A-B</td><td>Esperanto</td><td>5161</td><td>Kinyarwanda</td><td>6469</td><td>Quechua</td><td>6367</td><td>Tigrinya</td><td>6655</td></tr><tr><td colspan="2">Abkhazian 4748</td><td>Estonian</td><td>5166</td><td>Kirghiz</td><td>5771</td><td>Rhaeto-Romance</td><td>6459</td><td>Tonga</td><td>6661</td></tr><tr><td colspan="2">Afar 4747</td><td colspan="2">F-H</td><td colspan="2">Kirundi 6460</td><td>Romanian [RUM]</td><td>6461</td><td>Tsonga</td><td>6665</td></tr><tr><td colspan="2">Afrikaans 4752</td><td colspan="2">Faroese 5261</td><td>Korean [KOR]</td><td>5761</td><td>Russian [RUS]</td><td>6467</td><td>Turkish [TUR]</td><td>6664</td></tr><tr><td colspan="2">Albanian 6563</td><td>Fiji</td><td>5256</td><td>Kurdish</td><td>5767</td><td colspan="2">S</td><td colspan="2">Turkmen 6657</td></tr><tr><td colspan="2">Amharic 4759</td><td>Finnish [FIN]</td><td>5255</td><td colspan="2">L-N</td><td>Samoan</td><td>6559</td><td>Twi</td><td>6669</td></tr><tr><td colspan="2">Arabic 4764</td><td>French [FRE]</td><td>5264</td><td>Laothian</td><td>5861</td><td colspan="2">Sangho 6553</td><td colspan="2">U-Z</td></tr><tr><td colspan="2">Armenian 5471</td><td>Frisian</td><td>5271</td><td>Latin</td><td>5847</td><td>Sanskrit</td><td>6547</td><td>Ukrainian</td><td>6757</td></tr><tr><td colspan="2">Assamese 4765</td><td>Galician</td><td>5358</td><td>Latvian; Lettish</td><td>5868</td><td>Scots Gaelic</td><td>5350</td><td>Urdu</td><td>6764</td></tr><tr><td colspan="2">Aymara 4771</td><td colspan="2">Georgian 5747</td><td colspan="2">Lingala 5860</td><td>Serbian</td><td>6564</td><td>Uzbek</td><td>6772</td></tr><tr><td colspan="2">Azerbaijani 4772</td><td>German [GER]</td><td>5051</td><td>Lithuanian</td><td>5866</td><td>Serbo-Croatian</td><td>6554</td><td>Vietnamese</td><td>6855</td></tr><tr><td colspan="2">Bashkir 4847</td><td>Greek [GRE]</td><td>5158</td><td>Macedonian</td><td>5957</td><td>Sesotho</td><td>6566</td><td>Volapuk</td><td>6861</td></tr><tr><td colspan="2">Basque 5167</td><td>Greenlandic</td><td>5758</td><td>Malagasy</td><td>5953</td><td>Setswana</td><td>6660</td><td>Welsh</td><td>4971</td></tr><tr><td colspan="2">Bengali; Bangla 4860</td><td>Guarani</td><td>5360</td><td>Malay</td><td>5965</td><td>Shona</td><td>6560</td><td>Wolof</td><td>6961</td></tr><tr><td colspan="2">Bhutanl 5072</td><td>Gujarati</td><td>5367</td><td>Malayalam</td><td>5958</td><td>Sindhl</td><td>6550</td><td>Xhosa</td><td>7054</td></tr><tr><td colspan="2">Bihari 4854</td><td>Hausa</td><td>5447</td><td colspan="2">Maltese 5966</td><td>Singhalese</td><td>6555</td><td>Yiddish</td><td>5655</td></tr><tr><td colspan="2">Bislama 4855</td><td>Hebrew</td><td>5569</td><td colspan="2">Maori 5955</td><td colspan="2">Siswat 6565</td><td>Yoruba</td><td>7161</td></tr><tr><td colspan="2">Breton 4864</td><td>Hindi</td><td>5455</td><td colspan="2">Marathi 5964</td><td>Slovak [SLO]</td><td>6557</td><td>Zulu</td><td>7267</td></tr><tr><td>Bulgarian [BUL]</td><td>4853</td><td>Hungarian [HUN]</td><td>5467</td><td colspan="2">Moldavian 5961</td><td>Slovenian</td><td>6558</td><td></td><td></td></tr><tr><td>Burmese</td><td>5971</td><td colspan="2">I-K</td><td>Mongolian</td><td>5960</td><td colspan="2">Somali 6561</td><td></td><td></td></tr><tr><td rowspan="2">Byelorussian</td><td rowspan="2">4851</td><td>Icelandic [ICE]</td><td>5565</td><td>Nauru</td><td>6047</td><td>Spanish [SPA]</td><td>5165</td><td></td><td></td></tr><tr><td colspan="2">Indonesian 5560</td><td colspan="2">Nepali 6051</td><td>Sundanese</td><td>6567</td><td></td><td></td></tr><tr><td colspan="2">C-E</td><td>Interlingua</td><td>5547</td><td>Norwegian [NOR]</td><td>6061</td><td>Swahili</td><td>6569</td><td></td><td></td></tr><tr><td>Cambodian</td><td>5759</td><td>Interlingue</td><td>5551</td><td colspan="2">O-R</td><td>Swedish [SWE]</td><td>6568</td><td></td><td></td></tr><tr><td>Catalan</td><td>4947</td><td>Inuplak</td><td>5557</td><td colspan="2">Occitan 6149</td><td colspan="2">T</td><td></td><td></td></tr><tr><td>Chinese [CHI]</td><td>7254</td><td>Irish [IRI]</td><td>5347</td><td>Oriya</td><td>6164</td><td>Tagalog</td><td>6658</td><td></td><td></td></tr><tr><td>Corsican</td><td>4961</td><td>Italian [ITA]</td><td>5566</td><td>Oromo(Afan)</td><td>6159</td><td>Tajik</td><td>6653</td><td></td><td></td></tr><tr><td>Croatian</td><td>5464</td><td>Japanese [JPN]</td><td>5647</td><td>Panjabi</td><td>6247</td><td>Tamil</td><td>6647</td><td></td><td></td></tr><tr><td>Czech [CZE]</td><td>4965</td><td>Javanese</td><td>5669</td><td>Pashto; Pushto</td><td>6265</td><td>Tatar</td><td>6666</td><td></td><td></td></tr><tr><td>Danish [DAN]</td><td>5047</td><td>Kannada</td><td>5760</td><td colspan="2">Persian 5247</td><td>Telugu</td><td>6651</td><td></td><td></td></tr><tr><td>Dutch [DUT]</td><td>6058</td><td>Kashmiri</td><td>5765</td><td>Polish [POL]</td><td>6258</td><td>Thai</td><td>6654</td><td></td><td></td></tr><tr><td>English [ENG]</td><td>5160</td><td>Kazakh</td><td>5757</td><td>Portuguese [POR]</td><td>6266</td><td>Tibetan</td><td>4861</td><td></td><td></td></tr></table>
<h1 id="note-43">Note</h1>
<p>- If you choose a language that has a 3-letter-language code (written in bracket), the code will be displayed every time you change the audio or subtitle language setting on page 22. If you choose any other languages, ‘—’ will be displayed instead.</p>
<h1 id="others-others">Others Others</h1>
<h1 id="specifications">Specifications</h1>
<h1 id="signal-system">SIGNAL SYSTEM</h1>
<p>NTSC color</p>
<h1 id="applicable-discs">APPLICABLE DISCS</h1>
<p>(1) BD/DVD-video Discs <br />
1-layer 12cm single-sided discs, 2-layer 12cm single-sided discs, 2-layer 12cm double-sided discs <br />
(1 layer per side) <br />
1-layer 8cm single-sided discs, 2-layer 8cm single-sided discs, 2-layer 8cm double-sided discs <br />
(1 layer per side) <br />
(2) BD-RE/BD-R (Recorded in BDMV format) <br />
1-layer 12cm single-sided discs, 2-layer 12cm single-sided discs <br />
1-layer 8cm single-sided discs, 2-layer 8cm single-sided discs <br />
(3) DVD-R <br />
1-layer 12cm single-sided discs, 2-layer 12cm single-sided discs <br />
1-layer 8cm single-sided discs, 2-layer 8cm single-sided discs <br />
(4) DVD-RW <br />
1-layer 12cm single-sided discs <br />
1-layer 8cm single-sided discs <br />
(5) Compact discs (audio CD) <br />
12cm discs, 8cm discs <br />
(6) CD-RW/-R <br />
12cm discs, 8cm discs</p>
<h1 id="applicable-memory-cards">APPLICABLE MEMORY CARDS</h1>
<p>(1) SD Memory Card <br />
(2) SDHC Memory Card <br />
(3) minISD Card <br />
(4) microSD Card</p>
<h1 id="s-video-output">S-VIDEO OUTPUT</h1>
<p>Y output level: 1Vp-p (75Ω/ohms)</p>
<p>C output level: 0.286Vp-p</p>
<p>Output connectors: S connector, 1 set</p>
<h1 id="video-output">VIDEO OUTPUT</h1>
<p>Y output level: 1Vp-p (75Ω/ohms)</p>
<p>Output connectors: Pin jack, 1 set</p>
<h1 id="component-output">COMPONENT OUTPUT</h1>
<p>Y output level: 1Vp-p (75Ω/ohms)</p>
<p>PB/CB output level: 0.648Vp-p (75Ω/ohms)</p>
<p>PR/CR output level: 0.648Vp-p (75Ω/ohms)</p>
<p>Output connectors: BNC jacks, 1 set/Pin jacks, 1 set</p>
<h1 id="hdmi-output">HDMI OUTPUT</h1>
<p>Output jack: 19-pin HDMI terminal, 1 set</p>
<p>HDMI ver. 1.3a (Deep Color, Dolby Digital Plus, Dolby TrueHD, DTS-HD)</p>
<h1 id="analog-audio-output">ANALOG AUDIO OUTPUT</h1>
<p>Output level: 2Vrms</p>
<p>2 channel (L, R) output connector: Pin jacks,</p>
<p>Multi channel (FL, FR, C, SL, SR, SBL, SBR, SW): Pin jacks, 1set</p>
<h1 id="audio-output-properties">AUDIO OUTPUT PROPERTIES</h1>
<p>(1) Frequency response</p>
<p>1 BDs (linear PCM) : 4Hz to 22kHz (48kHz sampling) <br />
: 4Hz to 44kHz (96kHz sampling) <br />
: 4Hz to 88kHz (192kHz sampling) <br />
2 DVDs (linear PCM) : 4Hz to 22kHz (48kHz sampling) <br />
: 4Hz to 44kHz (96kHz sampling)</p>
<p>3 CDs : 4Hz to 20kHz</p>
<p>(2) S/N ratio : 125dB</p>
<p>(3) Total harmonic distortion : 1kHz 0.0008%</p>
<p>(4) Dynamic range : 110dB</p>
<h1 id="digital-audio-output">DIGITAL AUDIO OUTPUT</h1>
<p>Optical digital output: Optical connector, 1 set</p>
<p>Coaxial digital output: Pin jack, 1 set</p>
<h1 id="power-supply-2">POWER SUPPLY</h1>
<h1 id="power-consumption">POWER CONSUMPTION</h1>
<p>68W (Standby: 0.8W)</p>
<h1 id="maximum-external-dimensions">MAXIMUM EXTERNAL DIMENSIONS</h1>
<p>W:434mm (17-2/16")</p>
<p>H:139mm (5-8/16")</p>
<p>D:399mm (15-12/16")</p>
<p>(including protruding parts)</p>
<h1 id="mass">MASS</h1>
<p>10.3 kg (22.8 lbs)</p>
<h1 id="remote-control-2">REMOTE CONTROL</h1>
<p>RC-1090</p>
<p>Infrared pulse type</p>
<p>Supply: DC 3V, 2 R6P/AA batteries</p>
<p>External dimensions:</p>
<p>W :52mm (2-1/16")</p>
<p>H :227mm (8-15/16")</p>
<p>D :30mm (1-3/16")</p>
<p>Mass: 171g (0.4 lbs) (included batteries)</p>
<p>- For purposes of improvement, specifications and design are subject to change without notice.</p>
<p>ENGLISH</p>
<h1 id="français">FRANÇAIS</h1>
<h1 id="introduction-2">Introduction</h1>
<p>Introduction</p>
<h1 id="table-des-matières-caractéristiques">Table des Matières Caractéristiques</h1>
<h1 id="introduction-3">Introduction</h1>
<p>Caractéristiques .... 1</p>
<p>Advanced AL24 Processing 2</p>
<p>Important 2</p>
<p>Alimentation de Courant 2</p>
<p>Avertissement 2</p>
<p>Emplacement de l'installation 2</p>
<p>Précautions Pendant l'Installation 2</p>
<p>Avertissement Quant à l'Utilisation .... 3</p>
<p>Avertissement de Rosée .... 3</p>
<p>Évitez les Risques de Choc Electrique et d'Incendie .... 3</p>
<p>Avant l'Utilisation .... 3</p>
<p>À propos du Droit d'auteur .... 3</p>
<p>Accessoires Fournis 3</p>
<p>Renseignements Relatifs à la Marque de Commerce .... 3</p>
<p>À Propos des Disques .... 4</p>
<p>Manipulation des Disques 4</p>
<p>Nettoyage de Disque 4</p>
<p>Disques et Fichiers Lisibles 4</p>
<p>Disques Non Lisibles 5</p>
<p>Systèmes de Couleur 5</p>
<p>Codes Régionaux 5</p>
<p>Structure du Contenu du Disque/de la Carte Mémoire SD ....5</p>
<p>Symboles Utilisés Dans le Mode d'Emploi 5</p>
<p>À Propos de la Télécommande 6</p>
<p>Chargement des Piles 6</p>
<p>L'utilisation de la Télécommande 6</p>
<p>Régler cet Appareil Pour qu'il ne Réaqisse pas à la</p>
<p>Télécommande des Autres Lecteurs DVD DENON 6</p>
<p>Telecommande des Autres Lecteurs DVD DENON miniminimilio
Modification du Code de Signal d'Une Télécommande 6</p>
<p>Noms des Pièces et Fonctions ....7</p>
<p>Panneau Avant 7</p>
<p>Panneau Aarrière 7</p>
<p>Télécommande 8</p>
<p>Afficheur du Panneau Avant 9</p>
<p>Béglage de la Luminosité de l'Afficheur 9</p>
<p>Exemples d'Affichages Durant le Fonctionnement 9</p>
<h1 id="connexions">Connexions</h1>
<p>Connexion à Une Télé ....10</p>
<p>Connexion à un Dispositif d'Affichage Avec un Câble HDMI .....10</p>
<p>Connexion à un Dispositif d'Affichage et un Amplificateur/</p>
<p>Récepteur Avec un Câble HDMI 10</p>
<p>Mode de Sortie HDMI et Signaux de Sortie Réels ....11</p>
<p>Paramètres Audio 11</p>
<p>Connexion numérique à un amplificateur AV avec un</p>
<p>Décodeur Intégré 12</p>
<p>Raccordement à un Dispositif Avec des Entrées Audio</p>
<p>Analogiques à Deux Canaux ....13</p>
<p>Connexions Ambiophonie à un Dispositif Avec Des Canaux</p>
<p>7.1/5.1 des Entrées Audio Analogiques ....13</p>
<p>Connexion du Cordon d'Alimentation 13</p>
<p>Lecture</p>
<p>Mettre Sous Tensions 14</p>
<p>Lecture Directe 14</p>
<p>Opérations au Moyen du Menu Disque, du</p>
<p>Menu Titre et du Menu Éclair ......15</p>
<p>Lecture d'Un Disque DVD-RW/-R en Mode VR ....15</p>
<p>Pause 15</p>
<p>Reprendre la Lecture</p>
<p>Lecture en Avance Rapide / Retour Rapide .....16</p>
<p>Lecture au Ralenti 16</p>
<p>Lecture Pas à Pas ....16</p>
<p>Vitesse de Dialogue....17</p>
<p>Répétition de la Lecture ....17</p>
<p>A-B Répéter 17</p>
<p>Programmation de la Lecture ....18</p>
<p>Lecture Aléatoire ....18</p>
<p>Zoom 19</p>
<p>Angle de Caméra 19</p>
<p>Angie de camera 19
Recherche 19</p>
<p>Affichage à l'Écran 20</p>
<p>Aménage d'Écrain immédiomédie 20
Sélection du Format Audio et Vidéo ....22</p>
<p>Sélection des Suites/Canaux Audio 22</p>
<p>Sélection de la Lanque du Sous-Titrage 22</p>
<p>Ambio Virtuel 23</p>
<p>Mode Pure Direct 23</p>
<p>Réglage du Mode Audio BD 23</p>
<p>Réglage de l'Image 24</p>
<p>Lecture d'UnFichier MP3, Windows Media™ Audio,</p>
<p>JPEG et DivX ^* .....25</p>
<p>Kodak Picture CD 27</p>
<p>Lecture de la Carte Mémoire SD ....27</p>
<p>Fonction de Configuration</p>
<p>L'utilisation du Menu de Configuration 29</p>
<p>Rapide 29</p>
<p>Personnalisé 29</p>
<p>Initialise 37</p>
<p>Autres</p>
<p>Dépannage 38</p>
<p>Code de Lanque ....39</p>
<p>Spécifications 40</p>
<p>●HDMI (High-Definition Multimedia Interface)</p>
<p>Vous profiterez d'une sortie vidéo plus claire lorsque vous</p>
<p>brancherez ce l'appareil à un dispositif de visionnement</p>
<p>disposant d'un port compatible HDMI.</p>
<p>•Vitesse de Dialogue</p>
<p>Lecture à une vitesse légèrement supérieure tout en maintenant</p>
<p>la sortie sonore.</p>
<p>La vitesse de dialogue est uniquement disponible avec les</p>
<p>disques enregistrés en format Dolby Digital.</p>
<p>Pause/Rapide/Lente/Lecture Par Pas</p>
<p>Divers modes de lecture sont offerts, notamment pause sur</p>
<p>image, avance/retour rapide, ralenti et image par image.</p>
<p>●Mode Pause Sur Image</p>
<p>Il est possible d'ajuster la résolution des images lorsque</p>
<p>l'appareil est en mode pause.</p>
<p>●Lecture Aléatoire Pour CD Audio, MP3, JPEG, et Windows</p>
<p>Media™ Audio</p>
<p>Cet appareil peut jouer les pistes/fichiers de manière aléatoire.</p>
<p>- Programme de Lecture Pour CD Audio, MP3, JPEG, et</p>
<p>Windows Media™ Audio</p>
<p>Vous pouvez programmer l'ordre de lecture des pistes/fichiers</p>
<p>dans l'ordre que vous voulez.</p>
<p>●Menus BD/DVD Dans la Langue de Préférence</p>
<p>Vous pouvez afficher les menus BD/DVD selon votre langue de</p>
<p>préférence, si elle est disponible sur le BD/DVD.</p>
<p>- Interruption de Courant Automatique</p>
<p>Le courant est automatiquement interrompu si aucune activité</p>
<p>l'appareil ou de la télécommande n'est détectée pendant plus</p>
<p>de 30 minutes (consultez la page 37).</p>
<p>- Sous-Titres Dans la Langue de Préférence</p>
<p>Vous pouvez choisir d'afficher les sous-titres dans votre langue de</p>
<p>préférence, si cette dernière est disponible sur le BD/DVD et DivX®.</p>
<p>•Choisir un Angle de Caméra</p>
<p>Vous pouvez choisir un angle de caméra, si le disque contient</p>
<p>des séquences enregistrées sous différents angles.</p>
<p>●Choix de Langue Audio et Mode de Son</p>
<p>Vous pouvez choisir une langue audio et un mode de son, si</p>
<p>différentes langues et différents modes sont offerts sur le disque.</p>
<p>- Contrôle de Classement (Contrôle Parental)</p>
<p>Vous pouvez règle le niveau de contrôle afin d'empêcher la</p>
<p>lecture de disque ne convenant pas aux enfants.</p>
<p>•Détection Automatique de Disques</p>
<p>Cet appareil détecte automatiquement si le disque chargé est un</p>
<p>BD, DVD, CD audio, MP3, JPEG, Windows Media™ Audio ou DivX®.</p>
<p>●Pure Direct</p>
<p>La qualité du son de la sortie audio analogique est améliorée par</p>
<p>l'arrêt de la sortie de signaux vidéo, etc.</p>
<h1 id="français-2">FRANÇAIS</h1>
<h1 id="introduction-introduction-4">Introduction Introduction</h1>
<h1 id="affichage-à-lécran">•Affichage à l'Écran</h1>
<p>Les informations sur l'opération en cours peuvent être affichées à l'écran de la télévision afin que vous puissiez confirmer les fonctions en cours (par ex. le programme de lecture) avec la télécommande.</p>
<h1 id="gradateur">•Gradateur</h1>
<p>Il est possible d'ajuster la luminosité du panneau avant.</p>
<h1 id="economiseur-décran">•Economiseur d'Écran</h1>
<p>L'économiseur d'écran est activé lorsque l'appareil ou sa télécommande demeure inactif pendant plus de cinq minutes. La luminosité de l'afficheur est obscurcie à 75 %. Le programme est désactivé dès la reprise des activités.</p>
<h1 id="contrôle-de-limage">- Contrôle de l'Image</h1>
<p>Le contrôle de l'image permet d'ajuster la qualité de l'image de l'affichage en question.</p>
<h1 id="recherche">Recherche</h1>
<p>Recherche de chapitre : Recherche un chapitre souhaité.
Recherche de titre : Recherche un titre souhaité.
Recherche de piste : Recherche d'une piste ou d'un fichier.
Recherche chronologique : Recherche d'une heure, d'un titre ou d'une piste ou d'un fichier.</p>
<h1 id="répétition">•Répétition</h1>
<p>Chapitre : Répète la lecture d'un chapitre du disque.
Titre : Répète la lecture d'un titre du disque.
Piste : Répète la lecture d'une piste ou d'un fichier du disque.
Tous : Répétition de la lecture du disque au complet.</p>
<p>(non disponible pour les disques BD et les DVD-vidéo)
A-B : Répète la lecture d'une section entre deux points.</p>
<p>Groupe : La répétition de la lecture d'un dossier du disque MP3/ JPEG/Windows Media™ Audio/DivX® en répétition de lecture est possible.</p>
<h1 id="zoom-3">- Zoom</h1>
<p>Une image agrandie x1,2, x1,5, x2,0, x4,0 peut être affichée. (non disponible pour BD)</p>
<h1 id="indicateur">-Indicateur</h1>
<p>Les points de référence électriques attribués par l'utilisateur peuvent être rappelés.</p>
<h1 id="reprendre-la-lecture">●Reprendre la Lecture</h1>
<p>L'utilisateur peut reprendre la lecture depuis l'endroit où elle a été interrompue, même s'il y a eu une interruption de courant.</p>
<h1 id="indication-du-débit-binaire">-Indication du Débit Binaire</h1>
<p>Le débit binaire (le nombre de données vidéo lues) peut être affiché durant la lecture d'un contenu vidéo. (non disponible pour BD)</p>
<h1 id="drc-compression-de-la-gamme-dynamique">●DRC (Compression de la Gamme Dynamique)</h1>
<p>Suivez cette procédure pour régler la dynamique des signaux de sortie lorsque vous jouez des DVD/Blu-ray enregistrés en Dolby Digital/Dolby Digital Plus/Dolby TrueHD.</p>
<h1 id="affichage-dune-image-jpeg">•Affichage d'Une Image JPEG</h1>
<p>Les Kodak Picture CD peuvent être visionnées à nouveau. Les images fixes enregistrées en format JPEG sur un DVD-RW/-R, CD-RW/-R ou une carte mémoire SD peuvent également être visionnées.</p>
<h1 id="lecture-de-fichier-windows-media-audio">●Lecture de Fichier Windows Media™ Audio</h1>
<p>Vous pouvez profiter des fichlers Windows Media™ Audio enregistrés sur un DVD-RW/-R, CD-RW/-R ou une carte mémoire SD.</p>
<h1 id="lecture-dun-fichier-mp3">●Lecture d'Un Fichier MP3</h1>
<p>Vous pouvez profiter des fichiers MP3 enregistrés sur un DVD-RW/-R, CD-RW/-R ou carte mémoire SD.</p>
<h1 id="lecture-de-fichier-divx">●Lecture de Fichier DivX®</h1>
<p>Vous pouvez profiter des fichiers DivX ^99 enregistrés sur un DVD-RW/-R ou un CD-RW/-R.</p>
<p>• Produit officiel DivX®Certified</p>
<p>- Prend en charge la lecture de toutes les versions de vidéo DivX ^ (y compris DivX ^ 6) et les fichiers DivX ^ standard.</p>
<h1 id="lecture-du-contenu-dune-carte-mémoire-sd">●Lecture du Contenu d'Une Carte Mémoire SD</h1>
<p>- Vous pouvez lire MP3, Windows Media™ Audio, ou JPEG stockés dans une carte mémoire SD.
- Vous pouvez stocker des commentaires image dans image, sous-titres ou autres suppléments pour BD-ROM profil 1.1 dans une carte mémoire SD et les lire avec le BD-ROM.</p>
<h1 id="application-bd-j">●Application BD-J</h1>
<p>- Lorsque les disques Blu-ray permettent des application java (BD Java), vous pouvez profiter d'une fonction Interactive (p. ex. Jeu).</p>
<h1 id="sortie-analogique-ambiophonique-71">- Sortie analogique ambiophonique 7.1</h1>
<p>Ce lecteur est pourvu de prises de sortie audio ambiophonique 7.1 pour la lecture.</p>
<h1 id="advanced-al24-processing-2">Advanced AL24 Processing</h1>
<p>Le traitement "Advanced AL24 Processing" qui augmente considérablement le volume d'information dans la zone de l'axe des temps en utilisant uniquement la détection du signal haute vitesse et la technologie de traitement pour le circuit de lecture de BD/DVD/CD pour le signal PCM est fourni pour la sortie deux canaux. En plus de l'expansion de données jusqu'à 24 bits, la correction naturelle du signal sans apparenter les données originales est effectuée avec échantillonnage d'interpolation.</p>
<p>De plus, la technologie originale de reproduction de forme d'onde analogique de DENON, "AL24 Processing PLUS", est utilisée pour la sortie audio à 7.1 canaux, ce qui assure la qualité élevée du son pour toutes les sources du signal PCM.</p>
<p>Le témoin "Advanced AL24" s'allume sur le panneau avant quand Advanced AL24 Processing est activé.</p>
<h1 id="important-2">Important</h1>
<p>Utiliser uniquement des disques dont les logos sont indiqués à la page 4.</p>
<h1 id="alimentation-de-courant">Alimentation de Courant</h1>
<p>L'alimentation de courant principale est engagée lorsque la fiche principale est branchée dans une prise de 120 V, 60 Hz CA. Afin de faire fonctionner l'appareil, appuyer sur <— ON / ■ OFF> pour l'allumer.</p>
<h1 id="avertissement">Avertissement</h1>
<p>Afin d'éviter les risques d'incendie ou de choc électrique, n'exposez pas cet appareil à la pluie ni à l'humidité.</p>
<h1 id="avertissement-2">AVERTISSEMENT:</h1>
<p>PARTIES SOUS TENSION À L'INTÉRIEUR.
NE PAS RETIRER LES VIS.</p>
<h1 id="emplacement-de-linstallation">Emplacement de l'Installation</h1>
<p>Pour la sécurité et les performances optimales de cet appareil:
- Ne pas mettre l'appareil debout sur le côté. Installez l'appareil en position horizontale et de façon stable. Ne posez rien directement sur l'appareil. Ne placez pas l'appareil directement sur le téléviseur.
- Protéger contre les rayons du soleil et tenir éloigné des sources de chaleur intense. Évitez les lieux poussièreux ou humides. Évitez les lieux dont la ventilation est Insuffisante pour une bonne dissipation thermique. N'obstruez pas les trous de ventilation sur les côtés de l'appareil. Évitez les lieux soumis à de fortes vibrations ou à des champs magnétiques intenses.
- Assurez-vous d'avoir retiré le disque et de débrancher le cordon d'alimentation de la fiche avant de transporter l'appareil.</p>
<p>Périodes d'inutilisation - Éteindre l'appareil lorsqu'il n'est pas utilisé. Débrancher l'appareil de la prise électrique s'il n'est pas utilisé pour une période de temps prolongée. Débrancher l'appareil pendant les orages électriques.</p>
<p>Veuillez lire attentivement le mode d'emploi avant d'utiliser l'appareil, puis le conserver pour consultation future.</p>
<h1 id="précautions-pendant-linstallation">Précautions Pendant l'Installation</h1>
<p>Si cet appareil ou un autre équipement électronique utilisant des microprocesseurs sont utilisés à proximité d'un tuner ou d'une télévision, cela peut générer des bruits ou déformer l'image. Le cas échéant, veuillez suivre ces étapes:</p>
<p>- Installez l'appareil aussi éloigné que possible du tuner ou de la télévision.</p>
<p>- Placez les fils de l'antenne du tuner ou de la télévision loin du cordon d'alimentation de cet appareil et des cordons de raccord d'entrée et de sortie.</p>
<p>- Les bruits et les interférences arrivent plus fréquemment lorsqu'une antenne intérieure ou des câbles de liaison 300Ω/ohms sont utilisés. Nous vous conseillons d'utiliser une antenne extérieure et des câbles coaxiaux de 75 Ω/ohms.</p>
<h1 id="remarque">Remarque</h1>
<p>- N'installez pas cet appareil dans un espace confiné, tel que bibliothèque ou autre, afin de permettre une bonne répartition de la chaleur.</p>
<h1 id="français-3">FRANÇAIS</h1>
<p>Introduction <br />
<img alt="" src="images/d7daf72482d8686eab86d9978815a22eb01fe652fbf4e1e65cbd824a25ac8953.jpg" /></p>
<details>
<summary>text_image</summary>
* 10 cm ou plus
CDI
*
</details>
<p><img alt="" src="images/8be60386c09315f3988e0ebcb7afd2d5570f31020c77f8cc6664f321e1a791a6.jpg" /></p>
<h1 id="avertissement-quant-à-lutilisation">Avertissement Quant à l'Utilisation</h1>
<p>- Avertissements quant à l'utilisation de téléphones mobiles. Utiliser un téléphone mobile près de cet appareil peut causer du bruit. Si cela se produit, éloignez le téléphone mobile de cet appareil lorsque vous l'utilisez.</p>
<h1 id="avant-de-mettre-lappareil-en-marche">- Avant de mettre l'appareil en marche.</h1>
<p>Vérifiez une fois de plus que toutes les connexions sont faites correctement et qu'il n'y a pas de problème au niveau des câbles de connexion. Réglez toujours le bouton de mise en marche en position attente (standby) avant de connecter ou de déconnecter les câbles de connexion.</p>
<h1 id="aérez-suffisamment-lemplacement">•Aérez suffisamment l'emplacement.</h1>
<p>Si l'appareil est dans une salle enfumée par la cigarette, ou autre, pendant une période prolongée, la surface de l'oeil optique pourrait s'encrasser et, par conséquent, ne plus pouvoir lire correctement les signaux.</p>
<h1 id="avertissement-de-rosée">Avertissement de Rosée</h1>
<p>Une condensation peut se former à l'intérieur de l'appareil lorsqu'il est transporté d'un lieu froid à un lieu chaud, lorsqu'une pièce froide est chauffée ou en cas de conditions d'humidité élevée. N'utilisez pas cet appareil pendant au moins deux heures, jusqu'à ce que l'intérieur soit sec.</p>
<h1 id="évitez-les-risques-de-choc-électrique-et-dincendie">Évitez les Risques de Choc Électrique et d'Incendie</h1>
<ul>
<li>Ne pas manipuler le cordon d'alimentation avec les mains mouillées. </li>
<li>Ne pas tirer sur le cordon d'alimentation pour débrancher l'appareil de la prise murale. Saisissez-le par la fiche. </li>
<li>Si, par accident, l'appareil est aspergé d'eau, débranchez immédiatement le cordon d'allimentation et apportez l'appareil à un centre de réparation autorisé.</li>
</ul>
<h1 id="avant-lutilisation">Avant l'Utilisation</h1>
<p>Portez une attention particulière aux détails suivants avant d'utiliser l'appareil:</p>
<h1 id="déplacer-lappareil">- Déplacer l'appareil.</h1>
<p>Pour prévenir les courts-circuits et pour éviter d'endommager les fils des câbles de connexion, débranchez toujours le cordon d'alimentation et déconnectez tous les câbles reliant l'appareil aux composants radio avant de déplacer l'appareil.</p>
<h1 id="conservez-le-mode-demploi-dans-un-lieu-sûr">- Conservez le mode d'emploi dans un lieu sûr.</h1>
<p>Après lecture du mode d'emploi, rangez le dans un lieu sûr, car il pourrait être utile plus tard.</p>
<p>- Lorsque le bouton <ON/STANDBY> est en position STANDBY (attente), l'appareil est toujours connecté à la ligne à c.a. Veuillez vous assurer d'appuyer sur <ON / OFF> pour couper l'alimentation ou de débrancher le cordon lorsque vous quittez la maison, par exemple lorsque vous partez en vacances.</p>
<h1 id="remarquez-que-les-illustrations-de-ce-manuel-peuvent-différer-de-lappareil-concerné-par-les-explications">- Remarquez que les illustrations de ce manuel peuvent différer de l'appareil concerné par les explications.</h1>
<p>Le numéro de série de cet appareil se trouve à l'arrière. Le numéro de série est unique à chaque appareil. Vous devriez inscrire le numéro de série et toute autre information importante ici et conserver ce livret comme registre d'achat afin de faciliter son identification en cas de vol.</p>
<table><tr><td>Date d'Achat</td><td></td></tr><tr><td>Nom du Détaillant</td><td></td></tr><tr><td>Adresse du Détaillant</td><td></td></tr><tr><td>N° de Téléphone du Détaillant</td><td></td></tr><tr><td>N° du Modèle</td><td></td></tr><tr><td>N° de Série</td><td></td></tr></table>
<h1 id="à-propos-du-droit-dauteur">À propos du Droit d'auteur</h1>
<p>Le copiage, la diffusion, la présentation en public et le prêt des disques non autorisés sont interdits.</p>
<p>Ce produit contient de la technologie qui est protégée par des droits d'auteur, de propriété intellectuelle et des brevets en vigueur aux États-Unis. L'exploitation des présentes technologies protégées par copyright doit être autorisée par Macrovision et est permise à des fins domestiques ou autres fins limitées, sauf si autorisé diversement par Macrovision.</p>
<p>La rétroingénierie ou le démontage sont interdits.</p>
<p>No des brevets des É.-U.: 4.631.603; 4.819.098; 4.907.093; 5.315.448 et 6.516.132.</p>
<p>Introduction</p>
<h1 id="accessoires-fournis">Accessoires Fournis</h1>
<p>Veuillez vérifier pour vous assurer que vous avez bien tous les articles suivants avec l'appareil dans la boîte.</p>
<p>télécommande (RC-1090) 2 Piles "AA" (R6P)</p>
<p><img alt="" src="images/eebd65fcafcee4e1ff7971ef210fef940c81e50dc265f21f8eb17bbfd6ec80fb.jpg" /></p>
<p><img alt="" src="images/ca2e4e5b9bd103a589890718ee9982bcc6736c6b578f75ce3019f2d85f32be3a.jpg" /></p>
<p>cordon d'alimentation mode d'emploi</p>
<p><img alt="" src="images/c89a00bfded9c2ad96bfe0f83845feb1c927fc605ac48d1bf5550eff9e59ab4e.jpg" /></p>
<p><img alt="" src="images/aae465675062b558734619305ae9c5718f44ebbe28820734beec257d4fcf33c7.jpg" /></p>
<p>liste des centres de service carte de garantie</p>
<p><img alt="" src="images/633fd8942f4d493496b529e0d72d799ed1649f4026d9553a1256450ddfb78537.jpg" /></p>
<p><img alt="" src="images/ac8dc46415cd64b6c64fd9f995594d9b085dd61b9a5bf710655456ec6969ea73.jpg" /></p>
<p>câble audio RCA câble vidéo RCA</p>
<p><img alt="" src="images/aa58ca0ed5e1bc6c01a0a4bd778e9e66b8bd5707105a45fe8ade3c3e03adba1d.jpg" /></p>
<p><img alt="" src="images/2d79fb9530170d332f712f5191d6051ad5e751f319cf956419d930d6959e3bf3.jpg" /></p>
<h1 id="renseignements-relatifs-à-la-marque-de-commerce">Renseignements Relatifs à la Marque de Commerce</h1>
<h1 id="hdmi">HDMI™</h1>
<p>HDMI, le logo HDMI et High-Definition Multimedia Interface HDMI Licensing LLC sont des marques commerciales ou des marques commerciales.</p>
<h1 id="dolby-digitalplus">DOLBY DIGITAL·PLUS</h1>
<h1 id="dolby-truehd">DOLBY TRUEHD</h1>
<p>Fabriqué sous licence de Dolby Laboratories. Le terme Dolby et le sigle double D sont des marques commerciales de Dolby Laboratories.</p>
<h1 id="dts-digital-survey">dts Digital Survey</h1>
<p>Fabriqué sous licence en vertu des numéros de brevet américains suivants: 5.451.942; 5.956.674; 5.974.380; 5.978.762; 6.487.535 et autres brevets américains et internationaux émis ou en instance. DTS et DTS Digital Surround sont des marques déposées et les logos et le symbole DTS sont des marques de commerce de DTS, Inc. © 1996-2007 DTS, Inc. Tous droits réservés.</p>
<h1 id="introduction-introduction-5">Introduction Introduction</h1>
<p><img alt="" src="images/14f515d7e56c0f2f0e55e67970d04854a51ec086670d1ee4ed2cd5cb02644e34.jpg" /></p>
<p><img alt="" src="images/0d5c9f40240cf3770cc837ddf361938123484f4a77d3e0e173a8cd9ba023b566.jpg" /></p>
<h1 id="powered">POWERED</h1>
<p>Java, toutes les autres marques de commerce et tous les autres logos sont des marques de commerce ou des marques déposées de Sun Microsystems, Inc. aux États-Unis et/ou dans les autres pays.</p>
<p><img alt="" src="images/eec7b245c3a01e5abaf81368c3262e5e39f45475db60e0a2244d42133067c565.jpg" /></p>
<p>DivX, la certification DivX et les logos associés sont des marques de DivX, Inc. et sont utilisés sous licence.</p>
<p><img alt="" src="images/722410d88d62eeb3bb82b91b22f401d9880de325d465399f47fe8a8793b616a8.jpg" /></p>
<p>Windows Media et le logo Windows sont des marques de commerce ou des marques de commerce déposées de Microsoft Corporation aux États-Unis et/ou dans d'autres pays.</p>
<p>"Blu-ray Disc" et sont des marques de commerce.</p>
<p>DVD est une marque commerciale de DVD Format/Logo Licensing Corporation.</p>
<p><img alt="" src="images/45d92540068115874d5206f71699dbf5a887110fa4de177cb4c74ea397b53862.jpg" /></p>
<p>Picture CD est une marque de commerce de Eastman Kodak Company.</p>
<h1 id="à-propos-des-disques">À Propos des Disques</h1>
<h1 id="manipulation-des-disques">Manipulation des Disques</h1>
<ul>
<li>Manipulez les disques en veillant à ce que les empreintes digitales et la poussière n'adhèrent pas à leurs surfaces. </li>
<li>Rangez toujours le disque dans son boîtier protecteur lorsque vous ne l'utilisez pas. </li>
<li>Veuillez prendre note que cet appareil ne peut lire les disques ayant des formes spéciales. Ne tentez pas de lire ces derniers au risque d'endommager le lecteur.</li>
</ul>
<h1 id="nettoyage-de-disque">Nettoyage de Disque</h1>
<ul>
<li>Lorsqu'un disque est sale, nettoyez-le avec un torchon. Frottez le disque du centre vers l'extrémité. Ne frottez pas en mouvements circulaires. </li>
<li>N'utilisez aucun solvant tels que benzène, diluant, produit de nettoyage disponible sur le marché, détergent, produit de nettoyage abrasif ou antistatique en aérosol conçu pour nettoyer des disques analogiques.</li>
</ul>
<h1 id="disques-et-fichiers-lisibles">Disques et Fichiers Lisibles</h1>
<p>Cet appareil est compatible avec la lecture des disques suivants. Assurez-vous que le BD ou le DVD que vous souhaitez lire respecte les exigences en matière de code régional et les systèmes de couleur tels que décrits on page 5. Sur cet appareil, vous pouvez lire des disques qui portent les logos suivants. La lecture des autres types de disques n'est pas garantie.</p>
<h1 id="disques-lisibles-logos">Disques lisibles Logos</h1>
<p>Disque Blu-ray</p>
<p>-BD-vidéo</p>
<p>- BD-BF (ver 3.0)</p>
<p>(Enregistré en format BDMV)</p>
<p>- B D -(Ver.2.0)</p>
<p>(Enregistré en format BDMV)</p>
<p>( Il est possible que les disques non</p>
<p>finalisés ne puissent être lus.)</p>
<p><img alt="" src="images/8616e04eec736dc8d8f7161f553be705ad4aa2e8ce9f224f65a065d3066349ba.jpg" /></p>
<table><tr><td>DVD-vidéo</td><td></td><td>DVDVIDEO</td><td>DVDVISIO</td></tr><tr><td>DVD-RW</td><td>(disques finalisés uniquement)</td><td>DVDRW</td><td>DVDRW</td></tr><tr><td>DVD-R DVD-R DL</td><td>(disques finalisés uniquement)</td><td>DVDR</td><td>DVDR</td></tr></table>
<p>CD-DA (CD audio)</p>
<p><img alt="" src="images/5eb9d94c678ed1e7e682511edcdd42d4cb41fadd1c51a059039776fdfffd796a.jpg" /></p>
<p>CD-RW</p>
<p><img alt="" src="images/b0d6061814731e37f099e6909288e7889c5bc5da5d4c605733e00186abcb55e6.jpg" /></p>
<p><img alt="" src="images/3a346808c8efc1bfb5c9436a05cfea96e0a8c6a91f20a4ea13846f25ea1899a7.jpg" /></p>
<p>CD-R</p>
<p><img alt="" src="images/e4a0b28a02a25f905cfd4aa9cc0c44ca87385caf0c99e6e0ff4bc346234d0025.jpg" /></p>
<p><img alt="" src="images/fdac52f25d7309baa9ec6daf38be2153171590abf43b9f7b3d39d240ce9e9375.jpg" /></p>
<p>Kodak Picture CD</p>
<p><img alt="" src="images/6b0ef40879c4d9938b0cd0d702aa3fb99ad8e5ea1d814bba949d612ab8fc3505.jpg" /></p>
<p>DTS - CD (Disque de musique 5.1)</p>
<p>-</p>
<h1 id="fichiers-lisibles-logos-média">Fichiers lisibles Logos Média</h1>
<p>MP3</p>
<p>-</p>
<p>Windows Media™ Audio</p>
<p><img alt="" src="images/d42527f7dbf5cd9be9970a04e7227895674c60b5fd894f66058e9a47cc6f531b.jpg" /></p>
<p>JPEG</p>
<p>一</p>
<p>DVD-RW/-R
CD-RW/-R</p>
<p>Carte mémoire SD</p>
<p>(comprend SDHC)</p>
<p>Carte miniSD</p>
<p>Carte microSD</p>
<p>DivX®</p>
<p><img alt="" src="images/e2a003e9ac74de8a5021a0d31831125aab8ac454e30e95e8c3357b3311763bed.jpg" /></p>
<p>DVD-RW/-R
CD-RW/-R</p>
<h1 id="français-4">FRANÇAIS</h1>
<h1 id="remarque-2">Remarque</h1>
<ul>
<li>Les disques contenant les fichlers DivX ^ avec la fonction de lecture DivX ^ GMC (compensation globale du mouvement), une fonction DivX ^ supplémentaire, ne peuvent être lus sur cet appareil. </li>
<li>Cet appareil ne peut lire les contenus de disque protégés par la gestion des droits numériques de Windows Media™ (DRM). </li>
<li>"WMA" (Windows Media™ Audio) est un codec audio mis au point par Microsoft® aux États-Unis d'Amérique.</li>
</ul>
<h1 id="cartes-lisibles-fichiersdonnées-lisibles">Cartes lisibles Fichiers/données lisibles</h1>
<p>Carte mémoire SD (8 MB à 2 GB) MP3, Windows Media™ Audio,
Carte mémoire SDHC (4 GB) JPEG, Commentaire image dans
Carte miniSD (8 MB - 2 GB) Image, sous-tlitres ou autres
suppléments pour BD-ROM profil
Carte microSD (8 MB - 2 GB) 1.1</p>
<h1 id="remarque-sur-les-cartes-mémoire-sd">Remarque Sur les Cartes Mémoire SD</h1>
<ul>
<li>Ne pas retirer la carte mémoire SD ou éteindre l'appareil pendant la lecture du contenu de la carte. Ceci pourrait causer un mauvais fonctionnement ou la perte des données sur la carte. </li>
<li>Veuillez conserver les cartes mémoire SD dans leur boîtier lorsque vous ne les utilisez pas. <br />
• N'essayez pas d'ouvrir ni de modifier la carte. </li>
<li>Ne touchez pas la surface du terminal avec les doigts ou un métal quelconque. </li>
<li>Ne fixez pas d'étiquettes ou d'autocollants sur les cartes. </li>
<li>Ne pas retirer l'étiquette d'origine sur les cartes mémoire SD. </li>
<li>Cet appareil accepte la carte mémoire SD avec le système de fichier FAT12/FAT16 et la carte mémoire SDHC avec le système de fichier FAT32. </li>
<li>Cet appareil peut ne pas lire les cartes mémoire SD formatées sur un ordinateur. Si tel est le cas, reformatez les cartes mémoire SD sur cet appareil et essayez à nouveau. </li>
<li>Cet appareil n'accepte pas les cartes mémoire mini SDHC et micro SDHC. </li>
<li>Pour la carte miniSD et microSD, l'adaptateur est indispensable.</li>
</ul>
<p><img alt="" src="images/0899a3631a3fb2d47d66572a2aa4467f312692c37b34b1dfc0f0cb2ce7c0aab1.jpg" /></p>
<details>
<summary>text_image</summary>
Adaptateur pour
carte miniSD
Carte miniSD
Adaptateur pour
carte microSD
Carte microSD
</details>
<p>- Des portions de ce produit sont protégées par la loi sur le droit d'auteur et sont fournies sous licence par ARIS/SOLANA/4C.</p>
<h1 id="français-5">FRANÇAIS</h1>
<h1 id="introduction-4">Introduction</h1>
<h1 id="disques-non-lisibles">Disques Non Lisibles</h1>
<p>Les disques suivants ne sont pas lus sur cet appareil.</p>
<p>• BD-RE Vers.1.0 (disque BD avec cartouche) <br />
• BD-RE (Ver.2.0) (enregistrés en format BDAV) <br />
• BD-RE (Ver.1.0) (enregistrés en format BDAV) <br />
- BD contient des fichiers MP3/Windows Media™ Audio/JPEG/DivX® <br />
• Disque hybride BD/DVD (p. ex. disque hybride Total HD) <br />
- BD-vidéo n'incluant pas de "A" dans le code région. <br />
- DVD-vidéo n'incluant ni de "ALL" ni de "1" dans le code région. <br />
• DVD-ROM/RAM (pour les disques DVD-ROM, les fichiers de <br />
données DivX ^40 3.11, 4.x, 5.x et 6 peuvent être joués) <br />
- DVD-RW/-R enregistré dans un format d'enregistrement incompatible <br />
- CD-ROM (les fichiers de données DivX ^® 3,11, 4.x, 5.x et 6 peuvent être joués) <br />
• CD vidéo (seule la partie audio peut être jouée) <br />
- CD-G (seuls les signaux audio peuvent être transmis) <br />
• Disque compact interactif (CD-I) <br />
• Disque vidéo (VSD) <br />
• CD vidéo/CD super vidéo <br />
- CD super audio (seul le son enregistré sur la couche normale du CD peut être lu). Le son enregistré sur la couche CD super audio haute densité ne peut être lu. <br />
• DVD audio <br />
- HD DVD <br />
- Disque ayant une zone d'enregistrement d'un diamètre de moins de 55 mm <br />
- Disque non autorisé (Disque piraté) <br />
- Disque non finalisés</p>
<h1 id="systèmes-de-couleur">Systèmes de Couleur</h1>
<p>Les disques BD et les DVD sont enregistrés selon des systèmes de couleurs distinctes dans le monde entier. Le système de couleur le plus courant est NTSC (principalement utilisé aux Etats-Unis et au Canada). Cet appareil utilise NTSC, donc les BD et les DVD que vous écoutez doivent être enregistrés par le système NTSC. Vous ne pouvez pas lire des BD ou des DVD enregistrés avec d'autes systèmes de couleur.</p>
<h1 id="codes-régionaux">Codes Régionaux</h1>
<p>Cet appareil a été conçu afin de lire les BD avec la région A et les DVD-vidéo avec la région 1. Vous ne pouvez pas lire de BD ou de DVD-vidéo étiquetés pour d'autres régions. Repérez les symboles qui se trouvent sur la droite de votre BD ou de votre DVD-vidéo. Si ces symboles de région n'apparaissent pas sur votre BD ou votre DVD-vidéo, cet appareil ne pourra pas lire le disque. La lettre ou le chiffre à l'intérieur du globe désigne la région dans le monde. Un BD ou un DVD-vidéo étiqueté pour une région en particulier peut seulement être lu sur un appareil doté du même code de région.</p>
<p><img alt="" src="images/6a95ccee1d37c6b489ec4e11cfacdf43cb8044f6ca420d7e64477dc9c7edf3d4.jpg" /></p>
<h1 id="structure-du-contenu-du-disquede-la-carte-mémoire-sd">Structure du Contenu du Disque/de la Carte Mémoire SD</h1>
<p>Le contenu d'un BD / DVD est généralement divisé en titres. Les titres peuvent être subdivisés en chapitres.</p>
<p><img alt="" src="images/4f8ecaed00c2495ee90eb5818305b39b1f649d182065c487b8cf7da0d78a33a4.jpg" /></p>
<details>
<summary>text_image</summary>
BD/DVD
titre 1 titre 2
chapitre 1 chapitre 2
chapitre 1 chapitre 2
chapitre 3
D audio sont divisés en pistes.
CD audio
piste 1 piste 2 piste 3 piste 4 piste 5
</details>
<p>Les disques de données ou les cartes mémoire SD contiennent MP3/Windows Media™ Audio/JPEG/DivX®, qui sont divisés en dossiers, et ces dossiers sont sous-divisés en fichiers.</p>
<p><img alt="" src="images/1eefab0f9ad507afce1ce5d27bf627d6b6531f5f685e296f41aa4adeb4a8d6da.jpg" /></p>
<details>
<summary>text_image</summary>
dossier (groupe) 1 dossier (groupe) 2
fliver (groupe 1) fliver (groupe 2) fliver (groupe 3) fliver (groupe 4) fliver (groupe 5)
</details>
<p>5
FRANÇAIS</p>
<p>Introduction</p>
<h1 id="symboles-utilisés-dans-le-mode-demploi">Symboles Utilisés Dans le Mode d'Emploi</h1>
<p>Afin d'indiquer à quel type de média correspond chaque fonction, nous avons mis les symboles suivants devant chaque élément à utiliser.</p>
<h1 id="symbole">Symbole</h1>
<p>BD-V</p>
<h1 id="description">Description</h1>
<p>La description concerne les disques BD-vidéo et BD-RE (ver. 3.0)/BD-R (ver. 2.0) enregistrés en format BDMV</p>
<p>DVD-V</p>
<p>La description concerne un disque DVD-vidéo et un disque DVD-RW/-R enregistré en mode vidéo</p>
<p>DVD-VR</p>
<p>La description concerne un disque DVD-RW/-R enregistré en mode VR</p>
<p>CD</p>
<p>La description concerne un CD audio et un DTS-CD</p>
<p>MP3</p>
<p>La description se rapporte aux DVD-RW/-R, CD-RW/-R et carte de mémoire SD avec fichiers MP3</p>
<p>WMA</p>
<p>La description se rapporte aux DVD-RW/-R, CD-RW/-R et carte de mémoire SD avec fichiers Windows Media™ Audio</p>
<p>JPEG</p>
<p>La description se rapporte aux DVD-RW/-R, CD-RW/-R et carte de mémoire SD avec fichiers JPEG</p>
<p>DivX®</p>
<p>La description concerne un disque DVD-RW/-R et un CD-RW/-R avec fichiers DivX®</p>
<p>Si vous ne trouvez aucun des symboles listés ci-dessus sous 'entête de la fonction, l'opération est applicable à tous les supports.</p>
<h1 id="à-propos-des-touches">À propos des touches</h1>
<p><>: Touches de l'unité principale</p>
<p>[ ] : Touches de la télécommande</p>
<p>Nom de la touche seulement:</p>
<p>Touches de l'unité principale et de la télécommande</p>
<p>Introduction Introduction</p>
<h1 id="à-propos-de-la-télécommande">À Propos de la Télécommande</h1>
<h1 id="chargement-des-piles">Chargement des Piles</h1>
<p>①Ouvrez le couvercle du compartiment à piles.</p>
<p><img alt="" src="images/5abddaccb82b1b03e4412202a3a0eecef12135c011314db423866fb8fcce7e63.jpg" /></p>
<p>③Fermez le couvercle.</p>
<p>②Insérez deux piles "AA" (R6P) dans le sens indiqué.</p>
<p><img alt="" src="images/36fc57c240107498eaff3e33e0b7f8a26c8f7a3d864d645a21a33241699488f2.jpg" /></p>
<h1 id="précautions-concernant-les-piles">Précautions Concernant les Piles</h1>
<p>- Utilisez des piles "AA" (R6P) avec cette télécommande.</p>
<ul>
<li>Remplacez les piles environ une fois par année, dépendamment de la fréquence d'utilisation de la télécommande. </li>
<li>Si l'appareil est éloigné de la télécommande, remplacez les piles plus fréquemment: ne pas attendre qu'une année soit écoulée. </li>
<li>Les piles incluses sont destinées uniquement aux fins de vérification. Remplacez-les par des piles neuves dès que possible. </li>
<li>Lorsque vous insérez les piles, veillez à les insérer dans le sens approprié, en respectant les marques et dans le compartiment à piles de la télécommande. </li>
<li>Afin d'éviter des dommages ou une fuite de liquide de pile:</li>
<li>Ne pas mélanger une pile neuve avec une vieille.</li>
</ul>
<p>- Ne pas mélanger des piles de types différents, tel que alcaline et manganèse.</p>
<p>- Ne pas court-circuiter, démonter, chauffer ni jeter les piles dans les flammes.</p>
<ul>
<li>Retirez les piles si vous prévoyez ne pas utiliser la télécommande pendant une longue période de temps. </li>
<li>Si les piles ont une fuite, essuyez délicatement le liquide à l'intérieur du compartiment à pile, puis insérez des piles neuves.</li>
</ul>
<h1 id="lutilisation-de-la-télécommande">L'utilisation de la Télécommande</h1>
<p>Ayez toujours ces points à l'esprit lorsque vous utilisez une télécommande:</p>
<p>- Vérifiez qu'il n'y a pas d'obstacles entre la télécommande et la fenêtre du capteur infrarouge de l'appareil.</p>
<ul>
<li>Le fonctionnement de la télécommande peut devenir instable si la fenêtre du capteur infrarouge de l'apparell est inondé par des rayons de soleil ou par une lumière fluorescente. </li>
<li>Les télécommandes des autres dispositifs peuvent interférer les unes avec les autres. Évitez d'utiliser la télécommande d'un autre équipement situé à proximité de l'appareil. </li>
<li>Remplacez les piles quand vous remarquez une diminution de la portée de la télécommande. </li>
<li>Les portées opérationnelles maximales mesurées à partir de l'appareil sont les suivantes. </li>
<li>Visée directe: environ 23 pieds (7 m) </li>
<li>De chaque côté de l'axe: environ 23 pieds (7 m) à 30"</li>
</ul>
<p><img alt="" src="images/0810a024fc947c3739ce49ef2eb86de16ed5f710e11d627c79bdcfe5ff806e94.jpg" /></p>
<details>
<summary>text_image</summary>
environ 23 pieds
(7 m) 30°
30°
30°
environ 23 pieds
(7 m)
environ 23 pieds
(7 m)
30°
environ 23 pieds
(7 m)
</details>
<h1 id="régler-cet-appareil-pour-quil-ne-réagisse-pas-à-la-télécommande-des-autres-lecteurs-dvd-denon">Régler cet Appareil Pour qu'il ne Réagisse pas à la Télécommande des Autres Lecteurs DVD DENON</h1>
<p>Si vous avez d'autres lecteurs DVD DENON près de cet appareil, ce dernier réagira aux commandes entrées sur les télécommandes des lecteurs DVD. Pour éviter que ça ne se produise, vous pouvez régler cet appareil de sorte à ce qu'il ne réagisse pas à la télécommande des autres lecteurs DVD DENON.</p>
<p>1) En mode arrêt, appuyez sur la touche [SETUP].
2) Appuyez sur [7],[8],[9],[2]. <br />
3) Appuyez sur [SETUP].</p>
<p>- "Only Attached Remocon" (Télécommande attachée seulement) sera affiché dans le coin supérieur droit de l'écran et cet appareil répondra uniquement aux commandes entrées sur sa propre télécommande.</p>
<p>- Pour revenir au mode par défaut, appuyez sur [7],[8],[9],[1] à l'étape 2. "Normal Remocon" (Télécommande normale) sera affiché dans le coin supérieur droit de l'écran et cet apparell répondra à la fois aux commandes entrées sur sa propre télécommande et sur celles entrées sur les télécommandes de tous les autres lecteurs DVD DENON.</p>
<h1 id="remarque-3">Remarque</h1>
<ul>
<li>Ce réglage restera ainsi même lorsque vous éteindrez l'appareil ou que vous le débrancherez. </li>
<li>Si vous essayez de faire fonctionner cet appareil avec la télécommande d'un autre lecteur DVD DENON, certaines opérations pourraient ne pas fonctionner, tout dépendant de l'année de fabrication ou encore du type de télécommande.</li>
</ul>
<p>FRANÇAIS</p>
<h1 id="modification-du-code-de-signal-dune-télécommande">Modification du Code de Signal d'Une Télécommande</h1>
<p>Afin d'éviter que les autres lecteurs BD DENON réagissent au signal de la télécommande de cet appareil, vous pouvez modifier le code de signal de la télécommande. Si le code de signal de la télécommande ne correspond pas au code de signal de l'appareil, vous ne pourrez contrôler l'appareil avec la télécommande.</p>
<h1 id="modifiez-le-code-de-signal-de-lappareil">■Modifiez le code de signal de l'appareil</h1>
<p>1) En mode arrêt, appuyez sur la touche [SETUP].</p>
<p>2) Utilisez [◀ / ▷] pour sélectionner CUB TON, ensuite appuyez sur [ENTER]. <br />
3) Utilisez [◀ / ▷] pour sélectionner Other, ensuite appuyez sur [ENTER]. <br />
4) Utilisez [△ / ▽] pour sélectionner "Réglage télécommande". <br />
5) Appuyez sur [ENTER] pour sélectionner "DENON1" ou "DENON2".</p>
<p><img alt="" src="images/62a524fbf84c7fb695e454299217f91ba477746fde2f5c5abb5dccf6384397bb.jpg" /></p>
<p>6) Appuyez sur la touche [SETUP] pour quitter.</p>
<p>- À ce stade, le nouveau code de signal de l'appareil est en vigueur. Veuillez suivre la procédure suivante pour changer le code de signal de la télécommande pour le faire correspondre au code de signal de l'appareil.</p>
<h1 id="modifiez-le-code-de-signal-de-la-télécommande-réglez-sur-denon1">■Modifiez le code de signal de la télécommande Réglez sur "DENON1":</h1>
<p>Appuyez et maintenez [RETURN], ensuite appuyez sur [3], [2], [1]. Réglez sur "DENON2":</p>
<p>Appuyez et maintenez [RETURN], ensuite appuyez sur [1], [2], [3].</p>
<ul>
<li>Si le code de signal ne correspond pas, au signal de code de la télécommande s'affichera sur l'écran du panneau avant. </li>
<li>Le réglage par défaut et le réglage à faire avant de changer les piles est "DENON1".</li>
</ul>
<h1 id="français-6">FRANÇAIS</h1>
<p>Introduction Introduction</p>
<p>Noms des Pièces et Fonctions</p>
<p>Panneau Avant <br />
<img alt="" src="images/7bf447094883c9a0f6458903fbc73c9e8529a8f45ab203218460ad88bbef103a.jpg" /></p>
<details>
<summary>text_image</summary>
9
10
11
12
13
14
15
1 2 3 4 5 6 7 8 17 16
</details>
<p>L'appareil peut également être allumé en appuyant sur les touches marquées de nombres encerclés.</p>
<h1 id="1-voyant-dactivation">1. Voyant d'activation</h1>
<p>Ce voyant s'allume en vert lorsque l'appareil est allumé, en rouge lorsque qu'il est en mode de veille.
2. Touche ON/STANDBY</p>
<p>Appuyez pour mettre l'appareil en mode Veille. En mode de veille, cette unité consomme peu d'énergie.</p>
<h1 id="3-on-off-puissance-switch">3. ON / OFF (PUISSANCE) switch</h1>
<p>Appuyez pour allumer et éteindre l'appareil. Si vous éteignez l'appareil en utilisant cet interrupteur, l'appareil ne consomme pas d'électricité. Dans ces conditions, il n'accepte la commande d'aucune touche à l'exception de cet interrupteur.</p>
<h1 id="4-voyant-advanced-al24">4. Voyant Advanced AL24</h1>
<p>Indique que les signaux audio d'un BD, DVD, etc., sont traités numériquement Avec AL24 Processing.</p>
<h1 id="5-voyant-video-nr">5. Voyant VIDEO NR</h1>
<p>Indique que les signaux vidéo d'un BD, DVD, etc., sont traités numériquement avec DNR (réduction numérique du bruit).</p>
<h1 id="6-fenêtre-du-capteur-infrarouge">6. Fenêtre du capteur infrarouge</h1>
<p>Reçoit les signaux de votre télécommande afin de pouvoir contrôler le lecteur à distance.</p>
<h1 id="7-écran">7. Écran</h1>
<p>Consultez "Afficheur du Panneau Avant" on page 9.</p>
<h1 id="8-fente-pour-sd-card">8. Fente pour SD CARD</h1>
<p>Insérez une carte mémoire SD et mettez son contenu en mode lecture.</p>
<h1 id="9-tiroir-à-disque">9. Tiroir à disque</h1>
<p>Mettez un disque lorsque vous ouvrez le tiroir à disque.</p>
<h1 id="10-touche-overturefermeture">10. Touche ▲(OVERTURE/FERMETURE)</h1>
<p>Appuyez pour fermer ou ouvrir le tiroir à disque.</p>
<h1 id="11-touchelecture">11. Touche▶(LECTURE)</h1>
<p>Appuyez pour démarrer ou reprendre la lecture.</p>
<h1 id="12-touche-stop">12. Touche ■(STOP)</h1>
<p>Appuyez pour interrompre la lecture.</p>
<h1 id="13-touche-sauter-hautbas">13. Touche |◀◀/▶▶| (SAUTER HAUT/BAS)</h1>
<p>Appuyez pour sauter des titres/chapitres/pistes/fichiers vers le haut/bas.</p>
<h1 id="14-touche-avance-retour-rapide">14. Touche ◀◀/▶▶ (AVANCE / RETOUR RAPIDE)</h1>
<p>Appuyez pour chercher en avant / en arrière sur le disque.</p>
<h1 id="15-touche-ii-toujourspause">15. Touche II (TOUJOURS/PAUSE)</h1>
<p>Appuyez pour interrompre la lecture.</p>
<h1 id="16-touche-video-noise-reduction">16. Touche VIDEO NOISE REDUCTION</h1>
<p>Appuyez à plusieurs reprises pour diminuer le niveau général du bruit sur l'image (réduction numérique du bruit). Chaque fois que vous appuyez sur le bouton, le niveau de réduction numérique du bruit passe sur "Hf" → "+1" → "+2" → "+3" → "Hf".</p>
<h1 id="17-touche-hdmi-resolution">17. Touche HDMI RESOLUTION</h1>
<p>Appuyez pour programmer le mode de sortie du signal vidéo du terminal HDMI.</p>
<p>Panneau Aarrière <br />
<img alt="" src="images/976ad4262d4865187eefc09cdcbe991ccaaefd4f177a67bba0d55fab8ad727fa.jpg" /></p>
<details>
<summary>text_image</summary>
1
2
3
4
5
6
7
8
9
10
</details>
<h1 id="1-prise-digital-out-opticalcoaxial">1. Prise DIGITAL OUT (OPTICAL/COAXIAL)</h1>
<p>Utilisez un câble coaxial/optique audio numérique pour connecter l'appareil à un récepteur AV, un décodeur Dolby Digital ou autre dispositif avec un terminal d'entrée coaxial/optique audio.</p>
<h1 id="2-prises-71ch-audio-out">2. Prises 7.1ch AUDIO OUT</h1>
<p>Utilisez un câble audio RCA pour raccorder ces prises aux prises de l'entrée audio du canal 7.1 de votre amplificateur avec les bornes d'entrée du canal 7.1.</p>
<h1 id="3-prises-2ch-audio-out">3. Prises 2ch AUDIO OUT</h1>
<p>Utilisez un câble audio RCA pour raccorder ces prises aux prises de l'entrée audio du canal 2 de votre amplificateur avec les bornes d'entrée du canal 2.</p>
<h1 id="4-prise-video-out">4. Prise VIDEO OUT</h1>
<p>Utilisez un câble vidéo RCA pour branchement sur un écran de télévision, un récepteur AV ou un autre appareil.</p>
<h1 id="5-prise-s-video-out">5. Prise S VIDEO OUT</h1>
<p>Utilisez un câble S-vidéo pour branchement sur une prise d'entrée S-vidéo d'un appareil externe.</p>
<h1 id="6-prise-hdmi-out">6. Prise HDMI OUT</h1>
<p>Utilisez un câble HDMI pour connecter à un écran doté d'un port HDMI.</p>
<h1 id="7-prises-component-video-out">7. Prises COMPONENT VIDEO OUT</h1>
<p>Utilisez un câble vidéo en composante pour raccord à un dispositif d'affichage avec ports d'entrée de composante.</p>
<h1 id="8-prises-remote-control-out-in">8. Prises REMOTE CONTROL OUT / IN</h1>
<p>Le raccordement d'une télécommande satellite DENON à l'un de ces terminaux permet de faire fonctionner plus d'un composant DENON avec une seule télécommande.</p>
<h1 id="9-control-connector-rs-232c-2">9. CONTROL CONNECTOR (RS-232C)</h1>
<p>C'est le terminal pour la future extension du système.</p>
<h1 id="10-terminal-ac-in">10. Terminal AC IN</h1>
<p>Utilisez pour connecter le cordon d'alimentation pour alimenter l'appareil.</p>
<h1 id="remarque-4">Remarque</h1>
<p>Ne touchez pas les broches intérieures des prises de la face arrière. Une décharge électrostatique peut endommager définitivement l'appareil.</p>
<h1 id="télécommande">Télécommande</h1>
<p><img alt="" src="images/a72a2f725800e9b787a9f5dc8ab20f28462f6d1e2bd06e58eac04dd53f09d7b9.jpg" /></p>
<details>
<summary>text_image</summary>
31
30
2 1
3
4
5
6 7
8
9
10
11
12
13
14
15
16
17
18
19
20
DENON
RC-1080
ON POWER OFF DIMMER OFF LND
OFF BUM
OFF A-B
1 2 3
4 5 6
7 8 9
DOWN RANDOM
HAND
7 CLK
0 LSP/CH-MENU
RICH
RED SPIN BLU VEL
TOP MENU POP UP MENU
T M
ENTER
SETUP RETURN
S T
ANGLE SUBTITLE AUDIO
PUBB SWITCH
PURPLE DISPLAY MODE
SKIP
STOP PLKW
STILL/PULSE
II
Blue-ray Disc
</details>
<p>L'appareil peut également être allumé en appuyant sur les touches marquées de nombres encerclés.</p>
<h1 id="1-touche-power-on">1. Touche POWER ON</h1>
<p>• Appuyez pour allumer le lecteur.</p>
<h1 id="2-touche-power-off">2. Touche POWER OFF</h1>
<p>- Appuyez pour mettre l'appareil en mode veille.</p>
<h1 id="3-touche-a-b-repeat">3. Touche A-B REPEAT</h1>
<p>- Appuyez pour marquer un segment entre A et B pour la répétition de lecture A-B.</p>
<h1 id="4-touche-repeat">4. Touche REPEAT</h1>
<p>- Appuyez pour choisir le mode répétition.</p>
<h1 id="5-touche-random">5. Touche RANDOM</h1>
<p>- Appuyez pour afficher l'écran de lecture aléatoire afin de mélanger l'ordre de lecture des pistes/fichiers.</p>
<h1 id="6-touche-zoom">6. Touche ZOOM</h1>
<p>- Pendant la lecture, appuyez pour agrandir l'image à l'écran.</p>
<h1 id="7-touche-clear">7. Touche CLEAR</h1>
<p>- Appuyez pour effacer l'information préalablement entrée, pour effacer les paramètres ou pour annuler la programmation de CD, etc.</p>
<h1 id="8-touche-redgrnbluyel">8. Touche RED/GRN/BLU/YEL</h1>
<p>- Appuyez pour choisir un item sur certains menus de disque BD.</p>
<h1 id="9-touche-top-menu">9. Touche TOP MENU</h1>
<p>- Appuyez pour afficher le menu supérieur.</p>
<h1 id="10-touches-de-curseur">10. Touches de curseur △/▽/◀/▶</h1>
<p>- Appuyez pour choisir les items ou les paramètres.</p>
<h1 id="11-touche-enter">11. Touche ENTER</h1>
<p>• Appuyez pour confirmer ou choisir un item de menu.</p>
<h1 id="12-touche-setup">12. Touche SETUP</h1>
<p>- Appuyez pour afficher le menu de configuration.</p>
<h1 id="13-touche-angle">13. Touche ANGLE</h1>
<p>- Appuyez pour accéder à divers angles de caméra sur le disque.</p>
<p>- Appuyez pour appliquer une rotation de 90 degrés dans le</p>
<p>sens horaire aux l'image JPEG/Kodak Picture.</p>
<h1 id="14-touche-subtitle">14. Touche SUBTITLE</h1>
<p>• Appuyez pour afficher le menu de sous-titre.</p>
<h1 id="15-touche-pure-direct">15. Touche PURE DIRECT</h1>
<p>- Appuyez pour arrêter la sortie de signaux vidéo, etc., et permettre la sortie des signaux audio analogues seulement pour atteindre une haute qualité du son de ceux-ci.</p>
<h1 id="16-touche-display">16. Touche DISPLAY</h1>
<p>• Appuyez pour afficher le menu à l'écran.</p>
<h1 id="17-touche-skip">17. Touche SKIP</h1>
<p>- Pendant la lecture, appuyez pour revenir au début du chapitre, de la piste ou du fichier en cours.</p>
<h1 id="18-touche-skip">18. Touche SKIP ▶▶</h1>
<p>- Pendant la lecture, appuyez pour passer au chapitre, piste ou fichier suivant.</p>
<h1 id="19-touche-stop">19. Touche STOP</h1>
<p>• Appuyez pour interrompre la lecture.</p>
<p>• Appuyez pour quitter le menu titre.</p>
<h1 id="20-touche-rew">20. Touche REW</h1>
<p>- Pendant la lecture, appuyez pour un retour rapide.</p>
<h1 id="21-touche-stillpause">21. Touche STILL/PAUSE</h1>
<p>• Appuyez pour interrompre la lecture.</p>
<p>- Lorsque la lecture est en pause, appuyez de manière répétée pour avancer la lecture pas à pas.</p>
<h1 id="22-touche-ffw">22. Touche FFW ▶▶</h1>
<p>- Pendant la lecture, appuyez pour une avance rapide de la lecture.</p>
<p>- Lorsque la lecture est en pause, appuyez pour une avance lente de la lecture.</p>
<h1 id="23-touche-play">23. Touche PLAY</h1>
<p>- Appuyez pour démarrer ou reprendre la lecture.</p>
<h1 id="24-touche-mode">24. Touche MODE</h1>
<p>- Pendant la lecture, appuyez pour afficher le menu d'ajustement de l'image et la lecture rapide.</p>
<p>- Pendant la lecture de JPEG, appuyez pour afficher les menus pour modifier l'effet visuel, pour changer d'image ou pour modifier la taille de l'image.</p>
<p>- En mode arrêt et lorsqu'un disque BD est inséré, appuyez pour afficher un menu pour régler le mode audio du BD.</p>
<p>- En mode arrêt et lorsqu'un disque BD ou un DVD est inséré, appuyez pour afficher un menu pour régler l'ambiophonie virtuelle.</p>
<p>- En mode arrêt et alors qu'un CD audio ou un disque avec fichiers MP3, Windows Media™ Audio, JPEG est inséré, appuyez pour afficher les menus pour lecture de programme et lecture aléatoire.</p>
<h1 id="25-touche-audio">25. Touche AUDIO</h1>
<p>• Appuyez pour afficher le menu audio.</p>
<h1 id="26-touche-return">26. Touche RETURN</h1>
<p>- Appuyez pour revenir à la page du menu précédement.</p>
<h1 id="27-touche-pop-up-menu-menu">27. Touche POP UP MENU / MENU</h1>
<p>- Appuyez pour afficher le menu contextuel/disque/liste des fichiers.</p>
<p>- Appuyez pour changer "Original" et "Playlist" lecture sur lécran de télévision.</p>
<h1 id="28-touche-search-mode">28. Touche SEARCH MODE</h1>
<p>- Appuyez pour afficher le menu de recherche.</p>
<h1 id="29-touches-de-chiffre">29. Touches de chiffre</h1>
<p>- Appuyez pour entrer les numéros de titre/chapitre/piste/fichier.</p>
<h1 id="30-touche-openclose">30. Touche OPEN/CLOSE ▲</h1>
<p>- Appuyez pour fermer ou ouvrir le tiroir à disque.</p>
<h1 id="31-touche-dimmer">31. Touche DIMMER</h1>
<p>- Appuyez pour régler la luminosité de l'affichage du panneau avant.</p>
<p>Remarque</p>
<p>- Les [ZOOM] et [RANDOM] ne sont pas disponibles avec BD.</p>
<h1 id="français-7">FRANÇAIS</h1>
<p>Introduction Introduction</p>
<p>Afficheur du Panneau Avant <br />
<img alt="" src="images/5a526e3d91e306c596911cefd48f8711ebf6df9835e85115daf7295caabccc2b.jpg" /></p>
<details>
<summary>text_image</summary>
12
13
11
10
9
8
7
DIO
C
HDM
GROFFLE TRACK IOLI SNRER
2 CH
MULTI
DIGITAL + DIS
Tus-O DISHD WSTR
VSS MP3 NVA
L. PCM MPEG
ANGLE
1
RDSC
C 14-B
FROG RAND
2
3
4
14
5
6
</details>
<ol>
<li>▶ : Apparaît pendant la lecture d'un disque.
II : Apparaît pendant la pause de la lecture. </li>
<li>Apparait pendant la lecture du programme. </li>
<li>Apparaît pendant la lecture aléatoire. </li>
<li>Apparaît pendant la lecture répétée. </li>
<li>Ceux-ci indiquent le format de codification.
• Ceci n'est pas une indication du format enregistré ou du format qui sera émis. </li>
<li>Apparait pendant la lecture d'un disque à angles multiples. </li>
<li>Apparait pendant la lecture d'un disque audio à canaux multiples. </li>
<li>Apparait pendant la lecture d'un disque audio à deux canaux. </li>
<li>Indique le mode d'affichage de temps.</li>
</ol>
<p>TOTAL : Apparaît pendant l'affichage de la durée restante/écoulée totale d'un CD audio.</p>
<p>SING : Apparaît pendant que des données audio sont en lecture ou que des données audio sont en surbrillance dans le menu de programme.</p>
<p>REM : Apparaît pendant que la durée restante est affichée.</p>
<ol>
<li>Ceux-ci indique le type des différentes sections du disque en lecture. </li>
<li>Apparaît lorsque les signaux de vidéo HDMI ou audio sont émis.
N'apparaît pas si la connexion HDMI n'a pas été vérifiée. </li>
<li>Ceux-ci indiquent le type de disque présentement en lecture. </li>
<li>Apparaît lorsqu'une carte mémoire SD est introduite. </li>
<li>Donne diverses informations sur le disque, temps écoulé, etc.</li>
</ol>
<h1 id="réglage-de-la-luminosité-de-lafficheur">Réglage de la Luminosité de l'Afficheur</h1>
<p>Vous pouvez régler la luminosité de l'afficheur en appuyant de manière répétée sur [DIMMER]. La luminosité passe de lumineux obscur auto chaque fois que vous appuyez sur [DIMMER]. Si vous sélectionnez auto, l'écran s'obscurcit pendant la lecture.</p>
<h1 id="remarque-5">Remarque</h1>
<p>- [DIMMER] n'est pas disponible lorsque le menu de configuration est affiché.</p>
<p>Exemples d'Affichages Durant le Fonctionnement </p>
<table><tr><td>Écran</td><td>Description</td></tr><tr><td>POWER-ON</td><td>Sous tension</td></tr><tr><td>POWER-OFF</td><td>Hors tension</td></tr><tr><td>OPEN</td><td>Tiroir ouvert</td></tr><tr><td>CLOSE</td><td>Le tiroir se referme</td></tr><tr><td>LOADING</td><td>Disque en chargement</td></tr><tr><td>NO DISC</td><td>Aucun disque inséré</td></tr><tr><td>NO SD MEMORY</td><td>Aucune carte mémoire SD insérée</td></tr><tr><td></td><td>Cet appareil ne peut lire la carte mémoire SD ou le disque inséré.</td></tr><tr><td>STOP</td><td>Mode arrêt.</td></tr><tr><td>480.P</td><td>Le mode de sortie HDMI(480p) est sélectionné.</td></tr><tr><td>720.P</td><td>Le mode de sortie HDMI(720p) est sélectionné.</td></tr><tr><td>1080.i</td><td>Le mode de sortie HDMI(1080i) est sélectionné.</td></tr><tr><td>1080.P</td><td>Le mode de sortie HDMI(1080p) est sélectionné.</td></tr><tr><td>1080.P24</td><td>Le mode de sortie HDMI (image 1080p24) est sélectionné.</td></tr><tr><td>Normal</td><td>Le mode Pure Direct est réglé sur Pure Direct éteint.</td></tr><tr><td>Display Off</td><td>Le mode Pure Direct est réglé sur l'afficheur du panneau avant éteint.</td></tr><tr><td>Video Off</td><td>Le mode Pure Direct est réglé sur le signal vidéo éteint.</td></tr><tr><td>All Off</td><td>Le mode Pure Direct est réglé sur le signal vidéo et le panneau avant ételnts.</td></tr><tr><td>POO 01</td><td>Nombre total de pistes enregistrées pour la lecture et nombre de pistes sélectionnées.</td></tr><tr><td>POO F001-0002</td><td>Nombre total de fichiers enregistrées pour la lecture et nombre de dossier/fichier sélectionnés.</td></tr><tr><td>POO ROOT-0002</td><td>Lorsque le dossier racine est sélectionné, "ROOT" est affiché.</td></tr><tr><td>ALL CLEAR</td><td>"Annul Tout" pour le réglage de lecture de programme est sélectionné.</td></tr></table>
<h1 id="remarque-6">Remarque</h1>
<p>- L'affichage du chapitre et du temps sur le panneau avant sera déplacé quelques points vers la droite lors de la lecture d'un disque contenant plus de 100 titres.</p>
<h1 id="connexions-2">Connexions</h1>
<p>FRANÇAIS</p>
<p>Connexions</p>
<h1 id="connexion-à-une-télé">Connexion à Une Télé</h1>
<p>Effectuez une des connexions suivantes, selon les capacités de votre dispositif.</p>
<p><img alt="" src="images/1157757738d1f8707622933d1d1e79408a92187bb3b5110bd5ac600c3757c0c8.jpg" /></p>
<details>
<summary>text_image</summary>
dispositif d'affichage
audio analogique
Câble audio RCA
et
2ch AUDIO OUT VIDEO OUT
S VIDEO OUT
Méthode 1
image standard
Méthode 2
bonne image
Méthode 3
meilleure image
COMPONENT VIDEO OUT
Lorsque le câble RCA
COMPONENT VIDEO OUT
Lorsque le câble BNC
</details>
<h1 id="les-câbles-fournis-utilisés-dans-cette-connexion-sont-les-suivants">Les câbles fournis utilisés dans cette connexion sont les suivants:</h1>
<p>• Cable audio RCA (L/R) x</p>
<p>• Câble vidéo RCA x 1</p>
<p>Veuillez acheter le reste des câbles nécessaires au magasin d'électronique le plus près de chez vous.</p>
<h1 id="remarque-7">Remarque</h1>
<ul>
<li>Connectez cet appareil directement à la télé. Si les câbles audio/vidéo RCA sont connectés à un magnétoscope, les images peuvent être déformées à cause du système de protection contre la copie. </li>
<li>Si le dispositif d'affichage auquel le lecteur doit être raccordé est compatible avec la vidéo à balayage progressif, connectez-le à l'entrée de composant vidéo. </li>
<li>Les prises COMPONENT VIDEO OUT de cette unité sont compatibles avec une résolution vidéo de 480i/480p/720p/1080i. Si le dispositif d'affichage connecté n'est pas compatible pour une résolution vidéo 480p/720p/1080i, réglez "Sortie composantes" à "480i". (La résolution 480i n'est pas disponible pour les blu-ray.) </li>
<li>Si l'image n'est pas sortie correctement vers le dispositif d'affichage en raison du réglage "Résolution Vidéo HDMI" ou "Sortie composantes", appuyez sur ▶ et maintenez enfoncé pendant plus de cinq secondes sur l'afficheur du panneau avant. Le réglage "Résolution Vidéo HDMI" sera automatiquement ramené à la valeur par défaut. </li>
<li>Si vous utilisez une connexion HDMI et réglez "Résolution Vidéo HDMI" à "1080p" ou à "1080p24", l'image pourrait ne pas être affichée correctement. Dans ce cas, réglez "Résolution Vidéo HDMI" à "480p", "720p" ou "1080i".</li>
</ul>
<h1 id="connexion-à-un-dispositif-daffichage-avec-un-câble-hdmi">Connexion à un Dispositif d'Affichage Avec un Câble HDMI</h1>
<p>La connexion de ce lecteur à un dispositif doté d'un terminal HDMI avec un câble HDMI permet le transfert numérique des signaux vidéo numériques et des signaux audio à canaux multiples. Après avoir complété la connexion, veuillez régler les paramètres HDMI dans le menu de configuration selon votre dispositif d'affichage. Consultez la page 30-32.</p>
<p><img alt="" src="images/df3f4769fa54d32f382cb727e84140f9c4efbbd308f812fc5068ee7f8398b6b9.jpg" /></p>
<details>
<summary>text_image</summary>
Méthode 4
audio et image optimaux
dispositif d'affichage
Un dispositif d'affichage avec un port HDMI
Vers terminal d'entrée HDMI
Câble HDMI
cet appareil
</details>
<h1 id="câbles-non-compris">Câbles non compris.</h1>
<p>Veuillez acheter les câbles nécessaires au magasin d'électronique le plus près de chez vous.</p>
<h1 id="connexion-à-un-dispositif-daffichage-et-un-amplificateurrécepteur-avec-un-câble-hdmi">Connexion à un Dispositif d'Affichage et un Amplificateur/Récepteur Avec un Câble HDMI</h1>
<p>La connexion de cet appareil à un dispositif d'affichage et un amplificateur/récepteur dotés d'un terminal HDMI avec des câbles HDMI permet l'ambiophonie numérique avec vidéo de grande qualité.</p>
<p><img alt="" src="images/ea6f4ebef8b281eb58f0cf2e017107bc435e29c9a90479fc2c52253f9b8aec94.jpg" /></p>
<details>
<summary>flowchart</summary>
<pre><code class="language-mermaid">graph TD
A["dispositif d'affichage"] --> B["Câble HDMI"]
B --> C["Ambiophonie arrière (pour canal 7.1) (gauche)"]
B --> D["Ambiophonie arrière (pour canal 7.1) (droite)"]
C --> E["enceinte avant (gauche)"]
D --> F["enceinte centrale"]
F --> G["enceinte avant (droite)"]
G --> H["enceinte d'ambiophonie (gauche)"]
H --> I["Subwoofer"]
I --> J["câble HDMI"]
J --> K["cet appareil"]
K --> L["enceinte d'ambiophonie (droite)"]
</code></pre>
</details>
<h1 id="câbles-non-compris-2">Câbles non compris.</h1>
<p>Veuillez acheter les câbles nécessaires au magasin d'électronique le plus près de chez vous.</p>
<h1 id="français-8">FRANÇAIS</h1>
<h1 id="connexions-connexions">Connexions Connexions</h1>
<h1 id="mode-de-sortie-hdmi-et-signaux-de-sortie-réels">Mode de Sortie HDMI et Signaux de Sortie Réels</h1>
<p>Appuyez sur <HDMI RESOLUTION> pour sélectionner le mode de sortie HDMI. La résolution vidéo HDMI change chaque fois comme suit.</p>
<table><tr><td>480.P</td><td>480 progressif</td></tr><tr><td colspan="2">Appuyez sur↓</td></tr><tr><td>720.P</td><td>720 progressif</td></tr><tr><td colspan="2">Appuyez sur↓</td></tr><tr><td>1080.i</td><td>1080 entrecroisé</td></tr><tr><td colspan="2">Appuyez sur↓</td></tr><tr><td>1080.P</td><td>1080 progressif</td></tr><tr><td colspan="2">Appuyez sur↓</td></tr><tr><td>1080.P24</td><td>1080 progressif 24 image</td></tr><tr><td colspan="2">Appuyez sur</td></tr></table>
<h1 id="remarque-8">Remarque</h1>
<ul>
<li>Il est également possible de changer le mode de sortie HDMI à l'aide de <HDMI RESOLUTION> pendant la lecture. </li>
<li>Après avoir choisi le mode de sortie HDMI, vous verrez les images en résolution vidéo HDMI correspondante. </li>
<li>Les signaux audio et vidéo peuvent être déformés temporairement lorsque vous revenez/passez au mode de sortie HDMI. </li>
<li>Vous pouvez également changer le mode de sortie HDMI à partir de "Résolution Vidéo HDMI" dans le menu "Video" situé dans le menu de configuration. Dans ce menu, vous pouvez confirmer quelles résolutions vidéo HDMI sont prises en charge par le dispositif d'affichage. Consultez la page 31. </li>
<li>Pour obtenir une reproduction de film naturelle et de grande qualité pour tout document filmé en 24 trames, utilisez un câble HDMI (un câble HDMI haute vitesse est recommandé) et sélectionnez "1080p24" si le dispositif d'affichage branché est compatible avec l'entrée de trames 1080p24. </li>
<li>Pour les blu-ray, en trame 1080p24, vous obtiendrez une qualité de film supérieure et naturelle avec du matériel filmé en 24 images. Si le dispositif d'affichage connecté n'est pas compatible avec les trame 1080p24, vous ne pouvez régler la "Résolution Vidéo HDMI" à "1080p24". </li>
<li>Même lorsque la "Résolution Vidéo HDMI" est réglée à "1080p24", si "I/P Direct" est réglé à "Hf" ou pour lire un DVD, la résolution vidéo sera celle compatible avec le disque et le dispositif d'affichage au lieu de trame 1080p24. </li>
<li>Aucune sortie n'est prévue à partir des prises VIDEO OUT, S VIDEO OUT et COMPONENT VIDEO OUT lorsqu'un disque BD avec un document filmé à 24 trames est en lecture. </li>
<li>Les ports COMPONENT VIDEO OUT pourraient ne produire aucun signal lorsque vous réglez <br />
"Selection HDMI" sur "RVB" ou "HDMI Deep Color" sur "Auto" lors de la lecture d'un blu-ray. </li>
<li>Lorsque les prises HDMI OUT et COMPONENT VIDEO OUT sont connectées au dispositif d'affichage et que la sortie HDMI est "1080p", le signal vidéo pourrait ne pas sortir correctement des prises COMPONENT VIDEO OUT. </li>
<li>Si vous changez le mode de sortie HDMI par <HDMI RESOLUTION> lors de la lecture d'un blu-ray, il peut s'écouler de 2 à 10 secondes avant que le changement prenne effet, et il n'y aura ni vidéo ni son pendant le changement. </li>
<li>"HDMI Deep Color" n'est disponible que lorsque le dispositif d'affichage est connecté au moyen d'un câble HDMI et qu'il est compatible avec les couleurs foncées HDMI. </li>
<li>Pour "Auto" en "HDMI Deep Color" et pour "1080p" ou "1080p24" en "Résolution Vidéo HDMI", l'utilisation d'un câble HDMI hate vitesse est recommandée.</li>
</ul>
<h1 id="paramètres-audio">Paramètres Audio</h1>
<p>Lorsque vous utilisez des connexions HDMI, réglez "Sortie Audio HDMI" dans le menu "Son" du menu de configuration, conformément aux spécifications du dispositif ou du moniteur à connecter.</p>
<table><tr><td>Dispositif à connecter</td><td>Paramètre "Sortie Audio HDMI"</td><td>Signal de sortie HDMI audio</td></tr><tr><td>Dispositif compatible avec décodage DTS, DTS-HD, Dolby Digital, Dolby Digital Plus ou Dolby TrueHD</td><td>Multi HDMI (Normal)</td><td>Les flux binaires Dolby Digital, Dolby Digital Plus, Dolby TrueHD, DTS, ou DTS-HD sont émis par la HDMI OUT. Faites la configuration de l'enceinte sur l'amplificateur AV connecté, etc.</td></tr><tr><td>Dispositif compatible avec trois canaux ou plus d'entrées audio (non compatible avec DTS, DTS-HD, Dolby Digital, Dolby Digital Plus ou Dolby TrueHD)</td><td>Multi HDMI (LPCM) Les signaux</td><td>audio à canaux multiples sont émis par le terminal HDMI. Faites la configuration de l'enceinte avec les paramètres d'enceinte qui apparaissent après avoir sélectionné "Multi HDMI (LPCM)". Consultez la page 32.</td></tr><tr><td>Dispositif compatible avec deux entrées audio à deux canaux ou dispositif non compatible avec entrée audio</td><td>HDMI 2ch Les signaux audio à</td><td>deux canaux réduits par mixage sont émis par la HDMI OUT.</td></tr><tr><td>HDMI connexion à un dispositif d'affichage et connexion audio numérique (coaxiale/optique) à un amplificateur AV.</td><td>Sourdine</td><td>L'audio HDMI sera mis en sourdine et le flux binaire Dolby Digital/DTS ou LPCM sera émis de DIGITAL OUT selon les configurations "Sortie numérique". Consultez la page 12.</td></tr></table>
<p>■Sortie de signaux audio de HDMI OUT</p>
<table><tr><td rowspan="2">Type de disque</td><td rowspan="2">Format d'enregistrement audio</td><td colspan="2">Paramètre "Sortie Audio HDMI"</td></tr><tr><td>Multi HDMI (Normal)</td><td>Multi HDMI (LPCM) HDMI 2ch</td></tr><tr><td rowspan="6">BD-vidéo</td><td>Dolby Digital</td><td>Dolby Digital*1</td><td>Multi LPCM 2ch Réduit LPCM</td></tr><tr><td>Dolby Digital Plus</td><td>Dolby Digital Plus*1</td><td>Multi LPCM 2ch Réduit LPCM</td></tr><tr><td>Dolby TrueHD</td><td>Dolby TrueHD*1</td><td>Multi LPCM 2ch Réduit LPCM</td></tr><tr><td>DTS</td><td>DTS*1</td><td>Multi LPCM 2ch Réduit LPCM</td></tr><tr><td>DTS-HD</td><td>DTS-HD*1</td><td>Multi LPCM 2ch Réduit LPCM</td></tr><tr><td>LPCM Multi LPCM</td><td>Multi LPCM 2ch Réduit LPCM</td><td></td></tr><tr><td rowspan="3">DVD-vidéo</td><td>Dolby Digital</td><td>Dolby Digital</td><td>Multi LPCM 2ch Réduit LPCM</td></tr><tr><td>DTS</td><td>DTS</td><td>Multi LPCM 2ch Réduit LPCM</td></tr><tr><td>LPCM Multi LPCM</td><td>Multi LPCM 2ch Réduit LPCM</td><td></td></tr><tr><td rowspan="2">DivX®</td><td>Dolby Digital</td><td>Dolby Digital</td><td>Multi LPCM 2ch Réduit LPCM</td></tr><tr><td>MP3/MP2</td><td>2ch LPCM</td><td>2ch LPCM</td></tr><tr><td colspan="2">CD audio/ MP3/Windows MediaTM Audio</td><td>2ch LPCM</td><td>2ch LPCM</td></tr><tr><td colspan="2">DTS-CD</td><td>DTS</td><td>Multi LPCM</td></tr></table>
<h1 id="français-9">FRANÇAIS</h1>
<h1 id="connexions-3">Connexions</h1>
<p>*1 Si "Mode Audio BD" est réglé sur "Sortie Audio Mixte", l'audio sortira en Multi LPCM. Consultez la page 23. <br />
- Si l'apparell connecté n'est pas compatible avec HDMI BITSTREAM, l'audio sortira en Multi LPCM ou en 2ch Réduit LPCM, tout dépendant de la capacité de l'apparell connecté, ce même si vous sélectionnez "Multi HDMI (Normal)" dans les réglages de "Sortie Audio HDMI". Consultez la page 32.</p>
<h1 id="système-de-protection-des-droits-dauteur">Système de protection des droits d'auteur</h1>
<p>Pour lire les images vidéo numériques d'un BD/DVD via une connexion HDMI, il est nécessaire que l'appareil et le dispositif d'affichage (ou l'amplificateur AV) soient tous deux compatibles avec un système de protection des droits d'auteur appelé HDCP (système de protection de contenu numérique à large bande passante). HDCP est une technologie de protection contre la copie qui procède au chiffrement des données et à l'authentication du dispositif AV connecté. Cet appareil est compatible avec HDCP. Veuillez lire le mode d'emploi de votre dispositif d'affichage (ou amplificateur AV) pour de plus amples informations. <br />
* HDMI: Interface multimédia haute définition</p>
<h1 id="remarque-9">Remarque</h1>
<ul>
<li>Si vous utilisez un dispositif d'affichage incompatible avec HDCP, l'image ne s'affichera pas correctement. </li>
<li>Parmi les dispositifs compatibles avec HDMI, certains peuvent contrôler d'autres dispositifs via le terminal HDMI; cet appareil ne peut être contrôlé par un autre dispositif via le terminal HDMI. </li>
<li>Les signaux audio du terminal HDMI (incluant la fréquence d'échantillonnage, le nombre de canaux et la longueur du débit binaire) peuvent être limités par dispositif connecté. </li>
<li>Parmi les moniteurs compatibles avec HDMI, certains ne permettent pas la sortie audio (p. ex., les projecteurs). Dans les connexions avec un appareil tel que celui-ci, les signaux audio ne sortent pas par le terminal de sortie HDMI.</li>
</ul>
<p>Connexion numérique à un amplificateur AV avec un Décodeur Intégré <br />
<img alt="" src="images/95f0eab2aed8f58f156030488d8609cf8987b27c46f7b3a2ee22b343edf2c11c.jpg" /></p>
<details>
<summary>text_image</summary>
audio
câble numérique
audio coaxial/
optique
OU
terminal d'entrée
numérique audio
coaxial/ optique
cet appareil
</details>
<h1 id="sortie-de-signaux-audio-de-digital-out-opticalcoaxial">■Sortie de signaux audio de DIGITAL OUT (OPTICAL/COAXIAL)</h1>
<p>Lorsque HDMI et DIGITAL OUT sont tous deux reliés à d'autres appareils, les signaux audio qui sortent présentement du HDMI OUT seront également émis à partir de la prise DIGITAL OUT, excepté que le signal Dolby Digital sera émis au lieu de Dolby Digital Plus et Dolby TrueHD, et le signal DTS sera émis au lieu de DTS-HD.</p>
<p>< Lorsque HDMI n'est pas branché ou que "Sourdine" est sélectionné... >
Lorsque HDMI n'est pas branché ou que "Sourdine" est sélectionné dans les paramètres "Sortie Audio HDMI", la sortie des signaux audio émis par DIGITAL OUT changent en fonction des réglages de "Sortie numérique". Consultez le tableau suivant.
Pour régler sur "Sortie numérique", appuyez sur [SETUP], puis sélectionner "Rapide" → "Sortie Audio HDMI" → "Sourdine" ou "Custom" → "Son" → "Sortie Audio HDMI" → "Sourdine".</p>
<table><tr><td rowspan="2" colspan="2">Type de disque Format d'enregistrement audio</td><td colspan="2">Paramètre "Sortie numérique"</td></tr><tr><td>Train Binaire LPCM</td><td></td></tr><tr><td rowspan="6">BD-vidéo</td><td>Dolby Digital Dolby Digital</td><td>2ch Réduit LPCM</td><td></td></tr><tr><td>Dolby Digital Plus Dolby Digital</td><td></td><td>2ch Réduit LPCM*2</td></tr><tr><td>Dolby TrueHD</td><td>Dolby Digital</td><td>2ch Réduit LPCM*2</td></tr><tr><td>DTS</td><td> DTS^*1 </td><td>2ch Réduit LPCM</td></tr><tr><td>DTS-HD</td><td> DTS^*1 </td><td>2ch Réduit LPCM*2</td></tr><tr><td>LPCM</td><td>2ch Réduit LPCM*1</td><td>2ch Réduit LPCM</td></tr><tr><td rowspan="3">DVD-vidéo</td><td>Dolby Digital Dolby Digital</td><td>2ch Réduit LPCM</td><td></td></tr><tr><td>DTS</td><td>DTS</td><td>2ch Réduit LPCM</td></tr><tr><td>LPCM</td><td>2ch Réduit LPCM</td><td>2ch Réduit LPCM</td></tr><tr><td rowspan="2">DivX®</td><td>Dolby Digital Dolby Digital</td><td>2ch Réduit LPCM</td><td></td></tr><tr><td>MP3/MP2</td><td>2ch LPCM</td><td>2ch LPCM</td></tr><tr><td colspan="2">CD audio/ MP3/Windows MediaTM Audio</td><td>2ch LPCM</td><td>2ch LPCM</td></tr><tr><td colspan="2">DTS-CD</td><td>DTS</td><td>2ch Réduit LPCM</td></tr></table>
<p>* Pour un blu-ray avec audio secondaire ou interactif, il sera en Dolby Digital lorsque toutes ces conditions sont respectées :</p>
<p>• O u a n'Mode Audio BD" est réglé à "Sortie Audio Mixte". <br />
• O u a d'Sórtie Audio HDMI" est réglé à "Sourdine" <br />
• Q u a n'Sobtie numérique" est réglé à "Train Binaire". <br />
Si le blu-ray n'a pas d'audio secondaire ou interactif, vous aurez l'audio indiqué dans le tableau. <br />
*²Pour générer un signal LPCM en sortie de la prise DIGITAL OUT, régler "Mode Audio BD" sur "Sortie Audio Mixte". (Un signal sera produit en flux binaire en sortie lorsque "Sortie Audio HD" sera sélectionné.) Consultez la page 23 et 32. <br />
- Ce tableau s'applique uniquement lorsque HDMI n'est pas branché, ou que "Sourdine" est sélectionné dans les paramètres de "Sortle Audio HDMI".</p>
<h1 id="remarque-10">Remarque</h1>
<p>- Pour sortir le signal LPCM des terminaux DIGITAL OUT en même temps que le signal audio HDMI, réglez "Mode Audio BD" sur "Sortie Audio Mixte" et "Sortie Audio HDMI" sur "Multi HDMI (LPCM)".</p>
<h1 id="remarque-pour-câble-optique">Remarque pour Câble Optique</h1>
<ul>
<li>Le câble optique peut être endommagé s'il est plié en angle aigu. Assurez-vous que les câbles sont enroulés en boucles de diamètre de 6 pouces (15 cm) ou plus lorsque vous les stockez.</li>
<li>Utilisez un câble de 9,8 pieds (3 m) ou plus court. </li>
<li>Poussez bien les fiches des câbles dans les prises correspondantes lorsque vous faites les branchements. </li>
<li>Si une fiche est poussiéreuse ou sale, nettoyez-la avec un torchon avant de la brancher dans une prise.</li>
</ul>
<h1 id="câbles-non-compris-3">Câbles non compris.</h1>
<p>Veuillez acheter les câbles nécessaires au magasin d'électronique le plus près de chez vous.</p>
<h1 id="français-10">FRANÇAIS</h1>
<p>Connexions Connexions</p>
<p>Raccordement à un Dispositif Avec des Entrées Audio Analogiques à Deux Canaux</p>
<p><img alt="" src="images/036c16d31c27a937f3b5cfd2930fe3f11029f42ae8630014be66a44d54936935.jpg" /></p>
<details>
<summary>text_image</summary>
audio
Composant stéréo
AUDIO IN
L
R
Câble audio RCA
cet appareil
</details>
<p>Les câbles fournis utilisés dans cette connexion sont les suivants:</p>
<p>• Câble audio RCA (L/R) × 1</p>
<h1 id="remarque-11">Remarque</h1>
<p>- Pour un branchement sur un appareil stéréo à 2 canaux, utilisez les ports 2ch AUDIO OUT. Si les ports 7.1.ch AUDIO OUT sont utilisés, réglez "Sortie Audio 7.1.ch" dans le menu "Son" sur "2 Canaux" (voir page 33). Pour les logiciels enregistrés en multicanaux, des signaux analogiques ayant été ramenés à 2 canaux sont retransmis ainsi, (pour les sources dont la réduction n'est pas autorisée, seuls les signaux FL/FR sont reproduits).</p>
<p>Connexions Ambiophonie à un Dispositif Avec Des Canaux 7.1/5.1 des Entrées Audio Analogiques</p>
<p>Les signaux audio 7.1ch/5.1ch analogiques peuvent être sortis des terminaux 7.1ch AUDIO OUT.</p>
<p><img alt="" src="images/7f7a8fa375adb3b05f0776055db1b36cc7d338f19cbf41c4d3262ddca79bd796.jpg" /></p>
<details>
<summary>flowchart</summary>
<pre><code class="language-mermaid">graph TD
A["cat apparel"] --> B["Amplificateur AV"]
B --> C["FRONT L R"]
B --> D["SURROUND L R"]
B --> E["SURROUND BACK L R"]
B --> F["CENTER"]
B --> G["SUD WOOFER"]
</code></pre>
</details>
<p>Les câbles fournis utilisés dans cette connexion sont les suivants:</p>
<p>• Câble audio RCA (L/R) x 1</p>
<p>Veuillez acheter le reste des câbles nécessaires au magasin d'électronique le plus près de chez vous.</p>
<h1 id="remarque-12">Remarque</h1>
<p>- Si vous le branchez à un système ambiophonique 5.1, ne le branchez pas aux prises SBR/SBL (ambiophonie arrière gauche-droite), puis réglez "Surround back" dans "Config. haut-parleur" sur "Non".</p>
<h1 id="connexion-du-cordon-dalimentation">Connexion du Cordon d'Alimentation</h1>
<p>Une fois que vous aurez fait toutes les connexions nécessaires, branchez le cordon d'alimentation dans AC IN. Branchez ensuite le cordon d'alimentation dans la prise c.a.</p>
<p><img alt="" src="images/9cf0198985d90c0cb9eba94187438042d7ce51909569760f72d896465cfbe608.jpg" /></p>
<details>
<summary>text_image</summary>
Prise a.c.
Cordon
d'alimentation
c.a. 120 V, 60 Hz
</details>
<p>Les câbles fournis utilisés dans cette connexion sont les suivants:</p>
<p>• Cordon d'alimentation x 1</p>
<h1 id="remarque-13">Remarque</h1>
<p>- Insérez fermement les fiches. Des connexions mal faites peuvent produire du bruit.</p>
<h1 id="lecture">Lecture</h1>
<p>FRANÇAIS</p>
<p>Lecture</p>
<p><img alt="" src="images/d26efaa42d4b558f00c3cea7fa560356a72ffe9cf58a78faec95d63f63870a99.jpg" /></p>
<details>
<summary>text_image</summary>
<ON/OFF>
</details>
<p><img alt="" src="images/150d614431e22a2bdd64010c98683b53db03c139d4d2f21edf6f5a5c502de589.jpg" /></p>
<details>
<summary>text_image</summary>
[ON/STANDBY]
[POWER OFF]
[POWER ON]
[△/▽/</I>]
[ENTER]
</details>
<h1 id="à-propos-des-touches-2">À propos des touches</h1>
<p><>: Touches de l'unité principale</p>
<p>[ ] : Touches de la télécommande</p>
<p>Nom de la touche seulement:</p>
<p>Touches de l'unité principale et de la télécommande</p>
<h1 id="mettre-sous-tensions">Mettre Sous Tensions</h1>
<p>1</p>
<p>Appuyez sur <ON/OFF>.</p>
<p>Le voyant d'activation s'allume en rouge et l'alimentation est réglée au mode veille.</p>
<p>2</p>
<p>Appuyez sur <ON/STANDBY> ou sur [POWER ON].</p>
<p>Le voyant d'activation s'allume en vert et l'appareil est sous tension.</p>
<h1 id="mettre-hors-tension">■Mettre hors tension</h1>
<p>Appuyez sur <ON/STANDBY> ou sur [POWER OFF].</p>
<p>• L'alimentation est réglée sur le mode veille.</p>
<p>Appuyez sur <ON/OFF></p>
<p>• Le voyant d'activation s'éteins et l'alimentation s'arrête.</p>
<h1 id="remarque-14">Remarque</h1>
<p>- Une partie de la circulterle continue à être sous tension, même si l'alimentation est en mode veille. Lorsque vous absentez de chez vous pour longtemps ou que vous partez en voyage, appuyez sur <ON/OFF> pour couper l'alimentation ou débranchez le cordon d'alimentation de la prise.</p>
<h1 id="lecture-directe">Lecture Directe</h1>
<p>BD-V DVD-V DVD-VR CD</p>
<p>1</p>
<p>Mettez cet appareil sous tension. (Consultez</p>
<p>"Mettre Sous Tensions" sur cette page.)</p>
<p>2</p>
<p>Allumez le dispositif d'affichage et sélectionnez</p>
<p>l'entrée appropriée du dispositif pour connecter l'appareil.</p>
<p>3</p>
<p>Appuyez sur ▲ pour ouvrir le tiroir à disque.</p>
<p>4</p>
<p>Placez le disque sur le tiroir à disque, l'étiquette tournée vers le haut.</p>
<p><img alt="" src="images/50c89db084b03a662ddb656b8e0e25773ab5ee1a65b6042c6ce5a813924dbd93.jpg" /></p>
<details>
<summary>text_image</summary>
Alignez le disque
avec le guide du
tiroit.
</details>
<p>5</p>
<p>Appuyez sur ▲ pour fermer le tiroir à disque.</p>
<p>Il faudra peut-être un moment</p>
<p>pour télécharger le disque.</p>
<p>La lecture peut commencer automatiquement sur certains disques.</p>
<p>6</p>
<p>Appuyez sur▶ pour commérer la lecture.</p>
<p>Pour plusieurs disque BD-vidéo et DVD-vidéo, un écran de menu peut apparaître.</p>
<p>Dans ce cas, utilisez [△/▽/◀/▷] pour</p>
<p>sélectionner l'item voulu, puis appuyez sur [ENTER].</p>
<p>7</p>
<p>Appuyez sur ■ pour interrompre la lecture temporairement.</p>
<p>Consultez "Reprendre la Lecture" à la page 16.</p>
<p>Pour éjecter le disque:</p>
<p>Appuyez sur ▲ pour ouvrir le tiroir à disque, puis retirez le disque avant de fermer le lecteur.</p>
<h1 id="remarque-15">Remarque</h1>
<ul>
<li>peut apparaître dans le coin supérieur droit de l'écran si l'opération est interdite par le disque ou par cet appareil </li>
<li>Pendant la lecture de disque à deux couches, il peut y avoir un arrêt momentané sur les images. Ceci survient lorsque la première couche passe à la deuxième couche. Ceci n'est pas un fonctionnement défectueux. </li>
<li>L'opération peut varier lorsque vous lisez un BD/DVD avec le menu du disque. Veuillez vous reporter au manuel accompagnant le disque pour de plus amples informations.</li>
</ul>
<h1 id="français-11">FRANÇAIS</h1>
<p>Lecture Lecture <br />
<img alt="" src="images/a42ce5e915de5dc6dc0b4da0df784deb7632393bf60e1e82f5f2880a4ad62b0b.jpg" /></p>
<details>
<summary>text_image</summary>
Diagram of a CD-ROM front panel with labeled ports and control buttons
</details>
<p><img alt="" src="images/157b4072c530f84f2be6f71bfc489de52eb3659b9f78dfc6538f119aa113bd6a.jpg" /></p>
<details>
<summary>text_image</summary>
[TOP MENU]
[POP UP MENU / MENU]
[△/▽/◇/◇]
[ENTER]
■
■
■
■
■
■
■
</details>
<h1 id="à-propos-des-touches-3">À propos des touches</h1>
<p><>: Touches de l'unité principale</p>
<p>[ ] : Touches de la télécommande</p>
<h1 id="nom-de-la-touche-seulement">Nom de la touche seulement:</h1>
<p>Touches de l'unité principale et de la télécommande</p>
<h1 id="opérations-au-moyen-du-menu-disque-du-menu-titre-et-du-menu-éclair">Opérations au Moyen du Menu Disque, du Menu Titre et du Menu Éclair</h1>
<h1 id="bd-v-dvd-v-2">BD-V DVD-V</h1>
<p>Plusieurs disques BD et DVD contiennent un menu disque (DVD), un menu titre (BD/DVD) ou un menu éclair (BD-vldéo) décrivant le contenu du disque, ou un disque menu vous guidant parmi les fonctions du disque. Le contenu des menus peut différer selon le disque.</p>
<h1 id="menu-du-disque-dvd">Menu du disque (DVD)</h1>
<p>1) Appuyez sur [POP UP MENU / MENU].</p>
<p>• Le menu du disque apparaîtra.</p>
<p>2) Utilisez [△/▽/◀/▷] pour sélectionner un item, ensuite appuyez sur [ENTER].</p>
<h1 id="menu-titre-bddvd">Menu titre (BD/DVD)</h1>
<p>1) Appuyez sur [TOP MENU].</p>
<p>2) Utilisez [△/▽/◀/▷] pour sélectionner un item, ensuite appuyez sur [ENTER].</p>
<h1 id="menu-eclair-bd-vidéo">Menu eclair (BD-vidéo)</h1>
<p>- Il s'agit d'une option spéciale offerte sur certains BD. Lorsque vous appuyez sur [POP UP MENU / MENU], un menu contextuel apparaît à l'écran, sans que la lecture ne s'interrompe.</p>
<p>1) Pendant la lecture d'un BD, appuyez sur [POP UP MENU / MENU].</p>
<p>2) Utilisez [△/▽/◀/▷] pour sélectionner un item, ensuite appuyez sur [ENTER].</p>
<h1 id="remarque-16">Remarque</h1>
<ul>
<li>Si l'option n'est pas disponible, pourrait s'afficher à l'écran de la télévision. </li>
<li>Le contenu des menus et les opérations correspondantes peuvent varier selon les disques. Veuillez vous reporter au manuel accompagnant le disque pour de plus amples informations.</li>
</ul>
<h1 id="lecture-dun-disque-dvd-rw-r-en-mode-vr">Lecture d'Un Disque DVD-RW/-R en Mode VR</h1>
<h1 id="dvd-vr-2">DVD-VR</h1>
<p>Lors de la lecture d'un disque DVD-RW/-R en mode VR, vous pouvez choisir "Original" ou "Playlist" si le disque contient un "Playlist".</p>
<p>1) En mode arrêt, appuyez sur [POP UP MENU / MENU] pour faire apparaître le menu du DVD. <br />
2) Utilisez [◀/▶] pour sélectionner "Original" ou "Playlist".</p>
<p><img alt="" src="images/49ba8d0d806865cfca19ec9259d5a9de5e46729dd6d77793ee711755e1787f4f.jpg" /></p>
<p>3) Utilisez [△ / ▽] pour sélectionner le titre voulu, ensuite appuyez sur [ENTER].</p>
<h1 id="remarque-17">Remarque</h1>
<p>• "Original" est le titre de ce qui est enregistré sur le disque. <br />
• La liste de lecture est une version éditée de l'original. <br />
• Le menu DVD varie en fonction des disques. <br />
- Si le disque ne contient pas de liste de lecture, la liste de lecture ne s'affichera pas sur le menu DVD.</p>
<h1 id="pause-2">Pause</h1>
<p>1) Pendant la lecture, appuyez sur II.</p>
<p>La lecture s'arrêtera.</p>
<p><img alt="" src="images/c2705db165eba6f6a26abbd3773b71a1d83b60d5f6f00aa1e5a1c19f9dad9717.jpg" /></p>
<p>2) Appuyez sur ▶ pour reprendre la lecture normale.</p>
<h1 id="remarque-18">Remarque</h1>
<p>- Pour les BD, DVD et DivX ^8 , réglez "Arrêt sur Image" à "Trame" dans le menu "Video" si les images en mode pause sont troubles (consultez la page 31).</p>
<h1 id="lecture-lecture">Lecture Lecture</h1>
<h1 id="reprendre-la-lecture-2">Reprendre la Lecture</h1>
<h1 id="1-pendant-la-lecture-appuyez-sur">1) Pendant la lecture, appuyez sur ■.</h1>
<p>- Le message de reprise apparaîtra à l'écran.</p>
<p><img alt="" src="images/8cac1960c8652a58061d362a98ddeae9009bd8fb47e9a6596d387fa90d3d8e9e.jpg" /><br />
<Exemple: BD></p>
<h1 id="2-appuyez-sur">2) Appuyez sur ▶.</h1>
<p>Dans quelques secondes, la lecture reprendra depuis le point où elle a été interrompue. Pour annuler la reprise de la lecture et recommencer la lecture du disque depuis le début, appuyez à nouveau sur ■ pendant que la lecture est interrompue.</p>
<h1 id="remarque-19">Remarque</h1>
<ul>
<li>Pour MP3, JPEG ou Windows Media™ Audio, la lecture reprendra dès le début de la piste courant. </li>
<li>L'information de reprise sera sauvegardée même si le courant est en mode veille. </li>
<li>Si vous ouvrez le compartiment à disque ou appuyez sur une fois de plus en mode arrêt, les informations de reprise seront effacées. </li>
<li>Si vous passez du mode "Disque" au mode "Mémoire SD", les informations de reprises seront effacées. </li>
<li>Reprendre la lecture n'est pas disponible pour les BD compatibles avec les applications Java (BD-Java).</li>
</ul>
<h1 id="lecture-en-avance-rapide-retour-rapide">Lecture en Avance Rapide / Retour Rapide</h1>
<p><img alt="" src="images/021b805245db79947da5ff552ee87a391323ff558ee15dad7a0d2b7cd30b46b7.jpg" /></p>
<p>1) Pendant la lecture, appuyez sur ◀◀ ou▶▶ de manière répétée pour sélectionner la vitesse d'avance ou de retour voulue.</p>
<p><img alt="" src="images/dd96c90f36c3afa08794b91ebd9dc7972966fd0d29af45908f99a6b352168aab.jpg" /></p>
<details>
<summary>flowchart</summary>
<pre><code class="language-mermaid">graph LR
A["..."] --> B["..."] --> C["..."] --> D["..."] --> E["..."]
F["..."] --> G["..."] --> H["..."] --> I["..."] --> J["..."]
</code></pre>
</details>
<p>2) Appuyez sur ▶ pour reprendre la lecture normale.</p>
<ul>
<li>Pour les BD et DVD, il existe 5 niveaux de vitesse différents. Pour les CD audio, MP3, Windows Media™ Audio, et DivX®, il existe trois niveaux de vitesse différents. </li>
<li>Pour les CD audio, MP3 et Windows Media™ Audio, le son sera émis à la vitesse de l'avance rapide et de la recherche inversée.</li>
</ul>
<h1 id="remarque-20">Remarque</h1>
<ul>
<li>Pour MP3 et Windows Media™ Audio, l'avance rapide/inversée entre différents fichiers n'est pas disponible. </li>
<li>Pour les CD audio, l'avance rapide avant/arrière entre différents pistes n'est pas disponible pendant la lecture du programme ou la lecture en mode aléatoire. </li>
<li>Pour certains fichiers DivX ^® , l'avance rapide et inversé rapide peuvent ne pas fonctionner.</li>
</ul>
<h1 id="lecture-au-ralenti">Lecture au Ralenti</h1>
<p>BD-V DVD-V DVD-VR DivX®</p>
<p>1) Pendant la lecture, appuyez sur II.</p>
<p>2) Appuyez sur ▶▶.</p>
<p>• La lecture lente débutera et le son sera coupé.</p>
<p>3) Appuyez sur ▶▶ de manière répétée pour sélectionner la vitesse voulue.</p>
<p>- Il existe 3 niveaux de vitesse de ralenti différents.</p>
<p>Touche</p>
<p><img alt="" src="images/e7c7f548e6b055e683fb1e11ba528583ffb1d3abe47205d1071be8d78da3ee3b.jpg" /></p>
<p>4) Appuyez sur ▶ pour reprendre la lecture normale.</p>
<h1 id="remarque-21">Remarque</h1>
<ul>
<li>Règlez "Arrêt sur Image" sur "Trame" dans le menu "Video" si les images en mode ralenti sont brouillées (consultez la page 31). </li>
<li>La lecture inversée au ralenti n'est pas disponible.</li>
</ul>
<p>FRANÇAIS</p>
<h1 id="lecture-pas-à-pas">Lecture Pas à Pas</h1>
<p>BD-V DVD-V DVD-VR DivX®</p>
<h1 id="1-pendant-la-lecture-appuyez-sur-ii">1) Pendant la lecture, appuyez sur II.</h1>
<p>- La lecture sera interrompue et le son coupé. Le disque avance trame par trame chaque fois que vous appuyez sur la touche II.</p>
<p><img alt="" src="images/0940ac5002db77609068497f53aaf460859d1b50c1fe1bdae3a06f8402689c75.jpg" /></p>
<h1 id="2-appuyez-sur-pour-reprendre-la-lecture-normale">2) Appuyez sur ▶ pour reprendre la lecture normale.</h1>
<h1 id="remarque-22">Remarque</h1>
<ul>
<li>Réglez "Arrêt sur Image" à "Trame" sur le menu "Video", si les images en mode pause sont brouillées (vous reporter à la page 31). </li>
<li>Seule l'avance pas à pas est disponible.</li>
</ul>
<h1 id="français-12">FRANÇAIS</h1>
<p>Lecture Lecture <br />
<img alt="" src="images/552bf9a16531ab687c489aa5666df0df28aa15d0da3f0d48b86a072ee3205051.jpg" /></p>
<details>
<summary>natural_image</summary>
Front view of a CD-ROM drive with control panel and indicator lights (no visible text or labels)
</details>
<p><img alt="" src="images/2cf81125572fbc6bd0b952c1e2a418b3b6ae929f4b500491876a06d9725bb781.jpg" /></p>
<details>
<summary>text_image</summary>
[A-B REPEAT]
[REPEAT]
[RANDOM]
[CLEAR]
[△/▽/∠/▶]
[ENTER]
[RETURN]
[MODE]
■
</details>
<h1 id="à-propos-des-touches-4">À propos des touches</h1>
<p><>: Touches de l'unité principale</p>
<p>[ ] : Touches de la télécommande</p>
<h1 id="nom-de-la-touche-seulement-2">Nom de la touche seulement:</h1>
<p>Touches de l'unité principale et de la télécommande</p>
<h1 id="vitesse-de-dialogue">Vitesse de Dialogue</h1>
<h1 id="bd-v-dvd-v-dvd-vr-3">BD-V DVD-V DVD-VR</h1>
<p>Cette fonction permet de jouer à une vitesse d'environ 1,3 fois la lecture normale et d'entendre les sons. Cette fonction est uniquement disponible sur les disques enregistrés au format Dolby Digital.</p>
<p>1) Pendant la lecture, appuyez sur la touche [MODE] de manière répétée jusqu'à ce que le paramètre de la vitesse de dialogue apparaisse.</p>
<p><img alt="" src="images/ff223c5c7ffae27f3cdde2ccd5b4c54ddcac1b8f75a90bc937abbfca5a23738f.jpg" /></p>
<p>2) Appuyez sur [ENTER] ou [◀/▶] pour changer ⚡ (x1.3) ou éteint.</p>
<p>"Hf": Lecture à la vitesse normale.</p>
<p>“♪”: Lecture à environ 1,3 fois la lecture normale.</p>
<p>3) Appuyez sur ▶ pour reprendre la lecture normale.</p>
<h1 id="remarque-23">Remarque</h1>
<p>- Chaque fois que vous appuyez sur ■, la programmation sera mise à "Hf".</p>
<p>- Les sous-titres sont visibles lorsque cette fonction est utilisée.</p>
<p>- Les réglages de l'image et de la langue audio ne peuvent être modifiés pendant cette fonction.</p>
<p>- L'ambiophonie virtuelle ne fonctionne pas sous ce mode.
- Cette fonction peut ne pas fonctionner à certains endroits du disque.</p>
<p>- Pendant l'exécution de cette fonction, les signaux Multi/2ch LPCM seront reproduits par la sortie HDMI, les signaux 2ch LPCM seront reproduits par la sortie audio numérique ou le son analogique à 2 canaux seront reproduits par la sortie audio analogique.</p>
<h1 id="répétition-de-la-lecture">Répétition de la Lecture</h1>
<p>La disponibilité de la fonction de répétition peut varier selon les disques insérés.</p>
<p>1) Pendant la lecture, appuyez sur [REPEAT] de manière répétée jusqu'à ce que le mode de répétition souhaité apparaisse à l'écran.</p>
<p>Les modes de répétitions suivants sont disponibles.</p>
<p>Mode de répétition Media disponible </p>
<table><tr><td>Répétition de chapitre</td><td colspan="3"></td></tr><tr><td>Répétition du chapitre en cours de lecture.</td><td>BD-V</td><td>DVD-V</td><td>DVD-VR</td></tr><tr><td>Répétition de titre</td><td colspan="3"></td></tr><tr><td>Répétition du titre en cours de lecture.</td><td>BD-V</td><td>DVD-V</td><td>DVD-VR</td></tr><tr><td>Répétition de piste</td><td>CD</td><td>MP3</td><td>WMA</td></tr><tr><td>Répétition de la piste en cours de lecture.</td><td>JPEG</td><td>DivX®</td><td></td></tr><tr><td>Répétition de groupe</td><td>MP3</td><td>WMA</td><td>JPEG</td></tr><tr><td>Répétition du dossier en cours de lecture.</td><td>DivX®</td><td></td><td></td></tr><tr><td>Répétition tous</td><td colspan="3"></td></tr><tr><td rowspan="2">La lecture de tous les titres, toutes les pistes ou toutes les fichiers sur le média sera répétée.</td><td>DVD-VR</td><td>CD</td><td>MP3</td></tr><tr><td>WMA</td><td>JPEG</td><td>DivX®</td></tr></table>
<h1 id="a-b-répéter">A-B Répéter</h1>
<h1 id="bd-v-dvd-v-dvd-vr-cd-divx-3">BD-V DVD-V DVD-VR CD DivX®</h1>
<p>Il est possible de répéter la lecture d'une section en particulier.</p>
<p>1) Appuyez sur [A-B REPEAT] à l'endroit où vous souhaitez que la lecture reprenne, point A.</p>
<p>2) Appuyez sur [A-B REPEAT] à l'endroit où vous souhaitez que la lecture s'arrête, point B.</p>
<p>- La séquence de répétition débute.</p>
<p>3) Appuyez sur [A-B REPEAT] pour quitter la séquence.</p>
<h1 id="lecture-lecture-2">Lecture Lecture</h1>
<h1 id="remarque-24">Remarque</h1>
<ul>
<li>Le réglage répété du chapitre/titre/plste/groupe sera effacé lorsque vous changerez de chapitre, de titre, de piste, de fichier ou de dossier. </li>
<li>La répétition de la lecture ne fonctionne pas pendant une répétition de lecture de séquence (A-B). </li>
<li>La répétition de chapitre ou de titre n'est pas disponible avec certaines scènes. </li>
<li>La répétition A-B peut uniquement être réglée pour le titre en cours ou la piste/le fichier en cours. </li>
<li>La répétition de séquence A-B n'est pas disponible avec certaines scènes. <br />
• Pour annuler le point A programmé, appuyez sur [CLEAR]. </li>
<li>La répétition de lecture A-B ne fonctionne pas pendant la lecture de chapitre, titre, piste, groupe ou répétition de tous.</li>
<li>Sur certains fichiers DivX ^® , la lecture en mode répétition A-B peut ne pas fonctionner.</li>
</ul>
<h1 id="programmation-de-la-lecture">Programmation de la Lecture</h1>
<p>CD</p>
<p>MP3</p>
<p>WMA</p>
<p>JPEG</p>
<p>Vous pouvez programmer l'ordre de lecture du disque.</p>
<p>1) En mode arrêt, appuyez sur la touche [MODE].
• L'écran de programmation apparaîtra. <br />
2) Utilisez [△ / ▽] pour sélectionner une piste/un fichier, puis appuyez sur [ENTER].</p>
<p><img alt="" src="images/d3791d3631150a375a38c400825d956256b351a8bb7944fb3002a8176cbb08ab.jpg" /><br />
<Exemple: MP3></p>
<ul>
<li>Pour MP3, Windows Media™ Audio, et JPEG, utilisez [△ / ▽] pour sélectionner un dossier, puis appuyez sur [ENTER] et utilisez [△ / ▽] pour sélectionner une piste/fichier. Appuyez enfin sur [ENTER]. </li>
<li>Appuyez sur [CLEAR] pour effacer la dernière piste/le dernier fichier du programme. </li>
<li>Sélectionnez "Annul Tout" au bas de la liste pour effacer toutes les pistes/tous les fichiers du programme. </li>
<li>
<p>La piste/le fichier programmé est affiché dans le coin droit de l'écran.</p>
</li>
<li>
<p>Si le programme au complet ne peut être affiché à l'écran, "▼" ou "▲" s'affiche. </p>
</li>
<li>Utilisez [◀/▶] pour revenir au début de la hiérarchie des dossiers. </li>
<li>Si huit pistes/fichiers ou plus ont été programmés, utilisez la |◀◀/▶▶| pour voir toutes les pistes/tous les fichiers.</li>
</ul>
<p>3) Appuyez sur ▶ pour commencer la lecture de programme.</p>
<p>• La lecture du programme débutera.</p>
<h1 id="remarque-25">Remarque</h1>
<ul>
<li>Pendant la lecture du programme, appuyez une fois sur pour programmer le point de reprise, puis appuyez sur pour reprendre la lecture du programme depuis le début de la piste (CD audio) où la touche a été appuyée ou depuis le fichier ou la touche a été appuyée (MP3, Windows Media™ Audio, ou JPEG). </li>
<li>Pendant la lecture du programme, appuyez deux fois sur pour afficher l'écran de programmation. Pour retourner à la lecture de programme normale, appuyez sur [RETURN] pour quitter l'écran de programmation, puis appuyez sur. </li>
<li>Votre programme reste en mémoire jusqu'à ce que vous retiriez le disque du tiroir ou que vous éteigniez le courant.</li>
<li>Il est possible d'entrer 99 pistes/fichiers. </li>
<li>Pour répéter la lecture de la piste/du fichier du programme en cours de lecture, appuyez sur [REPEAT] plusieurs fols,</li>
</ul>
<p>jusqu'à ce que "apparaisse pendant la lecture. Pour répéter la lecture du programme au complet, appuyez sur [REPEAT] plusieurs fois, jusqu'à ce que "apparaisse pendant la lecture.</p>
<ul>
<li>Même si le disque inséré contient des fichiers en format MP3, JPEG et Windows Media™ Audio, la fonction de programmation permet une combinaison de 99 fichiers de fichiers en format MP3, JPEG et Windows Media™ Audio. </li>
<li>Le numéro présentement sélectionné sur l'afficheur du panneau avant clignote pendant que vous réglez la lecture du programme. </li>
<li>"F***" est affiché sur l'afficheur du panneau avant pendant que vous sélectionnez le dossier. (***) est le numéro du dossier), et le fichier est affiché ainsi: "-*****" suivant l'indication du dossier. </li>
<li>La lecture à partir d'une piste/d'un fichier bien précis et la lecture aléatoire ne sont pas disponibles en cours de lecture d'un programme.</li>
</ul>
<h1 id="français-13">FRANÇAIS</h1>
<h1 id="lecture-aléatoire">Lecture Aléatoire</h1>
<p>CD</p>
<p>MP3</p>
<p>WMA</p>
<p>JPEG</p>
<p>Cette fonction défait l'ordre établi des pistes/fichiers et règle la lecture en mode aléatoire.</p>
<p>1) En mode arrêt, appuyez sur la touche [RANDOM].</p>
<p><img alt="" src="images/552a1bc94a28d6362afa873c780d41f78ce4910449522f9a9c60d763822cfd6f.jpg" /><br />
<Exemple: CD audio></p>
<p>2) Appuyez sur ▶ pour commérer la lecture aléatoire.</p>
<h1 id="remarque-26">Remarque</h1>
<ul>
<li>Pendant la lecture aléatoire, appuyez sur ■ une fois pour programmer le point de reprise, puis appuyez sur ▶ pour reprendre la lecture aléatoire depuis le début de la piste où la touche ■ a été appuyée (CD audio) ou depuis le fichier ou la touche ■ a été appuyée (MP3, Windows Media™ Audio, ou JPEG). </li>
<li>Pendant la lecture aléatoire, appuyez deux fois sur ■ pour afficher l'écran de lecture aléatoire. Pour annuler la lecture aléatoire, appuyez sur [RANDOM] pendant que l'écran de lecture aléatoire est affiché. </li>
<li>Pour répéter la lecture de la piste/du fichier selon la sélection aléatoire, appuyez sur [REPEAT] plusieurs fois, jusqu'à ce que "Piste" apparaisse pendant la lecture. Pour répéter la</li>
</ul>
<p>lecture de la sélection aléatoire, appuyez sur [REPEAT]</p>
<p>plusieurs fois, jusqu'à ce que "Tout" apparaisse pendant</p>
<p>la lecture.</p>
<ul>
<li>Vous ne pouvez pas revenir à la piste/au fichier précédent lorsque vous êtes en mode de lecture aléatoire. </li>
<li>Un disque contenant des fichiers en format MP3, JPEG et Windows Media™ Audio, la lecture en mode aléatoire de ces fichiers sera exécutée. <br />
• "RAND" s'affiche sur l'afficheur du panneau avant.</li>
</ul>
<h1 id="français-14">FRANÇAIS</h1>
<p>Lecture Lecture <br />
<img alt="" src="images/2ad1fcdd25f99c1f582af73581ff91313ab11cb62a80eb629c33ebcf2b2aa831.jpg" /></p>
<details>
<summary>natural_image</summary>
Front view of a CD-ROM drive with buttons and ports (no visible text or labels)
</details>
<p><img alt="" src="images/2fb600bf92407549292cd0789625f8ff627484af7871fae1068e08b35050739b.jpg" /></p>
<details>
<summary>text_image</summary>
[les touches numériques]
[ZOOM]
[CLEAR]
[SEARCH MODE]
[△/▽/▽/▽]
[ENTER]
[RETURN]
[ANGLE]
[DISPLAY]
[◀]
</details>
<h1 id="à-propos-des-touches-5">À propos des touches</h1>
<p><>: Touches de l'unité principale</p>
<p>[ ] : Touches de la télécommande</p>
<p>Nom de la touche seulement:</p>
<p>Touches de l'unité principale et de la télécommande</p>
<h1 id="zoom-4">Zoom</h1>
<p>DVD-V DVD-VR JPEG DivX®</p>
<p>Cette fonction vous permet d'agrandir l'image vidéo et de faire un panoramique sur l'image agrandie.</p>
<p>1) Appuyez sur [ZOOM] pendant la lecture.</p>
<p>• La lecture se poursuivra.</p>
<p>2) Appuyez sur la touche [ZOOM] de manière répétée pour sélectionner le taux d'agrandissement souhaité: x1.2, x1.5, x2.0, x4.0 ou arrêté.</p>
<p>• L'agrandissement "x4.0" n'est pas disponible pour JPEG et DivX®.</p>
<p><img alt="" src="images/d8b2ad218f9cdcbeab1ac586d80655fea80701654d31d0b91a2ce67933964657.jpg" /></p>
<details>
<summary>flowchart</summary>
<pre><code class="language-mermaid">graph TD
A["输入框 1.2"] --> B["输入框 1.5"]
B --> C["输入框 2.4"]
C --> D["输出图标 6.0"]
</code></pre>
</details>
<p>3) Utilisez [ △ / ∇ / ◀/ ▷] pour déplacer l'image agrandie à l'écran.</p>
<p><img alt="" src="images/66a0e48a179411d73c7578bfbf723c234cc76ba8a1e6dd7b125ff40d5fdffead.jpg" /></p>
<details>
<summary>flowchart</summary>
<pre><code class="language-mermaid">graph TD
A["Step 1: Computer Icon"] --> B["Step 2: Computer Icon"]
B --> C["Step 3: Computer Icon"]
C --> D["Step 4: Computer Icon"]
D --> E["Step 5: Computer Icon"]
</code></pre>
</details>
<p>4) Appuyez sur [ZOOM] pour quitter le mode agrandissement.</p>
<h1 id="remarque-27">Remarque</h1>
<ul>
<li>Pour les disques BD, la fonction de zoom n'est pas disponible. </li>
<li>La fonction d'agrandissement ne fonctionne pas lorsque le menu du disque est affiché. <br />
• L'écran de navigation n'est pas offert sur le format JPEG. </li>
<li>Vous ne pouvez pas faire de panoramique d'une image agrandie sur certains fichiers JPEG. </li>
<li>Sur certains DVD, l'agrandissement "x4.0" n'est pas disponible. </li>
<li>Pour certains fichiers DivX ^® avec une petite image, la fonction d'agrandissement n'est pas disponible. </li>
<li>Pour D'itoux dépend de la grosseur de l'image, Il se pourrait que certains facteurs d'agrandissement ne fonctionnent pas.</li>
</ul>
<h1 id="angle-de-caméra">Angle de Caméra</h1>
<p>BD-V DVD-V</p>
<p>Certains disques BD et DVD contiennent des scènes qui ont été prises simultanément avec une caméra à angles multiples. Vous pouvez modifier l'angle de la caméra lorsque apparaît à l'écran.</p>
<p>1) Appuyez sur [ANGLE] pendant la lecture.</p>
<p>• L'angle choisi s'affichera sur la barre d'affichage en haut de l'écran.</p>
<p>2) Utilisez [△ / ▽] pour sélectionner l'angle voulu.</p>
<h1 id="remarque-28">Remarque</h1>
<p>- Si le paramètre "Icône de L'Angle" est sur "Hf" dans le menu "Autres", Rapparaîtra pas. Consultez la page 37.</p>
<h1 id="recherche-2">Recherche</h1>
<p>■ Utilisation de la fonction |◀◀ /▶▶|</p>
<p>1) Appuyez sur ▶▶ pour passer au prochain chapitre, à la prochaine piste ou au prochain fichier en cours de lecture. Pour revenir au chapitre, à la piste ou au fichier précédent, appuyez deux fois rapidement sur ◀◀.</p>
<h1 id="remarque-29">Remarque</h1>
<p>- Si le titre ne contient aucun chapitre, |◀◀/▶▶| change le titre.</p>
<p>■Utilisation de la fonction [SEARCH MODE]</p>
<p>Sous le mode [SEARCH MODE], vous pouvez sélectionner les options de recherche suivantes.</p>
<table><tr><td>Mode de recherche</td><td>Media disponible</td></tr><tr><td>TT / CRRecherche Titre / Chapitre</td><td>BD-V DVD-V DVD-VR</td></tr><tr><td>TR Recherche de Piste</td><td>CD MP3 WMAJPEG DivX®</td></tr><tr><td>REcherche de Temps</td><td>BD-V DVD-V DVD-VRCD DivX®</td></tr><tr><td>WTR Recherche de Marque</td><td>BD-V DVD-V DVD-VRCD</td></tr></table>
<h1 id="français-15">FRANÇAIS</h1>
<h1 id="lecture-lecture-3">Lecture Lecture</h1>
<p>1) Sélectionnez le mode de recherche en appuyant sur [SEARCH MODE].</p>
<p>- Chaque fois que vous appuyez sur [SEARCH MODE], le mode de recherche change.</p>
<p>2) Pour effectuer une recherche, entrez le numéro du chapitre, de la piste, du titre, du fichier ou le temps désiré en utilisant [les touches numériques].</p>
<p>- La recherche de chapitre, titre, piste ou durée débutera, par ex.)</p>
<p>- Pour un disque avec moins de 10 titres, appuyez directement, sur le numéro correspondant au titre.</p>
<p>- Si un disque contient 10 titres ou plus, mais moins de 100 titres, et on veut procéder à la lecture d'un titre à un chiffre, appuyez d'abord sur [0], puis sur le numéro correspondant au titre (par ex. pour le titre 3, appuyez sur [0], puis sur [3]). Pour lire un titre à deux chiffres, appuyez sur le numéro correspondant au titre.</p>
<p>- Si un disque contient 100 titres ou plus, et on veut procéder à la lecture d'un titre à un ou deux chiffres, appuyez d'abord sur [0], puis sur le numéro correspondant au titre (par ex. pour le titre 3, appuyez sur [0], [0], puis sur [3], et pour le titre 26, appuyez sur [0], [2], puis sur [6]). Pour lire un titre à trois chiffres, appuyez sur le numéro correspondant au titre.</p>
<h1 id="remarque-30">Remarque</h1>
<p>- Pendant la lecture d'un programme et la lecture aléatoire, les fonctions de recherche ne sont pas disponibles, sauf la recherche à l'aide de ◀◀◀/▶▶.</p>
<p>- La fonction de recherche par temps est disponible uniquement sur le même piste, fichier ou titre.</p>
<p>- Il est possible que sur certains fichiers DivX ^® , la recherche par durée ne fonctionne pas.</p>
<p>Pour BD, la recherche de chapitre et de temps est disponible uniquement pendant la lecture.</p>
<h1 id="recherche-de-marque">■Recherche de marque</h1>
<p>Cette fonction vous permet d'attribuer une marque particulière à un titre ou à une piste afin de les rappeler plus tard.</p>
<p>1) Pendant la lecture, appuyez sur la touche [SEARCH MODE] de manière répétée jusqu'à ce que le paramètre de marque apparaïsse. <br />
2) Utilisez [◀ / ▷ pour sélectionner un numéro de marque (1 à 9).</p>
<p><img alt="" src="images/de29578ac4b193057d1aea2f467e95e60f20bd4fc951de7dee787e5e6eac14f3.jpg" /></p>
<p>3) Lorsque le disque parvient à l'endroit où vous voulez fixer une marque, appuyez sur la touche [ENTER].</p>
<p>• Le titre ou la piste et la durée écoulée apparaîtront à l'écran.</p>
<p>4) Appuyez sur la touche [SEARCH MODE] ou [RETURN] pour quitter.</p>
<p>5) Pour revenir à la marque plus tard, appelez le paramètre de la marque en appuyant sur [SEARCH MODE] de manière répétée pendant la lecture ou en mode arrêt, et utilisez [◀ /▶ pour sélectionner la marque voulue, puis appuyez sur [ENTER].</p>
<h1 id="remarque-31">Remarque</h1>
<ul>
<li>Toutes les marques s'effacent dès que le tiroir à disque est ouvert, que le courant est coupé ou que "AC" est sélectionné à l'étape 2 et que la touche [ENTER] est enfoncée. </li>
<li>Pour effacer une marque, utilisez [◀/▶] pour sélectionner le numéro de la marque à effacer et appuyez sur [CLEAR].</li>
<li>Vous pouvez marquer jusqu'à 9 endroits. </li>
<li>Pour les BD-vidéo, la recherche de marque entre deux titre différents n'est pas disponible. </li>
<li>Pour BD, vous pouvez retourner à la marque uniquement pendant la lecture.</li>
</ul>
<h1 id="affichage-à-lécran-2">Affichage à l'Écran</h1>
<p>Vous pouvez vérifier les informations du disque en cours en appuyant sur [DISPLAY].</p>
<p>Pour activer l'écran, appuyez sur la touche [DISPLAY] pendant la lecture. Chaque fois que vous appuyez sur [DISPLAY], les informations changent. En fonction du support utilisé, les informations varieront.</p>
<h1 id="bd-v-5">BD-V</h1>
<p>ARRÊT → Information sur le titre/chapitre → Information sur le titre (temps écoulé) → Information sur le titre (temps restant) → Information HDMI → ARRÊT</p>
<h1 id="dvd-v-dvd-vr-2">DVD-V DVD-VR</h1>
<p>ARRÊT → Information sur le chapitre (temps écoulé) <br />
→ Information sur le chapitre (temps restant) → Information sur le titre (temps restant) → Information sur le titre (temps restant) <br />
→ Information sur le débit binaire → Information sur HDMI → ARRÊT</p>
<h1 id="cd-2">CD</h1>
<p>ARRÊT → Information sur la piste (temps écoulé) → Information sur la piste (temps restant) → Information sur le disque* (temps écoulé) → Information sur le disque* (temps restant) <br />
→ Information sur HDMI → ARRÊT <br />
(* non disponible pendant la lecture d'un programme ou la lecture aléatoire)</p>
<h1 id="mp3-jpeg-2">MP3 JPEG</h1>
<p>ARRÊT → Information sur le nom de fichier → Information sur le fichier (temps écoulé*) → Information sur HDMI → ARRÊT (* non disponible pour JPEG)</p>
<h1 id="wma-2">WMA</h1>
<p>ARRÊT → Information sur le nom du fichier → Information sur l'étiquette (nom de titre) → Information sur l'étiquette (nom de l'artiste) → Information sur le fichier (temps écoulé) → Information sur HDMI → ARRÊT</p>
<h1 id="divx-3">DivX®</h1>
<p>ARRÊT → Information sur le nom de fichier → Information sur le fichier (temps écoulé) → Information sur le fichier (temps restant) → Information sur HDMI → ARRÊT <br />
- Pendant la lecture d'un programme ou la lecture aléatoire, dans le cas des CD audio, des MP3, des Windows Media™ Audio, et des JPEG, l'indication sera affichée après l'information de la piste/du fichier.</p>
<p>■Information sur le chapitre <br />
<img alt="" src="images/7baab7b9016a36f626cb344da698bfd2b27d1e83e5bfefebfbd40491b4570627.jpg" /><br />
<Information sur le titre/chapitre, pour les disques BD></p>
<p><img alt="" src="images/7e66cc7d26894097f4e1d821c51d0c01f8437eedcca32800bc2c842ea3db39eb.jpg" /></p>
<ol>
<li>Numéro du chapitre en cours de lecture/nombre total de chapitres </li>
<li>Temps écoulé/temps restant du chapitre en cours </li>
<li>Indique qu'il y a des images à angles multiples disponibles pour la scène </li>
<li>Statut de la lecture en cours </li>
<li>Numéro du titre en cours </li>
<li>Réglage de répétition actuel (uniquement lorsque le paramètre de répétition est actif)
(C: répétition de chapitre, T: Répétition de titre, AB : A-B répété)</li>
</ol>
<p>Information sur le titre <br />
<img alt="" src="images/32ff1603fb956da15952ca189051566357215090734fe2935fd51808aceb7a4c.jpg" /><br />
7. Numéro du titre en cours de lecture/nombre total de titres
8. Temps écoulé/temps restant du titre en cours de lecture</p>
<h1 id="français-16">FRANÇAIS</h1>
<p>Lecture Lecture <br />
<img alt="" src="images/577b0509dd037baad10aa88df7075381af7ace611ec82696b7c25a511369509e.jpg" /></p>
<details>
<summary>text_image</summary>
Front panel of a CD-ROM drive with control knobs and display screen showing power, settings, and output ports
</details>
<p><img alt="" src="images/751c73e514f8d035226fd00f03f659967dc745f86c4f66de7fea415cd8928216.jpg" /></p>
<details>
<summary>text_image</summary>
[TOP MENU]
[△/▽/◇/◇]
[SUBTITLE]
[DISPLAY]
[POP UP MENU / MENU]
[ENTER]
[AUDIO]
</details>
<h1 id="à-propos-des-touches-6">À propos des touches</h1>
<p><>: Touches de l'unité principale</p>
<p>] : Touches de la télécommande</p>
<p>Nom de la touche seulement:</p>
<p>Touches de l'unité principale et de la télécommande</p>
<p>Information du débit binaire <br />
<img alt="" src="images/91d898076537e1d789562afabc572b8c6ed8d3d39e6f5221e30358176c2fef68.jpg" /></p>
<details>
<summary>flowchart</summary>
<pre><code class="language-mermaid">graph TD
A["9"] --> B["Bar"]
C["10"] --> D["L1"]
</code></pre>
</details>
<p><Pour DVD-RW/-R en mode VR></p>
<p><img alt="" src="images/08b9241ee7c69944ea3fb3c9e8a784806c9888cb37acc8ec4d2281d8fd727978.jpg" /></p>
<details>
<summary>text_image</summary>
11
ORG
</details>
<ol>
<li>Taux binaire (la quantité de données vidéo en cours de lecture) </li>
<li>Numéro de la couche (Uniquement pour les disques à deux couches)
(L0: Couche 0 en lecture. L1: couche 1 en lecture) </li>
<li>Type de titre (ORG: original, PL: liste)</li>
</ol>
<p>Information sur la piste/le fichier <br />
<img alt="" src="images/acbbb62c5911aae4cde1bda48bae9b77db5d11d121337abc4f846e3295902e02.jpg" /></p>
<ol>
<li>Numéro de la piste (fichier) en cours de lecture/nombre total de pistes (fichiers) </li>
<li>Temps écoulé/temps restant de la piste (du fichier) en cours de lecture </li>
<li>Indication de la lecture de la carte mémoire SD</li>
<li>Réglage de répétition actuel (Uniquement lorsque le paramètre de répétition est actif)
(T: Répétition de la piste/du fichier, G: Répétition du groupe, A: Répétition de tout)</li>
</ol>
<p>Information sur le disque <br />
<img alt="" src="images/a54c23b9611d32b0c6df25244f90bb2b185cbe079d8a9020407122f24e73fa91.jpg" /></p>
<ol>
<li>Numéro de la piste en cours/nombre total de pistes </li>
<li>Temps écoulé/temps restant du disque en cours de lecture</li>
</ol>
<p>Information sur le nom du fichier <br />
<img alt="" src="images/51f73afa6150d308774cfaef9bbd23c0853952fe61798db65c58a27c22e60f0c.jpg" /></p>
<p><img alt="" src="images/afad2b6520d5038b40e2b6ebae5fe3a1e460df92bb8a24315ac4148082ef2fa0.jpg" /></p>
<p>Information sur l'étiquette <br />
<img alt="" src="images/e0d3fedd5eef09d5804b6ffc0032beb632297f8f6fc970563dd21a0f3f429d66.jpg" /></p>
<details>
<summary>flowchart</summary>
<pre><code class="language-mermaid">graph TD
A["19"] --> B["TITRE"]
B --> C["[DISPLAY"]]
D["20"] --> E["NOM DE L'ARTISTE"]
E --> F["▶"]
</code></pre>
</details>
<ol>
<li>Nom du titre basé sur l'information de l'étiquette du fichier en Windows Media™ Audio cours </li>
<li>Nom de l'artiste basé sur l'information de l'étiquette du fichier en Windows Media™ Audio cours</li>
</ol>
<p>Lecture Lecture</p>
<p>■Informations sur HDMI</p>
<p><img alt="" src="images/cef7ce0aac59a14b199f6b5f7608d73922ae36780a9df9500b840c88ed6cdf48.jpg" /></p>
<details>
<summary>text_image</summary>
21
22
HDMI Info. Video : YCbCr / 1080i
Info. Audio : Dolby Digital
Canaux Max : 6ch
23
24
</details>
<ol>
<li>Format vidéo HDMI </li>
<li>Résolution de la sortie d'image HDMI </li>
<li>Format audio HDMI </li>
<li>Nombre maximum de canaux audio compatibles avec le dispositif connecté</li>
</ol>
<h1 id="remarque-32">Remarque</h1>
<p>- SI HDMI n'est pas connecté, "---" sera affiché pour de l'information sur HDMI.</p>
<h1 id="sélection-du-format-audio-et-vidéo">Sélection du Format Audio et Vidéo</h1>
<h1 id="sélection-des-suitescanaux-audio">Sélection des Suites/Canaux Audio</h1>
<p>BD-V DVD-V DVD-VR CD DivX®</p>
<p>Certains disques BD et DVD contiennent de multiples suites audio. Souvent, elles sont offertes en plusieurs langues audio ou formats audio. Pour les disque BD, l'audio disponible varie en fonction du réglage de "Mode Audio BD". Consultez la page 23 pour de plus amples informations:</p>
<p>BD-V <br />
1) Pendant la lecture, appuyez sur [AUDIO]. <br />
2) Utilisez [△ / ▽] pour sélectionner l'audio "Primaire" ou "Secondaire" à programmer, ensuite appuyez sur [ENTER].</p>
<p><img alt="" src="images/dd5291a7e18b53cdde939d407f04a7dfd04a4814f025ab7ff852ee2eec498f81.jpg" /></p>
<p>"Primaire": Règle l'audio de l'image principale. <br />
"Secondaire": Règle l'audio de l'image secondaire. Lorsque la fonction d'image secondaire est activée, l'audio "Secondaire" sera reproduit parallèlement à l'image secondaire. <br />
- Pour écouter l'audio secondaire, "Mode Audio BD" doit être réglé sur "Sortie Audio Mixte". Consultez la page 23. <br />
3) Utilisez [ △ / ▽] pour sélectionner la suite ou le canal audio voulu. <br />
4) Appuyez sur la touche [AUDIO] pour quitter.</p>
<p>DVD-V DVD-VR CD DivX®</p>
<p>1) Pendant la lecture, appuyez sur [AUDIO].</p>
<p>2) Utilisez [△ / ▽] pour sélectionner la suite ou le canal audio désiré.</p>
<p><img alt="" src="images/805c4ef7e86b636eca557aabdaf5a59c834263c04947e07fbe0a008b673c6637.jpg" /></p>
<p>- Pour CD audio, vous pouvez choisir les options suivantes.</p>
<p>"Stéréo" : Les deux canaux, autant le droit et le gauche, sont actifs (stéréo)</p>
<p>"L-ch" : Seul le canal gauche est actif
"D-ch" : Seul le canal droit est actif</p>
<p>3) Appuyez sur la touche [AUDIO] pour quitter.</p>
<h1 id="remarque-33">Remarque</h1>
<ul>
<li>Pour les DVD-RW/-R en mode VR avec système MTS (transmission multivole de signaux sonores en télévision), vous pouvez alterner entre "1.Pral" (audio principal), "1. Sous" (audio secondaire) et "1.Pral/Sous" (audio principal et secondaire). </li>
<li>Pour certains disques BD, l'audio secondaire sera reproduit même si l'image secondaire est désactivée. </li>
<li>Le mode du son ne peut être changé pendant la lecture de disque n'ayant pas été enregistré en son multiple. </li>
<li>Certains disques permettent le changement du programme de langue audio sur leur menu. (L'opération varie d'un disque à l'autre. Veuillez vous reporter au manuel accompagnant le disque.) </li>
<li>La fonction liée à la touche [AUDIO] peut ne pas fonctionner sur certains disques avec des canaux ou des suites audio multiples (p. ex., un DVD sur lequel on peut modifier le paramètre audio dans son menu). </li>
<li>Si vous choisissez une langue ayant un code de langue à trois lettres, le code sera affiché chaque fois que vous modifiez le paramètre de la langue audio. Si vous optez pour une autre langue, c'est plutôt “---” qui apparaîtra (consultez la page 39). </li>
<li>Il n'est pas possible de faire la sélection de la langue audio pendant la vitesse de dialogue (consultez la page 17). </li>
<li>Si le disque n'a pas de langue audio, le message "Non Disponible" s'affichera. </li>
<li>Pour les disques avec fichiers DivX ^ , seul MP3, MP2 ou l'audio Dolby Digital est affiché. Tout autre audio sera affiché avec “—”. </li>
<li>Pour les CD DTS (disque de musique 5.1), la sélection du flot ou du canal audio n'est pas disponible.</li>
</ul>
<h1 id="français-17">FRANÇAIS</h1>
<h1 id="sélection-de-la-langue-du-sous-titrage">Sélection de la Langue du Sous-Titrage</h1>
<p>BD-V DVD-V DivX ^®</p>
<p>Les BD, DVD-vidéo et DivX® peuvent avoir des sous-titres dans une ou plusieurs langues. Les langues disponibles pour les sous-titres se trouvent sur le boîtier du disque. Vous pouvez changer la langue des sous-titres en tout temps pendant la lecture.</p>
<p>BD-V</p>
<p>1) Pendant la lecture, appuyez sur [SUBTITLE].</p>
<p>2) Utilisez [△ / ▽] pour sélectionner "Sous-titre principal", "Sous-titre secondaire" ou "Style sous-titres", ensuite appuyez sur [ENTER].</p>
<p><img alt="" src="images/68011edae7970345d305cd43c53f5cb590367ccfdd50a11224812c59f7b758f5.jpg" /></p>
<p>Sous-titre principal</p>
<p>Sous-titre secondaire</p>
<p>Style sous-titres</p>
<p>2.ENG/255</p>
<ol>
<li>ENO/255</li>
</ol>
<p>2/25</p>
<p>"Sous-titre principal" : Règle le sous-titre de l'image principale. <br />
"Sous-titre secondaire": Règle le sous-titre de l'image secondaire. <br />
"Style sous-titres": Réglez le style du sous-titrage. <br />
3) Utilisez [△ / ▽] pour sélectionner le sous-titre voulu. <br />
4) Appuyez sur la touche [SUBTITLE] pour quitter.</p>
<p>DVD-V DivX®</p>
<p>1) Pendant la lecture, appuyez sur [SUBTITLE]. <br />
2) Utilisez [△ / ▽] pour sélectionner le sous-titre voulu.</p>
<p><img alt="" src="images/74a2a6024aeb1ad456ff22178387ddb0012903ac5a33e4c07964323c117d29c7.jpg" /></p>
<p>ENG</p>
<p>3</p>
<p>[Non-Text]</p>
<p>3) Appuyez sur la touche [SUBTITLE] pour quitter.</p>
<h1 id="remarque-34">Remarque</h1>
<ul>
<li>Vous pouvez modifier le sous-titre sur certains disques depuis le menu du disque. Appuyez sur [TOP MENU] ou [POP UP MENU / MENU] pour afficher le menu du disque. </li>
<li>Si un code de langue à quatre chiffres apparaît dans le menu des sous-titres, reportez-vous à "Code de Langue" à la page 39. </li>
<li>Si le disque n'a pas de langage ou de style de sous-titre, "Non Disponible" s'affichera. </li>
<li>Dans le cas des DivX ^ , l'écran affiche uniquement le nombre de langues de sous-titre.</li>
</ul>
<h1 id="français-18">FRANÇAIS</h1>
<p>Lecture Lecture <br />
<img alt="" src="images/a961e08aee95e26ff74827431ab104aeb0ec6fe286b90e6ca81479bcccc5f7fe.jpg" /></p>
<details>
<summary>natural_image</summary>
Front view of a CD-ROM computer with control panel and buttons (no visible text or labels)
</details>
<p><img alt="" src="images/ccecc38f3d5afe433a9626907c148749c5e1e380ec7d1e32f9a1bedbff636963.jpg" /></p>
<details>
<summary>text_image</summary>
[△/▽/◄/►]
[PURE DIRECT]
[MODE]
[ENTER]
[RETURN]
</details>
<h1 id="à-propos-des-touches-7">À propos des touches</h1>
<p><>: Touches de l'unité principale</p>
<p>1 : Touches de la télécommande</p>
<p>Nom de la touche seulement:</p>
<p>Touches de l'unité principale et de la télécommande</p>
<h1 id="ambio-virtuel">Ambio Virtuel</h1>
<h1 id="bd-v-dvd-v-dvd-vr-4">BD-V DVD-V DVD-VR</h1>
<p>Vous pouvez profiter de l'espace phonétique stéréo virtuel par l'entremise de votre système stéréo à deux canaux.</p>
<p>1) En mode arrêt, appuyez sur [MODE] de manière répétée jusqu'à ce que le paramètre de l'ambiophonie virtuelle apparaïsse.</p>
<p><img alt="" src="images/c9acff16913824301bffe604e4332f9783ee876bb4305a86e203d2eeecd56ce1.jpg" /></p>
<p>2) Utilisez [△ / ▽] pour sélectionner "1" (Effet naturel), "2" (Effet accentué) ou "Hf".</p>
<p>3) Appuyez sur la touche [RETURN] pour quitter.</p>
<h1 id="remarque-35">Remarque</h1>
<ul>
<li>Sélectionnez l'amblophonique virtuelle "Hf" ou baissez le volume si le son est déformé. </li>
<li>Il n'est pas possible d'utiliser cette fonction pendant la vitesse de dialogue (reportez-vous à la page 17). </li>
<li>Pour l'ambiophonie virtuelle, le signal audio sera toujours sur 2 canaux LPCM.</li>
</ul>
<h1 id="mode-pure-direct">Mode Pure Direct</h1>
<p>BD-V DVD-V DVD-VR CD MP3 WMA</p>
<h1 id="divx-e">DivX ^e</h1>
<p>Utilisez cette fonction pour éteindre la circuiterie non utilisée afin d'obtenir un son analogique de haute qualité. <br />
1) Appuyez sur [PURE DIRECT] de manière répétée pour choisir le mode pure direct voulu.</p>
<p>- Chaque fois que vous appuyez sur [PURE DIRECT], le mode pure direct change en "Normal" → "Video Off" → "Display Off" → "All Off" → "Normal". Les modes de sortie s'afficheront sur l'écran du panneau avant.</p>
<p>Sorties vidéo / audio pour chaque mode</p>
<p>"Normal": Mode de lecture normal (le mode pure direct est inactif).</p>
<p>"Video Off": Le signal vidéo ne sera pas sorti.</p>
<p>"Display Off": La circulterle pour l'affichage du panneau avant et les voyants seront éteints.</p>
<p>"All Off": Le signal vidéo ne sera pas sorti et la circuiterie de l'affichage du panneau avant, ainsi que les voyants, seront éteints.</p>
<h1 id="remarque-36">Remarque</h1>
<p>- Si vous ételignez l'apparell ou le mettez en mode veille, le mode pure direct retournera à "Normal".</p>
<h1 id="réglage-du-mode-audio-bd">Réglage du Mode Audio BD</h1>
<h1 id="bd-v-6">BD-V</h1>
<p>Le mode BD audio offre deux possibilités; vous pouvez entendre soit l'audio secondaire interactif accompagné de l'audio primaire, soit l'audio primaire seulement. Selon le réglage du mode, la sortie Dolby Digital, DTS, Dolby Digital Plus, Dolby TrueHD ou DTS-HD bascule entre Multi LPCM et flux binaire.</p>
<p>1) En mode arrêt et avec un BD inséré, appuyez sur [MODE].</p>
<p>2) Utilisez [△ / ▽] pour sélectionner le réglage voulu.</p>
<p>■"Sortie Audio Mixte"</p>
<p>Si disponibles, l'audio secondaire et interactif du vidéo BD seront également en sortie, tout comme l'audio primaire.</p>
<p>- L'audio secondaire est celui des sous-images (commentaires du réalisateur, etc.) et l'audio interactif est celui des applications interactives (lorsque vous cliquez sur un bouton, etc.)</p>
<h1 id="sortie-audio-hd">■"Sortie Audio HD"</h1>
<p>Uniquement l'audio primaire sera en sortie. Configurez ce mode afin de sortir le son de BD Dolby Digital, Dolby Digital Plus, Dolby True HD, DTS ou DTS-HD par la connexion HDMI.</p>
<p>3) Appuyez sur la touche [RETURN] pour quitter.</p>
<p>- Vous pouvez aussi régler le "Mode Audio BD" sur le menu de configuration. Consultez la page 32.</p>
<h1 id="remarque-37">Remarque</h1>
<ul>
<li>En mode "Sortie Audio Mixte", même si vous réglez "Multi HDMI (Normal)" dans "Sortie Audio HDMI", les signaux multi LPCM seront reproduits par la sortie HDMI OUT pour l'audio BD. Consultez la page 11. </li>
<li>En mode "Sortie Audio Mixte" avec la sortie d'audio HDMI, le LPCM à 2 canaux réduit par mixage sera sorti de DIGITAL OUT pour audio BD. </li>
<li>En mode "Sortie Audio Mixte" avec "Sortie Audio HDMI" réglé sur "Sourdine" et "Sortie numérique" réglé sur "Train Binaire", DTS, DTS-HD et LPCM seront sortis en tant que Dolby Digital pour audio BD. Consultez la page 12. </li>
<li>En mode "Sortie Audio Mixte", de 7.1ch AUDIO OUT, Dolby Digital Plus, Dolby True HD et DTS-HD l'émission sera sous forme de multi LPCM décodé de son flux principal correspondant.</li>
</ul>
<h1 id="lecture-lecture-4">Lecture Lecture</h1>
<h1 id="réglage-de-limage">Réglage de l'Image</h1>
<h1 id="bd-v-dvd-v-dvd-vr-divx-2">BD-V DVD-V DVD-VR DivX®</h1>
<p>Vous povez régler la qualité de l'image et garder les réglages effectués en mémoite 1-5.</p>
<p>1) Pendant la lecture, appuyez sur la touche [MODE] de manière répétée jusqu'à ce que le menu de réglage de l'image apparaisse.</p>
<p>• Ménu de réglage de l'image:</p>
<p><img alt="" src="images/d64321f5f2ace28bef005e8c5e642e6f448d86b72cc5a57921ec48f040acd69f.jpg" /></p>
<p>Mémoir</p>
<p><img alt="" src="images/b801dd1d4d00dd598bdaa07212a40566b84a8626e0e9246228a404742b4319fb.jpg" /></p>
<p><img alt="" src="images/28f481f58b9e1eba2d73549202761ae38628ae6e5bd213e132e5ef5002fe9007.jpg" /></p>
<p><img alt="" src="images/ce479880cc201403b6894699beb619fa062f5283e118a020fa8919c686e78d60.jpg" /></p>
<p><img alt="" src="images/73bc69d6749a91e7736ee36f67811b2dcfda7c6d51933b215fa8a99d01486663.jpg" /></p>
<p><img alt="" src="images/e7dca769f17db3cfd68718e9e713a6a66ee5709e2fe3fc5e8768cafb2571842c.jpg" /></p>
<p><img alt="" src="images/cb579a402e378393baa108393d346372851e1bad6d6157e070269263ce29bc64.jpg" /></p>
<p>2) Utilisez [△ / ▽] pour sélectionner une mémoire de "Mémoire1" à "Mémoire5" afin de conserver vos réglages, ensuite appuyez sur [ENTER]. <br />
3) Utilisez [△ / ▽] pour sélectionner un élément à régler, puis utilisez [◀ / ▶] pour régler le paramètre.</p>
<p><img alt="" src="images/53576f18baa69e5eb26cfc0f1a116b87d32480f84ecc21e788d5c835a8f618e2.jpg" /></p>
<p>Mémoirí</p>
<p><img alt="" src="images/648e8f89e8d00954e79e23588806178a41965557e28af28ce5a6054c1fb61397.jpg" /></p>
<ol>
<li>Commande position V 0</li>
</ol>
<p>1.Contraste</p>
<p>7.1uminosito</p>
<p><img alt="" src="images/164e4c530049b23c1167e066968e117f72554f3f5b0011e7b5a210e2bcda1f87.jpg" /></p>
<p>- Pour restaurer les réglages par défaut, appuyez sur [RETURN], utilisez [△ / ▽] pour sélectionner "STD", puis appuyez sur [ENTER].</p>
<h1 id="correction-gamma">■Correction gamma</h1>
<ul>
<li>Pour régler "Correction Gamma", sélectionnez l'objet à l'étape 3 et appuyez sur [ENTER], puis utilisez [△ / ∇ / ◀ / ▷] pour ajuster le paramètre. </li>
<li>Dans le graphique de la correction gamma, l'axe horizontal indique le niveau de luminosité de l'image qui est enregistrée sur le disque et l'axe vertical indique le niveau de luminosité de l'image lorsqu'elle sort de l'appareil.</li>
</ul>
<p><img alt="" src="images/add6222aa5e696719f5378fdb594b60a6ab9509324df5af3f2416e156fe1abcd.jpg" /></p>
<details>
<summary>line</summary>
| X | Y |
|---|---|
| 0 | 0 |
| 255 | 255 |
GO: 0.24
</details>
<p>- Lorsque les points lumineux du côté du disque sont ajustés à la "noirceur" du côté de sortie, les parties subtiles du secteur lumineux qui normalement sont difficiles à voir, forment une image facile à discerner.</p>
<h1 id="français-19">FRANÇAIS</h1>
<p><img alt="" src="images/b24c903644e7725d913a78fc93a0d0cb0743cdcf5b4640904ac036f3ee05201b.jpg" /></p>
<details>
<summary>line</summary>
| X | Y |
|---|---|
| 0 | 0 |
| 255 | 255 |
| 255 | 255 |
| 255 | 255 |
| 255 | 255 |
| 255 | 255 |
| 255 | 255 |
| 255 | 255 |
| 255 | 255 |
| 255 | 255 |
| 255 | 255 |
</details>
<p>• Lorsque les points sombres du côté du disque sont ajustés à la "luminosité" du côté de sortie, les parties subtiles du secteur sombre qui normalement sont difficiles à voir, forment une image facile à discerner. <br />
4) Appuyez sur la touche [RETURN] de manière répétée pour quitter.</p>
<h1 id="remarque-38">Remarque</h1>
<ul>
<li>Ce paramétrage ne prend pas effet pour les images en sortie des ports VIDEO OUT et S VIDEO OUT. </li>
<li>Le réglage est conservé même lorsque vous éteignez le lecteur. </li>
<li>Vous ne pouvez pas faire le réglage pendant la lecture rapide <br />
ou si pure direct et réglé sur "Video Off" ou "All Off". </li>
<li>On peut également régler la réduction numérique de bruit en appuyant sur </li>
</ul>
<VIDEO NOISE REDUCTION> sur le panneau avant. (consultez la page 7.)
Liste des éléments/valeurs de réglage de l'image
<table><tr><td>Item</td><td>Description</td><td>Étendue de réglage (Defaut)</td></tr><tr><td>1. Contraste</td><td>Ajuste la différence entre les parties lumineuses et foncées de l'image.</td><td>-6 à +6 (0)</td></tr><tr><td>2. Luminosite</td><td>Règle la luminosité de l'image.</td><td>0 à +12 (0)</td></tr><tr><td>3. Améliorateur*1</td><td>Précise les contours de l'image.</td><td>0 à +11 (0)</td></tr><tr><td>4. DNR*1</td><td>Réduit le niveau général du bruit de l'image.</td><td>HF à +3 (HF)</td></tr><tr><td>5. Correction Gamma</td><td>Réglage détaillé de la luminosité de l'image.</td><td>16 à 235 (G0=24/G1=32/G2=48/G3=64/G4=80/G5=96/G6=128/G7=160/G8=192/G9=224)</td></tr><tr><td>6. Netteté moyenne*2</td><td>Ajuste la précision de l'image pour une étendue de fréquence moyenne.</td><td>-6 à +6 (0)</td></tr><tr><td>7. Netteté élevée*1</td><td>Ajuste la précision de l'image pour une étendue de fréquence élevée.</td><td>-6 à +6 (0)</td></tr><tr><td>8. Teinte*1</td><td>Règle l'équilibre entre le vert et le rouge.</td><td>-6 à +6 (0)</td></tr><tr><td>9. Niveau de blanc</td><td>Ajuste le niveau du blanc.</td><td>-5 à +5 (0)</td></tr><tr><td>10.Niveau noir*1</td><td>Ajuste le niveau du noir.</td><td>-5 à +5 (0)</td></tr><tr><td>11.Niveau de saturation</td><td>Règle la densité des couleurs.</td><td>-6 à +6 (0)</td></tr><tr><td>12.Niveau installation</td><td>Rend les parties noires de l'image plus lumineuses.</td><td>0 IRE : Montre l'image originale comme enregistrée.7.5 IRE : Rend les parties sombres plus lumineuses.(7.5 IRE)</td></tr><tr><td>13.Commande position H*1</td><td>Règle la position à gauche/à droite.</td><td>-7 à +7 (0)</td></tr><tr><td>14.Commande position V*1</td><td>Règle la position en haut/en bas.</td><td>-7 à +7 (0)</td></tr></table>
\* S'applique au signal vidéo de COMPONENT VIDEO OUT (excepté 480i) et aux prises HDMI OUT.
^*2 Ne s'applique pas au signal vidéo de la prise HDMI OUT.
<h1 id="français-20">FRANÇAIS</h1>
Lecture Lecture

<details>
<summary>natural_image</summary>
Front view of a CD-ROM drive with ports and control buttons (no visible text or labels)
</details>

<details>
<summary>text_image</summary>
[TOP MENU]
[POP UP MENU / MENU]
[△/▽/▽/▽]
[ENTER]
←←
→
</details>
<h1 id="à-propos-des-touches-8">À propos des touches</h1>
<>: Touches de l'unité principale
[ ] : Touches de la télécommande
Nom de la touche seulement:
Touches de l'unité principale et de la télécommande
<h1 id="lecture-dunfichier-mp3-windows-media-audio-jpeg-et-divx">Lecture d'UnFichier MP3, Windows Media™ Audio, JPEG et DivX®</h1>
<h1 id="mp3-wma-jpeg-divx-2">MP3 WMA JPEG DivX®</h1>
1 Insérez un disque DVD-RW/-R ou CD-RW/-R avec fichiers MP3, Windows Media™ Audio, JPEG ou DivX®.
• La liste des fichiers apparaîtra à l'écran
• Si la liste n'apparaît pas automatiquement, appuyez
sur [POP UP MENU / MENU].
• Appuyez sur [POP UP MENU / MENU] pour quitter
et reprendre la liste des fichiers.
2 Utilisez [△ / ▽] pour sélectionner le dossier ou le fichier voulu, puis appuyez sur [ENTER]. Utilisez [◀ / ▶] pour revenir et avancer entre les hiérarchies.
- Si vous appuyez sur [ENTER] sur les fichiers, la lecture débutera.

<details>
<summary>flowchart</summary>
<pre><code class="language-mermaid">graph TD
A["Router"] --> B["1"]
A --> C["2"]
A --> D["3"]
A --> E["4"]
A --> F["5"]
B --> G["5"]
C --> H["2"]
D --> I["4"]
E --> J["5"]
F --> K["3"]
</code></pre>
</details>
1. Nom du dossier en cours de lecture (Le nom de la carte du disque ou de la carte mémoire SD sera affiché pour les premières hiérarchies).
2. Liste des noms de fichiers/dossiers sur le dossier/disque en cours de lecture
3. Nom du fichier/dossier sélectionné
4. Page en cours/nombre total de pages
5. Indication de la page précédente/suivante
\- Utilisez |◀◀ /▶▶ pour revenir et avancer entre les pages.
\- Appuyez sur [TOP MENU] pour revenir au premier item.
Icônes:

: Dossiers

: Fichiers MP3

: Fichiers Windows Media™ Audio

: Fichiers JPEG

: Fichiers DivX®
Il est recommandé d'enregistrer les fichiers qui seront lus sur cet appareil en respectant les spécifications suivantes:
<MP3 / Windows Media™ Audio>
\- Fréquence d'échantillonnage : 44,1 kHz ou 48 kHz
• Taux binaire constant : 112 kbps - 320 kbps (MP3), 48 kbps - 192 kbps (Windows Media™ Audio)
<h1 id="jpeg-3"><JPEG></h1>
• Limite supérieure : 2 560 x 1 900 dots
(le sous-échantillon est 4:4:4)
5 120 x 3 840 dots
(le sous-échantillon est
jusqu'à 4:2:2)
• Limite inférieure : 32 x 32 dots
• Grandeur maximum de l'image : 12 MB
<h1 id="divx-①"><DivX ^① ></h1>
Produit officiel DivX ^® Certified
• Codec lisible des fichiers AVI : DivX ^32 3.x, DivX ^30 4.x, DivX ^35 5.x, DivX ^35 6.0
\- Grandeur maximale de : 720 x 480 @30 fps, l'image 720 x 576 @25 fps
• Fréquence d'échantillonnage : 8 kHz \~ 48 kHz
de l'audio
\- Type d'audio : MPEG1 couche audio 3 (MP3), MPEG1 couche audio 2, Dolby Digital
<h1 id="remarque-39">Remarque</h1>
- Le système peut reconnaître jusqu'à 255 dossiers/999 fichiers sur CD, 999 dossiers/9999 fichiers sur DVD et sur carte mémoire SD.
- Le nom du dossier et du fichier peut comporter jusqu'à 28 caractères. Les caractères ne pouvant être reconnus seront remplacés par des astérisques.
- Une hiérarchie de 9 et plus sur CD ne peut être affichée et une hiérarchie de 10 et plus sur DVD, carte mémoire SD ne peut être affichée.
- Les fichiers dont l'extension est différente de ".mp3(MP3)" ".wma(Windows Media™ Audio)", "jpg / .jpeg(JPEG)" ou ".avi/.divx" ne seront pas affichés.
- Les listes peuvent contenir certains dossiers ou fichiers non lisibles en raison de leur statut d'enregistrement.
- Les fichiers JPEG de haute résolution prennent plus de temps à afficher.
- Ce lecteur ne peut lire les fichiers JPEG progressifs (fichiers JPEG sauvegardés en format progressif).
- Ce lecteur reconnaît des noms de fichiers jusqu'à 8 caractères sur la carte mémoire SD. Les caractères en plus, ne seront pas affichés.
<h1 id="lecture-lecture-5">Lecture Lecture</h1>
<h1 id="pour-lire-le-sous-titre-divx-créé-par-lutilisateur">Pour Lire le Sous-Titre DivX® Créé Par l'Utilisateur.</h1>
Le sous-titre créé par l'utilisateur peut être affiché pendant la lecture de DivX®.
1) Après avoir sélectionné le fichier DivX ^® , la "Liste des Sous-titre" apparaîtra lorsque le "DivX Sous-Titre" est réglé sur toute autre fonction que "Hf". (Consultez la page 30.)
2) Utilisez [△ / ▽] pour sélectionner l'extension désirée du fichier de sous-titre que vous souhaitez afficher, puis appuyez sur [ENTER].

DivX ^ avec le sous-titre débute la lecture. Ce sous-titre ne peut être affiché lorsque le réglage est sur "Hf".
\- S'il y a plus d'une extension, le choix d'extension apparaît sur la liste du sous-titre.
\- Si vous insérez un DVD-RW/-R, CD-RW/-R avec des fichiers DivX ^ mélangées aux fichiers MP3/Windows Media ^TM Audio/JPEG, un écran avec un choix de média de lecture sera affiché. Utilisez [△ / ▽] pour sélectionner le média de lecture voulu, ensuite appuyez sur [ENTER].

\- Appuyez sur [TOP MENU] pour faire apparaître l'écran de sélection de médian en mode d'arrêt.
<h1 id="conseil-pour-le-produit-acheté-ou-loué-divx-certified">Conseil pour le produit acheté ou loué DivX® Certified</h1>
- Lorsque vous achetez ou louez un fichier DivX ^® par l'entremise d'un site officiel de vidéo DivX ^® , ce qui s'appelle un service de vidéo sur demande DivX ^® (VOD), un code d'enregistrement est nécessaire chaque fois que vous recevez un nouveau fichier des services DivX ^® VOD. Consultez "DivX(R) VOD" à la page 37.
• Le temps de certains fichiers
DivX® VOD est limité (vous ne pouvez les faire jouer après cette échéance). Si votre fichier DivX® VOD comporte une telle limite, l'écran de confirmation de lecture apparaîtra.
\- Utilisez [◀/▶] pour sélectionner "Oul" si vous voulez faire la lecture du fichier ou pour sélectionner "Non" si vous ne voulez pas refaire la lecture. Ensuite, appuyez sur [ENTER] pour confirmer la sélection
\- Vous ne pouvez pas lire les fichiers DivX® VOD dont la location est périmée. Dans ce cas, appuyez sur [POP UP MENU / MENU] et choisissez d'autres fichiers pouvant être lus.
- Vous ne pouvez faire la lecture de fichiers DivX® VOD obtenus avec différents codes d'enregistrement sur ce lecteur. Appuyez sur [POP UP MENU / MENU] et choisissez d'autres fichiers pouvant être lus.
- Vous ne pouvez lire le fichier DivX ^85 dont la résolution n'est pas compatible avec cet appareil. Cet appareil n'est pas compatible avec les fichiers DivX ^86 dont le format de l'image excède 720 x 480 @ 30 fps ou 720 x 576 @ 25 fps.


<h1 id="quest-ce-que-divx">Qu'est-Ce Que DivX®?</h1>
• U n D l'est un codec (compression/décompression) qui peut comprimer les images à une donnée très petite. Le logiciel peut comprimer les données vidéo de presque tous les dispositifs à une dimension pouvant être envoyée par Internet sans compromettre la qualité visuelle des images.
- Un fichier avec une extension ".avi" et ".divx" s'appelle un fichier DivX ^® . Tous les fichiers avec une extension DivX ^® sont reconnus comme un MPEG4.
- Pour de plus amples informations sur DivX ^ , veuillez visiter http://www.divx.com.
<h1 id="remarque-sur-divx">Remarque Sur DivX®</h1>
- Même si le fichier est doté d'une extension ".avi" et ".divx", cet appareil ne peut en faire la lecture s'il est enregistré dans un format autre que DivX ^3 .
- Il faudra peut-être un moment pour diffuser l'audio et les images après l'insertion du disque et avoir appuyé sur ▶.
- Lorsque vous faites la lecture de fichiers enregistrés à des taux binaires élevés, les Images peuvent être parfois interrompues.
- Blen que le logo DivX ^® a été obtenu pour ce lecteur, il peut ne pas jouer certaines données, en fonction des caractéristiques, taux binaires ou réglages du format audio, etc.
- Un f i c h i e ^19 dont la dimension excède 2 GB ne peut être lu.
- Si un fichier DivX ^® de grande dimension est sélectionné, le début de la lecture peut être long (parfois plus de 20 secondes).
- Si vous essayez de lire un fichier DivX ^® dont la résolution d'écran n'est pas compatible avec ce lecteur, la lecture sera interrompue et un message d'erreur apparaîtra.
- Certains fichiers DivX ^ ne peuvent être lus avec ce lecteur en raison de la configuration et des caractéristiques du disque, ou des termes d'enregistrement et des droits d'auteur du logiciel.
- Les DVD DivX® gravés en session multiples ne peuvent être lus sur cet appareil.
<h1 id="remarque-sur-le-sous-titrage-de-divx">Remarque Sur le Sous-Titrage de DivX®</h1>
- Pour utiliser cette fonction, les conditions suivantes doivent être respectées.
- Le "DivX Sous-Titre" doit être activé dans le paramètre
"Lanque". (Consultez "DivX Sous-Titre" à la page 30.)
- Le fichier de lecture et le fichier du sous-titre doivent avoir le même nom.
- Le fichier de lecture et le fichier du sous-titre doivent se trouver sous le même dossier.
- Seuls les fichiers de sous-titres dont l'extension est la suivante sont compatibles: .smi (.SMI), .srt (.SRT), .sub (.SUB), .ass (.ASS), .ssa (.SSA), .txt (.TXT). (les fichiers .sub (.SUB) et .txt (.TXT) pourraient ne pas être reconnus.)
- Les sous-titres qui dépassent le temps de lecture d'un fichier DivX ^® ne seront pas affichés.
<h1 id="français-21">FRANÇAIS</h1>
Lecture Lecture

<details>
<summary>text_image</summary>
CD-ROM
A21
</details>

<details>
<summary>text_image</summary>
[POP UP MENU / MENU]
[△/▽/◇/◇]
[ENTER]
[SETUP]
[ANGLE]
[MODE]
■
</details>
<h1 id="à-propos-des-touches-9">À propos des touches</h1>
< >: Touches de l'unité principale
[ ] : Touches de la télécommande
<h1 id="nom-de-la-touche-seulement-3">Nom de la touche seulement:</h1>
Touches de l'unité principale et de la télécommande
<h1 id="kodak-picture-cd-2">Kodak Picture CD</h1>
<h1 id="jpeg-4">JPEG</h1>
Cet appareil lit également sans problème les fichiers JPEG stockés sur les Kodak Picture CD, Profitez d'une excellente qualité d'image en insérant le CD photos dans l'appareil et en les visionnant sur votre téléviseur. Cet appareil accepte jusqu'à la version 7.0 des Kodak Picture CD. Pour de plus amples informations sur les Kodak Picture CD, communiquez avec un magasin offrant le service de développement Kodak Inc.
1 Lorsqu'un Kodak Picture CD est inséré dans cet appareil, son menu Kodak Picture CD apparaît automatiquement à l'écran.

<details>
<summary>text_image</summary>
Image1
Image2
Image3
Image4
Image5
Image6
8:32
2
1
2
</details>
1. Numéro de la piste en cours/nombre total de pistes
2. Indication de la page précédente/suivante
En mode arrêt, appuyez sur [POP UP MENU / MENU] pour faire apparaître le menu du Kodak Picture CD.
2 Utilisez [△/▽/◀/▶] pour sélectionner la piste à lire, ensuite appuyez sur▶ ou [ENTER].
\- Une image de la piste sélectionnée s'affichera et passera à la prochaine.
3 Appuyez sur ■ pour interrompre la lecture.
<h1 id="conseils-pour-la-lecture-dimages-jpegkodak">Conseils pour la lecture d'images JPEG/Kodak</h1>
- Chaque fois que vous appuyez sur [ANGLE], l'image est tournée à 90 degrés dans le sens horaire.
- Pour modifier l'effet visuel de lecture d'image, appuyez une fois sur [MODE], puis sur [△ / ▽ du [ENTER] pour basculer entre "Insérer/Supprimer" et "Fondu Entrée/Sortie". Le changement de grandeur pourrait ne pas agir sur certains fichiers (p. ex., des fichiers avec des images de petites dimensions).
- Pour modifier la dimension d'une image en lecture, pendant la lecture en mode JPEG/Kodak. Appuyez deux fois sur [MODE], puis utilisez[△/▽/ ◀/ ▶] ou [ENTER] pour basculer entre "Normal" (100 %) et "Petit" (93 %). Le changement de grandeur pourrait ne pas agir sur certains fichlers (p. ex., des fichlers avec des Images de petites dimensions).
<h1 id="lecture-de-la-carte-mémoire-sd">Lecture de la Carte Mémoire SD</h1>
<h1 id="mp3-wma-jpeg-2">MP3 WMA JPEG</h1>
Vous pouvez lire les fichiers en format MP3, Windows Media™ Audio et JPEG sur une carte mémoire SD. Avec la carte mémoire SD, vous pouvez également profiter du contenu complémentaire d'un BD-ROM profil 1.1, qu'il est possible de télécharger depuis l'internet. Vous pouvez conserver le contenu d'une carte mémoire SD par l'entremise d'un ordinateur et la lire avec un le BD-vidéo. Pour de plus amples informations sur le contenu complémentaire, consultez le livret accompagnant le disque.

<h1 id="programmation-du-mode-média">■Programmation du mode média</h1>
1 Appuyez sur [SETUP] lorsque l'appareil est en mode arrêt.
2 Utilisez [◀/▶] pour sélectionner sur appuyez sur [ENTER].
3 Utilisez [◀/▶] pour sélectionner appuyez sur [ENTER].
4 Utilisez [△ / ▽] pour sélectionner "Sélection média".
5 Appuyez sur [ENTER] de manière répétée pour sélectionner "Mémoire SD".

\- Ceci placera l'appareil en mode "Mémoire SD". Pour la lecture du contenu d'un disque, quittez le mode "Mémoire SD" en sélectionnant "Disque".
6 Appuyez sur la touche [SETUP] pour quitter.
<h1 id="lecture-lecture-6">Lecture Lecture</h1>
<h1 id="insertion-de-la-carte-mémoire-sd-et-lecture">■Insertion de la carte mémoire SD et lecture</h1>
1 Insérez la carte mémoire SD dans la fente SD CARD avec l'étiquette tournée vers le haut, jusqu'à ce que vous entendiez un déclic.
La liste des fichiers apparaîtra.

2 Suivez l'étape 2 dans "Lecture d'UnFichier MP3, Windows Media™ Audio, JPEG et DivX®" à la page 25.
<h1 id="retrait-de-la-carte-mémoire-sd">■Retrait de la carte mémoire SD</h1>
1 En mode arrêt, poussez la carte mémoire SD puis retirez lentement votre doigt.
2 Saisissez la carte et tirez-la hors de la fente SD CARD.
<h1 id="cartes-compatibles">Cartes Compatibles:</h1>
- Carte mémoire SD (8 MB - 2 GB)
- Carte mémoire SDHC (4 GB)
- Carte miniSD (8 MB - 2 GB)
- Carte microSD (8 MB - 2 GB)
- Un adaptateur sera nécessaire pour les cartes mémoire miniSD et microSD.
<h1 id="remarque-40">Remarque</h1>
- Ne pas retirer une carte mémoire pendant la lecture.
- Cet appareil accepte la carte mémoire SD avec le système de fichier FAT12/FAT16 et la carte mémoire SDHC avec le système de fichier FAT32.
- Ne pas supprimer de dossiers ou de fichiers sur une carte mémoire SD avec votre ordinateur. Cet appareil pourrait ne plus être en mesure de lire la carte mémoire SD.
- Ce lecteur reconnaît des noms de fichiers jusqu'à 8 caractères sur la carte mémoire SD. Les caractères en plus, ne seront pas affichés.
<h1 id="français-22">FRANÇAIS</h1>
<h1 id="fonction-de-configuration">Fonction de Configuration</h1>
Fonction de Configuration

<details>
<summary>text_image</summary>
CD-ROM
120
DC
DC
DC
DC
DC
DC
DC
DC
DC
DC
DC
DC
DC
DC
DC
DC
DC
DC
DC
DC
DC
DC
DC
DC
DC
DC
DC
DC
DC
DC
DC
DC
DC
DC
DC
DC
DC
DC
DC
DC
DC
DC
DC
DC
DC
DC
DC
DC
DC
DC
DSC
DSC
DSC
DSC
DSC
DSC
DSC
DSC
DSC
DSC
DSC
DSC
DSC
DSC
DSC
DSC
DSC
DSC
DSC
DSC
DSC
DSC
DSC
DSC
DSC
DSC
DSC
DSC
DSC
DSC
DSC
DSC
DSC
DSC
</details>

<details>
<summary>text_image</summary>
[les touches numériques]
[CLEAR]
[△/▽/◇/◇]
[SETUP]
[ENTER]
[RETURN]
DENON
</details>
<h1 id="à-propos-des-touches-10">À propos des touches</h1>
<>: Touches de l'unité principale
[ ] : Touches de la télécommande
Nom de la touche seulement:
Touches de l'unité principale et de la télécommande
<h1 id="lutilisation-du-menu-de-configuration">L'utilisation du Menu de Configuration</h1>
Sous le menu de configuration, vous pouvez modifier les paramètres de l'audio, vidéo, langue, etc. Vous ne pouvez pas changer les paramètres pendant la lecture.
<h1 id="quick-rapide">QUICK Rapide</h1>
Le menu de réglages rapides contient des items provenant du menu de réglages personnalisés qui peuvent être utilisés souvent.
1 Appuyez sur [SETUP] lorsque l'appareil est en mode arrêt.
2 Utilisez [◀/▶] pour sélectionner QUICK, ensuite appuyez sur [ENTER].

<details>
<summary>text_image</summary>
QUICK
CUSTOM
INITIAT LIZE
Rapide
Mode Audio BD
Sortie Audio HDMI
Résolution Vidéo HDMI
Sortie composantes
Sortie Audio 7.1ch
Langue afflich, écran
Aspect TV
Sortie Audio Mixte
Multi HDMI (Normal)
Auto
4800
Multi Canaux
Françale
16:9 Wide
</details>
3 Utilisez [△ / ▽] pour sélectionner les items de réglage.
4 Suivez la procédure ci-dessous, en fonction des items de réglage.
Pour régler l'item A:
Appuyez sur [ENTER] de manière répétée pour
modifier les options.
Pour régler l'item B:
1) Appuyez sur [ENTER].
2) Utilisez [△ / ▽] pour sélectionner les options, ensuite appuyez sur [ENTER].
• U t i l [<]eou [RETURN] pour revenir à l'écran précédent.
29
FRANÇAIS
5 Appuyez sur la touche [SETUP] pour quitter.
<h1 id="custom-personnalisé">CUSTOM Personnalisé</h1>
Le menu personnalisé contient tous les items de réglage.
1 Appuyez sur [SETUP] lorsque l'appareil est en mode arrêt.
2 Utilisez [◀ / ▷] pour sélectionner 📊, ensuite appuyez sur [ENTER].
3 Utilisez [◀ / ▶] pour sélectionner la catégorie de réglage souhaitée, ensuite appuyez sur [ENTER].

Other: Autres
• Pour les "Parent", suivez la procédure à la page 36.
4 Utilisez [△ / ▽] pour sélectionner les items de réglage.
Les paramètres non disponibles pour l'appareil courant apparaîtront en gris et vous ne pourrez les sélectionner.
5 Suivez la procédure ci-dessous, en fonction des items de réglage.
Pour régler l'item A:
Appuyez sur [ENTER] de manière répétée pour modifier les options.
\- Pour "DivX(R) VOD", appuyez sur [ENTER] pour afficher votre code d'enregistrement.
Pour régler l'item B:
1) Appuyez sur [ENTER].
2) Utilisez [△ / ▽] pour sélectionner les options, ensuite appuyez sur [ENTER].
\- Utilisez [<1] ou [RETURN] pour revenir à l'écran précédent.
6 Appuyez sur la touche [SETUP] pour quitter.
Fonction de Configuration
Langue

<details>
<summary>text_image</summary>
Langue
- Dialogues Original
- Sous-Titre Hf
- Menu du Disque Anglais
- Langue afflich. écran Français
- DivX Sous-Titre Hf
</details>
- Pour la manière de sélectionner les éléments de paramétrage et les options, voir "Personnalisé" page 29.
<table><tr><td>Paramètres Options</td><td></td></tr><tr><td>DialoguesRègle la langue pour l’audio.</td><td>Original*/Anglais/Français/Espagnol/Allemand/Italien/Suédois/Hollandais/Russe/Chinois/Japonais/Coréen/Danois/Finnois/Norvégien/Islandais/Hongrois/Roumain/Turc/Grec/Irlandais/Portugais/Polonais/Tchéque/Slovaque/Bulgare/Autre</td></tr><tr><td>Sous-TitreRègle la langue des sous-titres.</td><td>Hf*/Anglais/Français/Espagnol/Allemand/Italien/Suédois/Hollandais/Russe/Chinois/Japonais/Coréen/Danois/Finnois/Norvégien/Islandais/Hongrois/Roumain/Turc/Grec/Irlandais/Portugais/Polonais/Tchéque/Slovaque/Bulgare/Autre</td></tr><tr><td>Menu du DisqueRègle la langue du menu du disque.</td><td>Anglais*/Français/Espagnol/Allemand/Italien/Suédois/Hollandais/Russe/Chinois/Japonais/Coréen/Danois/Finnois/Norvégien/Islandais/Hongrois/Roumain/Turc/Grec/Irlandais/Portugais/Polonais/Tchéque/Slovaque/Bulgare/Autre</td></tr><tr><td>Langue affich. écranRègle la langue d'affichage à l’écran.</td><td>English*/Français/Espanol</td></tr><tr><td>DivX Sous-Titre Hf* / Anglais / FrançaisRègle la langue pour DivX® Sous-Titre.</td><td>Espagnol</td></tr></table>
- Les paramètres accompagnés d'un (\*) sont des paramètres d'usine.
- Le menu Rapide consiste de la programmation des menus utilisés fréquemment, et sont accompagnés de la marque
- Si vous sélectionnez "Autre", inscrivez le code à quatre chiffres de la langue désirée (consultez la liste des "Code de Langue" à la page 39). Seules les langues compatibles avec le disque peuvent être sélectionnées.
Video

<details>
<summary>text_image</summary>
Lung
single
Video
B
A
B
A
B
Aspect TV
16.9 Wide
Selection HDMI
YCbCr
Riglage RVB HDMI
Normal
Format auto HDMI
Max
Resolution Video HDMI
Auto
HDMI Deep Color
Auto
VP Direct
Hi
</details>

<details>
<summary>text_image</summary>
Sortie composantes 4801
Moda Progressif Auto
Sync Audio/Video HDMI
Arrêt sur Image Auto
Zone active TV Plain écr.
Fond d'écran Image
</details>
- Pour la manière de sélectionner les éléments de paramétrage et les options, voir "Personnalisé" page 29.
<table><tr><td>Paramètres Options</td><td></td></tr><tr><td rowspan="5">Aspect TVRègle la taille d'une image en fonction du rapport hauteur/ largeur de dispositif d'affichage connecté.</td><td>16:9 Wide*: Sélectionnez ceci lorsqu'une télévision à grand écran est connectée. Les disques enregistrés en format grand écran sont affichés sur tout l'écran.</td></tr><tr><td>4:3 Pan & Scan: Sélectionnez ceci pour lire en mode de recadrage plein écran le disque enregistré en format grand écran (les côtés de l'image coupés) sur une télé 4:3. Les disques dont le mode de recadrage n'est pas indiqué sont lus en mode boîte aux lettres.</td></tr><tr><td>4:3 Letter Box: Sélectionnez ceci pour lire en format panoramique les disques enregistrés en format grand écran sur une télé 4:3. (avec bandes noires dans le haut et dans le bas de l'écran).</td></tr><tr><td>4:3 Squeeze Auto: Lorsqu'une Image 4:3 est en lecture, l'image est affichée au centre d'un écran 16:9 avec un rapport hauteur/ largeur de 4:3.</td></tr><tr><td>4:3 Squeeze Ef: L'image affichée au centre d'un écran de télévision à 16:9 avec un rapport hauteur/largeur de 4:3, peu importe la grandeur originale de l'image.</td></tr><tr><td rowspan="2">Selection HDMI Sélectionnez un mode de sortie HDMI entre "YCbCr" et "RVB".</td><td>YCbCr*: Les signaux vidéo de format de composant et signaux audio sortent de HDMI OUT.</td></tr><tr><td>RVB: Les signaux vidéo en format RGB et les signaux audio sont émls de HDMI OUT.</td></tr></table>
FRANÇAIS
Fonction de Configuration
<h1 id="français-23">FRANÇAIS</h1>
Fonction de Configuration Fonction de Configuration
<table><tr><td>Paramètres Options</td><td></td></tr><tr><td rowspan="2">Réglage RVB HDMIRègle la sortie numérique RGB de l'étendue de l'image (étendue des données) provenant de HDMI OUT.</td><td>Normal*:Sortie de "16 (noir)" à "235 (blanc)".</td></tr><tr><td>Ehance:Sortie de "0 (noir)" à "246 (blanc)".Selon la dispositif d'affichage que vous utilisez, les couleurs sombres peuvent sembler plus visibles lorsque vous utilisez les connexions HDMI. Si tel est le cas, réglez à "Ehance".</td></tr><tr><td rowspan="2">Format auto HDMIConfigure "Auto" pour "Résolution Vidéo HDMI".</td><td>Max*:La résolution maximale pouvant être diffusée à dispositif HDMI connecté est détectée et la résolution de sortie HDMI est automatiquement sélectionnée.</td></tr><tr><td>Panel:Le nombre de pixels du panneau de l'appareil HDMI connecté est détecté et la résolution de sortie HDMI est automatiquement sélectionnée.</td></tr><tr><td rowspan="6">Résolution Vidéo HDMIRègle la résolution vidéo HDMI.</td><td>Auto*:La résolution vidéo HDMI sera automatiquement sélectionnée selon le dispositif HDMI raccordé et le réglage de "Format auto HDMI".</td></tr><tr><td>480p</td></tr><tr><td>720p</td></tr><tr><td>1080i</td></tr><tr><td>1080p</td></tr><tr><td>1080p24:Donne une reproduction de film naturelle et de grande qualité pour tout tout matériel filmé en 24 trames. Le dispositif d'affichage connecté doit être compatible avec une entrée de trame 1080p24.</td></tr><tr><td rowspan="2">HDMI Deep ColorRègle si la sortie d'image du HDMI doit être avec couleur profonde ou non.</td><td>Auto*:L'image affichée par HDMI sera en couleurs foncées si le dispositif d'affichage le prend en charge.</td></tr><tr><td>Hf:L'image de HDMI sera sortie sans Couleur Profonde.</td></tr><tr><td rowspan="2">I/P DirectDéfinit si oui ou non produire une sortie de matériel à 24 trames à partir de HDMI OUT. Ce réglage est pour BD seulement.</td><td>Hf*:Le matériel à 24 trames sera converti en 60 trames avec sortie en 1080p60 trames de HDMI OUT.</td></tr><tr><td>Ef:Le matériel à 24 trames sortira directement en 1080p24 trames de HDMI OUT.</td></tr></table>
<table><tr><td>Paramètres Options</td><td></td></tr><tr><td rowspan="4">Sortie composantesRègle la résolution vidéo pour la sortie de composant.</td><td>480i*</td></tr><tr><td>480p</td></tr><tr><td>720p</td></tr><tr><td>1080i</td></tr><tr><td rowspan="3">Mode ProgressifRègle le mode progressif optimal pour la sortie des images du terminal HDMI OUT et des terminaux COMPONENT VIDEO.</td><td>Auto*:Le mode progressif sera sélectionné automatiquement selon le type du matériel (film ou vidéo).</td></tr><tr><td>Video1:Convient pour la lecture de disques de matériel vidéo.</td></tr><tr><td>Video2:Convient pour la lecture de disques de matériel vidéo et et de disques de matériel filmé à 30 trames.</td></tr><tr><td rowspan="4">Sync Audio/VideoDétermine quel signal vidéo synchroniser avec le signal audio.</td><td>HDMI*:Synchronise le signal audio avec le signal vidéo provenant de HDMI OUT.</td></tr><tr><td>Progressif:Synchronise le signal audio avec le signal vidéo progressif de COMPONENT VIDEO OUT.</td></tr><tr><td>Entrelacé:Synchronise le signal audio avec le signal vidéo entrecroisé de COMPONENT VIDEO OUT(480i), de VIDEO OUT ou de S VIDEO OUT.</td></tr><tr><td>Autres: Sélectionnez cette option lorsque vous voulez voir simultanément des images progressives, entrecroisées et HDMI. Les signaux audio sont réglés sur le chronométrage optimal pour les images respectives. (Ils ne sont pas synchronisés.)</td></tr><tr><td rowspan="3">Arrêt sur ImageRègle la résolution de l'image et la qualité en mode pause.</td><td>Auto*: Sélectionne automatiquement le meilleur réglage de résolution ("Image" ou "Trame") en fonction des caractéristiques des images.</td></tr><tr><td>Trame:Stabilise les images, bien que la qualité de l'image peut devenir grossière en raison de la quantité limitée de données. Sélectionnez "Trame" lorsque les images sont toujours instables, même si "Auto" est sélectionné.</td></tr><tr><td>Image:Affiche des images relativement immobiles en haute résolution. "Image" améliore la qualité de l'image, bien que cela puisse déstabiliser les images en raison d'une diffusion simultanée des deux champs de données.</td></tr></table>
Fonction de Configuration
<table><tr><td>Paramètres Options</td><td></td></tr><tr><td rowspan="2">Zone active TVConfigure la zone d'affichage horizontal pour la sortie entrecroisée (480i).</td><td>Normal:Sélectionnez cette option si l'image n'est pas stable avec une connexion à un affichage professionnel.</td></tr><tr><td>Plein écr.*:Sélectionnez cette option pour brancher un dispositif d'affichage parmi ceux communément disponibles sur le marché.</td></tr><tr><td rowspan="4">Fond d'écranRègle l'image à afficher à l'écran en mode arrêt ou en mode de lecture audio.</td><td>Image*</td></tr><tr><td>Bleu</td></tr><tr><td>Noir</td></tr><tr><td>Gris</td></tr></table>
- Les paramètres accompagnés d'un (x) sont des paramètres par défaut.
- Le menu Rapide consiste de la programmation des menus utilisés fréquemment, et sont
<h1 id="accompagnés-de-la-marque">accompagnés de la marque</h1>
- Pour "Réglage RVB HDMI", sélectionner "Ehance" si le contraste noir-blanc n'est pas net. Le réglage fonctionne uniquement pour une sortie HDMI RGB.
- Même lorsque la "Résolution Vidéo HDMI" est réglée à "1080p24" et que "I/P Direct" est réglé à "Ef", lorsque le blu-ray n'est pas enregistré en 1080p24 ou pour lire un DVD, la résolution vidéo sera celle compatible avec le disque et le dispositif d'affichage au lieu de trame 1080p24.
- Une image individuelle à l'écran est appelée "Image", soit deux images séparées appelées "Trame". Certaines images peuvent être brouillées, à cause des caractéristiques des données, si "Arrêt sur Image" est en mode automatique.
- Si l'image n'est pas sortie correctement vers le dispositif d'affichage en raison du réglage "Résolution Vidéo HDMI" ou "Sortie composantes", appuyez sur ▶ et maintenez enfoncé pendant plus de cinq secondes sur l'afficheur du panneau avant. Les deux paramètres seront automatiquement rapportés à leur valeur par défaut.
- Si "Sortie composantes" est réglé à "480i", "4:3 Squeeze Auto" et "4:3 Squeeze Ef" en "Aspect TV" ne sont pas disponibles.
- Si HDMI est connecté, en ce qui concerne la résolution vidéo pour la sortie de composant, vous pouvez sélectionner uniquement la résolution vidéo sortie actuellement de HDMI OUT ou 480i.
- Si la résolution vidéo pour la sortie en composante et la résolution vidéo HDMI ne correspondent pas, la résolution vidéo de la sortie de la composante sera changée pour la résolution de sortie HDMI. Les ports COMPONENT VIDEO OUT pourraient ne pas reproduire de signaux, selon le matériel sur le disque.
- Si vous lisez des disques vidéo DVD protégés, le signal 480p sortira des ports COMPONENT VIDEO OUT quand "Sortie composantes" est réglé sur "480i", "720p" ou "1080i".
- Si l'appareil d'affichage branché n'est pas compatible avec les trames 1080p24 ou que "l/P Direct" est réglé sur "Hf", "1080p24" dans "Résolution Vidéo HDMI" sera grisé, et vous ne pourrez le sélectionner.
- Pour lire un blu-ray, si vous réglez "Sortie composantes" à "480i", le signal 480p sera émis des prises COMPONENT VIDEO OUT.
- Les paramètres non disponibles pour l'appareil courant apparaîtront en gris et vous ne pourrez les sélectionner.
- Même si "Selection HDMI" est réglé à "YCbCr", si le dispositif d'affichage ne prend pas YCbCr en charge, RGB sera affiché.
- Si "Résolution Vidéo HDMI" est réglé à "1080p" ou "1080p24", vous ne pouvez régler "Sortie composantes".
Sqn

<details>
<summary>text_image</summary>
Long
Long
Other
Son
A
Mode Audio BD
Sortie Audio HDMI
Sortie Audio 7.1ch
Sous Echantillon
DRC
Source Directe
Gestion des bases 2ch
Sortie Audio Mixte
Multi HDMI (Normal)
Multi Canaux
Hi
Auto
Hi
Hi
</details>

<details>
<summary>text_image</summary>
Long
range
Other
Son
Réglage audio 0ms
Amidio virtuel HF
</details>
- Pour la manière de sélectionner les éléments de paramétrage et les options, voir "Personnalisé" page 29.
Paramètres Options
<table><tr><td rowspan="2">Mode Audio BDPour le BD, sélectionnez l'une des options, de sortir soit l'audio secondaire et interactif avec l'audio primaire si disponible, soit l'audio primaire seulement.Consultez "Réglage du Mode Audio BD" à la page 23.</td><td>Sortie Audio Mixte*:Sortir l'audio secondaire et Interactif avec l'audio primaire si disponible.</td></tr><tr><td>Sortie Audio HD:Sortir l'audio primaire seulement. Configurez ce mode afin de sortir le son de BD Dolby Digital, Dolby Digital Plus, Dolby True HD, DTS ou DTS-HD par la connexion HDMI.</td></tr><tr><td rowspan="4">Sortie Audio HDMIRègle le format audio pour la sortie audio d'une HDMI OUT.</td><td>Multi HDMI (Normal)*:Les signaux audio à canaux multiples sont diffusés par le HDMI OUT avec un flux binaire ou LPCM.</td></tr><tr><td>Multi HDMI (LPCM):Les signaux audio à canaux multiples sont diffusés par le HDMI OUT avec LPCM.• Consultez les pages 34-35 pour les options de réglage.</td></tr><tr><td>HDMI 2ch:Les signaux audio sont diffusés par le HDMI OUT avec un mixage réducteur à 2ch LPCM.</td></tr><tr><td>Sourdine:Coupe le son du signal audio HDMI et définit le format du signal en sortie de DIGITAL OUT.• Consultez "Réglage de la sortie numérique" à la page 33 pour les options de réglage.</td></tr></table>
- Le réglage par défaut de "Mode Audio BD" est "Sortie Audio Mixte". Si vous ne désirez que la première sortie audio de haute qualité, réglez "Mode Audio BD" à "Sortie Audio HD".
<h1 id="français-24">FRANÇAIS</h1>
Fonction de Configuration Fonction de Configuration
<table><tr><td>Paramètres Options</td><td></td></tr><tr><td rowspan="2">Sortie Audio 7.1chRègle le format audio pour la sortieaudio d'une 7.1ch AUDIO OUT.</td><td>Multi Canaux*:Les signaux audio à canaux multiples sont sortis de7.1ch AUDIO OUT. Consultez les pages 34-35 pour lesoptions de réglage.</td></tr><tr><td>2 Canaux:Les signaux audio à deux canaux réduits par mixagesont sortis des terminaux 7.1ch AUDIO OUT.</td></tr><tr><td rowspan="2">Sous ÉchantillonConfigure la sortie audiounumérique lors de la lecture d'unBD ou d'un DVD enregistré enLPCM.</td><td>Ef:Les signaux LPCM sont convertis en 48 kHz pour sortie.- Réglage sur "Ef" lorsque vous utilisez des connexionsnumériques à un amplificateur AV qui n'est pascompatible avec les fréquences d'échantillonnage de96 kHz.</td></tr><tr><td>Hf*:Pour les disques BD ou DVD enregistrés en LPCM sansprotection des copyrights, des signaux audio à 2 canauxallant jusqu'à 96 kHz sont envoyés en sortie commesignaux LPCM sans conversion.</td></tr><tr><td rowspan="3">DRCConfiguration lorsque la portée duvolume du son (contrôle de laportée dynamique) doit êtrecompressée lorsqu'un audio enDolby Digital, Dolby Digital Plus ouDolby True HD est lu.</td><td>Auto*:Lorsque les disques sont enregistrés en format DolbyTrue HD de lecture, cet appareil détecte les réglagesDRC du disque et configure automatiquement lesparamètres DRC de cet appareil sur "Ef" ou "HI".</td></tr><tr><td>Hf</td></tr><tr><td>Ef</td></tr><tr><td rowspan="2">Source DirecteConfigure la sortie audio sansl'ajout des réglages de l'enceinteaux signaux audio du disque.</td><td>Ef:Sélectionnez cette option pour émettre l'audio sansaucun effet de la part des réglages de l'enceinte.</td></tr><tr><td>Hf*:Sélectionnez cette option pour émettre l'audio avec uneffet de la part des réglages de l'enceinte.</td></tr><tr><td rowspan="2">Gestion des basses 2chSi vous le désirez, réglez la sortiepour le caisson d'extrêmes graveslorsque de la lecture d'un contensuans signal d'effets de bassesfréquences. (p. ex. signal audio dedeux canaux seulement.)</td><td>Ef:Le signal audio sortira du caisson d'extrêmes graves.(Veuillez régler "Subwofer" dans le "Config. haut-parleur" à "EF".)</td></tr><tr><td>Hf*:Aucun signal audio ne sortira du caisson d'extrêmesgraves.</td></tr><tr><td>Réglage audioRéglez le délai entre l'image et lesignal audio.</td><td>0 ms à 200 ms (0 ms*)Le délai avant le signal audio sera celui que vous avezrèglé.</td></tr></table>
<table><tr><td>Paramètres Options</td><td></td></tr><tr><td rowspan="3">Ambio virtuelRéglez pour créer un effet ambiophonique pour un système à deux enceintes.</td><td>Hf*:L'ambiophonie virtuelle est éteinte.</td></tr><tr><td>1:Un effet ambiophonique naturel pour un systèmes à deux haut-parleurs branchés.</td></tr><tr><td>2:Un effet ambiophonique plus intense pour un systèmes à deux haut-parleurs branchés que pour un à haut-parleur unique.</td></tr></table>
- Les paramètres accompagnés d'un (\*) sont des paramètres d'usine.
- Le menu Rapide consiste de la programmation des menus utilisés fréquemment, et sont accompagnés de la marque
- Si vous réglez "Source Directe" sur "Ef", "Sortie Audio HDMI" sur "HDMI 2ch" ou "Sortie Audio 7.1ch" sur "2 Canaux", "Gestion des basses 2ch" n'est pas disponible.
- Dans les circonstances suivantes, "Multi HDMI (Normal)", "Multi HDMI (LPCM)" et "HDMI 2ch" ne sont disponibles.
- Le câble HDMI n'est pas connecté à un port HDMI OUT.
- L'écran raccordé est éteint.
- L'écran raccordé n'est pas compatible avec la sortie audio.
- Lorsque "Source Directe" est réglé à "Ef", "Gestion des basses 2ch" et "Config. haut-parleur" ne sont pas disponibles.
<h1 id="réglage-de-la-sortie-numérique">Réglage de la sortie numérique</h1>
Lorsque l'option "Sourdine" est sélectionnée dans "Sortie Audio HDMI", le signal audio de HDMI est en mode silencieux et les signaux audio de DIGITAL OUT changent selon le paramétrage de "Sortie numérique".
<Paramètre "Sortie numérique">
Son → Sortie Audio HD → Sourdine
Train Binaire\*
Lors de la lecture de disques enregistrés en Dolby Digital, Dolby Digital Plus, Dolby TrueHD, DTS ou DTS-HD, le flux principal correspondant (Dolby Digital ou DTS) est en sortie.
LPCM:
Le signal LPCM sera produit en sortie de DIGITAL OUT.
\- Ce paramètre prend effet quand le signal audio HDMI est transmis en sortie.
\- Lorsque HDMI et DIGITAL OUT sont tous deux reliés à d'autres appareils, les signaux audio qui sortent présentement du HDMI OUT seront également émis à partir de la prise DIGITAL OUT, excepté que le signal Dolby Digital sera émis au lieu de Dolby Digital Plus et Dolby TrueHD, et le signal DTS sera émis au lieu de DTS-HD.
\- Lorsque "Mode Audio BD" est réglé sur "Sortie Audio HD", Dolby Digital Plus, Dolby TrueHD ou DTS-HD sera émis à titre de source (Dolby Digital ou DTS). Si la source audio est Dolby Digital, DTS ou LPCM, le même type de flot audio que celui réglé dans "Sortie Audio HDMI" sera émis. (Lorsque plusieurs LPCM sont émis à partir de HDMI OUT, le mixage réducteur à 2 canaux provlendra de DIGITAL OUT.)
\- Lorsque "Mode Audio BD" est réglé sur "Sortie Audio Mixte", la sortie audio de DIGITAL OUT suivra le réglage dans "Sortie Audio HDMI". (Lorsque plusieurs LPCM sont émis à partir de HDMI OUT, le mixage réducteur à 2 canaux proviendra de DIGITAL OUT.)
<h1 id="fonction-de-configuration-2">Fonction de Configuration</h1>
<h1 id="programmation-des-enceintes">Programmation des Enceintes</h1>
Cet appareil vous permet de profiter pleinement du son ambiophonique à canaux multiples, par exemple 7.1 et 5.1.
<Exemple de schéma d'assemblage de base pour un système ambiophonique 7.1>

<details>
<summary>flowchart</summary>
<pre><code class="language-mermaid">graph TD
A["Enceinte avant (gauche)"] --> B["Subwofer"]
B --> C["Encelte d'amblophonie (gauche)"]
C --> D["Amblophonie arrière (gauche)"]
D --> E["Amblophonie arrière (droite)"]
F["Encelte centrale"] --> G["Encelte avant (droite)"]
G --> H["Encelte d'amblophonie (droite)"]
H --> I["Amblophonie arrière (droite)"]
</code></pre>
</details>
Pour profiter au maximum, réglez vos enceintes en conséquence, tel qu'indiqué ci-dessous.
Les options de réglage des enceintes sont disponibles dans les sections suivantes;
<Réglage des enceintes pour la sortie du signal audio du terminal HDMI OUT>
(Disponible lorsque vous avez un câble HDMI connecté au terminal HDMI OUT)
Installation → Rapide → Sortie Audio HDMI → Multi HDMI (LPCM)
Installation → Custom → Son → Sortie Audio HDMI → Multi HDMI (LPCM)
<Réglage des enceintes pour la sortie du signal audio des terminaux 7.1ch AUDIO OUT >
Installation → Rapide → Sortie Audio 7.1ch → Multi Canaux
Installation → Custom → Son → Sortie Audio 7.1ch → Multi Canaux
Comment naviguer dans les paramètres "Multi HDMI (LPCM)" et "Multi Canaux"
1) Utilisez [△ / ▽] pour sélectionner l'item de menu.
2) Utilisez [△ / ▽] pour sélectionner les items de réglage.
\- Servez-vous des touches [RETURN] pour revenir à l'écran précédant.
3) Utilisez [◀ / ▷] pour sélectionner les options désirées. (Excepté pour "Test Tonalite" et
"Default".)
Pour "Test Tonalite":
Utilisez [◀/▶] pour sélectionner "Manuel" ou "Auto", puis appuyez sur [ENTER].
\- Vous entendrez la tonalité d'essai. Si vous choisissez "Manuel", utilisez [△ / ▽] pour sélectionner
le enceinte désiré, puis utilisez [◀/▶] pour ajuster le volume. Si vous choisissez "Auto", utilisez
[< />] pour ajuster le volume du enceinte émettant la tonalité d'essai.
\- Si vous désirez arrêter la tonalité d'essai, appuyez sur [RETURN].
Pour "Default":
Appuyez sur [ENTER] pour réinitialiser le paramètre "Temp de Decalage" à la valeur par défaut.
<h1 id="français-25">FRANÇAIS</h1>
Fonction de Configuration
4) Appuyez sur la touche [SETUP] pour quitter.
<table><tr><td colspan="3">Menu Paramètres Options Descriptions</td><td></td></tr><tr><td rowspan="11">Config. haut-parleur Sélectionnez l'enceinte que vous souhaitez configurer. Changez ensuite les paramètres en fonction des descriptions.</td><td rowspan="2">Avant</td><td>Haut*</td><td rowspan="10">Haut:Pour les grosses enceintes avec de fortes capacités de reproduction des fréquences basses.Bas:Pour les petites enceintes offrant un son de basse pas trop puissant.Non:Aucune enceinte.Pour "Subwofer",seuls "Ef" ou "Hf" sont possibles.</td></tr><tr><td>Bas</td></tr><tr><td rowspan="2">Centre</td><td>Haut*</td></tr><tr><td>Bas/Non</td></tr><tr><td rowspan="2">Subwofer</td><td>Ef*</td></tr><tr><td>Hf</td></tr><tr><td rowspan="2">Surround</td><td>Haut*</td></tr><tr><td>Bas/Non</td></tr><tr><td rowspan="2">Surround back</td><td>Haut*</td></tr><tr><td>Bas/Non</td></tr><tr><td>Fréq transition: Pour les enceintes réglées à "Bas",les sons à la fréquence au-dessous de celle-ci sont coupés. Le son grave qui a été coupé est émis du caisson de basse ou d'une enceinte réglée au "Haut".</td><td>40/60/80*/100/120 Hz</td><td>Faltes la sélection selon les capacités de reproduction de la basse fréquence de l'enceinte connectée.</td></tr></table>
- Pour "Config. haut-parleur", les réglages de chacune des tailles d'enceinte peuvent être ajustés automatiquement en fonction de chacun des réglages. (par ex., si "Avant" est réglé sur "Bas", "Subwofer" sera automatiquement réglé sur "Ef", et de plus, vous ne pourrez pas régler "Centre", "Surround", et "Surround back", à "Haut".)
- Si vous le branchez à un système ambiophonique 5.1, réglez "Surround back" dans "Config. haut-parleur" sur "Non".
- "Non" pour "Centre", "Surround" et "Surround back" ne sont pas disponibles pour le réglage du haut-parleur pour la sortie du signal audio de la prise HDMI OUT.
- "Hf" pour "Subwofer" n'est pas disponible pour le réglage du haut-parleur pour la sortie du signal audio de la prise HDMI OUT.
<h1 id="français-26">FRANÇAIS</h1>
Fonction de Configuration Fonction de Configuration
<table><tr><td colspan="2">Menu Paramètres Options Descriptions</td><td></td><td></td></tr><tr><td rowspan="12">Niveaux par Canal Teste ou règle le volume de chacune haut-parleur.</td><td rowspan="3">Test Tonalite: "Test Tonalite" est le test sonore qu'il est possible de diffuser dans les haut-parleurs, ce qui vous aidera à ajuster leur volume.</td><td>Hf* Sélectionnez</td><td rowspan="3">z "Hf" pour désactiver la fonction "Test Tonalite". Sélectionnez "Manuel" et appuyez ensuite sur [ENTER] pour régler manuellement le volume de l'haut-parleur désirée. Sélectionnez "Auto" et appuyez ensuite sur [ENTER] pour diffuser automatiquement le test sonore dans chacune haut-parleurs.</td></tr><tr><td>Manuel</td></tr><tr><td>Auto</td></tr><tr><td>Avant Lch 0 dB à -12 dB</td><td>(0 dB*)</td><td rowspan="8">Si vous avez sélectionné "Manuel" dans "Test Tonalite", sélectionnez l'enceinte que vous souhaitez régler et ajustez son volume. Si vous avez sélectionné "Auto" dans "Test Tonalite", la tonalité d'essai sera automatiquement envoyée en sortie dans l'ordre. Réglez le volume du haut-parleur d'où la sortie de la tonalité d'essai est produite.</td></tr><tr><td>Centre</td><td>0 dB à -12 dB (0 dB*)</td></tr><tr><td>Avant Rch</td><td>0 dB à -12 dB (0 dB*)</td></tr><tr><td>Surround Rch</td><td>0 dB à -12 dB (0 dB*)</td></tr><tr><td>Surround back Rch</td><td>0 dB à -12 dB (0 dB*)</td></tr><tr><td>Surround back Lch</td><td>0 dB à -12 dB (0 dB*)</td></tr><tr><td>Surround Lch</td><td>0 dB à -12 dB (0 dB*)</td></tr><tr><td>Subwofer</td><td>0 dB à -12 dB (0 dB*)</td></tr><tr><td>SW + 10 dB (Non disponible pour HDMI)</td><td>Ef/Hf*</td><td>Configurez "Ef" pour augmenter le niveau du volume qui est émils du calsson de basse de 10 dB.</td></tr></table>
<table><tr><td colspan="3">Menu Paramètres Options Descriptions</td><td></td></tr><tr><td rowspan="11">Temp de DecalageCe paramètre sert à optimiser le temps d'attente avant que le son ne soit émis des enceintes, en fonction de leur distance de la position d'écoute.</td><td rowspan="2">Distance</td><td>Pieds*</td><td rowspan="2">Réglez le système de mesure que vous souhaitez. Ce système de mesure sera utilisé pour "Temp de Decalage" d'attente. Appuyez sur [ENTER] pour changer le réglage.</td></tr><tr><td>Metres</td></tr><tr><td>Avant Lch</td><td>0 ft à 60 ft (12ft°)(0 m à 18 m (3,6 m*))</td><td rowspan="8">Sélectionnez la distance entre le point d'écoute et l'enceinte pour obtenir le meilleur temps d'attente possible.</td></tr><tr><td>Avant Rch</td><td>0 ft à 60 ft (12ft°)(0 m à 18 m (3,6 m*))</td></tr><tr><td>Centre</td><td>0 ft à 60 ft (12ft°)(0 m à 18 m (3,6 m*))</td></tr><tr><td>Surround Lch</td><td>0 ft à 60 ft (10ft°)(0 m à 18 m (3,0 m*))</td></tr><tr><td>Surround Rch</td><td>0 ft à 60 ft (10ft°)(0 m à 18 m (3,0 m*))</td></tr><tr><td>Surround back Lch</td><td>0 ft à 60 ft (10ft°)(0 m à 18 m (3,0 m*))</td></tr><tr><td>Surround back Rch</td><td>0 ft à 60 ft (10ft°)(0 m à 18 m (3,0 m*))</td></tr><tr><td>Subwofer</td><td>0 ft à 60 ft (12 ft°)(0 m à 18 m (3,6 m*))</td></tr><tr><td colspan="2">Defaut</td><td>Choisissez "Default", puis appuyez sur [ENTER] pour réinitialiser "Temp de Decalage" à la valeur par défaut.</td></tr></table>
- Les paramètres accompagnés d'un (\*) sont des paramètres d'usine.
- Pour HDMI, "Non" et "Hf" les options de "Config. haut-parleur" ne sont pas disponibles.
- Pour "Temp de Decalage", la différence entre la valeur de chaque haut-parleur ne peut excéder les 15 ft (4,5 m).
<h1 id="fonction-de-configuration-3">Fonction de Configuration</h1>
<h1 id="parent">Parent</h1>
Le contrôle des valeurs nominales vous permet de fixer une limite, ce qui empêche les enfants de visionner du matériel inadéquat. La lecture sera interrompue si les valeurs nominales excèdent les niveaux programmés. Vous devrez entrer un mot de passe avant de pouvoir faire la lecture du disque.

<details>
<summary>text_image</summary>
Language
Other
Parent
Niveau nominal BD Tout
Niveau nominal DVD Tout
Change Password
</details>
1) Utilisez [◀/▶] pour sélectionner 📋, ensuite appuyez sur [ENTER].
2) Appuyez sur [les touches numériques] pour entrer votre mot de passe à quatre chiffres.
La première fois: Appuyez sur [les touches numériques] et entrez un numéro à 4 chiffres (excepté 4737), puis appuyez sur [ENTER]. Ce numéro vous servira de mot de passe à partir de la deuxième utilisation. Inscrivez votre mot de passe, afin de ne pas l'oublier.
\- Si vous avez oublié votre mot de passe, entrez [4], [7], [3], [7]. Le mot de passe sera effacé et le niveau de classification sera réglé à "Tout".
\- Pendant que vous entrez votre numéro de passe, appuyez sur [CLEAR] pour effacer le numéro et entrer à nouveau un mot de passe.
<h1 id="poursuivez-avec-a-c">Poursuivez Avec A - C</h1>
A) Niveau nominal BD
1) Utilisez [△ / ▽] pour sélectionner "Niveau nominal BD", ensuite appuyez sur [ENTER].
2) Utilisez [△ / ▽] pour sélectionner les options voulues, ensuite appuyez sur [ENTER].
"Tout": Pour effacer les limites.
"Réglage de l'âge": Pour fixer une limite d'âge.
\- Après avoir sélectionné "Réglage de l'âge", servez-vous des [les touches numériques] pour entrer l'âge entre 0 - 254, ensuite appuyez sur [ENTER].
(par ex., pour 15 ans, appuyez sur [0],[1],[5])
3) Appuyez sur la touche [SETUP] pour quitter.
B) Niveau nominal DVD
1) Utilisez [△ / ▽] pour sélectionner "Niveau nominal DVD", ensuite appuyez sur [ENTER].
2) Utilisez [△ / ▽] pour sélectionner le niveau voulu, ensuite appuyez sur [ENTER].
3) Appuyez sur la touche [SETUP] pour quitter.
<h1 id="explications-des-valeurs">EXPLICATIONS DES VALEURS</h1>
- Tout : Contrôle parental inactif; tous les disques peuvent être lus.
- 8 [Adult] : logiciel DVD de toutes catégories (adulte/général/enfants) peuvent être lus.
• 7 [NC-17]: Moins de 17 ans ne sont pas admis.
• 6 [R] : Limité; accompagnement parental ou adulte requis pour les moins de 17 ans.
• 5 [PGR] : Surveillance parentale recommandée.
• 4 [PG13] : Ne convient pas aux enfants âgés de moins de 13 ans.
- 3 [PG] : Surveillance parentale suggérée.
• 2 [G] : Audience générale.
• 1 [Kid Safe] : Convient aux enfants.
C) Modification du mot de passe
1) Utilisez [△ / ▽] pour sélectionner "Change Password", ensuite appuyez sur [ENTER].
2) Entrez un nouveau mot de passe à quatre chiffres, puis appuyez sur [ENTER].
3) Appuyez sur la touche [SETUP] pour quitter.
<h1 id="français-27">FRANÇAIS</h1>
Fonction de Configuration Fonction de Configuration

Autres

<details>
<summary>text_image</summary>
Autres
Jeçne de L'Angle Hi
Écaren de veille Ei
Arrêt Auto Ei
Afficheur Clair
Panorama Ssec
DivX(R) VOD
Souvilitres Hi
</details>

<details>
<summary>text_image</summary>
Autres
Économie d'énergie Ef
Réglage télécommande DENON1
Sélection média Disque
</details>
\- Pour la manière de sélectionner les éléments de paramétrage et les options, voir "Personnalisé" page 29.
<table><tr><td>Paramètres Options</td><td></td></tr><tr><td rowspan="2">Icône de L'Angle Ef:</td><td>L'icône d'angle apparaît à l'écran lors de la lecture de la scène avec des angles variés.</td></tr><tr><td>Hf*:L'icône d'angle disparaît de l'écran.</td></tr><tr><td rowspan="2">Écran de veille Ef*:</td><td>Si le lecteur ne détecte aucune activité pendant plus de cinq minutes, l'économiseur d'écran sera activé.</td></tr><tr><td>Hf:Désactive l'économiseur d'écran.</td></tr><tr><td rowspan="2">Arrêt Auto Ef*:</td><td>Si cet appareil ne dénote aucune activité pendant plus de 30 minutes, il s'éteint automatiquement.</td></tr><tr><td>Hf:Désactive le courant automatique.</td></tr><tr><td rowspan="3">AfficheurRégle la luminosité de l'affichage du panneau avant.</td><td>Clair*:L'afficheur du panneau avant devient plus lumineux.</td></tr><tr><td>Sombre:L'afficheur du panneau avant s'obscurcit.</td></tr><tr><td>Auto:Le panneau avant s'obscurcit en cours de lecture.</td></tr><tr><td rowspan="2">PanoramaRègle l'heure d'affichage pour une photo (en format JPEG)</td><td>5sec*</td></tr><tr><td>10sec</td></tr><tr><td>DivX(R) VODFournit un code d'enregistrement pour DivX®VOD.</td><td>Pour en savoir davantage sur DivX®VOD, visitez www.divx.com/vod</td></tr></table>
<table><tr><td>Paramètres Options</td><td></td></tr><tr><td rowspan="2">Sous-titresRègle si les sous-titres doivent s'afficher ou non à l'aide du décodeur de sous-titres (disponible sur le marché).</td><td>Ef</td></tr><tr><td>Hf*</td></tr><tr><td rowspan="2">Économie d'énergieDiminuez la consommation de courant du mode veille en refusant la commande du RS-232C durant le mode veille.</td><td>Ef*:Refuse la commande du RS-232C lorsque le courant est en mode veille.</td></tr><tr><td>Hf:Accepte la commande du RS-232C lorsque le courant est en mode veille.</td></tr><tr><td rowspan="2">Réglage télécommandeModifie le code de signal d'une télécommande. (Consultez la page 6)</td><td>DENON1*</td></tr><tr><td>DENON2</td></tr><tr><td rowspan="2">Sélection médiaSélectionner le média à lire.</td><td>Disque*: Sélectionner ceci lorsque vous faites la lecture d'un disque.</td></tr><tr><td>Mémoire SD:Sélectionner ceci lorsque vous faites la lecture d'une carte mémoire SD.</td></tr></table>

<h1 id="initialise">Initialise</h1>
Initialise le paramètre ou la carte mémoire SD.

<details>
<summary>text_image</summary>
QUICK
CUSTOM
INITIA SIZE
Initiateer
Initiateer ?
Non
Installation
Dispositif memoire
</details>
1) Appuyez sur [SETUP] lorsque l'appareil est en mode arrêt.
2) Utilisez [◀/▶] pour sélectionner "Initialiser", ensuite appuyez sur [ENTER].
3) Utilisez [△ / ▽] pour sélectionner l'option souhaitée, ensuite appuyez sur [ENTER].
"Non": Quitter sans initialisation.
"Installation" : Remet le réglage configuration aux paramètres d'usine.
"Dispositif mémoire": Initialise la carte mémoire SD. Après le message de confirmation, utilisez
[△ / ∇] pour sélectionner "Oui", puis appuyez sur [ENTER]
4) Appuyez sur [ENTER]. (pour "Installation" et "Dispositif mémoire" uniquement)
5) Appuyez sur la touche [SETUP] pour quitter.
<h1 id="remarque-41">Remarque</h1>
\- Le paramètre pour "Parent" n'est pas remis à zéro.
<h1 id="autres">Autres</h1>
<h1 id="français-28">FRANÇAIS</h1>
Autres
<h1 id="dépannage">Dépannage</h1>
Si l'appareil ne fonctionne pas correctement lorsque utilisé selon les mode d'emploi, veuillez vérifier l'appareil en suivant la liste de vérification suivante.
<table><tr><td colspan="2">Problème Solution Page</td><td></td></tr><tr><td rowspan="2" colspan="2">Pas de courant - Vérifiez si le cordon d'alimentation est correctement branché.</td><td>-</td></tr><tr><td>- Débranchez le cordon et attendre 5 à 10 secondes, puis branchez à nouveau.</td></tr><tr><td rowspan="8" colspan="2">Pas de son ou d'image - Vérifiez si dispositif d'affichage branché est allumé.</td><td>-</td></tr><tr><td>- Vérifiez la connexion HDMI. (Vérifiez le statut des indications pertinentes à HDMI.)</td></tr><tr><td>- Vérifiez les connexions des câbles audio/vidéo RCA.</td></tr><tr><td>- Vérifiez si le mode pure direct est configuré à "Video Off" ou à "All Off". Si tel est le cas, réglez-le sur "Display Off" ou "Normal".</td></tr><tr><td>- Vérifiez si dispositif d'affichage branché ou tout autre dispositif est compatible avec HDCP. (Ce appareil n'émettra pas un signal de sortie vidéo à moins que l'autre dispositif ne soit compatible avec HDCP.)</td></tr><tr><td>- Vérifiez si le format de sortie pour l'appareil (FORMAT HDMI) correspond au format d'entrée compatible de l'autre dispositif connecté.</td></tr><tr><td>- Vérifiez si "HDMI Deep Color" est programmé sur "Auto". Si tel est le cas, réglez sur "Hi".</td></tr><tr><td>- Vérifiez si "i/P Direct" est programmé sur "E". Si tel est le cas, réglez sur "Hi".</td></tr><tr><td rowspan="2">Image déformée</td><td>- Parfois une petite quantité d'Images déformées peuvent apparaître. Ceci n'est pas un fonctionnement défectueux.</td><td>-</td></tr><tr><td>- Connectez cet appareil directement à la tête. Si les câbles audio/vidéo RCA sont connectés à un magnétoscope, les images peuvent être déformées à cause du système de protection contre la copie.</td><td>10</td></tr><tr><td>Image complètement déformée ou image en noir et blanc sur BD/DVD</td><td>- Assurez-vous que le disque est compatible avec cet appareil. 4</td><td></td></tr><tr><td rowspan="4" colspan="2">Aucun son ou son déformé - Règlez le volume.</td><td>-</td></tr><tr><td>- Vérifiez si les enceintes sont bien connectées.</td></tr><tr><td>- Vérifiez la connexions HDMI.</td></tr><tr><td>- Vérifiez le paramètres "Son".</td></tr><tr><td rowspan="2">Image fige momentanément pendant la lecture</td><td>- Vérifiez s'il y a des marques de doigts ou des égratignures sur le disque; nettoyez-le avec un chiffon doux du centre au bord.</td><td>4</td></tr><tr><td>- Nettoyez le disque.</td><td>4</td></tr><tr><td rowspan="5" colspan="2">Le disque ne peut être lu - Nettoyez le disque.</td><td>4</td></tr><tr><td>- Vérifiez si l'étiquette du disque est tournée vers le haut.</td></tr><tr><td>- Vérifiez si le disque est défectueux en essayant un autre disque.</td></tr><tr><td>- Annulez les contrôles de classification ou modifiez le niveau de contrôle.</td></tr><tr><td>- Insérez un disque en bon état pouvant être lu par ce lecteur.</td></tr><tr><td>La carte mémoire SD ne peut être lue.</td><td>- Le format de la carte ne correspond pas avec cet appareil ou la carte n'est pas compatible.</td><td>-</td></tr><tr><td>Pas de retour sur l'écran de démarrage lorsque le disque est retiré</td><td>- Reinitialisez cet appareil en l'éteignant et en l'allumant à nouveau. -</td><td></td></tr><tr><td rowspan="5">L'appareil ne répond pas à la télécommande</td><td>- Alignez la télécommande directement avec la fenêtre du capteur infrarouge située à l'avant de l'appareil.</td><td>6</td></tr><tr><td>- Diminuez la distance entre la télécommande et la fenêtre du capteur infrarouge.</td><td>-</td></tr><tr><td>- Remplacez les piles de la télécommande.</td><td>6</td></tr><tr><td>- Réinsérer les piles en respectant la polarité (signes +/-) comme indiquée.</td><td>6</td></tr><tr><td>- Faites correspondre le code du signal de la télécommande avec le code de signal de l'appareil.</td><td>6</td></tr></table>
<table><tr><td colspan="2">Problème Solution Page</td><td></td></tr><tr><td>Les touches ne fonctionnent pas ou l'appareil ne réagit plus</td><td>- Pour réinitialiser complètement l'appareil, débranchez le cordon d'alimentation de la prise de courant pendant 5 à 10 secondes.</td><td>-</td></tr><tr><td>L'appareil ne réagit pas à certaines commandes pendant la lecture</td><td>- Les opérations peuvent ne pas être permises par le disque. Veurillez vous reporter aux directives accompagnant le disque.</td><td>14</td></tr><tr><td rowspan="3">L'appareil ne lit aucun BD/DVD/CD - Condensation ? (Laissez reposer pendant 1 ou 2 heures)</td><td>3</td><td></td></tr><tr><td>- Vous tentez de jouer un disque autre qu'un disque marqué tel qu'indiqué à la page 4.</td><td>4</td></tr><tr><td>- Essuyez la saleté présenté sur le disque ou remplacez le disque.</td><td>4</td></tr><tr><td>L'angle n'embarque pas - L'angle ne peut être modifié sur les BD/DVD ne contenant aucun angle multiple. Dans certains cas, les angles multiples sont uniquement enregistrés pour certaines scènes.</td><td>19</td><td></td></tr><tr><td>La lecture ne se fait pas lorsqu'un titre est sélectionné</td><td>- Vérifiez le paramètre "Parent".</td><td>36</td></tr><tr><td>Le mot de passe oublié pour la classification</td><td>- Entrez le mot de passe par défaut, "4737"; le mot de passe oublié sera effacé.</td><td>36</td></tr></table>
<h1 id="remarque-42">Remarque</h1>
- Certaines fonctions ne sont pas disponibles avec certains modes, mais il me s'agit pas là d'une défaillance. Lisez la description dans les présentes directives d'instruction pour plus de détails sur le bon fonctionnement.
- Certaines fonctions sont défendues sur certains disques.
<h1 id="français-29">FRANÇAIS</h1>
Autres Autres
Code de Langue
<table><tr><td>Langue Code</td><td></td></tr><tr><td colspan="2">A-B</td></tr><tr><td colspan="2">Abkhaze 4748</td></tr><tr><td colspan="2">Afar 4747</td></tr><tr><td colspan="2">Afrikaans 4752</td></tr><tr><td colspan="2">Albanais 6563</td></tr><tr><td colspan="2">Allemand [GER] 5051</td></tr><tr><td colspan="2">Amharique 4759</td></tr><tr><td colspan="2">Anglais [ENG] 5160</td></tr><tr><td colspan="2">Arabe 4764</td></tr><tr><td colspan="2">Arménien 5471</td></tr><tr><td colspan="2">Assamais 4765</td></tr><tr><td colspan="2">Aymara 4771</td></tr><tr><td colspan="2">Azerbaïdjanais 4772</td></tr><tr><td colspan="2">Bachkir 4847</td></tr><tr><td colspan="2">Balonga 6665</td></tr><tr><td colspan="2">Basque 5167</td></tr><tr><td>Bengali ; Bangla</td><td>4860</td></tr><tr><td>Bhoutanais</td><td>5072</td></tr><tr><td>Biélorusse</td><td>4851</td></tr><tr><td>Bihari</td><td>4854</td></tr><tr><td>Birman</td><td>5971</td></tr><tr><td colspan="2">Bislama 4855</td></tr><tr><td>Breton</td><td>4864</td></tr><tr><td colspan="2">Bulgare [BUL] 4853</td></tr><tr><td colspan="2">C-E</td></tr><tr><td>Cambodgien</td><td>5759</td></tr><tr><td>Catalan</td><td>4947</td></tr><tr><td>Chinois [CHI]</td><td>7254</td></tr><tr><td>Coréen [KOR]</td><td>5761</td></tr><tr><td>Corse</td><td>4961</td></tr><tr><td>Croate</td><td>5464</td></tr><tr><td colspan="2">Danois [DAN] 5047</td></tr><tr><td>Ecossais gaélique</td><td>5350</td></tr><tr><td>Espagnol [SPA]</td><td>5165</td></tr></table>
<table><tr><td colspan="2">Langue Code</td></tr><tr><td>Espéranto</td><td>5161</td></tr><tr><td colspan="2">Estonien 5166</td></tr><tr><td colspan="2">F-H</td></tr><tr><td>Féringien</td><td>5261</td></tr><tr><td>Fidji</td><td>5256</td></tr><tr><td>Finlandais [FIN]</td><td>5255</td></tr><tr><td>Français [FRE]</td><td>5264</td></tr><tr><td>Frison</td><td>5271</td></tr><tr><td>Galicien</td><td>5358</td></tr><tr><td>Gallols</td><td>4971</td></tr><tr><td>Géorgien</td><td>5747</td></tr><tr><td>Goujratl</td><td>5367</td></tr><tr><td>Grec [GRE]</td><td>5158</td></tr><tr><td>Groenlandais</td><td>5758</td></tr><tr><td>Guarani</td><td>5360</td></tr><tr><td>Haoussa</td><td>5447</td></tr><tr><td>Hébreu</td><td>5569</td></tr><tr><td>Hindi</td><td>5455</td></tr><tr><td>Hollandais [DUT]</td><td>6058</td></tr><tr><td>Hongrois [HUN]</td><td>5467</td></tr><tr><td colspan="2">I-K</td></tr><tr><td>Indonésien</td><td>5560</td></tr><tr><td>Interlingua</td><td>5547</td></tr><tr><td>Interlingue</td><td>5551</td></tr><tr><td>Inupiak</td><td>5557</td></tr><tr><td>Irlandais [IRI]</td><td>5347</td></tr><tr><td>Islandais [ICE]</td><td>5565</td></tr><tr><td>Italien [ITA]</td><td>5566</td></tr><tr><td>Japonals [JPN]</td><td>5647</td></tr><tr><td>Javanais</td><td>5669</td></tr><tr><td>Kachméré</td><td>5765</td></tr><tr><td colspan="2">Kannara 5760</td></tr><tr><td>Kazakh</td><td>5757</td></tr><tr><td>Kinyanwanda</td><td>6469</td></tr></table>
<table><tr><td colspan="2">Langue Code</td></tr><tr><td>Kirghiz</td><td>5771</td></tr><tr><td>Kiroundi 6460</td><td></td></tr><tr><td>Kurde 5767</td><td></td></tr><tr><td colspan="2">L-N</td></tr><tr><td>Laotien</td><td>5861</td></tr><tr><td>Latin</td><td>5847</td></tr><tr><td>Latvien ; Letton</td><td>5868</td></tr><tr><td>Lingalais</td><td>5860</td></tr><tr><td>Lituanien</td><td>5866</td></tr><tr><td>Macédonien</td><td>5957</td></tr><tr><td>Malais</td><td>5965</td></tr><tr><td>Malayalam</td><td>5958</td></tr><tr><td>Malgache</td><td>5953</td></tr><tr><td>Maltais</td><td>5966</td></tr><tr><td>Maori</td><td>5955</td></tr><tr><td>Marathi 5964</td><td></td></tr><tr><td>Moldave 5961</td><td></td></tr><tr><td>Mongol</td><td>5960</td></tr><tr><td>Nauru</td><td>6047</td></tr><tr><td>Népalais 6051</td><td></td></tr><tr><td>Norvégien [NOR]</td><td>6061</td></tr><tr><td colspan="2">O-R</td></tr><tr><td>Occitan 6149</td><td></td></tr><tr><td>Oromo(Afan)</td><td>6159</td></tr><tr><td>Ouolof</td><td>6961</td></tr><tr><td>Ourdou 6764</td><td></td></tr><tr><td>Ouzbek 6772</td><td></td></tr><tr><td>Panjabi</td><td>6247</td></tr><tr><td>Perse</td><td>5247</td></tr><tr><td>Polonais [POL]</td><td>6258</td></tr><tr><td>Portugais [POR]</td><td>6266</td></tr><tr><td>Provençal 6164</td><td></td></tr><tr><td>Pushtu ; Pushto 6265</td><td></td></tr><tr><td>Quechua</td><td>6367</td></tr></table>
<table><tr><td>Langue Code</td><td></td></tr><tr><td>Rhéto-Roman</td><td>6459</td></tr><tr><td>Roumain [RUM]</td><td>6461</td></tr><tr><td>Russe [RUS]</td><td>6467</td></tr><tr><td colspan="2">S</td></tr><tr><td>Samoan 6559</td><td></td></tr><tr><td>Sangho 6553</td><td></td></tr><tr><td>Sanscrit</td><td>6547</td></tr><tr><td>Serbe</td><td>6564</td></tr><tr><td>Serbo-Croate</td><td>6554</td></tr><tr><td>Sesotho</td><td>6566</td></tr><tr><td>Setswana</td><td>6660</td></tr><tr><td>Shana</td><td>6560</td></tr><tr><td>Sindhi</td><td>6550</td></tr><tr><td>Singhalals</td><td>6555</td></tr><tr><td>Siswat</td><td>6565</td></tr><tr><td>Slovaque [SLO]</td><td>6557</td></tr><tr><td>Slovène</td><td>6558</td></tr><tr><td>Somalien</td><td>6561</td></tr><tr><td>Soudanais</td><td>6567</td></tr><tr><td>Suédois [SWE]</td><td>6568</td></tr><tr><td>Swahili</td><td>6569</td></tr><tr><td colspan="2">T</td></tr><tr><td>Tadjik 6653</td><td></td></tr><tr><td>Tagalog</td><td>6658</td></tr><tr><td>Tamil</td><td>6647</td></tr><tr><td>Tatar</td><td>6666</td></tr><tr><td>Tchèque [CZE]</td><td>4965</td></tr><tr><td>Télougou</td><td>6651</td></tr><tr><td>Thallandals</td><td>6654</td></tr><tr><td>Tibétain 4861</td><td></td></tr><tr><td>Tigrigna</td><td>6655</td></tr><tr><td>Tonga</td><td>6661</td></tr><tr><td>Turc [TUR]</td><td>6664</td></tr><tr><td>Turcoman</td><td>6657</td></tr></table>
<table><tr><td colspan="2">Langue Code</td></tr><tr><td>Twi</td><td>6669</td></tr><tr><td colspan="2">U-Z</td></tr><tr><td>Ukrainien</td><td>6757</td></tr><tr><td>Vietnamien</td><td>6855</td></tr><tr><td colspan="2">Volapük 6861</td></tr><tr><td>Xhosa</td><td>7054</td></tr><tr><td>Yiddish</td><td>5655</td></tr><tr><td>Yoruba</td><td>7161</td></tr><tr><td>Zoulou</td><td>7267</td></tr></table>
<h1 id="remarque-43">Remarque</h1>
\- Si vous choisissez une langue dont le code de langue est composé de trois lettres (écrit entre crochets), le code sera affiché chaque fois que vous modifierez le réglage de l'audio ou des sous-titres à la page 22. Si vous optez pour une autre langue, c'est plutôt —' qui apparaîtra.
Autres Autres
FRANÇAIS
<h1 id="spécifications">Spécifications</h1>
<h1 id="système-de-signaux">SYSTÈME DE SIGNAUX</h1>
NTSC couleur
<h1 id="disques-applicables">DISQUES APPLICABLES</h1>
(1) Disques BD/DVD-vidéo
Disques 1 couche 12 cm un côté, disques 2 couches 12 cm un côté, disques 2 couches 12 cm deux côtés (1 couche par côté)
Disques 1 couche 8 cm un côté, disques 2 couches 8 cm un côté, disques 2 couches 8 cm deux côtés (1 couche par côté)
(2) BD-RE / BD-R (enregistrés en format BDMV)
Disques 1 couche 12 cm un côté, disques 2 couches 12 cm un côté
Disques 1 couche 8 cm un côté, disques 2 couches 8 cm un côté
(3) DVD-R
Disques 1 couche 12 cm un côté, disques 2 couches 12 cm un côté
Disques 1 couche 8 cm un côté, disques 2 couches 8 cm un côté
(4) DVD-RW
Disques 1 couche 12 cm un côté
Disques 1 couche 8 cm un côté
(5) Disques compacts (CD audio)
Disques de 12 cm, disques de 8 cm
(6) CD-RW/-R
Disques de 12 cm, disques de 8 cm
<h1 id="cartes-mémoire-applicables">CARTES MÉMOIRE APPLICABLES</h1>
(1) Carte mémoire SD
(2) Carte de mémoire SDHC
(3) Carte miniSD
(4) Carte microSD
<h1 id="sortie-s-vidéo">SORTIE S-VIDÉO</h1>
Niveau de sortie Y: 1 Vp-p (75Ω/ohms)
Niveau de sortie C: 0,286 Vp-p
Connecteurs de sortie: Connecteur S, 1 jeu
<h1 id="sortie-vidéo">SORTIE VIDÉO</h1>
Niveau de sortie Y: 1 Vp-p (75Ω/ohms)
Connecteurs de sortie: Fiche femelle, 1 jeu
<h1 id="sortie-de-composant">SORTIE DE COMPOSANT</h1>
Niveau de sortie Y: 1 Vp-p (75Ω/ohms)
Niveau de sortie Pb/CB: 0,648 Vp-p (75Ω/ohms)
Niveau de sortie PR/CR: 0,648 Vp-p (75Ω/ohms)
Connecteurs de sortie: Prises BNC, 1 jeu/fiche femelle 1 jeu
<h1 id="sortie-hdmi">SORTIE HDMI</h1>
Terminal de sortie: Terminal HDMI à 19 broches, un ensemble
HDMI ver. 1.3a (Deep Color, Dolby Digital Plus, Dolby TrueHD, DTS-HD)
<h1 id="sortie-audio-analogiques">SORTIE AUDIO ANALOGIQUES</h1>
Niveau de sortie: 2 Vrms
Connecteur de sortie à 2 canaux (L, R): Fiches femelles,
Canaux multiples (FL, FR, C, SL, SR, SBL, SBR, SW): Fiches femelle, 1 jeu
<h1 id="propriétés-de-la-sortie-audio">PROPRIÉTÉS DE LA SORTIE AUDIO</h1>
(1) Réponse en fréquence
1 BD (PCM linéaire) : 4 Hz à 22 kHz (échantillonnage 48 kHz)
: 4 Hz à 44 kHz (échantillonnage 96 kHz)
: 4 Hz à 88 kHz (échantillonnage 192 kHz)
2 DVD (PCM linéaire) : 4 Hz à 22 kHz (échantillonnage 48 kHz)
: 4 Hz à 44 kHz (échantillonnage 96 kHz)
3 CD : 4 Hz à 20 kHz
(2) Rapport signal/bruit : 125 dB
(3) Distorsion harmonique totale : 1 kHz 0,0008%
(4) Marge dynamique : 110 dB
<h1 id="sortie-audio-numérique">SORTIE AUDIO NUMÉRIQUE</h1>
Sortie numérique optique: Connecteur optique, 1 jeu
Sortie numérique coaxiale: Fiche femelle, 1 jeu
<h1 id="alimentation-électrique">ALIMENTATION ÉLECTRIQUE</h1>
C.A. 120 V, 60 Hz
<h1 id="consommation-de-courant">CONSOMMATION DE COURANT</h1>
68 W (en veille: 0,8 W)
<h1 id="dimensions-externes-maximales">DIMENSIONS EXTERNES MAXIMALES</h1>
L:434 mm (17-2/16 po)
H:139 mm (5-8/16 po)
P:399 mm (15-12/16 po)
(incluant les parties saillantes)
<h1 id="poids">POIDS</h1>
10,3 kg (22,8 lb)
<h1 id="télécommande-2">TÉLÉCOMMANDE</h1>
RC-1090
Type à impulsion infrarouge
Alimentation: c.c. 3 V, 2 piles R6P/AA
Dimensions externes:
L:52 mm (2-1/16 po)
H:227 mm (8-15/16 po)
P:30 mm (1-3/16 po)
Poids: 171 g (0,4 lb) (incluant les piles)
\- À des fins d'amélioration, les spécifications et le modèle sont sujets à changements sans préavis.
<h1 id="español">ESPAÑOL</h1>
<h1 id="introducción">Introducción</h1>
Introducción
<h1 id="índice-funciones">Índice Funciones</h1>
<h1 id="introducción-2">Introducción</h1>
Funciones ...... 1
Procesamiento Avonado de AI 24 ...... 2
Procesamiento Avanzado de AL24 ...... 2
Importante ...... 2
Fuente de Alimentación 2
Advertencia 2
Emplazamiento de la Instalación ....2
Precauciones Sobre la Instalacion ....2
Avisos Sobre el Mancio....3
Advertencia Contra el Rocío 3
Evitar los Peligros de Descargas Eléctricas e Incendios ..... 3
Antes del Uso 3
Acerca de los Derechos de Autor .... 3
Accesorios Provistos ....3
Información de Marca Registrada ....3
Acerca de los Discos 4
Manipulación de los Discos ....4
Limpiar los Discos 4
Discos y Archivos Reproducibles ....4
Discos no Reproducibles ....5
Discos no Reproducibles ....5
Sistemas de Color ....5
Códigos de Región 5
Estructura del Disco/Contenido de la Tarjeta de Memoria SD .....5
Simbolos Utilizados en Estas Instrucciones de Funcionamiento .....5
Acerca del Mando a Distancia ....6
Cargar las Pilas ....6
Uso del Mando a Distancia ....6
La Configuración de Esta Unidad no Reacciona con el Mando
a Distancia de Otros Reproductores de DVD de DENON .....6
Cambiar el Código de Señal del Mando a Distancia .....6
Nombres y Funciones de las Piezas ....7
Doral Delentora ....7
Panel Delantero ....7
Panel Trasero ....7
Mando a Distancia 8
Pantalla del Panel Delantero 9
Ajustar el Brillo de Pantalla ....9
Ejemplos de Visualizaciones Durante el Funcionamiento .....9
<h1 id="conexiones">Conexiones</h1>
Conexión al TV 10
Conectar a un Dispositivo de Visualización con el Cable
HDMI 10
Conelctar a un Dispositivo de visualización y a un Amplificador/Receptor con el Cable HDMI 10
Amplificador/Receptor con el Cable HDMI .... 10
Modo de Salida HDMI y Señales de Salida Real .... 11
Configuración de Sonido 11
Conexión Digital a un Amplificador AV con Descodificador
Integrado 12
Conexión a Dispositivo con 2 Canales de Entradas de
Sonido Analógico 13
Conexiones de Envolvente a Dispositivo con 7.1/5.1
Canales de Entradas de Sónido Analógico ....13
Conectar el Cable de Alimentación ....13
<h1 id="reproducción">Reproducción</h1>
Encendido de la Alimentación ....14
Reproducción Directa 14
Funcionamientos Utilizando el Menú de Disco,
el Menu de Títulos y el Menu Desplegable ....15
Reproducir Discos DVD-RW/-R en Modo VR....15
Reproduci Discos DVD-RW/R en Modo VR 15
Paugar 15
Reproducción de Reanudación ..... 16
Reproducción de Avance Rápido/Rebobinado Rápido .....16
Reproducción Lenta Adelante ....16
Reproducción Paso a Paso ....16
Velocidad de Diálogo ....17
Velocidad de Dialogo ....17
Reproducción de Benetición ....17
Reproducción de Repetición
Bepetir A-B 17
Reproducción de Programa 18
Reproducción Aleatoria ....18
Zoom 19
Angulo de la Cámara 19
Buscar ....19
Visualización en Pantalla ....20
Visualizacion en Pantana ....20
Seleccionar el Formato de Sonido e Imagen ....22
Seleccionar Corrientes de Sonido/Canales 22
Seleccionar el Idioma de Subtítulo 22
Envolvente Virtual 23
Modo Directo Puro 23
Configurar el Modo de BD de Sonido 23
Alustar la Imagen 24
Reproducción de Archivo MP3, Windows Media™ Audio,
JPEG y DivX ^® 25
Kodak Picture CD 27
Leer la Tarjeta de Memoria SD ......27
Configuración de Funciones
Utilizar el Menú Configuración 29
Rápido 29
Personalizado 29
Inicializa 37
Inicializar 37
<h1 id="otros">Otros</h1>
Resolución de Problemas ....38
Código de Idioma 39
Especificaciones ....40
●HDMI (Interface de Multimedios de Alta Definición)
Puede disfrutar de una salida de imágenes más clara cuando conecte este unidad a un equipo de visualización con un puerto compatible con HDMI.
-Velocidad de Diálogo
Reproducción en velocidad ligeramente más rápida mientras
que mantiene la salida de sonido.
La velocidad del diálogo está disponible solamente en discos grabados en el formato Dolby Digital.
●Reproducción Fija/Rápida/Lenta/Por Pasos
Hay disponibles distintos modos de reproducción Incluyendo foto fija,
avance/rebobinado rápido, cámara lenta y paso a paso de fotogramas.
●Modo Foto Fija
La resolución de las imágenes mientras está en el modo fijo (pausado) puede ajustarse.
●Reproducción Aleatoria de CD de Sonido, MP3, JPEG y
Windows Media™ Audio
Esta unidad puede desordenar el orden de reproducción de las pistas/archivos.
●Reproducción de Programa de CD de Sonido, MP3, JPEG y
Windows Media™ Audio
Usted puede programar el la orden de reproducción de las pistas/archivos en el orden deseado.
\- Menús del BD/DVD en el Idioma Deseado
Puede mostrar menús de BD/DVD en el idioma deseado, si está disponible en BD/DVD.
•Apagado Automático
La alimentación se apaga automáticamente si no hay ninguna actividad en el unidad o en su mando a distancia durante más de 30 minutos (consulte la página 37).
\- Subtítulos en el Idioma Deseado
Puede seleccionar el idioma deseado para los subtítulos si dicho Idioma está disponible en el BD/DVD y DivX ^® .
\- Selecionar un Ángulo de Cámara
Usted puede seleccionar el ángulo de cámara deseado si el disco contiene secuencias grabadas desde distintos ángulos.
\- Opciones Para Idioma de Sonido y Modo de Sonido
Usted puede seleccionar el idioma de sonido y modo de sonido deseados si están disponibles distintos idiomas y modos en el disco.
●Control de Categoría (Bloqueo Paterno)
Usted puede establecer el nivel de control para limitar la reproducción de discos que puedan no ser apropiados para niños.
●Detección Automática de Discos
Este unidad detecta automáticamente si el disco cargado es BD,
DVD, CD de sonido, MP3, JPEG, Windows Media™ Audio o DivX®.
\- Directo Puro
La calidad del sonido de la salida de sonido analógico se mejora por la detención de salida de señales de vídeo, etc.
<h1 id="español-2">ESPAÑOL</h1>
<h1 id="introducción-introducción">Introducción Introducción</h1>
<h1 id="visualización-en-pantalla">-Visualización en Pantalla</h1>
Se puede mostrar información acerca del funcionamiento actual en la pantalla televisión, permitiéndole confirmar las funciones activas actualmente (como la reproducción de programa) utilizando el mando a distancia.
<h1 id="atenuador">- Atenuador</h1>
El brillo de la pantalla del panel delantero puede ajustarse.
<h1 id="salvapantallas">●Salvapantallas</h1>
El programa salvapantallas arranca si no hay ninguna actividad en el unidad o en su mando a distancia durante más de 5 minutos. El brillo de la pantalla se oscurece en un 75 %. El programa se desactiva cuando hay alguna actividad.
<h1 id="control-de-imagen">•Control de Imagen</h1>
El control de imagen ajusta la calidad de la imagen de la pantalla específica.
<h1 id="buscar">- Buscar</h1>
Búsqueda de capítulo: Busca el capítulo deseado.
Búsqueda de título: Busca el título deseado.
Búsqueda de pistas: Busca pista/archivo deseado.
Búsqueda de tiempo: Busca el punto temporal o la pista/archivo o el título deseados.
<h1 id="repetir">●Repetir</h1>
Capítulo: Reproducción repetida de un capítulo del disco.
Título: Reproducción repetida de un título del disco.
Pista: Reproducción repetida de una pista/archivo de disco.
Todo: Reproducción repetida del disco entero.
(no disponible para BD ni DVD-vídeo)
A-B: Reproducción repetida de una parte entre dos puntos.
Grupo: Es posible la reproducción repetida de una carpeta del disco MP3/JPEG/Windows Media™ Audio/DivX® en reproducción.
<h1 id="zoom-5">Zoom</h1>
Se puede mostrar una imagen magnificada x1,2, x1,5, x2,0, x4,0. (no disponible para BD)
<h1 id="marcador">●Marcador</h1>
Son puntos de referencia electrónica designados por el usuario que se pueden volver a llamar.
<h1 id="reproducción-de-reanudación">●Reproducción de Reanudación</h1>
El usuario puede reanudar la reproducción desde el punto en el que se ha detenido la reproducción incluso si se apaga la alimentación.
<h1 id="indicador-de-velocidad-de-bits">- Indicador de Velocidad de Bits</h1>
La velocidad de bits (la cantidad de datos de Imagen que se está leyendo actualmente) se puede mostrar durante la reproducción del contenido de vídeo. (no disponible para BD)
<h1 id="drc-control-de-rango-dinámico">●DRC (Control de Rango Dinámico)</h1>
Utilice este procedimiento para configurar el rango dinámico de las señales de salida al reproducir DVD/BD grabados en Dolby Digital/Dolby Digital Plus/Dolby TrueHD.
<h1 id="mostrar-una-imagen-jpeg">●Mostrar Una Imagen JPEG</h1>
Las Kodak Picture CD se pueden reproducir. Las imágenes fijas almacenadas en el formato JPEG del DVD-RW/-R, CD-RW/-R o tarjeta de memoria SD también se pueden reproducir.
<h1 id="reproducción-de-archivo-windows-media-audio">●Reproducción de Archivo Windows Media™ Audio</h1>
Puede disfrutar de archivos Windows Media™ Audio que están grabados en DVD-RW/-R, CD-RW/-R o tarjeta de memoria SD.
<h1 id="reproducir-un-archivo-mp3">●Reproducir un Archivo MP3</h1>
Puede disfrutar de archivos MP3 que están grabados en DVD-RW/-R, CD-RW/-R o tarjeta de memoria SD.
<h1 id="reproducción-de-archivo-divx">●Reproducción de Archivo DivX®</h1>
Puede disfrutar de archivos DivX ^® que están grabados en DVD-RW/-R o CD-RW/-R.
- Producto con certificación DivX ^® Certified oficial
- Reproduce todas las versiones de videos DivX ^® (incluida la versión DivX ^® 6) y ofrece reproducción estándar de archivos multimedia de DivX ^®
<h1 id="reproducir-el-contenido-de-la-tarjeta-de-memoria-sd">●Reproducir el Contenido de la Tarjeta de Memoria SD</h1>
\- Puede reproducir los archivos MP3, Windows Media™ Audio o JPEG guardados en tarjetas de memorias SD.
- Puede almacenar comentarios en imágenes, subtitulos u otros extras para archivos BD-ROM Profile 1.1 de una tarjeta de memoria SD y reproducirlos con el BD-ROM.
<h1 id="aplicación-bd-j">●Aplicación BD-J</h1>
\- Con algunas BD que admiten aplicaciones Java (BD-J), puede disfrutar de una función interactiva, como por ejemplo para juegos.
<h1 id="salida-de-sonido-envolvente-analógico-de-71-canales">- Salida de sonido envolvente analógico de 7.1 canales</h1>
Este reproductor está equipado con tomas de salida de sonido envolvente analógico de 7.1 canales para reproducción.
<h1 id="procesamiento-avanzado-de-al24">Procesamiento Avanzado de AL24</h1>
"El procesamiento avanzado de AL24" que aumenta mucho la cantidad de información en el área del eje temporal utilizando una tecnología de detección y procesamiento única de alta velocidad para la circuitería de reproducción de señales PCM de BD/DVD/CD se proporciona para salida de 2 canales. Además de la expansión de datos a 24 bits, se realiza una corrección natural de señal sin estropear los datos originales sin conversión de mejora de muestreo. Además, la tecnología de forma de onda analógica original de DENON, "Procesamiento de AL24 PLUS", se utiliza para la salida de sonido de 7.1 canales, lo que da como resultado una alta calidad de sonido para todas las fuentes de señales PCM. El indicador "Advanced AL24" se ilumina en el panel delantero cuando está activado el Procesado AL24 avanzado.
<h1 id="importante">Importante</h1>
Utilice solamente discos marcados con los logotipos enumerados en la página 4.
<h1 id="fuente-de-alimentación">Fuente de Alimentación</h1>
La fuente de alimentación principal está ocupada cuando la clavilja principal está enchufada en un enchufe de CA 120 V a 60 Hz. Para hacer operar la unidad, pulse el botón <ON / OFF> para encender la unidad.
<h1 id="advertencia">Advertencia</h1>
Para evitar Incendlos o descargas eléctricas, no exponga está unida a la lluvia ni a la humedad.
<h1 id="advertencia-2">ADVERTENCIA:</h1>
PIEZAS CON TENSIÓN ELÉCTRICA DENTRO.
NO QUITE NINGÚN TORNILLO.
<h1 id="emplazamiento-de-la-instalación">Emplazamiento de la Instalación</h1>
Para la seguridad y el desempeño óptimo de este aparato:
- No ponga esta unidad verticalmente. Instale el equipo en una posición horizontal y estable. No coloque nada directamente encima del equipo. No coloque el aparato directamente encima del televisor.
- Aislela de la luz directa del sol y manténgala lejos de fuentes de calor Intenso. Evite los lugares polvorientos o húmedos. Para lograr una disipación correcta del calor, evite los lugares sin suficiente ventilación. No bloquee los agujeros de ventilación en los costados del aparato. Evite las ubicaciones sujetas a fuertes vibraciones o campos magnéticos Intensos.
- Asegúrese de sacar el disco y desenchufar el cable de alimentación antes de transportar la unidad.
Periodos sin uso - Apague la unidad cuando no esté en uso. Desenchufe el enchufe de corriente alterna doméstica si no se va a utilizar durante un largo tiempo. Desenchufe la unidad durante condiciones de tormentas con aparato eléctrico.
Por favor, lea estas instrucciones de funcionamiento con detenimiento antes de utilizar la unidad y consérvelas para futuras consultas.
<h1 id="precauciones-sobre-la-instalación">Precauciones Sobre la Instalación</h1>
Se puede generar ruido o perturbación de la imagen si esta unidad o cualquier otro equipo electrónico que utilice microprocesadores se utiliza cerca de un sintonizador o televisor. Si ocurre esto, dé los siguientes pasos:
- Instale está unidad lo más lejos que sea posible del sintonizador o del televisor.
- Ponga los cables de la antena del sintonizador o del televisor lejos del cable de CA de la unidad y de los cables de conexión de entrada/salida.
- Los ruidos o perturbaciones tiendes a ocurrir especialmente cuando se utilizan antenas interiores o cables de conductor de 300 Ω/ohmios. Recomendamos el uso de antenas exteriores y cables coaxiales de 75 Ω/ohmios.
<h1 id="nota">Nota</h1>
\- Para dispersar el calor, no instale este equipo en un espacio cerrado, libreria o unidad similar.
<h1 id="español-3">ESPAÑOL</h1>
Introducción Introducción

<details>
<summary>text_image</summary>
* 10 centímetros o más
*
</details>

<details>
<summary>text_image</summary>
Pared
</details>
<h1 id="avisos-sobre-el-manejo">Avisos Sobre el Manejo</h1>
- Precauciones con el uso de los teléfonos móviles.
Utilizar un teléfono móvil cerca de esta unidad puede tener como resultado la generación de ruidos. En ese caso, mueva el teléfono móvil lejos de esta unidad cuando lo esté utilizando.
- Antes de encender el botón de funcionamiento de la alimentación. Compruebe una vez más que todas las conexiones son correctas y que no hay ningún problema con los cables de conexión. Ponga siempre el botón de funcionamiento de la alimentación a la posición espera antes de conectar y desconectar los cables de conexión.
- Ventile suficientemente el lugar de instalación.
Si se deja la unidad en una habitación llena de humo de cigarrillos, etcétera, durante largos periodos de tiempo, la superficie de lectura óptica se puede ensuciar, en cuyo caso no podrá leer las señales correctamente.
<h1 id="advertencia-contra-el-rocío">Advertencia Contra el Rocío</h1>
La condensación del rocío puede ocurrir dentro de la unidad cuando se cambie de un sitio frío a uno callente o después de calentar una habitación fría o en condiciones de mucha humedad. No utilice la unidad al menos durante 2 horas hasta que su interior esté seco.
<h1 id="evitar-los-peligros-de-descargas-eléctricas-e-incendios">Evitar los Peligros de Descargas Eléctricas e Incendios</h1>
- No manipule el cable de alimentación CA con las manos húmedas.
- No tire del cable de alimentación CA cuando lo desconecte del enchufe de la pared de CA. Agárrelo por la clavija.
- Sí, por accidente, se vierte agua sobre esta unidad, desenchufe el cable de alimentación de CA inmediatamente y lleve la unidad a nuestro centro de reparaciones autorizado para que la reparen.
<h1 id="antes-del-uso">Antes del Uso</h1>
Preste atención a lo siguiente antes de utilizar esta unidad:
●Mover la unidad.
Para evitar cortocircuitos o cables dañados en los cables de conexión, desenchufe siempre el cable de la fuente de alimentación y desconecte los cables de conexión entre todos los otros componentes de sonido al mover la unidad.
- Guarde las instrucciones de funcionamiento en un lugar seguro. Después de leer las instrucciones de funcionamiento, almacénelas en lugar seguro ya que podrían resultarles útiles en el futuro.
- Siempre que el botón <ON/STANDBY> esté en estado ESPERA, la unidad sigue estando conectada a la tensión de la línea de CA. Por favor, asegúrese pulsar <ON/OFF> para apagar la alimentación o desenchufar el cable cuando se vaya de casa de, digamos, vacaciones.
- Tenga en cuenta que las ilustraciones de estas instrucciones pueden variar de la unidad real con propósitos de explicación. El número de serie de este producto puede encontrarse la parte trasera de la unidad. Ningún otro tiene el mismo número de serie que el suyo. Debe anotar el número y otra información vital aquí y retener este libro como registro permanente de su compra para ayudar a la identificación en caso de robo.
<table><tr><td>Fecha de Compra</td><td></td></tr><tr><td>Comprado al Distribuidor</td><td></td></tr><tr><td>Dirección del Distribuidor</td><td></td></tr><tr><td>Número de Teléfono del Distribuidor</td><td></td></tr><tr><td>Número de Modelo</td><td></td></tr><tr><td>Número de Serie</td><td></td></tr></table>
<h1 id="acerca-de-los-derechos-de-autor">Acerca de los Derechos de Autor</h1>
La copia, la emisión, la ejecución pública y el préstamo de discos no autorizados están prohibidos.
Este producto incorpora tecnología de protección de derechos de autor que está protegida por patentes de los EE.UU. y otros derechos de la propiedad intelectual. El uso de esta tecnología de protección de derechos de autor tiene que ser autorizado por Macrovision y está diseñada para su uso doméstico y otros usos limitados de visualización sólo, a menos que se autorice a menos que sea autorizado por Macrovision.
La ingenieria inversa y el desmontaje están prohibidos.
Patentes de los EE.UU. números 4.631.603; 4.819.098; 4.907.093; 5.315.448 y 6.516.132.
<h1 id="accesorios-provistos">Accesorios Provistos</h1>
Por favor compruebe que los siguientes elementos están incluidos con la unidad principal en el cartón.
mando a distancia (RC-1090) dos pilas de tipo "AA" (R6P)

cable de alimentation

instrucciones de funcionamiento

lista de estaciones de reparaciones

tarjeta de garantía

cable RCA de sonido cable RCA de vídeo


<h1 id="información-de-marca-registrada">Información de Marca Registrada</h1>
<h1 id="hdmi-tm-2">HDMI ^TM</h1>
HDMI, el logotipo HDMI y High-Definition Multimedia Interface (Interface de Multimedlos de Alta Definición) son marcas comerciales o marcas registradas de HDMI Licensing LLC.
DOLBY DIGITAL·PLUS
DOLBY
TRUEHD
Fabricado bajo licencia de Dolby Laboratories. Dolby y el símbolo de la doble D son marcas comerciales de Dolby Laboratories.
dts
Digital Surround
Fabricado bajo licencia bajo las patentes de los EE.UU. números: 5.451.942; 5.956.674; 5.974.380; 5.978.762; 6.487.535 y otras patentes de EE.UU. y mundiales publicadas y pendientes. DTS y DTS Digital Surround es una marca registrada y los logotipos y el símbolo DTS son marcas registradas de DTS, Inc. © 1996-2007 DTS, Inc. Reservados todos los derechos.
Introducción Introducción

POWERED
Java y todas las marcas se logotipos basados en Java son marcas o marcas registradas de Sun Microsystems en los Estados Unidos y en otros países.

DivX, DivX Certified y los logotipos correspondientes son marcas comerciales de DivX, Inc. usados bajo licencia.

Windows Media y el logotlpo de Windows son marcas o marcas registradas de Microsoft Corporation en los Estados Unidos y/o en otros países.
"Blu-ray Disc" y son marcas registradas.
DVD es una marca registrada de DVD Format/Logo Licensing Corporation.

es una marca registrada de Eastman Kodak Company.
<h1 id="acerca-de-los-discos">Acerca de los Discos</h1>
<h1 id="manipulación-de-los-discos">Manipulación de los Discos</h1>
- Manipule los discos de tal manera que no se adhleran a las superficies de los mismos huellas digitales y polvo.
- Siempre almacene el disco en su estuche protector cuando no lo utilice.
- Tenga en cuenta que los discos con formas especiales no pueden ser reproducidos en este reproductor. No intente reproducir dichos discos ya que pueden dañar a la unidad.
<h1 id="limpiar-los-discos">Limpiar los Discos</h1>
- Cuando se ensucie un disco, limpielo con un paño de limpieza. Limpie el disco desde el centro afuera. No limpie en movimiento circular.
- No utilice disolventes como bencina, diluyentes, limpiadores comerciales, detergente, agentes limpiadores abrasivos o rociadores antiestáticos para registros analógicos.
<h1 id="discos-y-archivos-reproducibles">Discos y Archivos Reproducibles</h1>
Este aparato es compatible con la reproducción de los siguientes discos. Para reproducir un BD o DVD, asegúrese de que cumple los requisitos de códigos de región y sistemas de colores descritos en la página 5. Usted puede reproducir discos que tengan los siguientes logotipos. No se garantiza que otros tipos de discos se reproduzcan.
<h1 id="discos-reproducibles-logotipos">Discos reproducibles Logotipos</h1>
Discos Blu-ray
-BD-vídeo
BD-RE(version 3.0)
(grabado en formato BDMV)
BD-R(versión 2.0)
(grabado en formato BDMV)
(Los discos no cerrados pueden no reproducirse.)

<table><tr><td>DVD-video</td><td></td><td>DVDVIDEO</td><td>DVDVIDEO</td></tr><tr><td>DVD-RW</td><td>(sólo discos finalizados)</td><td>DVDRW</td><td>DVDRW</td></tr><tr><td>DVD-R</td><td>(sólo discos finalizados)</td><td>DVDR</td><td>DVDR</td></tr></table>
CD-DA (CD de sonido)

<table><tr><td>CD-RW</td><td>COMPACTDISC BIG-TTL AUDIOReWritable</td><td>COMPACTDISC ReWritable</td></tr><tr><td>CD-R</td><td>COMPACTDISC WHITE RADIORecordable</td><td>COMPACTDISC Recordable</td></tr></table>
Kodak Picture CD

DTS - CD (Discos de música 5.1)
\-
<h1 id="archivos-reproducibles-logotipos-soportes">Archivos reproducibles Logotipos Soportes</h1>
MP3
一
Windows Media™ Audio

JPEG
一
DVD-RW/-R
CD-RW/-R
Tarjeta de memorias SD
(incluyendo SDHC)
tarjeta miniSD
tarjeta microSD
DVD-RW/-R
CD-RW/-R
<h1 id="español-4">ESPAÑOL</h1>
<h1 id="nota-2">Nota</h1>
- Los discos que contienen archivos DivX ^® con la función de reproducción DivX ^® GMC (Compensación de movimiento global), que es una función complementaria de DivX ^® , no se pueden reproducir en esta unidad.
- Esta unidad no puede reproducir el contenido del disco protegido por la Windows Media™ Gestión de derechos digitales (DRM).
- "WMA" (Windows Media™ Audio) es un codificador/descodificador de sonido desarrollado por Microsoft® en los Estados Unidos de América.
<h1 id="tarjetas-legibles-archivosdatos-reproducibles">Tarjetas legibles Archivos/datos reproducibles</h1>
Tarjeta de memoria SD
MP3, Windows Media™ Audio,
Tarjeta de memoria SDHC (4 GB)
Tarjeta miniSD (8 MB - 2 GB)
JPEG, comentario en imágenes, subtitulos u otros extras del BD-ROM Profile 1.1
Tarjeta microSD (8 MB - 2 GB)
<h1 id="nota-para-las-tarjetas-de-memorias-sd">Nota Para las Tarjetas de Memorias SD</h1>
- No extraiga la tarjeta de memoria SD ni apague la unidad mientras se está reproduciendo el contenido de la tarjeta. Puede tener como resultado un fallo de funcionamiento o la pérdida de los datos de la tarjeta.
- Por favor guarde las tarjetas de memorias SD en sus estuches cuando no las esté utilizando.
- No intente abrir ni modificar la tarjeta.
- No toque la superficie de terminal con sus dedos ni con ningún metal.
- No pegue etiquetas o adhesivos adicionales a las tarjetas.
- No quite la etiqueta de las tarietas de memorias SD.
- Esta unidad soporta tarjetas de memoria SD con sistema de archivos FAT12/FAT16 y tarjetas de memoria SDHC con el sistema de archivos FAT32.
- Esta unidad podría no ser capaz de leer tarjetas de memoria SD
formateadas en ordenador. Si ese es el caso, por favor vuelva a formatear las tarjetas de memoria SD en esta unidad e Inténtelo de nuevo.
- Esta unidad no soporta tarjetas de memoria mini SDHC ni micro SDHC.
- Para las tarjetas miniSD y microSD, es necesario un adaptador.


\- Porciones de este producto están protegidas por la ley de derechos de autor y se ofrecen bajo licencia de ARIS/SOLANA/4C.
ESPAÑOL
<h1 id="español-5">ESPAÑOL</h1>
<h1 id="introducción-introducción-2">Introducción Introducción</h1>
<h1 id="discos-no-reproducibles">Discos no Reproducibles</h1>
En este aparato no se podrán reproducir los siguientes discos.
• BD-RE Ver.1.0 (disco BD con cartucho)
• BD-RE (Ver2.0) (grabado en formato BDAV)
• BD-R (Ver1.0) (grabado en formato BDAV)
- El BD contiene archivos MP3/ Windows Media™ Audio/ JPEG/ DivX®
- Disco híbrido BD/DVD (por ejemplo disco híbrido de alta definición total)
- BD-vídeo que no incluye "A" en su código de región.
- DVD-video que no incluye ni "1" ni "ALL" en su código de región.
- DVD-ROM/RAM (para discos DVD-ROM, se pueden reproducir archivos de datos en DivX® 3.11, 4.x, 5.x y 6)
- DVD-RW/-R grabado en formato de grabación no compatible
- CD-ROM (se pueden reproducir archivos de datos en DivX ^® 3.11, 4.x, 5.x y 6)
- CDV (solamente se puede reproducir la parte de audio)
- CD-G (solamente se pueden emitir las señales de audio)
• CompactDisc-Interactivo (CD-I)
• Disco sencillo de vídeo (VSD)
- CD de video/CD de supervídeo
- CD de superaudio (solamente se podrá escuchar el sonido de la capa normal del CD. El sonido de la de capa de alta densidad de un CD de superaudio no se podrá escuchar.)
• Audio en DVD
• HD DVD
- Disco con área de grabación inferior a 55 mm de diámetro
- Disco no autorizado (disco pirateado)
- Disco sin finalizar
<h1 id="sistemas-de-color">Sistemas de Color</h1>
Los BD y DVD están grabados en distintos sistemas de colores en todo el mundo. El sistema de color más común es el NTSC (que se utiliza principalmente los Estados Unidos y Canadá). Esta unidad utiliza NTSC, por lo tanto el BD o DVD que reproduzca tiene que estar grabado en el sistema NTSC. No puede reproducir BD o DVD que estén grabados en otros sistemas de colores.
<h1 id="códigos-de-región">Códigos de Región</h1>
Esta unidad ha sido diseñada para reproducir BD con la región A y DVD-video con región 1. Usted no puede producir BD o DVD-video que hayan sido etiquetados para otras regiones. Busque el símbolo a la derecha de su BD o DVD-video. Si estos símbolos de regiones no aparecen en su BD o DVD-video, no puede reproducir el disco en esta unidad. El número o letra dentro del globo se refiere a la región del mundo. Un BD o DVD-video etiquetado para una región específica solamente puede reproducirse en unidades que tengan el mismo código de región.


<h1 id="estructura-del-discocontenido-de-la-tarjeta-de-memoria-sd">Estructura del Disco/Contenido de la Tarjeta de Memoria SD</h1>
El contenido de la unidad de disco rígido o el DVD está generalmente dividido en títulos. Los títulos pueden a su vez ser subdivididos adicionalmente en capítulos.

<details>
<summary>text_image</summary>
BD/DVD
título 1 título 2
capítulo 1 capítulo 2 capítulo 1 capítulo 2 capítulo 3
o de sonido están divididos en pistas.
CD de Sonido
pista 1 pista 2 pista 3 pista 4 pista 5
</details>
Los discos de datos o tarjetas de memoria SD contienen MP3/Windows Media™ Audio/JPEG/DivX ^® que están divididos en carpetas y las carpetas están subdivididas en archivos.

<details>
<summary>text_image</summary>
carpeta (grupo) 1. Top
carpeta (grupo) 2
movio (pasta) 1
archive (pasta) 2
archive (pasta) 3
archive (pasta) 4
archive (pasta) 5
</details>
5
ESPAÑOL
<h1 id="símbolos-utilizados-en-estas-instrucciones-de-funcionamiento">Símbolos Utilizados en Estas Instrucciones de Funcionamiento</h1>
Para especificar para qué tipo de medio es cada función, colocamos los siguientes símbolos al comienzo de cada elemento descripto.
<h1 id="simbolo">Simbolo</h1>
BD-V
La descripción se refiere a BD-vídeo y BD-RE(ver. 3.0)/BD-R(ver. 2.0) grabado en formato BDMV
DVD-V
La descripción se refiere a DVD-video y DVD-RW/-R grabados en modo vídeo
DVD-VR
La descripción se refiere a DVD-RW/-R grabado en modo VR
CD
La descripción se refiere a CD de sonido y DTS-CD
MP3
La descripción se refiere a DVD-RW/-R, CD-RW/-R y tarjeta de memoria SD con archivos MP3
WMA
La descripción se refiere a DVD-RW/-R, CD-RW/-R y tarjeta de memoria SD con archivos Windows Media™ Audio
JPEG
La descripción se refiere a DVD-RW/-R, CD-RW/-R y tarjeta de memoria SD con archivos JPEG
DivX®
La descripción se refiere a DVD-RW/-R y CD-RW/-R con archivos DivX®
Si usted no encuentra en el encabezado de la function ninguno de los símbolos listados más arriba, la operación es válida para todos los medios.
<h1 id="acerca-de-los-nombres-de-los-botones-en-esta-explicación">Acerca de los nombres de los botones en esta explicación</h1>
< >: Botones de la unidad principal
[ ] : Botones del mando a distancia
<h1 id="sólo-el-nombre-de-los-botones">Sólo el nombre de los botones:</h1>
Botones de la unidad principal y del mando a distancia
Introducción Introducción
<h1 id="acerca-del-mando-a-distancia">Acerca del Mando a Distancia</h1>
<h1 id="cargar-las-pilas">Cargar las Pilas</h1>
① Abrir la tapa del compartimiento de pilas.

③Cierre la tapa.
②Introduzca dos pilas "AA" (R6P), cada una de ellas orientada correctamente.

<h1 id="avisos-sobre-las-pilas">Avisos Sobre las Pilas</h1>
- Utilice pilas de tipo "AA" (R6P) en este mando a distancia.
- Sustituya a las pilas por pilas nuevas aproximadamente una vez al año, aunque esto depende de la frecuencia con la que se utilice la unidad del mando a distancia.
- Si la unidad de mando a distancia no funciona en la proximidad de la unidad principal, cambie las pilas por nuevas, incluso si ha pasado menos de un año.
- Las pilas incluidas sirven solamente para el funcionamiento de verificación. Cámbielas por nuevas pilas lo antes posible.
- Al introducir las pilas, tenga cuidado de hacerlo en la dirección apropiada, siguiendo las marcas y del compartimiento para pilas de la unidad de mando a distancia.
- Para prevenir daños o pérdida de líquido de las pilas:
- No mezcle pilas nuevas con antiguas.
- No mezcle 2 tipos distintos de pilas, alcalinas y manganeso.
- No cortocircuite, desmonte, caliente ni tire las pilas al fuego.
- Quite las pilas cuando planee no utilizar en la unidad de mando a distancia durante un período largo de tiempo.
- En caso de que las pilas tengan pérdidas, limpie con cuidado el fluido del interior del compartimiento de pilas y después introduzca nuevas pilas.
<h1 id="uso-del-mando-a-distancia">Uso del Mando a Distancia</h1>
Tenga lo siguiente en cuenta cuando utilice el mando a distancia:
- Asegúrese de que no haya obstáculos entre el mando a distancia y el sensor para el mando de la unidad.
- El funcionamiento a distancia puede ser no fiable si hay una fuerte luz del sol o luz fluorescente dando al sensor para el mando de la unidad.
- Los mandos a distancia de distintos dispositivos pueden interferir los unos con los otros. Evite utilizar el mando a distancia para otros equipos situados cerca de la unidad
- Cuando advierta una disminución en el rango de operación del control remoto, reemplace las pilas.
- Los máximos rangos de operación del equipo son los siguientes.
- Línea directa de visión: aprox. 23 pies (7 m)
- Hacia cualquier costado
respecto del centro: aprox. 23 pies (7 m) dentro de los 30°


<h1 id="la-configuración-de-esta-unidad-no-reacciona-con-el-mando-a-distancia-de-otros-reproductores-de-dvd-de-denon">La Configuración de Esta Unidad no Reacciona con el Mando a Distancia de Otros Reproductores de DVD de DENON</h1>
Si tiene otros reproductores de DVD de DENON cerca de esta unidad, esta unidad reacclona a los comandos que haga para los reproductores de DVD a través de su mando a distancia. Para evitar esta situación, puede configurar la unidad para que no reacclone con el mando a distancia de otros reproductores de DVD de DENON.
<h1 id="1-en-modo-parado-pulse-setup">1) En modo parado, pulse [SETUP].</h1>
<h1 id="2-presione-7-8-9-2">2) Presione [7], [8], [9], [2].</h1>
<h1 id="3-pulse-setup">3) Pulse [SETUP].</h1>
- Se mostrará "Only Attached Remocon" en la esquina superior derecha de la pantalla y esta unidad sólo reaccionará a los comandos del mando a distancia de esta unidad.
- Para volver a configurar al predeterminado, presione [7],[8],[9],[1] en el paso 2. Se mostrará "Normal Remocon" en la esquina superior derecha de la pantalla y esta unidad reaccionará a los comandos tanto del mando a distancia de esta unidad como a los mandos a distancia de otros reproductores de DVD de DENON.
<h1 id="nota-3">Nota</h1>
- La configuración permanece incluso si apaga la unidad o desenchufa el cable de CA.
- Si Intenta hacer funcionar esta unidad con el mando a distancia de otros reproductores de DVD de DENON, algunas de las operaciones pueden no estar disponibles dependiendo del año de fabricación o tipo de mando a distancia.
<h1 id="español-6">ESPAÑOL</h1>
<h1 id="cambiar-el-código-de-señal-del-mando-a-distancia">Cambiar el Código de Señal del Mando a Distancia</h1>
Para evitar que otros reproductores de BD de DENON respondan a la señal remota de esta unidad, usted puede camblar el código de señal del mando a distancia. Si el código de señal del mando distancia no hace nada al código de señal de la unidad, no puede controlar la unidad con el mando a distancia.
<h1 id="cambiar-el-código-de-señal-en-la-unidad">■Cambiar el código de señal en la unidad</h1>
<h1 id="1-en-modo-parado-pulse-setup-2">1) En modo parado, pulse [SETUP].</h1>
2) Utilice [◀/▶] para seleccionar CUS TUM y después presione [ENTER].
3) Utilice [◀/▶] para seleccionar Other y después presione [ENTER].
4) Utilice [△ / ▽] para seleccionar "Config. ctrl. remoto".
5) Presione [ENTER] para seleccionar "DENON1" o "DENON2".

<h1 id="6-pulse-setup-para-salir">6) Pulse [SETUP] para salir.</h1>
- En este momento el nuevo código de señal de la unidad es efectivo. Por favor, cambie el código de señal del mando a distancia para que coincida con el código de señal de la unidad con el siguiente procedimiento.
<h1 id="cambiar-el-código-de-señal-del-mando-a-distancia-2">■Cambiar el código de señal del mando a distancia</h1>
<h1 id="configurar-a-denon1">Configurar a "DENON1":</h1>
Pulse y mantenga pulsado [RETURN] y después pulse [3], [2], [1]. Configurar a "DENON2":
Pulse y mantenga pulsado [RETURN] y después pulse [1], [2], [3].
- Si el código de señal no coincide con el código de señal de la distancia, se mostrará el código de la señal en la pantalla del panel delantero.
- La configuración predeterminada y la configuración después de cambiar las pilas es "DENON1".
<h1 id="español-7">ESPAÑOL</h1>
Introducción Introducción
Nombres y Funciones de las Piezas
Panel Delantero

<details>
<summary>text_image</summary>
9
10
11
12
13
14
15
1 2 3 4 5 6 7 8 17 16
</details>
La unidad también se puede encender pulsando los botones con los números dentro de círculos.
<h1 id="1-indicador-de-alimentación">1. Indicador de alimentación</h1>
Esta luz de indicador se ilumina de color verde cuando la alimentación está encendida y se ilumina de color rojo está en modo espera.
<h1 id="2-botón-onstandby">2. Botón ON/STANDBY</h1>
Púlselo para poner la unidad en modo espera. En modo espera, esta unidad sigue consumiendo una pequeña cantidad de electricidad.
<h1 id="3-on-off-alimentación-switch">3. ON / OFF (ALIMENTACIÓN) switch</h1>
Púlselo para encender y apagar la unidad. Si apaga la unidad utilizando este interruptor, la unidad no consume electricidad. En esta condición, esta unidad no acepta ningún botón excepto este interruptor.
<h1 id="4-indicador-de-advanced-al24">4. Indicador de Advanced AL24</h1>
Indica que las señales de sonido de un BD, DVD, etc. se procesan digitalmente con el procesamiento de AL24.
<h1 id="5-indicador-video-nr">5. Indicador VIDEO NR</h1>
Indica que las señales de vídeo de un BD, DVD, etc. se procesan digitalmente con el procesamiento DNR (reducción digital de ruido, por sus siglas en inglés).
<h1 id="6-ventana-del-sensor-de-infrarrojos">6. Ventana del sensor de infrarrojos</h1>
Recibe señales de su mando a distancia para que pueda controlar la unidad desde la distancia.
<h1 id="7-pantalla">7. Pantalla</h1>
Consulte "Pantalla del Panel Delantero" en la página 9.
<h1 id="8-ranura-para-sd-card">8. Ranura para SD CARD</h1>
Introduzca la tarjeta SD y reproduzca el contenido de ella.
<h1 id="9-bandeja-de-discos">9. Bandeja de discos</h1>
Sitúe un disco al abrir la bandeja para discos.
<h1 id="10-botón-abircerrar">10. Botón ▲(ABIR/CERRAR)</h1>
Púlselo para cerrar o abrir la bandeja para discos.
<h1 id="11-botón-reproducir">11. Botón ▶ (REPRODUCIR)</h1>
Púlselo para comenzar o reanudar la reproducción.
<h1 id="12-botón-parar">12. Botón ■(PARAR)</h1>
Púlselo para detener la reproducción.
13. Botón |◀◀ /▶▶| (SALTAR ARRIBA/ABAJO)
Púlselo para saltar arriba/abajo títulos/capítulos/pistas/archivos.
<h1 id="14-botón-avancerebobinado-rápido">14. Botón ◀◀/▶▶ (AVANCE/REBOBINADO RÁPIDO)</h1>
Púlselo para buscar adelante/atrás en un disco.
<h1 id="15-botón-ii-congelarpausa">15. Botón II (CONGELAR/PAUSA)</h1>
Púlselo para pausar la reproducción.
<h1 id="16-botón-video-noise-reduction">16. Botón VIDEO NOISE REDUCTION</h1>
Púlselo repetidamente para reducir el nivel general de ruido en la imagen (DNR). Cada vez que pulsa el botón, el nivel del DNR cambia como sigue "Apdo." → "+1" → "+2" → "+3" → "Apdo.".
<h1 id="17-botón-hdmi-resolution">17. Botón HDMI RESOLUTION</h1>
Púlselo para establecer el modo de salida de señal de video del toma HDMI.
Panel Trasero

<details>
<summary>text_image</summary>
1
2
3
4
5
6
7
8
9
10
</details>
<h1 id="1-toma-digital-out-opticalcoaxial">1. Toma DIGITAL OUT (OPTICAL/COAXIAL)</h1>
Utilice cable coaxial/óptico de sonido digital para conectar a un receptor de AV, descodificador Dolby Digital o a otro dispositivo con una toma de entrada coaxial/óptica de sonido digital.
<h1 id="2-tomas-71ch-audio-out">2. Tomas 7.1ch AUDIO OUT</h1>
Utilice un cable RCA de sonido para conectar estas tomas a las tomas de entrada de sonido de 7.1 canales de su amplificador con los terminales de entrada de 7.1 canales.
<h1 id="3-tomas-2ch-audio-out">3. Tomas 2ch AUDIO OUT</h1>
Utilice un cable RCA de sonido para conectar estas tomas a las tomas de entrada de sonido de 2 canales de su amplificador con los terminales de entrada de 2 canales.
<h1 id="4-toma-video-out">4. Toma VIDEO OUT</h1>
Utilice un cable RCA de vídeo para conectar a un monitor de TV, receptor de AV u otro dispositivo.
<h1 id="5-toma-s-video-out">5. Toma S VIDEO OUT</h1>
Utilice un cable RCA de S-video para conectar la toma de entrada de S-video de un dispositivo externo.
<h1 id="6-toma-hdmi-out">6. Toma HDMI OUT</h1>
Utilice un cable HDMI para conectarlo a una pantalla con un toma de entrada HDMI.
<h1 id="7-tomas-component-video-out">7. Tomas COMPONENT VIDEO OUT</h1>
Utilice un cable de vídeo componente para conectarlo a un dispositivo de visualización con un tomas de entrada de componente.
<h1 id="8-tomas-remote-control-out-in">8. Tomas REMOTE CONTROL OUT / IN</h1>
Conectar el mando a distancia de satélite DENON a estas tomas le permite hacer funcionar más de un componente DENON con un mando a distancia.
<h1 id="9-control-connector-rs-232c-3">9. CONTROL CONNECTOR (RS-232C)</h1>
Esta es una terminal para la expansión futura del sistema.
<h1 id="10-terminal-ac-in-2">10. Terminal AC IN</h1>
Utilícela para conectar el cable de alimentación para suministrar alimentación.
<h1 id="nota-4">Nota</h1>
\- No toque las clavijas internas de los conectores hembra del panel trasero. La descarga electrostática puede ocasionar daños permanentes al aparato.
<h1 id="mando-a-distancia">Mando a Distancia</h1>

<details>
<summary>text_image</summary>
31
30
2 1
3
4
5
6 7
8
9
10
11
12
13
14
15
16
17
18
19
20
DENON
RC-1090
ON POWER OFF DIMMER
OFF
RUN
1 2 3
4 5 6
7 8 9
DOWN RANDOM
HAND
DOWN CLEAN 0 LIF/LIN/MAIN
RED RIN BLU VEL
TOP MENU INPUT MENU
T ENTER
INPUT RETURN
S
ANGLE SUBTITLE AUDIO
PUBB SWITCH DISPLAY MODE
SKIP
STOP PLAY
STILL/PULSE
I1
Blue-ray Disc
</details>
La unidad también se puede encender pulsando los botones con los números dentro de círculos.
<h1 id="1-botón-power-on">1. Botón POWER ON</h1>
• Púlselo para encender la unidad.
<h1 id="2-botón-power-off">2. Botón POWER OFF</h1>
• Púlselo para poner la unidad en modo espera.
<h1 id="3-botón-a-b-repeat">3. Botón A-B REPEAT</h1>
\- Púlselo para marcar un segmento entre A y B para la reproducción repetida A-B.
<h1 id="4-botón-repeat">4. Botón REPEAT</h1>
\- Púlselo para seleccionar el modo repetición.
<h1 id="5-botón-random">5. Botón RANDOM</h1>
\- Púlselo para mostrar la pantalla de reproducción aleatorla para desordenar el orden de reproducción de las pistas/archivos.
<h1 id="6-botón-zoom">6. Botón ZOOM</h1>
\- Durante la repetición, púlselo para agrandar la imagen de la pantalla.
<h1 id="7-botón-clear">7. Botón CLEAR</h1>
\- Púlselo para borrar la información una vez que se ha introducido, para borrar la programación de CD, etc.
<h1 id="8-botón-redgrnbluyel">8. Botón RED/GRN/BLU/YEL</h1>
\- Púlselo para seleccionar el elemento en algunos de los menús de BD.
<h1 id="9-botón-top-menu">9. Botón TOP MENU</h1>
• Púlselo para mostrar el menú superior.
<h1 id="10-botones-de-cursor">10. Botones de cursor △ / ∇ / ◀ / ▶</h1>
\- Púlselo para seleccionar elementos o configuraciones.
<h1 id="11-botón-enter">11. Botón ENTER</h1>
\- Púlselo para confirmar o seleccionar elementos de menú.
<h1 id="12-botón-setup">12. Botón SETUP</h1>
\- Púlselo para mostrar el menú de configuración.
<h1 id="13-botón-angle">13. Botón ANGLE</h1>
\- Púlselo para acceder a distintos ángulos de cámara del disco.
- Púlselo para girar las imágenes JPEG/Kodak Picture en sentido horario 90 grados.
<h1 id="14-botón-subtitle">14. Botón SUBTITLE</h1>
• Púlselo para mostrar el menú de subtítulos.
<h1 id="15-botón-pure-direct">15. Botón PURE DIRECT</h1>
\- Púlselo para detener la salida de señales de vídeo, etc., y dar como salida sólo las señales de sonido analógico para lograr sonido de alta calidad desde salidas de sonido analógico.
<h1 id="16-botón-display">16. Botón DISPLAY</h1>
\- Púlselo para mostrar el menú de visualización en pantalla.
<h1 id="17-botón-skip">17. Botón SKIP</h1>
\- Durante la reproducción, púlselo para volver al principio del título, capítulo, pista o archivo actual.
<h1 id="18-botón-skip">18. Botón SKIP ▶▶</h1>
\- Durante la reproducción, púlselo para saltar al siguiente capítulo, pista o archivo.
<h1 id="19-botón-stop">19. Botón STOP ■</h1>
• Púlselo para detener la reproducción.
• Púlselo para salir del menú de títulos.
<h1 id="20-botón-rew">20. Botón REW</h1>
\- Durante la reproducción, púlselo para invertir rápido la reproducción.
<h1 id="21-botón-stillpauseii">21. Botón STILL/PAUSEII</h1>
• Púlselo para pausar la reproducción.
\- Cuando la reproducción esté en pausa, púlselo
repetidamente para avanzar la reproducción paso a paso.
<h1 id="22-botón-ffw">22. Botón FFW ▶▶</h1>
\- Durante la reproducción, púlselo para avanzar rápido la reproducción.
- Cuando la reproducción esté en pausa, púlselo para avanzar lentamente la reproducción.
<h1 id="23-botón-play">23. Botón PLAY</h1>
\- Púlselo para iniciar la reproducción o reanudar la reproducción.
<h1 id="24-botón-mode">24. Botón MODE</h1>
\- Durante la reproducción, presione para mostrar el menú de ajuste de imagen y una reproducción rápida.
\- Durante la reproducción de JPEG, pulse para mostrar menús para cambiar el efecto visual para conmutar la imagen o cambiar el tamaño de la imagen.
\- En modo de detención con BD insertado, presiónelo para mostrar un menú para establecer el modo de audio BD.
\- En el modo de detención con BD o DVD insertado, presiónelo para mostrar un menú para establecer el sonido envolvente virtual.
\- En modo parado con CD de sonido, o un disco con archivos MP3, Windows Media™ Audio, JPEG introducido, presione para mostrar menús de programa y reproducción aleatoria.
<h1 id="25-botón-audio">25. Botón AUDIO</h1>
• Púlselo para mostrar el menú de sonido.
<h1 id="26-botón-return">26. Botón RETURN</h1>
\- Púlselo para volver a la pantalla de menú mostrada anteriormente.
<h1 id="27-botón-pop-up-menu-menu">27. Botón POP UP MENU / MENU</h1>
\- Púlselo para mostrar el menú desplegable/del disco/liste de archivos.
\- Púlselo para cambiar el "Original" y la "Playlist" en la pantalla de TV.
<h1 id="28-botón-search-mode">28. Botón SEARCH MODE</h1>
\- Presione para mostrar el menú de búsqueda.
<h1 id="29-botones-numéricos">29. Botones numéricos</h1>
\- Púlselos para introducir los números de título/capítulo/pista/archivo.
<h1 id="30-botón-openclose">30. Botón OPEN/CLOSE ▲</h1>
\- Púlselo para cerrar o abrir la bandeja para discos.
<h1 id="31-botón-dimmer">31. Botón DIMMER</h1>
\- Púlselo para ajustar el brillo del la pantalla del panel delantero.
Nota
• [ZOOM] y [RANDOM] no están disponibles para BD.
<h1 id="español-8">ESPAÑOL</h1>
Introducción Introducción
Pantalla del Panel Delantero

<details>
<summary>text_image</summary>
12 13 11 10 9 8 7
DC (C) 02
H1 30
PROS RWD
14-B
2 3 4 14 5 6
HDMI GROUP TITLE TRACK C-AP TOPL SAG FEM
2 CH MUNI
DC DIGITAL * DTS
DC Tue-H O DTHD VSTR
VSS MP3 WPA
L PCM MPEG ANGLE
</details>
1. ▶ : Aparece cuando se reproduce un disco.
II : Aparece cuando la reproducción está pausada.
2. Aparece durante la reproducción de programa.
3. Aparece durante la reproducción aleatoria.
4. Aparece durante la reproducción de repetición.
5. Estos indican el formato que se está descodificando.
\- Esta no es una indicación del formato de grabación ni del formato que se dará como salida.
6. Aparece cuando se reproduce un disco con múltiples ángulos.
7. Aparece cuando se reproduce un disco con múltiples canales de sonido.
8. Aparece cuando se reproduce un disco de 2 canales de sonido.
9. Indica el modo de visualización del tiempo.
TOTAL : Aparece al mostrar el tiempo tota restante/transcurrido del CD de sonido.
SING : Aparece cuando se reproduce sonido o datos de sonido está resaltado en el menú de programa.
REM : Aparece al mostrar el tiempo restante.
10. Estos indican el tipo de las distintas secciones del disco que están reproduciéndose actualmente.
11. Aparece cuando se están dando como salida las señales de sonido o video HDMI.
No aparece cuando la conexión HDMI no está verificada.
12. Indica el tipo del disco que se está reproduciendo actualmente.
13. Aparece al introducir una tarjeta de memoria SD.
14. Aparecen distintos tipos de información del disco, el tiempo de reproducción que ha pasado, etc.
<h1 id="ajustar-el-brillo-de-pantalla">Ajustar el Brillo de Pantalla</h1>
Usted puede ajustar el brillo de la pantalla pulsando repetidamente [DIMMER]. El brillo cambia brillante → oscuro → automático cada vez que pulsa [DIMMER]. Si selecciona automático, la pantalla se atenúa durante la reproducción.
<h1 id="nota-5">Nota</h1>
\- [DIMMER] no está disponible cuando se muestra el menú de configuración.
Ejemplos de Visualizaciones Durante el Funcionamiento
<table><tr><td>Pantalla</td><td>Descripción</td></tr><tr><td>POWER-ON</td><td>Alimentación encendida</td></tr><tr><td>POWER-OFF</td><td>Alimentación apagada</td></tr><tr><td>OPEN</td><td>Bandeja abierta</td></tr><tr><td>CLOSE</td><td>La bandeja se cierra</td></tr><tr><td>LOADING</td><td>Cargando disco</td></tr><tr><td>NO DISC</td><td>No hay ningún disco introducido</td></tr><tr><td>NO SD MEMORY</td><td>No hay ninguna tarjeta de memorias SD introducida</td></tr><tr><td></td><td>Esta unidad no puede leer el disco o la tarjeta de memoria SD introducida.</td></tr><tr><td>STOP</td><td>Modo parada.</td></tr><tr><td>480.P</td><td>El modo de salida HDMI (480p) está seleccionado.</td></tr><tr><td>720.P</td><td>El modo de salida HDMI (720p) está seleccionado.</td></tr><tr><td>1080.i</td><td>El modo de salida HDMI (1080i) está seleccionado.</td></tr><tr><td>1080.P</td><td>El modo de salida HDMI (1080p) está seleccionado.</td></tr><tr><td>1080.P24</td><td>El modo de salida HDMI (1080p de 24 fotogramas) está seleccionado.</td></tr><tr><td>Normal</td><td>El modo directo puro está configurado a directo puto apagado.</td></tr><tr><td>Display Off</td><td>El modo directo puro está configurado a pantalla de panel delantero apagada.</td></tr><tr><td>Video Off</td><td>El modo directo puro está configurado a señal de vídeo apagada.</td></tr><tr><td>All Off</td><td>El modo directo puro está configurado a señal de vídeo y panel delantero apagados.</td></tr><tr><td>POO 01</td><td>El número total de pistas que se ha registrado para la reproducción de programa y el número de pista seleccionada actualmente.</td></tr><tr><td>POO F001-0002</td><td>El número total de los archivos que se ha registrado para la reproducción de programa y el número de pista/archivo seleccionado actualmente.</td></tr><tr><td>POO ROOT-0002</td><td>Cuando la carpeta de raíz está seleccionada se muestra "ROOT".</td></tr><tr><td>ALL CLEAR</td><td>Se selecciona "Borra Todo" para la configuración de reproducción de programa.</td></tr></table>
<h1 id="nota-6">Nota</h1>
\- Al reproducir un disco que contenga más de 100 títulos, la visualización del capítulo y hora en la pantalla del panel delantero se moverá unos puntos a la derecha.
<h1 id="conexiones-2">Conexiones</h1>
ESPAÑOL
Conexiones
<h1 id="conexión-al-tv">Conexión al TV</h1>
Haga una de las siguientes conexiones, dependiendo de las capacidades de su dispositivo actual.

<details>
<summary>text_image</summary>
dispositivo de visualización
sonido analógico
Cable RCA de sonido
esta unidad
Método 1
imagen estándar imagen buena
2ch AUDIO OUT VIDEO OUT
S VIDEO OUT
COMPONENT VIDEO OUT
(Cuando está conectado el cable RCA)
Método 2
Cable RCA de video
o
S VIDEO N
Cable de S-video
COMPONENT VIDEO OUT
(Cuando está conectado el cable RCA)
Método 3
imagen mejor
Cable de video de componente
o
COMPONENT VIDEO OUT
(Cuando está conectado el cable RCA)
</details>
Los cables suministrados utilizados en esta conexión son como sigue:
• Cable RCA de sonido (I/D) x
• Cable RCA de video x 1
Por favor, compre el resto de los cables necesarios en su tienda local.
<h1 id="nota-7">Nota</h1>
- Conecte esta unidad directamente al TV. Si los cables RCA de sonido/imagen se conectan a un grabador de video, las Imégenes puede que se distorsionen debido al sistema de protección contra coplas.
- Si el dispositivo de visualización al cual se va a conectar el reproductor es compatible con vídeo de barrido progresivo, conéctelo a la entrada de vídeo de componente.
- Las tomas de esta unidad COMPONENT VIDEO OUT son compatibles con resolución de vídeo 480i/480p/720p/1080i. Si el dispositivo de visualización conectado no es compatible con resolución de vídeo 480p/720p/1080i, ponga "Salida de componentes" a "480i". (Para reproducir BD, la resolución de vídeo 480i no está disponible).
- Si la imagen no se da como salida correctamente al dispositivo de visualización debido a la configuración de "Resolución de Video HDMI" o "Salida de componentes", presione y mantenga
▶ en el panel delantero durante más de 5 segundos. La configuración "Resolución de Video HDMI" se cambia automáticamente a su predeterminado.
- Si está utilizando una conexión HDMI y pone "Resolución de Video HDMI" a "1080p" o
"1080p24", la imagen puede que no se de como salida correctamente al dispositivo de visualización. En ese caso, ponga "Resolución de Video HDMI" a "480p", "720p" o "1080l".
<h1 id="conectar-a-un-dispositivo-de-visualización-con-el-cable-hdmi">Conectar a un Dispositivo de Visualización con el Cable HDMI</h1>
Conectar esta unidad a un dispositivo con un toma HDMI que utilice un cable HDMI hace posible la transferencia digital tanto de señales de imagen digital como de señales de sonido con múltiples canales. Después de hacer la conexión, por favor haga la configuración de HDMI en el menú de configuración según su dispositivo de visualización. Consulte la página 30-32.

<details>
<summary>text_image</summary>
Método 4
mejor sonido e Imagen
dispositivo de
visualización
Al conector de entrada HDMI
Cable HDMI
</details>
Un dispositivo de visualización con un puerto compatible con HDMI
<h1 id="los-cables-no-están-incluidos">Los cables no están incluidos.</h1>
Por favor, compre los cables necesarios en su tienda local.
<h1 id="conectar-a-un-dispositivo-de-visualización-y-a-un-amplificadorreceptor-con-el-cable-hdmi">Conectar a un Dispositivo de Visualización y a un Amplificador/Receptor con el Cable HDMI</h1>
Conectar esta unidad a un dispositivo de visualización y a un amplificador/receptor con una toma HDMI que utilicen cables HDMI hace posible el sonido digital envolvente con vídeo de alta calidad.

<details>
<summary>flowchart</summary>
<pre><code class="language-mermaid">graph TD
A["dispositivo de visualización"] --> B["HDMI"]
B --> C["cable HDMI"]
C --> D["amplificador"]
D --> E["altavoz delantero (izquierdo)"]
D --> F["altavoz central"]
D --> G["altavoz delantero (derecho)"]
H["electrode 1"] --> I["electrode 2"]
J["electrode 3"] --> K["electrode 4"]
L["electrode 5"] --> M["electrode 6"]
N["electrode 7"] --> O["electrode 8"]
P["electrode 9"] --> Q["electrode 10"]
R["electrode 11"] --> S["electrode 12"]
T["electrode 13"] --> U["electrode 14"]
V["electrode 15"] --> W["electrode 16"]
X["electrode 17"] --> Y["electrode 18"]
Z["electrode 19"] --> AA["electrode 20"]
AB["electrode 21"] --> AC["electrode 22"]
AD["electrode 23"] --> AE["electrode 24"]
AF["electrode 25"] --> AG["electrode 26"]
AH["electrode 27"] --> AI["electrode 28"]
AJ["electrode 29"] --> AK["electrode 30"]
AL["electrode 31"] --> AM["electrode 32"]
AN["electrode 33"] --> AO["electrode 34"]
AP["electrode 35"] --> AQ["electrode 36"]
AR["electrode 37"] --> AS["electrode 38"]
AT["electrode 39"] --> AU["electrode 40"]
AV["electrode 41"] --> AW["electrode 42"]
AX["electrode 43"] --> AY["electrode 44"]
AZ["electrode 45"] --> BA["electrode 46"]
BB["electrode 47"] --> BC["electrode 48"]
BD["electrode 49"] --> BE["electrode 50"]
BF["electrode 51"] --> BG["electrode 52"]
BH["electrode 53"] --> BI["electrode 54"]
BJ["electrode 55"] --> BK["electrode 56"]
BL["electrode 57"] --> BM["electrode 58"]
BN["electrode 59"] --> BO["electrode 60"]
BP["electrode 61"] --> BQ["electrode 62"]
BR["electrode 63"] --> BS["electrode 64"]
BT["electrode 65"] --> BU["electrode 66"]
BV["electrode 67"] --> BW["electrode 68"]
BX["electrode 69"] --> BY["electrode 70"]
BZ["electrode 71"] --> CA["electrode 72"]
CB["electrode 73"] --> CC["electrode 74"]
DD["electrode 75"] --> DE["electrode 76"]
BEZ["electrode 77"] --> BEZ
BFZ["electrode 78"] --> BFZ
BGZ["electrode 79"] --> BGZ
BHZ["electrode 80"] --> BHZ
BIZ["electrode 81"] --> BIZ
BJZ["electrode 82"] --> BJZ
BKZ["electrode 83"] --> BKZ
BLZ["electrode 84"] --> BLZ
BMZ["electrode 85"] --> BMZ
BNZ["electrode 86"] --> BNZ
BOZ["electrode 87"] --> BOZ
BPZ["electrode 88"] --> BPZ
BZB["electrode 89"] --> BZB
BNZB["electrode 90"] --> BNZB
BOZB["electrode 91"] --> BOZB
BPZB["electrode 92"] --> BPZB
BZBZ["BEZ"] --> BZBZ
BZBZB["BEZ"]
</code></pre>
</details>
<h1 id="los-cables-no-están-incluidos-2">Los cables no están incluidos.</h1>
Por favor, compre los cables necesarios en su tienda local.
<h1 id="español-9">ESPAÑOL</h1>
<h1 id="conexiones-conexiones">Conexiones Conexiones</h1>
<h1 id="modo-de-salida-hdmi-y-señales-de-salida-real">Modo de Salida HDMI y Señales de Salida Real</h1>
Presione <HDMI RESOLUTION> para seleccionar el modo de salida HDMI. La resolución de vídeo HDMI cambia como sigue.
Pantalla del panel delantero Resolución de Video HDMI
<table><tr><td>480.P</td><td>480 Progresivo</td></tr><tr><td colspan="2">Presione <HDMI RESOLUTION> ↓</td></tr><tr><td>720.P</td><td>720 Progresivo</td></tr><tr><td colspan="2">Presione <HDMI RESOLUTION> ↓</td></tr><tr><td>1080.i</td><td>1080 Entrelazado</td></tr><tr><td colspan="2">Presione <HDMI RESOLUTION> ↓</td></tr><tr><td>1080.P</td><td>1080 Progresivo</td></tr><tr><td colspan="2">Presione <HDMI RESOLUTION> ↓</td></tr><tr><td>1080.P24</td><td>1080 Progresivo de 24 fotogramas</td></tr><tr><td colspan="2">Presione <HDMI RESOLUTION> ↓</td></tr></table>
<h1 id="nota-8">Nota</h1>
\- Puede cambiar el modo de salida HDMI con <HDMI RESOLUTION> durante la reproducción también.
- Después de que seleccione un modo de salida HDMI, se dará como salida la resolución de vídeo HDMI admitida.
\- Las señales de vídeo y sonido pueden distorsionarse temporalmente al cambiar del/al modo de salida HDMI.
\- También puede cambiar el modo de salida HDMI de "Resolución de Video HDMI" en el menú "Video" en el menú de configuración. En este menú usted puede confirmar qué resoluciones de video HDMI se admiten por parte del dispositivo conectado. Consulte la página 31.
\- Para obtener una reproducción natural y de alta calidad de material de película de 24 fotogramas, utlice cable HDMI (se recomienda cable HDMI de alta velocidad) y seleccione "1080p24" si el dispositivo de visualización conectado es compatible con una entrada de 1080p24 fotogramas.
\- Para BD, con el fotograma 1080p24, puede disfrutar de producción de película de alta calidad y natural de material de película de 24 fotogramas. Si el dispositivo de visualización conectado no es compatible con el fotograma 1080p24, no puede poner el "Resolución de Video HDMI" a "1080p24".
\- Incluso cuando la "Resolución de Video HDMI" esté configurada a "1080p24", si "I/P Direct" está configurado a "Apdo." o para reproducción de DVD, se dará como salida una resolución de vídeo que admitan el disco y el dispositivo de visualización en vez de fotograma 1080p24.
\- No hay ninguna salida desde las tomas VIDEO OUT, S VIDEO OUT y COMPONENT VIDEO OUT cuando reproduce un BD que tiene grabado material filmico de 24 fotogramas.
\- Las tomas COMPONENT VIDEO OUT pueden no dar como salida ninguna señal cuando configura "HDMI Select" a "RGB" o "HDMI Deep Color" a "Auto" durante la reproducción de BD.
\- Cuando las tomas HDMI OUT y COMPONENT VIDEO OUT están conectadas al dispositivo de visualización y la salida HDMI es "1080p", la señal de vídeo puede no darse correctamente como salida desde las tomas COMPONENT VIDEO OUT.
\- Si cambia el modo de salida HDMI con <HDMI RESOLUTION> durante la reproducción de BD, puede que tarde de 2 a 10 segundos en cambiar y mientras se cambia el modo de salida de HDMI, el sonido y la imagen se detendrán.
\- "HDMI Deep Color" está disponible sólo cuando esté conectado el dispositivo de visualización con un cable HDMI y admita el Color profundo de HDMI.
\- Para "Auto" en "HDMI Deep Color" y para "1080p" o "1080p24" en "Resolución de Video HDMI", se recomienda el uso del cable HDMI de alta velocidad.
<h1 id="configuración-de-sonido">Configuración de Sonido</h1>
Cuando utilice conexiones HDMI haga la configuración de "Salida audio HDMI" en el menú "Audio" del menú de configuración según las especificaciones del dispositivo o monitor a conectar.
<table><tr><td>Dispositivo a conectar</td><td>Configuración de "Salida audio HDMI"</td><td>Salida señal de sonido HDMI</td></tr><tr><td>Dispositivo compatible con descodificación DTS, DTS-HD, Dolby Digital, Dolby Digital Plus o Dolby TrueHD</td><td colspan="2">Mult. HDMI (Normal) Se dan como salida señales de corriente de bits Dolby Digital, Dolby Digital Plus, Dolby TrueHD, DTS o DTS-HD desde HDMI OUT. Haga las configuraciones del altavoz en el amplificador AV conectado, etc.</td></tr><tr><td>Dispositivo compatible con 3 o más canales de entradas de sonido (no compatible con DTS, DTS-HD, Dolby Digital, Dolby Digital Plus ni Dolby TrueHD)</td><td colspan="2">Mult. HDMI (LPCM) Se dan como salida señales de sonido de multicanales desde el terminal HDMI. Haga las configuraciones del altavoz con las opciones de configuración del altavoz que aparecen después de que seleccione "Mult. HDMI (LPCM)". Consulte la página 32.</td></tr><tr><td>Dispositivo compatible con entrada de sonido de dos canales, dispositivo no compatible con entrada de sonido</td><td colspan="2">HDMI 2ch Se dan como salida señales reducidas a sonido de 2 canales desde HDMI OUT.</td></tr><tr><td>La conexión de HDMI a un dispositivo de visualización y una conexión de sonido digital (coaxial/óptica) a un amplificador AV.</td><td colspan="2">Audio desactivado El sonido HDMI se silenciará y la corriente de bits Dolby Digital/DTS o LPCM se darán como salida desde DIGITAL OUT dependiendo de la configuración de "Salida digital". Consulte la página 12.</td></tr></table>
■Las señales de sonido se dan como salida desde HDMI OUT
<table><tr><td rowspan="2">Tipo de discos</td><td rowspan="2">Formato de grabación de sonido</td><td colspan="3">Configuración de "Salida audio HDMI"</td></tr><tr><td>Mult. HDMI (Normal)</td><td>Mult. HDMI (LPCM)</td><td>HDMI 2ch</td></tr><tr><td rowspan="6">BD-vídeo</td><td>Dolby Digital</td><td>Dolby Digital*1</td><td>Mult. LPCM</td><td>LPCM Downmix de 2 canales</td></tr><tr><td>Dolby Digital Plus</td><td>Dolby Digital Plus*1</td><td>Mult. LPCM</td><td>LPCM Downmix de 2 canales</td></tr><tr><td>Dolby TrueHD</td><td>Dolby TrueHD*1</td><td>Mult. LPCM</td><td>LPCM Downmix de 2 canales</td></tr><tr><td>DTS</td><td>DTS*1</td><td>Mult. LPCM</td><td>LPCM Downmix de 2 canales</td></tr><tr><td>DTS-HD</td><td>DTS-HD*1</td><td>Mult. LPCM</td><td>LPCM Downmix de 2 canales</td></tr><tr><td>LPCM</td><td>Mult. LPCM</td><td>Mult. LPCM</td><td>LPCM Downmix de 2 canales</td></tr><tr><td rowspan="3">DVD-vídeo</td><td>Dolby Digital</td><td>Dolby Digital</td><td>Mult. LPCM</td><td>LPCM Downmix de 2 canales</td></tr><tr><td>DTS</td><td>DTS</td><td>Mult. LPCM</td><td>LPCM Downmix de 2 canales</td></tr><tr><td>LPCM</td><td>Mult. LPCM</td><td>Mult. LPCM</td><td>LPCM Downmix de 2 canales</td></tr><tr><td rowspan="2">DivX®</td><td>Dolby Digital</td><td>Dolby Digital</td><td>Mult. LPCM</td><td>LPCM Downmix de 2 canales</td></tr><tr><td>MP3/MP2</td><td>2ch LPCM</td><td>2ch LPCM</td><td>2ch LPCM</td></tr><tr><td colspan="2">CD de sonido/ MP3/Windows MediaTM Audio</td><td>2ch LPCM</td><td>2ch LPCM</td><td>2ch LPCM</td></tr><tr><td colspan="2">DTS-CD</td><td>DTS</td><td>Mult. LPCM</td><td>LPCM Downmix de 2 canales</td></tr></table>
<h1 id="español-10">ESPAÑOL</h1>
<h1 id="conexiones-3">Conexiones</h1>
\*Si el "Modo de audio BD" está ajustado a "Salida audio comb." se dará sonido como Mult. LPCM. Consulte la página 23.
- Si el dispositivo conectado no es compatible con HDMI BITSTREAM, el sonido será dado como salida Mult. LPCM o LPCM Downmix de 2 canales dependiendo de la capacidad del dispositivo conectado incluso si selecciona "Mult. HDMI (Normal)" en la configuración de "Salida audio HDMI". Consulte la página 32.
<h1 id="sistema-de-protección-de-derechos-de-autor">Sistema de protección de derechos de autor</h1>
Para reproducir las imágenes de vídeo digital de un BD/DVD a través de una conexión HDMI, es necesario que tanto la unidad como el dispositivo de visualización (o amplificador AV) soporten un sistema de protección de derechos de autor llamado HDCP (sistema de protección de contenidos digitales de alto ancho de banda). HDCP es una tecnología de protección contra copias que consta de cifrado y autentificación de datos del dispositivo AV conectado. Esta unidad soporta HDCP. Por favor, lea las instrucciones de funcionamiento de su dispositivo de visualización (o amplificador de AV) para mayor información.
\* HDMI: Interface de Multimedios de Alta Definición
<h1 id="nota-9">Nota</h1>
- Al utilizar un dispositivo de visualización incompatible con HDCP, la imagen no se verá correctamente.
- Entre los dispositivos que soportan HDMI, algunos dispositivos pueden controlar otros dispositivos a través de la toma HDMI, esta unidad puede ser controlada por otro dispositivo a través de la toma HDMI.
- Las señales de sonido de la toma HDMI (incluyendo la frecuencia de muestreo, el número de canales y la longitud de bits) pueden estar limitadas por el dispositivo que está conectado.
- Entre los monitores que soportan HDMI, algunos no soportan la salida de sonido (por ejemplo, los proyectores). En las conexiones a dispositivos como esta unidad, las señales de sonido no se dan desde la toma de salida HDMI.
Conexión Digital a un Amplificador AV con Descodificador Integrado

<details>
<summary>text_image</summary>
sonido
cable coaxial/óptico
de sonido digital
toma de entrada
coaxiales/ópticas de
sonido digital
esta unidad
</details>
<h1 id="las-señales-de-sonido-se-dan-como-salida-desde-digital-out-opticalcoaxial">■ Las señales de sonido se dan como salida desde DIGITAL OUT (OPTICAL/COAXIAL)</h1>
Cuando tanto HDMI como DIGITAL OUT están conectados a otros dispositivos, las señales de sonido que se dan actualmente como salida desde HDMI OUT se darán como salida desde la toma DIGITAL OUT también, exceptuando que la señal Dolby Digital se dará como salida en vez de Dolby Digital Plus y Dolby TrueHD, y la señal DTS se dará como señal en vez de DTS-HD.
<h1 id="conexiones-4">Conexiones</h1>
< Cuando HDMI no está conectado o está seleccionado "Audio desactivado" --->
Cuando no está conectado HDMI o está seleccionado "Audio desactivado" en la configuración de "Salida audio HDMI", las señales de sonido de DIGITAL OUT cambia dependiendo de la configuración de "Salida digital". Consulte la tabla siguiente.
Para configurar "Salida digital", presione [SETUP] y después seleccione "Rápido" → "Salida audio HDMI" → "Audio desactivado" o "Custom" → "Audio" → "Salida audio HDMI" → "Audio desactivado".
<table><tr><td rowspan="2" colspan="2">Tipo de discos Formato de grabación de sonido</td><td colspan="2">Configuración de "Salida digital"</td></tr><tr><td>Bitstream LPCM</td><td></td></tr><tr><td rowspan="6">BD-video</td><td colspan="2">Dolby Digital Dolby Digital</td><td>LPCM Downmix de 2 canales</td></tr><tr><td colspan="2">Dolby Digital Plus Dolby Digital</td><td>LPCM Downmix de 2 canales*2</td></tr><tr><td colspan="2">Dolby TrueHD Dolby Digital</td><td>LPCM Downmix de 2 canales*2</td></tr><tr><td>DTS</td><td> DTS^*1 </td><td>LPCM Downmix de 2 canales</td></tr><tr><td>DTS-HD</td><td> DTS^*1 </td><td>LPCM Downmix de 2 canales*2</td></tr><tr><td>LPCM</td><td>LPCM Downmix de 2 canales*1</td><td>LPCM Downmix de 2 canales</td></tr><tr><td rowspan="3">DVD-video</td><td colspan="2">Dolby Digital Dolby Digital</td><td>LPCM Downmix de 2 canales</td></tr><tr><td>DTS DTS</td><td></td><td>LPCM Downmix de 2 canales</td></tr><tr><td>LPCM</td><td>LPCM Downmix de 2 canales</td><td>LPCM Downmix de 2 canales</td></tr><tr><td rowspan="2">DivX®</td><td colspan="2">Dolby Digital Dolby Digital</td><td>LPCM Downmix de 2 canales</td></tr><tr><td>MP3/MP2</td><td>2ch LPCM</td><td>2ch LPCM</td></tr><tr><td colspan="2">CD de sonido/ MP3/Windows MediaTM Audio</td><td>2ch LPCM</td><td>2ch LPCM</td></tr><tr><td colspan="2">DTS-CD</td><td>DTS</td><td>LPCM Downmix de 2 canales</td></tr></table>
\*1Para títulos de BD con sonido secundario o interactivo, estos sonidos se darán como salida como Dolby Digital cuando se cumplan todas las condiciones a continuación:
- Cuando "Modo de audio BD" está ajustado a "Salida audio comb."
- Cuando "Salida audio HDMI" está ajustado a "Audio desactivado".
- Cuando "Salida digital" está ajustado a "Bitstream".
Si el título de BD no tiene sonido secundario ni interactivo, el sonido se dará como salida según se muestra en la tabla.
^27 Para disponer de la señal LPCM en el conector DIGITAL OUT, establezca "Modo de audio BD" en "Salida audio comb." (La señal de secuencias de bits estará disponible en la salida cuando se seleccione "Salida de audio HD"). Consulte la página 23 y 32.
- Esta tabla se aplica sólo cuando HDMI no está conectado o está seleccionado "Audio desactivado" en la configuración de "Salida audio HDMI".
<h1 id="nota-10">Nota</h1>
\- Para dar como salida una señal LPCM desde las toma de DIGITAL OUT mientras que se da como salida la señal de sonido de HDMI, configure "Modo de audio BD" a "Salida audio comb." y configure "Salida audio HDMI" a "Mult. HDMI (LPCM)".
<h1 id="nota-para-cable-óptico">Nota para Cable Óptico</h1>
- El cable óptico se puede dañar si se dobla en ángulos agudos. Asegúrese de que los cables se enrollan en bobinas de un diámetro de 6 pulgadas (15 cm) o más al almacenarlos.
- Utilice un cable que sea de 9,8 pies (3 m) o menos.
- Introduzca las clavijas del cable firmemente en las tomas al hacer las conexiones.
- Si alguna clavija tiene polvo o está sucia, límpiela con un paño suave antes de introducirla en una toma.
<h1 id="los-cables-no-están-incluidos-3">Los cables no están incluidos.</h1>
Por favor, compre los cables necesarios en su tienda local.
<h1 id="español-11">ESPAÑOL</h1>
Conexiones Conexiones
Conexión a Dispositivo con 2 Canales de Entradas de Sonido Analógico

<details>
<summary>text_image</summary>
sonido
Componente estéreo
AUDIO IN
L
R
Cable RCA de sonido
esta unidad
</details>
Los cables suministrados utilizados en esta conexión son como sigue:
• Cable RCA de sonido (I/D) x 1
<h1 id="nota-11">Nota</h1>
\- Cuando conecte a un dispositivo de sonido de 2 canales, utilice las tomas 2ch AUDIO OUT. Si se utilizan las tomas 7.1ch AUDIO OUT, configure "Salida audio 7.1ch" del menú de "Audio" a "2 Canal" (Consulte la página 33). Para software grabado en señales multicanales, se dan como salida señales analógicas cuya mezcla se ha reducido a 2 canales. (Para fuentes que tengan prohibida la mezcla con reducción, sólo se dan como salida las señales FL/FR).
Conexiones de Envolvente a Dispositivo con 7.1/5.1 canales de Entradas de Sonido Analógico
Se pueden dar como salida de sonido analógico 7.1c/5.1c desde salidas de 7.1ch AUDIO OUT.

<details>
<summary>flowchart</summary>
<pre><code class="language-mermaid">graph TD
A["Conductor 1"] --> B["Amplifier AV"]
C["Conductor 2"] --> B
D["Conductor 3"] --> B
E["Conductor 4"] --> B
F["Conductor 5"] --> B
G["Conductor 6"] --> B
H["Conductor 7"] --> B
I["Conductor 8"] --> B
J["Conductor 9"] --> B
K["Conductor 10"] --> B
L["Conductor 11"] --> B
M["Conductor 12"] --> B
N["Conductor 13"] --> B
O["Conductor 14"] --> B
P["Conductor 15"] --> B
Q["Conductor 16"] --> B
R["Conductor 17"] --> B
S["Conductor 18"] --> B
T["Conductor 19"] --> B
U["Conductor 20"] --> B
V["Conductor 21"] --> B
W["Conductor 22"] --> B
X["Conductor 23"] --> B
Y["Conductor 24"] --> B
Z["Conductor 25"] --> B
AA["Conductor 26"] --> B
AB["Conductor 27"] --> B
AC["Conductor 28"] --> B
AD["Conductor 29"] --> B
AE["Conductor 30"] --> B
AF["Conductor 31"] --> B
AG["Conductor 32"] --> B
AH["Conductor 33"] --> B
AI["Conductor 34"] --> B
AJ["Conductor 35"] --> B
AK["Conductor 36"] --> B
AL["Conductor 37"] --> B
AM["Conductor 38"] --> B
AN["Conductor 39"] --> B
AO["Conductor 40"] --> B
AP["Conductor 41"] --> B
AQ["Conductor 42"] --> B
AR["Conductor 43"] --> B
AS["Conductor 44"] --> B
AT["Conductor 45"] --> B
AU["Conductor 46"] --> B
AV["Conductor 47"] --> B
AW["Conductor 48"] --> B
AX["Conductor 49"] --> B
AY["Conductor 50"] --> B
</code></pre>
</details>
Los cables suministrados utilizados en esta conexión son como sigue:
• Cable RCA de sonido (I/D) x
Por favor, compre el resto de los cables necesarios en su tienda local.
<h1 id="nota-12">Nota</h1>
\- Si conecta a un sistema de sonido envolvente de 5.1 canales, no conecte a las tomas SBR/SBL (envolvente trasero D/I) y después configure "Envol. trasero" de "Config. del altavoz" a "Ninguno".
<h1 id="conectar-el-cable-de-alimentación">Conectar el Cable de Alimentación</h1>
Después de que haya hecho todas las conexiones necesarias, conecte el cable de alimentación a AC IN. Después, conecte el cable de alimentación al enchufe de CA.

<details>
<summary>text_image</summary>
Enchufe de corriente altema
Cable de alimentation
CA 120 V, 60 Hz
</details>
Los cables suministrados utilizados en esta conexión son como sigue:
\- Cable de alimentación x 1
<h1 id="nota-13">Nota</h1>
\- Introduzca las clavijas de manera segura. Las conexiones incompletas tienen como resultado la generación de ruidos.
<h1 id="reproducción-2">Reproducción</h1>
<h1 id="español-12">ESPAÑOL</h1>
Reproducción

<details>
<summary>text_image</summary>
<ON/OFF>
</details>
<ON/STANDBY>

<details>
<summary>text_image</summary>
[POWER OFF]
[POWER ON]
[△/▽/▽/▽/▽/▽/▽/▽/▽/▽/▽/▽/▽/▽/▽/▽/▽/▽/▽/▽/▽/▽/▽/▽/▽/▽/▽/▽/▽/▽/▽/▽/▽/▽/▽/▽/▽/▽/▽/▽/▽/▽/▽/▽/▽/▽/▽/▽/▽/▽/▽/○
DENON
NO. 2014
</details>
Acerca de los nombres de los botones en esta explicación
< >: Botones de la unidad principal
[ ] : Botones del mando a distancia
Botones de la unidad principal y del mando a distancia
Sólo el nombre de los botones:
<h1 id="encendido-de-la-alimentación">Encendido de la Alimentación</h1>
1 Pulse <ON/OFF>.
El indicador de alimentación se enciende de color
rojo y la alimentación se configura a modo espera
Pulse <ON/STANDBY> o [POWER ON].
El indicador de alimentación se enciende en verde y se enciende la alimentación.
<h1 id="apagado-de-la-alimentación">■Apagado de la alimentación</h1>
Pulse <ON/STANDBY> o [POWER OFF].
- La alimentación se configura a modo espera.
Pulse <ON/OFF>
- El indicador de alimentación se apaga y lo mismo hace la alimentación.
<h1 id="nota-14">Nota</h1>
\- Se continúa suministrando alimentación a parte de la circuitería incluso cuando la alimentación está en modo espera. Cuando se vaya de casa para periodos largos de tiempo o cuando salga de viaje, presione <ON/OFF> para apagar la alimentación o desenchufe el cable de alimentación del enchufe de CA.
<h1 id="reproducción-directa">Reproducción Directa</h1>
<h1 id="bd-v-dvd-v-dvd-vr-cd">BD-V DVD-V DVD-VR CD</h1>
1 Encienda la alimentación de esta unidad. (Consulte "Encendido de la Alimentación" en esta página).
2 Encienda el dispositivo de visualización y seleccione la entrada apropiada en el dispositivo al cual está conectada la unidad.
3 Pulse ▲ para abrir la bandeja para discos.
<h1 id="4-sitúe-el-disco-en-la-bandeja-para-discos-con-la-etiqueta-hacia-arriba">4 Sitúe el disco en la bandeja para discos con la etiqueta hacia arriba.</h1>

<details>
<summary>text_image</summary>
Alinee el disco con
la guía de la
bandeja de discos.
</details>
<h1 id="5-pulse-para-cerrar-la-bandeja-de-discos">5 Pulse ▲ para cerrar la bandeja de discos.</h1>
<h1 id="puede-que-tarde-un-poco-en-cargar-el-disco">Puede que tarde un poco en cargar el disco.</h1>
Algunos discos pueden comenzar a reproducirse automáticamente.
<h1 id="pulse-para-comenzar-la-reproducción">Pulse▶ para comenzar la reproducción.</h1>
Para muchos BD-vídeo y DVD-vídeo, puede que aparezca una pantalla de menús.
En este caso, utilice [△ / ∇ / ◀ / ▷] para seleccionar a la opción deseada y después pulse [ENTER].
<h1 id="7-pulse-una-vez-para-detener-la-reproducción-temporalmente">7 Pulse ■ una vez para detener la reproducción temporalmente.</h1>
Consulte "Reproducción de Reanudación" en la página 16.
<h1 id="para-expulsar-el-disco">Para expulsar el disco:</h1>
Pulse ▲ para abrir la bandeja de discos y después saque el disco antes de apagar la unidad.
<h1 id="nota-15">Nota</h1>
- ¿nede que aparezca en la esquina superior derecha de la pantalla cuando el funcionamiento esté prohibido por parte del disco o de esta unidad.
- Durante la reproducción de discos de dos capas, las imágenes puede que se detengan durante un momento. Esto pasa cuando la primera capa cambia a la segunda capa. No es un fallo de funcionamiento.
- El funcionamiento puede variar cuando reproduzca BD/DVD con menú de disco. Consulte con el manual que acompaña al disco para ver los detalles.
<h1 id="español-13">ESPAÑOL</h1>
Reproducción Reproducción

<details>
<summary>text_image</summary>
Diagram of a CD-ROM front panel with labeled ports and control buttons
</details>

<details>
<summary>text_image</summary>
[TOP MENU]
[POP UP MENU / MENU]
[△/▽/◇/◇]
[ENTER]
DENON
100 MHz
100 MHz
100 MHz
100 MHz
100 MHz
100 MHz
100 MHz
100 MHz
100 MHz
100 MHz
100 MHz
100 MHz
100 MHz
100 MHz
100 MHz
100 MHz
100 MHz
100 MHz
100 MHz
100 MHz
100 kHz
100 kHz
100 kHz
100 kHz
100 kHz
100 kHz
100 kHz
100 kHz
100 kHz
100 kHz
100 kHz
100 kHz
100 kHz
100 kHz
100 kHz
100 kHz
100 kHz
100 kHz
100 kHz
100 kHz
100 kWh
100 kWh
100 kWh
100 kWh
100 kWh
100 kWh
100 kWh
100 kWh
100 kWh
100 kWh
100 kWh
100 kWh
100 kWh
100 kWh
100 kWh
100 kWh
100 kWh
100 kWh
100 kWh
100 kWh
100Wh
</details>
Acerca de los nombres de los botones en esta explicación
< >: Botones de la unidad principal
[ ] : Botones del mando a distancia
Sólo el nombre de los botones:
Botones de la unidad principal y del mando a distancia
<h1 id="funcionamientos-utilizando-el-menú-de-disco-el-menú-de-títulos-y-el-menú-desplegable">Funcionamientos Utilizando el Menú de Disco, el Menú de Títulos y el Menú Desplegable</h1>
<h1 id="bd-v-dvd-v-3">BD-V DVD-V</h1>
Muchos de los discos BD y DVD contienen número de discos (DVD) y menú de títulos (BD/DVD) o menú desplegable para el (BD-video) que describe el contenido del disco, con un menú de disco que le guía por las funciones disponibles del disco. El contenido de los menús puede variar dependiendo de los discos.
<h1 id="menú-de-disco-dvd">Menú de disco (DVD)</h1>
1) Pulse [POP UP MENU / MENU].
• Aparecerá el menú de disco.
2) Utilice [△ / ▽ / ◀ / ▷] para seleccionar una opción y después pulse [ENTER].
<h1 id="menú-de-título-bddvd">Menú de título (BD/DVD)</h1>
1) Pulse [TOP MENU].
2) Utilice [△ / ▽ / ◀ / ▷] para seleccionar una opción y después pulse [ENTER].
<h1 id="menú-desplegable-bd-vídeo">Menú desplegable (BD-vídeo)</h1>
\- Esta es una función especial disponible en algunos BD. Cuando pulsa el [POP UP MENU / MENU], aparece un menú en pantalla mientras que el contenido sigue reproduciéndose.
1) Durante la reproducción de BD, pulse [POP UP MENU / MENU].
2) Utilice [△ / ▽ / ◀ / ▷] para seleccionar una opción y después pulse [ENTER].
<h1 id="nota-16">Nota</h1>
\- Si la función no está disponible, ¿dede aparecer en la pantalla del televisor.
\- El contenido de los menús y las correspondientes operaciones de menú pueden variar entre los distintos discos. Consulte con el manual que acompaña al disco para ver los detalles.
<h1 id="reproducir-discos-dvd-rw-r-en-modo-vr">Reproducir Discos DVD-RW/-R en Modo VR</h1>
<h1 id="dvd-vr-3">DVD-VR</h1>
Cuando está reproduciendo un disco DVD-RW/-R en modo VR, puede elegir "Original" o "Playlist" si el disco contiene una "Playlist".
1) En el modo parado, pulse [POP UP MENU / MENU] para llamar al menú de DVD.
2) Utilice [◀/▶] para seleccionar "Original" o "Playlist".

3) Utilice [△ / ▽] para seleccionar el título deseado y después pulse [ENTER].
<h1 id="nota-17">Nota</h1>
- "Original" es el título de lo que realmente está grabado en el disco.
- La lista de reproducción es la versión editada de Original.
- El menú de DVD varia dependiendo de los discos.
- Si el disco no contiene una lista reproducción, la lista de reproducción no se mostrará en el menú del DVD.
<h1 id="pausar">Pausar</h1>
1) Durante la reproducción, pulse II.
La reproducción se pausará.

2) Pulse▶ para volver a la reproducción normal.
<h1 id="nota-18">Nota</h1>
\- Para BD, DVD y DivX®, configure "Modo Vista fija" a "Imagen" en el menú "Video" si las imágenes en modo de pausa están borrosas (consulte la página 31).
<h1 id="reproducción-reproducción">Reproducción Reproducción</h1>
<h1 id="reproducción-de-reanudación-2">Reproducción de Reanudación</h1>
<h1 id="1-durante-la-reproducción-pulse">1) Durante la reproducción, pulse ■.</h1>
\- El mensaje de reanudación aparecerá en la pantalla.

<Ejemplo: BD>
<h1 id="2-pulse">2) Pulse ▶.</h1>
Se reanudará la reproducción desde el momento en el que se paró por última vez. Para cancelar la reproducción de reanudación y comenzar a reproducir el disco desde el comienzo, pulse ■ de nuevo mientras la reproducción está detenida.
<h1 id="nota-19">Nota</h1>
- Para MP3, JPEG o Windows Media™ Audio, la reproducción se reanudará desde el comienzo del archivo actual.
- La información de reanudación se guardará incluso cuando la alimentación esté en modo espera.
- Si abre la bandeja de discos o presiona ■ de nuevo mientras se encuentra en el modo de parada, la información de reanudación se borrará.
- Si cambia entre modo "Disco" y modo "Memoria SD", la información de reanudación se borrará.
- La reproducción de reanudación puede no estar disponible para los BD que admitan aplicaciones Java (BD-Java).
<h1 id="reproducción-de-avance-rápidorebobinado-rápido">Reproducción de Avance Rápido/Rebobinado Rápido</h1>

1) Durante la reproducción, pulse ◀◀ o ▶▶ repetidamente para seleccionar la velocidad deseada adelante o atrás.

<details>
<summary>flowchart</summary>
<pre><code class="language-mermaid">graph LR
A["Start"] --> B["Step 1"]
B --> C["Step 2"]
C --> D["Step 3"]
D --> E["Step 4"]
E --> F["Step 5"]
G["Start"] --> H["Step 6"]
H --> I["Step 7"]
I --> J["Step 8"]
</code></pre>
</details>
2) Pulse▶ para volver a la reproducción normal.
- Para BD y DVD, la velocidad cambia en 5 niveles distintos. Para CD de sonido, MP3, Windows Media™ Audio, y DivX®, la velocidad cambia en 3 niveles distintos.
- Para CD de sonido, MP3 y Windows Media™ Audio, el sonido se dará a cualquier velocidad de búsqueda rápida adelante y atrás.
<h1 id="nota-20">Nota</h1>
- Para MP3 y Windows Media™ Audio, la búsqueda rápida adelante/atrás entre distintos archivos no está disponibil
- Para CD de sonido, la búsqueda rápida adelante/atrás entre distintas pistas no está disponible durante la reproducción de programa o aleatoria.
- Para ciertos archivos DivX ^® , puede que no funcione la búsqueda rápida adelante/atrás.
<h1 id="reproducción-lenta-adelante">Reproducción Lenta Adelante</h1>
<h1 id="bd-v-dvd-v-dvd-vr-divx-3">BD-V DVD-V DVD-VR DivX ^®</h1>
1) Durante la reproducción, pulse II.
2) Pulse ▶▶.
- Comenzará la reproducción a cámara lenta y el sonido se silenciará.
3) Pulse ▶▶ repetidamente para seleccionar una velocidad deseada.
- La velocidad lenta adelanta cambia en 3 niveles distintos.

4) Pulse ▶ para volver a la reproducción normal.
<h1 id="nota-21">Nota</h1>
- Configure "Modo Vista fija" a "Imagen" en el menú "Video" si las imágenes del modo de reproducción lenta están borrosas (consulte la página 31).
- La marcha atrás lenta no está disponible.
<h1 id="español-14">ESPAÑOL</h1>
<h1 id="reproducción-paso-a-paso">Reproducción Paso a Paso</h1>
<h1 id="bd-v-dvd-v-dvd-vr-divx-4">BD-V DVD-V DVD-VR DivX®</h1>
1) Durante la reproducción, pulse II.
- La reproducción se pausará y el sonido se silenciará. El disco avanza fotograma a fotograma cada vez que se pulsa II.

2) Pulse ▶ para volver a la reproducción normal.
<h1 id="nota-22">Nota</h1>
\- Configure "Modo Vista fija" en "Imagen" en el menú "Video" si las Imágenes en el modo pausado están borrosas (consulte la página 31).
- Sólo está disponible el avance paso a paso.
<h1 id="español-15">ESPAÑOL</h1>
Reproducción Reproducción

<details>
<summary>natural_image</summary>
Front view of a CD-ROM drive with control panel and indicator lights (no visible text or labels)
</details>

<details>
<summary>text_image</summary>
[A-B REPEAT]
[REPEAT]
[RANDOM]
[CLEAR]
[△I▽I▽I]
[ENTER]
[RETURN]
[MODE]
■
</details>
Acerca de los nombres de los botones en esta explicación
< >: Botones de la unidad principal
[ ] : Botones del mando a distancia
Sólo el nombre de los botones:
Botones de la unidad principal y del mando a distancia
<h1 id="velocidad-de-diálogo">Velocidad de Diálogo</h1>
<h1 id="bd-v-dvd-v-dvd-vr-5">BD-V DVD-V DVD-VR</h1>
Esta función se reproduce aproximadamente a 1,3 veces la velocidad de reproducción normal manteniendo la salida del sonido. Esta función está disponible sólo en discos grabados en formato Dolby Digital.
1) Durante la reproducción, pulse [MODE] repetidamente hasta que aparezca la configuración de velocidad de diálogo.

2) Pulse [ENTER] o [◀/▶] para cambiar ⌘ (x1,3) o apagado.
"Apdo.": Reproduce a velocidad normal.
“♪”: Reproduce aproximadamente a 1,3 veces la velocidad normal de producción.
3) Pulse ▶ para volver a la reproducción normal.
<h1 id="nota-23">Nota</h1>
- Cada vez que ■rla configuración se "Apdo".
- El subtítulo se puede ver durante esta función.
- El ajuste de imagen y la configuración de idioma de sonido no pueden cambiarse cuando se esté utilizando esta función.
- El envolvente virtual no funciona mientras se utiliza esta función.
- Esta función puede que en algún momento no funcione en un disco.
- Durante esta función, se dará como salida Multi/2ch LPCM desde la salida HDMI, se dará como salida 2ch LPCM desde la salida de sonido digital o sonido analógico de 2 canales desde la salida de sonido analógico.
<h1 id="reproducción-de-repetición">Reproducción de Repetición</h1>
Que la función repetir esté disponible puede variar dependiendo de los discos.
1) Durante la reproducción, pulse [REPEAT] repetidamente hasta que aparezca el modo repetición deseado en la pantalla.
Están disponibles los siguientes modos de repetición.
<table><tr><td>Modo repetición</td><td colspan="3">Soportes disponibles</td></tr><tr><td>Repetir capítulo</td><td colspan="3"></td></tr><tr><td>El capítulo actual sereproducirá repetidamente.</td><td>BD-V</td><td>DVD-V</td><td>DVD-VR</td></tr><tr><td>Repetir título</td><td colspan="3"></td></tr><tr><td>El título actual sereproducirá repetidamente.</td><td>BD-V</td><td>DVD-V</td><td>DVD-VR</td></tr><tr><td>Repetir pista</td><td>CD</td><td>MP3</td><td>WMA</td></tr><tr><td>El archivo o pista actual sereproducirá repetidamente.</td><td>JPEG</td><td>DivX®</td><td></td></tr><tr><td>Repetir grupo</td><td>MP3</td><td>WMA</td><td>JPEG</td></tr><tr><td>La carpeta actual sereproducirá repetidamente.</td><td>DivX®</td><td></td><td></td></tr><tr><td>Repetir todo</td><td colspan="3"></td></tr><tr><td rowspan="2">Todos los títulos, pistas oarchivos del soporte sereproducirán repetidamente.</td><td>DVD-VR</td><td>CD</td><td>MP3</td></tr><tr><td>WMA</td><td>JPEG</td><td>DivX®</td></tr></table>
<h1 id="repetir-a-b">Repetir A-B</h1>
BD-V DVD-V DVD-VR CD DivX®
La sección deseada puede reproducirse repetidamente.
1) Pulse [A-B REPEAT] en el punto deseado de inicio A.
2) Pulse [A-B REPEAT] en el punto deseado de final B.
• La secuencia de repetición comienza.
3) Pulse [A-B REPEAT] para salir de la secuencia.
<h1 id="reproducción-reproducción-2">Reproducción Reproducción</h1>
<h1 id="nota-24">Nota</h1>
- La configuración repetir capítulo/título/pista/grupo para el grupo se borrará cuando se cambie a otro título, capítulo, pista/archivo o carpeta.
- La reproducción de repetición no funciona durante la reproducción de repetición A-B.
- Repetir título/capítulo no está disponible en algunas escenas.
- La repetir A-B solamente se puede configurar en el título actual o en la pista/archivo actual.
- La repetición A-B no está disponible en algunas escenas.
- Para cancelar el punto A configurado, pulse [CLEAR].
- La reproducción repetir A-B funciona durante la reproducción de repetición del título, capítulo, plista, grupo o todo.
- Para algunos archivos DivX®, la reproducción de repetición A-B puede que no funcione.
<h1 id="reproducción-de-programa">Reproducción de Programa</h1>
CD MP3 WMA JPEG
Puede programar el disco para que se reproduzca en el orden deseado por usted.
1) En modo parado, pulse [MODE].
\- Aparecerá la pantalla de programa.
2) Utilice [△ / ▽] para seleccionar una pista/archivo y luego pulse [ENTER].

<Ejemplo: MP3>
- Para MP3, Windows Media™ Audio y JPEG, utilice [△/▽] para seleccionar una carpeta y después pulse [ENTER] primero y después utilice [△/▽] para seleccionar una pista/archivo y después pulse [ENTER].
- P u I [CLEAR] para borrar la última pista/archivo del programa.
- Seleccione "Borra Todo" de la parte inferior de la lista para borrar todas las pistas/archivos del programa.
- La pista/archivo programado se muestra en la pantalla de la derecha.
- Si no se puede mostrar el programa entero en la pantalla, aparece "▼" o "▲".
- Utilice [◀/▶] para ir atrás o adelante entre las jerarquías de carpetas.
- Si se han configurado ocho o más pistas/archivos en un programa, utilice ◀◀/▶▶ para ver todas las pistas/archivos.
3) Pulse ▶ para comenzar la reproducción del programa.
- Comenzara la reproducción de programa.
<h1 id="nota-25">Nota</h1>
- Durante la reproducción de programa, pulse ■ una vez para establecer el punto de reanudación y después pulse ▶ para reanudar la reproducción de programa desde donde se pulsó ■ (CD de sonido) o desde el comienzo de la pista en donde se pulsó ■ (MP3, Windows Media™ Audio o JPEG).
- Durante la reproducción de programa, pulse ■ dos veces para mostrar la pantalla de programa. Para volver a la reproducción de programa normal, pulse [RETURN] para salir de la pantalla de programa y después pulse ▶.
- Su programa sigue almacenado hasta que se abre la bandeja de discos o se apaga la alimentación.
- Se pueden introducir hasta 99 pistas/archivos.
- Para repetir la pista/archivo actual del programa, pulse
[REPEAT] repetidamente hasta que aparezca "Durada" durante la reproducción. Para repetir el programa completo, pulse [REPEAT] repetidamente hasta que aparezca "Todo" durante la reproducción.
- Incluso si el disco introducido contiene archivos MP3, JPEG y Windows Media™ Audio mezclados, la función programa permite 99 archivos de combinación de archivos MP3, JPEG y Windows Media™ Audio.
- El número seleccionado actualmente en el panel delantero parpadea durante la configuración de la reproducción del programa.
- "F\*\*\*\*" se muestra en la pantalla del panel delantero mientras se selecciona la carpeta. (\*\*\*) es el número de la carpeta) y el archivo se muestra como "-\*\*\*\*\*" después de la indicación de carpetas.
- La reproducción de una pista/ archivo deseada y la reproducción aleatoria no están disponibles durante la reproducción de programa.
<h1 id="español-16">ESPAÑOL</h1>
<h1 id="reproducción-aleatoria">Reproducción Aleatoria</h1>
CD MP3 WMA JPEG
Esta función desordena el orden de reproducción de las pistas/archivos.
1) En modo parado, pulse [RANDOM].

<Ejemplo: CD de sonido>
2) Pulse▶ para comenzar la reproducción aleatoria.
<h1 id="nota-26">Nota</h1>
- Durante la reproducción aleatoria, pulse ■ una vez para establecer el punto de reanudación y después pulse ▶ para reanudar la reproducción aleatoria desde donde se pulsó ■ (CD de sonido) o desde el comienzo de la pista en donde se pulsó ■ (MP3, Windows Media ^10 Audio o JPEG).
- Durante la reproducción aleatoria, pulse ■ dos veces para mostrar la pantalla de reproducción aleatoria. Para cancelar la reproducción aleatoria, pulse [RANDOM] cuando se muestre la pantalla de reproducción aleatoria.
- Para repetir la pista/archivo actual de la selección aleatoria,
pulse [REPEAT] repetidamente hasta que aparezca "Pista" durante la reproducción. Para repetir la selección aleatoria completa, pulse repetidamente [REPEAT] hasta que aparezca "Fono" durante la reproducción.
- No se puede volver a la pista/archivo anterior durante la reproducción aleatoria.
- Para discos que contengan archivos MP3, JPEG y Windows Media™ Audio mezclados, se realizará la reproducción aleatoria de esos archivos.
- "RAND" se muestra en la pantalla del panel delantero.
<h1 id="español-17">ESPAÑOL</h1>
Reproducción Reproducción

<details>
<summary>natural_image</summary>
Front view of a CD-ROM audio workstation (no visible text or labels)
</details>

<details>
<summary>text_image</summary>
[botones numéricos]
[ZOOM]
[CLEAR]
[SEARCH MODE]
[△/▽/◄/►]
[ENTER]
[RETURN]
[ANGLE]
[DISPLAY]
[◀]
</details>
Acerca de los nombres de los botones en esta explicación
<>: Botones de la unidad principal
]: Botones de la unidad de mando a distancia
Sólo el nombre de los botones:
Botones de la unidad principal y del mando a distancia
<h1 id="zoom-6">Zoom</h1>
DVD-V DVD-VR JPEG DivX®
Esta función le permite agrandar la imagen y hacer panorámica por la imagen agrandada.
1) Pulse [ZOOM] durante la reproducción.
• La reproducción continuará.
2) Pulse [ZOOM] repetidamente para seleccionar un factor de acercamiento deseado: x1.2, x1.5, x2.0, x4.0 o apagado.
\- El zoom "x4.0" no está disponible para JPEG ni DivX ^® .

<details>
<summary>flowchart</summary>
<pre><code class="language-mermaid">graph TD
A["Start"] --> B["Step 1: User Interaction"]
B --> C["Step 2: Data Input"]
C --> D["Step 3: User Interaction"]
D --> E["Step 4: Data Input"]
E --> F["End"]
</code></pre>
</details>
3) Utilice [△/▽/◀/▷] para mover la imagen agrandada por la pantalla.

<details>
<summary>natural_image</summary>
Four cartoon-style icons showing people around a central circular device, no text or symbols present
</details>
4) Pulse [ZOOM] para salir del modo zoom.
<h1 id="nota-27">Nota</h1>
- Para BD, la función de zoom no está disponible.
- La función zoom no funciona mientras se muestra el menú del disco.
- La pantalla de navegación no está disponible en JPEG.
- No puede hacer panorámica por la imagen agrandada en algunos archivos JPEG.
- En algunos DVD, el zoom "x4.0" no está disponible.
- En algunos archivos DivX ^15 con una imagen pequeña, la función zoom no está disponible.
- Para D°J depende del tamaño de la imagen, algunos factores de zoom pueden no estar disponibles.
<h1 id="ángulo-de-la-cámara">Ángulo de la Cámara</h1>
BD-V DVD-V
Algunos discos BD y DVD contienen escenas que se han rodado simultáneamente desde distintos ángulos. Puede cambiar el ángulo de cámara cuando aparece en pantalla.
1) Pulse [ANGLE] durante la reproducción.
- Se mostrará el ángulo seleccionado en la barra de
visualización de la parte superior de la pantalla.
2) Utilice [△ / ▽] para seleccionar su ángulo deseado.
<h1 id="nota-28">Nota</h1>
\- Si la configuración "Icono de Ángulo" es "Apdo." en el menú
"Otros", no aparecerá Consulte la página 37.
<h1 id="buscar-2">Buscar</h1>
Utilizar |◀◀/▶▶|
1) Pulse▶▶I para saltar al siguiente capítulo, pista o archivo durante la reproducción.
Para volver al capítulo, pista o archivo anterior, pulse ◀◀◀ dos veces rápidamente.
<h1 id="nota-29">Nota</h1>
\- Si el título no tiene ningún capítulo, ◀◀◀/▶▶▶ cambia el título.
Utilizar [SEARCH MODE]
Utilizando [SEARCH MODE], usted puede seleccionar las siguientes opciones de búsqueda.
Modo buscar Soportes disponibles
<table><tr><td>Búsqueda de Título / Capítulo</td><td>BD-V</td><td>DVD-V</td><td>DVD-VR</td></tr><tr><td rowspan="2">Búsqueda de Pista</td><td>CD</td><td>MP3</td><td>WMA</td></tr><tr><td>JPEG</td><td colspan="2">DivX ^ </td></tr><tr><td rowspan="2">Búsqueda de Hora</td><td>BD-V</td><td>DVD-V</td><td>DVD-VR</td></tr><tr><td>CD</td><td colspan="2">DivX ^ </td></tr><tr><td rowspan="2">Búsqueda de Marcador</td><td>BD-V</td><td>DVD-V</td><td>DVD-VR</td></tr><tr><td>CD</td><td colspan="2"></td></tr></table>
<h1 id="español-18">ESPAÑOL</h1>
<h1 id="reproducción-reproducción-3">Reproducción Reproducción</h1>
1) Seleccione un tipo de búsqueda pulsando [SEARCH MODE].
- Cada vez que pulsa [SEARCH MODE], el tipo de búsqueda cambia
2) Introduzca el capítulo, la lista, el archivo, el número de título o la hora deseados a buscar para utilizar [botones numéricos].
\- Comenzará la búsqueda de capítulo, título, pista u hora. Ejemplo
\- Para discos con menos de 10 títulos, presione el número de título directamente.
\- Para discos con 10 títulos o más, pero menos de 100: para reproducir un título de un solo digito presione [0] en primer lugar y, a continuación, el número de título (por ejemplo, para el título 3, presione [0], [3]). Para reproducir un título de dos dígitos, presione el número de título.
\- Para discos con 100 títulos o más: para reproducir un título de uno o dos dígitos preslone [0] en primer lugar y, a continuación, el número de título (por ejemplo, para el título 3, presione [0], [0], [3] y para el título 26, presione [0], [2], [6]). Para reproducir un título de tres dígitos, preslone el número de título.
<h1 id="nota-30">Nota</h1>
- Durante la reproducción de programa y la aleatoria, las funciones de búsqueda no están disponibles excepto la búsqueda que utiliza ◄◀◀ /▶▶◀.
- La función búsqueda de tiempo solamente está disponible en la misma pista, título o archivo.
- Para ciertos archivos DivX ^1 , la búsqueda de hora puede que no funcione.
- Para BD, las busquedas de capítulo y hora están disponibles solamente durante la reproducción.
<h1 id="búsqueda-de-marcador">Búsqueda de marcador</h1>
Esta función le permite asignar un punto específico de un título o plsta para volver a llamar más tarde.
1) Durante la reproducción, pulse [SEARCH MODE] repetidamente hasta que aparezca la configuración del marcador.
2) Utilice [◀ / ▷para seleccionar un número marcador (de 1 a 9).

3) Cuando el disco alcanza el punto que desea configurar como marcador, pulse [ENTER].
\- El título o pista y el tiempo de reproducción transcurrido aparecerán en la pantalla.
4) Pulse [SEARCH MODE] o [RETURN] para salir.
5) Para volver después al marcador, llame a la configuración del marcador pulsando [SEARCH MODE] repetidamente durante la reproducción y utilice [◀/▶] para elegir un marcador deseado y después pulse [ENTER].
<h1 id="nota-31">Nota</h1>
- Abrir la bandeja de discos, apagar la alimentación o seleccionar "AC" en el paso 2 y pulsar [ENTER] borra todos los marcadores.
- Para borrar un marcador, utilice [◀/▶] para seleccionar el número de marcador a borrar y pulse [CLEAR].
- Puede marcar hasta nueve puntos.
- Para BD-vídeo, la búsqueda de marcador entre distintos títulos no está disponible.
- Para BD, puede volver al marcador solamente durante la reproducción.
<h1 id="visualización-en-pantalla-2">Visualización en Pantalla</h1>
Puede comprobar la información acerca del disco actual pulsando [DISPLAY].
Para llamar a la visualización en pantalla, pulse [DISPLAY] durante la reproducción. Cada vez que pulsa [DISPLAY], cambia la información. Dependiendo del soporte, la información disponible varía.
<h1 id="bd-v-7">BD-V</h1>
APAGADO → Información de título/capítulo → Información de título (tiempo transcurrido) → Información de título (tiempo restante) → Información de HDMI → APAGADO
<h1 id="dvd-v-dvd-vr-3">DVD-V DVD-VR</h1>
APAGADO → Información de capítulo (tiempo transcurrido)
→ Información de capítulo (tiempo restante) → Información de título (tiempo transcurrido) → Información de título (tiempo restante) → Indicador de velocidad de bits → Información de HDMI → APAGADO
<h1 id="cd-3">CD</h1>
APAGADO → Información de pista (tiempo transcurrido) →
Información de pista (tiempo restante) → Información de disco\*
(tiempo transcurrido) → Información de disco\* (tiempo restante)
→ Información de HDMI → APAGADO
(\* no disponible durante la reproducción de programa/aleatoria)
<h1 id="mp3-jpeg-3">MP3 JPEG</h1>
APAGADO → Información de nombre de archivo → Información de archivo (tiempo transcurrido\*) → Información de HDMI
→ APAGADO
(\* no disponible para JPEG)
<h1 id="wma-3">WMA</h1>
APAGADO → Información de nombre de archivo → Información de etiqueta (nombre del título) → Información de etiqueta (nombre del artista) → Información de archivo (tiempo transcurrido) → Información de HDMI → APAGADO
<h1 id="divx-4">DivX®</h1>
APAGADO → Información de nombre de archivo → Información de archivo (tiempo transcurrido) → Información de archivo (tiempo restante) → Información de HDMI → APAGADO
\- Para CD de sonido, MP3, Windows Media™ Audio y JPEG, durante la reproducción de programa o aleatoria, la indicación se mostrará después de la información de pista/archivo.
Información de capítulo

<Información del título y el capítulo para BD>

1. Número del capítulo actual/número total de capítulos
2. Tiempo transcurrido/tiempo restante del capítulo actual
3. Indica que hay disponibles imágenes de distintos ángulos de cámara en la escena
4. Estado actual de reproducción
5. Número del título actual
6. Configuración actual de repetición (Solamente cuando está activa la configuración de repetición)
(C: Repetir capítulo, T: Repetir título, AB: repetir A-B)
■Información de título

7. Número del título actual/número total de títulos
8. Tiempo transcurrido/tiempo restante del título actual
<h1 id="español-19">ESPAÑOL</h1>
Reproducción Reproducción

<details>
<summary>natural_image</summary>
Front view of a CD-ROM device with control knobs and buttons (no visible text or labels)
</details>

<details>
<summary>text_image</summary>
[TOP MENU]
[△ / ▽ / ◀ / ▶]
[SUBTITLE]
[DISPLAY]
[POP UP MENU / MENU]
[ENTER]
[AUDIO]
</details>
Acerca de los nombres de los botones en esta explicación
<>: Botones de la unidad principal
[ ] : Botones del mando a distancia
Sólo el nombre de los botones:
Botones de la unidad principal y del mando a distancia
■Indicador de velocidad de bits

<details>
<summary>flowchart</summary>
<pre><code class="language-mermaid">graph TD
A["9"] --> B["A"]
C["10"] --> D["L1"]
</code></pre>
</details>
<Para modo VR DVD-RW/-R>

<details>
<summary>text_image</summary>
11
ORG
</details>
9. Velocidad de bits (la cantidad de datos de imagen que se está leyendo actualmente)
10. Número de capa (Solamente para discos de dos capas)
(L0: Se reproduce la capa 0. L1: Se reproduce la capa 1)
11. Tipo de título (ORG: original, PL: lista de reproducción)
■Información de pista/archivo

<details>
<summary>text_image</summary>
12
13
14
15
TR 2/5 0:00:00 SD ← T ►
</details>
12. Número de la pista (archivo) actual/número total de pistas (archivo)
13. Tiempo transcurrido/tiempo restante de la pista (archivo) actual
14. Indicación de reproducción de tarjeta de memoria SD
15. Configuración actual de repetición (Solamente cuando está activa la configuración de repetición)
(T: Repetir pista/archivo, G: Repetir grupo, A: Repetir todo)
■Información del disco

16. Número de la pista actual/número total de pistas
17. Tiempo transcurrido/tiempo restante del disco actual
■Información de nombre de archivo

18. Icono de soporte y nombre de archivo
:Archivo MP3 :Archivo Windows Media™ Audio
: Archivo J.P Archivo DivX ^®
■Información de etiqueta

<details>
<summary>flowchart</summary>
<pre><code class="language-mermaid">graph TD
A["Título"] --> B["19"]
B --> C["[DISPLAY"]]
D["NOMBRE DEL ARTISTA"] --> E["20"]
</code></pre>
</details>
19. Nombre del título basado en la información de etiqueta del archivo Windows Media™ Audio actual
20. Nombre del artista basado en la información de etiqueta del archivo Windows Media™ Audio actual
Reproducción Reproducción
■Información sobre HDMI

<details>
<summary>text_image</summary>
HDMI Info. Video : YCbCr / 1080l
Info. Audio : Dolby Digital
Max N' Canales : 6ch
</details>
21. Formato de vídeo HDMI
22. Resolución de la imagen de salida HDMI
23. Formato de sonido HDMI
24. El número máximo de canales de sonido que se pueden aceptar por parte del equipo conectado
<h1 id="nota-32">Nota</h1>
\- Si no está conectado HDMI, se mostrará “---” para la información de HDMI.
<h1 id="seleccionar-el-formato-de-sonido-e-imagen">Seleccionar el Formato de Sonido e Imagen</h1>
<h1 id="seleccionar-corrientes-de-sonidocanales">Seleccionar Corrientes de Sonido/Canales</h1>
<h1 id="bd-v-dvd-v-dvd-vr-cd-divx-4">BD-V DVD-V DVD-VR CD DivX®</h1>
Ciertos discos BD y DVD contienen múltiples corrientes de sonido. Con frecuencia son distintos idiomas de sonido o formatos de sonido. Para BD, el sonido disponible depende de la configuración de "Modo de audio BD". Consulte la página 23 para mayor información.
<h1 id="bd-v-8">BD-V</h1>
1) Durante la reproducción, pulse [AUDIO].
2) Utilice [△ / ▽] para seleccionar "Principal" o sonido "Secundario" para configurar y después pulse [ENTER].

"Principal": Configura el sonido para la imagen principal.
"Secundario": Configura el sonido de la Imagen secundaria. Cuando esté activada la imagen secundaria, el sonido "Secundario" se dará como salida con la imagen secundaria.
- Para oír el sonido secundario, el "Modo de audio BD" tiene que estar configurado a "Salida audio comb.". Consulte la página 23.
3) Utilice [△ / ▽] para seleccionar su corriente de sonido/canal deseado.
4) Pulse [AUDIO] para salir.
<h1 id="dvd-v-dvd-vr-cd-divx-2">DVD-V DVD-VR CD DivX®</h1>
1) Durante la reproducción, pulse [AUDIO].
2) Utilice [△ / ▽] para seleccionar su corriente de sonido/canal deseado.

\- Para los CD de sonido, usted puede seleccionar las siguientes opciones.
"Estéreo": Tanto el canal derecho como el izquierdo están activos (estéreo)
"L-ch": Sólo está activo el canal izquierdo
"R-ch": Sólo está activo el canal derecho
3) Pulse [AUDIO] para salir.
<h1 id="nota-33">Nota</h1>
- Para DVD-RW/-R en modo VR con el sistema MTS (sonido multicanal de televisión), usted puede conmutar entre
"1.Principal" (sonido principal), "1. Sub" (sonido secundario) y "1.Principal/Sub" (sonido principal y secundario).
- Para ciertos BD, el sonido secundario se dará como salida incluso cuando la imagen secundaria esté desactivada.
- El modo de sonido no se puede cambiar durante la reproducción de discos que no se hayan grabado en sonido múltiple.
- Algunos discos permiten cambiar la configuración de idioma de sonido en el menú del disco. (El funcionamiento cambia según los discos. Consulte el manual que acompaña al disco)
- Pulsar [AUDIO] puede que no funcione en algunos discos con corrientes de sonido/canales múltiples (por ejemplo, DVD que permiten cambiar configuración de sonido en el menú del disco).
- Si elige un idioma que tiene código de idioma de tres letras, el código se mostrará cada vez que cambie la configuración del idioma de sonido. Si elige cualquier otro idioma, se mostrará “—” en cambio (consulte la página 39).
- La selección de idioma del sonido no se puede hacer durante velocidad de diálogo (consulte la página 17).
- Si el disco no tiene idioma de sonido, se mostrará "No Disponible".
- Para discos con archivos DivX®, sólo se muestra el sonido MP3, MP2 o Dolby Digital. Otro sonido se mostrará con “—”.
- Para DTS-CD (disco de música 5,1), no está disponible la selección de corrientes ni canales de sonido.
<h1 id="español-20">ESPAÑOL</h1>
<h1 id="seleccionar-el-idioma-de-subtítulo">Seleccionar el Idioma de Subtítulo</h1>
<h1 id="bd-v-dvd-v-divx-2">BD-V DVD-V DivX®</h1>
BD, DVD-vídeo y DivX ^® pueden tener subtítulos en uno o más idiomas. Los idiomas disponibles de subtítulos pueden encontrarse en el estuche del disco. Puede cambiar los idiomas de subtítulos en cualquier momento durante la reproducción.
<h1 id="bd-v-9">BD-V</h1>
1) Durante la reproducción, pulse [SUBTITLE].
2) Utilice [△ / ▽] para seleccionar "Subtítulo principal", "Subtítulo secundario" o "Tipo de subtítulos" y después pulse [ENTER].

Subtítulo principal
Subtítulo secundario
Tipo de subtitulos
2.ENG/255
2. ENO/255
2/25
"Subtítulo principal": Configura subtítulo de la imagen principal.
"Subtítulo secundario": Configura el subtítulo de la imagen secundaria.
"Tipo de subtítulos": Configura el estilo de subtítulo.
3) Utilice [△ / ▽] para seleccionar el subtítulo deseado.
4) Pulse [SUBTITLE] para salir.
<h1 id="dvd-v-divx-2">DVD-V DivX®</h1>
1) Durante la reproducción, pulse [SUBTITLE].
2) Utilice [△ / ▽] para seleccionar el subtítulo deseado.

ENG
[Non-Text]
3
[NO TEXT]
3) Pulse [SUBTITLE] para salir.
<h1 id="nota-34">Nota</h1>
- Algunos discos le permitirán cambiar solamente el subtítulo desde el menú de disco. Pulse [TOP MENU] o [POP UP MENU / MENU] para mostrar el menú del disco.
- Si aparece un código de idioma de 4 dígitos en el menú del subtítulo, consulte el "Código de Idioma" en la página 39.
- Si el disco no tiene ningún idioma de subtítulo o el estilo de subtítulo, se mostrará "No Disponible".
- Para DivX ^® , la pantalla solamente muestra el número de idiomas de subtítulo.
Reproducción Reproducción

<details>
<summary>text_image</summary>
Front panel of a CD-ROM drive with control buttons and display screen showing power, settings, and output ports
</details>

<details>
<summary>text_image</summary>
[△/▽/◄/►]
[PURE DIRECT]
[MODE]
[ENTER]
[RETURN]
</details>
Acerca de los nombres de los botones en esta explicación
<>: Botones de la unidad principal
: Botones del mando a distancia
Sólo el nombre de los botones:
Botones de la unidad principal y del mando a distancia
<h1 id="envolvente-virtual">Envolvente Virtual</h1>
<h1 id="bd-v-dvd-v-dvd-vr-6">BD-V DVD-V DVD-VR</h1>
Usted puede disfrutar de un espacio virtual estereofónico a través de su sistema actual en estéreo de dos canales.
1) En modo parada, pulse [MODE] repetidamente hasta que aparezca la configuración de envolvente virtual.

2) Utilice [△ / ▽] para seleccionar "1" (Efecto natural), "2" (Efecto enfatizado) o "Apdo.".
3) Pulse [RETURN] para salir.
<h1 id="nota-35">Nota</h1>
- Seleccione "Apdo." en el envolvente virtual o baje el volumen si se distorsiona el sonido.
- Esta función no se puede utilizar durante velocidad de diálogo (consulte la página 17).
- Para el envolvente virtual, la señal de sonido siempre será LPCM de 2 canales.
<h1 id="modo-directo-puro">Modo Directo Puro</h1>
BD-V DVD-V DVD-VR CD MP3 WMA
<h1 id="divx-5">DivX ^®</h1>
Utilice esta función para apagar circuitería no utilizada para lograr un sonido analógico de alta calidad.
1) Pulse [PURE DIRECT] repetidamente para seleccionar el modo directo puro que desea.
Cada vez que pulse, [PURE DIRECT], cambia el modo directo puro según "Normal" → "Video Off" → "Display Off" → "All Off" → "Normal". Los modos se mostrarán en la pantalla del panel delantero.
<h1 id="salidas-de-imagensonido-para-cada-modo">Salidas de imagen/sonido para cada modo</h1>
"Normal": Modo normal de reproducción (el modo directo puro está apagado).
"Video Off": La señal de video no se dará como salida.
"Display Off": La circuitería de la pantalla y los indicadores del panel delantero se apagará.
"All Off": La señal de vídeo no se dará como salida y la circuiteria de la pantalla y los indicadores del panel delantero se apagará.
<h1 id="nota-36">Nota</h1>
\- Si apaga la unidad o pone esta unidad en modo espera, el modo directo puro volverá a "Normal".
<h1 id="configurar-el-modo-de-bd-de-sonido">Configurar el Modo de BD de Sonido</h1>
<h1 id="bd-v-10">BD-V</h1>
El modo de sonido es elegir entre dos vías. Puede dar como salida el sonido secundario e interactivo acompañado del sonido primario o podría dar como salida sólo el sonido primario. Dependiendo de la configuración del modo, la salida de Dolby Digital, DTS, Dolby Digital Plus, Dolby TrueHD, or DTS-HD cambia entre Mult. LPCM y corriente de bits.
1) En modo parado con un BD Introducido, presione [MODE].
2) Utilice [△ / ▽] para seleccionar la configuración deseada.
<h1 id="salida-audio-comb">■"Salida audio comb."</h1>
Si está disponible, el sonido secundario e interactivo del BD se dará igual que el sonido principal.
\- El sonido secundarlo es el sonido de la imagen secundarla (comentarios del director, etc.) y el sonido interactivo es el sonido de la aplicación interactiva (sonidos de clic de los botones, etc.).
<h1 id="salida-de-audio-hd">■"Salida de audio HD"</h1>
Se dará como salida el sonido principal. Configure este modo para dar como salida sonido Dolby Digital, Dolby Digital Plus, Dolby TrueHD, DTS o DTS-HD de BD a través de la conexión HDMI.
<h1 id="3-pulse-return-para-salir">3) Pulse [RETURN] para salir.</h1>
\- También puede establecer "Modo de audio BD" desde el menú de configuración. Consulte la página 32.
<h1 id="nota-37">Nota</h1>
- En el modo "Salida audio comb.", incluso si configura "Mult. HDMI (Normal)" en la configuración "Salida audio HDMI", se dará como salida multi LPCM desde HDMI OUT para BD de sonido. Consulte la página 11.
- En modo "Salida audio comb." con salida de sonido HDMI, se dará como salida LPCM con mezcla reducida a 2 canales desde DIGITAL OUT para sonido BD.
- En el modo "Salida audio comb." con "Salida audio HDMI" configurado a "Audio desactivado" y "Salida digital" configurado a "Bitstream", DTS, DTS-HD y LPCM, se dará como salida Dolby Digital para sonido BD. Consulte la página 12.
- En modo "Salida audio comb.", desde 7.1ch AUDIO OUT, Dolby Digital Plus, Dolby TrueHD y DTS-HD se dará como salida como multi-LPCM descodificado desde su corriente central correspondiente.
<h1 id="reproducción-reproducción-4">Reproducción Reproducción</h1>
<h1 id="ajustar-la-imagen">Ajustar la Imagen</h1>
<h1 id="bd-v-dvd-v-dvd-vr-divx-5">BD-V DVD-V DVD-VR DivX®</h1>
Puede ajustar la calidad de la imagen y guardar la configuración que ha ajustado en las memorias 1-5.
1) Durante la reproducción, pulse [MODE] repetidamente hasta que aparezca el menú de ajuste de imagen.
\- Menú de ajuste de imagen:

Memor.1

2) Utilice [△ / ▽] para seleccionar una memoria de "Memor.1" a "Memor.5" para guardar su configuración y luego pulse [ENTER].
3) Utilice [△ / ▽] para seleccionar una opción a ajustar y después utilice [◀ / ▷] para ajustar la configuración.

Homer 1

14. Ctrl. posic. vertic. 0

1. Contrasts

7. Luminasi
\- Para restablecer la configuración predeterminada, pulse [RETURN], utilice [△ / ▽] para seleccionar "STD" y después pulse [ENTER].
<h1 id="corrección-de-gamma">■Corrección de gamma</h1>
- Para ajustar la "Correction Gamma", después de seleccionar la opción del paso 3, pulse [ENTER], y después utilice [ / / ] para ajustar la configuración.
- En el gráfico de la corrección de gamma, el eje horizontal indica el nivel de brillo de la imagen registrada en el disco y el eje vertical indica el nivel de brillo de la imagen cuando se da como salida desde esta unidad.

<details>
<summary>line</summary>
GO: 0.24
5. Correction Gamma
| X | Y |
|---|---|
| 0 | 0 |
| 255 | 255 |
</details>
\- Cuando los puntos brillantes del lado del disco se ajustan al lado de salida "oscuro" del lado de salida, las partes finas de la porción brillante que normalmente son difíciles de ver se convierten en una imagen que se puede discernir fácilmente.
<h1 id="español-21">ESPAÑOL</h1>

<details>
<summary>line</summary>
| X | Y |
|---|---|
| 0 | 0 |
| 255 | 255 |
GO:0.24
</details>
- Cuando los puntos oscuros del lado del disco se ajustan al lado de salida "brillante" del lado de salida, las partes finas de la porción oscura que normalmente son difíciles de ver se convierten en una imagen que se puede discernir fácilmente.
4) Pulse [RETURN] repetidamente para salir.
<h1 id="nota-38">Nota</h1>
- Esta configuración no es efectiva para la salida de imagen desde las tomas VIDEO OUT y S VIDEO OUT.
- La configuración permanece incluso si apaga la unidad.
- No puede ajustar la configuración durante la reproducción rápida, ni cuando el directo puro está configurado a "Video Off" o "All Off".
- También se puede ajustar DNR pulsando <VIDEO NOISE>
REDUCTION> en el panel delantero. (consulte la página 7).
Lista de elementos/valores de ajuste de la imagen
<table><tr><td colspan="2">Opción Descripción Rango de ajuste (predeterminado)</td><td></td></tr><tr><td colspan="2">1. Contraste Ajusta la diferencia entre las partes brillantes y oscuras de la imagen. -6 a +6 (0)</td><td></td></tr><tr><td>2. Luminosi</td><td>Ajusta el brillo de la imagen.</td><td>0 a +12 (0)</td></tr><tr><td>3. Realzador*1</td><td>Refuerza los contornos de la Imagen.</td><td>0 a +11 (0)</td></tr><tr><td>4. DNR*1</td><td>Reduce el nivel general de ruido de la imagen.</td><td>Apdo. a +3 (Apdo.)</td></tr><tr><td>5. Correctión Gamma</td><td>Ajuste detallado del brillo de la Imagen.</td><td>16 a 235 (G0=24/G1=32/G2=48/G3=64/ G4=80/G5=96/ G6=128/G7=160/ G8=192/G9=224)</td></tr><tr><td>6. Nltidez media*2</td><td>Ajusta la nitidez de la imagen para el rango de frecuencias medias.</td><td>-6 a +6 (0)</td></tr><tr><td>7. Nitidez alta*1</td><td>Ajusta la nitidez de la imagen para el rango de frecuencias altas.</td><td>-6 a +6 (0)</td></tr><tr><td>8. Tono*1</td><td>Ajusta el equilibrio entre el verde y el rojo.</td><td>-6 a +6 (0)</td></tr><tr><td>9. Nivel de blanco</td><td>Ajusta el nivel de blanco.</td><td>-5 a +5 (0)</td></tr><tr><td>10.Nivel de negro*1</td><td>Ajusta el nivel de negro.</td><td>-5 a +5 (0)</td></tr><tr><td>11.Nivel de saturación</td><td>Ajusta la densidad de los colores.</td><td>-6 a +6 (0)</td></tr><tr><td>12.Nivel de instalación</td><td>Hace que las partes negras de las imágenes sean más brillantes.</td><td>0 IRE : Muestra la imagen original según se grabó.7.5 IRE : Hace que las partes oscuras sean más brillantes.(7.5 IRE)</td></tr><tr><td>13.Ctrl posic. horizon.*1</td><td>Ajusta la posición de elevación/derecha.</td><td>-7 a +7 (0)</td></tr><tr><td>14.Ctrl. posic. vertic.*1</td><td>Ajusta la posición superior/inferior.</td><td>-7 a +7 (0)</td></tr></table>
\*1 Efectivo para la señal de vídeo de COMPONENT VIDEO OUT (excepto 480i) y tomas HDMI OUT.
^2 No es efectivo para la señal de video de la toma HDMI OUT.
Reproducción Reproducción

<details>
<summary>natural_image</summary>
Front view of a CD-ROM drive with buttons and ports (no visible text or labels)
</details>

<details>
<summary>text_image</summary>
[TOP MENU]
[POP UP MENU / MENU]
[△/▽/▽/▽]
[ENTER]
DINOH
</details>
Acerca de los nombres de los botones en esta explicación
<>: Botones de la unidad principal
[ ] : Botones del mando a distancia
Sólo el nombre de los botones:
Botones de la unidad principal y del mando a distancia
<h1 id="reproducción-de-archivo-mp3-windows-media-audio-jpeg-y-divx">Reproducción de Archivo MP3, Windows Media™ Audio, JPEG y DivX®</h1>
<h1 id="mp3-wma-jpeg-divx-3">MP3 WMA JPEG DivX®</h1>
1 Introduzca un disco DVD-RW/-R or CD-RW/-R con archivos MP3, Windows Media™ Audio, JPEG o DivX®.
• La lista de archivos aparece en la pantalla.
\- Si la lista de archivos no aparece automáticamente,
pulse [POP UP MENU / MENU]
\- Pulse [POP UP MENU / MENU] para salir y reanudar la lista de archivos.
2 Utilice [△/▽] para seleccionar una carpeta o archivo deseado y después pulse [ENTER]. Utilice [◀ /▶] para retroceder y adelantar entre las jerarquías.
\- Sipulsa [ENTER] sobre los archivos, comenzará la reproducción.

<details>
<summary>flowchart</summary>
<pre><code class="language-mermaid">graph TD
A["Port 1"] --> B["Port 2"]
B --> C["Port 3"]
C --> D["Port 4"]
D --> E["Port 5"]
style A fill:#f9f,stroke:#333
style B fill:#ccf,stroke:#333
style C fill:#cfc,stroke:#333
style D fill:#fcc,stroke:#333
style E fill:#ffc,stroke:#333
</code></pre>
</details>
1. Nombre actual de carpeta (El disco o nombre de la tarjeta de memoria SD se mostrará para la superior de las jerarquías).
2. Lista de los nombres de carpeta/archivo en la carpeta/disco actual
3. Nombre del archivo/carpeta seleccionado
4. Página actual / Número total de páginas
5. Indicación de página anterior/siguiente
\- Util | para retroceder y adelantar entre las páginas.
\- Pulse [TOP MENU] para volver al primer elemento.
Iconos:
: Carpetas
:Archivos MP3
Archivos Windows Media™ Audio
Archivos JPEG
Archivos DivX®
Se recomienda que los archivos a reproducir en esta unidad se graben según las siguientes especificaciones:
<MP3 / Windows Media™ Audio>
\- Frecuencia de muestreo : 44,1 kHz o 48 kHz
\- Velocidad constante de bits: : 112 kbps - 320 kbps (MP3), 48 kbps - 192 kbps (Windows Media™ Audio)
<h1 id="jpeg-5"><JPEG></h1>
• Límite superior
: 2.560 x 1.900 puntos
(el muestreo secundario es
4:4:4)
5.120 x 3.840 puntos
(el muestreo secundario es
hasta
\- Limite inferior
: 32 x 32 puntos
\- Máximo del tamaño de
:12MB
<h1 id="divx-6"><DivX></h1>
Producto oficial DivX® Certified
• Codificador reproducible de : DivX ^® 3.x, DivX ^® 4.x, DivX ^® 5.x, archivos AVI DivX ^® 6.0
• Tamaño máximo de la imagen : 720 x 480 @ 30 fps,
720 x 576 @ 25 fps
• Frecuencia de muestreo del sonido : 8 kHz - 48 kHz
\- Tipo de sonido : MPEG1 capa de sonido 3 (MP3),
MPEG1 capa de sonido 2,
Dolby Digital
<h1 id="nota-39">Nota</h1>
- El sistema puede reconocer hasta 255 carpetas/999 archivos para los CD, 999 carpetas/9999 archivos para DVD y tarjetas de memoria SD.
- El nombre del carpeta y del archivo se pueden mostrar con hasta 28 caracteres. Los caracteres no reconocibles se sustituyen con asteriscos.
- Las jerarquías novena y posteriores no se pueden mostrar para el CD y las jerarquías décima y posteriores no puede mostrarse para DVD y tarjeta de memoria SD.
- Los archivos cuya extensión sea distinta de ".mp3(MP3)" ".wma(Windows Media™ Audio)", ".jpg / .jpeg(JPEG)" o ".avi/.divx" no se enumeran.
- Algunas carpetas o archivos que no sean reproducibles puede que se enumeren debido al estado de grabación
- Los archivos JPEG de alta resolución tardan más en mostrarse.
- Los archivos JPEG progresivos (archivos JPEG grabados en
formato progresivo) no pueden reproducirse en esta unidad.
- Esta unidad reconoce hasta 8 caracteres de nombre de archivo en la tarjeta de memoria SD. Los caracteres después del noveno no se mostrarán.
<h1 id="reproducción-reproducción-5">Reproducción Reproducción</h1>
<h1 id="para-reproducir-el-subtítulo-divx-creado-por-el-usuario">Para reproducir el Subtítulo DivX® Creado por el Usuario.</h1>
El subtítulo creado por el usuario puede mostrarse durante la reproducción de DivX ^18 .
1) Después de seleccionar el archivo DivX ^® , aparecerá la "Lista de Subtítulo" cuando el "DivX Subtítulo" está configurado a cualquier cosa distinta de "Apdo.". (Consulte la página 30.)
2) Utilice [△ / ▽] para seleccionar la extensión deseada del archivo de subtítulos que desea mostrar y después pulse [ENTER].

El DivX ^® con el subtítulo comienza a reproducirse. El subtítulo no puede mostrarse cuando la configuración es "Apdo." Si hay más de una extensión, la selección de extensiones aparece en la lista de subtítulos.
\- Si introduce un DVD-RW/-R, CD-RW/-R con archivos DivX ^ que están mezclados con archivos MP3/Windows Media ^™ Audio/JPEG, se mostrará la pantalla de selección de soportes de reproducción. Utilice [△ / ▽] para seleccionar su soporte deseado y después pulse [ENTER].

\- Pulse [TOP MENU] para llamar la pantalla de selección de soportes de reproducción en el modo parado.
Pista para productos oficiales DivX® Certified comprados o alquilados
\- Cuando haya comprado o alquilado un archivo DivX ^® a través del sitio oficial de vídeo DivX ^® que se llama DivX ^® servicios de vídeo bajo demanda (VOD, por sus siglas en inglés), se requiere un código cada vez que obtiene un nuevo archivo de los servicios DivX ^® VOD. Consulte "DivX(R) VOD" en la página 37.
\- Algunos archivos DivX ^® VOD están restringidos por un número de veces limitado de reproducciones (no se puede reproducirlos más allá del límite). Si su archivo DivX ^® VOD tiene dicho límite, la pantalla de confirmación de reproducción aparecerá.
\- Utilice [◀/▶] para seleccionar "Sí" si desea reproducir el archivo o seleccione "No" si no desea reproducirlo. Después, pulse [ENTER] para confirmar la selección.
\- Usted no puede reproducir los archivos DivX® VOD cuyo periodo de alquiler haya caducado. En tal caso, pulse [POP UP MENU / MENU] y seleccione los otros archivos que pueden reproducirse.
\- Usted no puede reproducir los archivos DivX® VOD obtenidos con códigos de registro distintos en esta unidad. Pulse [POP UP MENU / MENU] y seleccione otros archivos que se pueden reproducir.
\- No puede reproducir el archivo DivX ^ que tenga una resolución que no admita esta unidad. Esta unidad no admite los archivos DivX ^ que tengan un tamaño de imagen que supere 720 x 480 @ 30 fps o 720 x 576 @ 25 fps.


<h1 id="español-22">ESPAÑOL</h1>
<h1 id="qué-es-divx">¿Qué es DivX®?</h1>
- D i v ^2 ás un codec (compresión/descompresión) que puede comprimir imágenes a una cantidad muy pequeña de datos. El software puede comprimir datos de imagen desde cualquiera de los dispositivos al tamaño que pueda enviarse por Internet y sin poner en peligro la calidad visual de las imágenes.
\- Un archivo con extensión "avi" y "divx" se llama archivo DivX ^® . Todos los archivos con la extensión DivX ^® se reconocen como MPEG4.
\- Para mayor información sobre DivX ^ , por favor visite http://www.divx.com.
<h1 id="nota-para-divx">Nota para DivX®</h1>
\- Incluso si el archivo tiene la extensión de ".avi" y ".divx", esta unidad no puede reproducir los que están grabados en un formato distinto del DivX ^® .
\- Puede que tarde un rato en darse como salida sonido e imágenes después de que ha introducido el disco y pulsado
\- Cuando reproduzca los archivos grabados en altas velocidades de bits, las imágenes pueden interrumpirse en algunas ocasiones.
\- Aunque el logotipo DivX ^ se ha conseguido para esta unidad, puede que no sea capaz de reproducir algunos datos, dependiendo de sus características, velocidades de bits o configuraciones de formato de sonido, etc.
\- Los archivos DivX ^® cuyo tamaño excedan de 2 GB no se pueden reproducir.
\- Si se selecciona un archivo DivX ^1 de gran tamaño, puede que tarde un poco en comenzar la reproducción (a veces más de 20 segundos).
\- Si intenta reproducir un archivo DivX ^ que tenga una resolución de pantalla que no admita esta unidad, la reproducción se detendrá y aparecerá un mensaje de error.
\- Algunos archivos DivX ^ no se pueden reproducir en esta unidad por la configuración y características del disco, o debido a la condición de grabación y software de autoría.
\- Los DVD de copla multiseslón DivX ^39 no se pueden reproducir en esta unidad.
<h1 id="nota-para-subtítulos-divx">Nota para Subtítulos DivX®</h1>
\- Para utilizar esta función, se tiene que cumplir las siguientes condiciones.
\- "DivX Subtítulo" tiene que estar activado en el configuración de "Idioma". (Consulte "DivX Subtítulo" en la página 30).
\- El archivo de reproducción y el archivo de subtítulos tienen que tener el mismo nombre.
\- El archivo de reproducción y el archivo de su título tienen que estar en la misma carpeta.
\- Solamente se soportan los archivos de subtítulos con las siguientes extensiones: .smi (.SMI), .srt (.SRT), .sub (.SUB), .ass (.ASS), .ssa (.SSA), .txt (.TXT). (Los archivos .sub (.SUB) y .txt (.TXT) pueden no reconocerse).
\- Los subtítulos que excedan el tiempo de reproducción del archivo DivX® no se mostrarán.
Reproducción Reproducción

<details>
<summary>text_image</summary>
CD-ROM
+01
-02
-03
-04
-05
-06
-07
-08
-09
-10
-11
-12
-13
-14
-15
-16
-17
-18
-19
-20
-21
-22
-23
-24
-25
-26
-27
-28
-29
-30
-31
-32
-33
-34
-35
-36
-37
-38
-39
-40
-41
-42
-43
-44
-45
-46
-47
-48
-49
-50
-51
-52
-53
-54
-55
-56
-57
-58
-59
-60
-61
-62
-63
-64
-65
-66
-67
-68
-69
-70
-71
-72
-73
-74
-75
-76
-77
-78
-79
-80
-81
-82
-83
-84
-85
-86
-87
-88
-89
-90
-91
-92
-93
-94
-95
-96
-97
-98
-99
-100
</details>

<details>
<summary>text_image</summary>
[POP UP MENU / MENU]
[△/▽/◀/▶]
[SETUP]
[ENTER]
[ANGLE]
[MODE]
■
</details>
Acerca de los nombres de los botones en esta explicación
<>: Botones de la unidad principal
[ ] : Botones del mando a distancia
Sólo el nombre de los botones:
Botones de la unidad principal y del mando a distancia
<h1 id="kodak-picture-cd-3">Kodak Picture CD</h1>
<h1 id="jpeg-6">JPEG</h1>
Esta unidad también puede ejecutar archivos JPEG guardados en Kodak Picture CD. Puede disfrutar de imágenes en el dispositivo de visualización reproduciendo el CD de fotos. Esta unidad cumple con la versión 7.0 de Kodak Picture CD. Para ver los detalles de Kodak Picture CD, póngase en contacto con alguna tienda que ofrezca servicios de revelado de Kodak Inc.
1 Cuando se introduce un Kodak Picture CD en esta unidad, aparece automáticamente el menú Kodak Picture CD en la pantalla.

<details>
<summary>flowchart</summary>
<pre><code class="language-mermaid">graph TD
A["Imagen1"] --> B["3032"]
C["Imagen2"] --> B
D["Imagen3"] --> B
E["Imagen4"] --> B
F["Imagen5"] --> B
B --> G["2"]
B --> H["1"]
B --> I["2"]
</code></pre>
</details>
1. Número de la pista actual/número total de pistas
2. Indicación de página anterior/siguiente
\- En el modo parado, pulse [POP UP MENU / MENU] para llamar al menú de Kodak Picture CD.
2 Utilice [△/▽/◇/▷] para seleccionar una pista deseada a reproducir y después pulse ▶ o [ENTER].
• Se reproducirá una imagen desde la vista seleccionada e irá a la siguiente en orden.
3 Pulse ■ para detener la reproducción.
<h1 id="consejos-para-reproducción-de-jpegkodak-picture">Consejos para Reproducción de JPEG/Kodak Picture</h1>
\- Cada pulsación del [ANGLE] gira la imagen en el sentido del reloj 90 grados cuando se muestra una imagen.
\- Para cambiar el efecto visual para cambiar a la imagen de reproducción, pulse [MODE] una vez y después utilice [△ / √d][ENTER] para cambiar entre "Insertar / Cortar" y "Apar./Desap. Gradual". El modo de cambio de tamaño puede no tener ningún efecto en algunos archivos (por ejemplo, archivos con un tamaño pequeño de imagen).
\- Para cambiar el tamaño de la imagen de reproducción, durante la reproducción de JPEG/Kodak Picture. Pulse [MODE] dos veces y después utilice [Δ / ∇ / ◀/ ▷] o [ENTER] para cambiar entre "Normal" (100 %) y "Pequeño" (93 %). El modo de cambio de tamaño puede no tener ningún efecto en algunos archivos (por ejemplo, archivos con un tamaño pequeño de imagen).
<h1 id="leer-la-tarjeta-de-memoria-sd">Leer la Tarjeta de Memoria SD</h1>
<h1 id="mp3-wma-jpeg-3">MP3 WMA JPEG</h1>
Puede reproducir los archivos MP3, Windows Media™ Audio y JPEG de tarjetas de memorias SD. Con la tarjeta memoria SD, también puede disfrutar de los contenidos adicionales especiales de BD-ROM Profile 1.1 que se pueden descargar desde internet. Puede almacenar el contenido en una tarjeta de memoria SD a través de un ordenador y reproducirlo con BD-vídeo. Para mayor información acerca del contenido adicional especial, por favor consulte el libro de instrucciones que vino con el disco.

<h1 id="configurar-el-modo-del-soporte">■Configurar el modo del soporte</h1>
1 Pulse [SETUP] en modo parado.
2 Utilice [◀/▶] para seleccionar CUS TOW y después presione [ENTER].
3 Utilice [◀/▶] para seleccionar Other y después presione [ENTER].
4 Utilice [△ / ▽] para seleccionar "Selección de medios".
5 Pulse [ENTER] repetidamente para seleccionar "Memoria SD".

\- Esto configura la unidad a modo "Memoria SD". Para reproducir el contenido de cualquier disco, salga del modo "Memoria SD" seleccionando "Disco".
6 Pulse [SETUP] para salir.
Reproducción Reproducción
■Introduzca la tarjeta de memoria SD y reproduzcala
1 Introduzca una tarjeta de memoria SD en la ranura para SD CARD con la etiqueta hacia arriba.
Aparecerá una lista de archivos.

2 Siga el paso 2 de "Reproducción de Archivo MP3, Windows Media™ Audio, JPEG y DivX®" en la página 25.
■Extraer la tarjeta de memoria SD
1 En modo parado, empuje la tarjeta de memoria SD y después quite lentamente su dedo.
2 Agarre la tarjeta y tire de ella hacia fuera de la ranura para SD CARD.
<h1 id="tarjetas-compatibles">Tarjetas Compatibles:</h1>
- Tarjeta de memoria SD (8 MB - 2 GB)
- Tarjeta de memoria SDCH (4 GB)
- Tarjeta miniSD (8 MB - 2 GB)
- Tarjeta microSD (8 MB - 2 GB)
- Para las tarjetas de memoria miniSD y microSD, se necesita un adaptador.
<h1 id="nota-40">Nota</h1>
- No de extraiga la tarjeta durante su reproducción.
- Esta unidad soporta tarjetas de memoria SD con sistema de archivos FAT12/FAT16 y tarjetas de memoria SDHC con el sistema de archivos FAT32.
- No elimine las carpetas o archivos de la tarjeta de memorias SD con su ordenador. Esta unidad podría no leer la tarjeta de memoria SD.
- Esta unidad reconoce hasta 8 caracteres de nombre de archivo en la tarjeta de memoria SD. Los caracteres después del noveno no se mostrarán.
<h1 id="español-23">ESPAÑOL</h1>
<h1 id="configuración-de-funciones">Configuración de Funciones</h1>
Configuración de Funciones

<details>
<summary>text_image</summary>
CD-ROM
120
DC
DC
DC
DC
DC
DC
DC
DC
DC
DC
DC
DC
DC
DC
DC
DC
DC
DC
DC
DC
DC
DC
DC
DC
DC
DC
DC
DC
DC
DC
DC
DC
DC
DC
DC
DC
DC
DC
DC
DC
DC
DC
DC
DC
DC
DC
DC
DC
DC
DC
DSC
DSC
DSC
DSC
DSC
DSC
DSC
DSC
DSC
DSC
DSC
DSC
DSC
DSC
DSC
DSC
DSC
DSC
DSC
DSC
DSC
DSC
DSC
DSC
DSC
DSC
DSC
DSC
DSC
DSC
DSC
DSC
DSC
DSC
</details>

<details>
<summary>text_image</summary>
[botones numéricos]
[CLEAR]
[△/▽/◇/◇]
[SETUP]
[ENTER]
[RETURN]
DENON
EU 1984
</details>
Acerca de los nombres de los botones en esta explicación
<>: Botones de la unidad principal
[ ] : Botones del mando a distancia
Sólo el nombre de los botones:
Botones de la unidad principal y del mando a distancia
<h1 id="utilizar-el-menú-configuración">Utilizar el Menú Configuración</h1>
En el menú configuración, usted puede cambiar la configuración de sonido, imagen, idioma, etc. No puede cambiar la configuración durante la reproducción.
<h1 id="quick-rápido">QUICK Rápido</h1>
El menú de configuración rápida contiene elementos de configuración extraídos del menú de configuración personalizada que puede utilizarse con frecuencia.
<h1 id="1">1</h1>
Pulse [SETUP] en modo parado.
<h1 id="2">2</h1>
Utilice [◀/▶] para seleccionar QUICK y después presione [ENTER].

<details>
<summary>text_image</summary>
Rápido
A
B
Mode de audio BD
Salida audio comb.
Salida audio HDMI
Mult. HDMI (Normal)
Resolución de Vídeo HDMI
Auto
Salida de componentes
48Bl
Salida audio 7.1ch
Multi Canal
Lenguaje OSD
Español
Aspecto de TV
16:9 Wide
</details>
<h1 id="3">3</h1>
Utilice [△ / ▽] para seleccionar las opciones de configuración.
<h1 id="4">4</h1>
Siga el procedimiento a continuación dependiendo de las opciones de configuración.
Para configurar la opción A:
Presione [ENTER] repetidamente para cambiar las
opciones.
Para configurar la opción B:
1) Pulse [ENTER].
2)Utilice [△ / ▽] para seleccionar opciones y
después presione [ENTER].
• U t i l [i◀] ⊗ [RETURN] para volver a la pantalla anterior.
<h1 id="5">5</h1>
Pulse [SETUP] para salir.
<h1 id="cus-tom">CUS TOM</h1>
<h1 id="personalizado">Personalizado</h1>
El menú personalizado contiene todas las opciones de configuración.
<h1 id="1-2">1</h1>
Pulse [SETUP] en modo parado.
<h1 id="2-2">2</h1>
Utilice [◀/▶] para seleccionar CUS y después presione [ENTER].
<h1 id="3-2">3</h1>
Utilice [◀/▶] para seleccionar la categoría deseada y después pulse [ENTER].

\- Para las "Clasificación", siga el procedimiento de la página 36.
<h1 id="4-2">4</h1>
Utilice [△ / ▽] para seleccionar las opciones de configuración.
Las opciones de configuración que no están disponibles con la situación actual de esta unidad se muestran en gris y usted no puede seleccionarlas.
<h1 id="5-2">5</h1>
Siga el procedimiento a continuación dependiendo de las opciones de configuración.
Para configurar la opción A:
Presione [ENTER] repetidamente para cambiar las opciones.
\- Para "DivX(R) VOD", preslone [ENTER] para mostrar su código de registro.
Para configurar la opción B:
1) Pulse [ENTER].
2) Utilice [△ / ▽] para seleccionar opciones y después presione [ENTER].
\- U ti li [e] o [RETURN] para volver a la pantalla anterior.
<h1 id="6">6</h1>
Pulse [SETUP] para salir.
Configuración de Funciones Configuración de Funciones
dioma

<details>
<summary>text_image</summary>
Idioms
B
Dialogos
Subtítulo
Menu de Disco
Lenguaje OSD
DivX Subtítulo
Original
Apdo.
Inglés
Español
Apdo.
</details>
\- Para ver cómo seleccionar los elementos y opciones, consulte "Personalizado" en la página 29.
<table><tr><td colspan="2">Opciones de configuración Opciones</td></tr><tr><td>DiálogosConfigura el idioma de sonido.</td><td>Original*/Inglés/Francés/Español/Alemán/Italiano/Sueco/Danés/Ruso/Chino/Japonés/Coreano/Danés/Finés/Noruego/Islandés/Húngaro/Rumano/Turco/Griego/Irlandés/Portugués/Polaco/Checo/Eslovaco/Búlgaro/Otro</td></tr><tr><td>SubtítuloConfigura el idioma de subtítulo.</td><td>Apdo.*/Inglés/Francés/Español/Alemán/Italiano/Sueco/Danés/Ruso/Chino/Japonés/Coreano/Danés/Finés/Noruego/Islandés/Húngaro/Rumano/Turco/Griego/Irlandés/Portugués/Polaco/Checo/Eslovaco/Búlgaro/Otro</td></tr><tr><td>Menú de DiscoConfigura el idioma del menú del disco.</td><td>Inglés*/Francés/Español/Alemán/Italiano/Sueco/Danés/Ruso/Chino/Japonés/Coreano/Danés/Finés/Noruego/Islandés/Húngaro/Rumano/Turco/Griego/Irlandés/Portugués/Polaco/Checo/Eslovaco/Búlgaro/Otro</td></tr><tr><td>Lenguaje OSDConfigurar idioma para la visualización en pantalla.</td><td>English*/Français/Español</td></tr><tr><td>DivX Subtítulo Apdo.* / Inglés / Francés / EspañolConfigura el idioma de DivX®Subtítulo.</td><td></td></tr></table>
- Las configuraciones con ( ^\# ) son los predeterminados.
- El menú Rápido consta de menús de configuración que se utilizan con frecuencia y se acompañan de la marca
- Si selecciona "Otro", introduzca el código de número de 4 digitos del idioma deseado (consulte la lista de "Código de Idioma" de la página 39). Solamente se pueden seleccionar los Idiomas soportados por los discos.
Video

<details>
<summary>text_image</summary>
Lung
unge
Other
B
Aspecto de TV
16.9 Wide
A
HDMI Select
YCbCr
Ajuste RGB de HDMI
Normal
Auto formato HDMI
Mix.
B
Resolution de Video HDMI
Auto
HDMI Deep Color
Auto
APDc
A
VP Direct
</details>

<details>
<summary>text_image</summary>
Long
Image
Other
B
Salida de componentes 480X
Mode Progressive Auto
Sinc. Audio/Video HDMI
Mode Vista lijs Auto
A
Área activa del TV Compieta
Fondo de pantalla Imagen
B
</details>
\- Para ver cómo seleccionar los elementos y opciones, consulte "Personalizado" en la página 29.
<table><tr><td colspan="2">Opciones de configuración Opciones</td></tr><tr><td rowspan="5">Aspecto de TVConfigura el tamaño de Imagen según la proporción de aspecto del dispositivo de visualización conectado.</td><td>16:9 Wide*:Seleccione esto cuando esté conectado a una televisión de pantalla ancha. Los discos grabados en formato de pantalla ancha se reproducen en toda la pantalla.</td></tr><tr><td>4:3 Pan & Scan:Seleccione esto para reproducir discos grabados en formato 4:3 pantalla ancha en el modo panorámica y barrido (con los lados de la imagen cortados). Los discos que la panorámica y barrido no está especificado se muestran en el modo letter box.</td></tr><tr><td>4:3 Letter Box:Seleclone esto para reproducir el disco grabado en formato 4:3 en el modo letter box. (con tiras negras arriba y abajo).</td></tr><tr><td>4:3 Img. Compr. Auto:Al reproducir imágenes 4:3, la imagen se muestra en el centro de la pantalla de un televisor 16:9 con proporción de aspecto 4:3.</td></tr><tr><td>4:3 Img. Compr. Enc.:La imagen se muestra en el centro de la pantalla del televisor 16:9 con proporción de aspecto 4:3, independientemente de tamaño original de la imagen.</td></tr><tr><td rowspan="2">HDMI SelectSeleccione un modo de salida HDMI entre "YCbCr" y "RGB".</td><td>YCbCr*:Las señales de vídeo de formato de componente y señales de salida se dan como salida desde HDMI OUT.</td></tr><tr><td>RGB:Las señales de vídeo de formato de RGB y señales de salida se dan como salida desde HDMI OUT.</td></tr></table>
<h1 id="español-24">ESPAÑOL</h1>
Configuración de Funciones Configuración de Funciones
<table><tr><td colspan="2">Opciones de configuración Opciones</td></tr><tr><td rowspan="2">Ajuste RGB de HDMIConfigure la salida del rango de imagen digital RGB (rango de datos) de la toma HDMI OUT.</td><td>Normal*:Salida como "16 (negro)" a "235 (blanco)".</td></tr><tr><td>Enhanced:Salida como "0 (negro)" a "246 (blanco)".Dependiendo del dispositivo de visualización que esté utilizando, los colores negros pueden parecer que destacan cuando se utilizan conexiones HDMI. Si es así, configúrela a "Enhanced".</td></tr><tr><td rowspan="2">Auto formato HDMIHaga la configuración del "Auto" para "Resolución de Video HDMI".</td><td>Máx*:La máxima resolución que se puede dar como entrada a dispositivo HDMI conectado se detecta y la resolución de salida se HDMI selecciona automáticamente.</td></tr><tr><td>Panel:El número de píxeles del panel del dispositivo HDMI conectado se detecta y la resolución de salida HDMI se selecciona automáticamente.</td></tr><tr><td rowspan="6">Resolución de Video HDMIConfigurar la resolución de vídeo HDMI.</td><td>Auto*:La resolución de vídeo HDMI se selecciona automáticamente dependiendo del dispositivo HDMI conectado y la configuración del "Auto formato HDMI".</td></tr><tr><td>480p</td></tr><tr><td>720p</td></tr><tr><td>1080i</td></tr><tr><td>1080p</td></tr><tr><td>1080p24:Da una reproducción de película natural y de alta calidad de material filmado de 24 fotogramas. El dispositivo de visualización conectado tiene que ser compatible con una entrada de fotogramas 1080p24.</td></tr><tr><td rowspan="2">HDMI Deep ColorConfigura si dar la salida de imagen de HDMI con Color profundo o no.</td><td>Auto*:La imagen de HDMI se dará como Color profundo si el dispositivo de visualización admite el Color profundo.</td></tr><tr><td>Apdo.:La imagen con color profundo a través de HDMI se dará como salida.</td></tr><tr><td rowspan="2">I/P DirectConfigura si dar como salida o no el material de 24 fotogramas directamente desde la HDMI OUT.Esta configuración es sólo para BD.</td><td>Apdo.:El material de 24 fotogramas se convertirá a 60 fotogramas y se dará como salida 1080p60 fotogramas desde la HDMI OUT.</td></tr><tr><td>Enc.:El material de 24 fotogramas se dará como salida directamente como 1080p24 fotogramas desde la HDMI OUT.</td></tr></table>
<table><tr><td colspan="2">Opciones de configuración Opciones</td></tr><tr><td rowspan="4">Salida de componentesConfigura la resolución de vídeo a salida de componente.</td><td>480i*</td></tr><tr><td>480p</td></tr><tr><td>720p</td></tr><tr><td>1080i</td></tr><tr><td rowspan="3">Modo ProgresivoConfigura el modo progresivo óptimo para el material de imagen desde la toma HDMI OUT y las tomas COMPONENT VIDEO.</td><td>Auto*:El modo progresivo se selecciona automáticamente dependiendo del tipo de material (película o vídeo).</td></tr><tr><td>Video1:Apropiado para reproducir discos de material de vídeo.</td></tr><tr><td>Video2:Apropiado para reproducir discos de material de vídeo y discos de material fílmico de 30 fotogramas.</td></tr><tr><td rowspan="4">Sinc. de Audio/VideoConfigura con qué señal de vídeo sincronizar la señal de sonido.</td><td>HDMI*:Sincroniza el sonido con la señal de vídeo de HDMI OUT.</td></tr><tr><td>Progresivo:Sincroniza el sonido con la señal de vídeo progresivo de COMPONENT VIDEO OUT.</td></tr><tr><td>Entrelazar:Sincroniza el sonido con la señal de vídeo entrelazado de COMPONENT VIDEO OUT(480ii),VIDEO OUT o S VIDEO OUT.</td></tr><tr><td>Otro:Seleccione esto cuando desee ver imágenes progresivas, entrelazadas y HDMI simultáneamente. Las señales de sonido están configuradas a la temporización óptima para las imágenes respectivas. (No están sincronizadas).</td></tr><tr><td rowspan="3">Modo Vista fijaAjustar la resolución de la imagen y la calidad en modo fijo.</td><td>Auto*:Selecciona automáticamente la mejor configuración de resolución ("Cuadro" o "Imagen") basada en las características de datos de las Imágenes.</td></tr><tr><td>Imagen:Estabiliza las imágenes, aunque la calidad de la imagen puede vulgarizarse debido a la cantidad limitada de datos. Seleccione "Imagen" cuando las imágenes sigan siendo inestables incluso si está seleccionado "Auto".</td></tr><tr><td>Cuadro:Muestra imágenes relativamente sin movimiento en resolución más alta. "Cuadro" mejora la calidad de imagen aunque pueden desestabilizar las imágenes debido a las salidas alterna de dos datos de campos.</td></tr></table>
Configuración de Funciones Configuración de Funciones
<table><tr><td colspan="2">Opciones de configuración Opciones</td></tr><tr><td rowspan="2">Área activa del TVConfigura el área de visualización horizontal para salida entrelazada (480i).</td><td>Normal:Seleccione esto si la imagen no es estable al conectar a pantallas de uso profesional.</td></tr><tr><td>Completa*:Seleccione esto para conectar a pantallas normales del mercado.</td></tr><tr><td rowspan="4">Fondo de pantallaConfigura la imagen a mostrar en la pantalla del televisor para modo parado y modo de reproducción de sonido.</td><td>Imagen*</td></tr><tr><td>Azul</td></tr><tr><td>Negro</td></tr><tr><td>Gris</td></tr></table>
- Las configuraciones con (\*) son las predeterminadas.
- El menú Rápido consta de menús de configuración que se utilizan con frecuencia y se

- Para "Ajuste RGB de HDMI", seleccione "Enhanced" si el contraste blanco-negro no está claro. La configuración es efectiva solamente para la salida RGB de HDMI.
- Incluso cuando la "Resolución de Video HDMI" esté configurada a "1080p24" y "I/P Direct" esté configurado a "Enc.", para BD que no estén grabados a fotograma 1080p24 o para reproducción de DVD, se dará como salida una resolución de vídeo que admitan el disco y el dispositivo de visualización en vez de fotograma 1080p24.
- Una pantalla del televisor de imagen individual se llama "Cuadro", que consta de dos imágenes separadas llamadas "Imagen". Algunas imágenes pueden estar borrosas en la configuración automática de "Modo Vista fija" debido a sus características de datos.
- Si la imagen no se da como salida correctamente al dispositivo de visualización debido a la configuración de "Resolución de Video HDMI" o "Salida de componentes", presione y mantenga
▶ en el panel delantero durante más de 5 segundos. Ambas configuraciones se cambias automáticamente a su predeterminado.
- SI "Salida de componentes" está configurado a "480I", "4:3 Img. Compr. Auto" y "4:3 Img. Compr. Enc." de "Aspecto de TV" no están disponibles.
- Si está conectada HDMI, para la salida de componente de resolución de vídeo, sólo puede seleccionar una resolución de vídeo que se dé como salida actualmente de HDMI OUT o 480i.
- Si la resolución de vídeo de la salida de componente y la resolución de vídeo HDMI no coinciden, la resolución de vídeo de la salida de componente se cambiará a la resolución de salida HDMI actual. Las tomas de COMPONENT VIDEO OUT pueden no dar como salida ninguna señal dependiendo del material del disco.
- SI reproduce DVD de vídeo protegido contra coplas, se dará como salida una señal 480p desde las tomas COMPONENT VIDEO OUT, cuando la "Salida de componentes" está configurado a "480l", "720p" o "1080l".
- Si el dispositivo de visualización conectado no admite 1080p24 fotogramas o "I/P Direct" está ajustado a "Apdo.", "1080p24" de "Resolución de Video HDMI" se mostrará de color gris y no se puede seleccionar la opción.
- Para reproducción de BD, si configura "Salida de componentes" a "480i", la señal 480p se dará como salida desde las tomas COMPONENT VIDEO OUT.
- Las opciones de configuración que no están disponibles con la situación actual de esta unidad se muestran en gris y usted no puede seleccionarlas.
- Incluso aunque "HDMI Select" esté configurado a "YCbCr", si el dispositivo de visualización no admite YCbCr, se dará como salida RGB.
- Si "Resolución de Video HDMI" está configurada a "1080p" o "1080p24", no se puede configurar "Salida de componentes".
Audio

<details>
<summary>text_image</summary>
Audio
A
B
B
Salide audio BD
Salide audio HDMI
Salide audio 7.1ch
Sub Muestreo
DRC
Fuente Directa
Healse Graves
Salide audio comb.
Multi HDMI (Normal)
Multi Carval
Apdo.
Auto
Apdo.
Apdo.
</details>

<details>
<summary>text_image</summary>
Audio
Ajuste de audio
Virtual Surround
0ms
Apdo.
</details>
- Para ver cómo seleccionar los elementos y opciones, consulte "Personalizado" en la página 29.
Opciones de configuración Opciones
<table><tr><td rowspan="2">Modo de audio BDPara BD, seleclone si dar como salida el sonido secundario e Interactivo con el sonido principal si está disponible o sólo el sonido principal. Consulte "Configurar el Modo de BD de Sonido" en la página 23.</td><td>Salida audio comb.*:Da como salida el sonido secundario e interactivo con sonido principal si está disponible.</td></tr><tr><td>Salida de audio HD:Da como salida sólo el sonido principal. Configure este modo para dar como salida sonido Dolby Digital, Dolby Digital Plus, Dolby TrueHD, DTS o DTS-HD de BD a través de la conexión HDMI.</td></tr><tr><td rowspan="4">Salida audio HDMIConfigura el formato de sonido para la salida de sonido desde HDMI OUT.</td><td>Mult. HDMI (Normal)#:Se dan como salida señales de sonido multicanal desde HDMI OUT con una corriente de datos o LPCM.</td></tr><tr><td>Mult. HDMI (LPCM):Se dan como salida señales de sonido multicanal a través de HDMI OUT con un LPCM.• Consulte las páginas 34-35 para ver las opciones de configuración.</td></tr><tr><td>HDMI 2ch:Las señales de sonido se dan como salida a través de HDMI OUT como una mezcla reducida a 2ch LPCM.</td></tr><tr><td>Audio desactivado:Silencia la señal de sonido HDMI y configura el formato de señal de la DIGITAL OUT.• Consulte "Configuración de salida digital" en la página 33 para ver las opciones de configuración.</td></tr></table>
- La configuración predeterminada de "Modo de audio BD" es "Salida audio comb." Si desea dar como salida sólo el sonido principal de alta calidad, configure "Modo de audio BD" a "Salida de audio HD".
<h1 id="español-25">ESPAÑOL</h1>
Configuración de Funciones Configuración de Funciones
<table><tr><td colspan="2">Opciones de configuración Opciones</td></tr><tr><td rowspan="2">Salida audio 7.1chConfigura el formato de sonidopara la salida de sonido desde7.1ch AUDIO OUT.</td><td>Multi Canal*:Se dan como salida señales de sonido de multicanalesdesde el terminal 7.1ch AUDIO OUT. Consulte laspáginas 34-35 para ver las opciones de configuración.</td></tr><tr><td>2 Canal:Se dan como salida señales de sonido de 2 canalesdesde las tomas 7.1ch AUDIO OUT.</td></tr><tr><td rowspan="2">Sub MuestreoConfigure la salida de sonidodigital al reproducir BD o DVDgrabados en LPCM.</td><td>Enc.:Las señales LPCM se convierten a 48 kHz para su salida.- Configure a “Enc.” cuando utilice conexiones digitalesa un amplificador AV que no sea compatible confrecuencias de muestreo de 96 kHz.</td></tr><tr><td>Apdo.*:Para BD o DVD grabados en LPCM sin protección dederechos de autor, se dan como salida señales desonido de 2 canales de hasta 96 kHz como señalesLPCM sin ninguna conversión.</td></tr><tr><td rowspan="3">DRCConfigura si comprimir el rango devolumen de sonido (control derango dinámico) cuando sereproduce sonido Dolby Digital,Dolby Digital Plus o Dolby TrueHD.</td><td>Auto*:Cuando los discos grabados en formato Dolby TrueHDestán siendo reproducidos, esta unidad detecta laconfiguración DRC del disco y configura la opción DRCde esta unidad a “Enc.” o “Apdo.” automáticamente.</td></tr><tr><td>Apdo.</td></tr><tr><td>Enc.</td></tr><tr><td rowspan="2">Fuente DirectaConfigura para dar como salida elsonido sin añadir la configuraciónde los altavoces a las señales desonido del disco.</td><td>Enc.:Seleccione esto para dar como salida el sonido sinningún efecto de la configuración de los altavoces.</td></tr><tr><td>Apdo.*:Seleccione esto para dar como salida el sonido con elsefecto de la configuración de los altavoces.</td></tr><tr><td rowspan="2">Realce GravesConfigura si dar como salida elrealzador de graves al reproducirlos contenidos que no tenganseñal LFE (efecto de bajafrecuencia). (por ejemplo,contenidos con solamente señal desonido de 2 canales).</td><td>Enc.:La señal de sonido se dará como salida desde elrealzador de graves. (Por favor, configure “Sub graves”de “Config. del altavoz” a “Enc.”).</td></tr><tr><td>Apdo.*:No se dará señal de sonido como salida desde elrealzador de graves.</td></tr><tr><td>Ajuste de audioConfigura la cantidad el tiempo deretardo entre la señal de imagen yla de sonido.</td><td>0 ms a 200 ms (0 ms*)La señal de sonido se retardará durante la cantidad dtiempo que establezca.</td></tr></table>
<table><tr><td colspan="2">Opciones de configuración Opciones</td></tr><tr><td rowspan="3">Virtual SurroundConfigura para crear un efecto envolvente en un sistema que tenga conectados 2 altavoces.</td><td>Apdo.*:El envolvente virtual está ajustado a apagado.</td></tr><tr><td>1:Un efecto envolvente natural en un sistema que tenga conectados 2 altavoces.</td></tr><tr><td>2:Un efecto envolvente más potente en un sistema que tenga conectados 2 altavoces que "1".</td></tr></table>
- Las configuraciones con (\*) son los predeterminados.
- El menú Rápido consta de menús de configuración que se utilizan con frecuencia y se acompañan de la marca
- Si configura "Fuente Directa" a "Enc.", "Salida audio HDMI" a "HDMI 2ch" o "Salida audio 7.1ch" a "2 Canal", "Realce Graves" no está disponible.
- En las siguientes circunstancias, "Mult. HDMI (Normal)", "Mult. HDMI (LPCM)" y "HDMI 2ch" no están disponibles.
- El cable HDMI no está conectado a una toma HDMI OUT.
- El dispositivo de visualización conectado está apagado.
- El dispositivo de visualización conectado no es compatible con la salida de sonido.
- Cuando "Fuente Directa" está configurado a "Enc.", "Realce Graves" y "Config. del altavoz" no están disponibles.
<h1 id="configuración-de-salida-digital">Configuración de salida digital</h1>
Cuando se selecciona "Audio desactivado" en la configuración "Salida audio HDMI", la señal de sonido del HDMI se silencia y las señales de sonido que se dan como salida desde DIGITAL OUT cambia dependiendo de la configuración de "Salida digital".
<Configuración de "Salida digital">
Audio → Salida audio HDMI → Audio desactivado
<table><tr><td>Bitstream*:Cuando se reproducen discos grabados en Dolby Digital, Dolby Digital Plus, Dolby TrueHD, DTS o DTS-HD, se dan como salida la corriente central correspondiente (Dolby Digital o DTS).</td></tr><tr><td>LPCM:La señal LPCM se da como salida desde DIGITAL OUT.</td></tr></table>
- Esta configuración no es efectiva cuando se da como la salida de sonido de HDMI.
- Cuando tanto HDMI como DIGITAL OUT están conectados a otros dispositivos, las señales de sonido que se dan actualmente como salida desde HDMI OUT se darán como salida desde la toma DIGITAL OUT también, exceptuando que la señal Dolby Digital se dará como salida en vez de Dolby Digital Plus y Dolby TrueHD, y la señal DTS se dará como señal en vez de DTS-HD.
- Cuando "Modo de audio BD" está ajustado a "Salida de audio HD" Dolby Digital, DTS, Dolby Digital Plus, Dolby TrueHD o DTS-HD se darán como sonido en una corriente completa (Dolby Digital o DTS). Si la fuente de sonido es Dolby Digital, DTS o LPCM, el mismo tipo de corriente de sonido configurado en "Salida audio HDMI" se dará como salida. (Cuando se dé como salida Multi LPCM desde HDMI OUT, se dará como salida LPCM con reducción de mezcla a 2 canales desde DIGITAL OUT).
- Cuando "Modo de audio BD" esté configurado a "Salida audio comb.", la salida de sonido de DIGITAL OUT seguirá la configuración de "Salida audio HDMI". (Cuando se dé como salida Multi LPCM desde HDMI OUT, se dará como salida LPCM con reducción de mezcla a 2 canales desde DIGITAL OUT).
<h1 id="configuración-de-funciones-configuración-de-funciones">Configuración de Funciones Configuración de Funciones</h1>
<h1 id="configuración-de-altavoces">Configuración de Altavoces</h1>
Esta unidad le permite disfrutar de sonido envolvente multicanal como el envolvente 7.1 / 5.1 c.
<Ejemplo de diseño básico de sistema envolvente 7.1c>

<details>
<summary>flowchart</summary>
<pre><code class="language-mermaid">graph TD
A["Altavoz delantero (izquierdo)"] --> B["Realizador de graves"]
B --> C["Altavoz central"]
C --> D["Altavoz delantero (derecho)"]
E["Altavoz envolvente (izquierdo)"] --> F["Envolvente trascero (izquierdo)"]
G["Altavoz envolvente (derecho)"] --> H["Envolvente trascero (derecho)"]
</code></pre>
</details>
Para aprovechar lo máximo de esta función, configure sus altavoces correctamente consultando la tabla a continuación.
Las opciones de configuración de los altavoces están disponibles en las siguientes ubicaciones:
<Configuración de los altavoces para la salida de señal de sonido desde la toma de HDMI OUT>
(Disponible cuando tiene el cable HDMI conectado a la toma HDMI OUT)
Instalación → Rápido → Salida audio HDMI → Mult. HDMI (LPCM)
Instalación → Custom → Audio → Salida audio HDMI → Mult. HDMI (LPCM)
<Configuración de los altavoces para la salida de señal de sonido desde la tomas de 7.1ch AUDIO OUT>
Instalación ➔ Rápido ➔ Salida audio 7.1ch ➔ Multi Canal
Instalación → Custom → Audio → Salida audio 7.1ch → Multi Canal
Cómo navegar por la configuración de "Mult. HDMI (LPCM)" y "Multi Canal"
1) Utilice [△ / ▽] para seleccionar la opción de menú.
2) Utilice [△ / ▽] para seleccionar las opciones de configuración.
• Utilice [RETURN] para volver a la pantalla anterior.
3) Utilice [ ◀ / ▷ ] para seleccionar las opciones deseadas. (Excepto para "Tono Prueba" y "Por
Defecto")
<h1 id="para-tono-prueba">Para "Tono Prueba":</h1>
Utilice [◀/▶] para seleccionar "Manual" o "Auto" y después presione [ENTER].
- Se dará como salida el tono de prueba. Si selecciona "Manual", utilice [△ / ▽ para seleccionar el altavoz deseado y después utilice [◀ / ▽ para ajustar el volumen. Si selecciona "Auto" utilice [◀ / ▽ para ajustar el volumen del altavoz que da como salida el tono de prueba.
\- Si desea parar el tono de prueba, presione [RETURN].
Para "Por Defecto":
Presione [ENTER] para reconfigurar la configuración de "Tiempo de Retardo" al predeterminado de fábrica.
4) Pulse [SETUP] para salir.
<h1 id="español-26">ESPAÑOL</h1>
Menú Opciones de configuración Opciones Descripciones
<table><tr><td rowspan="11">Config. del altavozSeleccione la configuración de altavoces deseada a configurar.Después cambie la configuración correctamente consultando las descripciones.</td><td rowspan="2">Frontal</td><td>Ancha*</td><td rowspan="10">Ancha:Para altavoces grandes con potentes capacidades de reproducción de baja frecuencia.Estrecha:Para altavoces pequeños que no dan un potente sonido de bajos.Ninguno:Sin altavoces.Para “Sub graves” sólo hay “Enc.” o “Apdo.”.</td></tr><tr><td>Estrecha</td></tr><tr><td rowspan="2">Central</td><td>Ancha*</td></tr><tr><td>Estrecha/Ninguno</td></tr><tr><td rowspan="2">Sub graves</td><td>Enc.*</td></tr><tr><td>Apdo.</td></tr><tr><td rowspan="2">Surround</td><td>Ancha*</td></tr><tr><td>Estrecha/Ninguno</td></tr><tr><td rowspan="2">Envol. trasero</td><td>Ancha*</td></tr><tr><td>Estrecha/Ninguno</td></tr><tr><td>Frecuencia de cambio:Para altavoces configurados a “Estrecha”, el sonido con frecuencias por debajo de esta frecuencia se corta. Este sonido de bajos cortado se da como salida desde el realizador de graves o desde un altavoz que esté configurado a “Ancha”.</td><td>40/60/80*/100/120 Hz</td><td>Seleccione de acuerdo con las capacidades de reproducción de bajas frecuencias del altavoz conectado.</td></tr></table>
- Para la "Config. del altavoz", la configuración del tamaño de cada altavoz se puede ajustar automáticamente correspondiéndose con cada configuración. (Por ejemplo, si el "Frontal" está configurado a "Estrecha", el "Sub graves" se configurará automáticamente a "Enc." y también no puede configurar "Central", "Surround", y "Envol. trasero" a "Ancha".)
- Si conecta a un sistema de sonido envolvente de 5.1 canales, configure "Envol. trasero" de "Config. del altavoz" a "Ninguno".
- "Ninguno" para "Central", "Surround" y "Envol. trasero" no está disponible para la configuración de altavoces para la salida de la señal de sonido para la salida de señal de la toma HDMI OUT.
- "Apdo." para "Sub graves" no está disponible para la configuración de altavoces para la salida de la señal de sonido de la toma HDMI OUT.
<h1 id="español-27">ESPAÑOL</h1>
Configuración de Funciones Configuración de Funciones
<table><tr><td>Menú</td><td>Opciones de configuración</td><td>Opciones Descripciones</td></tr><tr><td rowspan="12">Nivel CanalesPrueba o configura el volumen de cada altavoz.</td><td rowspan="3">Tono Prueba:“Tono Prueba” es el tono de prueba que se puede dar como salida desde los altavoces para que pueda ajustar el volumen de cada altavoz.</td><td>Apdo.* Seleccione “Apdo.” para desactivar la función “Tono Prueba”.</td></tr><tr><td>Manual</td></tr><tr><td>Auto</td></tr><tr><td>Frontal Lch 0 dB a -12 dB</td><td>(0 dB*)</td></tr><tr><td>Central</td><td>0 dB a -12 dB(0 dB*)</td></tr><tr><td>Frontal Rch</td><td>0 dB a -12 dB(0 dB*)</td></tr><tr><td>Surround Rch</td><td>0 dB a -12 dB(0 dB*)</td></tr><tr><td>Envol. trasero Rch</td><td>0 dB a -12 dB(0 dB*)</td></tr><tr><td>Envol. trasero Lch</td><td>0 dB a -12 dB(0 dB*)</td></tr><tr><td>Surround Lch</td><td>0 dB a -12 dB(0 dB*)</td></tr><tr><td>Sub graves</td><td>0 dB a -12 dB(0 dB*)</td></tr><tr><td>SW + 10 dB(no disponible para HDMI)</td><td>Enc./Apdo.*</td></tr></table>
<table><tr><td>Menú</td><td>Opciones de configuración</td><td colspan="2">Opciones Descripciones</td></tr><tr><td rowspan="11">Tiempo de RetardoEste es un parámetro para optimizar la temporización en la que el sonido se da como salida de los altavoces y según la distancia a la posición de escucha.</td><td rowspan="2">Distancia</td><td>Ples*</td><td rowspan="2">Configure el sistema de medida deseado. Este sistema de medida será utilizado para la configuración del “Tiempo de Retardo”. Pulse [ENTER] para conmutar la configuración.</td></tr><tr><td>Metros</td></tr><tr><td>Frontal Lch 0 ft a 60</td><td>ft (12 ft*) (0 m a 18 m (3,6 m*))</td><td rowspan="8">Seleccione la distancia desde el punto de escucha al altavoz para obtener el tiempo de retardo ideal.</td></tr><tr><td>Frontal Rch 0 ft a 60</td><td>ft (12 ft*) (0 m a 18 m (3,6 m*))</td></tr><tr><td>Central 0 ft a 60 ft (1</td><td>2 ft*) (0 m a 18 m (3,6 m*))</td></tr><tr><td>Surround Lch 0 ft a</td><td>60 ft (10 ft*) (0 m a 18 m (3,0 m*))</td></tr><tr><td>Surround Rch 0 ft a</td><td>60 ft (10 ft*) (0 m a 18 m (3,0 m*))</td></tr><tr><td>Envol. trasero Lch 0</td><td>ft a 60 ft (10 ft*) (0 m a 18 m (3,0 m*))</td></tr><tr><td>Envol. trasero Rch 0</td><td>ft a 60 ft (10 ft*) (0 m a 18 m (3,0 m*))</td></tr><tr><td>Sub graves 0 ft a 60</td><td>ft (12 ft*) (0 m a 18 m (3,6 m*))</td></tr><tr><td colspan="2">Por Defecto</td><td>Seleccione “Por Defecto” y después presione [ENTER] para reconfigurar la configuración de “Tiempo de Retardo” al predeterminado de fábrica.</td></tr></table>
- Las configuraciones con (\*) son los predeterminados.
- Las opciones HDMI, "Ninguno" y "Apdo." no están disponibles para "Config. del altavoz".
- Para "Tiempo de Retardo", la diferencia entre el valor de cada altavoz no puede superar los 15 ft (4,5 m).
<h1 id="configuración-de-funciones-configuración-de-funciones-2">Configuración de Funciones Configuración de Funciones</h1>
<h1 id="clasificación">■ Clasificación</h1>
El control de calificaciones le permite establecer un límite que evite que sus hijos vean materiales inapropiados. La reproducción se detendrá si la calificación excede los niveles que usted ha configurado y requerirá que introduzca una contraseña antes de que el disco se reproduzca.

<details>
<summary>text_image</summary>
Language
Other
Classificación
Nivel clasific. BD Todo
Nivel clasific. DVD Todo
Camb. Contras.
</details>
<h1 id="1-utilice-para-seleccionar-y-después-presione-enter">1) Utilice [◀/▶] para seleccionar y después presione [ENTER].</h1>
2) Pulse los [botones numéricos] para introducir su contraseña de cuatro dígitos.
Para el uso por primera vez: Pulse [botones numéricos] e introduzca una contraseña de cuatro dígitos nueva (excepto 4737) y después pulse [ENTER]. Ese número se utilizará como contraseña desde la segunda vez. Anote su contraseña por si la olvida.
- Si ha olvidado la contraseña, introduzca [4], [7], [3], [7]. La contraseña se borrará y el nivel de calificación se configurará a "Todo".
- Mientras introduce la contraseña, pulse [CLEAR] para borrar el número y volver al introducir la contraseña.
<h1 id="pase-a-a-c">Pase a A - C</h1>
A) Nivel clasific. BD
1) Utilice [△ / ▽] para seleccionar "Nivel clasific. BD" y después presione [ENTER].
2) Utilice [△ / ▽] para seleccionar su opción deseada y después pulse [ENTER].
"Todo": Para liberar la limitación.
"Ajuste de edad": Para configurar la limitación de edad.
- Después de seleccionar "Ajuste de edad", utilice [botones numéricos] para introducir la edad de desde 0 a 254, y después pulse [ENTER].
(por ejemplo, para una edad de 15 años, presione [0],[1],[5])
3) Pulse [SETUP] para salir.
B) Nivel clasific. DVD
1) Utilice [△ / ▽] para seleccionar "Nivel clasific. DVD" y después presione [ENTER].
2) Utilice [△ / ▽] para seleccionar un nivel deseado y después pulse [ENTER].
3) Pulse [SETUP] para salir.
<h1 id="español-28">ESPAÑOL</h1>
<h1 id="explicaciones-de-la-calificación">EXPLICACIONES DE LA CALIFICACIÓN</h1>
- Todo: El control paterno está inactivo, se pueden reproducir todos los discos.
- 8 [Adult] : Software de DVD de cualquier calificación (adulto/general/niños) pueden reproducirse.
- 7 [NC-17] : No se permite a nadie de menos de 17 años.
• 6 [R] : Restringido, quienes tengan menos de diecisiete años necesitan ir acompañados de un padre o tutor.
• 5 [PGR] : Se recomienda orientación paterna.
• 4 [PG13] : No apropiado para niños de menos de 13 años.
• 3 [PG] : Se sugiere orientación paterna.
• 2 [G] : Público general.
• 1 [Kid Safe] : Apropiado para niños.
<h1 id="c-cambio-de-contraseña">C) Cambio de contraseña</h1>
1) Utilice [△ / ▽] para seleccionar "Camb. Contras." y después presione [ENTER].
2) Introduzca una contraseña de cuatro dígitos nueva y después pulse [ENTER].
3) Pulse [SETUP] para salir.
<h1 id="español-29">ESPAÑOL</h1>
Configuración de Funciones Configuración de Funciones


<details>
<summary>text_image</summary>
Language
Other
A
Icone de Ángulo
Salvapantallas
Auto Apogato
Panel Pantalla
Vista Mimilat
DivX(R) VOD
Substituido
Apdo.
Enc.
Enc.
Brillo
Esec
Apdo.
</details>

<details>
<summary>text_image</summary>
Los
lungs
usige
Other
Otros
A
Albarro de energía
Config. ctrl. remoto
Selección de medios
Enc.
DENON1
Disco
</details>
\- Para ver cómo seleccionar los elementos y opciones, consulte "Personalizado" en la página 29.
<table><tr><td colspan="2">Opciones de configuración Optiones</td></tr><tr><td rowspan="2">Icono de Ángulo Enc.:</td><td>El icono ángulo aparece en la pantalla cuando se reproduce una escena con varios ángulos.</td></tr><tr><td>Apdo.*: El icono de ángulo desaparece de la pantalla.</td></tr><tr><td rowspan="2">Salvapantallas Enc.*:</td><td>Si se deja la unidad sin actividad durante más de 5 minutos, se activa el salvapantallas.</td></tr><tr><td>Apdo.: Configura el salvapantallas a apagado.</td></tr><tr><td rowspan="2">Auto Apagato Enc.*:</td><td>Si se deja la unidad sin actividad durante más de 30 minutos, la unidad se apaga automáticamente.</td></tr><tr><td>Apdo.: Configura el apagado automático.</td></tr><tr><td rowspan="3">Panel Pantalla Configura el brillo de la pantalla del panel delantero.</td><td>Brillo*: La pantalla del panel delantero se lumina con más intensidad.</td></tr><tr><td>Oscuro: La pantalla del panel delantero se oscurece.</td></tr><tr><td>Auto: La pantalla del panel delantero se oscurece durante la reproducción.</td></tr><tr><td rowspan="2">Vista Minlat. Configura el tiempo de visualización de la reproducción de foto fija (en formato JPEG)</td><td>5sec*</td></tr><tr><td>10sec</td></tr><tr><td>DivX(R) VOD Proporciona el código de registro DivX® VOD.</td><td>Para mayor Información sobre DivX® VOD, visite www.dlvx.com/vod</td></tr></table>
<table><tr><td colspan="2">Opciones de configuración Opciones</td></tr><tr><td rowspan="2">SubtituladoConfigura si mostrar el subtitulado electrónico o no utilizando el descodificador de subtitulos (disponible en tiendas).</td><td>Enc.</td></tr><tr><td>Apdo.*</td></tr><tr><td rowspan="2">Ahorro de energíaBaje el consumo de energía para el modo de espera negando el comando de RS-232C durante el modo espera.</td><td>Enc.*:Niega el comando de RS-232C cuando la alimentación está en modo espera.</td></tr><tr><td>Apdo.:Acepta el comando de RS-232C cuando la alimentación está en modo espera.</td></tr><tr><td rowspan="2">Config. ctrl. remotoCambla el código de señal del mando a distancia. (Consulte la página 6)</td><td>DENON1*</td></tr><tr><td>DENON2</td></tr><tr><td rowspan="2">Selección de mediosSeleccione el soporte a reproducir.</td><td>Disco*:Seleccione esto cuando reproduzca un disco.</td></tr><tr><td>Memoria SD:Seleccione esto cuando reproduzca una tarjeta de memoria SD.</td></tr></table>
<h1 id="initia-lize-inicializar">INITIA LIZE Inicializar</h1>
Inicializar la configuración o tarjeta de memoria SD.

<details>
<summary>text_image</summary>
QUICK
CUS TOM
INITTA LIZE
Inicializar
¿Ejecuta La Inicialización?
No
Instalación
Dispositivo memoria
</details>
1) Pulse [SETUP] en modo parado.
2) Utilice [◀/▶] para seleccionar "Inicializar" y después presione [ENTER].
3) Utilice [△ / ▽] para seleccionar una opción deseada y después pulse [ENTER].
"No": Sale sin inicialización.
"Instalación": Reconfigura el ajuste configurar al predeterminado de fábrica.
"Dispositivo memoria": Inicializa la tarjeta de memoria SD. Después de que aparece el mensaje de confirmación, utilice [△ / ▽] para seleccionar "Sí" y despúes pulse [ENTER].
4) Pulse [ENTER]. (Sólo para "Instalación" y "Dispositivo memoria")
5) Pulse [SETUP] para salir.
<h1 id="nota-41">Nota</h1>
\- La configuración de "Clasificación" no se restablece.
<h1 id="otros-2">Otros</h1>
ESPAÑOL
Otros
<h1 id="resolución-de-problemas">Resolución de Problemas</h1>
Si la unidad no funciona correctamente cuando se hace funcionar según estas Instrucciones de funcionamiento, compruebe la unidad consultando la siguiente lista de comprobación.
<table><tr><td>Problema Solución</td><td></td><td>Página</td></tr><tr><td>Sin alimentación</td><td>- Compruebe si el cable de alimentación está conectado correctamente.- Desenchufe el cable de alimentación una vez y espere durante cinco de segundos y después vuelva a enchufarlo de nuevo.</td><td>-</td></tr><tr><td>Sin sonido o imagen</td><td>- Compruebe si el dispositivo de visualización conectado está encendido.- Compruebe la conexión HDMI. (Compruebe el estado de las indicaciones relacionadas con HDMI).- Compruebe la conexiones de cables RCA de sonido/video.- Compruebe si el modo directo puro está configurado a "Video Off" o "All Off". Si éste es el caso, configúrelo a "Display Off" o "Normal".- Compruebe si el equipo de visualización conectado u otro equipo soportan HDCP. (Esta unidad no puede dar como salida señal de vídeo a menos que el otro equipo soporte HDCP).- Compruebe si el formato de salida de esta unidad (FORMATO HDMI) coincide con el formato de entrada soportado del otro equipo conectado.- Compruebe si el "HDMI Deep Color" está configurado a "Auto". Si éste es el caso, configúrelo a "Apdo.".- Compruebe si el "VP Direct" está configurado a "Enc". Si éste es el caso, configúrelo a "Apdo.".</td><td>10, 13231210,30,313131</td></tr><tr><td colspan="3">Imagen distorsionada - A veces puede que aparezca una pequeña distorsión de la imagen.No es un fallo de funcionamiento.Conecte esta unidad directamente al TV. Si los cables RCA de sonido/ video se conectan a un grabador de video, las imágenes puede que se distorsionen debido al sistema de protección contra copias.</td></tr><tr><td>Imagen completamente distorsionada o imagen en blanco y negro con BD/DVD</td><td>- Asegúrese de que el disco sea compatible con esta unidad.4</td><td></td></tr><tr><td>Sin sonido o sonido distorsionado - Ajuste el volumen.- Compruebe que los altavoces están conectados correctamente.- Compruebe la conexiones HDMI.- Compruebe la configuraciones "Audio".</td><td>-10,12,131032,33</td><td></td></tr><tr><td>La imagen se congela momentáneamente durante la reproducción</td><td>- Compruebe el disco para ver si tiene huellas/rayas y limpieño con un paño suave desde el centro hasta el extrema.- Limpie el disco.</td><td>44</td></tr><tr><td>No se puede reproducir el disco - Limpie el disco.- Asegúrese de que la etiqueta del disco está hacia arriba.- Compruebe si el disco es defectuoso probando otro disco.- Cancele el control de calificación o cambie el nivel de control.- Introduzca un disco correcto que se pueda reproducir en esta unidad.</td><td>414-364</td><td></td></tr><tr><td>La tarjeta de memoria 5D no se puede leer.</td><td>- El formato de la tarjeta no coincide con esta unidad o la tarjeta no es compatible.</td><td>-</td></tr><tr><td>No vuelve a la pantalla de inicio cuando se quita el disco</td><td>- Restablezca esta unidad apagándola y después encendiéndola de nuevo.</td><td>-</td></tr><tr><td>La unidad no responde al mando a distancia</td><td>- Dirija el mando a distancia directamente a la ventana del sensor de infrarrojos de la parte delantera de la unidad.- Reduzca la distancia hasta la ventana del sensor de infrarrojos.- Susituya las pilas del mando a distancia.- Vuelva a introducir las pilas con su polaridades (signos +/-) según se indican.- Haga que el código de señal del mando a distancia coincida con el código de señal de la unidad.</td><td>6-66</td></tr></table>
<table><tr><td>Problema Solución</td><td></td><td>Página</td></tr><tr><td>Los botones no funcionan o la unidad deja de responder</td><td>- Para restaurar completamente la unidad, desenchufe el cable CA del enchufe de CA durante 5 a 10 segundos.</td><td>-</td></tr><tr><td>La unidad no responde a algunas instrucciones de funcionamiento durante la reproducción</td><td>- Las operaciones pueden no permitirse por parte del disco. Consulte las instrucciones del disco.</td><td>14</td></tr><tr><td>La unidad no puede leer los BD/DVD/CD</td><td>- ¿Condensación? (Deje la unidad reposar durante 1 o 2 horas)- Está intentando reproducir un disco distinto de uno con las marcas de la página 4.- Limpie la suciedad del disco o câmbielo.</td><td>344</td></tr><tr><td colspan="2">El ángulo no cambia - El ángulo no puede cambiarse para BD/DVD que no contengan múltiples ángulos. En algunos casos, los múltiples ángulos están grabados solamente para escenas específicas.</td><td>19</td></tr><tr><td>La reproducción no comienza cuando se selecciona el título</td><td>- Compruebe la configuración "Clasificación". 36</td><td></td></tr><tr><td>Se ha olvidado la contraseña para este nivel de calificación</td><td>- Introduzca la contraseña predeterminada "4737" y después su contraseña olvidada será borrada.</td><td>36</td></tr></table>
<h1 id="nota-42">Nota</h1>
\- Algunas funciones no están disponibles en modos específicos, pero esto no es un fallo de funcionamiento. Lea la descripción en estas Instrucciones de funcionamiento para ver los detalles de las operaciones correctas.
\- Algunas funciones están prohibidas en algunos discos.
Otros Otros
Código de Idioma
<table><tr><td colspan="2">Idioma Código</td></tr><tr><td colspan="2">A-B</td></tr><tr><td colspan="2">abkhazian 4748</td></tr><tr><td colspan="2">afar 4747</td></tr><tr><td colspan="2">afrikaans 4752</td></tr><tr><td colspan="2">aimará 4771</td></tr><tr><td colspan="2">albanés 6563</td></tr><tr><td colspan="2">alemán [GER] 5051</td></tr><tr><td colspan="2">amárico 4759</td></tr><tr><td colspan="2">árabe 4764</td></tr><tr><td colspan="2">armenlo 5471</td></tr><tr><td colspan="2">assamés 4765</td></tr><tr><td colspan="2">azerbalyano 4772</td></tr><tr><td colspan="2">bashkir 4847</td></tr><tr><td>bengali; bangladesi</td><td>4860</td></tr><tr><td colspan="2">bhutani 5072</td></tr><tr><td colspan="2">bielorruso 4851</td></tr><tr><td colspan="2">bihari 4854</td></tr><tr><td>birmano</td><td>5971</td></tr><tr><td colspan="2">bislama 4855</td></tr><tr><td colspan="2">bretón 4864</td></tr><tr><td>búlgaro [BUL]</td><td>4853</td></tr><tr><td colspan="2">C-E</td></tr><tr><td>cachemír</td><td>5765</td></tr><tr><td>camboyano</td><td>5759</td></tr><tr><td colspan="2">catalán 4947</td></tr><tr><td>checo [CZE]</td><td>4965</td></tr><tr><td>chino [CHI]</td><td>7254</td></tr><tr><td>coreano [KOR]</td><td>5761</td></tr><tr><td>corso</td><td>4961</td></tr><tr><td>croata</td><td>5464</td></tr><tr><td>danés [DAN]</td><td>5047</td></tr></table>
<table><tr><td colspan="2">Idioma Código</td></tr><tr><td>escocés gaélico</td><td>5350</td></tr><tr><td>eslovaco [SLO]</td><td>6557</td></tr><tr><td>esloveno</td><td>6558</td></tr><tr><td>español [SPA]</td><td>5165</td></tr><tr><td>esperanto</td><td>5161</td></tr><tr><td>estonio</td><td>5166</td></tr><tr><td colspan="2">F-H</td></tr><tr><td>faroés</td><td>5261</td></tr><tr><td>fidjiano</td><td>5256</td></tr><tr><td>finlandés [FIN]</td><td>5255</td></tr><tr><td>francés [FRE]</td><td>5264</td></tr><tr><td>frisio</td><td>5271</td></tr><tr><td>galés</td><td>4971</td></tr><tr><td>gallego</td><td>5358</td></tr><tr><td>georgiano</td><td>5747</td></tr><tr><td>griego [GRE]</td><td>5158</td></tr><tr><td>groenlandés</td><td>5758</td></tr><tr><td>guaraní 5360</td><td></td></tr><tr><td>gujarati 5367</td><td></td></tr><tr><td>hausa</td><td>5447</td></tr><tr><td>hebreo 5569</td><td></td></tr><tr><td>hindi</td><td>5455</td></tr><tr><td>holandés [DUT]</td><td>6058</td></tr><tr><td>húngaro [HUN]</td><td>5467</td></tr><tr><td colspan="2">I-K</td></tr><tr><td>Indonesio</td><td>5560</td></tr><tr><td>inglés [ENG] 5160</td><td></td></tr><tr><td>interlingua</td><td>5547</td></tr><tr><td>interlingue</td><td>5551</td></tr><tr><td>inupiak</td><td>5557</td></tr><tr><td>irlandés [IRI] 5347</td><td></td></tr><tr><td>islandés [ICE]</td><td>5565</td></tr></table>
<table><tr><td colspan="2">Idioma Código</td></tr><tr><td>italiano [ITA]</td><td>5566</td></tr><tr><td>japonés [JPN]</td><td>5647</td></tr><tr><td>javanés</td><td>5669</td></tr><tr><td>kannada</td><td>5760</td></tr><tr><td>kazakh</td><td>5757</td></tr><tr><td>kinyarwanda</td><td>6469</td></tr><tr><td>kirguis</td><td>5771</td></tr><tr><td>kirundi</td><td>6460</td></tr><tr><td>kurdo</td><td>5767</td></tr><tr><td colspan="2">L-N</td></tr><tr><td colspan="2">laosiano 5861</td></tr><tr><td>latín</td><td>5847</td></tr><tr><td>latvio; letón</td><td>5868</td></tr><tr><td>lingala</td><td>5860</td></tr><tr><td>lituano</td><td>5866</td></tr><tr><td>macedonio</td><td>5957</td></tr><tr><td>malayalam</td><td>5958</td></tr><tr><td>malayo</td><td>5965</td></tr><tr><td>malgache</td><td>5953</td></tr><tr><td>maltés</td><td>5966</td></tr><tr><td colspan="2">maori 5955</td></tr><tr><td>marati</td><td>5964</td></tr><tr><td colspan="2">moldavo 5961</td></tr><tr><td colspan="2">mongol 5960</td></tr><tr><td>naurú</td><td>6047</td></tr><tr><td>nepalés</td><td>6051</td></tr><tr><td>noruego [NOR]</td><td>6061</td></tr><tr><td colspan="2">O-R</td></tr><tr><td>occitano</td><td>6149</td></tr><tr><td>oriya</td><td>6164</td></tr><tr><td>oromo(afán)</td><td>6159</td></tr><tr><td>panjabi</td><td>6247</td></tr></table>
<table><tr><td colspan="2">Idioma Código</td></tr><tr><td>pashtu; pushto</td><td>6265</td></tr><tr><td>persa</td><td>5247</td></tr><tr><td>polaco [POL]</td><td>6258</td></tr><tr><td>português [POR]</td><td>6266</td></tr><tr><td>quichua 6367</td><td></td></tr><tr><td>raeto-romance</td><td>6459</td></tr><tr><td>rumano [RUM]</td><td>6461</td></tr><tr><td>ruso [RUS]</td><td>6467</td></tr><tr><td colspan="2">S</td></tr><tr><td>samoano</td><td>6559</td></tr><tr><td>sangho</td><td>6553</td></tr><tr><td>sánscrito 6547</td><td></td></tr><tr><td>senegalés</td><td>6555</td></tr><tr><td>serbio</td><td>6564</td></tr><tr><td>serbio-croata</td><td>6554</td></tr><tr><td>sesotho 6566</td><td></td></tr><tr><td>setswana</td><td>6660</td></tr><tr><td>shona</td><td>6560</td></tr><tr><td>sindhi</td><td>6550</td></tr><tr><td>siswat</td><td>6565</td></tr><tr><td>somali</td><td>6561</td></tr><tr><td>sueco [SWE]</td><td>6568</td></tr><tr><td>sundanés</td><td>6567</td></tr><tr><td>swahili</td><td>6569</td></tr><tr><td colspan="2">T</td></tr><tr><td>tagalog</td><td>6658</td></tr><tr><td>tallandés</td><td>6654</td></tr><tr><td>tajik</td><td>6653</td></tr><tr><td>tamil</td><td>6647</td></tr><tr><td>tártaro 6666</td><td></td></tr><tr><td>telugu</td><td>6651</td></tr><tr><td>tibetano</td><td>4861</td></tr></table>
<table><tr><td colspan="2">Idioma Código</td></tr><tr><td colspan="2">tigrinya 6655</td></tr><tr><td>tonga</td><td>6661</td></tr><tr><td>tsonga</td><td>6665</td></tr><tr><td>turco [TUR]</td><td>6664</td></tr><tr><td>turkmen</td><td>6657</td></tr><tr><td>twi</td><td>6669</td></tr><tr><td colspan="2">U-Z</td></tr><tr><td>ucranio</td><td>6757</td></tr><tr><td>urdu</td><td>6764</td></tr><tr><td>uzbeco</td><td>6772</td></tr><tr><td colspan="2">vasco 5167</td></tr><tr><td>vletnamlta</td><td>6855</td></tr><tr><td colspan="2">volapuk 6861</td></tr><tr><td colspan="2">wolof 6961</td></tr><tr><td>xhosa</td><td>7054</td></tr><tr><td colspan="2">yiddish 5655</td></tr><tr><td>yoruba</td><td>7161</td></tr><tr><td>zulú</td><td>7267</td></tr></table>
<h1 id="nota-43">Nota</h1>
\- Si elige un idioma que tiene código de idioma de 3 letras (escrito entre corchetes), el código se mostrará cada vez que cambie la configuración del idioma de sonido o idioma de subtítulo en las página 22. Si elige cualquier otro idioma, se mostrará ‘---’ en cambio.
Otros Otros
ESPAÑOL
<h1 id="especificaciones">Especificaciones</h1>
<h1 id="sistema-de-señales">SISTEMA DE SEÑALES</h1>
Color NTSC
<h1 id="discos-aplicables">DISCOS APLICABLES</h1>
(1) Discos BD/DVD-video
Discos de una capa de una sola y cara de 12 cm, discos de dos capas de una sola cara de 12 cm, discos de dos capas de 2 caras de 12 cm (1 capa por cada)
Discos de una capa de una sola cara de 8 cm, discos de dos capas de una sola cara de 8 cm, discos de dos capas de 2 caras de 8 cm (1 capa por cara)
(2) BD-RE / BD-R (grabado en formato BDMV)
Discos de una sola cara de 12 cm de 1 capa, discos de una sola cara de 12 cm de 2 capas
Discos de una sola cara de 8 cm de 1 capa, discos de una sola cara de 8 cm de 2 capas
(3) DVD-R
Discos de una sola cara de 12 cm de 1 capa, discos de una sola cara de 12 cm de 2 capas
Discos de una sola cara de 8 cm de 1 capa, discos de una sola cara de 8 cm de 2 capas
(4) DVD-RW
Discos de 1 capa, de 12 cm y de una sola cara
Discos de 1 capa, de 8 cm y de una sola cara
(5) Discos compactos (CD de sonido)
Discos de 12 cm, discos de 8 cm
(6) CD-RW/-R
Discos de 12 cm, discos de 8 cm
<h1 id="tarjetas-de-memoria-aplicables">TARJETAS DE MEMORIA APLICABLES</h1>
(1) Tarjeta de memorias SD
(2) Tarjeta de memoria SDHC
(3) Tarleta miniSD
(4) Tarjeta microSD
<h1 id="salida-s-video">SALIDA S-VIDEO</h1>
Nivel de salida Y: 1 Vp-p (75Ω/ohmios)
Nivel de salida C: 0,286 Vp-p
Tomas de salida: Conector S, 1 conjunto
<h1 id="salida-de-video">SALIDA DE VIDEO</h1>
Nivel de salida Y: 1 Vp-p (75Ω/ohmios)
Tomas de salida: Conector de patillas, 1 conjunto
<h1 id="salida-de-componente">SALIDA DE COMPONENTE</h1>
Nivel de salida Y: 1 Vp-p (75Ω/ohmios)
Nivel de salida Pb/CB: 0,648 Vp-p (75Ω/ohmios)
Nivel de salida PR/CR: 0,648 Vp-p (75Ω/ohmios)
Tomas de salida: Tomas BNC, 1 conjunto/Tomas de patillas, 1 conjunto
<h1 id="salida-hdmi">SALIDA HDMI</h1>
Toma de salida: Terminal HDMI de 19 patillas, 1 conjunto
HDMI ver. 1.3a (Deep Color, Dolby Digital Plus, Dolby TrueHD, DTS-HD)
<h1 id="salida-de-sonido-analógico">SALIDA DE SONIDO ANALÓGICO</h1>
Nivel de salida: 2 Vrms
Conector de salida de 2 canales (I, D): Tomas de patillas,
Multicanal (FL, FR, C, SL, SR, SBL, SBR, SW): Tomas de patillas, 1 conjunto
<h1 id="pripiedades-de-salida-de-sonido">PRIPIEDADES DE SALIDA DE SONIDO</h1>
(1) Respuesta de frecuencia
1 BD (PCM lineal) : 4 Hz a 22 kHz (muestreo a 48 kHz)
: 4 Hz a 44 kHz (muestreo a 96 kHz)
: 4 Hz a 88 kHz (muestreo a 192 kHz)
2 DVD (PCM lineal) : 4 Hz a 22 kHz (muestreo a 48 kHz)
: 4 Hz a 44 kHz (muestreo a 96 kHz)
3 CD:4 Hz a 20 kHz
(2) Proporción S/N : 125 dB
(3) Distorsión armónica total : 1 kHz 0,0008%
(4) Control de Rango Dinámico: 110 dB
<h1 id="salida-de-sonido-digital">SALIDA DE SONIDO DIGITAL</h1>
Salida digital óptica: Conector óptico, 1 conjunto
Salida digital coaxial: Conector de patillas, 1 conjunto
<h1 id="fuente-de-alimentación-2">FUENTE DE ALIMENTACIÓN</h1>
<h1 id="consumo-de-alimentación">CONSUMO DE ALIMENTACIÓN</h1>
68 W (Espera: 0,8 W)
<h1 id="dimensiones-externas-máximas">DIMENSIONES EXTERNAS MÁXIMAS</h1>
An:434 mm (17-2/16 pulgadas)
Al :139 mm (5-8/16 pulgadas)
P :399 mm (15-12/16 pulgadas)
(incluyendo las piezas que sobresalen)
<h1 id="peso">PESO</h1>
10,3 kg (22,8 libras)
<h1 id="mando-a-distancia-2">MANDO A DISTANCIA</h1>
RC-1090
Tipo de pulsos por infrarrojos
Alimentación: dos pilas de tipo DC 3 V, 2 R6P/AA
Dimensiones externas:
An:52 mm (2-1/16 pulgadas)
Al :227 mm (8-15/16 pulgadas)
P:30 mm (1-3/16 pulgadas
Peso: 171 g (0,4 libras) (incluidas las baterías)
\- Con propósitos de mejora, las especificaciones y el diseño están sujetos a cambios sin aviso previo.
<h1 id="denon-2">DENON</h1>
TOKYO, JAPAN
www.denon.com
Denon Brand Company, D&M Holdings Inc.
E5E00UD\_E5H00UD / 1VMN24353C ★★
Printed in China
541 110019 303D