H MOUNT ADAPTER G - Lens Adapter FUJIFILM - Free user manual and instructions
Find the device manual for free H MOUNT ADAPTER G FUJIFILM in PDF.
| Product Type | Lens Adapter |
| Brand | Fujifilm |
| Model | H Mount Adapter G |
| Weight | Approximately 210 g (without caps) |
| Supplied Accessories | Tripod collar, front cap, rear cap |
| Main Functions | Allows mounting compatible lenses on a Fujifilm camera body; function button to access the adapter ring settings menu; shutter selection (camera or lens) for lenses with internal shutter |
| Lens Compatibility | Lenses with H (G) mount |
| Care and Cleaning | Clean with a dry cloth; avoid steam, smoke, moisture, and dust; store away from sunlight with caps on |
| Safety Instructions | Do not immerse, disassemble, look at the sun through it, keep out of reach of children, do not use on unstable surface |
| Power Supply | No independent power supply; uses camera power via contacts |
| Dimensions | Not specified in the manual |
| Operating Temperature | Avoid very high temperatures (direct sunlight, closed vehicle) |
| Tripod Attachment | Use the supplied tripod collar; align the marks and lock |
| Firmware Update | Update via the Fujifilm website; some features require the latest version |
| Warranty | Not specified; contact the dealer for repairs |
| Disposal | Do not dispose of with household waste; recycle according to local regulations |
Frequently Asked Questions - H MOUNT ADAPTER G FUJIFILM
User questions about H MOUNT ADAPTER G FUJIFILM
0 question about this device. Answer the ones you know or ask your own.
Ask a new question about this device
Download the instructions for your Lens Adapter in PDF format for free! Find your manual H MOUNT ADAPTER G - FUJIFILM and take your electronic device back in hand. On this page are published all the documents necessary for the use of your device. H MOUNT ADAPTER G by FUJIFILM.
USER MANUAL H MOUNT ADAPTER G FUJIFILM
natural_image
Technical line drawing of a DSLR camera with labeled parts (no text or symbols beyond numbered annotations)レンズの取り付け方
natural_image
Technical line drawing of a DSLR camera with no visible text or symbols横位置
natural_image
Technical line drawing of a mechanical device with no visible text or symbols縱位置
natural_image
Line drawing of a DSLR camera with lens and adjustment knob (no text or symbols)natural_image
Technical line drawing of a DSLR camera with an inset showing a cable being inserted (no text or symbols present)主な仕様
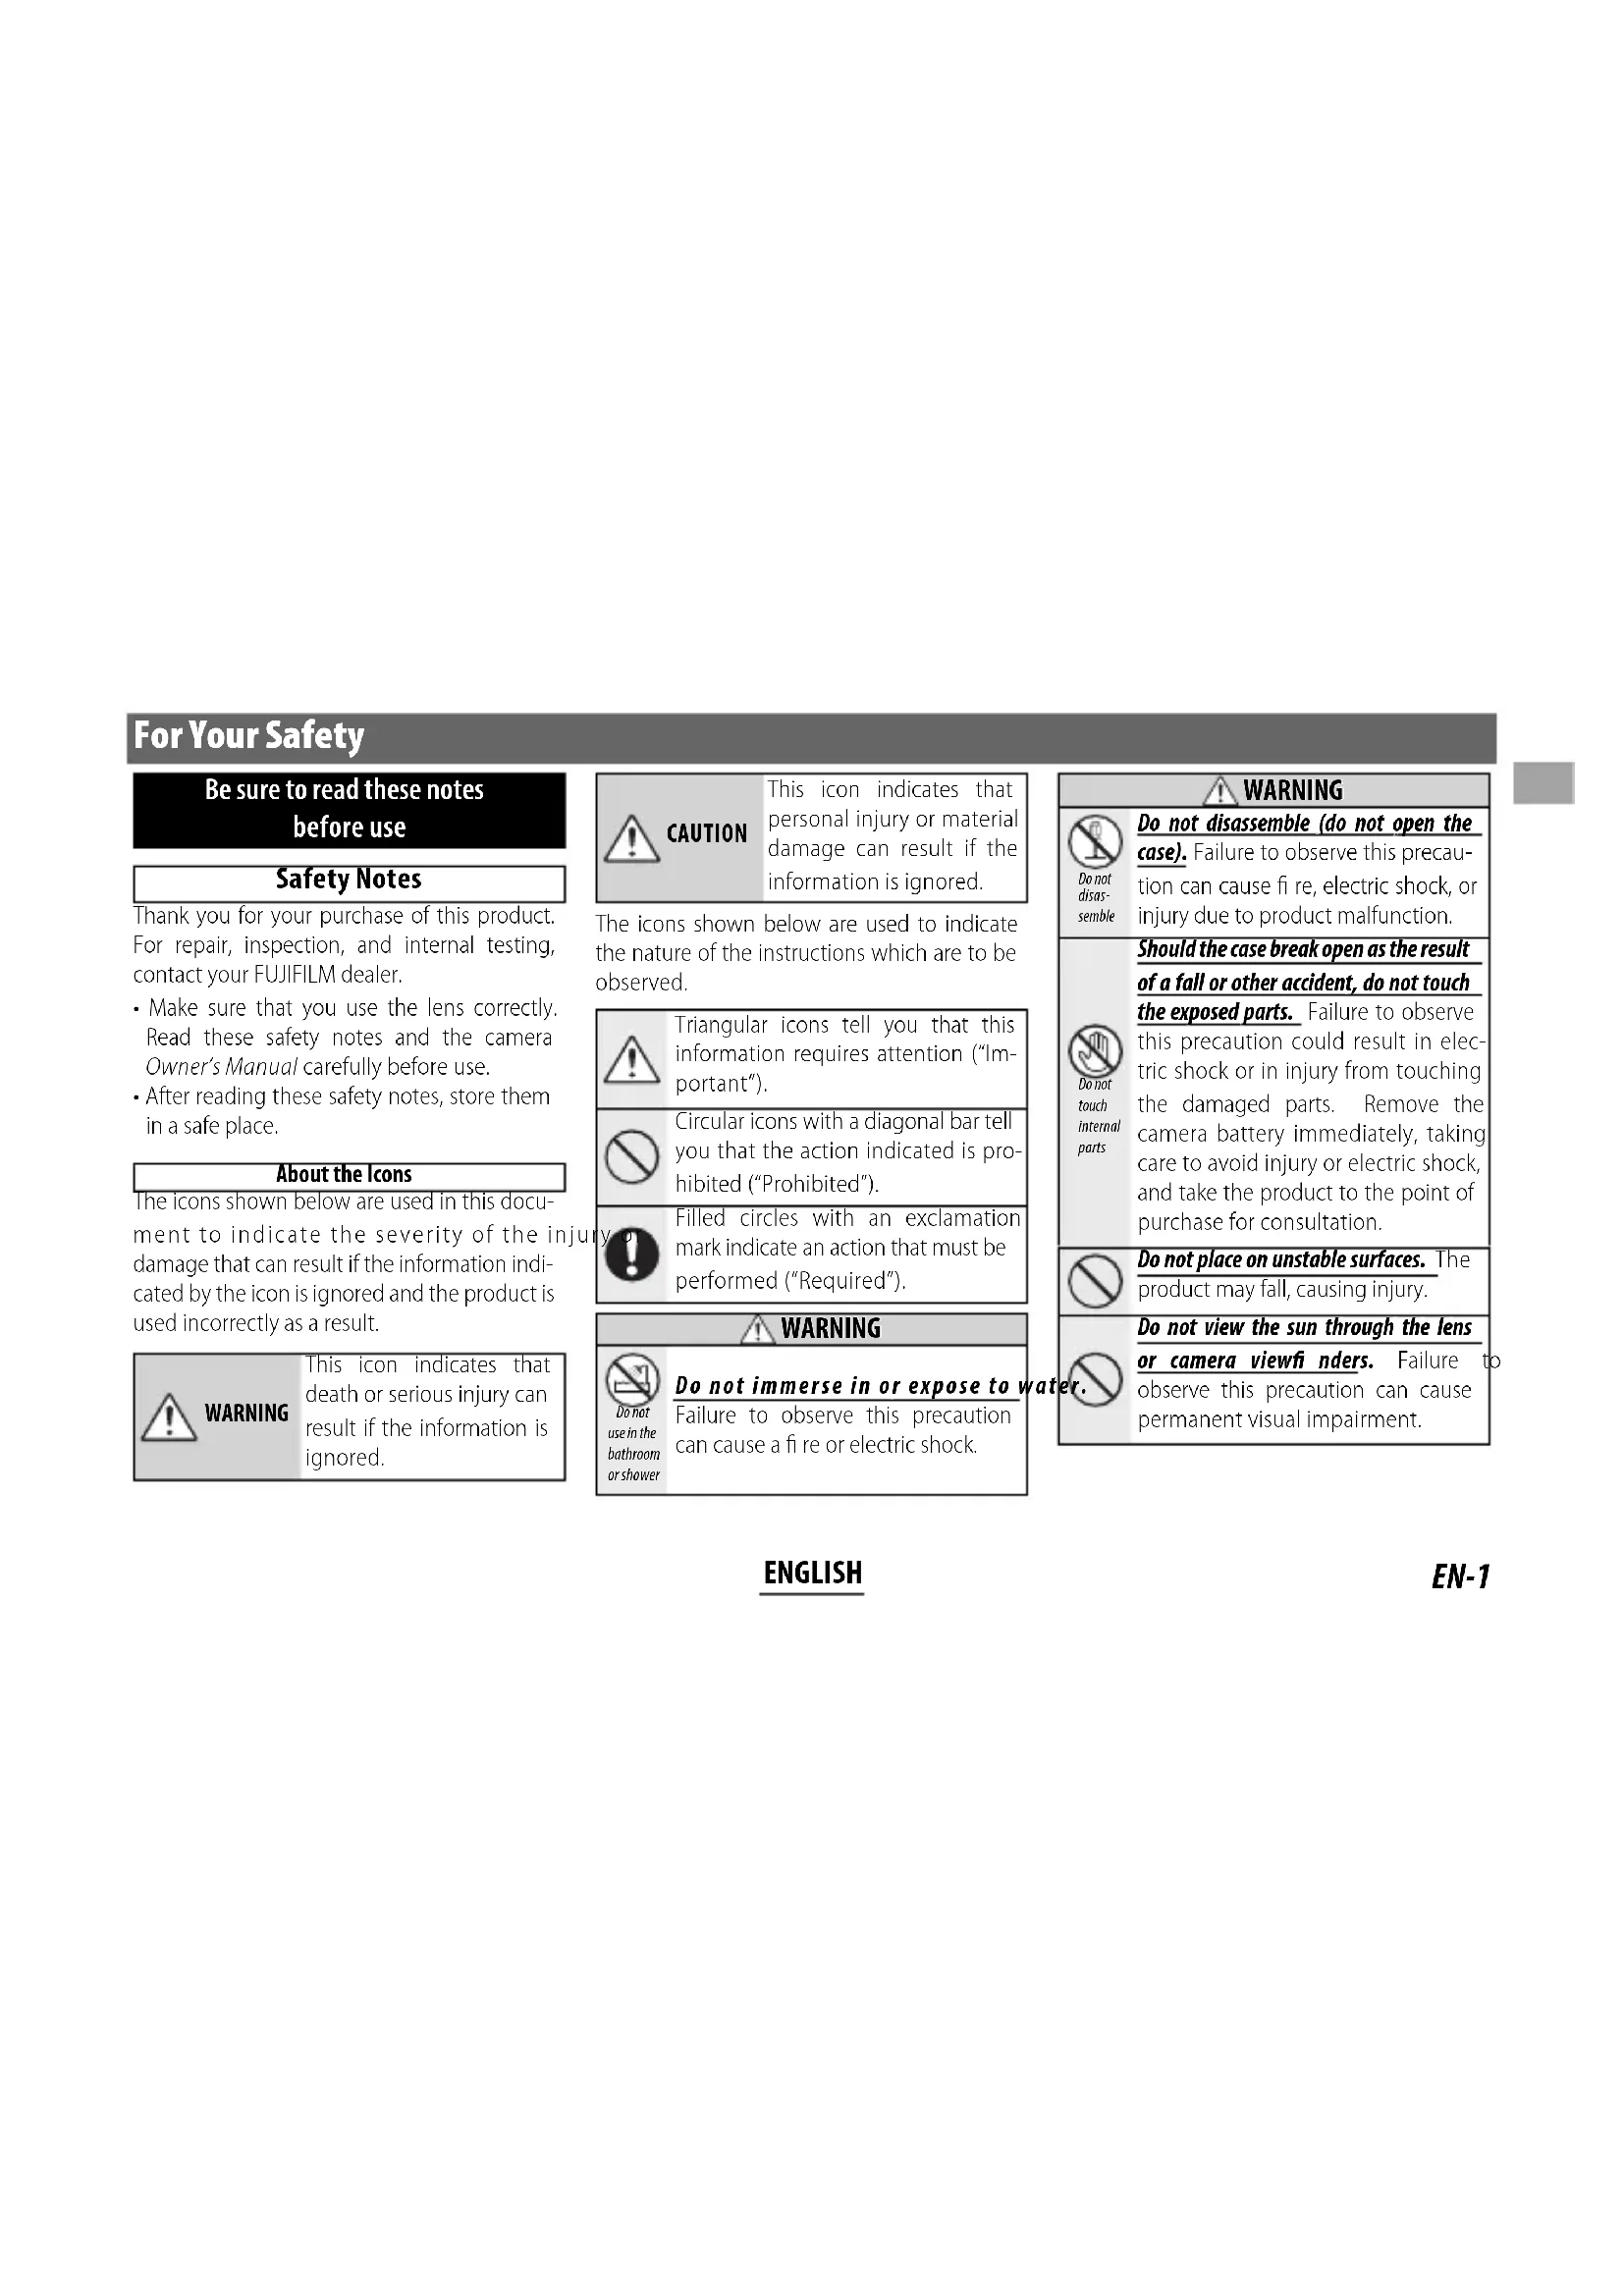
Be sure to read these notes before use
Safety Notes
Thank you for your purchase of this product. For repair, inspection, and internal testing, contact your FUJIFILM dealer.
• Make sure that you use the lens correctly. Read these safety notes and the camera Owner's Manual carefully before use.
• After reading these safety notes, store them in a safe place.
About the Icons
The icons shown below are used in this document to indicate the severity of the injury damage that can result if the information indicated by the icon is ignored and the product is used incorrectly as a result.

WARNING
This icon indicates that death or serious injury can result if the information is ignored.

CAUTION
This icon indicates that personal injury or material damage can result if the information is ignored.
The icons shown below are used to indicate the nature of the instructions which are to be observed.

Triangular icons tell you that this information requires attention ("Important").

Circular icons with a diagonal bar tell you that the action indicated is prohibited ("Prohibited").

Filled circles with an exclamation mark indicate an action that must be performed ("Required").
WARNING

Do not use in the bathroom or shower
Do not immerse in or expose to Failure to observe this precaution can cause a fire or electric shock.
| WARNING | |
 | Do not disassemble (do not open the case). Failure to observe this precaution can cause fi re, electric shock, or injury due to product malfunction. |
| Do not disas-semble | |
 | Should the case break open as the result of a fall or other accident, do not touch the exposed parts. Failure to observe this precaution could result in elec-tric shock or in injury from touching the damaged parts. Remove the camera battery immediately, taking care to avoid injury or electric shock, and take the product to the point of purchase for consultation. |
| touch internal parts | |
 | Do not place on unstable surfaces. The product may fall, causing injury. |
 | Do not view the sun through the lens or camera viewfi nders. Failure to observe this precaution can cause permanent visual impairment. |
| CAUTION | |
 | Do not use or store in locations that are exposed to steam, or smoke or are very humid or extremely dusty.Failure to observe this precaution can cause fi re or electric shock. |
 | Do not leave in direct sunlight or in locations subject to very high temperatures, such as in a closed vehi sunny day.Failure to observe this precaution can cause fi re. |
 | Keep out of the reach of small children.This product could cause injury in the hands of a child. |
 | Do not handle with wet hands.Failure to observe this precaution can cause electric shock. |
 | Keep the sun out of the frame when shooting backlit subjects.Sunlight focused into the camera when the sun is in or close to the frame can cause fire or burns. |
 | When the product is not in use, replace the lens caps and store out of direct sun-light.Sunlight focused by the lens can cause fi re or burns. |
| CAUTION | |
| Do not carry the camera or lens whilethey are attached to a tripod. Theproduct can fall or strike other objects, causing injury. | |
For Customers in the U.S.A.
Tested To Comply With FCC Standards FOR HOME OR OFFICE USE

FCC Statement: This device complies with Part 15 of the FCC Rules. Operation is subject to the following two conditions: (1) This device may not cause harmful interference, and (2) this device must accept any interference received, including interference that may cause undesired operation.
CAUTION: This equipment has been tested and found to comply with the limits for a Class B digital device, pursuant to Part 15 of the FCC Rules. These limits are designed to provide reasonable protection against harmful interference in a residential installation. This equipment generates, uses, and can radiate radio frequency energy and, if not installed and used in accordance with the instructions, may cause harmful interference to radio communications. However, there is no
guarantee that interference will not occur in a particular installation. If this equipment does cause harmful interference to radio or television reception, which can be determined by turning the equipment off and on, the user is encouraged to try to correct the interference by one or more of the following measures:
- Reorient or relocate the receiving antenna.
- Increase the separation between the equipment and receiver.
- Connect the equipment into an outlet on a circuit different from that to which the receiver is connected.
- Consult the dealer or an experienced radio/TV technician for help.
- You are cautioned that any changes or modifications not expressly approved in this manual could void the user's authority to operate the equipment.
Notes on the Grant: To comply with Part 15 of the FCC Rules, this product must be used with a Fujifi Im-specific ferrite-core A/V cable, USB cable, and DC supply cord.
For Customers in Canada
CAN ICES-3 (B)/NMB-3(B)
CAUTION: This Class B digital apparatus complies with Canadian ICES-003.
IMPORTANT SAFETY INSTRUCTIONS
- Read these instructions.
- Keep these instructions.
- Heed all warnings.
- Follow all instructions.
- Do not use this apparatus near water (excluding waterproof products).
- Clean only with a dry cloth.
- Do not block any ventilation openings. Install in accordance with the manufacturer's instructions.
- Do not install near any heat sources such as radiators, heat registers, stoves, or other apparatus (including amplifiers) that produce heat.
- Protect the power cord from being walked on or pinched particularly at plugs, nience receptacles, and the point where they exit from the apparatus.
- Only use attachments/accessories specified by the manufacturer.
- Unplug this apparatus during lightning storms or when unused for long periods of time.
- Refer all servicing to qualified service personal. Servicing is required when the apparatus has been damaged in any way, such as power supply cord or plug is liquid has been spilled or objects have fallen into the apparatus, the apparatus has been exposed to rain or moisture, does not operate normally, or has been dropped.
Disposal of Electrical and Electronic Equipment in Private Households
In the European Union, Norway, Iceland and Liechtenstein: This symbol on the product, or in the manual and in the warranty, and/or on its packaging indicates that this product shall not be treated as household waste. Instead it should be taken to an applicable collection point for the recycling of electrical and electronic equipment.
formation about recycling this product, please contact your local city office, your household waste disposal service or the shop where you purchased the product.
In Countries Outside the European Union, Norway, Iceland and Liechtenstein: If you wish to discard this product, including the batteries or accumulators, please contact your local authorities and ask for the correct way of disposal.
U.K. Importer:
FUJIFILM UK Ltd.
Fujifi Im House, Whitbread Way, Bedford, Bedfordshire, MK42 0ZE, United Kingdom
EU Importer:
FUJIFILM Germany GmbH
Balcke-Dürr-Allee 6, 40882 Ratingen, Germany
Support & Safety Notes
product.safety.eu@fujifilm.com
https://www.fujifilm.com/de/de/consumer/support
cByensuring this product is disposed of cor-
rectly, you will help prevent potential negative consequences to the environment and human health, which could otherwise be caused by inappropriate waste handling of this product.
The recycling of materials will help to conserve natural resources. For more detailed in-
Australian RCM
ENGLISH
Before Using This Product
Some features are not available with older fi rmware. Be sure to update the fi rmware to the latest version. Instructions on viewing the fi rmware version and updating fi rmware are available from the following website:
http://www.fujifilm.com/support/digital_cameras/software/#firmware
If you do not have access to a computer, support is available from the local distributor listed in the "FUJIFILM Worldwide Network" material provided with your camera.
Supplied Accessories
- Tripod collar
- Front cap
- Rear cap
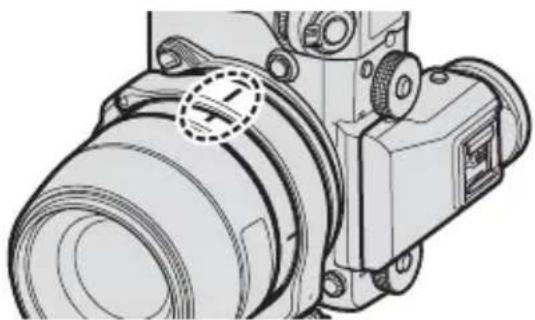
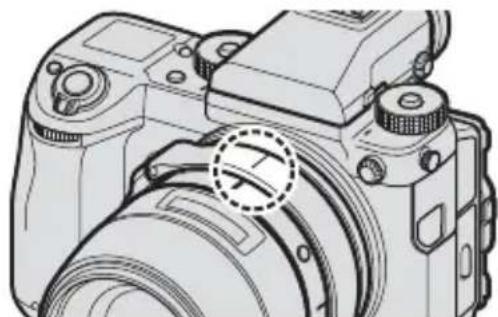
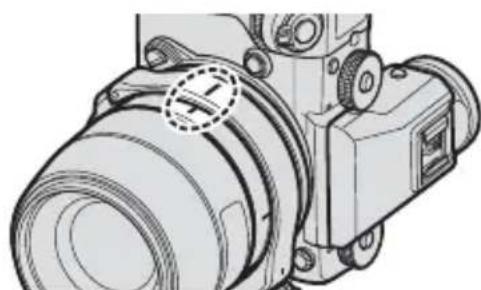
Parts of the Adapter

① Orientation marks
② Camera mounting mark
③ Lens mounting mark
④ Lens signal contacts
⑤ Function button
⑥ Camera signal contacts
⑦ Adapter lens release
⑧ Front cap
⑨ Rear cap
Removing the Caps
Remove the caps as shown.
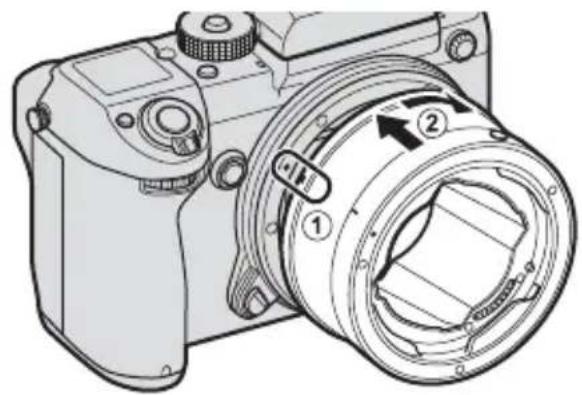
Attaching the Adapter
Turn the camera off. Keeping the marks on the adapter and camera aligned (①), place the adapter on the camera lens mount and rotate it until it clicks into place (②).
natural_image
Technical line drawing of a DSLR camera with labeled parts (no text or symbols beyond numbered annotations)Removing the Adapter
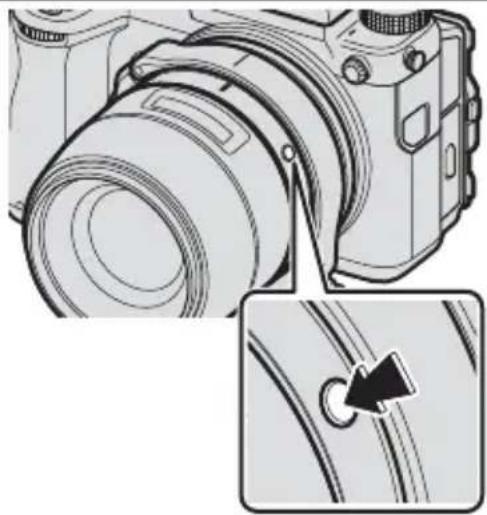
After turning the camera off, press the lens release button on the camera (①) and rotate the adapter as shown (②).

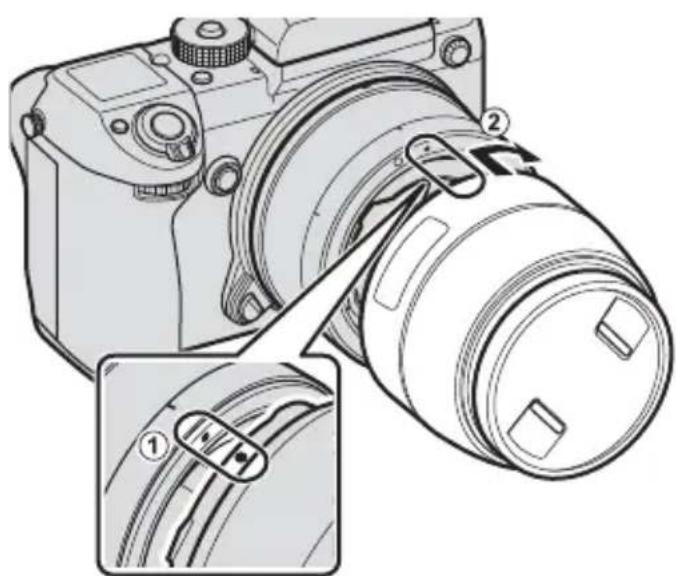
Attaching Lenses
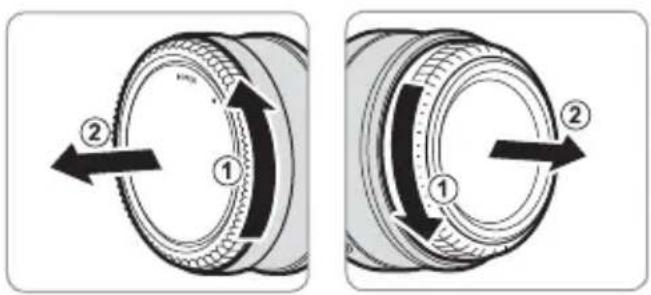
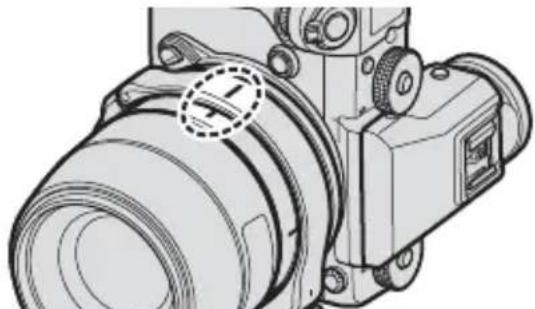
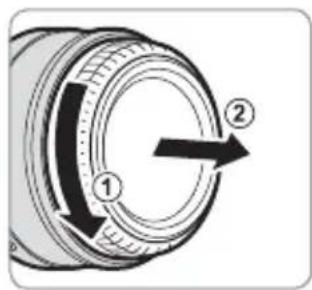
Turn the camera off. Keeping the marks on the lens and adapter aligned (①), place the lens on the adapter and rotate it until it clicks into place (②).
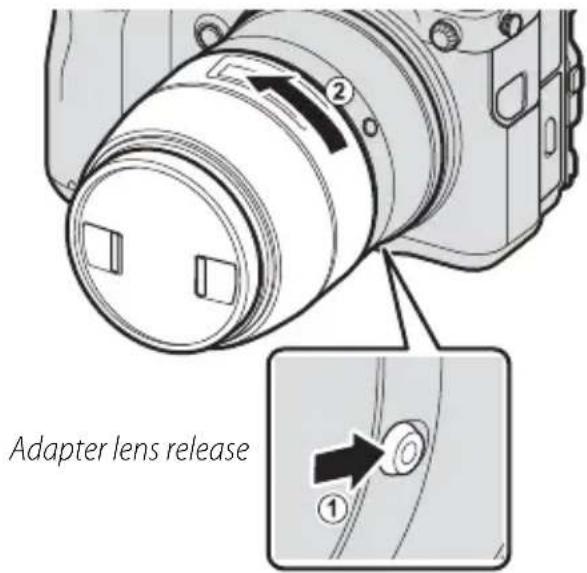
Removing Lenses
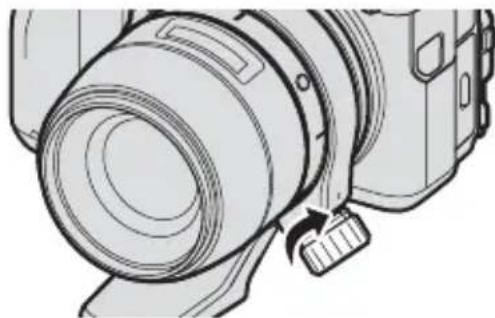
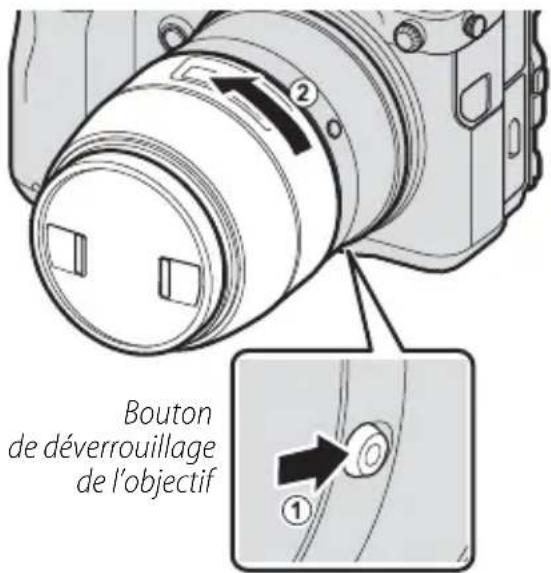
Turn the camera off. Keeping the adapter lens release in the position shown (①), rotate the lens in the direction shown by the arrow (②).
ENGLISH
EN-7
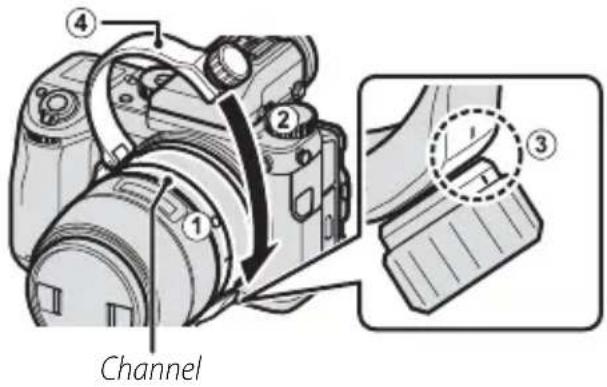
Attaching a Tripod
A tripod can be used to support the lens.
1 Attach the tripod collar to the tripod.
2 Align the marks on the lock knob and collar (①), then pull (②) and lift (③) the knob to open the collar as shown.
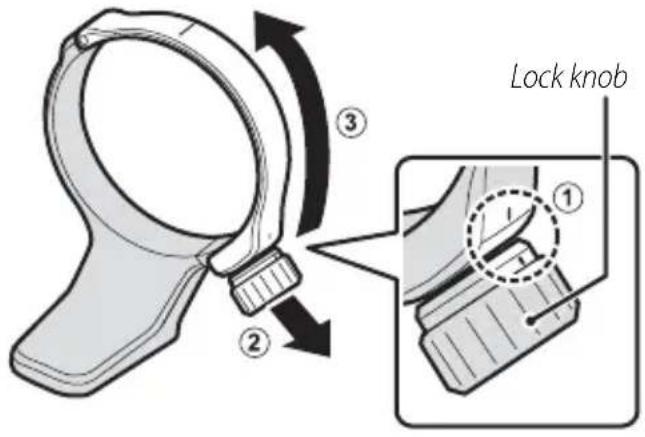
3 Position the collar in the channel on the mount adapter (①) and lower the hinged portion (②). Check that the marks on the knob and collar are aligned (③) and click the collar closed (④).
EN-8
ENGLISH
4 Rotate the collar to align the orientation mark on the collar with either of the marks (landscape or portrait) on the adapter.
natural_image
Technical line drawing of a DSLR camera with no visible text or symbolsLandscape orientation
natural_image
Technical line drawing of a mechanical device with no visible text or symbolsPortrait orientation
5 Tighten the lock knob to secure the collar.
natural_image
Line drawing of a camera lens assembly (no text or symbols)① Be careful not to pinch your fingers when attaching the collar. Failure to observe this precaution could result in injury.
When attaching the collar, keep a firm grip on the camera to prevent it falling.
The collar can be opened for removal as shown in Step 2.
Using the Adapter
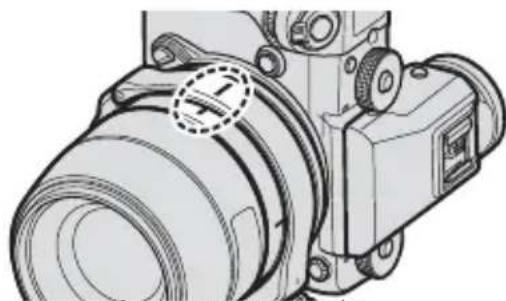
Pressing the mount adapter function button displays the MOUNT ADAPTER SETTING menu in the camera monitor. Adjust settings as required.
If the lens has an internal shutter, use MOUNT ADAPTER SETTING > SHUTTER SELECT to choose between the camera (BODY) and lens (LENS) shutters.
For more information on mount adapter settings, see "MOUNT ADAPTER SETTING" in Chapter 6 ("The Shooting Menus") of the camera manual.
Some features may be unavailable when a mount adapter is attached, while the availability of others may vary with the lens used.
natural_image
Technical line drawing of a DSLR camera with an inset showing a cable being inserted (no text or symbols present)Specifications
Dimensions 86.4×40.5 mm (excluding projections)
Weight Approx. 210 g (excluding caps)
EN-10
ENGLISH
Pour votre sécurité
http://www.fujifilm.com/support/digital_cameras/software/#firmware
natural_image
Technical line drawing of a DSLR camera with labeled parts (no text or symbols present)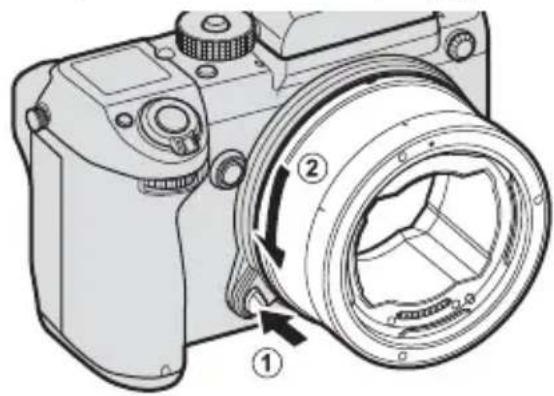
FR-8
FRANÇAIS
natural_image
Technical line drawing of a DSLR camera with no visible text or symbolsOrientation horizontale
natural_image
Technical line drawing of a mechanical device with no visible text or symbolsOrientation verticale
natural_image
Line drawing of a camera lens assembly (no text or symbols)natural_image
Technical line drawing of a DSLR camera with an inset showing a circular adjustment knob (no text or symbols)Caractéristiques
Dimensions ∅86,4 × 40,5 mm (hors parties saillantes)
http://www.fujifilm.com/support/digital_cameras/software/#firmware
natural_image
Technical line drawing of a DSLR camera with labeled parts (no text or symbols present)DE-6
DEUTSCH
Objektive anbringen
Objektive abnehmen
natural_image
Line drawing of a camera with lens and adjustment knob (no text or symbols)natural_image
Technical illustration of a DSLR camera with an inset showing a cable being inserted (no text or symbols present)DEUTSCH
http://www.fujifilm.com/support/digital_cameras/software/#firmware
natural_image
Technical line drawing of a DSLR camera with labeled parts (no text or symbols beyond numbered annotations)natural_image
Technical line drawing of a DSLR camera with no visible text or symbolsnatural_image
Technical line drawing of a mechanical device with no visible text or symbolsOrientacion vertical
natural_image
Line drawing of a camera lens assembly with no text or symbolshttp://www.fujifilm.com/support/digital_cameras/software/#firmware
natural_image
Line drawing of a DSLR camera with labeled parts (1, 2), showing internal components and no text or symbols beyond labels.Montaggio obiettivi
natural_image
Line drawing of a camera lens assembly with no text or symbolsnatural_image
Technical illustration of a DSLR camera with an inset showing a cable being inserted (no text or symbols present)Specifi che
http://www.fujifilm.com/support/digital_cameras/software/#firmware
natural_image
Technical line drawing of a DSLR camera with labeled parts (no text or symbols present)RU-6
РУССКИЙ
Снятие объективов
natural_image
Technical line drawing of a DSLR camera with no visible text or symbolsnatural_image
Technical line drawing of a mechanical device with no visible text or symbolsnatural_image
Technical line drawing of a camera lens assembly (no text or symbols)natural_image
Technical line drawing of a DSLR camera with an inset showing a cable being inserted (no text or symbols present)http://www.fujifilm.com/support/digital_cameras/software/#firmware
中文简
安装转接环
natural_image
Technical line drawing of a DSLR camera with labeled parts (no text or symbols present)取下转接环
ZHS-8
中文简
安装镜头
取下镜头
natural_image
Technical line drawing of a DSLR camera with no visible text or symbols风景方向
natural_image
Technical line drawing of a mechanical component with no visible text or symbols人像方向
5 拧紧锁定旋钮以固定好固定环。

natural_image
Line drawing of a camera lens assembly with no text or symbolsnatural_image
Technical line drawing of a DSLR camera with an inset showing a cable being inserted (no text or symbols present)技术规格