
TFEH60SW10A - Cooker TELEFUNKEN - Free user manual and instructions
Find the device manual for free TFEH60SW10A TELEFUNKEN in PDF.

| Product Type | Built-in Electric Cooker |
| Brand | Telefunken |
| Model | TFEH60SW10A |
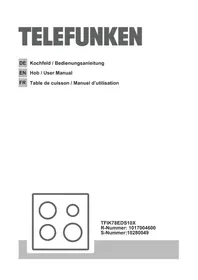
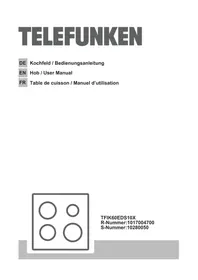
| Hob | Ceramic glass, 4 radiant burners |
| Built-in dimensions (hob) | 590 x 520 mm (W x D) |
| Built-in dimensions (oven) | 557 x 595 mm (W x D) |
| Weight | 35 kg (+/- 2 kg) |
| Power supply | 220-240 V ~ / 380-415 V 3N ~ |
| Energy class (oven) | A |
| Oven volume | 69 L |
| Energy consumption (oven, conventional) | 0.98 kWh/cycle |
| Energy consumption (oven, fan-assisted) | 0.87 kWh/cycle |
| Oven functions | Defrost, Turbo, Static cooking, Pizza, Grill, Fast grill, Double grill + fan |
| Timer | Digital display with duration and end of cooking programming |
| Hob burners | 2 x radiant burner ø 14.5 cm (192 Wh/kg), 1 x radiant burner 15.5 x 26.0 cm (190 Wh/kg), 1 x radiant burner ø 18.0 cm (191.3 Wh/kg) |
| Residual heat indicator | Yes, per burner |
| Child safety | Key lock and door safety |
| Automatic switch-off | Yes, after 6 hours |
| Oven light | Bulb 25 W, type E14, resistant to 300 °C |
| Cleaning | Ceramic glass hob: non-abrasive cream or liquid; Oven: soapy water; Removable door for glass cleaning |
| Supplied accessories | Metal grid, deep and shallow trays, telescopic rails, glass spatula |
| Repairability | Spare parts available from authorized service |
| Warranty | Compliance with European standards |
Frequently Asked Questions - TFEH60SW10A TELEFUNKEN
User questions about TFEH60SW10A TELEFUNKEN
0 question about this device. Answer the ones you know or ask your own.
Ask a new question about this device
Download the instructions for your Cooker in PDF format for free! Find your manual TFEH60SW10A - TELEFUNKEN and take your electronic device back in hand. On this page are published all the documents necessary for the use of your device. TFEH60SW10A by TELEFUNKEN.
USER MANUAL TFEH60SW10A TELEFUNKEN
EN BUILT-IN SET / User Manual
natural_image
Simple geometric diagram with four circles arranged in a 2x2 grid within a square frame (no text or symbols)
natural_image
Line drawing of a standard oven with front panel and top ovens (no text or symbols)TFEH60SW10A
R-Nummer:1017004400
S-Nummer:10280047
natural_image
Pure technical diagram of a mechanical or electrical component with no visible text, numbers, or symbols.natural_image
Simple line drawing of a cooking pot with crossed panes (no text or symbols)natural_image
Black rectangular button with a small sun icon on top, surrounded by gray border and diagonal stripes (no text or symbols)Ofenbeleuchtung:
Nur die
natural_image
Abstract diagram with circular arrows and a central grid pattern, no text or symbols presentAuftaufunktion: Die
natural_image
Abstract grayscale graphic with a central hexagonal pattern and curved arrows, no text or symbols present.Turbofunktion:
natural_image
Abstract grayscale graphic with circular and curved arrows, no text or symbols presentUmluft:
natural_image
Abstract grayscale graphic with a central hexagonal pattern and curved lines, no text or symbols present.natural_image
Simple black rectangular object with five white zigzag lines on a dark surface, surrounded by diagonal lines (no text or symbols)Grillfunktion:
natural_image
Pure electrical circuit lines without any symbolsnatural_image
Abstract diagram with circular arrow and concentric rings, no text or symbols presentnatural_image
Technical line drawing of a square frame with bolt holes and a central circular hole (no text or symbols)Flaches Blech
natural_image
Technical line drawing of a square frame with bolt holes and mounting holes (no text or symbols)Teleskopschienenstange
natural_image
Pure geometric shape outline with no text, numbers, or symbolsnatural_image
Technical line drawing of a mechanical assembly with horizontal plates and mounting holes (no text or symbols)natural_image
Technical line drawing of a mechanical clamp or bracket component (no text or symbols)Kindersicherung
natural_image
Line drawing of a refrigerator interior with an open door and a side panel, showing a piston inside (no text or symbols)Wasserauffang
natural_image
Technical line drawing of a mechanical component with internal channels and a downward arrow indicating direction (no text or symbols)natural_image
Line drawing of a hand cleaning teeth with a circular object on the right side (no text or symbols)Glaskeramik reinigen
natural_image
Technical line drawing of a mechanical component with an arrow indicating direction (no text or symbols)natural_image
Diagram of a refrigerator interior with a directional arrow indicating movement (no text or symbols)natural_image
Diagram showing a hand holding a grid-like object inside a device frame, with no visible text or symbols.5.2. Wartung
natural_image
Symbol of a trash bin crossed with a diagonal line, representing no waste or discharge (no text or labels)natural_image
Recycling symbol composed of three chasing arrows forming a triangle (no text or labels)Thank you for choosing this product.
This User Manual contains important information on safety and instructions intended to assist you in the operation and maintenance of your appliance.
Please take the time to read this User Manual before using your appliance and keep this book for future reference.
| Icon Type Meaning | ||
 | WARNING Serious injury or death risk | |
 | RISK OF ELECTRIC SHOCK Dangerous voltage risk | |
 | CAUTION Injury or property damage risk | |
 | IMPORTANT Operating the system correctly | |
CONTENTS
1.SAFETY INSTRUCTIONS ......29
1.1. General Safety Warnings ......29
1.2. Installation Warnings ....31
1.3. During Usage 32
1.4. During Cleaning and Maintenance 33
2.INSTALLATION AND PREPARATIONS FOR USE ....34
3.PRODUCT FEATURES 37
4. USE OF PRODUCT ...... 39
4.1. Control of Hob 39
4.2. Control of Oven 40
4.3. Use of Visio Display Timer....41
5.CLEANING AND MAINTENANCE 44
6.TROUBLE SHOOTING&TRANSPORT 47
6.1. Trouble shooting....47
6.2. Transport....47
1. SAFETY INSTRUCTIONS
- Read these instructions carefully and completely before using your appliance and keep them in a convenient place for reference when necessary.
- This manual is prepared for more than one model. Your appliance may not have some of the features described in this manual. Pay particular attention to any figures while you are reading the operating manual.
1.1. General Safety Warnings
- This appliance can be used by children aged from 8 years and above and persons with reduced physical, sensory or mental capabilities or lack of experience and knowledge if they have been given supervision or instruction concerning use of the appliance in a safe way and understand the hazards involved. Children shall not play with the appliance. Cleaning and user maintenance shall not be made by children without supervision.
- ⚠ WARNING: The appliance and its accessible parts become hot during use. Care should be taken to avoid touching heating elements. Keep children less than 8 years of age away unless they are continuously supervised.
- ⚠ WARNING: Unattended cooking on a hob with fat or oil can be dangerous and may result in fire. NEVER try to extinguish a fire with water, but switch off the appliance and then cover flame e.g. with a lid or a fire blanket.
- ⚠ WARNING: Danger of fire: do not store items on the cooking surfaces.
- ⚠️⚠ WARNING: If the surface is cracked, switch off the appliance to avoid the possibility of electric
shock.
- For models which incorporate a hob lid, clean any spillages off the lid before using and allow the Cooker to cool before closing the lid.
- Do not operate the appliance by means of an external timer or separate remote-control system.
- During use the appliance will get hot. Care should be taken to avoid touching heating elements inside the oven.
- During use handles held for short periods in normal use may get hot.
- Do not use harsh abrasive cleaners or sharp metal scrapers to clean the oven door glass and other surface. They can scratch the surface which may result in shattering of the glass or damage to the surface.
- Do not use steam cleaners for cleaning the appliance.
- ⚠ WARNING: To avoid the possibility of electric shocks, make sure that the appliance is switched off before replacing the lamp.
- CAUTION: Accessible parts may be hot when cooking or grilling. Keep young children away from the appliance when it is in use.
- Your appliance is produced in accordance with all applicable local and international standards and regulations.
- Maintenance and repair work must only be carried out by authorised service technicians. Installation and repair work that is carried out by unauthorised technicians may be dangerous. Do not alter or modify the specifications of the appliance in any way. Inappropriate hob guards can cause accidents.
• Before connecting your appliance, make sure
that the local distribution conditions (nature of the gas and gas pressure or electricity voltage and frequency) and the specifications of the appliance are compatible. The specifications for this appliance are stated on the label.
- CAUTION: This appliance is designed only for cooking food and is intended for indoor domestic household use only. It should not be used for any other purpose or in any other application, such as for non-domestic use or in a commercial environment or room heating.
- Do not use the oven door handles to lift or move the appliance.
- All possible measures have been taken to ensure your safety. Since the glass may break, care should be taken while cleaning to avoid scratching. Avoid hitting or knocking the glass with accessories.
- Make sure that the supply cord is not trapped or damaged during installation. If the supply cord is damaged, it must be replaced by the manufacturer, its service agent or similarly qualified persons in order to prevent a hazard.
- Do not let children climb on the oven door or sit on it while it is open.
1.2. Installation Warnings
- Do not operate the appliance before it is fully installed.
- The appliance must be installed by an authorised technician. The manufacturer is not responsible for any damage that might be caused by defective placement and installation by unauthorised people.
- When the appliance is unpacked, make sure that it is has not been damaged during transportation.
In case of any defect do not use the appliance and contact a qualified service agent immediately. The materials used for packaging (nylon, staplers, styrofoam, etc.) may be harmful to children and they should be collected and removed immediately.
- Protect your appliance against atmospheric effects. Do not expose it to effects such as sun, rain, snow, excessive humidity etc.
- The material around the appliance (cabinet) must be able to withstand a minimum temperature of 100°C.
1.3. During Usage
- When you first use your Oven you may notice a slight smell. This is perfectly normal and is caused by the insulation materials on the heater elements. We suggest that before using your Oven for the first time you leave it empty, and set at maximum temperature for 45 minutes. Make sure that the environment in which the product is installed is well ventilated.
• Take care when opening the oven door during or after cooking. The hot steam from the oven may cause burns.
- Do not put flammable or combustible materials in or near the appliance when it is operating.
• Always use oven gloves to remove and replace food in the oven.
- Do not leave the cooker unattended while cooking with solid or liquid oils. They may catch fire under extreme heating conditions. Never pour water on to flames that are caused by oil, instead switch the cooker off and cover the pan with its lid or a fire blanket.
• Always position pans over the centre of the cooking
zone, and turn the handles to a safe position so they cannot be knocked or grabbed.
- If the product will not be used for a long period of time, turn the main control switch off. Also when not using a gas appliance, turn the gas valve off.
- Make sure the appliance control knobs are always in the “0” (stop) position when it is not used.
- The trays incline when pulled out. Take care not to spill or drop hot food when removing it from the ovens.
- Do not place anything on the oven door when it is open. This could disrupt the balance of the oven or damage the door.
- Do not place heavy items or flammable or ignitable items (e.g. nylon, plastic bag, paper, cloth, etc.) into the drawer. This includes cookware with plastic accessories (e.g. handles).
- Do not hang towels, dishcloths or clothes from the appliance or its handles.
1.4. During Cleaning and Maintenance
• Make sure that your appliance is turned off at the mains before carrying out any cleaning or maintenance.
- Do not remove the control knobs to clean the control panel.
- To maintain the efficiency and safety of your appliance, we recommend you always use original spare parts and to call our authorised service agents in case of need.
2. INSTALLATION AND PREPARATIONS FOR USE

WARNING : This appliance must be installed by an authorised service person or qualified technician, according to the instructions in this guide and in compliance with the current local regulations.
- Incorrect installation may cause harm and damage, for which the manufacturer accepts no responsibility and the warranty will not be valid.
- Prior to installation, ensure that the local distribution conditions (electricity voltage and frequency) and the adjustments of the appliance are compatible. The adjustment conditions for this appliance are stated on the label.
- The laws, ordinances, directives and standards in force in the country of use are to be followed (safety regulations, proper recycling in accordance with the regulations, etc.).
Instructions for the Installer General instructions
- After removing the packaging material from the appliance and its accessories, ensure that the appliance is not damaged. If you suspect any damage, do not use it and contact an authorised service person or qualified technician immediately.
- Make sure that there are no flammable or combustible materials in the close vicinity, such as curtains, oil, cloth etc. which may catch fire.
- The worktop and furniture surrounding the appliance must be made of materials resistant to temperatures above 100°C.
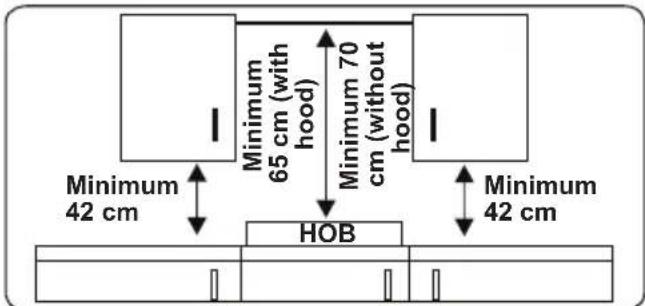
- If a cooker hood or any cupboard is to be installed above the appliance, the safety distance between cooktop and any cupboard/cooker hood should be as shown below.
- The appliance should not be installed directly above a dishwasher, fridge, freezer, washing machine or clothes dryer.
Installation of the appliances
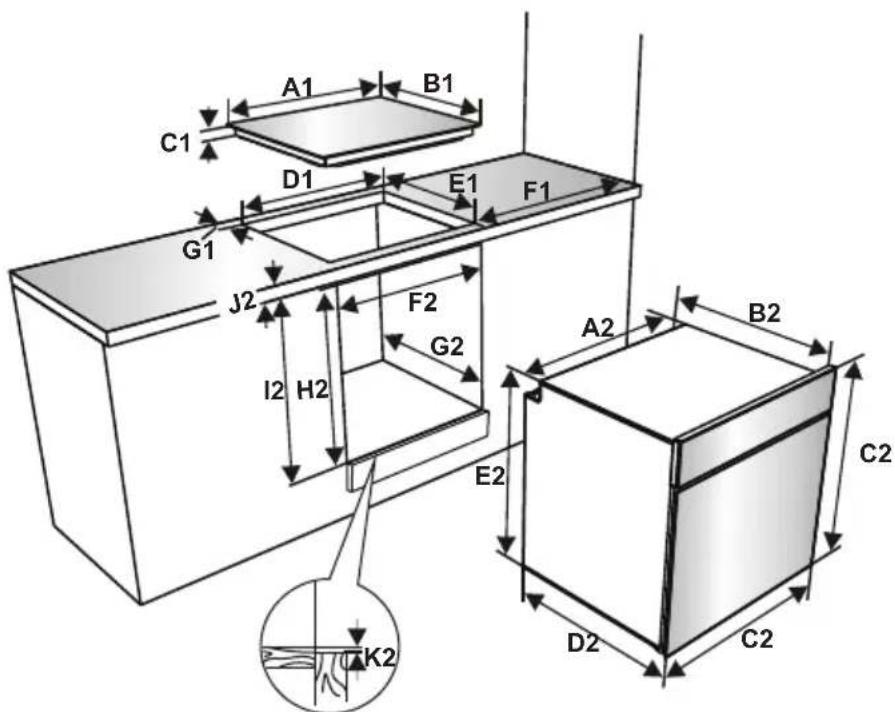
The appliances are supplied with installation kits and can be installed in a worktop with the appropriate dimensions. The dimensions for hob and oven installation are given below.
Installation dimensions for hob
| A1 (mm) 5 | 90 E1 (mm) | 490 | |
| B1 (mm) 5 | 20 min. F1 (mm) | 150 | |
| C1 (mm) 4 | 1 min. G1 (mm) | 60 | |
| D1 (mm) 5 | 60 | ||
Installation dimensions for oven
| A2 (mm) 557 | E2 (mm) 576 | ||
| B2 (mm) 550 | min. F2 (mm) 560/580 | ||
| C2 (mm) 595 | min. G2 /K2(mm) 555/2 | ||
| D2 (mm) 575 | H2 (mm) 590 | ||
| I2 (mm) | 600 | J2(mm) | 25 |
Installation of the hob
- Apply the supplied one-sided self-adhesive sealing tape all the way around the lower edge of the cooktop. Do not stretch it.
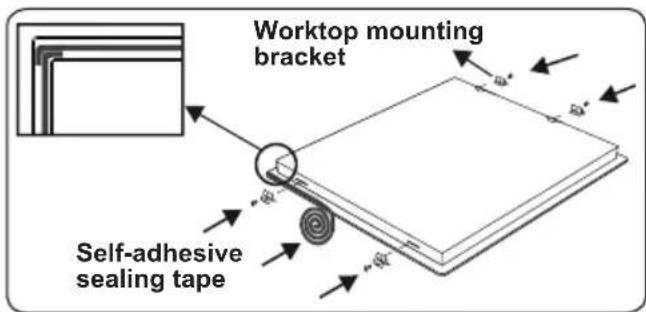
- Screw the 4 worktop mounting brackets on to the side walls of the appliance.
- Insert the appliance into the aperture.
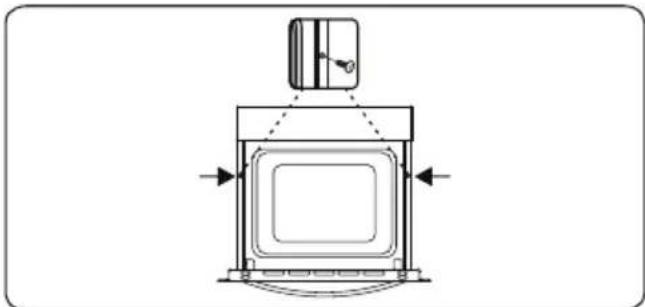
Installation of the oven
- After making the electrical connections, insert the oven into the cabinet by pushing it forward. Open the oven door and insert 2 screws in the holes located on the oven frame. While the product frame touches the wooden surface of the cabinet, tighten the screws.
natural_image
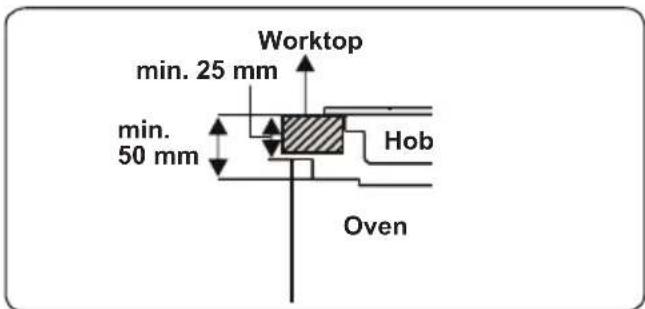
Technical line drawing of a mechanical device with no visible text or symbols- The distance between the worktop and the top panel of the oven must be a minimum of 50 mm and the distance between the worktop and the top of control panel must be a minimum of 25 mm.
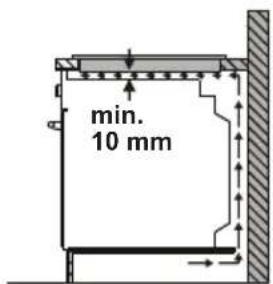
- The distance between the base of the hob and the top panel of the oven must be a minimum of 10 mm for air circulation.
Electrical Connection and Safety

WARNING: The electrical connection of this appliance should be carried out by an authorised service person or qualified electrician, according to the instructions in this guide and in compliance with the current local regulations.

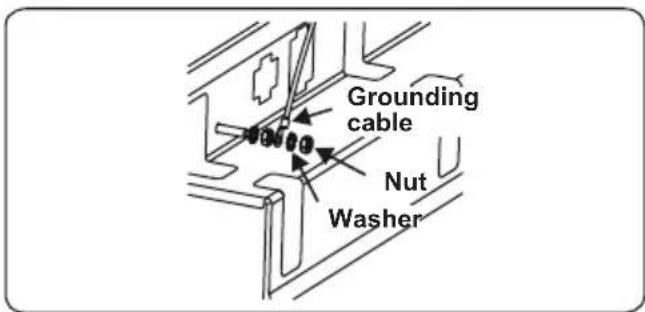
WARNING: THE APPLIANCE MUST BE EARTHED.
- Before carrying out the connection to the power supply, the voltage rating of the appliance (stamped on the appliance identification plate) must be checked for correspondence to the available mains supply voltage, and the mains electric wiring should be capable of handling the appliance's power rating (also indicated on the identification plate).
- During installation, please ensure that isolated cables are used. An incorrect connection might damage your appliance. If the mains cable is damaged and needs to be replaced this should be done by a qualified personnel.
- Do not use adaptors, multiple sockets and/or extension leads.
- The supply cord should be kept away from hot parts of appliance and must not be bent or compressed. Otherwise the cord may be damaged, causing a short circuit.
- If the appliance is not connected to the mains with a plug, a multi-pole isolator switch (with at least 3 mm contact spacing) must be used in order to meet the safety regulations.
- The appliance is designed for a power supply of 220-240V \~ and 380-415V 3N\~. If your supply is different, contact the authorised service person or a qualified electrician.
• The power cable (H05VV-F) must be
long enough to be connected to the appliance, even if the appliance stands on the front of its cabinet.
- Ensure all connections are adequately tightened.
- Fix the supply cable in the cable clamp and then close the cover.
- The terminal box connection is placed on the terminal box.
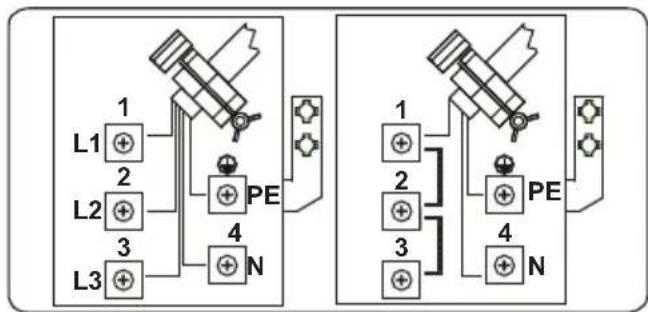
- Remove the nut and the washer on the screw shown in the figure and attach the Yellow + Green grounding cable to this screw. Then retighten the screw with a washer and nut when the oven is installed.
3. PRODUCT FEATURES

Important: Specifications for the product vary and the appearance of your appliance may differ from that shown in the figures below.
List of Components
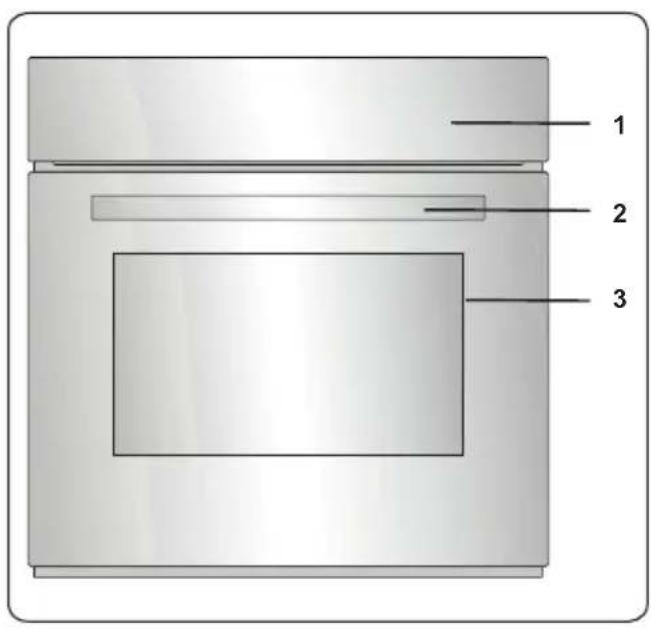
- Control Panel
- Oven Door Handle
- Oven Door
- Electric Heater
Control Panel
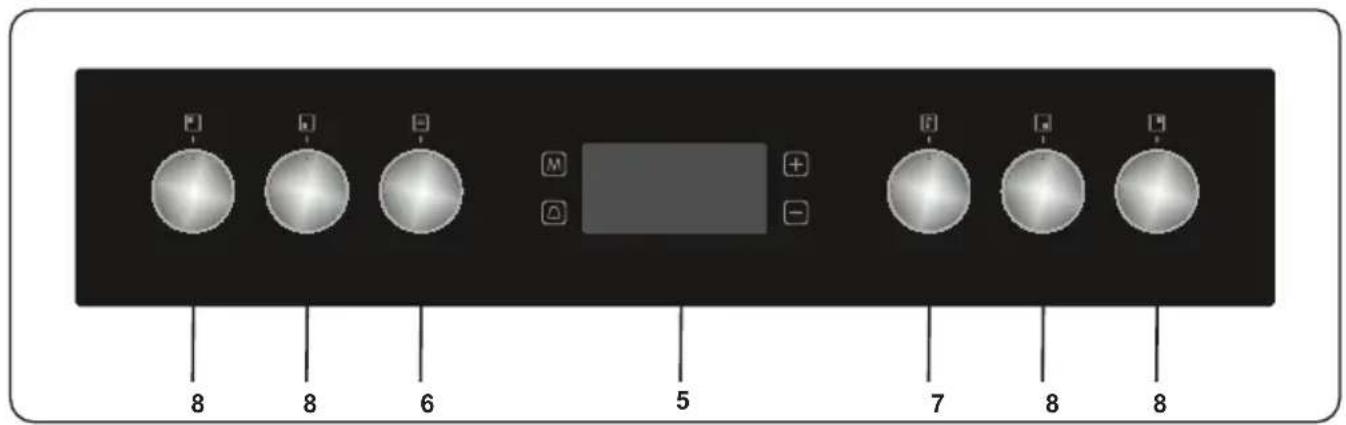
- Timer
- Oven Function Control Knob
- Oven Thermostat Knob
- Hob Control Knob
4. USE OF PRODUCT
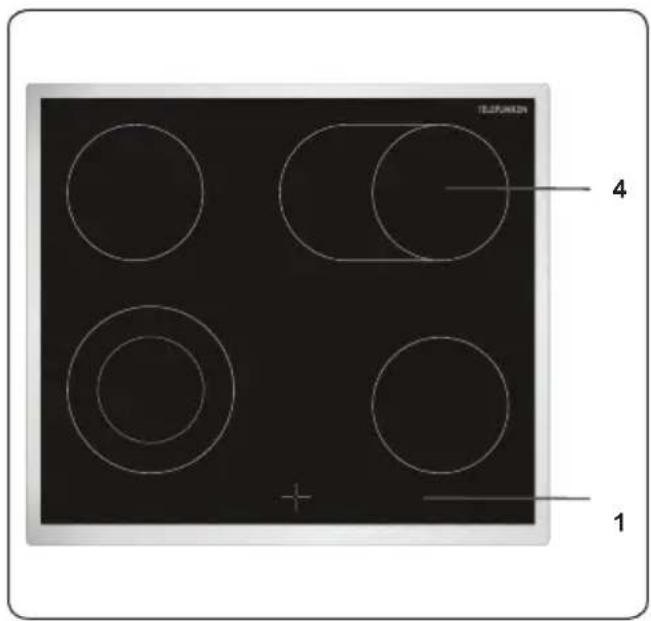
4.1. Control of Hob
Control of the ceramic heater
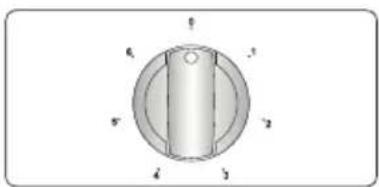
The ceramic heater is controlled by a 6 position knob.
The ceramic heater is operated by turning the control knob to the required setting. Near each control knob is a symbol which indicates the heater that is controlled by the knob. The on/off light on the control panel shows if any of the ceramic heaters are in use.
natural_image
Circular mechanical component with a central shaft and four labeled points (1, 2, 3, 4) arranged around it, no text or symbols present.| Knob Position Function | |
| 0 Off position | |
| 1 Keep warm position | |
| 2-3 Heating position at low heat | |
| 4-5-6 | Cooking, roasting and boiling position |

Important: The knob rotation direction may differ according to the product specification.
Dual and oval heaters (If available)
Dual and oval heaters have two heating zones. To activate the outer zone of a dual/oval heater, turn the knob to Ⓞ position. Both outer zones are switched on.
To deactivate the outer zone of a dual/oval heater, turn the knob to the 'Off' position. Both outer zones are switched off.
Residual heat indicator(If available)
After using the hob there will be heat which is called residual heat stored in the vitroceramic glass. If the residual heat level is greater than 60^ C, the residual heat indicator will be active for the cooking zone which is above this temperature.
If the power supply to the hob is disconnected while residual heat indicator is on, the warning light will flash when the power is reconnected. The display will flash until the residual heat has decreased or one of the cooking zones is activated.
Hints and Tips

Important: When ceramic heaters are operated in higher heat settings, the heated areas may be seen switching on and off. This is due to a safety device, which prevents the glass from overheating. Some switching on and off when cooking at high temperatures is quite normal, causes no damage to the hob and little delay in cooking times.

WARNING:
- Never operate the hob without ans on the cooking zone.
- Use only flat saucepans and with a sufficiently thick base.
• Make sure the bottom of the pan is dry before placing it on the hob. - While the cooking zone is in operation, it is important to ensure that the pan is centred correctly above the zone.
- In order to conserve energy, never use a pan with a different diameter to hotplate being used.

Do not use pans with rough bottoms since these can scratch the glass ceramic surface.
If possible, always place lids on the pans. The temperature of accessible parts maybe high when the appliance is operating. Keep
children and animals well away from the hob during operation and until it has fully cooled after operation.
If you notice a crack on the cook top it must be switched off immediately and replaced by authorised service personnel.
4.2. Control of Oven
Oven function control knob
Turn the knob to the corresponding symbol of the desired cooking function. For the details of different functions see 'Oven functions'.
Oven thermostat knob
After selecting a cooking function, turn this knob to set the desired temperature. The oven thermostat light will light whenever the thermostat is in operation to heat up the oven or maintain the temperature.
Oven Functions
* The functions of your oven may be different due to the model of your product.
natural_image
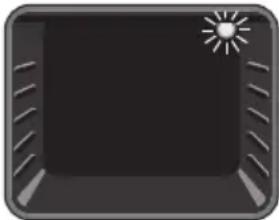
Simple grayscale icon with a sunburst symbol on a dark square, surrounded by diagonal lines and corner brackets (no text or symbols)Oven Lamp: Only the oven light will be turned on. It remains on for the duration of the cooking function.
natural_image
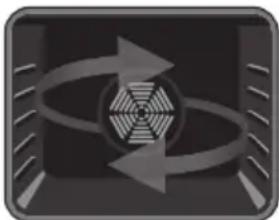
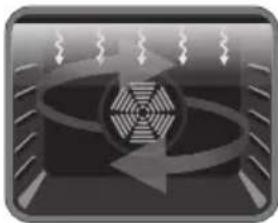
Abstract circular arrow graphic with concentric rings and stripes, no text or symbols presentDefrost Function: The oven's warning lights will be turned on and the fan starts operating. To use the defrost function, take your frozen food and
place it in the oven on a shelf in the third slot from the bottom. It is recommended that you place an oven tray under the defrosting food, to catch the water accumulated due to melting ice. This function will not cook or bake your food, it will only help to defrost it.
natural_image
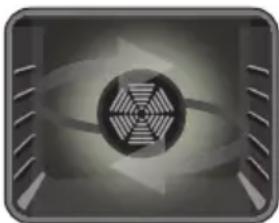
Abstract grayscale graphic with a central circular emblem and radial lines, no text or symbols present.Turbo Function: The oven's thermostat and warning lights will be turned on and the ring heating element and fan will start operating. The turbo function
evenly disperses the heat in the oven. All food on all racks will be cooked evenly. It is recommended that you pre-heat the oven for about 10 minutes..
natural_image
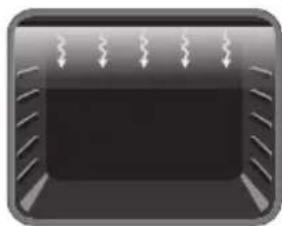
Gray gradient rectangular button with white ventilation grilles (no text or symbols)Static Cooking Function: The oven's thermostat and warning lights will be turned on and the lower and upper heating elements will start operating. The
static cooking function emits heat, ensuring even cooking of the food. This is ideal for making pastries, cakes, baked pasta, lasagne and pizza. Prehating the oven for 10 minutes is recommended and it is best to cook on only one shelf at a time in this function.
natural_image
Abstract grayscale graphic with circular arrow and grid pattern, no text or symbols presentFan Function: The Oven's thermostat and warning lights will turn on and .The upper and lower heating elements and fan will start operating. This function
is very good when baking pastry. Cooking is carried out by the lower and upper heating elements within the oven and by the fan, which provides air circulation, giving a slightly grilled effect to the food. It is recommended that you pre-heat the oven for about 10 minutes. The fan and lower heating function is ideal for baking food such as pizza, evenly in a short period of time. While the fan evenly disperses the heat of the oven, the lower heating element bakes the food.
natural_image
Abstract geometric design with a central hexagonal pattern and radial lines (no text or symbols)Pizza Function: The oven's thermostat and warning lights will be turned on. The ring, lower heating elements and fan will start operating. This function
is ideal for baking food, such as pizza, evenly in a short time. While the fan evenly disperses the heat of the oven, the lower heating element ensures baking of the food.
natural_image
Pure electrical circuit lines without any symbolsGrilling Function: The oven's thermostat and warning lights will be turned on, the grill heating element will start operating. This function is used for
grilling and toasting food. Use the upper shelves of the oven. Lightly brush the wire grid with oil to stop food sticking and place food in the centre of the grid. Always place a tray beneath the food to catch any drips of oil or fat. It is recommended that you pre-heat the oven for about 10 minutes.

Warning: When grilling, the oven door must be closed and the oven temperature should be adjusted to C.
natural_image
Simple diagram of a rectangular object with downward arrows and ventilation grilles (no text or symbols)Faster Grilling
Function: The oven's thermostat and warning lights will be turned on. The grill and upper heating elements will start
operating. This function is used for faster grilling and for grilling a larger surface area, such as meat. Use the upper shelves of oven. Lightly brush the wire grid with oil to stop food sticking and place food in the centre of the grid. Always place a tray beneath the food to catch any drips of oil or fat. It is recommended that you pre-heat the oven for about 10 minutes.

Warning: When grilling, the oven door must be closed and the oven erature should be adjusted to 190°C.
natural_image
Abstract diagram with curved arrows and a central circular pattern, no text or symbols presentDouble Grill and Fan Function: The oven's thermostat and warning lights will be turned on. The grill, upper heating elements and fan will
start operating. This function is used for faster grilling of thicker food and for grilling a larger surface area. Both the upper heating elements and grill will be energised along with the fan to ensure even cooking. Use the upper shelves of oven. Lightly brush the wire grid with oil to stop food sticking and place food in the centre of the grid. Always place a tray beneath the food to catch any drips of oil or fat. It is recommended that you pre-heat the oven for about 10 minutes.

Warning: When grilling, the oven door must be closed and the oven temperature should be adjusted to C.
4.3. Use of Visio Display Timer


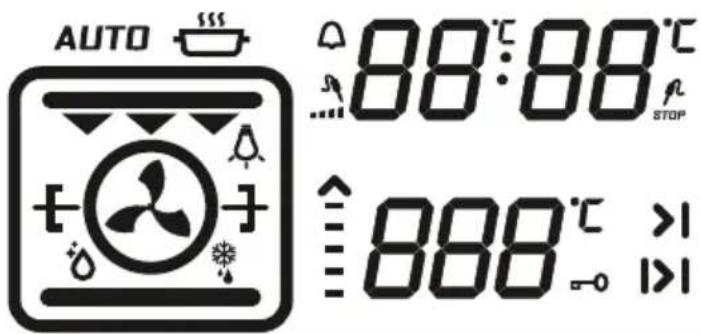
| Function Description | |||
 | Mode key Oven function display 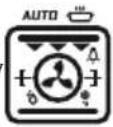 | ||
 | Alarm key Timer display 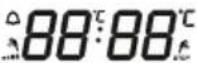 | ||
 | Time setting key Temperature c 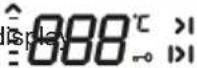 | ||
 | Time setting/Temperature settings for meat probe/ Key lock key | ||
Adjusting the Day Time:
When the built in oven is installed, the time of day must be set according to the following instructions.
When the oven is installed, '0.00' will flash
on the display. Touch the 'M' sensor or the '-' and '+' sensors to adjust the day time mode. The':' symbol will flash on the display. You can adjust it with the '-' and '+' sensors.
If Auto Cooking mode is off, touch the '-' and '+' sensors at the same time as the day time mode. You can adjust it with the '-' and '+' sensors. You have to adjust the day time to be able to use the oven functions.
Adjusting the cooker time:
Adjusting the Minute Minder:
Touch the alarm sensor which shows the ' Symbol. The ' symbol will flash on the display and '0.00' will appear on the clock digits. Adjust the desired time period for the warning using the Timer Plus and Minus sensor while the symbol is flashing. When you have completed the adjustment, wait until the ' symbol lights continuously. The audible warning time adjustment is complete.
When the timer reaches zero, an audible warning will sound and the ' symbol will flash on the screen. Pressing '- or '+ will stop the audible warning and the symbol disappears from the screen.
Adjusting the Cooking Duration Time:
This function helps you to cook for a fixed period of time. Prepare the food for cooking and put it in the oven. Select the desired cooking function and the temperature. Touch the 'M' sensor until you see Duration time symbol 'I>I' on the timer display screen and 'AUTO' appear on the display. Set the required cooking period using the Timer Plus and minus sensor while the timer is in this position. When you have completed the adjustment, wait until the current time is displayed on the screen and the Duration time symbol is continuously lit. When the timer reaches zero, the oven will switch off, an audible warning will sound and 'AUTO' will flash on the screen. Touch any sensor on the control unit to end the audible warning. 'AUTO' will continue to flash. Touch the '-' and '+' symbols at the same time to exit 'AUTO' mode.
Adjusting the Cooking End Time:
This function is used to cook after a certain period of time and within a certain duration. Prepare the food for cooking and put it in the oven. Select the desired cooking function and the temperature.
Touch the 'M' sensor until you see Duration time symbol 'I>I' on the timer display screen and 'AUTO' appear on the display. Set the required cooking period using the Timer Plus and minus sensor while the timer is in this position. Then touch the 'M' sensor until the '>|`symbol is displayed. The day time and the cooking period will flash. Adjust the finish time for the food using the Timer Plus and minus sensor while the timer is in this position. When you have completed the adjustment, wait until the the current time is displayed on the screen and the >| symbol will be continuously lit on the screen.
The oven will start operating at the time calculated by deducting the cooking period from the set finishing time, and will stop at the set finishing time. The timer will give an audible warning and 'AUTO' will flash on the screen. Touch any button on the timer to end the audible warning. 'AUTO' will continue to flash. Touch the '-' and '+' symbols at the same time to exit 'AUTO' mode.
Digital Timer Sound Adjustment:
Touch the '-' sensor until you hear an audible signal beep. After that each time the '-' sensor button is pressed a different signal beep is sounded. There are three different types of signal beep. Select the desired signal beep and do not press any other buttons. After a short time, the selected signal beep will be saved.
Key Lock Function
Key lock is used to avoid changing the oven settings unintentionally. To activate the key lock touch the '+' sensor until you see key lock symbol on the display. To deactivate the key lock touch the '+' sensor until the key lock symbol vanishes from the display. While the oven is operating, if the control switches or touch buttons are not pushed or touched for 6 hours, the oven will be automatically switched off.
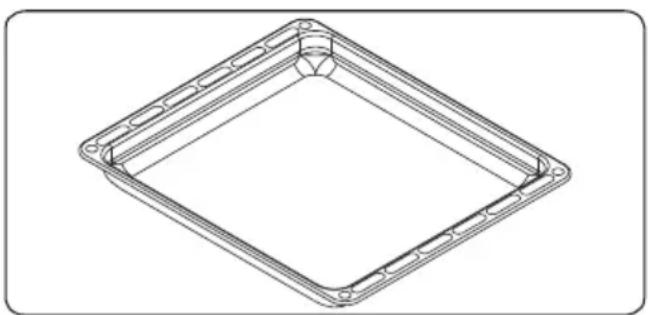
Deep Tray
The deep tray is used when cooking stews. To locate the tray correctly in the cavity, put it to any rack and push it up to the end.
natural_image
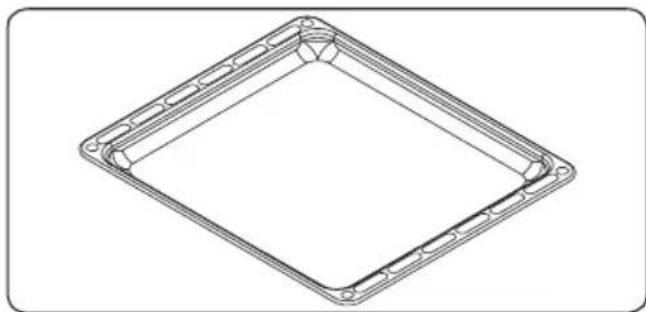
Technical line drawing of a square frame with bolt holes and a central circular hole (no text or symbols)Shallow Tray
The shallow tray is used when baking pastry, such as flans, etc.
To locate the tray correctly in the cavity, put it to any rack and push it up to the end.
natural_image
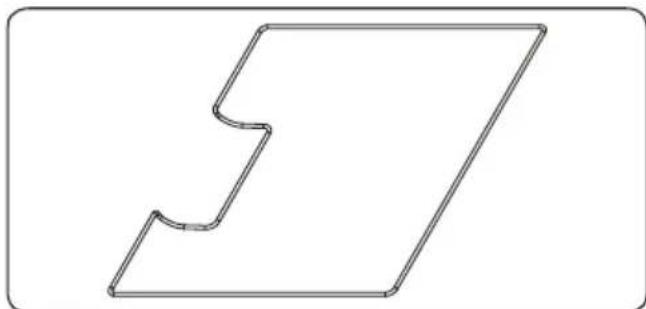
Technical line drawing of a square frame with bolt holes and internal ribs (no text or symbols)Telescopic Rail Wire
Telescopic rail wire holds the telescopic rail together and allows for synchronisation of movement.
natural_image
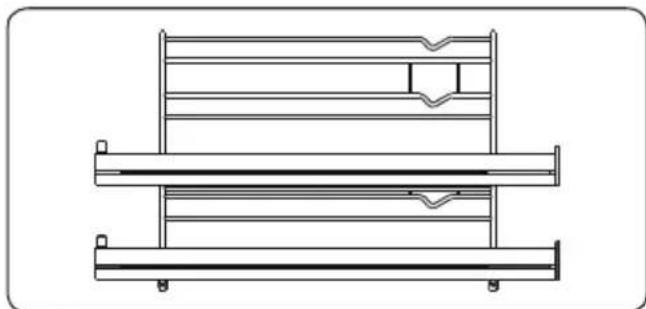
Pure geometric shape resembling a stylized letter or symbol, no text or markings presentWire Rack with Two Full Extension Telescopic Rails
Two of the shelves in the wire rack are fully telescopic; they extend out fully on ball bearings to allow easy access to your food.
natural_image
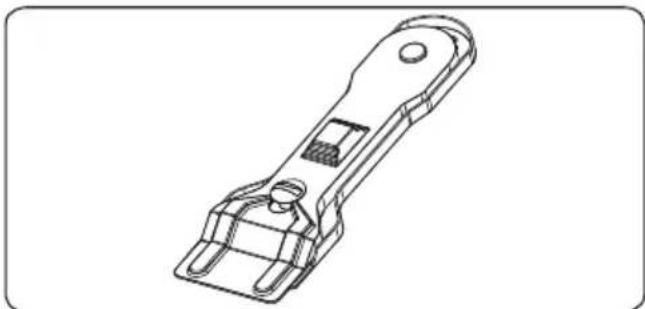
Technical line drawing of a mechanical assembly with horizontal plates and mounting holes (no text or symbols)Vitroceramic Glass Spatula
Always use the glass spatula to remove spillages or deposits from the hob before trying chemical cleaning agents. This is the ideal method of removing even the smallest deposits from the hob and also removing spillages from hot cooking zones before they burn on.
Important: Always push the safety cover back over the razor blade after use. Take care when using the spatula and keep it out of the reach of children.
natural_image
Technical line drawing of a mechanical clamp or bracket component (no text or symbols)Child Lock
When opening the oven door, first lift the child lock and push it right using your hand, and pull the oven door towards yourself by holding its handle with your other hand, then release the child lock. A slight push to the door will be enough to close the door.
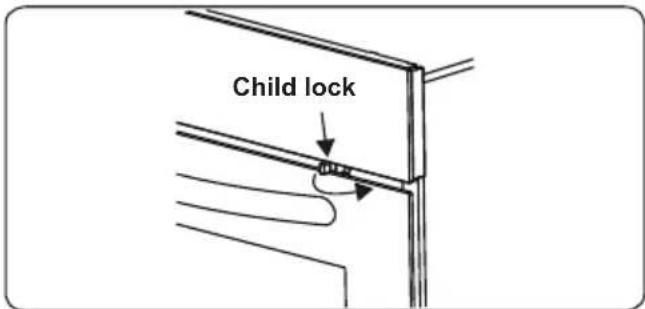
Soft Close Oven Door
The oven door is closed slowly by itself, when it is released just before closed position.
natural_image
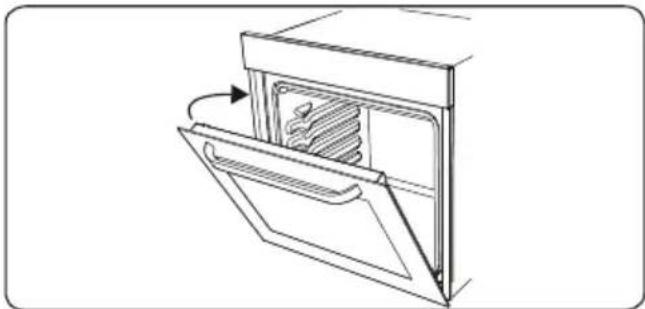
Line drawing of a refrigerator interior with a door open and a scroll inside (no text or symbols)Water Collector
There may be condensation on the inner glass in some cases depending on the food. This is not a product malfunction.
Open oven door till grill position and stay at that position for 20 seconds.
Water drips to collector.
Cool the oven and wipe with a dry towel. That procedure must apply regularly.
natural_image
Technical line drawing of a mechanical component or bracket with internal channels and a downward arrow indicating direction (no text or symbols)5. CLEANING AND MAINTENANCE
5.1. Cleaning

WARNING: Switch off the appliance and allow it to cool down before cleaning your appliance.
General Instructions
- Check whether the cleaning materials are appropriate and recommended by the manufacturer before using on your appliance.
- Use cream cleaners or liquid cleaners which do not contain particles. Do not use caustic (corrosive) creams, abrasive cleaning powders, rough wire wool or hard tools as they may damage the cooker surfaces.
- Do not use cleaners that contain particles, as they might scratch the glass, enameled and/or painted parts of your appliance.
- Should any liquids overflow, clean them up immediately to avoid parts becoming damaged.
• Do not use steam cleaners for cleaning any part of the appliance.
Cleaning the inside of the Oven
- The inside of enamelled ovens are best cleaned when the oven is warm.
- Wipe the oven with a soft cloth soaked in soapy water after each use. Then wipe the oven over again with a wet cloth and then dry it.
- You may need to use a liquid cleaning material occasionally to completely clean the oven.

natural_image
Line drawing of a hand cleaning a car trunk with a circular object on the side (no text or symbols)Cleaning the Ceramic Glass
Ceramic glass can hold heavy utensils but may be broken if it is hit with a sharp object.

WARNING : Ceramic Cooktops - if the surface is cracked, to avoid any possibility of electric shock switch off appliance and call for service.
- Use cream or liquid cleaner to clean vitroceramic glass, then rinse and dry them thoroughly with a dry cloth.
• Do not use cleaning materials meant for steel as they may damage the glass. - Spilt sugary or sweet foods must be cleaned immediately after the glass has cooled down.
- Dust on the surface must be cleaned with a wet cloth.
- Any changes in colour to the ceramic glass does not affect the structure or durability of the ceramic and is not due to a change in the material.
Colour changes to the ceramic glass may be for a number of reasons:
- Spilt food has not been cleaned off the surface.
- Using incorrect dishes on the hob which erodes the surface.
- Using the wrong cleaning materials.
Cleaning the Glass Parts
- Clean the glass parts of your appliance on a regular basis.
- Use a glass cleaner to clean inside and outside of the glass parts, then rinse and dry them thoroughly with a dry cloth.
Cleaning the Enamelled Parts
Clean the enamelled parts of your appliance on a regular basis.
Wipe the enamelled parts with a soft cloth soaked in soapy water. Then wipe them
over again with a wet cloth and then dry them.

Do not wash the enamelled parts when they are still hot from cooking.

Do not leave vinegar, coffee, milk, salt, water, lemon or tomato juice on the enamel for a long time.
Cleaning the Stainless Steel Parts (If avaliable)
- Clean the stainless steel parts of your appliance on a regular basis.
- Wipe the stainless steel parts with a soft cloth soaked in only water. Then dry them thoroughly with a dry cloth.
Do not wash the stainless steel parts when they are still hot from cooking.
Do not leave vinegar, coffee, milk, salt, water, lemon or tomato juice on the stainless steel for a long
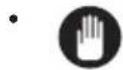

Removal of inner Glasses
Before cleaning the oven door glass, you must remove the inner glass as shown:
- Push the glass towards direction B and release from the location bracket (x). Pull out the glass towards direction A.
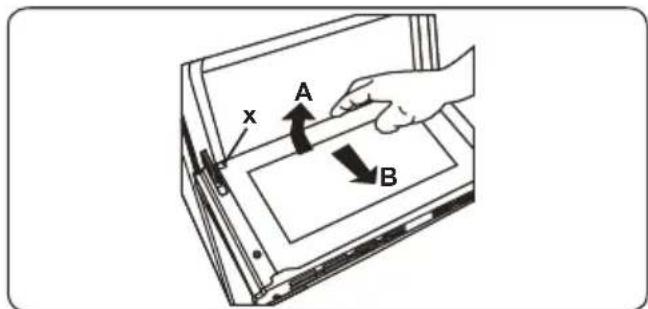
To replace the inner glass;
- Push the glass towards and under the under the location bracket (y) towards to direction B.
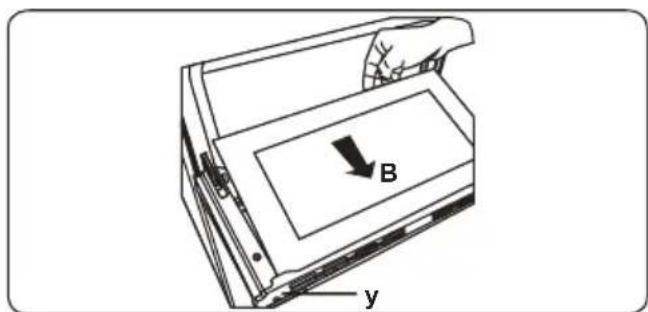
- Place the glass under the location bracket (x) towards to direction C.

If the oven door is a triple glass oven door, the third glass layer can be removed the same way as the second s.
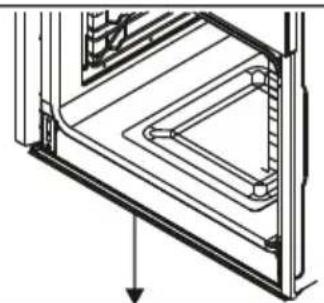
5.2. Removal of oven door
Before cleaning the oven door glass, you must remove the inner glass as shown:
- Open the oven door.
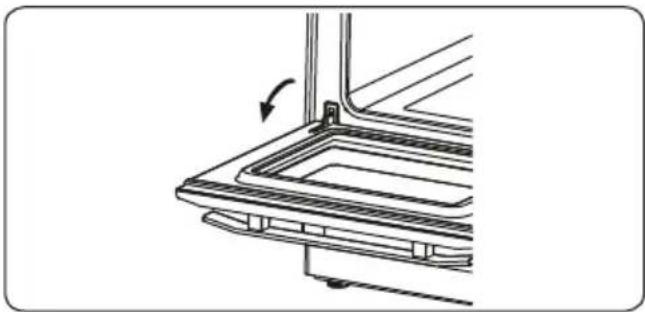
natural_image
Technical line drawing of a vehicle front panel with an arrow indicating direction (no text or symbols)- Open the saddle bracket (a)(with the aid of a screwdriver) up to the end position.
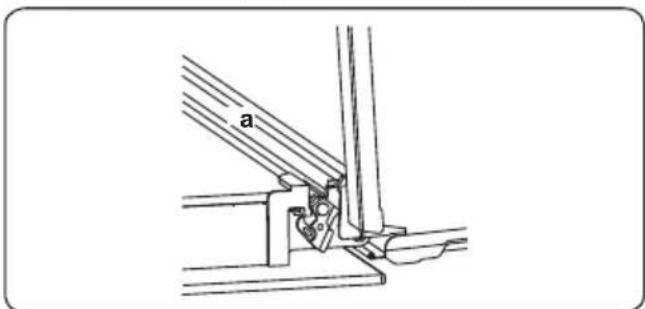
- Close the door until it almost reaches the fully closed position and remove the door by pulling it towards you.
natural_image
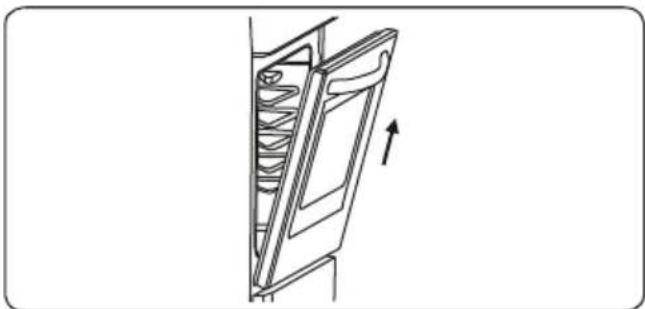
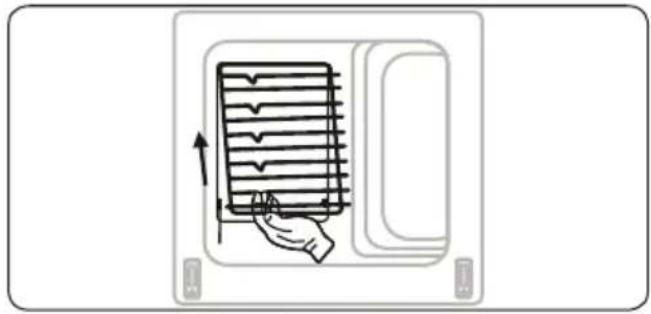
Diagram of a refrigerator with a scroll inside, showing an upward arrow indicating motion (no text or symbols)Removal of Wire Shelf
To remove the wire rack;
Pull the wire rack as shown in the figure. After releasing it from clips (a), lift it up.
natural_image
Illustration of a hand holding a closed notebook inside a rectangular frame, with no visible text or symbols.Maintenance

WARNING: The maintenance of this appliance should be carried out by an authorised service person or qualified physician.
Change of Oven Lamp

WARNING: Switch off the appliance and allow it to cool down before cleaning your appliance.
- Remove the glass lense and then remove the bulb.
- Insert the new bulb (resistant to 300°C) to replace the bulb that you removed (230 V, 15-25 Watt, Type E14).
- Replace the glass lens, then your oven is ready for use.

The lamp design is designed specifically for use in household cooking appliances. It is not suitable for ehold room illumination.
6. TROUBLE SHOOTING&TRANSPORT
6.1. Trouble shooting

After checking these basic trouble shooting, if you have still problem with your appliance, please contact with an authorised service person or qualified technician.
| Problem Possible Cause Solution | ||
| The hob or cooking zones cannot be switched on. | There is no power supply. | Check the household fuse for the appliance.Check whether there is a power cut by trying other electronic appliances. |
| Oven does not turn on. Power is turned off. | Check whether there is power supplied.Also check that other kitchen appliances are working. | |
| No heat or oven does not warm up. | Oven temperature control is incorrectly set.Oven door has been left open. | Check the oven temperature control knob is set correctly. |
| Cooking is uneven within the oven. | Oven shelves are incorrectly positioned. | Check that the recommended temperatures and shelf positions are being used.Do not frequently open the door unless you are cooking things that need to be turned.If you open the door often, the interior temperature will be lower and this may affect the results of your cooking. |
| Oven light (if avaliable) does not operate. | Lamp has failed.Electrical supply is disconnected or switched off. | Replace lamp according to the instructions.Make sure the electrical supply is turned on at wall socket outlet. |
| The timer buttons cannot be pressed properly. | If there is foreign matter caught between the timer buttonsTouch model: if there is moisture on the control panelIf the key lock function is set | Remove the foreign matter and try again.Remove the moisture and try again.Check whether the lock function is set. |
| The oven fan (if avaliable) is noisy. | Oven shelves are vibrating. | Check that the oven is level.Check that the shelves and bakeware are not vibrating in contact with the oven back panel. |
6.2. Transport
If you need to transport the product, use the original product packaging and carry it using its original case. Follow the transport signs on the packaging. Tape all independent parts to the product to prevent damaging the product during transport.
If you do not have the original packaging; prepare a carriage box so that the appliance, especially the external surfaces of the product, are protected against external threats.
| Brand | TELEFUNKEN | |
| Model | TFEH60SW10A | |
| Type of Oven ELECTRIC | ||
| Mass kg 35,0(+/-2) | ||
| Energy Efficiency Index - conventional 116,7 | ||
| Energy Efficiency Index - fan forced 103,6 | ||
| Energy Class A | ||
| Energy consumption (electricity) - conventional kWh/cycle 0,98 | ||
| Energy consumption (electricity) - fan forced kWh/cycle 0,87 | ||
| Number of cavities 1 | ||
| Heat Source ELECTRIC | ||
| Volume I 69 | ||
| This oven complies with EN 60350-1 | ||
| Energy Saving TipsOven- Cook the meals together, if possible.- Keep the pre-heating time short.- Do not elongate cooking time.- Do not forget to turn-off the oven at the end of cooking.- Do not open oven door during cooking period. | ||
| Type of Hob Electric | ||
| Number of Cooking Zones 4 | ||
| Heating Technology-1 Radiant | ||
| Size-1 cm ∅14,5 | ||
| Energy Consumption-1 Wh/kg 192,0 | ||
| Heating Technology-2 Radiant | ||
| Size-2 cm ∅14,5 | ||
| Energy Consumption-2 Wh/kg 192,0 | ||
| Heating Technology-3 Radiant | ||
| Size-3 cm 15,5x26,0 | ||
| Energy Consumption-3 Wh/kg 190,0 | ||
| Heating Technology-4 Radiant | ||
| Size-4 cm ∅18,0 | ||
| Energy Consumption-4 Wh/kg 191,0 | ||
| Energy Consumption of Hob Wh/kg 191,3 | ||
| This hob complies with EN 60350-2 | ||
| Energy Saving TipsHob- Use cookwares having flat base.- Use cookwares with proper size .- Use cookwares with lid.- Minimize the amount of liquid or fat.- When liquid starts boiling , reduce the setting. | ||
Declaration of conformity
We declare that our products meet the applicable European Directives, Decisions and Regulations and the requirements listed in the standards referenced.
C€
Disposal of the device
natural_image
Symbol of a trash bin crossed with a diagonal line, no text or numbers presentOld devices cannot be placed in the household waste!
If the device can no longer be used, every consumer is legally obliged to hand in devices separately from household waste e.g. at a collection site of their local authority / borough. This ensures that the devices are properly recycled and negative effects on the environment are avoided.
Therefore, electrical devices are marked with the symbol depicted.
Recycling

natural_image
Recycling symbol with three chasing arrows forming a triangle (no text or labels)Our packaging is made of environmentally-friendly, recyclable materials:
External packaging made of cardboard
Moulded parts made of CFC-free polystyrene (PS)
Films and bags made of polyethylene (PE)
Wrapping straps made of polypropylene (PP).
If you have sufficient space to permit it, we recommend you retain the packaging, at least during the warranty period. If the device must be returned for repair or brought into a repair drop-off centre, the device is only adequately protected in the original packaging.
If you want to no longer retain the packaging, please dispose of this in an environmentally friendly manner.
natural_image
Technical line drawing of a mechanical device with no visible text or symbolsnatural_image
Black rectangular object with a small sun icon on top, surrounded by decorative side stripes (no text or symbols)Ampoule du four :
natural_image
Abstract circular diagram with concentric arrows and a central pattern, no text or symbols present.Fonction de
natural_image
Abstract grayscale graphic with a central circular emblem and curved arrows, no text or symbols present.Fonction Turbo :
natural_image
Abstract circular graphic with concentric rings and arrows, no text or symbols presentMode Ventilateur :
natural_image
Abstract grayscale graphic with a central circular emblem and symmetrical patterns, no text or symbols present.natural_image
Simple diagram of a black rectangle with five white zigzag arrows on its top edge, surrounded by gray rectangular borders (no text or symbols)natural_image
Abstract grayscale graphic with diagonal stripes and central rectangular shape (no text or symbols)natural_image
Abstract diagram with circular arrows and wave patterns, no readable text or symbols
natural_image
Technical line drawing of a square frame with bolt holes and a central circular hole (no text or symbols)Plateau peu profond
natural_image
Technical line drawing of a square frame with circular cutouts and mounting holes (no text or symbols)natural_image
Pure geometric shape resembling a stylized letter or symbol, no text or markings presentnatural_image
Technical line drawing of a mechanical assembly with horizontal plates and mounting holes (no text or symbols)natural_image
Technical line drawing of a mechanical clamp or bracket component (no text or symbols)Sécurité enfants
natural_image
Line drawing of a refrigerator interior with a door and drawer, showing a scroll inside (no text or symbols)Collecteur d'eau
natural_image
Technical line drawing of a door frame with internal channels and a downward arrow indicating direction (no text or symbols)5. NETTOYAGE ET ENTRETIEN
5.1. Nettoyage
natural_image
Line drawing of a hand cleaning a car trunk with a circular object on the side (no text or symbols)natural_image
Technical line drawing of a mechanical component with an arrow indicating direction (no text or symbols)natural_image
Diagram of a refrigerator interior with a directional arrow indicating movement (no text or symbols)natural_image
Illustration of a hand holding a closed notebook inside a tray, with no visible text or symbols5.2. Entretien

natural_image
Symbol of a trash bin crossed with a diagonal line, representing waste sorting or disposal (no text or labels)natural_image
Recycling symbol composed of three chasing arrows forming a triangle (no text or labels)
- Ofenbeleuchtung:
- Auftaufunktion: Die
- Turbofunktion:
- Umluft:
- Grillfunktion:
- Flaches Blech
- Teleskopschienenstange
- Kindersicherung
- Wasserauffang
- Glaskeramik reinigen
- Wartung
- Thank you for choosing this product.
- CONTENTS
- 1.SAFETY INSTRUCTIONS ......29
- 2.INSTALLATION AND PREPARATIONS FOR USE ....34
- 3.PRODUCT FEATURES 37
- USE OF PRODUCT ...... 39
- 5.CLEANING AND MAINTENANCE 44
- 6.TROUBLE SHOOTING&TRANSPORT 47
- SAFETY INSTRUCTIONS
- General Safety Warnings
- Installation Warnings
- During Usage
- During Cleaning and Maintenance
- INSTALLATION AND PREPARATIONS FOR USE
- Instructions for the Installer General instructions
- Installation of the appliances
- Installation dimensions for hob
- Installation of the hob
- Installation of the oven
- Electrical Connection and Safety
- WARNING: THE APPLIANCE MUST BE EARTHED.
- PRODUCT FEATURES
- List of Components
- Control Panel
- USE OF PRODUCT
- Control of Hob
- Control of the ceramic heater
- Dual and oval heaters (If available)
- Hints and Tips
- WARNING:
- Control of Oven
- Oven function control knob
- Oven thermostat knob
- Oven Functions
- Faster Grilling
- Use of Visio Display Timer
- Adjusting the Day Time:
- Adjusting the cooker time:
- Adjusting the Minute Minder:
- Adjusting the Cooking Duration Time:
- Adjusting the Cooking End Time:
- Digital Timer Sound Adjustment:
- Key Lock Function
- Deep Tray
- Shallow Tray
- Telescopic Rail Wire
- Wire Rack with Two Full Extension Telescopic Rails
- Vitroceramic Glass Spatula
- Child Lock
- Soft Close Oven Door
- Water Collector
- CLEANING AND MAINTENANCE
- Cleaning
- General Instructions
- Cleaning the inside of the Oven
- Cleaning the Ceramic Glass
- Cleaning the Glass Parts
- Cleaning the Enamelled Parts
- Cleaning the Stainless Steel Parts (If avaliable)
- Removal of inner Glasses
- Removal of oven door
- Maintenance
- Change of Oven Lamp
- TROUBLE SHOOTING&TRANSPORT
- Trouble shooting
- Transport
- C€
- Disposal of the device
- Recycling
- Ampoule du four :
- Fonction de
- Fonction Turbo :
- Mode Ventilateur :
- Plateau peu profond
- Sécurité enfants
- Collecteur d'eau
- NETTOYAGE ET ENTRETIEN
- Nettoyage
- Entretien
Brand : TELEFUNKEN
Model : TFEH60SW10A
Category : Cooker