USER MANUAL CR221I THOMSON
Piles de secours (non fournies)
BELGIQUE, customerservice@bigben-interactive.be
NEDERLAND, customerservice@bigben-interactive.nl
ESPANA, sat@bigbenespana.es
ITALIA. support@bigbeninteractive.it
www/bigben.eu
THOMSON
EN
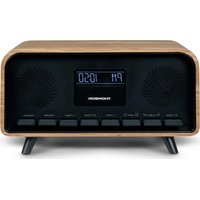
CR221I (White) CR225I (Grey)
WIRELESS & USB CHARGE / FM CLOCK RADIO

OPERATING INSTRUCTIONS
PLEASE READ THIS USER MANUAL CAREFULLY BEFORE OPERATING THIS UNIT AND RETAIN FOR FUTURE REFERENCE
WARNING AND PRECAUTIONS


The lightning bolt with an arrowhead within a triangle indicates the presence of uninsulated dangerous voltage within the product enclosure that may be of sufficient magnitude to constitute a risk of electric shock to persons
The exclamation point within a triangle indicates the presence of important operating and maintenance (servicing) instructions in the literature accompanying the unit.
Important safety instructions
- Read these instructions.
- Keep these instructions.
Heed all warnings.
- Follow all instructions.
Refer all servicing to qualified service personnel.
- Do not expose the unit to dripping or splashing and make sure that no objects filled with liquids, such as vases, are placed on it.
Class I appliances must be connected to the mains socket outlet with a protective-earth connection.
- The mains plug connects the device and should remain operable during use.
- To disconnect the unit from the mains, the plug should be fully disconnected from the mains socket outlet. The mains plug should not be obstructed and should be easily accessible during use.
- When a power indicator light is on, it indicates the unit is connected to the mains supply. When the light is off, it indicates the unit is fully disconnected from the mains supply.
- Polarity must be respected when inserting batteries.
- The batteries should be inserted in such a way as to avoid any short circuit.
- Do not mix used and new batteries.
- Do not mix alkaline, standard (carbon-zinc) and rechargeable (nickel-cadmium) batteries.
- Do not expose the battery to excessive heat such as sunshine or fire.
- Remove the batteries when they have not been used for a long time.
- If the liquid contained in the batteries comes in contact with eyes or skin, immediately and carefully wash the affected area with clear water and consult a doctor.
- The product/remote control may contain a coin/button type battery:
WARNING :
This product has not been manufactured to be used by people (including children) whom physical or mental capacities are reduced, or people without experience except if they are under the responsibility of somebody who is able to read and follow the instructions properly. Children must use this product under the supervision of an adult.
WARNING CONCERNING BATTERIES :
Don't swallow batteries. Risk of chemical burning. This product contains one or several batteries. If a battery is swallowed, it can cause within less than 2 hours severe internal damages and death. Keep new and old batteries away from children and vulnerable people. If the compartment of batteries can't be closed correctly, please don't use the product any longer. If a battery is swallowed, please go and see a doctor immediately.
Risk of explosion if the battery/ies is/are not replaced correctly or if the product is not used for a long time with batteries left inside.
Replace old batteries by an identical or similar models.
| double insulation | |
| direct current | |
| alternating current | ~ |
| symbol indoor use | |
Care of the environment

Your product is designed and manufactured with high quality materials and components, which can be recycled and reused.
When this crossed-out wheeled bin symbol is attached to a product it means that the product is covered by the European Directive 2002/96/EC. Please inform yourself about the local separate collection system for electrical and electronic products. Please act according to your local rules and do not dispose of your old products with your normal household waste. Correct disposal of your old product helps to prevent potential negative consequences for the environment and human health.
Compliance

This product complies with the radio interference requirements of the Europe Community.
Battery power
- Be sure that the batteries are inserted correctly to avoid damage to the appliance. Always remove the batteries when appliance will not be used for a long period of time, as this will cause leakage to the batteries and subsequently damage to your set.
- Use batteries of the same type. Never use different types of batteries together.
- Do not throw the battery into the fire, or exposed to sunshine or the like.
- If the liquid contained in the batteries comes in contact with eyes or skin, wash the area immediately and carefully with clear water and consult a doctor.

CAUTION
- Risk of product damager! Make sure that the power voltage corresponds to the voltage printed on the back label.
- Risk of electric shock! When you unplug the AC power cord always pull the plug from the socket. Never pull the cord.
- Before connecting the AC power cord, ensure you have completed all other connections.

When AC power supply...
Place the unit in the desired position and unravel the mains cable. Insert the cable into the supply socket and switch on if applicable.
What's in the box
Check and identify the contents of your package:
- Main unit
Power cord
- Instruction manual
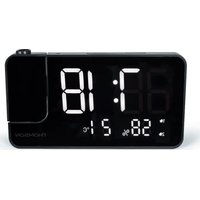
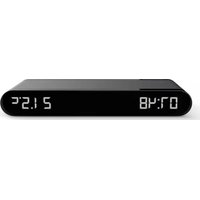
Overview of the Components


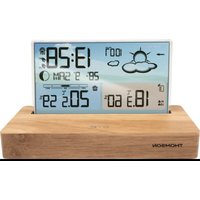
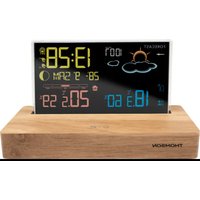
- DISPLAY
- STANDBY button
- CLOCK/MEMORY button
- VOLUME-/ALARM1 button
- VOLUME+ / ALARM 2 button
-
SNOOZE / DIMMER button
-
SKIP- button
- SKIP+ button
- PRESET button
- SLEEP button
- WIRELESS CHARGE LOCATION

12.ANTENNA
13. AC POWER CORD
14. BATTERY DOOR
- AUX-IN JACK
- USB CHARGING PORT
Start-up of the device/introduction.
- Remove the protective film from the display if it is still present.
- Press the "STANDBY" button to turn on the device.
- Press the "STANDBY" button again to switch into the standby mode.
Power Supply
You can power your appliance by plugging the AC power cord at the back of the appliance into a wall AC power outlet. Check that the rated voltage of your appliance matches your local voltage.
Back-up Battery (not supplied)
Open the battery compartment on the backside of the product. Insert 2 x 'AAA' size battery (Battery not included).
Close the battery compartment.
Note: The back-up battery preserves the clock time in case of a temporary power blackout.
CAUTION
Danger of explosion if battery is incorrectly replaced. Replace only with the same or equivalent type.
Setting the clock
The system must be in standby mode in order to set the clock.
- Press and hold the "CLK. / MEM." button for approx.2 seconds.
- Use the "SKIP +" & "SKIP -" buttons to set the time format "12 / 24hr".
- Press the "CLK. / MEM." button to confirm time format.
- Use the "SKIP +" & "SKIP -" buttons to set the hours accordingly. The hour digits start flashing.
- Press the "CLK. / MEM." button to confirm the hour.
- Repeat step 4 and 5 to set the minute.
NOTE:
- Because clock setting is at standby mode, the display is dim.
- You may press and hold the "SNOOZE/DIMMER" button to adjust display lightness.
Setting of the alarm time
The system must be in standby mode in order to set the alarm.
- Press and hold the "VOL - / ALARM 1" button for 2 seconds to entry alarm set mode.
- Use the "SKIP +" & "SKIP -" buttons to set the hour accordingly. The hour digits start flashing.
- Press the "VOL - / ALARM 1" button to confirm the hour.
- Repeat step 2 and 3 to set the minute.
- Press the "SKIP +" or "SKIP -" button to select below 1, or 2 for wake-up function.
1-BUZZ,2-TUNE (RADIO)
- Press the "VOL - / ALARM 1" button to confirm.
- Use the "SKIP +" & "SKIP -" buttons to set the Alarm volume.
- Press the "VOL - / ALARM 1" button to confirm.
To set the second alarm time, repeat each of the above steps with the "VOL. + / ALARM 2" button.
In order to deactivate the alarm function, press the "VOL. - / ALARM 1" or "VOL. + / ALARM 2" button.
Snoopze
Press "SNOOZE / DIMMER" button to suspend alarm sound for a few minutes.
The alarm will start again after approx. 9 minutes.
Dimmer
NOTE:
This function can be used in both "Standby Mode" and "Turned On Mode"
- Press and hold the "SNOOZE / DIMMER" button for 2 seconds to select dimmer. Dimmer has 3 steps.
Sleep
NOTE:
The system must be "Turned On" in order to set the sleep timer
- Press the "SLEEP" button to enter.
- Press the "SLEEP" buttons to set SLEEP time (120, 110, 100... OFF)
- To cancel SLEEP, follow above step 1 to 2 and set the SLEEP time to "OFF".
Listening to the FM Radio
- Press the "STANDBY" button to turn on the device to listen the FM radio.
- For FM reception: Completely extend the telescopic antenna. Change its position to improve the reception.
- There are two options to search for and preset radio stations.
Automatic scan for FM stations:
Press the "SKIP +" or "SKIP -" buttons for approx.2 seconds, the device will search to the previous or next radio station respectively.
- Manual scan for FM stations:
Briefly press the "SKIP +" & "SKIP -" buttons, until you have found the radio station which you are looking for.
Automatic preset station:
- Press and hold the "CLK. / MEM." button on unit for about 2-3 seconds to start the automatic preset process.
- Display will show the memory sequence number and radio stations will be automatically preset into the sequence number (Note: Each sequence number means 1 preset station while during automatic preset process.)
- Once all the stations were preset, press the "PRE." button until you see memory sequence number.
- Press the "SKIP +" & "SKIP -" buttons to search for the desired preset station.
- Press "PRE." button to confirm and listen to your desired radio stations.
- Manual memory preset
- Search for a station as described in "Automatic scan for FM stations" or "Manual scan for FM stations".
- Press "CLK. / MEM." button to enter manual preset station setting.
- Display will show "P01" flashing.
- Press "SKIP +" or "SKIP -" buttons to choose preset station number.
- Press "CLK. / MEM." button to confirm chosen preset station number.
- Once all the stations were preset, press the "PRE." button until you see memory sequence number.
- Press the "SKIP +" & "SKIP -" buttons to search for the desired preset station.
- Press "PRE." button to confirm and listen to your desired radio stations
Importance Notice
Due to the interference from wireless charging, the wireless charging function will be suspended under the FM radio mode.
Charge Your Phone
You can charge your phone via wireless charge or USB charger slot(cable not included).
Wireless charge
- Place your smartphone centrally on top of the device as shown.
- The charge state is indicated in your smartphone display as usual.
NOTE:
- If problems occur when charging or if the charging does not start:
-
Remove your smartphone from the case, if the thickness of the case exceeds 5mm or if it consists of metal.
-
Check if your smartphone is placed on top of the device as shown.
-
The charging time varies depending on charging capacity of the battery and its current residual capacity.
- The components may heat up during the charging process. They slowly cool down again after the charging process.
USB charger slot
- Connect an external device via a USB cable to the USB charging port on the back of the device for charging.
- The charge state is indicated in your external device as usual.
Remark:
- There will be some radio interference while the charging.
- Please charge your device with only one charging method.
- Please do not charge your device with wirless charge & USB cable together.
AUXILIARY (AUX) playback
The system must be "Turned On". If you want to play from AUX-IN jack, please connect the external device via 3.5mm plug jack(cable not included) to the AUX-IN jack. The display will show "AU". You can hear the sound from the external device through the loud speakers and you may adjust the volume on the external audio device. For further functions please refer to the user manual of the external audio device.
NOTE:
Adjust the volume of the external device to a comfortable level.
Cleaning and Maintenance
WARNING:
Do not immerse the device in water.
- Always remove the mains plug before cleaning the machine.
- Any marks on the surface can be wiped off with a slightly damp cloth without any additives.

Don't discard the electrical and electronic appliances in the regular waste disposal.
Take them to a collection point.
- Some components in these appliances may be hazardous to health and the environment.
- In order to save energy when the unit has no sound output for a while, the unit will be switched to stand-by automatically. It can be switched ON by using the POWER selector again.
The undersigned, Bigben Interactive declares that the radio equipment of the CR225I / CR221I type complies with the 2014/53/EU directive.
The complete text is available at https://www/bigben-interactive.co.uk/support/
Manufactured by BIGBEN INTERACTIVE
396, Rue de la Voyette
CRT2-FRETIN
CS 90414
59814 LESQUIN Cedex - France
www/bigben.eu
Made in China
Email: support.thomson@bigben.fr


REACH

Fabricant: Bigben Interactive FRANCE
- Rue de la Voyette, C.R.T.2, Fretin, CS90414-59814 Lesquin Cedex, France
BELGIQUE, customerservice@bigben-interactive.be
NEDERLAND, customerservice@bigben-interactive.nl
ESPANA, sat@bigbenespana.es
ITALIA, support@bigbeninteractive.it
www/bigben.eu
THOMSON
ES
CR221I (blanco) CR225I (gris)
RADIO RELOJ FM CON CARGADOR INALÁMBRICO Y USB

Waterloo Office Park / Batiment H
Dreve Richelle 161 bte 15 1410 Waterloo, Belgium
Bigben Interactive NEDERLAND b.v.
BELGIQUE, customerservice@bigben-interactive.be
NEDERLAND, customerservice@bigben-interactive.nl
ESPANA, sat@bigbenespana.es
ITALIA, support@bigbeninteractive.it
www/bigben.eu
THOMSON
IT
CR221I (bianco) CR225I (grigio)
CARICABATTERIA WIRELESS E USB / RADIOSVEGLIA FM

ISTRUZIONI D'USO
PRIMA DI UTILIZZARE L'APPARECCHIO, LEGGERE PER INTERO IL PRESENTE MANUALE E CONSERVARLO PER CONSULTAZIONI FUTURE.
Waterloo Office Park / Batiment H
Dreve Richelle 161 bte 15 1410 Waterloo, Belgium
Bigben Interactive NEDERLAND b.v.
BELGIQUE, customerservice@bigben-interactive.be
NEDERLAND, customerservice@bigben-interactive.nl
ESPANA, sat@bigbenespana.es
ITALIA, support@bigbeninteractive.it
www/bigben.eu
CR221I (branco) CR225I (cinzano)
BELGIQUE, customerservice@bigben-interactive.be
NEDERLAND, customerservice@bigben-interactive.nl
ESPANA, sat@bigbenespana.es
ITALIA, support@bigbeninteractive.it
www/bigben.eu
THOMSON
DE
CR221I (Weiβ) CR225I (Grau)
KABELLOSES UND USB-LADEGERÄT / UKW UHR RADIO

BEDIENUNGSANLEITUNG
Waterloo Office Park / Batiment H
Drive Richelle 161 bte 15 1410 Waterloo, Belgium
Bigben Interactive NEDERLAND b.v.
BELGIQUE, customerservice@bigben-interactive.be
NEDERLAND, customerservice@bigben-interactive.nl
ESPANA, sat@bigbenespana.es
ITALIA, support@bigbeninteractive.it
www/bigben.eu
CR221I (Wit) CR225I (Grijs)
FM-WEKKERRADIO MET DRAADLOZE EN USB-LAADFUNCTIE

HANDLEIDING
LEES DEZE GEBRUKSAANWIJZING VOLLEDIG DOOR ALVORENS DEZE EENHEID TE BEDIENEN, EN BEWAAR DIT BOEKJE VOOR UW ADMINISTRATIE.
WAARSCHUWINGEN EN VOORZORGSGMAATREGELEN


Waterloo Office Park / Batiment H
Drive Richelle 161 bte 15 1410 Waterloo, Belgium
Bigben Interactive NEDERLAND b.v.
Mail: support@bighen-interactive.de
BELGIQUE, customerservice@bigben-interactive.be
NEDERLAND, customerservice@bigben-interactive.nl
ESPANA, sat@bigbenespana.es
ITALIA. support@bigbeninteractive.it
www/bigben.eu