EX — Cooker — Mode d'emploi PDF")
I6VSH2(W)EX - Cooker INDESIT - Free user manual and instructions
Find the device manual for free I6VSH2(W)EX INDESIT in PDF.
| Product Type | Freestanding Electric Cooker |
| Brand | Indesit |
| Model | I6VSH2(W)EX |
| Oven dimensions (HxWxD) | 32 x 43.5 x 39.5 cm |
| Oven volume | 65 L |
| Useful drawer dimensions (WxDxH) | 42 x 46 x 8.5 cm |
| Ceramic hob power | Front left: 1700 W, Rear left: 1200 W, Rear right: 1200 W, Front right: 2300 W, Total: 6400 W |
| Power supply | 230 V single-phase ~ (possible 400 V 2N~ or 3N~) |
| Oven functions | Static, Pastry, Top heating element, Grill, Rotisserie (on certain models) |
| Cleaning | Assisted steam cleaning, door removal for cleaning |
| Safety | Anti-tip safety chain, control lock not provided |
| Oven light | Bulb 230 V, 25 W, E14 base |
| Repairability index | Not specified |
Frequently Asked Questions - I6VSH2(W)EX INDESIT
User questions about I6VSH2(W)EX INDESIT
0 question about this device. Answer the ones you know or ask your own.
Ask a new question about this device
Download the instructions for your Cooker in PDF format for free! Find your manual I6VSH2(W)EX - INDESIT and take your electronic device back in hand. On this page are published all the documents necessary for the use of your device. I6VSH2(W)EX by INDESIT.
USER MANUAL I6VSH2(W)EX INDESIT
Operating Instructions COOKER AND OVEN
Contents
Operating Instructions,1 ATTENZIONE, 2
Description of the appliance-Overall view,7
Description of the appliance-Control Panel,8 Installation,9
Start-up and use,11
Cooking modes,11
Using the hob,14
Precautions and tips,15
Care and maintenance,16
Assistance,16
FR
Français
PykoBoDCTBO no 3KcNpyatau KXYOHHAR PINTA C DYXOBbIM WIK
CoepkaHne
PykoBOdCTBO NO 3KcPnyataun,1
BHIMAHNE,5
OncanHe n3denny-Obuui Bn7
Onncnne n3dennn-panenbynnpaBneHn8
MoHTaJx,47
BkIIOueHHe n 3KcNJIyataaun,48
IporpamMbI npiroTOBJeHnA,49
PpeoctopoxkHocTn peKoMeHdaun,52
Texnueckoe obcnykubahne uyxo,53
TexHnueckoe 06cIyXnBaHne,54
KZ
Kazakwa
PnndanaHy HycayIbIFbl
Ma3MyHbi
PaindanaHyckaynbftb1
ECKEPTYE6KEPTYECKEPTY Kypbunbcnattamacbl,annblwny 7
KypblnfbcunntaMaCbI, Bacepy TaTacbl 8
Ophaty, 57
Kocy xehe naaandahy,59
CaKaTaHDbIpynap MeN KeHeCTep 64
Kytim XaHe TexHnKaIbIK KbI3MeT Kepcety 65
Komek 65

jLgJxuUcL
jLgJzLd
1
y
ziluaig jia jiluw
aillg aill
GB
ATTENZIONE
WARNING: The appliance and its accessible parts become hot during use.
Care should be taken to avoid touching heating elements.
Children less than 8 years of age shall be kept away unless continuously supervised.
This appliance can be used by children aged from 8 years and above and persons with reduced physical, sensory or mental capabilities or lack of experience and knowledge if they have been given supervision or instruction concerning use of the appliance in a safe way and understand the hazards involved. Children shall not play with the appliance. Cleaning and user maintenance shall not be made by children without supervision.
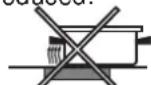
WARNING: Unattended cooking on a hob with fat or oil can be dangerous and may result in fire.
NEVER try to extinguish a fire with water, but switch off the appliance and then cover flame e.g. with a lid or a fire blanket.
Do not use harsh abrasive cleaners or sharp metal scrapers to clean the oven door glass since they can scratch the surface, which may result in shattering of the glass.
The internal surfaces of the compartment (where present) may become hot.
Never use steam cleaners or pressure cleaners on the appliance.
Remove any liquid from the lid before opening it.
Do not close the glass cover (if present) when the gas burners or electric hotplates are still hot.
WARNING: Ensure that the appliance is switched off before replacing the lamp to avoid the possibility of electric shock.
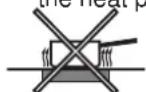
WARNING: Danger of fire: do not store items on the cooking surfaces.
WARNING: If the surface in glassceramic is cracked, switch off the appliance to avoid the possibility of electric shock.
! When you place the rack inside, make sure that the stop is directed upwards and in the back of the cavity.
FR
ATTENTION
a a a a a a a a a a a a a a a a a a a a a a a a a a a a a
Jg 8 Jg 8 Jg 8 Jg 8 Jg 8 Jg 8 Jg 8 Jg 8 Jg 8 Jg 8 Jg 8
jll
. 1
g l a 1 1 1 1 1 1 1 1 1 1 1 1 1 1 1 1 1 1 1 1 1 1 1 1
Jusuiu olulua ayilbabn
abll bawlgl cwlil 2:dlgds jaii
a 1
y
1j
a111 (2+1) a111 111
jiei jie jie jie jie jie jie jie jie jie jie jie jie jie jie jie jie jie jie jie jie jie jie jie jie jie jie jie jie jie jie jie jie jie jie jie jie jie jie jie jie jie jie jie jie
y
aieiuee iie eiee ieieieieieieieieieieieieieieieieieieieieieieieieieieieieieieieieieieieieieieieieieieieieieieie
1111 1111 1111 1111 1111 1111 1111 1111
a 1
a 1
jll j 1000
a
:gljlll 4
aiee eae ee eee eee eee eee eee eee eee eee
GB
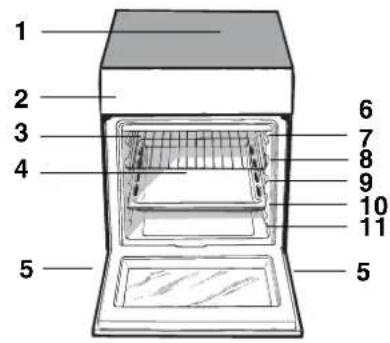
Description
Overall view
1.Glass ceramic hob
2. Control panel
3.Sliding grill rack
4.DRIPPING pan
5. Adjustable foot
6.GUIDERAILS for the racks
7.position 5
8.position 4
9.position 3
10.position 2
11.position 1
PT
Descrição
Vista de Conjunto
- Plano de vitrocerámica
- Paine de comandos
- Prateleira GRADE
- Prateleira BANDEJA PINGADEIRA
- Pé de regulação
- GUIAS de deslizamento
- Posicao 5
- Posicao 4
- Posicao 3
- Posicao 2
- Posicao 1
KZ
KypbINrFbl CnNaTTaMaCbI
Kannbi wony
- 甲bHbKepeamKaJIbIKnNTa
- Bacekapy TaKTacbi
3.ΓPUNb - TYTKAJBI TABA
- PetteerinRaeeteriH
- BAFblTTAYbI JXOJIAP
- 5-no3nua
- 4-No3n
- 3-03nua
10.2-no3nur - 1-no3nur
FR
Description
Vue d'ensemble
Description of the appliance
Control panel
1.SELECTIONKnob
2.THERMOSTAT knob
3.Electric HOTPLATE control knob
4.THERMOSTAT indicator light
5.TIMER knob
6.ELECTRIC HOTPLATE indicator light

Before operating your new appliance please read this instruction booklet carefully. It contains important information concerning the safe installation and operation of the appliance.
Please keep these operating instructions for future reference. Make sure that the instructions are kept with the appliance if it is sold, given away or moved.
! The appliance must be installed by a qualified professional in accordance with the instructions provided.
Any necessary adjustment or maintenance must be performed after the cooker has been disconnected from the electricity supply.
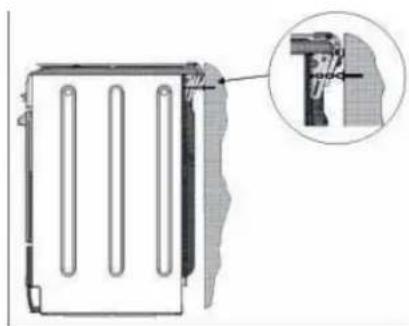
Positioning and levelling
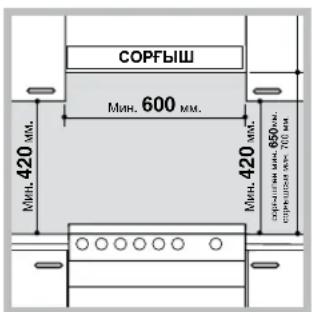
! It is possible to install the appliance alongside cupboards whose height does not exceed that of the hob surface.
Make sure that the wall in contact with the back of the appliance is made from a non-flammable, heat-resistant material (T 90^
To install the appliance correctly:
- Place it in the kitchen, the dining room or the bed-sit (not in the bathroom).
If the top of the hob is higher than the cupboards, the appliance must be installed at least 600mm away from them.
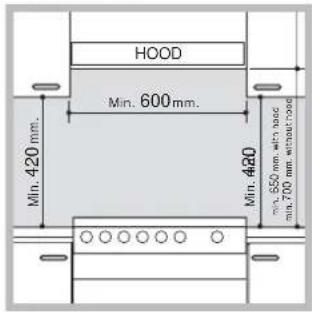
- If the cooker is installed underneath a wall cabinet, there must be a minimum distance of 420mm between this cabinet and the top of the hob.
This distance should be increased to 700mm if the wall cabinets are flammable (see figure).
- Do not position blinds behind the cooker or less than 200mm away from its sides.
- Any hoods must be installed according to the instructions listed in the relevant operating manual.
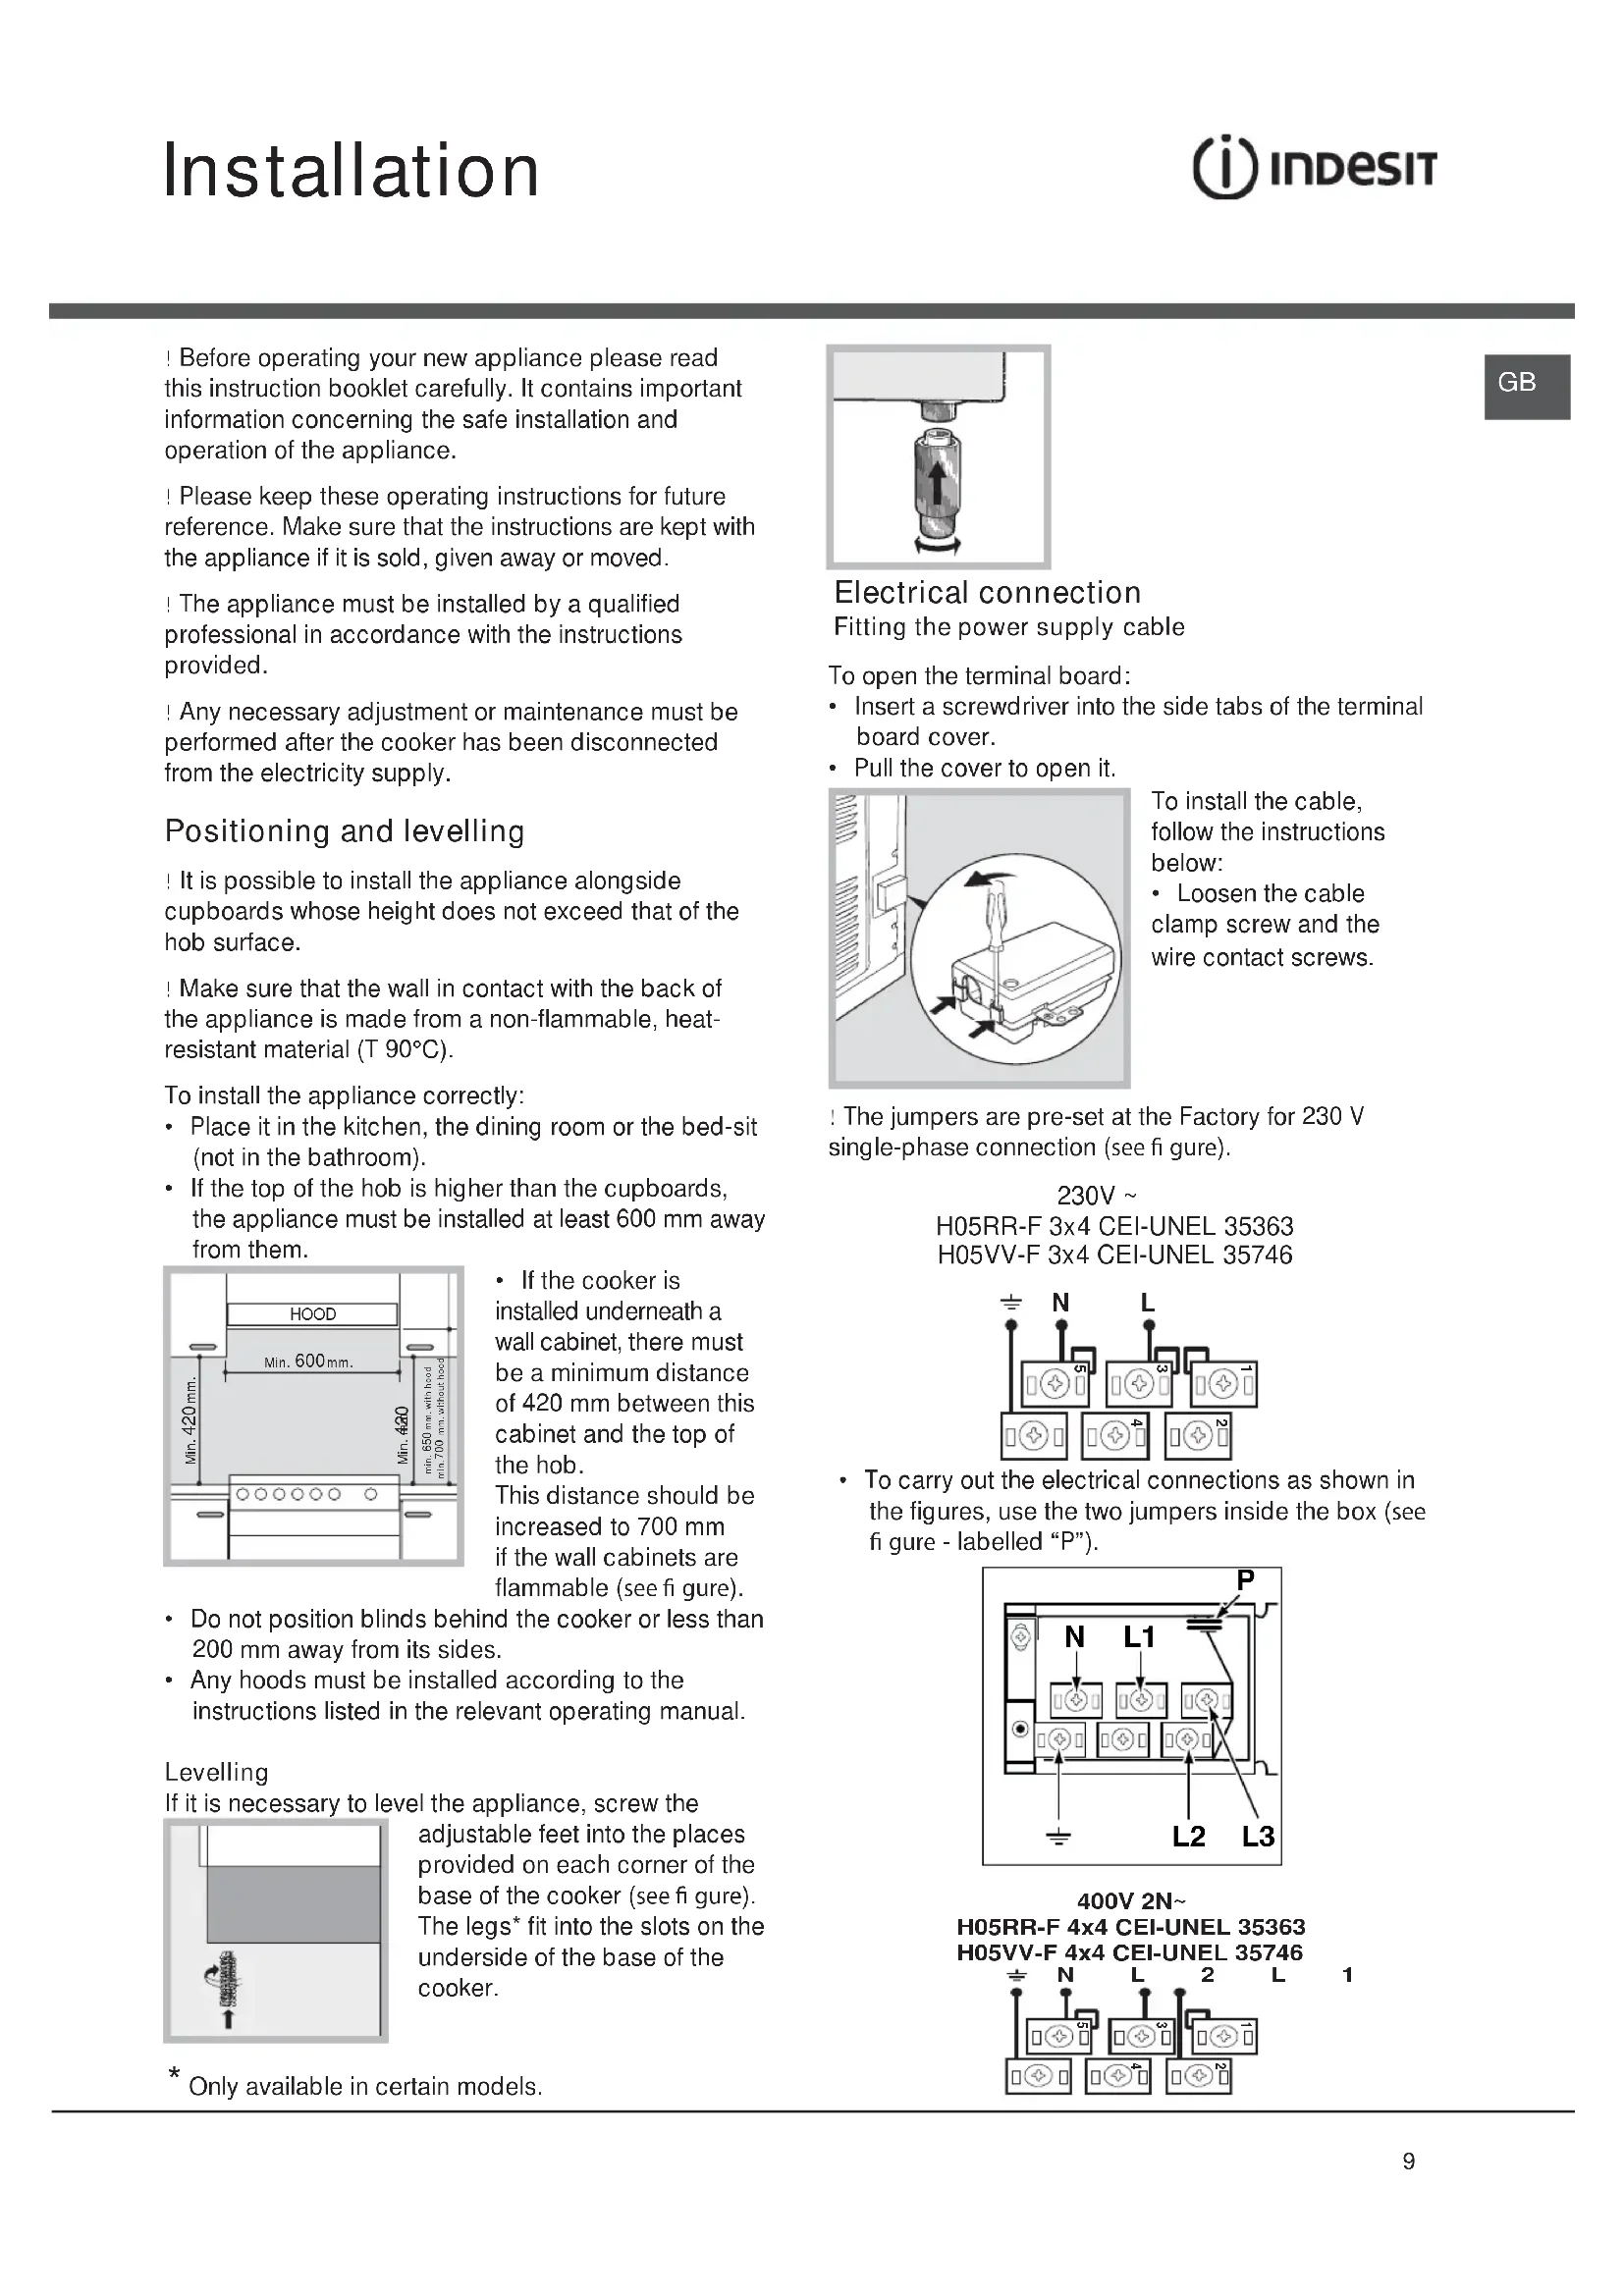
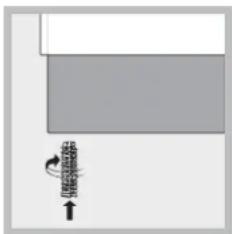
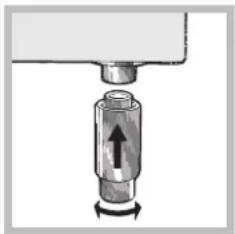
Levelling
If it is necessary to level the appliance, screw the
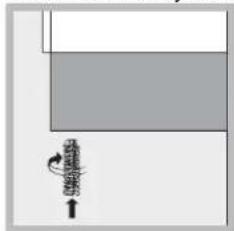
adjustable feet into the places provided on each corner of the base of the cooker (see figure). The legs* fit into the slots on the underside of the base of the cooker.
* Only available in certain models.
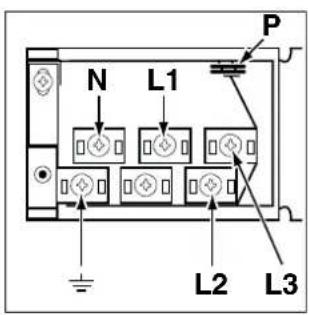
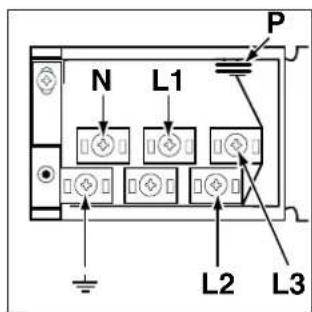
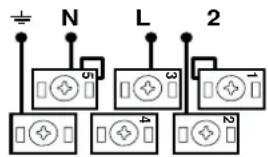
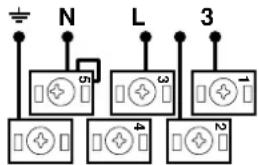
Electrical connection
Fitting the power supply cable
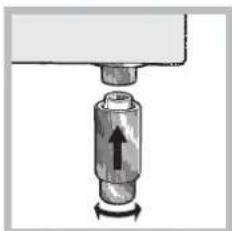
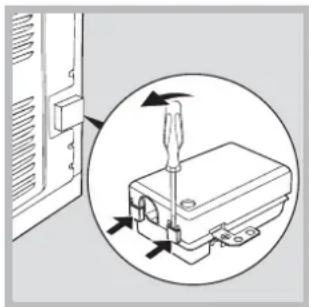
To open the terminal board:
- Insert a screwdriver into the side tabs of the terminal board cover.
Pull the cover to open it.
To install the cable, follow the instructions below:
- Loosen the cable clamp screw and the wire contact screws.
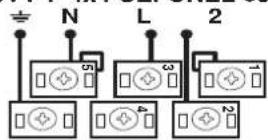
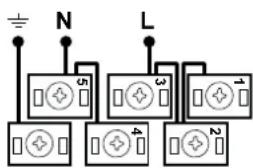
! The jumpers are pre-set at the Factory for 230V single-phase connection (see figure).
230V\~
H05RR-F 3x4 CEI-UNEL 35363
H05VV-F 3x4 CEI-UNEL 35746
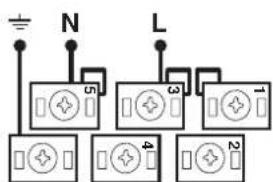
- To carry out the electrical connections as shown in the figures, use the two jumpers inside the box (see figure - labelled "P").
400V 2N~ H05RR-F 4x4 CEI-UNEL 35363 H05VV-F 4x4 CEI-UNEL 35746
1
400V 3N~
H05RR-F 5x2.5 CEI-UNEL 35363
H05VV-F 5x2.5 CEI-UNEL 35746
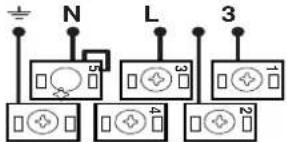
L
- Secure the power supply cable by fastening the cable clamp screw then put the cover back on.
Connecting the supply cable to the electricity mains Install a standardised plug corresponding to the load indicated on the appliance data plate (see Technical data table).
The appliance must be directly connected to the mains using an omnipolar switch with a minimum contact opening of 3mm installed between the appliance and the mains. The switch must be suitable for the charge indicated and must comply with current electrical regulations (the earthing wire must not be interrupted by the switch). The supply cable must be positioned so that it does not come into contact with temperatures higher than 50^ at any point.
Before connecting the appliance to the power supply, make sure that:
- The appliance is earthed and the plug is compliant with the law.
- The socket can withstand the maximum power of the appliance, which is indicated by the data plate.
- The voltage is in the range between the values indicated on the data plate.
- The socket is compatible with the plug of the appliance. If the socket is incompatible with the plug, ask an authorised technician to replace it. Do not use extension cords or multiple sockets.
! Once the appliance has been installed, the power supply cable and the electrical socket must be easily accessible.
! The cable must not be bent or compressed.
! The cable must be checked regularly and replaced by authorised technicians only.
! The manufacturer declines any liability should these safety measures not be observed.
We recommend cleaning the oven before using it for the first time, following the instructions provided in the "Care and maintenance" section.
| TABLE OF CHARACTERISTICS | |
| Oven dimensions (HxWxD) | 32x43.5x39,5 cm |
| Volume | 65 l |
| Useful measurements relating to the oven compartment | width 46cm depth 42 cm height 8.5 cm |
| 2 Voltage and frequency | see data plate Data plate, is located inside the flap or, after the oven compartment has been opened, on the left-hand wall inside the oven. |
| Ceramic hob | |
| Front Left | 1700 W |
| Back Left | 1200 W |
| Back Right | 2300 W |
| Front Right | 1200 W |
| Max. ceramic hob consumption | 6400 W |
| ENERGY LABEL | Directive 2002/40/EC on the label of electric ovens. Standard EN 50304 Natural convection energy consumption heating mode: Static |
| This appliance conforms to the following European Economic Community directives: 2006/95/EC dated 12/12/06 (Low Voltage) and subsequent amendments - 2004/108/EC dated 15/12/04 (Electromagnetic Compatibility) and subsequent amendments - 93/68/EEC dated 22/07/93 and subsequent amendments. 2002/96/EC 1275/2008 (Stand-by/Off mode) | |
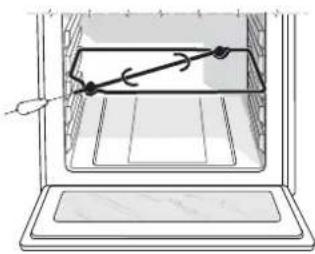
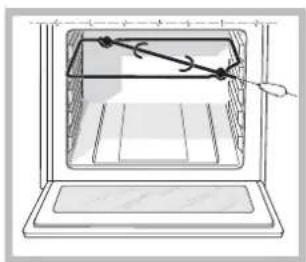
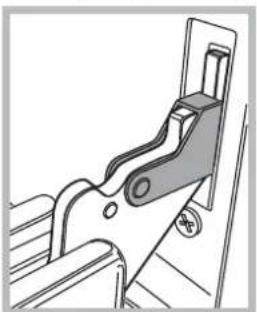
Safety Chain
! In order to prevent accidental tipping of the appliance, for example by a child climbing onto the oven door, the supplied safety chain MUST be installed!
The cooker is fitted with a safety chain to be fixed by means of a screw (not supplied with the cooker) to the wall behind the appliance, at the same height as the chain is attached to the appliance.
Choose the screw and the screw anchor according to the type of material of the wall behind the appliance. If the head of the screw has a diameter smaller than 9mm , a washer should be used. Concrete wall requires the screw of at least 8mm of diameter, and 60mm of length.
Ensure that the chain is fixed to the rear wall of the cooker and to the wall, as shown in figure, so that after installation it is tensioned and parallel to the ground level.
Using the oven
The first time you use your appliance, heat the empty oven with its door closed at its maximum temperature for at least half an hour. Ensure that the room is well ventilated before switching the oven off and opening the oven door. The appliance may emit a slightly unpleasant odour caused by protective substances used during the manufacturing process burning away.
Before operating the product, remove all plastic film from the sides of the appliance.
- Select the desired cooking mode by turning the SELECTOR knob.
- Select the recommended temperature for the cooking mode or the desired temperature by turning the THERMOSTAT knob.
A list detailing cooking modes and suggested cooking temperatures can be found in the relevant table (see Oven cooking advice table).
During cooking it is always possible to:
- Change the cooking mode by turning the SELECTOR knob.
- Change the temperature by turning the THERMOSTAT knob.
- Set the total cooking time and the cooking end time (see below).
- Stop cooking by turning the SELECTOR knob to the "0" position.
! Never put objects directly on the bottom of the oven; this will avoid the enamel coating being damaged.
Only use position 1 in the oven when cooking with the rotisserie spit.
Always place cookware on the rack(s) provided.
Cooking Modes
Convection Mode
Position of thermostat knob between 60^ and Max. On this setting, the top and bottom heating elements come on. This is the classic, traditional type of oven which has been perfected, with exceptional heat distribution and reduced energy consumption. The convection oven is still unequalled when it comes to cooking dishes made up of several ingredients, e.g. cabbage with ribs, Spanish style cod, Ancona style stockfish, tender veal strips with rice, etc. Excellent results are achieved when preparing veal or beef-based dishes as well (braised meats, stew, goulash, wild game, ham etc.) which need to cook slowly and require basting or the addition of liquid. It nonetheless remains the best system for baking cakes as well as
fruit and cooking using covered casserole dishes for oven baking. When cooking in convection mode, only use one dripping pan or cooking rack at a time, otherwise the heat distribution will be uneven. Using the different rack heights available, you can balance the amount of heat between the top and the bottom of the oven. Select from among the various rack heights based on whether the dish needs more or less heat from the top.
Pastry Model
Position of thermostat kno: Between 60^ and Max. The bottom heating element comes on.
This mode is ideal for baking and cooking delicate foods - especially cakes that need to rise because the heat coming from the bottom helps the leavening process.
Please note that it takes a considerable amount of time for the higher temperatures to be reached, therefore we recommend you use the "Convection Mode" in these cases.
"Top" Oven
Position of thermostat knob: Between 60^ and Max. The top heating element comes on.
This mode can be used to brown food at the end of a cooking.
Grill
Position of thermostat knob: Max
The top central heating element comes on.
The extremely high and direct temperature of the grill makes it possible to brown the surface of meats and roasts while locking in the juices to keep them tender.
The grill is also highly recommended for dishes that require a high temperature on the surface: beef steaks, veal, rib steak, fillets, hamburgers etc...
Some grilling examples are included in the "Practical Cooking Advice" paragraph.
The oven light
Set knob to the symbol to turn it on. It lights the oven and stays on when any of the electrical heating elements in the oven come on.
Thermostat Light Thermostat Light Thermostat Light This light indicates that the oven is heating. When it turns off, the temperature inside the oven has reached the setting made with the thermostat knob. At this point, the light will turn on and off as the oven maintains the temperature at a constant level.
* Only available in certain models.

The turnspit
To start the turnspit, proceed as follows: a) place the oven tray on the 1st rack; b) insert the special turnspit support on the 3rd rack and position the spit by inserting it through the special
hole into the turnspit at the back of the oven; c) start the turnspit using knob "L" to select setting
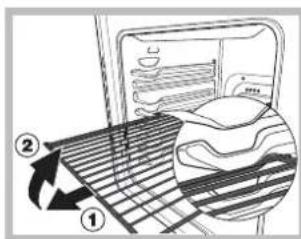
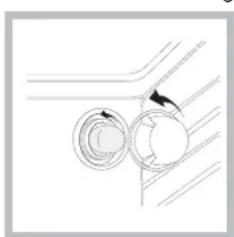
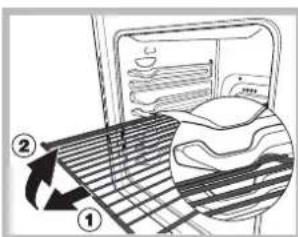
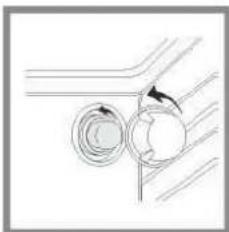
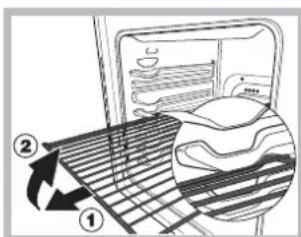
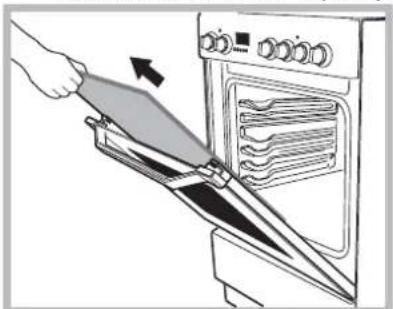
WARNING! The oven is provided with a stop system to extract the racks and prevent them from coming out of the oven.(1) As shown in the drawing, to extract them completely, simply lift the racks, holding them on the front
part, and pull (2).
Practical Cooking Advice
When cooking in the oven, use only one dripping pan or rack at a time. Select from among the top or bottom rack heights based on whether the dish needs more or less heat from the top.
Preheating
If the oven must be preheated (this is generally the case when cooking leavened foods), we recommend you use the "convection mode" to reach the desired temperature as quickly as possible. When preheating is over, which is indicated by the red light "E" going out, select the required cooking mode.
Cooking Fish and Meat
When cooking white meat, fowl and fish, use temperature settings from 180^ to 200^ .
For red meat that should be well done on the outside while tender and juicy in the inside, it is a good idea to start with a high temperature setting (200^ - 220^) for a short time, then turn the oven down afterwards. In general, the larger the roast, the lower the temperature setting. Place the meat on the centre of the grid and place the dripping pan beneath it to catch the fat. Make sure that the grid is inserted so that it is in the centre of the oven. If you would like to increase the amount of heat from below, use the low rack heights. For savoury roasts (especially duck and wild game), dress the meat with lard or bacon on the top.
- Only available in certain models.
Baking Cakes
When baking cakes, always preheat the oven and do not open the oven door during baking to prevent the cake from dropping.
Using the Grill
Use the "grill" mode, placing the food under the centre of the grill (situated on the 3rd or 4th rack form the bottom) because only the central part of the top heating element is turned on.
Use the bottom rack (1st from the bottom), placing the dripping pan provided to collect any sauce and/or grease and prevent the same from dripping onto the oven bottom.
When using this mode, we recommend you set the thermostat to the highest setting. However, this does not mean you cannot use lower temperatures, simply by adjusting the thermostat knob to the desired temperature.
In models fitted with a rotisserie, you can use the spit kit provided when using the "grill" mode. In this case, cook with the oven door shut, placing the spit kit on the third oven rack from the bottom and the dripping pan on the bottom rack to collect any sauce and/or dripping fat.
! Always use the grill with the oven door shut. This will allow you both to obtain excellent results and to save on energy (approximately 10% ).
Therefore the best results when using the grill modes are obtained by placing the grid on the lower racks (see cooking table) then, to prevent fat and grease from dripping onto the bottom of the oven and smoke from forming, place a dripping pan on the 1st oven rack from the bottom.
Cooking Control Timer Knob
Some models are equipped with a timer program to control when the oven shuts off during cooking. To use this feature, you must wind the knob one full turn in the counter-clockwise direction; Then, turn the knob in the clockwise direction, to set the time by matching up the indicator on the control panel with the number of minutes on the knob.
At the end of the programmed length of time, the timer will sound and automatically turn off the oven.
Attention: to use the oven in manual mode without the cooking control timer, match the indicator on the
control panel with the symbol on the timer knob. When the oven is not in use, the cooking control timer can be used like a normal timer.
Oven cooking advice table
| Selector knob setting | Food to be cooked Weight (In kg) | Cooking rack position from bottom | Preheating time (minutes) | Thermostat knob setting | Cooking time (minutes) |
| 1 Convection | Duck | 1 | 3 | 15 | 200 |
| Roast veal or beef | 1 | 3 | 15 | 200 | |
| Pork roast | 1 | 3 | 15 | 200 | |
| Biscuits (short pastry) | - | 3 | 15 | 180 | |
| Tarts | 1 | 3 | 15 | 180 | |
| Lasagne | 1 | 3 | 10 | 190 | |
| Lamb | 1 | 2 | 10 | 180 | |
| Mackerel | 1 | 2 | 10 | 180 | |
| Plum-cake | 1 | 2 | 10 | 170 | |
| Cream puffs | 0.3 | 3 | 10 | 180 | |
| Sponge-cake | 0.5 | 3 | 10 | 170 | |
| Savoury pies | 1.5 | 3 | 15 | 200 | |
| 2 Pastry Mode | Raised Cakes | 0.5 | 3 | 15 | 160 |
| Tarts | 1 | 3 | 15 | 180 | |
| Fruit cakes | 1 | 3 | 15 | 180 | |
| Brioches | 0.5 | 3 | 15 | 160 | |
| 3 Top Oven | Browning food to perfect cooking | - 3/4 | 15 220 - | ||
| 4 Grill | Soles and cuttlefish | 1 | 4 | 5 | Max |
| Squid and prawn kebabs | 1 | 4 | 5 | Max | |
| Cod filet | 1 | 4 | 5 | Max | |
| Grilled vegetables | 1 | 3/4 | 5 | Max | |
| Veal steak | 1 | 4 | 5 | Max | |
| Cutlets | 1 | 4 | 5 | Max | |
| Hamburgers | 1 | 4 | 5 | Max | |
| Mackerels | 1 | 4 | 5 | Max | |
| Toasted sandwiches | n.° 4 | 4 | 5 | Max | |
| With rotisserie (where present) | |||||
| Veal on the spit | 1.0 | - | 5 | Max | |
| Chicken on the spit | 1.5 | - | 5 | Max | |
| Lamb on the spit | 1.0 | - | 5 | Max |
NB: cooking times are approximate and may vary according to personal taste. When cooking using the grill, the dripping pan must always be placed on the 1st oven rack from the bottom.
Using the glass ceramic hob
GB
! The glue applied on the gaskets leaves traces of grease on the glass. Before using the appliance, we recommend you remove these with a special non-abrasive cleaning product. During the first few hours of use there may be a smell of rubber which will disappear very quickly.
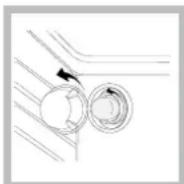
Switching the cooking zones on and off To switch on a cooking zone, turn the corresponding knob in a clockwise direction.
To switch it off again, turn the knob in an anticlockwise direction until it is in the "0" position.
If the COOKING ZONE ON indicator light is lit, this shows that at least one pf the cooking zones on the hob is switched on.
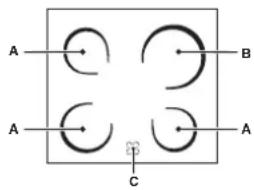
Cooking zones
The hob is equipped with electric radiant heating elements. When they are in use the following items on the hob become red.

A.The cooking zone with radiant heating elements.
B.The cooking zone with HILITE heating elements.
C.The residual heat indicator light: this indicates
that the temperature of the
corresponding cooking zone is
greater than 60^ even when
the heating element has been switched off but is still hot.
Cooking zones with radiant heating elements.
The circular radiant heating elements become red 10 - 20 seconds after they have been switched on.
| Setting | Normal or Fast Plate |
| 0 | Off |
| 1 | Cooking vegetables, fish |
| 2 | Cooking potatoes (using steam) soups, chickpeas, beans. |
| 3 | Continuing the cooking of large quantities of food, minestrone |
| 4 | For roasting (average) |
| 5 | For roasting (above average) |
| 6 | For browning and reaching a boil in a short time. |
Cooking zones with HILITE heating elements.
Traditional cooking zones are made up of circular heating elements. They turn red approximatively 10 seconds after they have been turned on.
Hilate cooking zones ensure a uniform distribution of the temperature.
The hilite lamps warm up rapidly to high temperatures which results in:
Rapid temperature rise (compared to a gas burner)
Rapid cooling
- Uniform temperature over the entire surface
Traditional cooking zone control knobs. Each cooking zone is fitted with a control knob allowing you to select from 12 different temperature settings from a minimum of 1 to a maximum of 12.
| Set. | Radiant Burner |
| 0 | Off |
| 1 | To melt butter and chocolate. |
| 2 | To heat liquids. |
| 3 | |
| 4 | For creams and sauces. |
| 5 | |
| 6 | For cooking at the boiling point. |
| 7 | |
| 8 | For roasts. |
| 9 | |
| 10 | For boiling large pieces of meat. |
| 11 | |
| 12 | For frying. |
Practical advice on using the hob
- Use pans with a thick, flat base to ensure that they adhere perfectly to the cooking zone.
Always use pans with a diameter that is large enough to cover the hotplate fully, in order to use all the heat produced.
- Always make sure that the base of the pan is completely clean and dry: this ensures that the pans adhere perfectly to the cooking zones and that both the pans and the hob remain effective for a longer period of time.
- Avoid using the same cookware that is used on gas burners: the heat concentration on gas burners may have warped the base of the pan, causing it not to adhere to the surface correctly.
Never leave a cooking zone switched on without a pan on top of it, as doing so may cause the zone to become damaged.
Precautions and tips
! This appliance has been designed and manufactured in compliance with international safety standards.
The following warnings are provided for safety reasons and must be read carefully.
General safety
- These instructions are only valid for the countries whose symbols appear in the manual and on the serial number plate located on the appliance.
- The appliance was designed for domestic use inside the home and is not intended for commercial or industrial use.
- The appliance must not be installed outdoors, even in covered areas. It is extremely dangerous to leave the appliance exposed to rain and storms.
- Do not touch the appliance with bare feet or with wet or damp hands and feet.
- The appliance must be used by adults only for the preparation of food, in accordance with the instructions outlined in this booklet. Any other use of the appliance (e.g. for heating the room) constitutes improper use and is dangerous. The manufacturer may not be held liable for any damage resulting from improper, incorrect and unreasonable use of the appliance.
- The instruction booklet accompanies a class 1 (insulated) or class 2 - subclass 1 (recessed between 2 cupboards) appliance.
- Do not touch the heating elements or certain parts of the oven door when the appliance is in use; these parts become extremely hot. Keep children well away from the appliance.
- Make sure that the power supply cables of other electrical appliances do not come into contact with the hot parts of the oven.
- The openings used for the ventilation and dispersion of heat must never be covered.
- Do not use unstable or misshapen pans on the cooking zones; this will help to avoid accidental spills. Make sure pan handles are turned towards the centre of the hob in order to avoid accidental burns.
Always use oven gloves when placing cookware in the oven or when removing it. - Do not use flammable liquids (alcohol, petrol, etc...) near the appliance while it is in use.
- Do not place flammable material in the lower storage compartment or in the oven itself. If the appliance is switched on accidentally, it could catch fire.
Always make sure the knobs are in the position when the appliance is not in use. - When unplugging the appliance, always pull the plug from the mains socket; do not pull on the cable.
- Never perform any cleaning or maintenance work without having disconnected the appliance from the electricity mains.
-
If the appliance breaks down, under no circumstances should you attempt to perform the repairs yourself. Repairs carried out by inexperienced persons may cause injury or further malfunctioning of the appliance. Contact Assistance.
-
Do not rest heavy objects on the open oven door.
- The internal surfaces of the compartment (where present) may become hot.
- The glass ceramic hob is resistant to mechanical shocks, but it may crack (or even break) if hit with a sharp object such as a tool. If this happens, disconnect the appliance from the electricity mains immediately and contact a Service Centre.
- If the surface of the hob is cracked, switch off the appliance to prevent electric shocks from occurring.
- Remember that the cooking zones remain relatively hot for at least thirty minutes after they have been switched off.
- Keep any object which could melt away from the hob, for example plastic and aluminium objects, or products with a high sugar content. Be especially careful when using plastic film and aluminium foil or packaging: if placed on surfaces that are still hot, they may cause serious damage to the hob.
- Do not place metal objects (knives, spoons, pan lids, etc.) on the hob as they may become hot.
- The appliance should not be operated by people (including children) with reduced physical, sensory or mental capacities, by inexperienced individuals or by anyone who is not familiar with the product. These individuals should, at the very least, be supervised by someone who assumes responsibility for their safety or receive preliminary instructions relating to the operation of the appliance.
- Do not let children play with the appliance.
- If the cooker is placed on a pedestal, take the necessary precautions to prevent the cooker from sliding off the pedestal itself.
Disposal
- When disposing of packaging material: observe local legislation so that the packaging may be reused.
- The European Directive 2002/96/EC relating to Waste Electrical and Electronic Equipment (WEEE) states that household appliances should not be disposed of using the normal solid urban waste cycle. Exhausted appliances should be collected separately in order to optimise the cost of reusing and recycling the materials inside the machine, while preventing potential damage to the atmosphere and to public health. The crossed-out dustbin is marked on all products to remind the owner of their obligations regarding separated waste collection.
For further information relating to the correct disposal of exhausted household appliances, owners may contact the public service provided or their local dealer.
Respecting and conserving the environment
- You can help to reduce the peak load of the electricity supply network companies by using the oven in the hours between late afternoon and the early hours of the morning.
Always keep the oven door closed when using the TOP OVEN, GRILL and GRATIN modes: This will achieve improved results while saving energy (approximately 10% ). - Check the door seals regularly and wipe them clean to ensure they are free of debris so that they adhere properly to the door, thus avoiding heat dispersion.
Switching the appliance off
Disconnect your appliance from the electricity supply before carrying out any work on it.
Cleaning the oven
! Never use steam cleaners or pressure cleaners on the appliance.
- Clean the glass part of the oven door using a sponge and a non-abrasive cleaning product, then dry thoroughly with a soft cloth. Do not use rough abrasive material or sharp metal scrapers as these could scratch the surface and cause the glass to crack.
- The stainless steel or enamel-coated external parts and the rubber seals may be cleaned using a sponge which has been soaked in lukewarm water and neutral soap. Use specialised products for the removal of stubborn stains. After cleaning, rinse and dry thoroughly. Do not use abrasive powders or corrosive substances.
- The inside of the oven should ideally be cleaned after each use, while it is still lukewarm. Use hot water and detergent, then rinse well and dry with a soft cloth. Do not use abrasive products.
- The accessories can be washed like everyday crockery, and are even dishwasher safe.
- Dirt and grease should be removed from the control panel using a non-abrasive sponge or a soft cloth.
- Stainless steel can be marked by hard water that has been left on the surface for a long time, or by aggressive detergents that contain phosphorus. We recommend that the steel surfaces are rinsed well then dried thoroughly.
Inspecting the oven seals
Check the door seals around the oven regularly. If the seals are damaged, please contact your nearest After-sales Service Centre. We recommend that the oven is not used until the seals have been replaced.
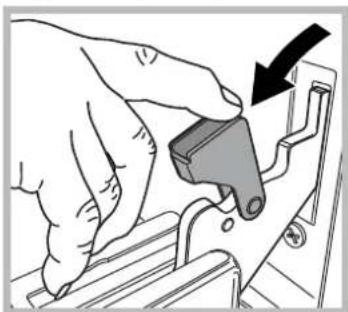
Replacing the oven light bulb
- After disconnecting the oven from the electricity mains,
as/for ambient lighting
remove the glass lid covering the lamp socket (see fi gure).
-
Unscrew the light bulb and replace it with a similar one: voltage 230 V, wattage 25 W, cap E 14.
-
Replace the lid and reconnect the oven to the electricity supply.
! Do not use the oven lamp
Cleaning the glass ceramic hob
! Do not use abrasive or corrosive detergents (for example, products in spray cans for cleaning barbecues and ovens), stain removers, anti-rust products, powder detergents or sponges with abrasive surfaces: these may scratch the surface beyond repair.
- It is usually sufficient simply to wash the hob using a damp sponge and dry it with absorbent kitchen roll.
- If the hob is particularly dirty, rub it with a special glass ceramic cleaning product, then rinse well and dry thoroughly.
- To remove more stubborn dirt, use a suitable scraper (this is not supplied with the appliance). Remove spills as soon as possible, without waiting for the appliance to cool, to avoid residues forming crusty deposits. You can obtain excellent results by using a rustproof steel wire sponge - specifically designed for glass ceramic surfaces - soaked in soapy water.
- If plastic or sugary substances have accidentally been melted on the hob, remove them immediately with the scraper, while the surface is still hot.
- Once it is clean, the hob may be treated with a special protective maintenance product: the invisible film left by this product protects the surface from drips during cooking. This maintenance should be carried out while the appliance is warm (not hot) or cold.
- Always remember to rinse the appliance well with clean water and dry it thoroughly: residues can become encrusted during subsequent cooking processes.
| Glass ceramic hob cleaners | Available from |
| Window scraper Razor blade scrapers | DIY Stores |
| Replacement blades DIY Stores, supermarkets, chemists | |
| COLLO lunetaHOB BRITEHob CleanSWISSCLEANER | Boots, Co-op stores,department stores, Regional Electricity Company shops,supermarkets |
Assistance
! Never use the services of an unauthorised technician.
Please have the following information to hand:
The type of problem encountered.
The appliance model (Mod.).
The serial number (S/N).
The latter two pieces of information can be found on the data plate located on the appliance.
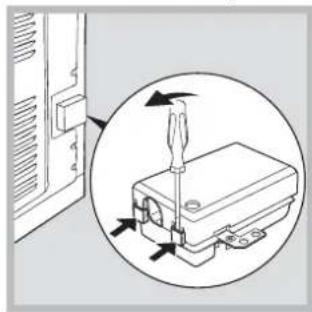
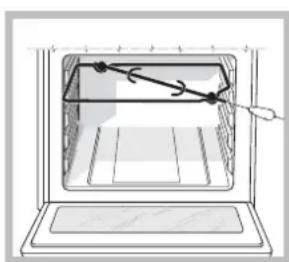
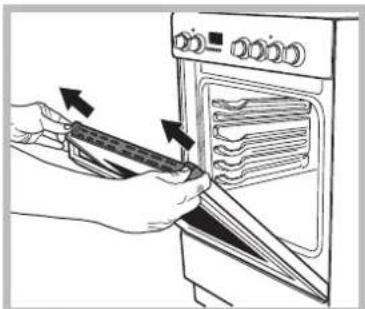
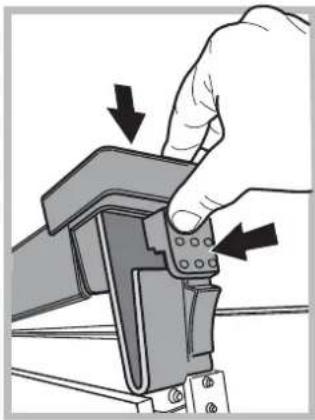
Removing and fitting the oven door:
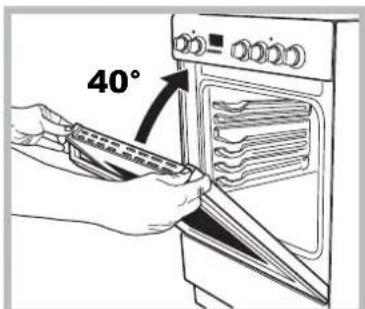
1.Open the door
2.Make the hinge clamps of the oven door rotate backwards completely (see photo)


3.Close the door until the clamps stop (the door will remain open for 40^ approx.) (see photo)
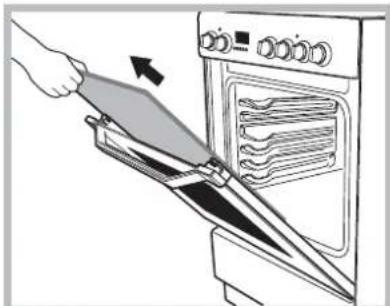
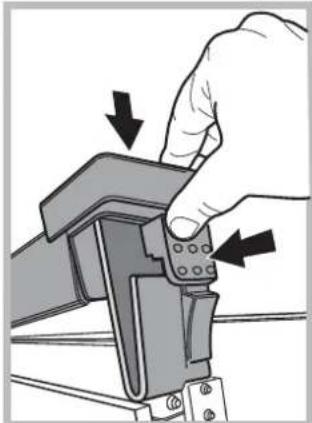
- Press the two buttons on the upper profile and extract the profile (see photo)

5.Remove the glass sheet and do the cleaning as indicated in chapter: "Care and maintenance".
- Replace the glass.
WARNING! Oven must not be operated with inner door glass removed!
WARNING! When reassembling the inner door glass insert the glass panel correctly so that the text written on the panel is not reversed and can be easily legible.
- Replace the profile, a click will indicate that the part is positioned correctly.
8.Open the door completely.
9.Close the supports (see photo).
- Now the door can be completely closed and the oven can be started for normal use.
Steam-Assisted Oven Cleaning
This method of cleaning is recommended especially after cooking very fatty (roasted)meats.
This cleaning process allows to facilitate the removal of dirt of the walls of the oven by the generation of steam that is created inside the oven cavity for easier cleaning.
! Important! Before you start steam -cleaning:
-Remove any food residue and grease from the bottom of the oven.
- Remove any oven accessories (grids and drip pans).
Perform the above operations according to the following procedure:
- pour 300ml of water into the baking tray in the oven, placing it in the bottom shelf. In the models where the drip pan is not present, use a baking sheet and place it on the grill at the bottom shelf;
- select the function of the oven: Pastry Model and set the temperature to 100^
- keep it in the oven for 15min;
- turn off the oven;
- Once cooled the oven, you can open the door to complete the cleaning with water and a damp cloth;
- eliminate any residual water from the cavity after finishing cleaning
When the steam -cleaning is done, after cooking especially fatty foods, or when grease is difficult to remove, you may need to complete the cleaning with the traditional method, described in the previous paragraph.
! Perform cleaning only in the cold oven!
Installation
FR
| Set | Radiant Burner |
| 0 | Off |
| 1 | To melt butter and chocolate. |
| 2 | To heat liquids. |
| 3 | |
| 4 | For creams and sauces. |
| 5 | |
| 6 | For cooking at the boiling point. |
| 7 | |
| 8 | For roasts. |
| 9 | |
| 10 | For boiling large pieces of meat. |
| 11 | |
| 12 | For frying. |
Bo Bpem npiroTOBHeHnBa3MOxHO:
n3MeHbpeKIM nprirotobHeHna, Bpaaay pykoTky CENEKTOPA;
- ɪnʒæmɪŋt b TemnepaTpy, Bpaɪər pykoɪr kTy TEPMOCTATA;
- yCTaHOBnTb npoJONKIneJIbHOCtI npriTOOBHeHn I BpemEero OKOHcHn (CM. danee);
- npepBaTb npriroTOBJIeHne, noBepHyB pyKoIky CEJIeKTOPA B nO3nUHO «0».
!He NomeuAaIte npEaMeTb HEnocpeDCTBeHHo Ha IHO dYxOBKn,HTObI He NOBpeHtB erO 3MaJIeBOe NOKpbITne. IcNoIb3yIte ypoBeHb 1 dYxOBKn TOnbKO npn rOtobKe Ha BepTeNe.
!Nocydy Bcerda CtaBbTe Ha peWetKy IIN npOTnBeHb DxyOBKn.
INHdkaTop Tepmoctata
FopuHnHnKaTOp NOKa3bIBaET,TO DxyOBKa HArpeBa-ETc. HnDKaTOp NorachET, KOrJa TEMnepatya B DxyOBKe DoCTnHTet 3HaueHnA, YCTaHOBJIeHHORo pyKOaTKoI TepMOCTATA.C 3TOrO MOMeHTa NONepemehHOe BKIOUeHne IN BBkIOUeHHe INHnDKaTOpa 6yDet NOKa3bIBaTb, TO B DxyOBKe NOIDepKINBAETC NOCTOHHa TEMnepatya.
OcBeueHneDyXOBKn
OcBeueHHe BkIIOuaETc npyycTaHOBKe pyKoRTKn CEJEKTOPA B IIO6yIO IO3NIO,OTINHyIO OT<0>.
OcBeueHne ocTaeTcBKnUoyeHHbIM, noka pa6oTaet dy
XOBka.Пи Вьборе руков КОп 6OBEшЕнe 6yET BkIIOUeHO 6e3 aKtNBupOBaHnHaHpeBaTeNbHbIX 3JIemEHTOB.
PykoTka TaMepa OKOHuaHn npiroTOBHeHn
HekotopbIe moJEN dyxOBOK OCHAueHb TaImePOM nporpaMMPOBaHnO KOHcHn PnroTOBJIeHn Dn erO nCNoB3OBaHn 3aBeDnte 3BOHOK, NOBepHyB pyKoTky noTuHa ODNH noJIHbI O6OpOT npOTNB acobO B CTpeJKN
O. NobepnTe Ha3ad O, 3aJaTe HxKHe BpeM, yCTaHOBnB HAnpoTnB FUKCnpOBaHHo OTMeTKn Ha nepeHne naneiu cphiPy, COOTBeTcByIOuyo HxKHomy BpeMeHN. IIO nCTeueHN 3aHaHHoro BpeMeHn NOMMO 3BOHka npOn3oJET aBTOMaTHueCKoe BbIKNIOueHne DxyOBKn.
BHHMaHHe:ДЯИСNOЛБ3OBaHnI DyXOBOrO WkaΦaВpyHOM pexKIMe, T.E. NCKNIOUChY B yCTPOJCTBOnporpaMMIpOBaHnI OKOHuaHnI npiroTOBneHnI, Heo6xOДnMo, YTO6bI ΦNKcIPOBaHHa OTMetKaHa nepeDHe nAHeIn DyXOBKn COBnA C CmBOJOM
PexnmbipnproTOBneHn
!3HaueHne TemnepaTpybO T5 0^ Do Max MoKet 6bItb yctahOBJIeHO DnB CEx pexKIMoB npIroTOBHeHna NCKJIOUeHHeM pexkMa IPNJIb, dN KOTOPOro peKOMeHNyETcRy yCTAHOBKa TOlbKO MaKcMaJIbHoro (Max) ypOBHr MOUHOCTn.
CTATNUECKA DYXOBKA
BkIOUeHbI O6a HArpeBaTeNbHbIX 3nEmeHTa - BepxHn IN HXHH. C 3Tm TpaDnUHOHHbIM pexHMOM nprirotOBJeHn IyUWe NCOnb3OBAbToTbKO OINH yPOBeHb DyXOBKn; npri roTOBKe Ha HeCKoJIbKnx yPOBHX paCnpeDeJeHne TENJa 6yDet HApABHomepHbIM.
HIXHH HARPEBATEIbHbI 3JEMEHT
Pa60taet HxHn HarpeBaTeIbHbI 3neMeHT. Pekim peKomeHdyETcN cNoIb3ObaTb dIy 6NIoB (BΦopMax dIaNEkaHn), NOBepXHOCTb KOtOpBX yke roTOBA, HO Tpe6yETc DaIbHeiWee npiroTOBLeHne INx CEHTpaIb-HoH qACTn, INI dIy DecepTOB, NOKpbITbIX pkyKTamn INI JxEMOM, YTObI OTKOnIpOBaTb INX NOBepXHOCTb. UyTIte, YTO B 3TOM peKime HeBO3MOxHO DOCTNuB B dyXOBKe MAKCImaIbHoI TempePAtpyI (250 °C), NoTOMy HE peKomeHdyETcN piroTOBLeHne C cNoIb3ObaHnem TOIbKO 3ToI yCTaHOBKn, 3a ICKJIIOUeHNEM KOHdTEpCKO BblneKn, dIy piroTOBLeHnR KOTopoN Tpe6yETcN TempePata180 °C n Hxke.
BEPXHNI HAFPEBATEIbHbI 3JEMEH
TempeIpya meKdy 50^ nMax.
BkIIOUeHO OcBeSeHHe, a TaKKe DeIeCTBye TynbTpA- KpaHoe N3LyueHHe rPnIA. OChEB BbICOKOE IN PpAmOE TeNlO rPnII NO3BOJRAET MRHOBeHHO 3aNeHb NOBepXHOCTb Mca, COxPAHRA ERO COHbIM IN HeXHbIM.
W
Tempepatpa MeKdy 50°C n Max.
BknHoyeHO ocBeueHne, a TAKKe pa6oTaet DBOHOn HaraPeBaTeNbHbI 3JeMeHT rpnJRA, MOTOP HAunHaet BpaAaTb BepTeN. 3TOT rpnJIb 60nbwe 06bUHoro n IMeET COBepseHNO HOByIO KOHCTpyKcUNO: 3ΦΦeKTHBHOCTb npiroTOBHeHn BblIe Ha 50% . DBOHOrrpnB o6ecneHBAe TNONHO nponeKaHne 6KnOda daXe no yrnaM dYxOBKn.
RU
!PnncnoB3OBaHmnpnIepKInTeDBepu dyXOBKn 3akpytoon — nnyeHnHaunLyuNXpe3yNbTaTOB npiroTOBHeHnNkOHOOMn 3JeKtpo3Hepn (OKONO 10%
Korda roTOBNTe c nCnONb3OBaHHe m rpnIy, pa3MeuaItepeWTeKY Ha HIXKNHX yPOBHX, aHa DHO dYXOBKn NOCTaBBTe noDOnH dIra c6opa knpa / coka xkaporo.
Ppaktnueckne coBeTbI
!PnroTOBKeBpeKIMe《「Punb》nomecHTHeHa npBbIypoBBeNoDOnDNaC6opaJka/pcoKaXkaporo.
TPIb
Bctabte peuETky Ha 3 nnn 4 ypoBeHb. Pnuy pa3-MecTnte B ceHTpe peuETKn.
- PeKOMeHnyem yCTaHOBt b MaKcImaJIbHbI yPoBeHb MOUHOCTn: BepxHn HArpeBaTeNbHbI 3NeMeHT peRyInpyETc TepMOCTaTOM n He BCerda MoKet 6bITb BKJIOUeH
BHIMAHHE!DyXOBoi
WkaΦ yKOMnJIeKTOBaH
CnCTeMoB 6JIOKNPOBKn
peWEtOK,NO3BOJIAUeNei
BbIHMaTb NX N3 DyXOBKn
He NOJIHOCTbO (1).
IgnoNHO BbIHMaHn
peWEtOK IOCTaTOH0
NoHNrTB KAK
NOKa3aHo Ha cxeme, B3aB INx 3a nepeHnKpaI, N IOTaHyTb Ha ce68 (2).
BepTeN
Pn nCIOJIb3OBAHm BepTeNa, DeIcTByIe CNeDyIOUIM 06pa3OM:
a) NOMECTNTE NOIDON DnA c6opa Xnpa Ha 1- yPOBeHb;
6) BCTaBbTe pamky BepTeJa Ha 4-η ypoBeHb N NOMeCTnTe Ha Hee BepTeJ, BCTaBbEeroB CneuHaNbHoe OTBepCTne B 3aDHei CTeHKe DyXOBKn;
B) BKIOHHTe BepTe, yCTaHOBBpyKoTky G B NIOXKeHHe 60JIbIiX KOINHECTB INIIu, INN B NIOXKeHHe
BcnomoraTeIbHa Ta6nua no npuroTOBneHIO BdyxOBKe
| Рек imm пригоровлия | Бликов | Вес, Кг | Уразовь духовки | Вреемп prejud- варительно разоррев духовки, мин | Рекоменуемая temпера typа, С° | Вреем пригоровлия, мин |
| Сточеская духовka | Пазаныя Канеллочи | 2,5 2,5 | 2 3 | 5 5 | 200 200 200 180 200 180 | 45-50 30-35 30-35 60-70 80-90 90-100 70-80 70-80 70-80 30-40 30-35 25-30 15-20 10-15 |
| Мakронная залеганka Телегда | 2,0 1,7 | 3 3 | 5 10 | 200 180 200 180 180 180 180 180 180 180 180 180 180 180 180 180 180 180 180 180 180 180 180 180 180 180 180 180 170 | 200 200 200 200 200 200 200 200 200 200 200 200 200 200 200 200 200 200 200 200 200 200 200 200 200 200 | |
| Куршиа Утka | 1,5 1,8 | 3 3 | 10 10 | 200 180 180 180 180 180 180 180 180 180 180 180 180 180 180 180 180 180 180 180 180 180 180 180 180 | 80-90 90-100 90-100 90-100 90-100 90-100 90-100 90-100 90-100 90-100 90-100 90-100 90-100 90-100 90-100 90-100 | |
| Крочь Свинна | 2 2,1 | 3 3 | 10 10 | 180 180 180 180 180 180 180 180 180 180 180 180 180 180 180 180 180 180 180 180 180 180 180 180 180 | 200 200 200 200 200 200 200 200 200 200 200 200 200 200 200 200 200 200 200 200 200 200 200 200 25-30 25-30 25-30 25-30 25-30 25-30 | |
| Бараннaya | 1,8 | 3 | 10 | 180 180 180 180 180 180 180 180 180 180 180 180 180 180 180 180 180 180 180 180 180 180 180 180 25-30 25-30 25-30 25-30 25-30 25-30 25-30 25-30 25-30 25-30 25-30 25-30 25-30 25-30 25-30 25-30 25-30 26-30 26-30 26-30 26-30 26-30 26-30 26-30 26-30 26-30 26-30 26-30 26-30 26-30 26-30 26-30 26-30 26-30 | 200 200 200 200 200 200 200 200 200 200 200 200 200 200 200 200 200 200 200 200 200 200 200 200 26-30 26-30 26-30 26-30 26-30 26-30 26-30 26-30 26-30 26-30 26-30 26-30 26-30 26-30 26-30 26-30 25-30 25-30 25-30 25-30 25-30 25-30 25-30 25-30 25-30 25-30 25-30 25-30 25-30 25-30 25-30 25-30 | |
| Скунбрыя | 1,1 | 2 | 5 | 180 180 180 180 180 180 180 180 180 180 180 180 180 180 180 180 180 180 180 180 180 180 180 180 185 185 185 185 185 185 185 185 185 185 185 185 185 185 185 185 185 185 185 185 185 185 185 185 185 186 186 186 186 186 186 186 186 186 186 186 186 186 186 186 186 186 186 186 186 186 186 186 186 186 185 185 185 185 185 185 185 185 185 185 185 185 185 185 185 185 185 185 185 185 185 185 185 185 18. 18. 18. 18. 18. 18. 18. 18. 18. 18. 18. 18. 18. 18. 18. 18. 18. 18. 18. 18. 18. 18. 18. 18. 18. 18. 18. 18. 18. 18. 18. 18. 18. 18. 25-30 25-30 25-30 25-30 25-30 25-30 25-30 25-30 25-30 25-30 25-30 25-30 25-30 25-30 25-30 25-30 25-45 25-45 25-45 25-45 25-45 25-45 25-45 25-45 25-45 25-45 25-45 25-45 25-45 25-45 25-45 25-45 25-45 25- 25- 25- 25- 25- 25- 25- 25- 25- 25- 25- 25- 25- 25- 25- 25- 25- 25- 25- 25- 25- 25- 25- 25- 25- 25- 25- 25- 25- 25- 25- 25- 25- 25- - 25- 25- 25- 25- 25- 25- 25- 25- 25- 25- 25- 25- 25- 25- 25- 25- 25- 25- 25- 25- 25- 25- 25- 25- 25- 25- 25- 25- 25- 25- 25- 25- 25-30 25-30 25-30 25-30 25-30 25-30 25-30 25-30 25-30 25-30 25-30 25-30 25-30 25-30 25-30 25-30 25-65 25-65 25-65 25-65 25-65 25-65 25-65 25-65 25-65 25-65 25-65 25-65 25-65 25-65 25-65 25-65 25-65 25- 25- 25- 25- 25- 25- 25- 25- 25- 25- 25- 25- 25- 25- 25- 25- 25- 25- 25- 25- 25- 25- 25- 25- 25- 25- 25- 25- 25- 25- 25- 25- 26-30 26-30 26-30 26-30 26-30 26-30 26-30 26-30 26-30 26-30 26-30 26-30 26-30 26-30 26-30 26-30 26-65 26-65 26-65 26-65 26-65 26-65 26-65 26-65 26-65 26-65 26-65 26-65 26-65 26-65 26-65 26-65 26-65 26- 26- 26- 26- 26- 26- 26- 26- 26- 26- 26- 26- 26- 26- 26- 26- 26- 26- 26- 26- 26- 26- 26- 26- 26- 26- 26- 26- 26- 26- 26- 26- 26- 26- - 26- 26- 26- 26- 26- 26- 26- 26- 26- 26- 26- 26- 26- 26- 26- 26- 26- 26- 26- 26- 26- 26- 26- 26- 26- 26- 26- 26- 26- 26- 26- 26- 26-30 26-30 26-30 26-30 26-30 26-30 26-30 26-30 26-30 26-30 26-30 26-30 26-30 26-30 26-30 26-30 26- 26- 26- 26- 26- 26- 26- 26- 26- 26- 26- 26- 26- 26- 26- 26- 26- 26- 26- 26- 26- 26- 26- 26- 26- 26- 26- 26- 26- 26- 26- 26- 26-65 26-65 26-65 26-65 26-65 26-65 26-65 26-65 26-65 26-65 26-65 26-65 26-65 26-65 26-65 26-65 26-30 26-30 26-30 26-30 26-30 26-30 26-30 26-30 26-30 26-30 26-30 26-30 26-30 26-30 26-30 26-30 26- 30-30 26-30 26-30 26-30 26-30 26-30 26-30 26-30 26-30 26-30 26-30 26-30 26-30 26-30 26-30 26-30 26-30 |
PpumueaHue. PpBBeHHoe Bpem npiroToBHeHn AByIeTc np6n3ntbHbIM nMOKeT 3MeHrbcn no BaWemy ycmotpeHIO. Ppi nCnoB3OBAHN pRnla o6ra3aTeBHO nOmeCTne nDOnn Ha HnKnn yPoBeH dyXOBKn.
RU
ИспOLSване cTeКLOKepaMnYeCKoI pa6очeй NOBepxHocTn
RU
!IpeepncnoB3oBAHnemobopydOBAHn ydaJIteocTaTKnKJNEcTeKNOkepamuecko paOoey nobepxHOCTnPNTbIC NOMOUBcneUaNBHoro Hea6pa3NBHOOTyCTAero CpeDCTBa.B TeueHne nepBbIX YacOB ncNoB3oBAHnpaOoey nobepxHOCTN Bbl MoKeTe NoCyBCTBOBaTbHeepnraTHbIX 3anax — OH nCye3Het OeHb 6bICTpo.
BkJIIOueHne n BbIKJIIOueHne 30H HArpeBa
YTo6bl BKNIOHTb 30Hy HArpeBa, NOBepHInTe COOTBeTCTByIOUyIpyKoRrKyNo yacOBOn CTpeJIke.
Дя Bыкюгеля 30нь HarpeBa NOBepHnTe pyKoRTky npOTuB YacBOB OCTpeJKN Do no3nCnN «0».
HnKaTOp 3eKtpoKoHΦopok 3aRopaetc npBKnHcHnXOTa6bOHOHn30HHarpeBa.
IcnoJb3OBaHne 3OH HArpeBa
Pa6oya noBepxHocTb nnIbOcHaueHa paHaJIbHbIMn HarpeBaTeNbHbIMN 3JemeHTAmN, KOtOpBie NocNe BKNIOyehn HaKaJaIOCTdOKpacha.
A. 3oHa harpeBa.
B.30ha harpeba.HILITE
C. INHINKATOP OCTaTOHORO TENIa: NOKa3bIbAe, YTO TEMnepaTypa COOTBetCTBHyOSe 30HbHaRpeBa BbIe 60^ ,daxe KOrda OHa yKe BbIKNoHe, Ho eSe He OCTbIa.
3OhbHarpeBa
cpaHnBbIMNHarpeBaTeIbHbIMN 3JemeHTAMN
3Tn 3Ohbl nOo6HbI raOBBIM ropeKam: IerKn B ynpaBHeHnn N 6bICTpo DOCTnraKOT YcTAHOBNeHHoN TeMnepaTypbI, PO3BOJRA NOlb3OBAteHIO KOHTpOJIuPObaTb yPoBeHb IN MOUHOCTn.
BpaaIte COOTBeTCTByIOUyO pyKOaTKy NO yacOBoCtpeKke Kno3uMOn 1 do 6.
CETN, BbIHyB BnIKy n3 pO3eTKN.
B cnyuae HnncnpaBHOCTN, Hn np KaKnx 06ctOTeNBCTBax He nbItaTaeCb NOHNHb OBOpDObaHne CaMOCTeJIbHO. PeMoHT, BInONHeHHb IHEKBAINHcIPoBaOHbIMn IuaAM, MoXET 6e3BOBpaTHO NOBpeiNTb OBOpDObaHne INI cTaTB npuHoiE rO HnPaBUNbHOrO pYHKUIOHIpObaHnI. ObpaTntEc 3a NOMOUsbOB ABTOpN3OBAHHb CepBnCHbI LcHTp.
He knaTe TaeKeIbe npEMeTbHa OTKpbTyO Dbepuy DyXOBKn.
- ObopydOBaHnEM He DoJXhbl NOnb3ObaTbCra Nlca (BKnIOyAaJeTei) CO CHNXeHHbIMN fN3UeCKMn, CEHCOPbIMN IIN yMCTBeHHbIMN cNoCO6HOCTMa, a TAKKe He O3HaKOMJIeHHbIe C INHCTpyKcIaMn DaHHORo pyKOBOcCTBa. IcNOJIb3OBaHHe IMN oBopydOBaHn IOnyckaetc ToJIbKO IO KoHTPOJeM IInu, OTBeTcBeHHbIX 3a IN 6e30NaHOCt b INI NOcNe NOnyueHn HcTpyKcIu No pa6Ote obopydOBaHn.
He no3BONJTe DetrM npratb c o6OpdyoBaHnEM.
BHIMAHHE!Octynhhe qactn o6opyoBaHnna doTnraot BbICOKI Tempepatpyi npu paOte rpIny. He noDnyckaTe DetEe 6N3K KnnTe.
- Ecnn nIInTa pacnonoXeHa Ha nbEeDeTaN, npnHraTb Heo6xOuMbIe Mepbl npeOCTOpOXHOCtN dIpy npeDTBpaueHncoCKaJIb3bIBaHnna nnITbIC nbEeDeTaN caMOrO.
YTNIN3aun
- Ppi yHHTOKeHHy naKoBOuHOro MaTePnAna n B cIyae H36abHeHn oT CTaporo OobpyoBaHn Co6nOdaIte DeiCTbYIOUne Tpe6oBaHn NO IN yTuIN3aUN.
Cornacho EbponeckoI npKeTnBe 2002/96/EC no ytnn3aunn 3neKtpueckoro n 3neKtpoHOrO obopyobAHna (WEEE) cTapbIe 3neKtpo6bIToBbIe npu6opbl He doJXhbl NOMEaTbcra B 06unr rpoocN HeOTcOpTnOBaHHbIO TOK OTxOIOB: OHI DOJIKNbI CObupTaBCr OTeJBHO, YTO6bI ONTNIMNtPOBaTb BOCCTA HOJIENHe I nepepa60Ky IH MaTePnAnOB IN yMeHbUHTb HeratNBHOe BO3DeEChTBHe Ha 3DOpOBBe YenOBeka HKOJONHO. YkaaHHbHa Hn3dennn CmBOnl NepepepKHyTOrO BePa Ha KOlecaHAnOMInHaet, YTO npn yTNIIN3aUNn 3TO obOpydoBaHne CNeDuYET NOMEcTb OTDeHBHO.
IJI NOJyHnIHΦOpMaUNO npaBnIbHOYTNIN3aUN CTAPOROOBOpUoBaHNNoTpe6NTeIN DoJXKnBI OpaTNTbcB MeCTHbIE OPAHbI ynpABHeHn INN BΦIpMyNOCTaBUnK.
3KoHOMn 3Heprnn n oxpaHa OkpykaUoien Cpebl
IcnoJb3ObaHne 6OpdyoBaHn yTpOM nIN Buepeom I03BOJrER CHN3NTB NIKOBYHO HArpy3KHa 3JIeKTPocetb IN CAKOHIMTB NOTpe6NeHne 3Heprnn.
Дяп получehнй Hanluywhx pe3yIbTaTOB nprirotOBHeHnИЗКOHOMNи 3JeKTPo3HepRnIN (npIMePHO 10%) BcerdaIcNoJIb3yItepeXIM «「PpInb»И«ДВоHOr「PpInb» npIN3akpyTOn DBepCe DuxOBKn.
- Perynpho npOBepaIte yNIOTHNTeIN DBepuI dyXOBKn I npOtnpaIte IN, ONUsA aT IOBOI rpa3N i copa: BO n36exAHne yTeKN TeJIa yNIOTHNTeIN DOJXHBi NIOTHO npnneratb K DBepue.
RU
OTKJIHcHHe O6OpyIOBaHHa
!IpeepIIO6bIMn pa6oTAMn no 06cnyKNaHnO o6opy- doBaHHaOTKJIIOuHaIte erO OT 3NeKtpocetN.
!HnKorda He nCnoJb3yIe dIg NcTkn DyXOBKn npoOuHCTNTeNn aap030JI.
UncTka DyXOBKn
3MaInpOBaHHBbE BHeUHHe Yactn NnIOBepxHocTN n3 HepKabEIOSe cTaN, a TaKKe pe3NHOBBie yNtHTnTeNN ONUaIe r6ko, CMOueHNo B pactBOpe TcNIOB BObl C HeITpaJIbHbIM MbINOM, 3aTEM ONIOCHNTe N tuaTeNBHO BbITpnte. IydaJeHNAyCTOnuBBix 3aPra3NeHn NcNOJb3yIte CneuaNbHbIE cpeCTBa. Pocne OuncTKn ONOIOChNTe N bItpnte hacyxo. He npImeHnTe abpa3NHBbIe nopouKn nn CpeCDTa, codepKaIzne arpeccNBbIe BeueCTBa.
DyXOBkyIeaeIbHOOHNaTbN3HyTpNnocNeKaKdoRo IcNoJIb3oBaHnra,NOKA OHa He OCTbIa. NcNoJIb3yIte ropayuBOyUHeITpaJIbHOOEMOUcEe CpeCDTO, 3aTEM XopoUO ONIOCHNTe N BbITPnte MmKoTKaHbIO.HeNCNoJIb3yIteabpa3INBhIeYnCTAunCepeCDTa.
CTeKnO DBePcBdyXOBKn OUnuAne T c NOMoUbIy6Kn HHea6pa3nBHO rCCTraIeero CpeICTBa, 3aTeM BbITpInTe Hacyxo MmKoT KAnHbIO. He IcNoJIb3yIte a6pa3nBhBle CpeDCTBaUNM MetaIINueckne CKpe6Kn, KOToPbIe MOrY T NOBpeINb T NOBepxHocT b N pInBeCTn O6pa3OBAHIO TpeunH Ha CTeKNe.
- PnHAnJnxKHOCTNObOpyOBoAHNMOxHOMbITb,KaIK O6bHuNTOncuDy(daKeBIOcCyDoMoEHOMaUNHe).
- Yactnucj Knpa n rpr3n, ocTaIOUncEra Ha naHeJIy ynpabJIeHnI NOcJIe roTOBKn, ydaJIaIte Hea6pa3NBHO Iy6Ko nn MArKO TKaHbIO.
PpOBepka ynIIOHTHnTeNei
PeryIpaHno npOBepnTe yNIOHTeIN DBepcIb NO BcEmy nepImMeTp. B cnyae nx nobpekdeHna 6paTntecb B ABTOpU3OBAHHb CEPBNCbI cHTp. He nOJb3yInTeCb dXyOBKo, NOKa yNIOHTeIN He 6yDyT 3aMeHeHbI.
3aMeHa lamMbI OCBeueHnA
1.OTKIOHHTeO6OpyIOBAHNAOT 3JNEKTPOCETN,3aTEMCHMNTE CTKEHNNIINAPOH C nATPOnA JAMNBI (CM.puc.).
2.BbBepHnTe neperoeBswyIaMny 3aMeHnTe ee lamnoC aHaJIoNHybIMx XapakTepcTnKaMn: HanpJxHeNe 230 B,MOUHOCTb-25BT,TIN-E14.
3.YctaHOBnte CTeknHHbI npaOH Ha MeTo I CHOBA IOKnHouHTe 6OpdyOBaHne K 3NeKtpocEtN.
!He nCnoB3yIte lamNooyky dYxOBOrO uKaΦa dnyocBeueHnN NOMeueHn.
YnCTka cTeKIOkepaMueecko pa6oey NOBepxHocTn
!He nCnoB3yIte a6pa3nHBbIe IIN arpeccNBbIe YnCTaIue cpeCTBa (HAnp. a3po3OIn dIra YnCTKn 6ap6ekIO n dyXOBK), PANTHOBBIOHTeIN, aHTNKoppo3NOHHbIE cpeCTBa, NopoWIK INI a6pa3NHBIe ry6Kn: OH MOrYT 6e3BO3BpAHO NobpeNTb (NoapanaTb) NOBepxHOCTb.
- O6bHNO DoCTaTOH NoPcTo PnPoTepeTb pa6Ouyo NOBepxHOCTb BnaXHoI r6KoN N BbITEpeTb 6yMaXHbIM KxyOHbIM NOnOTeHcEM.
- Ecnn pa6ooya noBepxHocTh cNlBHO 3arpy3HeHa, nCnoJIb3yIte CneuNaIbHbIe CpeIcTBA Inra YIcCTKn CTekNOkepaMnK, 3aTeM XopoUO ONONCHIne N Bbltpnte Hacyxo.
-Дя устраненя сиьнхix 3арязни Испь-ут e cneцалын ckpe6ok dЯ CTeKIOkepaMnK (He nOCTaBnIeTc C n3dennem).YTObI n36ExkaTb obpa3OBaHnHa Harapa, ydaJrTe 6pb3rN oocTaKN OT roTOBKn, noka nobepxHOCTb He ocTbJa. NcNoIb3yTe BnaXHyO aHTNKoppo3nHyO r6Ky, cneZuaNbHO npedHa3NaueHHyo dЯ uCtKn CTeKIOkepaMnYeCKnx NOBepxHOCTe. - Ecnn Ha ropuyu pa6oyu noBepxHocb CnyauHo nonaII nIactnK nIc caxopocopekuae npOdyktbI (KOtopbIE MOyT pacnabntcb), HEmdIeHHO ydaJIte nx ckpe6kom, noka nobepxHocb He ocTbJa.
EINHOBpeMeHNO MoXHO Ipon3BecTN 6pa6Oky CneIaJIbHbIM CpeCTBOM DnI CTekNIOkepAMNK, KOTOpoe OCTabJAreT Ha NOBepxHOCTN HeBUNIMyU 3aunTHyo NIIeKHy, PpeOxpanHIOUyO OT 6pb3r npn rOtOBKe. 3Ta Onpaun DoJnxHa BbINOJHrTBc H Ta TEPNo (He ropJe) nnn XoJIoHDn pa6OheN NOBepxHOCTN.
He 3abbaIte Bcerda xopoOo ononacknBaTb N Bbl cyuBaatb pa6oyIO NOBepxHocTb, yTO6bN36eKaTb o6pa3OBaHHarapa nocne cNeDyUOnx rOTOBOK.
YnCTKa PnTbC nCNoJIb3OBaHHem npa:
IcnoB3OBAHnE 3TOro peKIma OuNCTKN peKOMeHNyETcna Nocne npuroTOBHeHnJ XnPbIX npOdyKTOB (kapKe, MrcO).
3Ta npoceDpya ONUCTKMOKET npedymatpmbatb npoeecc ydaeneHnra rpa3n CO CTeHOK NNTbl NyTeM rehenpobAHn napa BHyTpni NOIOCTN NNTbl. TaKIM o6pa3OM, 6ydet npoue OCUSeCTBnTb ONUCTKY HeNOPcpeIDCTBeHHO NOIOCTN NNTbl.
Baxho! Npei nauanom npocecca ounstkn napom:
- ydaJInte OCTaTKn NIIuN / Jnpa co DHa NOIOCTN IINITbI;
-CHIMITE DoONHHTeBHBIE npncnoc6leHHra (peweTkn KAcTpOJn).
Iocne BbInOpHeHn Bblweyka3aHHbIX onepaun Mbl peKOMeHdyem cJeDyIOoee:
1-HaeneTe B rny60kno KOnTeHep nntb3 300 Mn BOdb; NomeCTnte ero Ha nepBbI ypoBeHb OT HxKHeu qactn. B MoDenJx 6e3 rny6okoro KOHTeHepa nCNObl3ynte CTaNapTHyo Xne6onekapHyO fOpMy nNTbI n NOMECTnte ee Ha nepBbI ypoBeHb OT HxKHeu qactn.
2-BbI6epnte yHKuHIO
HIXHHN HAFPBEATEJbHbI 3JEMEHT
u yctaHOBnTe TemnepaTpy 100^
3-BKJIIOHTe PNTy Ha 15 MmHyT;
4-BbIKIIOHHTe IINITy;
5 - Korda nnta 6ydet oxnaqdeha, oTKpoTe DBepu y 3aBepuNTe OuncTy BDOH N BnaXHO TKAHbIO.
6-YdaIte IIObIe OCTaTKN BObI n3 NOIOCTn NocIe 3aBepseHn npOceCa OYNCTkN.
Ecn npoceDpya napoBoi ouHCTKn BbIOnHReTcN oCne npiroTOBJIeHn NiU (OCO6eHHx JnHPbIX npOdyKTOB), IIN60 KOrda nPiNTa OChHb 3aqrz3HeHa, CNeDuYET 3aBepuNTb npOceCC ouHCTKn TpaDiuIOHHbIM cNoCO6OM, ONNCaHHbIM B ppeblduyem a63aue.
!Bce npoueypbO uHCTKn Heo6xoDIMO OcyueeCTBnTb nocJe OxnaJckHeHn PnNTb!
!KaHa KpybIrfHbI icke Kocnac 6ypbH HcKayblk Kitanwacbi MHKNRT OKBn WbIfbHb3. MyHa KaPbIrfHbI kayinci opaty Xhe OHbl naDanaHy TypaJIbMaHbI3dbI aKnapaTAP KaMTbJFaH.
!KeenekeTe aHbIKTaMa peTInDe kapay yuHn naJaHaHy HcayNbIfbIH caKtan KOnbHbI3. Kypblfbl caTbIca, 6ipeyre 6epince HeMece KeWipince, iYcaynap OHbIMe6ipre 6oNaTbHbHa Ke3 JeTKi3iH3.
!KpybInfHbHHyckaynapFa cKec apHaNb 6iNikTjiri 6ap MaMaH opHaTyf Taic.
Ke3 KeIreH Tpype peTtey Hemece Kbl3MeT KepCeTy KaKet 6oNca, OHbI KypblfblHb1 TOKtaH aXkbipaTKaHHaH KeiH opbHday KepeK.
OphaIacTbIpy KəHe Ty3yney
!KpypbHbHb6nIKTirnnntaHB6nIKTIRHeacnaHTbH WkaΦTapdbH KacbHaOpHaTyfa6onadbl.
!KpybInfbHbIn apTkbI KaBbHa TnIn TypaBIn Ka6bipra KaHbll emec, Kbl3yFa Te3imDi MaTepnanDaH (T 90°C) XacanFaHbHa Ke3 XeTki3iH3.
KpybINFbHbI pybIC opHaTy ywiH:
- Ohbl ac yIre, 3aJIra HeMeCe TpyfblH yIre KoIbIHb3 (BaHHara KOnMaHaB3).
Питаньн корары karышkaфан корарыбога, Крьлгьнл олардан KMдereнд 200 MM KaWBikTbIKTa opHaTy Kepek.
Kepek (cypemmi KapaHbI3).
-Neu Ka6bipfara
iniHetIH uKaΦTbIH actHa
opHaTbIcA,ocbI uKaΦ neH
nIHTaHbIH Xorapfbl XaFbl
apacbHa kEM derHeDe
420 MM apa KaUbIKTBk
6oNybl Tnic.
Ka6bipfara iniHetIH
uKaΦTap KaHbIi
6oJCa,6yN KaUbIKTBkTbI
700 MM-Te DeHH yJIkeTy
- NeuTih apTKbI KaBHa Hemece 6yniipnepihe 200 MMDeH KaKbIH Kepre KaJIIO3N opHaTnaHbI3.
KankapanKaTbICTi naDanaHy HcKayIbIFbIHdaBbI Hyckaynapra caikec opHaTbIybi Tnic.
Ty3yney
KypblfblHbTy3yneyKaKeT
6oJcA,nnIa Ty6iHIn ap6ip
6ypblbHdaBbOpbHdapbHa
peTTenH anKTapbH* bpaHb3 (cypemmi KapaHb3).
KypbInfbIme6ipre6epinetih aarTap* nnta ty6hiH actbHfbl KafbiHafti TecikTepre Kniriznei.
Tokka kanaFay
3neKtp Ka6eniH opHaty
Kohtaktinep taTacbH awy yuH:
- KoTakTinep TaKtacbI KaKNaBbHbH 6yNip KynakUaIapbHa 6ypayblTb1 TblfHbI3.
KaNaTbIawy yuH OHbI TapTbIHbI3.
Kabebdi opnaty yuhih TeMeHderi HcykaynapdbiOpbHaB3:
Ka6eIb KbickblbHbHbpaHaacbHxHe cbIM KOHTAciciHbypaHdaanapbH 6ocatbHb3.
!KanfractbipfbiwTap3aybita230B6ippa3aibk KocblbIMra andbIH ana opHaTbIFAH (cypemmi kapaHbI3).
230V\~ H05RR-F 3x4 CEI-UNEL 35363 H05VV-F 3x4 CEI-UNEL 35746
3neKtp KocblbImapblcypeTepderidej kacay yuH KopanTaftbEkiXaNfactBtfbIITapblkONdaHbIH3 (cypemmi KapaHb3-《P》epnimeh6enrineHreH

- Tek 6enrini ynrinepe de 6onaabi.
400V 2N~
H05RR-F 4x4 CEI-UNEL 35363
H05VV-F 4x4 CEI-UNEL 35746

400V 3N~ H05RR-F 5x2.5 CEI-UNEL 35363 H05VV-F 5x2.5 CEI-UNEL 35746

Ka6eJIbIiH KbIcNa 6ypaHdacBn KaTaN Ty apKbJIbI TOK Ka6eJIiH 6eKiTiHi3 De, oAn KeiH KaKnAaTbI OPhbHa CaJIbIHbI3.
3neKtp Ka6eniH zenire Kocy
KypblfnbHbH Heri3ri DepekTepe KecTecHde KepCetIinre Hkyktemere Caikec CTaHapTTb WTeNceBik YwTbOpHaTbHb3 (TexHuKaNbIK depekMep Kecmecin KaPahb13).
KypbIbnMeH Xeni apacbiHa opHaTbJnFAH 3 MM aWbIK KIIKeHe 6aJIaNbIC 6ap XaH-XaKTbI aIbIpBn-KCKblITb NaIaIaNyApKbIbI KypbIbn TikeNe 3neKtp XeNiciHe KocblNyI KaKet. AIBpBn-KCKblA hblkTaIraH KXTemere IaBIKTbIXe HAFIMDaftbTOK peTeyiHe CaiKc 6OByI KaKet (Xepre KocblfAH CBIM aIbIpBn-KCKblTah aXbipTaINMaybTInc). 3neKtp KaBenIH Ke3 KeIre H KyTeci 50^ -Tah XofapbI TemnpaTpamEH 6aJIaNbICnaiTbIHdA etin opHaNaCTbIPy KaKet.
KypbIINfBIHbI TOKKa KocnactaH 6ypbIH TeMeHderiJepdi TeKcepiH3:
Kypblfjxepre KocblfHaJxHe WTeNceIbdk yu3aHa fa caike60bnT Ta6bnAdb.
- Po3eTka Heri3ri DepeKTeP KeCTecHne KepCetIinre H KypbIbIbHbI eH XOFapFb KyuHHe Te3imDi.
Kephey depekTepe KecTecHde KepeTeIreH MApaIbIby aMyaBbHa 60nabI.
- Po3eTka KpybIrfbIHbI H TTeNCeBdIK yMbHa cAkec keJIeI. Po3eTka WTeNCeBdIK yUka CaiKeC 6oImaca, ekInetTI MaMaHHa OHbl aybICTbIPbIN 6epydi eTIHiJ3. BipHeWe po3eTKanap MeH 3apTkbl ChIMapbH naJaHaH6aHbI3.
1! KypbIbI opHaTbIFaHH KeiH 3neKtp Ka6eni MeH p03eTKa KaBH XepJe 6onybl KaKeT.
!KabenHimeyi Hemece KbcnMaykaxeT.
!KabeIbJnI TeKcepinIN,TeEkinETTmMaHaHHbIH KEMerImeH faha anMactbIpblIybl Tnic.
!OcbKayinci3ik wapaanapbI caKtanMaHaH KaDaJa eHdipywi kayankepuijikTi e3 MoHbHa anydAn 6ac TapTaBbl.
NeuTi anFaaw pet KOnJaHa6ac 6ypbH «Kytim XaHe texHnKaIbIK KbI3MeT KepeTy» BeNIMiHne 6epiJire HycKaynapra caikec OHbl Ta3aJaan anfah XeH.

NewKayinci3ik
!Kypblfbl
6aikaycbl3da
tycin keTneyi
yuH,MbICabI
6ana new
ecirihe sbikkaH
kaFdaia,
6ipre 6epiren
kayincizik
lbHkbipbl
opHaTbIybl
TNIC!
NeW Kayinci3ik WbIHXbIPbMeH Xa6DbIKTaIHaH; OHBI KypblfblHbH apTbHdaftb Ka6biprara, WbIHbip Kypblfbla f6eKITinreH 6nIKtIKTe 6ypaHdAmen (neuhen 6ipre 6epimei) 6ekity KaKeT.
BypaHaMeH 6paHda aHKepi KpybInfbl apTbHdafti Ka6bipra MaTePnaJIbHa CenKec TaHaHbI3.
BpaHda 6acb9 MM-deH Kiui 6oNca, TbIFbpblK KOJIaHbIybl Tnic. BeToH Ka6bIpFara KEM dereHde DnaMeTpi 8 MM XeHE Y3bIHDbIfbl 60 MM 6ypaHaKepek.
IbHkbp neTih apTkbl KaftbHa Xahe Ka6bipraf a cypette KepcetinreHne, opHaTbInFaHHan KeiH JepMeH npapnnenb Kynde TaptbInbTpyatbHdai 6eKtiH3.
| TEXHUNKALBIK CINATTAMAJAP KECTECI | |
| Посьемерí (БхExT) | 32x43,5x32x39,5 cm |
| Калеми 65л | |
| Песштей сень karогары Куат ТУТВИН Mэнì | 2250 Вт |
| Песьелiri né КатуICTы пайдальы Еншемерí | сени 46см Терендiri 42сm Биikтiri 8,5сm |
| Кермен men киілік | depekter костecin караныз |
| Керамкильк пл'tа Жыл'dam Кал'tы Кал'tы Керамкильк пл'tанын сень karогары Куат ТУТВИН мэнì | 1700 Br 1200 Br 2300 Br 1200 Br 6400 Br |
| КУТВ БELГICI | Зелекр的新шторин бел Ricin'deri 2002/40/EC Нскayы. EN 50304 стандары Табири Ковеця Куатын ТУТВИн КьДыру рекимi: —— —— Kohвеця |
| CE | Бул курьлгыЕуponа экоюнамкалык Калыдастьгын сень калci Нускayлары сай каледи: 12.12.2006 Курney) кале EC (Темен Керney) кале Калыrelе 15.12.204 Курьлгы 2004/108/ EC (Делекромагнитti Унlecimдійк) кале e3reptулergi - 22.07.1993 Жыл'tы 93/68/EEC кале e3reptулergi. 2002/96/EC 1275/2008 (Куту/өшірулі реким) |
Kak Ka6bipfada opHaIaNackaH DepeKTeP KecTeciHde KepceTilreH Ke3 KeIReH Ra3 TypimeH KOJaHy ywiH 6anTaHdbipyfa 6oJabl,
Neutki kondany
I KypblfHb anFaW pet naJaHaHaHa oHb 6oc KyiHde eciir H kayBn, eH XorapBf TemnepaTypaKe mHde jkapTb caftTaN b3dbipbHb3. NeuTi eWipin, OHbH eciri H awnactah 6ypbH 6JlmEH JAKcBj KeJeTeINReHH TeKcepH3. OHdipy Ke3iHe KOJaHaBnFAH KopraBbU 3aTTapDbH KaHbN KeTyIe 6aJNaHbCTb JKeHIN XarBIMCb3 NIC WbIFyB MyMKIn. I OhimDi naJaAnaHbAc 6ypbH KypblfHbH 6yipnepiHderi 6apbIK nlaactkAnbIK Yndipnepdi anbln TaCTaHb3.
- CELEKTOP TTKacbiH 6ypay apkblb KaKeTTI TaFAM daBnHday pexmH TaHaHbI3.
- TEPMOCTAT TyTkaCbIH 6py apKbIbI niicipypeXIMHe YcbHbIaTbIH TemnepaTypaHbI Hemeckaxketti TemnepaTypaHbTaHaHbI3.
Iicipy pexmdepi meh ycbhlntbH nicipy TemnepaTpyanapbH CNnataTbH T3iIMdi KaTbICTbKcTeDeH Tabyra 60ana (Neume maramnicipy 6ouhwa Kehecmep Kecmecin> KapaHb3).
Taram daibiny KeiHne epkaaHa MbHa epeKeTTepi opbHdayfa 60naDbI:
TAHDAy TytKacbIH 6ypay apkblkaKeTTI TaFam daBHHay peXIMIn e3repty.
- TEPMOCTAT TyTkacbH 6ypay apKbInbl TemnepaTypaHbI e3repTy.
ToIbIKnicipyyaKbITbIHxHe nicipydi aarKray yaKbITbH opHaty (memeHdezi mamiHo KaapaHb3).
- TAHDAY TYTKacbIH «0» NO3NcIyCbHa 6ypan, TaFAM DaBHydAydbl TOKtaty.
! Ewkaaah newiH actbHfI kafbiHa 3at KOnMaHb3;
6yI mAbdi Ka6aTbI 3akBIMdaIdbI. FpNb-6ap
ictirimeh nicipren Ke3e neWTe TK 1-nO3nucnHbI
KoJdaHbHbI3.
!OpkaaHa acxaha bIbIcTapbH 6epinreH taptna nap) fa KOibHbI3.
Taraam daaibHday peXHMdepi
KoHBeKzunpeXnmi
60°C MeH EKofapbl apacbIHdafbl TepMoCTaT TyTKacBHbH, NO3uNcBcI
BnynapaMeTp opHaTbIrlFaHda KOFapfbl XeHe TEmHri
Kb3dbpy 3nemeHTepi KocblnabI. Byn Minc3 KaIbnKa
XeTindpipiren neuTHKnaccknabIK, dAcTyprNI typi,
ON KepeMet Kb3y Tapatby MeH a3 Kyat TytbHydbI
KamTamacb3 etedi. KOhBeKunlBk neu 6ackanapbHa
KapaFaHda Ka6bpfa MeH KblpkiKa6at, nCnAH mHepiHde
DaibHdAnraH HnIM, ANKoHa MHepeHde KaTaNraH
BaibK, Kpyiwn He JyMCak 6y3ay etiHIn TiniMdepi, T.6.
CnAeTbI bipHeWe INrPeDneHTTeH TypaTBn TaFamadpbl
nicipy XaftbHaH AnjXofapbl DeHreJe. Bary nicipydi
XeHe KybIPraH Ke3De COyc He CyBtBk KocSybl KaKeT
etEtih 6y3ay etiHe Hemece Cbip etHe HerizdeIenre
TaFamadpbl (6KybtpblfA H e, 6kTbIPblnFaH
TarAmdarp, rynl, Xa6aBbI Kyc eti, Koi eti XeHe T.6.)
DaibHdarah Ke3De de eTe JxAKCbI HTeNke bepedi.
DereHmeh, ON Topt nen Jxemic Nicipyre, cohdai-ak
NeWte Nicipyre apHaIraH KiWi TabakTapmeh Xaybin
nicipy R KondaHbIaTbH en XaKcbI Kyye 60bn
Tabbladbl. KOhBeKunia pexKmiHde Nicipren Ke3de,
6ip yaBItTa TeK 6ip TyTKaIbl TabaHbI Hemece Nicipy
TaptnacbH naJaIaHaHbIb3, EITnEe Kbl3y 6ipKeKenKi
TapalmaDb. KondaHyfa 6onatbH aptypni Taptna
6nIKTepiH naJaIaHaY apKblbI NeuTIH JxOFapbl XeHe
temeHi XaftbHn Bepinet H kb3yDbI petTeyre 60aNbl.
Taram Xofapblan KaHaJbIKbI Kbl3y Kaxet etEtIHHe
6aNaNbHcIbI aptypnl Taptna 6nIKTKePiHn TaHaHbI.
*TeK 6enrini ynrinepe 6onaIbI.
KZ
KoHntep TaFamDapbI pexnmi I
TePMoCTa TYTKacbH MbHaadai opHaTbHb3: 60°C neH EKorapbl apacbHa
ActbHfblKb3dbpy anemeHti icke Kocblnadbl.
Bnypekm Jekin Taamapbl, ocipece KeTeepinetih TopTAPbl (ce6ebi actbdaH keNetIH bictbik auy npoueccihe KEmekteeci) niicipyre ete bHfainbl.
Korapbl TemnepaTypanapra ketyuH eDyip yaKbit KeTei, coHbIKtaH 6yHaJkDaInapda «KohBeKunpa peKIMIN» naDanaHy cblnabdi.
«XorapbI»new
TePMoCTa TYTKacbIH MbHaadai opHaTbHbI3: 60^ neH EKorapbl apacbHa
YctHri Kbl3dbpy 3nemEnI icke KocbinaDbI.
Bny peKmDi TaFamDbI daBHdaydbIH aRbHda
Kbl3apTy ywiH naDanaHyra 6onaDbI.
rnilb

Tepmoctat tykacbH mbHaadai opHaTBbI3:EH Kofapbl YcHri opta Kb3dbpy 3JemeHTi icke KocbinaDbI. TpunbDIn ac aKofapbl api Tike TemnepaTypacbl et nen KaTaNFAH eTTi XyMcaK Typde KaNDbpy yHin HApIN iUHne YCTaon OTbIPbIN, ONAPbIN 6etIN Kb3apTyFa MymKinDiK bepei. CoHdA-ak, Kofapbl 6et TemnepaTypacbl KaKet EtETIH TaRmDapra rPunbdi naaDanaH an 63an: 6nFwTeKc, CNbip eti, Ka6bipfa cTeKi, 6enDeMe, rambyprepnej xane T.6... Keibip MbCaJnap «TaFam daBihday BoBihwaKeHeC» naparpaBHaDa 6epinreH.
New wambl
OhbkyiH TyKaHb TaHbAcbHa opHaTbHb3.
On kanaDbj KHe neWTei Ke3 KeIreH 3neKtp Kb3dbpy
JemeHTepi KocBbIn TyPraHda KaHbIn TypaDbI.
TepmoCTat Wambl
Eyn Wam neWtiH Kb3bIn XaTkAcbH 6inDipei. On
ceHce, demek new iHiDe TemnepaTypa TepMoCTat
TyTKacbIme HopHaTbIraH TemnepaTypara KeTTi.
Eyn Ke3de, new TemnepaTypaHb 6ip KaNbIta YcTan
TypaTbHbIKTaH Byn WAm 6ip KaHbIn, 6ip ceHdi.
ECKEPTY! Neu TapTnapanapbl aIbIn SwIFyfa apHaIFaH XaHe neuTeH uBfBn KeTyiHe xoJ 6epMeiTin WeKTERIW JxynEmeH Ka6DbikTaNFaH. Cbi36ada
KepceTilreHdei,ToIbIFbIMeH WbIFapBn any ywiH TapTnlaIapDbI aNdbIHbFb WeTIHeH YCTan KETepin, TapTcaHb3 (2) 6oNFAhbl.
TaFam daBbHday 6oBbHwa keHeC
!PNIbpeXmHHe TaAMHbIHKaIdbIKTapBH(TOH MaH HeMaHcNAKtB)XHHayYwIH TYTKaJIbTa6aHbI bipHui PI03uJFA opHaJIacTbIPbIHbI3.
PnIb
- TapTnahbI 3 Hemece 4-No3nuefApHaJIaCTbIPbIHbI3. TaFAMdbI TapTnahbIHOpTaCbHa CanbIHbI3.
KyaT deHreinE h KofapbMmHre opHaTy YcbHbIaNabI. YcIHRI Kbi3dbpy 3nemeHTi TepMoCTaT apKbIbpeTTenei XHe TypaKTbIKynde Kymbic ICTemeyi MyMKIH.
NIIULA
XeHJI anHomHHIeH xacanfAH NnUca TabacBH naIdaIaNbIHbI3. OHKI KAMTaMaCbI3 etINreH TaPTNaFa opHaIacTbIPbIHbI3. CbIpTBH KbITbIPnak etin nicipy ywiH TyTKaJIbI Ta6aHBI naIdaIaN6aHbI3, ce6e6i on nicipy Mep3IMH y3apTy apKbIbI KbITbIPnak 6onybHa Kepepi XacaIbI.
- PnuaHbH 6eTKeN Kypamdb6oJFaHa nicipy yPdiCiHOpTaBHaDn PnuaHbH yCTHe MoaapeIpaipimwiH Kocy cyHBnaDbI.
Tpmb-6ap
c) Neu wambl meH rpiNb
PnB-6apbl icke kocy yuHIN TEmeHderi epekeTepdi opbIHdaHbI3:
a) 1-TapTnara TyTKaJIb Ta6aHbI KOINbIHbI3;
b) 4-TapTnara apHaNb rpnIb-6ap Tiperin calbn, icTI rpnIb-6apFa OHdaFbI apHaNb TecIK apKblb Kipri3n, neWtIH apTKbl KaFbHa KOHbH3;
Ep TyMeci

Tafam daibHday TaMepin naDanaHy
- Dby6bIC CnHnBnOpHaTy yuH TAFAM DAyBIHDAY TAI MEPI TyTkacbIH caFat tini 6oynBuHwa 6ip ToIbK aiHaNbIMra 6ypaHb3.
- KaKetTi yaKbITbI opHaTy yuH TyTKaHbI caFat TiJIHe Kapcbl 6paHbI3: TAFAM DAHybIHdAY TAI MEPI TyTKacBHJa KepCeTIJreH MInHyTTbI 6ackapy TaKTacBHdaFbl INHdkaTopMeH TeHeCTipiH3.
- TaHdaIHaH yaKbIT 6itKeHne Dbl6bc CnHaJIbc ectiJe iXaHe neu eupipinei.
- New eupipireHne TaFam daBihday TaMEpiH kaIbINTaBl TaMep petiHne naDanaHyfa 60naBl.
!NeWtiKoJMeHnaIaIaNHyUWIn,FHN TaFAM daBbIHday TaImepi yaKbIbIHbIN 6IyIH KytKlHi3 KeNMece,TAFAM DAIBHAYTAIMEPITyTKacbIH 6enricHeeINbpaHbI3.
«NewTe TaFam daHday 6oBihwa KeHectep» KecTeci
| Реттей Тукасын Каллы | Даьыдалатын Tarам Салмak (кг) | Теменец санаганда nicipy TarTPaSbIHbH no3nucrybI | Адын за Кыздуру УзakТыБы (MinHyT) | Термocтат Тукасын Каллы | Пису УзakТыБы (MinHyT) | |
| 1 Кonsвекця | Учек Кырсылган 6уЗay hemece сыр eti Кырсылган 社ошka eti Пechенbe (kiшkeHTaH naH eHIMdepi) Балiiш Лазань Жас кoи eti Марpenь Мени Косылган Кекс Шад�алган каймakты 6Балiiш Пирor Хоч niICTi 6Балiiш | 1 1 1 -1 1 1 1 1 1 1 1 1 1 0.5 1.5 | 3 3 3 3 3 3 3 3 2 2 2 2 3 3 3 3 3 3 3 3 3 3 3 3 3 3 3 3 3 3 3 3 3 3 3 3 3 3 3 3 3 3 3 3 3 3 3 3 3 3 3 3 3 3 3 3 3 3 3 3 3 3 4 - | 15 15 15 15 15 15 15 15 15 15 15 15 15 15 15 15 15 15 15 15 15 15 15 15 15 15 15 15 15 15 15 15 15 15 - | 200 200 200 180 180 190 180 180 170 180 170 180 170 200 160 180 180 160 160 150 180 180 170 180 170 200 30-40 35-40 50-60 30-35 40-50 30-35 20-25 30-35 | |
| 2 Кондітөрін Тaramдаг рөхimi | Көтөрінгтөрттөр Балiiш Жemic көсылган 6Балiiш Бриштөр | 0.5 1 1 0.5 | 3 3 3 3 3 3 3 3 3 3 3 3 3 3 3 3 3 3 3 3 3 3 3 3 3 3 3 3 3 3 3 3 3 3 3 3 3 3 3 3 3 3 3 3 3 3 3 3 3 3 | 15 15 15 15 15 15 15 15 15 15 15 15 15 15 15 15 15 15 15 15 15 15 15 15 15 15 15 15 15 15 15 15 15 | 30-40 35-40 50-60 25-30 | |
| 3 Пewsін Жогары Жагы | Камл тaram дайындан ушin тaramы Кызэрту | -3/4 | 15 220 - | |||
| 4 Г irrь | Камбалma мен каркатиca Каллмар мен acшан кебы Тразда baydemeci Грильде писінгі көkenістэр Бүүүүүүүүүүүүүүүүүүүүүүүүүүүүүүүүүүүүүүүүүүүүүүүүүүүүүүүүүүүүүүүүүүүүүүүүүүүүүүүүүүүүүүүүүүүүүүүүүүүү | 4 4 4 4 3/4 4 4 4 4 4 4 4 4 4 4 4 4 4 4 4 4 4 4 4 4 4 4 4 4 4 4 4 4 4 4 4 4 4 4 4 4 4 4 4 4 4 4 4 4 4 4 4 4 4 4 | 5 5 5 5 5 5 5 5 5 5 5 5 5 5 5 5 5 5 5 5 5 5 5 5 5 5 5 5 5 5 5 5 5 5 5 5 5 5 5 5 5 5 5 5 5 5 5 5 5 5 5 | EHжогары EHжогары EHжогары EHжогары EHжогары EHжогары EHжогары EHжогары EHжогары EHжогары EHжогары EHжогары EHжогары EHжогары EHжогары EHжогары EHжогары EHжогarы EHжогarы EHжогarы EHжогarы EHжогarы EHжогarы EHжогarы EHжогarы EHжогarы EHжогarы EHжогarы EHжогarы EHжогarы EHжогarы EHжогarы EHжогarы EHжогarы EH Welch | 8-10 6-8 10 10-15 15-20 15-20 7-10 15-20 2-3 | |
| Гриль-бар болса Гриль ictiride niciipinten 6uzay eti Гriпь ictiride niciipinten tanbyk eti | 1.0 2.0 | - | 5 5 | EHжогары EHжогары EHжогары EHжогары EHжогары EHжогары | 70-80 70-80 |
Eckeptne: nicipy yaKbTTapbl waman 6epiReH xeHe onapbl jKeke Kanayra kapa e3repTyre 6oNaIb.
TpNbdi HeMece Koc rPnbDi naDanaHbIN tarAm daBHaHaH Ke3e, TyTKaIb TaBa neuTIn Ty6iHeh
CaharaHa 6ipinwi taptnada opHnactbipinybi Tnic.
KZ
3NEKTP KOHOPKACbI KOCYbI INdkaTOp WAmbl KaHbIN Tpyca, demek nnntada kem dereHne 6ip KOHOPKa KocblIn Tpy.
Nicipy aMakTapbl
IINITa 3JIeKTp KbI3y TaPaTy 3JemeHTTepiMeH
Jka6dbIKTanFaH. Onap kondaHbIFHaN Ke3Je IINITada
KeJeci 3aTTap KbI3apaDbI.

A. Kby ly bIrapaTbH Kb3bIpy 3JeMeHTepi 6ap nicipy aMfbl.
B. Kby3y wbyrapaTbH Kb3dbypy 3nementepi 6ap nicipy aMafbl.HILITE
C. KaIbIK Kbl3y HnDnKaTOp
Wambl: ON Kb13dIpy 3nemeHTi
eWipin, Bipak ani bCTbIK
Ke3de Tnicti Nicipy ayMaftbIHh
temnepaypacb60°C-tan acahtbHbN 6inipeid.
Kb3y TapaTaBH 3neMeHTTepi 6ap nicipy ayMaKTapbl
Onap iuHderi Kbl3y wamdapbHaH Kb3yDbI
cayneneHipy apkblnb uHfapaDbI. Onap ra3
XaKbIHTapra YKcac cnaTTapra Ne: onapdb6ackapy
Ohai XeHe Onap opHaTbINrA H TemnepaTypara Te3
Xetin, bepirren KyATtbI Kepyre MymkiHik 6peedi.
TniCTI TYTKaHbI caFAT TJI 6aftbIMeH 1 MeH 6 apaIbIbIHaFbI NO3nurFa 6ypaHbI3
| Параметр | Калыntынемец Калдам плота |
| 0 Θширni | |
| 1 | Кекенic, балыкNICIPу |
| 2 | Картои (буней), Нокат, Бурах NICIPу, copna дайыnday |
| 3 | Улken мелшерд тafam Лени Кекенic Kocылfaн стiti copnaны дайыndayыжалfacтbyp |
| 4 | КыэрUpу ушin (optашa) |
| 5 | КыэрUpу ушin (optашадан xorapby) |
| 6 | Кызарту Кал hayra a3 уakыttа кетkiэу ушin. |
Kb3y TaPaTaTbIH 3JeMeHTRepi 6ap nicipy ayMaKTapbl
Onap iwiHderi Kbl3y wamdapbHaH Kb3ydbI
cayneHenipy apkblnb WbIfapaDbI. Onap ra3
XaKKblTapra YKcac CnnaTTapra Ne: onapdb6ackapy
Ohai XeHe onap opHaTbInrA H TemnepaTpya Te3
Xetin, 6epinreH KyATbI Kepye MymKiHik 6peedi.
TnictiTyTKaHb caf Tini 6aftbImeH 1 MeH 12 apanblfHbAfbI NO3uNraFa 6ypahb3
HILITE 30H npiroTOBHeHH NnCocTOnT n3 KpyroBbIX 3JEMeMHTOB OTONJIeHH.
OHH cTahOBaTcKpaChbIMn npImepHo 10cekyHIOncJIe TOrO KAK OHN 6blIN BkJIIOueHbl.
BbIeJIeHHe 30HbI npriToOBJIeHnO6ecNeuTb paBHOMepHOe pacnPpeJenHe TemnpaTypbI
HILITE lamnbI 6bICTpo pa3oRpeTdo BBICOKnx TemnepaTp, YTO npuBOIDNT K:
-БьICTpoe NOBbIeHne TemnepaTpybl (no cpaBHeHIO Cra3OBO BROPeko)
-БьICTpe oxlaXdHne
- PaBHomepHoi TemnepaTpybI NO BceN NOBepxHOCTN
!KpybInfbJa eUkaWan 6y Ta3apTkblTbI HEmecE WaHCOPFbIHTbI naDanaH6aHbI3.
Neutrtata3anay
TOT 6acnaiBtih 60nat Hemece 3MaIbdaHfAH cbipTkbl 6eIKTepe3eHke TlbIb3daIbIITap Xblbl cyra MaIbIbIn, Tycci3 ca6BH XaRbIraH r6kAmeh TaapIbIaNbl. KnbIH daKTapdbI Ketipy yuiH apHaBI eHIMdepni naJaIaNbHaIBH3. Kybin 6oNraH coH Ohbl Wain, MyKNRT KpyFaTBH3. KaTbI YHTaKTapdbI Hemece TaTTaHDbipaTBH 3aTTapDbI naJdanaHbAHI3.
- NewTih iwi ap6ip kollhaHaHaH keiH Xblb Ke3iHde MyKnT Ta3aHaHyb Tnic. bICTk cy MeH Ta3apTkblTbI naDalaHbHb3, OaH KeiH WaiBIn, KymCaK 7y6epeKeHN KpytaBn CypTHi3. Kbipfbi 3aTtapDbI naDalaHaBb3.
- New eciriH anHerin bckbIwnen XeHe Kblpbl emec Ta3apTKbl KypaIapMeH Ta3anan, KymcaK WSybepeKeHn MYKnT KpyFaTbHb3. KaTbI Kblpbl 3aTTbI Hemece eTkip Temip KblpflTapbl NaJdaJaHa6aHb3, ce6e bi onap an HeK 6etih TbipHan, OHbH CbiHyBaHa eKenyi MymKiH.
KepeK-kaapakTap KHyHdeiikTi bIDbCTap CnKTbI KyblNybl MyMKIH, Tinti OnapdbI bIDbc Xyfbu MaunHaFA Kyyfba 60naBbl.
Kip MeH MaIbI b6acApy TaKTaBHaH KbIPbIe Mec cy6kAmeh Hemece XymcaK WY6peKeNeh CypTin any KaXeT.
New TbIfb3DaftbIITapbIH TeKcepy
NeWteri eCik TbIb3daBilTapbIH KNI TEKcepIN TypbHb3. Erep TbIb3daBilTap 3aKbIMdaJFaH 60JcA, KaKbIH KepeReri CatyDah KeIH KbImet Kepcety optaBifBaHa xaBapnacbHb3. TbIb3daBilTap aybcTbIpblfHaFra DeiH neWti naDaanH6aydbI yCbHaMb3.
New wambiH aybICTbipy
- Neut TokTah akbipatKaHHa KeH WAM YcBIn XayBn TyprAh WbHb KaNtakTb Wein anBbH3 (cypemmi KapaHb3).
- Wamdba anbIn, OHb coHdai baca
WAMMeH aybictbipHB3: KepHeyi 230
B, KyaTb 25BT, zuKoNi E 14. - KaKnakTbI opHbHa KoBbIn, neWtTOkKa KaTaNanH KocbHb3.
UbIHbKepaMnKaIbIK NITaHbTa3aJaly
!KbipfH Hemece TaTtA hBipaTbIH Ta3apTkbl 3aTTapDb (MbicaJIb, bap6ekIO XacaiTbIH KypanIap MeH neWTepei Ta3anayra aphanrae cnpeJlep), daKetipriuTepdi, TAT KeTIpiTuTepdi, YHTAK Ta3apTkbl 3aTTapDbI Hemece KbipfH 6ETepi 6ap r6kanaPdbI naHaJaHa6aHbI: onap KpybIFb 6ETepin BixkOla Cb13bn Tacaybl MyMKIn.
- ΘДETTE,ПЛNTaHbI dIbIMKbI rY6kAmEH Jybln, COPfblw ac yI cyIrricimEn KpyrFaty KeTknlKiTI.
- ПлNTа eTe KIP 60Ica, OHbI apHaNbI WbIHbI KepaMnKaHbI Ta3aIay 3aTbIMeH bICbIJaN, Oda H KeiH XaKcbIaN WaBbIbI3 da, KeNTipiH3.
KeTne KOnFaH Kipdi KeTipy yuIn Tnicti KbIpFbIHTbI KOJaHaBbIb3 (OJ KypblfBIme6ipre 6epimEnDi). Terinre TaMaK KaTbIN KaMmaybI yuIN, KypblfBtHbIH cyFaBH KytNe-ak, OHJIpeey cyptin aHbIb3. IbHbI KepaMKaBbIK 6TeTPre apHaJFaH TO T 6acNaTbIH 6oJat CbIMHaH XacaIHaH r6KaHbI c6bIHDbI cyFa MaBbIN KOJaHaCahBIs, TamaWHa HEtNkere Kon JeTeKl3yRe 6oJaDbI.
-Пл actmaccanbik Hemece kaHTka YKcac 3aTap a6aHcb13 -ПиТа epice, ПиТа beti ani bICtbyk Ke3ne OnapDbI -depey KbIPfblwnen anbl Tactay Kepek.
TasaarAHnHKeIH, pntaHbI apHaBI KOPraBbI KytIM eHIMImeH eHdeYre 60aIbI: 6yN eHIM KaIbIpaTbIH Ke3RE KepiH6eTIH yIip nNTaHbIH 6etIH nicipy Ke3IHDe TaMaTbIH TAmuBnapDaH KopraDbI. ByN KbI3MeT KepCeTy KymblCTapBH KypblfBi KblbI (bICTbIK eMEc) Hemece caIKbIH Ke3e opbIHay KepeK.
KypblfHbTa3a Cymen WaaBn, Kaccblan KeNTipydi MybTnHaB1: KaIbIKTap KeiH nicipre HKe3e Ka6bcBn, KaTbIN KaJybl MYMKH.
| Шыны керамкалык плNTа тazapTKыштапы | Сатынатын черпесурпсурпсурпсурпсурпсурпсурпсурпсурпсурпсурпсурпсурпсурпсурпсурпсурпсурпсурпсурпсурпсурпсурпсурпсурпсурпcs |
| Тереze Кырfvычы Yстара ЖузiiHIN, Кырfvычтапы | Керек-жарak ДУKEндерi |
| Косалны жуздер | Кураел-жабдьк ДУKEндерi, сунермаркутер, дэPixаналap |
| COLLO luneta HOB BRITE ПлNTаны тазалay SWISSCLEANER | Boots, КоонератиВТИК ДУKEн, Унburnерmar, aiMaNTbIK ЗЕКТР КOMпанясынын DУKEндерi, сунермаркутер |
Tot 6acnaiTbIH 6oNaTbI Ta3aay
TOT 6acnaiTbH 60JatKa OHbH 6eIHHe y3ak yaKbIT TpyFaH KaTbIbIbI cy HEmec KypaMbHa da focpop 6ap KyuTI Ta3apTkBbI 3attap DaTycipyi MymkH. BOnaT 6etepdi JkaKcbIan WaaBn, MyKmT KeTIpren a63aI.
Kemek
KeJIeci MəJIImeTepI OHaJ KepDe yCTaHbI3:
KypbIJIbIHHMoJeni(MoI).
CepnJIbIK Hemipi (C/H).
Bnyaknapat KypbIbIbIdaOpHaTbIbnfAnepeKeTEmkeCTecIHde Hemece opamaaHaTa6bIybyMymKiH.

Newecirihweinanyxhe6ekity:
- EciKi aUbHb3
- Neu eciri TOnCaBbHbIKaMbITbIH TObIFbIMeH Kepi 6paHb3 (fotocypetTi kapaHb3)
- KaBbTTap tipenreHwe ecikTi Ka6bHb13 (ecik 40°-Ka aWbIK typaI (ΦOTOCypETI KapaHb13)

- Kofapfbl npoepnIbderi eki TymMeHi 6acbln, npoepnIbdi wblfapbin aIbHb3 (phiocypetTkapaHb13)
- ΜυHbHbI ΜυFapBn aIbI, MbHa Taayda KepcetinReHdη Ta3aNaHbI3: «KyTim XeHe TEXHkAJIbIK KbI3MeT KePceTy»
- 乌HbHbOpHbHa caNbHb3.
ECKEPTY!Iwki eciriHc eHeri aIbIHraH neuTin naJaHaHyra 6oJMaNdbI!
ECKEPTY! Iwki eciktih aHerih kaTtcaIraH Ke3de, naHenbde Jka3bInraH eCKePTy TeHKepiin
TpyMaHTbIHdAnXeHaBkKePiHInTypaTBHdAn etin eHneknaHEnDypbictan caJIbHbI3.
- IpoΦnIbI opHbHa KoIbIbI3, dypbc KoIbIbIaH Ke3De «TbIK» etKeH dbIbIc ectinei.
- EciKTI TOnbIK aWbIHbI3.
- TipeKTePdi Ka6bHb3 (fotocypetTi KapaHb3).
- Ehni ecikti tonbifbImen kaybin, neuTI aetterieKocyfa 60anaBl.
NeWti 6ydbH KEMerImeH Ta3aJAY:
Bytataay pexmi MaJIbI TaFamap (KybpdaK, et) nicipreHHEN KeIH YcblHInaBl.
By Ta3aJay ic pacimi neuTih iuiHde 6y uhrapy apkbln neuTih ka6bipraJapbHaFbi kipdi xoIO ypciciH xeHHteDi. By JxarDaJa, neuTH iuiH e3 6etIH36eH Ta3anaRah OHai BonaBl.
MaHb3db! Eymen Ta3aJay yPdiin 6actayan 6ypbH:
NeWTHTeMeHrKaFbHdAfbKe3KeJreH TaRAM KaNDbIKTapbH /MaKaNDbIKTapbH KeTipHi3;
Ke3 KeIReH KepeK-KapaKaTapDbI (Topnap XHe Ta6anap) aIbIn TactaHbI3.
XorapbdaflpekeTTepdi opbIHdafaHHaH KeiH, 6i3 MbHaHbI yCbIHAmbl3:
1-NeWtH WYHbI KaHbIbIbp Ta6acbHa 300 Mn cy KynbHbI3; OHbTeMeHHe BactaHaDaBb6ipihui DeHreire KoBHbI3. WYHbI Ta6anapbiKoK ynrinepe, cTahdApTbI neuTin nicipy KaIb6bIH naDanaHbHbI3 XHe OHbTeMeHHe BactaHaDaBb6ipihwi DeHreIderi Topra KObHbI3
2-MyMKiHdiirTaHaDaHBi3
KoHntep TaamdapbI pexnmi I
KHe TemnepaTypaHb1 100^ Ka opHaTbIhB3;
3-NeuTi 15 MmHyTaa KOCyIb KoNbHb3;
4-NeuTi eWipiH3;
5-Neu cybifan Ke3ne,ecirih aubib3xHe Ta3aIaydbI cy xHE dIMkbl WybepeKeHn aKTAhbl3.
6-Ta3anay ypiciin aarktafahHAn KeiH,neWtiH iuiHderi cy kanaBkTapbH KetipiH3.
Erep6ymen Ta3anay ic pacimi MaIbI TaFamdap niciprenHKeiH Hemece neu ete lac 6onfah Ke3de opbHdaIaNbH 6oNca, Ta3anay ypdiCIN aIdbIHbI naparpafta CnNaTTaIraH dctypni eicneh aKaTaHbI3.
!BapnbTataanayicpocimdeepinewcybiraHKe3deOpbIHdaHbI3!
:
j 1
n nn nnnnnnnnnnnnnnnnnnnnnnnnnnnnnnnnnnnnnnnnnnnnnnnnnnnnnnnnnnnnnnnnnnnnnnnnnnnnnnnnnnnnnnnnnnnnnnnnnnnnnnnnnnnnnnnnn
Aai jall
j 1
Jai jie jao cdilio /plebi cdilio 5i alljip
jll
()
Lai yao jao oXei oJySall ci Jao
gac 1j jll jall jell 300 -1
jie g jie 2 gill y d gall s aill no Jy
aelll j 1j1s gannll
jrrnnaa 1
100
15 12d lac all
jai jai 4
cllll lgl 15
a.b.aa
Iac elg! 2e y gill g aia ola joa cali -6
b1 = 32,b2 = - 32
i 1
paai i 1i iia i jll i k ic
aaii aaii aiaiaai iaiii aaii
11 1
1
j11)
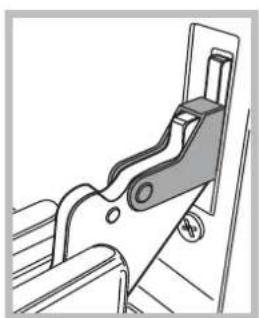
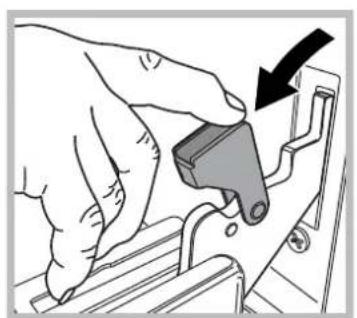
()
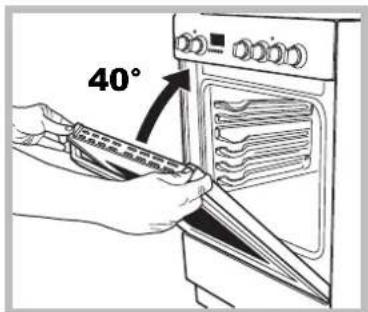
4 4
( )
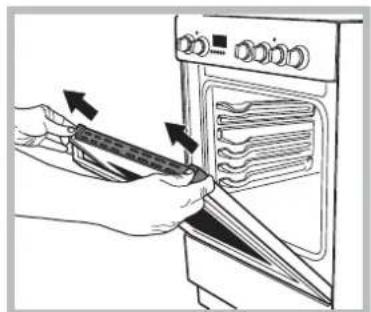
jll 1e jccg jn jnn jn jn jn .5
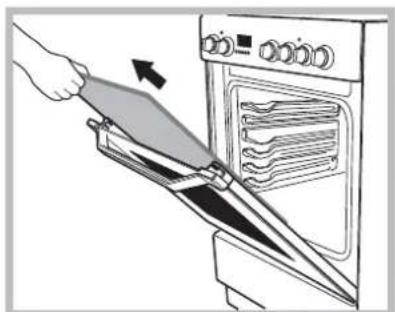
jil jil jil jil jil jil jil jil jil jil jil jil jil jil jil jil jil jil jil jil jil jil jil jil jil jil jil jil jil jil jil jil jil jil jil jil jil jil jil jil jil jil jil jil jil
(3)
La 1
jlll yllll lall" 14 1
a
i 1
1
glll jaii gaii jai jai jai jai iie!
y
Aa1gJgGgGg
7
3.3a
. 8.
jaijiieJuiie 9
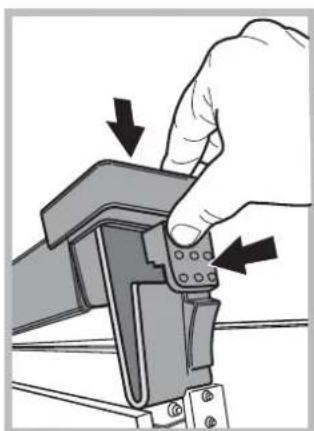
10
- a b c d e f g h i j k l
Sul
1 1 1 1 1 1 1 1 1 1 1 1 1 1 1 1 1 1 1 1 1 1 1 1 1 1 1 1 1 1 1 1 1 1
aalal aagaaagaaagaaagaaagaaagaaagaaagaaagaaagaaagaaagaaagaaagaaagaaagaaagaaagaaagaaagaaagaaagaaagaaagaaagaaagaaagaaagaaagaaagaaagaaagaaagaaagaaagaaagaaagaaagaaagaaagaaagaaagaaagaaagaaagaaagaaagaaagaaagaaagaaagaaa
| ملاoverview | الإستعمالالترجمةالترجمةالترجمة |
| DIY ملاoverview | الإستعمالالترجمةالترجمةالTRL |
| IWOWOWOWOWOWOWOWOWOWOWOWOWOWOWOWOWOWOWOWOWOWOWOWOWOWOWOWOWOWOWOWOWOWOWOWOWOWOWOWOWOWOWOWOWOWOWOWOWOWOWOWOWOWOWOWOWOWOWOWOWOWOWOWOWOWOWOWOWOWOWOWOWOWOWOWOWOWOWOWOWOWOWOWOWOWOWOWOWOWOWOWOWOWOWOWOWOWOWOWOWWOWOWOWOWOWOWOWOWOWOWOWOWOWOWOWOWOWOWOWOWOWOWOWOWOWOWOWOWOWOWOWOWOWOWOWOWOWOWOWOWOWOWOWOWOWOWOWOWOWOWOWOWOWOWOWOWOWOWOWOWOWOWOWOWOWOWOWOWOWOWOWOWOWOWOWOWOWOWOWOWOWOWOWOWOWOWOWOWOWOWOWOWOWOWOWOWOWOWOWowowowowowowowowowowowowowowowowowowowowowowowowowowowowowowowowowowowowowowowowowowowowowowowowowowowowowowowowowowowowowowowowowowowowowowowowowowowowowowowowowowowowowowowowowowowowowowowowowowowowawowowowowowowowowowowowowowowowowowowowowowowowowowowowowowowowowowowowowowowowowowowowowowowowowowowowowowowowowowowowowowowowowowowowowowowowowowowowowowowowowowowowowowowowowowowowowowowowowowowowwwowowowowowowowowowowowowowowowowowowowowowowowowowowowowowowowowowowowowowowowowowowowowowowowowowowowowowowowowowowowowowowowowowowowowowowowowowowowowowowowowowowowowowowowowowowowowowowowowowowowwowowowowowowowowowowowowowowowowowowowowowowowowowowowowowowowowowowowowowowowowowowowowowowowowowowowowowowowowowowowowowowowowowowowowowowowowowowowowowowowowowowowowowowowowowowowowowowowowowowowewowowowowowowowowowowowowowowowowowowowowowowowowowowowowowowowowowowowowowowowowowowowowowowowowowowowowowowowowowowowowowowowowowowowowowowowowowowowowowowowowowowowowowowowowowowowowowowowowowowowpowowpowpowpowpowpowpowpowpowpowpowpowpowpowpowpowpowpowpowpowpowpowpowpowpowpowpowpowpowpowpowpowpowpowpowpowpowpowpowpowpowpowpowpowpowpowpowpowpowpowpowpowpowpowpowpowpowpowpowpowpowpowpowpowpowpowpowpowpowpowpowpowpowpowpowpowpowpowpowpowpowpowpowpowpowpowpowpowpowpowpowpowpowpowpowpowpowpowpowpowpow PowPowPowPowPowPowPowPowPowPowPowPowPowPowPowPowPowPowPowPowPowPowPowPowPowPowPowPowPowPowPowPowPowPowPowPowPowPowPowPowPowPowPowPowPowPowPowPowPowPowPowPowPowPowPowPowPowPowPowPowPowPowPowPowPowPowPowPowPowPowPowPowPowPowPowPowPowPowPowPowPowPowPowPowPowPowPowPowPowPowPowPowPowPowPowPowPowPowPowPowPowpowpowpowpowpowpowpowpowpowpowpowpowpowpowpowpowpowpowpowpowpowpowpowpowpowpowpowpowpowpowpowpowpowpowpowpowpowpowpowpowpowpowpowpowpowpowpowpowpowpowpowpowpowpowpowpowpowpowpowpowpowpowpowpowpowpowpowpowpowpowpowpowpowpowpowpowpowpowpowpowpowpowpowpowpowpowpowpowpowpowpowpowpowpowpowpowpowpowpow powder powder powder powder powder powder powder powder powder powder powder powder powder powder powder powder powder powder powder powder powder powder powder powder powder powder powder powder powder powder powder powder powder powder powder powder powder powder powder powder powder powder powder powder powder powder powder powder powder powder powder powder powder powder powder powder powder powder powder powder powder powder powder powder powder powder powder powder powder powder powder powder powder powder powder powder powder powder powder powder powder powder powder powder powder powder powder powder powder powder powder powder powder powder powder powder powder powder powder powder pow pow pow pow pow pow pow pow pow pow pow pow pow pow pow pow pow pow pow pow pow pow pow pow pow pow pow pow pow pow pow pow pow pow pow pow pow pow pow pow pow pow pow pow pow pow pow pow pow pow pow pow pow pow pow pow pow pow pow pow pow pow pow pow pow pow pow pow pow pow pow pow pow pow pow pow pow pow pow pow pow pow pow pow pow pow pow pow pow pow pow pow pow pow pow pow pow pow pow pow powder powder powder powder powder powder powder powder powder powder powder powder powder powder powder powder powder powder powder powder powder powder powder powder powder powder powder powder powder powder powder powder powder powder powder powder powder powder powder powder powder powder powder powder powder powder powder powder powder powder powder powder powder powder powder powder powder powder powder powder powder powder powder powder powder powder powder powder powder powder powder powder powder powder powder powder powder powder powder powder powder powder powder powder powder powder powder powder powder powder powder powder powder powder powder powder powder powder powder Powder Powder Powder Powder Powder Powder Powder Powder Powder Powder Powder Powder Powder Powder Powder Powder Powder Powder Powder Powder Powder Powder Powder Powder Powder Powder Powder Powder Powder Powder Powder Powder Powder Powder Powder Powder Powder Powder Powder Powder Powder Powder Powder Powder Powder Powder Powder Powder Powder Powder Powder Powder Powder Powder Powder Powder Powder Powder Powder Powder Powder Powder Powder Powder Powder Powder Powder Powder Powder Powder Powder Powder Powder Powder Powder Powder Powder Powder Powder Powder Powder Powder Powder Powder Powder Powder Powder Powder Powder Powder Powder Powder Powder Powder Powder Powder Powder Powder Powder Powder powder powder powder powder powder powder powder powder powder powder powder powder powder powder powder powder powder powder powder powder powder powder powder powder powder powder powder powder powder powder powder powder powder powder powder powder powder powder powder powder powder powder powder powder powder powder powder powder powder powder powder powder powder powder powder powder powder powder powder powder powder powder powder powder powder powder powder powder powder powder powder powder powder powder powder powder powder powder powder powder powder powder powder powder powder powder powder powder powder powder powder powder powder powder powder powder powder powder powderpowpowpowpowpowpowpowpowpowpowpowpowpowpowpowpowpowpowpowpowpowpowpowpowpowpowpowpowpowpowpowpowpowpowpowpowpowpowpowpowpowpowpowpowpowpowpowpowpowpowpowpowpowpowpowpowpowpowpowpowpowpowpowpowpowpowpowpowpowpowpowpowpowpowpowpowpowpowpowpowpowpowpowpowpowpowpowpowpowpowpowpowpowpowpowpowpowpowpowgowgowgowgowgowgowgowgowgowgowgowgowgowgowgowgowgowgowgowgowgowgowgowgowgowgowgowgowgowgowgowgowgowgowgowgowgowgowgowgowgowgowgowgowgowgowgowgowgowgowgowgowgowgowgowgowgowgowgowgowgowgowgowgowgowgowgowgowgowgowgowgowgowgowgowgowgowgowgowgowgowgowgowgowgowgowgowgowgowgowgowgowgowgowgowgowgowgowgowgowwoman woman woman woman woman woman woman woman woman woman woman woman woman woman woman woman woman woman woman woman woman woman woman woman woman woman woman woman woman woman woman woman woman woman woman woman woman woman woman woman woman woman woman woman woman woman woman woman woman woman woman woman woman woman woman woman woman woman woman woman woman woman woman woman woman woman woman woman woman woman woman woman woman woman woman woman woman woman woman woman woman woman woman woman woman woman woman woman woman woman woman woman woman woman woman woman woman woman woman woman womanWoman woman woman woman woman woman woman woman woman woman woman woman woman woman woman woman woman woman woman woman woman woman woman woman woman woman woman woman woman woman woman woman woman woman woman woman woman woman woman woman woman woman woman woman woman woman woman woman woman woman woman woman woman woman woman woman woman woman woman woman woman woman woman woman woman woman woman woman woman woman woman woman woman woman woman woman woman woman woman woman woman woman woman woman woman woman woman woman woman woman woman woman woman woman woman woman woman woman woman woman women women women women women women women women women women women women women women women women women women women women women women women women women women women women women women women women women women women women women women women women women women women women women women women women women women women women women women women women women women women women women women women women women women women women women women women women women women women women women women women women women women women women women women women women women women women women women women women women women women women women woman woman woman woman woman woman woman woman woman woman woman woman woman woman woman woman woman woman woman woman woman woman woman woman woman woman woman woman woman woman woman woman woman woman woman woman woman woman woman woman woman woman woman woman woman woman woman woman woman woman woman woman woman woman woman woman woman woman woman woman woman woman woman woman woman woman woman woman woman woman woman woman woman woman woman woman woman woman woman woman woman woman woman woman woman woman woman woman woman woman woman woman woman woman woman woman woman woman woman wom wom wom wom wom wom wom wom wom wom wom wom wom wom wom wom wom wom wom wom wom wom wom wom wom wom wom wom wom wom wom wom wom wom wom wom wom wom wom wom wom wom wom wom wom wom wom wom wom wom wom wom wom wom wom wom wom wom wom wom wom wom wom wom wom wom wom wom wom wom wom wom wom wom wom wom wom wom wom wom wom wom wom wom wom wom wom wom wom wom wom wom wom wom wom wom wom wom wom womwoman wom wom wom wom wom wom wom wom wom wom wom wom wom wom wom wom wom wom wom wom wom wom wom wom wom wom wom wom wom wom wom wom wom wom wom wom wom wom wom wom wom wom wom wom wom wom wom wom wom wom wom wom wom wom wom wom wom wom wom wom wom wom wom wom wom wom wom wom wom wom wom wom wom wom wom wom wom wom wom wom wom wom wom wom wom wom wom wom wom wom wom wom wom wom wom wom wom wom womWoman wom wom wom wom wom wom wom wom wom wom wom wom wom wom wom wom wom wom wom wom wom wom wom wom wom wom wom wom wom wom wom wom wom wom wom wom wom wom wom wom wom wom wom wom wom wom wom wom wom wom wom wom wom wom wom wom wom wom wom wom wom wom wom wom wom wom wom wom wom wom wom wom wom wom wom wom wom wom wom wom wom wom wom wom wom wom wom wom wom wom wom wom wom wom wom wom wom wom womwormwormwormwormwormwormwormwormwormwormwormwormwormwormwormwormwormwormwormwormwormwormwormwormwormwormwormwormwormwormwormwormwormwormwormwormwormwormwormwormwormwormwormwormwormwormwormwormwormwormwormwormwormwormwormwormwormwormwormwormwormwormwormwormwormwormwormwormwormwormwormwormwormwormwormwormwormwormwormwormwormwormwormwormwormwormwormwormwormwormwormwormwormwormwormwormwormwormwormworm Worm Worm Worm Worm Worm Worm Worm Worm Worm Worm Worm Worm Worm Worm Worm Worm Worm Worm Worm Worm Worm Worm Worm Worm Worm Worm Worm Worm Worm Worm Worm Worm Worm Worm Worm Worm Worm Worm Worm Worm Worm Worm Worm Worm Worm Worm Worm Worm Worm Worm Worm Worm Worm Worm Worm Worm Worm Worm Worm Worm Worm Worm Worm Worm Worm Worm Worm Worm Worm Worm Worm Worm Worm Worm Worm Worm Worm Worm Worm Worm Worm Worm Worm Worm Worm Worm Worm Worm Worm Worm Worm Worm Worm Worm Worm Worm Worm Worm Worm Wormwormwormwormwormwormwormwormwormwormwormwormwormwormwormwormwormwormwormwormwormwormwormwormwormwormwormwormwormwormwormwormwormwormwormwormwormwormwormwormwormwormwormwormwormwormwormwormwormwormwormwormwormwormwormwormwormwormwormwormwormwormwormwormwormwormwormwormwormwormwormwormwormwormwormwormwormwormwormwormwormwormwormwormwormwormwormwormwormwormwormwormwormwormwormwormwormwormwormworm wormwormwormwormwormwormwormwormwormwormwormwormwormwormwormwormwormwormwormwormwormwormwormwormwormwormwormwormwormwormwormwormwormwormwormwormwormwormwormwormwormwormwormwormwormwormwormwormwormwormwormwormwormwormwormwormwormwormwormwormwormwormwormwormwormwormwormwormwormwormwormwormwormwormwormwormwormwormwormwormwormwormwormwormwormwormwormwormwormwormwormwormwormwormwormwormwormwormwormworm wormswormwormwormwormwormwormwormwormwormwormwormwormwormwormwormwormwormwormwormwormwormwormwormwormwormwormwormwormwormwormwormwormwormwormwormwormwormwormwormwormwormwormwormwormwormwormwormwormwormwormwormwormwormwormwormwormwormwormwormwormwormwormwormwormwormwormwormwormwormwormwormwormwormwormwormwormwormwormwormwormwormwormwormwormwormwormwormwormwormwormwormwormwormwormwormwormwormwormwormillumillumillumillumillumillumillumillumillumillumillumillumillumillumillumillumillumillumillumillumillumillumillumillumillumillumillumillumillumillumillumillumillumillumillumillumillumillumillumillumillumillumillumillumillumillumillumillumillumillumillumillumillumillumillumillumillumillumillumillumillumillumillumillumillumillumillumillumillumillumillumillumillumillumillumillumillumillumillumillumillumillumillumillumillumillumillumillumillumillumillumillumillumillumillumillumillumillumillumillumllumillumillumillumillumillumillumillumillumillumillumillumillumillumillumillumillumillumillumillumillumillumillumillumillumillumillumillumillumillumillumillumillumillumillumillumillumillumillumillumillumillumillumillumillumillumillumillumillumillumillumillumillumillumillumillumillumillumillumillumillumillumillumillumillumillumillumillumillumillumillumillumillumillumillumillumillumillumillumillumillumillumillumillumillumillumillumillumillumillumillumillumillumillumillumillumillumillumillumillum illumillumillumillumillumillumillumillumillumillumillumillumillumillumillumillumillumillumillumillumillumillumillumillumillumillumillumillumillumillumillumillumillumillumillumillumillumillumillumillumillumillumillumillumillumillumillumillumillumillumillumillumillumillumillumillumillumillumillumillumillumillumillumillumillumillumillumillumillumillumillumillumillumillumillumillumillumillumillumillumillumillumillumillumillumillumillumillumillumillumillumillumillumillumillumillumillumillumillumillumulfulfulfulfulfulfulfulfulfulfulfulfulfulfulfulfulfulfulfulfulfulfulfulfulfulfulfulfulfulfulfulfulfulfulfulfulfulfulfulfulfulfulfulfulfulfulfulfulfulfulfulfulfulfulfulfulfulfulfulfulfulfulfulfulfulfulfulfulfulfulfulfulfulfulfulfulfulfulfulfulfulfulfulfulfulfulfulfulfulfulfulfulfulfulfulfulfulfulfulfurdulduldul dul dul dul dul dul dul dul dul dul dul dul dul dul dul dul dul dul dul dul dul dul dul dul dul dul dul dul dul dul dul dul dul dul dul dul dul dul dul dul dul dul dul dul dul dul dul dul dul dul dul dlul dul dul dul dul dul dul dul dul dul dul dul dul dul dul dul dul dul dul dul dul dul dul dul dul dul dul dul dul dul dul dul dul dul dul dul dul dul dul dul dul dul dul dul dul dul dul dul dul dul da da da da da da da da da da da da da da da da da da da da da da da da da da da da da da da da da da da da da da da da da da da da da da da da da da da da da da da da da da da da da da da da da da da da da da da da da da da da da da da da da da da da da da da da da da da da da da da da da da da da Da da da da da da da da da da da da da da da da da da da da da da da da da da da da da da da da da da da da da da da da da da da da da da da da da da da da da da da da da da da da da da da da da da da da da da da da da da da da da da da da da da da da da da da da da da da da da da da da da da da da DA DA DA DA DA DA DA DA DA DA DA DA DA DA DA DA DA DA DA DA DA DA DA DA DA DA DA DA DA DA DA DA DA DA DA DA DA DA DA DA DA DA DA DA DA DA DA DA DA DA DA DA DA DA DA DA DA DA DA DA DA DA DA DA DA DA DA DA DA DA DA DA DA DA DA DA DA DA DA DA DA DA DA DA DA DA DA DA DA DA DA DA DA DA DA DA DA DA DA DA GA GA GA GA GA GA GA GA GA GA GA GA GA GA GA GA GA GA GA GA GA GA GA GA GA GA GA GA GA GA GA GA GA GA GA GA GA GA GA GA GA GA GA GA GA GA GA GA GA GA GA GA GA GA GA GA GA GA GA GA GA GA GA GA GA GA GA GA GA GA GA GA GA GA GA GA GA GA GA GA GA GA GA GA GA GA GA GA GA GA GA GA GA GA GA GA GA GA GA GAGA GA GA GA GA GA GA GA GA GA GA GA GA GA GA GA GA GA GA GA GA GA GA GA GA GA GA GA GA GA GA GA GA GA GA GA GA GA GA GA GA GA GA GA GA GA GA GA GA GA GA GA GA GA GA GA GA GA GA GA GA GA GA GA GA GA GA GA GA GA GA GA GA GA GA GA GA GA GA GA GA GA GA GA GA GA GA GA GA GA GA GA GA GA GA GA GA GA GA GA BA BA BA BA BA BA BA BA BA BA BA BA BA BA BA BA BA BA BA BA BA BA BA BA BA BA BA BA BA BA BA BA BA BA BA BA BA BA BA BA BA BA BA BA BA BA BA BA BA BA BA BA BA BA BA BA BA BA BA BA BA BA BA BA BA BA BA BA BA BA BA BA BA BA BA BA BA BA BA BA BA BA BA BA BA BA BA BA BA BA BA BA BA BA BA BA BA BA BA BA NA NA NA NA NA NA NA NA NA NA NA NA NA NA NA NA NA NA NA NA NA NA NA NA NA NA NA NA NA NA NA NA NA NA NA NA NA NA NA NA NA NA NA NA NA NA NA NA NA NA NA NA NA NA NA NA NA NA NA NA NA NA NA NA NA NA NA NA NA NA NA NA NA NA NA NA NA NA NA NA NA NA NA NA NA NA NA NA NA NA NA NA NA NA NA NA NA NA NA NANA NA NA NA NA NA NA NA NA NA NA NA NA NA NA NA NA NA NA NA NA NA NA NA NA NA NA NA NA NA NA NA NA NA NA NA NA NA NA NA NA NA NA NA NA NA NA NA NA NA NA NA NA NA NA NA NA NA NA NA NA NA NA NA NA NA NA NA NA NA NA NA NA NA NA NA NA NA NA NA NA NA NA NA NA NA NA NA NA NA NA NA NA NA NA NA NA NA NA NA Na Na Na Na Na Na Na Na Na Na Na Na Na Na Na Na Na Na Na Na Na Na Na Na Na Na Na Na Na Na Na Na Na Na Na Na Na Na Na Na Na Na Na Na Na Na Na Na Na Na Na Na Na Na Na Na Na Na Na Na Na Na Na Na Na Na Na Na Na Na Na Na Na Na Na Na Na Na Na Na Na Na Na Na Na Na Na Na Na Na Na Na Na Na Na Na Na Na Na Na NA Na Na Na Na Na Na Na Na Na Na Na Na Na Na Na Na Na Na Na Na Na Na Na Na Na Na Na Na Na Na Na Na Na Na Na Na Na Na Na Na Na Na Na Na Na Na Na Na Na Na Na Na Na Na Na Na Na Na Na Na Na Na Na Na Na Na Na Na Na Na Na Na Na Na Na Na Na Na Na Na Na Na Na Na Na Na Na Na Na Na Na Na Na Na Na Na Na Na NA NA NA NA NA NA NA NA NA NA NA NA NA NA NA NA NA NA NA NA NA NA NA NA NA NA NA NA NA NA NA NA NA NA NA NA NA NA NA NA NA NA NA NA NA NA NA NA NA NA NA NA NA NA NA NA NA NA NA NA NA NA NA NA NA NA NA NA NA NA NA NA NA NA NA NA NA NA NA NA NA NA NA NA NA NA NA NA NA NA NA NA NA NA NA NA NA NA NA NNA NNA NNA NNA NNA NNA NNA NNA NNA NNA NNA NNA NNA NNA NNA NNA NNA NNA NNA NNA NNA NNA NNA NNA NNA NNA NNA NNA NNA NNA NNA NNA NNA NNA NNA NNA NNA NNA NNA NNA NNA NNA NNA NNA NNA NNA NNA NNA NNA NNA NBA NBA NBA NBA NBA NBA NBA NBA NBA NBA NBA NBA NBA NBA NBA NBA NBA NBA NBA NBA NBA NBA NBA NBA NBA NBA NBA NBA NBA NBA NBA NBA NBA NBA NBA NBA NBA NBA NBA NBA NBA NBA NBA NBA NBA NBA NBA NBA NBA NBA NBBN BNB NBBN BNB NBBN BNB NBBN BNB NBBN BNB NBBN BNB NBBN BNB NBBN BNB NBBN BNB NBBN BNB NBBN BNB NBBN BNB NBBN BNB NBBN BNB NBBN BNB NBBN BNB NBBN BNB NBBN BNB NBBN BNB NBBN BNB NBBN BBBN BNB NBBN BNB NBBN BNB NBBN BNB NBBN BNB NBBN BNB NBBN BNB NBBN BNB NBBN BNB NBBN BNB NBBN BNB NBBN BNB NBBN BNB NBBN BNB NBBN BNB NBBN BNB NBBN BNB NBBN BNB NBBN BNB NBBN BNB BNB NBBN BNB NBBN BNB NBBN BNB NBBN BNB NBBN BNB NBBN BNB NBBN BNB NBBN BNB NBBN BNB NBBN BNB NBBN BNB NBBN BNB NBBN BNB NBBN BNB NBBN BNB NBBN BNB NBBN BNB NBBN BNB NBBN BNB NBBB NBBN BNB NBBN BNB NBBN BNB NBBN BNB NBBN BNB NBBN BNB NBBN BNB NBBN BNB NBBN BNB NBBN BNB NBBN BNB NBBN BNB NBBN BNB NBBN BNB NBBN BNB NBBN BNB NBBN BNB NBBN BNB NBBN BNB NBBN B NB NB NB NB NB NB NB NB NB NB NB NB NB NB NB NB NB NB NB NB NB NB NB NB NB NB NB NB NB NB NB NB NB NB NB NB NB NB NB NB NB NB NB NB NB NB NB NB NB NB NB NB NB NB NB NB NB NB NB NB NB NB NB NB NB NB NB NB NB NB NB NB NB NB NB NB NB NB NB NB NB NB NB NB NB NB NB NB NB NB NB NB NB NB NB NB NB NB NB NBNB NB NB NB NB NB NB NB NB NB NB NB NB NB NB NB NB NB NB NB NB NB NB NB NB NB NB NB NB NB NB NB NB NB NB NB NB NB NB NB NB NB NB NB NB NB NB NB NB NB NB NB NB NB NB NB NB NB NB NB NB NB NB NB NB NB NB NB NB NB NB NB NB NB NB NB NB NB NB NB NB NB NB NB NB NB NB NB NB NB NB NB NB NB NB NB NB NB NB NB BB BB BB BB BB BB BB BB BB BB BB BB BB BB BB BB BB BB BB BB BB BB BB BB BB BB BB BB BB BB BB BB BB BB BB BB BB BB BB BB BB BB BB BB BB BB BB BB BB BB BB BB BB BB BB BB BB BB BB BB BB BB BB BB BB BB BB BB BB BB BB BB BB BB BB BB BB BB BB BB BB BB BB BB BB BB BB BB BB BB BB BB BB BB BB BB BB BB BB BBBB BB BB BB BB BB BB BB BB BB BB BB BB BB BB BB BB BB BB BB BB BB BB BB BB BB BB BB BB BB BB BB BB BB BB BB BB BB BB BB BB BB BB BB BB BB BB BB BB BB BB BB BB BB BB BB BB BB BB BB BB BB BB BB BB BB BB BB BB BB BB BB BB BB BB BB BB BB BB BB BB BB BB BB BB BB BB BB BB BB BB BB BB BB BB BB BB BB BB BB AB AB AB AB AB AB AB AB AB AB AB AB AB AB AB AB AB AB AB AB AB AB AB AB AB AB AB AB AB AB AB AB AB AB AB AB AB AB AB AB AB AB AB AB AB AB AB AB AB AB AB AB AB AB AB AB AB AB AB AB AB AB AB AB AB AB AB AB AB AB AB AB AB AB AB AB AB AB AB AB AB AB AB AB AB AB AB AB AB AB AB AB AB AB AB AB AB AB AB ABAB AB AB AB AB AB AB AB AB AB AB AB AB AB AB AB AB AB AB AB AB AB AB AB AB AB AB AB AB AB AB AB AB AB AB AB AB AB AB AB AB AB AB AB AB AB AB AB AB AB AB AB AB AB AB AB AB AB AB AB AB AB AB AB AB AB AB AB AB AB AB AB AB AB AB AB AB AB AB AB AB AB AB AB AB AB AB AB AB AB AB AB AB AB AB AB AB AB AB AB. |
oo
ailllll lglal 1jiey is
.(Mod.) j = 11 j 1
(S/N)
g 1000000000000000000000000000000000000000000000000000
jie jie jie jie jie jie jie
Aie Jae jai! 1a aal bai jia jia jia jia jia
jLQ_1
I 1
j_4 = 276
aaiuui 1 aaiiui 1 iuiui uuiui uuiui uuiui uuiui uuiui uuiui uuiui uuiui uuiui uuiui uuiui uuiui uuiui uuiui uuiui uuiui uuiui uuiui uuiui uuiui uuiui uuiui uuiui uuiui uuiui uuiui uuiui uuiui uuiui uuiui uuiui uuiui uuiui uuuu
1j 1 j 1 j 1 j 1 j 1 j 1 j 1 j 1 j 1 j 1 j 1 j 1 j 1 j 1 j 1 j 1 j 1 j 1 j 1 j 1 j 1 j 1 j 1 j 1 j 1 j 1 j 1 j 1 j 1 j 1 j 1 j 1 j 1 j 1 j
a a a a a a a a a a a a a a a
jaii jaiia gall jaiai all pssial sai kai jai i aai
aall yll llll aal 1jai jai lae iagaa
a 1
aalall aaiall
aai 1
jag aie gill jil gill dll y cnnn 1i jai biall qia
j 1
15 15
a_i 0,1 = 12
g jdall a jao jbi gll jdl gl kaii caiil n
i
Juauiu Jiaue jao jiaai Jiai jiaai Jiaui Jiaai
j 1
alglglllglll lglll 12 jhll jhll jhlo
m = 311
gaiy gai baa jia jia jia
aai jll 0jg jg jll
2 all j (jall) 1 all no jally aea y caiill s
aalw, yabllblll aalw allll allll
C. 12 all 3 个 3 small
m = 311
(1)
Aolssuul 1 jzai
Aii jill g aalll jssll 8g Jaaalall al
j 1 jSall j 1 j 1 j 1 j
Aisw gai (C, 1) aalall jaih
jglal plisial 10 gaiy jgaiy gaiiall jia la25
aill lalol ool jie jie jie jie
151 2 4
y 1
1
y j 1
xcllally 1yaiy jybi y j yj
alglll aillg lglall glll alll gllll gllll gllll gllll gllll
y 1
i 1
jie jie jie jie jie jie jie jie jie jie jie jie jie jie jie jie jie jie jie jie jie jie jie jie jie jie jie jie jie jie jie jie jie jie jie jie jie jie jie jie jie jie
y
gai jial 1
g 12 y g aal gall gall y gail yie
J 1 J 1 1 1 1 1 1 1 1 1 1 1 1 1 1 1 1 1 1 1 1 1 1 1 1 1 1 1 1 1 1 1 1 1 1 1 1 1 1 1 1 1
j 1
*cui
Lai la 1
AolS oJd O aclll aJae 5r Jy 1
.2
.2
(a)0011
1 4 2
aalj yab j 3
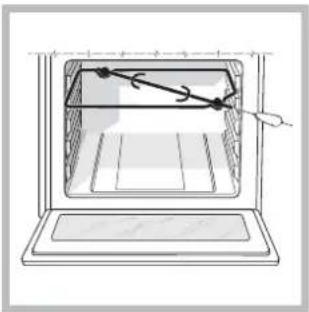
a
a 1
L 10
1 1
jbi) 230 jia dai jia gai jia jia jia jia jia jia jia jia jia jia jia jia jia jia jia jia jia jia jia jia jia jia jia jia jia jia jia
.
H05RR-F 3x4 CEI-UNEL 35363
H05VV-F 3x4 CEI-UNEL 35746
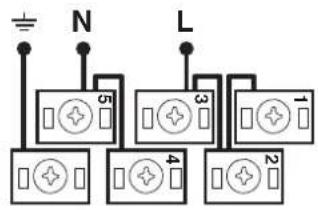
y
(P)-aalj (204