
The Birdy - Watch Shinola - Free user manual and instructions
Find the device manual for free The Birdy Shinola in PDF.

User questions about The Birdy Shinola
0 question about this device. Answer the ones you know or ask your own.
Ask a new question about this device
Download the instructions for your Watch in PDF format for free! Find your manual The Birdy - Shinola and take your electronic device back in hand. On this page are published all the documents necessary for the use of your device. The Birdy by Shinola.
USER MANUAL The Birdy Shinola
Where American is made.
As makers of handcrafted watches, bicycles, leather goods & journals, we believe that products should be built to last, and they should be built right here in America. Shinola stands for skill at scale, the preservation of craft, the beauty of industry.
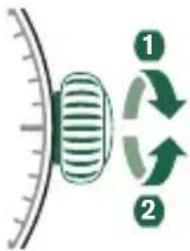
SCREW-DOWN CROWNS
CROWN FUNCTIONALITY
The components of your Shinola watch are made of the finest materials and have been rigorously inspected to meet our strict criteria. Some Shinola watches feature a screw-down crown, which adds an extra level of water-tightness. To safeguard your investment, it is important to understand how this type of crown works:
To make the crown operational, unscrew it from the case by turning it counterclockwise until it releases.
- Once released, follow the instructions for setting the time/date as described in the next sections.
To reseal the crown, press it in against the case until the threads engage, and turn clockwise until tight.
WATCH MODELS WITH DATE INDICATOR
PLEASE NOTE:
- If your watch features a date indicator, the date window might be in a different position from the one depicted in this manual.
- When performing a quick date setting (as described further under the sections SETTING THE DATE), the time indicated by your watch should not be between 9:30 p.m. and 3:00 a.m. This is because as the hands approach midnight on the watch during its normal operation, gears begin to engage with the date wheel and lock into place. Manually setting the date during that particular period of time could possibly result in damage to the small teeth on the gears.
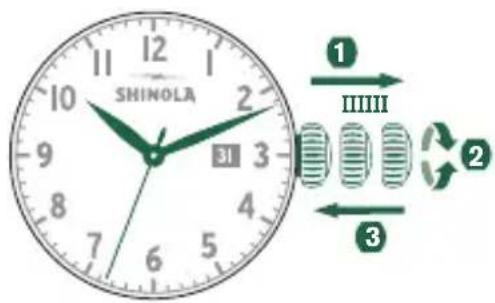
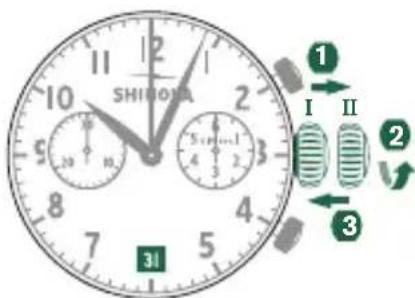
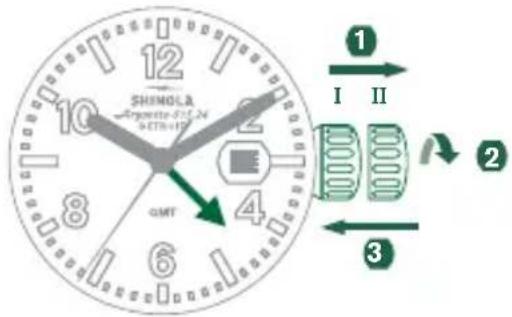
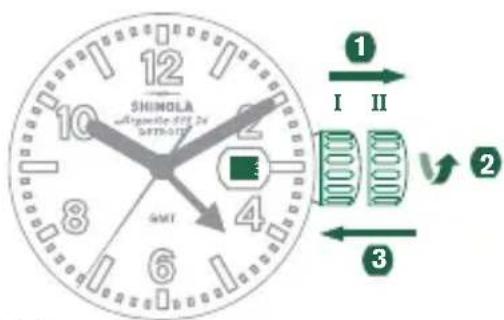
SINGLE TIME MODELS
SETTING THE TIME
Pull out the crown to position II. (The watch stops.)
Turn the crown until you reach the correct time.
Push the crown back to position I.
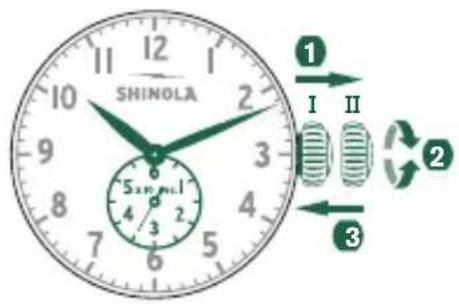
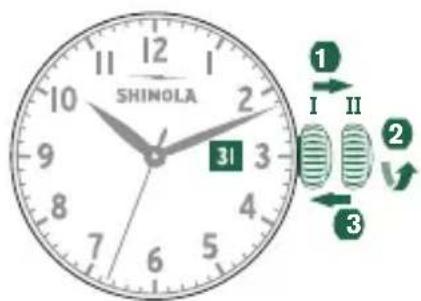
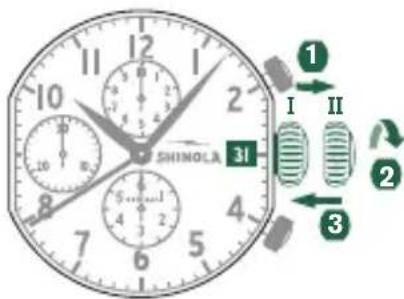
SINGLE TIME WITH DATE MODELS
SETTING THE TIME
Pull out the crown to position III. (The watch stops.)
Turn the crown until you reach the correct time.
Push the crown back into position I.
SETTING THE DATE
Pull out the crown to position II. (The watch continues to run.)
Turn the crown until the correct date appears.
3 Push the crown back to position I.
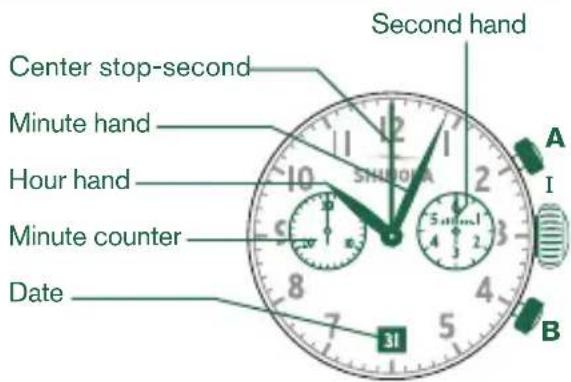
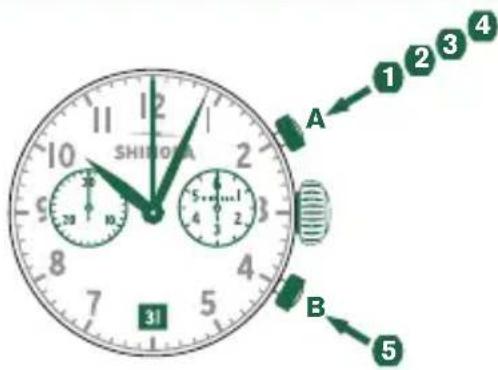
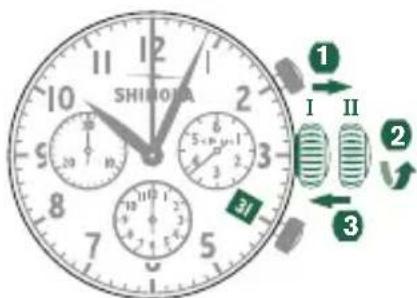
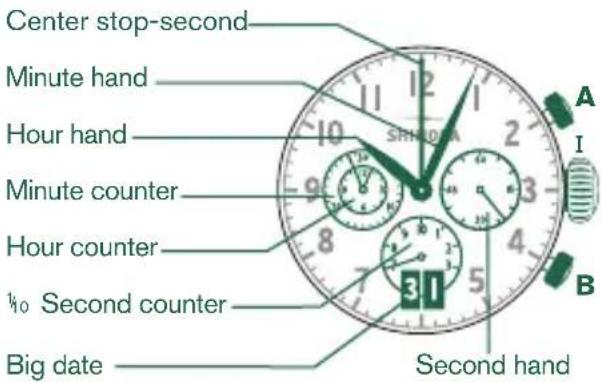
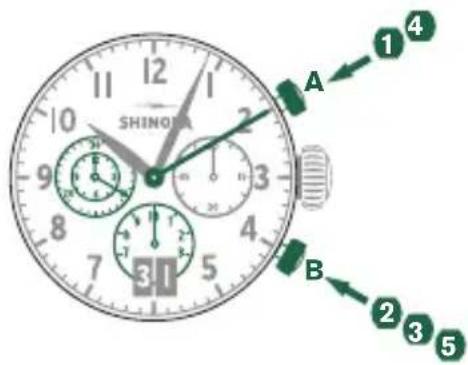
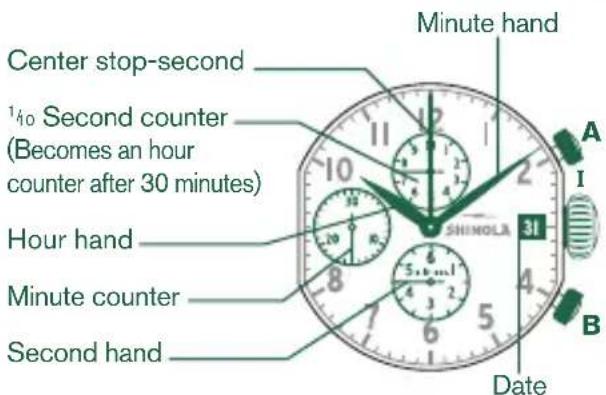
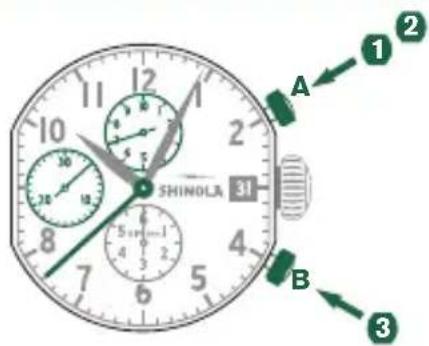
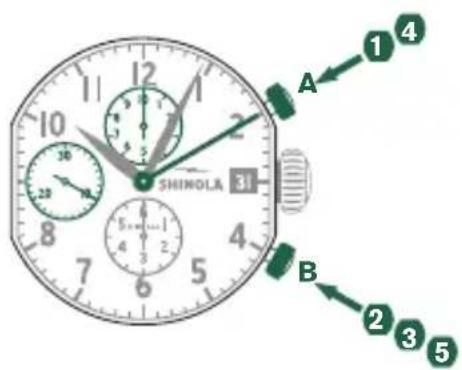
CHRONOGRAPH MODEL 5021.D
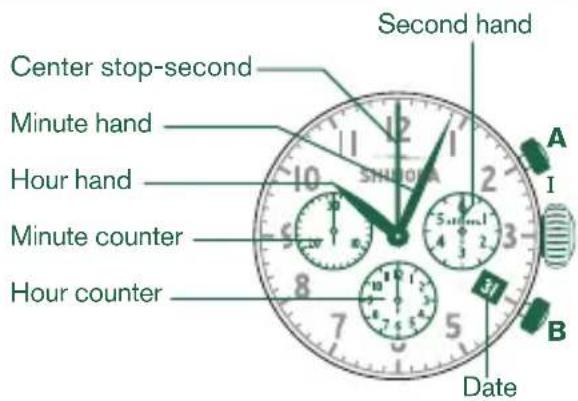
DESCRIPTION OF THE DISPLAY AND CONTROL BUTTONS
Please note:
Before using the chronograph functions, please ensure that:
- the crown is in position I (= normal position).
- the two chronograph hands are precisely at zero position following activation of push-button B. If the hands are not precisely at zero, their positions must be adjusted. (See the chapter Adjusting the Chronograph Hands to Zero.)
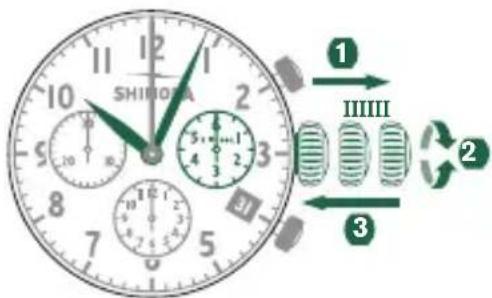
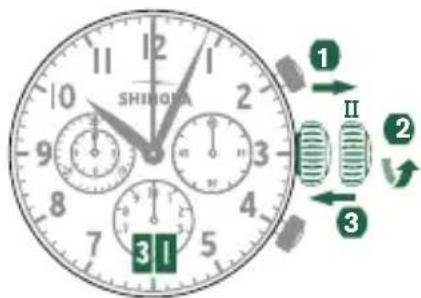
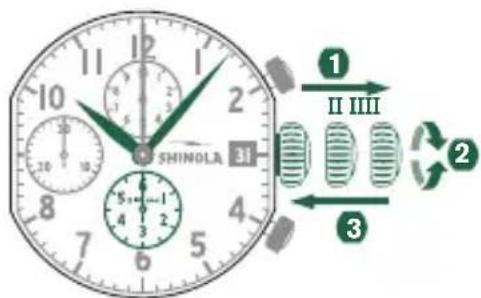
SETTING THE TIME
Pull out the crown to position III. (The watch stops.)
Turn the crown until you reach the correct time.
3 Push the crown back to position I.
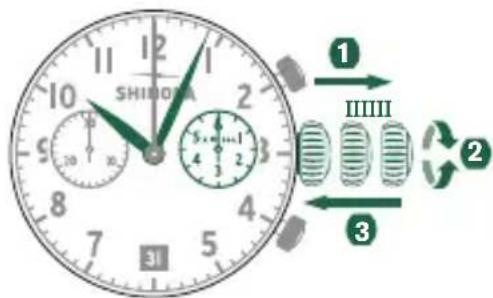
SETTING THE DATE
Pull out the crown to position II. (The watch continues to run.)
2 Turn the crown until the correct date appears.
3 Push the crown back to position I.
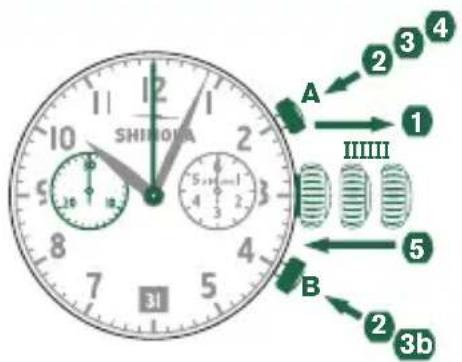
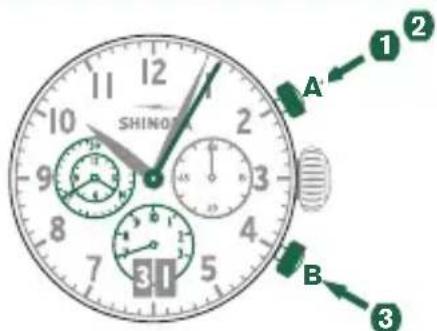
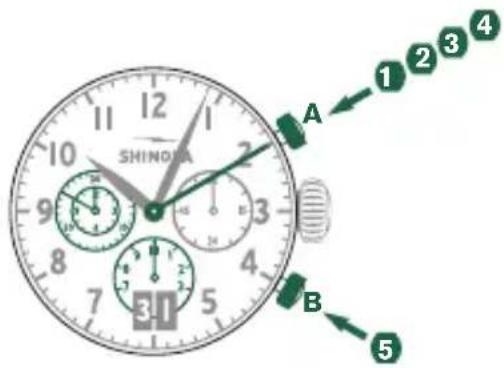
ADJUSTING THE CHRONOGRAPH HANDS TO ZERO
Pull crown out to position III.
(All two chronograph hands are in their correct or incorrect zero position.)
2 Keep push Buttons A and B depressed simultaneously for at least 2 seconds. (The center stop-second rotates by 360 - corrective mode is activated.)
Press push-button A to single step the center stop-second hand. Press and hold push-button A to advance the center stop-second hand quickpress push-button B to advance to the next hand.
Press push-button A to single step the minute counter hand. Press and hold push-button A to advance the minute counter hand quickly.
Return the crown to position I.
BASIC FUNCTION (START / STOP / RESET)
Example
Start: press push-button A.
2 Stop: to stop the timing, press push-button A once more and read the two chronograph counters: 20min / 10sec.
Zero positioning: Press push-button B. (The two chronograph hands will be reset to their zero positions.)

ACCUMULATED TIMING
Example
Start: start timing
2 Stop: e.g., 15 min. 5 sec. following 1.
3 Restart: timing is resumed
4 *Stop: e.g., 13 min. 5 sec. following 3. The accumulated time = 28 min. 10 sec.
Reset: the three chronograph hands are returned to their zero positions.
Please note:
- Following 4, the accumulation of the timing can be continued by pressing push-button A (Restart/Stop, Restart/Stop,...)
INTERMEDIATE OR INTERVAL TIMING
Example
Start: start timing.
Display interval:
e.g., 10 min. 10 sec. follow 1. Timing continues in the background.
Making up the measured time:
the two chronograph hands are quickly advanced to the ongoing measured time.
4 Stop: e.g., 28 min. 10 sec. following 1.
Reset: the three chronograph hands
are returned to their zero positions.
Please note:
- Following 3, further intervals or intermediates can be displayed by pressing B (display interval / make up measured time, ...)
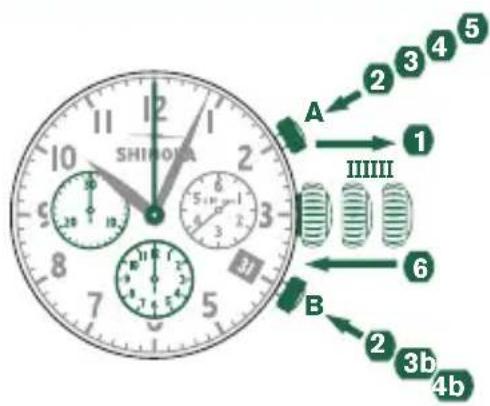
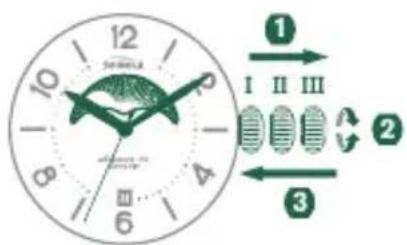
CHRONOGRAPH MODEL 5030.D
DESCRIPTION OF THE DISPLAY AND CONTROL BUTTONS
Please note:
Before using the chronograph functions, please ensure that:
- the crown is in position I (= normal position).
- the three chronograph hands are precisely at zero position following activation of push-button B. If the hands are not precisely at zero, their positions must be adjusted. (See the chapter Adjusting the Chronograph Hands to Zero.)
SETTING THE TIME
Pull out the crown to position III. (The watch stops.)
Turn the crown until you reach the correct time.
3 Push the crown back to position I.
SETTING THE DATE
Pull out the crown to position II. (The watch continues to run.)
Turn the crown until the correct date appears.
3 Push the crown back to position I.
ADJUSTING THE CHRONOGRAPH HANDS TO ZERO
Pull crown out to position III.
(All three chronograph hands are in their correct or incorrect zero position.)
2 Keep push Buttons A and B depressed simultaneously for at least 2 seconds. (The center stop-second rotates by 360^ - corrective mode is activated.)
Press push-button A to single step the center stop-second hand. Press and hold push-button A to advance the center stop-second hand quickly Press push-button B to advance to the next hand.
4 Press push-button A to single step the hour counter hand. Press and hold push-button A to advance the hour counter hand quickl4b Press push-button B to advance to the next
Press push-button A to single step the minute counter hand. Press and hold push-button A to advance the minute counter hand quickly.
Return the crown to position I.
BASIC FUNCTION (START / STOP / RESET)
Example
Start: press push-button A.
Stop: to stop the timing, press push-button A once more and read the three chronograph counters: 1h / 20min / 10sec.
Zero positioning: Press push-button B. (The three chronograph hands will be reset to their zero positions.)
ACCUMULATED TIMING
Example
Start: start timing
2 Stop: e.g., 15 min. 5 sec. following 1.
Restart: timing is resumed
4 *Stop: e.g., 13 min. 5 sec. following 3. The accumulated time = 28 min. 10 sec.
Reset: the three chronograph hands are returned to their zero positions.
Please note:
- Following 4, the accumulation of the timing can be continued by pressing push-button A (Restart/Stop, Restart/Stop,...)
INTERMEDIATE OR INTERVAL TIMING
Example
1 Start: start timing.
Display interval:
e.g., 10 min. 10 sec. follow 1. Timing continues in the background.
Making up the measured time:
the three chronograph hands are quickly advanced to the ongoing measured time.
4 Stop: e.g., 28 min. 10 sec. following 1.
Reset: the three chronograph hands are returned to their zero positions.

Please note:
- Following 3, further intervals or intermediates can be displayed by pressing B (display interval / make up measured time, ...)
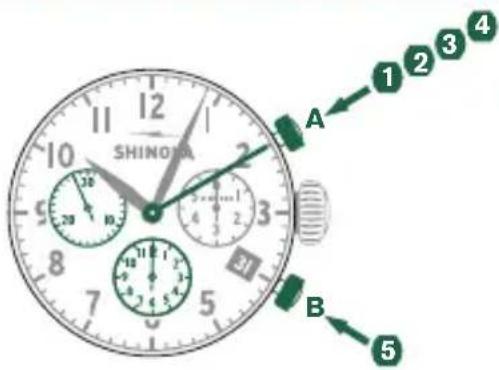
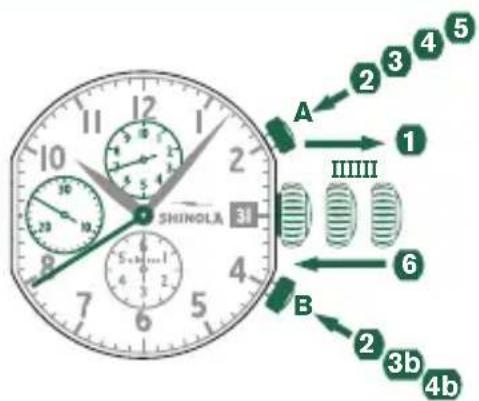
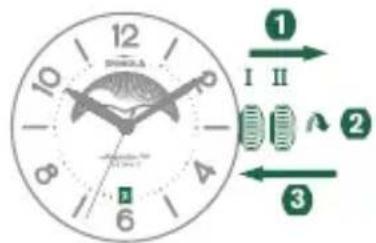
CHRONOGRAPH MODEL 5050.B
DESCRIPTION OF THE DISPLAY AND CONTROL BUTTONS
Please note:
Before using the chronograph functions, please ensure that:
- the crown is in position I (= normal position).
- the four chronograph hands are precisely at zero position following activation of push-button B. If the hands are not precisely at zero, their positions must be adjusted. (See the chapterAdjusting the Chronograph Hands to Zero)
SETTING THE TIME
Pull out the crown to position III. (The watch stops.)
Turn the crown until you reach the correct time.
3 Push the crown back to position I.

SETTING THE DATE
Pull out the crown to position II. (The watch continues to run.)
Turn the crown until the correct date appears.
3 Push the crown back to position I.
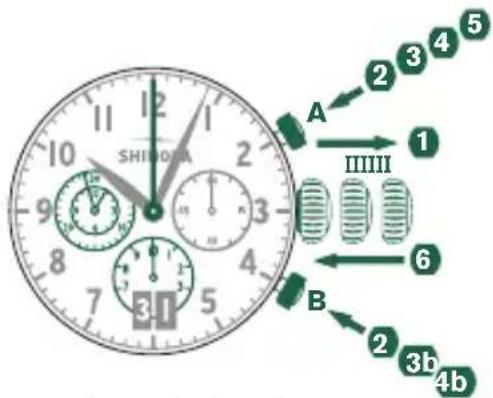
ADJUSTING THE CHRONOGRAPH HANDS TO ZERO
Pull crown out to position III. (All four chronograph hands are in their correct or incorrect zero position.)
2 Keep push Buttons A and B depressed simultaneously for at least 2 seconds. (The center stop-second rotates by 360^ - corrective mode is activated.)
3 Press push-button A to single step the center stop-second hand. Press and hold push-button A to advance the center stop-second hand quickly b Press push-button B to advance to the next hand.
4 Press push-button A to single step the 1/10 second counter hand. Press and hold push-button A to advance the 1/10 second hand quickly. 4b Press push-button B to advance to the next hand.
Press push-button A to single step the minute and the hour counter hands. Press and hold push-button A to advance the minute and hour counter hands quickly. 4b Press push-button B to advance to the next hand.
6 return the crown to position I.
BASIC FUNCTION (START / STOP / RESET)
Example
1 Start: Press push-button A.
2 Stop: to stop the timing, press push-button A. once more and read the four chronograph counters: 4 hr. / 20 min. / 5 sec. / 7/10 sec.
Zero positioning: Press push-button B. (The four chronograph hands will be reset to their zero positions.)
ACCUMULATED TIMING
Example
Start: start timing.
2 Stop: e.g., 15 min. 5 sec. following 1.
3 Restart: timing is resumed.
4 *Stop: e.g., 10 min. 5 sec. following 3. The accumulated time = 25 min. 10 sec.
Reset: The four chronograph hands are returned to their zero positions.
Please note:
- Following 4, the accumulation of the timing can be continued by pressing push-button A (Restart/Stop, Restart/Stop,...)
INTERMEDIATE OR INTERVAL TIMING
Example
Start: start timing.
Display interval:
e.g., 10 min. 10 sec. follow. Timing continues in the background.
Making up the measured time:
the four chronograph hands are quickly advanced to the ongoing measured time.
Stop: (Final time is displayed).
Reset: The four chronograph hands are returned to their zero positions.
Please note:
- Following 3, further intervals or intermediates can be displayed by pressing B (display interval / make up measured time, ...)
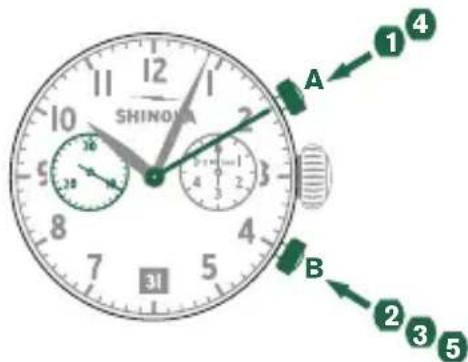
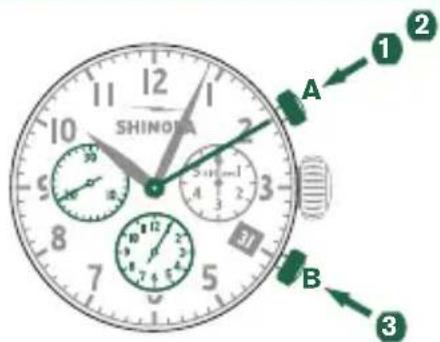
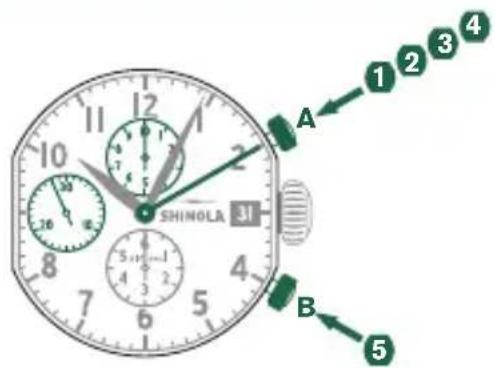
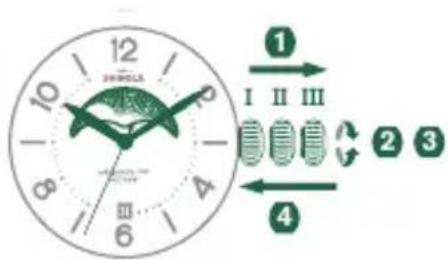
CHRONOGRAPH MODEL 3540.D
DESCRIPTION OF THE DISPLAY AND CONTROL BUTTONS
Please note:
Before using the chronograph functions, please ensure that:
- the crown is in position I (= normal position).
- the three chronograph hands are precisely at zero position following activation of push-button B. If the hands are not precisely at zero, their positions must be adjusted. (See the chapter Adjusting the Chronograph Hands to Zero)
SETTING THE TIME
Pull out the crown to position III. (The watch stops.)
Turn the crown until you reach the correct time.
3 Push the crown back into position I.
SETTING THE DATE
Pull out the crown to position II. (The watch continues to run.)
Turn the crown anticlockwise until the correct date appears.
3 Push the crown back into position I.
ADJUSTING THE CHRONOGRAPH HANDS TO ZERO
Pull crown out to position III.
(All three chronograph hands are in their correct or incorrect zero position.)
2 Keep push Buttons A and B depressed simultaneously for at least 2 seconds. (The center stop-second rotates by 360^ - corrective mode is activated.)
Press push-button A to single step the center stop-second hand. Press and hold push-button A to advance the center stop-second hand quickly Press push-button B to advance to the next hand.
4 Press push-button A to single step the hour counter hand. Press and hold push-button A to advance the hour counter hand quickl4b Press push-button B to advance to the next
Press push-button A to single step the minute counter hand. Press and hold push-button A to advance the minute counter hand quickly.
Return the crown to position I.
BASIC FUNCTION (START / STOP / RESET)
Example
Start: Press push-button A.
2 Stop: to stop the timing, press push-button A once more and read the three chronograph counters: 4 min. / 38 sec. / 7/10 sec.
Zero positioning: Press push-button B. (The three chronograph hands will be reset to their zero positions.)
ACCUMULATED TIMING
Example
Start: start timing.
Stop: e.g., 15 min. 5 sec. following 1.
Restart: timing is resumed.
4 *Stop: e.g., 13 min. 5 sec. following 3 The accumulated time = 28 min. 10 sec.
Reset: The three chronograph hands are returned to their zero positions.
Please note:
- Following 4, the accumulation of the timing can be continued by pressing push-button A (Restart/Stop, Restart/Stop,...)
INTERMEDIATE OR INTERVAL TIMING
Example
Start: start timing.
Display interval:
e.g., 10 min. 10 sec. follow. Timing continues in the background.
Making up the measured time:
the three chronograph hands are quickly advanced to the ongoing measured time.
4 Stop: e.g., 28 min. 10 sec. following 1.
Reset: The three chronograph hands are returned to their zero positions.
Please note:
- Following 3, further intervals or intermediates can be displayed by pressing B (display interval / make up measured time, ...)
MOON PHASE MODEL 708
SETTING THE TIME
Pull out the crown to position III (the watch stops).
Turn the crown until you reach the correct time.
3 Push the crown back into position L.
SETTING THE DATE
Pull out the crown to position II (the watch continues to run).
Turn the crown until the correct date appears.
3 Push the crown back to position I.
SETTING THE MOON PHASE
Pull out the crown to position III (the watch stops).
Turn the crown until you reach the correct moon position. Be sure to match the position to accurate moon phase (use a lunar calendar). The moon disc moves very slowly by incrementally jumping every 24 hours (each date change).
As time function rotates on position III, the hands will move while setting moon phase. Once accurate moon phase is achieved, set the hour and minute hands back to the correct time.
4 Be sure to reset the date indicator to correct date (refer to SETTING THE DATE instructions above).
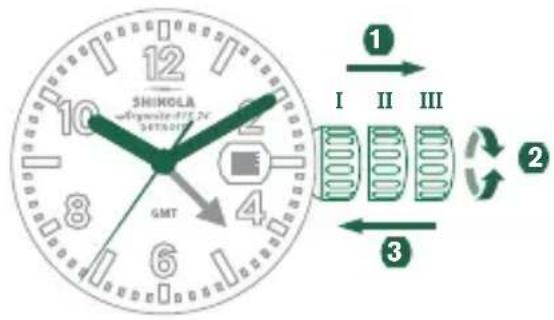
GMT MODEL 515.24H
If your 24-hour watch features a date indicator, the date window might be in a different position from the one depicted in this manual.
SETTING THE TIME
Pull out the crown to position III. (The watch stops.)
Turn the crown until you reach the correct time.
3 Push the crown back into position I.
SETTING THE 24-HOUR INDICATOR
Pull out the crown to position II. (The watch continues to run.)
Tum the crown counterclockwise until you reach the correct time.
3 Push the crown back to position I.
SETTING THE DATE
Pull out the crown to position II. (The watch continues to run.)
Turn the crown clockwise until the correct date appears.
3 Push the crown back to position I.
If performing a quick date setting between 10:30 p.m. and 12:00 a.m., follow steps 1 through 3, but be sure to set the date to the following day, as there will be no change at midnight.
WATER RESISTANCE
All the Shinola timepieces are designed with a minimum water-resistance rating of 3ATM (100ft / 30m).
The water-resistance of a timepiece protects the movement from dust, moisture, and risk of damage to the movement should it be immersed in water. Please see chart for guidelines for recommended exposure of various water ratings.
It is important not to attempt to adjust the position of the crown while the timepiece is in contact with water. Water can enter the case causing damage to the movement. For timepieces with screw-down crowns, it is important to ensure the crown is in the proper position and completely locked before contact with water. For timepieces with chronograph functions, do not engage the chronograph under water, as water may leak into the case and cause damage to the movement.
| INDICATION WATER-RELATED USE | |||||
| Water-ResistanceCharacteristics | Light Spray,Perspiration, Light Rain, etc. | Bathing,etc. | Swimming,etc. | Skin Diving(Diving without oxygencylinder) | |
| 1 | 3 ATM OK NO NO | NO | |||
| 2 | 5 ATM OK OK NO | NO | |||
| 3 | 10 ATM OK OK OK | NO | |||
| 4 | 20 ATM OK OK OK | OK | |||
| 5 | 30 ATM OK OK OK | OK | |||
| ALWAYS SET THE CROWN IN THE NORMAL POSITION AND TIGHTEN SCREW LOCK CROWN COMPLETELY. | |||||
CARE AND PRECAUTION
Each Shinola timepiece is designed and manufactured to the highest of standards. Unlike most other mechanical objects, a watch operates non-stop. In order to ensure optimal performance and longevity from your Shinola timepiece, please review the simple guidelines for care and precautions.
CARE
- Clean your watch with a soft cloth and water only. Do not submerge your watch under water unless it is water rated.
- After saltwater use, rinse watch under tap water and wipe dry with a soft cloth.
- Metal bracelets should be cleaned periodically. Clean with a soft brush dipped in mild soapy water and dry thoroughly with a soft cloth.
- We advise having your timepiece serviced every 18 - 24 months to ensure long use and trouble free operation.
PRECAUTIONS
Your timepiece is a complex integration of parts and components brought together by skilled craftsmen. There are certain actions or environmental situations that may damage or impede your timepiece's ability to perform optimally.
It is important to avoid the following conditions: extreme heat or cold, as well as prolonged periods of exposure to direct sunlight, exposure to wet conditions that exceed your timepiece's water rating. (See caseback and chart).
Your timepiece should not be affected by magnetic fields generated by household items such as televisions and stereos, but avoidance of other strong electric fields or static electricity, which may interrupt mechanism, is suggested. It is also important to avoid extreme shock or impact.
POWER SAVING MECHANISM
In order to extend the battery life of your watch when it's not in use, gently pull the movement stem/crown out until you feel it click. This will reduce battery power consumption
by 70% . Please note that this is the same stem/crown position that is used to perform a quick TIME SETTING. If your watch features a screw-down crown, follow the instructions at the beginning of this manual to release the crown before pulling it out all the way.
END OF BATTERY LIFE (EOL)
Your watch is equipped with a feature to indicate when the battery level is low. When the battery gets to that stage, the second hand will jump 4 steps at a time, every 4 seconds. This behavior lowers the power consumption while still displaying the time accurately and letting you know that it is time to change the battery.
LEATHER CONDITIONING Balm
Unique formula cleans, polishes and protects, leaving a soft satiny finish that retards water spotting and cracking. Enhances the life and natural lustre of your leather watch strap. May be used safely on all colors of Shinola leather watch strap (please note that use of this product may darken the color of your watch strap). Do not use on suede or nubuck.
Directions: Apply a small amount with soft cloth, let dry and buff lightly.
Ingredients: Paraffin wax, Tallow, and Mink Oil.
Caution: Do not take internally. KEEP OUT OF REACH OF CHILDREN
LIMITED LIFETIME WARRANTY
Your SHINOLA watch is warranted by Shinola for the lifetime of the watch under the terms and conditions of this warranty. The Shinola warranty covers faulty workmanship under normal use for the lifetime of the product. In case of defects covered by the warranty, all components (excluding battery, leather strap and buckle) will be repaired or the watch will be replaced free of charge. In the case of a replacement, Shinola cannot guarantee that you will receive the same watch model. If your model is not available a watch of equal value and similar style will be provided. A copy of the receipt and/or your completed Certificate of Warranty is required as proof of purchase. A check or money order payable to Shinola/Detroit, LLC in the amount of $25.00 as service and handling fee must be included for all warranty and repair services. The fee is subject to change.
THIS WARRANTY DOES NOT COVER
- Leather strap, battery or buckle
- Damage resulting from improper handling, lack of care, accidents or normal wear and tear
Water damage unless marked water-resistant - This warranty is void if the watch has been damaged by accident, negligence of persons other than authorized Shinola sales or services agents, unauthorized service, or other factors not due to defects in materials or workmanship.
- Pre-owned vintage watches sold in as-is condition.
- The following warranties and remedies are exclusive and in lieu of all other warranties, terms or conditions, express, implied or statutory, as to any matter whatsoever, including, without limitation, warranties of merchantability, fitness for a particular purpose, accuracy, satisfactory quality, title, and non-infringement, all of which are expressly disclaimed by Shinola. Shinola shall not be liable for incidental, consequential, indirect, special or punitive damages or liabilities of any kind arising out of or in connection with the sale or use of this product, whether based in contract, tort (including negligence), strict product liability or any other theory, even if Shinola has been advised of the possibility of such damages and even if any limited remedy specified herein is deemed to have failed of its essential purpose. Shinola's entire liability shall be limited to replacement or repair at Shinola's
sole option. However some countries, states, or provinces do not allow the exclusion or limitation of implied warranties or the limitation of incidental consequential damages so the above limitations and exclusions may be limited in their application to you. When implied warranties may not be excluded in their entirety, they will be limited to the duration of the applicable written warranty. This warranty gives you specific legal rights; you may have other rights that may vary depending on local law. Your statutory rights are not affected.
- If you have your watch battery replaced by any service provider other than a Shinola authorized service center, such replacement will not void your warranty, so long as such replacement (i) is performed by an experienced and legitimate service center, (ii) is not performed in a negligent manner, and (iii) is reassembled properly, including without limitation, replacement of gasket if necessary to achieve suitable water-tightness. Shinola has the right to determine, in its sole and absolute discretion, if any such third party battery replacement voids your warranty.
REQUESTING WARRANTY AND OTHER WATCH REPAIR
Should you require work under warranty, please send in your watch, a copy of your sales receipt and/or the Certificate of Warranty, and a completed watch repair form, which can be found on the Shinola website (www.shinola.com), to the authorized international watch service center listed below. Do not send original packaging, as it will not be returned. Shinola highly recommends you insure your parcel and adequately protect the watch during shipment. Shinola is not responsible for product lost or damaged during shipment.
For service work that is not covered under this warranty, the service center may perform the services you request for a charge dependent on watch style and type of work requested. Such charges will be notified and agreed by you prior to performing the services.
In addition to repair charges, if required, a service and handling fee of (25.00 will be charged for all repairs and warranty services. Such fee must be prepaid by check or money order payable to Shinola/Detroit, LLC at the time of delivery of the watch to the repair center. This fee is subject to change.
INTERNATIONAL WARRANTY & REPAIRS
SHINOLA / DETROIT, LLC
485 W. Milwaukee St. Suite 501 Detroit, MI 48202
1-888-304-2534
www.shinola.com
FRANÇAIS
SHINOLA
DETROIT
Where American is made.
MONTRES AVEC CADRAN DATE
REMARQUE:
Where American is made.
INTERNATIONALE GARANTIE & REPARATUREN
SHINOLA / DETROIT, LLC
485 W. Milwaukee St. Suite 501 Detroit, MI 48202, USA
1-888-304-2534
www.shinola.com
ESPNOL
SHINOLA
DETROIT
Where American is made.
Where American is made.
Where American is made.