SM120WD4 011 - Handheld vacuum HOOVER - Free user manual and instructions
Find the device manual for free SM120WD4 011 HOOVER in PDF.
| Product Type | Cordless Table Vacuum Cleaner |
| Brand | Hoover |
| Model | SM120WD4 011 |
| Power Source | Rechargeable lithium-ion battery via included mains charger |
| Charging Time | Approximately 5 hours |
| Charge Indicator | Flashing LED during charging, solid when fully charged |
| Battery Level Display | 4-level LED display (100%, 75%, 50%, 25%) |
| Included Accessories | Removable crevice tool, upholstery brush, flexible hose and flat brush (depending on model) |
| Filter Type | Cloth filter (ref. S103) and microfiber filter (ref. S105) |
| Filter Maintenance | Clean with hot water without detergent, dry completely before reassembly |
| Dust Bin Emptying | By opening trigger, flap opens at 45° |
| Usage | On/off switch, dry vacuuming only |
| Safety | Do not use on wet surfaces, do not vacuum liquids, hard or hot objects; keep away from rotating brushes |
| Storage | Charging base on horizontal surface or wall mount (with cardboard template and wall plugs) |
| Battery Replacement | Only by an authorized Hoover repairer |
| Spare Parts Available | Cloth and microfiber filters, contact your Hoover dealer |
| Warranty | According to the conditions of the country of sale, present the purchase invoice |
| Standards | Complies with EC directives 2006/95/EC, 2004/108/EC, 2011/65/EU |
| Recycling | Do not dispose of with household waste; take to WEEE recycling center |
| Customer Service | Contact an authorized Hoover repairer for any repair |
Frequently Asked Questions - SM120WD4 011 HOOVER
User questions about SM120WD4 011 HOOVER
0 question about this device. Answer the ones you know or ask your own.
Ask a new question about this device
Download the instructions for your Handheld vacuum in PDF format for free! Find your manual SM120WD4 011 - HOOVER and take your electronic device back in hand. On this page are published all the documents necessary for the use of your device. SM120WD4 011 by HOOVER.
USER MANUAL SM120WD4 011 HOOVER
natural_image
Exterior view of a white and black HOVOER vacuum cleaner (no text or symbols visible on body)
GENERATION FUTURE
| ENGLISH | P01 |
| FRANÇAIS | P05 |
| DEUTSCH | P09 |
| ITALIANO | P13 |
| NEDERLANDS | P17 |
| PORTUGUÉS | P21 |
| ESPAÑOL | P25 |
| DANSK | P29 |
| NORSK | P33 |
| SVENSKA | P37 |
| SUOMI | P41 |
| ΕΛΛΗΝΙΚΑ | P45 |
| PYCCKΙЙ | P49 |
| POLSKI | P53 |
| ČESKY | P57 |
| SLOVENČINA | P61 |
| TÜRKÇE | 65P |

text_image
Technical diagram of a hairless device with labeled parts including handle, socket, and cable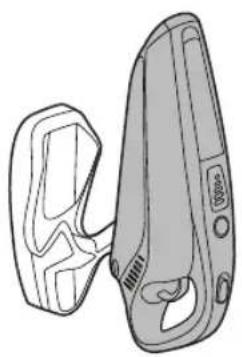
natural_image
Technical line drawing of a mechanical device with two views (front and side), no text or symbols present.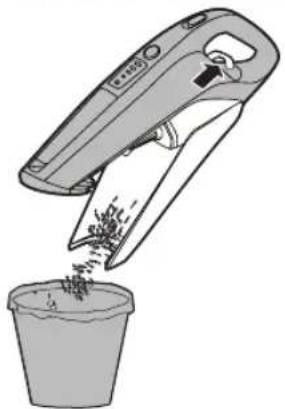
natural_image
Illustration of a handwashing a leaf from a container (no text or symbols)2
1
natural_image
Illustration of a handheld electric vacuum cleaner with a screwdriver inserted (no text or symbols)3
natural_image
Illustration of a handheld vacuum cleaner with a small connector (no text or symbols visible)4
natural_image
Illustration of a handheld medical or laboratory device with a coiled cable and handle (no text or symbols)5
natural_image
Line drawing of a handheld electronic device with handle, clasp, and control buttons (no text or symbols)6
text_image
Diagram of a handheld device with labeled parts and directional arrows indicating movement or assembly.7

natural_image
Exploded view diagram of a handbag showing internal components and handle (no text or labels)8
INSTRUCTIONS FOR SAFE USE
This appliance should only be used for domestic cleaning, as described in this user guide. Please ensure that this guide is fully understood before operating the appliance.
Always switch off and remove the charger from the socket before cleaning the appliance or any maintenance task.
This appliance can be used by children aged from 8 years and above and persons with reduced physical, sensory or mental capabilities or lack of experience and knowledge if they have been given supervision or instruction concerning use of the appliance in a safe way and understand the hazards involved. Children shall not play with the appliance. Cleaning and user maintenance shall not be made by children without supervision.
If the power cord is damaged stop using the appliance immediately. To avoid a safety hazard, an authorised Hoover service engineer must replace the power cord.
Never touch the charger with wet hands.
Use only the original charger supplied with the appliance.
Check that your supply voltage is the same as that stated on the charger.
Never charge the batteries in temperatures above 37°C or below 0°C.
Plug the charger in to suitable socket outlet and connect the charger cable to the [G] Charger Base. Ensure the product on/off switch button is at the "OFF" position, place the cleaner into the charger base, ensuring the shroud covers the back of the product. [1]
When the cleaner is charging, the charging LED indicator will flash to advise that the product is charging. When the product is fully charged and is still positioned on the charger base, the icon will stop flashing and remain lit.
Before using your cleaner for the first time, you must fully charge it. This will take approximately 5 hours.
Do return the appliance to the charger base after use to recharge the batteries.
It is normal for the charger to become warm to the touch when charging.
Use only attachments, consumables or spares recommended or supplied by Hoover.
Do not pick up hard or sharp objects, matches, hot ashes, cigarette ends or other similar items.
Do not spray with or pick up flammable liquids, cleaning fluids, aerosols or their vapours.
Do not continue to use your appliance or charger if it appears faulty.
Hoover service: To ensure the continued safe and efficient operation of this appliance we recommend that any servicing or repairs are only carried out by an authorised Hoover service engineer.
Do not use the appliance to clean animals or people.
Keep hands, feet, loose clothing and hair away from rotating brushes.
Do frequently clean the dust cup and filter assembly.
Do not unplug the charger by pulling on the power cord.
Unplug the charger in the event of prolonged absence (holidays, etc.). Recharge appliance again before use as batteries may self discharge over increased periods of storage.
Static electricity: Some carpets can cause a small build up of static electricity. Any static discharge is not hazardous to health.
Do not use your appliance out of doors or on any wet surface or for wet pickup.
Battery replacement
For reasons of safety Lithium-ion batteries in this cleaner are only replaceable by a Hoover Service engineer. When the batteries fail to maintain charge, please contact the Hoover Customer Service Centre to arrange a replacement.
Do not replace the batteries with non-rechargeable batteries.
End of Product Life Battery Disposal
If the appliance is to be disposed of the batteries must first be removed. The appliance must be disconnected from the supply mains when removing the battery. Dispose of the batteries safely. Used batteries should be taken to a recycling station and not disposed of with household waste. To remove the batteries, please contact the Hoover Customer Centre or proceed according to the following instructions.
IMPORTANT: Always fully discharge the batteries before removal.
Run the cleaner until the batteries are completely empty.
Remove the front cover and top cover from the unit. Unscrew 7 screws and open the unit. Unscrew 6 screws and open the battery pack. Cut off the wires which connect to the batteries one by one to make sure no short circuit.
NOTE: Should you experience any difficulty in dismantling the unit or for more detailed information on treatment, recovery and recycling of this appliance, please contact your local city office or your household waste disposal service.
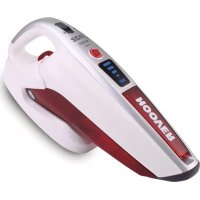
FEATURES
A. On/Off Switch
B. LED Display
C. LED Charging Indicator
D. Removable Crevice Tool
E. Suction Inlet
F. Dust Bin Flap
G. Charger Base
H. Cardboard Ruler
I. Charger
J. Dust Brush
K. Dust Bin Open Trigger
L. Flexible Hose*
M. Crevice Brush*
STORAGE/CHARGING
Unit Storage
The product is designed to sit in the charging base on a flat surface or vertically if wall mounted. [1] For tidy storage wrap excess cord on the back of the charging base and exit either side or bottom.
To Wall Mount (Tools required: Screwdriver and drill)
- Place the cardboard ruler against the mounting surface. Mark the centres of the holes.
- Move base then drill 4.8mm holes.
- Fit wall plugs.
- Position base into the insert screws, and move down to ensure the base is fixed firmly to the wall.
Charging & LED Indicator
Ensure the product on/off switch button is at the "OFF" position, then place the cleaner into the base, ensuring the shroud covers the back of the product.
When the cleaner is charging, the charging LED indicator will flash to advise that the product is charging. When the product is fully charged and is still positioned on the charger base, the icon will stop flashing and remain lit.
NOTE: Use only the charger supplied with your cleaner to recharge the unit.
IMPORTANT: When charging the appliance, the power switch must be off. Before using your cleaner for the first time, you must fully charge it. This will take approximately 5 hours. Never charge the batteries in temperatures above 37^ C or below 0^ C. It is normal for the charger to become warm to the touch when charging.
HOW TO USE
- Remove the cleaner from the storage base.
- Push the switch to 'ON' position to begin cleaning and to turn off move the switch to the 'OFF' position.
- Empty and clean the unit and filter after each use.
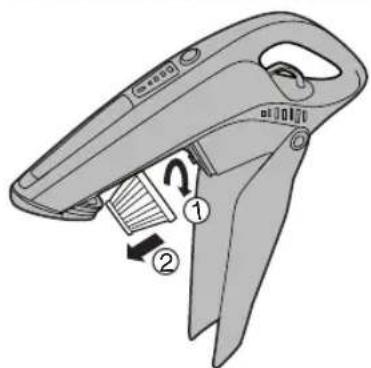
- To empty the bin pull the bin open trigger, the dust bin flap will open and stop about 45^ position for debris to empty easily. [2]
IMPORTANT: For best results clean the filter after each use.
LED DISPLAY
This cleaner is equipped with a LED display. When the product is on, the display will report following information:
Battery Level Indicator:
- 4 bars = 100% charge
- 3 bars = 75% charge
-
2 bars = 50% charge
-
1 bar = 25% charge
- 0 bar <= 5% charge
ATTACHMENTS
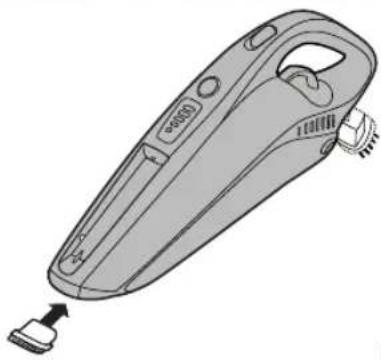
Removable Crevice Tool
Fit the crevice tool onto the dust cup to clean corners and hard to reach areas. [3]
*certain models only ** May vary according to model
DUSTING BRUSH
Fit the dusting brush onto the dust cup to clean keyboards and other delicate areas. [4]
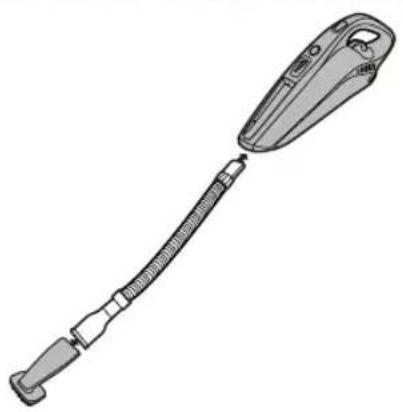
Crevice Brush\*
Insert one end of flexible hose into the suction Inlet, and attach the Crevice Brush to the other end of the flexible hose. [5]
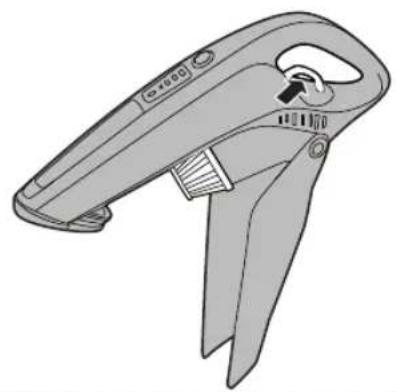
FILTER MAINTENANCE
- Pull the trigger and the dust bin flap will open automatically. [6]
- Rotate and remove the filter. [7]
- The container may be cleaned using a wet cloth.
- The filter should be washed in hand warm water DO NOT USE DETERGENTS. Make sure all are completely dry before replacing in your cleaner.
- Replace the filter into the dust container and close the dust container flap.
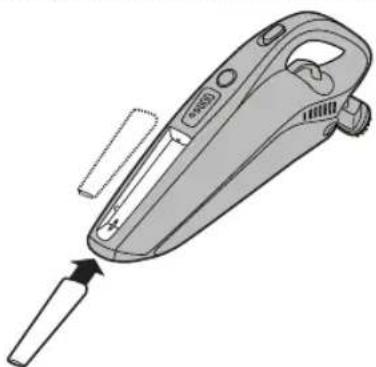
Battery removal [8]
For reasons of safety lithium-ion batteries in this cleaner are only replaceable by a Hoover Service engineer. When the batteries fail to maintain charge, please contact the Hoover Customer Service Centre to arrange a replacement.
End of Product Life Battery Disposal
If the cleaner is to be disposed of the batteries should be removed. Used batteries should be taken to a recycling station and not disposed of with household waste. To remove the batteries, please contact the Hoover Customer Centre or proceed according to the following instructions:
Remove the front cover and top cover from the unit. Unscrew 7 screws and open the unit. Unscrew 6 screws and open the battery pack. Disconnect the cables and remove the batteries.
IMPORTANT: Always fully discharge the batteries before removal.
NOTE: Should you experience any difficulties in dismantling the unit or for more detailed information about treatment, recovery and recycling of this product, please contact your local city office, your household waste disposal service.

Hoover spares and Consumables
Always replace parts with genuine Hoover spares. These are available from your local Hoover dealer or direct from Hoover. When ordering parts always quote your model number.
Cloth Filter S103 35601645
Microfiber Filter S105 35601646
The Environment:
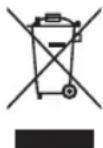
The symbol on the product indicates that this product may not be treated as household waste. Instead it shall be handed over to the appliance collection point for recycling of electrical and electronic equipment.
Disposal must be carried out in accordance with the local environmental regulations for waste disposal.
For more detailed information about treatment, recovery and recycling of this product, please contact your local city office, your household waste disposal service or the shop where you purchased the product.

This product complies with the European Directives 2006/95/EC, 2004/108/EC and 2011/65/EC.
HOOVER Limited Pentrebach, Merthyr Tydfil, Mid Glamorgan CF48 4TU
YOUR GUARANTEE
The guarantee conditions for this appliance are as defined by our representative in the country in which it is sold. Details regarding these conditions can be obtained from the dealer from whom the appliance was purchased. The bill of sale or receipt must be produced when making any claim under the terms of this guarantee.
Subject to change without notice.
INSTRUCTIONS DE SÉCURITÉ D'UTILISATION
• 4 staplar = 100% laddad
• 3 staplar = 75% laddad
• 2 staplar = 50% laddad
• 1 stapel = 25% laddad
- 0 stapel <= 5% laddad