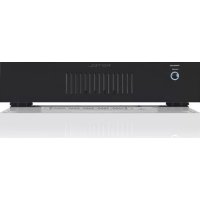
RKB8100 V2 - Receiver ROTEL - Free user manual and instructions
Find the device manual for free RKB8100 V2 ROTEL in PDF.



| Product Type | Multichannel Power Amplifier |
| Brand | Rotel |
| Model | RKB8100 V2 |
| Number of Channels | 8 |
| Output Power | 100 W per channel (8 ohms, 20 Hz - 20 kHz, < 0.1% THD) |
| Speaker Impedance | 4 ohms minimum |
| Frequency Response | 20 Hz - 20 kHz, +0 dB / -1.4 dB |
| Signal-to-Noise Ratio (IHF A) | 108 dB |
| Damping Factor | > 150 |
| Analog Inputs | 4 pairs of RCA inputs (INPUT A, B, C, D) |
| Digital Input | Optical PCM (depending on version, up to 24-bit/192 kHz) |
| Preamp Output | 1 pair RCA (INPUT A to other devices) |
| Chaining Function | Ability to link inputs between channels (LINK switch) |
| Mono Mode | MONO switch on INPUT A to combine channels |
| Gain Control | 4 adjustable potentiometers on front panel |
| Power On | Manual (front switch), automatic via signal detection or 12V trigger |
| Trigger Input/Output | 3.5 mm jack (input and output, 3-30 V) |
| Control Port | RS-232 (DB-9) for home automation integration |
| Protection | Thermal and overload protection circuit |
| Cooling | 2 fans with temperature detection (normal/high speed) |
| Power Consumption | 300 W operating, < 0.5 W standby |
| Power Supply Voltage | 120 V/60 Hz (US) or 230 V/50 Hz (Europe) |
| Dimensions (W x H x D) | 430 x 97 x 424 mm |
| Net Weight | 9.6 kg |
| Maintenance and Cleaning | Dry cloth or vacuum; do not use liquids |
| Safety | Unplug before service; do not open; avoid moisture; 10 cm ventilation space at rear |
| Repairability | Contact an authorized repairer; no user-serviceable parts |
Frequently Asked Questions - RKB8100 V2 ROTEL
User questions about RKB8100 V2 ROTEL
0 question about this device. Answer the ones you know or ask your own.
Ask a new question about this device
Download the instructions for your Receiver in PDF format for free! Find your manual RKB8100 V2 - ROTEL and take your electronic device back in hand. On this page are published all the documents necessary for the use of your device. RKB8100 V2 by ROTEL.
USER MANUAL RKB8100 V2 ROTEL
natural_image
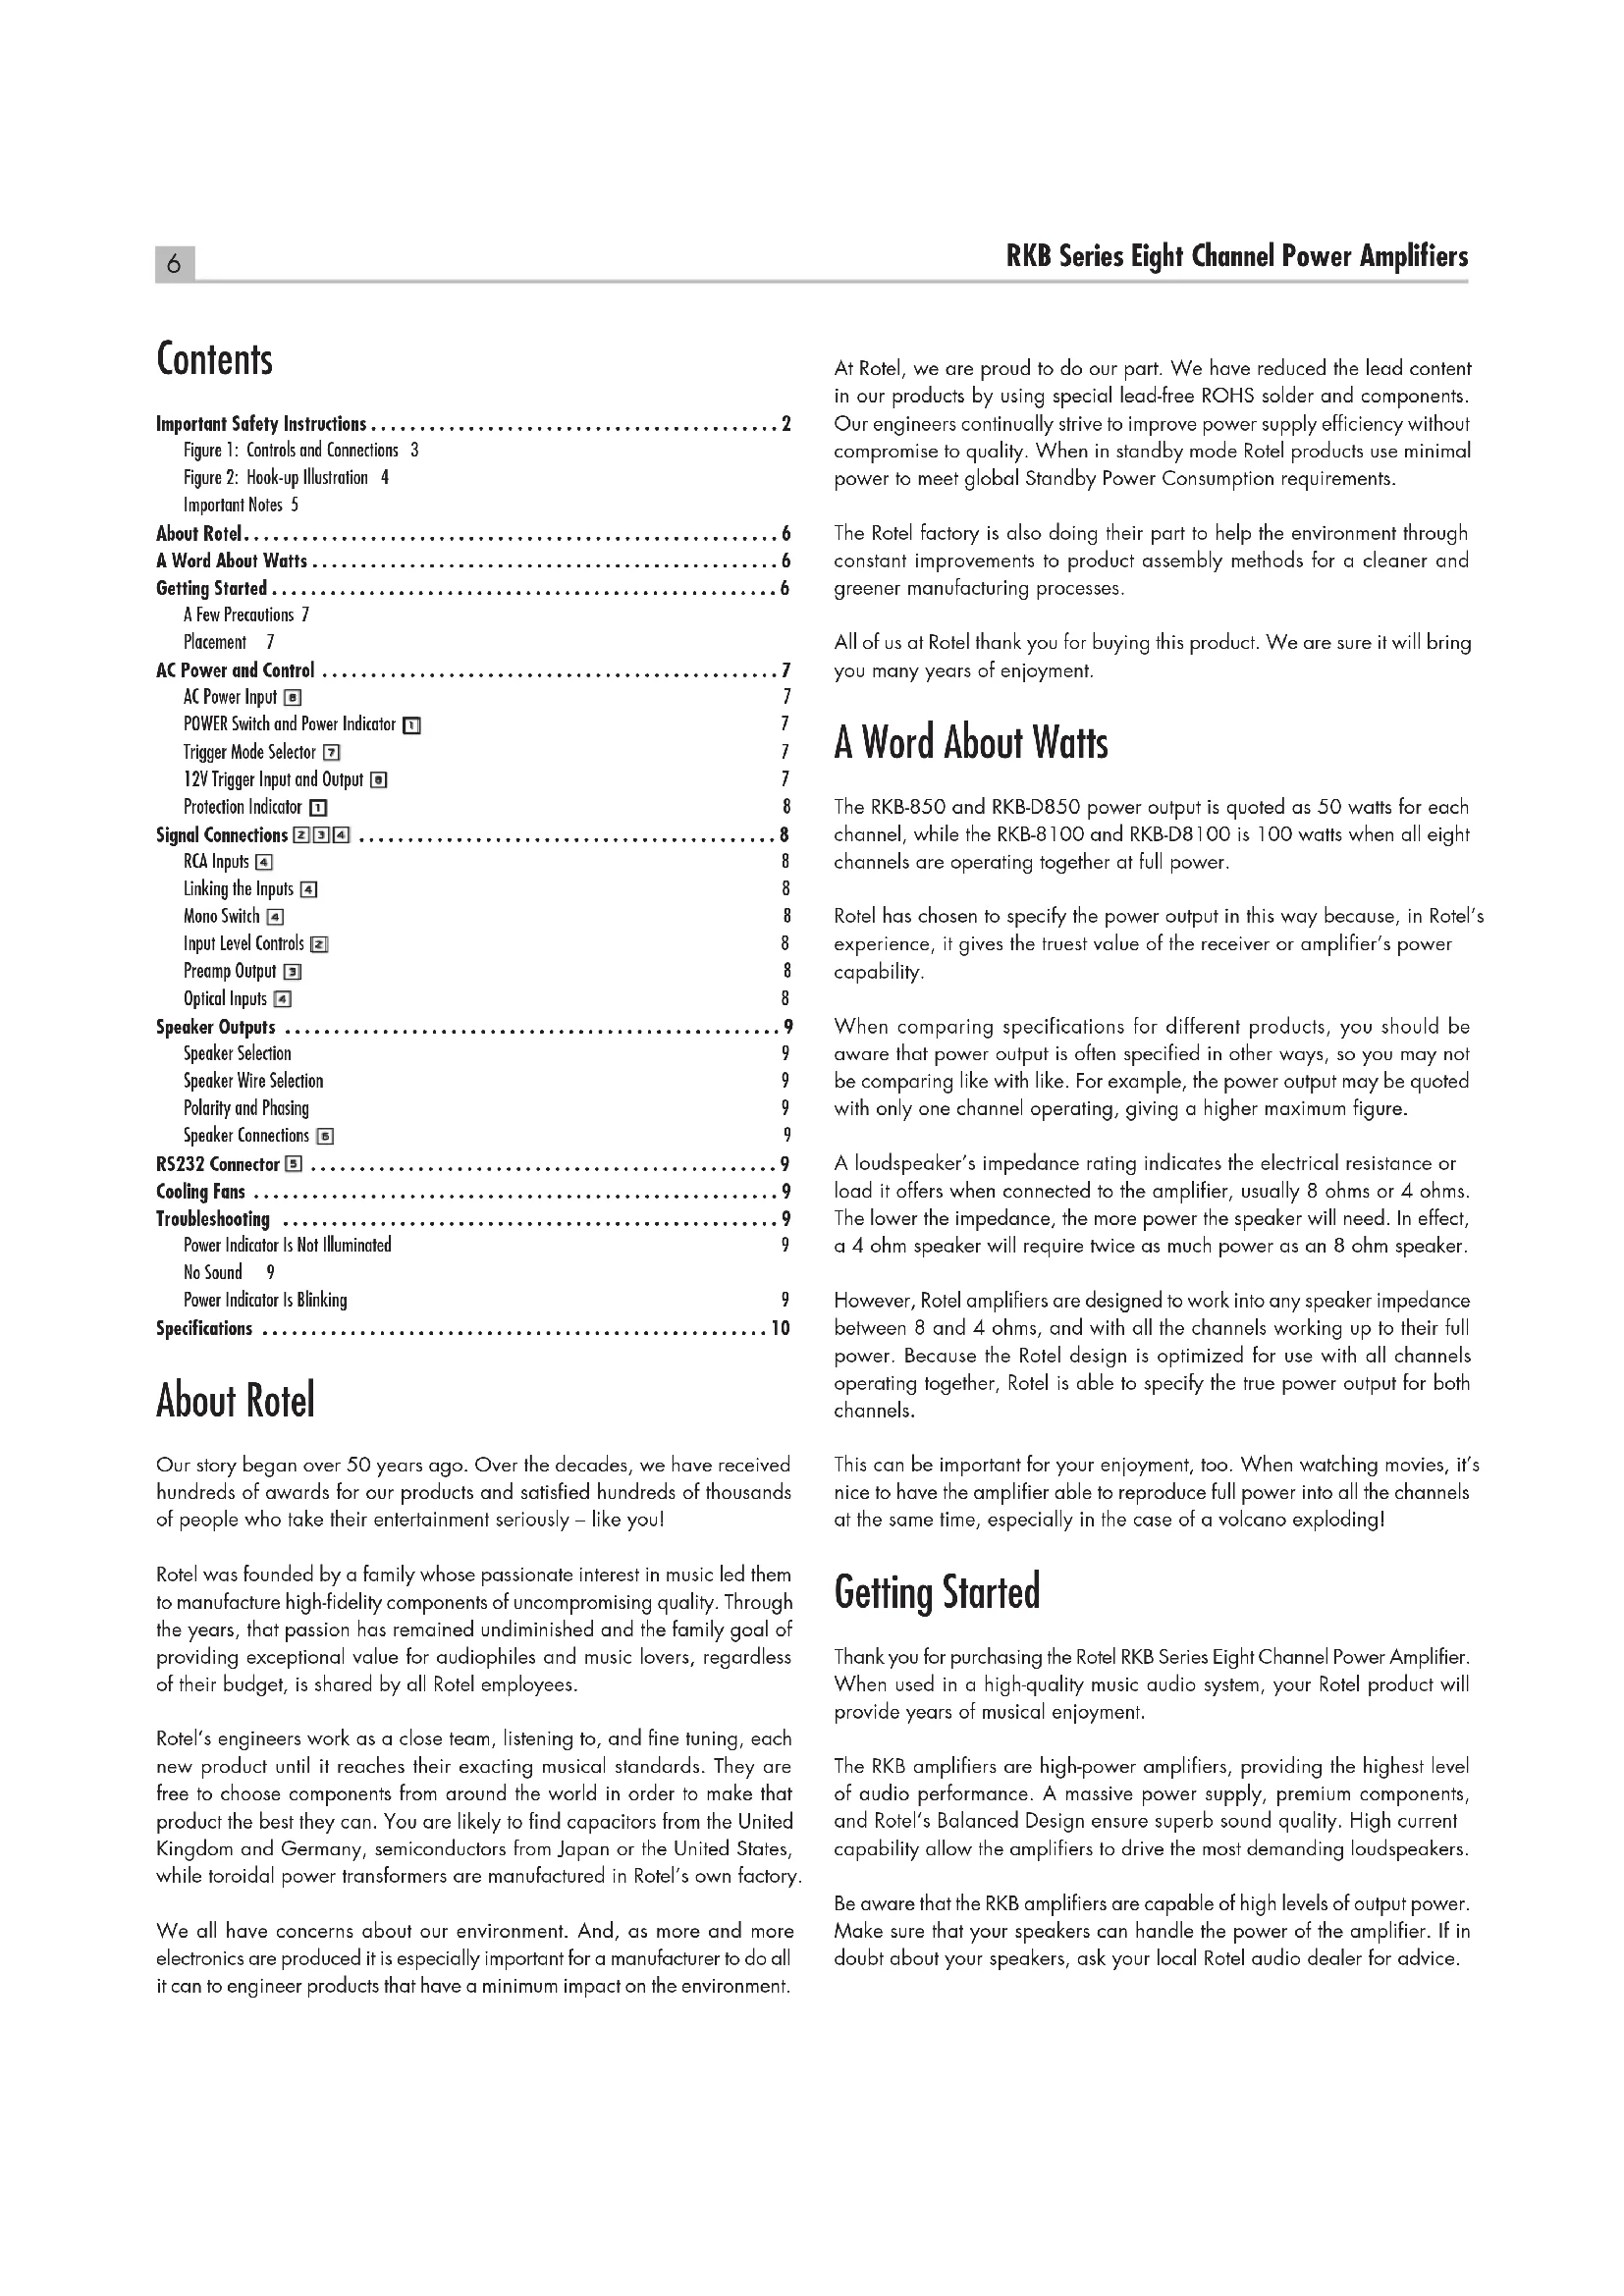
Front view of a ROTEL audio device with no visible text or symbols on the body (pure branding)RKB-850 / RKB-8100 RKB-D850 / RKB-D8100
Eight Channel Power Amplifiers
Important Safety Instructions
Notice
The RS232 connection should be handled by authorized persons only.
WARNING: There are no user serviceable parts inside. Refer all servicing to qualified service personnel.
WARNING: To reduce the risk of fire or electric shock, do not expose the unit to moisture or water. Do not expose the unit to dripping or splashing. Do not place objects filled with liquids, such as vases, on the unit. Do not allow foreign objects to get into the enclosure. If the unit is exposed to moisture, or a foreign object gets into the enclosure, immediately disconnect the power cord from the wall. Take the unit to a qualified service person for inspection and necessary repairs.
Read all the instructions before connecting or operating the component.
Keep this manual so you can refer to these safety instructions.
Heed all warnings and safety information in these instructions and on the product itself. Follow all operating instructions.
Clean the enclosure only with a dry cloth or a vacuum cleaner.
Do not use this unit near water.
You must allow a minimum 10 cm or 4 inches of unobstructed clearance around the back of the unit.
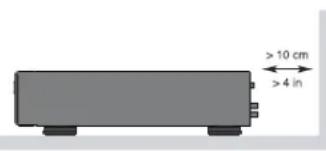
Do not place the unit on a bed, sofa, rug, or similar surface that could block the ventilation openings. If the unit is placed in a bookcase or cabinet, there must be ventilation of the cabinet to allow proper cooling.
Keep the component away from radiators, heat registers, stoves, or any other appliance that produces heat.
WARNING: The rear panel power cord connector is the mains power disconnect device. The device must be located in an open area that allows access to the cord connector.
The unit must be connected to a power supply only of the type and voltage specified on the side panel. (USA: 120 V/60Hz, EC: 230V/50Hz)
Connect the component to the power outlet only with the supplied power supply cable or an exact equivalent. Do not modify the supplied cable. A polarized plug has two blades, with one wider than the other. A grounding plug has two blades plus a third grounding prong. These are provided for your safety. Do not defeat grounding and/or polarization safety provisions. If the supplied plug does not fit your outlet, please consult an electrician for replacement of the obsolete outlet. Do not use extension cords.
The main plug of the power cordset is a disconnect device of the apparatus. In order to completely disconnect the apparatus from the supply mains, the main plug of the power cordset should be unplugged from the mains (AC) outlet. The power LED indicator will not be lit up to show the power cord is unplugged. The disconnect device shall remain readily operable.
Do not route the power cord where it will be crushed, pinched, bent, exposed to heat, or damaged in any way. Pay particular attention to the power cord at the plug and where the cord exits the back of the unit.
The power cord should be unplugged from the wall outlet during a lightning storm or if the unit is to be left unused for a long period of time.
This apparatus shall be connected to a main socket outlet with a protective earth connection.
Use only accessories specified by the manufacturer.
Use only with a cart, stand, rack, bracket or shelf system recommended by Rotel. Use caution when moving the unit in a stand or rack to avoid injury from a tip-over.
Use Class 2 wiring for speaker connections to ensure proper installation and minimize the risk of electrical shock.
Immediately stop using the component and have it inspected and/or serviced by a qualified service agency if:
- The power supply cord or plug has been damaged.
- Objects have fallen or liquid has been spilled into the unit.
• The unit has been exposed to rain. - The unit shows signs of improper operation.
- The unit has been dropped or damaged in any way.

APPLICABLE FOR USA, CANADA OR WHERE APPROVED FOR THE USAGE
CAUTION: TO PREVENT ELECTRIC SHOCK, MATCH WIDE BLADE OF PLUG TO WIDE SLOT. INSERT FULLY.
ATTENTION: POUR EVITER LES CHOCS ELECTRIQUES, INTRODUIRE LA LAME LA PLUS LARGE DE LA FICHE DANS LA BORNE CORRESPONDANTE DE LA PRISE ET POUSSER JUSQU AU FOND.

Rotel products are designed to comply with international directives on the Restriction of Hazardous Substances (RoHS) in electrical and electronic equipment and the disposal of Waste Electrical and Electronic Equipment (WEEE). The crossed wheelie bin symbol indicates compliance and that the products must be appropriately recycled or processed in accordance with these directives.

Figure 1: Controls and Connections
Figure 1 : Commandes et branchements
Figure 1: Bedienelemente und Anschlüsse
Figura 1: Controles y Conexiones
Afbeelding 1: Bedieningselementen en aansluitingen
Figura 1: Controlli e connessioni
Figur 1: Kontroller och kontakter
Рисунок 1: Органы управления и разъемы
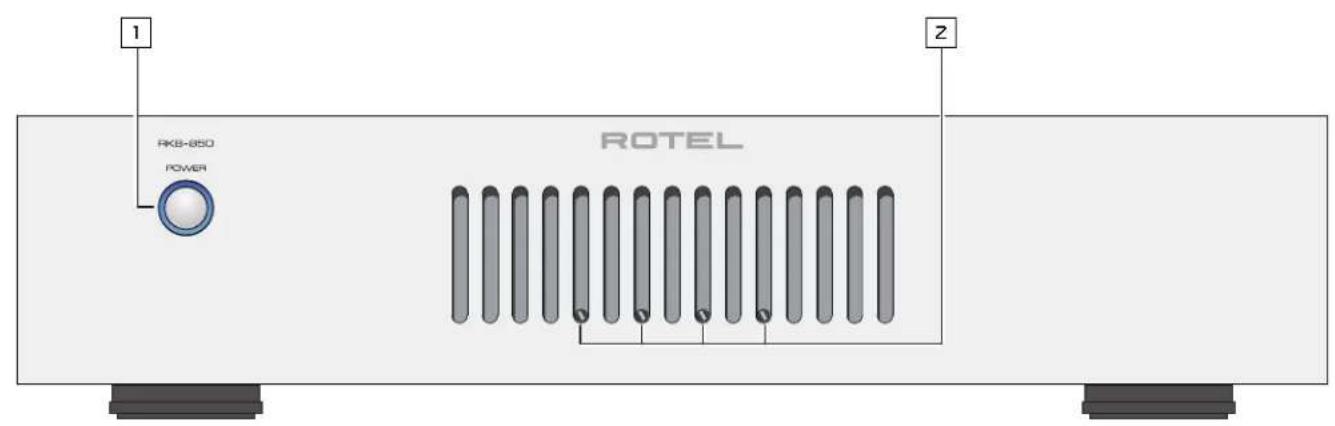
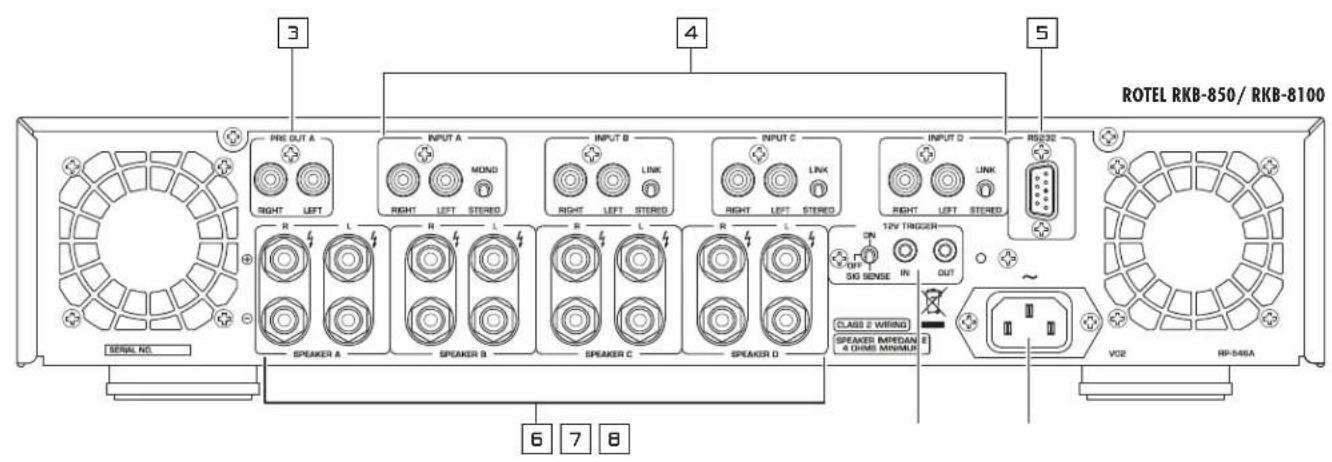
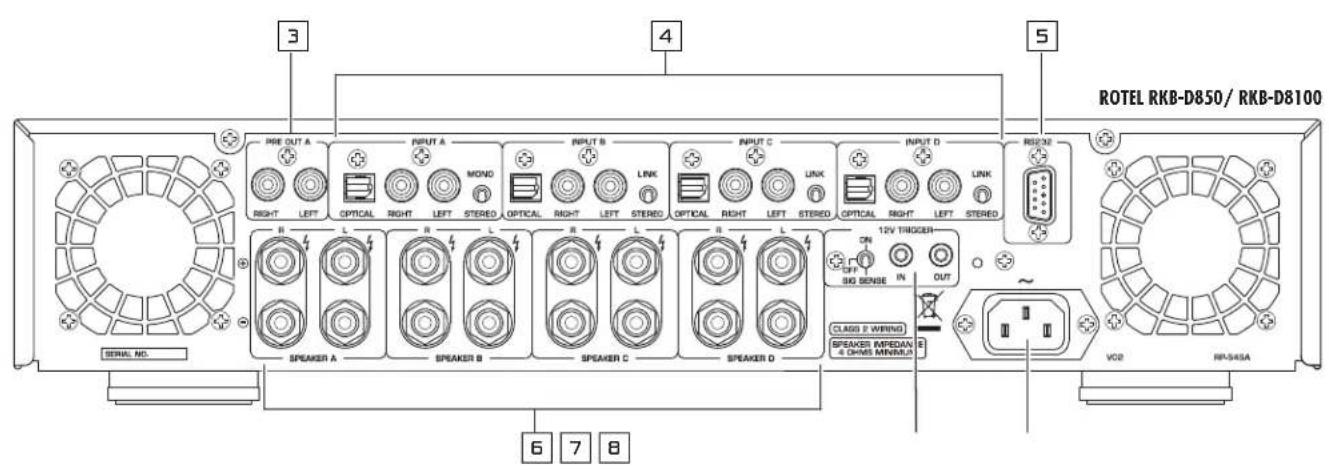
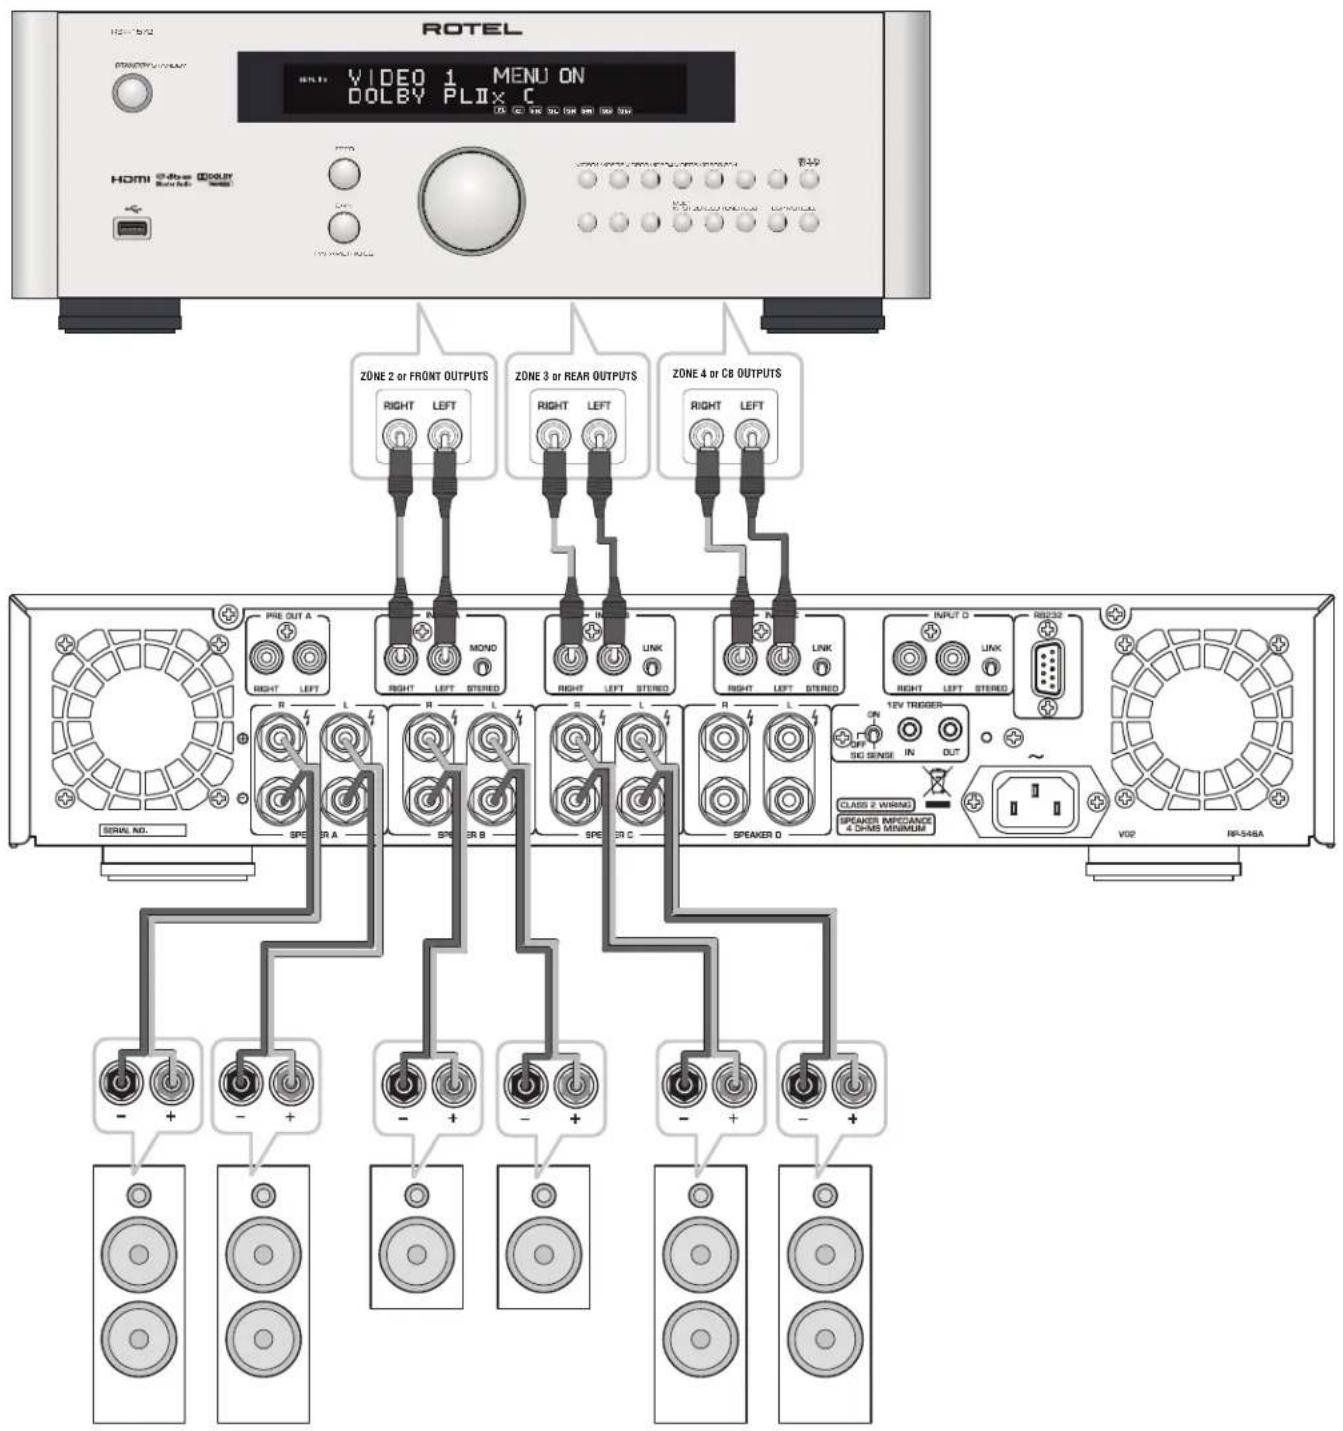
Figure 2: Hook-up Illustration
Figure 2 : Schéma de raccordement
Figure 2: Anschlussdiagramm
Figura 2: Ilustración del Conexionado
Afbeelding 2: Aansluiten Afbeelding
Figura 2: Collegamento ingressi ed uscite
Figur 2: Anslutningar
Рисунок 2: Подсоединение -пример
Important Notes
When making connections be sure to:
√ Turn off all the components in the system before hooking up any components, including loudspeakers.
√ Turn off all components in the system before changing any of the connections to the system.
It is also recommended that you:
√ Turn the volume control of the amplifier all the way down before the amplifier is turned on or off.
Remarques importantes
Important Safety Instructions 2
Figure 1: Controls and Connections 3
Figure 2: Hook-up Illustration 4
Important Notes 5
About Rotel....6
A Word About Watts....6
Getting Started....6
A Few Precautions 7
Placement 7
AC Power and Control 7
AC Power Input 7
POWER Switch and Power Indicator 7
Trigger Mode Selector 7
12V Trigger Input and Output 7
Protection Indicator 1 8
Signal Connections 2 3 4 8
RCA Inputs 4 8
Linking the Inputs 4 8
Mono Switch 4 8
Input Level Controls 8
Preamp Output 8
Optical Inputs 8
Speaker Outputs 9
Speaker Selection 9
Speaker Wire Selection 9
Polarity and Phasing 9
Speaker Connections 9
RS232 Connector 5 9
Cooling Fans 9
Troubleshooting 9
Power Indicator Is Not Illuminated 9
No Sound 9
Power Indicator Is Blinking 9
Specifications 10
About Rotel
Our story began over 50 years ago. Over the decades, we have received hundreds of awards for our products and satisfied hundreds of thousands of people who take their entertainment seriously – like you!
Rotel was founded by a family whose passionate interest in music led them to manufacture high-fidelity components of uncompromising quality. Through the years, that passion has remained undiminished and the family goal of providing exceptional value for audiophiles and music lovers, regardless of their budget, is shared by all Rotel employees.
Rotel's engineers work as a close team, listening to, and fine tuning, each new product until it reaches their exacting musical standards. They are free to choose components from around the world in order to make that product the best they can. You are likely to find capacitors from the United Kingdom and Germany, semiconductors from Japan or the United States, while toroidal power transformers are manufactured in Rotel's own factory.
We all have concerns about our environment. And, as more and more electronics are produced it is especially important for a manufacturer to do all it can to engineer products that have a minimum impact on the environment.
At Rotel, we are proud to do our part. We have reduced the lead content in our products by using special lead-free ROHS solder and components. Our engineers continually strive to improve power supply efficiency without compromise to quality. When in standby mode Rotel products use minimal power to meet global Standby Power Consumption requirements.
The Rotel factory is also doing their part to help the environment through constant improvements to product assembly methods for a cleaner and greener manufacturing processes.
All of us at Rotel thank you for buying this product. We are sure it will bring you many years of enjoyment.
A Word About Watts
The RKB-850 and RKB-D850 power output is quoted as 50 watts for each channel, while the RKB-8100 and RKB-D8100 is 100 watts when all eight channels are operating together at full power.
Rotel has chosen to specify the power output in this way because, in Rotel's experience, it gives the truest value of the receiver or amplifier's power capability.
When comparing specifications for different products, you should be aware that power output is often specified in other ways, so you may not be comparing like with like. For example, the power output may be quoted with only one channel operating, giving a higher maximum figure.
A loudspeaker's impedance rating indicates the electrical resistance or load it offers when connected to the amplifier, usually 8 ohms or 4 ohms. The lower the impedance, the more power the speaker will need. In effect, a 4 ohm speaker will require twice as much power as an 8 ohm speaker.
However, Rotel amplifiers are designed to work into any speaker impedance between 8 and 4 ohms, and with all the channels working up to their full power. Because the Rotel design is optimized for use with all channels operating together, Rotel is able to specify the true power output for both channels.
This can be important for your enjoyment, too. When watching movies, it's nice to have the amplifier able to reproduce full power into all the channels at the same time, especially in the case of a volcano exploding!
Getting Started
Thank you for purchasing the Rotel RKB Series Eight Channel Power Amplifier. When used in a high-quality music audio system, your Rotel product will provide years of musical enjoyment.
The RKB amplifiers are high-power amplifiers, providing the highest level of audio performance. A massive power supply, premium components, and Rotel's Balanced Design ensure superb sound quality. High current capability allows the amplifiers to drive the most demanding loudspeakers.
Be aware that the RKB amplifiers are capable of high levels of output power. Make sure that your speakers can handle the power of the amplifier. If in doubt about your speakers, ask your local Rotel audio dealer for advice.
These amplifiers are straightforward in their installation and operation. If you have experience with other stereo power amplifiers, you shouldn't find anything perplexing. Simply plug in the associated components and enjoy.
A Few Precautions
WARNING: To avoid potential damage to your system, turn off ALL the components in the system when connecting or disconnecting the loudspeakers or any associated components. Do not turn the system components back on until you are sure all the connections are correct and secure. Pay particular attention to the speaker wires. There must be no loose strands that could contact the other speaker wires, or the chassis of the amplifier.
Please read this manual carefully. In addition to basic installation and operating instructions, it provides valuable information on various RKB amplifier system configurations as well as general information that will help you get optimum performance from your system. Please contact your authorized Rotel dealer for answers to any questions you might have. In addition, all of us at Rotel welcome your questions and comments.
Save the RKB amplifier shipping carton and all enclosed packing material for future use. Shipping or moving the amplifiers in anything other than the original packing material may result in severe damage to your amplifier.
If included in the box please fill out and send in the owner's registration card. Also be sure to keep the original sales receipt. It is your best record of the date of purchase, which you will need in the event warranty service is ever required.
Placement
The RKB amplifiers generate heat as part of their normal operation. The heat sinks and ventilation openings in the amplifier are designed to dissipate this heat. The ventilation slots in the top and bottom covers must be open. When possible there should be 10 cm (4 inches) of clearance around the back side of the chassis. Reasonable airflow in the equipment rack is required to prevent the amplifier from overheating.
Remember the weight of the amplifier when you select an installation location. If you are not using the included rack ears make sure that the shelf or cabinet used can support the RKB. We recommend installing the unit in furniture designed to house audio components. Such furniture is designed to reduce or suppress vibration which can adversely affect sound quality. Ask your authorized Rotel dealer for advice about component furniture and proper installation of audio components.
AC Power and Control
AC Power Input ☐
Your amplifier is configured at the factory for the proper AC voltage in the country where you purchased it, either 120 volts or 230 volts. The AC line configuration is noted on a label on the side panel.
NOTE: Should you move your unit to another country, it may be possible to reconfigure it for use on a different line voltage. Do not attempt to perform this conversion yourself. Opening the enclosure of the unit exposes you to dangerous voltages. Consult a qualified service person or the Rotel factory service department for information.
NOTE: Some products are intended for sale in more than one country and as such are supplied with more than one AC cord. Please only use the one appropriate for your country/region.
Because of its high power rating, the amplifier can draw considerable current. Therefore, it should be plugged directly into a wall outlet. The RKB amplifier must be plugged into a 3-pin polarized outlet. Do not use an extension cord. A heavy duty multi-tap power outlet strip may be used if it (and the wall outlet) is rated to handle the current demanded by the amplifier and all the other components connected to it.
Be sure the POWER SWITCH ☐ on the front panel of the amplifier is turned off (in the "out" position). Then, connect the supplied power cord to the Power Connector ☐ on the rear of the unit and the AC power outlet.
If you are going to be away from home for an extended period of time such as a month-long vacation, it is a sensible precaution to unplug your amplifier (as well as other audio and video components) while you are away.
POWER Switch and Power Indicator ☐
The power switch is located on the front panel of your amplifier. To turn the amplifier on, push the switch in. The ring around the switch will light up and blink three times, indicating that the amplifier is turned on. To turn the amplifier off, push the button again and return it to the "out" position.
NOTE: Place the self adhesive ring over the light surrounding the power switch if the blue light is too bright.
Trigger Mode Selector 7
The RKB amplifiers provide three different options for manual or automatic power operation. These modes are selectable using a three-position switch on the back panel as follows:
- With the switch in the OFF position, the amplifier is turned on or off manually using the front panel power switch. Also use this mode if you are using a switched AC outlet to control power to the amplifier.
- With the switch in the SIGNAL SENSE position, the amplifier turns on automatically when an audio signal is detected at the inputs. The amplifier will go into Signal Sense Standby mode and the front Power Indicator will dim after approximately 10 minutes without detecting an audio signal. The front panel POWER SWITCH overrides this function. It must be ON for the signal sensing function to operate. Turning the front panel power switch OFF turns the amplifier off, regardless of whether or not a signal is present.
- With the switch in the ON position, the amplifier is turned on automatically when a 12 volt trigger signal is present at the 3.5 mm jack of TRIGGER IN on the rear panel. The amplifier will go into standby mode and the front Power Indicator will dim if the +12 volt signal is not present. The front panel POWER SWITCH overrides this function. It must be ON for the +12V trigger to work. Turning the switch OFF turns the amplifier off, regardless of whether or not a trigger signal is present.
12V Trigger Input and Output ☐
The jack labeled IN is for connecting the 3.5mm mono plug/cable carrying a +12 volt trigger signal to turn the amplifier on and off. To use this feature the toggle switch must be set to the ON position. This input accepts any control signal (AC or DC) ranging from 3 volts to 30 volts.
The jack labeled OUT is for connecting another 3.5mm mono plug/cable to provide a 12 volt trigger signal to other components. The 12 volt output signal is available whenever a +12 volt trigger signal is applied to the IN connector.
NOTE: The maximum current for the trigger out is 10mA.
Protection Indicator 1
The RKB amplifiers feature thermal and over-current protection circuits that protect against potential damage in the event of extreme or faulty operating conditions.
Most likely, you will never see this protection circuitry in action. However, should a faulty condition arise, the amplifier will shut down and the Power Indicator on the front panel will be blinking.
If this happens, turn the amplifier off, let it cool down for several minutes, and attempt to identify and correct the problem. When you turn the amplifier back on, the protection circuit will automatically reset and the Power Indicator should light up, indicating that the amplifier is operating normal.
In most cases, the protection circuitry activates because of a fault condition such as shorted speaker wires, or inadequate ventilation leading to an overheating condition. In very rare cases, highly reactive or extremely low impedance speaker loads could cause the protection circuit to engage.
If the protection circuitry triggers repeatedly and you are unable to isolate and correct the faulty condition, contact your authorized Rotel dealer for assistance in troubleshooting.
Signal Connections 2 3 4
See Figure 2
NOTE: To prevent loud noises that neither you nor your speakers will appreciate, make sure the system is turned off when you make any signal connections.
The RKB amplifier provides standard RCA type input connections as found on nearly all audio equipment.
In addition to the four groups of stereo inputs labeled INPUT A to INPUT D, there is also a pair of PREAMP OUTPUT connections for passing the signal connected to INPUT A to another audio component.
RCA Inputs 4
There are two RCA inputs for each of the four pairs of amplifier channels. These RCA inputs accept audio signals from preamplifiers or surround sound processors. Select high quality audio interconnect cables for best performance.
For each pair of amplifier channels, connect the left channel output of your preamp to the LEFT INPUT on the amplifier. Connect the right channel of your preamp to the RIGHT INPUT. Make sure that the input switch to the right of the RCA inputs is in the STEREO position.
Linking the Inputs 4
You can link the analog and digital inputs to other channels by moving the LINK/STEREO switch located next to the RCA inputs for Channel B, C and D to the LINK position. When this switch is set to LINK the analog and digital source of the preceding channel will be used for that channel. No source input is required for a channel with LINK enabled. For example when channel C is set to LINK the digital or analog source from channel B will be used.
NOTE: Both the analog and digital input source of INPUT A can be linked to INPUTS B, C and D.
Mono Switch 4
For the channel INPUT A, when the input switch is moved to the MONO position, the left and right RCA inputs are combined and provided to both speakers as a mono signal. Channels linked to INPUT A will also be MONO if the switch is moved to the MONO position.
Input Level Controls ☐
Four controls on the front panel, one for each channel, provide input level adjustments. These allow you to adjust the gain of the amplifier to match source components attached to the amplifier. The INPUT A level control changes the gain of the INPUT A channel; the INPUT B level control changes the INPUT B channel and so on. The controls are not labeled on the front, but when viewed from the front they are from left to right Input D,C,B,A, with input A on the farthest right. To adjust these controls, use a small, flat blade screwdriver. Turn the control clockwise to increase gain. Turn counterclockwise to reduce gain.
Preamp Output
This pair of RCA connections can be used to pass unprocessed input signals to another audio component, for example to "daisy-chain" to another amplifier to drive additional speakers. The input signals connected to the INPUT A connectors is available on the Preamp Output connectors. This is typically used when the amplifier is part of a multi-room system.
NOTE: It is recommended to Daisy Chain a maximum of 8 RKB amplifiers.
NOTE: The MONO switch does not affect the Preamp Output.
Optical Inputs 4
For RKB-D850 and RKB-D8100 Only
There is a digital input labeled OPTICAL for each channel. Connect the OPTICAL PCM outputs of your source component into these sockets. The digital signals will be decoded and played by the RKB-D850 or RKB-D8100. The RKB is capable of decoding PCM signals up to 24 bit, 192kHz.
NOTE: The OPTICAL input will automatically be selected whenever a digital signal is detected. Some source devices will continue to send a signal even when no audio is being transmitted. An example is some CD players will continue to send a signal even if the CD is paused or stopped. In some cases it may be required to power off the digital source device or even disconnect the Optical cable to switch back to the Analog RCA input.
Speaker Outputs
See figure 2
The RKB amplifier has four pairs of speaker connectors, one for each amplifier channel. The eight speaker connectors may be used in many different configurations. The Hook-up Illustration, Figure 2, shows just one example, with the connections for a typical six-speaker system. Here, the remaining two channels are still available to power up to two more speakers as required.
Speaker Selection
We recommend using loudspeakers with a nominal impedance of 4 ohms or higher with the RKB amplifiers. You should not drive more than one pair of speaker for each output channel. Driving more than one set of speakers from an output may damage the RKB amplifier. Speaker impedance ratings are less than precise. In practice, very few loudspeakers will present any problems for the RKB amplifiers. See your authorized Rotel dealer if you have any questions.
Speaker Wire Selection
Use insulated two-conductor stranded wire to connect the RKB amplifier to the speakers. The size and quality of the wire can have an audible effect on the performance of the system. Standard speaker wire will work, but can result in lower output or diminished bass response, particularly over longer distances. In general, heavier wire will improve the sound. For best performance, you may want to consider special high-quality speaker cables. Your authorized Rotel dealer can help in the selection of cables for your system.
Polarity and Phasing
The polarity – the positive/negative orientation of the connections – for every speaker and amplifier connection must be consistent so all the speakers will be in phase. If the polarity of one connection is reversed, bass output will be very weak and stereo imaging degraded. All wire is marked so you can identify the two conductors. There may be ribs or a stripe on the insulation of one conductor. The wire may have clear insulation with different color conductors (copper and silver). There may be polarity indications printed on the insulation. Identify the positive and negative conductors and be consistent with every speaker and amplifier connection.
Speaker Connections ☐
NOTE: The following text describes both binding post and plug-in connections. DO NOT use both connection methods in combination to connect multiple speakers.
Turn off all the components in the system before connecting the speakers. The RKB amplifier has a pair of two color coded binding posts for each channel. These connectors accept bare wire, connector lugs, or dual banana type connectors (except in the European Community countries where their use is not permitted).
Route the wire from the RKB amplifier to the speakers. Give yourself enough slack so you can move the components to allow access to the speaker connectors.
If you are using dual banana plugs, connect them to the wires and then plug into the backs of the binding posts. The thumbscrews of the binding posts should be screwed in all the way (clockwise).
If you are using terminal lugs, connect them to the wires. If you are attaching bare wires directly to the binding posts, separate the wire conductors and strip the insulation from the end of each conductor. Be careful not to cut into the wire strands. Unscrew (turn counterclockwise) the binding post. Place the connector lug or wire around the binding post shaft. Turn the binding post clockwise to clamp the connector lug or wire firmly in place.
NOTE: Be sure there are no loose wire strands that could touch adjacent wires or connectors.
RS232 Connector 5
The RKB amplifier can be controlled via RS232 for integration with automation systems. The RS232 input accepts a standard straight DB-9 Male-to-Female cable.
For additional information on the connections, software, and operating codes for computer control of the RKB amplifier, contact your authorized Rotel dealer.
Cooling Fans
The RKB amplifier includes 2 cooling fans to help exhaust the heat generated by the power supply and amplifier modules. These fans will operate at NORMAL speed when the RKB is powered on and not in STANDBY mode. The fans will automatic switch to HIGH SPEED mode when required by internal thermostat sensors.
NOTE: Depending on the installation location the cooling fans may need to be cleaned periodically to ensure proper ventilation. Please contact your authorized Rotel dealer for more information.
Troubleshooting
Most difficulties in audio systems are the result of incorrect connections, or improper control settings. If you encounter problems, isolate the area of the difficulty, check the control settings, determine the cause of the fault and make the necessary changes. If you are unable to get sound from the RKB amplifier, refer to the suggestions for the following conditions:
Power Indicator Is Not Illuminated
No main power to the RKB amplifier. Check AC power connections at the amplifier and the AC outlet. Check the front panel power switch. Make sure that it is set to the ON position. If using 12V trigger power-on, make sure that a trigger signal is present at rear panel 12V TRIGGER IN connector.
No Sound
If the amplifier is getting AC power, but is producing no sound, check the POWER INDICATOR on the front panel. If blinking, see below. If not, check all of your connections and control settings on associated components.
Power Indicator Is Blinking
The front panel POWER INDICATOR is blinking when the amplifier protection circuits have shut off the amplifier. Typically, this occurs only when the ventilation openings are blocked, when there is faulty speaker wiring, or after a period of extreme use. Turn off the system and wait for the amplifier to cool. Then push the front panel power switch in and out to reset the protection devices. If the problem is not corrected or reoccurs, there is a problem with the system or the amplifier itself.
Specifications
RKB-850
Continuous Power Output 50 watts / channel (8 ch driven) (20 Hz - 20kHz, <0.1% THD, 8 ohms)
Total Harmonic Distortion < 0.08% (20 Hz - 20k Hz, 8 ohms)
Intermodulation Distortion < 0.08% (60 Hz : 7k Hz, 4:1)
Damping Factor > 150
Input Impedance / Sensitivity 100k ohms / 0.6 V
Amplifier Gain 30 dB
Frequency Response 20 Hz - 20k Hz, + 0 dB/ -1.4 dB
Signal to Noise Ratio (IHF A) 108 dB
Crosstalk / Separation > 60 dB
Speaker Impedance 4 ohms minimum
Power Requirements:
USA: 120 Volts, 60 Hz
EC: 230 Volts, 50 Hz
Power Consumption 150 watts Idle: 40 watts
Standby: < 0.5 watts
BTU (4 ohms, 1/8th power) 180 BTU/h
Dimensions (W x H x D) 430 x 97 x 424 mm (17 x 3) ^7/6 x 16 ^3/4 ins)
Front Panel Height 2U (88.1 mm, 3 12 ins)
Weight (net) 9.3 kg, 20.5 lbs.
RKB-D850
Continuous Power Output 50 watts / channel (8 ch driven)
(20 Hz - 20k Hz, <0.1% THD, 8 ohms)
Total Harmonic Distortion < 0.08%
(20 Hz - 20k Hz, 8 ohms)
Intermodulation Distortion < 0.08%
(60 Hz: 7k Hz, 4:1)
Damping Factor > 150
Input Impedance / Sensitivity 50k ohms / 0.6V
Amplifier Gain 30 dB
Frequency Response 20 Hz - 20k Hz, + 0 dB/ - 1.4 dB
Signal to Noise Ratio (IHF A) 108 dB
Crosstalk / Separation > 60 dB
Speaker Impedance 4 ohms minimum
Digital Section
Signal to Noise Ratio (IHF A) 95 dB
Input Sensitivity - 10 dBFS
Optical Digital Signals SPDIF LPCM (up to 192k Hz 24 bit)
Power Requirements:
USA: 120 Volts, 60 Hz
EC: 230 Volts, 50 Hz
Power Consumption 150 watts
Idle: 45 watts
Standby: < 0.5 watts
BTU (4 ohms, 1/8th power) 180 BTU/h
Dimensions (W x H x D) 430 x 97 x 424 mm
(17 × 3 ^7/8 × 16 ^3/4 ins)
Front Panel Height 2U (88.1 mm, 3 12 ins)
Weight (net) 9.3 kg, 20.5 lbs.
All specifications are accurate at the time of printing.
Rotel reserves the right to make improvements without notice.
RKB-8100
Continuous Power Output 100 watts / channel (8 ch driven) (20 Hz - 20k Hz, < 0.1% THD, 8 ohms)
Total Harmonic Distortion < 0.08% (20 Hz - 20k Hz, 8 ohms)
Intermodulation Distortion < 0.08% (60 Hz : 7k Hz, 4:1)
Damping Factor > 150
Input Impedance / Sensitivity 100k ohms / 0.9 V
Amplifier Gain 30 dB
Frequency Response 20 Hz - 20k Hz, + 0 dB / - 1.4 dB
Signal to Noise Ratio (IHF A) 108 dB
Crosstalk / Separation > 60 dB
Speaker Impedance 4 ohms minimum
Power Requirements:
USA: 120 Volts, 60 Hz
EC: 230 Volts, 50 Hz
Power Consumption 300 watts Idle: 75 watts
Standby: < 0.5 watts
BTU (4 ohms, 1/8th power) 279 BTU/h
Dimensions (W x H x D) 430 x 97 x 424 mm (17 x 3) 18 × 16^34 ins)
Front Panel Height 2U (88.1 mm, 3 12 ins)
Weight (net) 9.6 kg, 21 lbs.
RKB-D8100
Continuous Power Output 100 watts / channel (8 ch driven)
(20 Hz - 20kHz, <0.1% THD, 8 ohms)
Total Harmonic Distortion < 0.08%
(20 Hz - 20k Hz, 8 ohms)
Intermodulation Distortion < 0.08%
(60 Hz : 7k Hz, 4:1)
Damping Factor > 150
Input Impedance / Sensitivity 50k ohms / 0.9 V
Amplifier Gain 30 dB
Frequency Response 20 Hz - 20k Hz, + 0 dB / - 1.4 dB
Signal to Noise Ratio (IHF A) 108 dB
Crosstalk / Separation > 60 dB
Speaker Impedance 4 ohms minimum
Digital Section
Signal to Noise Ratio (IHF A) 95 dB
Input Sensitivity -7 dBFS
Optical Digital Signals SPDIF LPCM (up to 192k Hz 24 bit)
Power Requirements:
USA: 120 Volts, 60 Hz
EC: 230 Volts, 50 Hz
Power Consumption 300 watts
Idle: 80 watts
Standby: < 0.5 watts
BTU (4 ohms, 1/8th power) 279 BTU/h
Dimensions (W x H x D) 430 x 97 x 424 mm
(17 × 3 ^7 /s × 16 ^3 /4 ins)
Front Panel Height 2U (88.1 mm, 3 12 ins)
Weight (net) 9.6 kg, 21 lbs.
Rotel and the Rotel Hi-Fi logo are registered trademarks of The Rotel Co., Ltd, Tokyo, Japan.
Poids (net) 9.3 kg, 20.5 lbs.
RKB-D850
Poids (net) 9.3 kg, 20.5 lbs.
Distorsion harmonique totale < 0.08% (20 Hz – 20 kHz, 8 ohms)
Distorsion d'intermodulation < 0.08% (60 Hz : 7 kHz, 4 : 1)
Signalanschlüsse 234 21
Cinch-Eingänge 21
Signalanschlüsse 2 3 4
Siehe Abbildung 2
GELDT VOOR VS, CANADA OF WAAR
GOEDGEKEURD VOOR GEBRUIK
WAARSCHUWING: OM ELEKTRISCHE SCHOKKEN TE VOORKOMEN DIENT U HET BREDE UITEINDE VAN DE PLUG MET DE BREDE SLEUF TE COMBINEREN. VOLLEDIG INSTEKEN.
ATTENTION: POUR EVITER LES CHOCS ELECTRIQUES, INTRODUIRE LA LAME LA PLUS LARGE DE LA FICHE DANS LA BORNE CORRESPONDANTE DE LA PRISE ET POUSSER JUSQU AU FOND.

2-11-4, Nakane, Meguro-ku,
Tokyo, 152-0031
Japan
Rotel of America
54 Concord Street
North Reading, MA 01864-2699
USA
Phone: +1 978-664-3820
Fax: +1 978-664-4109
Rotel Europe
Dale Road
Worthing, West Sussex BN11 2BH
England
Phone: +44 (0)1903 221 710
Fax: +44 (0)1903 221 525
Rotel Deutschland
- RKB-850 / RKB-8100 RKB-D850 / RKB-D8100
- Important Safety Instructions
- Notice
- APPLICABLE FOR USA, CANADA OR WHERE APPROVED FOR THE USAGE
- Important Notes
- When making connections be sure to:
- It is also recommended that you:
- Remarques importantes
- About Rotel
- A Word About Watts
- Getting Started
- A Few Precautions
- Placement
- AC Power and Control
- AC Power Input ☐
- POWER Switch and Power Indicator ☐
- Trigger Mode Selector 7
- 12V Trigger Input and Output ☐
- Protection Indicator 1
- Signal Connections 2 3 4
- RCA Inputs 4
- Linking the Inputs 4
- Mono Switch 4
- Input Level Controls ☐
- Preamp Output
- Optical Inputs 4
- Speaker Outputs
- Speaker Selection
- Speaker Wire Selection
- Polarity and Phasing
- Speaker Connections ☐
- RS232 Connector 5
- Cooling Fans
- Troubleshooting
- Power Indicator Is Not Illuminated
- No Sound
- Power Indicator Is Blinking
- Specifications
- RKB-850
- RKB-D850
- Digital Section
- Power Requirements:
- RKB-8100
- RKB-D8100
- Signalanschlüsse 2 3 4
- GELDT VOOR VS, CANADA OF WAAR
Brand : ROTEL
Model : RKB8100 V2
Category : Receiver