
DCS8525LH - Surveillance Camera D-LINK - Free user manual and instructions
Find the device manual for free DCS8525LH D-LINK in PDF.
| Product type | IP surveillance camera |
| Brand | D-Link |
| Model | DCS-8525LH |
| Video resolution | Full HD 1080p |
| Night vision | Yes, infrared LED |
| Wireless connectivity | Wi-Fi 802.11n/g |
| Wired connectivity | Ethernet RJ45 |
| Power supply | USB 5V adapter |
| Audio | Built-in microphone and speaker |
| Main features | Motion detection, push alerts, cloud recording via mydlink, QR code for easy setup |
| Compatibility | iPhone, iPad, Android (mydlink app) |
| Viewing angle | Not specified in the manual |
| Focus | Manual (focus ring) |
| Installation | Wall mount included, adjustable orientation |
| Security | Data encryption, password-protected mydlink account |
| Maintenance and cleaning | Clean with a soft dry cloth. Avoid abrasive products. |
| Repairability | Repair by D-Link authorized center |
| Reset | Reset button (press for 10 seconds) |
| Weight | Approx. 200 g (estimated) |
| Dimensions | Approx. 8 x 8 x 12 cm (estimated) |
Frequently Asked Questions - DCS8525LH D-LINK
User questions about DCS8525LH D-LINK
0 question about this device. Answer the ones you know or ask your own.
Ask a new question about this device
Download the instructions for your Surveillance Camera in PDF format for free! Find your manual DCS8525LH - D-LINK and take your electronic device back in hand. On this page are published all the documents necessary for the use of your device. DCS8525LH by D-LINK.
USER MANUAL DCS8525LH D-LINK
If any of these items are missing from your packaging, contact your reseller.
SYSTEM REQUIREMENTS
- 802.11n/g router
- A broadband Internet connection
- iPhone, iPad, Android smartphone or tablet (please refer to the mobile app's store page to check whether your device is compatible)
PRODUCT SETUP
SETTING UP YOUR CAMERA WITH MYDLINK
Please follow the instructions below to set up your mydlink camera.
Step 1: On your mobile device, download mydlink by searching for mydlink in the iTunes App Store, Google Play.

Step 2: Launch the mydlink app and create a new account or sign in to your existing account.
When you are asked to scan a QR code, use the code on the Quick Install Card in your package, or on the label attached to your device.
Congratulations, your DCS-8525LH is now ready to use! Be sure to check the mydlink.com website periodically for the latest firmware updates to keep your product secure and up to date with the latest features.
Note: If you experience issues registering this camera with your mydlink account, or if you purchased an open box or resold unit, perform a hard reset by pressing and holding the reset button on the device for 10 seconds while the device is powered on. If you are returning the device to the place of purchase, please perform the hard reset procedure to clear the device of any personal data.
PRODUCT SETUP
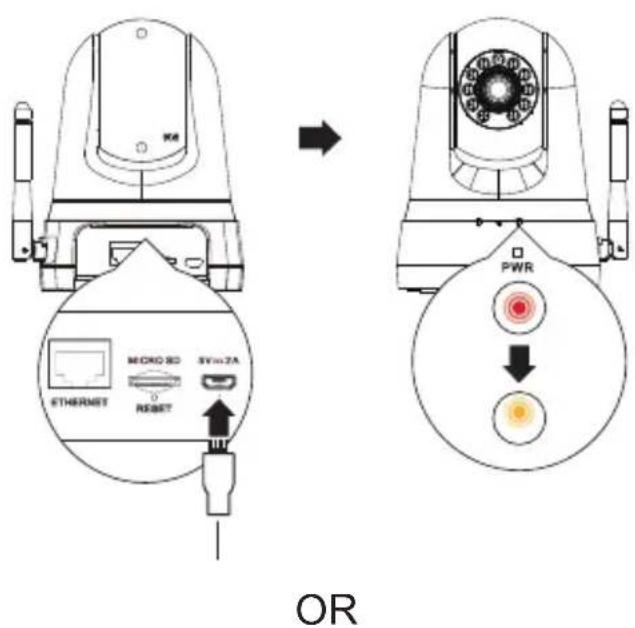
Wireless set-up:
Plug the included USB Power Adapter into the back of the camera. Wait until the PWR LED changes from red to blinking orange.
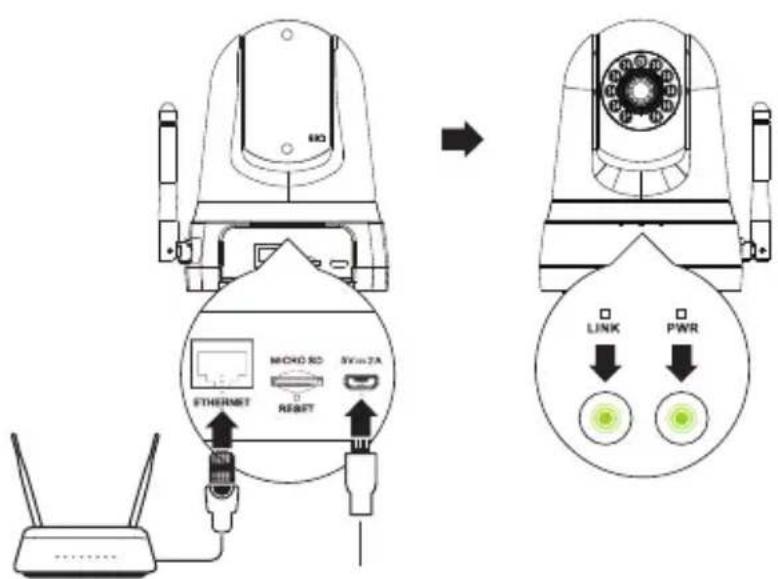
Wired set-up:
Plug the included USB Power Adapter and Ethernet cable into the back of the camera. Connect the other end of the Ethernet cable to your router or existing network. Wait until both the PWR LED and LINK LED turn green.
MOUNTING THE CAMERA
Please refer to the steps below to assist you with mounting the camera using the arm mount. We suggest that you configure the camera before mounting.
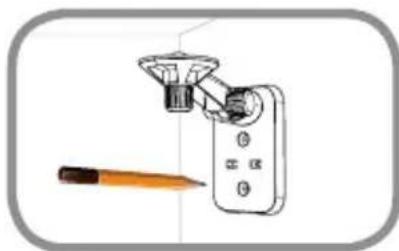
Step 1:
Place the arm mount where you want to position the camera and use a pencil to mark the holes. Ensure the arm mount is oriented correctly with adequate space for the camera to be mounted and necessary cables to be routed.
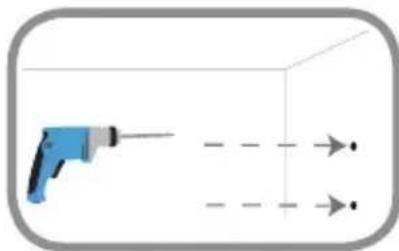
Step 2:
Depending on the material of the wall or ceiling, use proper tools to drill two holes 25mm deep with a 6mm drill bit where you marked. After drilling the holes, insert the plastic anchors to support the screws.

Step 3:
If desired, the cable can be concealed behind the mounting bracket. Run the cable through the back of the mounting bracket, securing it with the built-in guides. Be sure to leave enough cable length protruding to allow connection to the camera.
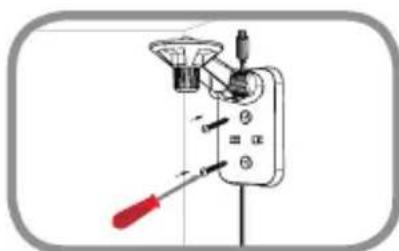
Step 4:
Fasten the mounting bracket to the wall using the screws provided.
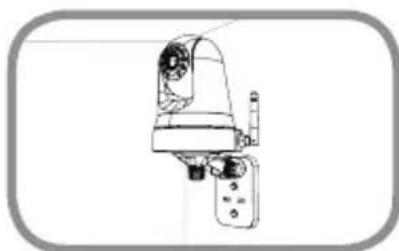
Step 5:
Using the supplied thumbscrew, fasten the camera to the mounting bracket. Connect the power cable to the camera.
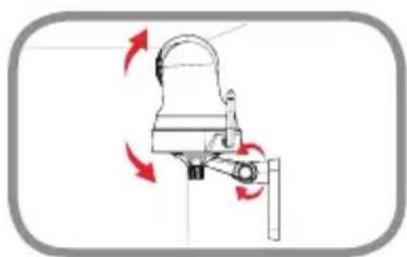
Step 6:
Adjust the angle of the arm on the mounting bracket as required. Tighten the thumbscrew to lock the arm in place.
TROUBLESHOOTING
SETUP AND CONFIGURATION PROBLEMS
1. THE IMAGE IS OUT OF FOCUS.
You can turn the focus ring on the front of the camera to adjust the focus.
2. WHY IS THE CAMERA VIEW HAZY OR BRIGHT WHEN USING NIGHT VISION MODE?
The IR night vision lights on the camera may be reflecting off of a nearby surface or window. Try repositioning your camera to avoid reflections or glare.
3. WHAT CAN I DO IF I FORGET MY CAMERA PASSWORD?
If you forget your camera password, you will need to perform a hard reset of your camera. This process will change all your settings back to the factory defaults.
To reset your camera, please use an unfolded paperclip to press and hold the RESET button for at least 10 seconds while your camera is plugged in.
TECHNICAL SUPPORT
dlink.com/support
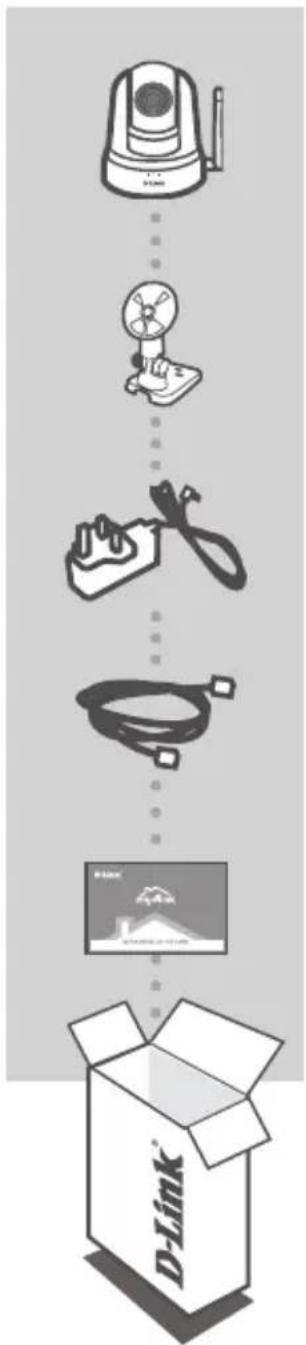
FULL HD PAN UND WI-FI-SCHWENKKAMERA
DCS-8525LH
MONTAGESET
NETZTEIL
ETHERNET-KABEL (KAT.5 UTP)
CONFIGURATION DU PRODUIT
CONFIGURATION DE VOTRE CAMÉRA AVEC MYDLINK
CONFIGURATION DU PRODUIT
Configuration sans fil :
INDSTILLING AF PRODUKTET
INDSTILLING AF KAMERAET MED MYDLINK
INDSTILLING AF PRODUKTET
Trädløs konfiguration:
CAMARA WI-FI FULL HD PAN & TILT DCS-8525LH
KIT DE MONTAGEM
CAMERA WI-FI FULL HD CU PANORAMARE $I INCLINARE DCS-8525LH
SET DE MONTARE
INCARCATOR
CABLU ETHERNET (CAT5 UTP)
CONECTEAZA CAMERA LA RUTER IN TIMPUL CONFIGURÄRII
FISÄ DE INSTALLARE RAPIDA
- SYSTEM REQUIREMENTS
- PRODUCT SETUP
- SETTING UP YOUR CAMERA WITH MYDLINK
- Wireless set-up:
- Wired set-up:
- MOUNTING THE CAMERA
- Step 1:
- Step 2:
- Step 3:
- Step 4:
- Step 5:
- Step 6:
- TROUBLESHOOTING
- THE IMAGE IS OUT OF FOCUS.
- WHY IS THE CAMERA VIEW HAZY OR BRIGHT WHEN USING NIGHT VISION MODE?
- WHAT CAN I DO IF I FORGET MY CAMERA PASSWORD?
- CONFIGURATION DU PRODUIT
- Configuration sans fil :
- INDSTILLING AF PRODUKTET
- INDSTILLING AF KAMERAET MED MYDLINK
- Trädløs konfiguration:
Brand : D-LINK
Model : DCS8525LH
Category : Surveillance Camera