
ME682827 - Meat Grinder MOULINEX - Free user manual and instructions
Find the device manual for free ME682827 MOULINEX in PDF.
| Product type | Meat grinder |
| Brand | Moulinex |
| Model | ME682827 |
| Knife material | Self-sharpening stainless steel |
| Grille material | Stainless steel (3 holes: very fine, fine, coarse) |
| Removable tray | Plastic or aluminum depending on model |
| Included accessories | Sausage, cookie, kibbeh, coulis, vegetable cutter (drums and cones) |
| Main functions | Grinding, reverse, sausage making, cookies, kibbeh, coulis, grating, slicing, gratin, dicing |
| Control buttons | On/off (0/I), momentary reverse, head unlock |
| Maximum meat capacity | Not specified (estimated 1-2 kg) |
| Power supply | Mains electricity (not specified) |
| Power | Not specified (estimated 800-1000 W) |
| Dimensions (L x W x H) | Not specified |
| Weight | Not specified |
| Care and cleaning | Wash accessories with soapy water; grille and knife must remain greasy; coat with oil |
| Safety | Safety instructions booklet LS-123456 provided; head unlock button |
| Storage | Accessory storage cover; storage in bin (fig. 8) |
| Coulis accessory | Allows juice and coulis with filters L3 and L4 |
| Vegetable cutter accessory | Drums (slicing, coarse grating, fine grating, gratin, ice) and cones (fine grating, gratin, slicing, thin slices, dicing) |
| Sausage accessory | Requires casing; fill continuously |
| Kibbeh accessory | Fine paste obtained by passing the meat 2-3 times |
| Cookie accessory | Soft dough recommended; choice of design |
Frequently Asked Questions - ME682827 MOULINEX
User questions about ME682827 MOULINEX
0 question about this device. Answer the ones you know or ask your own.
Ask a new question about this device
Download the instructions for your Meat Grinder in PDF format for free! Find your manual ME682827 - MOULINEX and take your electronic device back in hand. On this page are published all the documents necessary for the use of your device. ME682827 by MOULINEX.
USER MANUAL ME682827 MOULINEX
RU. 6-8
UK. 9 - 11
KK. 12 - 14
AR. 17 - 15
FA. 20 - 18
EN. 21-23
FR. 24 - 26
ES, 27 - 29
PD. 30 - 32
Ip. 33 - 35
Eh, 36 - 38
natural_image
Technical line drawing of a pair of kitchen grilles (no text or symbols)RU UK KK AR FA EN FR ES PT IT EL
natural_image
Illustration of a hand operating a mechanical device with arrows indicating motion or force (no text or symbols present)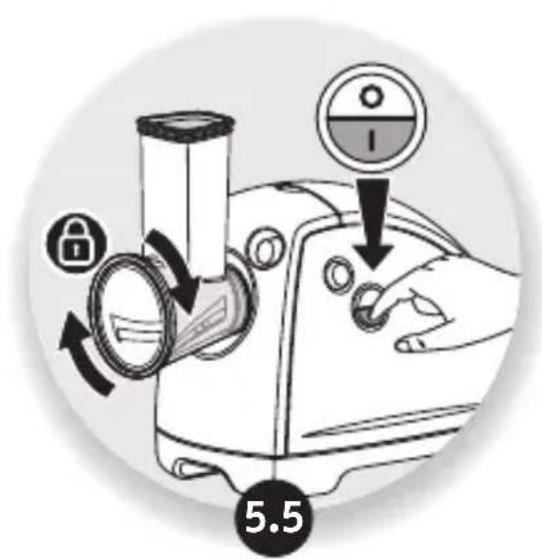

natural_image
Illustration of industrial pipe fittings and machinery components (no text or symbols)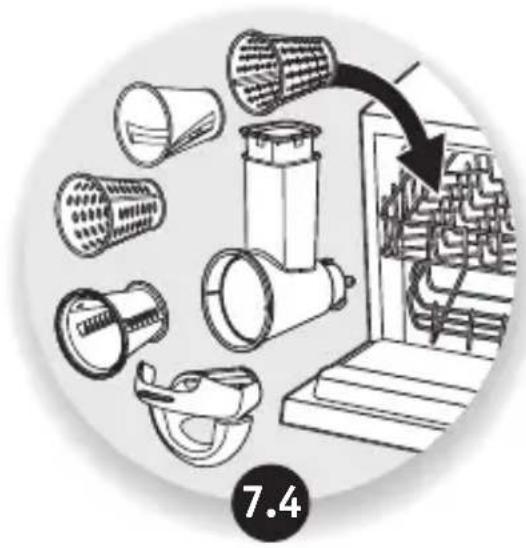
natural_image
Illustration of industrial machinery components including a pump, rollers, and conveyor system (no text or symbols)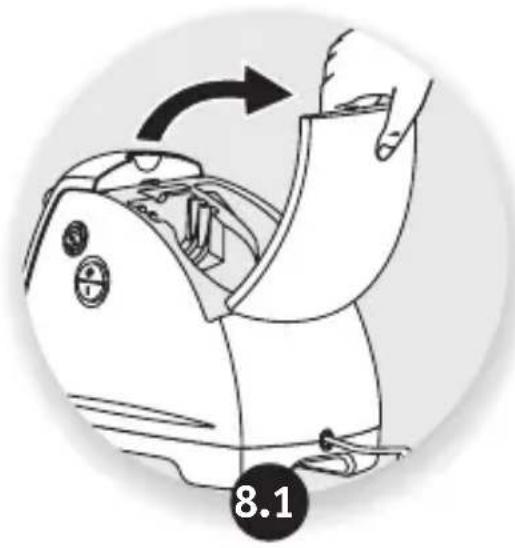
natural_image
Line drawing of a hand operating a device with an arrow indicating rotation (no text or symbols)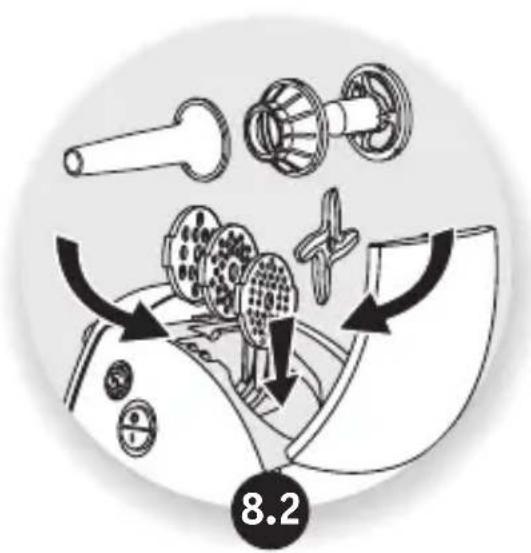
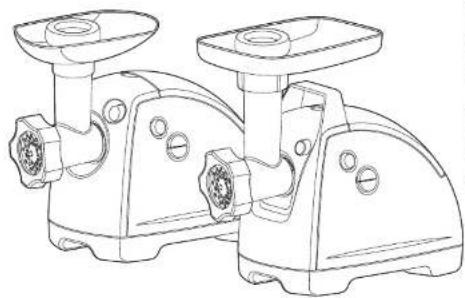
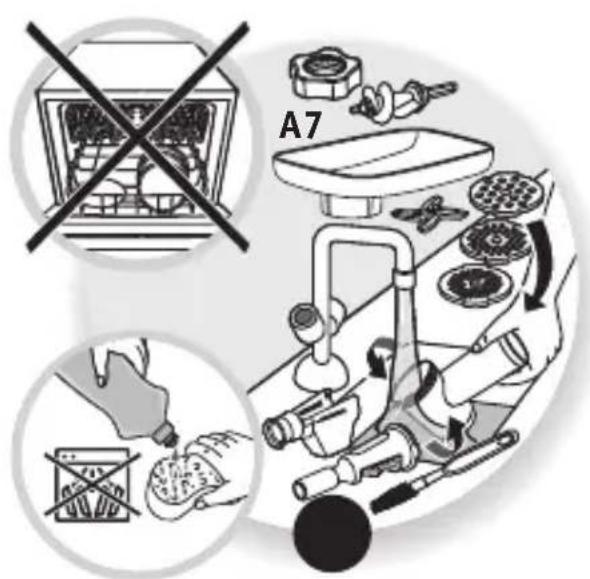
A Removable mincer head
A1 Aluminium casing
A2 Screw
A3 Self-sharpening stainless steel blade
A4 Perforated plates (depending on model)
A4a Small-hole perforated plate (very fine mincing)
A4b Medium-hole perforated plate (fine mincing)
A4c Large-hole perforated plate (coarse mincing)
A5 Aluminium nut
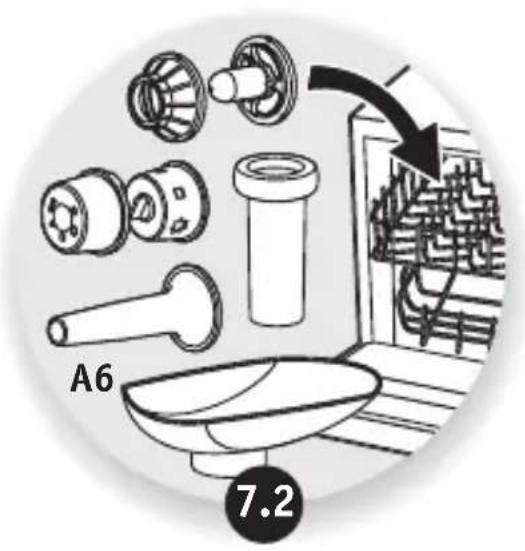
A6 Detachable plastic tray
A7 Detachable aluminium tray
A8 Meat pusher
B Sausage accessory (depending on model)
B1 Centring piece
C Biscuit maker accessory (depending on model)
C1 Support
C2 Mould
C3 Centring piece
D Kebbe accessory (depending on model)
D1 Die end piece
D2 Ring
E Motor unit
F «Reverse» button (short reverse movement)
G On/off button
H Mincer head release button
I Accessory storage cover
J Handle (depending on model)
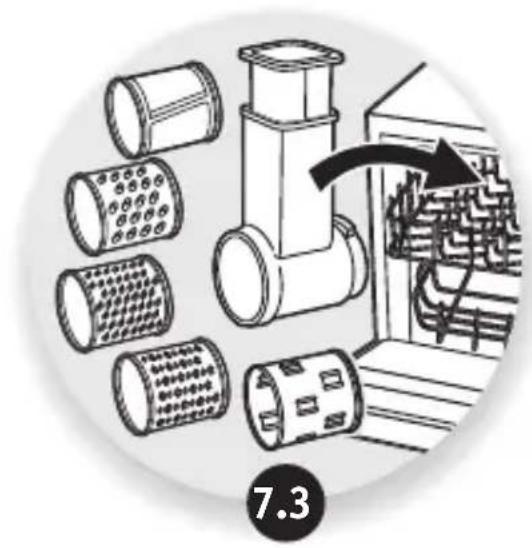
K Vegetable chopper (depending on model)
K1 Drum body/feed tube
K2 Pusher
K3 Cones (depending on model)
K3a Slicing cone
K3b Coarse grating cone
K3c Fine grating cone
K3d Scraper cone
K3e Ice shaving cone
L Vegetable cutter (according to model)
L1 Cone compartment / spout
L2 Pusher
L3 Cones (according to model)
L3a Shredder
L3b Grater
L3c Slicer
L3d Dicer
L3e Dice cutting accessory
M Coulis accessory (according to model)
M1 Watertightness joint
M2 Screw
M3 Mixed holes filter for coulis
M4 Small holes filter for juice
M5 Juice guide
M6 Cleaning brush
Note: Safety instruction booklet LS-123456 is supplied with the appliance.
Before using your appliance for the first time, read the booklet carefully and keep it in a safe place.
BEFORE FIRST USE
- Wash all accessories in warm water and washing up liquid. Rinse, and carefully dry them straight away.
- The perforated plate and the cutter must remain greased. Coat them with cooking oil.
- Do not switch on the appliance when it is empty or if the mincer plates are not greased.
ATTENTION: The blades of the cones are extremely sharp; handle the cones with great care, always holding them by the plastic parts.
EN
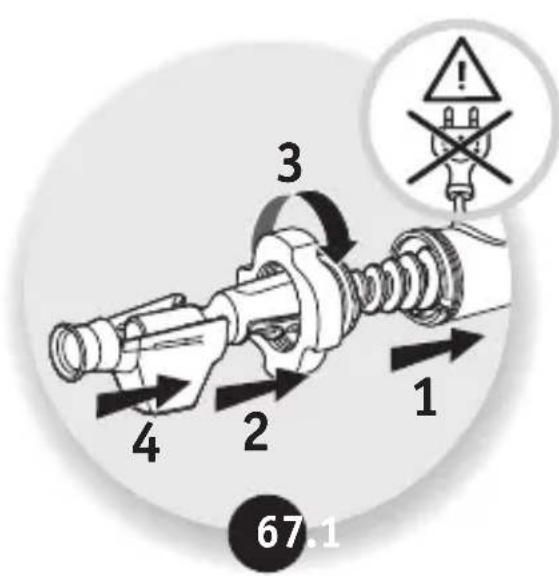
USE: MEAT GRINDER HEAD (FIG. 1.1 TO 1.6)
Prepare the entire quantity of food to be minced, remove any bones, gristle and tendons. Cut the meat into pieces. (approx. 2 cm x 2 cm)
Tip: At the end of operation, you can pass a few pieces of bread through the grinder in order to extract all the ground meat.
Notes:
- Only use your appliance for mincing raw meat. Do not mince cooked meat.
- Do not use your appliance for more than 14 minutes.
What should you do if the machine is clogged?
- Stop the mincer by pressing position "0" of the On/Off button (G).
- Then press the "Reverse" button (F) for a few seconds to release the jam.
- Press position "I" of the On/Off button (G) to continue mincing.
USE: SAUSAGE ACCESSORY (FIG. 2.1 TO 2.6)
Important: this accessory can only be used after the meat has been minced, seasoned and the preparation has been well mixed.
After leaving the skin to soak in warm water to regain its elasticity, slide it onto the funnel and let it overhang by around 5 cm (which you will seal by tying a knot with a link). Start the appliance, feed the mince through the mincer, following the skin as it fills.
Note: this work will be done more easily with two people, one to feed the mince through and the other to take care of filling the skin.
Give the sausages the required length by clamping and twisting the skin. For a quality sausage, take care to avoid trapping air during filling and make sausages that are 10 to 15 cm long (separate the sausages by making a link and tying a knot with the link).
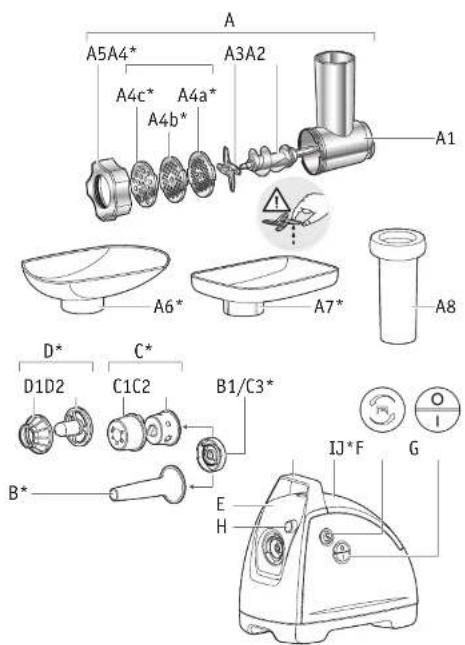
USE: KEBBE ACCESSORY (FIG. 3.1 TO 3.3)
Practical tip:
To make a fine Kebbe or Kefta paste, run the meat through the mincer two or three times until you obtain the desired smoothness.
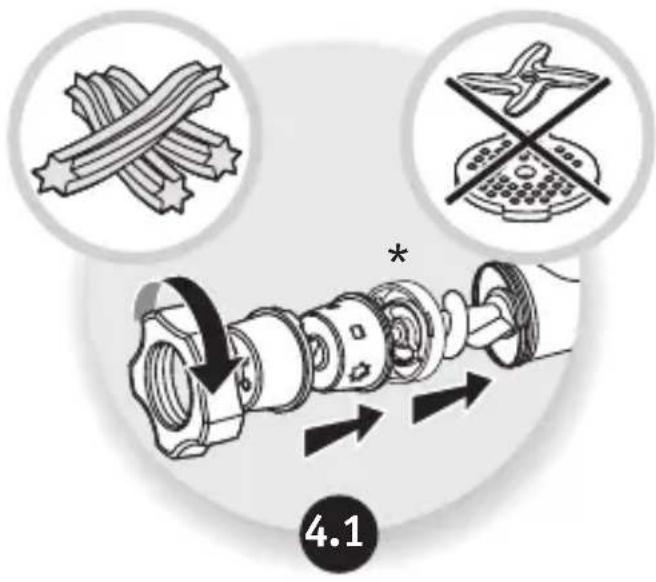
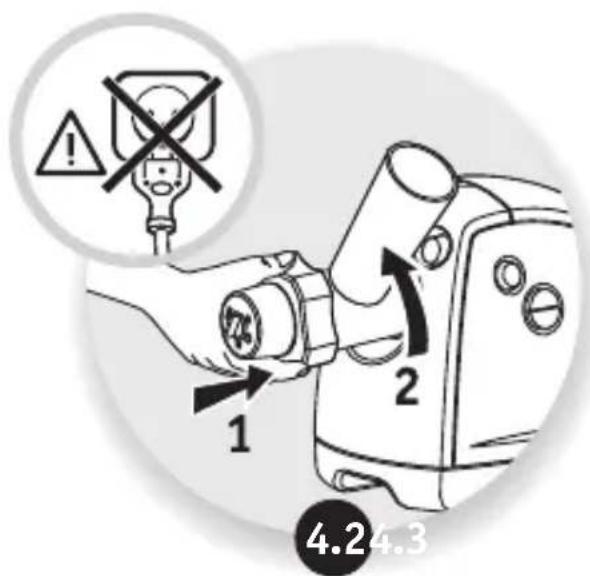
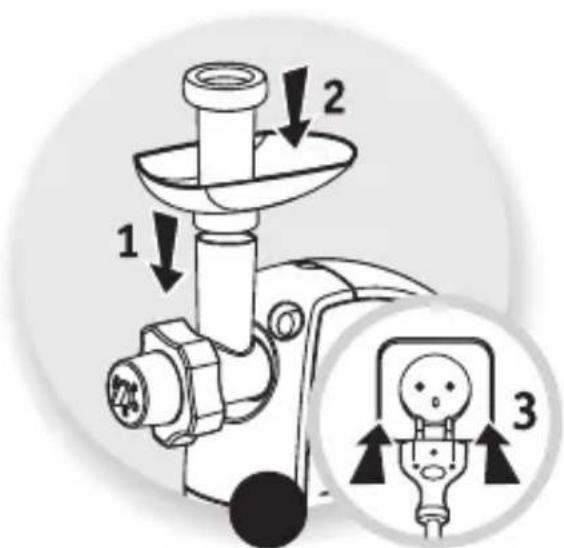
USE: BISCUIT ACCESSORY (FIG. 4.1 TO 4.3)
Prepare the dough. For best results, use a soft dough.
Choose the design by aligning it with the arrow.
Repeat the process until you have obtained the desired amount of biscuits.
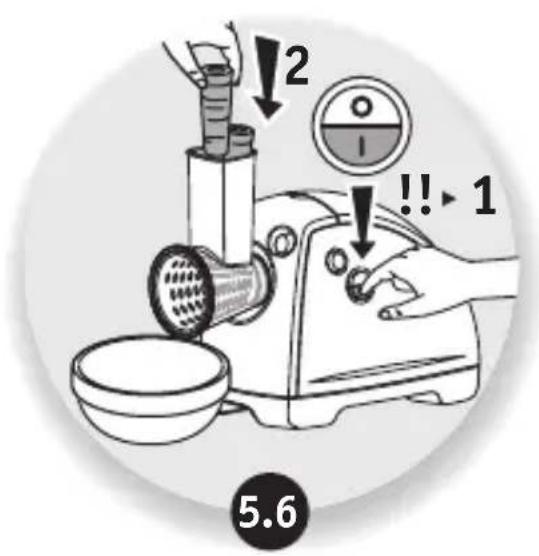
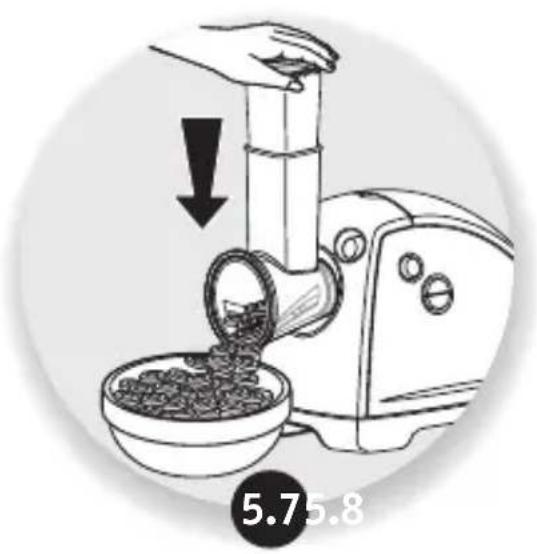
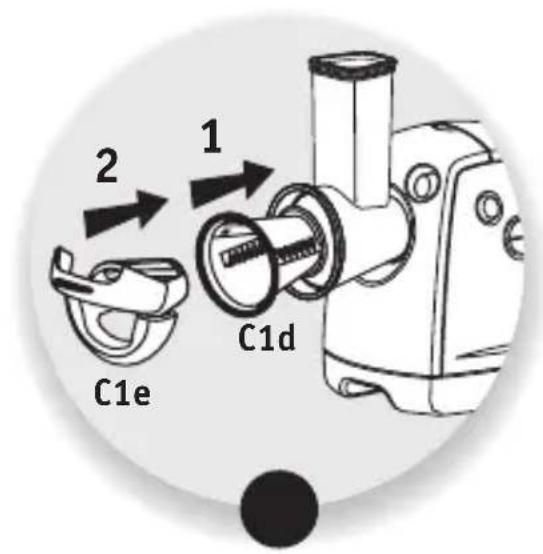
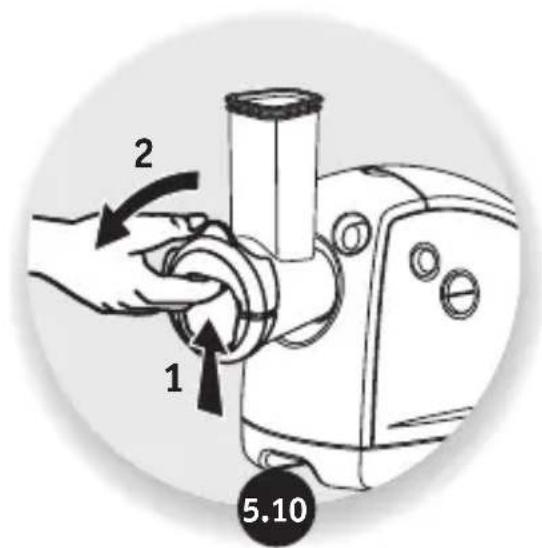
USE: VEGETABLE CHOPPER (FIG. 5.1 TO 5.10)
Useful tips for best results:
The ingredients that you use must be firm to obtain satisfactory results and to avoid the accumulation of food in the compartment.
Do not use the appliance to grate or cut food products that are too hard such as sugar cubes or pieces of meat.
USE: COULIS ACCESSORY (FIG. 6)
Use: Place a container under the juice groove (K5) to collect the juice and another one at the end of the filter to collect any residues. If you wish to make coulis or juice, using fresh fruits only is an imperative. According to the season and to the quality of your fruits, we recommended that you run the pulp through a second time to extract the maximum possible amount of coulis or juice.
Juice: Use filter L4
Coulis: Use filter L3
CLEANING (FIG. 7.1 TO 7.4)
STORAGE OF ACCESSORIES (FIG. 8.1 TO 8.2)
DESCRIPTION
A Tête de hachoir amovible
A1 Corps aluminium
A2 Vis
LIMPEZA (IMAGEM 7.1 À 7.4)
ARRUMAÇÃO DOS ACESSÓRIOS (IMAGENS 8.1 À 8.2)
DESCRIZIONE
A Accessorio tritacarne removibile
PORTA-ACCESSORI (FIG. 8.1 - 8.2)
ПЕРИГРАФН


- BEFORE FIRST USE
- EN
- USE: MEAT GRINDER HEAD (FIG. 1.1 TO 1.6)
- Notes:
- What should you do if the machine is clogged?
- USE: SAUSAGE ACCESSORY (FIG. 2.1 TO 2.6)
- USE: KEBBE ACCESSORY (FIG. 3.1 TO 3.3)
- Practical tip:
- USE: BISCUIT ACCESSORY (FIG. 4.1 TO 4.3)
- USE: VEGETABLE CHOPPER (FIG. 5.1 TO 5.10)
- Useful tips for best results:
- USE: COULIS ACCESSORY (FIG. 6)
- CLEANING (FIG. 7.1 TO 7.4)
- STORAGE OF ACCESSORIES (FIG. 8.1 TO 8.2)
- DESCRIPTION
- LIMPEZA (IMAGEM 7.1 À 7.4)
- ARRUMAÇÃO DOS ACESSÓRIOS (IMAGENS 8.1 À 8.2)
- DESCRIZIONE
- ПЕРИГРАФН
Brand : MOULINEX
Model : ME682827
Category : Meat Grinder