
SmartHome - Smoke detector EQ-3 - Free user manual and instructions
Find the device manual for free SmartHome EQ-3 in PDF.

| Product type | Radio smoke detector |
| Model | WSD-2.0 (SmartHome EQ-3) |
| Dimensions | Approximately 115 x 45 mm (diameter x height) |
| Weight | 148 g |
| Power supply | 2 integrated 3 V lithium batteries (non-removable) |
| Battery life | Up to 10 years (typical) |
| Detector type | Photoelectric (scattered light) |
| Alarm sound level | >85 dB at 3 meters |
| LED display | Red LED (alarm/status) and white LED (emergency light) |
| Radio communication | BidCoS, 868.3 MHz |
| Radio range | >100 m in free field |
| Maximum number of detectors in network | Up to 40 |
| Repeater function | Yes, up to 3 repeaters per network |
| Operating temperature | +5 °C to +30 °C |
| Storage temperature | -5 °C to +30 °C (max 14 days at 55 °C) |
| Permissible humidity | Up to 93 % (without condensation) |
| Protection rating | IP20 |
| Mounting | Ceiling only, with 1 central screw or 2 screws (spacing 60 mm) |
| Maintenance | Wipe with a damp cloth; monthly function test |
| Safety instructions | Do not open, do not paint, do not expose to moisture |
| Standard | EN 14604:2005, certifications CE, VdS, Q-Label |
Frequently Asked Questions - SmartHome EQ-3
User questions about SmartHome EQ-3
0 question about this device. Answer the ones you know or ask your own.
Ask a new question about this device
Download the instructions for your Smoke detector in PDF format for free! Find your manual SmartHome - EQ-3 and take your electronic device back in hand. On this page are published all the documents necessary for the use of your device. SmartHome by EQ-3.
USER MANUAL SmartHome EQ-3
ENSmoke alarm Page 28
DoP: DoP_WSD-2.0_160122
EN 14604:2005
WSD-2.0
General system information 31
Hazard warnings 31
Device overview 33
Commissioning 34
Teach-in process 34
Teach-in process to interconnect
wireless smoke alarms 35
Selecting the installation location 37
Minimum protection 37
Recommended protection 38
Installation location on flat ceilings 38
Installation location on pitched ceilings 38
Unsuitable installation locations 39
Installation 39
Integration into the SmartHome system 40
Using the system 41
Function test 42
Communication test 43
Muting an alarm 43
Muting in monitoring status 44
Repeater function 45
Resetting the device to the factory settings 46
Signal output during operation 46
Signal output during the function test 47
Fault messages 47
Duty cycle limit reached 48
Maintenance and cleaning 48
Battery service life 49
General information about wireless operation 49
Technical data 50
Information about disposal 51
Function
The smoke alarm monitors a room for smoke development using the photoelectric scattered light principle. This means that fires can be detected in their early stages and ensures that the alarm can be sounded early enough to protect people against the effects of toxic smoke gases.
The alarm is indicated by the triggering of an integrated siren and a warning LED flashing red. A white LED serves for emergency lighting purposes and offers additional orientation in the event of a power cut.
The integrated LED serves for emergency lighting purposes only and is not suitable for illuminating the room.
The smoke alarm device sends a wireless smoke alarm signal simultaneously to all the smoke alarm devices of the same type located within wireless range. This wireless smoke alarm device can also be used as part of the SmartHome home automation system. Additional functions that arise from this are not an integral part of the VdS-tested range of functions.
This gives occupants enough time to react to a fire that may still be some distance away (e.g. on a different floor of your home). The smoke alarm device can be combined with other smoke alarm devices of the same type in the same group to create a system consisting of up to 40 smoke alarm devices.
The wireless protocol of the wireless smoke alarm device WSD 2.0 is not compatible with the wireless protocol of the wireless smoke alarm device WSD. For this reason, the direct teaching in (without a central unit) of both smoke alarm types in the same wireless network is not permitted.
To avoid any overlapping with other wireless services on the 868 MHz frequency, the system works with individual wireless addresses
and is thus safeguarded against false alarms caused by other wireless transmitters in this frequency band.
The smoke alarm features a built-in lithium battery with a typical battery service life of 10 years to ensure low-maintenance operation.
General system information
This wireless smoke alarm device can also be used as part of the SmartHome system.
Any functions resulting from the use and configuration options described in this paragraph are not VdS-tested and not covered by the VdS approval of the wireless smoke alarm. All devices installed in the system are delivered with a standard configuration. Moreover, the function of the devices can be configured using a programming unit and the software. For information about the resulting extended range of functions and the additional functions in the SmartHome system that are possible in combination with other components, refer to the online help.
Hazard warnings
- Do not open the device. It does not contain any parts to be serviced by the user. In the event of a fault, please send the device to our service department.
- Only operate the device indoors and keep it away from humidity, dust, sunlight and other heat radiation.
- If you are unsure how to operate or connect the device or if you have any safety concerns, please contact a specialist or our service department.
- Do not use the device if you can see from the outside that it is damaged (e.g. on the housing or control button) or malfunction
ing. If you have any doubts, have the device checked by a specialist or by our service department.
- Do not store or operate the system within the reach of children. It is not a toy!
- Do not leave packaging materials lying around. Plastic film, plastic bags, polystyrene parts, etc. can be dangerous for children.
- Do not paint the smoke alarm or cover it with wallpaper!
- Do not cover or conceal the smoke inlet openings.
- Do not use the smoke alarm in environments where the transmission of wireless signals could cause other devices to malfunction, e.g. in medical facilities with life-support systems or similar environments.
- Never modify the device. The manufacturer will not accept any liability for the consequences of improper use, and no warranty claims will be entertained.
- A smoke alarm detects smoke, not flames.
- The loud warning tone can be harmful to your hearing. Protect your ears during the function test.
- The smoke alarm only monitors a specific area around its installation location.
Device overview
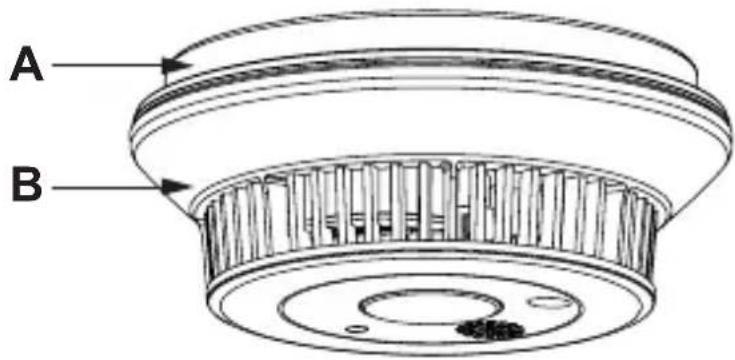
A Ceiling bracket
B Smoke alarm
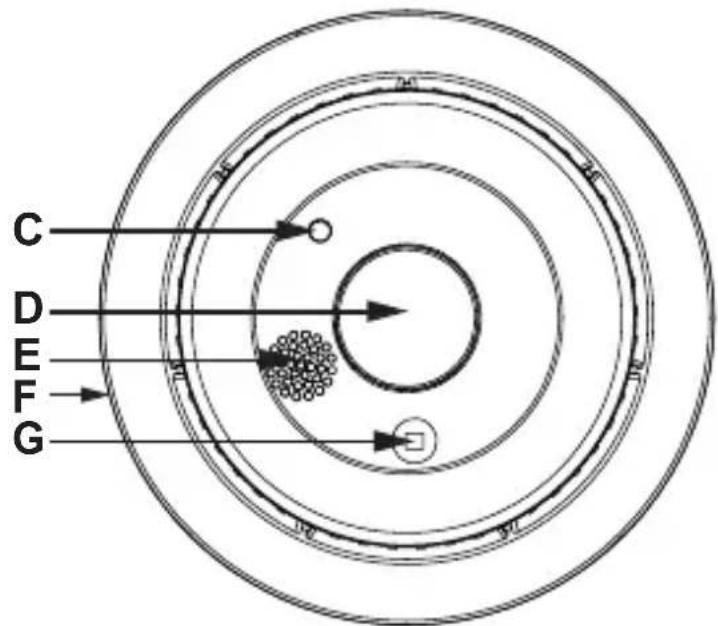
C Device LED (status display)
D Control button (for testing and teaching in)
E Acoustic signal generator (sounds in the case of alarm and during the function test)
F Release lever
G Visual signal generator (escape light, lights up in the case of alarm and during the function test)
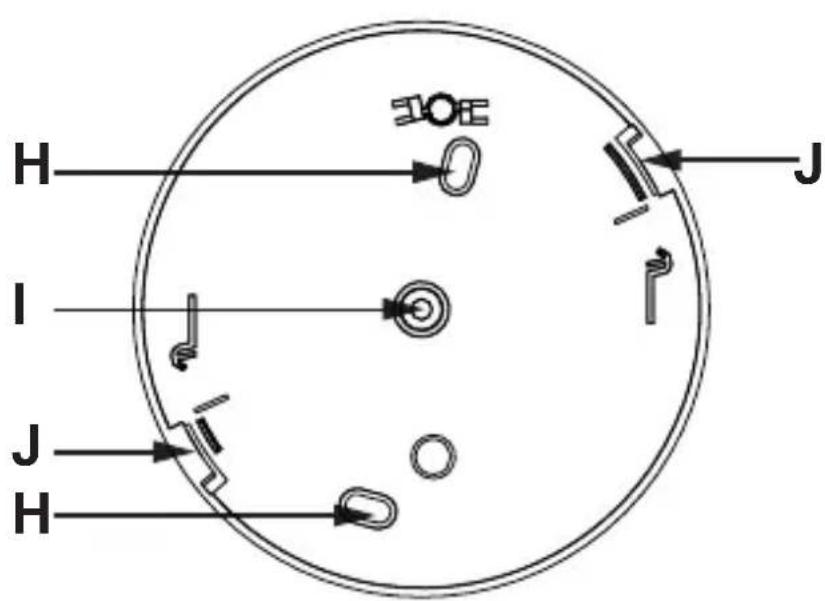
H Drill holes (for installation with two screws)
I Drill hole (for installation via one central screw)
J Housing engagement
Commissioning
Please read through this entire section before starting with the teach-in process and installation.
Where multiple wireless smoke alarms will be used, a teach-in process should be carried out to interconnect them before installation.
Teach-in process
A wireless network is created via the teach-in process to interconnect two or more smoke alarms. The smoke alarm of a smoke alarm device in the network is then automatically forwarded to all the other smoke alarm devices in the network with the same group address. You are thus warned if a fire alarm occurs in a room of your house.
The wireless smoke alarm must initially undergo a teach-in process so that it is integrated into your system and can communicate with other wireless smoke alarms and/or the central unit.
Teach-in process to interconnect wireless smoke alarms
If you wish to use the smoke alarm in the SmartHome system, please skip this section and go directly to the chapter "Integration into the SmartHome system" (page 40).
The first two smoke alarms in the system define a group address. Every additional smoke alarm can be taught into any desired smoke alarm that is already located in the system; it receives the previously defined group address automatically.
Every smoke alarm within a system must be able to contact every other smoke alarm of the system and, where required, the central unit!
Maintain a minimum distance of 1m between the WSD 2.0 devices during the teach-in process.
Please proceed as follows for the teach-in process:
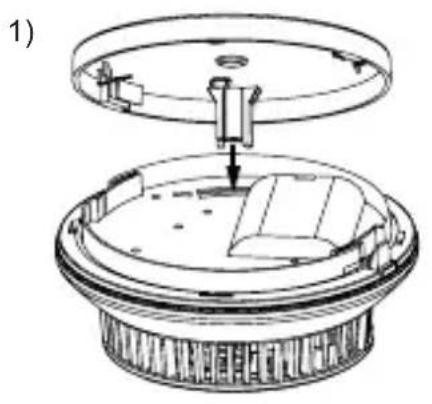
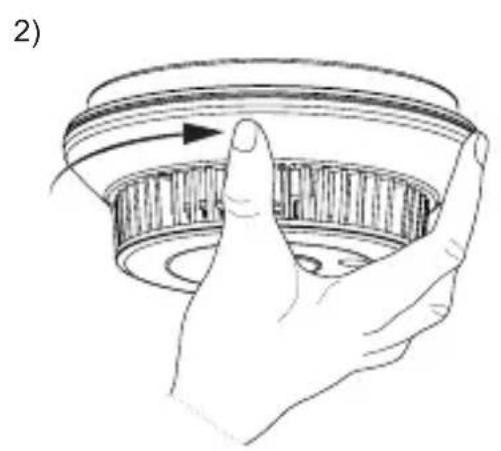
- To activate the smoke alarms, screw the devices into the ceiling brackets in a clockwise direction until they audibly engage.
- Once the devices are operational, the teach-in process to interconnect them can be carried out. Preposition both wireless smoke alarms for this purpose. Maintain a minimum distance of 1m between the devices during the teach-in process in order to prevent wireless signal interference.
- To activate the teach-in mode of the first smoke alarm, press the control button until the device LED starts to flash orange.
- Now activate the teach-in mode of the second smoke alarm. For this purpose, also press the control button until the device LED starts to flash orange.
The teach-in process to interconnect the devices is now carried out. The device LED continues to flash orange during the teach-in process. A successful teach-in process is signalled by a green device LED. An unsuccessful teach-in process is signalled by a red device LED. In this case, please repeat the teach-in process.
Proceed accordingly for additional wireless smoke alarms, i.e. re-activate teach-in mode for one of the wireless smoke alarms already located in the system and then start teach-in mode for the new wireless smoke alarm. Wireless smoke alarms that have already been taught in to a group cannot be taught in to interconnect them with the wireless smoke alarms of a different group. It is not possible to connect two groups. A factory reset must be carried out for all smoke alarms of a group for this purpose.
These smoke alarms can then be individually taught in to the group as described above.
Once the wireless smoke alarms have successfully completed the teach-in process and have been interconnected with each other, the devices can be installed.
Selecting the installation location
The smoke alarm must be installed on the ceiling. Any other type of installation, e.g. installation on a wall, is not permitted.
Every smoke alarm must be extensively tested at its installation location to verify whether it has wireless contact under all circumstances with other smoke alarms in the wireless network and, where required, with the central unit. It must also be checked whether the selected installation location is acoustically suitable.
You must test each smoke alarm in its installation location to make sure that it can always establish a wireless connection with other smoke alarms in the wireless network and the central unit (if installed) (cf. section "Communication test"). In addition, you must test the acoustic properties of your chosen installation location (cf. section "Function test"). Please note that frequent communication and function tests may affect battery life (cf. sections "Function test" and "Communication test").
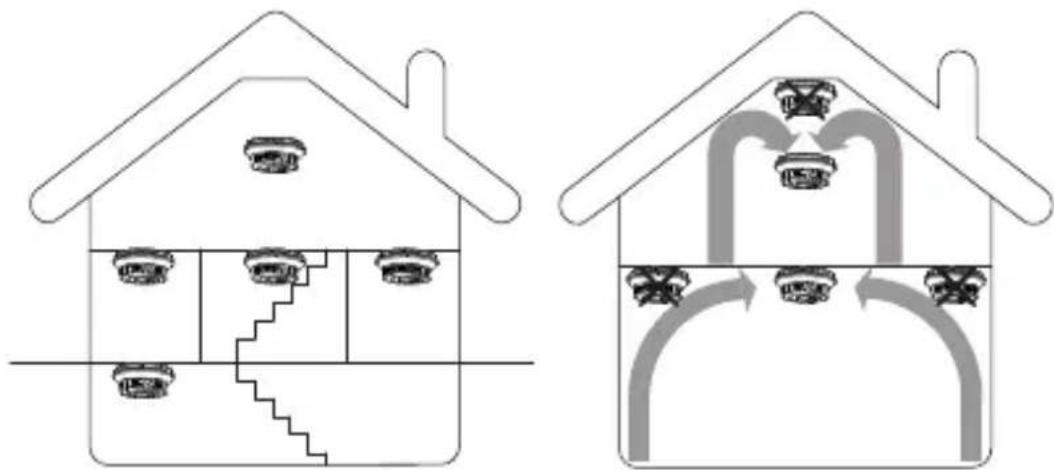
Minimum protection
At least the following areas must be monitored by smoke alarms: the sleeping areas, in particular children's bedrooms and other bedrooms, and hallways. A smoke alarm on the topmost storey is the minimum requirement in the case of staircases without doors between storeys.
Recommended protection
You should always install multiple smoke alarms in your house or apartment and, where possible, equip each room (except for those indicated in the following as unsuitable installation locations) with a smoke alarm. This is the only way to ensure that a timely – and therefore effective – warning is raised in the event of a fire starting.
Installation location on flat ceilings
The smoke alarm must ideally be installed in the centre of the ceiling. Maintain a minimum distance of 50~cm to the walls and corners of the rooms, as air can accumulate here and keep rising smoke at bay.
Installation location on pitched ceilings
If installing the smoke alarm in pitched roof spaces, do not install the smoke alarm directly in the apex of the roof space. In the event of installation on a pitched ceiling, the device must be installed at least approx. 1 m away from the highest point of the room, or even better on a corbel or a roof beam.
The smoke alarm must always be installed so that it is horizontal. Contrary to the installation type envisaged in DIN 14676, 4.3.5.4, installation on the pitched ceiling is not permitted.
Unsuitable installation locations
- Kitchen and bathroom (high degree of vapours/steam)
Rooms with an open chimney (smoke) - In the immediate vicinity of halogen lamps, transformers or halogen rope lights as well as fluorescent and energy-saving lamps, in particular of their ballast units (minimum distance: 50 cm)
- Garages (vehicle exhaust emissions)
- Dusty and dirty rooms (the measuring chamber quickly becomes dirty or false alarms are triggered)
- Near to windows, ventilators, fans and all other areas exposed to strong air movement
- False alarms may be triggered near areas where people smoke heavily
- Close to solid steel beams, large metal surfaces, etc. These elements can significantly impair the emission and/or the reception of the wireless signal. Simply moving the smoke alarm by a few centimetres can often make all the difference here.
Installation
1 Release the ceiling bracket by pressing the detent and unscrew the device from the ceiling bracket in an anticlockwise direction.
2 Mark the desired installation location for the central unit or the external drill holes by marking this/these location(s) with a pen through the respective mounting holes.
Make sure that there is no inwall wiring at the drilling position!
3 Drill one or two holes and insert the dowels included in the scope of delivery. When installing the device on wooden ceilings, use a 2-mm woodboring drill bit to predrill the drill holes to make it easier to screw in the screws.
4 Install the ceiling bracket by screwing the provided screw(s) into the previously inserted dowel(s).
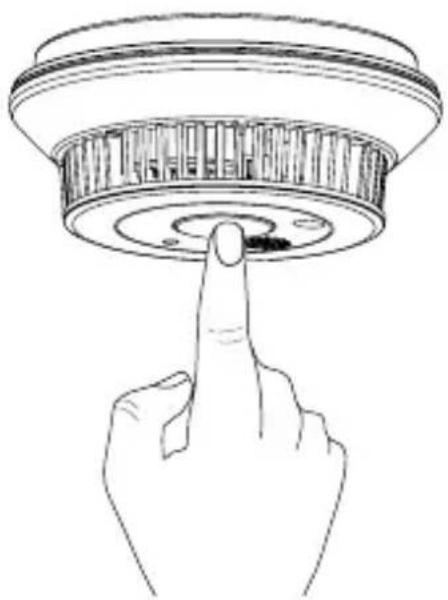
5 Confirm that the smoke alarm is operational by briefly pressing the control button before inserting the smoke alarm in the ceiling bracket. This will not trigger an alarm.
6 Now screw in the smoke alarm in a clockwise direction until it audibly engages.
Integration into the SmartHome system
1 Now start your SmartHome user software and go to SEARCH MODE.
2 After installation, the smoke alarm carries out a self-test. During this, the LED changes from red via green to orange before going out.
3 To integrate the smoke alarm into the SmartHome system, press and hold the control button for longer than 2 seconds until the LED flashes orange. Now release the control button; the smoke alarm is now in wireless teach-in mode for 1 minute.
4 Drag the device icon into the room in which the smoke alarm was installed.
5 If the device icon remains grey after the integration process, please repeat step 3 to restart the wireless teach-in mode and successfully complete the integration process.
Using the system
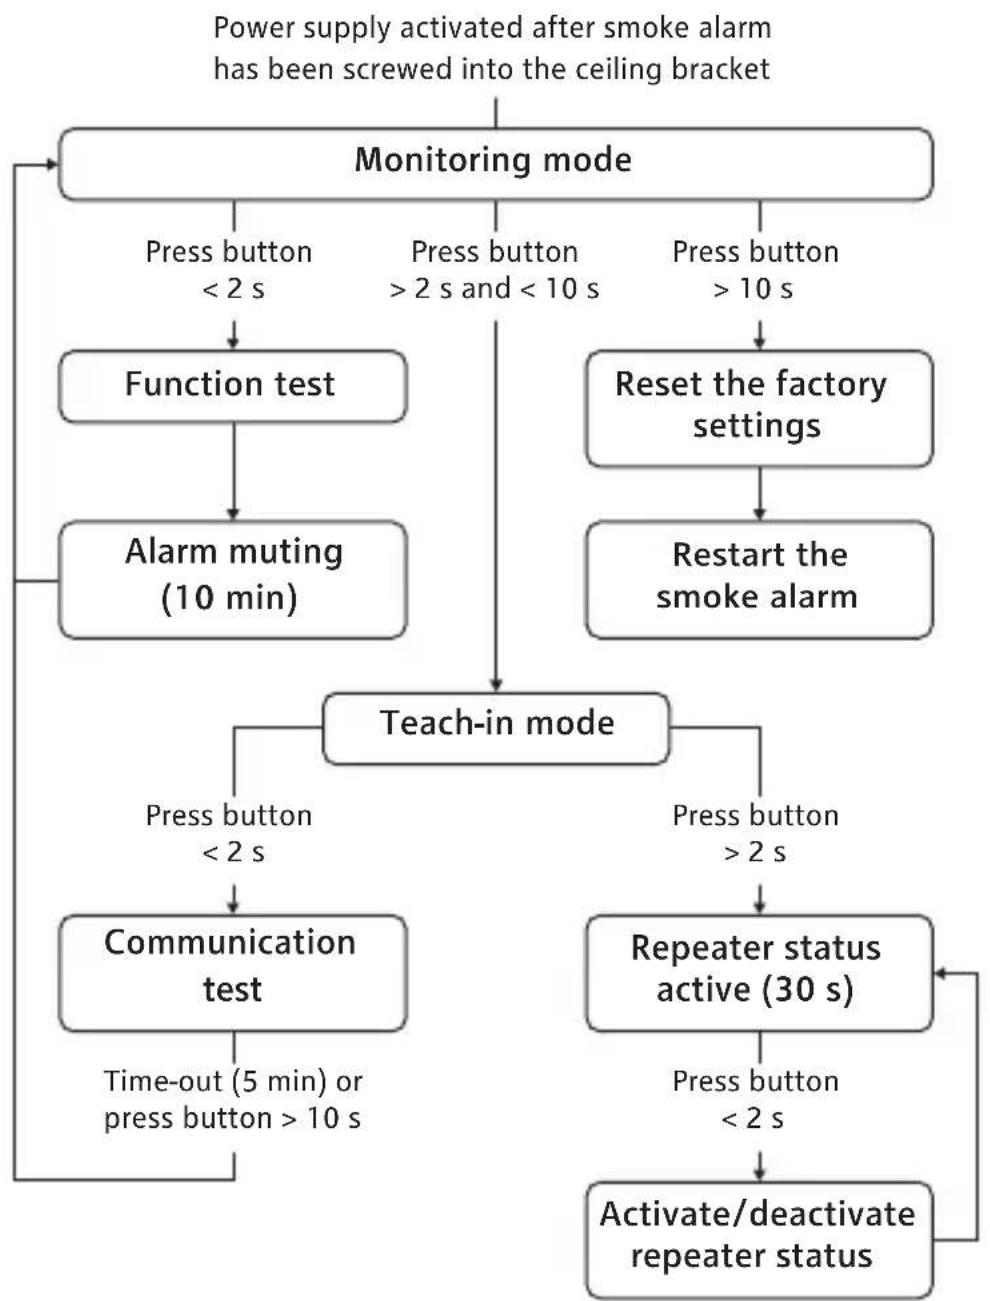
Once the wireless smoke alarm has been installed, various functions are available via the control button. The operating structure for the smoke alarm can be seen in the flow chart.
The device carries out a LED test once it has engaged with the ceiling bracket. During this period the device LED changes from red via green to orange. Then the LED goes out and the device changes to observation mode. In observation mode the LED briefly flashes red approximately once every 43 seconds.
Function test
Once the wireless smoke alarm has been installed and taught in, a function test must then be carried out. After the installation, a function test should also be carried out once a month in order to ensure that the smoke alarm works correctly.
The loud warning tone can be harmful to your hearing. Protect your ears during the function test.
Please proceed as follows to carry out the function test:
1 Briefly press the smoke alarm control button once.
2 The smoke alarm is working properly if the alarm tone sounds 3 times, the LED flashes red quickly and the escape light lights up for the duration of the function test.
3 If no alarm tone is emitted after the control button has been pressed or no visual signal whatsoever is output, this means that the device is faulty and must be replaced.
The smoke detection is deactivated for 10 minutes after the function test. No alarm can be triggered during this time. The device LED briefly flashes red once every 10 seconds for the duration of the alarm muting after a function test.
Communication test
The correct integration of the wireless smoke alarm into a wireless network and the flawless communication with other smoke alarms can be checked by making the smoke alarm send a test wireless signal. Please proceed as follows to generate the test wireless signal:
1 Keep the control button pressed until the device LED starts to flash orange.
2 Briefly press the control button again once. The device LED starts to flash green.
3 The communication test is now started and a test wireless signal is sent.
4 All wireless smoke alarms in the wireless network respond to this signal.
5 If the transmission was successful, the LEDs of the smoke alarms that received the wireless signal flash green for 5 minutes. This confirms the communication between the smoke alarms in the wireless network.
6 If a smoke alarm has not been integrated into the wireless network, the LED does not flash and the device must be taught in or the distance between the devices reduced.
To terminate the signalling of the communication test prematurely, press the control button on any smoke alarm that signalled successful transmission until the signalling is terminated. This also terminates the signalling of the other smoke alarms after a short time.
Muting an alarm
In the case of undesired alarms, alarm muting of the wireless smoke alarm can be activated for 10 minutes. Always carry out an additional check before muting alarms, to make sure that a life-threatening sit-
uation does not exist. Please check whether there is a plausible reason for the alarm triggering (steam, cigarette smoke, dust or similar). If the alarm still exists at other smoke alarms in the group after the muting of the alarm, the smoke alarm that triggered the alarm must be sought out to check the situation at the location where the alarm was triggered.
Caution: There is danger to life when opening doors to closed rooms in a fire that is spreading!
Press the control button briefly once to activate the muting in the alarm status.
The alarm is muted and the smoke detection is deactivated for 10 minutes. The device LED flashes red once every 10 seconds for the duration of the alarm muting.
Muting an alarm when there is an alarm leads to deactivation of the alarm in all the interconnected wireless smoke alarms that are not signalling an alarm of their own, i.e. that do not have smoke in their smoke chambers.
Smoke alarms that are emitting their own alarm can only be deactivated directly at the corresponding device (the suspected location of the fire must be sought out).
Muting in monitoring status
In the monitoring status, alarm muting can be activated for 10 minutes as a precaution to prevent the triggering of an alarm. Press the control button briefly once to activate the muting in the monitoring status.
The alarm is muted and the smoke detection is deactivated for 10 minutes. At the same time, actuating the control button carries out a complete function test with acoustic and visual signalling.
The device LED flashes red once every 10 seconds for the duration of the alarm muting.
Repeater function
To bridge large distances, the wireless smoke alarm has an integrated repeater function via which an alarm can be transmitted from one smoke alarm to another taught-in smoke alarm. In this case, the smoke alarm acts as a „signal amplifier“ by receiving and repeating a wireless signal.
Wireless messages that have already been repeated are not repeated by other smoke alarms that have been configured as repeaters.
Do not configure more than 3 devices as repeaters in a wireless network.
The number of repeaters in a wireless network is not limited by the system, but by the user. For this reason, it must be strictly ensured that no more than 3 smoke alarms in a wireless network are configured as repeaters. Having more than 3 repeaters in the system can lead to a delay in the alarm forwarding. Please proceed as follows to activate/deactivate the repeater function of the smoke alarm:
1 Keep the control button pressed until the device LED starts to flash orange.
2 Press the control button again once for a few seconds. The device LED now signals the current repeater status (red = repeater function OFF, green = repeater function ON).
3 Briefly press the control button again to change the repeater status.
4 If no further actuation is carried out, the device reverts to monitoring mode after approx. 30 seconds and assumes the currently set repeater status.
Resetting the device to the factory settings
To remove the wireless smoke alarm device from a wireless network, the device must be reset to the as-delivered condition (carry out factory reset). The device can then be integrated into another wireless network.
Please proceed as follows to restore the factory settings of the smoke alarm device:
1 Keep the control button pressed for a few seconds. The device LED will start to flash orange after approx. 2 seconds. Keep the control button pressed until the device LED starts to flash red.
2 Once you release the control button, the factory settings for the wireless smoke alarm will be restored and the device restarted.
Signal output during operation
| Operating status Signal output | |
| Monitoring status Flashes red every 43 seconds | |
| Local smoke alarm Flashes red and emergency lighting with subsequent LED follow-up time of 24 h (30 min rapid flashing, then two rapid flashes every 43 s); acoustic intermittent alarm signal | |
| Smoke alarm from other smoke alarm device in the wireless network | Emergency lighting; acoustic intermittent alarm signal |
Signal output during the function test
| Operating status Signal output | |
| Function test OK Rapid red flashing and emergency lighting for the duration of the function test with subsequent muting for 10 minutes (red flashing every 10 seconds for 10 minutes); 3 x short alarm tone | |
| Function test not OK - | |
Fault messages
| Operating status Signal output | |
| Low battery 1 x red flashing every 43 seconds; short signal tone every 43 seconds | |
| Low battery at another wireless smoke alarm (the signal cannot be deactiva- ted at the smoke alarms receiving the signal) | 1 x red flashing every 3 hours; short signal tone every 3 hours |
| Smoke chamber dirty (information is not trans- mitted to other smoke alarms, only to a SmartHome central unit, if installed) | 3 x red flashing every 43 seconds; 3 short signal tones every 43 seconds |
Do not use devices with low or empty batteries or dirty smoke chambers any more; these devices must be replaced!
Duty cycle limit reached
The duty cycle describes a legally regulated limitation of the transmission time for devices on the 868 MHz frequency. The objective of this regulation is to ensure the function of all the devices working on the 868 MHz frequency.
In the frequency band we use, namely 868 MHz, the maximum transmission time for each device is 1% of an hour (i.e. 36 seconds in an hour). If the devices reach the 1% limit, they are not permitted to transmit any more until this time limit has expired. The devices are developed and produced in full compliance with this regulation. In normal operation, the duty cycle is usually not reached. This can, however, arise in individual cases during commissioning or the initial installation of a system due to increased and wireless-intensive teach-in processes. Exceeding of the duty cycle limit is indicated by one long red flash and one short red flash of the device LED and can be expressed as a temporary loss of function of the device. The function of the device is restored after a short period (max. 1 hour).
Maintenance and cleaning
Maintenance must be carried out at least once a month to ensure the functional reliability of the wireless smoke alarm. To do this, proceed as follows:
1 Where required, wipe off the housing using a slightly damp cloth.
2 Briefly actuate the control button once to carry out a function test.
3 The smoke alarm is working properly if the alarm tone sounds three times, the LED flashes red quickly and the escape light is permanently lit up at the same time.
4 If no signal is output after the test button has been pressed, this means that the device is faulty and must be replaced.
Battery service life
The smoke alarm features a built-in lithium battery with which a typical battery service life of 10 years can be achieved. It is not possible to replace the batteries.
The battery service life of typically 10 years can only be achieved under the following conditions:
- Do not carry out more than 52 function tests per year and one alarm for 60 seconds within the group.
- During the entire service life, do not carry out more than one commissioning process, two range tests and a one-off teach-in process for interconnection with a group.
- The interference rate due to other wireless transmitters on the 868 MHz frequency may not be greater than 15 seconds per day.
- The ambient operating temperature of +5^ C to +30^ C must be complied with.
General information about wireless operation
The wireless system that is used operates on the 868 MHz frequency, which is also used by other wireless services. This means that the operation and range of the wireless device can be restricted by other equipment operating on the same or a similar frequency.
The stated range of >100m is the open-air range, i.e. the line-of-sight range between the transmitter and the receiver. In everyday use, however, the range between the transmitter and receiver can be reduced by walls, ceilings, etc.
Additional factors for a reduced range can be:
- Any type of high-frequency interference.
-
Any type of building structure or vegetation.
-
Electrically conducting components in the vicinity of wireless devices and/or within or near to the wireless transmission path that can distort and weaken fields.
- The distance between the transmitter or receiver and conducting surfaces or other objects (including the human body or the ground) influences the radiation pattern of the antennas and therefore the range.
- Broadband interference in urban areas can reach levels that reduce the signal-to-noise ratio, which in turn reduces the range.
- Radiation from poorly shielded PCs can reach the receiver and reduce the range.
eQ-3 AG hereby declares that this device meets the basic requirements and the other relevant regulations laid down in Directive 1999/5/EC. You can find the complete declaration of conformity at: www.eq-3.de/service/downloads.html eQ-3 AG, Maiburger Str. 29, D-26789 Leer
Technical data
| Name of device WSD-2.0 | |
| Power supply 2x built-in 3 V lithium battery | |
| Battery service life >10 years (typical) | |
| Radio frequency 868.3 MHz | |
| Open-air range >100 m | |
| Receiver class SRD Class 2 | |
| Ambient temperature +5°C to +30°C | |
| Storage temperature -5°C to +30°C (short-term, max. 14 days total time:) 55°C | |
| Air humidity Max. 93% (non-condensing) | |
| Duty Cycle < 1% per hour | |
| Wireless communication BidCoS protocol (up to 40 alarm devices) | |
| Detector type Light scattering smoke alarm | |
| Alarm output Piezo signal generator (>85 dB at 3 m distance), status LED, wireless | |
| Display Dual status LED | |
| Test mark CE, VdS, Q-Label | |
| Installation type Ceiling installation with one central screw or two screws spaced 60 mm apart | |
| Protection class IP20 | |
| Dimensions Approx. 115 x 45 mm (DxH) | |
| Weight 148 g |
Technical changes reserved.
Information about disposal
Do not dispose of the device in the household waste! Electronic devices are to be disposed of via the local collection points for old electronic devices in accordance with the Waste Electrical and Electronic Equipment Directive.
2nd English edition 09/2016
Documentation © 2016 innogy SE, Germany. All rights reserved. We accept no liability for errors of a technical or typographical nature or their consequences. All trademarks and property rights are recognised.
Changes in response to technical progress can be made without prior notice.
€0786
Manufacturer: eQ-3 AG
Maiburger Straße 29
D-26789 Leer
16
DoP: DoP_WSD-2.0_160122
EN 14604:2005
WSD-2.0
Intended for use as a smoke alarm in households or comparable applications in the home.
Declared performance:
Essential characteristic: Smoke alarm as per
EN 14604:2005
Performance: pass
You can find the full declaration of performance at
www.eQ-3.de
FR
Table des matieres
Fonction 56
Protection recommende
DoP: DoP_WSD-2.0_160122
EN 14604:2005
WSD-2.0
DoP: DoP_WSD-2.0_160122
EN 14604:2005
WSD-2.0