
RM201 - Smoke detector EQ-3 - Free user manual and instructions
Find the device manual for free RM201 EQ-3 in PDF.


| Product Type | Smoke Detector |
| Brand | eQ-3 |
| Model | RM201 |
| Dimensions (Diameter x Height) | 100 mm x 30 mm |
| Weight | 150 g (including battery) |
| Power Supply | 9V alkaline battery (included) |
| Sensor Type | Photoelectric |
| Alarm Loudness | 85 dB at 3 meters |
| Test Button | Yes, for functional test |
| Low Battery Warning | Audible chirp every 40 seconds |
| Silence/Hush Feature | Yes, temporary mute for false alarms |
| Installation | Ceiling mount, includes bracket and screws |
| Operating Environment | Indoor, temperature 0°C to 40°C, humidity ≤85% |
| Standards Compliance | EN 14604 certified |
| Lifespan | 10 years from manufacture date |
| Maintenance | Vacuum dust monthly; replace battery annually |
| Cleaning | Use a dry cloth; do not use chemicals |
| Safety Precautions | Do not paint; replace after 10 years |
| Spare Parts | 9V battery (standard LP9, 6LR61) |
| Repairability | Not user-serviceable; replace unit if faulty |
Frequently Asked Questions - RM201 EQ-3
User questions about RM201 EQ-3
0 question about this device. Answer the ones you know or ask your own.
Ask a new question about this device
Download the instructions for your Smoke detector in PDF format for free! Find your manual RM201 - EQ-3 and take your electronic device back in hand. On this page are published all the documents necessary for the use of your device. RM201 by EQ-3.
USER MANUAL RM201 EQ-3
Installation and operating manual (p. 21)
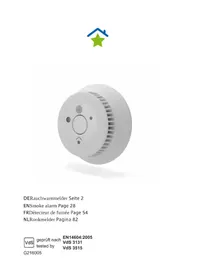
Rauchwarnmelder Smoke Alarm RM201

geprüft nach
tested by
EN14604:2005
VdS 3131
G216002
Lieferumfang
Anzahl Artikel
Printed in Hong Kong
natural_image
Diagram of a circular mechanical component with internal parts and a pointer, no text or symbols presentnatural_image
Technical line drawing of a mechanical component with a circular housing and internal structure (no text or symbols)2)

natural_image
Illustration of a hand holding a circular mechanical component with internal structure, no text or symbols presentnatural_image
Line drawing of a hand holding a lid with a curved arrow indicating rotation (no text or symbols)6 Bedienung
DoP: DoP_RM201_150202
0786-CPR-21471
EN 14604:2005
VdS 3131
RM201
1 x Smoke alarm RM201 (Part no. 130756)
1 x Installation and operating manual in German and English
1 x Brief instruction sheet
2 x Mounting screw
2 x Plug
1st English edition 04/2014
Documentation © 2014 eQ-3 AG, Germany
All rights reserved. This manual may not be reproduced in any format, either in whole or in part, nor may it be duplicated or edited by electronic, mechanical or chemical means, without the written consent of the publisher.
Typographical and printing errors cannot be excluded. However, the information contained in this manual is reviewed on a regular basis and any necessary corrections will be implemented in the next edition. We accept no liability for technical or typographical errors or the consequences thereof.
All trademarks and industrial property rights are acknowledged.
Printed in Hong Kong.
Changes may be made without prior notice as a result of technical advances.
Translation from original version in German.
132360 / V1.8
Table of contents
1 Information about this manual 23
2 Hazard information....23
3 Function 24
4 Device overview....25
5 Start-up 26
5.1 General information about the installation location 26
5.2 Mounting the smoke alarm....29
6 Operation 32
7 LED signals and error messages....35
8 Maintenance and cleaning 36
9 Battery life 36
10 Technical specifications 37
1 Information about this manual
Read this manual carefully before starting to use the device. Keep the manual so you can refer to it at a later date if you need to. If you hand over the device to other persons for use, please hand over the operating manual as well.
Symbols used:

Attention! This indicates a hazard.
Note. This section contains important additional information.
2 Hazard information

Do not open the device. It does not contain any parts that can be maintained by the user. In the event of an error, please return the device to your retailer.

The device is for indoor operation only and must be protected from the effects of damp and dust, as well as solar or other methods of heat radiation.

If you have any doubts about the method of operation, safety or connection of the device, please enlist the help of an expert.

Do not use the device if there are signs of damage to the housing or control elements, for example, or if it demonstrates a malfunction. If you have any doubts, have the device checked by an expert.

The device must not be kept or operated in a location that is accessible to children. It is not a toy!

Do not leave packaging material lying around. Plastic films/bags, pieces of polystyrene, etc. can be dangerous in the hands of a child.

The smoke alarm must not be painted over or covered with wallpaper. The smoke inlet openings may not be covered or concealed.

The device must not be modified in any way. The manufacturer is not responsible for the consequences of improper use, which will also render all warranty claims invalid.

Smoke alarms detect smoke, no flames.

The loud warning sound may damage your hearing. Protect your hearing during the function test.

The smoke alarm only monitors a specific zone in the surrounding of where it is fitted.
3 Function
The Smoke Alarm RM201 monitors a room for smoke emissions. Operation of the device is based on the photoelectric scattered light principle. This enables a fire to be detected at an early stage and a warning to be given in good time before dangerous smoke gases are present.
When an alarm has been triggered, the integrated siren sounds and the warning LED will start to flash red. A white LED acts as emergency lighting for easy orientation also in the event of power failure.

The integrated LED only serves as emergency light and is not to be used as room lighting.
The smoke alarm is powered by a permanently sealed lithium battery with a typical lifetime of 10 years which enables a low-maintenance operation.
4 Device overview

Fig. 1: Device overview
A Ceiling bracket
B Smoke alarm

Fig. 2: Device bottom
C Device LED (status display)
D Operating button (function test)
E Audible signal (triggered in alarm mode and during function test)
F Release lever
G Optical signal (escape light, lights if alarm is triggered and during function test)
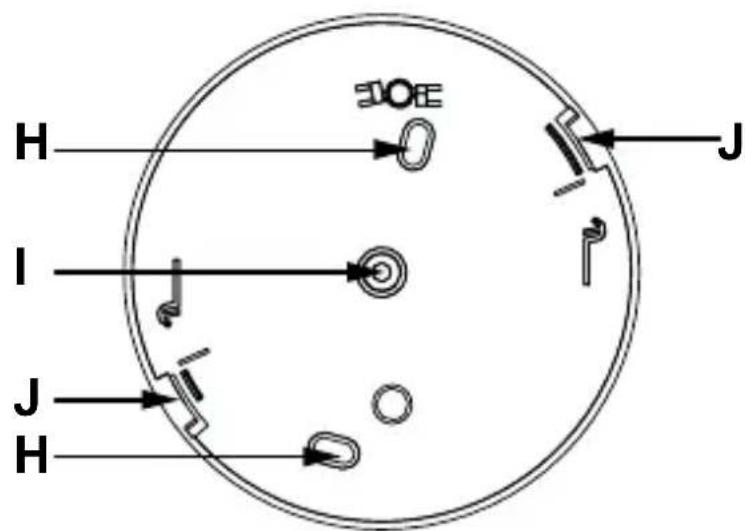
Fig. 3: Ceiling bracket
H Bore holes (for mounting with two screws)
I Bore hole (for mounting with one central screw)
J Housing latches
5 Start-up
5.1 General information about the installation location

The installation notes of this manual must be observed in order to ensure proper functioning. Please read this entire section before mounting the smoke alarm.
Minimum protection
For minimum protection, sleeping areas such as children's rooms or bedrooms, as well as corridors must be controlled by smoke alarms. In buildings where ceilings are extended over multiple floors at least one smoke alarm has to be installed on the upper floor.
Recommended protection
It is always recommended to install several smoke alarms in your house or flat and if possible in every room (except those mentioned below as unsuitable installation locations). This is the only way to ensure that a timely and, as a result, an effective warning can be given in the early stages of a fire.

flowchart
graph TD
    A["attic - recommended protection"] --> B["bedroom - minimum protection"]
    A --> C["corridor - minimum protection"]
    A --> D["children's room - minimum protection"]
    A --> E["dining room - recommended protection"]
    A --> F["living room - recommended protection"]
    G["basement - recommended protection"] --> H
Fig. 4: Mounting smoke alarms - minimum and recommended protection
Each smoke alarm must be tested with a function test (press operating button shortly) at its installation location to ensure that it is acceptable in terms of the smoke alarms audible alarm. Please note, that frequent communication and function tests can influence on the battery lifetime (see sec. „6.2.1 Function test“ on page 33).
Unsuitable installation locations
-
kitchen and bathroom (steam)
• rooms with open fireplaces (smoke) -
in the immediate vicinity of halogen lamps, transformers or halogen lamp cable systems, as well as fluorescent lamps or energy-saving lamps and in particular to its ballasts (minimum distance 50 cm)
• garages (exhaust emissions) - dusty and dirty rooms (malfunction due to polluted chambers as it gets dirty quickly)
- in the vicinity of windows, ventilators, fans or any other locations where the air moves around a lot
- in the vicinity of areas where people smoke heavily (false alarms can be triggered).
5.1.1 Flat ceilings
The smoke alarm must be mounted on the ceiling in the centre of a room. Keep a minimum distance of 50 cm to the walls and corners of the room to avoid a build-up of air that stops the rising smoke (see „Fig. 5: Installation on flat and pitched ceilings“ on page 29).

The smoke alarm may only be mounted to the ceiling. Another type of installation, e.g. side wall mounting, is not allowed.
5.1.2 Pitched ceiling
When mounting the smoke alarm in attic rooms with pitched roofs the device must not be installed at the apex of the roof. If it is to be installed on the pitched roof, it must be mounted around 1 m below the room's highest point or, even better, on a (roof) beam (see „Fig. 5: Installation on flat and pitched ceilings“ on page 29).

The smoke alarm has to be installed horizontally in any case. The installation on sloping ceilings is not allowed.

The wireless smoke alarm has to be installed horizontally in any case. Contrary to DIN 14676 4.3.5.4, the installation on sloping ceilings is not allowed.

Fig. 5: Installation on flat and pitched ceilings
5.2 Mounting the smoke alarm
Following careful selection of the installation location, the ceiling bracket has to be mounted first.
You can mount the smoke alarm to the ceiling via
- screw fastening with one central screw and plug or
- screw fastening with two screws and plugs, e.g. for installation using a standard installation box.
5.2.1 Screw fastening with one central screw
- Use a pen to mark the central bore hole position of the ceiling bracket to the ceiling.

natural_image
Diagram of a circular mechanical component with internal parts and a pointer, no text or symbols presentFig. 6: Marking central bore hole

Make sure that no electricity or concealed lines run at the mounting location!
- Drill the bore hole. When using the supplied plug you will need a 5 mm drill.

For mounting the device to wooden ceilings, you can use 2 mm wood drills in order to pre-drill the bore holes and to make screws easier to insert.
- Use the screw and plug supplied to fasten the ceiling bracket.
- Before latching the device into the ceiling bracket, press the operating button shortly (the alarm will not be triggered).
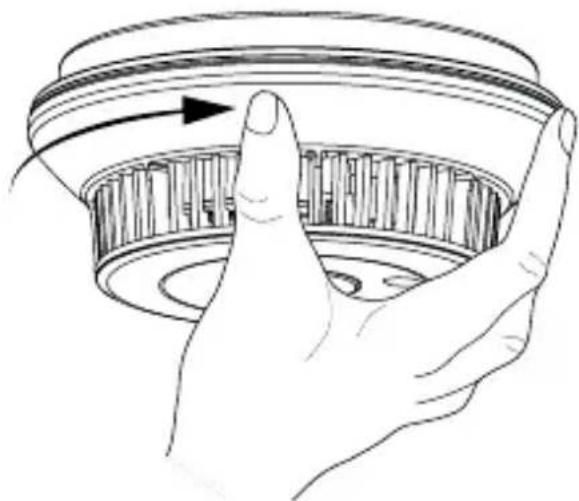
- Turn the smoke alarm in a clockwise direction into the ceiling bracket until it clicks into place.
1)

natural_image
Technical line drawing of a mechanical component with a circular base and internal structure, showing no text or symbols.2)
natural_image
Illustration of a hand gripping a circular mechanical component with a rotating arrow (no text or symbols)Fig. 7: Latching the smoke alarm
The device is now ready for operation.
5.2.2 Screw fastening with two screws
For the installation e.g. with a standard installation box, use the two bore holes at a distance of 60 mm.
- Use the opposite bore holes to fasten the ceiling bracket with two screws.

Fig. 8: Marking two bore holes
- Use two appropriate screws and plugs to fasten the ceiling bracket.
• Therefore, drill the corresponding bore holes. -
Before latching the device into the ceiling bracket, press the operating button shortly.
-
Turn the smoke alarm afterwards in a clockwise direction into the ceiling bracket until it clicks into place (see „Fig. 7: Latching the smoke alarm“ on page 31).
- To remove the smoke alarm, press the release lever and turn the device anticlockwise.
5.2.3 Removing the device
If you want to remove the device from the ceiling bracket, please press the latch to open the locking and turn the device out of the ceiling bracket.

natural_image
Line drawing of a hand holding a lid with a curved arrow indicating rotation (no text or symbols)6 Operation
In observation mode, the device LED shortly flashes red every 43 sec.
After an alarm ends, the next 24 hours the LED will then shortly flash red twice every 43 sec.
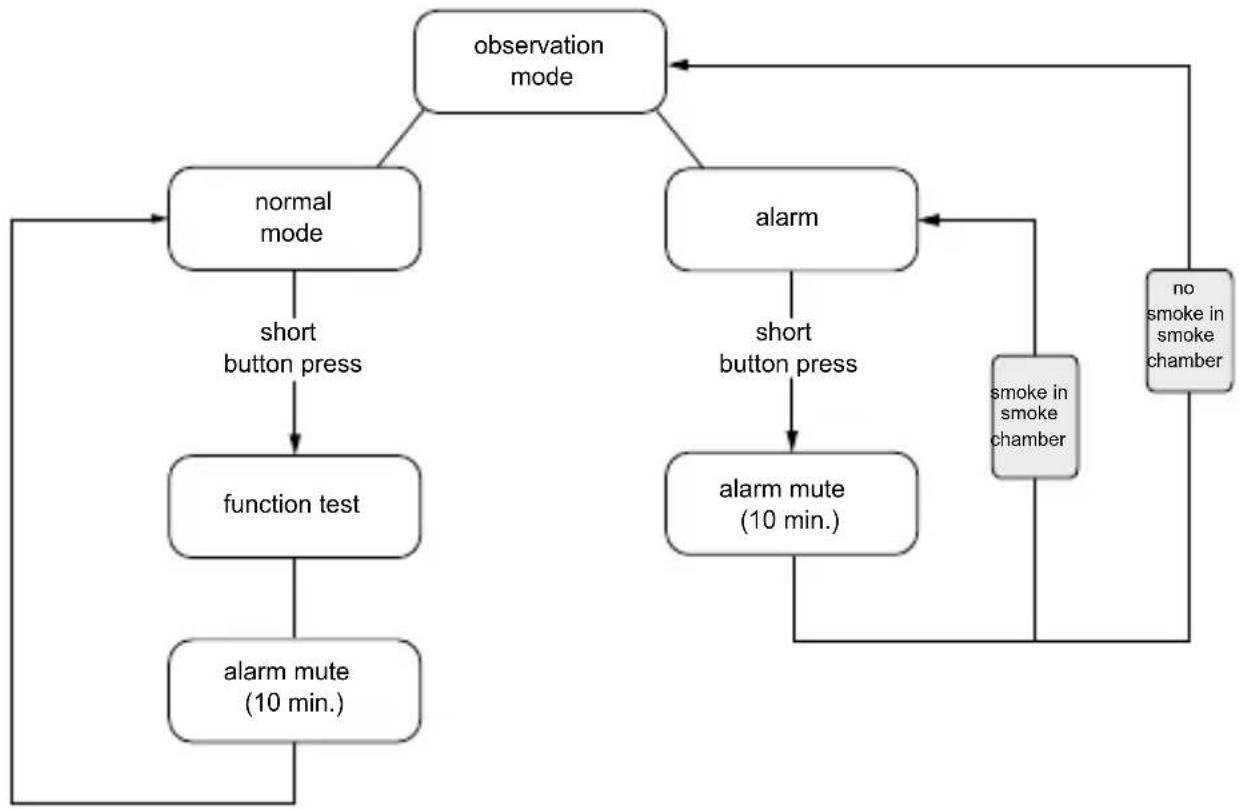
During normal operation, a function test can be performed via the operating button. If an alarm is triggered you can mute the device for 10 min. via the operating button.
flowchart
graph TD
    A["observation mode"] --> B["normal mode"]
    A --> C["alarm"]
    B --> D["short button press"]
    D --> E(function test)
    E --> F["alarm mute (10 min.)"]
    C --> G["short button press"]
    G --> H["alarm mute (10 min.)"]
    H --> I["smoke in smoke chamber"]
    I --> J["no smoke in smoke chamber"]
    J --> A
Fig. 9: Operation structure in observation mode
6.2.1 Function test
If you have installed the smoke alarm successfully you have to perform a function test first. It is also recommended to perform a function test once a month after installation to ensure correct operation of the device.
The loud warning sound may damage your hearing. Protect your hearing during the function test.
To perform the function test, proceed as follows:
- Press the operating button of the smoke alarm.
- If the alarm sound is triggered 3 times, the LED flashes red and the escape light flashes during the function test, the smoke alarm is working correctly.
- If no alarm sound is triggered or no visual signal can be detected, the device is defective and has to be replaced.
After the functional test, the smoke detection is deactivated for 10 min. During this time, no alarm can be triggered.
6.2.2 Muting an alarm
If an unintended alarm is triggered, it can be muted for 10 min. An existing danger to life may not be ignored in any case by muting the smoke alarm without further investigation. Please check if there is a plausible reason for the alarm (steam, cigarette smoke, dust, etc.).

Caution when opening doors of closed rooms in case of fire: there is a danger to life!
For muting the alarm, please proceed as follows:
- Press the operating button one time shortly.
The alarm is muted and the smoke detection is deactivated for 10 min. For the time the alarm is muted the device LED lights up red every ten seconds.
6.2.3 Muting in observation mode
In observation mode, you can mute the alarm for 10 min. precautionary if you want to avoid that an alarm is triggered. For muting the alarm in observation mode, please proceed as follows:
- Press the operating button one time shortly.
The alarm is muted and the smoke detection is deactivated for 10 min. By pressing the operating button, a function test including audible and optical signals is performed at the same time. For the time the alarm is muted the device LED lights up red every ten seconds.
7 LED signals and error messages
The current mode of the smoke alarm is indicated optically and audibly by the following signals:
Operating mode
| Operating status LED display Audible alarm | ||
| Observation mode red flashing every 43 sec. | - | |
| Smoke alarm red flashing and emergency lighting with subsequent LED flashing for 24 hrs (double flash every 43 s) | audible alarm signal | |
Functional test
| Operating status LED display Audible alarm | ||
| Function test OK Fast red | flashing and emergency lighting while function test is active with subsequent LED flashing for 10 min (single flash every 10 s) | 3 x alarm sound |
| Function test not OK - - | ||
Error messages
| Operating status LED display Audible alarm | ||
| Weak battery 1 x red flashing every 43 sec. | Short beep every 43 sec. | |
| Smoke chamber polluted | 3 x red flashing every 43 sec. | 3x short beep every 43 sec. |

Devices with weak or empty battery or degraded smoke chamber may not be used and have to be replaced!
8 Maintenance and cleaning
To ensure operational liability of the smoke alarm, the device has to be maintained at least once a month. To do this, proceed as follows:
- Wipe the housing with a slightly damp cloth if necessary.
- Shortly press the operating button to perform a function test.
- If the alarm sound is triggered 3 times, the LED flashes red and the escape light flashes at the same time, the smoke alarm is working correctly.
- If no alarm sound is triggered or no visual signal can be detected, the device is defective and has to be replaced.
9 Battery life
The smoke alarm is powered by a permanently sealed lithium battery with a typical lifetime of 10 years. Batteries cannot be replaced.

The battery life of typically 10 years can only be enabled under the following conditions:
- A max. number of 52 function tests and one alarm for 60 sec. may be performed per year.
- The operating ambient temperature of +5^ to +30^ has to be maintained.
10 Technical specifications
Device short description: RM201
Power supply: 1x permanently installed 3 V lithium battery
Battery life: > 10 years (typ.)
Degree of protection: IP20
Ambient temperature: +5 to +30 °C
Storage temperature: -5 to +30 °C (temporarily max. 14 days total time) 55 °C
Humidity: max. 93% (non-condensing)
Detector type: scattered-light smoke alarm
Alarm output: Piezo buzzer (>85 dB in 3 m distance), status LED
Display: Status LED
Mark of conformity: CE, VdS, Q-label
Type of installation: Ceiling mount with one central screw or two screws in 60 mm grid
Housing dimensions
(D x H): approx. 115 x 45 mm
Weight: 116 g
Subject to technical changes.
Disposal instructions

Do not dispose of the device with regular domestic waste.
Electronic equipment must be disposed of at local collection points for waste electronic equipment in compliance with the Waste Electrical and Electronic Equipment Directive.
Information about conformity:

The CE sign is a free trading sign addressed exclusively to the authorities and does not include any warranty of any properties.

For technical support, please contact your specialist dealer.
CE0786
Manufacturer: eQ-3 AG
Maiburger Straße 29
D-26789 Leer
15
DoP: DoP_RM201_150202
0786-CPR-21471
EN 14604:2005
VdS 3131
RM201
Intended for use as smoke alarm in households or similar residential application.
Declared performance:
Essential characteristics: Smoke alarm in accordance with EN 14604:2005
Performance: passed
You can find the full declaration of performance at www.eQ-3.de
Bevollmächtigter des Herstellers: Manufacturer's authorised representative:

eQ-3 AG Maiburger Straße 29 26789 Leer / GERMANY www.eQ-3.de




- Installation and operating manual (p. 21)
- Rauchwarnmelder Smoke Alarm RM201
- Lieferumfang
- Anzahl Artikel
- Bedienung
- Table of contents
- Information about this manual
- Symbols used:
- Hazard information
- Function
- Device overview
- Start-up
- General information about the installation location
- Minimum protection
- Recommended protection
- Unsuitable installation locations
- Flat ceilings
- Pitched ceiling
- Mounting the smoke alarm
- Screw fastening with one central screw
- Screw fastening with two screws
- Removing the device
- Operation
- Function test
- Muting an alarm
- Muting in observation mode
- LED signals and error messages
- Maintenance and cleaning
- Battery life
- Technical specifications
- Disposal instructions
- Information about conformity:
- CE0786
Brand : EQ-3
Model : RM201
Category : Smoke detector