
EC 744 100 C - Cooker AMICA - Free user manual and instructions
Find the device manual for free EC 744 100 C AMICA in PDF.
| Product Type | Built-in ceramic glass hob |
| Brand | Amica |
| Model | EC 744 100 C |
| Dimensions (W x D x H) | 592 x 522 x 48 mm |
| Weight | 7.8 kg |
| Power Supply | 230 V ~ 50 Hz |
| Maximum Power | 6.8 kW |
| Number of Cooking Zones | 4 |
| Cooking Zones | 1 normal zone ∅145 (1200 W) or HiLight (1200 W) 1 normal zone ∅180 (1700 W) or HiLight (1800 W) 1 normal zone ∅210 (2100 W) or HiLight (2300 W) 1 double zone ∅180/120 (1700 W) or ∅145x250 (2000 W) |
| Control Type | Control panel or oven (cable connection) |
| Indicators | 4 residual heat indicators (temperature > 50°C) |
| Surface Material | Thermal shock-resistant ceramic glass |
| Cleaning | Soft cloth for light stains; special scraper for stubborn stains; specific cleaner for sugar |
| Safety | Automatic shut-off in case of overheating (not specified, but general safety); do not use water to extinguish fire; do not operate via external timer |
| Installation | Worktop thickness 28-40 mm, depth ≥600 mm; cut-out according to diagram; front clearance ≥60 mm, rear ≥50 mm; free space under hob ≥80 mm |
| Electrical Connection | Via cables with color-coded plugs (white, green, blue, black, yellow) to be connected to same-color sockets |
| Repairability | Spare parts available through customer service; do not attempt repair yourself |
| Warranty | Compliant with EU directives (low voltage, EMC, ErP) |
| Environmental Instructions | Do not dispose with household waste; recycle via WEEE collection points |
Frequently Asked Questions - EC 744 100 C AMICA
User questions about EC 744 100 C AMICA
0 question about this device. Answer the ones you know or ask your own.
Ask a new question about this device
Download the instructions for your Cooker in PDF format for free! Find your manual EC 744 100 C - AMICA and take your electronic device back in hand. On this page are published all the documents necessary for the use of your device. EC 744 100 C by AMICA.
USER MANUAL EC 744 100 C AMICA
natural_image
Four simple circles arranged in a 2x2 grid with one circle partially visible below (no text or symbols)natural_image
Symbol of a trash bin with crossed lines and a blank rectangular base (no text or labels)text_image
Incorrect Correct Incorrectnatural_image
Simple line drawing of a hand holding a tool near a circular object (no text or symbols)Dessin
natural_image
Pure technical line drawing of a 3D mechanical part with no text or symbols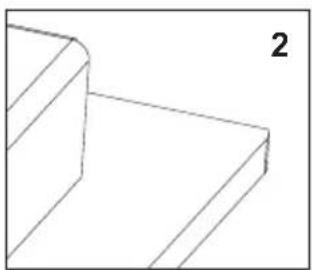
natural_image
Pure 3D geometric lines forming a stepped corner (no text or symbols)
natural_image
Pure 3D geometric diagram showing a corner bracket with no text or symbols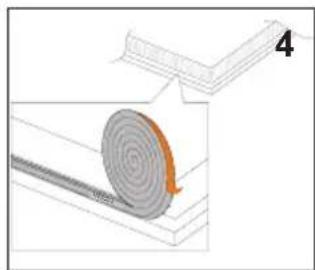
natural_image
Diagram showing a spiral-patterned object on a wooden shelf, with no visible text or symbols
natural_image
Diagram showing two steps of folding a rectangular frame, with arrows indicating downward movement (no text or symbols)This hob combines exceptional ease of use with excellent effectiveness. Once you have read the instructions, operating the appliance will not be a problem.
Before packing each hob is subjected to rigorous safety and operational testing in our quality control facilities.
Please carefully read this User Manual before using the appliance for the first time. By following all instructions contained in this manual you will avoid improper use of the appliance.
Please keep this User Manual in a safe place for future use. Please follow all instructions and recommendations of this User Manual in order to avoid an accident.
Important!
The appliance may only be operated when you have read and understood this manual thoroughly.
The appliance is designed solely for cooking. Any other use (eg heating) is incompatible with the appliance's intended purpose and can pose a risk to the user.
The manufacturer reserves the right to introduce changes which do not affect the operation of the appliance.
Information about the product concerning Regulation (EU) No 66/2014, can be found on the last pages of the user manual or in other printed documents provided with the product.
Basic information....12
Safety instructions....13
The arrangement of functional groups....15
Technical specification....16
Installation....19
Certificate of compliance CE
The Manufacturer hereby declares that this product complies with the general requirements pursuant to the following European Directives:
● The Low Voltage Directive 2014/35/EC,
● Electromagnetic Compatibility Directive 2014/30/EC,
● ErP Directive 2009/125/EC,
and therefore the product has been marked with the CE symbol and the Declaration of Conformity has been issued to the manufacturer and is available to the competent authorities regulating the market.
Caution! The appliance and its accessible parts become hot during use. Use caution when touching the appliance. Children under 8 years of age should be kept away from the unit. Children can use the appliance when supervised.
This appliance can be used by children aged 8 years and older or persons with physical, mental or sensory handicaps, provided they are supervised or have been instructed how to safely use the appliance and are familiar with the associated risks. Ensure that children do not play with the appliance. Children can clean the device only when supervised. Children can use the appliance only when supervised.
Caution! Do not heat up fat or oil unattended (fire hazard!).
NEVER extinguish fire with water. Unplug the appliance and extinguish the flames using a lid or non-combustible blanket.
Caution! Do not store any items on the hob (fire hazard!).
Caution! In the event of an any damage to the bob (scratches or cracks), turn off the appliance and disconnect from the power supply (risk of electric shock!).
The appliance is not intended to be operated by means of an external timer or separate remote-control system.
Do not use steam cleaning equipment to clean the appliance.
Caution! The cooking process has to be supervised. A short term cooking process has to be supervised continuously.
Warning! Use only hob guards designed by manufacturer of the cooking appliance or indicated by the manufacturer of the appliance in the instructions for use as suitable or hob guards incorporated in the appliance. The use of inappropriate guards can cause accidents.
text_image
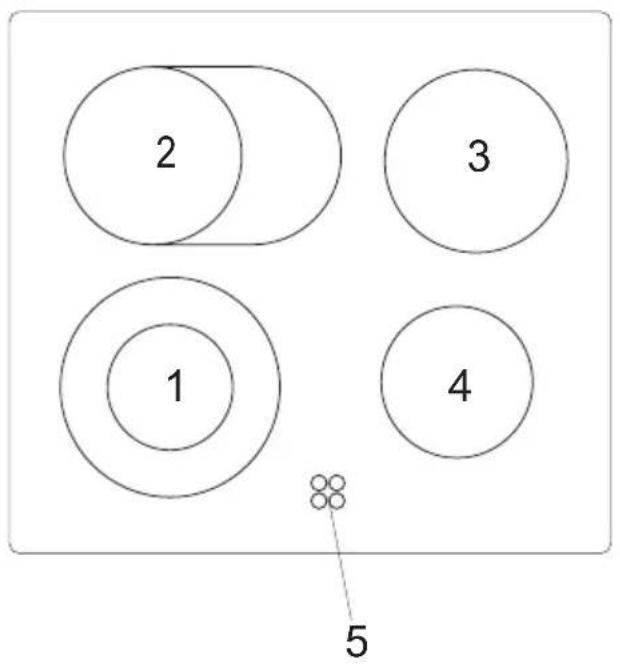
1 2 3 4 5
text_image
1 2 3 4 51.4-Cooking zone ∅145 regular (1200 W) or HiLight (1200 W)
2-Cooking zone ∅210 regular (2100 W) or HiLight (2300 W)
3-Cooking zone ∅180 regular (1700 W) or HiLight (1800 W)
5-Residual heat indicator
text_image
2 3 1 4 51 - Double cooking zone ∅180 / ∅120 (1700 W)
2 - Double cooking zone ∅145 x 250 (2000 W)
3 - Cooking zone ∅180 regular (1800 W)
4 - Cooking zone ∅145 regular (1200 W)
5-Residual heat indicator
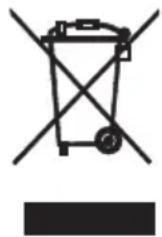
Used appliance cannot be disposed together with other household waste. The user is obliged to hand it over to waste collection centre collecting used electrical and electronic goods. It is indicated by the symbol on the product itself, or on the Operating Instructions or packaging.
The raw materials may be reused as indicated. By reusing or recycling the materials or parts, you will be playing an important part in protecting our environment.
Information on the collection point for electrical waste may be obtained from a
competent municipal office.
Important!
The appliance may only be operated when you have read and understood this manual thoroughly.
The appliance is intended for household use only. Any other use (e.g. for room heating) will be inconsistent with the intended use and may be dangerous. The manufacturer reserves the right to make changes that do not affect the operation of the appliance.
1. Technical specification
- Rated voltage of the heating elements \~230V, 50 Hz
- Max. power 6,8 kW (widest version)
- Dimensions 592 x 522 x 48
- Weight 7,8 kg
The hob is designed to be controlled by a control panel or oven control panel.
Certain hob models can be equipped with the following cooking zones:
- Frying pan ∅145 x 250 regular (1800 W) or HiLight (2000 W)
- Wide cooking zone ∅180/120 regular (1700 W) or HiLight (1700 W)
- Wide cooking zone ∅210/120 regular (2100 W) or HiLight (2200 W)
2. Practical tips
Ceramic hob is resistant to temperature shocks — you can put both hot and cold pots on it. Do not put large, heavy pots, which do not fit onto one cooking zone, for example small cauldrons. Ceramic glass is particularly sensitive to the point impact, e.g. with a salt shaker, condiment jars and other small, hard objects.
Observe the following rules when using the ceramic hob:
- Do not operate a cooking zone without cookware,
- Only place pots with a clean, dry bottom,
-
Immediately remove small amounts of sugar or foods (e.g. fruit compote), if possible also when hot, otherwise sugar starts to react with the hob and will cause irreparable damage,
-
Do not cook any food in aluminium foil, aluminium or plastic containers.
- Remember not to scratch the ceramic glass, for example with dirty cookware with sharp edges,
- Do not place any plastic objects on the hob, e.g. small spoons or forks, etc.
Only use cookware with lids. Lids must not extend beyond the outline of the pot, so that condensed water drips on the hob,
- If you notice deep scratches or cracks, immediately disconnect the hob from the electrical power supply and contact the customer service department.
- Ensure that children do not play with the appliance.
- This appliance may not be operated by persons with reduced physical, mental or sensory abilities (including children), or by persons with no knowledge of the appliance, unless under supervision or in accordance with the operating instructions of the appliance, provided by a person responsible for safety.
Important!
Good pot allows you to save energy. Suitable pot should have a thick, flat bottom, and its diameter should match the diameter of the cooking zone, as it provides best heat transfer properties.
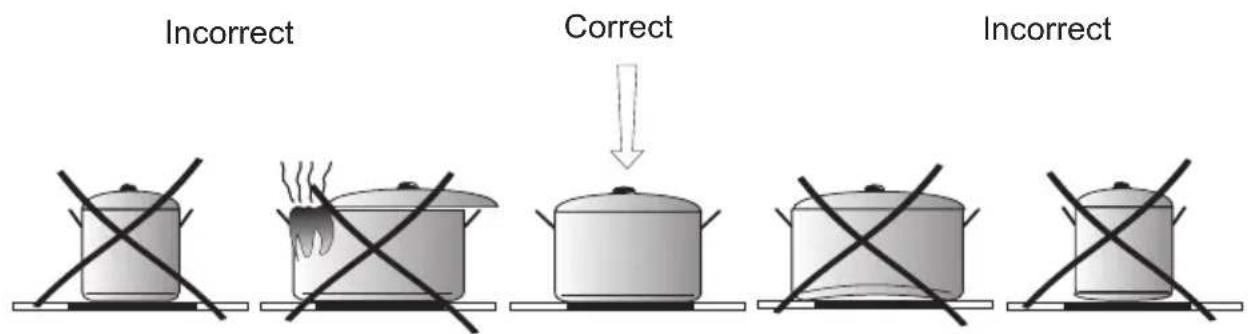
text_image
Incorrect Correct Incorrect3. Residual heat indicator
If the temperature of a heating zone exceeds 50^ C this is signalled by an indicator which lights up for that zone. When the heating indicator lights up it warns the person using the cooker against touching a hot heating zone.
For about 5 to 10 minutes after a heating zone is switched off it will still have residual heat that can be used, for example to warm up or keep dishes warm without switching on another heating zone.
4. Cleaning the ceramic hob
Clean the hob regularly after each use, if possible, while still hot. Do not allow the hob surface to burn or become heavily soiled.
- Remove light, non-sticky dirt with a damp cloth,
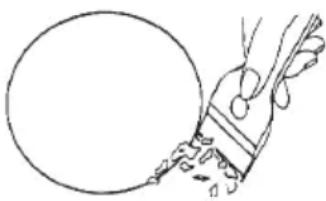
- Remove all heavy and sticky dirt with a special scraper for ceramic hobs; remember not to scratch the ceramic glass while cleaning. (scraper is fitted with a replaceable blade (see figure))
natural_image
Line drawing of a hand holding a paintbrush near a circular object (no text or symbols)Figure
In the event of damage by sugar or food with high sugar content, always, or at least each time before cooking such food, wipe the hob with a special detergent for cleaning ceramic hobs or steel containers. This detergent not only cleans, but also protects by forming a protective layer of silicone oils.
5. Connect to the control panel
Connect the hob to the control panel or the oven with a cable harness terminated with plugs. It is colour-coded (white, green, blue, black, yellow). Connect by plugging a specific-colour plug of the cable harness to the outlet in the control Panel or the oven marked with the same colour.
6. Installation
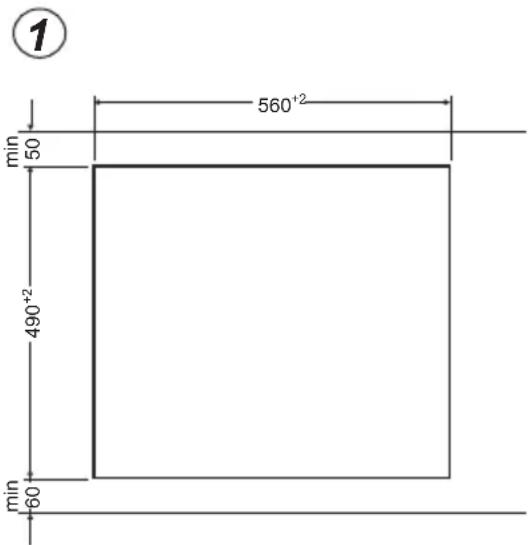
- Kitchen worktop must have a thickness of between 28 and 40 mm and depth of at least 600 mm. It must be flat and horizontal. Space between the wall and the worktop must be protected against ingress or water and moisture
- The distance between the edge of the opening (cut-out) and the edge of the worktop should be at least 60 mm on the front side, and at least 50 mm at the rear.
- Kitchen cabinets for built-in appliances must have a veneer finishing, and adhesives used must be resistant to temperature of 100°C. Failure to comply with this requirement may result in deformation of the surface and veneer peeling.
- The opening (cut-out) edges should be protected with a sealant providing water resistance to prevent swelling of the product.
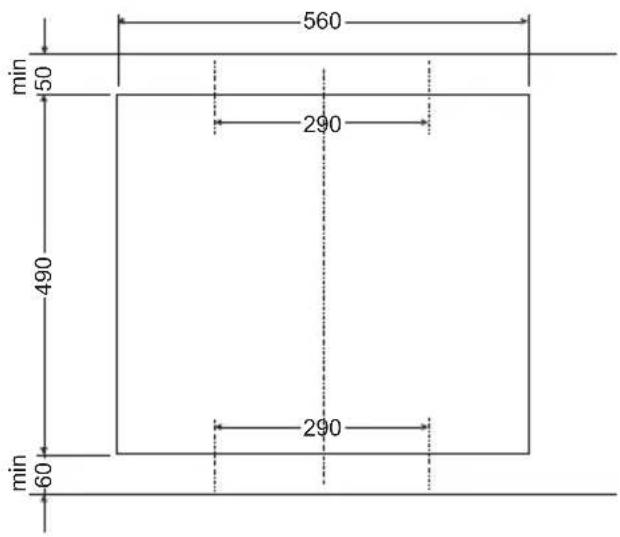
- Worktop opening must be cut to dimensions as shown on Figure 1.
- Leave space of at least 80 mm under the hob, to ensure proper air circulation and avoid excessive heating of parts around the cooking zone.
text_image
① 560⁺² 50 490⁺² 60 min minAssembly of the gasket
*Depending on the model, the seal is already installed at the factory (fig.1)
If the seal has not been fitted at the factory, proceed as follows:
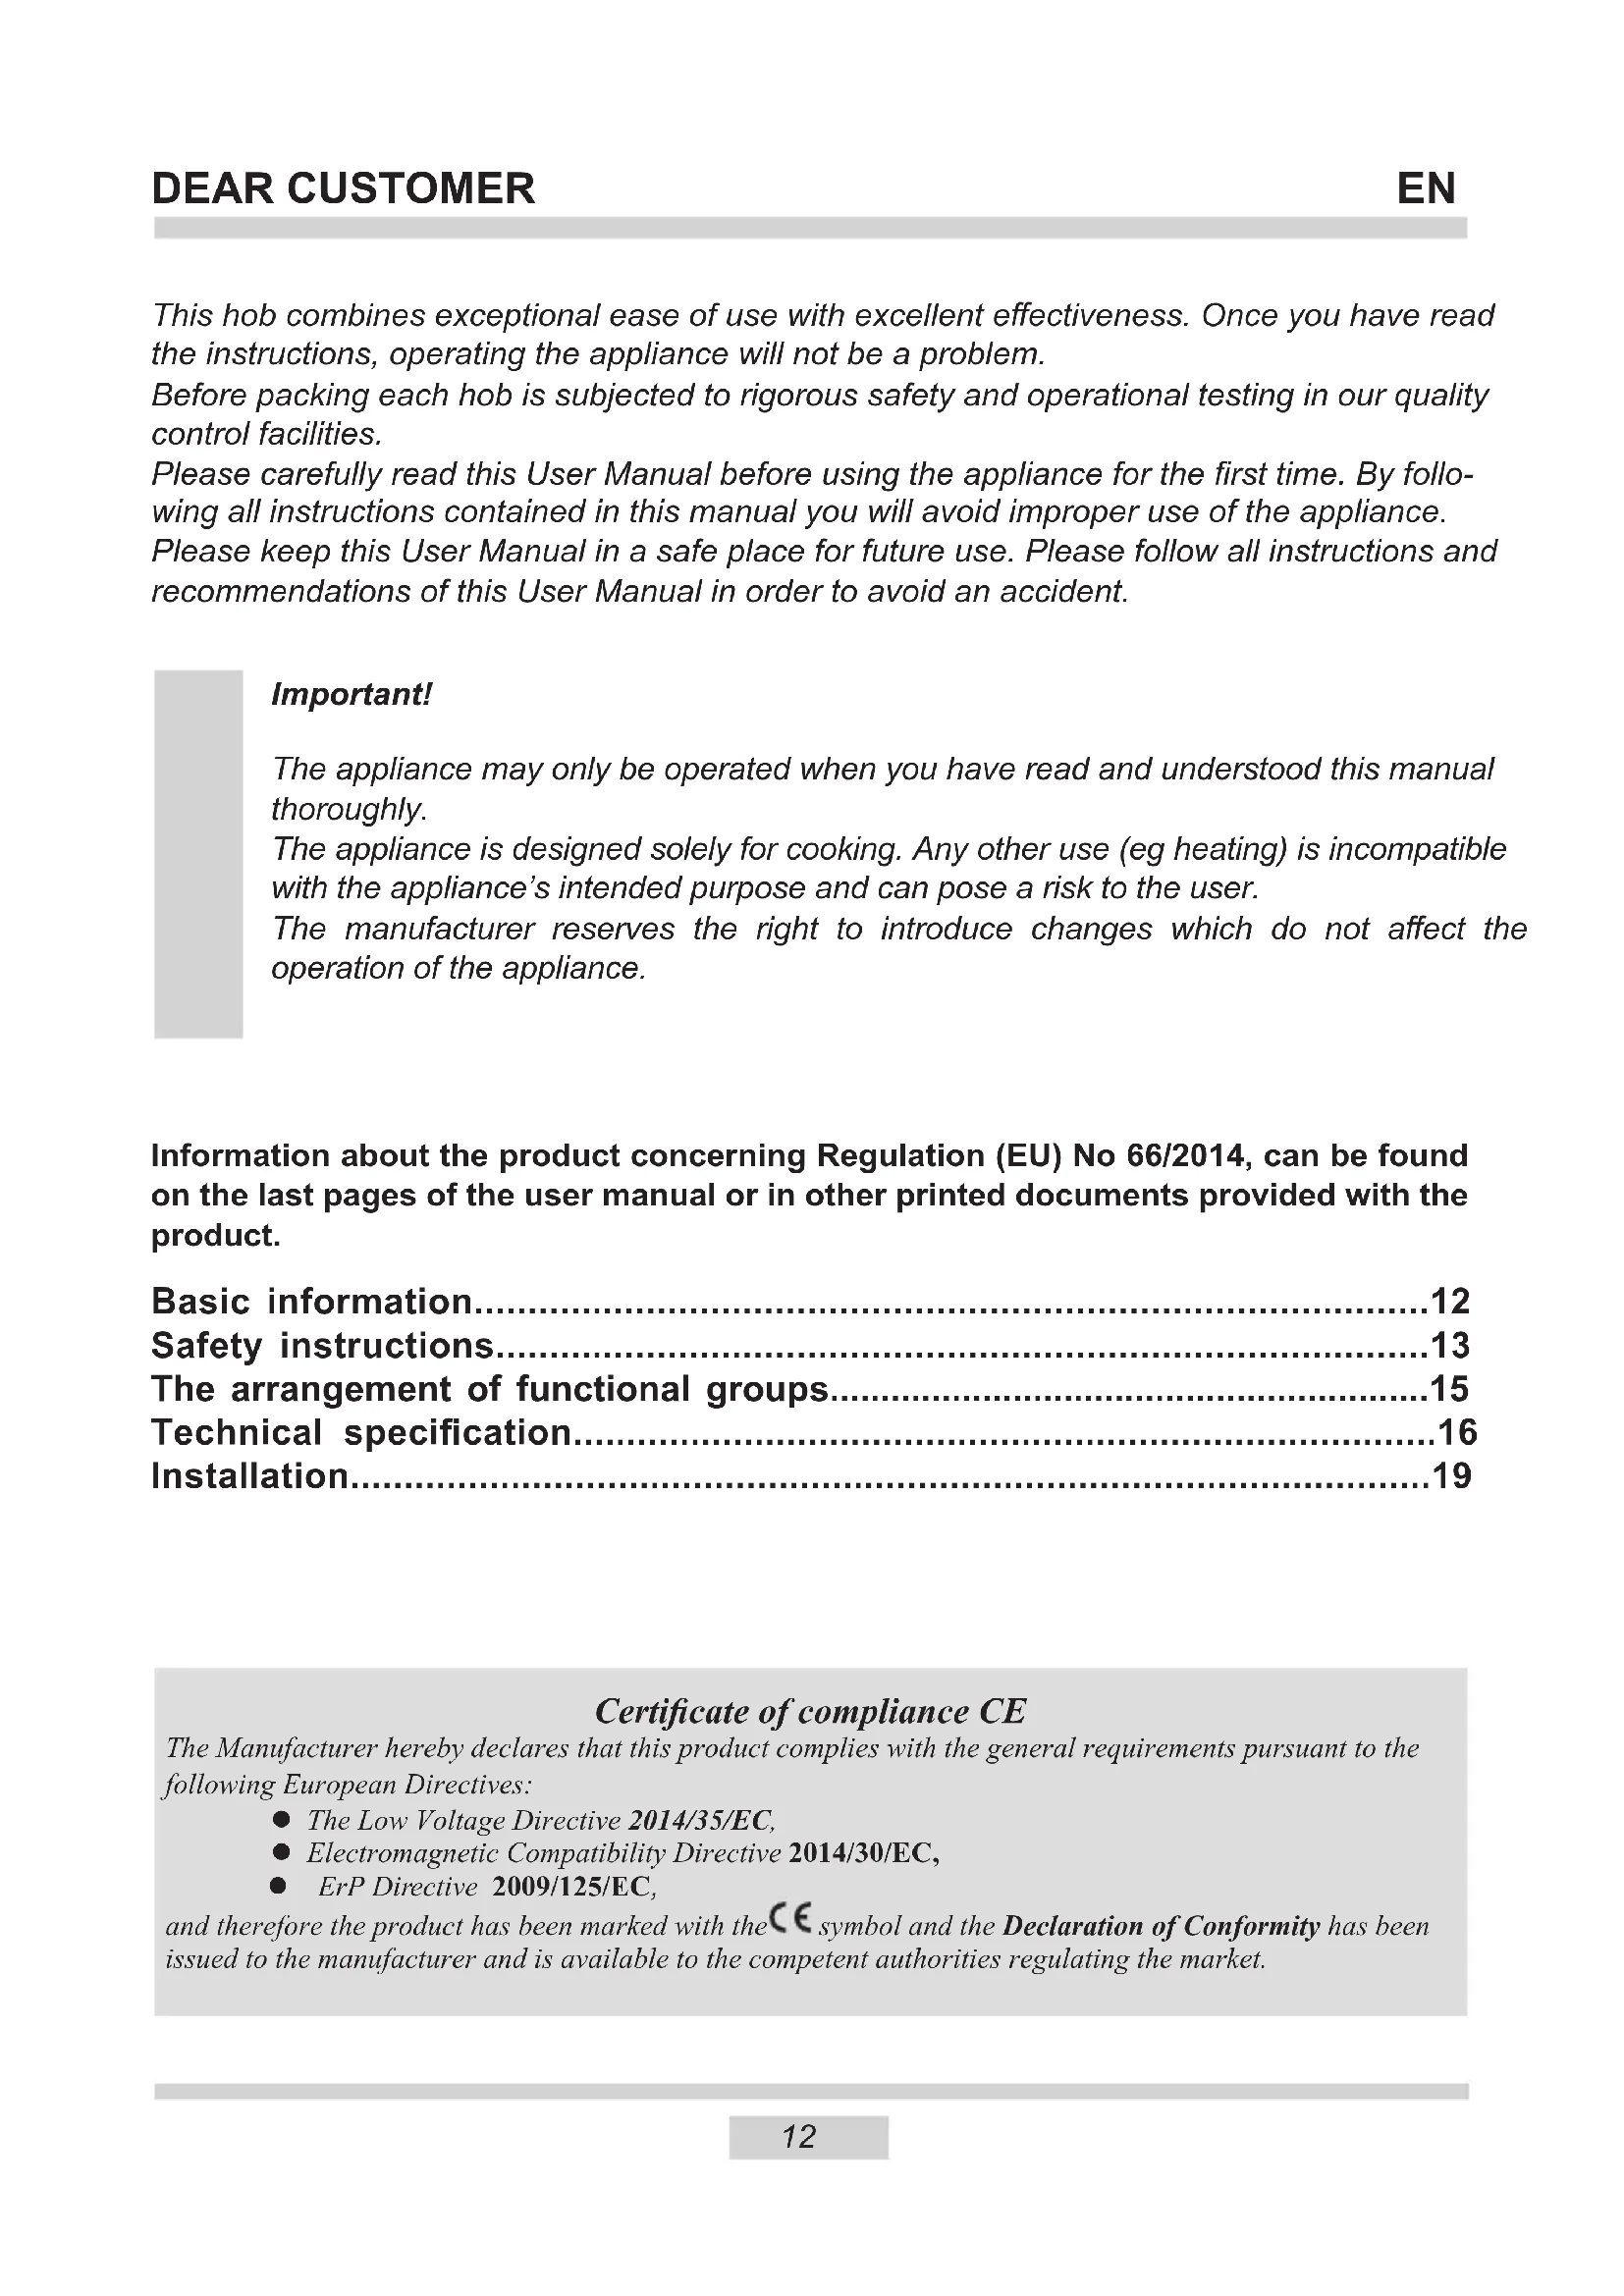
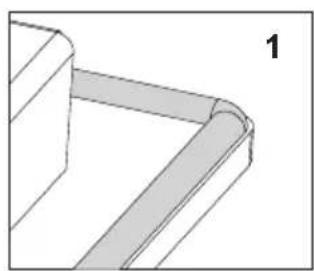
Before installing the hob in the cut-out worktop, the gasket is to be attached to the back of the hob (pic. 2)
To do this, first peel off the protective film from the self-adhesive seal and glue the gasket as close as possible to the outer edge of the hob (fig. 3,4).
natural_image
Pure 3D geometric diagram of a curved bracket or corner structure without any text, numbers, or symbols
natural_image
Simple line drawing of a 3D geometric shape with no text or symbols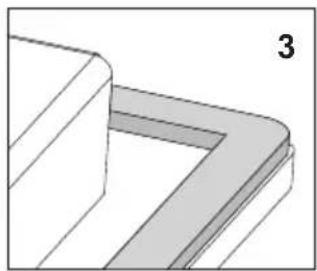
natural_image
Pure 3D geometric diagram showing a corner with a shaded rectangular area, no text or symbols present
natural_image
Diagram showing a spiral-patterned object being cut into a rectangular block, with no visible text or symbols.
Do not install the appliance without the foam gasket.
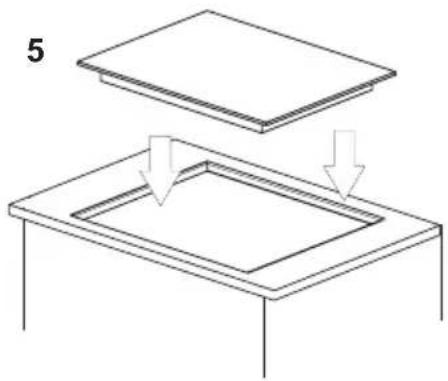
Then turn the hob over insert it into the cut-out of the furniture. Align the positioning symmetrically so that the distances between the hob and the countertop is the same on all sides. (fig. 5)
natural_image
Diagram showing two steps of folding a rectangular object, with arrows indicating downward motion (no text or symbols)Install the hob in a furniture worktop PG4\*\*
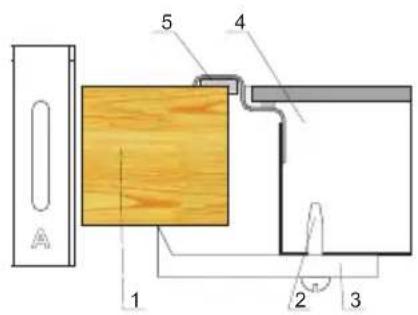
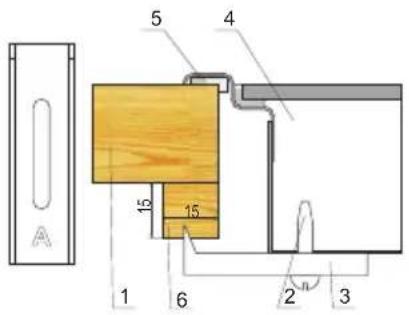
- To install a worktop with a thickness of 38 mm, use 4 "A" fixing brackets. Installation is shown on Fig. 2 and in Fig. 3. To install a worktop with a thickness of 28 mm, in addition to "A" fixing brackets, use additional 4 wooden elements with dimensions of 15x15x50 mm. Installation is shown on Fig. 4 and in Fig. 5.
- Check the hob gasket for any defects and correct fitting to the hob.
- Slightly tighten the fixing brackets from the underside of the worktop.
- Clean the worktop, place the hob in the opening and push into worktop opening.
- Put the fixing brackets vertically to the edge of the hob and tighten.
2
text_image
A 1 2 3 4 5- Worktop
- Bolt
- Fixing bracket
- Hob
- Hob
4
text_image
5 4 15 15 1 6 2 3- Worktop
- Bolt
- Fixing bracket
- Hob
- Hob
- Wooden element
③
text_image
560 min 50 290 490 290 min 605
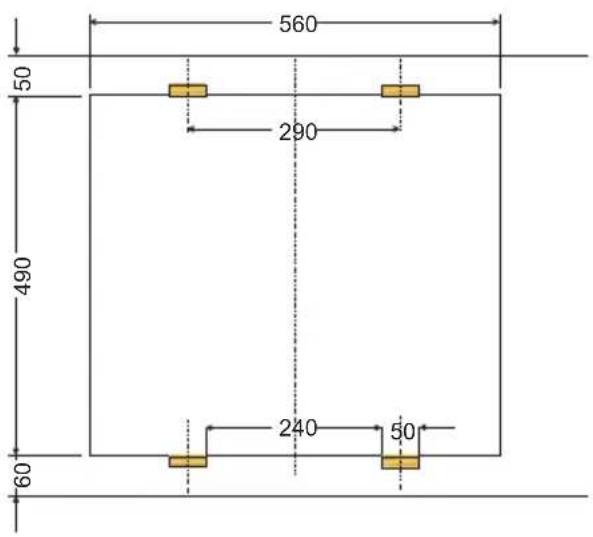
text_image
560 50 290 490 240 50 60* in some models the gasket is attached to the hob.
Installation in the furniture worktop PB\*4V\*0...
- Cut the opening in the furniture worktop according the dimensions indicated on the figure (Fig. A).
• The minimum clearance under the hob is 80 mm. - Connect the hob with a power cord according to the attached diagram.
- Select the power cord core cross-section to match to the hob power (this should be done by an authorized installer).
- Check the hob gasket for any defects and correct fitting to the hob*
- Clean the worktop, place the hob in the opening and push into worktop opening.
Fig. A
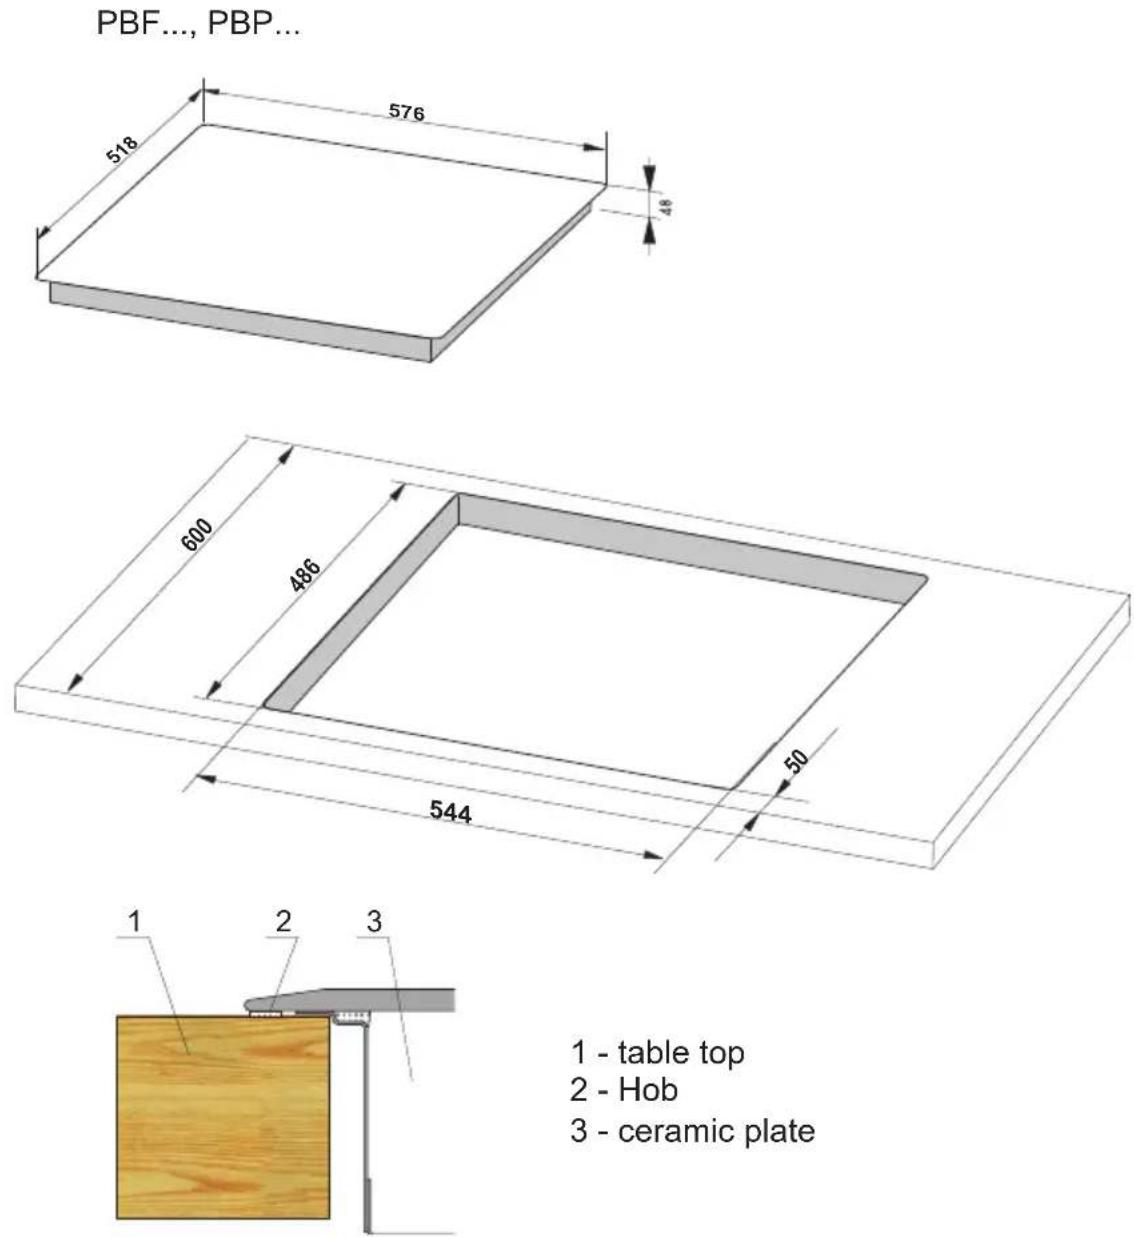
1 - table top
2 - Hob
3 - ceramic plate
natural_image
Symbol of a recycling bin with crossed lines and a battery, no text or labels presentnatural_image
Line drawing of a hand holding a paintbrush near a circular object (no text or symbols)Tekening
natural_image
Pure technical line drawing of a 3D mechanical part with no text or symbols
natural_image
Pure 3D geometric lines forming a stepped corner (no text or symbols)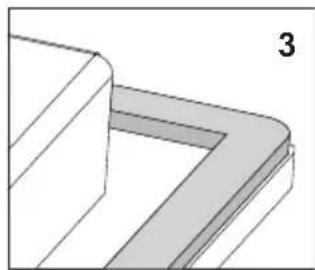
natural_image
Pure 3D geometric diagram showing a corner bracket with no text or symbols
natural_image
Diagram showing a spiral-patterned object on a wooden shelf, with no visible text or symbols
natural_image
Diagram showing two steps of folding a rectangular frame, with arrows indicating downward movement (no text or symbols present)natural_image
Symbol of a trash bin with crossed lines and a circular element, no text or labels present.natural_image
Line drawing of a hand holding a paintbrush near a circular object (no text or symbols)Zeichnung
natural_image
Pure 3D geometric diagram of a curved bracket or corner (no text or symbols)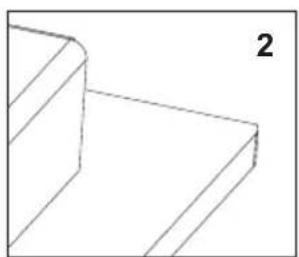
natural_image
Pure 3D geometric lines forming a stepped corner (no text or symbols)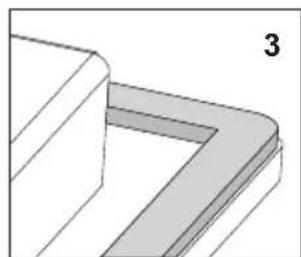
natural_image
Pure 3D geometric diagram showing a stepped corner with shaded regions, no text or symbols present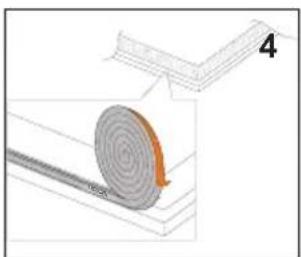
natural_image
Diagram showing a spiral-patterned object on a textured surface, with no visible text or symbolsnatural_image
Diagram showing two views of a rectangular frame with downward arrows indicating compression or disassembly (no text or symbols)natural_image
Line drawing of a hand holding a paintbrush near a circular object (no text or symbols)Crtež
Kod oštećenja uzrokovanih šećerom ili hranom s velikom količinom šećera, uvijek, a najrjeđe prije kuhanja takve hrane, prebrisati ploču specijalnim deterdžentom za čišćenje keramičkih ploča ili čeličnih površina. Takav deterdžent ne samo da čisti, ali i štiti površinu stvarajući sloj silikonskog filma.
natural_image
Pure technical line drawing of a 3D mechanical part with no text or symbols
natural_image
Pure geometric line drawing of a 3D rectangular prism with no text, numbers, or symbols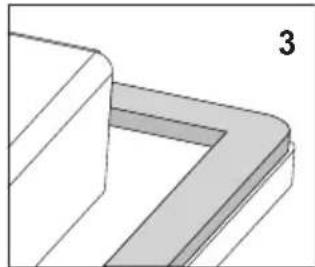
natural_image
Pure 3D geometric diagram showing a corner with a shaded rectangular cutout (no text or symbols)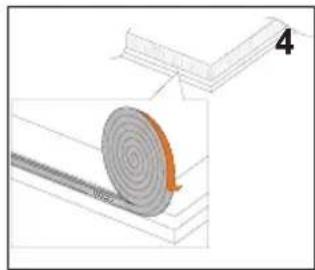
natural_image
Diagram showing a spiral-patterned object on a textured surface, with no visible text or symbols
natural_image
Diagram showing two views of a rectangular frame with arrows indicating direction, no text or symbols presentInstalacija ploče – pričvrsni element PG4\*
- Kod pulta debljine 38 mm za pričvršćivanje ploče iskoristiti 4 pričvrsna elementa "A". Način montaže je prikazan na crt.2 i 3. Kod pulta debljine 28 mm osim pričvrsnih elemenata"A" dodatno upotrijebiti 4 drvene kocke dimenzija 15x15x50 mm. Način montaže je prikazan na crt.4 i 5.
- Provjeriti da li brtva dobro leži na ploči.
- Lagano zavrnuti pričvrsne elemente ispod ploče.
- Očistiti pult, umetnuti ploču u otvor i pritisnuti na pult.
- Pričvrsne elemente podesiti okomito u odnosu na rubove ploče i do kraja zavrnuti.
③

text_image
A 1 2 3 4 5natural_image
Symbol of a trash bin with crossed lines and a horizontal bar below (no text or labels)text_image
Incorrect Correct Incorrectnatural_image
Simple line drawing of a hand holding a tool near a circular object (no text or symbols)Dessin
natural_image
Pure technical line drawing of a 3D mechanical part with no text or symbols
natural_image
Pure 3D geometric lines forming a stepped structure (no text or symbols)
natural_image
Pure geometric diagram showing a 3D corner structure with no text, numbers, or symbols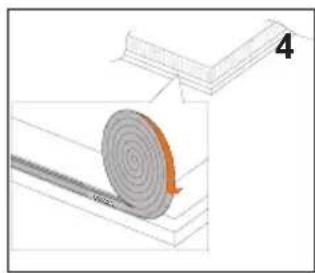
natural_image
Diagram showing a spiral-patterned object on a textured surface, with no visible text or symbols
Montaža naprave brez tesnila je prepo-vedana.
natural_image
Diagram showing two views of a rectangular frame with downward arrows indicating compression or disassembly (no text or symbols)natural_image
Line drawing of a hand holding a paintbrush near a circular object (no text or symbols)Obrázek
natural_image
Pure technical line drawing of a 3D mechanical part with no text, numbers, or symbols
natural_image
Pure geometric line drawing of a 3D block structure without any text, numbers, or symbols
natural_image
Pure 3D geometric diagram showing a corner with a shaded cutout, no text or symbols present
natural_image
Diagram showing a spiral-patterned object on a surface with a numbered label '4' (no text or symbols on the object itself)
Montaža naprave brez tesnila je prepo-vedana.
natural_image
Diagram showing two steps of folding a rectangular frame, with arrows indicating downward movement (no text or symbols present)Instalace varné desky - úchyt PG4\*
natural_image
Line drawing of a hand holding a paintbrush near a circular object (no text or symbols)Obrázok
natural_image
Pure technical line drawing of a mechanical bracket or bracket (no text or symbols)
natural_image
Pure geometric line drawing of a 3D stepped structure without any text, numbers, or symbols
natural_image
Pure geometric diagram showing a 3D corner structure with no text, numbers, or symbols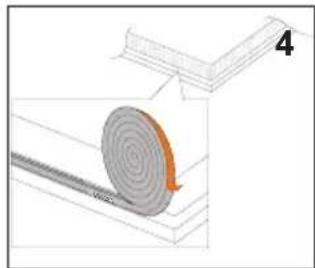
natural_image
Diagram showing a spiral-patterned object on a surface with an orange arrow indicating rotation (no text or symbols)
Vstavenie spotrebiča bez tesnenia je zakázané.