CM5050C - Coffee machine BLACK & DECKER - Free user manual and instructions
Find the device manual for free CM5050C BLACK & DECKER in PDF.
Document temporarily unavailable
The manual is currently being transferred to our new server. It will be accessible again in a few hours. Thank you for your patience.
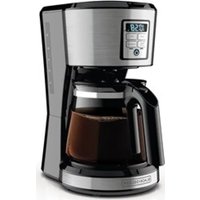
| Product Type | Programmable Coffee Maker |
| Brand | Black & Decker |
| Model | CM5050C |
| Capacity | 12 cups (60 oz / 1.8 L) |
| Color | Black |
| Power Supply | 120 V ~ 60 Hz (North American models) |
| Dimensions | Approximately 30 x 25 x 35 cm (approx.) |
| Weight | Approximately 2.5 kg (approx.) |
| Coffee Type | Ground Coffee |
| Filter | Permanent nylon filter included or basket paper filter (8-12 cups) |
| Water Filter | Removable charcoal filter (part CM5050-06) |
| Functions | Delay programming (PROG/AUTO), brew strength selection (Regular/Strong), 1-4 cups mode, Sneak-A-Cup function, automatic shut-off after 2 hours |
| Display | Digital clock, icons for programming and 1-4 cups mode |
| Warming Plate | Yes, keeps warm for up to 2 hours |
| Carafe | Glass, hinged lid, capacity 60 oz (1.8 L) |
| Replacement Parts | Filter basket (CM5050-01), water filter (CM5050-02), carafe lid (CM5050-03), carafe (CM5050-04), permanent filter (CM5050-05), water filter holder (CM5050-06) |
| Care and Cleaning | Wash removable parts in dishwasher (top rack) or by hand; monthly vinegar cleaning recommended |
| Safety | Automatic shut-off, polarized plug, tamper-resistant screw, do not immerse base |
| Warranty | 2-year limited (USA and Canada) |
| Customer Service | USA: 1-800-231-9786; Canada: 1-800-231-9786; Parts: 1-800-738-0245; Website: www.prodprotect.com/applica |
Frequently Asked Questions - CM5050C BLACK & DECKER
User questions about CM5050C BLACK & DECKER
0 question about this device. Answer the ones you know or ask your own.
Ask a new question about this device
Download the instructions for your Coffee machine in PDF format for free! Find your manual CM5050C - BLACK & DECKER and take your electronic device back in hand. On this page are published all the documents necessary for the use of your device. CM5050C by BLACK & DECKER.