
EMS 4 - Exercise bike Christopeit - Free user manual and instructions
Find the device manual for free EMS 4 Christopeit in PDF.
User questions about EMS 4 Christopeit
0 question about this device. Answer the ones you know or ask your own.
Ask a new question about this device
Download the instructions for your Exercise bike in PDF format for free! Find your manual EMS 4 - Christopeit and take your electronic device back in hand. On this page are published all the documents necessary for the use of your device. EMS 4 by Christopeit.
USER MANUAL EMS 4 Christopeit
Assembly and Exercise Instructions for Order No. 9119
F
NL
Test - (Fitness Test)
- Summary of Parts Page 3 - 4
- Important Recommendations and Safety Information Page 13
- Parts List (List of spare parts) Page 14 - 15
- Assembly Instructions With Exploded Diagrams Page 16 - 18
- Computer instructions Page 19 - 21
- Training Instructions Page 21
Dear customer,
We congratulate you on your purchase of this home training sports unit and hope that we will have a great deal of pleasure with it. Please take heed of the enclosed notes and instructions and follow them closely concerning assembly and use.
Please do not hesitate to contact us at any time if you should have any questions.
Important Recommendations and Safety Instructions
Our products are all TUV-GS tested and therefore represent the highest current safety standards. However, this fact does not make it unnecessary to observe the following principles strictly.
- Assembly the machine exactly as described in the installation instructions and use only the enclosed, specific parts of the machine contained in the parts list. Before assembling, verify the completeness of the delivery against the delivery notice and the completeness of the carton against the parts list in the installation and operating instructions.
- Check the firm seating off all screws, nuts and other connections before using the machine for the first time and at regular intervals to ensure that the trainer is in a safe condition.
- Set up the machine in a dry, level place and protect it from moisture and water. Uneven parts of the floor must be compensated by suitable measures and by the provided adjustable parts of the machine if such are installed. Ensure that no contact occurs with moisture or water.
- Place a suitable base (e.g. rubber mat, wooden board etc.) beneath the machine if the area of the machine must be specially protected against indentations, dirt etc.
- Before beginning training, remove all objects within a radius of 2 metres from the machine.
- Do not use aggressive cleaning agents to clean the machine and employ only the supplied tools or suitable tools of your own to assemble the machine and for any necessary repairs. Remove drops of sweat from the machine immediately after finishing training.
- WARNING! Your health can be impaired by incorrect or excessive training. Consult a doctor before beginning a planned training programme. He can define the maximum exertion (pulse, Watts, duration of training etc.) to which you may expose yourself and can give you precise information on the correct posture during training, the targets of your training and your diet. Never train after eating large meals.
- Only train on the machine when it is in correct working order. Use original spare parts only for any necessary repairs. WARNING: Replace the worm parts immediately and keep this equipment out of use until repaired.
- When setting the adjustable parts, observe the correct position and the marked, maximum setting positions and ensure that the newly adjusted position is correctly secured.
-
Unless otherwise described in the instructions, the machine must only be used for training by one person at a time.
-
Wear training clothes and shoes which are suitable for fitness training with the machine. Your clothes must be such that they cannot catch during training due to their shape (e.g. length). Your training shoes should be appropriate for the trainer, must support your feet firmly and must have non-slip soles.
- WARNING! If you notice a feeling of dizziness, sickness, chest pain or other abnormal symptoms, stop training and consult a doctor.
- Never forget that sports machines are not toys. They must therefore only be used according to their purpose and by suitably informed and instructed persons.
- People such as children, invalids and handicapped persons should only use the machine in the presence of another person who can give aid and advice. Take suitable measures to ensure that children never use the machine without supervision.
- Ensure that the person conducting training and other people never move or hold any parts of their body into the vicinity of moving parts.
- At the end of its life span this product is not allowed to dispose over the normal household waste, but it must be given to an assembly point for the recycling of electric and electronic components. You may find the symbol on the product, on the instructions or on the packing.
The materials are reusable in accordance with their marking. With the re-use, the material utilization or the protection of our environment. Please ask the local administration for the responsible disposal place. - For speed dependent operation mode, the braking resistance level can be adjustable manually and the variations of power will depend on the pedaling speed. For speed independent operation mode, the user can set the wanted power consumption level in Watt, constant power level will be kept by various braking resistance levels, that will be determined automatically by system. That is independent on the pedaling speed.
- The unit has a resistance device with 32 levels. This makes it possible to increase or reduce the braking resistance and thus the amount of effort required in the training. Pressing the button with n , " reduces the braking resistance and thus the amount of effort required in the training. Pressing the button n + u increases the braking resistance and thus the amount of effort required in the training.
- This machine has been tested and certified in compliance with EN 957-1 and -5 "H,A". The maximum permissible load (=body weight) is specified as 150kg .
Parts list - List of spare parts EMS 4 order No.9119
Technical data: Issue: 01.05.2009
with high accuracy in regard to class HA/EN 957-1/5
Electric induction braking
- Approx 10 kg flywheel
- 32 manually adjustable load steps
- 6 stored training programs
1 heart rate program
1 individual program
- 1 speed independent program
(50 - 350 Watt, resistance adjustable in 5 Watt steps)
- Hand pulse measurement
- Horizontally and vertically adjustable saddle (quick release)
- Saddle and handlebar inclination adjustable
- Saddle universal exchangeable
- Floor level compensation
Transport rollers - Power plug (Adapter)
-
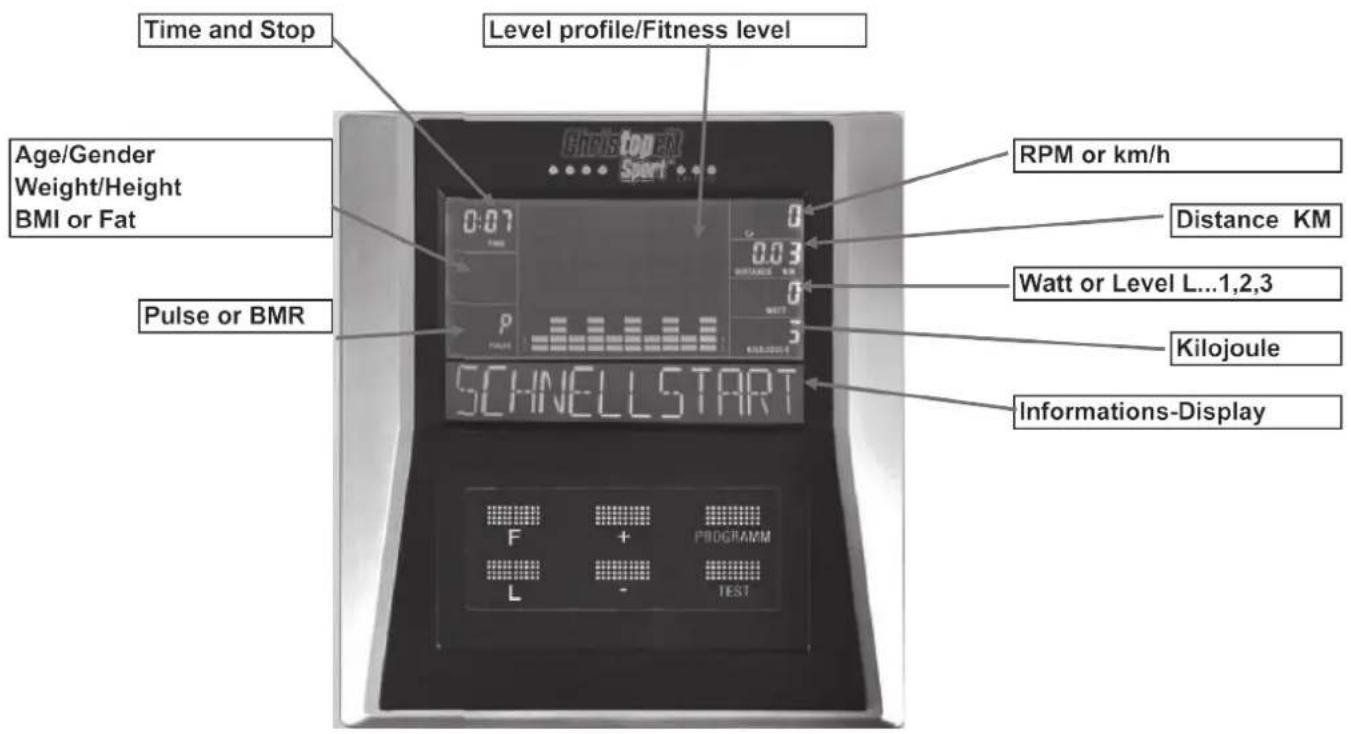
With Blue Back Light LCD Display, 7 windows display simultaneously: time, speed, distance, approx calorie consumption, Watt and pulse frequency.
-
Input of limits for time, speed and approx calories
Announcement of higher limits
Fitness-Test - Body fat analysis (BMI, BMR)
- Load max. 150kg (Body weight)
Space requirement approx L 110 x W 53 x H 137 cm
Please check after opening the packing that all the parts shown in the following parts lists are there. Once you are sure that this is the case, you can start assembly.
Please contact us if any components are defective or missing, or if you need any spare parts or replacements in future:
Assembly Instructions
Before beginning assembly, be sure to observe our recommendations and safety instruction. Remove all the part of your cycle from the carton and place them on the floor carefully. Some parts are pre-assembled.
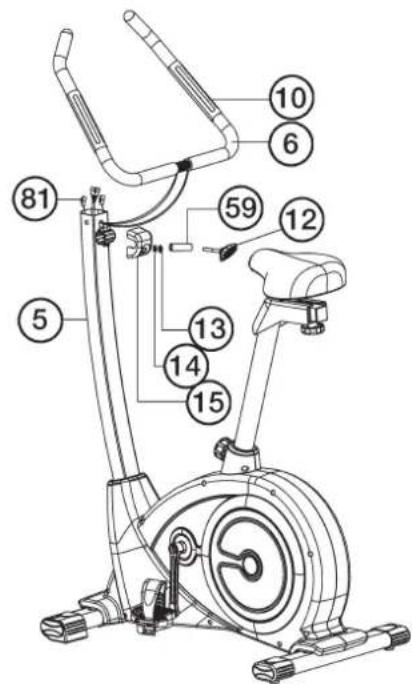
Step 1:
Attach the stabilizer (33 + 72)
- Attach the front stabilizer (33) assembled with 2 front cross bar caps (34) to main frame (62), using 2 bolts M8x55 (37), 2 washers (16) and 2 spring washers (13).
- Attach the rear stabilizer (72) assembled with 2 rear cross bar caps (69) and 2 adjustable knob (70) to main frame (62), using 2 bolts M8x55 (37), 2 washers (16) and 2 spring washers (13). (For uneven floor you can adjust the height with screw (70) and secure position with nut (71).)

Step 2:
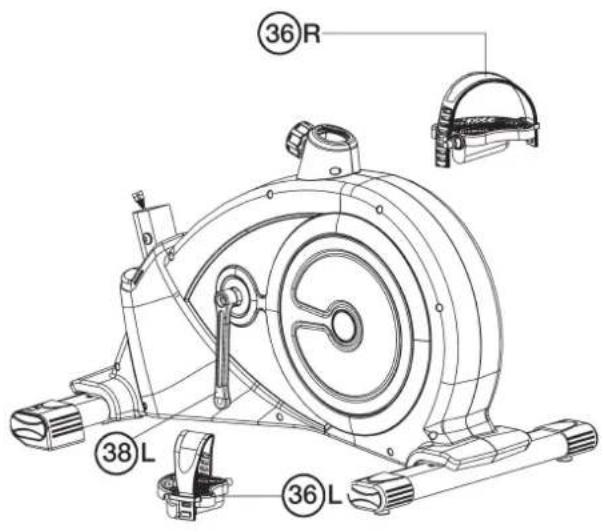
Attach the pedals (36L+36R).
- Attach the pedal straps to the pedals (36R/36L).
- The pedals (36R/36L) are marked with ^ \& ^ NOTE: Right and Left are specified as viewed seated on the machine during training. Connect each pedal (36R/36L) to the matching crank arm (38L+38R)
(NOTE: The right pedal, R should be threaded on clockwise.
The left pedal "L" should be threaded on counter-clockwise.)

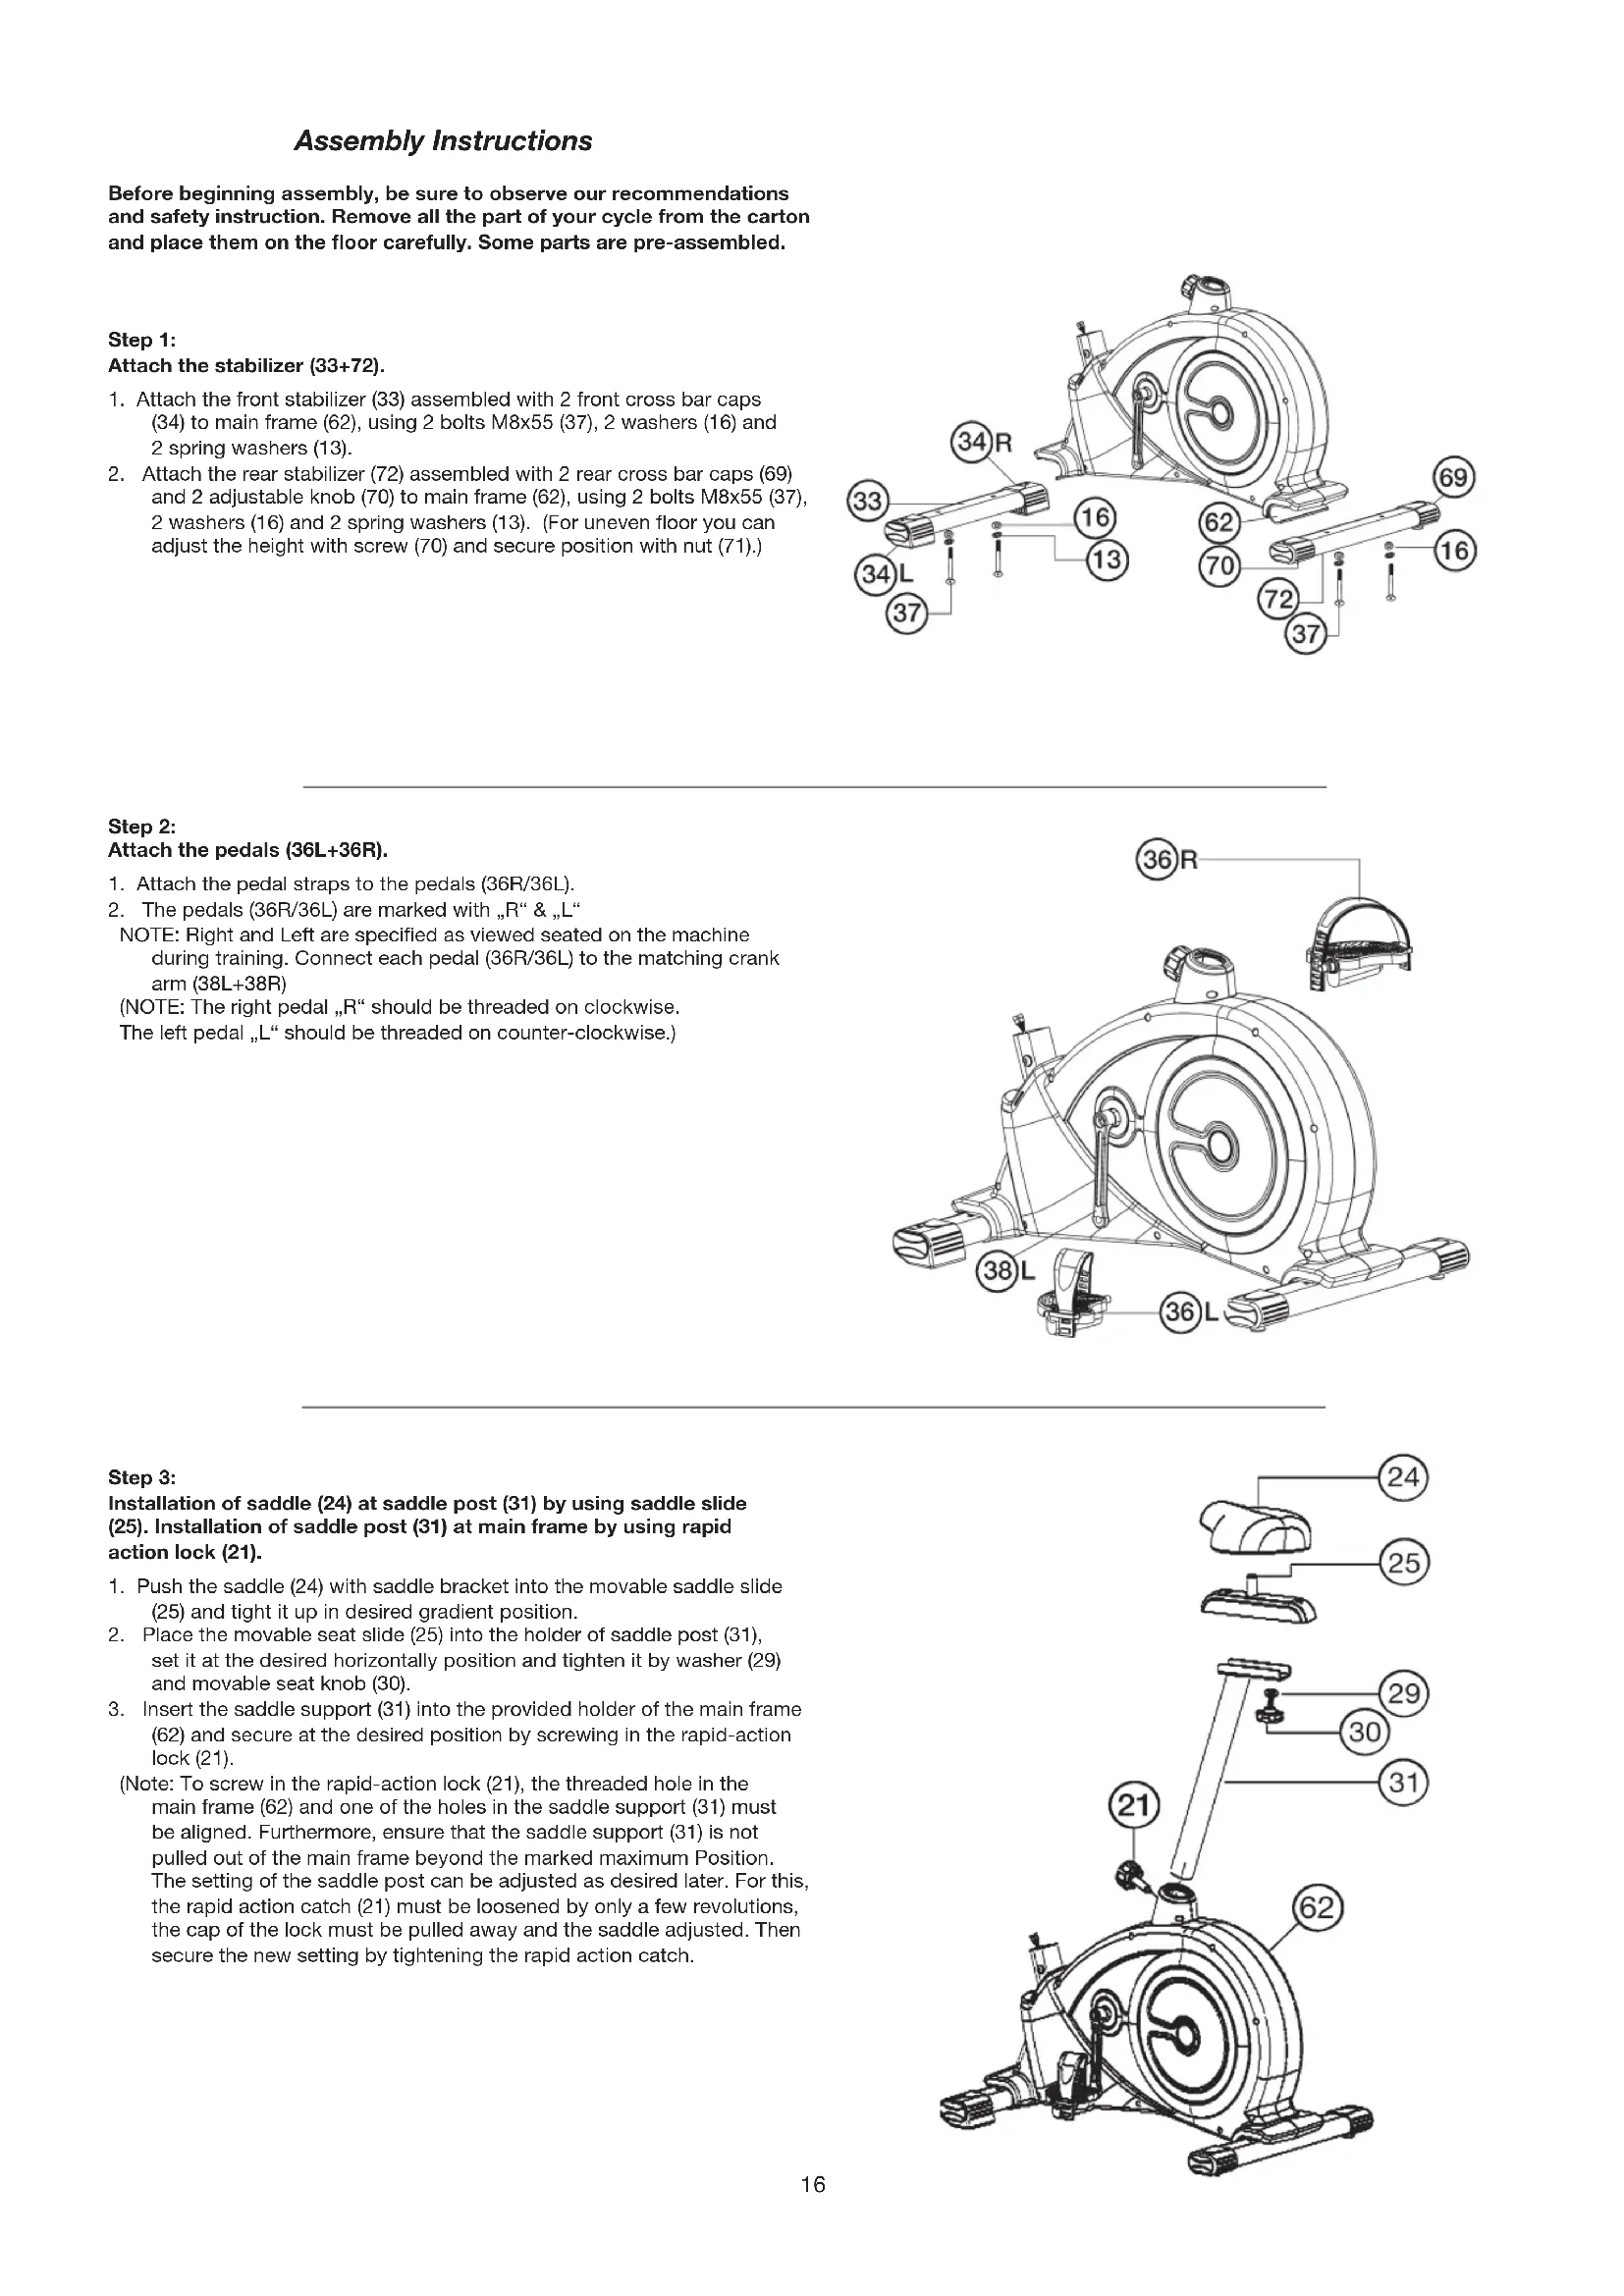
Step 3:
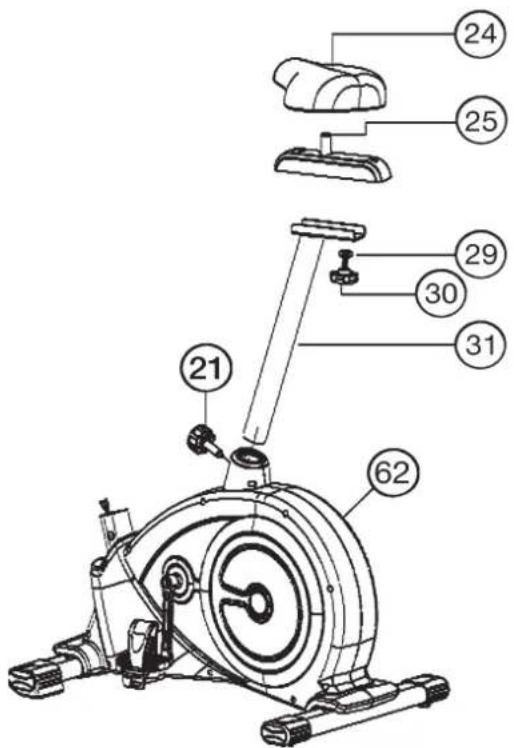
Installation of saddle (24) at saddle post (31) by using saddle slide (25). Installation of saddle post (31) at main frame by using rapid action lock (21).
- Push the saddle (24) with saddle bracket into the movable saddle slide (25) and tight it up in desired gradient position.
- Place the movable seat slide (25) into the holder of saddle post (31), set it at the desired horizontally position and tighten it by washer (29) and movable seat knob (30).
- Insert the saddle support (31) into the provided holder of the main frame (62) and secure at the desired position by screwing in the rapid-action lock (21).
(Note: To screw in the rapid-action lock (21), the threaded hole in the main frame (62) and one of the holes in the saddle support (31) must be aligned. Furthermore, ensure that the saddle support (31) is not pulled out of the main frame beyond the marked maximum Position. The setting of the saddle post can be adjusted as desired later. For this, the rapid action catch (21) must be loosened by only a few revolutions, the cap of the lock must be pulled away and the saddle adjusted. Then secure the new setting by tightening the rapid action catch.
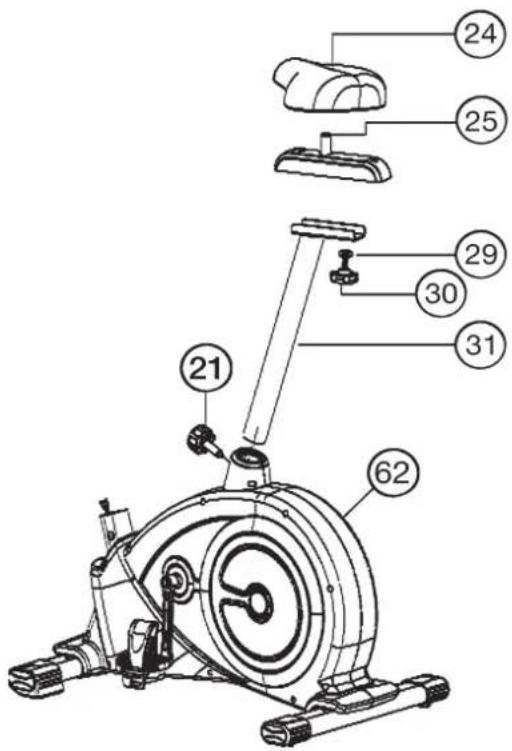
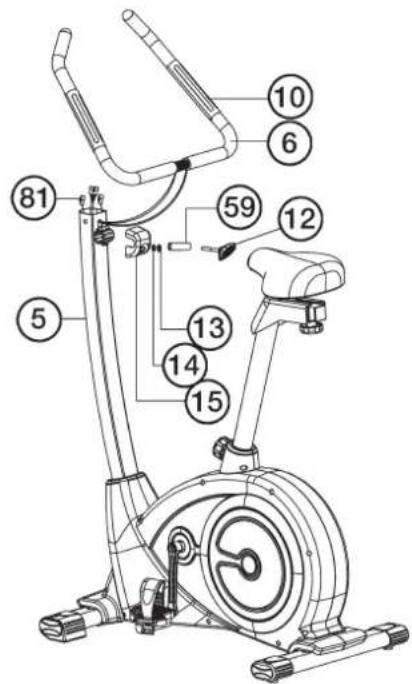
Step 4: Attach the front post (5).
- Put onto the front post (5) the front post cover (20). Attach the front post (5) to the front post mounting tube of main frame (62) and connect the plug of connection cable (19) to the socket of the circuit cable (77).
- Insert the front post (5) to main frame (62) and secure, using allen head bolts M8x16 (18), spring washers (13) and washers (16+17).
(Attention: Ensure that the cable loom are not crunched or pinched during installation.)
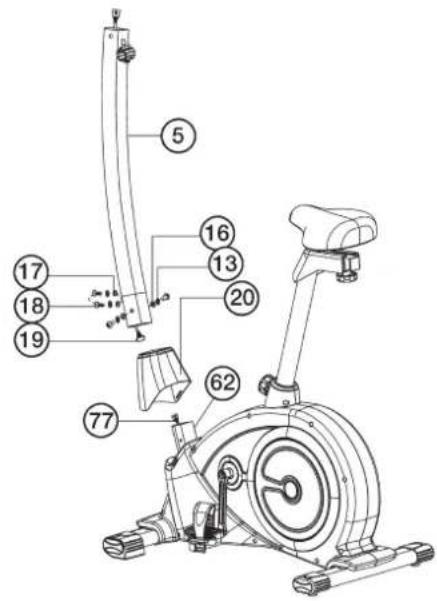
Step 5: Attach the handlebar (6) at handlebar support (5).
- Guide the preassembled handlebar unit (6) through the upper part of the handlebar post (5), put the pulse cable (81) through the hole and close the bracket of handlebar holder.
- Attach the front handlebar cover (15) at the handlebar holder of handlebar support (5) and screw the handlebar (6) in desired position at the handlebar post (5) and tighten firmly with spacer (59), spring washer (13), washer (14) and handlebar screw (12).
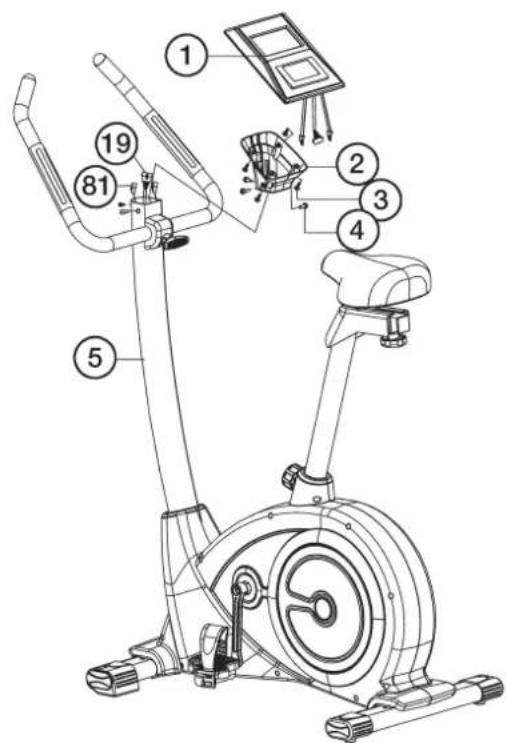
Step 6: Attach the computer (1) at handlebar support (5).
- Put the computer holder (2) onto the handlebar support (5) and attach it with screws (4).
- Push the plug of the connecting cable (19) and pulse cable (81) into the associated socket of the computer (1).
- Place the computer (1) on the computer holder (2) and attach it with the screws (3).

Step 7: Attach the AC adapter (74).
- Please insert the plug of adaptor (74) into the jack (55) of chain guard.
- Please insert the adaptor (74) to the jack of wall power (230V / 50Hz)

Step 8: Checks
- Check the correct installation and function of all screwed and plug connections. Installation is thereby complete.
- When everything is in order, familiarize yourself with the machine at a low resistance Setting and make your individual adjustments.
Note: Please keep the tool set and the instructions in a safe place as these may be required for repairs or spare parts orders becoming necessary later.
Mount, Use & Dismount
Transportation of Equipment:
There are two rollers equipped on the front foot. For moving, you can lift up the rear foot and drive it to where you would like to locate or store it.
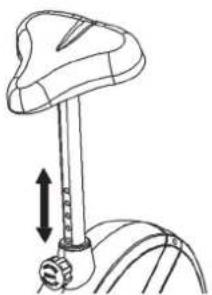
Adjustment - Seat Position
For an effective workout, the seat must be adjusted properly. While your are pedaling, your Knees should be slightly bent when the pedals are in the farthest position. In order to adjust the seat, unscrew the knob few turns and draw it out slightly. Adjust the seat to the right height, then release the knob and tighten it all the way.

Important:
Make sure to put the knob back into place in the seat post and tighten it completely. Never exceed the maximum height of the seat. Always get off the bicycle before making any adjustment.
Mount, Use & Dismount
Mount:
a. After the seat is adjusted to properly position, insert your foot into retaining strap of pedal step on the pedal and hold the handlebar tightly.
b. Try to put whole body weight on your foot and simultaneously cross over the trainer and land your another foot on the other side.
c. Now you are in the position to start your training.
Use:
a. Keep you hands on the handlebar, and both feet are insert into retaining straps of both pedal properly.
b. Pedal your exercise bike by your both feet alternately.
c. Then you can increase the pedaling speed gradually and adjust braking resistance levels to increase the exercise intension.
Dismount:
a. Slow down the pedaling speed until it comes to rest.
b. Keep the left hand grabbing the left handlebar tightly, put your feet cross over the equipment and land on the floor, then land the other one.
This training equipment is a stationary exercise machine used to simulate without causing excessive pressure to the joints, hence decreasing the risk of impact injuries.
Exercise bike offer a non-impact cardiovascular workout that can vary from light to high intensity based on the resistance preference set by the user. It will strengthen your muscles of legs and increase cardio capacity and maintain fitness of your body also.
Computer manual
Power Up
When turned on, the display with emit 3 beep sounds as all LCD displays light up.
Note: When there is no signal or data input for 4 minutes, the machine will enter sleep mode. Pedaling the machine or key selection will wake-up the computer.
Break
Workout can be break by pressing "L" - key. Workout will continue when "L" - key is pressed again.
Exercise Selection
After power-up using PROGRAMM keys to select desired mode. Then the text window will display the desired program by scrolling 3 seconds.
There are 9 basic workout modes:
Quick Start (SCHNELLSTART), Manual- (MANUELL), User- (INDIVIDUAL), Interval- (INTERVALL), Watt (WATT), HRC (ZIELPULS), Test- (TEST), Bmi-Bmr-Fat- (BMI-BMR-FETT), Mountain- (BERG) Program.
After that the text window will display "TRETEN BEGINNEN" or "MODUS DRÜCKEN" press "F"- key to set data by scrolling, it will be varied depend on different programs.
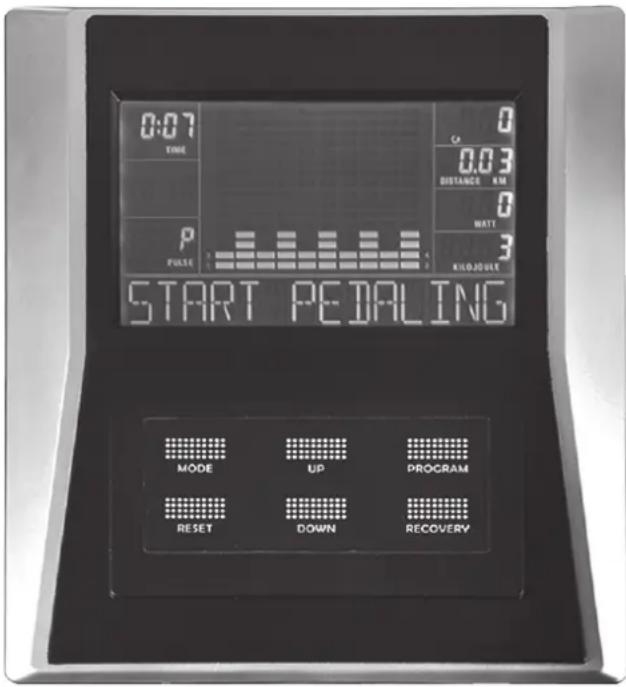
Key Functions
"F" - (MODE) To input desired value or workout mode. May advance flashing prompt to next parameter or mode for selection.
"L"-(RESET) Break & Resume workouts.
Back up to the previous prompt during data entry.
Operates only when in pause mode. Holding key for 3 seconds will reset computer to power-up condition.
"-"-(DOWN) Decrease value of selected workout parameter: TIME, DISTANCE, etc.
During the workout, it will decrease the resistance load.
“+”-(UP)
Increases value of selected workout parameter.
During the workout, it will increase the resistance load.
PROGRAMM - (PROGRAM)
Selection of workout mode: Quick Start, Manual, User Program, Interval Program, Watt Program, HRC Program, Test Program, BMI-BMR-FATT Program, Mountain Program.
Test - (RECOVERY)
After workout or during workout press Test -key and Recovery Measurement will start.
Recovery is Fitness Level 1-6 after 1 minute.
Setting Workout Parameters
After selecting desired workout mode: Quick Start, Manual, User Program, Interval Program, Watt Program, HRC Program, Test Program, BMI-BMR-FATT Program, Mountain Program may pre-set several workout parameters for desired results.
WORKOUT PARAMETERS:
TIME/ DISTANCE/WATTS/KILOJOULE/PULSE
Note: Some parameters are not adjustable in certain programs. Once a program has been selected, pressing "F"-key,
The text window will display "Select Time" 3 seconds then display "PRESS MODE TO ACCEPT" (MODUS DRÜCKEN). At the same time "0:00" of time parameter will flash.
Using "+" or "-" - key you may select desired time value. Press "F" - key to input value. Flashing prompt will move to the next parameter. Continue use of Continue use of "+" or "-" - key to select desired value then press "F" - key to input value.
After finished of setting workout parameters, the text window will display "TRETEN BEGINNEN" (Start pedaling) by scrolling. User can start the workout by starting pedaling.
| Field | Display Range | Default Value | Increment/Decrement | Description |
| Zeit | 0:00~99:00 | 00:00 | ±1:00 | 1.When display is 0:00, Time will count up.2.When time is 10:00-99:00, it will count down to 0. |
| Distanz | 0.00~999.0 | 0.00 | ±0.1 | 1.When display is 0.00, Distance will count up.2.When Distance is 1.0~999.0, it will count down to 0. |
| KiloJOULE | 0~9995 | 0 | ±5 | 1.When display is 0.0, KILOJOULE will count up.2.When KILOJOULE is 5~9995, it will count down to 0. |
| WATT | 50~350 50/80 | ±5 | WATT value can be set only in Watt/Test program | |
| Puls | 40~220 | 90 | ±1 | When Heart Rate exceeds set range, user will be alerted. |
QUICK-START-PROGRAM
After power-up, press PROGRAMM -key to enter "SCHNELLSTART" (Quick Start) -Program. Start pedaling to begin workout at this time. Press "+" or "-" -key to adjust resistance load during workout.
MANUAL-PROGRAM
Setting Parameters for Manual
Selecting "MANUELL" (Manual) using PROGRAMM -key then pressing "F"-key, 1St parameter "ZEIT" (Time) will flash so value can be adjusted using "+" or "-" -key.
Press "F"-key to save value & move to next parameter to be adjusted. Continue through all desired parameters, start pedaling to start workout. "+" or -" -key adjusts resistance load during workout.
USER-Program
User program allows user to create their own program that can be used immediately and on subsequent workouts.
Create User Profile
Selecting user program with PROGRAMM -key, Press "F"-key to select "INDIVIDUAL" (USER) mode. The text window will display "Select Profile" 4 seconds, meanwhile Segment 1 will flash. Adjust "+" or "-" key to set desired resistance load. Press "F"-key to move to next segment, continue for all 10 segments.
Setting Parameters for User Program
After that 1st parameter "ZEIT" (Time) will flash so value can be adjusted using "+" or "-" - key. Press "F"-key to save value & move to next parameter to be adjusted. Continue through all desired parameters, start pedaling to begin workout. The resistance could not be adjusted by "+" or "-" -key during workout.
Note: The final 10 segments profile will be saved for future workouts.
INTERVAL-PROGRAM
Selecting "INTERVALL" (Interval) pressing PROGRAMM -key then pressing "F"-key. The text window will display "SELECT LEVEL" 3 seconds. There are 3 levels (L1, L2, L3) to select, using "+" or "-" -key then pressing "F"-key to confirm.
Setting Parameters for Interval
After that 1st parameter "Time" will flash so value can be adjusted using "+" or "-" -key. Press "F"-key to save value & move to next parameter to be adjusted. Continue through all desired parameters, start pedaling to start workout. The resistance could not be adjusted by "+" or "-" -key during workout.
WATT-PROGRAM
Selecting "WATT" pressing PROGRAMM -key, then pressing "F"-key. The text window will display "SELECT WATT" 3 seconds. Meanwhile "100" will flash. Selecting WATT value from 100W to use "+" or "-" key then pressing "F"-key to confirm.
Setting Parameters for WATT
After that 1st parameter "Time" will flash so value can be adjusted using "+" or "-" -key. Press "F"-key to save value & move to next parameter to be adjusted. Continue through all desired parameters. Start Pedaling to start Workout, "+" or "-" -key adjusts WATT value during workout.
HRC-PROGRAM
Setting Parameters for Heart Rate Control
Selecting "ZIELPULS" (HRC) pressing PROGRAMM -key, then pressing "F"-key. 1St parameter "ZEIT" (Time) will flash so value can be adjusted
using "+" or "-" -key. Press "F" - key to save value & move to next parameter to be adjusted. Continue through all desired parameters, start pedaling to start workout.
If pulse is above or below the set target pulse, computer adjust the resistance load automatically.
It will check every 10 seconds approx. 1 level will increase or decrease (Note: each bar represents 2 level of loading)
User can not adjust resistance load, using "+" or "-" -key during the workout.
TEST-PROGRAM
Selecting "TEST" pressing PROGRAMM -key then pressing "F"-key. The display will show out average speed, total Distance, total Kilojoules and average Pulse of last workout for 4 seconds. After that the text window will display "SELECT WATT" 3 seconds, meanwhile "100" will flash.
Selecting WATT value from 100W, using "+" or "-" -key then pressing "F"-key to confirm. Start Pedaling to start Workout, Time display will show 12:00, it can not be changed.
After 12 minutes, will display Average Speed, Total Distance, Total Kilojoules and Average Pulse,
BMI-BMR-FAT-PROGRAM
Setting Data for BMI BMR FAT
Selecting "BMI BMR FETT" pressing PROGRAMM -key then pressing "F"-key.
The text window will display "SLECT AGE" 3 seconds, meanwhile "30" will flash so Age can be adjusted using "+" or "-" -key, press "F"-key to save value & move to next data.
The text window will display 'SELECT GENDER' 3 seconds, meanwhile "♀" of Gender will flash so Gender can be adjusted using "+" or "-" -key, press "F"-key to save gender & move to next data.
The text window will display "SELECT WEIGHT" 3 seconds, meanwhile "70" of Weight will flash so weight can be adjusted to use "+" or "-" -key, press "F"-key to save value & move to next data.
The text window will display "SELECT HEIGHT" 3 seconds, meanwhile "175 of Height will flash so Height can be adjusted to use "+" or "-" -key, press "F"-key to save value
Press "F"- key to start measurement, please also grip hand pulse grips. After measurement the display will show out Body Fat %, BMI and BMR. (Body Fat % and BMI will switch display to another in every 4 seconds)
-
BMI (Body Mass Index): BMI is a measure of body fat based on height and weight that applies to both adult men and women.
-
BMR (Basal Metabolic Rate): Your Basal Metabolic Rate (BMR) shows the number of calories (1 Calorie = 4,186 Joule) your body needs to operate. This doesn't account for any activity, it's simply the energy needed to sustain a heartbeat, breathing and normal body temperature. It measures the body at rest, not sleep, at room temperature.
MOUNTAIN-PROGRAM
Selecting "BERG" (Mountain) pressing PROGRAMM -key then pressing "F"-key. The text window will display "SELECT LEVEL" 3 seconds.
There are 3 levels (L1, L2, L3) to select, using "+" or "-" -key then pressing "F"-key to confirm.
Setting Parameters for Mountain
After that 1st parameter "ZEIT" (Time) will flash so value can be adjusted using "+" or "-" -key. Press "F"-key to save value & move to next parameter to be adjusted. Continue through all desired parameters, start pedaling to begin workout. The resistance could not be adjusted by "+" or "-" -key during workout.
Pulse Rate:
The whole set of heart rate detector include 2 sensors each side. Each sensor has 2 pieces of metal parts. The correct way to get detected is to gently hold both metal parts each hand. With the good signals picked up by the computer, the heart mark in the HEART RATE Display shall flash.
Sometimes the heart rate value is not useable, based on wet hands or any other contact problems during exercising. If you need high accuracy heart rate value you have to use an external heart rate measurement with a pulse belt.
Training instructions
You must consider the following factors in determining the amount of training effort required in order to attain tangible physical and health benefits:
1. Intensity:
The level of physical exertion in training must exceed the level of normal exertion without reaching the point of breathlessness and / or exhaustion. A suitable guideline for effective training can be taken from the pulse rate. During training this should rise to the region of between 70% to 85% of the maximum pulse rate (see the table and formular for determination and calculation of this).
During the first weeks, the pulse rate should remain at the lower end of this region, at around 70% of the maximum pulse rate. In the course of the following weeks and months, the pulse rate should be slowly raised to the upper limit of 85% of the maximum pulse rate. The better the physical condition of the person doing the exercise, the more the level of training should be increased to remain in the region of between 70% to 85% of the maximum pulse rate. This should be done by lengthening the time for the training and / or increasing the level of difficulty.
If the pulse rate is not shown on the computer display or if for safety reasons you wish to check your pulse rate, which could have been displayed wrongly due to error in use, etc., you can do the following:
a. Pulse rate measurement in the conventional way (feeling the pulse at the wrist, for example, and counting the number of beats in one minute). b. Pulse rate measurement with a suitable specialised device (available from dealers specialising in health-related equipment).
2.Frequency
Most experts recommend a combination of health-conscious nutrition, which must be determined on the basis of your training goal, and physical training three times a week. A normal adult must train twice a week to maintain his current level of condition. At least three training sessions a week are required to improve one's condition and reduce one's weight. Of course the ideal frequency of training is five sessions a week.
3. Planning the training
Each training session should consist of three phases: the warm-up phase, the training phase, and the cool-down phase. The body temperature and oxygen intake should be raised slowly in the warm-up phase. This can be done with gymnastic exercises lasting five to ten minutes.
Then the actual training (training phase) should begin. The training exertion should be relatively low for the first few minutes and then raised over a period of 15 to 30 minutes such that the pulse rate reaches the region of between 70% to 85% of the maximum pulse rate.
In order to support the circulation after the training phase and to prevent aching or strained muscles later, it is necessary to follow the training phase with a cool-down phase. This should be consist of stretching exercises and / or light gymnastic exercises for a period of five to ten minutes.
4. Motivation
The key to a successful program is regular training. You should set a fixed time and place for each day of training and prepare yourself mentally for
the training. Only train when you are in the mood for it and always have your goal in view. With continuous training you will be able to see how you are progressing day by day and are approaching your personal training goal bit by bit.
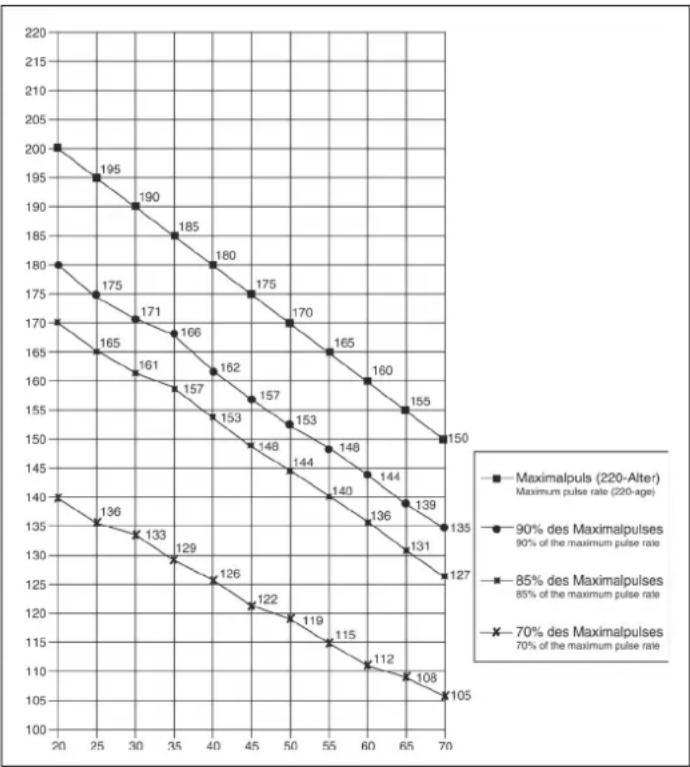
Calculation formula: Maximum pulse rate = 220 - age (220 minus your age)
90% of the maximum pulse rate = (220 - age) x 0.9
85% of the maximum pulse rate = (220 - age) x 0.85
70% of the maximum pulse rate = (220 - age) x 0.7
Chere cliente, cher client,
Dimensions approximatives : L 110 x I 53 x H 137 cm.
Programme Individual (INDIVIDUAL)
PROGRAMMMA-(PROGRAMMA)
Selecteren van de workout modus: Snel starten, Handmatig, Gebruikersprogramma, Intervalprogramma, Watt Programma, HRC Programma, Testprogramma, BMI-BMR-VET Programma, Bergprogramma.
Test - (Recovery)
Recovery is Fitness Level 1-6 na 1 minut.
Exercise Parameters
3. Planning van de training
Uar 2: MoHTax neJaIe (36R + 36L).
- YctaHOBtE cKcnpyUOuNE JeHTbI neJaTe Ha COOTBeTCTByOuNe neDann (36R/36L).
- YctahOBInTe neaI (36R/36L) Ha pbHBrn neaIe (38L+38R).
IeannmmeoTMapKupOBky,R"dna npaBoi n,L"dnna neBoi.
(BHMaHHe:JeBaHa npaBaA CTOpOHa NOpa3yMeBaHOCT npn HaxoXdEHN Ha TpeHaxepe B MOMENT TpeHnpOBKn. PpaBaN neJaIb (36R)doJxHa BpauaTbcn No YacobOn CTpeJIke,a NeBaN neJaIb (36L) npOTNB YacobOn CTpeJIkn.)
Uar 3: MoTax ceIa (24) c nOmoBIO noJ3yHa ceIa (25) Ha onOpHyIO Tpy6y ceIa (31). MoTax onOpHOIO Tpy6bI ceIa (31) Ha ochOBHyIO pamy (62) c nomOsbIO 6bICTpoDeHCTByIOuero 3aTBopa (21).
- Bctabte ceIIO (24) c KpeIeHem CeIa Ha non3y H CeIIa (25) n KpeKo npIKpyTHe erO B XeJaEMOM NOJOxHIN.
- BCTaBbTe noJI3KH ceIa (25) KK KpENJIeHHe Ha onOpHOr TpyBe ceIa (31) n 3aKpeNITe erO XeJaEMOM rOpN30HTaJIbHOM nONoXeHn C nOMoUbHO rPb6KOBo BOnT (30) nNoKnAdHO wA#6bl (29).
- Bctabntb onopnyo Tpy6y ceIa (31B npedycmOTpeHHoe dIa 3TOrO KpennneHn Ha OCHOBHO pame (62) n 3aФNKcnpoBaT b c NOMoubIO 6bICTPOeICTByUoero 3aTbopa (21). (BHMAMHe! Pn3 zakpyuHaHN 6bICTPOeICTByUoero 3aTbopa (21) pe3b60oe OTBepCTNE B OCHOBHO pame (62) n OdHO n3 OTBepCTN B ONOPHO Tpy6e CeIa (31) DOnKHBn HaxODNTCB Apyr NaD pyrom.. TaKxe OpaTne BHIMAHne Ha To, YTO6bl ONOPHAR Tpy6a CeIa (31) He BIXOINa I3 OCHOBHO pambl DaIbwe MapKnpoBaHNO MAKCImalBOH NO3uIN peryNPOBKN. OnopHAR Tpy6a CeIa MoKeT No3xe npOImBolHo peylnpoBAcTcB. Ira 3Toro HeO6XoIMO HEMHORO OCAnbT b 6bICTPOeICTByUOoi 3aTbOP (21) NocpeIcTBOM He6lonuoro NobOpauHBAHn, 3aTeM BbITRHyb Ero IAOOCBOOXeHn PHKCaUN BBICOTb, INpeCTABNTb BbICOTy CeIa B XeNaEMO NOONeHne. Nocne XeNaeMoH NaCTPoiKn 6bICTPOeICTByUOoi 3aTbOP (21) CHOBA 3akpenTb NocpeIcTBOM 3akpyuHaHN).
War 4: MoTax onopnoI py6bI pyra (5).
1.ПОДБЕДЛТЕ ONOPHYTOpy6ypyI(5)KKPENJIENHOHaOCHOBHpaMe(62),HADEHbTe KOKyX ONOPHO Tpy6bI(20)N COeINHTe KOHTPOJIbHbIKaBb(77)CcoeINHHTeNbHM KaBeIem(19).
2. BCTaBbTe onOpHyTo Tpy6y pyn8 (5 B COOTBeTcTBHyOoee KpENneHHe Ha OCHOBHO paMe (62) u 3aФИKcPnyTe ee c NOMUbIO 60NTOB M8x16 (18), npYXHHbIX Wai6 (13) nNoKJIaHbIX Wai6 (16+17).
(BHMaHHe: O6paTne BHMaHHe Ha To, YTo6bI Ka6eBHOe CoeHNHeHHe 3aueMnAIOcb.)

Uar 5: MoHTax pyna (6) Ha onopHyTO Tpy6y pyna (5).
1.ПОДБЕДNTеpy6)КOTKpbITOMyKpePnneHNOpyHaONOPHO Tpy6 (5),npODeHbTeKaBebJaDaTmkaYepe3OTBepCTNeHaONOPHO Tpy6 (5)иЗakpoIteKpenneHnepyHaNpEm(6).
2. HadehTe 3aunThb Koxyx pyr (15) Ha pyb (6) n zakpenTe pyb (6 B Jenaemn PO3uHa onopHOn Tpybe pyra (5) C nomooh 6apaokoboro BNHTa (12), npomexkytoHoro TeHa (59), npyknHou waib(13) n noKnadno wai6bl (14).
Uar 6: MoHTax KOMNbIOTepa (1) Ha onophyIO Tpy6y (5).
- Hanehe Te Kpenenne He KombIoTepa (2) Ha BepxHn KoHeu OnOpHou Tpy6bI (5) n Kpenko npnkpyTne er c nOmoB 6oTob (4) KOnOpHou Tpy6e (5).
2.BCTaBbTe coeHHTenbHbI Ka6eNb (19) n Ka6eNb DaTnKa npNbca (81) B COOTBeTCTBIOUne THe3Da KOMNbOtepa (1). - Bctabte KOMnbOpTe (1) B COOTBeTCTByIOuee KpENHeHne (2) (O6paTTE BHNMaHne Ha To, TTo6bI Ka6ebNHOe CoeINHeHne He 3aUeMnIIOCb) IN KpEnKO pPnKpyTtE KOMNbOpTe (1) C NOMOuBo 6oITOB (3) HA KpENHeHne KOMNbOpTepa (2).
War 7:
Iopknloeyne6loka nntaHn74).
- BCTaBtE 6TKeP 6nKa nTaHn7 (74) B COOTBeTCTByIOUe e rHe3do (55) Ha 3aDHeM KOHcE O6uINBKN.
- 3aTeM BCTaBbTe 6JIOK NITaHn (74) B po3eTky (230V-/50Hz).
War 8:
KoHTpoJIb
- PpOBepbTe Bce CoeDInHeHn Ha npaBnBHOCTb C6OpKn n pOBeDnte npOBepKy cyHKUHOHaJIbHOCTn. Ppn 3OM MOHTax ChNTaeTcra 3aKOHueHHbIM.
- EcnnBce B npAke, npoBeDnTe npo6HyTo TpeHnpOBy npn MaIeHbKo Harpy3Ke, nocJe Yero INDbNduaIbHo HacTpoNe TpeHaKepe.
3ameyane:
IoxaIyIcTa, coxpaHnIte Ha6Op IHCTpyMeHTOB IINocJeUnx BO3MOXhIx pEmOHTOB INHCTpyKUINO MOHTAXy IINBO3MOXhIX 3aKa3OB 3aNaChbIX YAcTei.

IoiB3OBaHne TpeHaXepom
Ionb3OBaHne TpeHaXepoM
Ha nepeHne HoxKe HaxoAryc Da TpaHCnOpTnpOBOHybIX pONka. Ira TORo, YTo6bl nepeBnHybT TpeHaeKep Ha dpyroe MeCTO nIIN NOMeCTHT Ha MecTO XpAHEnH, BO3bMntEc3a pyNBnHakNoHtpeHaeKep Ha nepeDHOIO HOXky TaK, YTo6bl TpeHaeKep MOxHO 6blno NERKO nepeBnHybTC NOMOsbIO TpaHCnOpTnpOBOHybIX pONkOB HA HyKHOe MeCTO.
PerynpoBka BbICOTbI ceHa:
IINPnHHTN yD06HOrO NOLOXeHN Ha CeIe Bo Bpemr TpeHnpOBKn, Heo6xOJIMO yCTaHOBnTb npabunbHyIO BicOTy ceIa. IpaBnBbIM NOLOXeHNm CEIa CHTaETCA NOLOXeHne, KOrJa KOJIeHN B HIXKHeM NOLOXeHN nEaII HAxoIATCR B HemHOrO cHryOM NOLOXeHNn H MeMOT 6bIT Do KOHcA BInpammeHb. IINy UcTAHOBLeHNr npabunbHorO NOLOXeHNCeIaOCa6bTe OHOHpyKO6bICrPOeCTByIOU3 3aTbOp IN BbITAHnTE rPi6OK, Dpyro pyKoNEpcTaBtE ceINO B XeNaEMoe NOLOXeHne. OTnyCTnte rpi6ok, YTO6bl OH 3anaI N KpENKO 3akpyntte erO.
BaxHo:
YdoCTOBepbTecb TOM, YTO bIcTPOeNCTBIOU3aTbOp 3aФNKcnpoBaH IN KpENKO 3aKpyHe. He BbITACKnBaTe OONPHyIO Tpy6y cedna do KOHua H Me MeHrTe No3uHm CEda BO BpeM TpeHnPoBKn.
Cauntbca n cnYcKaTbca c TpeHaKepa:
CaNTbCnHa TpeHaxKe:
Iocne yctahOBnEHn npabunbHOB bICOTb CeDna BO3bMNTecb 3a pyNb. YcTahOBnTE 6nnKaWyIO neDanb B HxHIO NO3nIO n BDeHbTe CTynHIO BΦNKcnpyoUIN pEmoK TAK, YTObI OHa HaxOuNacB HAdEcxHom noOnKeHN Ha neDanI. PepeKnHbTe dpyrHy HOY Ha npotnbONNoXHyO CTOpOHy IN CAnbTe HA cEDNO. PpN 3OM KpeKNo DePckntecb DByMR pykAMn 3a pyNb. Nocne 3TORo BDeHbTe dpyrHy CTynHIO BΦNKcnpyoUIN pEmoK neDanI.
Nonb30BaHne:
Depxntecb DBym pykam 3a pynb HcBCTabaiTe CceNa BO Bpem TpeHnpOBKn. Cneinte 3a Tem, yTo6bl CTynn Ha neJaIHX BCE Bpem TpeHnpOBKn 6bln 3aФнкpObaHbI peMeuKamn.
CnyckaTbcn C tpehakepa:
PpeKpaTnTe TpeHnpOBky, KpENKO Deepkac 3a pynb. Chmnte Chauana Ondy CtyNHc NeJaN IN NOCTaBte ee HaJeKHOM nIOJKeHN HA ONI COUITE C cedna. Chmnte Notom DpyTuO CTynHc N neJaIN IN NOCTaBte ee HA ONI COUITE M TpeHaxepa.
3TOT Tpehakep - HnOdBHXHbI DOMaunH Tpehakep, MMInTppyoUe 3dy Ha BEnocnepe. I3-3a TpeHIpOBKn npn IIObo noroDe, 6e3 BHeuHX Bo3dEiCTBn, a TaKxe 6e3 daBHeHn Pn e3e B rpynne yMeHbwaetcBepoHTHOCTb naehnna nepeyTomHeHHa.
I3-3a BO3MOXHOCTN I3MEHINr COpOTnBHeHn, E3da Ha BENOCnEe IpeoCTabnRETO3MOXHOCTb TpeHPOBKn CepDeHOCyDnCTOcNCTEmbl 6e3 Ype3MePHORo HAnpJxHEnr. PInr 3TOM BO3MOXHa 60Jee IMn MeHee INTHCnBHn TpeHPOBKa. PtIg 3TOM TpeHNpyTCnHXHnKeOHcHOctn, YkpePNlReTc CepeHo-cocyndctar CnCTema nCnOCo6CTByTe cNoDepKanHe XopoOwe cnOpTNBHOfopMbI.
OncanHe KOMnIbIOTepa
BkIIOUeHne
PnBKJIIOUeHm KOMNbIOTepa,3aropaiOTcBce IINCIIEN pa3dAIOTc3 3ByKObIX CnHaJa.
Yka3aHHe: Pocne 4-x MNHyT 6e3 noDaHn CnHnAHa nIn BBOda daHbIX KOMNbIOTep nepeBOOHTcB COCTOHN E NOKo. DnKHeHne neJaen nn HauKaTne Ha KJIaBmU BblBOITN KOMNbIOTep n3 COCTOHN NOKo.
IpepepbB
IocpeDCTBOM HaxaTnHa KnaBnUy“L”BO3MOxH0 IpnoctaHOBneHKeKOMbHOTepa. Pn NOBtOpHOM HaxaTnHa KnaBnUy“L”BO3MOxHaDaJIbHeiwa TpeHIpOBka.
Iporpammbi TpeHnpobkn
IocpeDCTBOM HaxatnaHa KlaBnuy PROGRAMM (PPOPGAMMA) BO3MOXeH Bb6op XeJaemOn npOrpammbl. Ha3BaHne Bb6paHHoN nporpammb6eryue CTpOKO NOKa3bBAeTcra Ha DnCnlee.
9 OCHOBbIX nporpaMM TpeHnOBKn:
nporpamma 6bictpbn cnap (SCHNELLSTART), nporpamma pyhnoyctahOBKn (MANUELL), INHINBNUdyaIbHa nporpamma (INDIVIDUAL), nporpamma TpeHnOboKN C hHTepBaIaMn (INTERVALL), nporpamma KOHTPOJNA NOKa3aTeN B BaTTax (WATT), nporpamma KOHTPOJNA HaCTOTbcePdeuHbIX cokpaueHn (ZIELPULS-HRC), nporpamma-TeCT (TEST), nporpamma onpeDeneHHn coedeRkaHn Xnpu TeNa (BMI-BMR-FETT), nporpamma ,ropa"(BERG).
Iocne 3toro Ha dncnnee BbIbOHTcR TRETEN BEGINNEN" (CTapT) nnn "MODUS DRUECKEN"(BbIbePte nporpammy).Ina hauaJia TpeHnpOBKn Hauhnte KpyTntb neaJIIN Nn C NOMOsbIO KlaBnIn ,F" Hauhnte 3aDaBaTb Heo6xoDmBle NOKa3aTeIN B COTBeTCTBN C BbIbpaHHo nporpAMMoI.
Функционьньгклабиш:
"F"-(CTAPT) IINI nepexoda K CneDyIOUeMy NOKa3AteHIO INI Bb6opa nporpamMbI. POKa3aTeB INI nporpamMa MOrY T 6bITb H3MeHeHb TOJbKO npm MepcaOSeHnDNkauuN.
"L"-(BO3BPAT)ПиocTaHOBJIeHneИ npOdoJIKeHne TpeHIpOBKn. Bo3Bpat KnpdeIbIyIeMу nOKa3aTeJIIO BO BpEm BA OBa nOKa3aTeJIe.ФнкцЯ He DoCTyIHa BO BpEm DnIXeHnA.ДЯ yCTaHOBKn BCEx nOKa3aTeJIe O6paTHO Ha MOpHT BkJIIOUeHnA, HaxImaJIte Ha KJIaBNIy B TeueHne 3 cekyHd.
“-”-(BHN3)ymebwaet nokaaTeNBb6paHoro napameTpa TpeHnOBKn: BPEM, PACCTOARHE nT.d.
YMeHbwaet Harpy3ky no Bpemr TpeHnpOBKn.
“+”-(BBEPX) YBJIuHnBaet noka3aTeJb Bbl6paHHoro napameTp a TpeHnpOBKn.
YBeJIuINBaet Harpy3Ky NO BpEMr TpeHnPOBKM.
PROGRAMM (ПОТРAMMA)
Bb6op nporpamm TpeHnOBoKn: nporpamma 6bIcTpb nctap, nporpamma pyHoi yCTaHOBKn, ININIBuIDyabNbae nporpamma, nporpamma TpeHnOBoKN C nHTepBaJAMn, nporpamma KOHTpon NOKa3aTeN B BAATT, nporpamma KOHTpon JAcToTb CepeDeyhIX COKpaueHn, nporpamma-TeCT, nporpamma onpeJeHENn COepeXaHn Jnpa TeJa, nporpamma "ropa".
Test - (ΦNTHEC-TECT)
Bo Bpemn no nocne TpeHnpOBKn paCCHTbIbaeT cyHKnIO BOCCTaHOBHeHHnybca, ouehnBaemyo no 1-6.
YctahOBKa nokaataene TpeHnpOBKn
Iocne Bb6opapnporpammbi (nporpamma 6bictpbn CTAP, nporpamma pyHOn yctaHOBKn, INDINBNDyAalhna nporpamma, nporpamma TpeHnPOBKn CInTEPBAJAMn, nporpamma KOHTPONA NOKa3aTeN B BaTTax, nporpamma KOHTPONA cactoTbCepdeuHbIX COKpaueHn, nporpamma-TeCT, nporpamma onPeJeENHe nCOdEcpKaHn XjPa TeN, nporpamma "ropa") BO3MOXHO n3MeHeHne nOKa3aTeNe TpeHnPOBKn.
© by Top-Sports Gilles GmbH
D-42551 Velbert (Germany)
