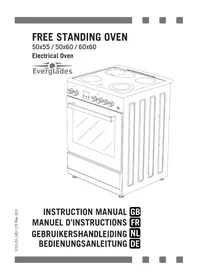
EVCK032 - Cooker Everglades - Free user manual and instructions
Find the device manual for free EVCK032 Everglades in PDF.

| Product type | Gas/electric mixed cooker |
| Brand | Everglades |
| Model | EVCK032 |
| External dimensions (W x D x H) | 600 x 630 x 855 mm |
| Oven internal dimensions (W x D x H) | 460 x 400 x 330 mm |
| Oven volume | 61 liters |
| Power supply | 230/400 V, 50-60 Hz |
| Maximum power (electric) | Approx. 7.5 kW (depending on elements used) |
| Gas type | Natural gas (G20/G25) or LPG (G30) |
| Hob burners | 5 burners: wok (3.6 kW), large (3.0 kW), medium (1.78 kW), small (0.88 kW), auxiliary |
| Electric plates | 4 plates: 2 of 145 mm (1000-1500 W), 2 of 180 mm (1500-2000 W) |
| Oven functions | Natural convection, hot air, grill, rotisserie, lighting |
| Maximum oven temperature | 280 °C |
| Timer | Mechanical (optional) or electronic |
| Safety | Automatic gas shut-off device (thermocouple) on burners |
| Cleaning | Removable door, removable glass panes, clean with damp cloth |
| Included accessories | Grid, drip pan, rotisserie (depending on version), coffee maker support |
| Approximate weight | 55 kg |
| Energy class | Not specified |
Frequently Asked Questions - EVCK032 Everglades
User questions about EVCK032 Everglades
0 question about this device. Answer the ones you know or ask your own.
Ask a new question about this device
Download the instructions for your Cooker in PDF format for free! Find your manual EVCK032 - Everglades and take your electronic device back in hand. On this page are published all the documents necessary for the use of your device. EVCK032 by Everglades.
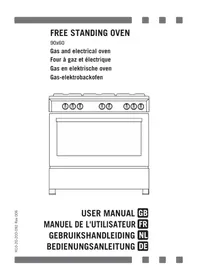
USER MANUAL EVCK032 Everglades
Our objective is to make this product provide you with the best output which is manufactured in our modern facilities in a careful working environment, in compliance with total quality concept.
Therefore, we suggest you to read the user manual carefully before using the product and, keep it permanently at your disposal.
NOTE:
This user manual is prepared for more than one model. Some of the features specified in the Manual may not be available in your appliance.
All our appliances are only for domestic use, not for commercial use.
"THIS APPLIANCE SHALL BE INSTALLED IN ACCORDANCE WITH THE REGULATIONS IN FORCE AND ONLY USED IN A WELL VENTILATED SPACE. READ THE INSTRUCTIONS BEFORE INSTALLING OR USING THIS APPLIANCE"
CONTENTS:
Important warnings
Technical features of your oven
Installation of your oven
If the appliance does not operate
Description of oven & control panel
Using cooker section
Using oven section
Using grill deflector
Maintenance and cleaning
Usage of Coffeepot support
IMPORTANT WARNINGS
Electrical Connection and Security:
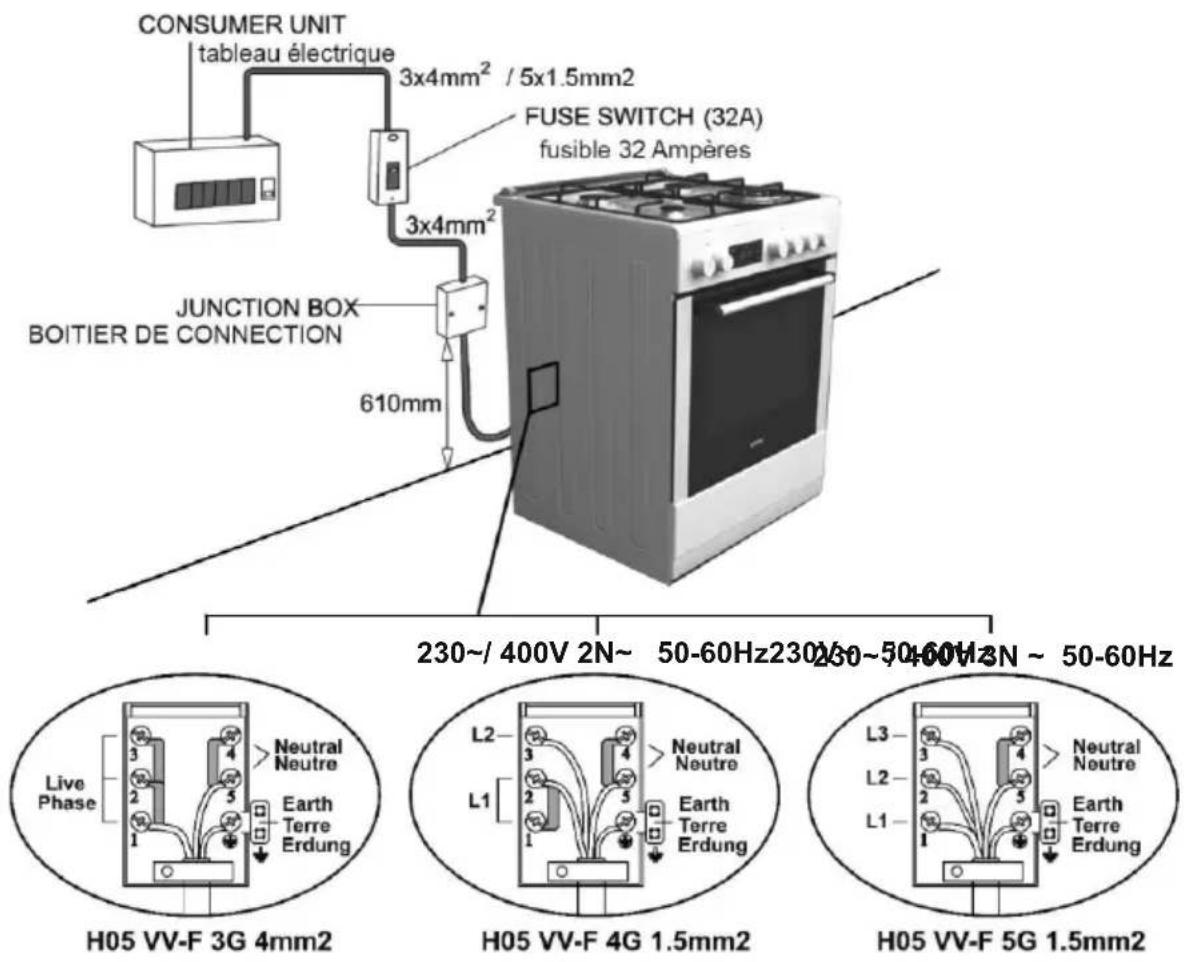
- Your oven requires 16 or 32 Ampere fuse according to the appliance's power. If necessary, installation by a qualified electrician is recommended.
- Your oven is adjusted in compliance with 230V\~50-60Hz. (or 230V/400V\~50-60Hz.) electric supply. If the mains are different from this specified value, contact your authorized service.
- Electrical connection of the oven should only be made by the sockets with earth system installed in compliance with the regulations. If there is no proper socket with earth system in the place where the oven will be placed, immediately contact a qualified electrician. Manufacturer shall never be responsible from the damages that will arise because of the sockets connected to the appliance with no earth system. If the ends of the electrical connection cable are open, according to the appliance type, make a proper switch installed in the mains by which all ends can be disconnected in case (connecting / disconnecting from / to the mains.
- If your electric supply cable gets defective, it should definitely be replaced by the authorized service or qualified electricians in order to avoid from the dangers.
- Electrical cable should not touch the hot parts of the appliance.
- Please operate your oven in dry atmosphere.
Gas Connection and Security:
Please operate your oven in dry atmosphere.
- Fit the clamp to the hose. Push one of the hose until it goes to the end of the pipe.
- For the sealing control; ensure that the buttons in the control panel are closed, but the gas cylinder is open. Apply some soap bubbles to the connection. If there is gas leakage, there will be foaming in the soaped area.
- The oven should be using a well ventilation place and should be install on flag ground.
- Re-inspect the gas connection.
- When placing your oven to its location, ensure that it is at the counter level. Bring it to the counter level by adjusting the feet if necessary.
-
Do not make gas hose and electrical cable of your oven go through the heated areas, especially through the rear side of the oven. Do not move gas connected oven. Since the forcing shall loosen the hose, gas leakage may occur.
-
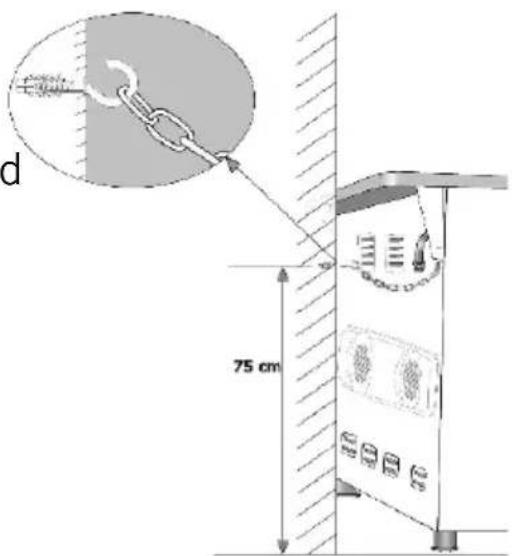
Before using the appliance, in order to ensure safe use, be sure to fix the appliance to the wall using the chain and hooked screw supplied. Ensure that the hook is screwed into the wall securely.
- Please use flexible hose for gas connection.
Before using the appliance, in order to ensure safe use, be sure to fix the appliance to the wall using the chain and hooked screw supplied. Ensure that the hook is screwed into the wall securely.
INSTALLATION OF YOUR OVEN
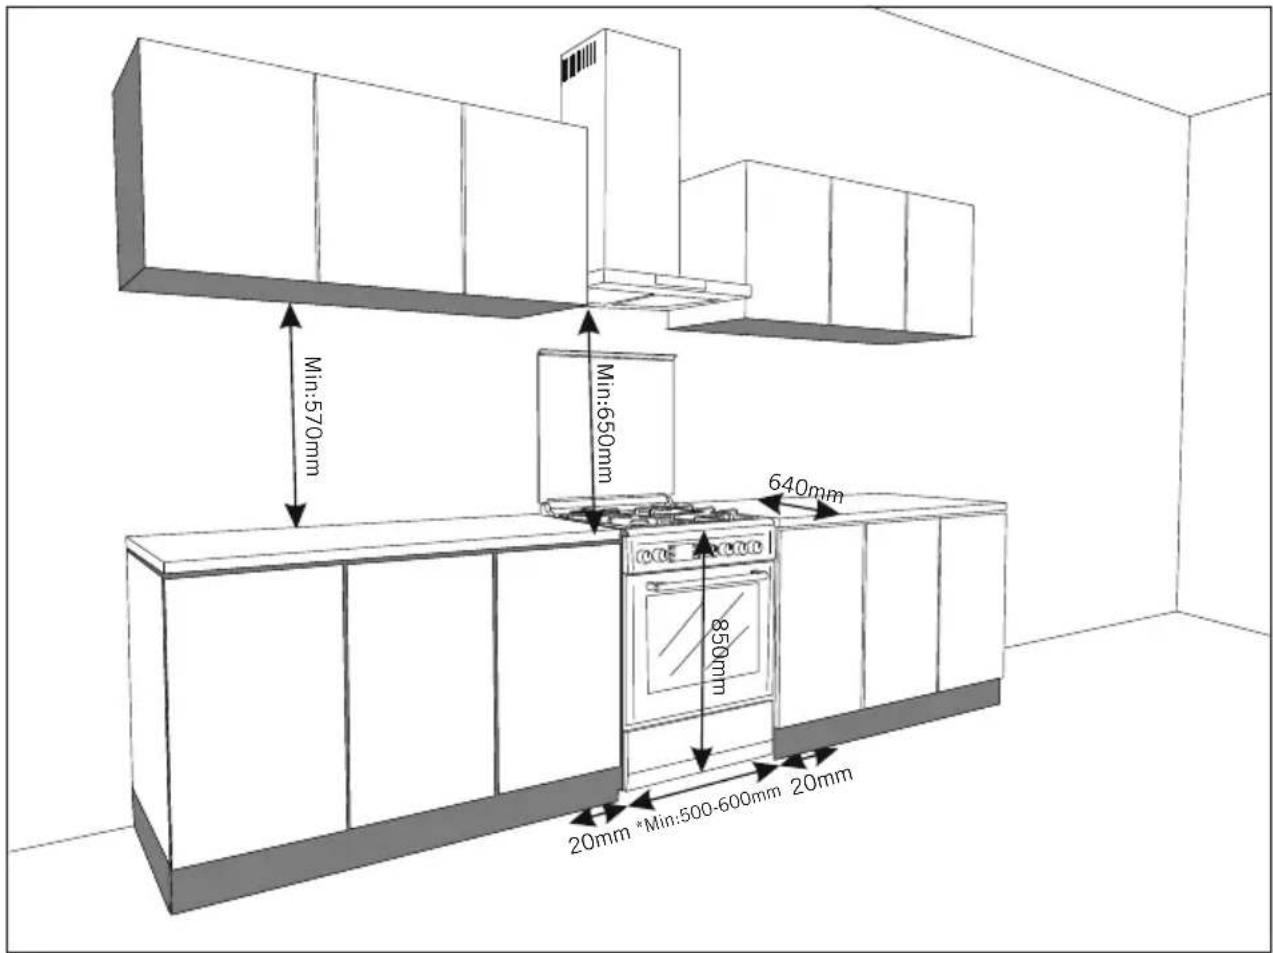
TECHNICAL FEATURES OF YOUR OVEN
| SPECIFICATIONS | 50x60 60x60 | |
| Outer width | 500 mm 600 mm | |
| Outer depth | 630 mm 630 mm | |
| Outer height | 855 mm 855 mm | |
| Inner width | 360 mm 460 mm | |
| Inner depth | 400 mm 400 mm | |
| Inner height | 330 mm 330 mm | |
| Inner Volume | 48 lt | 61 lt |
| Lamp power | 15 W 15 W | |
| Bottom heating element | 1000 W 1200 W | |
| Top heating element | 800 W 1000 W | |
| Turbo heating element | 1800 W 2200 W | |
| Grill heating element | 1500 W 2000 W | |
| Supply Voltage | 220V-240V AC,50-60Hz (Or 230V400V AC,50-60 Hz) |
| 1000 WHot Plate 145 | |
| Hot Plate 180 mm | 1500 W |
| Hot Plate rapid 145 mm | 1500 W |
| Hot Plate rapid 180 mm | 2000 W |
| BURNER INJECTOR VALUES ACCORDING TO THE GAS TYPE | LPG G30/28-30mbar | NGG20/20mbar | NGG25/25mbar | |
| Wok Burner | Injector ∅ mm | 0,96 1,30 1,40 | ||
| Power kW | 3,60 3,35 3,66 | |||
| Consumption Gr/h,m3/h | 284 0,3 0,365 | |||
| Rapid Burner | Injector ∅ mm | 0,85 1,15 1,20 | ||
| Power kW | 3,00 2,77 3,00 | |||
| Consumption Gr/h,m3/h | 286 0,253 0,326 | |||
| Semi Rapid Burner | Injector ∅ mm | 0,65 0,97 0,95 | ||
| Power kW | 1,78 1,78 1,61 | |||
| Consumption Gr/h,m3/h | 140 0,167 0,174 | |||
| Auxiliary Burner | Injector ∅ mm | 0,50 0,72 0,70 | ||
| Power kW | 0,88 0,99 0,88 | |||
| Consumption Gr/h,m3/h | 70 0,092 0,094 | |||
| Oven Burner | Injector ∅ mm | 0,70 0,97 0,95 | ||
| Power kW | 2,16/2,22 1,83/2,00 1,72/1,70 | |||
| Consumption Gr/h,m3/h | 170/175 0,178/0,179 0,183/0,178 | |||
| Grill Burner | Injector ∅ mm | 0,60/0,65 0,95 0,92/0,95 | ||
| Power kW | 1,50/1,72 1,78/1,85 1,50/1,60 | |||
| Consumption Gr/h,m3/h | 118/135 0,162/0,169 0,162/0,173 | |||
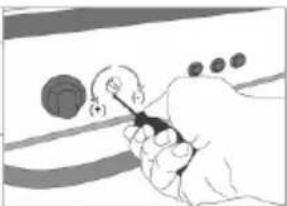
Nozzle change operation:1. Please use driver with special head for removed and install nozzle as figure-1 2. Please remove nozzle (Figure -2) from burner with special nozzle driver and install new nozzle
(Figure -3)

natural_image
Top-down technical drawing of a mechanical component with no visible text or symbols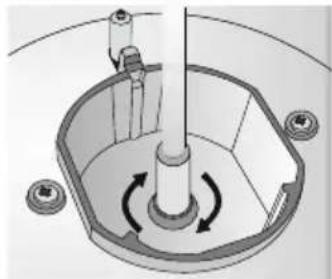
natural_image
Mechanical assembly diagram showing a rotating shaft and housing with mounting holes (no text or symbols)Figure-1 Figure-2 Figure-3
GB
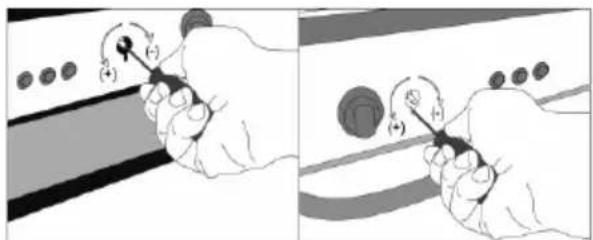
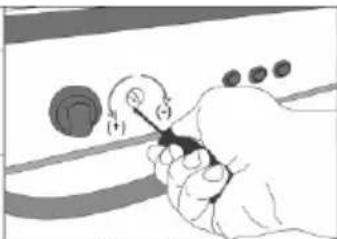
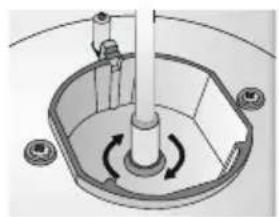
Reduced Flame Gas Cock Adjustment:
In order to adjust your oven to the gas type, make the adjustment for reduced flame carefully by turning with a small screwdriver as shown below on the screw in the middle of the gas cocks as well as nozzle changes.
| From LPG to NG | From NG to LPG | |
| Rapid Burner | 3 Turns Counterclockwise | 3 Turns Clockwise |
| Semi-Rapid Burner | 2.5 Turns Counterclockwise | 2.5 Turns Clockwise |
| Auxiliary Burner | 2 Turns Counterclockwise | 2 Turns Clockwise |
| WOK Burner | 4 Turns Counterclockwise | 4 Turns Clockwise |
| Oven Burner | 4,5 Turns Counterclockwise | 4,5 Turns Clockwise |
| Grill Burner | 4 Turns Counterclockwise | 4 Turns Clockwise |
For oven burners:
- Please remove nut from on nozzle body with nutdriver and disconnect gas pipe from body as Figure-6 and 7.
- Please remove nozzle body and burner
natural_image
Illustration showing two hand positions with arrows indicating movement, no text or symbols presentfrom cavity as Figure -8/9 and remove nozzle from injector body (Figure-10/11) and change. Than re-install nozzle body and burner on cavity by screws.
| Figure - 6 | Figure - 7 | Figure - 8 |
| Figure - 9 | Figure - 10 | Figure - 11 |

natural_image
Three gray rectangular shapes of varying widths on a white background (no text or symbols)If your oven has another type of oven burner, oven burner nozzle replacement will be:

natural_image
Three-step diagram showing a device being inserted into a rack, with no visible text or symbols.
natural_image
Three-panel illustration showing a machine control panel with tool, hand operating controls, and a sewing machine (no text or symbols)IMPORTANT WARNINGS:
- Pay attention to minimum health and safety requirements.
- The cooker is supplied setup according to the conditions shown on the rating label which is stuck to the rear of the appliance. From this sticker you can learn for which gas type (LPG or NG) this appliance is configured when supplied.
- Keep the electrical cable of your oven away from the hot areas.
- If the supply cord is damaged, it must be replaced by the manufacturer its services agent or similar qualified persons in order to avoid hazard.
- Ensure that the appliance is switches off before replacing the lamp to avoid the possibility of electric shock.
- In case of power failure, readjust your timer definitely. Otherwise, the oven will not operate (Digital Timer).
- Your oven can be having different output pressure according to your countries gas and pressure specifications. Be sure that the cooker is configured correctly for local requirements (for example, the jets must be suitable for local gas type and gas pressure).
- Connect your oven to LPG in shortest way and without any leakage. Min. 40 cm Max. 125 cm.
- When making gas leakage check, never use any flame type like those of lighter, matches, cigarette fire or similar ones.
- Usage of your appliance creates moisture and heath in the room it is placed, make sure that your kitchen is ventilated well. Maintain the natural ventilation ducts properly.
GB
11.CAUTION! Do not touch hot parts with bare hands and keep children well supervised
12. When the oven is hot never touch the oven glass by hand.
13. Before starting to use your appliance, keep curtain, tulle, paper or inflammable things away from your appliance. Do not keep combustible or inflammable things in or on the appliance.
14. This appliance is for cooking purposes only. It must not be used for other purposes, for example room heating. All our appliances are only for domestic use, not for commercial use.
15. For disconnection from the supply mains having a contact separation in all poles that provide full disconnection, must be incorporated in fixed wiring in accordance with the wiring rules.
16. Some models are supplied without a plug-an-lead set. In this case please use a flexible cable to suitable for connection to mono phase: H05 VV-F 3 G 4 mm2 or for 3 phase: H05 VV-F 5 G 1.5 mm2
17. This appliance is produced in accordance with the safety regulations. Incorrect use will harm people and appliance.
18. Children should be supervised to ensure that they do not play with the appliance. Never let them play with the appliance.
19. Unattended cooking on a hob with fat or oil can be dangerous and may result in fire. NEVER try to extinguish a fire with water, but switch off the appliance and then cover flame e.g. with a lid or a fire blanket.
20. Danger of fire: do not store items on the cooking surfaces
21. This appliance is not intended for use by persons (including children) with reduced physical, sensory and mental capabilities or lack of experience and knowledge, unless they have been given supervision or instruction concerning the use of the appliance by a person responsible for their safety.
22. "Caution: Accessible parts may be hot when the grill is in use. Young children should be kept away"
WARNING-- This appliance can be used by children aged from 8 years and above and persons with reduced physical, sensory or mental capabilities or lack of experience and knowledge if they have been given supervision or instruction concerning use of the appliance in a safe way and understand the hazards involved.
Children shall not play with the appliance. Cleaning and user maintenance shall not be made by children without supervision.
IF THE APPLIANCE DOES NOT OPERATE
- Please check the plug of power supply cord has a well connection with wall socket or not.
- Please check the electric network.
- Please check the fuse.
- Please check power supply cord for any damage problems.
- If you can not solve the problem, get in contact with manufacturer-supplier service agent or similar qualified persons.
DESCRIPTION OF OVEN and CONTROL PANELS
 | Turnspit | Fan | |
 | Top + Bottom heating element | Turbo heating + Fan | |
 | Lamp | Bottom + Top heating elements + Fan | |
 | Bottom heating element + Fan | Grill heating element+fan | |
 | Grill heating e | Grill burner / grill heating element | |
 | Grill heating element+lamp | Top heating element | |
 | Electrical timer | Oven burner / Bottom heating element | |
 | Flame | Ignition lighter |
THERMOSTAT KNOB; In order to operate the oven, thermostat must be adjusted to desired temperature. Your thermostat has a feature of adjustment to 50 - 280 degree.
MECHANIC TIMER KNOB (Optional); In order to operate the oven, timer switch should be adjusted to desired time from 0-90 minute. You can use cooking time table.
DESCRIPTION OF THE OVEN and CONTROL PANELS
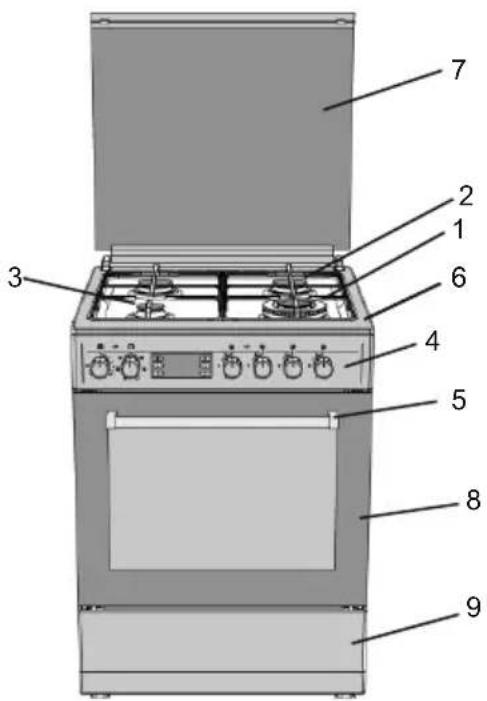
1-Rapid burner
2-Semi-rapid burner
3-Auxiliary burner
4-Command panel
5-Oven handle
6-Top plate
7-Top lid (glass or metal)
8-Oven door
9-Dish warmer Drawer
USING COOKER SECTION
Using Gas Burners:
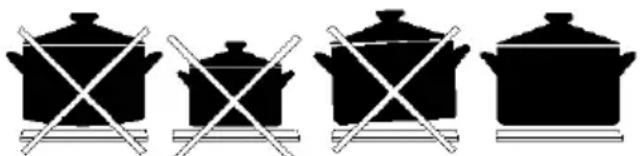
| WOK Bur### closed | 24-28cm |
| Big Burner Fully open | 22-26cm |
| Normal Burner | 18-22cm |
| Small Burner | 12-18cm |


Half open
- In order to obtain maximum output, be careful that the saucepan which will be used should be flat bottomed, and use the saucepans with dimensions given herein above.
- The valves controlling the gas cookers have special security mechanism. In order to light the cooker;
Always press on the switch forward and bring it to flame symbol by turning counterclockwise. All of the lighters shall operate and the cooker you controlled shall light only. Keep the switch pressed until ignition is performed. Press on the lighter button and turn the knob counter clockwise.
- Do not continuously operate the igniter for more than 15 seconds. If the burner does not ignite, wait minimum one minute before try again. If the burner is extinguished because of any reason, close the gas control valve and wait minimum one minute before try again.
- In models with Gas Security System, when flame of the cooker is extinguished, control valve cuts off the gas automatically. For operate the burners with gas security system you must press the knob and turn counterclock-wise. After the ignition you must wait nearly 5-10 second for gas security systems activation. If the burner is extinguished for of the any reason, close the gas control valve and wait a minimum of one minute before trying again.
Using Hot Plates:
| LEVEL 1 | LEVEL 2 | LEVEL 3 | LEVEL 4 | LEVEL 5 | LEVEL 6 | |
| 145 mm | 95 W | 155 W | 250 W | 400 W | 750 W | 1000 W |
| 180 mm | 115 W | 175 W | 250 W | 600 W | 850 W | 1500 W |
| 145 mm rapid | 135 W | 165 W | 250 W | 500 W | 750 W | 1500 W |
| 180 mm rapid | 175 W 220 W | 300 W | 850 W | 1150 W | 2000 W | |
- Electric hotplates have standard of 6 temperature levels (as described herein above)
- When using first time, operate your electric hotplate in position 6 for 5 minutes. This will make the agent on your hotplate which is sensitive to heat get hardened by burning.
- Use flat bottomed saucepans which fully contact with the heat as much as you can, so that you can use the energy more productively.
natural_image
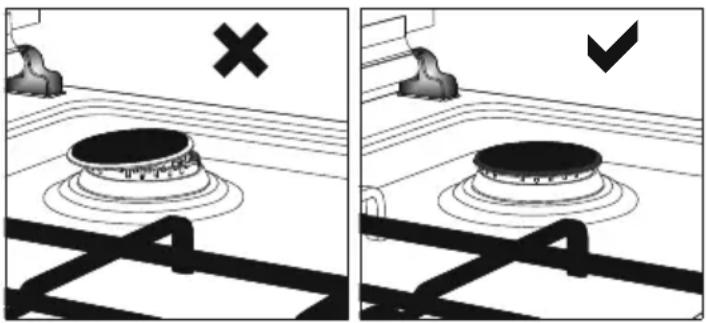
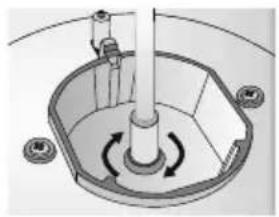
Four black-and-white cooking pots with crossed handles, arranged in a row (no text or symbols)Before operating your hob please make sure that the burner caps are well positioned. The right placement of the burner caps are shown as below.
natural_image
Two-panel illustration showing a stove interior with a cross mark and checkmark, no text or symbols present.USING OVEN SECTION
Using oven burners:
-
If your oven equipped with burners that operates with gas, appropriate knob should be used in order to ignite the burners. Some models have automatic ignition from the knob; it is easy to ignite the burner by turning the knob. Also, burners can be ignited by pressing the ignition button or they can be ignited with a match.
-
Do not continuously operate the igniter for more than 15 seconds. If the burner does not ignite, wait minimum one minute before trying again. If the burner is extinguished for of the any reason, close the gas control valve and wait a minimum of one minute before trying again.
Using oven heating elements:
- When your oven is operated first time, an odor will be spread out which will be sourced from using the heating elements. In order to get rid of this, operate it at 250 °C for 45-60 minutes while it is empty.
- Oven control knob should be positioned to desired value; otherwise oven does not operate.
- Kinds of meals, cooking times and thermostat positions are given in cooking table. The values given in the cooking table are characteristic values and were obtained as a result of the tests performed in our laboratory. You can find different flavors suitable for your taste depending on your cooking and using habits.
- You can make chicken revolving in your oven by means of the accessories.
- Cooking times: The results may change according to the area voltage and material having different quality, amount and temperatures.
- During the time when cooking is being performed in the oven, the lid of the oven should not be opened frequently. Otherwise circulation of the heat may be imbalanced and the results may change.
- Using cake forms while cooking cake gives better result.
8.5 - 10 min. preliminary heating should be done prior cooking.
Cooking Time Table:
| Meals | Temperature (°C) | Rack position | Cooking time (min.) |
| Creamed cake | 150-170 | 2 | 30-35 |
| Pastry | 200-220 | 2 | 35-45 |
| Biscuit | 160-170 | 3 | 20-25 |
| Cookie | 160-170 | 3 | 20-35 |
| Cake | 160-180 | 2 | 25-35 |
| Braided cookie | 200-220 | 2 | 30-40 |
| Filo Pastry | 180-220 | 2 | 35-45 |
| Savory pastry | 160-180 | 2 | 20-30 |
| Lamb meat | 210-230 | 1 | 90-120 |
| Veal | 210-230 | 1 | 90-120 |
| Mutton | 210-230 | 1 | 90-120 |
| Chicken (pieced) | 210-230 | 1 | 75-100 |
| Fish | 190-210 | 3 | 40-50 |
MAINTENANCE and CLEANING
- Disconnect the plug supplying electricity for the oven from the socket.
- While oven is operating or shortly after it starts operating, it is extremely hot. You must avoid touching from heating elements.
- Never clean the interior part, panel, lid, trays and all other parts of the oven by the tools like hard brush, cleaning mesh or knife. Do not use abrasive, scratching agents and detergents.
- After cleaning the interior parts of the oven with a soapy cloth, rinse it and then dry thoroughly with a soft cloth.
- Clean the glass surfaces with special glass cleaning agents.
6.Do not clean your oven with steam cleaners. - Before opening the upper lid of the oven, clean spilled liquid off the lid. Also, before closing the lid, ensure that the cooker table is cooled enough.
- Never use inflammable agents like acid, thinner and gasoline when cleaning your oven.
- Do not wash any part of your oven in dishwasher.
- In order to clean the front glass lid of the oven; remove the fixing screws fixing the handle by means of a screwdriver and remove the oven door. Than clean and rinse it thoroughly. After drying, place the oven glass properly and re-install the handle.

natural_image
Diagram of a mechanical assembly with arrows indicating direction, no text or symbols present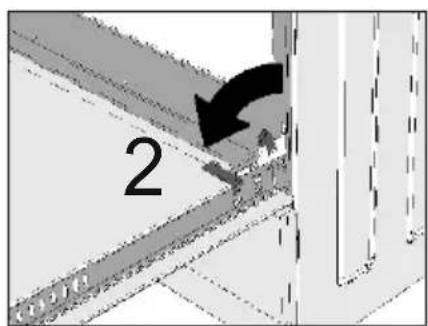
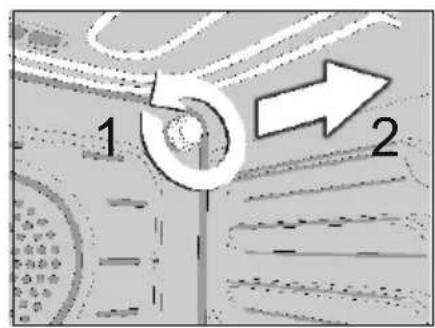
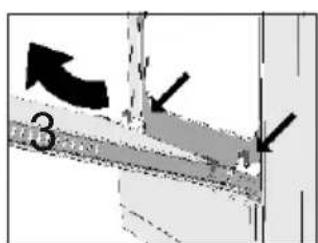
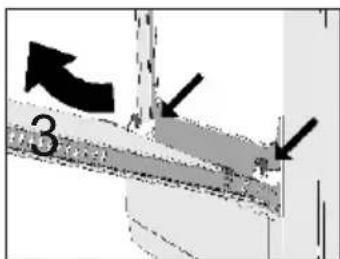
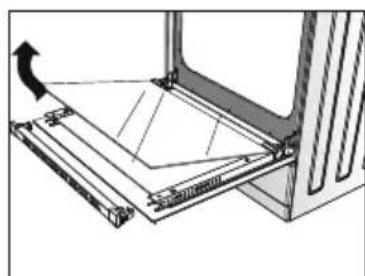
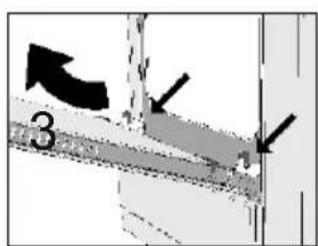
CLEANING AND MAINTENANCE OF THE OVEN'S FRONT DOOR GLASS
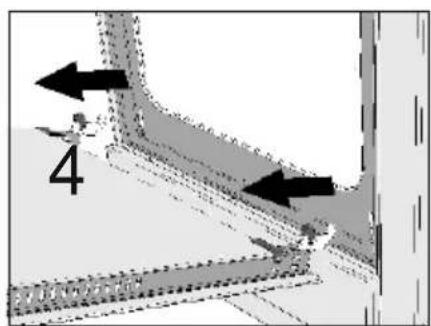
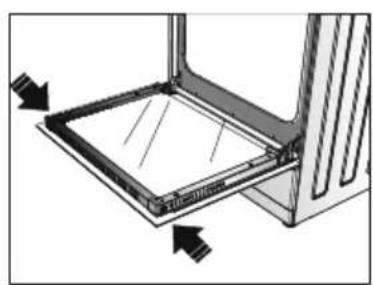
Remove the profile by pressing the plastic latches on both left and right sides as shown in Figure 1 and pulling the profile towards yourself as shown in Figure 2. Then remove the inner-glass as shown in Figure 3. If required, middle glass can be removed in the same way. After cleaning and maintenance are done, remount the glasses and the profile in reverse order. Make sure the profile is properly seated in its place.
natural_image
Diagram of a device interior with arrows indicating movement or force (no text or symbols present)
natural_image
Technical diagram of a mechanical assembly with no visible text or symbolsFigure 2 Figure 1
natural_image
Technical diagram of a mechanical assembly with a rotating arrow indicating motion (no text or symbols present)Figure 3
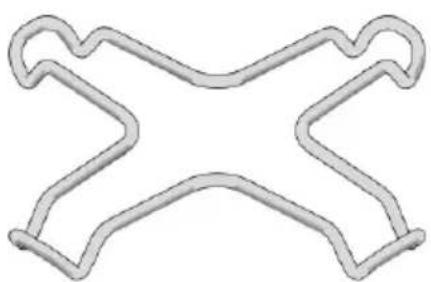
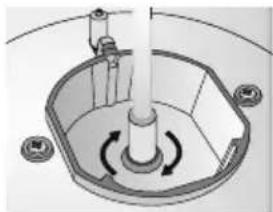
USAGE OF COFFEEPOT SUPPORT:
natural_image
Pure geometric line drawing of a symmetrical X-shaped structure (no text or symbols)Coffeepot support is to use small diameter pots with your cooker. Place the support part on the grid centerly and then put the pot on it to start using.
Cher utilisateur,
CARACTÉRISTIQUES TECHNIQUES DE VOTRE FOUR
natural_image
Top-down technical drawing of a mechanical component with mounting holes and a central hub (no text or symbols)Figure-2
natural_image
Mechanical assembly diagram showing a rotating shaft and housing with mounting points (no text or symbols)Figure-3
natural_image
Two-panel illustration showing a hand holding a small object with a pointer, and another hand holding a tool with a circular component (no text or symbols)Figure-4 Figure-5
natural_image
Three-panel illustration showing a device with labeled ports and a hand inserting a component into a slot (no text or symbols)
natural_image
Three-panel illustration showing a hand operating a mechanical device in a control panel, with no visible text or symbols.MISES EN GARDE IMPORTANTES:
natural_image
Four black-and-white silhouettes of cooking pots with crossed handles, no text or symbols presentnatural_image
Diagram of a gas stove with a valve and cross symbol (no text or labels)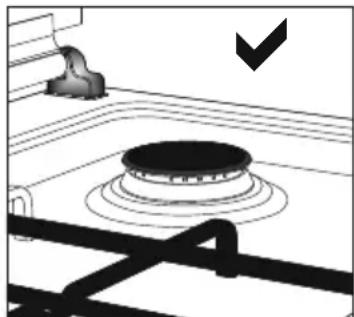
natural_image
Simple line drawing of a gas stove with a chimney and heating element (no text or symbols)UTILISATION DU FOUR
natural_image
Diagram of a mechanical assembly with arrows indicating force direction (no text or symbols)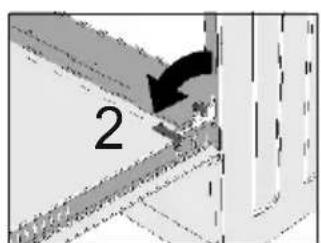


natural_image
Three gray rectangular blocks of varying widths on a white background (no text or symbols)NETTOYAGE ET MAINTENANCE DE LA VITRE AVANT DU FOUR
natural_image
Pure geometric line drawing of a symmetrical X shape with no text or symbolsnatural_image
Three gray rectangular blocks of varying widths on a white background (no text or symbols)natural_image
Technical line drawing of a mechanical component with mounting holes and central hub (no text or symbols)Figure-2
natural_image
Mechanical assembly diagram showing a rotating shaft and housing with mounting holes (no text or symbols)Figure-3
natural_image
Hand holding a small object with a curved arrow, pointing at a control panel (no text or symbols visible)Figure-4
natural_image
Illustration of a hand holding a small object with a pointer, against a plain background (no text or symbols)Figure-5
natural_image
Three gray rectangular shapes of varying widths on a white background (no text or symbols)| Figure - 6 | Figure - 7 | Figure - 8 |
| Figure - 9 | Figure - 10 | Figure - 11 |

natural_image
Three-step diagram showing a computer monitor with internal components and a hand inserting a drive into a rack (no text or symbols)
natural_image
Three-panel illustration showing a sewing machine's step-by-step procedure: opening, adjusting the base plate, and inserting a sewing tool into a back panel (no text or symbols present)WICHTIGE HINWEISE:
GEBRAUCH DES BACKOFENS
natural_image
Diagram showing a mechanical assembly with arrows indicating motion or force direction (no text or symbols present)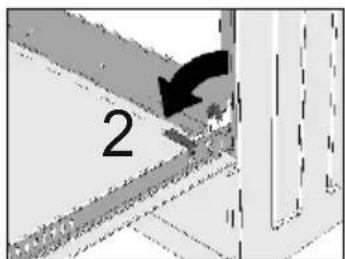

natural_image
Technical diagram showing two views of a mechanical assembly with arrows indicating motion direction (no text or symbols)Abb. 2Abb. 1
natural_image
Mechanical assembly diagram showing a rotating component with arrows indicating motion (no text or symbols)Abb. 3
natural_image
Pure line drawing of a symmetrical abstract shape resembling a stylized letter or symbol (no text or symbols present)natural_image
Three gray rectangular shapes of varying widths on a white background (no text or symbols)| Figure - 6 | Figure - 7 | Figure - 8 |
| Figure - 9 | Figure - 10 | Figure - 11 |

natural_image
Three-panel illustration showing a computer monitor with internal components and a hand inserting a drive into a rack (no text or symbols)
natural_image
Three-panel illustration showing a sewing machine's step-by-step procedure: opening, adjusting the base plate, and inserting a sewing tool into a back panel (no text or symbols present)BELANGRIJKE WAARSCHUWINGEN:
natural_image
Technical line drawing of a mechanical component with mounting holes and central bore (no text or symbols)Figure-2
natural_image
Mechanical assembly diagram showing a rotating shaft and housing with mounting holes (no text or symbols)Figure-3
Vlam aanpassen:
natural_image
Hand holding a tool with a knob, pointing at a screen (no text or symbols visible)Figure-4
natural_image
Illustration of a hand holding a small object with a circular arrow and pointer, against a plain background (no text or symbols)Figure-5
1-Grote gaspit
2-Middelgrote gaspit
3-Kleine gaspit
4-Bedieningspaneel
5-Ovenhendel
6-Bovenplaat
7-Deksel
8-Ovendeur
9-Bordverwarmer gedeelte
natural_image
Four black-and-white silhouettes of cooking pots with crossed x marks, no text or symbols present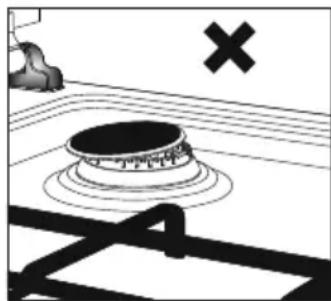
natural_image
Diagram of a gas stove with a cross symbol indicating no change, showing circuit lines and components (no text or labels)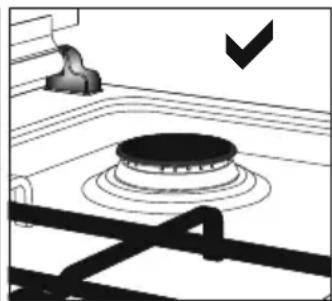
natural_image
Simple line drawing of a gas stove with a checkmark indicating a cooking step (no text or symbols)GEBRUIK VAN DE OVEN
natural_image
Diagram of a mechanical assembly with arrows indicating direction (no text or symbols)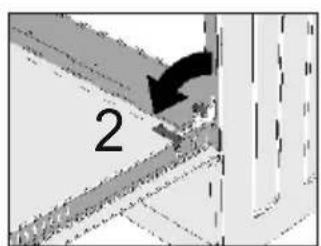
REINIGING EN ONDERHOUD VAN HET GLAS AAN DE VOORZIJDE VAN DE OVEN
natural_image
Diagram of a device interior with arrows indicating movement or force (no text or symbols present)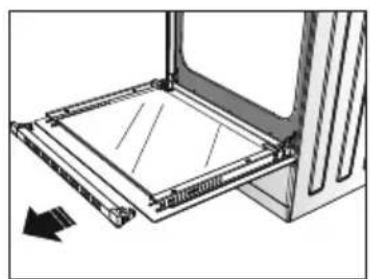
natural_image
Technical diagram of a mechanical assembly with no visible text or symbolsnatural_image
Diagram of a mechanical assembly with a rotating arrow indicating motion (no text or symbols present)Afbeelding 3
HET GEBRUIK VAN DE KOFFIEPOT ONDERSTEUNING: