
VG425211CA - Cooker GAGGENAU - Free user manual and instructions
Find the device manual for free VG425211CA GAGGENAU in PDF.
User questions about VG425211CA GAGGENAU
0 question about this device. Answer the ones you know or ask your own.
Ask a new question about this device
Download the instructions for your Cooker in PDF format for free! Find your manual VG425211CA - GAGGENAU and take your electronic device back in hand. On this page are published all the documents necessary for the use of your device. VG425211CA by GAGGENAU.
USER MANUAL VG425211CA GAGGENAU
Use and care manual 2
IMPORTANT SAFETY INSTRUCTIONS 4
Fire Safety 6
Gas Safety 7
Burn Prevention 8
Child Safety 9
Cleaning Safety 10
Cookware Safety 10
Proper Installation and Maintenance 11
Proposition 65 Warning: 11
Causes of Damage 12
Environmental protection 12
Saving energy 12
Getting to know your appliance 13
Gas cooktop 13
Control knob 13
Display on the illuminated ring 13
Individual parts of the burner 14
Operating the appliance 14
Turning on 15
Simmer setting 15
Electronic flame monitoring and automatic re-ignition 15
Turning off 15
Residual heat display 15
Safety shut-off 15
Table of settings and tips 16
Tips for cooking and roasting 16
Notes regarding cookware 16
Appropriate Cooking Vessels 16
Information for Use 16
Cleaning and maintenance 17
Cleaning the appliance 18
Burnt-on dirt 18
Discoloration of the burners 18
Faults - What to Do? 19
Demo Mode 21
Customer Service 21
Additional information on products, accessories, replacement parts and services can be found at www.gaggenau.com and in the online shop www.gaggenau.com/zz/store
Safety Definitions
WARNING
This indicates that death or serious injuries may occur as a result of non-observation of this warning.
CAUTION
This indicates that minor or moderate injuries may occur as a result of non-observation of this warning.
NOTICE
This indicates that damage to the appliance or property may occur as a result of non-compliance with this advisory.
Note: This alerts you to important information and/or tips.

WARNING:
If the information in these instructions is not followed exactly, a fire or explosion may result causing property damage, personal injury or death.
-
Do not store or use gasoline or other flammable vapors and liquids in the vicinity of this or any other appliance.
WHAT TO DO IF YOU SMELL GAS -
Do not try to light any appliance.
- Do not touch any electrical switch.
- Do not use any phone in your building.
- Immediately call your gas supplier from a neighbor's phone. Follow the gas supplier's instructions.
-
If you cannot reach your gas supplier, call the fire department.
-
Installation and service must be performed by a qualified installer, service agency or the gas supplier.

WARNING:
Never Operate the Top Surface Cooking Section of this Appliance Unattended
- Failure to follow this warning statement could result in fire, explosion, or burn hazard that could cause property damage, personal injury, or death.
- If a fire should occur, keep away from the appliance and immediately call your fire department.
DO NOT ATTEMPT TO EXTINGUISH AN OIL/GREASE FIRE WITH WATER.

IMPORTANT SAFETY INSTRUCTIONS
READ AND SAVE THESE INSTRUCTIONS
Fire Safety
Save these instructions.
Set the burner control so that the flame does not extend beyond the bottom of the pan.
Do not allow aluminum foil, plastic, paper or cloth to come in contact with a hot surface element, burner or grate. Do not allow pans to boil dry.
If the cooktop is near a window, forced air vent or fan, be certain that flammable materials such as window coverings do not blow over or near the burners or elements. They could catch on fire.
Always have a working smoke detector near the kitchen.
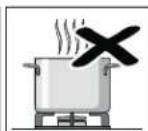
Never leave the cooktop unattended when in use. Boilovers cause smoking and greasy spillovers may ignite.

WARNING
TO REDUCE THE RISK OF A GREASE FIRE:
- Never leave surface units unattended at high settings. Boilovers cause smoking and greasy spillovers that may ignite. Heat oils slowly on low or medium settings.
- Always turn hood ON when cooking at high heat or when flambéing food (i.e. Crepes Suzette, Cherries Jubilee, Peppercorn Beef Flambé).
- Clean ventilating fans frequently. Grease should not be allowed to accumulate on fan or filter.
4.Use proper pan size. Always use cookware appropriate for the size of the surface element.
In the event that personal clothing or hair catches fire, drop and roll immediately to extinguish flames.
Smother flames from food fires other than grease fires with baking soda. Never use water on cooking fires.
Take care that drafts like those from fans or forced air vents do not push the flames so that they extend beyond the edges of the pan.
Have an appropriate fire extinguisher available, nearby, highly visible and easily accessible near the appliance.

IMPORTANT SAFETY INSTRUCTIONS
READ AND SAVE THESE INSTRUCTIONS
WARNING
TO REDUCE THE RISK OF INJURY TO PERSONS IN THE EVENT OF A GREASE FIRE, OBSERVE THE FOLLOWING:
1.SMOTHER FLAMES with a close-fitting lid, cookie sheet, or metal tray, then turn off the burner. BE CAREFUL TO PREVENT BURNS. If the flames do not go out immediately, EVACUATE AND CALL THE FIRE DEPARTMENT.
2. NEVER PICK UP A FLAMING PAN - You may be burned.
3.DO NOT USE WATER, including wet dishcloths or towels - a violent steam explosion will result.
4.Use an extinguisher ONLY if:
- You know you have a Class ABC extinguisher, and you already know how to operate it.
- The fire is small and contained in the area where it started.
- The fire department is being called.
- You can fight the fire with your back to an exit.
Whenever possible, do not operate the ventilation system during a cooktop fire. However, do not reach through fire to turn it off.
Gas Safety
To prevent carbon monoxide build-up, do not block appliance air vents.
Have the installer show you where the gas shut-off valve is located.
For proper burner performance, keep igniters clean and dry.
If a burner goes out and gas escapes, open windows and doors. Wait until gas dissipates before using the appliance.
IMPORTANT SAFETY NOTICE: Burning gas cooking fuel generates some byproducts which are on the list of substances which are known by the State of California to cause cancer or reproductive harm. To minimize exposure to these substances, always operate this unit according to the instructions contained in this booklet and provide good ventilation.
WARNING
All igniters spark when any single burner is turned on. Do not touch any of the burners when the cooktop is in use.
If you smell gas, your installer has not done a proper job of checking for leaks. If the connections are not perfectly tight, you can have a small leak and, therefore, a faint smell. Finding a gas leak is not a "do-it-yourself" procedure. Some leaks can only be found with the burner control in the ON position and this must be done by a qualified service technician. See Warning,

IMPORTANT SAFETY INSTRUCTIONS
READ AND SAVE THESE INSTRUCTIONS
WARNING
To prevent flare-ups all grates must be properly positioned on the cooktop whenever the cooktop is in use. Each of the feet must be placed into the corresponding dimples in the cooktop. Do not use a grate if the rubber feet are missing or damaged.
Keep the igniter ports clean for proper lighting performance of the burners. It is necessary to clean these when there is a boilover or when the burner does not light even though the electronic igniters click.
WARNING
To prevent flare-ups do not use the cooktop without all burner caps and all burner grates properly positioned.
WARNING
Do not clean or touch any of the burners when an extra low burner (if equipped) is in use. When the extra low burner automatically reignites the ignitor at the burner will spark.
WARNING
Use this appliance only for its intended use as described in this manual. NEVER use this appliance as a space heater to heat or warm the room. Doing so may result in carbon monoxide poisoning and overheating the appliance. Never use the appliance for storage.
WARNING
NEVER cover any slots, holes or passages in the oven bottom or cover an entire rack with materials such as aluminum foil. Doing so blocks air flow through the oven and may cause carbon monoxide poisoning. Aluminum foil linings may also trap heat, causing a fire hazard.
Burn Prevention
DO NOT TOUCH SURFACE UNITS OR AREAS NEAR UNITS - Surface units may be hot even though they are dark in color. Areas near surface units may become hot enough to cause burns. During and after use, do not touch, or let clothing, potholders, or other flammable materials contact surface units or areas near units until they have had sufficient time to cool. Among these areas are the cooktop and areas facing the cooktop.

IMPORTANT SAFETY INSTRUCTIONS
READ AND SAVE THESE INSTRUCTIONS

WARNING
Risk of burns!
Only close the appliance cover once the appliance has cooled down.
Never turn on the appliance with the appliance cover closed. Don't set down food on appliance cover or use it for keeping food warm.
Do not heat or warm unopened food containers. Build-up of pressure may cause the container to burst and cause injury.
Always turn hood ON when cooking at high heat or when flambéing food (i.e. Crêpes Suzette, Cherries Jubilee, Peppercorn Beef Flambé).
Use high heat settings on the cooktop only when necessary. To avoid bubbling and splattering, heat oil slowly, on no more than a low-medium setting. Hot oil is capable of causing extreme burns and injury.
Never move a pan of hot oil, especially a deep fat fryer. Wait until it is cool.
Secure all loose garments, etc., before beginning. Tie long hair so that it does not hang loose, and do not wear loose-fitting clothing or hanging garments, such as ties, scarves, jewelry, or dangling sleeves.
Child Safety
When children become old enough to use the appliance, it is the responsibility of the parents or legal guardians to ensure that they are instructed in safe practices by qualified persons.
Do not allow anyone to climb, stand, lean, sit, or hang on any part of an appliance, especially a door, warming drawer, or storage drawer. This can damage the appliance, and the unit may tip over, potentially causing severe injury.
Do not allow children to use this appliance unless closely supervised by an adult. Children and pets should not be left alone or unattended in the area where the appliance is in use. They should never be allowed to play in its vicinity, whether or not the appliance is in use.

CAUTION
Items of interest to children should not be stored in an appliance, in cabinets above an appliance or on the backsplash. Children climbing on an appliance to reach items could be seriously injured.

IMPORTANT SAFETY INSTRUCTIONS
READ AND SAVE THESE INSTRUCTIONS
Cleaning Safety
IMPORTANT SAFETY NOTICE: The California Safe Drinking Water and Toxic Enforcement Act requires the Governor of California to publish a list of substances known to the state to cause cancer, birth defects or other reproductive harm, and requires businesses to warn customers of potential exposure to such substances. The burning of gas cooking fuel and the elimination of soil during self-cleaning can generate some by-products which are on the list. To minimize exposure to these substances, always operate this unit according to the instructions contained in this booklet and provide good ventilation.

WARNING
The burning of gas cooking fuel can create small amounts of Carbon Monoxide, Benzene, Formaldehyde and Soot. To minimize exposure to these substances the burners should be adjusted by a certified installer or agency to ensure proper combustion. Ensure proper ventilation with an open window or use a ventilation fan or hood when cooking with gas. Always operate the unit according to the instructions in this manual.
Do not block the oven vent(s) during the self-cleaning cycle. Always operate the unit according to the instructions in this manual.
After a spill or boilover, turn off the burner and allow the cooktop to cool. Clean around the burner and burner ports. After cleaning, check for proper operation.
Cookware Safety
Hold the handle of the pan when stirring or turning food. This helps prevent spills and movement of the pan.
Use Proper Pan Size.
The use of undersized cookware will expose a portion of the heating element or burner to direct contact and may result in ignition of clothing. Select cookware having flat bottoms large enough to cover the surface heating unit. This appliance is equipped with one or more surface units of different sizes. Proper relationship of cookware to heating element or burner will also improve efficiency.
Always position handles of utensils inward so they do not extend over adjacent work areas, burners, or the edge of the cooktop. This reduces the risk of fires, spills and burns.
Adjust burner flame size so that it does not extend beyond the edge of the cookware. Proper relationship of cookware to burner flame reduces safety risks.

IMPORTANT SAFETY INSTRUCTIONS
READ AND SAVE THESE INSTRUCTIONS
Proper Installation and Maintenance
Have the installer show you the location of the circuit breaker or fuse. Mark it for easy reference.
This appliance must be properly installed and grounded by a qualified technician. Connect only to properly grounded outlet. Refer to Installation Instructions for details.
This appliance is intended for normal family household use only. It is not approved for outdoor use. See the Statement of Limited Product Warranty. If you have any questions, contact the manufacturer.
Do not store or use corrosive chemicals, vapors, flammables or nonfood products in or near this appliance. It is specifically designed for use when heating or cooking food. The use of corrosive chemicals in heating or cleaning will damage the appliance and could result in injury.

WARNING
Failure to operate knobs properly may result in personal injury and damage to the appliance.
This appliance is not intended for operation with an external time switch or external remote control.
Do not operate this appliance if it is not working properly, or if it has been damaged. Contact an authorized service provider.
Do not repair or replace any part of the appliance unless specifically recommended in this manual. Refer all servicing to an authorized service provider.
To avoid electrical shock hazard, before servicing the appliance, switch power off at the service panel and lock the panel to prevent the power from being switched on accidentally.
Proposition 65 Warning:
This product may contain a chemical known to the State of California, which can cause cancer or reproductive harm. Therefore, the packaging of your product may bear the following label as required by California:
STATE OF CALIFORNIA PROPOSITION 65 WARNING:

WARNING
Cancer and Reproductive Harm - www.P65Warnings.ca.gov
Causes of Damage
NOTICE
RISK OF HEAT DAMAGE TO ADJACENT APPLIANCES OR KITCHEN UNITS:
If the appliance is in operation for an extended period, heat and moisture will be generated. Additional ventilation is required. Open the window or switch on an extractor hood that discharges the extracted air and moisture outside the building.
NOTICE
RISK OF DAMAGE TO THE APPLIANCE DUE TO THE BUILD-UP OF HEAT:
Do not heat roasters, frying pans or grill stones using more than one burner at a time.
NOTICE
OPERATIONAL FAULT:
Always turn the control knob to the "Off" position when the appliance is not being used.
Environmental protection
The sections below list a number of energy-saving tips and provide information on disposing of your appliance.
Saving energy
- Choose a burner of roughly the same size as your pan. Place the cookware in the middle.
- Use a small saucepan for small quantities. A larger, less full saucepan requires more energy.
Always place suitable lids on saucepans. Cooking without a lid consumes significantly more energy. Use a glass lid so that you can see into the pan without having to lift the lid.
Cook with a small amount of water. That saves energy. Vitamins and minerals in vegetables are preserved. - Switch to a lower heat setting when possible. As a result, you save energy.
Getting to know your appliance
Gas cooktop
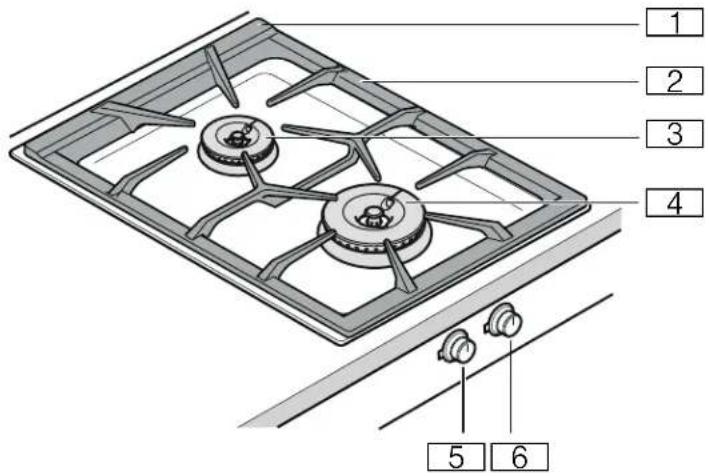
(Ventilation openings (underneath pan support)
0 Pan support
8 Standard-output burner 2.0 kW 7,000 BTU/hr
@ High-output burner 4.0 kW 13,500 BTU/hr
H Control knob, front burner
P Control knob, rear burner
Control knob
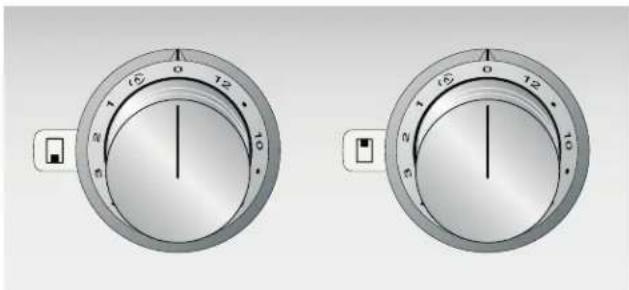
The markings by each of the control knobs show which burner they operate and the heat setting (from 1 to 12 or Simmer setting).
Display on the illuminated ring
Each control knob is encircled by an illuminated ring with various display functions.
| Display screen Meaning | |
| ○ Off Appliance OFF | |
| ● Lit orange Appliance ON | |
| ● Flashing orange Appliance OFF | |
| Residual heat indicator | |
| ● Flashing orange and white alternately | Safety shut-off, power failure |
| ● Flashing yellow and magenta alternately | Appliance fault Call Customer Service |
| ● Lights up green for a few seconds, then turns yellow | Appliance initialized, only after initial connection or power failure |
Individual parts of the burner
Ensure that the individual parts of the burner are fitted in the correct position and are straight; otherwise, this may result in ignition problems or problems during operation.
Ensure that the burner head and burner ring fit so that the locking catches on the bottom of the burner snap into the appropriate recesses. The direction of burner head and burner ring doesn't matter.
Note: If the burner parts are fitted at an angle, the appliance will not work.
Individual parts of the standard-output burner and high-output burner

Burner cap
0Burner ring
8 Burner head
@ Ignition plug
H Thermocouple
Operating the appliance
Notes
- Only use the accessories specified. Do not line the stainless steel recess (e.g. with aluminum foil).
The burner and ignition plug must be clean and dry.
Only light the burners if the pan supports and all burner parts are correctly fitted. - When one burner is ignited, an ignition spark will also be generated at all the other burners.
- Do not touch the ignition plug while the gas appliance is being lit.
It is important to keep the appliance clean. If the ignition plugs are dirty, this may cause ignition problems. Clean the ignition plugs regularly with a small, non-metallic brush. Take care to prevent the ignition plugs from suffering any heavy knocks. - When you switch from setting 3 to setting 4 or higher, the burner will briefly switch to its maximum output. This is to optimize ignition between the burner rings.
- Do not cover the ventilation openings on the rear of the gas cooktop.
- When the gas cooktop is switched on, the electronics open up the gas supply, which produces a short sound. This is normal.
In the event of a power failure, the appliance will not work. The gas supply is shut off.
Turning on
Your gas cooktop has an automatic quick-ignition function.
- Place a suitable item of cookware on the pan support.
- Push in the control knob for your chosen burner and turn it clockwise or counter-clockwise to the heat setting you require.
The burner ignites automatically.
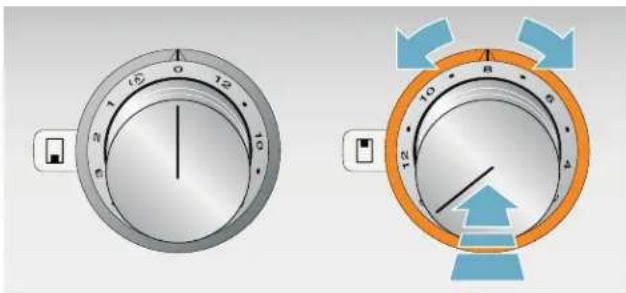
Turn the control knob to set the heat setting.

WARNING
Risk of deflagration!
If the burner does not ignite after 15 seconds, switch off the control knob and open the door or window in the room. Wait at least 1 minute before igniting the burner again.
Simmer setting
With the simmer setting, the burner switches the gas flame on and off. This allows you to melt chocolate or heat up delicate sauces, for example.
Turn the control knob to . It takes 10-50 seconds to switch on or off.
Electronic flame monitoring and automatic re-ignition
For your safety, the cooktop has an electronic flame monitoring system. If the flame goes out while the cooktop is in use (e.g. due to a draft), the appliance will automatically re-ignite the burner.
If re-ignition is unsuccessful (e.g. because liquid or food has boiled over and remains on the burner), the appliance will switch off the gas supply. The illuminated ring behind the control knob will flash.
Turn the control knob to 0. Wait until the appliance is cool enough and then check whether all the burner parts are in the correct position. Check whether the burner or the ignition plug are covered in food remnants etc. "Faults - What to Do?" on page 19
Turning off
Turn the control knob to position 0. The appliance electronics will shut off the gas supply.

WARNING
Risk of burns!
When the appliance cover is closed, this leads to a build-up of heat. Only operate or switch on the appliance when the appliance cover is open. Do not use the appliance cover for keeping warm or setting down. Only close the appliance cover once the appliance has cooled down.

CAUTION
Damage to the appliance
Remove spilled liquids before opening the appliance cover.
Residual heat display
The illuminated ring behind the control knob will flash after switching off as long as the appliance is too hot to touch it safely.
Safety shut-off
For your protection, the appliance is equipped with a safety shut-off. The appliance is automatically switched off if it has been in operation for an extended period. How long the appliance waits before switching itself off depends on the setting (setting 12 = 1 hour, setting 1 = 4 hours). The illuminated ring behind the control knob will flash orange and white alternately.
Turn the control knob to 0. You will now be able to start the appliance again as usual.
Table of settings and tips
| Heat setting | Cooking method Examples | |
| 12 Heating Water, clear soups | ||
| Blanching Vegetables | ||
| 10 - 12 Searing Meat, wok dishes/pan-fried dishes | ||
| Frying at high temperatures | Meat, potatoes | |
| 7 - 10 | Simmering with the lid open | Liquids, dough-based foods |
| 6 - 8 | Baking | Flour-based food |
| Frying at medium temperatures | Poultry, fish | |
| 4 - 6 | Frying at low tem-peratures | Fried sausages, onions, egg dishes |
| Heating Vegetables, soups, stews | ||
| Deep-fat frying | Fries, dough-based confectionery | |
| Poaching with the lid open | Dumplings, boiled sau-sages | |
| 3 - 4 | Defrost | Frozen food |
| Braising | Roulades, roasts | |
| Stewing | Vegetables | |
| 2 - 4 | Simmering with the lid on | Soups, vegetables |
| Simmer setting - up to 3 | Sources | Rice, rice pudding, cereals |
| Simmer setting | Melting, keeping warm | Chocolate, butter |
Tips for cooking and roasting
The values in the settings table serve as mere guidelines, since more or less heat may be required, depending on the type and condition of the foods, as well as the size and fullness of the pot.
The high output causes grease and oil to heat up quickly. Don't leave food unattended while frying; grease can catch fire and burn the food.
The rear cooking zone should be used to prepare foods requiring longer cooking times.
For parboiling, frying and deep-frying large portions, you should use the high-output burner.
Notes regarding cookware
The following information and tips have been provided to help you save energy and avoid damaging your cookware.
Appropriate Cooking Vessels
| Burner | Recommended pan base diameter | Minimum pan base diameter |
| Standard-output burner | 8 - 91/2" (200 - 240 mm) | 31/2" (90 mm) |
| High-output burner | 91/2 - 11" (240 - 280 mm) | 31/2" (90 mm) |
Pans with a diameter of less than 31/2 (90 mm) or more than 11" (280 mm) should not be used. If you do use larger pans, these should not protrude beyond the edges of the appliance.
Information for Use
Use cooking vessels of appropriate size for the particular burner. Don't use small cooking vessels on large burners. The flame shouldn't come in contact with the sides of the cooking vessel.
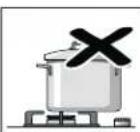
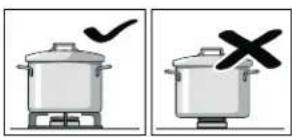
Don't use any deformed cooking vessels that don't stand solidly on the cooktop. The vessels could tip over.
Only use cooking vessels with flat and thick bottoms.
Don't cook without a lid or if the lid is not on all the way. The majority of the heat is lost.
Place the cooking vessel in the center of the burner, otherwise it may tip over. Don't place large pots on the burners near the stove controls. They could overheat and become damaged.
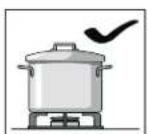
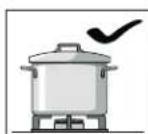
Place the pots on the pan supports, never directly onto the burners.
Prior to use, ensure that the pan supports and lids of the gas burners are positioned correctly.
Handle vessels carefully on the cooktop.
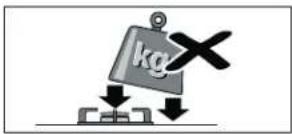
Don't bang the cooktop and don't place any heavy weights on it.
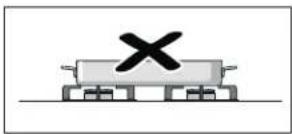
Never heat a cooking vessel (e.g. roasting tin, pan, cooking stone) with multiple burners. The resulting accumulation of heat causes damage to the appliance.
Cleaning and maintenance
WARNING
Risk of electrical shock!
Moisture entering the appliance can cause an electrical shock. Don't use a high-pressure cleaner or steam cleaner.
WARNING
Risk of burns!
The accessible parts get hot during operation. Never touch hot parts. Keep children away.
NOTICE
SURFACE DAMAGE:
Do not use the following cleaning agents:
- Abrasive or rough cleaners
Oven cleaners - Caustic, chlorinated or aggressive cleansers
Cleanser with a high alcohol content - Hard, scratchy sponges, brushes or scouring pads
If such an agent comes into contact with the appliance, wash it off immediately with water.
Always wash new sponge cloths thoroughly before use.
Cleaning the appliance
Clean the appliance after each use once it has cooled down. Remove liquids that have boiled over or spilled immediately and do not allow any food remnants to burn on.
Make sure that the ventilation openings under the pan support are always clean. The ventilation openings may not be covered.
Dry the burners thoroughly after cleaning. Only operate the appliance when the burners are dry. Damp burners can cause ignition problems and/or an unstable flame.
During assembly, make sure that the burner parts (lugs) are in the correct position. All parts must be positioned straight.
| Appliance part/ Surface | Recommended cleaning |
| Stainless steel surfaces | Use soapy water and dry with a soft cloth. Only use a minimal amount of water when cleaning so that no water enters the appliance.Soak burnt-on remnants with a small amount of soapy water; do not scour.Remove heavy soiling or yellow discoloration caused by heat using our stainless-steel cleaning agent (article no. 00311499). |
| Pan support Carefully remove for cleaning. Soak in the sink. Clean using a scrubbing brush and detergentCLEAN the area around the rubber buffers carefully so that they do not become detached.Rinse with clean water before leav-ing to dry.Do not clean in the dishwasher. | |
| Burner parts Use soapy water and dry with a soft cloth. Make sure that the openings are not blocked.Take care that no small parts are lost.Do not clean in the dishwasher. | |
| Control knob The soapy cloth may not be too wet.Dry with a soft cloth. | |
Burnt-on dirt
For hard-to-remove, burnt-on dirt, you can order a cleaning gel from our online shop, from your specialist retailer or our Customer Service (item number 00311859). It is suitable for pan supports and the stainless steel recess. If necessary, let the dirt soak overnight. Heed the instructions on the cleaning agent.
NOTICE
DAMAGE TO THE SURFACE -
Do not use the cleaning gel on the burner parts.
Discoloration of the burners
After long use, the burner parts made of brass become darker due to natural oxidation. The change in the color does not affect use user benefits.
Faults - What to Do?
You can often easily eliminate problems that may occur on your own. Before calling Customer Service, take into account the following information.

WARNING
Risk of electric shock!
Incorrect repairs are dangerous. Repairs may only be carried out by an authorized servicer. If the appliance is not functioning properly, unplug the power cord or switch off the fuse in the fuse box. Contact Customer Support.
| Disruption Possible cause Solution | ||
| The burner will not ignite when it is switched on. | Power supply disconnected. Turn all of the control knobs to 0. Check the fuse box to see whether the circuit breaker has tripped. | |
| The burner will not ignite when it is switched on. | Burner or gas supply fault. Turn all of the control knobs to 0. Check:Are the burner parts positioned correctly?Is the main gas tap open?Is the burner clean and dry?Is there air in the line following initial con- nection or a cylinder change (in the case of liquid gas)?Gas cylinder empty (in the case of liquid gas)? | |
| The illuminated ring behind the control knob will flash orange and white alternately. | ||
| The burner will not ignite when it is switched on. | Demo mode is activated. Deactivate demo mode. | |
| All the illuminated rings behind the control knobs are lit white for 10 seconds after switch-on. Then the illuminated ring around the active control knob is lit orange. | ||
| The burner will not ignite when it is switched on. | Electronics fault Turn all control knobs to 0 and disconnect the appliance from the power supply for one minute (switch off the circuit breaker or pull out the plug).Reconnect the appliance. The illuminated rings around the control knobs light up green for a few seconds and then turn yellow. Wait until the illuminated rings switch off. Then turn any of the control knobs to any of the heat settings and then back to 0.Switch on the burner. If the illuminated ring starts flashing yellow and magenta again, call Customer service. | |
| The illuminated ring behind the control knob is flashing yellow and white alternately. | ||
| The burner goes out while the appli- ance is in operation. | Safety switch off:No actions have been performed for an extended period. | Turn all control knobs to 0, and then switch them back on if you wish to continue using the appliance. |
| The illuminated ring behind the control knob will flash orange and white alternately. | ||
| The burner goes out while the appli- ance is in operation. | Power failure in the house- hold: | Turn all control knobs to 0, and then switch them back on if you wish to continue using the appliance. |
| The illuminated ring behind the con- trol knob will flash orange and white alternately. | Following a power failure, the apppliance will remain switched off for safety rea- sons. | |
| There is a smell of gas in the kitchen. | Gas may be leaking out where the gas cylinder is connected. | Check that the gas cylinder connection is not leaking. Open windows and ensure the room is well ventilated. |
| The appliance paneling becomes slightly raised at the corners when it is in operation. | The metal from which the cooktop is made expands as it heats up. | This is normal. It will contract again once it has cooled down. |
Notes
Each time the mains power is switched on or following a power failure, a sound is produced when the gas valves are started up. The illuminated rings around the control knobs light up green for a few seconds and then turn yellow. Wait until the illuminated rings switch off.
- When the gas cooktop is switched on, the electronics open up the gas supply, which produces a short sound. A sound can also be heard when the setting is changed. This is normal.
Demo Mode
The demo mode is activated if all of the illuminated rings around the control knobs light up white for 10 seconds after switching on the appliance. The burner will not ignite. The illuminated ring around the active control knob will be lit orange.
You can deactivate the demo mode as follows:
- Turn all of the control knobs to 0. Disconnect the appliance from the power supply. Wait at least 30 seconds.
- Reconnect the appliance. The illuminated rings around the control knobs light up green for a few seconds and then turn yellow. Wait until the illuminated rings switch off.
- Then deactivate demo mode within three minutes as follows:
Turn any of the control knobs anti-clockwise to position 12. - Turn the control knob clockwise to position 1.
- Turn the control knob anti-clockwise to position 0. Wait until the illuminated ring lights up yellow.
- Turn the control knob clockwise to position 1. The illuminated ring lights up green. Wait for five seconds. The illuminated ring now turns yellow.
Demo mode has now been deactivated. To save the setting, always exit the menu as follows: - Turn the control knob to 0. Then turn the control knob anti-clockwise to position 12. Turn the control knob clockwise to position 1. Turn the control knob counterclockwise to position 0. Wait until the illuminated ring goes out.
Customer Service
If your appliance needs repairs, our Customer Service is there for you. We work hard to help solve problems quickly and without unnecessary service calls, getting your appliance back up and running correctly in the least amount of time possible.
When you call, please indicate the product number (E-Nr.) and serial number (FD-Nr.) so that we can support you in a qualified manner. You will find the data plate with these numbers on the bottom of the appliance. To avoid having to search when you need it, you can enter your appliance data and the Customer Service telephone number here.
E-Nr. FD-Nr.
Customer Service
Please read the use and care instructions provided with your appliance. Failure to do so may result in an error in using the appliance resulting in unnecessary service calls, which may not be covered by the warranty.
Please find the contact data of all countries in the enclosed customer service list.
To book a service visit and product advice
USA 877 442 4436
toll-free
CANADA 877 442 4436
toll-free
Table des Matieres
Conserverces instructions.
www.P65Warnings.ca.gov
Causes des dommages
AVIS
DOMMAGES DUS À LA CHALEUR SUR DES APPAREILS OU DES MEUBLES:
1901 Main Street, Suite 600
Irvine, CA 92614
1-877-442-4436
www.gaggenau.com/us
© 2020 BSH Home Appliances