VA 420 001 - Cooker GAGGENAU - Free user manual and instructions
Find the device manual for free VA 420 001 GAGGENAU in PDF.

User questions about VA 420 001 GAGGENAU
0 question about this device. Answer the ones you know or ask your own.
Ask a new question about this device
Download the instructions for your Cooker in PDF format for free! Find your manual VA 420 001 - GAGGENAU and take your electronic device back in hand. On this page are published all the documents necessary for the use of your device. VA 420 001 by GAGGENAU.
USER MANUAL VA 420 001 GAGGENAU
natural_image
Technical diagram showing a mechanical assembly with a bracket and a close-up view of the component (no text or symbols present)
natural_image
Technical diagram showing a mechanical component with a 3D view and its close-up view, labeled '1b' (no text or symbols on the diagram itself)
text_image
2 3 CLICK
natural_image
Technical line drawing of a mechanical assembly with multiple views and mounting brackets (no text or symbols)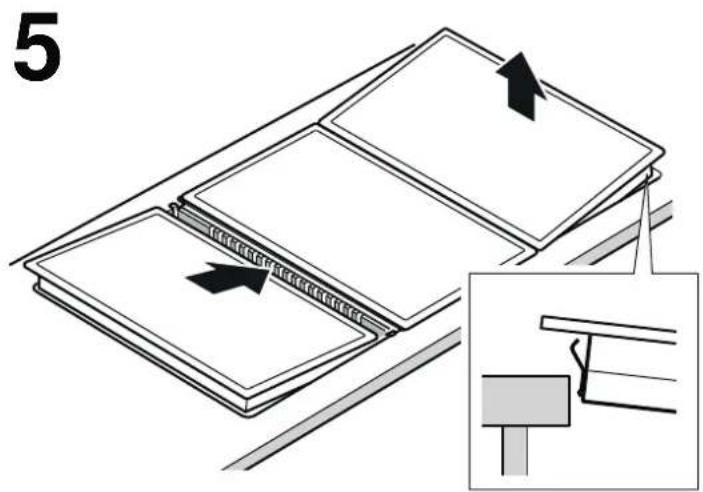
text_image
5
flowchart
graph TD
    A["Block 1"] --> B["Block 2"]
    B --> C["Block 3"]
    C --> D["Downward Arrow"]
    style A fill:#f9f,stroke:#333
    style B fill:#bbf,stroke:#333
    style C fill:#bfb,stroke:#333
    style D fill:#ffb,stroke:#333
Verbindungsleiste
VA 420 000
Connection strip for combination with other Vario 400 appliances for flush mounting
VA 420 010
Connection strip for combination with other Vario 400 appliances for surface mounting
VV 401 000
25 mm connection strip for use in combination with other Vario 400 appliances in sections of the previous Vario series. Not suitable for appliance combinations with the VL 414 downdraft ventilation. For surface mounting without appliance cover.
Notes
- Observe the installation instructions of the appliances.
■ Only install the downdraft ventilation VL 414 with the mounting device fitted.
Installation
-
Produce the cut-out in the worktop.
-
Insert the appliance into the cut-out
-
Join the connecting strip at the rear first, then push element on the front and insert the connecting strip in (Fig. 2).
Note: the rounded edge of the connecting strip has to rear.
-
Firmly push the connecting strip against the appliance clips on the side of the appliance must snap into the connecting strip (Fig. 3).
-
Insert further appliances and connecting strips (Fig. 4).
-
In order to facilitate a perfect assembly of the complete range, the cut-out, insert the last appliance and slightly tilt the two appliances on either end of the range slightly upwards on the outer edge (to relieve the spring clips – Fig. 5). Then simultaneously push both appliances into the recess on the outer edge (Fig. 6).
Birləşdirici planka
VA 420 000
.הכלהה (בַרְׁה) is not a whole, but it is not a whole. VL 414 is not a whole.
תְקַרָה
.הכלההוּרָהוּרָהוּרָהוּרָהוּרָהוּרָהוּרָהוּרָהוּרָהוּרָהוּרָהוּרָהוּרָהוּרָהוּרָה
.הכלההוּרָהוּרָהוּרָהוּרָהוּרָהוּרָהוּרָהוּרָהוּרָהוּרָהוּרָהוּרָהוּרָהוּרָהוּרָה
- 3.