HDDB30WS - Cooker THERMADOR - Free user manual and instructions
Find the device manual for free HDDB30WS THERMADOR in PDF.
User questions about HDDB30WS THERMADOR
0 question about this device. Answer the ones you know or ask your own.
Ask a new question about this device
Download the instructions for your Cooker in PDF format for free! Find your manual HDDB30WS - THERMADOR and take your electronic device back in hand. On this page are published all the documents necessary for the use of your device. HDDB30WS by THERMADOR.
USER MANUAL HDDB30WS THERMADOR
natural_image
A bowl of pasta salad with vegetables, shrimp, and herbs served on a checkered tablecloth, accompanied by side dishes of tea and spices (no text or symbols visible).Use and Care
GUIDE
Thermador Masterpiece® Chimney Drawer Hood
Table of Contents (English) 3
Home Connect User's Information
Wi-Fi® Module
FCC/IC Statements
CMIIT ID: 2017AJ4134 (M)
FCC: 2AHES-COM2
IC: 21152-COM2
The Home Connect module is a communication device designed to provide communication between appliances and smart devices.
This module is integrated at the factory, under direct control of BSH Home Appliances Corporation, and is not user serviceable or upgradable. At least 20 cm separation distance should be maintained from device to user.
FCC COMPLIANCE STATEMENT
CAUTION: Changes or modifications not expressly approved could void your authority to use this equipment.
This device complies with Part 15 of the FCC Rules. Operation to the following two conditions: (1) This device may not cause harmful interference, and (2) This device must accept any interference received, including interference that may cause undesired operation.
INDUSTRY CANADA STATEMENT
This device complies with Industry Canada licence-exempt RSS standard(s). Operation is subject to the following two conditions: (1) this device may not cause interference, and (2) this device must accept any interference, including interference that may cause undesired operation of the device.
Congratulations on your recent Thermador purchase! Whether you are a dedicated chef or simply a connoisseur of the art of cooking, owning a Thermador kitchen is the ultimate expression of personal style, good taste and an appreciation for the complete culinary experience. Our award-winning products have been empowering culinary enthusiasts for more than eleven decades.
Before you begin using your new Thermador product, please take a moment to review the Use and Care Guide. You will find the answers to all of your questions as well as some very important safety information. Pay special attention to the Important Safety Instructions located at the beginning of the manual. Your Thermador product is ready and waiting to be used for your next gourmet creation!
Our products are handcrafted with the highest quality authentic materials to ensure years of reliable service. In the unlikely event that you have a service question, please have your model and serial numbers of your product available (see the "Before Calling For Service" section for location).
We realize that you have made a considerable investment in your kitchen. Please feel free to share your Thermador kitchen photos and remodeling stories with us. Follow us on Twitter or post your kitchen photos on Facebook. We would love to hear from you!
Thermador wishes you many years of creative cooking.
Félicitations!
Important Safety Instructions 3
Advance Planning 5
Before You Begin 5
General Information 6
Installation 7
Installation Considerations 7
Ductwork Preparation 8
Hood Transition 11
Electrical Requirements 11
Choosing the Correct Blower 11
Preparing the Ceiling Cutout and Housing...... 12
Custom Insert Installation with Hood Trims 13
Blower Motor Installation 14
Remote Installation (optional) 16
Installing Filters and Grease Trays.... 18
Installer Checklist and Service 19
Installer Checklist 19
Before Calling Service 19
Product Data Rating Plate 19
Service, Parts & Accessories ...... back page
Safety
Definitions
WARNING
This indicates that death or serious injuries may occur as a result of non-observance of this warning.
CAUTION
This indicates that minor or moderate injuries may occur as a result of non-observance of this warning.
NOTICE: This indicates that damage to the appliance or property may occur as a result of non-compliance with this advisory.
Note: This alerts you to important information and/or tips.
This THERMADOR® appliance is made by
BSH Home Appliances Corporation
1901 Main Street, Suite 600
Irvine, CA 92614
Questions?
1-800-735-4328
www.thermador.com
We look forward to hearing from you!
Safety

IMPORTANT SAFETY INSTRUCTIONS
READ AND SAVE THESE INSTRUCTIONS
INSTALLER: Save these instructions for the local electrical inspector's use. Please leave these instructions with this unit for the owner. Show the owner the location of the circuit breaker or fuse. Mark it for easy reference.
OWNER: Please retain these instructions for future reference.
WARNING
If the information in this manual is not followed exactly, fire or shock may result causing property damage or personal injury.
WARNING
If the information in this manual is not followed exactly, fire or shock may result causing property damage, personal injury or death.
- DO NOT store or use gasoline or other flammable vapors and liquids in the vicinity of this or any other appliance.
- WHAT TO DO IF YOU SMELL GAS
- DO NOT try to light any appliance.
- DO NOT touch any electrical switch.
- DO NOT use any phone in your building.
- Immediately call your gas supplier from a neighbor's phone. Follow the gas supplier's instructions.
- If you cannot reach your gas supplier, call the fire department.
- Installation and service must be performed by an authorized servicer, service agency or the gas supplier.
WARNING
Turn off power circuit at service panel and lock out panel before wiring this appliance. Requirement: 120 VAC, 60 Hz 15 A. Allow the appliance to cool after the power has been turned off before servicing the appliance.
WARNING
Automatically Operated Device To reduce the risk of injury disconnect from power supply before servicing.
WARNING
TO REDUCE THE RISK OF FIRE, ELECTRIC SHOCK, OR INJURY TO PERSONS, OBSERVE THE FOLLOWING:
- Use this unit only in the manner intended by the manufacturer. If you have questions, contact the manufacturer at the address or telephone number listed on the back page.
- Before servicing or cleaning unit, switch power off at service panel and lock the service disconnecting means to prevent power from being switched on accidentally. When the service disconnecting means cannot be locked, securely fasten a prominent warning device, such as a tag, to the service panel.
WARNING
DO NOT repair or replace any part of the appliance unless specifically recommended in the manuals. Improper installation, service or maintenance can cause injury or property damage. Refer to this manual for guidance. All other servicing should be done by an authorized servicer.
WARNING

ELECTRICAL SHOCK HAZARD
- DO NOT remove connections.
• DO NOT use an extension cord. - Failure to follow these instructions can result in death, fire, or electrical shock.

IMPORTANT SAFETY INSTRUCTIONS
READ AND SAVE THESE INSTRUCTIONS
Grounding Instructions
WARNING
Improper grounding can result in a risk of electric shock.
This appliance must be grounded. In the event of an electrical short circuit, grounding reduces the risk of electric shock by providing an escape wire for the electric current.
Be sure your appliance is properly installed and grounded by a qualified technician. Installation, electrical connections and grounding must comply with all applicable codes.
If required by the National Electrical Code (or Canadian Electrical Code), this appliance must be installed on a separate branch circuit.
WARNING
To reduce the risk of fire or electrical shock, DO NOT use this appliance with any solid state speed device.
Safety Codes and Standards
This appliance complies with one or more of the following Standards:
- UL 507, The Standard for the Safety of Electric Fans
• CSA C22.2 No. 113, Fans and Ventilators
It is the responsibility of the owner and the installer to determine if additional requirements and/or standards apply to specific installations.
CAUTION

Unit is heavy and requires at least two people or proper equipment to move and install.
Hidden surfaces may have sharp edges. Use caution when handling the appliance. Failure to do so may result in property damage or personal injury.
WARNING
State of California Proposition 65 Warnings:
This product can expose you to chemicals including vinyl chloride, which is known to the State of California to cause cancer and birth defects or other reproductive harm. For more information go to
www.P65Warnings.ca.gov.
Never modify or alter the construction of the appliance. For example, do not remove panels, wire covers or brackets/screws.
CAUTION
For general ventilating use only. DO NOT use to exhaust hazardous or explosive materials and vapors.
WARNING
To reduce the risk of fire, use only metal ductwork.
Use a qualified installer.
Remove all tape and packaging before using the appliance. Destroy the packaging after install. Never allow children to play with packaging material.
WARNING
TO REDUCE THE RISK OF FIRE, ELECTRIC SHOCK, OR INJURY TO PERSONS, OBSERVE THE FOLLOWING:
- Installation work and electrical wiring must be done by qualified person(s) in accordance with all applicable codes and standards, including fire-related construction.
- Sufficient air is needed for proper combustion and exhausting of gases through the flue (chimney) of fuel burning equipment to prevent back drafting. Follow the heating equipment manufacturer's guideline and safety standards such as those published by the National Fire Protection Association (NFPA), and the American Society for Heating, Refrigeration and Air Conditioning Engineers (ASHRAE), and the local code authorities.
- When cutting or drilling into wall or ceiling, do not damage electrical wiring and other hidden utilities.
- Ducted fans must always be vented to the outdoors.

IMPORTANT SAFETY INSTRUCTIONS
READ AND SAVE THESE INSTRUCTIONS
WARNING
TO REDUCE THE RISK OF A RANGE TOP GREASE FIRE:
- Never leave surface units unattended at high settings.
Boilovers cause smoking and greasy spillovers that may ignite. Heat oils slowly on low or medium settings. - Always turn hood ON when cooking at high heat or when cooking flambéing food (i.e. Crepes Suzette, Cherries Jubilee, Peppercorn Beef Flambe).
- Clean ventilating fans frequently. Grease should not be allowed to accumulate on fan or filter.
- Use proper pan size. Always use cookware appropriate for the size of the surface element.
WARNING
TO REDUCE THE RISK OF INJURY TO PERSONS IN THE EVENT OF A RANGE TOP GREASE FIRE, OBSERVE THE FOLLOWING: ^a
- SMOTHER FLAMES with a close fitting lid, cookie sheet, or metal tray, then turn off the burner. BE CAREFUL TO PREVENT BURNS. If the flames do not go out immediately, EVACUATE AND CALL THE FIRE DEPARTMENT.
- NEVER PICK UP A FLAMING PAN - you may get burned.
- DO NOT USE WATER, including wet dishcloths or towels - a violent steam explosion will result.
- Use an extinguisher ONLY if:
a) You know you have a class ABC extinguisher, and you already know how to operate it.
b) The fire is small and contained in the area where it started.
c) The fire department is being called.
d) You can fight the fire with your back to an exit. ^a Based on “Kitchen Fire Safety Tips” published by NFPA.
Introduction
Before You Begin
Before using your appliance, be sure to read this manual. Pay special attention to the Important Safety Instructions located at the beginning of the manual.
WARNING
To avoid risk of burn, turn the hood ON when cooking at high heat or when flambéing food.
DO NOT use all heating elements or gas burners simultaneously at high settings for a prolonged period. (max.15 minutes).
If the hood is located over a gas cooktop, operate the hood at maximum setting whenever three or more gas burners are being used.
DO NOT operate the ventilation system during a cooktop fire.
All Hood models are rated for 120 VAC, using a 15 amp circuit breaker; see the Installation Manual for more details.
Operating the Appliance
Overview
NOTE: The Use and Care Guide applies to several versions of this appliance. Accordingly, you may find descriptions of individual features that do not apply to your specific appliance.
IMPORTANT: DO NOT use cooktop, rangetop, or range while hood is disassembled.
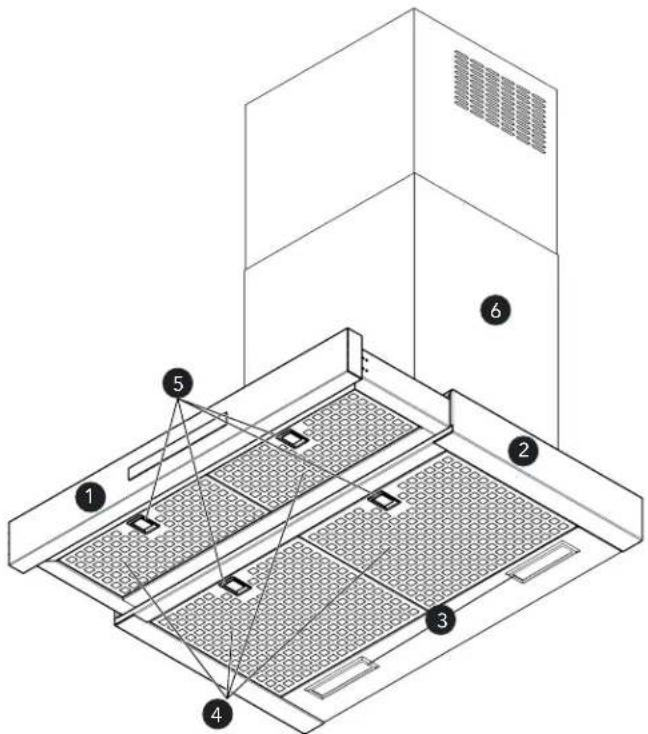
Chimney Drawer Hood
HDDB30WS & HDDB36WS
26 216 " (664 mm) in depth with the open drawer or 18 216 " (460 mm) with the closed drawer, with widths of 30" (762 mm) and 36" (914 mm).
This model series features brushed stainless-steel canopy with LED lights.
text_image
Technical diagram of a server rack with numbered components, likely for installation or maintenance instructions.(1) Touch control
(4) Hybrid mesh filters
(2) Hood canopy
(5) Filter latch
(3) LED lights
(6) Flue duct
Touch Control Panel
NOTE: Not all features referred to in this manual applies to all models.

text_image
FILTERAUTOLIGHTSCONNECT DELAY 1 2 3 4 43(1) FILTER
Clean Filter Reminder
After 40 hours of operation, the FILTER button will illuminate indicating that the filters need to be cleaned. When this indicator illuminates clean the filters as instructed on page 15. After cleaning, press and hold the FILTER button for 3 seconds until it beeps to reset the 40-hour period and to turn the reminder off.
Receive clean filter reminder notification through the Home Connect™ app when activated in Settings section, as well as see filter saturation status.
(2) DELAY
Delay Shut Off
If the blower is off when the DELAY button is pressed, the blower will turn on to the high speed setting for 10 minutes. Once time has elapsed, the blower will automatically turn off. If the blower is on when the DELAY button is pressed, the blower runs for 10 minutes from the time the DELAY button was pressed at the current speed then turns off. During the 10 minute timed period, the DELAY button is illuminated. To interrupt a timed period, press one of the fan speed buttons or 0 button to turn off.
Ability to choose a different time period and speed than the default setting is possible through the Home Connect™ app in the settings menu.
(3) 0
OFF
Touch '0' once to turn the blower off and reset the control.
(4) 1 - 4
Fan Speed
Increases or decreases the blower speeds. The chosen blower speed LED will remain illuminated while in operation.
1 - Low
2 - Medium
3 - Medium/High
4 - High
(5) AUTO
Automatic Mode
When in AUTO mode, the hood automatically turns the blower on, depending on the amount of heat the control senses. It automatically adjusts every 5 minutes. If the control does not sense a high level of heat, it will turn the blower off.
Remotely control and monitor hood fan speeds through Home Connect™ app.
(6) LIGHTS
LED Light Control
This button controls the LED lighting. The first press turns the lights on. A second press dims the lights. A third press turns the lights off. 0-100% light slider in Home Connect™ app allows additional control to obtain the perfect level of light.
(7) CONNECT
Home Connect™
This function allows the user to connect the hood with a mobile device. See "Home Connect™" on page 11.
Control tone
To turn OFF/ON the control tone, hold the FILTER and LIGHTS button for 3 seconds.
Control tone can also be turned OFF/ON through the settings section of the Home Connect™ app.
Operating the Hood
For Better Results
- The blower should be turned on for about 5 minutes before cooking in order to establish air currents upward through the hood. Thus when heat, smoke, moisture, grease and cooking odors are produced, they will be carried outside instead of drifting into other rooms.
- Use the low speeds for normal use and the higher speeds for strong odors or fumes.
NOTE: It is not recommended to use the closed hood at more than the second speed.
- Drafts across the range or cooktop will reduce the effectiveness of the hood. Such drafts should be prevented when possible.
- The best job of ventilation in the kitchen is done where the only air currents are those created by the blower itself.
- Regular use of the fan system while cooking helps keep the kitchen comfortable and less humid.
- Use a rear burner when browning or pan frying meat.
- For optimal performance, the width of the hood should equal that of the cooktop or rangetop or exceed it by 3 inches on either side. Install these hoods only with Thermador blowers.
- You can elongate 8" (203 mm) the front of the aspiration area, by pulling out the hood drawer.
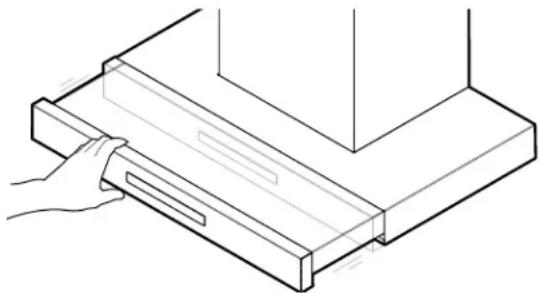
natural_image
Line drawing of a hand holding a rectangular object with a handle, next to a wooden shelf (no text or symbols)Home Connect™
With Home Connect ^™ , the appliance is Wi-Fi-capable and can be remotely controlled using a mobile device (e.g. tablet PC, smartphone). Home Connect ^™ app offers additional functions which are a perfect complement to the networked appliance.
Home Connect™ does not work over Wi-Fi networks that require browser registration, i.e. a user name and password entered via a web browser. You should have a stable wireless network with good reception and access to the internet.
If the appliance is not connected to the WLAN network (home network), it functions in the same way as a typical hood with no network connection and can be operated as usual via the Touch Panel.
NOTE: Please ensure that you follow the safety instructions given at the beginning of this instruction manual and that these are also observed when operating the appliance via the Home Connect™ app and when away from home. Please also follow the instructions in the Home Connect™ app. NOTE: Operation on the appliance itself always takes priority, and during this time it is not possible to operate the appliance using Home Connect™ App.
Cooktop-Hood Sync
You can connect this appliance to a matching cooktop (if the cooktop supports connection to the hood) and then control the functions of the hood via your cooktop.
There are various options for connecting the appliances:
Home Connect™
Two appliances can be connected using the Home Connect™ app provided that both of them are Home Connect™ compatible.
Refer to the Home Connect™ documents supplied for more information.
Connecting appliances directly
If the appliance is connected directly to a cooktop, it cannot be connected to your home network as well. The appliance will function in the same way as a hood that is not connected to the network and you can continue to operate it via the touch control panel.
Connecting appliances via your home network
If the appliances are connected to each other via your home network, both the hood controls on the cooktop and Home Connect™ can be used to operate the appliance.
Notes
- Make sure you follow the safety instructions in the instruction manual for your hood and that these are complied with even when operating the appliance via the hood controls on the cooktop.
- If the hood is being operated by means of the touch control panel on the hood itself, this mode of operation always has priority. It is not possible to use the hood controls on the hob during this time.
Setting up a connection
To set up the connection between the hood and the cook-top, the hood must be switched off and the cooktop must be switched on before you can connect the cooktop and hood.
Connecting directly
Ensure that the cooktop is switched on and is in search mode.
To do this, refer to the section entitled "Connecting to the hood" in the instruction manual for your cooktop.
Notes
- If your hood is connected directly to the cooktop, it cannot be connected to your home network as well and you will not be able to use Home Connect™.
- The cooktop must not be connected to your home network. To break a connection, follow the instructions in the section entitled "Disconnecting from the network".
Press and hold the CONNECT button until it starts to flash. The hood has been connected to the cooktop when the CONNECT button stops flashing and remains continuously lit.
Connecting via your home network
Follow the instructions in the section entitled "Connecting your hood to your home network (Wi-Fi) on page 13.
Once the hood is connected to your home network, you can connect to the hob via the Home Connect™ app. To do this, follow the instructions on your mobile device.
Setting up
To implement settings via Home Connect™, you must have installed the Home Connect™ App on a mobile device (e.g. tablet PC, smartphone).
Follow the steps specified by the app to implement the settings.
What do you need to connect your hood to Home Connect™?
- Your smartphone or tablet PC must be running the latest version of the operating system it uses.
- A home network signal (Wi-Fi) at the location where the home appliance is located.
- Name and password for your home network (Wi-Fi): (SSID):..... Password:....
Step 1: Installing the Home Connect™ app
- On your smartphone or tablet PC, go to the App Store (Apple devices) or Google Play Store (Android devices).
- Enter "Home Connect™" in the store's search field.
- Select the "Home Connect (America)" app published by BSH Home Appliances Corporation and install it on your smartphone or tablet.
Open the Home Connect™ app and press "Register" to create a new Home Connect™ account. The app will guide you through the registration process. Don't forget to make a note of your e-mail address and password afterwards.
Save your Home Connect™ login details here: Email:.......... Password:..........
Step 2 (initial start-up): Connecting your hood to your home network (Wi-Fi)
A. Connect the appliance.
B. Check whether your home network router has A WPS function (automatic connection) and locate the WPS button. Refer to the router manual for more information.
C. Does your router have a WPS function (automatic connection)?
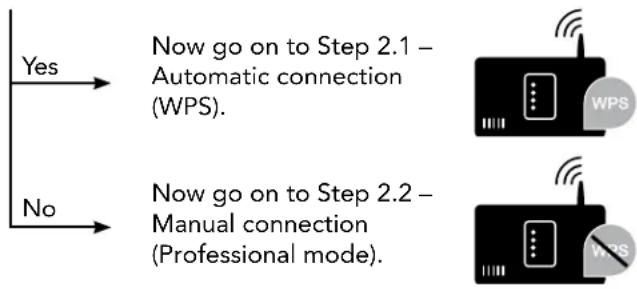
flowchart
graph TD
    A["Yes"] --> B["Now go on to Step 2.1 – Automatic connection (WPS)."]
    C["No"] --> D["Now go on to Step 2.2 – Manual connection (Professional mode)."]
Step 2.1: Automatically connecting your hood to your home network (Wi-Fi)
- Press SPEED 1 button.
- CONNECT and SPEED 1 buttons flash.
- WPS connection process started.
A. Note: To connect the hood to your home network, the hood and the light must be switched off.
You can cancel the process at any time by pressing "0".
B. Press and hold the "CONNECT" button until "0" and "CONNECT" start flashing.
C. Press "1".
Note: "1" and "CONNECT" will flash.
D. If you have WPS (see previous page) press the WPS button on your router.
Note: Please consult your router's manual to locate the WPS button.
E. When "CONNECT" and "3" flashes your appliance is connected to the home network.
Go on to step 3.
Error: If the "CONNECT" and "2" light flashes then the hood could not establish a connection with your home Wi-Fi within 2 minutes.
Fix: Check whether your hood is in range of your Wi-Fi and repeat the process. If unsuccessful, refer to step 2.2 to connect the oven manually.
Step 2.2: Manually connecting your hood to your home network (Wi-Fi)
A. Note: To connect the hood to your home network, the hood and the light must be switched off.
You can cancel the process at any time by pressing "0".
B. Press and hold the "CONNECT" button until it start flashing.
C. Press "2".
Note: "2" and "CONNECT" will start flashing.
D. Open general settings on your mobile device and then open Wi-Fi settings. Connect to the network named "HomeConnect".
This is your hoods Wi-Fi-network.
Use the following
login information to connect:
Wi-Fi-Name/SSID: HomeConnect
Password/Key: HomeConnect
E. Open the Home Connect™ App on your mobile device.
F. The app will prompt you to enter your home Wi-Fi's network name and password.
Note: The app may take a few minutes to find your hood.
G. Next, follow directions in the App.
H. When "CONNECT" and Fan Setting "3" flashes your appliance is connected to the home network.
Go on to step 3.
Error: The appliance fails to connect to the app (The "CONNECT" light will turn off).
Fix: Ensure your smartphone or tablet is connected to the same home network (Wi-Fi). Check that your wireless connection is stable and has a strong signal. Then repeat the process from step 2.
Connecting your hood to another Home Connect™ account
A. Open general settings on your mobile device and then open Wi-Fi settings. Connect to the same home network (Wi-Fi) as the hood.
B. Press and hold the "CONNECT" button until the "CONNECT" and 3 buttons start flashing.
C. Open the app on your mobile device and follow the instructions.
D. The registration process is complete once "CONNECT" stops flashing on the hood.
If you want to change the wireless home network that is connected to the hood, reset the connection to your hood by:
A. Press and hold the "CONNECT" and fan setting "0" buttons on your hood for at least 3 seconds. The "CONNECT" button will turn off.
B. Repeat the process from step 2.
Software update
Using the software update function, your hood's software can be updated (e.g. for the purpose of optimization, troubleshooting or security updates). To do this, you need to be a registered Home Connect™ user, have installed the app on your mobile device and be connected to the Home Connect™ server.
As soon as a software update is available, you will be informed through the Home Connect™ app and will be able to start the software update via the app.
Once the update has been successfully downloaded, you can start installing it via the Home Connect™ app if you are on your local area network.
The Home Connect™ app will inform you once installation is complete.
Notes
- You can continue to use your hood as normal while updates are downloading.
- Depending on your personal settings in the app, software updates can also be set to download automatically.
- We recommend that you install security updates as soon as possible.
Resetting the connection
You can reset the connections you have saved on your home network and on Home Connect ^™ at any time.
- Press and hold the 0 and CONNECT buttons at the same time until the CONNECT symbol is no longer illuminated.
About Data Protection
When your appliance is connected for the first time to a WLAN network, which is connected to the Internet, your appliance transmits the following categories of data to the Home Connect™ server (initial registration):
- Unique appliance identification (consisting of appliance codes as well as the MAC address of the installed Wi-Fi communication module).
- Security certificate of the Wi-Fi communication module (to ensure a secure IT connection).
- The current software and hardware version of your domestic appliance.
• Status of any previous resetting to factory settings.
This initial registration prepares the Home Connect ^TM functions for use and is only required when you want to use these Home Connect ^TM functions for the first time.
NOTE: Ensure that the Home Connect™ functions can be used only in conjunction with the Home Connect™ app. Information on data protection can be accessed in the Home Connect™ app.
Care and Cleaning
Grease Filters Cleaning

WARNING
Be sure the entire appliance (including the filters and lights) has cooled and grease has solidified before attempting to clean any part of the appliance.
Your hood has removable aluminum mesh filters. They must be cleaned when the FILTER light illuminates on the touch panel or whenever they collect grease. When used over a grill, wok or other high grease applications, more frequent cleaning may be required.
The filters may be washed by hand or in the dishwasher. Soak the ventilation filters in hot water using a mild detergent. Rinse well and shake to dry.
Slight discoloration can occur when cleaning the filters in a dishwasher. This has no influence on the function of the grease filters.
NOTE: Reverse the directions below to remove the filters. Ensure filters are cool and grease has solidified before removal.
NOTE: Do not use cooktop, rangetop, or range while hood is disassembled.
To Install Filters:
- Remove the filter by pulling the spring release filter latch and then pulling down the filter.
- Reinstall the filter by making sure the spring release filter latch is toward the front. Insert aluminum filter into upper track.
- Push in spring release filter latch.
- Push up on aluminum filter and release handle to latch into place.
natural_image
Abstract geometric pattern with repeating diamond shapes and a central square (no text or symbols)Access additional tips and tricks through the Home Connect™ app.
Cleaning Chart
| Anodized Aluminum Surfaces | Wash top and underside with hot sudsy water. Rinse and wipe dry or apply Fantastic® or Formula 409® first to a clean sponge or paper towel and wipe clean. DO NOT USE powdered cleaners or steel wool pads. |
| Aluminum Mesh Filters | Clean filters in the dishwasher or by agitating in sudsy water. Ensure that there is no soil trapped in the fine mesh. Dry the filters before reinstalling them. |
| Plastic surfaces | DO NOT REMOVE control buttons. Wipe with a moist soapy sponge. Rinse and dry. |
| Painted surfaces | For general care, wipe the outside of the hood with sudsy water or household cleaners such as Fantastic or Formula 409, rinse well and dry with a clean soft cloth to avoid water marks. DO NOT USE powdered cleansers or steel wool pads. |
| Stainless Steel Surfaces | Wipe and dry stainless steel in the same direction as the grain. Avoid using too much pressure, which may mar the surface. To remove finger prints and give added shine, use cleaners such as Stainless Steel Magic. Do not allow any cleaning compounds to remain in contact with stainless steel for extended periods. |
Hood Surface Cleaning
- For general care, wipe the outside of the stainless steel with mild, lukewarm, soapy water. Always wipe and dry in the direction of the stainless steel grain. Avoid using too much pressure, which may mar the surface.
- DO NOT use abrasive products such as steel wool.
- DO NOT use cellulose sponges. Some sponges are processed with salt and can cause corrosion by leaving salt deposits on the metal.
- DO NOT allow any cleaning compounds to remain in contact with stainless steel for extended periods.
• DO NOT USE CHLORINE-BASED CLEANERS. - To remove fingerprints and produce added shine, use a stainless steel cleaner or conditioner. The THERMADOR Stainless Steel Conditioner can be purchased online (US only) at: www.store.thermador.com (order part number 00576697).
Service
Before Calling Service
Trobuleshooting
To reach a service representative, see the contact information at the back of the manual. Before calling, please note the complete model and serial number printed on your product data rating label.
Use the suggestions in the table below before calling for service to avoid service charges.
| Problem Suggested Solution | |
| Noise during operation Some noise is normal due to vibration and air movement.Excessive noise could indicate one of the following:a) Ductwork is too small / undersizedb) Ductwork is too large / oversizedc) Ductwork is loosed) Transition is too small or is loosee) Wood screws are not fully tightenedf) Loose screws in trim parts, etc.Check Installation Manual to verify that ductwork is the proper size. Tighten screws. | |
| Noise when unit is off | a) Backflow flap on outside of duct wall cap moves with the wind. This is normal. |
| Lights and fan blower do not work | a) Hood circuit breaker may be tripped. Reset breaker. |
| Fan blower does not work a) Power supply is insufficient.b) Electrical wiring is incorrectly connected.See the Installation Manual for more information. | |
| Hood trips breaker a) Electrical wiring is incorrectly connected.b) Circuit is not sufficient.See the Installation Manual for more information. | |
| The hood is not venting properly. | a) The hood may be too high from the cook top.b) The hood may not be centered above the cook top.c) Make up air not sufficient.d) The wind from opened windows or opened doors in the surrounding area is affecting the ventilation of the hood. Close all the windows and doors to eliminate the outside air flow.e) Blockage in the duct opening or ductwork. Remove all blockage from the duct-work or duct opening.f) Duct length too long, too many elbows, “back to back” elbows, or too small roof or wall cap, will all cause issues with air draw.See the Installation Manual for more information. |
How to Obtain Service or Parts
We want you to remain a satisfied customer. If a problem comes up that cannot be resolved to your satisfaction please let us know.
To reach a service representative, see the contact information at the back page of the manual. Whether you write or call, please provide us with the Model Number, Serial Number and Date of Original Purchase or Installation.
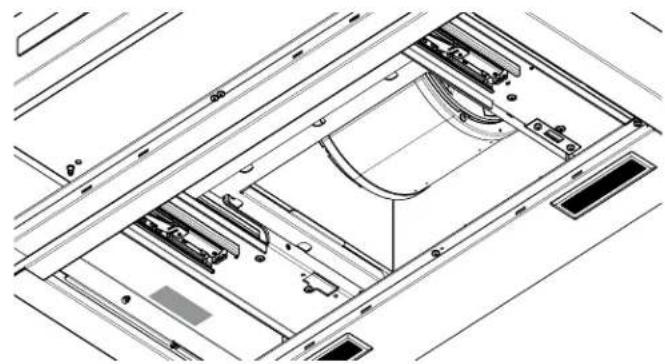
Product Data Rating Label
The data rating label shows the model and serial number. Refer to the data label on the appliance when requesting service. The data rating label is located on the frame behind the filter. Remove the filter to view it (see figure below for an example).
natural_image
Technical line drawing of a mechanical assembly with no visible text or symbolsService Information
For handy reference, copy the information below from the data rating label located on the frame. Keep your invoice for Warranty validation.
Model Number
Serial Number
Date of Purchase
Also enter this information on the Product Registration Form included with this product.
Register your BSH product to ensure timely service and access to your product related information. You may register your product through one of the following ways:
- Mail in the completed THERMADOR Product Registration card.
- Register your product online at www.thermador.com.
- Call us at THERMADOR customer service at 1-800-735-4328.
Statement of Limited Product Warranty
What this Warranty Covers & Who it Applies to
The limited warranty provided by BSH Home Appliances Corporation (BSH) in this Statement of Limited Product Warranty applies only to the THERMADOR® appliance sold to you, the first using purchaser, provided that the Product was purchased:
- For your normal, household (non-commercial) use, and has in fact at all times only been used for normal household purposes.
- New at retail (not a display, "as is", or previously returned model), and not for resale, or commercial use.
- Within the United States or Canada, and has at all times remained within the country of original purchase.
The warranties stated herein apply to the original purchaser of the product warranted herein and to each succeeding owner of the product purchased for ordinary home use during the term of the warranty.
Please make sure to return your registration card; while not necessary to effectuate warranty coverage, it is the best way for BSH to notify you in the unlikely event of a safety notice or product recall.
How Long the Warranty Lasts
Product built preceding January 1, 2012 with a number of FD911299999 or lower: BSH warrants that the Product is free from defects in materials and workmanship for a period of three hundred and sixtyfive (365) days from the date of purchase. The foregoing timeline begins to run upon the date of purchase, and shall not be stalled, tolled, extended, or suspended, for any reason whatsoever.
Product built subsequent to January 1, 2012 with a number of FD920100000 or higher: BSH warrants that the Product is free from defects in materials and workmanship for a period of seven hundred and thirty (730) days from the date of purchase. The foregoing timeline begins to run upon the date of purchase, and shall not be stalled, tolled, extended, or suspended, for any reason whatsoever.
This Product is also warranted to be free from cosmetic defects in material and workmanship (such as scratches of stainless steel, paint/porcelain blemishes, chips, dents, or other damage) to the finish of the Product, for a period of sixty (60) days from the date of purchase or closing date for new construction. This cosmetic warranty excludes slight color variations due to inherent differences in painted and porcelain parts, as well as differences caused by kitchen lighting, product location, or other similar factors. This cosmetic warranty specifically excludes any display, floor, "As Is", or "B" stock appliances.
Repair/Replace as Your Exclusive Remedy
During this warranty period, BSH or one of its authorized service providers will repair your Product without charge to you (subject to certain limitations stated herein) if your Product proves to have been manufactured with a defect in materials or workmanship. If reasonable attempts to repair the Product have been made without success, then BSH will replace your Product (upgraded models may be available to you, in the sole discretion of BSH, for an additional charge). All removed parts and components shall become the property of BSH at its sole option. All replaced and/or repaired parts shall assume the identity of the original part for purposes of this warranty and this warranty shall not be extended with respect to such parts. BSH's sole liability and responsibility hereunder is to repair manufacturer-defective Product only, using a BSH-authorized service provider during normal business hours. For safety and property damage concerns, BSH highly recommends that you do not attempt to repair the Product yourself, or use an un-authorized servicer; BSH will have no responsibility or liability for repairs or work performed by a non-authorized servicer. If you choose to have someone other than an authorize service provider work on your Product, THIS WARRANTY WILL AUTOMATICALLY BECOME NULL AND VOID. Authorized service providers are those persons or companies that have been specially trained on BSH products, and who possess, in BSH's opinion, a superior reputation for customer service and technical ability (note that they are independent entities and are not agents, partners, affiliates or representatives of BSH). Notwithstanding the foregoing, BSH will not incur any liability, or have responsibility, for the Product if it is located in a remote area (more than 100 miles from an authorized service provider) or is reasonably inaccessible, hazardous, threatening, or treacherous locale, surroundings, or environment; in any such event, if you request, BSH would still pay for labor and parts and ship the parts to the nearest authorized service provider, but you would still be fully liable and responsible for any travel time or other special charges by the service company, assuming they agree to make the service call.
Out of Warranty Product
BSH is under no obligation, at law or otherwise, to provide you with any concessions, including repairs, pro-rates, or Product replacement, once this warranty has expired.
Warranty Exclusions
The warranty coverage described herein excludes all defects or damage that are not the direct fault of BSH, including without limitation, one or more of the following:
- Use of the Product in anything other than its normal, customary and intended manner (including without limitation, any form of commercial use, use or storage of an indoor product outdoors, use of the Product in conjunction with air or water-going vessels).
- Any party's willful misconduct, negligence, misuse, abuse, accidents, neglect, improper operation, failure to maintain, improper or negligent installation, tampering, failure to follow operating instructions, mishandling, unauthorized service (including self-performed "fixing" or exploration of the appliance's internal workings).
- Adjustment, alteration or modification of any kind.
- A failure to comply with any applicable state, local, city, or county electrical, plumbing and/or building codes, regulations, or laws, including failure to install the product in strict conformity with local fire and building codes and regulations.
- Ordinary wear and tear, spills of food, liquid, grease accumulations, or other substances that accumulate on, in, or around the Product.
- Any external, elemental and/or environmental forces and factors, including without limitation, rain, wind, sand, floods, fires, mud slides, freezing temperatures, excessive moisture or extended exposure to humidity, lightning, power surges, structural failures surrounding the appliance, and acts of God.
- In no event shall BSH have any liability or responsibility whatsoever for damage to surrounding property, including cabinetry, floors, ceilings, and other structures or objects around the Product. Also excluded from this warranty are products on which the serial numbers have been altered, defaced, or removed; service visits to teach you how to use the Product, or visits where there is nothing wrong with the Product; correction of installation problems (you are solely responsible for any structure and setting for the Product, including all electrical, plumbing or other connecting facilities, for proper foundation/flooring, and for any alterations including without limitation cabinetry, walls, floors, shelving, etc.); and resetting of breakers or fuses.
TO THE EXTENT ALLOWED BY LAW, THIS WARRANTY SETS OUT YOUR EXCLUSIVE REMEDIES WITH RESPECT TO PRODUCT, WHETHER THE CLAIM ARISES IN CONTRACT OR TORT (INCLUDING STRICT LIABILITY, OR NEGLIGENCE) OR OTHERWISE. THIS WARRANTY IS IN LIEU OF ALL OTHER WARRANTIES, WHETHER EXPRESS OR IMPLIED. ANY WARRANTY IMPLIED BY LAW, WHETHER FOR MERCHANTABILITY OR FITNESS FOR A PARTICULAR PURPOSE, OR OTHERWISE, SHALL BE EFFECTIVE ONLY FOR THE PERIOD THAT THIS EXPRESS LIMITED WARRANTY IS EFFECTIVE. IN NO EVENT WILL THE MANUFACTURER BE LIABLE FOR CONSEQUENTIAL, SPECIAL, INCIDENTAL, INDIRECT, "BUSINESS LOSS", AND/OR PUNITIVE DAMAGES, LOSSES, OR EXPENSES, INCLUDING WITHOUT LIMITATION TIME AWAY FROM WORK, HOTELS AND/OR RESTAURANT MEALS, REMODELLING EXPENSES IN EXCESS OF DIRECT DAMAGES WHICH ARE DEFINITIVELY CAUSED EXCLUSIVELY BY BSH, OR OTHERWISE. SOME STATES DO NOT ALLOW THE EXCLUSION OR LIMITATION OF INCIDENTAL OR CONSEQUENTIAL DAMAGES, AND SOME STATES DO NOT ALLOW LIMITATIONS ON HOW LONG AN IMPLIED WARRANTY LASTS, SO THE ABOVE LIMITATIONS MAY NOT APPLY TO YOU. THIS WARRANTY GIVES YOU SPECIFIC LEGAL RIGHTS, AND-YOU MAY ALSO HAVE OTHER RIGHTS WHICH VARY FROM STATE TO STATE.
No attempt to alter, modify or amend this warranty shall be effective unless authorized in writing by an officer of BSH
No ID CMIIT (Chine): 2017AJ4134 (M)
FCC: 2AHES-COM2
IC: 21152-COM2
1901 Main Street, Suite 600
Irvine, CA 92614 É.-U.
Questions?
1-800-735-4328
www.thermador.com
text_image
Technical diagram of a server rack with numbered components and grounding connectionsnatural_image
Line drawing of a hand holding a rectangular object with a handle, no text or symbols presentHome Connect™
natural_image
Abstract geometric pattern with repeating diamond shapes and a central square (no text or symbols)natural_image
Technical line drawing of a mechanical assembly with no visible text or symbolsService Information
CMIIT ID: 2017AJ4134 (M)
FCC: 2AHES-COM2
IC: 21152-COM2
1901 Main Street, Suite 600
Irvine, CA 92614
¿Tiene preguntas?
1-800-735-4328
www.thermador.com
text_image
Technical diagram of a server rack with numbered components and labeled parts(1) Control táctil
natural_image
Line drawing of a hand holding a tray with a handle, next to a wooden shelf (no text or symbols)Home Connect™
natural_image
Pure geometric pattern with diamond shapes and a central square (no text or symbols)natural_image
Technical line drawing of a mechanical assembly with no visible text or symbolsThank you for being a Thermador customer!
Thermador is dedicated to supporting you and your appliance so you have many years of creative cooking. Please don't hesitate to contact us if you have any questions. We're happy to help you with cleaning and care instructions, cooking tips, accessories, troubleshooting, and more.
USA:
1-800-735-4328
www.thermador.com/customer-care
Canada:
1-800-735-4328
www.thermador.ca/support
Accessories & Parts
Filters, Thermador cleaners, teppanyaki pans, griddles, replacement parts, and more can be purchased in our online accessories store.
USA:
www.store.thermador.com/us
Canada:
For Atlantic, Ontario or Québec provinces, contact:
Marcone: 1-800-287-1627
For Manitoba, Saskatchewan, Alberta, British Columbia or any of the Territories, contact:
Reliable Parts: 1-800-663-6060
Assistance
www.thermador.ca/support
www.store.thermador.com/us
Canada:
www.thermador.ca/support
www.store.thermador.com/us
Canadá:
Para las provincias del Atlántico, Ontario o Québec, contacte a:
Marcone: 1-800-287-1627