CET305YB - Cooker THERMADOR - Free user manual and instructions
Find the device manual for free CET305YB THERMADOR in PDF.

User questions about CET305YB THERMADOR
0 question about this device. Answer the ones you know or ask your own.
Ask a new question about this device
Download the instructions for your Cooker in PDF format for free! Find your manual CET305YB - THERMADOR and take your electronic device back in hand. On this page are published all the documents necessary for the use of your device. CET305YB by THERMADOR.
USER MANUAL CET305YB THERMADOR
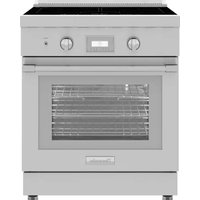
Masterpiece® Series Electric Cooktop CET305YB

THERMADOR.COM
()=cm
CET305YB
Table of contents
1 IMPORTANT SAFETY INSTRUCTIONS 4
1.1 Safety definitions 4
1.2 General information 4
1.3 Intended use 4
1.4 Restriction on user group 4
1.5 Safe use 4
1.6 Child safety 7
1.7 Proper installation and maintenance 7
1.8 State of California Proposition 65Warnings 7
2 Preventing material damage 8
2.1 Overview of the most common types of damage.... 8
3 Environmental protection and energy-saving 8
3.1 Disposal of packaging 8
3.2 Saving energy 8
4Familiarizing yourself with your appliance 10
4.1 Control panel. 10
4.2 Residual heat indicator 10
4.3 Cooking zones 11
5 Operation 11
5.1 Turning the cooktop on 11
5.2 Turning the cooktop off 11
5.3 Cooking zone settings 11
5.4Recommended cooking settings 12
5.5 CookSmart® 13
5.6 Kitchen timer 16
5.7 Panel lock 16
5.8 Wipe protection 16
5.9 Basic settings 17
6 Cleaning and maintenance. 17
6.1 Cleaning agents 17
6.2 Cleaning the glass ceramic cooktop 18
6.3 Cleaning recommendations.. 18
6.4 Maintenance 19
7 Troubleshooting 20
8 Disposal 21
8.1 Disposal of your old appliance 21
9 Customer Service 21
9.1 Model number (E-Nr.) and production number (FD) 22
9.2 Rating plate location 22
10 STATEMENT OF LIMITED PRODUCT WARRANTY 22
10.1 What this warranty covers & Who it applies to..... 22
10.2 How long the warranty lasts 22
10.3 Repair/replace as your exclusive remedy 22
10.4 Out of warranty product.. 23
10.5 Warranty exclusions 23
10.6 Obtaining warranty service 24
10.7 Product information 24

IMPORTANT SAFETY INSTRUCTIONS READ AND SAVE THESE INSTRUCTIONS
Read all of the instructions carefully before using the appliance. In order to reduce the risk of fire, electric shocks and personal injuries when using the appliance, follow the basic safety precautions, including the following safety instructions.
1.1 Safety definitions
Here you can find explanations of the safety signal words used in this manual.
WARNING
This indicates that death or serious injuries may occur as a result of non-observance of this warning.
CAUTION
This indicates that minor or moderate injuries may occur as a result of non-observation of this warning.
NOTICE:
This indicates that damage to the appliance or property may occur as a result of non-compliance with this advisory.
Note: This alerts you to important information and/or tips.
1.2 General information
Read this manual carefully.
- Keep the instructions, the appliance pass and the product information safe for future reference or for the next owner.
- Do not connect the appliance if it has been damaged in transit.
1.3 Intended use
Only a qualified electrician may connect appliances without plugs. The manufacturer is not responsible for damage caused by incorrect connections. Please see the Statement of Limited Product Warranty Page 22.
Only use this appliance:
To prepare meals and drinks.
Under supervision. Never leave the appliance unattended when cooking for short periods.
for normal household use and in enclosed spaces in a residential environment.
up to an altitude of 6,560 ft (2000 m) above sea level.
Do not use the appliance:
This appliance is not intended for operation with an external clock timer or a remote control.
1.4 Restriction on user group
This appliance is not intended for use by persons (including children) with reduced physical, sensory or mental capabilities, or lack of experience and knowledge, unless they have been given supervision or instruction concerning use of the appliance by a person responsible for their safety.
When children become old enough to use the appliance, it is the responsibility of the parents or legal guardians to ensure that they are instructed in safe practices by qualified persons.
Children should be supervised to ensure that they do not play with the appliance.
Do not let children play with the appliance.
1.5 Safe use
WARNING
When properly cared for, your new appliance has been designed to be safe and reliable.
Read all instructions carefully before use. These precautions will reduce the risk of burns, electric shock, fire, and injury to persons.
- When using kitchen appliances, basic safety precautions must be followed, including those in the following pages.
WARNING
While cooking food items, small amounts of certain byproducts, such as particulate matter / soot, can be released. To minimize exposure to these substances:
Always ensure proper ventilation by using an appropriate ventilation fan or hood vented to the outside and/or an open window.
Always operate the unit according to the instructions in this manual.
WARNING
Overheated materials can cause fire or burns and may produce potentially harmful smoke or fumes.
- To prevent overheating, turn ventilation hood ON when heating grease, fats or frying using medium to high heat settings.
Avoid heating empty pots and pans.
Do not allow pans to boil dry.
Do not allow aluminum foil, plastic, paper, or cloth to come in contact with a hot surface element, burner, or grate.

IMPORTANT SAFETY INSTRUCTIONS READ AND SAVE THESE INSTRUCTIONS
WARNING
Never leave the cooktop unattended when in use. Unattended cooking on a cooktop with fat or oil can be dangerous and may result in a fire. Boilovers cause smoking, and greasy spillovers may ignite.
WARNING
A fire could occur during cooking.
Always have a working smoke detector near the kitchen.
- Have an appropriate fire extinguisher available, nearby, highly visible and easily accessible near the appliance. If the cooktop is near a window, forced air vent or fan, be certain that flammable materials such as window coverings do not blow over or near the burners or heating elements. They could catch on fire.
Cooking fires can spread if extinguished incorrectly.
Never use water on cooking fires.
WARNING
TO REDUCE THE RISK OF A GREASE FIRE
- Never Leave Surface Units Unattended at High Settings - Boilovers cause smoking and greasy spillovers that may ignite. Heat oils slowly on low or medium settings.
Always turn hood ON when cooking at high heat or when flambeing food (i.e. Crepes Suzette, Cherries Jubilee, Peppercorn Beef Flambe'). - Use proper pan size. Always use cookware appropriate for the size of the surface element.
Do not flambé under the extractor hood or work with a naked flame. When switched on, the extractor hood draws flames into the filter. There is a risk of fire due to deposits on the grease filter!
Flames can be drawn into the ventilation system.
- Whenever possible, do not operate the ventilation system during a cooktop fire. However, do not reach through fire to turn it off.
Cookware Handles Should be Turned Inward and Not Extend Over Adjacent Surface Units.
To reduce the risk of burns, ignition of flammable materials, and spillage due to unintentional contact with the cookware, the handle of a cookware should be positioned so that it is turned inward, and does not extend over adjacent surface units.
Wear Proper Apparel. Loose-fitting or hanging garments, such as ties, scarves, jewelry, or dangling sleeves, should never be worn while using the appliance.
Tie long hair so that it does not hang loose.
- Secure all loose garments, etc. before beginning.
Use Proper Pan Size - This appliance is equipped with one or more surface units of different sizes.
- Select cookware having flat bottoms large enough to cover the surface unit cooking zone.
The use of undersized cookware will expose a portion of the cooking zone to direct contact and may result in ignition of clothing. Proper relationship of cookware to cooking zone will also improve efficiency.
Controls may be operated unintentionally by spills covering the control panel.
- Never use the appliance if liquids or foods have spilled around the control panel.
Always turn off the cooktop and dry the control panel. Boilovers can cause smoke and some foods and oils may catch fire if left on high temperature settings. - When using a timer, always supervise the cooktop.
Do not allow anything to boil over or burn.
WARNING
If the frying sensor is not working properly, overheating may result causing smoke and damage to the pan or fire. WHEN COOKING WITH THE FRYING SENSOR FUNCTION OBSERVE THE FOLLOWING
Always use a sensor frying pan.
Always put the pan in the center of the cooking zone.
Do not place a lid on the pan.
Never leave hot fat or oil unattended.
If the cooktop turns off automatically and can no longer be operated, it may turn itself on unintentionally at a later point.
- Switch off the circuit breaker or fuse in the electrical panel.
Contact Customer Service for support.
CAUTION
The cooking process has to be supervised. A short term cooking process has to be supervised continuously.
WARNING
If the display does not work when a cooking area is heating up disconnect the circuit breaker or fuse in the electrical panel.
Contact an authorized service provider.
To avoid risk of fire do not store items on the cooking surfaces.
In the event that personal clothing or hair catches fire, drop and roll immediately to extinguish flames.
Do Not Use Water on Grease Fires.
Smother fire or flame or use dry chemical or foam-type extinguisher.

IMPORTANT SAFETY INSTRUCTIONS READ AND SAVE THESE INSTRUCTIONS
WARNING
Use Only Dry Potholders - Moist or damp potholders on hot surfaces may result in burns from steam.
Do not let potholders touch hot heating elements.
Do not use a towel or other bulky cloth.
Hot oil is capable of causing extreme burns and injury.
- Use high heat settings on the cooktop only when necessary.
To avoid bubbling and splattering, heat oil slowly on no more than a low-medium setting. - Never move a pan of hot oil, especially a deep fat fryer. Wait until it is cool.
Spills of hot food may cause burns.
Hold the handle of the pan when stirring or turning food.
This helps prevent spills and movement of the pan. DO NOT TOUCH SURFACE UNITS OR AREAS NEAR UNITS. Surface units may be hot even though they are dark in color. Areas near surface units may become hot enough to cause burns.
During and after use, do not touch, or let clothing, potholders, or other flammable materials contact surface units or areas near units until they have had sufficient time to cool. Among these areas are the cooktop and areas facing the cooktop.
Clean Cooktop With Caution.
If a wet sponge or cloth is used to wipe spills on a hot cooking area, be careful to avoid steam burn.
- Some cleaners can produce noxious fumes if applied to a hot surface.
Do not clean the appliance while it is still hot.
WARNING
Storage in or on Appliance - The use of corrosive chemicals in heating or cleaning will damage the appliance and could result in injury.
- Flammable materials, corrosive chemicals, vapors or non-food products should not be stored or used in an oven or on or near surface units.
The appliance is specifically designed for use when heating or cooking food.
This appliance is intended for normal family household use only. It is not approved for outdoor use. See the Statement of Limited Product Warranty. If you have any questions, contact the manufacturer.
WARNING
Using this appliance other than for its intended use can cause fire or injury to persons.
Use this appliance only for its intended use as described in this manual.
NEVER use your appliances as a space heater for warming or heating the room. Doing so may result in excessive heat radiation and can cause a fire.
Never use the appliance for storage.
WARNING
TO REDUCE THE RISK OF INJURY TO PERSONS IN THE EVENT OF A GREASE FIRE, OBSERVE THE FOLLOWING.
SMOTHER FLAMES with a close-fitting lid, cookie sheet, or metal tray, then turn off the burner. BE CAREFUL TO PREVENT BURNS. If the flames do not go out immediately, EVACUATE AND CALL THE FIRE DEPARTMENT.
NEVER PICK UP A FLAMING PAN - You may be burned.
DO NOT USE WATER, including wet dishcloths or towels - a violent steam explosion will result.
Use an extinguisher ONLY if:
- You know you have a Class ABC extinguisher, and you already know how to operate it.
- The fire is small and contained in the area where it started.
- The fire department is being called.
- You can fight the fire with your back to an exit.
Do not heat or warm unopened food containers. Build-up of pressure may cause the container to burst and cause injury.
Liquid between the pot base and the cooktop may build up steam pressure. This may cause the pot to jump suddenly causing injury.
Always keep the cooktop and bases of pots dry.
When cooking with a double-boiler, the cooktop and cooking vessel may crack due to overheating.
The cooking vessel in the double-boiler must not come in direct contact with the bottom of the pot filled with water.
Use only heat-resistant cookware.
Glazed Cooking Utensils - Only certain types of glass, glass/ceramic, ceramic, earthenware, or other glazed utensils are suitable for cooktop or range-top service without breaking due to the sudden change in temperature.
Use only pans that are appropriate for ceramic cooktops.
Cookware not approved for use with ceramic cooktops may break with sudden temperature changes.

IMPORTANT SAFETY INSTRUCTIONS READ AND SAVE THESE INSTRUCTIONS
WARNING
Moisture intrusion may cause an electric shock.
- Do not use any steam cleaners or high-pressure cleaners to clean the appliance.
WARNING
If the surface is cracked, switch off the appliance to avoid the possibility of electric shock.
Do Not Cook on a Broken Cooktop - If the cooktop should break, cleaning solutions and spillovers may penetrate the broken cooktop and create a risk of electric shock.
- Contact an authorized service provider immediately.
1.6 Child safety
This appliance is not intended for use by persons (including children) with reduced physical, sensory or mental capabilities, or lack of experience and knowledge, unless they have been given supervision or instruction concerning use of the appliance by a person responsible for their safety.
When children become old enough to use the appliance, it is the responsibility of the parents or legal guardians to ensure that they are instructed in safe practices by qualified persons.
WARNING
Do not allow children to use this appliance unless closely supervised by an adult.
Children and pets should not be left alone or unattended in the area where the appliance is in use. They should never be allowed to play in its vicinity, whether or not the appliance is in use.
Do not allow anyone to climb, stand, lean, sit, or hang on any part of an appliance, especially a door, warming drawer, or storage drawer.
This can damage the appliance, and the unit may tip over, potentially causing severe injury.
Do not let children play with the appliance.
CAUTION
Do not store items of interest to children in cabinets above an appliance or on the backguard of an appliance. Children climbing on the appliance to reach items could be seriously injured. Do Not Leave Children Alone.
Children should not be left alone or unattended in the area where the appliance is in use.
They should never be allowed to sit or stand on any part of the appliance.
WARNING
To avoid the risk of suffocation:
Do not allow children to play with packaging material.
1.7 Proper installation and maintenance
WARNING
In the event of a malfunction, it might become necessary to turn off the power supply.
- Have the installer show you the circuit breaker or fuse. Mark it for easy reference.
To avoid electrical shock hazard, before servicing the appliance, turn power off at the service panel and lock the panel to prevent the power from being switched on accidentally.
Proper Installation - Improper installation or grounding can cause electric shock.
This appliance must be properly installed and grounded by a qualified technician.
Connect only to properly grounded outlet.
Refer to installation instructions for details.
User Servicing - Do not repair or replace any part of the appliance unless specifically recommended in this manual.
All other servicing should be referred to an authorized service provider.
If the supply cord is damaged, it must be replaced by the manufacturer, its authorized service provider or similar qualified persons in order to avoid hazard.
WARNING
Malfunctions can cause injuries.
Do not operate this appliance if it is not working properly, or if it has been damaged. Contact an authorized service provider.
1.8 State of California Proposition 65Warnings
This product may contain a chemical known to the State of California, which can cause cancer or reproductive harm. Therefore, the packaging of your product may bear the following label as required by California:
STATE OF CALIFORNIA PROPOSITION 65 WARNING:
WARNING
Cancer and Reproductive Harm - www.P65Warnings.ca.gov
2 Preventing material damage
NOTICE:
Cookware with rough bottoms scratch the glass ceramic surface.
- Check the bottom of the cookware before setting it down.
Salt, sugar or grains of sand scratch the glass ceramic surface. - Never use the cooktop as a working surface or for setting things down.
Overheating can damage the cookware or the appliance. - Do not heat empty pots or pans, or let cookware boil dry.
Hot cookware can cause the electronics to overheat. - Never set down hot pans and pots on the control panel or the cooktop frame.
When hard or sharp objects fall on the cooktop, they can cause damage. - Do not let hard or pointed objects fall on the cooktop.
Non heat-resistant materials will melt on heated cooking zones.
Do not use oven protective foil. - Do not use aluminum foil or plastic containers.
Unsuitable cleaning agents can cause shimmering metallic discolorations on the glass ceramic surface.
Refer to the cleaning recommendations in this manual.
"Cleaning and maintenance", Page 17
2.1 Overview of the most common types of damage
Here you can find an overview of the most common types of damage and suggestions how to avoid them.
Stains
| Cause How to avoid | |
| Boiled-over food Remove boiled-over food immediately with a glass scraper. | |
| Unsuitable cleaning agents | Use cleaning agents that are suitable for glass ceramic cooktops. |
Scratches
| Cause How to avoid | |
| Salt, sugar and sand | Do not use the cooktop as a work surface or storage space. |
| Cookware with rough bases | Check the cookware. |
Discolorations
| Cause How to avoid | |
| Unsuitable cleaning agents | Use cleaning agents that are suitable for glass ceramic cooktops. |
| Cause How to avoid | |
| Pot abrasion (e.g. aluminum) | Lift pots and pans when moving them. |
Blisters
| Cause How to avoid | |
| Sugar, food with a high sugar content | Remove boiled-over food immediately with a glass scraper. |
3 Environmental protection and energy-saving
3.1 Disposal of packaging
The packaging materials are environmentally compatible and can be recycled.
- Sort the individual components by type and dispose of them separately.
3.2 Saving energy
If you follow these tips, your appliance consumes less energy.
Select cookware with a base diameter that matches the cooking zone. Center the cookware on the cooking zone.
Tip: For frying pans, cookware manufacturers usually state the top diameter of the cookware. The diameter of the pan base is usually smaller.
- The energy is targeted at the cookware.
If you use cookware that is too small, energy is wasted. If the cookware is too large, much energy is used to heat up the cookware.
Close cookware with a fitting lid.
Cooking without a lid consumes more energy.
Only lift the lid when necessary.
If you lift the lid, a lot of energy can escape.
Use a glass lid.
- If you use a glass lid, you can look inside the cookware without lifting the lid.
Use cookware with a solid flat bottom.
Curved cookware bases increase energy consumption.
Use a cookware size that matches the amount of food you want to cook.
Large cookware with little content consumes a lot of energy.
Cook with a small amount of water.
- More water requires more energy to heat it up.
Select a lower power level as soon as possible. Select a suitable power level to continue cooking.
For ongoing cooking a lower power level is sufficient.
Use the residual heat of the cooking zone. For longer cooking times, turn the cooking zone off 5-10 minutes before the end of the cooking time.
Unused residual heat increases energy consumption.
4 Familiarizing yourself with your appliance
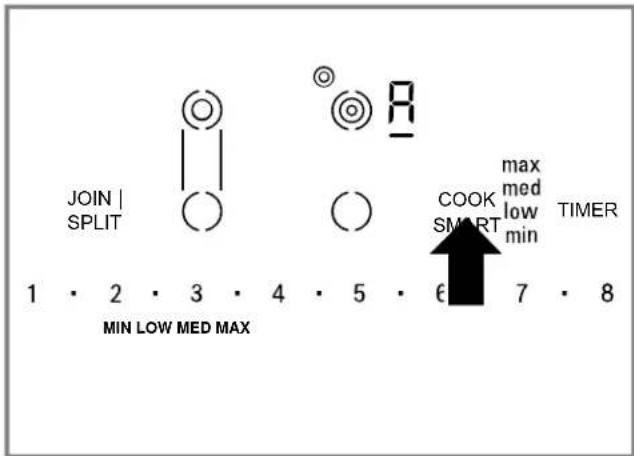
4.1 Control panel
You can use the control panel to configure all functions of your appliance and to obtain information about the operating status.
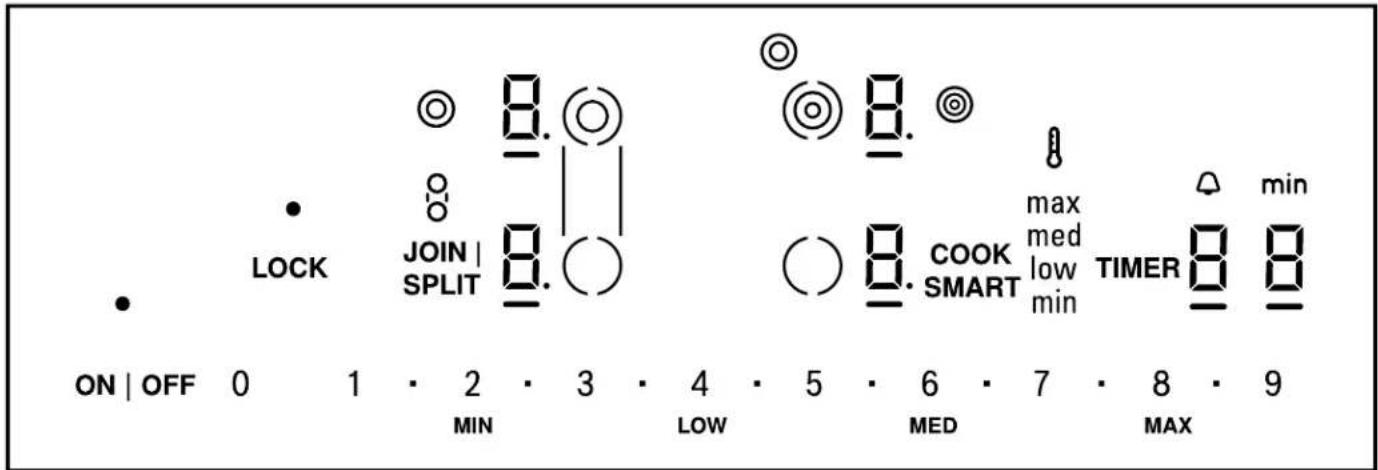
Touch keys
Touch keys are touch sensitive areas. Touch a symbol to activate the corresponding function.
| Touch key Function | |
| ON I OFF Main switch | |
| 01■2■3.■ Settings area | |
| 9 | |
| ○ Select single cooking zone | |
| ◎ Select dual cooking zone | |
| ◎ Select triple cooking zone | |
| JOIN I SPLIT Select Bridge zone | |
| LOCK Wipe protection / Panel lock | |
| COOK SMART CookSmart® function | |
| MIN / LOW / MED / MAX | CookSmart® levels Press number above level indicator |
| TIMER Kitchen timer | |
Notes
- Keep the controls clean and dry. Moisture can impair the function of the controls.
- Do not place cookware close to the displays and sensors. The electronics may overheat.
- When you touch several symbols at once, for example when food spills over, the settings will not change.
Displays
The displays show active settings and functions.
| Display Name |
| Cooktop ready |
| Display Name | |
| I - Power levels | |
| H/ HResidual heat indicator | |
| • Indicated function active | |
| _ Cooking zone selected | |
| R | CookSmart® active |
| min | CookSmart® frying level |
| low / | |
| med / | |
| max | |
| © | Dual cooking zone active |
| © | Triple cooking zone active |
| ® | Bridge zone active |
| © | Timer value |
| 4 min | Timer indicator |
4.2 Residual heat indicator
The cooktop is equipped with a residual heat indicator for each cooking zone. The residual heat indicator lights up when a cooking zone is turned off. Do not touch the cooking zone when the residual heat indicator lights up.
| Display Meaning | |
| H | The cooking zone is hot. Tip: You can keep a small quantity of food warm or melt a chocolate coating. |
| h | The cooking zone is hot. |
The residual heat indicator automatically turns on after a power failure. The display lights up for approximately 30 minutes.
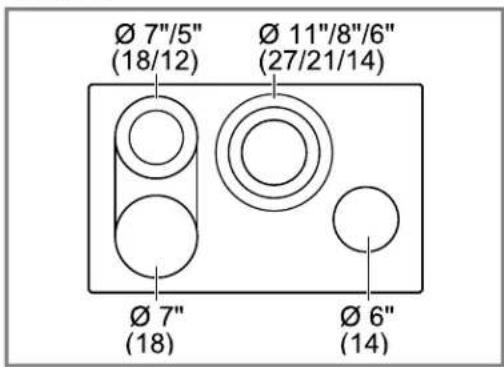
4.3 Cooking zones
Here you can find an overview of the cooking zones available on your cooktop. Place the cookware on the cooking zone that best matches its size. When a cooking zone is active, the corresponding displays light up.
Refer to the overview of models and dimensions.
Page 2
| Symbol Cooking zone Function | |
| ○ | Single cooking zone Only one cooking zone size is available. |
| ◎ | Dual cooking zone Two cooking zone sizes are available. → "Using the dual cooking zone", Page 12 |
| ◎ | Triple cooking zone Three cooking zone sizes are available. → "Using the triple cooking zone", Page 12 |
| ○○ | Bridge zone The bridge zone combines two cooking zones to a long griddle zone. → "Using the bridge zone", Page 12 Note: Do not use cookware larger than 17" x 10" (430 x 250 mm). |
Notes
- The cooking zone regulates the temperature by switching the heat on and off. The heat may also switch on and off when on the highest power level.
This protects components from overheating.
The appliance is protected from electrical overload.
Better cooking results are achieved.
- For cooking zones with more than one heating element, the different sections of the cooking zone may turn on and off at different intervals.
5 Operation
Here you will find everything you need to know about operating your appliance.
5.1 Turning the cooktop on
Press ON I OFF.
lights up in the cooking zone displays.
5.2 Turning the cooktop off
Press ON I OFF.
The indicator above ON I OFF turns off.
Th8 displays turn off.
All cooking zones are turned off.
- The residual heat indicators remain lit until the cooking zones have cooled off sufficiently.
Note: The cooktop turns off automatically when all the cooking zones have been turned off for more than 20 seconds.
5.3 Cooking zone settings
In order to make settings on a cooking zone, the cooking zone has to be selected.
Set the desired power level for each cooking zone in the settings area.
| Setting Power level | |
| 1 | lowest power level |
| 9 | highest power level |
| ■ | Intermediate setting for all power levels The intermediate setting is displayed as a dot in the cooking zone display, for example 4 lights up when you set the intermediate level between power level 4 and 5 |
Setting the power level
Requirement: The cooktop is turned on.
- Press to select the cooking zone ①
lights up in the cooking zone display. - lights up under the cooking zone display.
- Set the power level in the settings area②
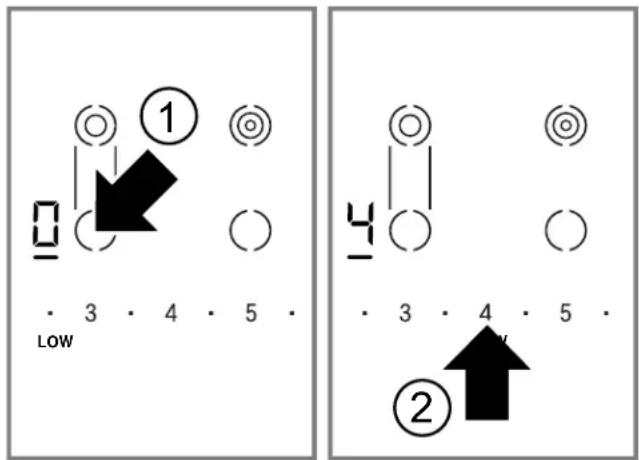
Press to set an intermediate level.
Changing the power level
- Press to select the cooking zone.
- Set the power level in the settings area.
Turning the cooking zone off
- Press to select the cooking zone.
-
Select in the settings area.
-
The residual heat indicator lights up after approximately 10 seconds.
Note: You can also switch off the cooking zone directly by touching the cooking zone symbol for longer than 3 seconds.
Using the dual cooking zone
Requirement: The cooking zone is turned off.
- Press to select the cooking zone.
lights up in the cooking zone display. - Press once.
lights up.
Both rings of the dual cooking zone are selected. - Press again.
turns off. - The inner ring of the dual cooking zone remains selected.
Using the triple cooking zone
Requirement: The cooking zone is turned off.
- Press to select the cooking zone.
lights up in the cooking zone display. - Press once.
lights up.
All three rings of the triple cooking zone are selected. - Press again.
- lights up.
- The two inner rings of the triple cooking zone are selected.
- Press again.
turns off. - The inner ring of the triple cooking zone remains selected.
Using the bridge zone
The bridge zone joins two individual cooking zones to one long griddle zone. This configuration is ideal for griddles and large pans.
Requirement: One of the two cooking zones that belong to the bridge zone is selected.
1. Press JOIN I SPLIT.
lights up.
lights up in both cooking zone displays. If you activate the bridge zone and you have already set a power level on one or both cooking zones, both cooking zones switch to power level
- Both rings of the dual cooking zone are automatically activated.
2. Select one of the two cooking zones that belong to the bridge zone.
- Set the desired power level in the settings area.
- To split the bridge zone, Press JOIN I SPLIT again. Setting the power level to 0 does not split the bridge zone.
lights up in both cooking zone displays.
The front cooking zone remains selected.
5.4 Recommended cooking settings
Here you can find recommendations on cooking and an overview of various dishes with suitable heat levels.
- Select power level 8 or 9 for bringing to a boil or initial frying.
Stir thick liquids occasionally. - Food that needs to be seared quickly, or food which loses a lot of liquid during initial frying, is best seared in several small portions.
Cooking charts
The cooking chart shows which power level is suitable for each type of food. The cooking time may vary depending on the type, weight, thickness and quality of the food. The power level for continuous cooking depends on the type of cookware you use.
CAUTION
Stews or liquids can heat up very quickly during cooking and may overflow or spatter, e.g. soups, sauces or drinks.
Stir continuously.
Heat the food at a suitable power level.
Note: Intermediate levels are indicated with a dot behind the number. Power level 2.5 is displayed as 2. in the cooking zone display as well as the cooking charts.
Melting
| Type of food Power level |
| Chocolate 1 - 2 |
| Butter 1 - 2 |
Heating
| Frozen vegetables, e. g. spinach 2. - 3. | |
| Broth 7 - 8 | |
| Thick soup 1. - 2. | |
| Milk¹ | 1 - 2 |
| ¹Cook without lid | |
Simmering
| Delicate sauce, e. g. Béchamel sauce 4 - 5 | |
| Spaghetti sauce | 2 - 3 |
| Pot roast | 4 - 5 |
| Fish1 | 4 - 5 |
| 1 Ongoing cooking without lid | |
Cooking
| Rice, with double amount of water 2 - 3 | |
| Potatoes boiled in their skins, with 1-2 cups of water | 4 - 5 |
| Boiled potatoes, with 1-2 cups of water | 4 - 5 |
| Fresh vegetables, with 1-2 cups of water | 2. - 3. |
| Frozen vegetables, with 1-2 cups of water | 3. - 4. |
| Pasta, with 2-4 qt. water1 | 6 - 7 |
| Pudding2 | 1 - 2 |
| Cereals 2 - 3 | |
| 1 Ongoing cooking without lid | |
| 2 Cook without lid | |
| Frying | |
| Pork chop1 | 5. - 6. |
| Chicken breast1 | 5 - 6 |
| Bacon 6 - 7 | |
| Eggs 5 - 6 | |
| Fish 5 - 6 | |
| Pancakes 5. - 6. | |
| 1 Turn the food several times. | |
| Deep-fat frying | |
| Fry in 1-2 qt. oil without a lid. | |
| Deep-frozen foods, e. g. chicken nuggets (0.5 lb per serving) | 8 - 9 |
| Other, e. g. doughnuts (0.5 lb per serving) | 4. - 5. |
5.5 CookSmart®
With the CookSmart® function, a sensor controls the temperature of the pan. You can fry while the pan maintains the selected temperature. Cooking zones marked with CookSmart® with this function.
Frying levels
The CookSmart® function offers 4 frying levels.
Advantages when using the CookSmart® function:
- The cooking zone only continues heating for as long as this is necessary to maintain the temperature. This saves energy and prevents the oil or fat from overheating.
The frying function reports when the empty frying pan has reached the optimum temperature for adding oil and then for adding the food.
Suitable pans for CookSmart®
A suitable sensor frying pan for the CookSmart® function is available as an optional accessory. You can purchase suitable sensor frying pans from Customer Service, in our online shop www.thermador.com/us/accessories or in specialized stores. Always indicate the relevant reference number.
Reference number Special accessory
| CHEFSPAN08 Sensor frying pan Ø 10" (26 cm)Suitable for 8" (21 cm) and 9" (23 cm) cooking zones |
The sensor frying pans have a non-stick coating, which means that very little oil is needed for frying.
Conventional frying pans

CAUTION
When using a conventional frying pan observe the following notes.
The CookSmart® function has been configured specifically for our system pans.
- Other frying pans may overheat. They may reach a temperature above or below the selected frying level. Try the lowest frying level first and then change it according to your requirements.
Make sure that the diameter of the base of the frying pan corresponds to the size of the cooking zone. Place the pan in the center of the cooking zone.
| Frying level | Temperature Suitable for |
| MIN Low Chicken breast, omelettes, french toast, hash browns, fried food in butter or olive oil | |
| LOW Medium-low Thick pan-fried foods such as pork chop, hamburger, pancakes | |
| MED Medium-high | Veal cutlet, ground meat, thin slices of meat, vegetables |
| MAX High | Steaks medium-rare, fried boiled potatoes |
Setting CookSmart®
CAUTION
Hot oil or fat may ignite.
- Never leave hot fat or oil unattended.
- Do not place a lid on the frying pan. This will prevent the CookSmart® function from activating correctly. Use a mesh splatter guard to prevent fat from spitting out.
Only use fat or oil that is suitable for frying. - When you are using butter, margarine, olive oil or lard, select frying level MIN.
Do not use CookSmart® for boiling.
Note: CookSmart® is positioned on the second ring of the triple cooking zone of your cooktop, the outer heating ring is not available while using this feature. The triple cooking zone will automatically be operated as a dual cooking zone.
If only the inner ring of the cooking zone is activated, the additional ring will automatically be turned on once you select the CookSmart® feature.
Requirements
The cooktop is turned on.
- You have selected a suitable frying level from the chart. Page 14
- Place the frying sensor pan in the center of the cooking zone with the CookSmart® feature.
- Select the cooking zone.
- Press COOK SMART.
R lights up in the cooking zone display.
The frying levels light up.
Frying recommendations
Here you can find recommendations on which frying level is best used for particular foods. The frying time depends on the type, weight, thickness and quality of the food.
- Select the desired frying level with the number keys in the settings area.

lights up.
- When the set frying temperature is reached a beep sounds.
goes out.
5. Add the frying oil to the pan.
6. Add the ingredients.
Turn the food over as usual to avoid burning.
Turning CookSmart® off
- Select the cooking zone.
- Touch COOK SMART.
Cooking tips
- The frying levels stated here are for cooking with the system pan. The frying levels may vary when you use other frying pans.
- First heat the empty pan. Add the fat and the food to the pan when the signal sounds.
Meat
| Food Frying level Total frying time | ||
| from signal in min. | ||
| Pork chop, boneless or bone-in, 1" (2.5 cm) thick low 10 - 17 | ||
| Veal cutlet inbreadcrumb, %" (0.5 cm) thick med 6 - 10 | ||
| Fillet, 1" (2.5 cm) thick med 6 - 10 | ||
| Cordon bleu low 15 - 20 | ||
| Beef steak, medium rare, 3¼" (2 cm) thick max 8 - 10 | ||
| Beef steak, medium or well done, ¾" (2 cm) thick med 8 - 12 | ||
| Chicken breast, 1" (2.5 cm) thick min 20 - 30 | ||
| Skillet-fried chicken min 25 - 35 | ||
| Sausages, e.g. hot dogs, ½ - 1¾" (1.5 - 3 cm) low 8 - 20 | ||
| Hamburger low 6 - 12 | ||
| Thin slices of meat | med 7 - 12 | |
| Ground meat | med 6 - 10 | |
| Bacon | min 5 - 8 | |
| Fish | ||
| Fish, fried, whole | low 15 - 25 | |
| Fish fillet with or without bread crumbs | low/med | 10 - 20 |
| Shrimp | med 4 - 8 | |
| Egg dishes | ||
| Pancakes | low ongoing frying | |
| Omelettes | min ongoing frying | |
| Fried eggs | min 2 - 6 | |
| Scrambled eggs | min 2 - 4 | |
| French toast | min ongoing frying | |
| Potatoes | ||
| Fried boiled potatoes | max 6 - 12 | |
| Fried raw potatoes | low 15 - 25 | |
| Hash browns | min 20 - 30 | |
| Vegetables | ||
| Garlic, onions | min 2 - 10 | |
| Squash, egg plant | low 4 - 12 | |
| Mushrooms | med 10 - 15 | |
| Stir-fried vegetables | med 10 - 12 | |
| Frozen products | ||
| Chicken nuggets, chicken patties | med 8 - 15 | |
| Cordon bleu min 10 - 30 | ||
| Chicken breast | low 10 - 30 | |
| Fish fillet with bread crumbs | low 10 - 20 | |
| Fish sticks | med 8 - 12 | |
| Oven French fries | max 4 - 6 | |
| Stir-fried vegetables min 8 - 15 | |
| Spring rolls, eggrolls, 3/4 - 1¼" (2 - 3 cm) thick low 10 - 30 | |
| Ready-made meals | |
| Potato products, e.g. fried potatoes low 10 - 15 | |
| Potato products, e.g. hash browns min 10 - 20 | |
| Pasta, with added water¹ | min 4 - 6 |
| ¹ Place in cold pan | |
| Other | |
| Baked camembert, baked cheese low 7 - 10 | |
| Roast almonds, nuts, pine kernel¹ | min 3 - 7 |
| ¹ Place in cold pan | |
5.6 Kitchen timer
You can use the Kitchen timer to set a time of up to 99 minutes.
The Kitchen timer is independent from other settings and does not switch off a cooking zone.
You can also use the Kitchen timer when the cooktop is turned off or the panel lock is activated.
Setting the Kitchen timer
WARNING
Boilovers can cause smoke and some foods and oils may catch fire if left on high temperature settings.
-
When using a timer, always supervise the cooktop.
Do not allow anything to boil over or burn. -
Press TIMER.
andightup on the timer display.
2. Set the desired time in the settings area.
The time starts to count down.
- When the time has elapsed, a beep sounds.
and link in the timer display.
3. Press TIMER to stop the signals. After 10 seconds the signals stop automatically.
Changing or canceling the kitchen timer
- Press TIMER.
- Set the desired time in the settings area.
To cancel the kitchen timer, set the time to 00
5.7 Panel lock
You can use the panel lock to prevent the cooktop from being turned on accidentally.
CAUTION
The panel lock may be turned on and off accidentally due to:
water spilled during cleaning
food that has overflowed
- objects being placed on the panel lock touch key.
Activating the panel lock
Requirement: The cooktop is turned off.
- Touch LOCK for 4 seconds.
The indicator over LOCK lights up for 10 seconds.
The control panel is locked.
Deactivating the panel lock
- Touch LOCK for 4 seconds.
The control panel is unlocked.
Automatic panel lock
This function automatically activates the panel lock when you switch off the cooktop.
The automatic panel lock can be activated in the basic settings Page 17.
5.8 Wipe protection
With this function you can avoid changing the settings while cleaning the control panel during cooking.
This function does not lock the main switch. You can turn the cooktop off at any time.
Activating wipe protection
- Touch LOCK.
The indicator above LOCK lights up.
The control panel is locked for 35 seconds.
After 30 seconds a beep indicates that the wipe protection is about to turn off.
Deactivating wipe protection
You can turn off the wipe protection manually.
- Touch LOCK.
The indicator above LOCK goes out.
5.9 Basic settings
You can configure the basic settings for your appliance to meet your needs.
Basic settings overview
Here you can find an overview of the basic settings and the preset factory settings.
| Display Function | |
| c1 | Panel lock 0 - Manual1 1 - Automatic 2 - Function deactivated |
| c2 | Signal tones 0 - Confirmation signal and error signal are off. The main switch signal remains on. 1 - Only error signal is on. 2 - Only confirmation signal is on. 3 - Confirmation signal and error signal are on1. |
| cδ | Duration of timer end signal 1 - 10 seconds1 2 - 30 seconds 3 - 1 minute |
| c7 | Automatically activating cooking zone extensions when a cooking zone is selected. 0 - Off 1 - On1 2 - Last selected setting before turning off the cooking zone. |
| c9 | Time for setting a cooking zone after selection 0 - Unlimited: The last selected cooking zone remains selected. You can adjust the settings without having to select it again1. 1 - Limited: You can adjust the settings for the selected cooking zone within 10 seconds. After 10 seconds you have to select the cooking zone again. |
| c0 | Restore factory settings 0 - Off1 1 - Restore appliance to factory settings |
| 1 Factory setting | |
Changing the basic settings
Requirement: The cooktop is turned off.
-
Turn on the cooktop.
-
Within the next 10 seconds, touch TIMER for about 4 seconds.

In the left display and flash alternately.
In the timer display lights up.
3. Press TIMER repeatedly until the desired setting lights up in the left display.
4. Set the desired option in the settings area.
5. Press TIMER for about 4 seconds.
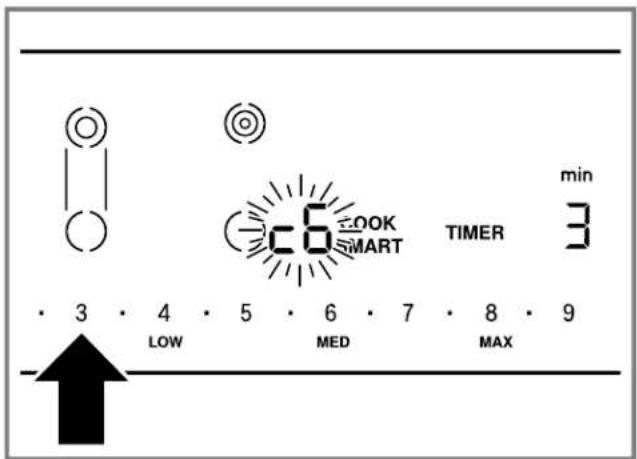
The setting is saved.
Tip: Press to leave the basic settings and turn off the cooktop.
6 Cleaning and maintenance
To keep your appliance working efficiently for a long time, it is important to clean and maintain it carefully.
6.1 Cleaning agents
You can purchase suitable cleaners and glass scrapers from Customer Support or in our online shop www.thermador.com/us/accessories.
Tip: Thermador cleaners have been tested and approved for use on Thermador appliances. Other recommended cleaners do not constitute an endorsement of a specific brand.
Recommended cleaning agents
Glass ceramic cooktop cleaner
Thermador glass cooktop cleaner
BonAmi
Soft Scrub® (without bleach)
White vinegar
Unsuitable cleaning agents
Glass cleaners which contain ammonia or chlorine bleach. These cleaners may damage or permanently stain the cooktop.
- Caustic cleaners such as Easy Off® These cleaners may stain the cooktop surface.
- Abrasive cleaners.
Metal scouring pads and scrub sponges such as Scotch Brite®. These cleaners may scratch the cooktop surface and/or leave metal marks.
- Soap-filled scouring pads such as SOS®. These cleaners may scratch the cooktop surface.
Powdery cleaners containing chlorine bleach. These cleaners may permanently stain the cooktop surface.
- Flammable cleaners such as lighter fluid or WD-40®.
6.2 Cleaning the glass ceramic cooktop
WARNING
Clean Cooktop With Caution.
If a wet sponge or cloth is used to wipe spills on a hot cooking area, be careful to avoid steam burn.
- Some cleaners can produce noxious fumes if applied to a hot surface.
Do not clean the appliance while it is still hot.
CAUTION
Do not use any kind of cleaner on the glass while the surface is hot; use only the glass scraper. The resulting fumes can be hazardous to your health. Heating the cleaner can chemically attack and damage the surface.
Requirements
The cooktop has cooled off.
- Exception: Remove dry sugar, sugar syrup, milk and tomato products and melted plastic film or foil immediately using the glass scraper.
"Cleaning recommendations", Page 18
- Wipe off splatters with a clean, damp sponge or a paper towel.
- Rinse and dry.
- If a smudge remains use white vinegar.
- Rinse and dry again.
- Apply a small amount of cooktop cleaner with a clean paper towel or cloth and let it dry.
- Buff the surface with a clean paper towel or cloth.
6.3 Cleaning recommendations
- Follow these cleaning instructions for removing common soiling.
WARNING
The blade of the glass scraper is extremely sharp. You can cut yourself.
- Replace the blade immediately, when you see any imperfections.
- Follow the manufacturer's instructions.
NOTICE:
Diamond rings may scratch the ceramic cooktop surface.
Take off any rings before you clean the ceramic cooktop surface.
Type of soil Recommendation
- Dry sugar
- Remove IMMEDIATELY. Failure to remove these substances
- Milk immediately can permanently damage the ceramic cooktop
-
Melted plastic film surface.
or foil Remove the soil with the glass scraper while the cooktop surface is still hot. Use a new, sharp razor in the glass scraper. -
Remove the cookware and turn off the cooking zone.
Put on an oven mitt.
Hold the glass scraper at 30^ angle and scrape off the soil. Be careful not to gouge or scratch the glass ceramic surface. - Push the soil off the heated area.
Let the surface cool. -
Remove the residue and apply glass ceramic cooktop cleaner.
-
Burned-on food soil
- Dark streaks
- Dark specks
- Lay a damp paper towel or sponge on top of the soil for 30 minutes to soften the soil.
- Remove the soil with a plastic scrubber and glass ceramic cooktop cleaner or with the glass scraper.
- Rinse the cooktop surface and dry it.
Greasy spatters Remove grease with a soapy sponge or cloth.
1 These marks are registered trademarks of their respective owners. All other trademarks are trademarks of BSH Home Appliances Corporation or its affiliated companies.
| Type of soil Recommendation | |
| ■ Rinse the cooktop surface thoroughly and dry it. ■ Apply glass ceramic cooktop cleaner. | |
| Metal marks: iridescent stain | Pans with aluminum, copper or stainless steel bases may leave marks. Treat metal marks immediately after the cooktop surface has cooled off. Failure to do so makes removal very difficult. ■ Clean the cooktop surface with glass ceramic cooktop cleaner. ■ If this does not remove the marks, clean the cooktop surface with a damp paper towel and a mild abrasive (Bon Ami®, Soft Scrub® without bleach). ■ Rinse the cooktop surface and apply glass ceramic cooktop cleaner. |
| Hard water spots Hot cooking liquids may drip or spill on the cooktop surface. The minerals in some water can be transferred onto the surface and cause stains. Remove boilovers and stains before using the cooktop again. ■ Clean the cooktop surface with undiluted white vinegar. ■ Rinse the cooktop surface and dry it. ■ Apply glass ceramic cooktop cleaner. | |
| Surface scratches Small scratches are common and do not affect cooking. They become smoother and less noticeable with daily use of the glass ceramic cooktop cleaner. ■ Apply glass ceramic cooktop cleaner before cooking to remove sand-like grains and grit such as salt and seasoning. ■ Scatches can be reduced by using pans with bases that are smooth, clean, and dry before use. Use recommended glass ceramic cooktop cleaner daily. | |
| 1 These marks are registered trademarks of their respective owners. All other trademarks are trademarks of BSH Home Appliances Corporation or its affiliated companies. | |
6.4 Maintenance
This appliance requires no maintenance other than daily cleaning.
For best results, apply cooktop cleaning cream daily.
7 Troubleshooting
You can eliminate minor issues on your appliance yourself. Please read the information on eliminating issues before contacting Customer Service. This may avoid unnecessary repair costs.
WARNING
Improper repairs are dangerous.
- Only authorized service providers should repair the appliance.
If the appliance has an issue, call Customer Service.
WARNING
Improper repairs are dangerous.
Repairs to the appliance should only be performed by authorized service providers.
- Only original spare parts may be used to repair the appliance.
If the power cord of this appliance becomes damaged, it must be replaced with a specific connection cord, which is available from the manufacturer or the manufacturer's Customer Service.
WARNING
The cooking zone heats up but the display does not work.
- Switch off the circuit breaker or fuse in the electrical panel.
- Call Customer Service.
WARNING
The cooktop switches off automatically and can no longer be operated. It may switch on unintentionally at a later point.
- Switch off the circuit breaker or fuse in the electrical panel.
- Call Customer Service.
Issue Cause and troubleshooting
| No display information The power supply has been disconnected. Check whether the lighting in your kitchen or other appliances in the room are working. The appliance has not been connected as shown in the circuit diagram. 1. Disconnect the appliance from the power supply. 2. Make sure the appliance has been connected as shown in the circuit diagram. There is an electronics fault If the fault cannot be eliminated, call Customer Service. | |
| All indicators are flashing The control panel is wet or an object is covering it. Dry the control panel or remove the object. | |
| F2 | The electronics have overheated. The corresponding cooking zone has been switched off. 1. Wait until the electronics have cooled down sufficiently. 2. Touch any control element. When error message disappears, the electronics have cooled down sufficiently. You can continue to cook. |
| F4The electronics have overheated. All cooking zones have switched off. 1. Wait until the electronics have cooled down sufficiently. 2. Touch any control element. When error message disappears, the electronics have cooled down sufficiently. You can continue to cook. | |
| F5+heat level and signal tone There is hot cookware near the control panel. The electronics are at risk of overheating. Remove the cookware from the control panel. You can continue to cook. | |
| F5and signal tone There is hot cookware near the control panel. The cooking zone has switched off to protect the electronics. 1. Remove the cookware from the control panel. 2. Wait a few seconds. 3. Touch any control element. When error message disappears, the electronics have cooled down sufficiently. You can continue to cook. | |
| Issue Cause and troubleshooting | |
| FB+ H and cooking zones not heating | The cooking zone has been operating continuously for an extended period of time without interaction. The automatic time limitation has been triggered. • Touch any control element. • You can set the cooking zone and continue to cook. |
| dE and cooking zones do not heat up | Demo mode is activated. 1. Disconnect the appliance from the power supply for 30 seconds by switching off the circuit breaker or fuse in the electrical panel. 2. Touch any touch field within the next 3 minutes. |
| A message with "D" or "E" appears on the display. | Operational fault 1. Switch the appliance off and on again. • If the fault was a one-off occurrence, the message disappears. 2. If the message appears again, call Customer Service. Please specify the exact error message when calling. → "Customer Service", Page 21 |
7.1 Normal behavior of your appliance
The following behavior is normal and does not constitute a malfunction or issue.
| Behavior Cause | |
| The reddish glow of the heat source appears uneven. | The cooktop regulates the cooking zone temperature by turning the heat source on and off. This means that the reddish glow of the heat source beneath the cooking zone may not always be visible. If you select a low power level, the heat source is frequently off; at higher settings it is seldom off. The source turns on and off even at the highest settings. |
| The cooktop makes a quiet humming sound during the heating phase. | You may hear a quiet hum when the heating elements are in the heating phase. The heating elements may glow with different levels of brightness. Depending on the angle from which you are looking at the heating element, this glow may be visible over the marked edge of the heating element. These are technical characteristics. They have no effect on quality and function. |
| The glass ceramic has uneven areas on the surface. | This is due to the nature of the material itself. Because of the mirror-like finish on the cooking surface, even extremely small bubbles less than 1 mm in diameter may be visible. These bubbles will not have any adverse effect on the operation of the cooktop nor on the durability of the glass ceramic cooking surface. |
| Behavior Cause | |
| There is an uneven gap between the cooktop unit and the countertop. | This depends on the countertop that is present in the kitchen. For this reason, a flexible seal is provided around the entire cooktop unit. |
8 Disposal
8.1 Disposal of your old appliance
Environmentally compatible disposal allows valuable raw materials to be recycled.
- Dispose of the appliance in an environmentally responsible manner. Information about current disposal methods can be obtained from your specialist dealer or local authority.
9 Customer Service
With any warranty repair, we will make sure your
appliance is repaired by an authorized service provider
using genuine replacement parts. We use only genuine
replacement parts for all repairs.
Detailed information on the warranty period and terms of
warranty can be found in the Statement of Limited Product
Warranty, from your retailer, or on our website.
If you contact Customer Service, you will need the model
number (E-Nr.) and the production number (FD) of your
applpliance.
USA:
1-800-735-4328
www.thermador.com/support
www/store.thermador.com/us
CA:
1-800-735-4328
www.thermador.ca
9.1 Model number (E-Nr.) and production number (FD)
You can find the model number (E-Nr.) and the production number (FD) on the appliance's rating plate.
Making a note of your appliance's details and the Customer Service telephone number will enable you to find them again quickly.
9.2 Rating plate location
You can find the rating plate of your appliance:
on the underside of the appliance
in the appliance pass
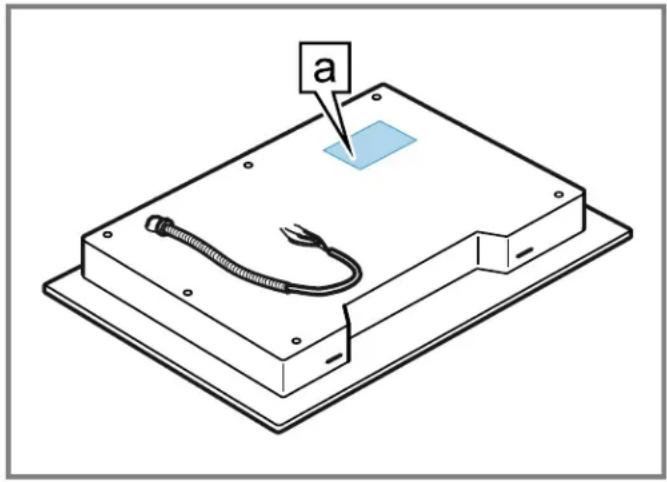
Rating plate
10 STATEMENT OF LIMITED PRODUCT WARRANTY
10.1 What this warranty covers & Who it applies to
The limited warranty provided by BSH Home Appliances ("Thermador") in this Statement of Limited Product Warranty applies only to the Thermador appliance sold to you ("Product"), provided that the Product was purchased:
- For your normal, household (non-commercial) use, and has in fact at all times only been used for normal household purposes.
- New at retail from a BSH authorized dealer or directly from BSH (not a display, "as is", or previously returned model), and not for resale, or commercial use.
Within the United States or Canada, and has at all times remained within the country of original purchase.
The warranties stated herein apply to the original purchaser of the product warranted herein and to each succeeding owner of the product purchased for ordinary home use during the term of the warranty.
Please make sure to register your Product; while not necessary to effectuate warranty coverage, it is the best way for Thermador to notify you in the unlikely event of a safety notice or product recall.
10.2 How long the warranty lasts
Thermador warrants that the Product is free from defects in materials and workmanship for a period of seven hundred and thirty (730) days from the date of the original delivery. The foregoing timeline begins to run upon the date of original delivery, and shall not be stalled, tolled, extended, or suspended, for any reason whatsoever. This Product is also warranted to be free from cosmetic defects in material and workmanship (such as scratches of stainless steel, paint/porcelain blemishes, chips, dents, or other damage to the finish) of the Product, for a period of sixty (60) days from the date of delivery or closing date for new construction. This cosmetic warranty excludes slight color variations due to inherent differences in painted and porcelain parts, as well as differences caused by kitchen lighting, product location, or other similar factors. This cosmetic warranty specifically excludes any display, floor, "As Is", or "B" stock appliances.
10.3 Repair/replace as your exclusive remedy
During this warranty period, Thermador or one of its authorized service providers will repair your Product without charge to you (subject to certain limitations stated herein) if your Product proves to have been manufactured with a defect in materials or workmanship. If reasonable attempts to repair the Product have been made without success, then Thermador will replace your Product (upgraded models may be available to you, in Thermador's sole discretion, for an additional charge). Nothing in this warranty requires damaged or defective parts to be replaced with parts of a different type or design than the original part. All removed parts and components shall become the property of Thermador at its sole option. All replaced and/or repaired parts shall assume the identity of the original part for purposes of this warranty and this warranty shall not be extended with respect to such parts. Thermador's sole liability and responsibility hereunder is to repair manufacturer-defective Product only, using a Thermador authorized service provider during normal business hours. For safety and property damage concerns, Thermador highly recommends that you do not attempt to repair the Product yourself, or use a non-authorized service provider; Thermador will have no responsibility or liability for damage resulting from repairs or work performed by a non-authorized service provider. Authorized service providers are those persons or companies that have been specially trained on Thermador products, and who possess, in Thermador's opinion, a superior reputation for customer service and technical ability (note that they are independent entities and are not agents, partners, affiliates or representatives of Thermador). Nevertheless, taking your product to be
serviced by a repair shop that is not affiliated with or an authorized dealer of Thermador will not void this warranty. Also, using third-party parts will not void this warranty. Notwithstanding the foregoing, Thermador will not incur any liability, or have responsibility, for the Product if it is located in a remote area (more than 100 miles from an authorized service provider) or is reasonably inaccessible, hazardous, threatening, or treacherous locale, surroundings, or environment; in any such event, if you request, Thermador would still pay for labor and parts and ship the parts to the nearest authorized service provider, but you would still be fully liable and responsible for any travel time or other special charges by the service company, assuming they agree to make the service call. Further, to the extent you have installed the Product in a difficult-to-access location or have otherwise installed temporary or permanent fixtures that create barriers to accessing or removing the Product, Thermador will not incur any liability for, or have responsibility, for work or costs associated with moving the Product or otherwise creating access to the Product in order to repair or replace it. All such costs shall be your sole responsibility.
10.4 Out of warranty product
Thermador is under no obligation, at law or otherwise, to provide you with any concessions, including repairs, prorates, or Product replacement, once this warranty has expired.
10.5 Warranty exclusions
The warranty coverage described herein excludes all defects or damage that are not the direct fault of Thermador, including without limitation, one or more of the following:
- Use of the Product in anything other than its normal, customary and intended manner (including without limitation, any form of commercial use, use or storage of an indoor product outdoors, use of the Product in conjunction with air or water-going vessels).
- Any party's willful misconduct, negligence, misuse, abuse, accidents, neglect, improper operation, failure to maintain, improper or negligent installation, tampering, failure to follow operating instructions, mishandling, unauthorized service (including selfperformed "fixing" or exploration of the appliance's internal workings).
- Adjustment, alteration or modification of any kind.
- A failure to comply with any applicable state, local, city, or county electrical, plumbing and/or building codes, regulations, or laws, including failure to install the product in strict conformity with local fire and building codes and regulations.
Ordinary wear and tear, spills of food, liquid, grease accumulations, or other substances that accumulate on, in, or around the Product. - Any external, elemental and/or environmental forces and factors, including without limitation, rain, wind, sand, floods, fires, mud slides, freezing temperatures,
excessive moisture or extended exposure to humidity, lightning, power surges, structural failures surrounding the appliance, and acts of God.
Service calls to correct the installation of your Product, to instruct you how to use your Product, to replace house fuses or correct house wiring or plumbing.
- Removal and replacement of trim or decorative panels that interfere with servicing the Product.
- Damage or defects caused by labor or parts installed by any non-authorized service provider, unless approved by Thermador before service is performed.
In no event shall Thermador have any liability or responsibility whatsoever for damage to surrounding property, including cabinetry, floors, ceilings, and other structures or objects around the Product. Also excluded from this warranty are Products, on which the serial numbers have been altered, defaced, or removed; service visits to teach you how to use the Product, or visits where there is nothing wrong with the Product; correction of installation problems (you are solely responsible for any structure and setting for the Product, including all electrical, plumbing or other connecting facilities, for proper foundation/flooding, and for any alterations including without limitation cabinetry, walls, floors, shelving, etc.); and resetting of breakers or fuses. TO THE EXTENT ALLOWED BY LAW, THIS WARRANTY SETS OUT YOUR EXCLUSIVE REMEDIES WITH RESPECT TO PRODUCT, WHETHER THE CLAIM ARISES IN CONTRACT OR TORT (INCLUDING STRICT LIABILITY, OR NEGLIGENCE) OR OTHERWISE. THIS WARRANTY IS IN LIEU OF ALL OTHER WARRANTYES, WHETHER EXPRESS OR IMPLIED. ANY WARRANTY IMPLIED BY LAW, WHETHER FOR MERCHANTABILITY OR FITNESS FOR A PARTICULAR PURPOSE, OR OTHERWISE, SHALL BE EFFECTIVE ONLY FOR THE PERIOD THAT THIS EXPRESS LIMITED WARRANTY IS EFFECTIVE. IN NO EVENT WILL THE MANUFACTURER BE LIABLE FOR CONSEQUENTIAL, SPECIAL, INCIDENTAL, INDIRECT, "BUSINESS LOSS", AND/OR PUNITIVE DAMAGES, LOSSES, OR EXPENSES, INCLUDING WITHOUT LIMITATION TIME AWAY FROM WORK, HOTELS AND/OR RESTAURANT MEALS, REMODELLING EXPENSES IN EXCESS OF DIRECT DAMAGES WHICH ARE DEFINITIVELY CAUSED EXCLUSIVELY BY THERMADOR, OR OTHERWISE. SOME STATES DO NOT ALLOW THE EXCLUSION OR LIMITATION OF INCIDENTAL OR CONSEQUENTIAL DAMAGES, AND SOME STATES DO NOT ALLOW LIMITATIONS ON HOW LONG AN IMPLIED WARRANTY LASTS, SO THE ABOVE EXCLUSIONS OR LIMITATIONS MAY NOT APPLY TO YOU. THIS WARRANTY GIVES YOU SPECIFIC LEGAL RIGHTS, AND YOU MAY ALSO HAVE OTHER RIGHTS WHICH VARY FROM STATE TO STATE.
No attempt to alter, modify or amend this warranty shall be effective unless authorized in writing by an officer of BSH.
10.6 Obtaining warranty service
To obtain warranty service for your product, you should contact Thermador Customer Support at 1-800-735-4328 to schedule a repair.
10.7 Product information
For handy reference, copy the information below from the rating plate. Keep your invoice and/or delivery documents for warranty validation.
| Model number (E-Nr.) |
| Production number (FD) |
| Date of delivery |
Table des matieres
1 IMPORTANTES CONSIGNES DE SECURITE 26
www.P65Warnings.ca.gov
www/store.thermador.com/us
CA:
1-800-735-4328
www.thermador.ca
www/store.thermador.com/us
CA:
1-800-735-4328
www.thermador.ca

Thermador.com/us/support/quicklinks
Owner Manuals
Download owner manuals, specifications and CADs.

Home Connect® Support
Find the answers to all your Home Connect related questions.
Product Registration
Register your products today to easily manage your appliance information.

Newsletter
Get the latest information on product news and events.

How-To Videos
View instructional videos for changing water filters, cleaning, adjusting settings, and beyond.
Thermador Accessories Store
Purchase filters, cleaners, accessories, and parts.
Virtual Demo
Schedule a product overview to receive step-by-step guidance on using your appliance.
Blog
Read about the latest in home design and culinary inspiration.

FAQs & Cleaning Tips
Browse through cleaning, usage, and troubleshooting tips.
Warranties
View information on Thermador product warranties.

Virtual Showroom
Take a Virtual Showroom tour to view and interact with our entire collection of appliances.
Recipes
Need inspiration for your next gathering? Browse our vast collection of recipes.