Pro Grand PRD366WGC - Cooker THERMADOR - Free user manual and instructions
Find the device manual for free Pro Grand PRD366WGC THERMADOR in PDF.

User questions about Pro Grand PRD366WGC THERMADOR
0 question about this device. Answer the ones you know or ask your own.
Ask a new question about this device
Download the instructions for your Cooker in PDF format for free! Find your manual Pro Grand PRD366WGC - THERMADOR and take your electronic device back in hand. On this page are published all the documents necessary for the use of your device. Pro Grand PRD366WGC by THERMADOR.
USER MANUAL Pro Grand PRD366WGC THERMADOR
Professional Series Pro Grand® and Pro Harmony® Ranges
PRD364WDGU/C PRD364WDGU/C PRD364WIGU/C
PRD364WIGU/C PRD366WGU/C PRD366WGU/C
PRD486WDGU/C PRD486WDGU/C PRD486WIGU/C
PRD486WIGU/C PRG364WDG PRG364WDG
PRG366WG PRG366WG PRG486WDG
PRG486WDG PRD304WHU/C PRD304WHU/C
PRD305WHU/C PRD305WHU/C PRD364WDHU/C
PRD364WDHU/C PRD366WHU/C PRD366WHU/C
PRD486WDHU/C PRD486WDHU/C PRD488BHU/C
PRD488BHU/C PRG304WH PRG304WH PRG305WH
PRG305WH PRG364WDH PRG364WDH
PRG366WH PRG366WH PRG486WDH
PRG486WDH PRG488BH PRG488BH

natural_image
A bowl of pasta with garnishes of peas, peppers, and herbs, served on a checkered napkin with chopsticks and a fork (no text or symbols visible)Table of contents
1 IMPORTANT SAFETY INSTRUCTIONS.... 3
1.1 Safety definitions.... 4
1.2 General information.... 4
1.3 Safe use.... 4
1.4 Induction module.... 7
1.5 Remote operation 7
1.6 Requirements and standards 7
1.7 Gas requirements 8
1.8 State of California Proposition 65 Warnings ...... 8
2 Preventing material damage 9
2.1 Preventing oven cavity damage 9
2.2 Preventing cooktop damage.... 9
3 Environmental protection and energy-saving ..... 9
3.1 Disposal of packaging.... 9
3.2 Saving energy when using the oven.... 9
3.3 Saving energy when using the cooktop.... 10
4 Familiarizing yourself with your appliance .... 11
4.1 Appliance 11
4.2 Oven cavity 12
4.3 Oven controls.... 14
4.4 Rangetop control knobs 14
5 Accessories.... 14
5.1 Oven accessories 15
5.2 Other accessories 15
5.3 Installing the rack guides.... 15
5.4 Rack positions.... 15
5.5 Safe use of oven racks.... 16
5.6 Inserting the wire rack.... 16
5.7 Installing the FullAccess® racks.... 16
6 Before using for the first time 17
6.1 Start-up settings.... 17
6.2 Cleaning the appliance before using it for the first time.... 17
6.3 Burner cap placement.... 17
6.4 Placing the burner grates 18
6.5 Register your appliance 18
7 Oven operation.... 19
7.1 Oven heating modes and functions.... 19
7.2 Setting the heating mode and temperature 20
7.3 Heating time limitation.... 20
7.4 Fast preheat.... 20
7.5 Meat probe.... 20
7.6 Turning the panel lock on or off.... 21
7.7 Kitchen timer.... 21
7.8 Oven timer 21
7.9 Sabbath mode.... 22
7.10 Basic Settings - Oven.... 22
7.11 Getting the most out of your appliance.... 23
8 Rangetop operation 24
8.1 Turning on a burner.... 24
8.2 Automatic re-ignition 24
8.3 In case of a power failure 24
8.4 ExtraLow® feature 24
8.5 PowerBoost® feature 25
8.6 Recommended cooking settings.... 25
9 Electric griddle 25
9.1 Operating the electric griddle.... 25
9.2 Seasoning the griddle plate.... 25
10 Home Connect® 25
10.1 Setting up Home Connect® 26
10.2 Home Connect® settings 26
10.3 Changing the settings via the Home Connect® app.... 26
10.4 Remote start.... 26
10.5 Setting remote control 27
10.6 Remote diagnostics.... 27
10.7 Software update 27
10.8 Data Protection 27
11 Cleaning and maintenance.... 27
11.1 General cleaning tips.... 28
11.2 Cleaning recommendations.... 28
11.3 Self clean function.... 31
11.4 Maintenance.... 32
12 Troubleshooting.... 34
13 Disposal 36
13.1 Disposal of your old appliance.... 36
14 Customer Service.... 36
14.1 Remote Customer Service connection 36
14.2 Model number (E-Nr.) and production number (FD) 36
14.3 Rating plate location.... 37
14.4 Product registration 37
15 STATEMENT OF LIMITED PRODUCT WARRANTY 37
15.1 What this warranty covers & Who it applies to..... 37
15.2 How long the warranty lasts 37
15.3 Repair/replace as your exclusive remedy 37
15.4 Out of warranty product.... 38
15.5 Warranty exclusions.... 38
15.6 Obtaining warranty service.... 39
15.7 Product information 39
Read all instructions carefully before use. These precautions will reduce the risk of electrical shock, fire and injury to persons. When using kitchen appliances, basic safety precautions must be followed including those in the following pages.
⚠ WARNING: If the information in these instructions is not followed exactly, a fire or explosion may result causing property damage, personal injury or death.
- Do not store or use gasoline or other flammable vapors and liquids in the vicinity of this or any other appliance.
- WHAT TO DO IF YOU SMELL GAS
- Do not try to light any appliance.
- Do not touch any electrical switch.
- Do not use any phone in your building.
- Immediately call your gas supplier from a neighbor's phone. Follow the gas supplier's instructions.
- If you cannot reach your gas supplier, call the fire department.
- Installation and service must be performed by a qualified installer, service agency or the gas supplier.
WARNING:
Never Operate the Top Surface Cooking Section of this Appliance Unattended.
- Failure to follow this warning statement could result in fire, explosion, or burn hazard that could cause property damage, personal injury, or death.
- If a fire should occur, keep away from the appliance and immediately call your fire department.
DO NOT ATTEMPT TO EXTINGUISH AN OIL/GREASE FIRE WITH WATER.

IMPORTANT SAFETY INSTRUCTIONS READ AND SAVE THESE INSTRUCTIONS
1.1 Safety definitions
Here you can find explanations of the safety signal words used in this manual.

WARNING
This indicates that death or serious injuries may occur as a result of non-observance of this warning.

CAUTION
This indicates that minor or moderate injuries may occur as a result of non-observance of this warning.
NOTICE:
This indicates that damage to the appliance or property may occur as a result of non-compliance with this advisory.
Note: This alerts you to important information and/or tips.
1.2 General information
This Use and Care Guide explains the basics of operating your appliance and those safety measures that must be followed. For complete and safe installation information, refer to the Installation Instructions included with the appliance.
WARNING
Please review the Use and Care Guide for the induction element for other specific important safety information.
All product manuals may be downloaded online at www.thermador.com/us/support/owner-manuals.
INSTALLER: Please leave these instructions with this unit for the owner.
OWNER: Please retain these instructions for future reference. Read all safety instructions before operating the appliance. Have the installer show you where the electric circuit breaker and the gas supply shut-off valve are located so you know how and where to turn off the gas and electricity to the appliance.
1.3 Safe use
WARNING
ALL APPLIANCES
▶ Proper installation – Be sure your appliance is properly installed and grounded by a qualified technician.
▶ Never use your appliance for warming or heating the room.
- Do not leave children alone – Children should not be left alone or unattended in area where an appliance is in use. They should never be allowed to sit or stand on any part of the appliance.
▶ Wear proper apparel – Loose-fitting or hanging garments should never be worn while using the appliance.
▶ User servicing – Do not repair or replace any part of the appliance unless specifically recommended in the manual. All other servicing should be referred to an authorized service provider.
Storage in or on appliance – Flammable materials should not be stored in or near the appliance. To eliminate risk of burns or fire caused by reaching over heated surface units, cabinet storage located above the surface units should be avoided.
- Do not use water on grease fires – Smother fire or flame or use dry chemical or foam-type extinguisher.
▶ Use only dry potholders – Moist or damp potholders on hot surfaces may result in burns from steam. Do not let a potholder touch hot heating elements. Do not use a towel or other bulky cloth.
WARNING
SURFACE COOKING UNITS
▶ Use proper pan size – This appliance may be equipped with surface burners of different sizes. Select utensils having flat bottoms large enough to cover the surface burner. The use of undersized utensils will expose a portion of the burner to direct contact and may result in ignition of clothing. Proper relationship of utensil to burner will also improve efficiency. The flame size should not extend beyond the edge of the cooking utensil. This instruction is based on safety considerations.
▶ Never leave surface burners unattended at high heat settings – Boil-over causes smoking and greasy spillovers that may ignite.
If applicable, make sure drip trays are in place – Absence of these trays during cooking may subject wiring or components underneath to damage.
- Protective liners – Do not use aluminum foil to line oven bottoms. Improper installation of these liners may result in a risk of electric shock, or fire.

IMPORTANT SAFETY INSTRUCTIONS READ AND SAVE THESE INSTRUCTIONS
Glazed cooking utensils – Only certain types of glass, glass/ceramic, ceramic, earthenware, or other glazed utensils are suitable for range-top service without breaking due to the sudden change in temperature.
- Utensil handles should be turned inward and not extend over adjacent surface units – To reduce the risk of burns, ignition of flammable materials, and spillage due to unintentional contact with the utensil, the handle of a utensil should be positioned so that it is turned inward, and does not extend over adjacent surface units.
- Clean the cooktop with caution – If a wet sponge or cloth is used to wipe spills on a hot cooking area, be careful to avoid steam burns. Some cleaners can produce noxious fumes if applied to a hot surface.
- Do not soak removable heating elements – Heating elements should never be immersed in water.
WARNING
DEEP FAT FRYERS
▶ Use extreme caution when moving a grease kettle or disposing of hot grease.
WARNING
OVENS
▶ Use care when opening door – Let hot air or steam escape before removing or replacing food.
- Do not heat unopened food containers – Build-up of pressure may cause the container to burst and result in injury.
▶ Keep oven vent ducts unobstructed.
- Placement of oven racks – Always place oven racks in desired location while oven is cool. If a rack must be moved while oven is hot, do not let potholder contact the hot heating element in oven.
WARNING
SELF-CLEANING OVENS
- Do not clean the door gasket – The door gasket is essential for a good seal. Care should be taken not to rub, damage, or move the gasket.
▶ Do not use a protective coating to line the oven and do not use a commercial oven cleaner unless certified for use in a self-cleaning oven.
▶ Clean only parts listed in manual.
▶ Do not leave food or cooking utensils, etc., in an oven during the pyrolytic self-cleaning mode of operation.
▶ Please note that some pets or humans can be sensitive to the odors created during the self-cleaning process whether it is a manufacturing residue burn off or food. It is recommended that those potentially affected be removed from the kitchen area during the self-clean process.
WARNING
DO NOT TOUCH SURFACE UNITS OR AREAS NEAR UNITS. Surface units may be hot even though they are dark in color. Areas near surface units may become hot enough to cause burns.
During and after use, do not touch, or let clothing, potholders, or other flammable materials contact surface units or areas near units until they have had sufficient time to cool. Among these areas are the cooktop and areas facing the cooktop.
DO NOT TOUCH HEATING ELEMENTS OR INTERIOR SURFACES OF OVEN - Heating elements may be hot even though they are dark in color. Interior surfaces of an oven become hot enough to cause burns.
During and after use, do not touch, or let clothing, potholders, or other flammable materials contact heating elements or interior surfaces of oven until they have had sufficient time to cool. Other surfaces of the appliance may become hot enough to cause burns. Among these surfaces are oven vent openings, surfaces near these openings and oven doors.
WARNING
VENTILATING HOODS
- Clean ventilating hoods frequently – Grease should not be allowed to accumulate on hood or filter.
This appliance should not be installed with a ventilation system that directs air in a downward direction toward the appliance. This type of ventilation system may cause ignition and combustion problems with the appliance resulting in personal injury, property damage, or unintended operation. Ventilating systems that direct the air upwards do not have any restriction.
An air curtain or other overhead range hood, which operates by blowing a downward airflow onto a range, shall not be used in conjunction with a gas range unless the hood and range have been designed and tested in accordance with the Standard for Domestic Gas Ranges, ANSI Z21.1 • CSA 1.1, and listed by an independent testing laboratory for combination use.

IMPORTANT SAFETY INSTRUCTIONS READ AND SAVE THESE INSTRUCTIONS
▶ When flambéing foods under the hood, turn the fan on.
WARNING
NEVER cover any slots, holes or passages in the oven bottom or cover an entire rack with materials such as aluminum foil.
- Doing so blocks air flow through the oven and may cause carbon monoxide poisoning.
- Aluminum foil linings may also trap heat, causing a fire hazard.
WARNING
IN CASE OF AN ELECTRICAL FAILURE
If a gas control knob is turned ON and there is no electrical power to operate the electronic igniters on the burners, turn OFF the gas control knob and wait 5 minutes for the gas to dissipate before lighting the burner manually.
▶ To light the burners manually, carefully hold a lighted match to the burner ports and turn the gas control knob to HI. During a power failure, you can use the standard burners, but each must be lit with a match.
- Do not attempt to light an XLO® burner manually. These burners are equipped with the ExtraLow® feature and cannot be lit manually.
CAUTION
Do not store items of interest to children in cabinets above a range or on the backguard of a range. Children climbing on the range to reach items could be seriously injured.
WARNING
Do not block or obstruct the flow of air through the ventilation openings. The vent is located at the back of the appliance. The vent needs to be unobstructed and open to provide necessary airflow that is important for proper performance.

natural_image
Diagram of a mechanical component with internal cavities and an arrow indicating direction (no text or symbols)Do not touch the vent area while the appliance is on and for several minutes after the appliance is off. Some parts of the vent and surrounding areas become hot enough to cause burns. Allow appliance sufficient time to cool before touching or cleaning vent areas.
▶ Do not position plastic or other heat-sensitive items on or near the vent. These items could melt or ignite.
▶ To provide proper ventilation of the range do not remove range feet.
WARNING
Do not allow meat probes or other utensils to come into contact with the heating elements.
WARNING
Do not use the grill plate accessory for cooking excessively fatty meats or products which promote flare-ups.
WARNING
When cooking fatty or oily foods on burners or the griddle, adjacent gas burners can ignite airborne fumes. Use caution to avoid burns.
WARNING
DO NOT store or use corrosive chemicals, vapors, flammables, or nonfood products in or near this appliance. It is specifically designed for use when heating or cooking food. The use of corrosive chemicals while heating or cleaning will damage the appliance and could result in injury.
NOTICE:
There is a possibility to discolor the back wall under certain cooking conditions.
WARNING
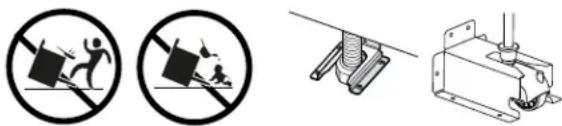
DANGER OF TIPPING ON RANGES
natural_image
Three safety symbols: no prohibition, a person pulling a block, and a mechanical clamp (no text or labels)All ranges can tip and injury can result. To prevent accidental tipping of the range, attach it to the floor, wall, or cabinet by installing the anti-tip bracket supplied.
▶ A child or adult can tip the range over and be killed or seriously injured. Verify that the anti-tip bracket is securely installed. Ensure the anti-tip bracket is engaged when the range is moved.
▶ DO NOT operate the range without the anti-tip bracket in place. Failure to follow the instructions in this manual can result in death or serious burns to children and adults.
If the range is moved for cleaning, service, or any other reason, ensure that the anti-tip bracket is properly reengaged when the range is pushed back into place. In the event of abnormal usage (such as a person standing, sitting, or leaning on an open door), failure to take this

IMPORTANT SAFETY INSTRUCTIONS READ AND SAVE THESE INSTRUCTIONS
precaution can result in tipping of the range. Personal injury might result from spilled hot liquids or from the range itself.
▶ Check for proper installation and use of anti-tip bracket. Carefully tip range forward pulling from the back to ensure that the anti-tip bracket engages the range and prevents tip-over. Range should not move more than 1" (2.5 cm).
1.4 Induction module
WARNING
Do not place metallic objects such as knives, forks, spoons, and lids on the cooktop surface since they can get hot.
After each use, turn off the cooking zone using the control knob. DO NOT rely on the pan detection feature to turn off the cooking zones when you remove the pans.
WARNING
Do Not Cook on a Broken Cooktop - If the cooktop should break, cleaning solutions and spillovers may penetrate the broken cooktop and create a risk of electric shock.
▶ Contact an authorized service provider immediately.
Electromagnetic interference
WARNING
This induction cooktop generates and uses ISM frequency energy that heats cookware by using an electromagnetic field. It has been tested and complies with Part 18 of the FCC Rules for ISM equipment. This induction cooktop meets the FCC requirements to minimize interference with other devices in residential installation. Induction cooktops may cause interference with television or radio reception. If interference occurs, the user should try to correct the interference by
▶ Relocating the receiving antenna of the radio or television.
▶ Increasing the distance between the cooktop and the receiver.
- Connecting the receiver into an outlet different than the cooktop.
It is the user's responsibility to correct any interference.
CAUTION
Persons with a pacemaker or similar medical device should exercise caution when standing near an induction cooktop while it is in use.
- Consult your doctor or the manufacturer of the pacemaker or similar medical device for additional information about its effects with electromagnetic fields from an induction cooktop.
1.5 Remote operation
CAUTION
This appliance may be configurable to allow remote operation at any time.
- Do not store any flammable materials or temperature sensitive items inside, on top or near surface units of the appliance.
1.6 Requirements and standards


■ The appliance must be electrically grounded in accordance with local codes or, in the absence of local codes, with the with the National Electrical Code, NFPA 70 or the Canadian Electrical Code, CSA C22.1.
■ Installation must conform with local codes or, in the absence of local codes, with the National Fuel Gas Code, ANSI Z223.1/NFPA 54 or, in Canada, the Natural Gas and Propane Installation Code, CSA B149.1.
■ Installation of appliances designed for manufactured (mobile) home installation must conform with the Manufactured Home Construction and Safety Standard, Title 24 CFR, Part 3280 [formerly the Federal Standard for Mobile Home Construction and Safety, Title 24, HUD (Part 280)] or with local codes where applicable.
■ Installation of appliances designed for recreational park trailers must conform with state or other codes or, in the absence of such codes, with the ANSI A119.5 Park Model Recreational Vehicle Standard.
■ See the Installation Instructions for electrical requirements, grounding instructions and clearance to combustible material requirements.
■ Service should only be done by an authorized service provider.

IMPORTANT SAFETY INSTRUCTIONS READ AND SAVE THESE INSTRUCTIONS
- It is the responsibility of the owner and the installer to determine if additional requirements and/or standards apply to specific installations.
1.7 Gas requirements
Natural gas w.c.
| Minimum 7" (17.4 mbar) | |
| Maximum 14" (34.9 mbar) |
LP gas w.c.
| Minimum 11" (27.4 mbar) | |
| Maximum 14" (34.9 mbar) |
- A manual valve must be installed in an accessible location in the gas piping external to the appliance for the purpose of turning on or shutting off gas to the appliance.
- In the event a burner goes out and gas escapes, open a window or a door. DO NOT attempt to use the appliance until the gas has had time to dissipate. Wait at least 5 minutes before using the appliance.
■ The maximum depth of cabinets installed above cooking surface must be 13" (330 mm).
For Massachusetts installations:
■ Installation must be performed by a qualified or licensed contractor, plumber or gas fitter qualified or licensed by the state, province or region where this appliance is being installed.
■ Shut-off valve must be a "T" handle gas cock.
- Flexible gas connector must not be longer than 36" (914 mm).
1.8 State of California Proposition 65 Warnings
This product may contain a chemical known to the State of California, which can cause cancer or reproductive harm. Therefore, the packaging of your product may bear the following label as required by California:
STATE OF CALIFORNIA PROPOSITION 65 WARNING:

WARNING
Cancer and Reproductive Harm - www.P65Warnings.ca.gov
IMPORTANT SAFETY NOTICE: The California Safe Drinking and Toxic Enforcement Act requires the Governor of California to publish a list of substance known
to the state to cause cancer, birth defect or other reproductive harm, and requires businesses to warn customers of potential exposure to such substances. The burning of gas cooking fuel and the elimination of soil during self-cleaning can generate small amounts of carbon monoxide. The fiberglass insulation in self clean ovens gives off very small amounts of formaldehyde during the first several cleaning cycles. California lists formaldehyde as a potential cause of cancer. Carbon monoxide is a potential cause of reproductive toxicity.
Exposure to these substances can be minimized by:
■ Providing good ventilation when cooking with gas.
■ Providing good ventilation during and immediately after self-cleaning the oven.
- Operating the unit according to the instructions in this manual.
2 Preventing material damage
2.1 Preventing oven cavity damage
NOTICE:
The presence of objects on the oven cavity bottom will cause heat to build up. The baking and roasting times will no longer be correct and the enamel will be damaged.
- Do not cover the oven cavity bottom with any sort of foil or greaseproof paper.
- Do not place accessories on the oven cavity bottom. Do not allow aluminum foil in the oven cavity to come into contact with the door glass, it could cause permanent discoloration.
Never pour water into the oven cavity when it is still hot. Never place cookware containing water on the oven cavity bottom.
The prolonged presence of moisture in the oven cavity leads to corrosion.
- Allow the oven cavity to dry after use.
- Do not keep moist food in the oven cavity for a long time with the door closed.
▶ Do not store food in the oven cavity.
Leaving the appliance to cool down with the door open will damage the front of neighboring kitchen units over time.
▶ Always allow the oven cavity to cool down with the door closed after cooking at high temperatures. Only leave the oven cavity to dry with the door open if a lot of moisture was produced during operation.
Fruit juice dripping from the baking tray leaves stains that cannot be removed.
- When baking very juicy fruit pies, do not pack too much on the baking tray.
If the seal is very dirty, the appliance door will not close properly when the appliance is in operation. This may damage the front of adjacent kitchen units.
- Never operate the appliance if the seal is damaged or missing.
Sitting or placing objects on the appliance door may damage it.
▶ Do not place or hang objects on the appliance door.
- Do not place cookware or accessories on the appliance door.
With certain models, accessories may scratch the door glass when closing the appliance door.
▶ Always push accessories fully into the oven cavity. Carrying the appliance by the door handle could break it. The door handle cannot support the weight of the appliance.
- Do not carry or hold the appliance by the door handle.
2.2 Preventing cooktop damage
NOTICE:
OPERATIONAL FAULT.
- Always turn the control knob to the OFF position when the appliance is not being used.
Overheating can damage the cookware.
▶ Do not heat empty pots or pans.
Hot cookware can cause the electronics to overheat.
- Never set down hot pans and pots on the control panel or the cooktop frame.
Aluminum foil and plastic melt on hot burners.
- Do not let aluminum foil or plastic come into contact with hot burners.
A build-up of heat may damage the appliance.
- Never cover the cooktop, for example with aluminum foil or oven protectors.
- Do not place roasters, frying pans or grill stones on more than one burner at a time.
▶ Only use the accessories specified.
Acidic liquids such as lemon juice or vinegar may damage the surface finish of the appliance.
- Remove spilled liquids immediately. Use caution while the burners are still hot.
Heat may cause damage to adjacent appliances or furniture. If the appliance is in operation for an extended period, heat and moisture will be generated. Additional ventilation is required.
- Open the window or switch on an extractor hood that discharges the extracted air and moisture outside the building.
3 Environmental protection and energy-saving
3.1 Disposal of packaging
The packaging materials are environmentally compatible and can be recycled.
- Sort the individual components by type and dispose of them separately.
3.2 Saving energy when using the oven
If you follow these tips, your appliance consumes less energy.
Only preheat the appliance if the recipe or the recommended settings tell you to do so.
√ Not preheating the appliance can reduce the energy used.
Use dark-colored, black-coated or enameled baking pans.
√ These types of baking pans absorb the heat particularly well.
Open the appliance door as little as possible during operation.
√ This will maintain the temperature in the oven cavity and eliminate the need for the appliance to reheat.
When baking multiple dishes, do so in succession or at the same time.
√ The oven cavity is heated after baking the first dish. This reduces the baking time for the second dish.
If the cooking time is relatively long, you can switch the appliance off 10 minutes before the cooking time ends.
√ There will be enough residual heat to finish cooking the dish.
Remove any accessories that are not being used from the oven cavity.
√ An extra pan without food affects the browning and cooking.
Allow frozen food to defrost before cooking.
√ This will save the energy that would otherwise be required to defrost it.
3.3 Saving energy when using the cooktop
If you follow these tips, your appliance consumes less energy.
Select a cookware diameter that matches the burner. Center the cookware on the burner. Select cookware with a base diameter that matches the cooking zone. Center the cookware on the cooking zone.
Tip: Cookware manufacturers usually state the top diameter of the cookware. The diameter of the cookware base is usually smaller.
√ The energy is targeted at the cookware. If you use cookware that is too small, energy is wasted. If the cookware is too large, much energy is used to heat up the cookware.
Close cookware with a fitting lid.
√ Cooking without a lid consumes more energy.
Only lift the lid when necessary.
√ If you lift the lid, a lot of energy can escape.
Use a glass lid.
√ If you use a glass lid, you can look inside the cookware without lifting the lid.
Use cookware with a solid flat bottom.
√ Curved cookware bases increase energy consumption.
Use a cookware size that matches the amount of food you want to cook.
√ Cookware with little content consumes a lot of energy.
Cook with a small amount of water.
√ More water requires more energy to heat it up.
Select a lower power level as soon as possible. Select a suitable power level to continue cooking.
√ For ongoing cooking a lower power level is sufficient.
4 Familiarizing yourself with your appliance
This Use and Care Guide covers several models. Your model may have some but not all of the features listed.
4.1 Appliance
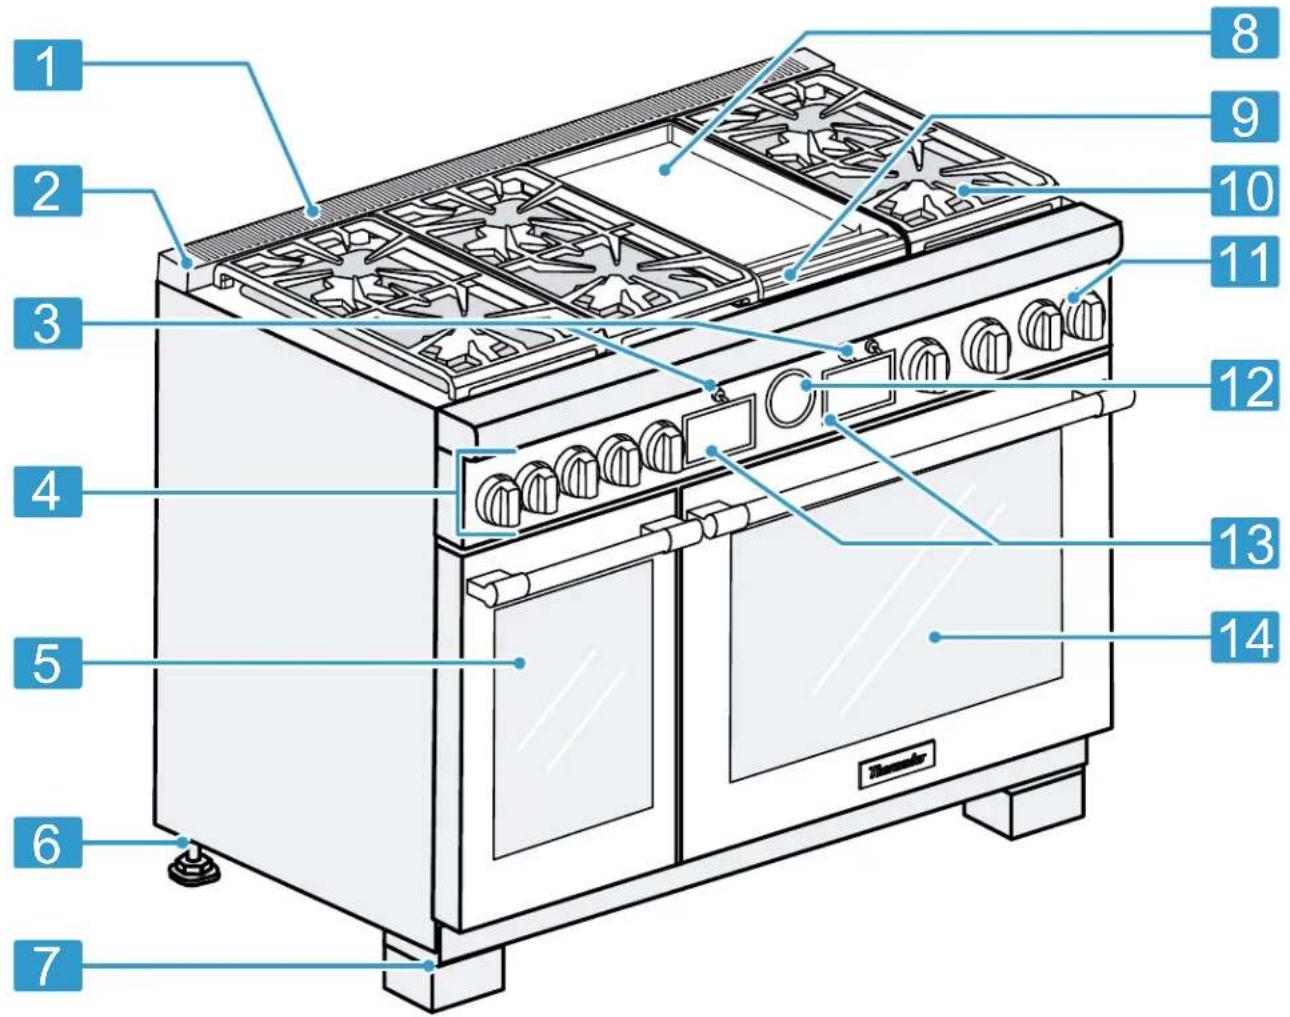
Here you can find an overview of the parts of your appliance.
Note: The graphics are representative. Your appliance may have different graphic or design appearances.
text_image
1 2 3 4 5 6 7 8 9 10 11 12 13 141 Rear vent trim/oven vent
2 Island trim included or low backguard ordered separately
See Installation Guide concerning spacing behind the range when using the range with the island trim.
3 Light switch
4 Control panel
5 Secondary oven
6 Range feet
7 Leg covers
Pro Grand® models only. If additional leg covers are required, you can order them from Customer Service at no charge for up to one year after delivery date of the appliance.
→ "Customer Service", Page 36
8 Griddle option
Options vary depending on model.
10 Griddle tray (electric griddle option)
11 Control knobs
12 Temperature gauge
13 Oven display
14 Main oven
4.2 Oven cavity
Here you can find information about the features of the oven cavity.
CAUTION
Do not place anything on the oven cavity bottom. Do not cover it with aluminum foil. A build-up of heat could damage the appliance or cause injury.
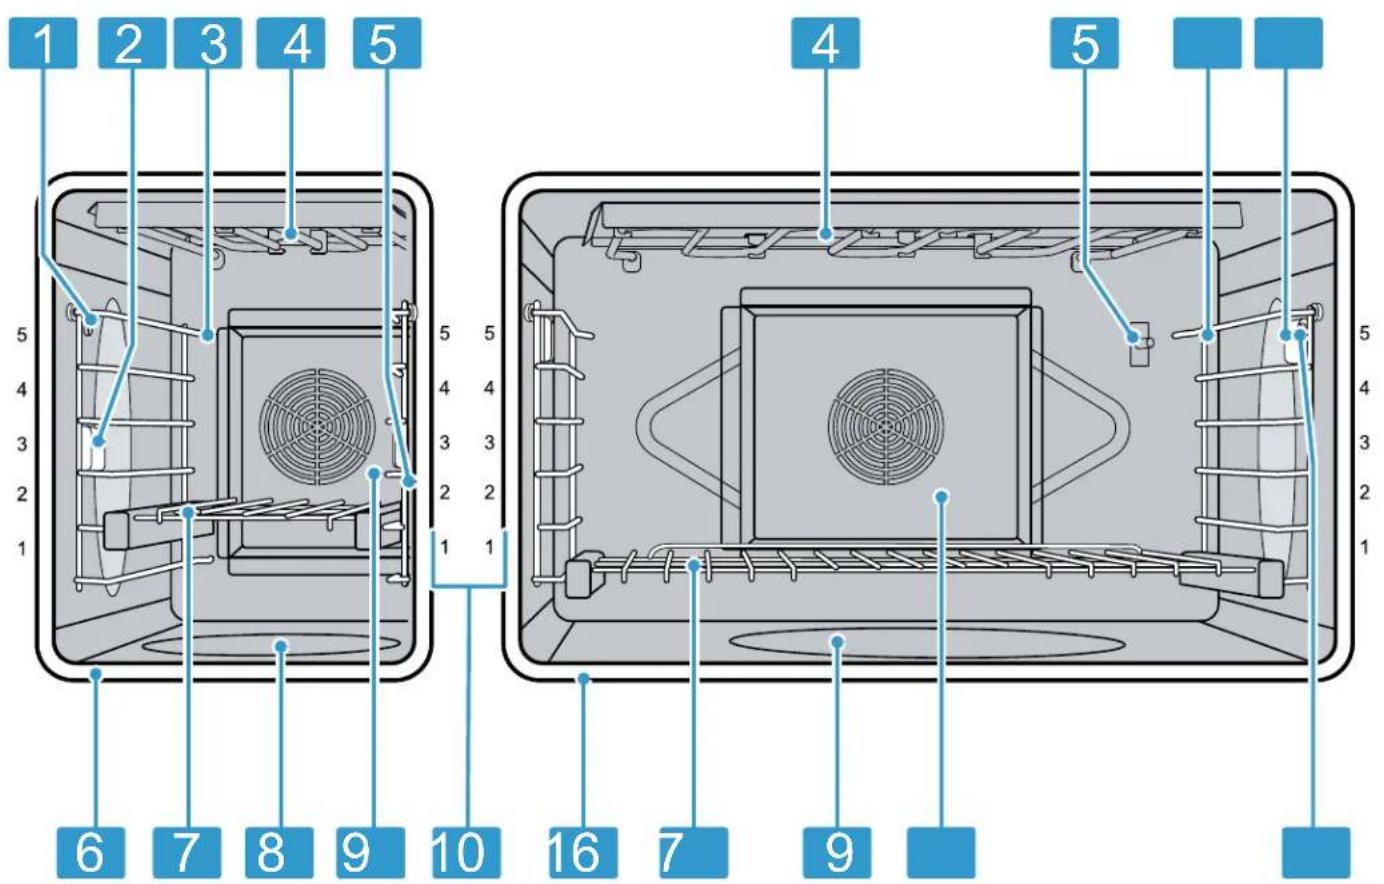
Dual fuel oven cavity
text_image
1 2 3 4 5 4 5 6 7 8 9 10 16 7 91 Socket for meat probe
2 Oven light
3 Oven rails
4 Broil element
5 Oven thermostat
6 Door gasket
7 Oven racks
8 Bake element, hidden
9 Convection fan cover
10 Rack positions
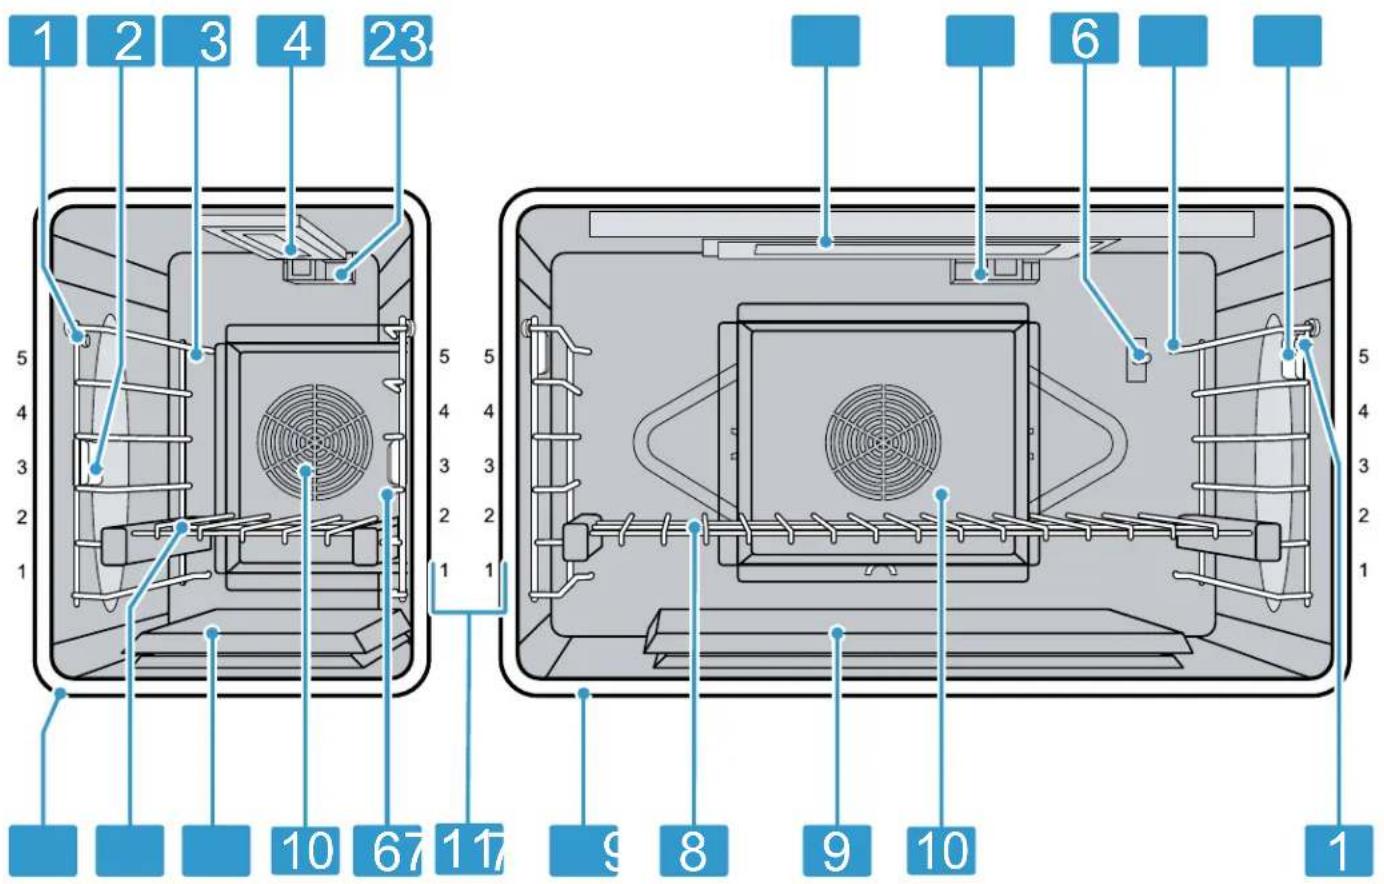
Gas oven cavity
text_image
1 2 3 4 23 5 4 3 2 1 10 67 117 9 8 9 10 6 5 4 3 2 1| 1 | Socket for meat probe |
| 2 | Oven light |
| 3 | Oven rails |
| 4 | Infrared broil burner |
| 5 | Broil igniter |
| 6 | Oven thermostat |
| 7 | Door gasket |
| 8 | Oven racks |
| 9 | Bake burner, hidden |
| 10 | Convection fan cover |
| 11 | Rack positions |
Oven vent
Warm air may be released from the oven vent before, during and after cooking. It is normal to see steam escaping from the vent, and condensation may collect in this area. This area may be warm when the oven is in use.
CAUTION
The oven vents are important for air circulation. Covering the oven vents will cause the oven to overheat. Refer to the appliance overview for the location of the oven vents.
→ "Appliance", Page 11
▶ Do not obstruct oven vents.
Convection fan
The convection fan operates during all convection modes. When the oven is operating in a convection mode, the fan turns off automatically when the door is opened.
The convection fan may also run during self-clean.
Cooling fan
The cooling fan runs during all cooking modes.
The fan can be heard when it is running, and warm air may be felt as it is released from the oven vent. The fan may also run after the oven is off.
Oven light
Your appliance is equipped with an oven light.
To turn the oven light on or off, flip the light switch on the oven control panel up or down.
Panel light
To turn the panel light on or off, flip the light switch on the oven control panel up or down.
Temperature gauge
The needle of the gauge points to the selected temperature and is for reference only. It does not reflect the actual temperature of the oven.
4.3 Oven controls
Depending on model, the control elements for each oven cavity may include a dual-function knob or two separate knobs for mode and temperature selection and an oven display with touch keys.
Operating the dual function control knob
For some ranges you can set the heating mode and temperature for the oven cavity with the same control knob.
-
Turn the settings ring around the control knob to set the heating mode.
-
Turn the control knob to set the temperature.
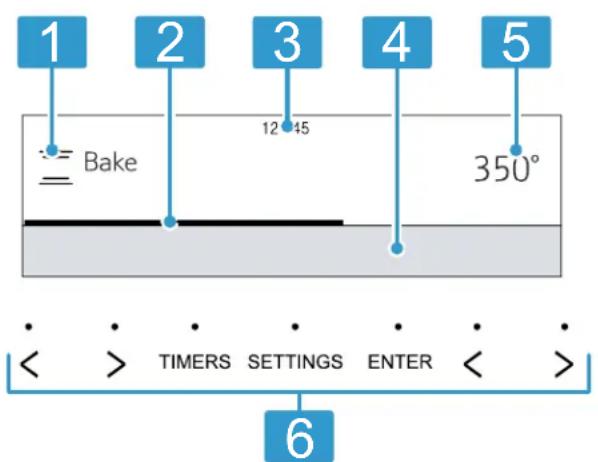
Oven display
text_image
1 2 3 4 5 Bake 12 45 350° • • • • • • • • < > TIMERS SETTINGS ENTER < > 61 Operating mode Currently selected heating mode or function
2 Progress bar
Fills up to indicate progress, e.g. for
■ preheating
■ meat probe temperature
3 Clock
Displays the time of day during all operating modes
4 Information area
Displays instructions or information
5 Mode setting
Heating mode settings, e.g. temperature
6 Touch keys
Oven touch keys
Here you can find information on the basic operating features of your oven.
Touch key Function
| 〈〉Navigate through display options |
| TIMERS Enter the timer menu |
| SETTINGS Access the basic settings |
| ENTER Confirm entered values / Start heating mode |
4.4 Rangetop control knobs
The icon next to each control knob shows the layout of the rangetop. The black section shows which burner the control knob is designated to.
Depending on model and functions, the control knobs may have the following markings:
Position Setting
| OFF Burner or cooking zone turned off |
Burners
| Ignition |
| HI Highest standard heat setting |
| LO Lowest standard heat setting |
| XLO ExtraLow® |
| XHI PowerBoost® |
Induction zone
| 1 - 9 Power levels | |
| HeatShift® | |
| + | Liberty® cooking zone |
| XHI PowerBoost® | |
| Electric griddle | |
| 250 - 500 Temperature setting in °F | |
5 Accessories
Only use original accessories. These are designed especially for your appliance.
The accessories supplied may differ depending on the appliance model.
5.1 Oven accessories
Your appliance includes the following oven accessories.
Other accessories Use
| Wire rack ■ These racks can be used fo | 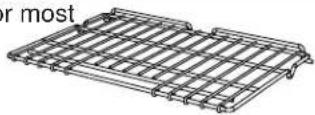 | cooking.■ You can use multiple racks at the same time.Note: Do not clean using the SELF CLEAN function. |
| Telescopic rack Use with heavier dishes f | 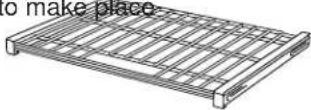 | ment into the oven easier.Note: Do not clean using the SELF CLEAN function. |
| Meat probe The meat probe can be used to | 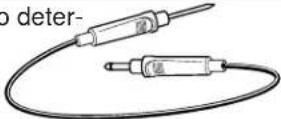 | mine the internal temperature of many foods, especially meats and poultry.Notes■ Do not clean using the SELF CLEAN function.■ Do not clean in the dishwasher. |
| Broiler pan and grid Use for broiling and roasting | Notes■ Do not clean using the SELF CLEAN function.■ You can clean this accessory in the dishwasher. |
5.2 Other accessories
You can purchase other accessories from our Customer Service, specialist retailers or online.
You will find a comprehensive range of products for your appliance in our brochures and online: www.thermador.com
Accessories are appliance-specific. When purchasing, always check for compatibility with your appliance model number (E-Nr).
You can find out which accessories are available for your appliance in our online shop or from our Customer Service.
5.3 Installing the rack guides
- Push the two rails in the holes in the back of the oven cavity ①
-
Slide the guide's key slots over the shoulder bolts.
-
Press down on the front of the rack guide ^② .

natural_image
Technical diagram of a metal ladder structure with directional arrows indicating movement or force (no text or symbols present)Removing the rack guides
- Press up on the front of the rack guide to clear the heads of the two shoulder bolts.
- Pull out the rack guide towards the front.
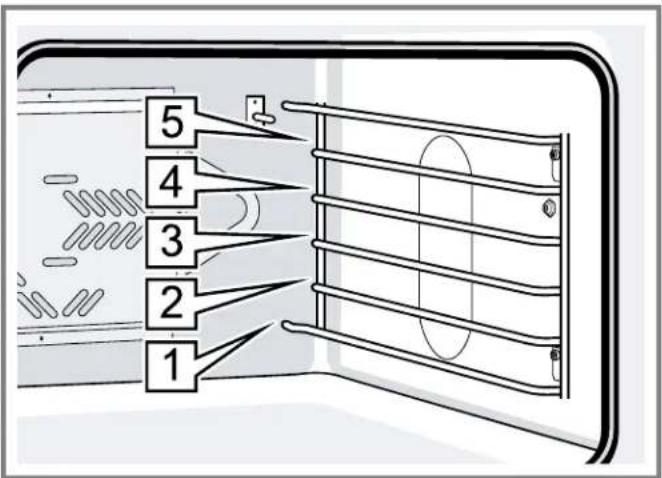
5.4 Rack positions
Your oven has 5 rack positions. The rack positions are counted from bottom to top.
Use rack positions 1 through 5 only. DO NOT attempt to use the top guide to support an oven rack, it may tip.
text_image
5 4 3 2 1Refer to our recommendations for selecting the suitable rack position.
5.5 Safe use of oven racks
For your safety, follow these recommendations on how to use the oven racks correctly.
CAUTION
Placement of Oven Racks - Always place oven racks in desired location while oven is cool. If the rack must be moved while the oven is hot, do not let potholders contact the hot heating elements in the oven. Use caution when removing oven racks from the lowest rack position to avoid contact with the hot oven door.
CAUTION
To avoid possible injury or damage to the appliance, ensure oven rack is installed exactly per installation instructions and not backwards or upside down. Do not slide any accessories between the rack positions, or they may tip.
5.6 Inserting the wire rack
The wire rack can be used in the conventional oven on level 1 to 5.
Requirement: You have read the recommendation on → "Safe use of oven racks", Page 16.
-
Grasp the rack firmly on both sides.
-
Tilt the rack up to allow the stop into rack guide.
natural_image
Diagram of a kitchen appliance with a fan and rack, showing internal wiring connections (no text or symbols)- Bring the rack to a horizontal position and push it in the rest of the way. The rack should be straight and flat, not crooked.
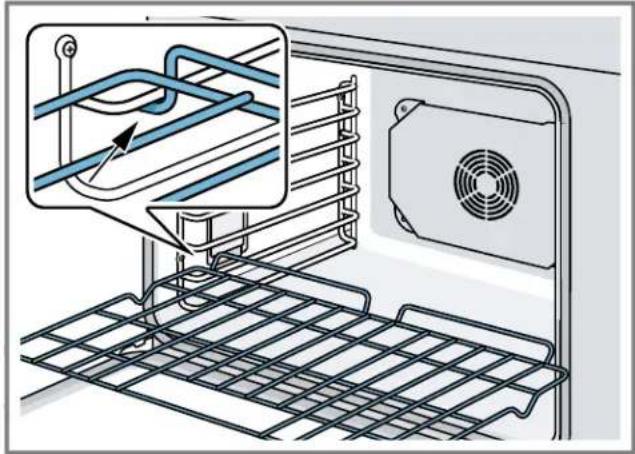
5.7 Installing the FullAccess® racks
Requirement: You have read the recommendation on → "Safe use of oven racks", Page 16.
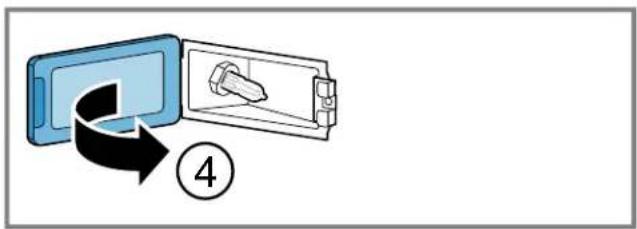
- Hold the telescopic rack at a slight angle and engage the rear hooks in the oven rails on both sides of the oven cavity.
natural_image
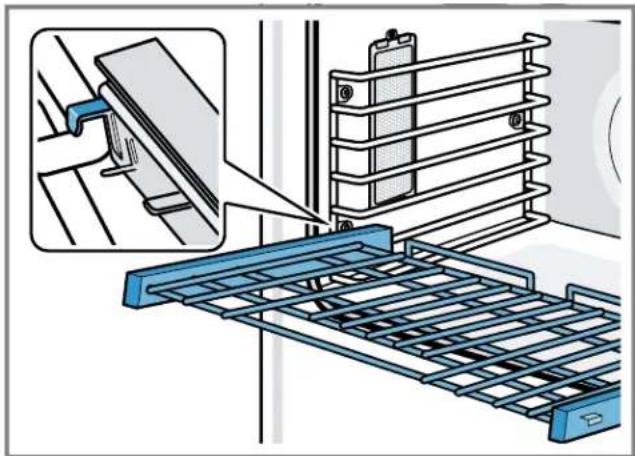
Technical illustration of a metal rack assembly with an inset showing a component being inserted (no text or symbols present)-
Hold the rack straight to allow the second tab to rest over the oven rail.
-
Push the rack in until it is even with the front hooks.
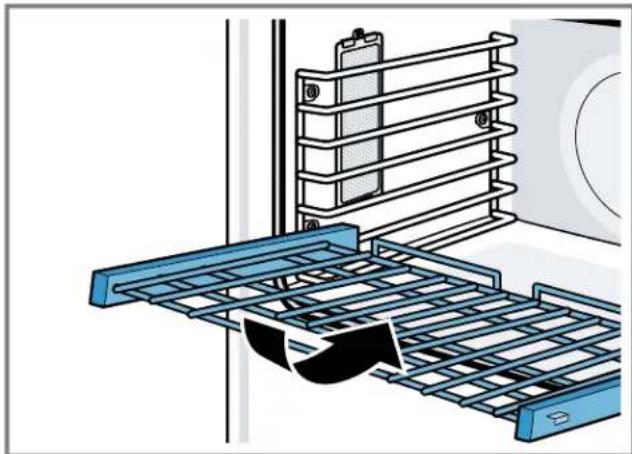
natural_image
Diagram of a mechanical assembly with a blue mesh structure and directional arrows indicating motion (no text or symbols)- Lift the rack up to lock the last hook into place.
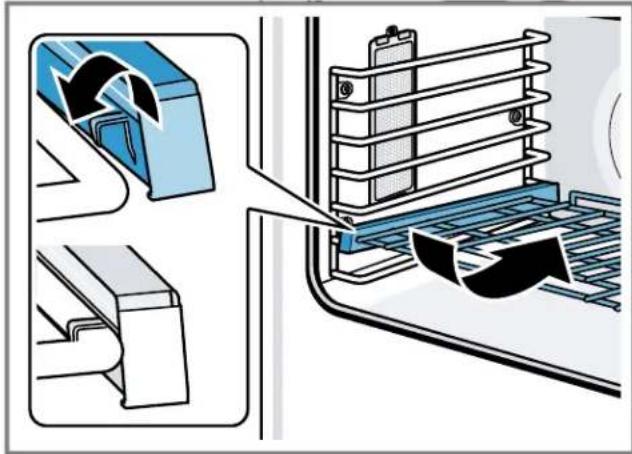
text_image
Diagram illustrating a mechanical assembly or mounting process with labeled components and directional arrows indicating motion.- Push the rack in completely.
- Make sure that the front hooks of the telescopic rack engage in the oven rails.
6 Before using for the first time
Carry out these steps before using your appliance.
■ The appliance must be properly installed by a qualified service provider before use.
- Read and understand all safety precautions → Page 3 and information in the Use and Care Guide prior to operating.
■ Download the Home Connect® (America) app to remotely control your appliance, get cooking inspiration, and access service tips and support.
→ "Home Connect®", Page 25
■ This Use and Care Guide covers several models. Not all features are available on all models.
6.1 Start-up settings
After the appliance has been connected to the power supply, you are prompted to set some basic settings to ensure you can use your appliance conveniently and safely.
Requirement: All oven control knobs are turned to OFF.
-
Connect the appliance to the power supply.
√ The basic settings open automatically. -
Select a setting with the left of .
- Change the desired option with the right or
- Press ENTER to confirm the selection or SETTINGS to discard the changes.
√ The screen changes to standby mode.
Note: You can access the settings at any time by pressing SETTINGS while the appliance is in standby mode. All oven knobs must be turned to OFF to access the settings.
6.2 Cleaning the appliance before using it for the first time
Clean the oven cavity and accessories before using the appliance to prepare food for the first time.
- Remove all packaging materials from the oven cavity. For models with two ovens check both oven cavities.
- Before heating the appliance, wipe the smooth surfaces in the oven cavity with a soft, damp cloth and dry.
- Keep the room ventilated while the appliance is heating.
-
Heat up the oven according to the following instructions. With conventional heating mode:
-
Set the oven to CONV BAKE at 450°F (230°C) for 20 to 30 minutes.
- Then set the oven to BROIL for 20 to 30 minutes. With self-clean function (if equipped):
- Remove oven racks.
- Set the oven to SELF CLEAN.
→ "Self clean function", Page 31
- Wait until the oven cavity has cooled off.
- Clean the smooth surfaces with soapy water and a dish cloth.
- Wash the accessories thoroughly with soapy water and a cloth and rinse well.
- If equipped, heat up the electric griddle for about 10 minutes to eliminate manufacturing residues and smells. Let cool and wash with warm soapy water and rinse well.
Note: There may be a slight odor during first uses. This is normal and will disappear.
6.3 Burner cap placement
The burner caps must be properly placed for the cooktop to function properly.
If the burner cap is not properly placed, one or more of the following may occur:
■ Burner flames are too high
■ Flames shoot out of the burners
■ Stainless steel discolorations
■ Burners do not ignite
■ Burner flames light unevenly
■ Burner emits gas odor
WARNING
To prevent flare-ups do not use the cooktop without all burner caps and all burner grates properly positioned.
CAUTION
To prevent burns, do not touch burner caps or grates while hot.
▶ Turn the cooktop off and allow the burners to cool.
Your rangetop has sealed STAR® burners. There are no burner parts under the rangetop to clean, disassemble or adjust.
Placing the burner caps
Each cap has a letter (B, D, or F) cast in the underside of the cap that corresponds to a letter (B, D, or F) cast in the burner base that is attached to the appliance.
- Place each burner cap on its correct burner base per its corresponding letter designation.
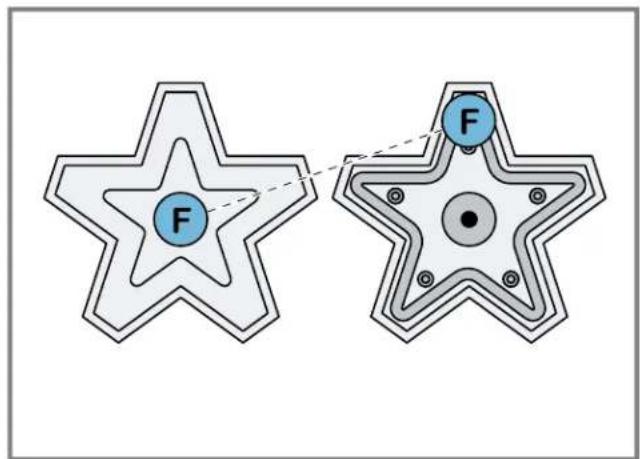
text_image
F F- Place the burner cap gently on top of base so that the prongs of the burner base fit snugly into the groove of the burner cap.
-
Check each burner to make sure there is no gap between the burner cap and burner base.
-
Gently try to move the burner caps from side to side to check if the caps are properly placed on the burner bases.
- When properly placed, each burner cap rests flat on top of its burner base, and completely covers the star-shape of the burner base when viewed from the top.
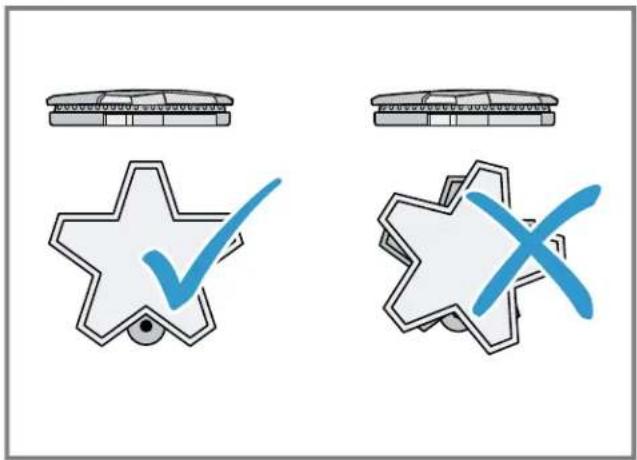
text_image
Diagram showing two star-shaped objects with checkmarks and crosses, likely illustrating a selection or comparison process.6.4 Placing the burner grates
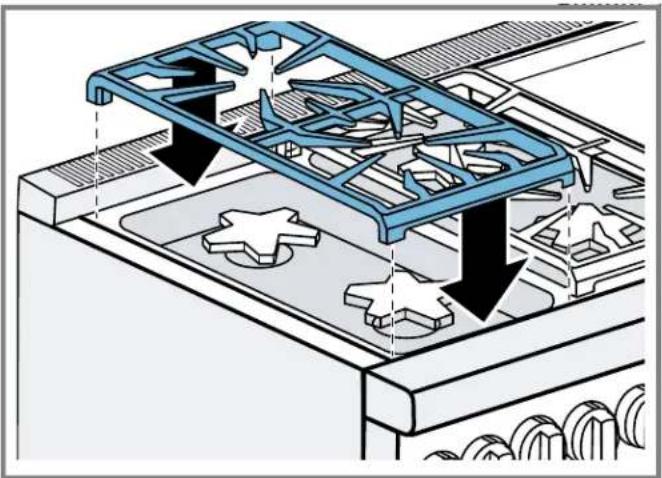
For proper combustion do not use the rangetop without the burner grates in place.
- Place the burner grates flat-side down and align them into the rangetop recess.
- The burner grates should rest flush against each other and against the sides of the recess.
natural_image
Technical diagram of a mechanical assembly with blue structural components and directional arrows indicating movement or force (no text or symbols present)6.5 Register your appliance
- Register your Thermador product to access your product related information. For product registration information see
→ "Customer Service", Page 36
→ "Customer Service", Page 36.
7 Oven operation
Here you will find out everything you need to know about operating your oven.
7.1 Oven heating modes and functions
Check here to see which oven modes are available for the main oven and the auxiliary oven, if equipped.
Note: This Use and Care Guide covers several models. Your model may have some but not all of the features listed.
| Mode Definitions and recommendations Electric | main | Gas main Electric aux. | Gas aux. | ||
| BAKE Cooks with dry, heated air.Use for a variety of foods, such as cakes,cookies, pastries, quick breads, quiche and casseroles. | + | + | + | + | |
| CONV BAKE Similar to bake, but air is circulated by a fan at the back of the oven.Best for baked goods such as cakes, corn-bread, pies, quick breads, tarts, and yeast breads. | + | + | +^1 | +^1 | |
| TRUE CONV Cooks with heat from a third element at the back of the oven. The heat is circulated throughout the oven by the convection fan.Well suited for cooking individual serving-sized foods such as cookies and pastries. | + | - | - | - | |
| BROIL Uses intense heat radiated from the upper ele-ment.Use for tender cuts of meat, 1" (2.5 cm) or less,poultry, browning bread and casseroles. | + | + | + | + | |
| CONV BROIL Combines intense heat from the upper element with fan circulation.Tender cuts of meat, more than 1" (2.5 cm),poultry and fish. Not for browning. | + | - | +^1 | - | |
| PROOF Use for raising yeast dough and sourdough. | - | - | + | + | |
| ROAST Uses a more intense heat for browning of the exterior.Best suited for meats, poultry, less tender cuts of meats and roasting vegetables. | + | + | +^1 | + | |
| CONV ROAST Uses lower and more intense heat from the up-per element than convection bake with air cir-culated by a fan.Use for tender cuts of meat and poultry and roasting vegetables. Meats are more juicy and moist than results with roast mode. | + | - | +^1 | - | |
| SABBATH /extend bake | This cooking mode is for assisting the user for compliance to Sabbath principles. | + | + | +^1 | +^1 |
| WARM Maintains a low temperature in order to keep food hot.Best for baked goods such as cakes, corn-bread, pies, quick breads, tarts, and yeast breads. | - | - | + | +^2 | |
| SELF CLEAN The oven reaches a high temperature to burn off food soil. | + | +^1 | + | +^1 | |
| REMOTE START ^3 | Allows you to start, pause, and abort oven pro-grams remotely via the Home Connect® app on a mobile device. | + | + | - | - |
| FAST PREHEAT ^3 | A symbol is displayed when fast preheating is activated. | + | - | + | - |
| PROBE ^3 | Appears when a probe is detected. | + | + | + | + |
| ^1 Pro Grand® models only ^2 Pro Harmony® models only ^3 Not available on 30" models | |||||
| KITCHEN TIMER3 | The kitchen timer runs independently of the other appliance functions. | + | + | + | + |
| OVEN TIMER3 | Allows you to set a cook timer.Shows the amount of time that the oven mode will run before turning off automatically. | + | + | + | + |
| DELAY COOK3 | Used when delaying the start of a timed oven mode. Shows the time of day that the oven mode will automatically end. | + | + | - | - |
| PANEL LOCK3 | Prevents the oven from being turned on or its settings from being changed accidentally. | + | + | + | + |
| Door lock3 | Symbol is displayed during and after the self-clean mode when the door is locked. | + | + | + | + |
| Remote service3 | Symbol is displayed if Customer Service is connected during remote access. | + | + | - | - |
| SETTINGS3 | Press to access the basic settings. | + | + | - | - |
| HOME CONNECT3 | Remotely control your appliance with a quick click or voice command. | + | + | - | - |
^1 Pro Grand® models only
^2 Pro Harmony® models only
^3 Not available on 30" models
7.2 Setting the heating mode and temperature
- Place the rack in the desired rack position and shut the oven door.
- Turn the mode selection knob to the desired heating mode.
√ The selected heating mode is shown on the display. - Turn the temperature selection knob to the desired temperature.
√ The selected temperature is shown on the display.
√ The progress bar moves to the right as the oven heats up. - When preheating is complete a beep sounds. Place the food inside the oven.
Turning the oven off
▶ Turn both control knobs to OFF.
√ The oven turns off and the clock is displayed.
7.3 Heating time limitation
The maximum heating time is limited. If you forget to turn off the oven, it turns off automatically after a set period of time.
The maximum time for Sabbath mode is 74 hours. For all other heating modes the maximum allowed time is 24 hours.
| Temperature °F (°C) Max. time allowed without activity | |
| 100 - 200(30 - 120) | 24 hours |
| 201 - 550(121 - 300) | 12 hours |
7.4 Fast preheat
With fast preheat, you can shorten the preheat time required for some heating modes. Fast preheat is generally recommended for frozen convenience foods, casseroles, or other foods that require longer baking times. This mode is not recommended for baked goods.
Once FAST PREHEAT is activated in the basic settings, it will be activated every time you start a heating mode.
Fast preheat is available for the following heating modes:
Setting fast preheat
Requirement: The oven is in standby mode.
- Press SETTINGS.
- Press the left < or > to scroll to FAST PREHEAT.
- Press the right (or) and select ON.
- Press ENTER.
- To disable FAST PREHEAT select OFF.
Note: After a power failure it might be necessary to activate FAST PREHEAT again.
7.5 Meat probe
The meat probe measures the internal temperature of the food. You can set a core temperature and the heating mode turns off automatically as soon as the set temperature is reached.
You can use the meat probe with the following heating modes:
■ The probe function is not available when an oven timer or end timer has been set.
■ Do not store the meat probe in the oven cavity.
Inserting the meat probe
Requirements
■ Food must be completely thawed before inserting the probe into the meat.
■ The probe ships with a black plastic safety cap over the pointed metal end of the probe. The cap must be removed prior to use.
- Insert the tip of the probe in the middle and thickest part of the meat or the breast for poultry. Make sure the probe is not touching fat, bone or parts of the oven or the pan.
Always use the handle of the probe for inserting and removing.
- Insert the plug of the probe into the socket at the side of the oven cavity.
Push the probe in all the way and pull back until it catches in the socket.
Setting the meat probe
-
Insert the probe end into the meat and the plug end into the probe outlet in the oven wall.
→ "Inserting the meat probe", Page 21 -
Close the oven door.
-
Set the desired heating mode and temperature.
-
Press the right or to select the desired internal temperature.
√ The set internal temperature and the current temperature measured by the meat probe are displayed side by side on the display.
√ The progress bar moves to the right as the internal cooking temperature increases.
√ When the internal temperature reaches the set value, the heating mode stops. A beep indicates that the cooking process has concluded.
√ The heating mode turns off automatically.
√ Always use potholders to remove the probe.
7.6 Turning the panel lock on or off
With the panel lock you can disable all touch keys on the control panel.
Requirement: The oven is in standby mode.
- Press and hold PANEL LOCK for 4 seconds.
"panel locked" and is displayed.
√ The panel lock is activated. - Press and hold PANEL LOCK again for 4 seconds to turn off the panel lock.
√ goes out.
√ The display returns to standby mode.
7.7 Kitchen timer
The kitchen timer is a countdown timer that has no affect on oven heating.
You can set a kitchen timer for up to 24 hours.
You can use the kitchen timer independently of other functions, and whether the appliance is turned on or off.
Setting the kitchen timer
- Press TIMERS.
- Press the left < or > to scroll to 🔔 KITCHEN TIMER.
- Press the right or to set the desired time.
- Press ENTER.
√ When the kitchen timer has counted down a beep sounds. - Press ENTER cancel the timer or to turn off the beep.
Changing the kitchen timer
- Press TIMERS.
- Press the left (or) to set the desired time.
- Press ENTER.
7.8 Oven timer
If you set an oven timer, the oven stops heating automatically once this time has elapsed.
Setting the oven timer
The oven timer automatically ends a heating mode after a set period of time.
- Set a heating mode and temperature.
- Press TIMERS.
- Press the left (or) and select→"Oven Timer".
- Press the right or to set the oven time.
- Press ENTER.
√ The oven timer starts to count down.
√ When the oven timer has counted down a beep sounds and the heating mode stops. - Press ENTER to cancel the timer or to turn off the beep.
Changing the oven timer
- Press TIMERS.
- Press the left or to set the desired time.
- Press ENTER.
Setting an end time
With this feature you can program your oven to finish a heating mode at a predetermined time.
CAUTION
Food might spoil when left standing for too long.
▶ To maintain food safety, do not leave food in the oven for more than one hour before or after cooking.
- Turn the mode selection knob to BAKE, for example.
- Press TIMERS.
- Press the left (or) and select→"Oven Timer".
- Press the right or to set the oven time.
- Press the left or and select→"End Time".
- Press the right or to set the end time.
- Press ENTER.
- Turn the temperature knob to 350, for example.
√ After confirming the end time the waiting time notification appears.
√ After the waiting period the oven starts heating.
7.9 Sabbath mode
The Sabbath mode enables those of particular faiths to use their ovens on the Sabbath.
About Sabbath mode - using the rangetop

WARNING
When using a blech, use only one STAR® burner at the lowest setting. Using multiple STAR® burners might cause overheating, combustion issues, or damage to the appliance. DO NOT cover vent openings.
- When Sabbath mode is initiated, the STAR® burners with the ExtraLow® feature are deactivated.
■ The standard STAR® gas burners without the ExtraLow® feature remain fully functional.
■ The induction or griddle module is fully functional during Sabbath mode.
■ The standard gas STAR® burners remain on during a power failure.
■ The STAR® burners are equipped with a re-ignition feature. The igniter will automatically re-light the STAR® burner if the flame is blown out.
About Sabbath mode - using the oven
■ Sabbath mode is only available in BAKE mode.
■ The temperature range may be set between 150^ F ( 66^ C) and 475^ F ( 246^ C).
- You can keep cooked dishes warm for a minimum time of 30 minutes and up to a maximum time of 74 hours without needing to switch the appliance on or off.
■ Do not leave easily perishable foodstuffs in the oven for too long.
- On the Sabbath, in lieu of a blech, the oven controls should be covered. Be careful not to cover vent openings.
■ The oven lamps are disabled in Sabbath mode.
■ The temperature may be adjusted for cooking purposes during Holidays. There is a delay between the request and implementation.
Setting Sabbath mode - Models with display
-
If you are using Sabbath mode for the first time or have reset the appliance to factory settings, you have to activate Sabbath mode in the basic settings:
-
Press the left < or > to scroll to "Sabbath".
- Press the right < or > to scroll to "On".
-
Press ENTER.
-
Turn the mode selection knob to BAKE.
-
Turn the temperature selection knob to the desired temperature.
-
Press TIMERS.
-
Press the left < or > to scroll to Sabbath Timer.
-
Press the right < or > to select the duration 30 minutes increments.
-
Press ENTER.
√ A 5 minutes delay notification appears on the display. During this pause, you can adjust the parameters. After the countdown the oven starts heating and all buttons are disabled.
Setting EXTEND BAKE mode - models without display
-
Turn the mode selection knob to EXTEND BAKE.
-
Turn the temperature selection knob to the desired temperature.
Canceling Sabbath mode
▶ Turn all knobs to OFF.
7.10 Basic Settings - Oven
You can configure the basic settings for your appliance to meet your needs.
Overview of the basic settings
Here you can find an overview of the basic settings and factory settings. The basic settings depend on the features of your appliance.
| Setting Options | |
| Time of day Time in hours and minutes | |
| Language■ English■ Français■ Español | |
| Clock format■ 12 hr■ 24 hr | |
| Clock display■ Digital■ Analogue | |
| Fast preheat■ On■ Off | |
| Key press sound■ On■ Off | |
| Display brightness 1 - 5 | |
| Standby mode■ On■ Off | |
| Dark mode■ On■ Off | |
| Convection conversion■ On■ Off | |
| Temperature offset -35° to +35°F(-20° to +20 °C) | |
| Sabbath mode■ On■ Off | |
| Home Connect® → "Home Connect®", Page 25 | |
| Factory settings | Restore |
| Service access | Connect |
| Customer Service | Displays Customer Service contact information |
Changing the basic settings
Requirement: The oven is in standby mode.
- Press SETTINGS.
- Select a setting with the left < or>.
- Change the desired option with the right < or>.
- Press ENTER to confirm the selection or SETTINGS to discard the changes.
√ The display changes to standby mode.
Oven temperature offset
The oven is calibrated to provide accurate results. This feature is useful if you prefer your foods lighter or darker.
■ When an offset temperature is selected, the actual oven temperature is raised or lowered by this value.
- Do not use residential oven thermometers to evaluate oven temperatures as they will fluctuate throughout cooking.
- You can set a temperature offset from the factory baseline. Each time you call up the temperature offset option in the basic settings menu, the factory baseline temperature is restored so you can set a new offset value.
Setting the temperature offset - models with display
Requirement: The oven is in standby mode.
- Press SETTINGS.
- Select a setting with the left < or > to scroll to the temperature offset setting.
- Press the right or to set the desired offset value.
- Press ENTER.
Setting the temperature offset - models without display
Requirements
-
Carry out the following steps within 5 minutes of a power reset.
■ The oven door is closed.
■ All control knobs are in OFF position.
■ For models with self clean function, the door latch must be unlocked. -
Identify the knob position for the temperature offset you want to apply.
| Knob position Temperature offset value in °F |
| 225 -50 |
| 250 -40 |
| 275 -30 |
| 300 -20 |
| 325 -10 |
| 350 0 |
| 375 10 |
| 400 20 |
| 425 30 |
| 450 40 |
| 475 50 |
- Reset the power at the breaker panel.
The power must remain off for at least 20 seconds. -
Complete the next steps within 5 seconds after the door is opened.
-
Open the oven door.
- Turn the mode selection knob to BROIL.
- Turn the temperature selection knob to the desired offset value.
- Close the oven door.
- Turn the temperature selection knob back to OFF.
√ All oven LEDs flash 4 times: The temperature offset has been initiated.
√ All oven LEDs flash 8 times: You have rotated the mode selection knob to a position other than OFF, or more than 1 minute has passed with no activity. The mode is exited without any change to the offset value.
Convection conversion
The heating modes CONV BAKE and TRUE CONV require a 25^ F ( 14^ C) reduction in temperature. Convection conversion reduces the temperature you enter automatically by this value.
- The convection conversion has to be activated and deactivated in the basic settings menu. In case of a power outage convection conversion needs to be reset.
→ "Changing the basic settings", Page 22
■ Simply enter the package or recipe temperature when setting the heating mode. The correct temperature is calculated automatically and is shown in the display.
■ Convection conversion is available for the heating modes CONV BAKE and TRUE CONV modes only.
- For meats and poultry, the temperature should not be reduced. The same temperature recommended in recipes and cooking charts for meats and poultry should be used.
7.11 Getting the most out of your appliance
Here, you can find tips on how best to use the heating modes and accessories of your oven. You can also find recommended settings for various dishes as well as the best accessories and cookware.
Download the Home Connect® (America) app to access cooking tips and tricks, as well as get cooking inspiration.
Preheating the oven
■ Most cooking times in recipes are designed for a preheated oven and require that the oven already be at a certain temperature before cooking starts. Refer to your recipe for preheating recommendations.
■ Preheating time depends on the temperature setting and the number of racks in the oven. Remove unused oven racks to shorten the preheat time.
■ Preheating is not necessary for ROAST and CONV ROAST.
Bakeware type
■ Metal bakeware with or without a non-stick finish, heat-proof glass, glass-ceramic, pottery, or other utensils are suitable for the oven.
- Suitable cookie sheets have a small lip on one side. Heavy sheets or those with more than one side may affect the baking time.
Pan placement
- Allow at least 1" (2.5 cm) of space between the pans and the oven walls so heat can circulate around each pan.
- Stagger all bakeware except cookie sheets so that one is not directly above another. Allow 1 12 (4 cm) above and below each pan.
High altitude baking
When cooking at high altitudes, recipes and cooking times will vary. For accurate information, go to www.csuextstore.com, or write to the Extension Service, Colorado State University, Fort Collins, Colorado 80521. There may be a cost for the guides. Specify which high altitude food preparation guide you prefer: general information, cakes, cookies, breads, etc.
Condensation
It is normal for a certain amount of moisture to evaporate from the food during any cooking process. The amount depends on the moisture content of the food. The moisture will condense on any surface cooler than the inside of the oven, such as the control panel.
Tips for using BROIL mode
| Level Recommended for | |
| 5 ■ Beef steaks, ground meat patties, ham steak and lamb chops 1" (2.5 cm) or less in thickness■ Top browning foods | |
| 4 ■ Meat 1 18 " (3 cm) or more in thickness■ Fish, poultry, pork chops and ham steaks 1" (2.5 cm) or more in thickness | |
| 3 ■ Chicken quarters or halves |
Tips for using convection modes
■ To convert most recipes for baked items, such as cookies, cakes, pies, etc., reduce the oven temperature by 25^ F ( 14^ C), or activate convection conversion.
- Do not reduce the temperature for meats and poultry. Use the same temperature recommended in recipes and cooking charts for meats and poultry.
■ Use low, shallow bakeware with convection cooking. This allows the heated air to circulate around the food.
■ When baking on more than one rack, do not stagger cookie sheets; round cake pans should be staggered.
■ For small items such as cookies, check 1 - 2 minutes before the recipe time.
■ For larger baked items such as cakes, check 5 - 6 minutes before the time indicated on the recipe.
■ Large meat or poultry items may cook up to 30 minutes less than the suggested time. Check them so they will not be over baked.
■ TRUE CONV is best when baking multiple racks of cookies, pastries and other individually baked goods.
Tips for using ROAST mode
- Use a high-sided broiler pan to minimize grease splatter. If you do not have this pan, we recommend covering your dish with a lid or foil.
■ For less tender cuts of meats, add liquids, such as water, juice, wine, bouillon, or stock for flavor and moisture. - You can use roasting bags for the standard roasting mode. When roasting a whole chicken or turkey, tuck the wings behind the back and loosely tie the legs with kitchen string.
Tips for using CONV ROAST mode
■ The roasting time may decrease; check your dish a little earlier than the recipe indicates.
- If your oven comes with a broiler pan and tray, use that for roasting. A shallow, uncovered pan can also be used.
■ For convection roasting, do not cover meat dishes or use roasting bags.
8 Rangetop operation
Here you will find out everything you need to know about operating your rangetop.
8.1 Turning on a burner
CAUTION
DO NOT touch the burners when the igniters are sparking.
WARNING
Escaping gas can ignite.
If the burner does not turn on after 15 seconds, turn off the control knob and open the door or window in the room. Wait at least 1 minute before igniting the burner again.
- Press in on the knob and turn it counter-clockwise to.
- Rotate the knob to any flame setting between HI and LO.
Note: There is a slight sound associated with gas combustion and ignition. This is a normal condition.
Turning off a burner
▶ Turn the control knob clockwise to OFF.
8.2 Automatic re-ignition
Each burner has its own electronic igniter that sparks when the burner is turned on. Each burner should light in four seconds or less.
■ If a burner does not light, check to see that the cap is positioned correctly on the base.
■ If one or more burners blow out, the electronic igniter automatically activates to re-light the flame. Do not touch the burners when the igniters are active.
- For flame height verification and adjustment instructions, refer to the Installation Guide included with the appliance.
8.3 In case of a power failure
WARNING
In the event of a power failure, turn all knobs to the OFF position. Only the burners that are not equipped with the ExtraLow® feature can be lit manually.
▶ Refer to the instructions IN CASE OF AN ELECTRICAL FAILURE listed in the IMPORTANT SAFETY INSTRUCTIONS. → Page 6
8.4 ExtraLow® feature
The XLO feature cycles the burner flame on and off in various increments to maintain a very low temperature. The 60-second revolution (as low as 10 seconds on and 50 seconds off) allows you to keep your food warm with less stirring than a conventional burner on a simmer.
To vary the amount of XLO heat to suit the food and quantity, you can set the control knob anywhere within the XLO range marked on the knob.
When on simmer, the XLO STAR® burners will have a slightly higher flame than the simmer on the standard STAR® burners. This operation is normal.
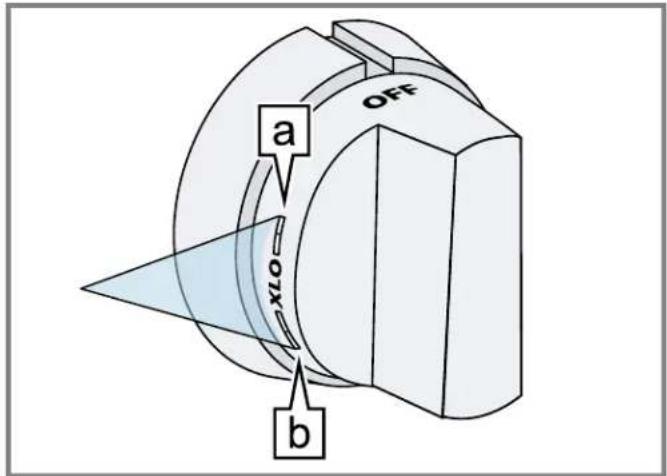
text_image
a OFF OLO b| Knob position ExtraLow® level | |
| a | Lowest ExtraLow® settingThe flame cycles on for approximately 10 seconds and off for 50 seconds of each minute. |
| b | Highest ExtraLow® settingThe flame cycles on for approximately 50 seconds and off for 10 seconds of each minute. |
8.5 PowerBoost® feature
With this feature you can quickly boil water, sear steaks or stir-fry vegetables.
To use PowerBoost® turn the control knob to XHI. To turn off PowerBoost® turn the control knob to a different power level.
8.6 Recommended cooking settings
| Food Start setting Finish setting standard | burner | Finish setting ExtraLow® burner | |
| Melting chocolate XLO: | XLO:Allow 10 - 15 minutes to melt | ||
| May be stirred to hasten melting | |||
| Simmering tomato sauce MED HI: | LO:To maintain simmer | XLO:Simmer to thicken sauce, uncovered | |
| Cook meat/ vegetables, fol-low recipe | |||
9 Electric griddle
9.1 Operating the electric griddle
NOTICE:
DO NOT heat cookware on the griddle surface.
Take care to avoid scratching or gouging the surface.
▶ DO NOT cut food directly on the griddle plate.
▶ DO NOT use metal utensils.
▶ Use plastic or wood utensils.
-
Press and turn the griddle knob clockwise to the desired temperature.
-
Preheat the griddle.
-
Add butter, margarine, oil or shortening if desired.
-
Clean the grease tray after every use.
9.2 Seasoning the griddle plate
Seasoning is a process by which a layer of animal fat or vegetable oil is applied and baked into the cookware. If the griddle plate seems to lose its non-stick abilities over time, seasoning can help regain the griddle's non-stick properties.
Note: The 24" griddle plate is too wide to fit in the oven cavity. Follow the instructions in this section if your appliance has a 12" griddle plate.
- The griddle plate must be clean and all residue removed before the griddle plate is seasoned.
- Before seasoning or re-seasoning your griddle plate, buff off any residue with a mixture of coarse salt and a small amount of white vinegar.
- Rinse well with clean water.
- Dry the griddle plate thoroughly.
- Use a paper towel to apply a thin, even coating of lard, shortening, or olive oil to the griddle surface.
- Bake the griddle plate in the oven at 350^ F ( 175^ C) for 1 hour.
- Remove the griddle plate from the oven and allow to cool to room temperature.
- Apply another layer, bake and let cool at least 2 more times.
10 Home Connect®
This appliance may be network-capable. Connecting your appliance to a mobile device lets you control its functions via the Home Connect® app, adjust its basic settings and monitor its operating status.
The Home Connect® services are not available in every country. The availability of the Home Connect® function depends on the availability of Home Connect® services in your country. You can find information on this at: www.home-connect.com.
The Home Connect® app guides you through the entire registration process. Follow the instructions in the Home Connect® app to implement the settings.
Tips
- Consult the Home Connect® documents supplied.
■ Follow the instructions in the Home Connect® app as well.
Notes
- Also note the safety information in this instruction manual and ensure that it is also observed when operating the appliance using the Home Connect® app.
■ Cooktops are not designed to be left unattended. Always monitor the cooking process.
- Operating the appliance on the appliance itself always takes priority. It is not possible to operate the appliance using the Home Connect® app during this time.
■ In networked standby mode, the appliance requires a maximum of 2 watts.
10.1 Setting up Home Connect®
Requirements
■ The appliance is connected to the power supply and is switched on.
■ You have a mobile device with a current version of the iOS or Android operating system, e.g. a smartphone.
■ The mobile device and the appliance are within range of your home network's Wi-Fi signal.
- Download the Home Connect® app.

text_image
GET IT ON Google Play Download on the App Store
- Open the Home Connect® app and scan the following QR code.

text_image
QR code image containing encoded data, no visible human-readable text- Follow the instructions in the Home Connect® app.
10.2 Home Connect® settings
Adapt Home Connect® to your needs. You can find the Home Connect® settings in the basic settings for your appliance. Which settings the display shows will depend on whether Home Connect® has been set up and whether the appliance is connected to your home network.
Overview of the oven Home Connect® settings
The following Home Connect® settings are available in the basic settings menu of the oven.
Basic setting Options Description and additional information
| Wi-Fi ■ On■ Off | If (Wi-Fi) is activated, you can use Home Connect®.In networked standby mode, the oven requires a maximum of 2 W. |
| Network ■ Connect to network■ Disconnect from network | If you disconnect the oven from the network, all network information will be deleted. This setting is useful if you have new login details for the router. |
| Connect to app - This setting initiates the connection between theHome Connect® app and the oven. | |
| Remote control ■ On■ Off | When this function is deactivated, you can only view the operating status of the oven in the app.When this function is activated, you can remotely start and control the oven. |
| Oven information - The display shows information about the network or the oven. | |
10.3 Changing the settings via the Home Connect® app
You can use the Home Connect® app to change the appliance settings and send them to the appliance. Prerequisites for using the Home Connect®:
■ The appliance is connected to the home network and to the Home Connect® app.
In order to set the appliance via the app, Home Connect® must be activated in the basic settings. Activate Home Connect ON in the oven basic settings.
Changing the oven settings
- Select the setting in the Home Connect® app and send it to the oven. Follow the instructions in the Home Connect® app.
10.4 Remote start
If you want to start an oven operation using your mobile device, you must activate Remote Start.
WARNING
REMOTE OPERATION This appliance is configurable to allow remote operation at any time.
- Do not store any flammable materials or temperature sensitive items inside, on top or near surface units of the appliance.
Notes
- For some models a permanent Remote start can be activated via the Home Connect™ app. This function allows a remote start of the available operating modes without automatically deactivating Remote start.
■ Remote start can only be activated if the Home Connect™ set-up has been successfully completed.
■ Some operating modes can only be started on the oven itself.
Setting remote start
- Turn the mode selection knob to REMOTE START.
Do not turn the tempearture selection knob to any setting. Leave it in the OFF position.
√ The displays turns to the standby screen.
√ □ appears in the display.
2. Continue with the Home Connect® app installed on your mobile device.
10.5 Setting remote control
You can use the Home Connect® app to easily access the functions of your oven.
Notes
- Operating the appliance directly from the oven always has priority. During this time, it is not possible to operate the oven using the Home Connect® app.
■ The remote control is already activated when you connect your oven.
If the remote control has been deactivated, only the oven's operating statuses will be displayed in the Home Connect® app.
■ The remote control is automatically activated when remote start is activated.
Requirement: The oven is in standby mode.
- Press SETTINGS.
- Press the left < or > to scroll to "Remote control".
- Press the right < or > to scroll to "On" or "Off".
- Press ENTER.
√ The display changes to standby mode.
10.6 Remote diagnostics
The Customer Service can access your appliance via Remote Diagnostics if you ask them to do so, if your appliance is connected to the Home Connect® server and if Remote Diagnostics is available in the country where you are using the appliance.
Tip: Further information and details about the availability of Remote Diagnostics in your country can be found in the Service/Support section of your local website: www.homeconnect.com.
10.7 Software update
Your appliance's software can be updated using the software update function, e.g. for the purposes of optimization, troubleshooting or security updates. To do this, you must be a registered Home Connect® user, have installed the app on your mobile device and be connected to the Home Connect® server. As soon as a software update is available, you will be informed via the Home Connect® app and will be able to start the software update via the app. Once the update has been successfully downloaded, you can start installing it via the Home Connect® app if you are in your home network (Wi-Fi). The Home Connect® app informs you once the installation is successful.
Notes
■ The software update consists of two steps.
– The first step is the download.
– The second step is the installation on your appliance.
- You can continue to use your appliance as normal while updates are downloading. Depending on your personal settings in the app, software updates can also be set to download automatically.
■ Installation takes a few minutes. You cannot use your appliance during installation.
■ We recommend that you install security updates as soon as possible.
10.8 Data Protection
Please see the information on data protection.
The first time your appliance is registered on a home network connected to the Internet, your appliance will transmit the following types of data to the Home Connect® server (initial registration):
■ Unique appliance identification (consisting of appliance codes as well as the MAC address of the installed Wi-Fi communication module).
■ Security certificate of the Wi-Fi communication module (to ensure a secure data connection).
■ The current software and hardware version of your appliance.
■ Status of any previous reset to factory settings.
This initial registration prepares the Home Connect® functions for use and is only required when you want to use the Home Connect® functions for the first time.
Note: Please note that the Home Connect® functions can be utilized only with the Home Connect® app. Information on data protection can be called up in the Home Connect® app.
11 Cleaning and maintenance
To keep your appliance working efficiently for a long time, it is important to clean and maintain it carefully. For more cleaning recommendations and tips to get the most out of your appliance, refer to the website:
■ USA: www.thermador.com/us/support/customer-care
■ Canada: www.thermador.ca/en/support/customer-care
WARNING
Do not clean the appliance while it is still hot. Some cleaners produce noxious fumes when applied to a hot surface. Wet clothes and sponges can cause burns from steam.
■ For customers in the USA:
You can purchase suitable cleaners and a glass scraper for the induction element from Customer Support or in our online shop www.thermador.com/us/accessories.
■ For customers in Canada:
Visit this web page to learn how to purchase cleaners for your appliance, www.thermador.ca/en/support/filters-cleaners-accessories.
Tip: Thermador cleaners have been tested and approved for use on Thermador appliances. Other recommended cleaners do not constitute an endorsement of a specific brand.
11.1 General cleaning tips
Only use suitable cleaning agents to avoid damage to the appliance surfaces.
Suitable cleaners
■ Use the mildest cleaning procedure that will do the job efficiently and effectively. Some cleaners of the same type are harsher than others. Try on a small inconspicuous area first.
■ Always rub metal finishes in the direction of the polish lines for maximum effectiveness and to avoid marring the surface.
11.2 Cleaning recommendations
Clean only those parts of your range that are listed in this cleaning chart.
WARNING
Be sure the entire appliance (including the light bulb) has cooled and grease has solidified before attempting to clean any part of the appliance.
Do not clean the cooktop while it is in operation.
■ Use only clean soft cloths, sponges, paper towels, fibrous brushes, plastic, non-metal or steel wool soap pads for cleaning and scouring, as recommended on the chart.
■ Most exterior parts of this appliance can be cleaned with hot sudsy water (except the various items specifically identified otherwise). When rinsing is required, rinse thoroughly.
■ Always wipe dry immediately to avoid water marks.
Avoid these cleaners
- Do not use commercial oven cleaners such as Easy Off® ^1 . They may damage the oven finish or parts.
■ DO NOT USE CHLORINE BASED CLEANERS.
CAUTION
All igniters spark when any single burner is turned on.
- Do not touch any of the burners when the cooktop is in use.
WARNING
To avoid risk of electrical shock, DO NOT use a steam cleaner or high pressure cleaners to clean the appliance. Penetrating moisture may cause electrical shock.
| Part/Material Cleaning instructions Recommendations | ||
| Bezels and control knobs / chrome, metal | Wipe with hot soapy water.Rinse and dry immediately. | Recommended cleaners:Dish soap and hot waterImportant notes:DO NOT soak knobs.DO NOT force knobs onto wrong valve shaft. |
| Burner base / brassBurner cap / cast iron | Wipe with recommended cleaner.A stiff nylon bristle tooth brush can be used to clean port openings.Rinse and dry immediately.Dry the burners completely. If there are water droplets or damp patches on the rangetop when you start cooking, the enamel may be damaged.Make sure the burner caps are seated correctly on the burner bases after cleaning. | Recommended cleaners:Non-abrasive cleaner: Dish soap and hot waterMild abrasive cleaners:- Bon Ami ^® 1- Barkeepers Friend ^® 1-Wright's ^® All Purpose Brass Polish1Important notes:DO NOT scratch or gouge the port openings of the burner cap.Do not clean the burner parts in the dishwasher. They may be damaged. |
^1 These marks are registered trademarks of their respective owners. All other trademarks are trademarks of BSH Home Appliances Corporation or its affiliated companies.
| Part/Material Cleaning instructions Recommendations | ||
| Burner grates / porcelain enamel on cast iron | Wait until the appliance has cooled.Carefully lift off the burner grates and place them on a protected surface.Scrub with a non-metallic brush and soapy water. Carefully clean around the rubber feet. If the rubber feet come off, the grates may scratch the rangetop surface.Dry the burners grates completely. If there are water droplets or damp patches on the cooktop when you start cooking, the enamel may be damaged.Place the burner grates in their proper position. | Recommended cleaners:Non-abrasive cleaners:Dish soap and hot water.Fantastik®1Mild abrasive cleaners:Bon Ami®1-Soft Scrub®1For stubborn stains:Soap-filled steel wool pad.Other degreaserFor metal deposits from aluminum or copper pans:Scotch BriteTM1Course steel wool padImportant notes:The grates are heavy; use care when you lift them up.Acidic and sugar-laden spills deteriorate the enamel. Remove soil immediately after the appliance has cooled enough to touch.Blisters, crazing or chips are common due to the extreme temperatures on the grate fingers and rapid temperature changes.If you use abrasive cleaners too vigorously or too often they may eventually mar the enamel.DO NOT clean in a self-cleaning oven. |
| Door gasket None DO NOT CLEAN THE DOOR GASKET. | The door gasket is essential for a good seal. Care should be taken not to rub, damage, or move the gasket. | |
| Doors / glass Wash with soap and water or glass cleaner.Use Fantastik® on a clean sponge or paper towel and wipe clean. | Recommended cleaners:Dish soap and hot waterFantastik®Important notes:Keep cleaners and water away from the door vents. If water or cleaners spill into the vents, water amy streak the glass inside. | |
| Exterior finish / stainless steel Clean with soapy water and soft cloth, then rinse and dry with a soft cloth.Condition steel with the Thermador Stainless Steel Conditioner (part # 00576697).Remove water spots with a cloth dampened with white vinegar.Remove heat discoloration with Bar Keeper's Friend®1. | Recommended cleaners:Non-abrasive cleaner:Dish soap and hot waterFantastik®1Household vinegar for hard water spotsMild abrasive cleaners:Bon Ami®1Barkeepers Friend®1Wright's® All Purpose Brass PolishStainless steel cleaners:Siege®1 Stainless Steel and Aluminum CleanerStainless Steel Magic®1Thermador Stainless Steel Conditioner (part # 00576697)Important notes:Never allow food stains or salt to remain on stainless steel for any length of time.Always wipe or rub in the direction of the grain.Chlorine or chlorine compounds in some cleansers are corrosive to stainless steel. Check the ingredients on the label of the cleanser. | |
^1 These marks are registered trademarks of their respective owners. All other trademarks are trademarks of BSH Home Appliances Corporation or its affiliated companies.
| Part/Material Cleaning instructions Recommendations | ||
| Gas rangetop surface / porcelain enamel | Wipe with recommended cleaner.Rinse and dry immediately.Make sure the burner caps are seated properly on the burner base after cleaning. | Recommended cleaners:Non-abrasive cleaner: Dish soap and hot waterMild abrasive cleaners:- Bon Ami ^ 1-Barkeepers Friend ^ 1- Soft Scrub ^ 1For burned-on food:- Soap-filled fiber or steel wool padImportant notes:Acidic and sugar-laden spills deteriorate the enamel. Remove soil immediately after the appliance has cooled enough to touch.Do not use wet sponge or towel on hot porcelain.Always apply minimal pressure with abrasive cleaners. |
| Griddle plate / aluminum with non-stick coating | Allow the griddle to cool.Wipe with hot soapy water.Rinse with warm water and dry with a soft cloth. | Recommended cleaners:Non-abrasive cleaners: Dish soap and hot waterImportant notes:NEVER flood a hot griddle plate with cold water. This can damage the griddle plate.DO NOT clean the griddle plate in a self-cleaning oven.The griddle plate is dishwasher safe, however, hand-washing the griddle plate is recommended. |
| Griddle grease tray | Remove the grease tray after the grease has cooled.Discard grease into a grease resistant container for disposal.Rinse and dry immediately. | Recommended cleaners:Non-abrasive cleaners: Dish soap and hot waterMild abrasive cleaners: Soft ScrubThe grease tray is dishwasher-safe.Important notes:Clean the grease tray after each use.Do not let the grease tray fill up so far that tipping it spills the grease. |
| Igniters / ceramic Clean with a cotton swab dampened with soapy water. | Recommended cleaners:Dish soap and hot waterFantastikImportant notes:DO NOT use sharp tools to scrape the igniters. The igniters are fragile. If an igniter is damaged, it may not light the burner. | |
| Induction module Refer to Use and Care Guide of the induction module | ||
| Oven cavity / porcelain on steel | When cool, apply recommended cleaning agent to a damp sponge or cloth.Rub lightly, rinse and dry.For stubborn stains, soak the stain with a cloth saturated in a recommended cleaner. Close the door and allow it to soak until the stain can be easily removed with a damp soapy cloth or mild abrasive.If available use the self clean function for stubborn stains. | Recommended cleaners:Non-abrasive cleaner:- Dish soap and hot waterVinegar and waterMild abrasive cleaners:- Bon Ami ^ 1-Barkeepers Friend ^ 1- Soft Scrub ^ 1Important notes:Acidic and sugar-laden spills deteriorate the enamel. Remove soil immediately after the appliance has cooled enough to touch.Do not use wet sponge or towel on hot porcelain.It is normal for porcelain to show fine lines with age due to exposure to heat and food soil. This is normal and does not affect operation.Always apply minimal pressure with abrasive cleaners. |
^1 These marks are registered trademarks of their respective owners. All other trademarks are trademarks of BSH Home Appliances Corporation or its affiliated companies.
Part/Material Cleaning instructions Recommendations
| Oven racks and rack guides | Wash with soapy water.Rinse and dry immediately. | Recommended cleaners:Non-abrasive cleaner:Dish soap and hot waterVinegar and waterMild abrasive cleaners:Bon Ami ^ ^1 Barkeepers Friend ^ ^1 Soft Scrub ^ ^1 Soap-filled fiber or steel wool padImportant notes:DO NOT CLEAN USING THE SELF CLEAN FUNCTION.Flat racks: If the flat racks remain in the oven during the self clean mode, they will loose their shiny finish and may not glide smoothly. If this happens, wipe the rack edges with a small amount of vegetable oil. Then wipe off excess oil.Telescopic racks: Avoid getting cleansing powder in the telescopic slides. Re-lubrication may become necessary. Use only high-temperature food-grade lubricants to re-lubricate the slides. |
Probe ■ Wipe with soapy water. ■ Do not submerge in water.
■ Do not wash in the dishwasher.
^1 These marks are registered trademarks of their respective owners. All other trademarks are trademarks of BSH Home Appliances Corporation or its affiliated companies.
11.3 Self clean function
With pyrolytic self cleaning the oven is heated to a very high temperature. Stubborn soil is burnt off and can be wiped out after self clean is finished.
After the completion of a self-clean cycle, the oven will not allow you to start another self-clean cycle for 24 hours.
All surface elements are automatically disabled during Self Clean. This is normal. Once the Self Clean cycle is complete and the oven has cooled, the elements become operable once again.
About self clean
■ Refer to the oven mode chart to see, if your range features the self clean feature.
→ "Oven heating modes and functions", Page 19
- During self clean, the standard rangetop burners and the electric griddle or induction zone may be used. The ExtraLow® burners cannot be used.
- It is common to see smoke or flames during the self clean cycle, depending on the content and amount of soil remaining in the oven. If a flame persists, turn off the oven and allow it to cool before opening the door to wipe up the excessive food soil.
Preparing self clean
WARNING
During the self clean cycle, parts of the appliance may become potentially harmful to persons who lack adult knowledge of appliances and adult reactions to potentially harmful conditions.
- Children should not be left alone or unattended in an area where appliances are in use.
The oven heats up to a very high temperature during self cleaning. Opening the door can result in injury.
- When self-cleaning, confirm that the door locks and will not open.
- If the door does not lock, do not run Self Clean. Contact Customer Service.
CAUTION
Remove broiler pans, pots, and other utensils and excess spillage before self-cleaning.
Do not leave food or cooking utensils, etc., in the oven during the pyrolytic self-cleaning mode of operation.
WARNING
Do not block or obstruct the flow of air through the ventilation openings. The vent is located at the back of the appliance. The vent needs to be unobstructed and open to provide necessary airflow that is important for proper performance.
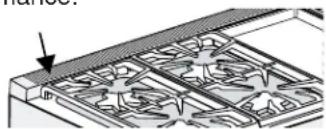
natural_image
Diagram of a mechanical component with internal cavities and an arrow indicating direction (no text or symbols)- Do not touch the vent area while the appliance is on and for several minutes after the appliance is off. Some parts of the vent and surrounding areas become hot enough to cause burns. Allow appliance sufficient time to cool before touching or cleaning vent areas.
- Do not position plastic or other heat-sensitive items on or near the vent. These items could melt or ignite.
- To provide proper ventilation of the range do not remove range feet.
NOTICE:
Do not clean parts or accessories with the self clean function.
- Remove all accessories, racks and rack guides from the oven.
- Wipe out excessive spillage from the oven cavity.
Starting self clean on models without display
Requirements
■ All heating modes or timers are canceled.
■ You have carried out the steps for preparing the oven for self clean.
→ "Preparing self clean", Page 31
-
Turn the mode selection knob to SELF CLEAN.
-
Turn the temperature selection knob to CLEAN.
-
Check if the door is locked.
Note: Do not use self clean if the oven door does not lock.
√ Self-clean duration is 2 hours.
Starting self clean on models with display
Requirements
■ All heating modes or timers are canceled.
■ You have carried out the steps for preparing the oven for self clean.
→ "Preparing self clean", Page 31
-
Turn the mode selection knob to SELF CLEAN.
-
Turn the temperature selection knob to CLEAN.
-
Press the right or to select the clean level.
Soil level Duration (excluding cool off)
| Low 1 12 hours |
| High 3 hours |
- Press ENTER.
√ An information text appears.
- Press ENTER.
√ Within 20 seconds the door locks and appears.
- Check if the door is locked.
Note: Do not use self clean if the oven door does not lock.
Setting an end timer for self clean
- Turn the mode selection knob to SELF CLEAN.
- Turn the temperature selection knob to CLEAN.
- Press the right or to select the clean level.
- Press ENTER.
- Press TIMERS.
- Press the left( or) to select "End Time".
- Press the right or to set an end time.
- Press ENTER.
- After the information text, press ENTER.
Completing self clean
When self clean is finished, the oven cools down. The door latch will open automatically when the oven is below 500^ F ( 260^ C).
CAUTION
To avoid risk of burns, let the oven cool down completely before opening the oven door. The oven cavity is still at baking temperatures when the door latch is released after self clean.
- Turn the mode selection knob and the temperature selection knob to OFF.
- Wipe the remaining ash from the oven with a moist cloth.
Note: After self clean is complete, the self clean function will be prevented from running again for a period of 24 hours.
11.4 Maintenance
Replacing an oven light bulb
When the oven light fails you can replace the light bulbs.
WARNING
Light socket is live when door is open if main power supply is not turned off.
- Turn off main power supply at the service panel before changing the light bulbs.
WARNING
Make sure the appliance and lights are cool and power to the appliance has been turned off before replacing the light bulb(s). Failure to do so could result in electrical shock or burns.
The lenses must be in place when using the appliance.
The lenses serve to protect the light bulb from breaking.
- The lenses are made of glass. Handle carefully to avoid breaking. Broken glass can cause an injury.
Light bulb specifications
Your range uses a light bulb with one of the following specifications. Check the inside of the light bulb housing to determine the correct light bulb for you range model.
Bulb description Bulb image
| 10 Watt, halogen bulb, G4 base, 12 Volts |
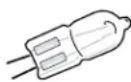
| 25 Watt, halogen bulb, G9 base, 120 Volts |
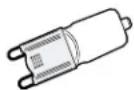
Replacing an oven light
Note: The graphics are representative. Your appliance may have different graphic appearances.
Requirements
■ Refer to the oven light bulb chart for the oven light specification of your oven.
■ Follow the safety instructions on replacing a light bulb. → Page 32
-
Turn off the power to the oven at the main power supply (fuse or breaker box).
-
Remove the oven racks.
-
Slide the tip of a flat blade screw driver between the holder clip and the lamp housing.
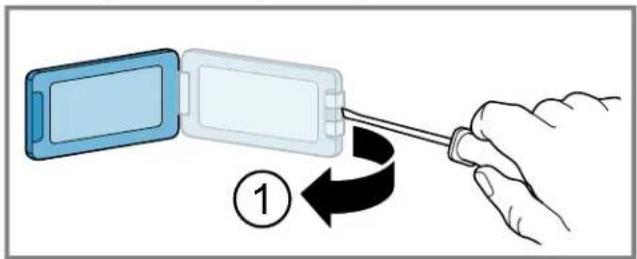
natural_image
Illustration of a hand holding a tool interacting with a device, showing a circular arrow indicating rotation (no text or symbols present)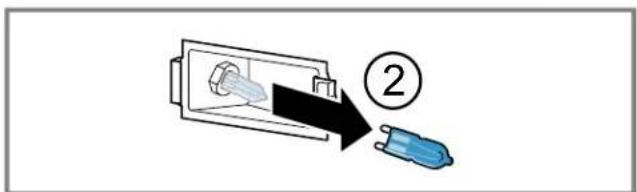
text_image
Diagram showing a connector being inserted into a socket, labeled with number 2- Support the glass lens cover with fingers along the bottom edge to prevent the cover from falling to the bottom of the oven. Gently twist the flat blade screw driver to loosen the glass lens cover ①
- Remove the glass lens cover.
- Remove the bulb by grasping and sliding the bulb straight back until the two prongs have cleared the ceramic holder ②
- DO NOT touch the glass of the new replacement bulb with your fingers. It may cause the bulb to fail when it first lights. Grasp the replacement bulb with a clean dry cloth. Locate the two prongs in the ceramic holder, gently poking until the two prongs locate in the ceramic socket ③

text_image
Diagram showing a hand inserting a component into a device with a numbered step and label ③
text_image
Diagram showing a device being transferred to a lock, with a numbered step and directional arrow indicating rotation.- Press down to seat the bulb.
- Slide the protective lens into the holder clip and push the other end until the fixing clip snaps back into the housing ④
- Turn on the circuit breaker.
12 Troubleshooting
You can eliminate minor issues on your appliance yourself. Please read the information on eliminating issues before contacting Customer Service. This may avoid unnecessary repair visits.

WARNING
Improper repairs are dangerous.
- Only authorized service providers should repair the appliance.
If the power cord of this appliance becomes damaged, it must be replaced by the manufacturer, the manufacturer's Customer Service, or an authorized service provider in order to prevent injury.
- Only original spare parts may be used to repair the appliance.
▶ If the appliance has an issue, call Customer Service.
| Issue Cause and troubleshooting | |
| Oven door is locked and will not open, even after cooling | The door lock is engaged1. Turn the oven off at the circuit breaker and wait five minutes.2. Turn breaker back on.✓ The oven should reset itself and will be operable. |
| Oven is not heating There is no power supply to the appliance1. Check circuit breaker or fuse box to your house.2. Make sure there is proper electrical power to the oven. | |
| Oven light is not working properly The oven light bulb is loose or burnt outReplace or reinsert the light bulb.→ "Replacing an oven light bulb", Page 32Tip: Touching the bulb with fingers may cause the bulb to burn out. | |
| Oven light does not turn off The oven door does not close properly1. Check the oven door for obstructions.2. Check to see if the hinge is bent. | |
| Cannot remove lens cover on light There is soil build-up around the lens cover1. Let the oven cavity cool off.2. Wipe the lens cover area with a clean, dry towel, then try to remove the lens cover. | |
| Oven is not self-cleaning properly The oven is too hot to start self clean1. Allow the oven to cool before running self clean.2. Always wipe out loose soils or heavy spillovers before running self clean.3. If the oven is heavily soiled, set the maximum self clean time. | |
| Clock and timer are not working properly There is no power supply to the appliance1. Check circuit breaker or fuse box to your house.2. Make sure there is proper electrical power to the oven. | |
| Control does not react when a key is touched The control is wet or soiled► Clean the control panel an wipe it dry. | |
Issue Cause and troubleshooting
| Warm air or steam escapes from oven vent | It is normal to see or feel steam or warm air escaping from the oven ventWARNINGDo not block or obstruct the flow of air through the ventilation openings. The vent is located at the back of the appliance. The vent needs to be unobstructed and open to provide necessary airflow that is important for proper performance. ► Do not touch the vent area while the appliance is on and for several minutes after the appliance is off. Some parts of the vent and surrounding areas become hot enough to cause burns. Allow appliance sufficient time to cool before touching or cleaning vent areas.► Do not position plastic or other heat-sensitive items on or near the vent. These items could melt or ignite.► To provide proper ventilation of the range do not remove range feet. ► Do not touch the vent area while the appliance is on and for several minutes after the appliance is off. Some parts of the vent and surrounding areas become hot enough to cause burns. Allow appliance sufficient time to cool before touching or cleaning vent areas.► Do not position plastic or other heat-sensitive items on or near the vent. These items could melt or ignite.► To provide proper ventilation of the range do not remove range feet. |
| Cooling fan runs even when the oven is turned off | The cooling fan will continue to run, even after the oven has been turned off, until the oven has cooled sufficiently► This is normal. There is no action required. |
| The general electrical system of the appliance is not working. | The circuit breaker has tripped.1. Check circuit breaker or fuse box to your house.2. Make sure there is proper electrical power to the appliance. |
| The plug for the power cord is not plugged in.► Connect the appliance to the power supply. | |
| There has been a power failure.► Check whether the lighting in your kitchen or other appliances in the room are working. | |
| The automatic ignition is not working. | Food remnants, dirt, or cleaning products are located between the igniters and the burners.► Clean the space between the igniter and the burner. |
| Burner parts are wet.► Carefully dry the burner parts. | |
| The burner parts are not positioned correctly.► Position the burner parts correctly. | |
| The appliance is not connected properly to the power supply.► Contact a qualified electrician. | |
| The burner flame is not uniform. The burner parts are not positioned correctly.► Position the burner parts correctly. | |
| The gas flow is not normal or there is no gas. | The gas supply is blocked by intermediate gas valves.► Open the gas valves. |
| The gas cylinder is empty.► Replace the gas cylinder. | |
| There is a smell of gas in the kitchen. | A gas valve has been left on.► Turn off the gas taps. |
| Incorrect coupling of gas cylinder.► Check the proper connection to the gas cylinder. | |
| The gas pipe to the appliance is leaking.1. Shut off the gas supply at the main gas valve.2. Ventilate the premises.3. Immediately notify an authorised installation technician to check and certify the installation. | |
| Issue Cause and troubleshooting | |
| There is a smell of gas in the kitchen. | 4. Do not use the appliance until you can be sure there are no gas leaks in the gas supply line or the appliance. |
| The burner switches off immediately after releasing the control knob. | The control knob has not been pressed down long enough.1. Keep the control knob pressed in for a few seconds after ignition.2. Push the control knob in firmly. |
| The grooves on the burner are dirty.▸ Clean the grooves on the burner. | |
| With a new oven there is a strong odor when oven is turned on | This is normal with a new oven and will disappear after a few uses▸ Operate the self clean mode to burn-off the smell more quickly. |
| Baking results are not as expected | The rack position in not ideal1. Refer to the cooking charts for the recommended rack position.2. Check "Getting the most out of your appliance" for tips and suggestions. |
| Food takes longer to cook than expected | The oven temperature needs to be recalibratedNote: The oven is carefully calibrated to provide accurate results.▸ If food is consistently too brown or too light the temperature can be offset.→ "Oven temperature offset", Page 22 |
| Food is overcooked The oven temperature needs to be recalibratedNote: The oven is carefully calibrated to provide accurate results.▸ If food is consistently too brown or too light the temperature can be offset.→ "Oven temperature offset", Page 22 | |
| "E" and a number appears in display and control beeps | An electronics fault has occurred1. Press TIMERS to stop the beeping.2. Reset the oven if necessary.3. Call an authorized service provider. |
13 Disposal
13.1 Disposal of your old appliance
Environmentally compatible disposal allows valuable raw materials to be recycled.
- Unplug the appliance from the power supply.
- Cut through the power cord.
- Dispose of the appliance in an environmentally responsible manner.
Information about current disposal methods can be obtained from your specialist dealer or local authority.
14 Customer Service
With any warranty repair, we will make sure your appliance is repaired by an authorized service provider using genuine replacement parts. We use only genuine replacement parts for all repairs.
Detailed information on the warranty period and terms of warranty can be found in the Statement of Limited Product Warranty, from your retailer, or on our website.
If you contact the Customer Service, you will need the model number (E-Nr.) and the production number (FD) of your appliance.
USA:
1-800-735-4328
www.thermador.com/support
www.thermador.com/us/accessories
CA:
1-800-735-4328
www.thermador.ca
www.thermador.ca/en/support/filters-cleaners-accessories For assistance with connecting to Home Connect®, you can also view instructions here:
www.home-connect.com/us/en/help-support/set-up
14.1 Remote Customer Service connection
It is possible for Customer Service to access the appliance via the Home Connect® connection in the event of an error.
Granting Customer Service access to the appliance
- Contact Customer Service. Follow the instructions given to you by the representative.
- Press ENTER to allow Customer Service access.
14.2 Model number (E-Nr.) and production number (FD)
You can find the model number (E-Nr.) and the production number (FD) on the appliance's rating plate.
Making a note of your appliance's details and the Customer Service telephone number will enable you to find them again quickly.
14.3 Rating plate location
Depending on your model, the rating plates are located above the main oven or behind the kick plate.
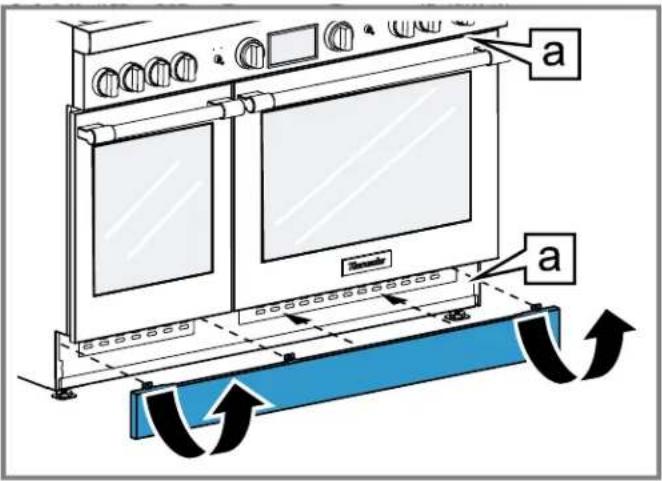
text_image
a b aa Rating plate
14.4 Product registration
Register your Thermador product to access to your product related information.
You may register your product through one of the following ways:
■ Register with your phone (USA only):

text_image
Thermador* PHOTOREGISTER THERMADOR- Take a photo of the camera icon on the registration card, including the points (⑨).
- Text the photo to 21432. (USA only, text and data rates may apply.)
■ Mail in the completed product registration card to the address printed on the card.
■ Register your product online at
- US: www.thermador.com
- Canada: www.thermador.ca
■ Call Thermador Customer Service at 1-800-735-4328.
15 STATEMENT OF LIMITED PRODUCT WARRANTY
15.1 What this warranty covers & Who it applies to
The limited warranty provided by BSH Home Appliances ("Thermador") in this Statement of Limited Product Warranty applies only to the Thermador appliance sold to you ("Product"), provided that the Product was purchased:
■ For your normal, household (non-commercial) use, and has in fact at all times only been used for normal household purposes.
■ New at retail from a BSH authorized dealer or directly from BSH (not a display, "as is", or previously returned model), and not for resale, or commercial use.
■ Within the United States or Canada, and has at all times remained within the country of original purchase.
The warranties stated herein apply to the original purchaser of the product warranted herein and to each succeeding owner of the product purchased for ordinary home use during the term of the warranty.
Please make sure to register your Product; while not necessary to effectuate warranty coverage, it is the best way for Thermador to notify you in the unlikely event of a safety notice or product recall.
15.2 How long the warranty lasts
Thermador warrants that the Product is free from defects in materials and workmanship for a period of seven hundred and thirty (730) days from the date of the original delivery. The foregoing timeline begins to run upon the date of original delivery, and shall not be stalled, tolled, extended, or suspended, for any reason whatsoever. This Product is also warranted to be free from cosmetic defects in material and workmanship (such as scratches of stainless steel, paint/porcelain blemishes, chips, dents, or other damage to the finish) of the Product, for a period of sixty (60) days from the date of delivery or closing date for new construction. This cosmetic warranty excludes slight color variations due to inherent differences in painted and porcelain parts, as well as differences caused by kitchen lighting, product location, or other similar factors. This cosmetic warranty specifically excludes any display, floor, "As Is", or "B" stock appliances.
15.3 Repair/replace as your exclusive remedy
During this warranty period, Thermador or one of its authorized service providers will repair your Product without charge to you (subject to certain limitations stated herein) if your Product proves to have been manufactured with a defect in materials or workmanship. If reasonable attempts to repair the Product have been made without success, then Thermador will replace your Product (upgraded models may be available to you, in Thermador's sole discretion, for an additional charge). Nothing in this warranty requires damaged or defective parts to be replaced with parts of a different type or design than the original part. All removed parts and components shall become the property of Thermador at its sole option. All replaced and/or repaired parts shall assume the identity of the original part for purposes of this warranty and this warranty shall not be
extended with respect to such parts. Thermador's sole liability and responsibility hereunder is to repair manufacturer-defective Product only, using a Thermador authorized service provider during normal business hours. For safety and property damage concerns, Thermador highly recommends that you do not attempt to repair the Product yourself, or use a non-authorized service provider; Thermador will have no responsibility or liability for damage resulting from repairs or work performed by a non-authorized service provider. Authorized service providers are those persons or companies that have been specially trained on Thermador products, and who possess, in Thermador's opinion, a superior reputation for customer service and technical ability (note that they are independent entities and are not agents, partners, affiliates or representatives of Thermador). Nevertheless, taking your product to be serviced by a repair shop that is not affiliated with or an authorized dealer of Thermador will not void this warranty. Also, using third-party parts will not void this warranty. Notwithstanding the foregoing, Thermador will not incur any liability, or have responsibility, for the Product if it is located in a remote area (more than 100 miles from an authorized service provider) or is reasonably inaccessible, hazardous, threatening, or treacherous locale, surroundings, or environment; in any such event, if you request, Thermador would still pay for labor and parts and ship the parts to the nearest authorized service provider, but you would still be fully liable and responsible for any travel time or other special charges by the service company, assuming they agree to make the service call. Further, to the extent you have installed the Product in a difficult-to-access location or have otherwise installed temporary or permanent fixtures that create barriers to accessing or removing the Product, Thermador will not incur any liability for, or have responsibility, for work or costs associated with moving the Product or otherwise creating access to the Product in order to repair or replace it. All such costs shall be your sole responsibility.
15.4 Out of warranty product
Thermador is under no obligation, at law or otherwise, to provide you with any concessions, including repairs, pro-rates, or Product replacement, once this warranty has expired.
15.5 Warranty exclusions
The warranty coverage described herein excludes all defects or damage that are not the direct fault of Thermador, including without limitation, one or more of the following:
■ Use of the Product in anything other than its normal, customary and intended manner (including without limitation, any form of commercial use, use or storage of an indoor product outdoors, use of the Product in conjunction with air or water-going vessels).
- Any party's willful misconduct, negligence, misuse, abuse, accidents, neglect, improper operation, failure to maintain, improper or negligent installation, tampering, failure to follow operating instructions, mishandling, unauthorized service (including selfperformed "fixing" or exploration of the appliance's internal workings).
■ Adjustment, alteration or modification of any kind.
- A failure to comply with any applicable state, local, city, or county electrical, plumbing and/or building codes, regulations, or laws, including failure to install the product in strict conformity with local fire and building codes and regulations.
■ Ordinary wear and tear, spills of food, liquid, grease accumulations, or other substances that accumulate on, in, or around the Product.
■ Any external, elemental and/or environmental forces and factors, including without limitation, rain, wind, sand, floods, fires, mud slides, freezing temperatures, excessive moisture or extended exposure to humidity, lightning, power surges, structural failures surrounding the appliance, and acts of God.
■ Service calls to correct the installation of your Product, to instruct you how to use your Product, to replace house fuses or correct house wiring or plumbing.
■ Removal and replacement of trim or decorative panels that interfere with servicing the Product.
■ Damage or defects caused by labor or parts installed by any non-authorized service provider, unless approved by Thermador before service is performed.
In no event shall Thermador have any liability or responsibility whatsoever for damage to surrounding property, including cabinetry, floors, ceilings, and other structures or objects around the Product. Also excluded from this warranty are Products, on which the serial numbers have been altered, defaced, or removed; service visits to teach you how to use the Product, or visits where there is nothing wrong with the Product; correction of installation problems (you are solely responsible for any structure and setting for the Product, including all electrical, plumbing or other connecting facilities, for proper foundation/flooring, and for any alterations including without limitation cabinetry, walls, floors, shelving, etc.); and resetting of breakers or fuses
TO THE EXTENT ALLOWED BY LAW, THIS WARRANTY SETS OUT YOUR EXCLUSIVE REMEDIES WITH RESPECT TO PRODUCT, WHETHER THE CLAIM ARISES IN CONTRACT OR TORT (INCLUDING STRICT LIABILITY, OR NEGLIGENCE) OR OTHERWISE. THIS WARRANTY IS IN LIEU OF ALL OTHER WARRANTIES, WHETHER EXPRESS OR IMPLIED. ANY WARRANTY IMPLIED BY LAW, WHETHER FOR MERCHANTABILITY OR FITNESS FOR A PARTICULAR PURPOSE, OR OTHERWISE, SHALL BE EFFECTIVE ONLY FOR THE PERIOD THAT THIS EXPRESS LIMITED WARRANTY IS EFFECTIVE. IN NO EVENT WILL THE MANUFACTURER BE LIABLE FOR CONSEQUENTIAL, SPECIAL, INCIDENTAL, INDIRECT, "BUSINESS LOSS", AND/OR PUNITIVE DAMAGES, LOSSES, OR EXPENSES, INCLUDING WITHOUT LIMITATION TIME AWAY FROM WORK, HOTELS AND/OR RESTAURANT MEALS, REMODELLING EXPENSES IN EXCESS OF DIRECT DAMAGES WHICH ARE DEFINITIVELY CAUSED EXCLUSIVELY BY THERMADOR, OR OTHERWISE. SOME STATES DO NOT ALLOW THE EXCLUSION OR LIMITATION OF INCIDENTAL OR CONSEQUENTIAL DAMAGES, AND SOME STATES DO NOT ALLOW LIMITATIONS ON HOW LONG AN IMPLIED WARRANTY LASTS, SO THE ABOVE EXCLUSIONS OR LIMITATIONS MAY NOT APPLY TO YOU. THIS WARRANTY GIVES YOU SPECIFIC LEGAL RIGHTS, AND YOU MAY ALSO HAVE OTHER RIGHTS WHICH VARY FROM STATE TO STATE.
No attempt to alter, modify or amend this warranty shall be effective unless authorized in writing by an officer of BSH.
15.6 Obtaining warranty service
To obtain warranty service for your product, you should contact Thermador Customer Support at 1-800-735-4328 to schedule a repair.
15.7 Product information
For handy reference, copy the information below from the rating plate. Keep your invoice and/or delivery documents for warranty validation.
| Model number (E-Nr.) |
| Production number(FD) |
| Date of delivery |
Table des matières
1 IMPORTANTES CONSIGNES DE SÉCURITÉ ..... 41
natural_image
Diagram of a mechanical or electrical component with internal channels and a downward arrow, no visible text or symbols.natural_image
Three safety symbols: no prohibition, a person falling on a block, and a mechanical clamp (no text or labels)text_image
Labeled diagram of a kitchen oven with numbered parts for identificationnatural_image
Diagram of a metal ladder structure with directional arrows indicating movement or force (no text or symbols present)natural_image
Diagram showing a kitchen appliance with a fan and rack, no text or symbols presentnatural_image
Technical illustration of a metal rack assembly with an inset showing a component being inserted (no text or symbols present)natural_image
Diagram of a mechanical assembly with a blue metal rack and a black arrow indicating motion (no text or symbols)text_image
Diagram illustrating a mechanical assembly or cooling process with labeled components and directional arrows indicating motion.→ "Home Connect®", Page 66
text_image
Diagram showing two star-shaped objects with checkmarks and a cross, likely illustrating a selection or cancellation process.natural_image
Technical diagram of a mechanical assembly with blue structural framework and black arrows indicating force or movement (no text or symbols)text_image
QR code image containing encoded data, no visible human-readable textnatural_image
Technical diagram of a mechanical component with internal cavities and an arrow indicating a feature (no text or symbols present)text_image
Diagram showing a hand using a screwdriver to adjust a component, with a numbered step labeled ①.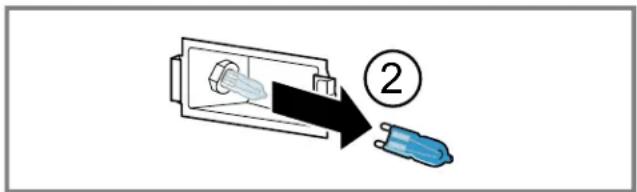
text_image
Diagram showing a battery with a plug inserted into a socket, labeled with number 2 pointing to the socket.text_image
Diagram showing a hand holding a blue plastic clip next to a device with an arrow pointing to it, labeled with number 3.