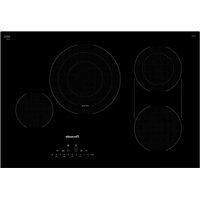
PRD48WISGU - Cooker THERMADOR - Free user manual and instructions
Find the device manual for free PRD48WISGU THERMADOR in PDF.

User questions about PRD48WISGU THERMADOR
0 question about this device. Answer the ones you know or ask your own.
Ask a new question about this device
Download the instructions for your Cooker in PDF format for free! Find your manual PRD48WISGU - THERMADOR and take your electronic device back in hand. On this page are published all the documents necessary for the use of your device. PRD48WISGU by THERMADOR.
USER MANUAL PRD48WISGU THERMADOR
Table of contents (English) 2
Table de matieres (Francais) 13
Índice de materias (Espanol) 28
Models
Modeles
Modelos:
PRD364WIGU
PRD364WIGC
PRD486WIGU
PRD48WISGU
PRD48WISGC
Table of CONTENTS
Important safety instructions 3
Cooking with induction 4
Advantages of induction cooking 4
Proper cookware 4
Getting to know the induction module 5
Parts identification. 5
Operation 6
Getting started 6
PowerBoost® function - XH1 6
Timer 7
Bridge 7
Heat shift 8
Safety shut-off 8
Overheating protection 8
Cooking recommendations 9
Care and maintenance 10
Daily cleaning 10
Before calling for service 11
Troubleshooting 11
Normal operating noises 12
Causes of damage 12
Support, accessories, and parts. back page
Safety DEFINITIONS
WARNING
This indicates that death or serious injuries may occur as a result of non-observation of this warning.
CAUTION
This indicates that minor or moderate injuries may occur as a result of non-observance of this warning.
NOTICE: This indicates that damage to the appliance or property may occur as a result of non-compliance with this advisory.
Note: This alerts you to important information and/or tips.
This THERMADOR® appliance is made by
BSH Home Appliances Corporation
1901 Main Street, Suite 600
Irvine, CA 92614
Questions?
1-800-735-4328
www.thermador.com
We look forward to hearing from you!
IMPORTANT SAFETY INSTRUCTIONS READ AND SAVE THESE INSTRUCTIONS
Please read carefully
WARNING
Please review the appliance's Use and Care Guide and Installation Manual for other important safety information regarding the appliance.
WARNING
When properly cared for, your new appliance has been designed to be safe and reliable. Read all instructions carefully before use. These precautions will reduce the risk of burns, electric shock, fire, and injury to persons. When using kitchen appliances, basic safety precautions must be followed, including those in the following pages.
State of California Proposition 65 Warning: WARNING
This product can expose you to chemicals including vinyl chloride, which is known to the State of California to cause cancer and birth defects or other reproductive harm. For more information go to www.P65Warnings.ca.gov.
Burn prevention
DO NOT TOUCH SURFACE UNITS OR AREAS NEAR
UNITS - Surface units may be hot even though they are dark in color. Areas near surface units may become hot enough to cause burns. During and after use, do not touch or let clothing, potholders, or other flammable materials contact surface units or areas near units until they have had sufficient time to cool. Among these areas are the cooktop and areas facing the cooktop.
After each use, turn off the cooking zone using the control knob. DO NOT rely on the pan detection feature to turn off the cooking zones when you remove the pans.
Risk of injury
When cooking with a bain-marie, the cooktop and cooking vessel may crack due to overheating. The cooking vessel in the bain-marie must not come in direct contact with the bottom of the pot filled with water. Use only heat-resistant cookware.
Cookware may jump upward due to fluid trapped between the cookware bottom and cooking zone. Always keep cooking zone and cookware bottom dry.
Electromagnetic interference
WARNING
This induction cooktop generates and uses ISM frequency energy that heats cookware by using an electromagnetic field. It has been tested and complies with Part 18 of the FCC Rules for ISM equipment. This induction cooktop meets the FCC requirements to minimize interference with other devices in residential installation. Induction cooktops may cause interference with television or radio reception. If interference occurs, the user should try to correct the interference by:
- Relocating the receiving antenna of the radio or television.
- Increasing the distance between the cooktop and the receiver.
It is the user's responsibility to correct any interference.
WARNING
Persons with a pacemaker or similar medical device should exercise caution when standing near an induction cooktop while it is in use. Consult your doctor or the manufacturer of the pacemaker or similar medical device for additional information about its effects with electromagnetic fields from an induction cooktop.
Cooking with induction
Advantages of induction Cooking
Induction cooking works by electromagnetic vibrations generating heat directly in the pan, rather than indirectly through heating the glass surface. The glass becomes hot only because the pan eventually warms it up. This technology has a number of advantages over traditional radiant energy cooking:
- Greater speed in cooking and frying
The pan is heated directly and not the glass, the efficiency is greater than in other systems because no heat is lost.
Especially at higher settings, foods and liquids will boil very rapidly. It is best not to leave pans unattended to avoid them boiling over or boiling dry.
- Greater convenience in care and cleaning
In the case of induction cooking, the only heated area is the zone under the pot. The glass is not heated, so foods that have spilled on the cooktop surface do not burn.
- Heat and safety control
The Induction Module supplies or cuts off power immediately when the controls are set. The induction stops supplying heat if the pan is removed without turning off the power first.
Proper cookware
Choose cookware of a size suited to the amount of food you are going to cook.
Ferromagnetic pans
Only ferromagnetic pans are suitable for induction cooking, these can be made from:
- enameled steel.
- cast iron.
- special stainless steel for induction cooking.
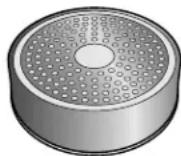
Check that the bases of your pans are attracted by a magnet to find out if they are suitable. For an optimal heat distribution, the use of sandwich bottom cookware is recommended.
Pressure cookers
Induction cooking is suitable for cooking in pressure cookers. The cooking zone reacts very quickly, and so the pressure cooker is quickly up to pressure. As soon as you switch a cooking zone OFF, the cooking process stops immediately.
Other suitable cookware for induction
There are other types of cookware with a base not entirely ferromagnetic that are made for induction cooking use.
Cookware with aluminum on the base reduces the ferromagnetic zone, so less heat may be supplied or problems with detection might occur.
Unsuitable pans
Never use pans made of:
- thin steel
glass - clay
copper
aluminum
DO NOT use cookware with jagged edges or a curved base.
Empty pans, or pans with a thin base
DO NOT heat up empty pans, or use pans with a thin base. The Induction Module is equipped with an internal safety system. However, an empty pan may heat up so quickly that the "automatic switch off" function may not have time to react and the pan may reach very high temperatures. The pan base could melt and damage the induction glass. In this case, do not touch the pan and switch the appliance off. If the appliance fails to work after it has cooled down, please contact technical service.
No Pot on the induction zone
The No Pot light flashes for 90 seconds if no cooking vessel is placed on the selected cooking position, if the cooking vessel consists of an unsuitable material, or does not have the right size. The module switches off automatically after 30 seconds if a cooking vessel is not detected.
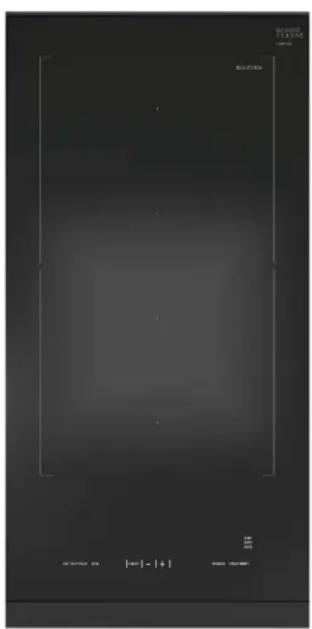
Getting to know the induction module
Parts identification
Control knobs
The power levels are controlled by the knobs on the front of the control panel.
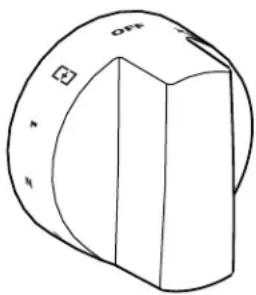
| Control knob settings | |
| OFF Turns the power to the Induction Module off. | |
| 1 - 9 Lowest heat level (1) to highest heat level (9). | |
| XHI PowerBoost® The function temporarily increases the maximum output of the selected cooking zone. | |
| + | Bridge (right knob) The two cooking zones can be bridged and cooked on simultaneously. |
| Heat shift (left knob) Where the pot is placed (Front | Middle | Back) dictates the heat setting (Min | Med | Max). | |
Zone locations
| Zone 1: Back half of the module. | |
| Zone 2: Front half of the module. | |
| Zone 1+2 (Bridge): | To access Bridge, set the right knob to and the left knob between 1-XHI. |
| Zone 1+2 (Heat Shift): | To access Heat Shift, set the left knob to ☐. |
Induction user display panel

Display panel
| 1 Cooking Zone and Residual Heat display Continuously lit up: Cooking zone is on and/or emitting heat. DO NOT touch the cooking zones as long as the Hot Surface light is lit up, even if the cooking zone is already turned off. |
| 2 XHI indicator XHI (PowerBoost) is working for either zone. |
| 3 No Pot indicator Indicates that no cookware is detected. |
| 4 Timer and error display Shows the countdown time and any error messages. |
| 5 MIN | MED | MAX indicator The current power level for the Heat Shift function. |
| 6 Heat shift indicator Continuously lit up: On when the Heat Shift function is activated. |
| 7 Bridge indicator Continuously lit up: On when the two zones are bridged. |
| 8 Timer setting touch key Decrease/increase the kitchen timer duration. |
| 9 Timer touch key Press to set the kitchen timer. |
Operation
Getting started
Positioning cookware
With induction cooking, it is only the part of the zone on which the pan stands that is used. If you use a small pan on the zone, the power will be adjusted to the diameter of the pan.
DO NOT use cookware with jagged edges or a curved base.
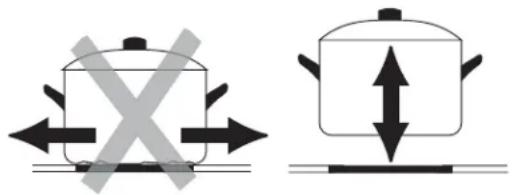
Ensure that the base of the pan is smooth, and sits flat against the glass. Always center your pan on the cooking zone.
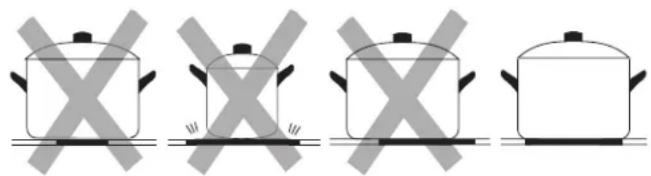
Always lift pans up off the induction top - DO NOT slide the cookware or they may scratch the glass.
DO NOT place hot cookware on the touch keys of the induction module.
Setting the heat level
- Push in the control knob and turn it either left or right to the desired heat level.
-- The cooktop indicator light turns on.
- Place appropriate cookware on top within 30 seconds.
If no pot is detected, the cooking zone is automatically turned off. To reactivate the cooking zone, turn the control knob to OFF and reset the heat level.
Turning Off the induction module
- Turn all control knobs to the OFF position.
The residual heat display of a cooking zone that is hot remains illuminated until the cooking zone has cooled down, even if the knob is turned OFF.
If the pan is removed but the cooking zone is not turned OFF, the No Pot indicator light will flash.
Residual heat indicator
The induction module has a Hot Surface indicator to show when surface is still hot. Although the module is switched off, the indicator will remain on for as long as the surface is hot. Avoid touching the surface when this indicator is lit.
PowerBoost® - XHI
Both cooking zones are equipped with the PowerBoost function. This function will heat large amounts of water faster than at heat level 9. The PowerBoost, or XHI, function temporarily increases the maximum output of the selected cooking zone.
Powerboost mode boosts power on one zone by diverting power from the other zone. If the other zone is on HIGH, the power output will be reduced. If both zones are set to XHI, power management will reduce each zone to a lower setting. For example, if Zone 1 is set to XHI, Zone 2 is set to 1, Zone 1 will automatically be reduced to power level 9.
When Zone 1 and Zone 2 are bridged PowerBoost is available (see "Bridge" on page 7).
Activating the PowerBoost®
- Turn the control knob of the desired cooking zone to XHI.
- Turn the control knob to any other heat level to disable PowerBoost mode.
-- PowerBoost mode will deactivate automatically after approximately 10 minutes of continuous operation. The PowerBoost function does not turn on automatically when it becomes available again. To turn it on manually, first set the control knob to any other heat level and then turn the knob to XHI again.
Timer
Use the built-in timer like a kitchen timer. You can set the duration for up to 99 minutes.
Note: The timer DOES NOT serve to automatically turn off the cooking zone.
Setting the Timer duration
- Tap the TIMER touch key on the display panel.
-- Notification 已 , and touch keys - and + are activated. - Set the desired duration by touching the - or + touch keys.
-- Touch and hold the touch keys - or + to increase or decrease the set duration more rapidly.
Note: If after 10 seconds nothing is inputted the timer will automatically turn off.
- Touch the TIMER touch key to confirm.
If confirmation is not received within 10 seconds, the countdown starts automatically.
A signal sounds and the duration begins to count down on the display.
After countdown of set time
An acoustic signal indicates that the countdown of the set duration is complete. The display blinks slowly.
- Tap the TIMER touch key.
-- The display goes out and the acoustic signal ceases.
The acoustic signal ceases automatically after three minutes. The OO and TIPER notification continue to blink until the TIPER touch key is touched or a control knob is operated.
Correcting timer duration
- Tap the TIMER touch key and re-adjust the duration by touching the - or + touch keys.
- Tap the TIMER touch key again to start the countdown with the modified time.
Canceling countdown
- Tap TIMER touch key, change duration to 00 and confirm by tapping the TIMER touch key again.
Bridge
In addition to being used separately, the two cooking zones can be bridged with the Bridge feature to evenly heat longer pans and griddles. It consists of four inductors that work independently of each other. If using the Bridge cooking zones, only the area that is covered by cookware is activated.
Activating the Bridge
-
Place the pan on the induction module over the two zones, covering both cooking zones.
-
Turn the Zone 2 knob to .

- Turn the Zone 1 knob to a desired setting of 1-9 or XHI.
-- The Bridge indicator will appear in the display panel.
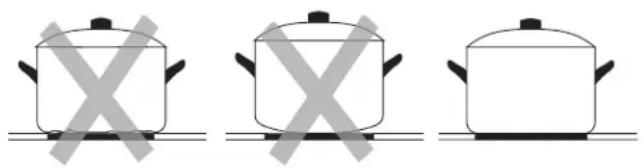
Advice on using cookware
To ensure that the cookware is detected and heat is distributed evenly, correctly center the cookware:
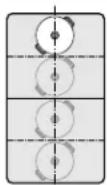
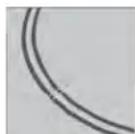
Diameter smaller than or equal to 5^ (13 cm)
Place the cookware on one of the four positions that can be seen in the illustration.
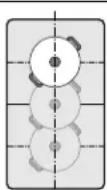
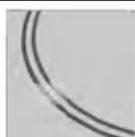
Diameter greater than 5^ (13 cm)
Place the cookware on one of the three positions that can be seen in the illustration.

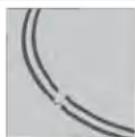
If the cookware takes up more than one zone, place it starting on the upper or lower edge of the flexible cooking zone.
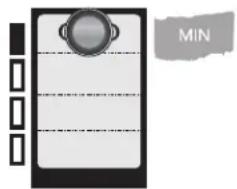
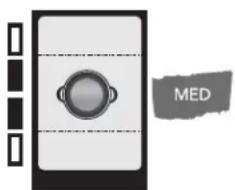
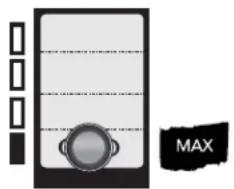
Heat shift
Heat Shift is a presetting of the Bridge. The location of where the pot is placed (Front | Middle | Back) dictates the heat setting (Max | Med | Min), respectively.
As an example, when the cookware is at the front of the induction unit, the heat level will be at a high heat setting. By shifting the cookware all the way back, it will change automatically to a low setting without the need to reset the control knobs.
Preset heat settings:
Front area = heat setting
Middle area = heat setting 5
Rear area = heat setting
Only use one item of cookware. The size of the cooking area depends on the cookware used and whether it is positioned correctly.
Activating heat shift
-
Place the pan at a desired location on the induction module.
-
Turn the Zone 1 knob to
The indicator will appear in the display panel.
Safety shut-off
For your protection, the induction module has a safety shut-off feature. Depending on the set power level, if a heating zone is left on for an extended period of time without any change in the temperature setting, it is automatically shut off.
| Power level Shuts OFF after... | |
| 1 to 6 3 hours | |
| 7 2 hours | |
| 8 and 9 1 hour | |
| PowerBoost®, XHI, function 10 minutes | |
An audible signal indicates when the duration has elapsed. The Hot Surface indicator on the touch display flashes.
To reset the automatic safety shut-off:
- Turn the knob to OFF to reset. The induction module can then be turned back on.
Overheating protection
In the event of overheating, the induction module automatically regulates itself to protect the electronic components.
Slight overheating
The induction module reduces the heat level. Once the cooking zone has cooled down sufficiently, the selected heat level is automatically reactivated. An acoustic signal indicates that all heat levels are available again.
Severe overheating
The cooking zone is turned off automatically. An acoustic signal sounds. Error message Hor F4 appears on the timer display. The light above the control knob blinks rapidly.
- Remove the cookware from the cooking zone.
-- If the error message goes out and a signal sounds, the cooking zone has cooled down sufficiently.
- Set control knob to OFF. Then set the desired heat level as usual.
Cooking recommendations
For best results
Use pans and saucepans with thick, flat bases. An uneven base increases cooking time.
Use correct pan size
- Use a small pan for small quantities.
Put the lid on
- Cover the pan with a lid that fits. Food cooks faster when you use the lid.
Use only enough water to boil food
- Boil foods with the smallest quantity of water. This saves energy and vegetables retain a larger percentage of their vitamins and minerals.
Reduce the heat
- Switch to a lower temperature as early as possible.
Note: During cooking, stews or liquid meals such as soups, sauces or drinks can heat up too quickly unnoticed and overflow or spatter. For this reason we recommend that you stir continuously, gradually heating the food at a suitable power level.
Cooking tips
The following table provides some examples. Cooking times may vary depending on the type of food, its weight and quality. Deviations are therefore possible.
| Examples Setting | |
| Melting | |
| Chocolate, | 1-2 |
| Chocolate chips | |
| Butter | |
| Heating | |
| Broth | 3-4 |
| Thick Soup | 2-3 |
| Milk | 1-2 |
| Simmering | |
| Delicate sauces | 1-2 |
| Spaghetti sauce | 1-2 |
| Pot roast | 4-5 |
| Fish | 4-5 |
| Cooking | |
| Rice | 1-2 |
| Potatoes, boiled | 6-8 |
| Frozen vegetables | 6-8 |
| Fresh vegetables | 6-8 |
| Pasta (2-4 quarts water) | 8-9 |
| Pudding | 3-4 |
| Cereals | 3-4 |
| Frying | |
| Pork chop | 8-9 |
| Chicken breast | 7-8 |
| Bacon | 8-9 |
| Eggs | 6-7 |
| Fish | 8-9 |
| Pancakes | 6-7 |
| Deep fat frying (in 1-2 quarts oil) | |
| Deep frozen foods (ex. French fries) | 8-9 |
| Donuts | 5-6 |
Care and maintenance
Daily cleaning
Note: Recommended cleaners indicate a type of cleaner and do not constitute an endorsement of a specific brand.
Cleaning guidelines
When using a cleaner, use only a small amount; apply to a clean paper towel or cloth. Wipe on the surface and buff with a clean dry towel.
For best results, use the Thermador Glass Cooktop Cleaner (#12010031) sold in the US at www/store.thermador.com/us. Other cleaners such as BonAmi®, Soft Scrub® (without bleach), and white vinegar can also be used.
Avoid these cleaners
Glass cleaners which contain ammonia or chlorine bleach. These ingredients may damage or permanently stain the induction surface.
- Caustic cleaners such as Easy Off may stain the induction surface.
- Abrasive cleaners.
- Metal scouring pads and scrub sponges such as Scotch Brite® can scratch and/or leave metal marks.
- Soap-filled scouring pads such as SOS® can scratch the surface.
Powdery cleaners containing chlorine bleach can permanently stain the induction surface.
- Flammable cleaners such as lighter fluid or WD-40.
Cleaning guide
| Type of soil Possible solution | |
| All these items REQUIRE IMMEDIATE REMOVAL. Failure to remove these immediately can permanently damage the induction surface: Dry sugar, syrup, milk, tomato spills, melted plastic film or foil. | Remove these types of spills while the surface is hot using glass scraper. Remove pan and turn OFF the cooking zone. Wearing an oven mitt, hold scraper at 30° angle, using care not to gouge or scratch the glass. Push soil off the heated area. After the surface has cooled, remove the residue and apply a glass ceramic cooktop cleaner. |
| Burned-on food soil, dark streaks, and specks: Softener | by laying a damp paper towel or sponge on top of soil for 30 minutes. Use a plastic scrubber and glass ceramic cooktop cleaner. Rinse and dry. |
| Greasy spatters: Use a soapy sponge or cloth to remove grease; rinse thoroughly and dry. Apply glass ceramic cooktop cleaner. | |
| Metal marks: Iridescent stain | Pans with aluminum, copper or stainless steel bases may leave marks. Treat immediately after surface has cooled with glass ceramic cooktop cleaner. If this does not remove the marks, try a mild abrasive (Bon Ami®, Soft Scrub® without bleach) with a damp paper towel. Rinse and reapply glass ceramic cooktop cleaner. Failure to remove metal marks before the next heating makes removal very difficult. |
| Hard water spots: Hot cooking liquids dripped on surface | Minerals in some water can be transferred onto the surface and cause stains. Use undiluted white vinegar, rinse and dry. Recondition with glass ceramic cooktop cleaner. Remove boilovers and stains before using the cooktop again. |
| Surface scratches: Small scratches are common and do not affect cooking. They become smoother and less noticeable with daily use of the glass ceramic cooktop cleaner. | Apply glass ceramic cooktop cleaner before using to remove sand-like grains and grit such as salt and seasoning. Scratches can be reduced by using pans with bases that are smooth, clean, and dry before use. Avoid contact with surface by jewelry, wrist watches and metallic utensils. These can scratch the surface. DO NOT stack kitchen utensils or dishware on the Induction Module. |
| Control knobs: Wipe with warm soapy cloth, rinse and dry. | |
Before calling for service
Troubleshooting
When a malfunction occurs, it is often caused by something small. Please take into account the following notes and tips before calling customer service.
| Malfunction Solution | |
| The induction module is not working. | Check the circuit breaker. Check if the lights are working in any of the rooms to check for a power outage. Is the appliance connected and switched on? |
| The No Pot display indicator blinks and turns off. | The pan detection detects no cookware. Check whether the cookware is magnetic (use a magnet). Check whether the cookware has a sufficiently large diameter. |
| The cooking zone has turned OFF. Indicator light is blinking. | The cooking zone control knob has not been moved for a long time. The safety lock has been activated. Turn control knob to OFF. Turn cooking zone back on as usual. |
| The cooking zone has turned OFF. | After a power failure, the induction module remains off for over 25 seconds for safety reasons. Turn control knob to OFF. Turn cooking zone back on as usual. |
| Er and numbers/ d and numbers/ e and numbers | The electronic system is malfunctioning. Disconnect power by turning off the circuit breaker for the circuit the appliance is connected. Wait a few seconds and then turn the appliance back on. If the notification appears again, disconnect appliance from power by turning off the circuit breaker. Call customer service. |
| FB The induction module has been operating continuously for an extended period. The automatic safety function has been activated. See the section "Safety Shut-off". | |
| F2 The electronics have overheated and have switched off the induction module. Wait until the electronics have cooled down sufficiently. Then touch any symbol on the display panel. | |
| FS + heat setting and signal tone | There is hot cookware near the control panel. There is a risk that the electronics will overheat. Remove the cookware. The fault code will go out shortly afterwards. You can resume cooking. |
| FS + signal tone | There is hot cookware near the control panel. To protect the electronics, the induction module has been switched off. Remove the cookware and wait a few seconds. Touch any control. When the fault code on the display goes out, you can resume cooking. |
| F1/F6 | The induction module has overheated and has been switched off to protect your work surface. Wait until the electronics have cooled down sufficiently before switching the induction module on again. |
| E06 12 Knobs are not connected to the induction module. Contact customer service. | |
| F0/F9 | The device has an internal malfunction. Disconnect power by turning off the circuit breaker the appliance is connected. Wait a few seconds and then turn the appliance back on. If the notification appears again, disconnect appliance from power by turning off the circuit breaker. Call customer service. |
| F4 The control panel is too hot | and the cooking zone has turned off. Remove the pot from the cooking zone. Turn all control knobs to OFF. F4 goes out once the appliance has cooled down sufficiently. Set a new heat level if desired. If the malfunction persists, call customer service. |
| U1 The supply voltage is wrong. | Contact your power company. |
| U2/U3 | The induction surface is too hot and the cooking zone has turned OFF. Remove the pot from the cooking zone. Turn all control knobs to OFF. The error message goes out once the surface has cooled down sufficiently. Set a new heat level if desired. If the malfunction persists, call customer service. |
Normal operating noises
Induction technology is based on the creation of electromagnetic fields. They may generate heat directly on the bottom of the cookware. Pots and pans may cause a variety of noises or vibrations depending on the way they've been manufactured. These noises are described as follows:
Low humming (like a transformer)
This noise is produced when cooking at a high heat level. It is based on the amount of energy transferred from the cooking surface to the cookware. The noise ceases or quiets down when the heat level is reduced.
Quiet whistling
This noise is produced when the cooking vessel is empty. It ceases once water or food is placed in the vessel.
Crackling
This noise occurs with cookware comprised of various materials layered one upon the other. It is caused by the vibrations of the surfaces where different materials meet. The noise occurs on the cookware and can vary depending on the amount and method of preparation of the food.
Loud whistling
This noise occurs with cookware comprised of different materials layered one upon the other, and when they are additionally used at maximum output and also on two cooking zones. The noise ceases or quiets down when the heat level is reduced.
The noises described are a normal element of the described induction technology and should not be regarded as defects.
Causes of damage
Saucepan and pan bases
- Rough saucepan bases can scratch the induction surface. Check your cookware.
- Avoid boiling the pan dry, especially with enamel pans. This damages both the pan base and the induction surface.
- Observe the manufacturer's instructions when using special cookware.
Salt, sugar and sand
- Salt, sugar and sand can scratch the induction surface. DO NOT use the glass as a work surface or a storage area.
- Sugar and foods with a high sugar content can damage the Induction Module. Remove food spills immediately with a glass scraper.
Hard and pointed objects
- Hard or pointed objects can damage the induction surface if they fall on the surface. DO NOT store such objects over the appliance.
DO NOT operate this appliance if it is not working properly, or if it has been damaged. Contact an authorized servicer.
DO NOT cook on a broken surface. Cleaning solutions and spillovers may create a risk of electric shock.
DO NOT repair or replace any part of the appliance unless specifically recommended in this manual. Refer all servicing to a factory authorized servicer.
Examples of possible damage
The following types of damage have no effect on either the function or the integrity of the induction surface top.
Pitting
Pitting is caused by melted sugar or foods with a high sugar content.
Scratches
Scratches are caused by grains of salt, or sand, or by the rough bottom of a pan.
Discoloration with a metallic sheen
Discoloration is caused by pan abrasion or an unsuitable cleaning agent.
Dulled markings
Dulled marking are caused by an unsuitable cleaning agent.
Table des
MATIÈRES
6696 Financial Drive, Unit 3
Mississauga, ON L5N 7J6
Des questions?
1-800-735-4328
www.thermador.ca
Identification de pieces
Boutons de commande
5 Temoin MIN | MOY | MAX
m = 311
Arrêt de sécurité
1901 Main Street, Suite 600
Irvine, CA 92614
Preguntas?
1-800-735-4328
www.thermador.com
Esperamos oir de usted!
Thank you for being a Thermador customer!
Thermador is dedicated to supporting you and your appliance so you have many years of creative cooking. Please don't hesitate to contact us if you have any questions. We're happy to help you with cleaning and care instructions, cooking tips, accessories, troubleshooting, and more.
USA:
1-800-735-4328
thermador.com/customer-care
Canada:
1-800-735-4328
thermador.ca/support
Accessories and parts
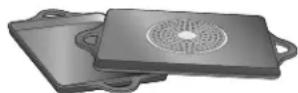
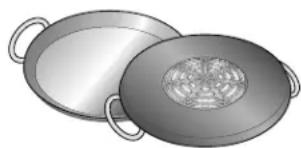
Filters, Thermador cleaners, teppanyaki pans, griddles, replacement parts, and more can be purchased in our online accessories store.
USA:
store.thermador.com/us
Canada:
Filters, parts and accessories can be purchased through our distributors.
Marcone: 1-800-287-1627
Reliable Parts: 1-800-663-6060
Soutien
thermador.ca/support
thermador.ca/support