FTM6716 - Treadmills Powerpeak - Free user manual and instructions
Find the device manual for free FTM6716 Powerpeak in PDF.
| Product type | Electric treadmill |
| Brand | Powerpeak |
| Model | FTM6716 |
| Usage | Home |
| Maximum user weight | 110 kg |
| Power supply | 220-240 V~, 50 Hz |
| Rated power | 750 W |
| Speed | 0.8 - 16.0 km/h |
| Incline | Adjustable by levels (1-12 depending on program) |
| Display | Speed, time, distance, calories, incline, pulse |
| Training programs | 1 manual, 12 preset, 1 body fat, 3 countdown |
| Safety functions | Safety magnet with clip, emergency stop, lock |
| Folding | Yes, with transport wheels |
| Lubrication | Recommended according to usage frequency (every 3 to 12 months) |
| Cleaning | Soft damp cloth, avoid abrasives |
| Warranty | 24 months |
| Customer service | Powerpeak, Thermiekstraat 1a, 6361 HB Nuth, Netherlands |
Frequently Asked Questions - FTM6716 Powerpeak
User questions about FTM6716 Powerpeak
0 question about this device. Answer the ones you know or ask your own.
Ask a new question about this device
Download the instructions for your Treadmills in PDF format for free! Find your manual FTM6716 - Powerpeak and take your electronic device back in hand. On this page are published all the documents necessary for the use of your device. FTM6716 by Powerpeak.
USER MANUAL FTM6716 Powerpeak
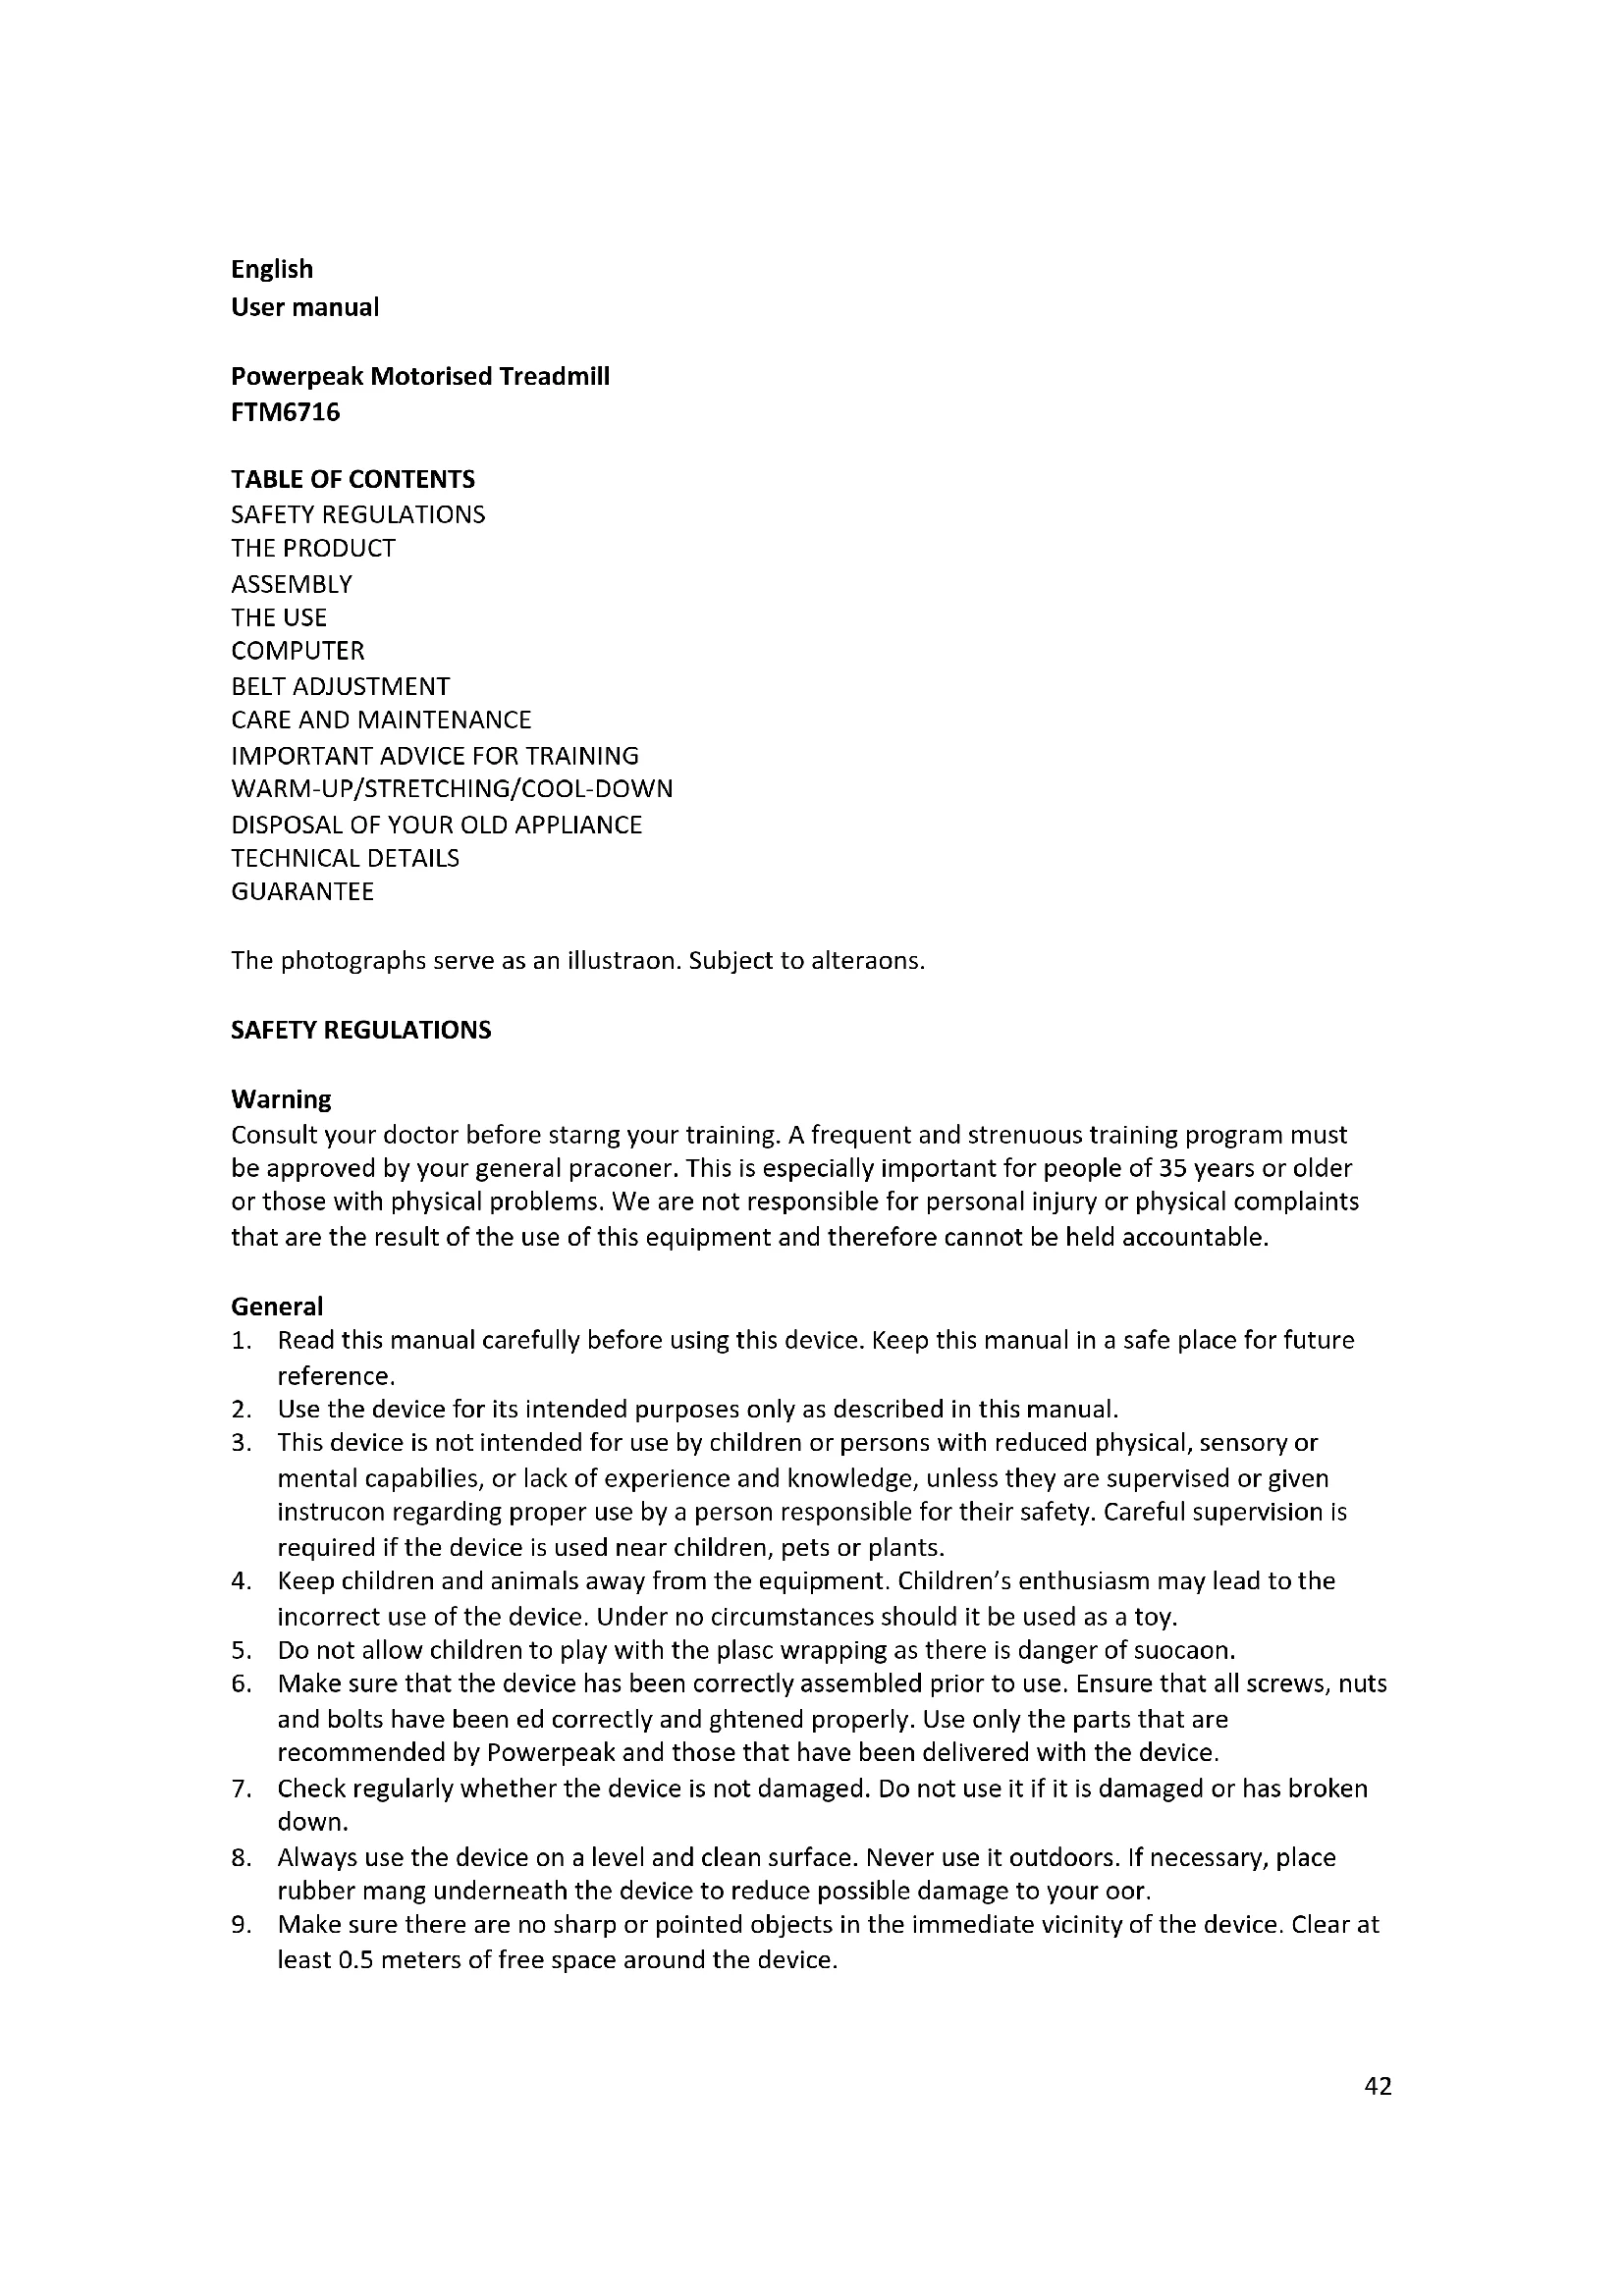
Powerpeak motorized treadmill
natural_image
Line drawing of a treadmill with adjustable arms and legs, no text or symbols presentFTM6716
07/14
Gebruiksaanwijzing
Bedienungsanleitung
Manual
Mode d'employ
Inhoud
Nederlands 3
Deutsch....22
English 42
Français....59
Nederlands
Gebruiksaanwijzing
Powerpeak Motorised Treadmill FTM6716
INHOUDSOPGAVE
VEILIGHEIDSVOORSCHRIFTEN
HET PRODUCT
MONTAGE
HET GEBRUIK
COMPUTERBEVELEN
BAND INSTELLING
VERZORGING EN ONDERHOUD
BELANGRIJK TRAININGSADVIES
OPWARMEN/STREKKEN/AFKOELEN
UW OUDE APPARAAT WEGDOEN
TECHNISCHE GEGEVENS
GARANTIEBEWIJS
text_image
Technical diagram of a treadmill with labeled parts and directional arrows indicating motion or movement.natural_image
Line drawing of a treadmill with adjustable arms and a control panel, showing motion direction (no text or symbols)natural_image
Technical line drawing of a mechanical lifting device (no text or symbols)text_image
WARNING: To reduce risk of serious Injury stand on foot rails before starting this treadmill, read the user's manual and the warnings before use. Keep children every. INCLINE 3 6 9 PROG SPEED STOP MODE IMPORTANT incline must be set at lowest level before folding treadmill into storage position 1 2 3 4 5 6 7 8 9 10 11 12 13 14 15 16 17 18 19 20 21 22 23 24 25 26 27 28 29 30 31 32 33 34 35 36 37 38 39 40 41 42 43 44 45 46 47 48 49 50 51 52 53 54 55 56 57 58 59 60 61 62 63 64 65 66 67 68 69 70 71 72 73 74 75 76 77 78 79 80START
Normaal starten na 5 seconden aellen
PROGRAMMA
natural_image
Simple line drawing of a mechanical clamp or spring assembly with two curved arrows indicating rotation (no text or symbols)natural_image
Simple line drawing of a mechanical device with a rotating arrow indicating rotation (no text or symbols)natural_image
Diagram of a robotic arm with a curved arrow indicating rotation (no text or symbols)OPWARMEN/STREKKEN/AFKOELEN
UW OUDE APPARAAT WEGDOEN
Powerpeak Motorised Treadmill FTM6716
INHALTSVERZEICHNIS
natural_image
Technical line drawing of a mechanical lifting device (no text or symbols)text_image
WARNING: To reduce risk of serious Injury stand on foot rails before starting this treadmill, read the user's manual and the warnings before use. Keep children away. IMPORTANT incline must be set at lowest level before folding treadmill into storage position INCLINE SPEED + 3 6 9 START STOP 9 6 3 PROG MODE -START
natural_image
Simple line drawing of a mechanical device with a curved arrow indicating rotation (no text or symbols)natural_image
Simple line drawing of a robotic arm with a curved handle and a small circular symbol (no text or labels)Powerpeak Motorised Treadmill FTM6716
TABLE OF CONTENTS
SAFETY REGULATIONS
THE PRODUCT
ASSEMBLY
THE USE
COMPUTER
BELT ADJUSTMENT
CARE AND MAINTENANCE
IMPORTANT ADVICE FOR TRAINING
WARM-UP/STRETCHING/COOL-DOWN
DISPOSAL OF YOUR OLD APPLIANCE
TECHNICAL DETAILS
GUARANTEE
The photographs serve as an illustraon. Subject to alteraons.
SAFETY REGULATIONS
Warning
Consult your doctor before staring your training. A frequent and strenuous training program must be approved by your general praconer. This is especially important for people of 35 years or older or those with physical problems. We are not responsible for personal injury or physical complaints that are the result of the use of this equipment and therefore cannot be held accountable.
General
-
Read this manual carefully before using this device. Keep this manual in a safe place for future reference.
-
Use the device for its intended purposes only as described in this manual.
-
This device is not intended for use by children or persons with reduced physical, sensory or mental capabilities, or lack of experience and knowledge, unless they are supervised or given instrucon regarding proper use by a person responsible for their safety. Careful supervision is required if the device is used near children, pets or plants.
-
Keep children and animals away from the equipment. Children's enthusiasm may lead to the incorrect use of the device. Under no circumstances should it be used as a toy.
-
Do not allow children to play with the plasc wrapping as there is danger of suocaon.
-
Make sure that the device has been correctly assembled prior to use. Ensure that all screws, nuts and bolts have been ed correctly and ghtened properly. Use only the parts that are recommended by Powerpeak and those that have been delivered with the device.
-
Check regularly whether the device is not damaged. Do not use it if it is damaged or has broken down.
-
Always use the device on a level and clean surface. Never use it outdoors. If necessary, place rubber mang underneath the device to reduce possible damage to your oor.
-
Make sure there are no sharp or pointed objects in the immediate vicinity of the device. Clear at least 0.5 meters of free space around the device.
-
Always wear safe and comfortable clothing when you are using tness equipment. Preferably wear sport shoes or aerobic footwear.
- In the event you feel faint of suer other discomfort, stop using the device immediately. You also need to stop when you experience pain or pressure in your joints. Dizziness is a sign that you worked out excessively. If you feel dizzy, stretch out on the oor and do not try to get back on your feet until the dizziness has disappeared.
- Keep the device away from re and hot surfaces.
- The device must have come to a complete standsll before stepping down.
- Make sure there is never more than one person using the device at the same me.
- Always store the device indoors.
- This device is only intended for domesc use, NOT for commercial use.
- The maximum permissible weight on this equipment is 110 KG.
Aenon
To reduce the risk of electric shock, burns, re or other injury, please read the following precautions and informaon before operang this treadmill.
- Never switch the treadmill on while someone is standing on the running surface.
• Always hold the handrails when using the treadmill. - The treadmill is capable of high speeds. To avoid sudden jumps in speed, adjust the speed in small increments.
- Do not operate where aerosol (spray) products are being used or where oxygen is being administered.
- Never leave the treadmill unaended while it is running. Always remove the safety key and move the on/o switch to the OFF posion when the treadmill is not in use.
- When folding or moving the treadmill, make sure that the safety lock is fully engaged.
- Always unplug the power cord before performing the maintenance and adjustment procedures described in this manual. Do not remove the motor cover unless instructed to do so by an authorized service representave. Servicing other than the procedures in this manual should be performed by an authorized service representave only.
- Keep the plug and power cord away from hot surfaces.
- To disconnect, turn the power switch to the OFF posion before removing the power plug from the wall socket.
- Keep all electrical components, such as the motor, power cord and on/o switch away from water or other liquids to prevent shock. Do not place anything on the handrail, computer console or belt. Never place liquids on any parts of the unit.
- Always insert the safety key and each the clip to your clothing at your waist before starng your workout. If you encounter problems and need to stop the motor quickly, simply pull the cord to disengage the safety key from the console. To get o the treadmill, wait unl the belt has stopped moving, then step onto the side plaorms and on to the oor. To connue operaon simply reinsert the safety key into the console.
- Keep all loose clothing and towels away from the running surface. Do not wear loose clothing and e back long hair. The belt will not stop immediately if an object becomes caught in the rollers or belt. Should an object become caught, turn the unit o immediately.
- Proceed with cauon when geng on or o the treadmill. Use the handrails whenever possible. Only step onto the running surface when it is running at a very slow speed. Do not step o the treadmill while the belt is moving.
- To get on or o the running surface, straddle the running surface by standing on the right and le plasc plaorms on each side of the belt.
- Never aempt to turn around while on the treadmill with the belt running. Keep your head and body facing forward at all mes.
- Do not rock the treadmill, stand on the handrails or computer console at any me.
• To reduce the risk of personal injury, there must be sucient space behind the treadmill.
- This device requires a regular check-up to prevent physical injury. This means that bolts and nuts should be frequently checked for cracks and sharp edges etc.
- Defective components must be replaced immediately. If this is not possible, the device must be put out of order until the necessary repairs have been made.
Electrical safety
This motorised treadmill must be grounded. Should it break or malfuncon, grounding reduces the risk of shock. The treadmill is equipped with a power cord with grounding conductor and an earth conncon in the plug. The plug must be inserted into an appropriate outlet that is properly installed and grounded in accordance with all local codes and ordinance.
Important
There is risk of electric shock if the grounding conductor is not properly connected. If you doubt whether this treadmill is earthed in the correct manner, please contact our service department. Do not change the power cord or plug.
THE PRODUCT
If you open the carton, you will nd the spare parts below.
Treadmill 1 SET | D25 Knob M10 2PC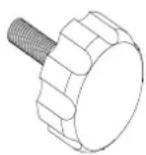 | D26 Knob M8 2PC |
C2 Safety key 1PC | D29 Allen wrench 1PC | B24 Silicon oil 1PC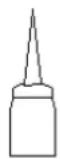 |
B23 Bole 2PCS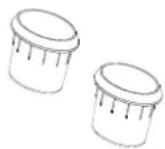 |
Step 1: Open the carton and take out all the parts. Place the main frame on the oor.
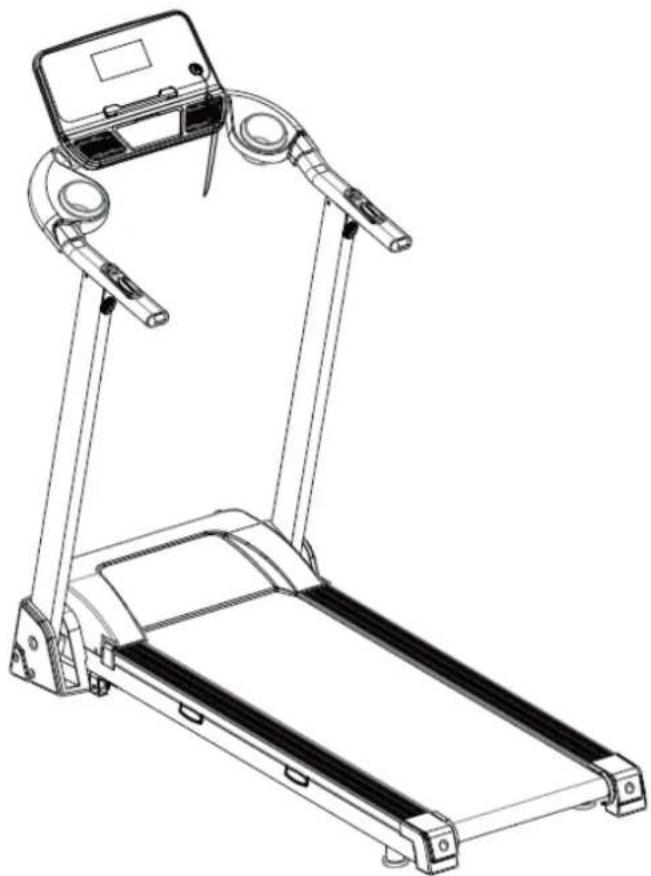
Step 2: Turn up the upright tube, then lock the lower side of the treadmill with Knob M10 (D25) as below picture show.
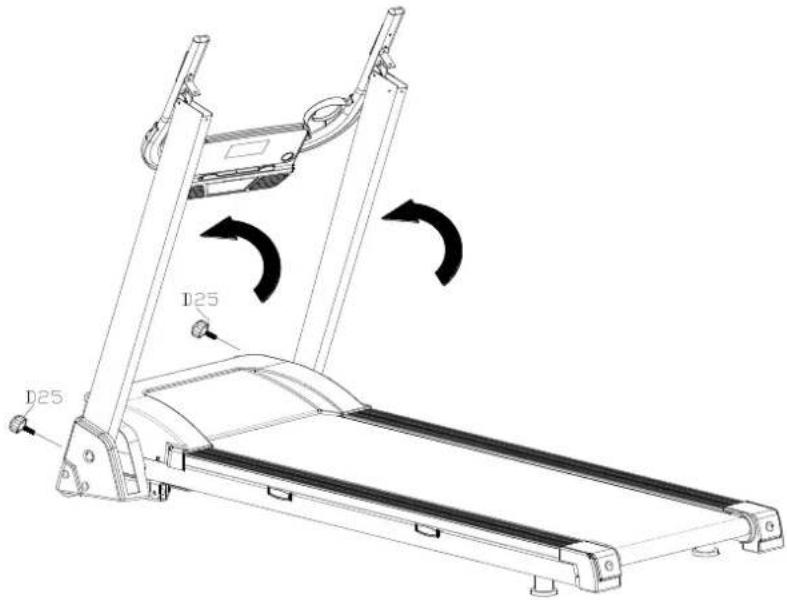
text_image
125 D25Step 3: Lock the upper side of the treadmill with Knob M8 (D26), and then turn up the computer as below picture show.
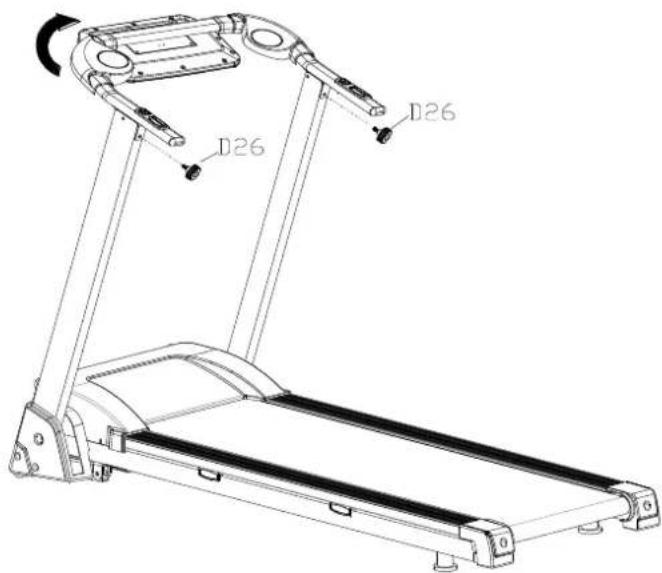
text_image
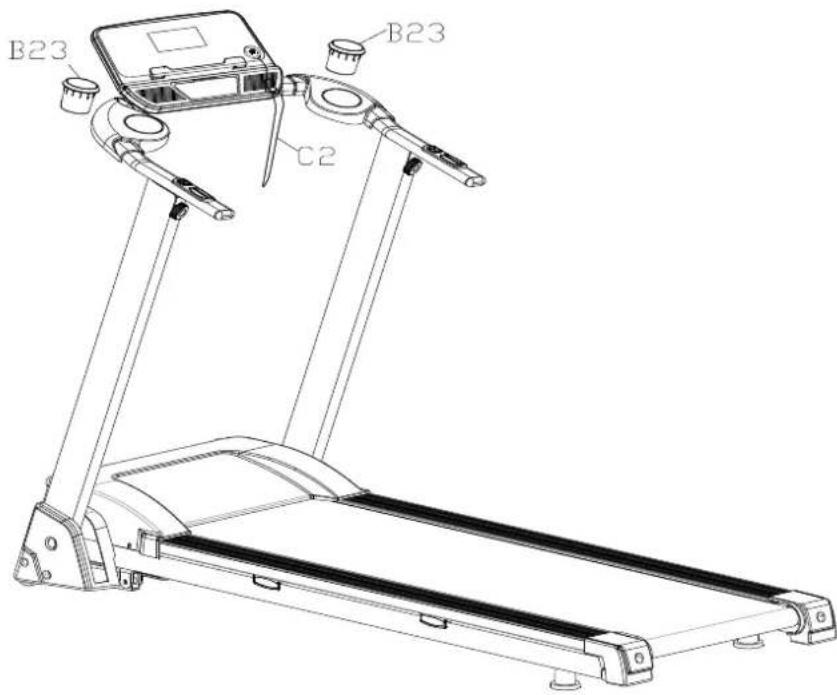
D26 D26Step 4: Put on the Bole (B23) and Safety key (C2).
text_image
B23 C2 B23ATTENTION: Must conrm complete assembly as the required above and lock all bolts. Do the following operaons aer checking everything is OK. Before you use the treadmill, please read the instrucons carefully.
The use
Folding and unfolding
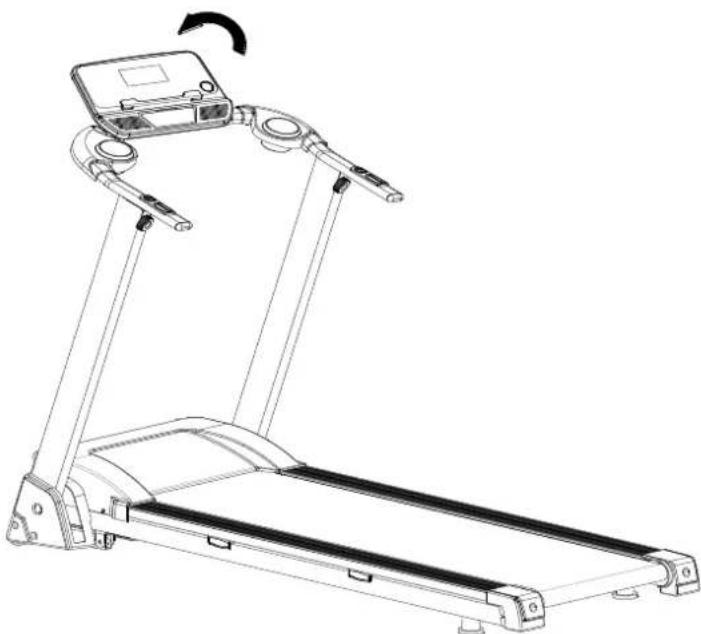
Step 1: Turn the computer to the back as below picture show.
natural_image
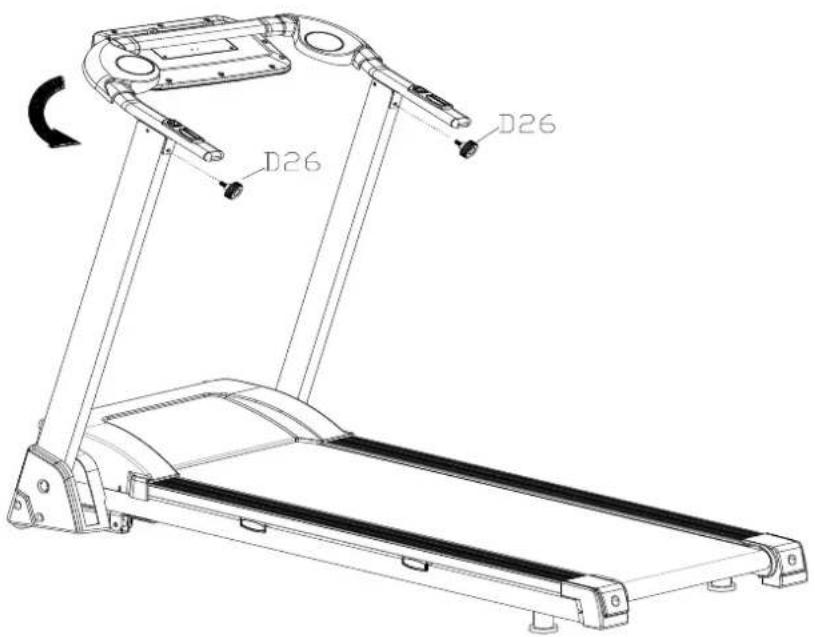
Line drawing of a treadmill with adjustable arms and a digital display unit, showing motion arrows (no text or symbols)Step 2: Screw up the Knob M8(26), then turn the handrail tube to the down.
text_image
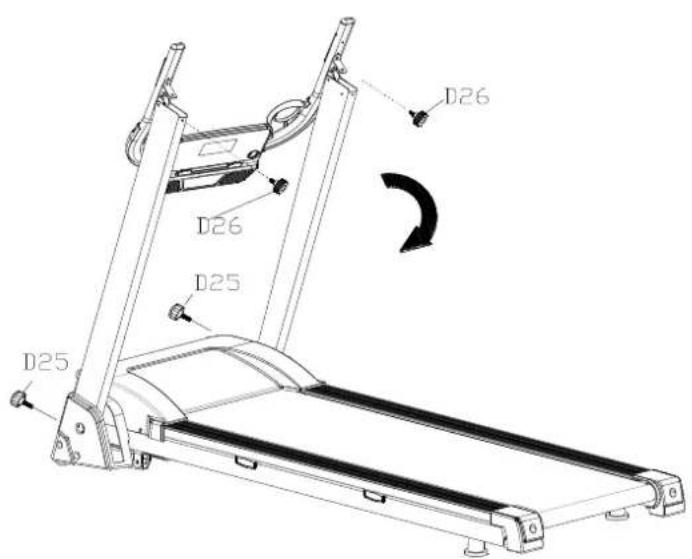
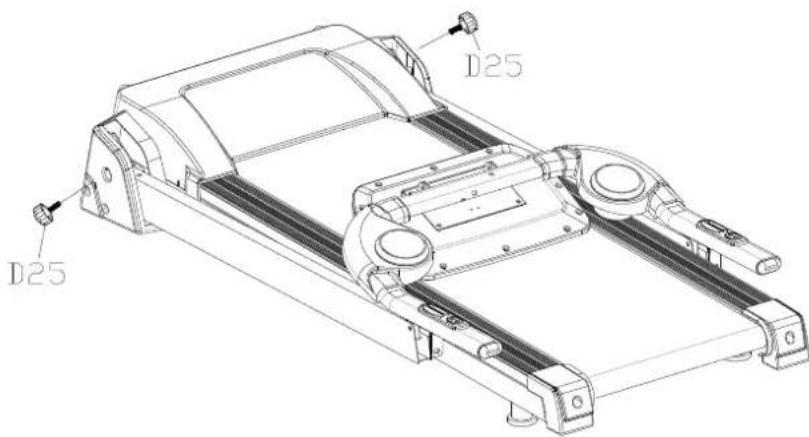
D26 D26Step 3: Lock the Knob M8(D26) on the upright tube, and screw the Knob M10(D25) out, and then fold the upright tube to the down.
text_image
D26 D26 D25 D25Step 4: Lock the Knob M10 (D25) on the Front cover.
text_image
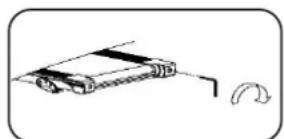
D25 D25Step 5: Li up the folded treadmill as below picture show.

natural_image
Technical line drawing of a mechanical lifting device (no text or symbols)This product must be grounded. If it should malfuncon or breakdown, grounding provides a path of least resistance for electric current to reduce the risk of electric shock. This product is equipped with a cord having an equipment-grounding conductor and a grounding plug. The plug must be plugged into an appropriate outlet that is properly installed and grounded in accordance with all local codes and ordinances.
DANGER: Improper conncon of the equipment-grounding conductor can result in a risk of electric shock. Check with a qualified electrician or serviceman if you are in doubt as to whether the product is properly grounded. Do not modify the plug provided with the product – if it will not t the outlet, Please nd a proper outlet installed by a qualified electrician.
This product is for use on a nominal 220V circuit and has a grounding plug. Make that the product is connected to an outlet having the same conguraon as the plug. No adapter should be used with this product.
COMPUTER
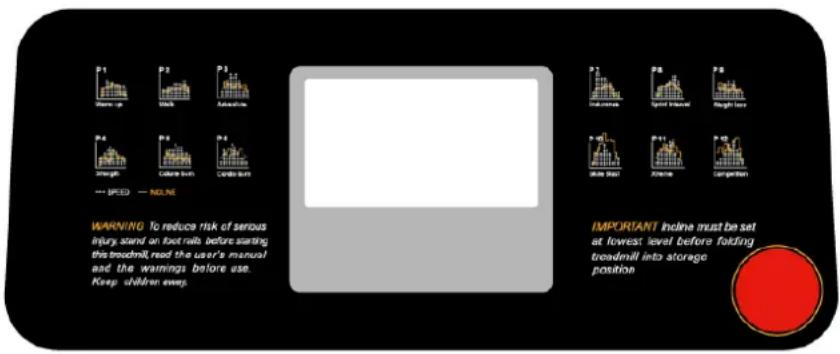
text_image
P1 Wear-up P2 Walk P3 Adequate P4 Strength P5 Cable touch P6 Cable touch P7 INDUSTRAL P8 Speed Interval P9 Rough leave P10 Wear lost P11 Adequate P12 Correlation WARNING: To reduce risk of serious injury stand on foot rails before starting this treadmill, read the user's manual and the warnings before use. Keep children every. IMPORTANT Incline must be set at lowest level before folding treadmill into storage position
text_image
INCLINE 3 6 9 START STOP 9 6 3 PROG MODE -START
Normal start aer 5 seconds countdown
PROGRAM
1 manual mode, 12 pre-set programs, 1 body fat program, 3 countdown funcon and 3 users
SAFETY LOCK FUNCTION
The window shows"----" when take away the safety key and the treadmill will stop quickly with "didi" alarm noise. And put the safety lock on, the computer will display for 2 seconds and the date count down to "0"
BUTTON FUNCTION
START/STOP
"START"--When the treadmill is not running, press this buon to start, speed is "0.8".
"STOP"--When the treadmill is running, press this buon to stop, then set program default and then return to manual mode aer stopped.
"PROGRAM" BUTTON
When the treadmill is not running, press this buon can circle choose from manual mode to pre-set mode P1-P12 and body fat;
"MODE" BUTTON
When the treadmill is not running, press this buon to choose countdown
modes:"H-1","H-2","H-3";:H-1" is the me countdown mode, and "H-2" is the distance countdown mode, "H-3" is the calorie countdown mode; press the "SPEED+/-" or "INCLINE+/-"buon to adjust the data. Aer that, press the "START" buon to start this treadmill
"SPEED +/- "BUTTON
SPEED +/- --Adjust speed when treadmill start, the increment is 0.1km/me in kilometer. Press the buon more than 2 seconds, and it will be up or down automatically.
SPEED QUICK BUTTON
Press the speed quick buon 3km/h, 6km/h, 9km/h to adjust the speed directly when the treadmill
is running
"INCLINE+/-" BUTTON
INCLINE +/- --Adjust incline when treadmill start; the increment is 1 level/me. Press the buon more than 2 seconds, and it will be up or down automacally
INCLINE QUICK BUTTON
Press the incline quick buon 3 , 6 , 9 to adjust the incline directly when the treadmill is running
DISPLAY FUNCTION
SPEED
Display running speed
TIME
Display the running me or countdown me
DISTANCE
Display the running total distance or distance countdown.
CALORIE
Display the calorie or calorie countdown
INCLINE
Display the incline
PULSE
Display pulse data
ALL WINDOW DISPLAY DATA RANGE
TIME : 0:00 - 99.59(MIN)
DISTANCE: 0.00 - 99.9(KM)
CALORIES: 0.0 - 999 (C)
SPEED: 0.8-16.0(km/h)
PULSE: 50 - 200 (BPM)
INCLINE : 0 - 12
PULSE FUNCTION
When the treadmill is running, hold the hand pulse about 5 seconds, it will display pulse data. The pulse data range is 50-200 mes/minute. It has heart-shaped graphics when tesng pulse. This data is only for reference, cannot be as medical data.
PROGRAM EXERCISE CHART
| TIME INTERVALPROG | SET TIME/10=EVERY GRADE TIME | ||||||||||
| 1 | 2 | 3 | 4 | 5 | 6 | 7 | 8 | 9 | 10 | ||
| P1 | SPEED | 3 | 3 | 6 | 5 | 5 | 4 | 4 | 4 | 4 | 3 |
| INCLINE | 0 | 3 | 3 | 3 | 4 | 4 | 4 | 1 | 1 | 0 | |
| P2 | SPEED | 3 | 3 | 4 | 4 | 5 | 5 | 5 | 6 | 6 | 4 |
| INCLINE | 2 | 2 | 2 | 3 | 3 | 3 | 3 | 4 | 4 | 2 | |
| P3 | SPEED | 2 | 4 | 6 | 8 | 7 | 8 | 6 | 2 | 3 | 2 |
| INCLINE | 3 | 5 | 4 | 4 | 3 | 4 | 4 | 3 | 4 | 2 | |
| P4 | SPEED | 3 | 3 | 5 | 6 | 7 | 6 | 5 | 4 | 3 | 3 |
| INCLINE | 0 | 3 | 3 | 2 | 2 | 5 | 5 | 3 | 3 | 2 | |
| P5 | SPEED | 3 | 6 | 6 | 6 | 8 | 7 | 7 | 5 | 5 | 4 |
| INCLINE | 3 | 5 | 3 | 4 | 2 | 3 | 4 | 2 | 3 | 2 | |
| P6 | SPEED | 2 | 6 | 5 | 4 | 8 | 7 | 5 | 3 | 3 | 2 |
| INCLINE | 3 | 4 | 5 | 6 | 3 | 5 | 5 | 6 | 4 | 3 | |
| P7 | SPEED | 2 | 9 | 9 | 7 | 7 | 6 | 5 | 3 | 2 | 2 |
| INCLINE | 0 | 3 | 3 | 3 | 4 | 4 | 4 | 1 | 1 | 0 | |
| P8 | SPEED | 2 | 4 | 4 | 4 | 5 | 6 | 8 | 8 | 6 | 2 |
| INCLINE | 1 | 1 | 4 | 4 | 4 | 5 | 5 | 4 | 3 | 2 | |
| P9 | SPEED | 2 | 4 | 5 | 5 | 6 | 5 | 6 | 3 | 3 | 2 |
| INCLINE | 3 | 5 | 3 | 4 | 2 | 3 | 4 | 2 | 3 | 2 | |
| P10 | SPEED | 2 | 5 | 7 | 5 | 8 | 6 | 5 | 2 | 4 | 3 |
| INCLINE | 1 | 5 | 6 | 8 | 12 | 9 | 10 | 9 | 5 | 3 | |
| P11 | SPEED | 2 | 5 | 6 | 7 | 8 | 9 | 10 | 5 | 3 | 2 |
| INCLINE | 3 | 5 | 6 | 8 | 6 | 5 | 8 | 7 | 5 | 2 | |
| P12 | SPEED | 2 | 3 | 5 | 6 | 8 | 6 | 9 | 6 | 5 | 3 |
| INCLINE | 5 | 7 | 5 | 8 | 6 | 5 | 9 | 10 | 6 | 2 | |
Manual model operaon
Press start key, me count down 5 seconds, then treadmill will start to work with initial speed 0.8km/h
Press speed +/- to adjust the speed
Press incline+/- to adjust the incline
Press stop, to stop treadmill at working state
Press quick speed key, to quickly adjust the speed you want
Press quick incline key, to quickly adjust the incline you want
COUNTDOWN FUNCTION PARAMETER DATA
Countdown me initial seng 30 : 00 minutes, seng range 5 : 00---99 : 00 minutes, each step 1:00.
Countdown calorie initial seng 50KJ, seng range 10---990 term, each step 10.
Countdown distance initial seng 1.0km, seng range 0.5---99.9 km, each step 0.1
Cycle switch order is: manual, me, distance, calories.
BODY TESTER (FAT)
At the beginning state, press “PROGRAM” connually to enter “FAT” body fat test, window display “FAT”. Press “MODE” to enter (F1 SEX, F2 AGE, F3 HEIGHT, F4 WEIGHT). Press “SPEED+”, “SPEED-” to set. Aer seng, the computer will display F5 and grasp the hand pulse, the window will display your body quality index.
The body quality index is to test the relaon between height and weight not the body scale.
The body FAT suits for any male and female to adjust the weight according together with other body quality index. The ideal FAT should be between 20-25, if under 19, it means too thin. If between 25 and 29, it means overweight, if over 30, it means obesity. (The data is just for reference and cannot be as medicinal data)
01 Sex 01 Male 02 Female
02 Age 10----99
03 Height 100----200
04 Weight 20----150
05 FAT ≤19 Under weight
FAT = (20---25) Normal weight
FAT = (25---29) Over weight
FAT ≥30 Obesity
OTHERS
The system will enter into power saving mode automacally if there is no any acon within 10 minutes under IDLE MODE and there is no display and backlit on the computer. Press any key to resume the system.
Countdown me, countdown calorie and countdown distance, you just can set one of them at one me, press last item to set running, the seng parameter is countdown, others display normal data.
BELT ADJUSTMENT
You may need to adjust the running belt during the rst few weeks of use. All running belts are properly set at the factory. It may stretch or be o centre aer use. Stretching is normal during the break-in period.
Adjusng the belt tension
If the running belt feels as though it is slipping or hesitang when you place your foot on it during a run, the tension on the running belt may have to be increased. To increase the running belt tension:
- Start the treadmill without anyone on the running belt, press SPEED+ buon unl speed reaches between 5 and 6 km/h.
- Place a wrench on the le adjustment screw. Turn the wrench clockwise 1/4 turn to draw the rear roller and increase the belt tension.
- Repeat step 2 for the right adjustment screw. You must be sure to turn both bolts the same number of turns, so the rear roller will remain square relave to the frame.
- Repeat step 2 and step 3 unl the slipping is eliminated.
Note: be careful not to ghten the running belt tension too much as you can create excessive pressure on the front and rear roller bearings. An excessively ghtened running belt may damage the roller bearings resulting in bearing noise from the front and rear rollers.
natural_image
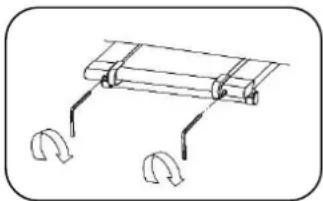
Simple line drawing of a mechanical clamp or spring assembly with two curved hooks (no text or symbols)Centering the running belt
When you run, you may place more pressure on the belt with one foot than with another. The severity of this deecon depends on the amount of force that one foot exerts in relaon to the other. This deecon can cause the belt to move o-centre. This deecon is normal and the running belt will centre when nobody is on the running belt.
If the running belt remains consistently o-centre, you will need to centre the running belt manually:
- Place the device on a level surface.
- Start the treadmill without anyone on the running belt, press SPEED+ buon unl speed reaches 5,6 km/h.
- Observe whether the running belt is toward the right or left side of the deck.
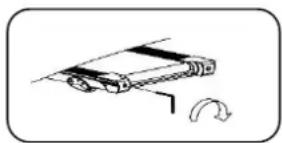
a. If toward the le side of the deck:
Turn the le adjustment screw clockwise 1/2 turn, and the right adjustment bolt counter clockwise 1/2 turn.
natural_image
Simple line drawing of a mechanical device with a curved arrow indicating rotation (no text or symbols)b. If toward the right side of the deck:
Turn the right adjustment screw clockwise 1/2 turn, and the le adjustment bolt counter clockwise 1/2 turn.
natural_image
Simple line drawing of a robotic arm with a curved arrow indicating rotation (no text or symbols)c. If the belt is sll not centered, repeat the above steps unl the running belt is centered.
- Aer the belt is centered, increase the speed and verify that it is running smoothly. Repeat the above steps if it is necessary. If the above procedure is not successful in resolving the problem, you may need to increase the belt tension.
CARE AND MAINTENANCE
Note: to prevent electrical shock, you need to make sure the treadmill is switched o and the plug removed from the socket, before you start cleaning the device or before you perform regular maintenance.
Treadmill and running belt lubrication
To achieve maximum life span this treadmill needs regular lubrication, as part of the general maintenance program. This will prevent premature wear and tear of treadmill, running belt and motor.
Aenon: Do not lubricate the belt itself, lubrication only at the rollers of the belt
| Use | Oil |
| Less than 3 hours a week | Annually |
| 3 – 5 hours a week | Every 6 months |
| More than 5 hours a week | Every 3 months |
Cleaning
Wipe the console and other surfaces to remove sweat residues. The device should be cleaned once a week with a clean so and damp cloth. To avoid damage to the computer, do not use any liquids.
When you remove the covers from the device for the lubrication, we suggest you make this part of the device dust free too.
Note: do not use any abrasive or solvent cleaners to clean the device.
Storage
Ensure the power switch is o and the unit unplugged from the electrical wall socket. Store the treadmill in a clean and dry environment. You should avoid storage in excessively cold or damp places as this may lead to corrosion and other related problems.
Moving
This treadmill has been designed and equipped with wheels for easy mobility. Before moving, ensure the power switch is in the o posion and the unit is unplugged.
IMPORTANT ADVICE FOR TRAINING
- Before you start the training, consult your doctor. Ask what kind of training is suitable for you. Wrong or excessive training can cause health defects.
- Avoid over exercising. Do not train if you are red or feeling faint. If you are not used to physical acvity, start the training slowly at the beginning.
- Stop exercising immediately if you feel pain or any other troubles.
- Pay aenon to your breathing during training.
- To avoid injuries, begin the training with an extensive warm up and nish it with a cool-down phase. Use the exercises described in this manual.
- Make sure you drink enough liquids during training. Keep in mind that the recommended amount of 2 litres might increase during physical workout.
- Use the product only with sport clothes and suitable shoes, which are equipped with non-slip soles. Avoid wide clothes, because they can get caught in moving parts of the product.
WARM-UP/STRETCHING/COOL-DOWN
A successful exercise session begins with warming up exercises and ends with exercises for cooling down and relaxing. These warming up exercises prepare your body for the subsequent demands made upon it. The cooling down/relaxaon period aer the exercise session ensures that you do not experience any muscular problems. Please pay aenon to the following points:
- Carefully warm up every muscle group you will be using in the exercise session for about 5 to 10 minutes. The stretching exercises are carried out correctly if you feel a comfortable tension in the corresponding muscle.
- Speed does not play a role during the stretching exercises. Fast and jerky movements must be avoided.
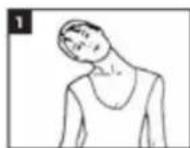
Neck exercises (1)
Tilt your head to the right and feel the tension in your neck. Slowly drop your head down to your chest in a semi-circle and then turn your head to the le. You will feel a comfortable tension in your neck again. You can repeat this exercise alternately several mes.
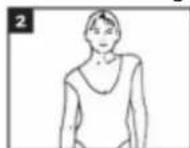
Exercises for the shoulder area (2)
Li the le and right shoulders alternately, or li both shoulders simultaneously
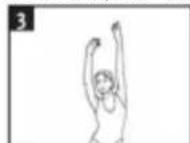
Arm stretching exercises (3)
Stretch the le and right arms alternately towards the ceiling. Feel the tension in the le and right sides of your body. Repeat this exercise several mes.
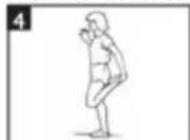
Exercises for the upper thigh (4)
Support yourself by placing your hand on the wall, then reach down behind you and li up your right or le foot as close to your buocks as possible. Feel a comfortable tension in your front upper thigh. Maintain this posion for 30 seconds if possible and repeat this exercise 2 mes for each leg.
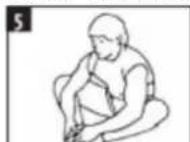
Inside upper thigh (5)
Sit on the oor and place your feet in such a way that your knees are facing outwards. Pull your feet as close as possible to your groin. Now press your knees carefully downwards. Maintain this posion for 30-40 seconds if possible.
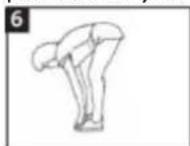
Touch toes (6)
Bend your trunk slowly forwards and try to touch your feet with your hands. Reach down as far as possible to your toes. Maintain this posion for 20-30 seconds if possible.
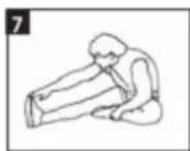
Exercises for the knees (7)
Sit on the oor and stretch out your right leg. Bend your le leg and place your foot on your right upper thigh. Now try to reach your right foot with your right arm. Maintain this posion for 30-40 seconds if possible.
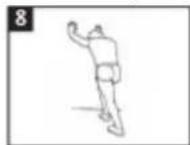
Exercises for the calves achilles tendon (8)
Place both your hands on the wall and support your full body weight. Then move your le and right leg alternately backwards. This stretches the back part of the leg. Maintain this posion for 30-40 seconds if possible.
DISPOSAL OF YOUR OLD APPLIANCE
- When this crossed-out wheeled bin symbol is aached to a product it means the product is covered by the European Directive 2002/96/EC.
- All electrical and electronic products should be disposed of separately from the municipal waste stream via designated collecon facilities appointed by the government or the local authorities.
- The correct disposal of your old appliance will help prevent potential negative consequences for the environment and human health.
- For more detailed information about disposal of your appliance, please contact your city oce, waste disposal service or the shop where you purchased the product.
| Fault Code | Fault Descripon | Fault Processing |
| E1 | Communicaton abnormal: The control and computer has abnormal communicaon aer start | The controller is not working and going into fault. The machine cannot run, the computer shows fault code “E1”, and the buzzer will ring three mes.Possible Reasons: Communicaon obstructed between controller and computer, please check the wire and make sure the wire connects well and the wire without any damage.. |
| E2 | No Speed Wireless Sensor Network: Can’t receive the motor speed sensor feedback above three seconds. | Stop and go into fault status, computer buzzer will ring 3 tones and shows fault code“E2”. Other areas show blank. Aer 10 seconds will go into ready mode, and can restart.Possible Reasons: Can’t receive the motor speed sensor feedback above three seconds, please check sensor plug and motor connect wire and the controller. |
| E3 | The motor wire is not connecng well | top and go into fault status, computer buzzer will ring 3 tones and shows fault code“E3”. Other areas show blank. Aer 10 seconds will go into ready mode, and can restart.Possible Reasons: Check if the motor wire is connected well and re-connect the motor wire well if not; check ifthe controller has the smell and change the controller if have |
| Current overloadProtecon, the motor electrical is overload | Stop and go into fault status, computer buzzer will ring 3 tones and shows fault code“E3”. Other areas show blank. Aer 10 seconds will go into ready mode, and can restart.Possible Reasons: Over the rated load cause too much electricity that make system Self-preservaon or some parts blocked and make DC motor can’t process. Adjust the machine and restart. Another please check the DC motor or controller have any burned smell or not. If yes, please change the motor or controller. Another make sure the power and voltage is comply with standard. | |
| E4 | Incline self-learning fault | Check incline motor sense wire and AC wire are inserted well; AC wire is right inserted according to the indeny in the incline motor; make sure the incline motor wire without damager; aer check those, press the buon on controller, then start self-learning again. |
| E5 | Incline sensor error | Check incline motor sense wire and AC wire are inserted well; AC wire is right inserted according to the indeny in the incline motor; make sure the incline motor wire without damager; aer check those, press the buon on controller, then start self-learning again. |
| E6 | Explosion-Proof Protecon: Some unusual condion of power or voltage that cause damage to the motor drive circuit. | Stop and go into fault status, computer buzzle will ring 3 tones and shows fault code“E6”. Other areas show blank. If recover then go into ready mode, then can restart.Possible Reasons: The power voltage is less than normal or the controller has some problems. Make sure the motor wire is connecng well. |
| E7 | The upper EEPROM is recorded faulty | Change upper EEPROM |
| E8 | The lower EEPROM is recorded faulty | Change lower EEPROM |
Remark: Aer replacing lower controller and replacing the parts for E5/E6 issue, please follow steps below to re-calibrate the machine
1.1 Press PROG and SPE+ KEY at the same me and POWER UP or reset SAFETY KEY entry. Aer entry, LCD will run display tesng, all segment will lights up to show according.
1.2 If press START KEY, the computer will take the default data to calibrate and save into EEPROM.
1.3 Press MODE to entry unit seng mode
1.4 Press MODE to entry the seng mode of WHEEL SIZE
1.5 Press MODE to entry the seng mode of MIN SPEED
1.6 Press MODE to entry the seng mode of MAX SPEED
1.7 Press MODE to entry the seng mode of MAX ELEVATION
1.8 Press START KEY to entry SPEED CALIBRATE, It will show "CAL" in the window of SPEED in sprinkle. Aer calibrate will back to IDLE MODE automacally.
You can start to use your treadmill aer the calibraon test be done
GUARANTEE
This warranty covers your unit for a period of 24 months from the date of purchase for service and replacement of parts, on the condition that you have used the machine correctly as described in the user manual. This warranty does not exclude naonal legislaon that may exist in the country of purchase in regards to warranty regulaons.
When you make a claim under this warranty, you must submit the original invoice or receipt with clear menon of the date of purchase, name of retailer and the descripon and model number of the appliance. You are advised to keep these documents in a safe place.
This device is intended for domesc use only. Damage and / or malfuncons as the result of industrial or commercial use are excluded from the warranty.
The warranty for this appliances expires if:
- The original invoice or receipt has in one way or another been changed or made illegible,
- The model or serial number on the product has been changed, removed, deleted or made illegible,
- Repairs have been executed by unauthorized repair workshops or persons who are not authorized to do so.
- The damage is the result of an external cause, such as re damage, water damage, transport damage, atmospheric discharges, insucient or improper maintenance;
- The appliance has been operated in another country than for which originally designed, approved, released and produced, as well as defects occurred as the result of such modicaons.
- The appliance has not been used according to the guidelines and direcons in the user manual supplied with the product.
In the unlikely event your appliance is not funconing well or shows any defect, please contact your retailer. To avoid any inconvenience, we advise you to read the user manual carefully before contacting them.
Powerpeak
Thermiekstraat 1a
6361 HB Nuth
The Netherlands
www.powerpeak.com
TECHNICAL DETAILS
Model number FTM6716
Power 750 W
Nominal voltage 200 – 240 Wa
Nominal frequency 50 HZ
Français
Mode d'emploi
Powerpeak Motorised Treadmill FTM6716
SOMMAIRE
CONSIGNES DE SÉCURITÉ
LE PRODUIT
ASSEMBLAGE
L'UTILISATION
COMMANDES D'ORDINATEUR
RÉGLAGE DU TAPIS
ENTRETIEN ET MAINTENANCE
CONSEILS D'ENTRAINEMENT IMPORTANT
EXERCICES D'ÉCHAUFFEMENT/ETIREMENT
ÉLIMINATION DE VOTRE ANCIEN APPAREIL
DONNÉES TECHNIQUES
CERTIFICAT DE GARANTIE
natural_image
Line drawing of a treadmill with adjustable arms and a digital display (no text or symbols)natural_image
Technical line drawing of a mechanical lifting device (no text or symbols)text_image
WARNING: To reduce risk of serious Injury stand on foot rails before starting this treadmill, read the user's manual and the warnings before use. Keep children away. IMPORTANT incline must be set at lowest level before folding treadmill into storage position INCLINE SPEED + 3 6 9 START STOP 9 6 3 PROG MODE -COMMENCER
natural_image
Simple line drawing of a mechanical clamp or spring assembly with two curved hooks (no text or symbols)natural_image
Simple line drawing of a mechanical device with a curved arrow indicating rotation (no text or symbols)natural_image
Simple line drawing of a vehicle with a curved arrow indicating rotation (no text or symbols)Email : info@powerpeak.com