FHT6704 - Exercise bike Powerpeak - Free user manual and instructions
Find the device manual for free FHT6704 Powerpeak in PDF.
| Product type | Exercise bike |
| Brand | Powerpeak |
| Model | FHT6704 |
| Maximum user weight | 125 kg |
| Power supply | Mains adapter (included) |
| Resistance type | Adjustable magnetic |
| Resistance adjustment | Tension knob |
| Monitor | LCD with display of time, speed, distance, calories and pulse |
| Pulse sensors | Integrated into handlebars |
| Available adjustments | Seat height and distance, handlebar height and angle |
| Pedals | Left (reverse thread) and right |
| Assembly | Requires manual assembly (7 steps, tools provided) |
| Maintenance | Clean with a damp cloth; regularly check screws and nuts |
| Intended use | Domestic only |
| Warranty | 24 months from date of purchase |
| Customer service | Powerpeak – info@powerpeak.com – +31900-8732728 |
| Spare parts | Available at www.muppa.nl |
| Main material | Steel |
| Safety | Do not use by more than one person; smooth surface; minimum clearance 0.5 m |
| Transport | Front and rear stabilizers with non-slip caps |
Frequently Asked Questions - FHT6704 Powerpeak
User questions about FHT6704 Powerpeak
0 question about this device. Answer the ones you know or ask your own.
Ask a new question about this device
Download the instructions for your Exercise bike in PDF format for free! Find your manual FHT6704 - Powerpeak and take your electronic device back in hand. On this page are published all the documents necessary for the use of your device. FHT6704 by Powerpeak.
USER MANUAL FHT6704 Powerpeak
OPWARMEN/STREKKEN/AFKOELEN
UW OUDE APPARAAT WEGDOEN
GARANTIEBEWIJS
Stap 6: Montage computer
OPWARMEN/STREKKEN/AFKOELEN
The photographs serve as an illustraon. Subject to alteraons.
SAFETY REGULATIONS
Warning
Consult your doctor before staring with the training. A frequent and strenuous training program must be accepted by your general praconer rst. This is especially important for people of 35 years old or older or those with physical problems. We are in no way responsible for personal injury or physical complaints that are the result of the use of this equipment and therefore cannot be held accountable.
General
- Read this manual carefully before using this device. Keep this manual in a safe place for future reference.
- Use the device for its intended purposes only as described in this manual.
- This device is not intended for use by children or persons with reduced physical, sensory or mental capabilities, or lack of experience and knowledge, unless they are supervised or given instrucon regarding proper use by a person responsible for their safety. Careful supervision is required if the device is used near children, pets or plants.
- Keep children and animals away from the equipment. Children's enthusiasm may lead to the incorrect use of the device. Under no circumstances should it be used as a toy.
- Do not allow children to play with the plasc wrapping as there is danger of suocaaon.
- Make sure that the device has been correctly assembled prior to use. Ensure that all screws, nuts and bolts have been ed correctly and ghtened properly. Use only the parts that are recommended by Powerpeak and those that have been delivered with the device.
- Check regularly whether the device is not damaged. Do not use it if it is damaged or has broken down.
- Always use the device on a level and clean surface. Never use it outdoors. If necessary, place rubber mang underneath the device to reduce possible damage to your oor.
-
Make sure there are no sharp or pointed objects in the immediate vicinity of the device. Clear at least 0.5 meters of free space around the device.
-
Always wear safe and comfortable clothing when you are using tness equipment. Preferably wear sport shoes or aerobic footwear.
- In the event you feel faint of suer other discomfort, stop using the device immediately. You also need to stop when you experience pain or pressure in your joints. Dizziness is a sign that you worked out excessively. If you feel dizzy, stretch out on the oor and do not try to get back on your feet unl the dizziness has disappeared.
- Keep the device away from re and hot surfaces.
- The device must have come to a complete standsll before stepping down.
- Make sure there is never more than one person using the device at the same me.
- Always store the device indoors.
- This device is only intended for domesc use, NOT for commercial use.
- The maximum permissible weight on this equipment is 125 KG.
THE PRODUCT
PARTS LIST
| NO | NAME | QUANTITY | |
| 1 | LEFT PEDAL | 1 | |
| 2 | DOMED NUT (M8) | 4 | |
| 3 | ARC WASHER (Ø8) | 10 | |
| 4 | FRONT END CAP (Ø60*1.5) | 2 | |
| 5 | FRONT STABILIZER | 1 | |
| 6 | CARRIAGE BOLT | 2 | |
| 7 | BOLT | 6 | |
| 8 | SPRING WASHER | 1 | |
| 9 | SUPPORTING TUBE COVER | 1 | |
| 10 | SUPPORT TUBE | 1 | |
| 11 | SCREW | 4 | |
| 12 | SCREW | 2 | |
| 13 | HANDLEBAR | 1 | |
| 14 | END CAP | 2 | |
| 15 | HANDLEBAR WRAPPING | 2 | |
| 16 | HANDLE PULSE | 2 | |
| 17 | COMPUTER | 1 | |
| 18 | HANDLEBAR PLASTIC COVER | 1 | |
| 19 | KNOB | 1 | |
| 20 | SEAT | 1 | |
| 21 | SEAT POST | 1 | |
| 22 | END CAP(38*38*1.5) | 2 | |
| 23 | WASHER (二) | 1 | |
| 24 | LOCKING KNOB | 1 | |
| 25 | VERTICAL SEAT POST | 1 | |
| 26 | RIGHT PEDAL | 1 | |
| 27 | SEAT PLASTIC COVER | 1 | |
| 28 | PLASTIC INSERT | 1 | |
| 29 | ADJUSTABLE KNOB | 1 | |
| 30 | ADAPTER | 1 | |
| 31 | REAR END CAP(Ø76*1.5) | 2 | |
| 32 | REAR STABILIZER | 1 | |
| 33 | CARRIAGE BOLT (M8*90) | 2 | |
| 34 | SCREW | 9 | |
| 35 | LEFT PROTECT COVER | 1 | |
| 36 | LEFT CRANK | 1 | |
| 37 | SCREW | 8 | |
| 38 | MOTOR | 1 | |
Aenon
Some of the above menoned parts have already been assembled to a main part. These are not delivered separately!
ASSEMBLY
In order to familiarise yourself with the parts of the device, we advise you to study the overview picture and the parts list carefully before you start assembly. Place all the parts on the oor and remove all packaging materials.
Use the present tooling for assembling. Before assembling please check whether all needed parts are available (at the above of this instrucon sheet you will nd an explosion drawing with all single parts (marked with numbers) which this item consists of.
Step 1: Assembling the front and rear stabilizer
A: Insert the bolt (33) into the rear stabilizer (32), the main frame, arc washer (3) 2PCS, ghten with domed nut (2) 2PCS.
B: Repeat the step, the front stabilizer (5) will be assembled in the same way.
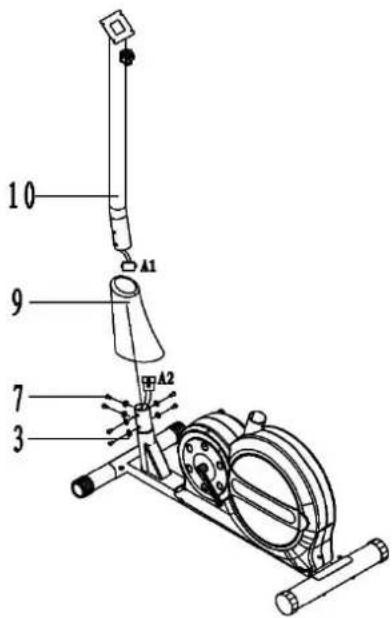
Step 2: assembling support tube & the front plasc cover
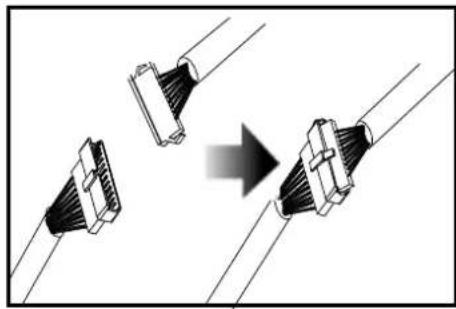
A: Insert the support tube (10) to the front plasc cover (9) and then connects the sensor A1&A2 and tension control wire as shown in FIG.2,
B: Install the support tube (10) on the main frame with arc washer (3) and bolt (7).
C: Lock the balance bolts on the main frame then put down the front plasc cover (9).
Aenon: Tighten the bolt (7) and the arc washer (3) aer the STEP 3
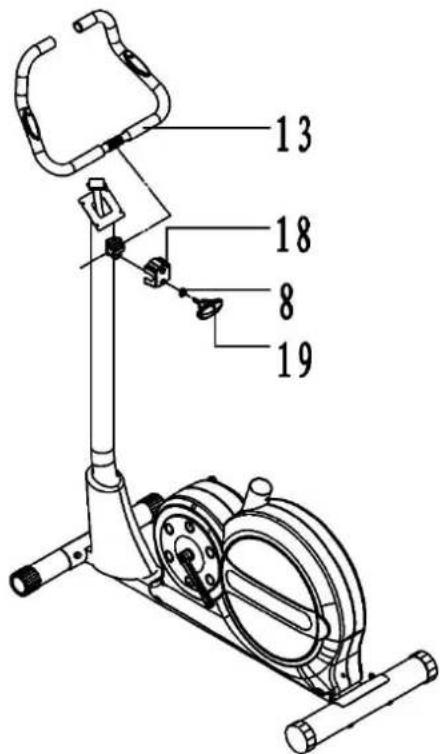
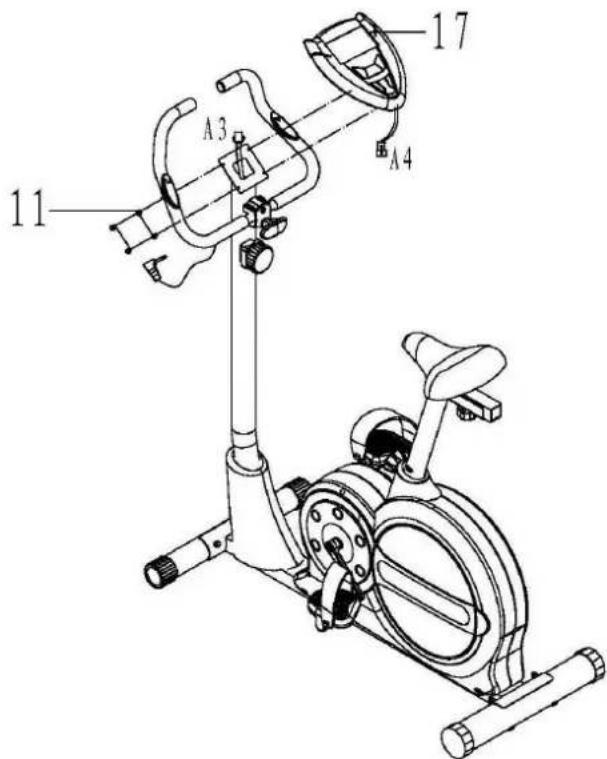
Step 3: assembling the handlebar
B. Put the handlebar (13) on the bind cap (18) of the supporng tube and adjust the comfortable angle, then install the bind cap (18).
C. Insert the knob (19) on the spring washer (8) and then put the handlebar (13) on the main frame.
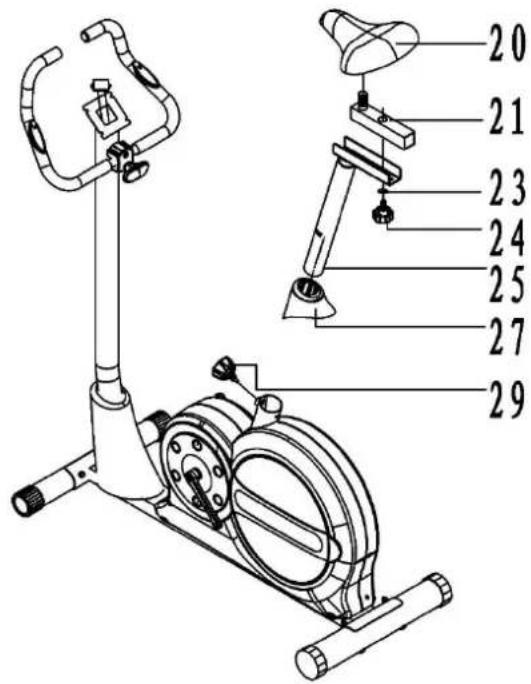
Step 4: assembling seat
A. Fix the Seat (20) to the seat post (21) as shown.
B. Insert the seat plasc cover (27) to the vercal Seat post (25). At the desired posion, align holes and x in place with the Locking Knob (29).
C. Slide the seat post (21) into the vercal seat post (25) and, at the desired posion, aligns holes and x in place with the Locking Knob (24) and Washer (23).
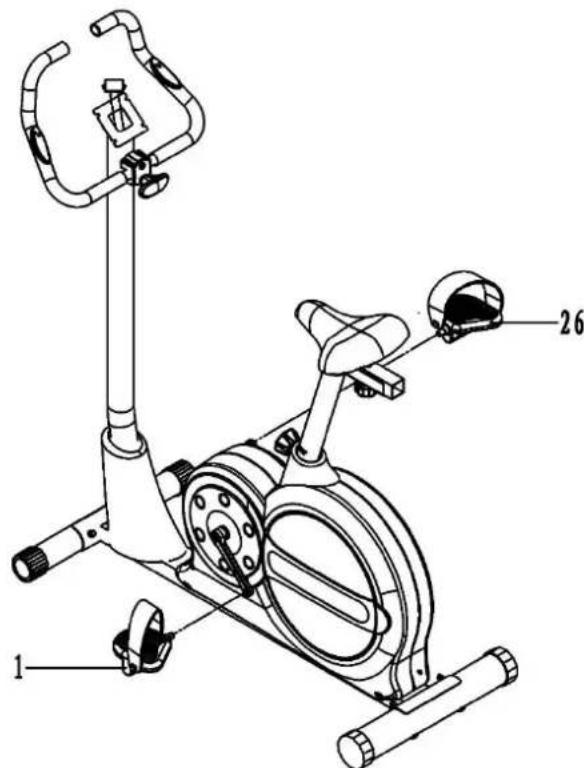
Step 5: assembling pedals
Each the pedals to the crank arms as shown in FIG.5,
A. Be sure the le pedal (1) marked (L) is aached to the le crank arm and ghtened to the le.
B. The right pedal (26) marked (R) is aached to the right crank arm and ghtened to the right.
Step 6: assembling computer
Connect the sensor A3&A4 as shown in FIG.6, then Install the computer (17) into the support tube of the main frame with the bolt (11).
NOTE: The pulse wire of computer must connect the wire of the handlebar.
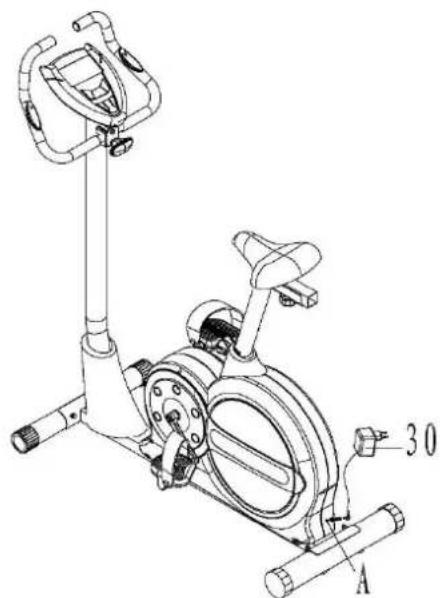
Step 7: Connect the power supply
Last but not least, connect the adapter (30) to the adapter input at the lower backside of the chain cover (you will nd a marking: ("Adapter input")
MAINTENANCE AND USE
- This device requires a regular check-up to prevent physical injury. This means that bolts and nuts should be frequently checked for cracks and sharp edges etc.
- Defecve components must be replaced immediately. If this is not possible, the device must be put out of order until the necessary repairs have been made.
- Clean only with a damp cloth, do not use solvent cleaners.
- This product is intended for use in clean, dry conditions. You should avoid storage in excessively cold or damp places as this may lead to corrosion and other related problems.
Adjustment method
When you adjust the height of connecng tube, please loosen the knob on the handlebar and pull out, then adjust a comfortable height for you, and insert the knob into the hole of the boom handlebar and ghten the knob.
When you adjust the distance between the seat and the handlebar, please loosen the knob under the seat tube and move the seat ahead and backwards to the comfortable posion, aim at the hole, then ghten the knob.
When you adjust the angle of handlebar, please loosen the knob on the bind cap of supporting tube and adjust the handlebar to the comfortable angle, then ghteen the knob.
The tension control knob allows you to alter the resistance of the pedals. A high resistance makes it more difficult to pedal, a low resistance makes it easier. For the best results set the tension while the bike is in use.
COMPUTER
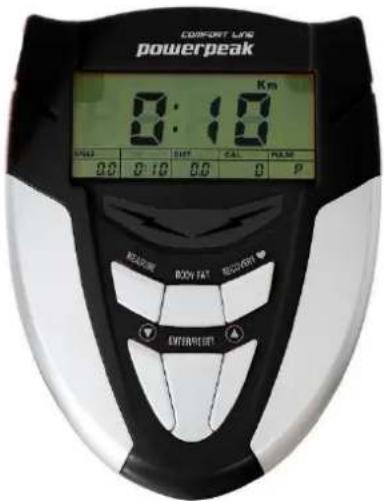
User Data:
You should input your personal data before workout. Press BODY FAT key to enter your personal data of sex, age, height and weight then the computer can save the data unless take out the baeries.
Program select and seng value
- Use the UP and DOWN keys to select the program mode and press ENTER to confirm your exercise mode.
- At the manual mode, the computer will use the UP or DOWN keys to set up your exercise TIME, DISTANCE, CALORIES, PULSE.
- Press the START/ STOP key to start your exercise.
- If you reach the target, the computer will beep and then stop.
- If you set up more than one target and you would like to reach next target, press START/ STOP key to keep on exercise.
SLEEP MODE:
The monitor will enter SLEEP mode (LCD o) when there is no signal input and no key be pressed aer 4 minutes.
Funcons and Features:
TIME: Shows your elapsed workout me in minutes and seconds. Your computer will automatically count up from 0:00 to 99:59 in one second intervals. You may also program your computer to count down from a set value by using the UP and DOWN keys from 0:00 to 99:00. If you connue exercising once the me has reached 0:00, the computer will begin beeping, and reset itself to the original me set, leng you know your workout is done.
WATT: The amount of mechanical power the computer is receiving from your exercise.
SPEED: Displays your workout speed value in KM/MILE per hour.
RPM: Your pedal cadence.
DISTANCE: Displays the accumulate distance traveled during each workout up to a maximum of 99.9KM/MILE.
CALORIES: Your computer will esmate the cumulate calories burned at any given me during your workout.
PULSE: Your computer displays your pulse rate in beats per minute during your workout.
AGE: Your computer is age-programmable from 10 to 99 years. If you do not set an age, this funcon will always default to age 35.
TARGET HEART RATE (TARGET PULSE): The heart rate you should maintain is called your Target Heart Rate in beats per minute.
PULSE RECOVERY key: During the START stage, hold the grips or have the chest transmier aached and press press PULSE RECOVERY key. All funcon displays will stop except for TIME. Time starts counting from 0:60 to 00:00. As soon as 00:00 is reached, the computer will show your heart rate recovery status with the grade F1.0 to F6.0.
F= 1.0 means OUTSTANDING
1.0 < F < 2.0 means EXCELLENT
2.0 ≤ F ≤ 2.9 means GOOD
3.0≤ F≤ 3.9 means FAIR
4.0≤F≤5.9 means BELOW AVERAGE
F=6.0 means POOR
TEMPERATURE: Display the current temperature
Key funcon:
There are 6 buon keys and the funcon descripon as follows:
- START/STOP key: a. Quick start funcon: allows you to start the computer without selecng a program. Manual workout only. Time automatically begins to count up from zero.
b. During exercise press the key to stop exercise
c. During stop mode, press the key to start exercise.
- UP key: During the seng mode, press the key to increase the value of Time, Distance, Calories, Age, Weight, Height etc. and to select sex. During the CLOCK mode, you can set up clock and alarm by this key.
- DOWN key: During the seng mode, press the key to decrease the value of Time, Distance, Calories, Age, Weight, Height etc. and to select sex. During the CLOCK mode, you can set up clock and alarm by this key.
Note: During the seng mode, you can hold UP and DOWN keys together for over two seconds then the seng value will reset to Zero or default value.
- ENTER/RESET key: a. Press the key to accept the current data entry.
b. During the no speed mode, by holding this key for over two seconds then the computer will re power-on.
c. During seng the clock, press this key and accept the seng me. - BODY FAT key: Press the key to enter your personal data before measure your body fat rao.
- PULSE RECOVERY key: press the key to acvate heart rate recovery funcon.
Program Introducon & Operaon:
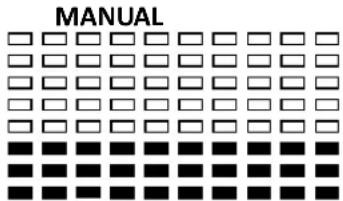
Manual Program: Manual
P1 is a manual program. User can start exercise by pressing START/STOP key. The default resistance level is 5. Users may exercise in any desirous of resistance level (Adjusng by UP/DOWN keys during the workout) with a period of me or a number of calories or a certain distance.
Operaons:
- Use UP/DOWN keys to select the MANUAL (P1) program.
- Press the ENTER key to enter MANUAL program.
- The TIME will ash and you can press UP or DOWN keys to set your exercise TIME. Press ENTER key to confirm your desired TIME.
- The DISTANCE will ash and you can press UP or DOWN keys to set your target DISTANCE. Press ENTER key to conrm your desired DISTANCE.
- The CALORIES will ash and you can press UP or DOWN keys to set your exercise CALORIES. Press ENTER key to conrm your desired CALORIES.
- The PULSE will ash and then you can press UP or DOWN keys to set your exercise PULSE. Press ENTER key to conrm your desired Pulse.
- Press the START/STOP key to begin exercise.
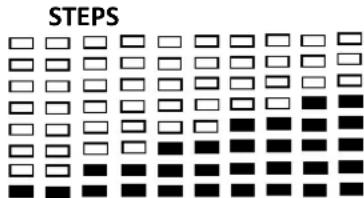
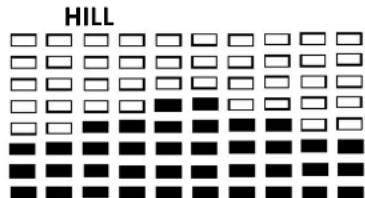
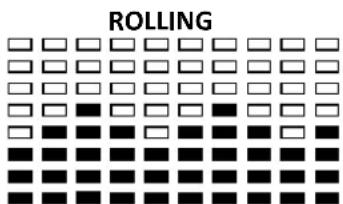
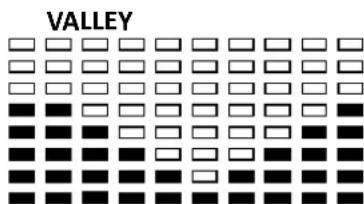
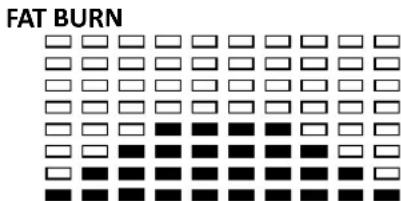
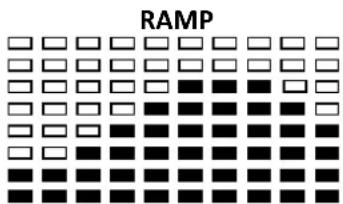
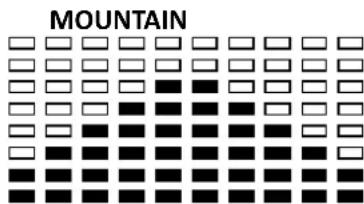
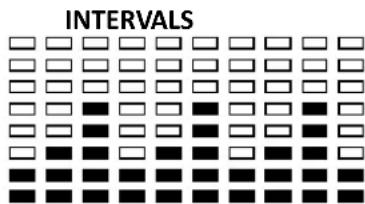
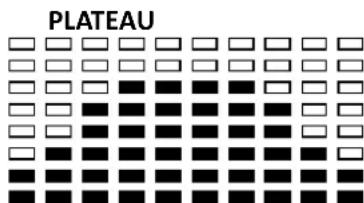
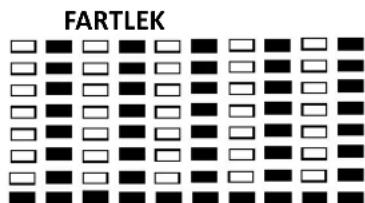
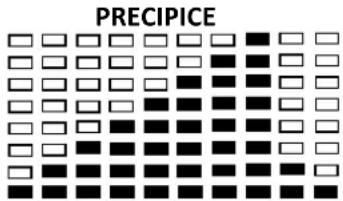
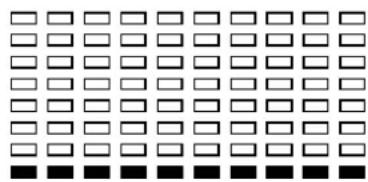
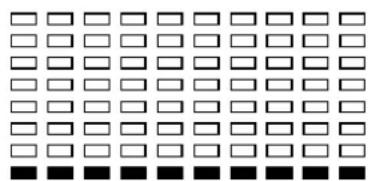
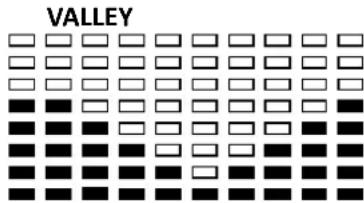
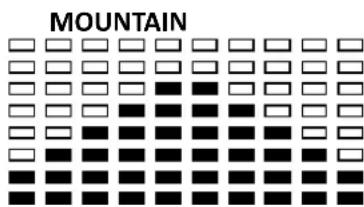
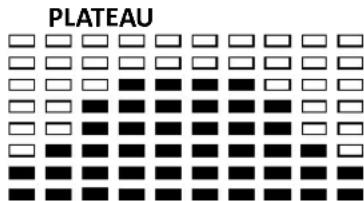
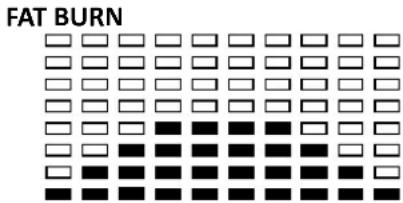
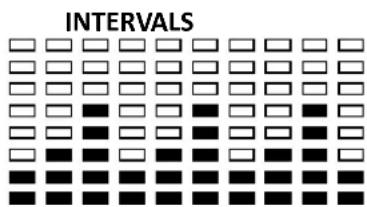
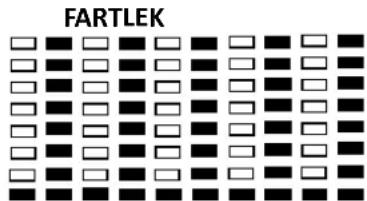
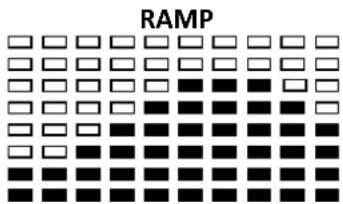
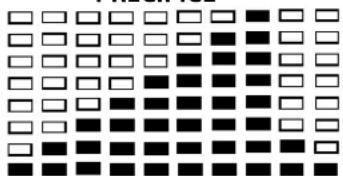
Preset Program: Steps, Hill, Rolling, Valley, Fat Burn, Ramp, Mountain, Intervals, Random, Plateau, Fartlek, Precipice Program
PROGRAM 2 to PROGRAM 13 is the preset programs. Users can exercise with different level of loading in dierent intervals as the proles show. Users may exercise in any desirous of resistance level (Adjusng by UP/DOWN keys during the workout) with a period of me or a number of calories or a certain distance
Operaons:
- Use UP/DOWN keys to select one of the above programs from P2 to P13.
- Press the ENTER key to enter your workout program.
- The TIME will ash and you can press UP or DOWN keys to seng your exercise TIME. Press ENTER key to confirm your desired TIME.
- The DISTANCE will ash and you can press UP or DOWN keys to seng your target DISTANCE. Press ENTER key to confirm your desired DISTANCE.
- The CALORIES will ash and you can press UP or DOWN keys to seng your exercise CALORIES. Press ENTER key to conrm your desired CALORIES.
- The PULSE will ash and then you can press UP or DOWN keys to set your exercise PULSE. Press ENTER to conrm your desired Pulse.
- Press the START/STOP key to start exercise.
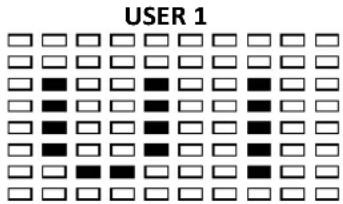
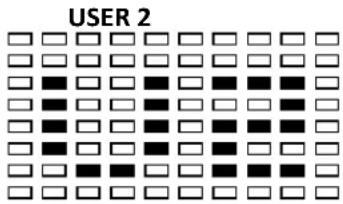
User Seng Program: User 1, User 2
Program 14 to 15 is the user seng program. Users are free to create the values in the order of TIME, DISTANCE, CALORIES and the resistance level in 10 columns. The values and proles will be stored in the memory aer setup. Users may also change the ongoing loading in each column by UP/DOWN keys, and they will not change the resistance level stored in the memory.
Operaons:
- Use UP/DOWN keys to select the USER program from P14 to P15.
- Press the ENTER key to enter your workout program.
- The column 1 will ash, and then use the UP/DOWN keys to create your personal exercise prole. Press ENTER to conrm your rst column of exercise prole. The default level is load 1.
- The column 2 will ash, and then use the UP/DOWN keys to create your personal exercise prole. Press ENTER to confirm your second column of exercise prole.
- Follow the above descripion 5 and 6 to nish your personal exercise proles. Press ENTER to confirm your desired exercise prole.
- The TIME will ash and you can press UP or DOWN keys to setng your exercise TIME. Press ENTER key to conrm your desired TIME.
- The DISTANCE will ash and you can press UP or DOWN keys to seng your target DISTANCE. Press ENTER key to confirm your desired DISTANCE.
- The CALORIES will ash and you can press UP or DOWN keys to seng your exercise CALORIES. Press ENTER key to conrm your desired CALORIES.
- The PULSE will ash and then you can press UP or DOWN keys to set your exercise PULSE. Press ENTER key to conrm your desired Pulse.
- Press the START/STOP key to begin exercise.
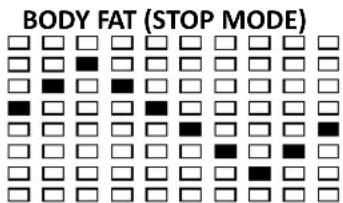
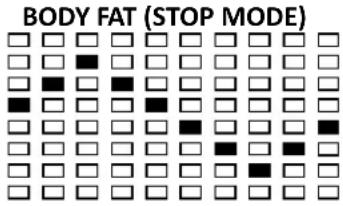
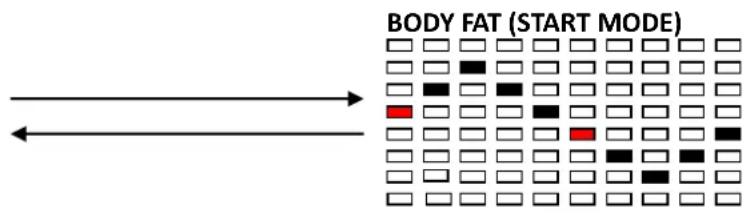
Body Fat Program: Body Fat
Program 16 is a special program design to calculate users' body fat rao and to oer a specic loading prole for users. There are 3 body types divided according to the FAT% calculated.
Type1: BODY FAT% > 20
Type2: 27 ≥ BODYFAT% ≥ 20
Type3:BODY FAT % < 20
The computer will show the test results of FAT PERCENT, BMI and BMR.
Operaons:
- Use UP/DOWN keys to select the BODY FAT (P24) program.
- Press the ENTER key to enter your workout program.
- The HEIGHT will ash and you can press UP or DOWN keys to set your HEIGHT. Press ENTER key to confirm your HEIGHT. The default HEIGHT is 170cm or 5'07'' (5feet 7 inches).
- The WEIGHT will ash and you can press UP or DOWN keys to set your WEIGHT. Press ENTER key to confirm your WEIGHT. The default WEIGHT is 70kgs or 155lbs.
- The GENDER will ash and you can press UP or DOWN keys to select your sex. Number 1 means man and number 0 means female. Press ENTER key to conrm your Gender. The default sex is 1 (MAN).
- The AGE will ash and you can press UP or DOWN keys to set your AGE. Press ENTER key to conrm your AGE. The default AGE is 35.
- Press the START/STOP key to begin body fat measurement. If the window show E on the window, please make sure your hands are ached well on the grips or the chest belt is touch well on your body. Then press the START/STOP key again to begin body fat measurement.
- Aer nished your measurement, the computer will show the values of BMR, BMI and FAT PERCENT on the LCD display. Furthermore, the computer will show your own exercise prole for your body type. Press START/STOP key to begin exercise.
Operaon guide:
- Sleep Mode:
The computer will enter the sleep mode when there is no signal input and no keys be pressed aer 4 minutes. You can press any key to wake up the computer.
-
BMI (Body Mass Index): BMI is a measure of body fat based on height and weight that applies to both adult men and women.
-
BMR (Basal Metabolic Rate): Your Basal Metabolic Rate (BMR) shows the number of calories your body needs to operate. This doesn't account for any acuity, it's simply the energy needed to sustain a heartbeat, breathing and normal body temperature. It measures the body at rest, not sleep, at room temperature.
Error Message:
E1 (ERROR 1):
Normal state: During workout, when the monitor does not get the count signal from the gear motor more than 4 seconds and check under successive 3 mes then the LCD will show E1.
Power on state: The gear motor will return to zero automatically, when the signal of motor cannot be detected for more than 4 seconds then the gear motor's driver will be cut off immediately and show the E1 on the LCD display. All the other digital and funcon mark are blank, and the output signals are cut o also.
E2 (ERROR 2): When the monitor read the memory data, if the I.D. code is not correct or the memory IC damages then the monitor will show E2 immediately at power on.
E3 (ERROR 3): Aer 4 seconds by start mode, the computer detects the faulty motor did not leave the zero point then the LCD bar displays "E3".
Technical data of the current adapter
- Available for Input: 230V/50Hz or 60Hz Output: 6V AC/0.5A
- Available for Input: 110V/50Hz or 60Hz Output: 6V AC/0.5A
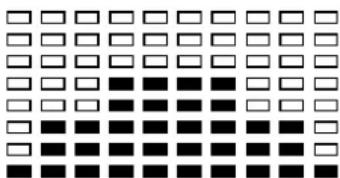
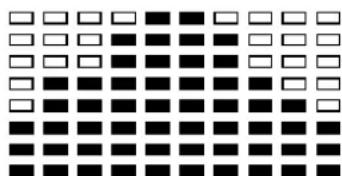
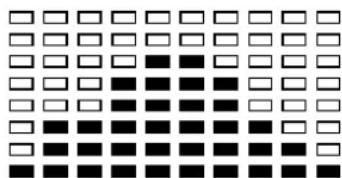
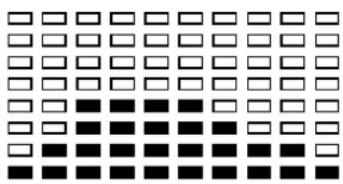
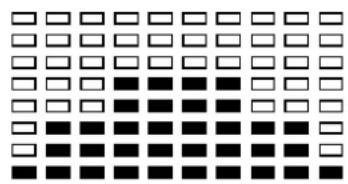
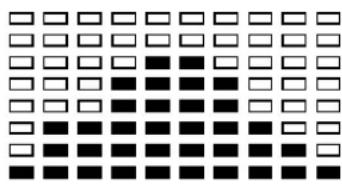
LCD Workout Graphics
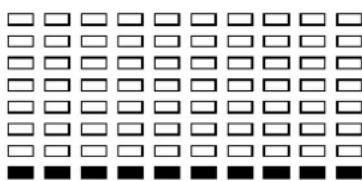
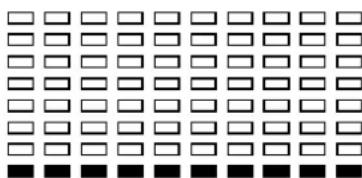
PRESET PROGRAM PROFILES:
PROGRAM 1
PROGRAM 2
PROGRAM 3
PROGRAM 4
PROGRAM 5
PROGRAM 6
PROGRAM 7
PROGRAM 8
PROGRAM 9

PROGRAM 10
PROGRAM 11
PROGRAM 12
PROGRAM 13
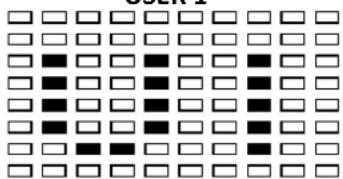
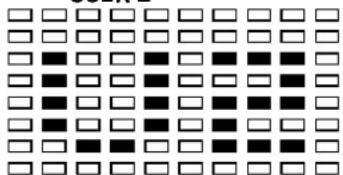
USER SETTING PROGRAM
PROGRAM 14
PROGRAM 15


BODY FAT TEST PROGRAMS: PROGRAM 16

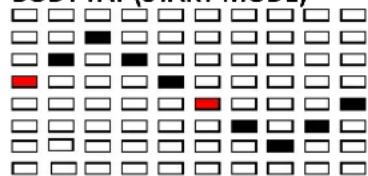
BODY FAT (START MODE)
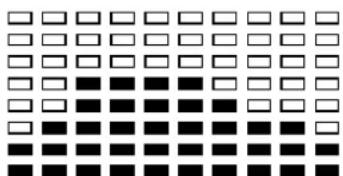
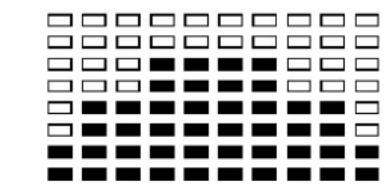
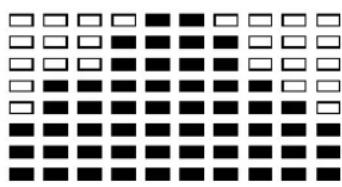
One of the Following Six Proles Will Display Automacally aer Measuring Your BODY FAT:
Workout Time: 40 minutes
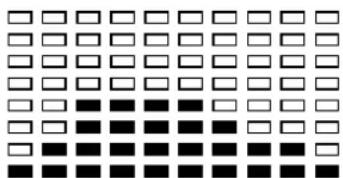
Workout Time: 40 minutes

Workout Time: 40 minutes
Workout Time: 40 minutes
Workout me: 20 minutes
Workout me: 20 minutes
IMPORTANT ADVICE FOR TRAINING
- Before you start the training, consult your doctor. Ask what kind of training is suitable for you. Wrong or excessive training can cause health defects.
- Avoid over exercising. Do not train if you are red or feeling faint. If you are not used to physical acuity, start the training slowly at the beginning.
- Stop exercising immediately if you feel pain or any other troubles.
- Pay aenon to your breathing during training.
- To avoid injuries, begin the training with an extensive warm up and nish it with a cool-down phase. Use the exercises described in this manual.
- Make sure you drink enough liquids during training. Keep in mind that the recommended amount of 2 litres might increase during physical workout.
- Use the product only with sport clothes and suitable shoes, which are equipped with non-slip soles. Avoid wide clothes, because they can get caught in moving parts of the product.
WARM-UP/STRETCHING/COOL-DOWN
A successful exercise session begins with warming up exercises and ends with exercises for cooling down and relaxing. These warming up exercises prepare your body for the subsequent demands made upon it. The cooling down/relaxaon period aer the exercise session ensures that you do not experience any muscular problems. Please pay aenon to the following points:
- Carefully warm up every muscle group you will be using in the exercise session for about 5 to 10 minutes. The stretching exercises are carried out correctly if you feel a comfortable tension in the corresponding muscle.
- Speed does not play a role during the stretching exercises. Fast and jerky movements must be avoided.
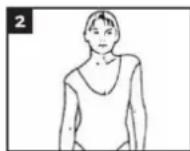
Neck exercises (1)
Tilt your head to the right and feel the tension in your neck. Slowly drop your head down to your chest in a semi-circle and then turn your head to the le. You will feel a comfortable tension in your neck again. You can repeat this exercise alternately several mes.

Exercises for the shoulder area (2)
Li the le and right shoulders alternately, or li both shoulders simultaneously
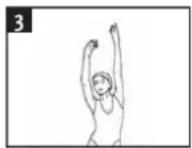
Arm stretching exercises (3)
Stretch the le and right arms alternately towards the ceiling. Feel the tension in the le and right sides of your body. Repeat this exercise several mes.
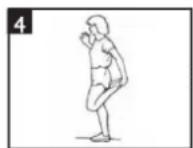
Exercises for the upper thigh (4)
Support yourself by placing your hand on the wall, then reach down behind you and lie up your right or le foot as close to your bucks as possible. Feel a comfortable tension in your front upper thigh. Maintain this posion for 30 seconds if possible and repeat this exercise 2 mes for each leg.
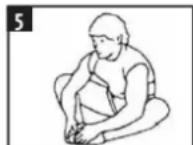
Inside upper thigh (5)
Sit on the oor and place your feet in such a way that your knees are facing outwards. Pull your feet as close as possible to your groin. Now press your knees carefully downwards. Maintain this posion for 30-40 seconds if possible.
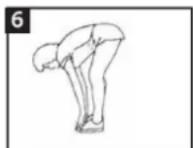
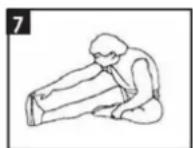
Touch toes (6)
Bend your trunk slowly forwards and try to touch your feet with your hands. Reach down as far as possible to your toes. Maintain this posion for 20-30 seconds if possible.
Exercises for the knees (7)
Sit on the oor and stretch out your right leg. Bend your le leg and place your foot on your right upper thigh. Now try to reach your right foot with your right arm. Maintain this posion for 30-40 seconds if possible.
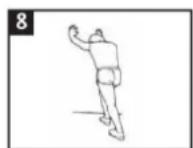
Exercises for the calves achilles tendon (8)
Place both your hands on the wall and support your full body weight. Then move your le and right leg alternately backwards. This stretches the back part of the leg. Maintain this posion for 30-40 seconds if possible.
SERVICE
Service number: +31 900-873 27 28, € 1.00 per conversaoon + regular phone costs.
E-mail: service@vdbergproducts.com
Accessories and parts of the product that are susceptible to wear and tear are not included in the guarantee. Should you wish to reorder these, please visit www.muppa.nl.
COMPULSORY INFORMATION REGARDING THE DEGREE ON BATTERIES
Baeries do not belong in your household waste. Users are required by law to return used baeries. For proper disposal of baeries, you can nd designated disposal containers in specialized shops as well as in municipal collecng facilities. This is a solid contribuon to the protecon of the environment. Since 1998, the decree on baeries requires all czens to dispose used baeries only via these specialized shops or collecng facilities. Specialized shops and manufactures are obliged to accept used baeries in return and re-use them in accordance to the decree or dispose of them as dangerous waste. If you wish to return your used baeries to us, you can mail them to our address in an adequately stamped envelope.
Baeries that need to be labelled by law are provided with one of the illustraons below, being a crossed-out wheeled bin and the chemical symbol for the classicaon of pollutants-containing heavy metals. The chemical symbol (Cd, Hg or Pb) will be shown under the illustraon.
The following text can be found on the pollutants co
Pb: Baery contains lead
Cd: Baery contains cadmium
Hg: Baery contains mercury


Powerpeak
Thermiekstraat 1a
6361Hb Nuth
The Netherlands
www.vdbergproducts.com
GUARANTEE
This warranty covers your unit for a period of 24 months from the date of purchase for service and replacement of parts, on the condion that you have used the machine correctly as described in the user manual. This warranty does not exclude naonal legislaoon that may exist in the country of purchase in regards to warranty regulaons.
When you make a claim under this warranty, you must submit the original invoice or receipt with clear menon of the date of purchase, name of retailer and the descripon and model number of the appliance. You are advised to keep these documents in a safe place.
This device is intended for domesc use only. Damage and / or malfuncons as the result of industrial or commercial use are excluded from the warranty.
The warranty for this appliances expires if:
The original invoice or receipt has in one way or another been changed or made illegible,
- The model or serial number on the product has been changed, removed, deleted or made illegible,
- Repairs have been executed by unauthorized repair workshops or persons who are not authorized to do so.
- The damage is the result of an external cause, such as re damage, water damage, transport damage, atmospheric discharges, insufficient or improper maintenance;
- The appliance has been operated in another country than for which originally designed, approved, released and produced, as well as defects occurred as the result of such modicaons.
- The appliance has not been used according to the guidelines and direcons in the user manual supplied with the product.
In the unlikely event your appliance is not functioning well or shows any defect, please contact your retailer. To avoid any inconvenience, we advise you to read the user manual carefully before contacting them.
Français
Mode d'emploi
Powerpeak Home Trainer Magnec
FHT8313P
SOMMAIRE
CONSIGNES DE SECURITE
LE PRODUIT
NOMENCLATURE DES PIECES
ASSEMBLAGE
ENTRETIEN ET UTILISATION
COMMANDES D'ORDINATEUR
CONSEILS D'ENTRAJEMENT IMPORTANT
EXERCICES D'ÉCHAUFFEMENT/ETIREMENT
INFORMATION DE RIGUEUR SUR LE DECRET À PROPOS DES PILES
CERTIFICAT DE GARANTIE
You should input your personal data before workout. Press BODY FAT key to enter your personal data of sex, age, height and weight then the computer can save the data unless take out the baeries.
Program select and seng value
- Use the UP and DOWN keys to select the program mode and press ENTER to confirm your exercise mode.
- At the manual mode, the computer will use the UP or DOWN keys to set up your exercise TIME, DISTANCE, CALORIES, PULSE.
- Press the START/ STOP key to start your exercise.
- If you reach the target, the computer will beep and then stop.
- If you set up more than one target and you would like to reach next target, press START/ STOP key to keep on exercise.
SLEEP MODE:
The monitor will enter SLEEP mode (LCD o) when there is no signal input and no key be pressed aer 4 minutes.
Funcons and Features:
TIME: Shows your elapsed workout me in minutes and seconds. Your computer will automatically count up from 0:00 to 99:59 in one second intervals. You may also program your computer to count down from a set value by using the UP and DOWN keys from 0:00 to 99:00. If you connue exercising once the me has reached 0:00, the computer will begin beeping, and reset itself to the original me set, leng you know your workout is done.
WATT: The amount of mechanical power the computer is receiving from your exercise.
SPEED: Displays your workout speed value in KM/MILE per hour.
RPM: Your pedal cadence.
DISTANCE: Displays the accumulate distance traveled during each workout up to a maximum of 99.9KM/MILE.
CALORIES: Your computer will esmate the cumulate calories burned at any given me during your workout.
PULSE: Your computer displays your pulse rate in beats per minute during your workout.
AGE: Your computer is age-programmable from 10 to 99 years. If you do not set an age, this funcon will always default to age 35.
TARGET HEART RATE (TARGET PULSE): The heart rate you should maintain is called your Target Heart Rate in beats per minute.
PULSE RECOVERY key: During the START stage, hold the grips or have the chest transmier ached and press press PULSE RECOVERY key. All funcon displays will stop except for TIME. Time starts counting from 0:60 to 00:00. As soon as 00:00 is reached, the computer will show your heart rate recovery status with the grade F1.0 to F6.0.
F= 1.0 means OUTSTANDING
1.0 < F < 2.0 means EXCELLENT
2.0 ≤ F ≤ 2.9 means GOOD
3.0≤ F≤ 3.9 means FAIR
4.0≤ F≤ 5.9 means BELOW AVERAGE
F= 6.0 means POOR
TEMPERATURE: Display the current temperature
Key funcon:
There are 6 buon keys and the funcon descripon as follows:
- START/STOP key: a. Quick start funcon: allows you to start the computer without selecng a program. Manual workout only. Time automatically begins to count up from zero.
b. During exercise press the key to stop exercise
c. During stop mode, press the key to start exercise. - UP key: During the seng mode, press the key to increase the value of Time, Distance, Calories, Age, Weight, Height etc. and to select sex. During the CLOCK mode, you can set up clock and alarm by this key.
- DOWN key: During the setting mode, press the key to decrease the value of Time, Distance, Calories, Age, Weight, Height etc. and to select sex. During the CLOCK mode, you can set up clock and alarm by this key.
Note: During the seng mode, you can hold UP and DOWN keys together for over two seconds then the seng value will reset to Zero or default value.
- ENTER/RESET key: a. Press the key to accept the current data entry.
b. During the no speed mode, by holding this key for over two seconds then the computer will reach power-on.
c. During seng the clock, press this key and accept the seng me. - BODY FAT key: Press the key to enter your personal data before measure your body fat rao.
- PULSE RECOVERY key: press the key to acvate heart rate recovery funcon.
Program Introducon & Operaon:
Manual Program: Manual
P1 is a manual program. User can start exercise by pressing START/STOP key. The default resistance level is 5. Users may exercise in any desirous of resistance level (Adjusng by UP/DOWN keys during the workout) with a period of me or a number of calories or a certain distance.
Operaons:
- Use UP/DOWN keys to select the MANUAL (P1) program.
- Press the ENTER key to enter MANUAL program.
- The TIME will ash and you can press UP or DOWN keys to set your exercise TIME. Press ENTER key to confirm your desired TIME.
- The DISTANCE will ash and you can press UP or DOWN keys to set your target DISTANCE. Press ENTER key to conrm your desired DISTANCE.
-
The CALORIES will ash and you can press UP or DOWN keys to set your exercise CALORIES. Press ENTER key to conrm your desired CALORIES.
-
The PULSE will ash and then you can press UP or DOWN keys to set your exercise PULSE. Press ENTER key to confirm your desired Pulse.
- Press the START/STOP key to begin exercise.
Preset Program: Steps, Hill, Rolling, Valley, Fat Burn, Ramp, Mountain, Intervals, Random, Plateau, Fartlek, Precipice Program
PROGRAM 2 to PROGRAM 13 is the preset programs. Users can exercise with dierent level of loading in dierent intervals as the proles show. Users may exercise in any desirous of resistance level (Adjusng by UP/DOWN keys during the workout) with a period of me or a number of calories or a certain distance
Operaons:
- Use UP/DOWN keys to select one of the above programs from P2 to P13.
- Press the ENTER key to enter your workout program.
- The TIME will ash and you can press UP or DOWN keys to setng your exercise TIME. Press ENTER key to conrm your desired TIME.
- The DISTANCE will ash and you can press UP or DOWN keys to seng your target DISTANCE. Press ENTER key to confirm your desired DISTANCE.
- The CALORIES will ash and you can press UP or DOWN keys to seng your exercise CALORIES. Press ENTER key to conrm your desired CALORIES.
- The PULSE will ash and then you can press UP or DOWN keys to set your exercise PULSE. Press ENTER to conrm your desired Pulse.
- Press the START/STOP key to start exercise.
User Seng Program: User 1, User 2
Program 14 to 15 is the user seng program. Users are free to create the values in the order of TIME, DISTANCE, CALORIES and the resistance level in 10 columns. The values and proles will be stored in the memory aer setup. Users may also change the ongoing loading in each column by UP/DOWN keys, and they will not change the resistance level stored in the memory. Operaons:
- Use UP/DOWN keys to select the USER program from P14 to P15.
- Press the ENTER key to enter your workout program.
- The column 1 will ash, and then use the UP/DOWN keys to create your personal exercise prole. Press ENTER to conrm your rst column of exercise prole. The default level is load 1.
- The column 2 will ash, and then use the UP/DOWN keys to create your personal exercise prole. Press ENTER to conrm your second column of exercise prole.
- Follow the above descripion 5 and 6 to nish your personal exercise proles. Press ENTER to confirm your desired exercise prole.
- The TIME will ash and you can press UP or DOWN keys to setng your exercise TIME. Press ENTER key to conrm your desired TIME.
- The DISTANCE will ash and you can press UP or DOWN keys to seng your target DISTANCE. Press ENTER key to conrm your desired DISTANCE.
- The CALORIES will ash and you can press UP or DOWN keys to seng your exercise CALORIES. Press ENTER key to conrm your desired CALORIES.
- The PULSE will ash and then you can press UP or DOWN keys to set your exercise PULSE. Press ENTER key to conrm your desired Pulse.
- Press the START/STOP key to begin exercise.
Body Fat Program: Body Fat
Program 16 is a special program design to calculate users' body fat rao and to oer a specic loading prole for users. There are 3 body types divided according to the FAT% calculated.
Type1: BODY FAT% > 20
Type2: 27 ≥ BODYFAT% ≥ 20
Type3:BODY FAT % < 20
The computer will show the test results of FAT PERCENT, BMI and BMR.
Operaons:
- Use UP/DOWN keys to select the BODY FAT (P24) program.
- Press the ENTER key to enter your workout program.
- The HEIGHT will ash and you can press UP or DOWN keys to set your HEIGHT. Press ENTER key to confirm your HEIGHT. The default HEIGHT is 170cm or 5'07'' (5feet 7 inches).
- The WEIGHT will ash and you can press UP or DOWN keys to set your WEIGHT. Press ENTER key to confirm your WEIGHT. The default WEIGHT is 70kgs or 155lbs.
- The GENDER will ash and you can press UP or DOWN keys to select your sex. Number 1 means man and number 0 means female. Press ENTER key to conrm your Gender. The default sex is 1 (MAN).
- The AGE will ash and you can press UP or DOWN keys to set your AGE. Press ENTER key to conrm your AGE. The default AGE is 35.
- Press the START/STOP key to begin body fat measurement. If the window show E on the window, please make sure your hands are ached well on the grips or the chest belt is touch well on your body. Then press the START/STOP key again to begin body fat measurement.
- Aer nished your measurement, the computer will show the values of BMR, BMI and FAT PERCENT on the LCD display. Furthermore, the computer will show your own exercise prole for your body type. Press START/STOP key to begin exercise.
Operon guide:
- Sleep Mode:
The computer will enter the sleep mode when there is no signal input and no keys be pressed aer 4 minutes. You can press any key to wake up the computer. - BMI (Body Mass Index): BMI is a measure of body fat based on height and weight that applies to both adult men and women.
- BMR (Basal Metabolic Rate): Your Basal Metabolic Rate (BMR) shows the number of calories your body needs to operate. This doesn't account for any acuity, it's simply the energy needed to sustain a heartbeat, breathing and normal body temperature. It measures the body at rest, not sleep, at room temperature.
Error Message:
E1 (ERROR 1):
Normal state: During workout, when the monitor does not get the count signal from the gear motor more than 4 seconds and check under successive 3 mes then the LCD will show E1.
Power on state: The gear motor will return to zero automatically, when the signal of motor cannot be detected for more than 4 seconds then the gear motor's driver will be cut o immediately and show the E1 on the LCD display. All the other digital and funcon mark are blank, and the output signals are cut o also.
E2 (ERROR 2): When the monitor read the memory data, if the I.D. code is not correct or the memory IC damages then the monitor will show E2 immediately at power on.
E3 (ERROR 3): Aer 4 seconds by start mode, the computer detects the faulty motor did not leave the zero point then the LCD bar displays "E3".
Technical data of the current adapter
- Available for Input: 230V / 50Hz or 60Hz Output: 6V AC/0.5A
- Available for Input: 110V/50Hz or 60Hz Output: 6V AC/0.5A
LCD Workout Graphics
PRESET PROGRAM PROFILES:

PROGRAM 1

PROGRAM 2
PROGRAM 3
HILL
PROGRAM 4
PROGRAM 5
PROGRAM 8
PROGRAM 11
PROGRAM 6
PROGRAM 9
PROGRAM 12
PROGRAM 7
PROGRAM 10

PRECIPICE
USER SETTING PROGRAM
PROGRAM 14
USER 1
PROGRAM 15
USER2


BODY FAT TEST PROGRAMS:
PROGRAM 16

One of the Following Six Proles Will Display Automacally aer Measuring Your BODY FAT:
Workout Time: 40 minutes
Workout Time: 40 minutes
Workout me: 20 minutes
Workout Time: 40 minutes
Workout Time: 40 minutes
Workout me: 20 minutes