BD4603 ALB - Blood pressure monitor Levita - Free user manual and instructions
Find the device manual for free BD4603 ALB Levita in PDF.

| Brand | Levita |
| Model | BD4603 ALB (BD-4603ALB/ALS) |
| Product Type | Automatic arm blood pressure monitor |
| Dimensions | Approx. 110 mm x 110 mm x 41 mm |
| Weight | Approx. 277 g (without batteries) |
| Power Supply | 4 AAA/LR03 alkaline batteries (1.5 V) |
| Measurement Method | Oscillometric method |
| Measurement Range (Pressure) | 40 to 230 mmHg |
| Measurement Range (Pulse) | 40 to 199 beats/min |
| Accuracy (Pressure) | ± 3 mmHg |
| Accuracy (Pulse) | ± 5% |
| Arm Circumference | 22 to 32 cm |
| Memory Capacity | 2 zones, 60 measurements each |
| Main Functions | WHO classification, irregular heartbeat detection (IHB), automatic inflation/deflation, automatic shut-off after 1 min |
| Maintenance and Cleaning | Clean with a damp cloth and mild detergent; do not use strong detergents; wipe the cuff with a dry cloth |
| Safety | Not suitable for children, people with arrhythmias, or pregnant women; avoid extreme temperatures |
| Operating Environment | 5 to 40 °C, ≤ 85% RH |
| Storage Environment | -20 to +60 °C, 10 to 93% RH |
| Classification | Internally powered device, type BF, IP21 |
| Accessories Included | Cuff, user manual, service card |
| Warranty | 36 months |
Frequently Asked Questions - BD4603 ALB Levita
User questions about BD4603 ALB Levita
0 question about this device. Answer the ones you know or ask your own.
Ask a new question about this device
Download the instructions for your Blood pressure monitor in PDF format for free! Find your manual BD4603 ALB - Levita and take your electronic device back in hand. On this page are published all the documents necessary for the use of your device. BD4603 ALB by Levita.
USER MANUAL BD4603 ALB Levita
UK The features described in this manual are published with reservation to modifications.
natural_image
Line drawing of a mechanical device with rollers and a paper clip (no text or symbols)We request that you read this information in order to quickly become familiar with this equipment and learn how to use its functions.
1 Information Regarding This User Guide
This user guide contains information on the BD-4603ALB/ALS (referred to as 'the equipment' in the following) and provides important instructions on the initial use, safety, proper use and maintenance of this equipment. Always keep the user guide available near the equipment. Every person responsible for operating, repairing or cleaning the equipment must read and/or consult the user guide.
Keep this user guide in a safe place and give it to the next owner of the equipment.
2 Copyright
This document is protected by copyright legislation.
All rights are reserved, including rights of photo mechanical reproduction, copying or distribution using specific means such as data processing, data storage media or data networks, either in full or in part, as well as technical changes and changes to the contents.
3 W a r n i n g s

CAUTION
This warning points out a potentially hazardous situation.
Injuries and/or material damage may result if the hazardous situation cannot be avoided.

Follow instructions for use
4 General rules when using the equipment
This device uses the oscillometric method to measure systolic and diastolic blood pressure as well as your heart rate.
This product is for household use only. It is not intended as a substitute for consultation with your doctor. All other forms of use are improper and can lead to hazards.
Always follow the instructions provided in this user guide.
No liability is accepted for any loss or damage resulting from improper use.
The user of the equipment is exclusively responsible for all risks.

CAUTION
- The unit should not be operated by children so to avoid hazardous situations.
- For users diagnosed with common arrhythmia (atrial or ventricular premature beats or atrial fibrillation), diabetes, poor circulation of blood, kidney problems, or for users suffered from stroke, or for unconscious users, the device might not be suitable for use. Consult your doctor in case of any doubt.
- The unit contains high-precision assemblies. Therefore, avoid extreme temperatures, humidity, and direct sunlight. Avoid dropping or strongly shocking the main unit, and protect it from dust.
- Do not press the start key when the cuff is not placed around the arm.
- Do not disassemble the main unit or cuff
To avoid inaccurate results caused by electromagnetic interference between electrical and electronic equipment, do not use the device near a cell phone or microwave oven. At least keep a maximum output power of 2 W yields and a distance 3.3m away from this equipment.

- If the unit is stored in a cold place, allow it to acclimatize at room temperature before use.
- Do not take a measurement in a low (less than 41^ / 5^ ) or high (more than 104^ / 40^ ) temperature or you may get the inaccurate readings.
- Wait 30 \~ 45 minutes before measurement if you've just consumed beverages containing caffeine or smoked cigarettes.
- Rest at least 5 \~ 10 minutes before taking a measurement.
- Relax at least 3 \~ 5 minutes in between measurements.
- Make sure the cuff plug is attached to the monitor.
- We recommend you using the same arm (preferably the left arm) and measuring around the same time each day.
- Perform measurements in a quiet and relaxed environment at room temperature.
- Sit down comfortably and place your arm on the table with your feet flat on the floor.
- Wrap the cuff snugly around your exposed upper arm and lay your arm on a table or a flat surface at the same level as your heart. Your feet should be flat on the floor.
- Do not move or shake the device during a measurement.
• Blood pressure measurements should be interpreted by a physician or a trained health professional who is familiar with your medical history. - Using the unit and recording the results regularly for your physician to interpret, you will keep your physician informed of the continuing changes in your blood pressure.
- If you have one of the circulatory problems as arteriosclerosis, diabetes, liver disease, kidney disease, severe hypertension, peripheral circulation......, please consult your healthcare professional before using the device.
- This product is not suitable for people with arrhythmia and pregnant women..
- Blood pressure measurements taken with this device are equivalent to those obtained by a trained observer using the cuff / stethoscope auscultation method and are within the accuracy limits prescribed by the standard of EN 1060-4.
- To avoid accidental strangulation, keep this product away from children. Don't let them wrap the tube around their neck.
5 Blood pressure
5.1 Measurement Principle
This product uses the Oscillometric Measuring method to detect blood pressure. Before every measurement, the unit establishes a “zero pressure” equivalent to the air pressure. Then it starts inflating the arm cuff, meanwhile, the unit detects pressure oscillations generated by beat-to-beat pulsatile, which is used to determine the systolic and diastolic pressure, and also pulse rate. The device also compares the longest and the shortest time intervals of detected pulse waves to mean time interval then calculates standard deviation. The device will display a warning signal with the reading to indicate the detection of irregular heartbeat when the difference of the time intervals is over 25%.
5.2 What is Blood Pressure?
Blood pressure is the pressure exerted on the artery tube while blood flows through the arteries. The pressure measured when the heart contracts and sends blood out of the heart is systolic (highest). The pressure measured when
the heart dilates with blood flowing back into the heart is called diastolic (lowest) blood pressure.
5.3 Why Measure Your Blood Pressure?
Among the various health problems afflicting modern people, problems associated with high blood pressure are by far the most common. High blood pressure's dangerously strong correlation with cardiovascular diseases and high morbidity has made measuring blood pressures a necessity of identifying those at risk.
5.4 Blood Pressure Standard
This device is equipped with a WHO Blood Pressure Indicator which classifies your blood pressure measurements into six stages (Optimal to Severe hypertension) based on WHO classification on blood pressure levels as shown in below chart.
After each measurement is completed, the LCD display will show your position automatically on the six segments of the bar indicator which corresponds to WHO Blood Pressure Indicator.
| Stages of blood pressure levels Indicator Systolic | in mmHg | Diastolic in mmHg | Our recommendation | ||
| Grade 3- Severe hypertension Red | >180 11 | 0 > | Take medical treatment at once | ||
| Grade 2 - Moderate hypertension | Orange 160 ~ 179 100 ~109 Seek medical advice | ||||
| Grade 1 - Mild hypertension Yellow | w 140 ~ 159 90 ~ 99 Check it regularly by doctor | ||||
| High - normal Green 3 | 130 ~ 139 85 ~ 89 Check it regularly by doctor | ||||
| Normal | Green 2 | 120 ~ 129 | 80 ~ 84 Check it yourself | ||
| Optimal | Green 1 | < 120 | < 80 | Check it yourself | |
5.5 Irregular Heartbeat Detector (IHB)
The symbol 🤨 will appear on the display, indicating a certain heartbeat irregularity was detected during measurement. The heartbeat rhythm that is more than or less than 25% from the average rhythm is usually defined as an irregular heartbeat rhythm. Talking, moving, shaking or an irregular pulse during the measurement can result in the appearance of this symbol.
Usually this is not a cause for concern, however if the symbol appears often, we recommend you seek medical advice and please note that the device does not replace a cardiac examination, but serves to detect pulse irregularities at an early stage.

• No Irregular Heartbeat Detector measurement will be stored in memory.
- The pulse display is not suitable for checking the frequency of heart pacemarkes. If a certain pulse irregularity is detected during measurement often, we recommend you seek medical advice.
• However, as a safeguard, we recommend that if you have arrhythmias such as atrial or ventricular premature beats and atrial fibrillation or any other special conditions you should check with your physician before using your device.
- The IHB function is not designed for use by people with arrhythmias nor for diagnosing or treating an arrhythmic problem. In order to filter the unstable status of user and avoid affecting the detection of heart rate from any movement, shaking or talking in the beginning of measurement, the method of averaging heart beat intervals for subject device is calculated with the three proper heart beat pulses detected in the beginning of measurement and that is different from a strict mathematical averaging of all recorded intervals.
- At least 3 beats with at least 25% difference from the average heart beat interval will generate the IHB icon on the screen.
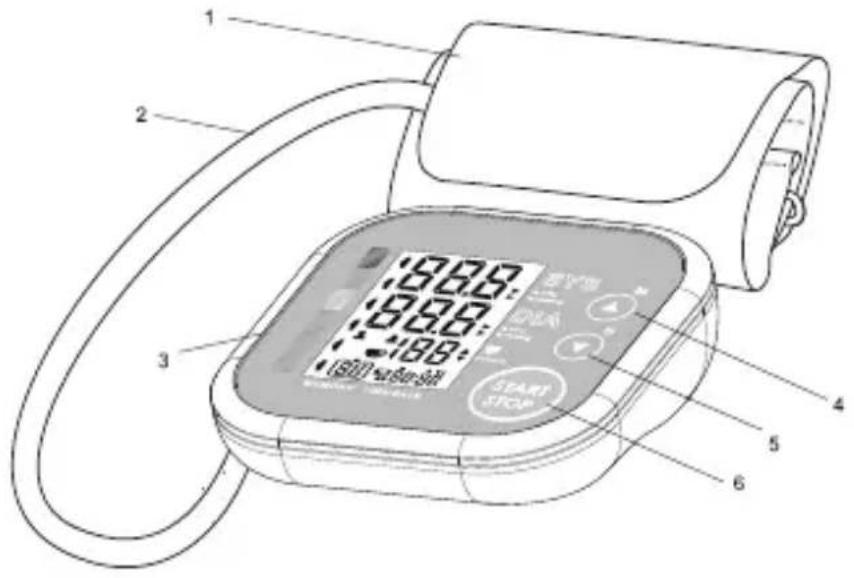
6 Product description
- Cuff
- Air hose
- Air connector plug
- Memory button
- Set button
- Start/stop button
- Battery compartment
natural_image
Technical line drawing of a mechanical device with labeled components (no text or symbols present)7 Display description
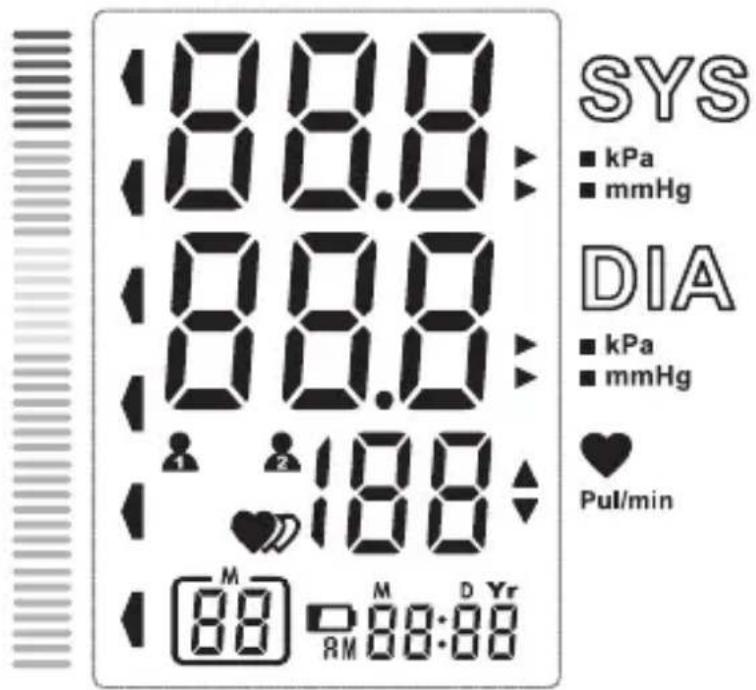
Symbol Description Explanation
| SYS | Systolic blood pressure High pressure result | |
| DIA | Diastolic blood pressure Low pressure result | |
| Pul/min | Pulse per minute Beats per minute, BPM | |
| Deflating CUFF air is exhausting of deflating | ||
| Memory | The displayed measurement values is from the memory. | |
| kPa | kPa Measurement Unit of the blood pressure (1kPa=7.5mmHg) | |
| mmHg | mmHg Measurement Unit of the blood pressure (1mmHg=0.133kPa) | |
| Lo+☐ | Low battery Batteries are low and need to be replaced | |
| Irregular heartbeat Irregular heartbeat detection | ||
| Grade The grade of the blood pressure | ||
| ,,88:88 | Current Time Year/Month/Day, Hour/Minute | |
| User 1 | Start measurement and save the results for User 1 | |
| User 2 | Start measurement and save the results for User 2 | |
| Heartbeat | Heartbeat detection during the measurement | |
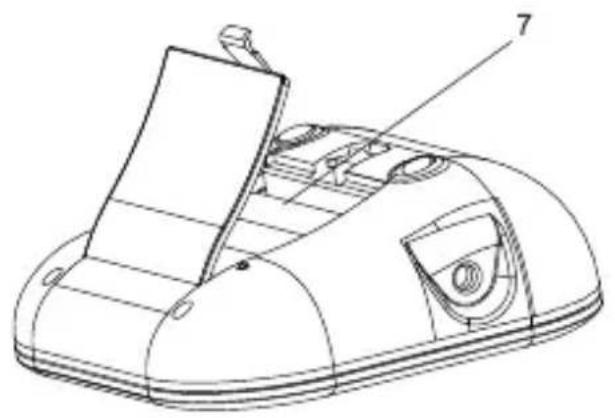
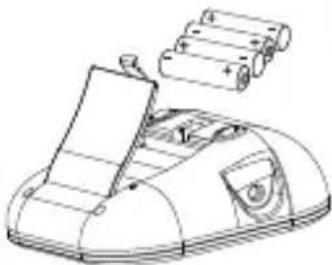
8 Installing batteries

CAUTION
Failure to use batteries according to instructions can be hazardous.
• Always use Alkaline batteries of the same type.
- Ensure that batteries are installed with correct polarity. Damage to the batteries and the equipment can result from installation with incorrect polarity.
- Never toss batteries into a fire, due to the risk of explosion.
- Never allow battery terminals to come into contact with each other or with metal objects, either intentionally or accidentally. This can cause overheating, fire or explosion.
- Keep batteries out of the reach of children. Consult a doctor immediately in case of swallowing.
- Fluid from leaking batteries can cause permanent damage to the equipment. Take particular care when handling damaged or leaking batteries, due to the risk of corrosion. Wear safety gloves.
- Remove the batteries if the equipment will not be used for an extended period.
- Open the battery compartment by pulling the cover away on the bottom of the unit.
- Insert 4 AAA/LR03 Alkaline batteries. Follow the polarity as indicated in the battery compartment.
natural_image
Line drawing of a mechanical device with rollers and a paper clip (no text or symbols)
When the batteries are low, is displayed. Low batteries must be replaced.
9 Setting date, time and measurement unit
- When the monitor is off, hold pressing "S" button for 3 seconds to enter the mode for year setting. Or when the monitor is off, press "S" button shortly, it will display the time. Then hold pressing "S" button to enter the mode for year setting.
- Press "M" button to change the [YEAR]. Each press will increase the numeral by one in a cycling manner.
- When you get the right year, press "S" button to set down and turn to next step.
- Repeat steps 2 and 3 to set the [MONTH] and [DAY].
- Repeat steps 2 and 3 to set the [HOUR] and [MINUTE].
- Repeat steps 2 and 3 to set the [UNIT] (kPa or mmHg).
- After the unit is set, the LCD will display "done" first, then display all the settings you have done and then turn off.
10 Select the user
- When the monitor is off, press "S" button to enter the selecting user mode, then press "S" button again to select the user between User 1 and User 2.
- If the LCD displays your desired user, press "START/STOP" button to turn off the device, the User selection is finished. Then press "START/STOP" button, you can start your measurement.
11 Applying the cuff

- Remove all watches, jewellery, etc. prior to attaching the Arm cuff.
- Press your brachial artery by two fingers approximately 2,5 cm above the elbow on the inside of your left arm to determine where your strongest pulse is.
- Slide the end of arm cuff furthest from the tube through the metal ring to a loop. The smooth cloth should be on the inside of the cuff. The Velcro will be on the outside of the cuff.
- Put the left arm through the cuff loop. The bottom of the cuff should be approx. 1,5 cm above the elbow. The cuff should lie over the brachial artery on the inside of the arm.
- Pull the cuff so that the top and bottom edges are tightened around your arm.
- When the cuff is positioned properly, press the Velcro firmly against the pile side of the cuff. The metal ring will not touch your skin.
- Relax your entire body, especially the area between your elbow and fingers. Place your elbow on a table so that the cuff is at the same level as your heart. Avoid leaning back while the measurement is being taken.
12 Taking measurement
- When the batteries are installed.
- Press the start/stop button to start measurement. After all segments are displayed, the cuff will inflate to a level that is right for you.
- If the cuff doesn't stop inflating, remove the cuff immediately. To stop the measurement, press start/stop button. The cuff will deflate right after.
• After the initial inflation of the cuff, the pressure will slowly decrease and when a pulse is detected, the heart rate symbol will start flashing.
- When the measurement is finished, the systolic pressure, diastolic pressure, heart rate and WHO indicator will be displayed and saved.
- Press the start/stop button to power off otherwise the monitor will automatically turn off after 1 minute if no button is pressed.
13 Recall the records
After each measurement, the systolic and diastolic pressure, heart rate with the time and date will be automatically stored.
The monitor features a 2 zone memory capability. Each memory zone holds at least 60 measurements
- When the monitor is off, please press "M" button to show the average value of the latest three records for the selected user.
- Press "M" or "S" button to get the record you want.
- The memory position, corresponding date and the corresponding time will be shown.
Note: If you want to check another user's records, please turn off the BPM when it is in the memory mode, then follow the steps of Select the User to select the user. Press "START/STOP" button to confirm your selection. Then press "M" button to check the measurement records.
Caution: The most recent record (1) is shown first. Each new measurement is assigned to the first (1) record. All other records are pushed back one digit (e.g., 2 becomes 3, and so on), and the last record (60) is dropped from the list.
14 Delete records
If you did not get the correct measurement, you can delete all results of the selected user by following steps below.
- Hold pressing "M" button and "S" button at the same time when the monitor is in the memory recall mode, the flash display "dEL ALL" will show.
- Press “S” button to confirm deleting, the LCD will display “dEL dOnE”, and then the monitor will turn off.
- Note: To exit out of delete mode without deleting any records, press "START/STOP" button before pressing "S" button to confirm any delete commands.
- If there is no record the display will show three dashes
15 Symbol indication / Troubleshooting
| Problem Symptom Check this | Remedy | ||
| no power | Display will not light up. | Batteries are exhausted. Replace with new batteries | |
| Batteries are inserted incorrectly. | Insert the batteries correctly | ||
| low batteries | Display is dim or show lo+ | Batteries are low. Replace with new batteries | |
| Error message | E1 shows The cuff is | not secure. Refasten the cuff and then measure again. | |
| E2 shows The cuff is | very tight Readjust the cuff, not too loose or too tight and then measure again. | ||
| E3 shows The pressure of the cuff is excess. | Relax for a moment and then measure again. | ||
| E10 or E11 shows | The monitor detected motion,talking or the pluse is too poor while measuring. | Relax for a moment and then measure again. | |
| E20 shows The measurement process does not detect the pulse signal. | Loosen the clothing on the arm and then measure again | ||
| E21 shows The treatment of the measurement failed. | Relax for a moment and then measure again. | ||
| EExx, shows | A calibration error occurred. | Retake the measurement. If the problem persists, contact the retailer or our customer service department for further assistance.Refer to the warranty for contact information and return instructions. | |
16 Technical specifications
| Model | TMB-1491, Ref: BD-4603ALB/ALS |
| Power source | 4 x AAA/LR03 (1,5V) - Alkaline batteries |
| Measurement zone | Rated cuff pressure: 0~300 mmHg |
| Measurement pressure: 40-230 mmHg | |
| Pulse: 40~199 beats/minute | |
| Accuracy | Pressure: 5°C - 40°C within±3 mmHg |
| Pulse value:±5% | |
| Pressure sensor | Semi-conductor |
| Inflation | Automatic - Pump driven |
| Deflation | Automatic Pressure release valve |
| Memory capacity | 2 Memory zones for each 60 memories |
| Auto-shut-off | 1 minute after last key operation |
| Operation environment | 5°C~+40°C |
| ≤85% RH | |
| Atmospheric pressure: 86 kPa to 106 kPa | |
| Storage/transportation environment | -20°C~+60°C |
| 10% RH~93% RH | |
| Atmospheric Pressure: 50-106 kPa | |
 | Keep dry |
| Weight | Approx. 277g (exc. batteries) |
| Cuff Arm circumference | 22~32 cm (about 83⁄4" - 121⁄2") |
| Limited patient | Over 18 years old |
| Giftbox content | Cuff, user guide, service card. |
| Classification | Internally powered equipment |
| Classification of type BF | |
| IP21 | |
| Not suitable for use in presence of flammable anaesthetic mixture with air or with oxygen or nitrous oxide | |
| Continuous operation with short-time loading. | |
| Display mode | Digital LCD V.A.60mm×40.5mm |
| Measurement mode | Oscillographic testing mode |
| External dimensions | Approx.110mm×110mm×41mm |
| Mode of operation | Continuous operation |
17 Complied European standards list
| Risk management | SO/EN 14971:2012 Medical devices — Application of risk management to medical devices |
| Labeling ISO/EN 1 | 5223-1:2012 Medical devices. Symbols to be used with medical device labels, labeling and information to be supplied. General requirements |
| User manual EN 10 | 041: 2008 Medical equipment manufacturers to provide information |
| General Requirements for Safety | EN 60601-1: 2006+A1:2013 Medical electrical equipment - Part 1: General requirements for basic safety and essential performanceIEC/EN 60601-1-11: 2010 Medical electrical equipment -- Part 1-11: General requirements for basic safety and essential performance - Collateral standard: Requirements for medical electrical equipment and medical electrical systems used in the home healthcare environmentIEC/EN 80601-2-30:2009 Medical electrical equipment - Part 2-30: Particular requirements for the basic safety and essential performance of automated noninvasive sphygmomanometers |
| Electromagnetic compatibility | IEC/EN 60601-1-2:2007 Medical electrical equipment - Part 1-2: General requirements for basic safety and essential performance - Collateral standard: Electromagnetic compatibility - Requirements and tests |
| Performance requirements | EN 1060-1:1995+A2:2009 Non-invasive blood pressurePart 1: General requirementsEN 1060-3:1997+A2:2009 Non-invasive blood pressurePart 3: Supplementary requirements for electromechanical blood pressure measuring system |
| Clinical investigation | EN 1060-4: 2004 Automatic Blood Pressure Monitor overall system Interventional accuracy of the testing process |
| Usability IEC/EN 60 | 0601-1-6: 2010 Medical electrical equipment -- Part 1-6: General requirements for basic safety and essential performance - Collateral Standard: UsabilityIEC/EN 62366: 2007 Medical devices - Application of usability engineering to medical devices |
| Software life-cycle processes | IEC/EN 62304:2006+AC: 2008 Medical device software - Software life cycle processes |
18 EMC Guidance
- This equipment needs to be installed and put into service in accordance with the information provided in the user manual;
- Wireless communications equipment such as wireless home network devices, mobile phones, cordless telephones and their base stations, walkie-talkies can affect this equipment and should be kept at least a distance d = 3,3m away from the equipment.
(Note: As indicated in Table 6 of IEC 60601-1-2:2007 for ME EQUIPMENT, a typical cell phone with a maximum output power of 2 W yields d=3, 3m at an IMMUNITY LEVEL of 3V/m)
19 Maintenance
- Use a piece of cloth with water or mild cleansing agent to wipe the device and dry it immediately with a dry cloth.
- Do not use detergent or any strong chemicals to clean the device.
- Use only a dry cloth to wipe the cuff.
- If the device is not to be used for a long time, please remove the batteries from the device (leaking of battery acid can cause the device to malfunction).
- Do not twist the cuff.
- Do not drop the product and avoid any strong impacts.
- Do not attempt to disassemble or change any parts of the monitor, including arm cuff, due to substitution of a component different from that supplied might result in measurement error.
• Always store the unit in the pouch after use. - Do not place the device directly under sunlight, in high temperature, or in humid or dusty places.
- Do not store the device in extremely low (less than -25^ ) or high (more than 70^ ) temperature.
20 Disposal (environmental protection)
Dispose of the device in accordance with EC Directive 2012/19/EU (Waste Electrical and Electronic Equipment). If you have any queries, please contact your local body responsible for waste disposal.
Batteries should be disposed of in an environmentally friendly manner in accordance with local regulations.
21 Warranty
21.1 Warranty period
The devices have a 36-month warranty period. The warranty period starts on the day the new unit is purchased. There is no warranty on Alkaline or rechargeable batteries (AA/AAA/LR03 type).
Consumables or defects causing a negligible effect on operation or value of the equipment are not covered.
The warranty has to be proven by presentation of the original or copy of the purchase receipt, on which the date of purchase and the unit-model are indicated.
21.2 Warranty handling
A faulty unit needs to be returned to an authorized service centre including a valid purchase note and a filled in service return card.
If the unit develops a fault during the warranty period, the service centre will repair any defects caused by material or manufacturing faults free of charge, by either repairing or exchanging the faulty units or parts of the faulty units. In case of replacement, colour and model can be different from the original purchased unit.
The initial purchase date shall determine the start of the warranty period. The warranty period is not extended if the unit is exchanged or repaired by the service centre.
21.3 Warranty exclusions
Damage or defects caused by incorrect treatment or operation and damage resulting from use of non-original parts or accessories are not covered by the warranty.
The warranty does not cover damage caused by outside factors, such as lightning, water and fire, nor any damage caused during transportation.
No warranty can be claimed if the serial number on the units has been changed, removed or rendered illegible.
Any warranty claims will be invalid if the unit has been repaired, altered or modified by the buyer.
To ensure precise measurement reading, re-calibration of the device is recommended after 2 years from the date of purchase. Shipping plus handling cost and recalibration service fee shall be charged accordingly.
Cher client,
natural_image
Technical line drawing of a mechanical device with labeled components (no text or symbols present)natural_image
Line drawing of a mechanical device with rollers and a paper clip (no text or symbols)natural_image
Technical line drawing of a mechanical device with labeled components (no text or symbols present)natural_image
Technical line drawing of a mechanical device with battery and paper components (no text or symbols)natural_image
Technical line drawing of a mechanical device with labeled components (no text or symbols present)natural_image
Line drawing of a vehicle with battery pack and paper roll (no text or symbols)
| Guidance and manufacturer's declaration – electromagnetic emissions | ||
| The device is intended for use in the electromagnetic environment specified below. The customer or the user of the device should assure that it is used in such an environment. | ||
| Emissions test | Compliance | Electromagnetic environment – guidance |
| RF emissionsCISPR 11 | Group 1 | The device uses RF energy only for its internal function. Therefore, its RF emissions are very low and are not likely to cause any interference in nearby electronic equipment. |
| RF emissionsCISPR 11 | Class B | The device is suitable for use in all establishments, including domestic establishments and those directly connected to the public low-voltage power supply network that supplies buildings used for domestic purposes. |
| Harmonic emissionsIEC 61000-3-2 | Not applicable | |
| Voltage fluctuations/flicker emissionsIEC 61000-3-3 | Not applicable | |
| Guidance and manufacturer's declaration – electromagnetic immunity | |||
| The device is intended for use in the electromagnetic environment specified below. The customer or the user of the device should assure that it is used in such an environment. | |||
| Immunity test | IEC 60601test level | Compliance level | Electromagnetic environment – guidance |
| Electrostatic discharge (ESD)IEC 61000-4-2 | ±6 kV contact±8 kV air | ±6 kV contact±8 kV air | Floors should be wood, concrete or ceramic tile. If floors are covered with synthetic material, the relative humidity should be at least 30 %. |
| Power frequency (50/60 Hz)magnetic fieldIEC 61000-4-8 | 3 A/m | 3 A/m | Power frequency magnetic fields should be at levels characteristic of a typical location in a typical commercial or hospital environment. |
| Guidance and manufacturer's declaration – electromagnetic immunity | |||
| The device is intended for use in the electromagnetic environment specified below. The customer or the user of the device should assure that it is used in such an environment. | |||
| Immunity test IEC 60601 test level | Compliance level | Electromagnetic environment – guidance | |
| Conducted RFIEC 61000-4-6 | 3 Vrms150 kHz to 80 MHz | Not applicable | Portable and mobile RF communications equipment should be used no closer to any part of the device, including cables, than the recommended separation distance calculated from the equation applicable to the frequency of the transmitter.Recommended separation distance d = 1,2 | |
| Radiated RFIEC 61000-4-3 | 3 V/m80 MHz to 2,5 GHz | 3 V/m | d = 1,2 | 80 MHz to 800 MHz d = 1,2 | 800 MHz to 2,5 GHz where P is the maximum output power rating of the transmitter in watts (W) according to the transmitter manufacturer and d is the recommended separation distance in metres (m).Field strengths from fixed RF transmitters, as determined by an electromagnetic site survey, ^a should be less than the compliance level in each frequency range. ^b Interference may occur in the vicinity of equipment marked with the following symbol: |
| NOTE 1 At 80 MHz and 800 MHz, the higher frequency range applies.NOTE 2 These guidelines may not apply in all situations. Electromagnetic propagation is affected by absorption and reflection from structures, objects and people. | |||
| \( ^aField strengths from fixed transmitters, such as base stations for radio (cellular/cordless) telephones and land mobile radios, amateur radio, AM and FM radio broadcast and TV broadcast cannot be predicted theoretically with accuracy. To assess the electromagnetic environment due to fixed RF transmitters, an electromagnetic site survey should be considered. If the measured field strength in the location in which the device is used exceeds the applicable RF compliance level above, the device should be observed to verify normal operation. If abnormal performance is observed, additional measures may be necessary, such as reorienting or relocating the device.\( ^bOver the frequency range 150 kHz to 80 MHz, field strengths should be less than 3 V/m. | |||
| Recommended separation distances between portable and mobile RF communications equipment and the device | |||
| The device is intended for use in an electromagnetic environment in which radiated RF disturbances are controlled. The customer or the user of the device can help prevent electromagnetic interference by maintaining a minimum distance between portable and mobile RF communications equipment (transmitters) and the device as recommended below, according to the maximum output power of the communications equipment. | |||
| Rated maximum output power of transmitter W | Separation distance according to frequency of transmitter m | ||
| 150 kHz to 80 MHz d = 1,2 | 80 MHz to 800 MHz d = 1,2 | 800 MHz to 2,5 GHz d = 2,3 | |
| 0,01 | Not applicable | 0,12 | 0,23 |
| 0,1 | Not applicable | 0,38 | 0,73 |
| 1 | Not applicable | 1,2 | 2,3 |
| 10 | Not applicable | 3,8 | 7,3 |
| 100 | Not applicable | 12 | 23 |
| For transmitters rated at a maximum output power not listed above, the recommended separation distance d in metres (m) can be estimated using the equation applicable to the frequency of the transmitter, where P is the maximum output power rating of the transmitter in watts (W) according to the transmitter manufacturer.NOTE 1 At 80 MHz and 800 MHz, the separation distance for the higher frequency range applies.NOTE 2 These guidelines may not apply in all situations. Electromagnetic propagation is affected by absorption and reflection from structures, objects and people. | |||
This Blood Pressure Monitor complies with the EC Directives and bears the CE Mark "CE 0197".
This blood pressure monitor also complies with mainly the following standards, (including but not limited).
Distributor:
Tristar Europe B.V.
Jules Verneweg 87
5015 BH Tilburg

Manufacturer
Guangdong Transtek Medical Electronics Co., Ltd.
Zone A, No.105 ,Dongli Road, Torch Development District,
Zhongshan,528437,Guangdong,China
| EC | REP |
Represented in Europe by:
MDSS - Medical Device Safety Service GmbH
Schiffgraben 41, 30175 Hannover, Germany