MWK 222.1 XHA - Microwave Oven HOTPOINT-ARISTON - Free user manual and instructions
Find the device manual for free MWK 222.1 XHA HOTPOINT-ARISTON in PDF.
| Product type | Built-in microwave oven |
| Brand | HOTPOINT-ARISTON |
| Model | MWK 222.1 XHA |
| Capacity | 25 L |
| Microwave output power | 900 W |
| Grill power | 1000 W |
| Microwave input power | 1450 W |
| Power supply | 230 V ~ 50 Hz |
| External dimensions (W x H x D) | 594 x 410 x 388 mm |
| Net weight | Approximately 19.7 kg |
| Turntable diameter | 315 mm |
| Control type | Electronic with rotary knob and buttons |
| Main functions | Microwave, Grill, Combi (2 levels), Weight defrost, Auto menu (8 programs), Multi-stage cooking, Timer, Clock |
| Safety function | Child lock, door locking system |
| Cleaning and maintenance | Clean with damp cloth, lemon tip; do not use steam cleaner or abrasives |
| Installation | Built into 60 cm cabinet, min height 85 cm, min depth 55 cm |
| Included accessories | Glass tray, tray support, grill rack, instruction manual |
Frequently Asked Questions - MWK 222.1 XHA HOTPOINT-ARISTON
User questions about MWK 222.1 XHA HOTPOINT-ARISTON
0 question about this device. Answer the ones you know or ask your own.
Ask a new question about this device
Download the instructions for your Microwave Oven in PDF format for free! Find your manual MWK 222.1 XHA - HOTPOINT-ARISTON and take your electronic device back in hand. On this page are published all the documents necessary for the use of your device. MWK 222.1 XHA by HOTPOINT-ARISTON.
USER MANUAL MWK 222.1 XHA HOTPOINT-ARISTON
natural_image
Simple line drawing of a 3D rectangular box (no text or symbols)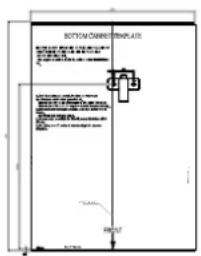
text_image
BOTTOM CONNECT TEMPLATE 1.0" 2.0" 3.0" 4.0" 5.0" 6.0" 7.0" 8.0" 9.0" 10.0" 11.0" 12.0" 13.0" 14.0" 15.0" 16.0" 17.0" 18.0" 19.0" 20.0" 21.0" 22.0" 23.0" 24.0" 25.0" 26.0" 27.0" 28.0" 29.0" 30.0" 31.0" 32.0" 33.0" 34.0" 35.0" 36.0" 37.0" 38.0" 39.0" 40.0" 41.0" 42.0" 43.0" 44.0" 45.0" 46.0" 47.0" 48.0" 49.0" 50.0" 51.0" 52.0" 53.0" 54.0" 55.0" 56.0" 57.0" 58.0" 59.0" 60.0" 61.0" 62.0" 63.0" 64.0" 65.0" 66.0" 67.0" 68.0" 69.0" 70.0" 71.0" 72.0" 73.0" 74.0" 75.0" 76.0" 77.0" 78.0" 79.0" 80.0" 81.0" 82.0" 83.0" 84.0" 85.0" 86.0" 87.0" 88.0" 89.0" 90.0" 91.0" 92.0" 93.0" 94.0" 95.0" 96.0" 97.0" 98.0" 99.0" 100.0"natural_image
Simple line drawing of a 3D rectangular box with internal vertical and horizontal lines, no text or symbols present.VITE A

STAFFA
LINEA MEDIANA
natural_image
Line drawing of a black electrical outlet plug with two leads (no text or symbols)Problema
natural_image
Simple line drawing of a 3D rectangular box (no text or symbols)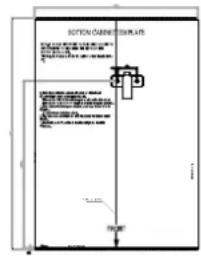
text_image
BUTTON CABLE TEMPLATE 1000mm x 250mm x 350mm x 450mm x 550mm x 650mm x 750mm x 850mm x 950mm x 1050mm x 1150mm x 1250mm x 1350mm x 1450mm x 1550mm x 1650mm x 1750mm x 1850mm x 1950mm x 2050mm x 2150mm x 2250mm x 2350mm x 2450mm x 2550mm x 2650mm x 2750mm x 2850mm x 2950mm x 3050mm x 3150mm x 3250mm x 3350mm x 3450mm x 3550mm x 3650mm x 3750mm x 3850mm x 3950mm x 4050mm x 4150mm x 4250mm x 4350mm x 4450mm x 4550mm x 4650mm x 4750mm x 4850mm x 4950mm x 5050mm x 5150mm x 5250mm x 5350mm x 5450mm x 5550mm x 5650mm x 5750mm x 5850mm x 5950mm x 6050mm x 6150mm x 6250mm x 6350mm x 6450mm x 6550mm x 6650mm x 6750mm x 6850mm x 6950mm x 7050mm x 7150mm x 7250mm x 7350mm x 7450mm x 7550mm x 7650mm x 7750mm x 7850mm x 7950mm x 8050mm x 8150mm x 8250mm x 8350mm x 8450mm x 8550mm x 8650mm x 8750mm x 8850mm x 8950mm x 9050mm x 9150mm x 9250mm x 9350mm x 9450mm x 9550mm x 9650mm x 9750mm x 9850mm x 9950mm x1natural_image
Simple line drawing of a 3D rectangular box with internal lines and a small vertical rod, no text or symbols present.VIS A

SUPPORT
LIGNE CENTRALE
text_image
A F D D G E D C B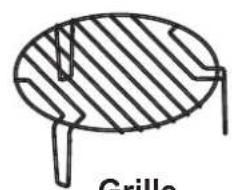
natural_image
Simple line drawing of a grille with diagonal hatching and two legs (no text or symbols)natural_image
Line drawing of an electrical outlet plug with two leads (no text or symbols)natural_image
Simple line drawing of a 3D rectangular box (no text or symbols)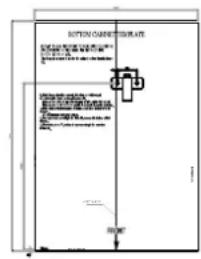
text_image
BOTTOM CABLE SETTLE 100mm x 200mm x 300mm x 400mm x 500mm x 600mm x 700mm x 800mm x 900mm x 1000mm x 1100mm x 1200mm x 1300mm x 1400mm x 1500mm x 1600mm x 1700mm x 1800mm x 1900mm x 2000mm x 2100mm x 2200mm x 2300mm x 2400mm x 2500mm x 2600mm x 2700mm x 2800mm x 2900mm x 3000mm x 3100mm x 3200mm x 3300mm x 3400mm x 3500mm x 3600mm x 3700mm x 3800mm x 3900mm x 4000mm x 4100mm x 4200mm x 4300mm x 4400mm x 4500mm x 4600mm x 4700mm x 4800mm x 4900mm x 5000mm x 5100mm x 5200mm x 5300mm x 5400mm x 5500mm x 5600mm x 5700mm x 5800mm x 5900mm x 6000mm x 6100mm x 6200mm x 6300mm x 6400mm x 6500mm x 6600mm x 6700mm x 6800mm x 6900mm x 7000mm x 7100mm x 7200mm x 7300mm x 7400mm x 7500mm x 7600mm x 7700mm x 7800mm x 7900mm x 8000mm x 8100mm x 8200mm x 8300mm x 8400mm x 8500mm x 8600mm x 8700mm x 8800mm x 8900mm x 9000mm x 9100mm x 9200mm x 9300mm x 9400mm x 9500mm x 9600mm x 9700mm x 9800mm x 9900mm x1natural_image
Simple line drawing of a 3D rectangular box with internal lines and a small vertical rod, no text or symbols present.TORNILLO A

SOPORTE

natural_image
Line drawing of a black electrical outlet plug with two leads (no text or symbols)Problema
natural_image
Simple line drawing of a 3D rectangular box (no text or symbols)
text_image
BOTTOM CABLE SETTLE 100mm x 200mm x 300mm x 400mm x 500mm x 600mm x 700mm x 800mm x 900mm x 1000mm x 1100mm x 1200mm x 1300mm x 1400mm x 1500mm x 1600mm x 1700mm x 1800mm x 1900mm x 2000mm x 2100mm x 2200mm x 2300mm x 2400mm x 2500mm x 2600mm x 2700mm x 2800mm x 2900mm x 3000mm x 3100mm x 3200mm x 3300mm x 3400mm x 3500mm x 3600mm x 3700mm x 3800mm x 3900mm x 4000mm x 4100mm x 4200mm x 4300mm x 4400mm x 4500mm x 4600mm x 4700mm x 4800mm x 4900mm x 5000mm x 5100mm x 5200mm x 5300mm x 5400mm x 5500mm x 5600mm x 5700mm x 5800mm x 5900mm x 6000mm x 6100mm x 6200mm x 6300mm x 6400mm x 6500mm x 6600mm x 6700mm x 6800mm x 6900mm x 7000mm x 7100mm x 7200mm x 7300mm x 7400mm x 7500mm x 7600mm x 7700mm x 7800mm x 7900mm x 8000mm x 8100mm x 8200mm x 8300mm x 8400mm x 8500mm x 8600mm x 8700mm x 8800mm x 8900mm x 9000mm x 9100mm x 9200mm x 9300mm x 9400mm x 9500mm x 9600mm x 9700mm x 9800mm x 9900mm x1natural_image
Simple line drawing of a 3D rectangular box with internal vertical and horizontal lines, no text or symbols present.PARAFUSO A

SUPORTE
LINHA CENTRAL
text_image
PARAFUSO A SUPORTEnatural_image
Line drawing of an electrical outlet plug with two leads (no text or symbols)Problema
natural_image
Simple line drawing of a 3D rectangular prism (no text or symbols)
text_image
BOTTOM QUINTAGE TAURATE 1. Top section is the main part of the bottom-right gauge. 2. Top section is the main part of the top-left gauge. 3. Top section is the main part of the bottom-left gauge. 4. Top section is the main part of the bottom-right gauge. 5. Top section is the main part of the bottom-left gauge. 6. Top section is the main part of the bottom-right gauge. 7. Top section is the main part of the bottom-left gauge. 8. Top section is the main part of the bottom-right gauge. 9. Top section is the main part of the bottom-left gauge. 10. Top section is the main part of the bottom-right gauge.natural_image
Simple line drawing of a 3D rectangular box with a vertical rod and dashed lines indicating depth (no text or symbols)SCHROEF A

text_image
SCHROEF A STEUNnatural_image
Line drawing of a black electrical outlet plug with two leads (no text or symbols)NL
Probleem
Magnetron verstoort tv-ontvangst.
Gedimd ovenlicht
Installation, 102-106
natural_image
Technical line drawing of a 3D cube and its corresponding diagram showing a bottom-right corner panel with internal components (no text or symbols)natural_image
Line drawing of an electrical outlet plug with two leads (no text or symbols)DE
Fehler
text_image
Technical drawing of a 3D cube with an inset showing a labeled diagram of a bottom cage and its internal structure.natural_image
Diagram showing a mechanical assembly with a circular component and a downward arrow, no text or symbols present.Вращающееся кольцо
Общии вид
natural_image
Line drawing of an electrical outlet plug with two leads (no text or symbols)natural_image
Simple line drawing of a 3D rectangular box (no text or symbols)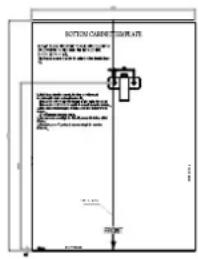
text_image
BOTTOM CABLE TIGRATE 1. 2. 3. 4. 5. 6. 7. 8. 9. 10. 11. 12. 13. 14. 15. 16. 17. 18. 19. 20. 21. 22. 23. 24. 25. 26. 27. 28. 29. 30. 31. 32. 33. 34. 35. 36. 37. 38. 39. 40. 41. 42. 43. 44. 45. 46. 47. 48. 49. 50. 51. 52. 53. 54. 55. 56. 57. 58. 59. 60. 61. 62. 63. 64. 65. 66. 67. 68. 69. 70. 71. 72. 73. 74. 75. 76. 77. 78. 79. 80. 81. 82. 83. 84. 85. 86. 87. 88. 89. 90. 91. 92. 93. 94. 95. 96. 97. 98. 99. 100.natural_image
Simple line drawing of a 3D rectangular box with internal structure and dashed lines indicating hidden edges (no text or symbols)ŚRUBA A

WSPORNIK
LINIA ŚRODKOWA
text_image
Technical diagram of a safe with labeled components and directional arrow indicating flow or movementnatural_image
Line drawing of a black electrical outlet plug with two leads (no text or symbols)Installation, 162-166
Installation and connection
Built-in furniture
Prepare the Cabinet
Install the oven
Turntable Installation
Setting up your oven, 167
Overall view
Names of Oven Parts and Accessories
Start-up and use, 168-170
Operation instruction
Important safety instructions, 171-174
Utensils, 175-176
Utensil Test
Materials you can use in microwave oven
Materials to be avoided in microwave oven
Maintenance and care, 177
Cleaning
Troubleshooting, 178
Assistance, 179

Hotpoint
ARISTON
! Read these instructions carefully before using your microwave oven, and keep it carefully. If you follow the instructions, your oven will provide you with many years of good service.
! SAVE THESE INSTRUCTIONS CAREFULLY
PRECAUTIONS TO AVOID POSSIBLE EXPOSURE TO EXCESSIVE MICROWAVE ENERGY
a) Do not attempt to operate this oven with the door open since this can result in harmful exposure to microwave energy. It is important not to break or tamper with the safety interlocks.
(b) Do not place any object between the oven front face and the door or allow soil or cleaner residue to accumulate on sealing surfaces.
(c) WARNING: If the door or door seals are damaged, the oven must not be operated until it has been repaired by a competent person.
(d) WARNING: Ensure that the appliance is switched off before replacing the lamp to avoid the possibility of electric shock.
(e) Accessible parts may become hot during use. Young children should be kept away.
(f) Steam cleaner is not to be used.
(g) Surface of a storage drawer can get hot.
(h) Do not use harsh abrasive cleaners or sharp metal scrapers to clean the oven door glass since they can scratch the surface, which may result in shattering of the glass.
(i) This appliance can be used by children aged from 8 years and above and persons with reduced physical, sensory or mental capabilities or lack of experience and knowledge if they have been given supervision or instruction concerning use of the appliance in a safe way and understand the hazards involved. Children shall not play with the appliance. Cleaning and user maintenance shall not be made by children unless they are older than 8 and supervised.
ADDENDUM
If the apparatus is not maintained in a good state of cleanliness, its surface could be degraded and affect the lifespan of the apparatus and lead to a dangerous situation.
Installation and connection
This appliance is only intended for domestic use.
- This oven is intended for built-in use only. It is not intended for counter-top use or for use inside a cupboard.
- Please observe the special installation instructions.
- The appliance can be installed in a 60cm wide wallmounted cupboard(at lease 55cm deep and 85cm off the floor).
- The appliance is fitted with a plug and must only be connected to a properly installed earthed socket.
- The mains voltage must correspond to the voltage specified on the rating plate.
- The socket must be installed and connecting cable must only be replaced by a qualified electrician. If the plug is no longer to accessible following installation, an all-pole disconnecting device must be present on the installation side with a contact gap of at lease 3mm.
- Adapters, multi-way multi-way strips and extension leads must not be used. Overloading can result in a risk of fire. Questo forno a microonde è dotato di un moderno sistema di controllo elettronico per regolare al meglio i parametri di cottura in base alle esigenze dell'utente.
The accessible surface may be hot during operation.

Please Read the Manual Carefully Before Installation.
Please Note
Electrical connection
- The oven is fitted with a plug and must be only connected to a properly installed earthed socket. In accordance with the appropriate regulations, the socket must only be installed and the connecting cable must only be replaced by a qualified electrician. If the plug is no longer accessible following installation and all-pole isolating switch must be present on the installation side with a contact gap at least 3mm.
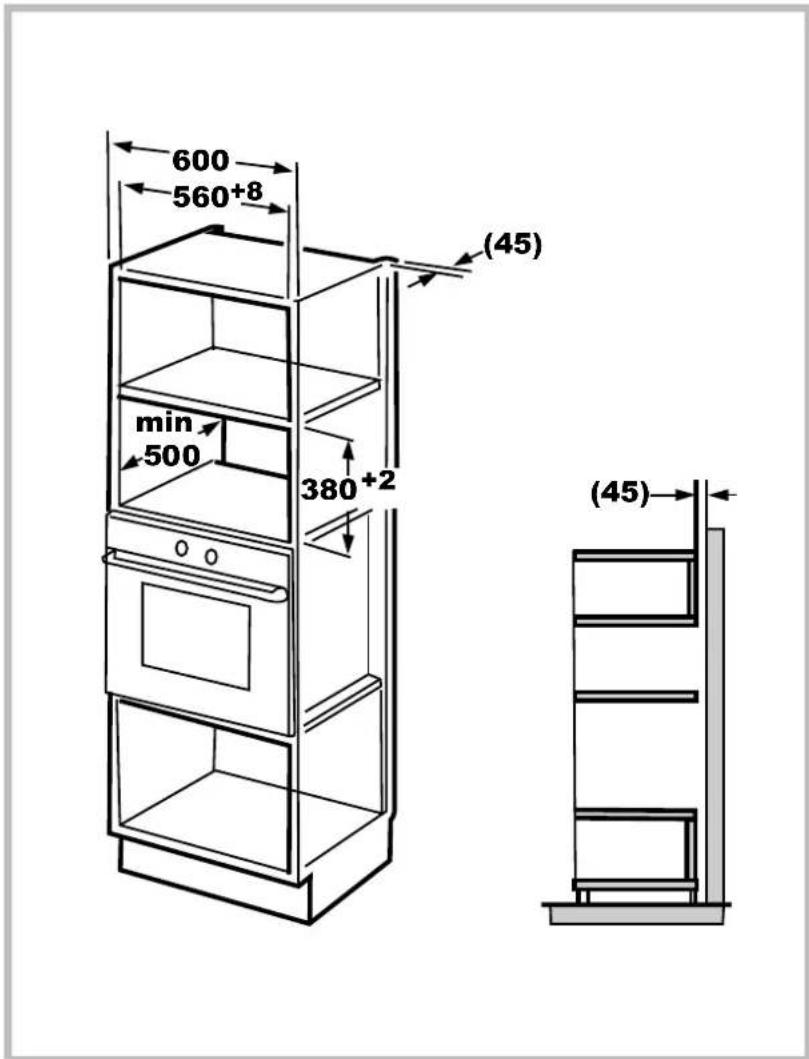
A. Built-in furniture
The built-in cabinet shall not have a rear wall behind the appliance.
Minimum installation height is 85cm. Do not cover ventilation slots and air intake points.
text_image
600 560+8 min 500 380+2 (45) (45)EN
B. Prepare the Cabinet
natural_image
Simple line drawing of a 3D rectangular box (no text or symbols)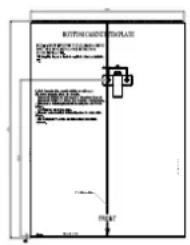
text_image
MOTTER CABLE DETRIGATE 1.0" 2.0" 3.0" 4.0" 5.0" 6.0" 7.0" 8.0" 9.0" 10.0" 11.0" 12.0" 13.0" 14.0" 15.0" 16.0" 17.0" 18.0" 19.0" 20.0" 21.0" 22.0" 23.0" 24.0" 25.0" 26.0" 27.0" 28.0" 29.0" 30.0" 31.0" 32.0" 33.0" 34.0" 35.0" 36.0" 37.0" 38.0" 39.0" 40.0" 41.0" 42.0" 43.0" 44.0" 45.0" 46.0" 47.0" 48.0" 49.0" 50.0" 51.0" 52.0" 53.0" 54.0" 55.0" 56.0" 57.0" 58.0" 59.0" 60.0" 61.0" 62.0" 63.0" 64.0" 65.0" 66.0" 67.0" 68.0" 69.0" 70.0" 71.0" 72.0" 73.0" 74.0" 75.0" 76.0" 77.0" 78.0" 79.0" 80.0" 81.0" 82.0" 83.0" 84.0" 85.0" 86.0" 87.0" 88.0" 89.0" 90.0" 91.0" 92.0" 93.0" 94.0" 95.0" 96.0" 97.0" 98.0" 99.0" 100.0"- Read the instruction on the BOTTOM CABINET TEMPLATE, put the template on the bottom plane of cabinet.
natural_image
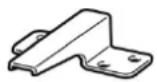
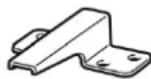
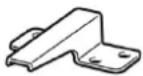
Simple line drawing of a 3D rectangular box with internal lines and a small vertical rod, no text or symbols present.SCREW A

BRACKET
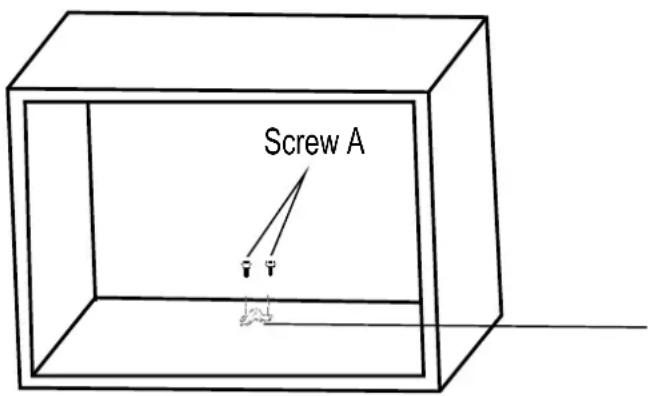
- Make marks on the bottom plane of cabinet according to marks "a" of the template.
text_image
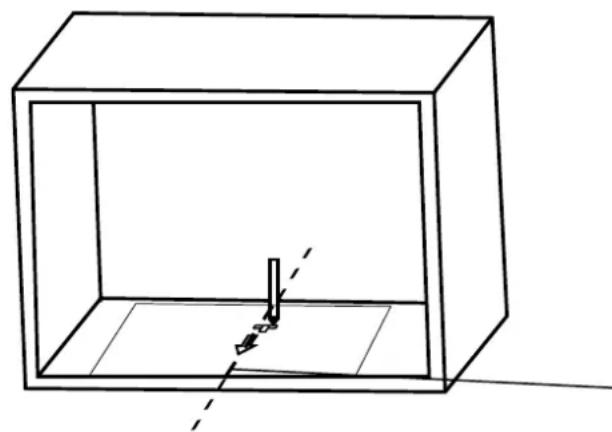
Screw ABRACKET
- Remove the BOTTOM CABINET TEMPLATE, and fix the BOTTOM BRACKETS with SCREW A.
C. Install the oven

text_image
Technical diagram of a double door with an arrow indicating direction, alongside its exploded view showing the bracket assembly.- Install the oven into the cabinet.
• Make sure the back of the oven is locked by bracket.
- Do not trap or kink the power cord.
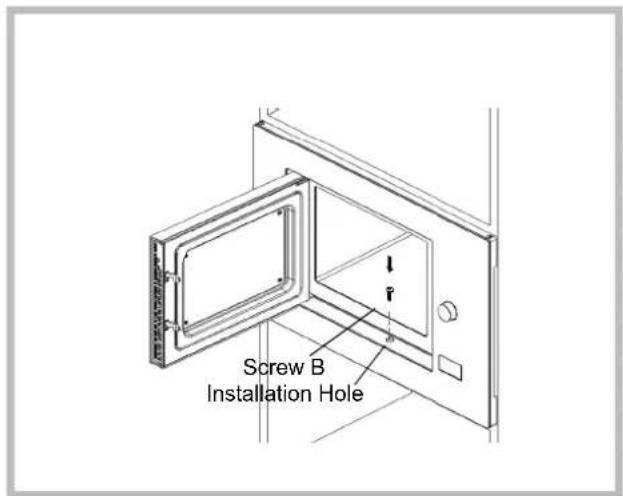
text_image
Screw B Installation Hole- Open the door, fix the oven to the cabinet with Screw B, at the installation hole.
Specifications
| Model: | MWK 222.1 X/HA |
| Rated Voltage: 230V~50Hz | |
| Rated Input Power (Microwave): | 1450W |
| Rated Output Power (Microwave): | 900W |
| Rated Input Power (Grill): | 1000W |
| Oven Capacity: 25L | |
| Turntable Diameter: ø 815mm | |
| External Dimensions: 594x410x388mm | |
| Net Weight: Approx. 19.7 kg | |
 | This appliance conforms to the following European Economic Community directives: 2006/95/EEC dated 12/12/06 (Low Voltage) and subsequent amendments 2004/108/EEC dated 15/12/04 (Electromagnetic Compatibility) and subsequent amendments 93/68/EEC dated 22/07/93 and subsequent amendments 2012/19/EEC and subsequent amendments.1275/2008 standby/off mode. |
Turntable Installation
a) Never place the enamel tray upside down. The enamel tray should never be restricted.
b) Both glass tray and turntable ring assembly must always be used during cooking.
c) All food and containers of food are always placed on the enamel tray for cooking.
d) If enamel tray cracks or breaks, contact your nearest authorized service center.
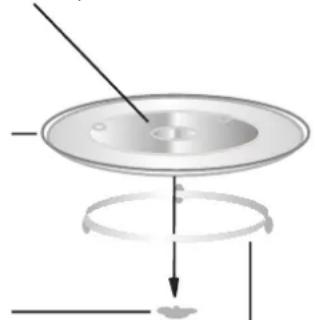
Hub (underside)
Glass tray
natural_image
Diagram of a mechanical assembly with a central circular component and a downward arrow indicating motion (no text or symbols)Turntable shaft
Turntable ring assembly
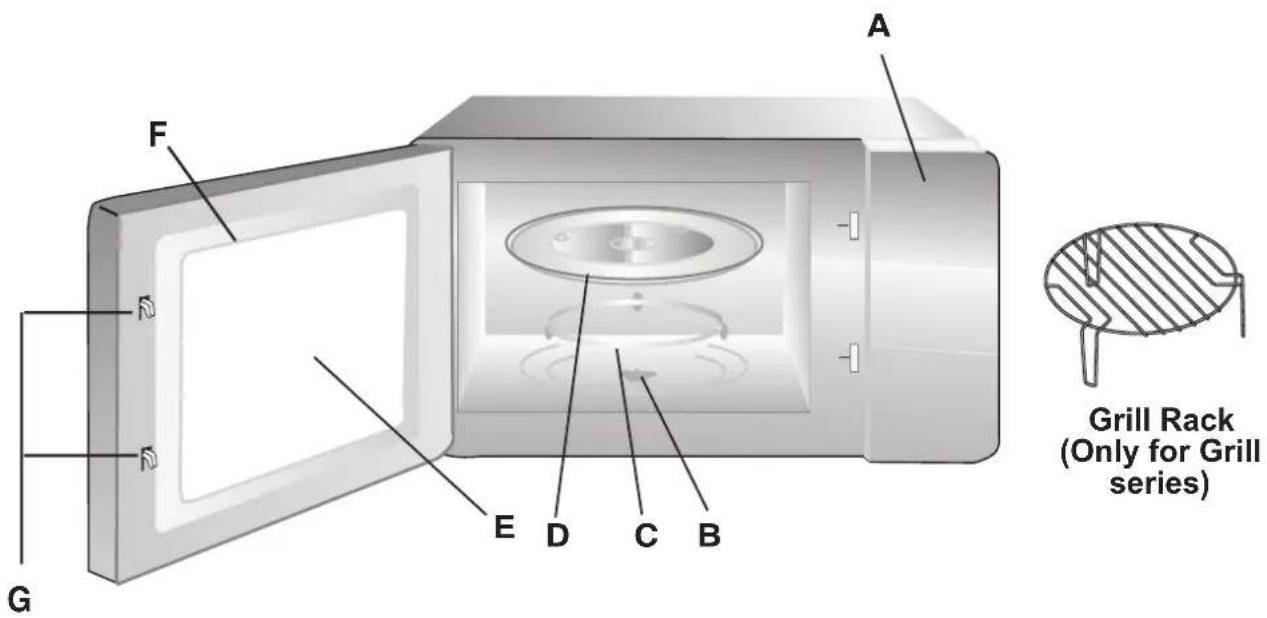
Names of Oven Parts and Accessories
Remove the oven and all materials from the carton and oven cavity. Your oven comes with the following accessories:
Enamel Tray 1
Turntable ring assembly 1
Instruction Manual 1
A) Control panel
B) Turntable shaft
C) Turntable ring assembly
D) Glass tray
E) Observation window
F) Door assembly
G) Safety interlock system
EN
text_image
A F G E D C B Grill Rack (Only for Grill series)User Interface

text_image
1 2 3 4 5 6 7 8 9Operation instruction
This microwave oven uses modern electronic control to adjust cooking parameters to meet your needs better for cooking.
1. Clock Setting
When the microwave oven is electrified, "0:00" will blink, buzzer will ring once.
1) Press "once."00:00" displays.
2) Turn “☐” to adjust the hour figures, the input time should be within 0--23 (24-hour).
3) Press “, the minute figures will flash.
4) Turn " 🔍" to adjust the minute figures, the input time should be within 0--59.
5) Press "to finish clock setting.":" will flash.
Note:
1) If the clock is not set, it would not function when powered.
2) During the process of clock setting, if you press "STOP", the oven will go back to the previous status automatically.
2. Microwave Cooking
Press "the LED will display "900".
Press “for times or turn “” to choose the power you want, and “900”, “720”, “450”, “270” o “90” will display for each added press.
Then press "START firm, and turn " set cooking time from 0:05 to 95:00. Press "START" again to start cooking.
Example:
If you want to use 720W microwave power to cook for 20 minutes, you can operate the oven as the following steps.
1) Press "once, the screen display "900".
2) Press "once again or turn " to choose 720W microwave power.
3) Press "STARTfirm, and the screen displays "720".
4) Turn " ” to adjust the cooking time until the oven displays "20:00".

5) Press "START cooking.
Note:
the step quantities for the adjustment time of the coding switch are as follow:
| 0---1 min 5 seconds | |
| 1---5 min 10 seconds | |
| 5---10 min | 30 seconds |
| 10---30 min | 1 minute |
| 30---95 min | 5 minutes |
| MW Pad Instructions Order | Display | Microwave Power | Suitable for |
| 1 | 900 | 900 W | Defrosting delicate foods |
| 2 | 720 | 720 W | Defrosting and continued cooking |
| 3 | 450 | 450 W | Cooking meat and heating delicate foods |
| 4 | 270 | 270 W | Heatling and cooking food |
| 5 | 90 | 90 W Heatling liquids | |
3. Grill or Combi. Cooking
Press “|∞|” the LED will display “G”, and
press “|∞|∞|” for times or turn the “∞” to choose the power you want, and “G”, “C-1”, “C-2”, will display for each added press. Then press “START
to confirm, and turn "→" to set cooking time from 0:05 to 95:00. Press "START to start cooking.
Example:
If you want to use 55% microwave power and 45% grill power (C-1) to cook for 10 minutes, you can operate the oven as the following steps.
1) Press "|\~\~|\~\~" once, the screen display "G".
2) Press "|∞|∞|" once again or turn "→" to choose combi. 1 mode, and the screen displays "C-1", the grill and microwave icons will light.
3) Press "STARTfirm.
4) Turn " [icon] to adjust the cooking time until the oven displays "10:00"
5) Press "START cooking.
| “Grill/Combi.” Order | Pad Instructions Display | Microwave Power | Grill Power |
| 1 G 0% 100% | |||
| 2 C-1 55% 45% | |||
| 3 C-2 36% 64% |
Note: If half the grill time passes, the oven sounds twice, and this is normal. In order to have a better effect of grilling food, you should turn the food over, close the door, and then press "START" to continue cooking. If no operation, the oven will continue working.
ghnikooC deepS4
In waiting state, turn “√” to set cooking time with 100% microwave power, then press “START” to start cooking.
5. Defrost By Weight
1) Press "❄️" once, and the microwave and defrosting icons will light.
2) Turn “” to select the weight of food from 100 to 2000 g.
3) Press "START" to start defrosting, and the microwave and defrosting icons will flash.
6. Auto Menu
1) Press " [icon] " to set auto menu function.
Turn “💡” to choose the different menu, “A-1” to “A-8” will display. And the microwave icon, “Auto” and the food selected will light in screen.
2) Press "START" to confirm.
3) Turn " [icon] " to choose the preset weight. Refer to the "The menu chart".
4) Press "START" to start cooking.
Example:
If you want to use “☐” to cook fish for 350g.
1) Press "☐" till "A-6" displays.
2) Press "START" to confirm.
3) Turn " ” to select the weight of fish till "350" displays.
4) Press "START" to start cooking.
Tabella Menu Automatico:
| Menu | Weight | Display | Time |
| A-1 Pizza | 200 g | 200 | 1'20" |
| 400 g | 400 | 2'30" | |
| A-2 Meat | 250 g | 250 | 4'00" |
| 350 g | 350 | 5'30" | |
| 450 g | 450 | 6'50" | |
| A-3 Vegetables | 200 g | 200 | 2'50" |
| 300 g | 300 | 4'10" | |
| 400 g | 400 | 5'30" | |
| A-4 Pasta | 50 g (with 450 ml cold water) | 50 | 17'00" |
| 100 g (with 800 ml cold water) | 100 | 20'00" | |
| A-5 Potato | 200 g | 200 | 4'40" |
| 400 g | 400 | 7'30" | |
| 600 g | 600 | 9'10" | |
| A-6 Fish | 250 g | 250 | 4'20" |
| 350 g | 350 | 6'00" | |
| 450 g | 450 | 7'30" | |
| A-7 Beverage | 1 cup (120 ml) | 1 | 1'00" |
| 2 cups (240 ml) | 2 | 1'50" | |
| 3 cups (360 ml) | 3 | 2'40" | |
| A-8 Popcorn | 50 g | 50 | 1'20" |
| 100 g | 100 | 2'10" |
7. Multi-Stage Cooking
Two stages can be maximally set. If one stages is defrosting, it should be put in the first stage. The buzzer will ring once after each stage and the next stage will begin.
Note: Auto menu cannot be set as one of the multi-stage.
Esempio:
If you want to defrost 200 gr of food, then to cook with 720W microwave power for 7 minutes. The steps are as following:
1) Press “” once, and the microwave and defrosting icons will light.
2) Turn " 🔍" to select the food weight till "200" displays.
3) Press "the LED will display "9 0" and the microwave icon will light.
4) Repeatly press "return" displays.

5) Press "STARTfirm.
6) Turn “ ” to adjust the cooking time till the oven displays “7:00”.
7) Press "START" to start cooking, and buzzer will sound once for the first section, defrosting time counts down; buzzer will sound once again entering the second cooking. When multi-section cooking finishes, buzzer sounds five times.
8. Inquiring Function
1) In states of microwave, grill and combination cooking, press "the current power will be displayed for 3 seconds. After 3 seconds, the oven will turn back to the former state.
2) In cooking state, press “” to inquire the time and the time will display for 3 seconds.
9. Lock-out Function for Children
Lock:
In waiting state, press "STOP" seconds, there will be a long "beep" denoting entering into the children-lock state and "Indicator will light. LED will display current time or [::].
Lock quitting:
In locked state, press "STOP" seconds, there will be a long "beep" denoting that the lock is released, and "→" indicator will disappear.
IMPORTANT SAFETY INSTRUCTIONS
WARNING
To reduce the risk of fire, electr a shock, injury to persons or exposure to excessive crowave oven energy when using your appliance, follow basic precautions, cl ng dhe foll ng: owi
- Warning: Liquids and other foods must not be heated in sealed containers since they are liable to explode.
- Warning: It is hazardous for anyone other than a competent person to carry out any service or repair operation that involves the removal of a cover which gives protection against exposure to microwave energy.
- Warning: Only allow children to use the oven without supervision when adequate instructions have been given so that the child is able to use the oven in a safe way and understand the hazards of improper use.
- Warning: When the appliance is operated in the combination mode, children should only use the oven under adult supervision due to the e temperatures generated. (only for grill series).
- Only use utensils suitable for use in microwave ovens.
-
The oven should be cleaned regularly and any food deposits should be removed.
-
Read and follow the specific: "PRECAUTIONS TO AVOID POSSIBLE EXP OSURE TO EXCESSIVE MICROWAVE ENERGY".
- When heating for oil and paper containers, keep an eye on the oven due to the possibility of ignition.
- If smoke is observed, switch off or unplug the appliance and keep the door closed in order to stifle a ny flames.
- Do not overcook food.
- Do not use the oven cavity for storage purposes. Do not store items, such as bread, cookies, etc. inside the oven.
- Remove wire twist -ties and metal handles from paper or plastic containers/bags before placing them in the oven.
- Install or locate th is oven only n accordance with the ristall atin instructions provided.
- Eggs in the shell and whole hard-boiled eggs should not be heated in microwave ovens since they may explode, even after microwave heating has ended.
- Use this appliance only for its intended uses as desired in i manual. Do not use corrosive chemicals or vapors in this appliance. This oven is especially designed to heat. It is not designed for industrial or laboratory use.
Important safety instructions
EN
- If the supply cord is damaged, it must be replaced by the manufacturer, its service agent or similarly qualified persons in order to avoid a hazard.
- Do not store or use this appliance outdoors.
- Do not use this oven near water, in a wet basement or near a swimming pool.
- The temperature of accessible surfaces may be high when the appliance is operating. The surfaces are liable to get hot during use. Keep cord away from heated surface, and do not cover any events on the oven.
- Do not let cord hang over edge of table or counter.
- Failure to maintain the oven in a clean condition could lead to deterioration of the surface that could adversely affect the life of the appliance and possibly result in a hazardous situation.
- The contents of feeding bottles and baby food jars shall be stirred or shaken and the temperature checked before consumption, in order to avoid burns.
-
Microwave heating of beverages can result in delayed eruptive boiling, therefore care must be taken when handling the container.
-
The appliance is not intended for use by persons (including children) with reduced physical, sensory or mental capabilities, or lack of experience and knowledge, unless they have been given supervision or instruction concerning use of the appliance by a person responsible for their safety.
- Children should be supervised to ensure that they do not play with the appliance.
- The microwave oven shall not be placed in a cabinet unless it has been tested in a cabinet.
- The appliances are not intended to be operated by means of an external timer or separate remote-control system.
- Surface of a storage drawer can get hot.
- During use the appliance becomes hot. Care should be taken to avoid touching heating elements inside the oven.
- Only use the temperature probe recommended for this oven. (for ovens provided with a facility to use a temperature -sensing probe.)
- During the first use there is a particular smell due to production oils to protect some components.
Important safety instructions
- Keep the appliance and its cord out of reach of children less than 8 years.
- This appliance is intended to be used in household and similar applications such as: -staff kitchen a reas in shops, offices and other working environments; -by clients in hotels, motels and other residential type environments; -farm houses; -bed and breakfast type environments.
- WARNING: The appliance and its accessible parts b ecome hot during use. Care should be taken to avoid touching heating elementsChildren less than 8 years of age shall be kept away unless continuously supervised.
READ CAREFULLY AND KEEP FOR FUTUREREFERENCE
EN
Important safety instructions
EN
DANGER
Electric Shock Hazard Touching some of the internal components can cause serious personal injury or death. Do not disassemble this appliance.
WARNING
Electric Shock Hazard Improper use of the grounding can result in electric shock. Do not plug into an outlet until appliance is properly installed and grounded.
This appliance must be grounded. In the event of an electrical short circuit, grounding reduces the risk of electric shock by providing an escape wire for the electric current.
This appliance is equipped with a cord having a grounding wire with a grounding plug.
The plug must be plugged into an outlet that is properly installed and grounded.
Consult a qualified electrician or serviceman if the grounding instructions are not completely understood or if doubt exists as to whether the appliance is properly grounded. If it is necessary to use an extension cord, use only a 3-wire extension cord.
1) A short power-supply cord is provided to reduce the risks resulting from becoming entangled in or tripping over a longer cord.
2) If a long cord set or extension cord is used:
1) The marked electrical rating of the cord set or extension cord should be at least as great as the electrical rating of the appliance.
2) The extension cord must be a grounding type 3-wire cord.
3) The long cord should be arranged so that it will not drape over the counter top or tabletop where it can be pulled on by children or tripped over unintentionally.
CAUTION
Personal Injury Hazard
It is hazardous for anyone other than a competent person to carry out any service or repair operation that involves the removal of a cover which gives protection against exposure to microwave energy.
Disposal
- When disposing of packaging material: observe local legislation so that the packaging may be reused.
- The European Directive 2012/19/EEC on Waste Electrical and Electronic Equipment (WEEE), requires that old household electrical appliances must not be disposed of in the normal unsorted municipal waste stream. Old appliances must be collected separately in order to optimise the recovery and recycling of the materials they contain and reduce the impact on human health and the environment. The crossed out “wheeled bin” symbol on the product reminds you of your obligation, that when you dispose of the appliance it must be separately collected.
Consumers may take their old appliance to public waste collection areas, other communal collection areas, or if national legislation allows return it to a retailer when purchasing a similar new product.
All major household appliance manufacturers are active in the creation of systems to manage the collection and disposal of old appliances.
See the instructions on "Materials you can use in microwave oven or to be avoided in microwave oven."
There may be certain non-metallic utensils that are not safe to use for microwaving. If in doubt, you can test the utensil in question following the procedure below.
Utensil Test:
1) Fill a microwave-safe container with 1 cup of cold water (250ml) along with the utensil in question.
2) Cook on maximum power for 1 minute.
3) Carefully feel the utensil. If the empty utensil is warm, do not use it for microwave cooking.
4) Do not exceed 1 minute cooking time.
Materials you can use in microwave oven
| Utensils Remarks | |
| Aluminum foil Shielding only. Small smooth pieces can be used to cover thin parts of meat or poultry to prevent overcooking. Arcing can occur if foil is too close to oven walls. The foil should be at least 1 inch (2.5cm) away from oven walls. | |
| Browning dish Follow man | manufacturer's instructions. The bottom of browning dish must be at least 3/16 inch (5mm) above the turntable. Incorrect usage may cause the turntable to break. |
| Dinnerware Microwave-safe only. Follow manufacturer's instructions. Do not use cracked or chipped dishes. | |
| Glass jars Always remove lid. Use only to heat food until just warm. Most glass jars are not heat resistant and may break. | |
| Glassware Heat-resistant oven glassware only. Make sure there is no metallic trim. Do not use cracked or chipped dishes. | |
| Oven cooking bags Follow manufacturer's instructions. Do not close with metal tie. Make slits to allow steam to escape. | |
| Paper plates and cups Use for short-term cooking/warming only. Do not leave oven unattended while cooking. | |
| Paper towels Use to cover food for reheating and absorbing fat. Use with supervision for a short-term cooking only. | |
| Parchment paper Use as a cover to prevent splattering or a wrap for steaming. | |
| Plastic Microwave-safe only. Follow the manufacturer's instructions. Should be labeled "Microwave Safe". Some plastic containers soften, as the food inside gets hot. "Boiling bags" and tightly closed plastic bags should be slit, pierced or vented as directed by package. | |
| Plastic wrap Microwave-safe only. Use to cover food during cooking to retain moisture. Do not allow plastic wrap to touch food. | |
| Thermometers | Microwave-safe only (meat and candy thermometers). |
| Wax paper | Use as a cover to prevent splattering and retain moisture. |
Materials to be avoided in microwave oven
| Utensils Remarks | |
| Aluminum tray May cause arcing. Transfer food into microwave-safe dish. | |
| Food carton with metal handle | May cause arcing. Transfer food into microwave-safe dish. |
| Metal or metal-trim-med utensils | Metal shields the food from microwave energy. Metal trim may cause arcing. |
| Metal twist ties May cause arcing and could cause a fire in the oven. | |
| Paper bags May cause a fire in the oven. | |
| Plastic foam Plastic foam | may melt or contaminate the liquid inside when exposed to high temperature. |
| Wood Wood will dry out | when used in the microwave oven and may split or crack. |
Cleaning
Be sure to unplug the appliance from the power supply.
1) Clean the inside of the oven after using with a slightly damp cloth.
2) Clean the accessories in the usual way in soapy water.
3) The door frame and seal and neighboring parts must be cleaned carefully with a damp cloth when they are dirty.
4. Do not use harsh abrasive cleaners or sharp metal scrapers to clean the oven door glass since they can scratch the surface, which may result in shattering of the glass.
5. Cleaning Tip---For easier cleaning of the cavity walls that the food cooked can touch: Place half a lemon in a bowl, add 300ml (1/2 pint) water and heat on 100% microwave power for 10 minutes.
Wipe the oven clean using a soft, dry cloth.
Two-round-pin plug

natural_image
Line drawing of a black electrical outlet plug with two leads (no text or symbols)Problem
Microwave oven interfering TV reception
Dim oven light.
Steam accumulating on door, hot air out of vents.
Oven started accidentally with no food in.
Oven can not be started.
Oven does not heat.
Glass turntable makes noise when microwave oven operates
There are sparks coming from the appliance.
Possible causes/Remedy
- Radio and TV reception may be interfered when microwave oven operating. It is similar to the interference of small electrical appliances, like mixer, vacuum cleaner, and electric fan. It is normal.
- In low power microwave cooking, oven light may become dim. It is normal.
- In cooking, steam may come out of food. Most will get out from vents. But some may accumulate on cool place like oven door. It is normal.
- It is forbidden to run the unit without any food inside. It is very dangerous.
- Power cord not plugged in tightly. Unplug. Then plug again after 10 seconds.
- Fuse blowing or circuit breaker works. Replace fuse or reset circuit breaker (repaired by professional personnel of our company).
- Test outlet with other electrical appliances.
- Door not closed well. Close door well.
- roller rDirty est and oven bottom. Refer to “Maintenance of Microwave” to clean dirty parts.
- Clean the appliance thoroughly; remove any traces of grease, bits of food, etc. Make sure that are no metal abjects close to the oven walls. Never use metal abjects with the shelf. Never operate your oven when it is empty.
Before contacting the After Sales Service:
- make sure you can't fix the anomaly yourself;
- if you can't, contact an authorized Technical Assistance Service.
! Never engage non-authorized technicians.
Report:
• the type of anomaly;
• the oven model (Mod.);
• the serial number (S/N).
This information is on the ratings plate on the Microwave Oven.
EN
EN
EN