HA — Microwave Oven — Mode d'emploi PDF")
FQ 99 C.1 (BK) HA - Microwave Oven HOTPOINT-ARISTON - Free user manual and instructions
Find the device manual for free FQ 99 C.1 (BK) HA HOTPOINT-ARISTON in PDF.

| Product type | Built-in microwave oven |
| Brand | HOTPOINT-ARISTON |
| Model | FQ 99 C.1 (BK) HA |
| Dimensions (W x H x D) | 43.5 x 32 x 40 cm |
| Volume | 56 L |
| Supply voltage | 220-240 V ~ 50/60 Hz |
| Maximum absorbed power | 2800 W |
| Cooking programs | Traditional, Multi-cooking, Barbecue, Gratin, Pizza, Pastry, Fast Cooking, Steaming |
| Temperature range | 40 °C to 250 °C |
| Door type | Removable glass inner door |
| Interior lighting | 25 W bulb, E14 base |
| Display | Digital with icons |
| Timer | Independent with audible alarm |
| Delayed programming | Yes (duration and end of cooking) |
| Preheating | Automatic with indicator |
| Cooling system | Cooling fan |
| Rotisserie | No (on some models) |
| Cavity material | Enamel |
| Cleaning | Manual, removable door |
| Safety | Automatic shut-off after 2 hours, child lock not specified |
| Energy class | Not specified (conforms to EC directives) |
| Included accessories | Rack, drip pan, telescopic slides (depending on model) |
| Country of origin | Not specified |
Frequently Asked Questions - FQ 99 C.1 (BK) HA HOTPOINT-ARISTON
User questions about FQ 99 C.1 (BK) HA HOTPOINT-ARISTON
0 question about this device. Answer the ones you know or ask your own.
Ask a new question about this device
Download the instructions for your Microwave Oven in PDF format for free! Find your manual FQ 99 C.1 (BK) HA - HOTPOINT-ARISTON and take your electronic device back in hand. On this page are published all the documents necessary for the use of your device. FQ 99 C.1 (BK) HA by HOTPOINT-ARISTON.
USER MANUAL FQ 99 C.1 (BK) HA HOTPOINT-ARISTON
Electrical connection
Technical data
Description of the appliance, 16
Overall view
Control panel
Display
Start-up and use, 17
Setting the clock
Setting the timer
Starting the oven
FZ 990 C.1 /HA
FZ 990 C.1 IX /HA
FZ 99 C.1/HA
FZ 99 C.1 IX /HA
FQ 99 C.1 /HA
FZ 992 C.1/HA
FZ 992 C.1 IX /HA
FB 99 C.1 /HA
FB 99 C.1 IX /HA
FD 99 C.1/HA
F 99 C.1 /HA
F 99 C.1 IX /HA
F 89.1/HA
F 89.1 IX/HA
FH 99 C /HA
FH 99 C IX /HA
FH 997 C IX/HA
FH 997 C /HA
FH 899 XA/HA
FH 899C XA/HA
Cooking modes, 18-20
Cooking modes
Programming cooking
Practical cooking advice
Cooking advice table
Precautions and tips, 21
General safety
Disposal
Respecting and conserving the environment
Care and maintenance, 22-23
Switching the appliance off
Cleaning the appliance
Cleaning the oven door
Replacing the light bulb
Assembling the sliding rack kit
Assistance, 24
GB
Before operating your new appliance please read this instruction booklet carefully. It contains important information concerning the safe operation, installation and maintenance of the appliance.
! Please keep these operating instructions for future reference. Pass them on to possible new owners of the appliance.
Positioning
Keep packaging material out of the reach of children.
It can become a choking or suffocation hazard. (see Precautions and tips).
The appliance must be installed by a qualified professional in accordance with the instructions provided. Incorrect installation may cause harm to people and animals or may damage property.
Built-in appliance
Use the appropriate cabinet to ensure that the appliance functions properly.
- The panels adjacent to the oven must be made of heat-resistant material.
- Cabinets with a veneer exterior must be assembled with glues which can withstand temperatures of up to 100^ .
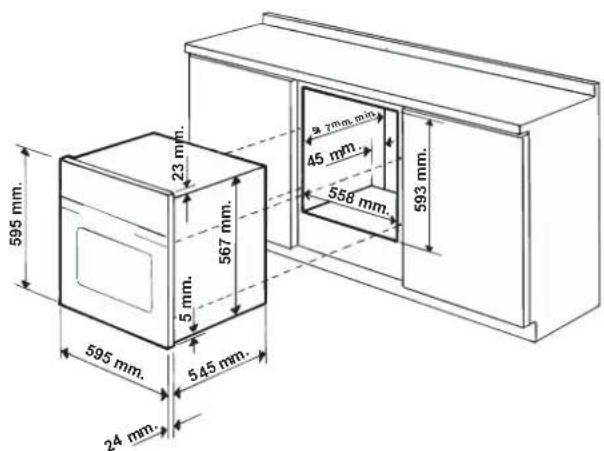
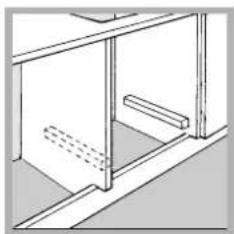
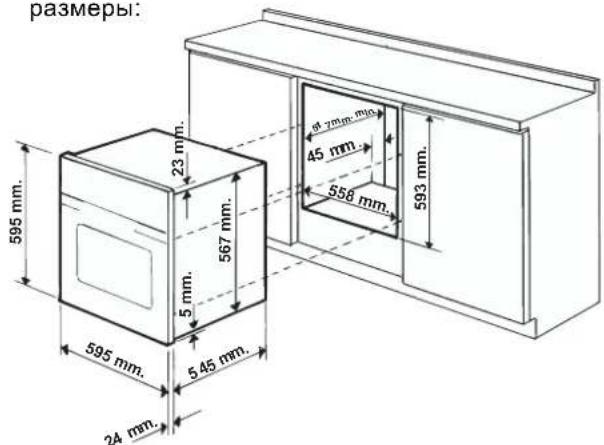
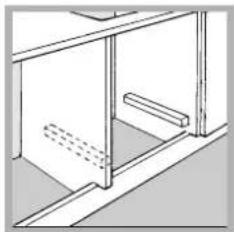
- to install the oven under the counter (see diagram) or in a kitchen unit, the cabinet must have the following dimensions:
The appliance must not come into contact with electrical parts once it has been installed. The indications for consumption given on the data plate have been calculated for this type of installation.
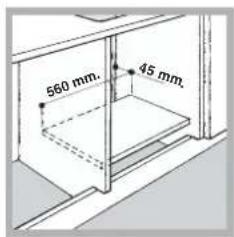
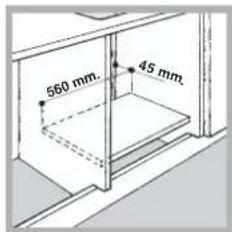
Ventilation
To ensure adequate ventilation is provided, the back panel of the cabinet must be removed. It is advisable to install the oven so that it rests on two strips of wood, or on a completely flat surface with an opening of at least 45 × 560 ~mm (see diagrams).
Centring and fixing
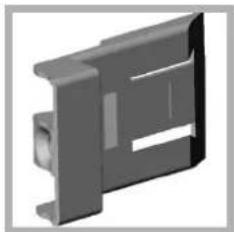
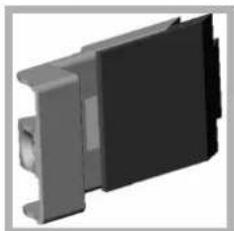
Position the 4 tabs on the side of the oven, in line with the 4 holes on the outer frame. Adjust the tabs according to the thickness of the cabinet side panel, as shown below:
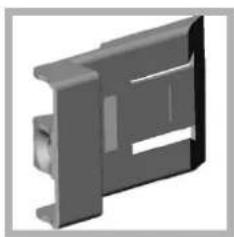
20 mm thick: take off the removable part of the tab (see diagram).
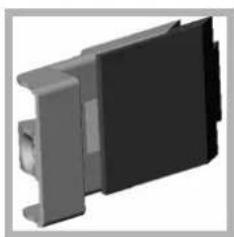
18 mm thick: use the first groove, which has already been set in the factory (see diagram).

16 mm thick: use the second groove (see diagram).
Secure the appliance to the cabinet by opening the oven door and inserting 4 screws into the 4 holes on the outer frame.
All parts which ensure the safe operation of the appliance must not be removable without the aid of a tool.
Electrical connection
Ovens equipped with a three-pole power supply cable are designed to operate with alternating current at the voltage and frequency indicated on the data plate located on the appliance (see below).
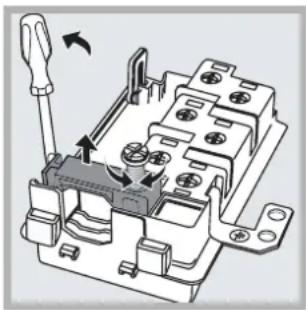
Fitting the power supply cable
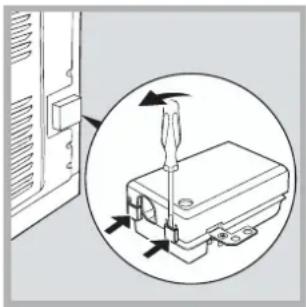
- Open the terminal board by inserting a screwdriver into the side tabs of the cover. Use the screwdriver as a lever by pushing it down to open the cover (see diagram).
-
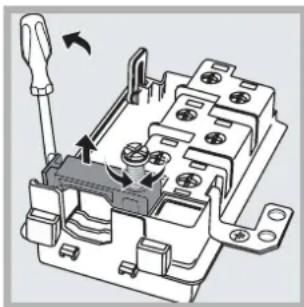
Loosen the cable clamp screw and remove it, using a screwdriver as a lever (see figure).
-
Remove the wire contact screws L-N- 1一 then fasten the wires under the screw heads, respecting the colour code: Blue (N), Brown (L) and Yellow-Green (1±)
Connecting the electricity supply cable to the mains
Install a standardised plug corresponding to the load indicated on the data plate (see table).
The appliance must be directly connected to the mains using an omnipolar switch with a minimum contact opening of 3mm installed between the appliance and the mains. The switch must be suitable for the charge indicated and must comply with current electrical regulations (the earthing wire must not be interrupted by the switch). The supply cable must be positioned so that it does not come into contact with temperatures higher than 50^ at any point.
! The installer must ensure that the correct electrical connection has been made and that it is fully compliant with safety regulations.
Before connecting the appliance to the power supply, make sure that:
-
The appliance is earthed and the plug is compliant with the law.
-
The socket can withstand the maximum power of the appliance, which is indicated on the data plate (see below).
The voltage is in the range between the values indicated on the data plate (see below). - The socket is compatible with the plug of the appliance. If the socket is incompatible with the plug, ask an authorised technician to replace it. Do not use extension cords or multiple sockets.
Once the appliance has been installed, the power supply cable and the electrical socket must be easily accessible.
! The cable must not be bent or compressed.
! The cable must be checked regularly and replaced by authorised technicians only (see Assistance).
! The manufacturer declines any liability shouldThe manufacturer these safety measures not be observed.these safety measures
| TABLE OF CHARACTERISTICS | |
| Dimensions | width 43.5 cm hei gh t 32 cm depth 40 cm |
| Volume 56 l | |
| Dimensions * | width 43.5 cm hei gh t 32 cm depth 41.5 cm |
| Volume * 58 l | |
| Electrical connections | voltage: 220 - 240 V~ 50/60Hz maximum power absorbed 2800 W (see data plate) |
| ENERGY LABEL | Directive 2002/ 40/EC on the label of electric ovens. Standard EN 50304 Energy consumption for Natural convection – heating mode: Traditional mode Declared energy consumption for Forced convection Class – heat ing mode: Baking |
| CE | This appliance conf orms to the following European Economic Community directives: 2006/95/EEC dated 12/12/06 (Low Voltage) and subsequent amendments – 2004/108/EEC dated 15/12/04 (Electromagnetic Compatibility) and subsequent amendments – 93/68/EEC dated 22/07/93 and subsequent amendments. 2002/96/EC and subsequent amendments. 1275/2008 stand-by/of f mode |
- Withglass panel fitted to the inside of the door
Description of the appliance
GB
Overall view
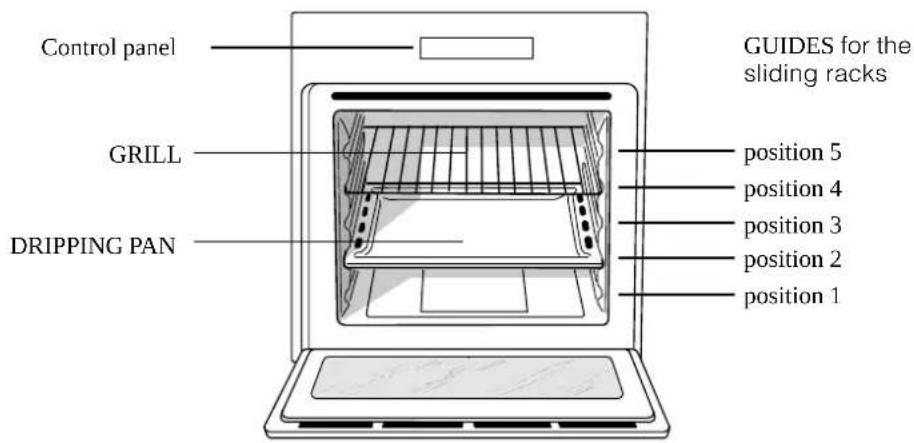
Control panel
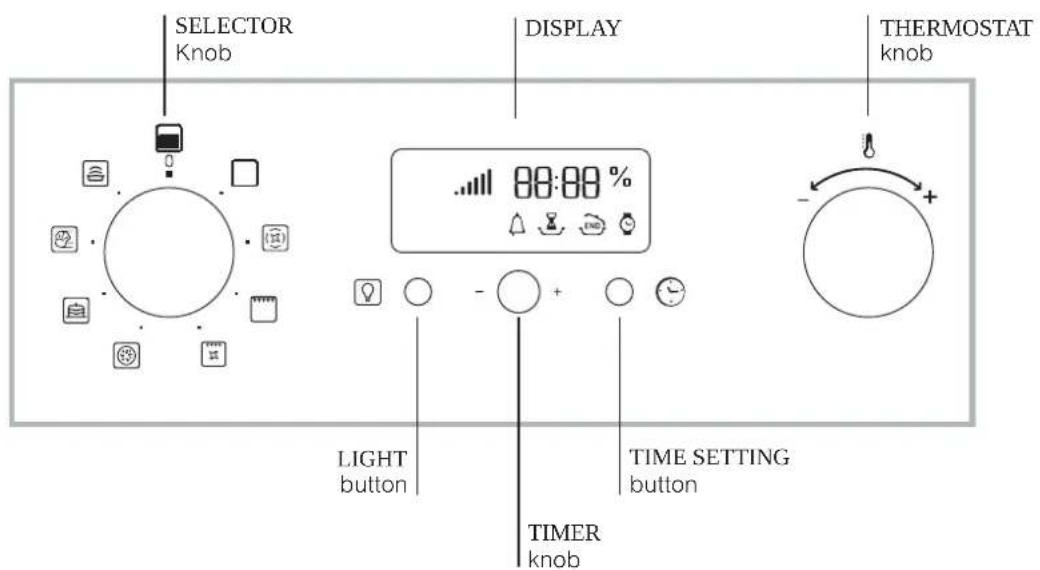
Display
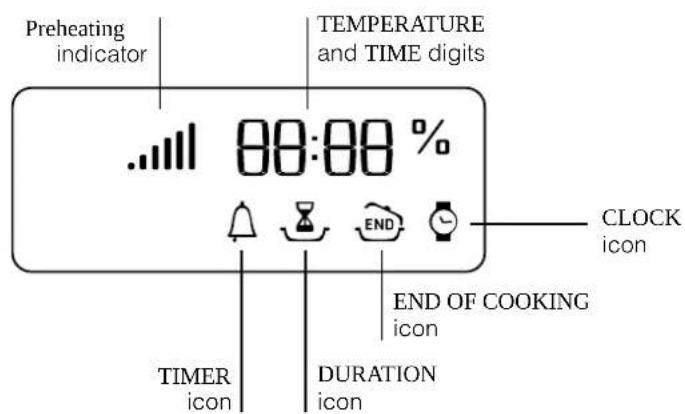
! The first time you use your appliance, heat the empty oven with its door closed at its maximum temperature for at least half an hour. Ensure that the room is well ventilated before switching the oven off and opening the oven door. The appliance may emit a slightly unpleasant odour caused by protective substances used during the manufacturing process burning away.
Setting the clock
The clock may be set when the oven is switched off or when it is switched on, provided that a the end time of a cooking cycle has not been programmed previously.
- Press the button several times until the icon and the first two digits on the display start to flash.
- Turn the TIMER KNOB towards "+" and "-" to adjust the hour value.
- Press the button again until the other two digits on the DISPLAY begin to flash.
- Turn the TIMER KNOB towards "+" and "-" to adjust the minute value.
- Press the button again to confirm.
Setting the timer
This function does not interrupt cooking and does not affect the oven; it is simply used to activate the buzzer when the set amount of time has elapsed.
- Press the button several times until the icon and the three digits on the display begin to flash.
- Turn the TIMER KNOB towards "+" and "-" to adjust the minute value.
- Press the button again to confirm. The display will then show the time as it counts down. When this period of time has elapsed the buzzer will be activated.
Starting the oven
- Select the desired cooking mode by turning the SELECTOR knob.
- The oven begins its preheating stage and the preheating indicator lights up.
The temperature may be changed by turning the THERMOSTAT knob
- When the preheating indicator switches off and a buzzer sounds the preheating process is
complete: you may now place the food in the oven.
- During cooking it is always possible to:
- change the cooking mode by turning the SELECTOR knob
- change the temperature by turning the THERMOSTAT knob
- set the cooking duration in addition to the cooking end time
(see Cooking modes)
- stop cooking by turning the SELECTOR knob to the "0" position.
- The oven switches off automatically after two hours: this default period of time is set for all cooking modes for safety reasons.
The cooking duration may be changed (see Cooking modes).
6. If a blackout occurs while the oven is already in operation, an automatic system within the appliance will reactivate the cooking mode from where it was interrupted as long as the temperature has not dropped below a certain level. Programmed cooking modes which have not started will not be restored and must be reprogrammed.
There is no preheating stage for the FAST COOKING and BARBECUE modes.
! Never put objects directly on the bottom of the oven; this will avoid the enamel coating being damaged.
! Always place cookware on the rack(s) provided.
Cooling ventilation
In order to cool down the external temperature of the oven, a cooling fan blows a stream of air between the control panel and the oven door. In the FAST COOKING mode, the fan is activated automatically after ten minutes. In the BAKING mode, the cooling fan is only activated when the oven is hot.
! Once cooking has been completed, the cooling fan continues to operate until the oven has cooled down sufficiently.
Oven light
When the oven is not in operation, the lamp can be switched on at any time by pressing the button
Cooking modes
GB
Cooking modes
! All cooking modes have a default cooking temperature which may be adjusted manually between 40^ and 250^ as desired.
In the BARBECUE mode, the default power level value is indicated as a percentage (%) and may also be adjusted manually.

TRADITIONAL OVEN mode
When using this traditional cooking mode, it is best to use one cooking rack only. If more than one rack is used, the heat will be distributed unevenly.

MULTI-COOKING mode
Since the heat remains constant throughout the oven, the air cooks and browns food in a uniform manner. A maximum of two racks may be used at the same time.

BARBECUE mode
By turning the THERMOSTAT knob, the different power levels which may be set will appear on the display; these range between 50% and 100% . The high and direct temperature of the grill is recommended for food which requires a high surface temperature. Always cook in this mode with the oven door closed.

GRATIN mode
This combination of features increases the effectiveness of the unidirectional thermal radiation provided by the heating elements through forced circulation of the air throughout the oven. This helps prevent food from burning on the surface and allows the heat to penetrate right into the food. Always cook in this mode with the oven door closed.

PIZZAOVENmode
This combination heats the oven rapidly by producing a considerable amount of heat, particularly from the element at the bottom. If you use more than one rack at a time, switch the position of the dishes halfway through the cooking process.

BAKING mode
This mode is ideal for baking temperature sensitive foods (such as cakes, which need to rise) and for the preparation of "bitesize pastries" on 3 shelves simultaneously.

FAST COOKING mode
Preheating is not necessary for this cooking mode. This mode is particularly suitable for cooking prepacked food quickly (frozen or pre-cooked). The best results are achieved using one cooking rack only.

PROVING mode
The oven reaches and maintains a temperature of 40^ irrespective of the position of the THERMOSTAT knob. This mode is ideal for leavening dough made with yeast.
Spit roast (only available in certain models)
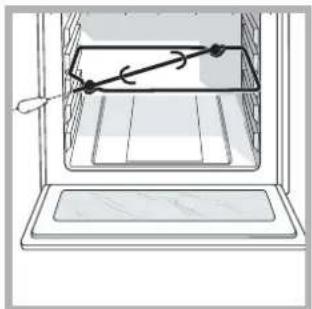
To operate the spit roast function (see diagram) proceed as follows:
- Place the dripping pan in position 1.
- Place the rotisserie support in position 3 and insert the spit in the hole provided on the back panel of the oven.
- Start the rotisserie using the SELECTOR knob to select mode or
! When the mode is activated, the spit will stop if the door is opened.
Programming cooking
! A cooking mode must be selected before programming can take place.
Programming the cooking duration
- Press the button several times until the icon and the three digits on the DISPLAY begin to flash.
- Turn the TIMER KNOB towards "+" and "- to adjust the duration.
- Press the button again to confirm.
- When the set time has elapsed, the text END appears on the DISPLAY, the oven will stop cooking and a buzzer sounds.
- For example: it is 9:00 a.m. and a time of 1 hour and 15 minutes is programmed. The programme will stop automatically at 10:15 a.m.
Setting the end time for a cooking mode
! A cooking duration must be set before the end cooking time can be scheduled.
- Follow steps 1 to 3 to set the duration as detailed above.
- Next, press the button until the icon and the two digits on the DISPLAY begin to flash.
- Turn the TIMER KNOB towards "+" and "-" to adjust the hour value.
- Press the button again until the other two digits on the DISPLAY begin to flash.
- Turn the TIMER KNOB towards "+" and "-" to adjust the minute value.
- Press the button again to confirm.
- When the set time has elapsed, the text END appears on the DISPLAY, the oven will stop cooking and a buzzer sounds.
Programming has been set when the 2 and buttons are illuminated. The DISPLAY shows the cooking end time and the cooking duration alternately.
To cancel programming, turn the SELECTOR knob to the "0" position.
Practical cooking advice
! Do not place racks in position 1 and 5 during fan-assisted cooking. This is because excessive direct heat can burn temperature sensitive foods.
! In the BARBECUE and GRATIN cooking modes, particularly when using the rotisserie spit, place the dripping pan in position 1 to collect cooking residues (fat and/or grease).
MULTI-COOKING
- Use positions 2 and 4, placing the food which requires more heat on 2.
- Place the dripping pan on the bottom and the rack on top.
BARBECUE
- Place the rack in position 3 or 4. Position the food in the centre of the rack.
- We recommend that the power level is set to maximum. The top heating element is regulated by a thermostat and may not always operate constantly.
PIZZAOVEN
- Use a light aluminium pizza pan. Place it on the rack provided.
For a crispy crust, do not use the dripping pan as it prevents the crust from forming by extending the total cooking time. - If the pizza has a lot of toppings, we recommend adding the mozzarella cheese on top of the pizza halfway through the cooking process.
Cooking advice table
| Cooking modes | Foo | ds (In kg) | Rack plesightn Preheating Recommended | Cooking duration (minutes) | ||
| Standard guide rails | Sliding guide rails | |||||
| Convection Oven | Duck | 15 | 2 | 1 | Yes | 200-210 |
| Chickens | 15 | 2 | 1 | Yes | 200-210 | |
| Roast veal or beef | 1 | 2 | 1 | Yes | 200 | |
| Roast pork | 1 | 2 | 1 | Yes | 200-210 | |
| Biscuits (shortcrust pastry) | - | 2 | 1 | Yes | 180 | |
| Pies / Tarts | 1 | 2 | 1 | Yes | 180 | |
| Multi-cooking | Pizza on 2 racks | 2 and 4 | 1 and 3 | Yes | 220-230 | |
| Pies on two racks/cakes on 2 racks | 2 and 4 | 1 and 3 | Yes | 180 | ||
| Sponge cake on 2 racks (on the dripping pan ) | 2 and 4 | 1 and 3 | Yes | 170 | ||
| R roast chicken + potatoes | 1+1 | 1 and 2/3 | 1 and 3 | Yes | 200-210 | |
| Lamb | 1 | 2 | 1 | Yes | 190-200 | |
| Mackerel | 1 | 1 or 2 | 1 | Yes | 180 | |
| Lasagne | 1 | 2 | 1 | Yes | 190-200 | |
| Cream puffs on 2 racks | 2 and 4 | 1 and 3 | Yes | 190 | ||
| Biscuits on 2 racks | 2 and 4 | 1 and 3 | Yes | 190 | ||
| Cheese puffs on 2 racks | 2 and 4 | 1 and 3 | Yes | 210 | ||
| Savoury pies | 1 and 3 | 1 and 3 | Yes | 200 | ||
| Barbecue Mackerel | Sole and out lefish | 1 | 4 | 3 | No | 100% |
| Squid and prawn kebabs | 0.7 | 4 | 3 | No | 100% | |
| Cod fillet | 0.7 | 4 | 3 | No | 100% | |
| Grilled vegetables | 0.5 | 3 or 4 | 2 or 3 | No | 100% | |
| Ve al steak | 0.8 | 4 | 3 | No | 100% | |
| Sausages | 0.7 | 4 | 3 | No | 100% | |
| Hamburgers | 4 or 5 | 4 | 3 | No | 100% | |
| Toasted sandwiches (or toast) | 4 or 6 | 4 | 3 | No | 100% | |
| Spit-roast c chicken using rotisserie spit (where present) | 1 | - | - | No | 100% | |
| Spit-roast lamb using rotisserie spit (where present) | 1 | - | - | No | 100% | |
| Gratin | Grilled chicken | 1,5 | 2 | 2 | No | 210 |
| Cuttlefish | 1 | 2 | 2 | No | 200 | |
| Spit-roast c chicken using rotisserie spit (where present) | 1,5 | - | - | No | 210 | |
| Spit-roast duck using rotisserie spit (where present) | 1,5 | - | - | No | 210 | |
| R castveal or beef | 1 | 2 | 2 | No | 210 | |
| Roast pork | 1 | 2 | 2 | No | 210 | |
| Lamb | 1 | 2 | 2 | No | 210 | |
| Pizza Oven | Pizza | 0.5 | 2 | 1 | Yes | 220 |
| Focaccia bread | 0.5 | 2 | 1 | Yes | 200 | |
| Baking mode | Pies / Tarts | 0.5 | 2 or 3 | 1 or 2 | Yes | 180 |
| Fruit cakes | 1 | 2 or 3 | 1 or 2 | Yes | 180 | |
| Sponge cake made with yoghurt | 0.7 | 2 or 3 | 1 or 2 | Yes | 170-180 | |
| Small cakes on 2 racks | 0.7 | 2 and 4 | 1 and 3 | Yes | 180-190 | |
| Sponge cake | 0.6 | 2 or 3 | 1 or 2 | Yes | 160-170 | |
| Cream puffs on 3 racks | 0.7 | 1,3 and 5 | 1,2 and 4 | Yes | 180-190 | |
| Biscuits on 3 racks | 0.7 | 1,3 and 5 | 1,2 and 4 | Yes | 180 | |
| Filled pancakes | 0.8 | 2 | 1 | Yes | 200 | |
| Meringues on 3 racks | 0.5 | 1,3 and 5 | 1,2 and 4 | Yes | 90 | |
| Cheese puffs | 0.5 | 2 | 1 | Yes | 210 | |
| Fast cooking Frozen food | Pizza | 0.3 | 2 | 1 | - | 250 |
| Courgette and prawn pie | 0.4 | 2 | 1 | - | 200 | |
| C country style spinach pie | 0.5 | 2 | 1 | - | 220 | |
| Turnovers | 0.3 | 2 | 1 | - | 200 | |
| Lasagne | 0.5 | 2 | 1 | - | 200 | |
| Golden Rolls | 0.4 | 2 | 1 | - | 180 | |
| Chicken bites | 0.4 | 2 | 1 | - | 220 | |
| Pre-cooked food | ||||||
| Golden chicken wings | 0.4 | 2 | 1 | - | 200 | |
| Fresh Food | ||||||
| Biscuits (shortcrust pastry) | 0.3 | 2 | 1 | - | 200 | |
| Sponge cake made with yoghurt | 0.6 | 2 | 1 | - | 180 | |
| Cheese puffs | 0.2 | 2 | 1 | - | 210 | |
| Proving Rising | pr oces for do ugh mad e wit h ye ast ( brio ch es, bread , sugar pie , croissants , etc.) | 2 | 1 | |||
! The cooking times listed above are intended as guidelines only and may be modified according to personal tastes. Oven preheating times are set as standard and may not be modified manually.
! This appliance has been designed and manufactured in compliance with international safety standards. The following warnings are provided for safety reasons and must be read carefully.
General safety
- The appliance was designed for domestic use inside the home and is not intended for commercial or industrial use.
- The appliance must not be installed outdoors, even in covered areas. It is extremely dangerous to leave the appliance exposed to rain and storms.
- When moving or positioning the appliance, always use the handles provided on the sides of the oven.
- Do not touch the appliance with bare feet or with wet or damp hands and feet.
- The appliance must be used by adults only for the preparation of food, in accordance with the instructions provided in this booklet.
- Do not touch the heating elements or certain parts of the oven door when the appliance is in use; these parts become extremely hot. Keep children well away from the appliance.
- Ensure that the power supply cables of other electrical appliances do not come into contact with the hot parts of the oven.
- The openings used for the ventilation and dispersion of heat must never be covered.
- Always grip the oven door handle in the centre: the ends may be hot.
Always use oven gloves when placing cookware in the oven or when removing it. - Do not use aluminium foil to line the bottom of the oven.
- Do not place flammable materials in the oven: If the appliance is switched on accidentally, the materials could catch fire.
Always make sure the knobs are in the "●"/"O" position when the appliance is not in use. - When unplugging the appliance, always pull the plug from the mains socket; do not pull on the cable.
- Never perform any cleaning or maintenance work without having disconnected the appliance from the electricity mains.
- If the appliance breaks down, under no circumstances should you attempt to perform the repairs yourself. Repairs carried out by inexperienced persons may cause injury or further malfunctioning of the appliance. Contact a Service Centre (see Assistance).
- Do not rest heavy objects on the open oven door.
- The appliance should not be operated by people (including children) with reduced physical, sensory or mental capacities, by inexperienced individuals or by anyone who is not familiar with the product. These individuals should, at the very least, be supervised by someone who assumes responsibility for their safety or receive
preliminary instructions relating to the operation of the appliance.
- Do not let children play with the appliance.
Disposal
- When disposing of packaging material: observe local legislation so that the packaging may be reused.
- The European Directive 2002/96/EC relating to Waste Electrical and Electronic Equipment (WEEE) states that household appliances should not be disposed of using the normal solid urban waste cycle. Exhausted appliances should be collected separately in order to optimise the cost of re-using and recycling the materials inside the machine, while preventing potential damage to the atmosphere and to public health. The crossed-out dustbin is marked on all products to remind the owner of their obligations regarding separated waste collection. For further information relating to the correct disposal of exhausted household appliances, owners may contact the public service provided or their local dealer.
Respecting and conserving the environment
- You can help to reduce the peak load of the electricity supply network companies by using the oven in the hours between late afternoon and the early hours of the morning. The cooking mode programming options, the "delayed cooking" mode (see Cooking modes) and "delayed automatic cleaning" mode (see Care and Maintenance) in particular, enable the user to organise their time efficiently.
- Always keep the oven door closed when using the BARBECUE and GRATIN modes: This will achieve improved results while saving energy (approximately 10% ).
- Check the door seals regularly and wipe them clean to ensure they are free of debris so that they adhere properly to the door, thus avoiding heat dispersion.
This product complies with the requirements of the latest European Directive on the limitation of power consumption of the standby mode.
If no operations are carried out for a period of 2 minutes, the appliance automatically switches to the standby mode.
The standby mode is visualised by the high luminosity "Watch Icon".
As soon as interaction with the machine resumes, the system's operating mode is restored.
GB
Switching the appliance off
Disconnect your appliance from the electricity supply before carrying out any work on it.
Cleaning the appliance
- The stainless-steel or enamel-coated external parts and the rubber seals may be cleaned using a sponge that has been soaked in lukewarm water and neutral soap. Use specialised products for the removal of stubborn stains. After cleaning, rinse and dry thoroughly. Do not use abrasive powders or corrosive substances.
- The inside of the oven should ideally be cleaned after each use, while it is still lukewarm. Use hot water and detergent, then rinse well and dry with a soft cloth. Do not use abrasive products.
- All accessories - with the exception of the sliding racks - can be washed like everyday crockery, and are even dishwasher safe.
! Never use steam cleaners or pressure cleaners on the appliance.
Cleaning the oven door
Clean the glass part of the oven door using a sponge and a non-abrasive cleaning product, then dry thoroughly with a soft cloth. Do not use rough abrasive material or sharp metal scrapers as these could scratch the surface and cause the glass to crack.
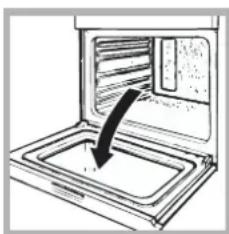
To clean more thoroughly, you can remove the oven door.
- Open the oven door fully (see diagram).
- Use a screwdriver to lift up and turn the small levers F located on the two hinges (see diagram).
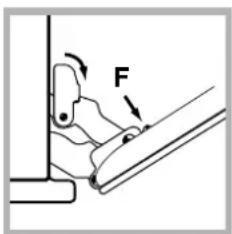
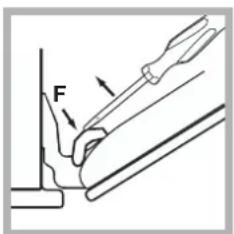
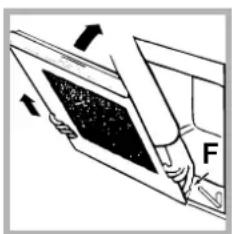
- Grip the door on the two external sides and close it approximately half way. Unlock the door by pressing on the clamps F, then pull the door towards you lifting it out of its seat (see diagram).*
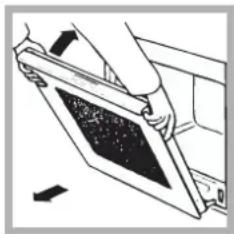
- Grip the door on the two outer sides and close it approximately half way. Pull the door towards you lifting it out of its seat (see diagram).* To replace the door, reverse this sequence.
Inspecting the seals
Check the door seals around the oven regularly. If the seals are damaged, please contact your nearest After-sales Service Centre (see Assistance). We recommend that the oven is not used until the seals have been replaced.
Replacing the light bulb
To replace the oven light bulb:

- Remove the glass cover of the lamp-holder.
- Remove the light bulb and replace it with a similar one: Wattage 25 W, cap E 14.
- Replace the glass cover (see diagram).
* Only on certain models
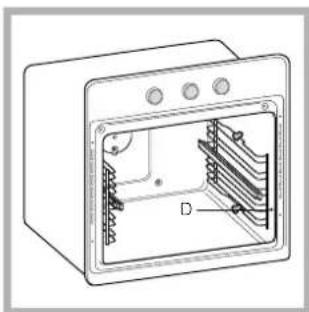
Assembling the sliding rack kit
To assemble the sliding racks:
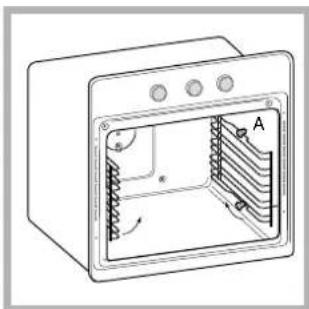
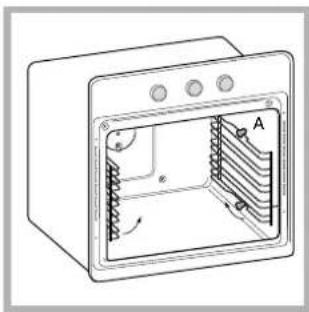
- Remove the two frames, lifting them away from the spacers A (see figure).
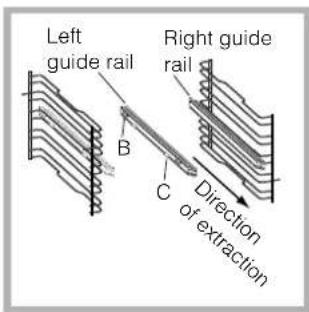
- Choose which shelf to use with the sliding rack. Paying attention to the direction in which the sliding rack is to be extracted, position joint B and then joint C on the frame.
-
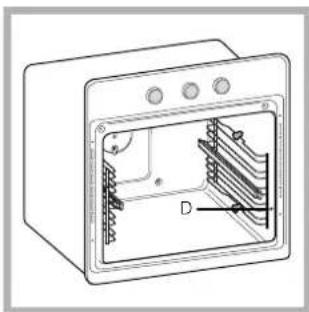
Secure the two frames with the guide rails using the holes provided on the oven walls (see diagram). The holes for the left frame are situated at the top, while the holes for the right frame are at the bottom.
-
Finally, fit the frames on the spacers A.
! Do not place the sliding racks in position 5.
Warning:
The appliance is fitted with an automatic diagnostic system which detects any malfunctions. Malfunctions are displayed by messages of the following type: "F" followed by numbers.
Call for technical assistance should a malfunction occur.
! Never use the services of an unauthorised technician.
Please have the following information to hand:
- The type of problem encountered.
The appliance model (Mod.).
The serial number (S/N).
The latter two pieces of information can be found on the data plate located on the appliance.

Italiano, 1

English,13

Français, 25

Espanol, 37Portuges, 49


Pycckn,61
FZ 990 C.1 /HA
FZ 990 C.1 IX /HA
FZ 99 C.1 /HA
FZ 99 C.1 IX /HA
FQ 99 C.1/HA
FZ 992 C.1/HA
FZ 992 C.1 IX /HA
FB 99 C.1/HA
FB 99 C.1 IX /HA
FD 99 C.1/HA
F 99 C.1 /HA
F 99 C.1 IX /HA
F 89.1/HA
F 89.1 IX/HA
FH 99 C /HA
FH 99 C IX /HA
FH 997 C IX/HA
FH 997 C /HA
FH 899 XA/HA
FH 899C XA/HA
Sommaire
FR
Installation, 26-27
Positionnement
Para montar as guias correiras:
PporpaMMbl npiroTOBneHn
PporpaMMnpOBaHne npIroTOBnHeHn
PpakTnueckne coBebI no npiroTOBJeHHIO
Ta6nua npiroTOBneHna
IpeoctopoxKHOCTn peKomeHdaCnn, 69
Obune Tpe6oBaHnno 6e3oNaChocTn
YTNIN3aU
3KOHOMN 3JIeKTo3HepRn N OxpaHa OkpykaIOUeN
cpebl
TexHnueckoe o6cIyXnBaHne n yxo, 70-71
ObecToUBAHne n3dennr
UHCTKa H3dEIna
UcTkaBepbI
3aMeHaJamNouKn
KpenneHn KOMnKeTa BbIDBnXhBix HappaBnIouxN
CepBnchoe 06cnyxmbaHne,72
RS
Baxho coxpaHnTB daHHoe pyKOBOCTBO nra erO nocJeYIOux KOHCyIbTaun. B cnyae npoJaxn, nepeaHn3dennr nn npn peee3de Ha HOBoe MeCTO XHTeJIbCTBa Heo5XoIMNo npOBepntb, TTObl pyKOBOCTBO OCTabALOCB MecTe C N3dEINEM, nToro YTObl ERO HOBBI BLaJeNEu MOR O3HaKOMITbcr C npabINAMM 3KcNlNyataUN iC COOTBETCTBYUONMn npedynpexkdenm.
BnMaTeIbHo npOHTaTe HCTpyKuHn:B HxcoepKaTc BaxHbIe CBeDeHnO MOHTaKe N3dEINr,ero 3KcNpyatau n 6e3onacHOCTn.
PacnoJoxeHne
!He pa3pe7aTe TETM INpTaB C yNAKOBOHbIMMaTePnAnam.YnakOBKa DOnXHa 6blb YHmTOKeHa BCOTBcTCTBnC npabnJAmPa3dEhoro c6opa Mycopa (cm. PpedocmoopxHocmu u pekomedauu).
!MOHTAK n3deJn npoN3BOuNTcB COOTBeTCTBn C daHHbIMn IHCTpyKUma KBAJIINΦIuPObaHHbIMn cneuaJIInCTamn. HenpaBUNbHbM MOHTAK n3deJn MoKET CTaTb npuHHO NOBpeKDeHn IMyueCTBa IN npuHNHTb yuep6 JIOJDM IN DOMaUHM XJBOTHBIM.
BcTpoeHHbIM MOHTAX
IIOBScneueHnncpaBHO paObbl BCTpANBaEMOrIO3dJIy KxOHbIMoDyIb DOJKeH IMeT COOTBeTcByUOnHe XapakTePNCNTKN:
- NaHEn KyXOHbIX 3JNEMeHTOB, npNJerAIOxK DyXOBOMy IkaΦy, DoJXHbI 6bITb BblONHeHbI N3 TepMOCTOIKORo MaTePnAna;
KJEn KxyOHbIX 3JeMeHToB 3JeMeHToB, UNOHPOBaHHbIX DepeBOM, DOnKeH 6bItb yCTOnuBBIM K TeMnepaType 100^
-ДЯ BCTpAиBaHЯ DyXOBOr O WkaФа NOД KyxOHbIM TOnOM (CM.CxEmy)ИИВ WkaΦ-NEHaI HnIa KyxOHHO 3IeMeHTa DoIIXHa IMeTb CneDyUOuNe pa3Mepbl:
!Iocne BCTpaBbHnN 3dJIINB KkyoHHb 3JemeHT DOnxHa 6bItb NCKIOUeHa BO3MOXHOCTb KacaHnK 3JeKtpuYeCKMn Yactm. PacxOd 3JeKtpo3Heprn, yKa3aHHb Ha nacOpTHoT TabInuKe 3dJIIN, 6bl 3aMeepn Dnla DaHHoro Tnna MoTataKa.
BeHTnJIaCnIa
IЯ obecneueHnHaJIeKaUeBENTnlaCnHoe6xOIMo ChrTb 3aHIO NaHeIb HnN KxOHHO3JemeHTa.PekomeHdyETcYCTaHOBNTb DyXOB0WkaΦ Ha Dba DepeBHHbIX 6pycka Nn Ha CnNouHoeOCHOBAHne c OTBepCTnEM dnaMeTpOM He MeHee 45 x560 MM (cm. cxEmbl).
UeHTpOBka n KpenJIeHne
4 KpeNexKbIX 3nemeHtca 60kOB dYxOBO rkaFa
DOJXHbI 6bITb OTpeRyINPOBaHb B COOTBeTCTBUN C 4
OTBepCTnMn B nepmEtpaJIbHOJ pAME B
3aBNCIMoCTn OT TOnUHHb I 60KOBo nAHeJI
KxyOHHOrO 3nemeHTa:
TOJIUHa 20 MM:NONHOCTbIO ydaJIInTe CbeMHyO Yactb KpenexHoro 3nemeHTa (CM. CXemy);
TOnuHa 18 MM: nCnOJb3yUte nepBbI na3, corNacho yKe roTOBoI KOHpypaun npOn3BOIDNTe (CM.CXeMy);
TOJIUHa 16 MM: INCNoJIb3yIte BToPoi na3 (CM. CXeMy).
IgKpennnHnN3dJIINK KyxOHHomy 3JemEHTyOTKpoTe DBepyu DxyOBoro uKapa n3aBHTnte 4Wypyna dIgDepeBraHHbIX naHeJeB B 4 OTBepCTnB NepmuTpalbHoPame.
!Bce 3aunthbIe 3JeMeHtbl DoJXhbl 6blTb 3akpeInHeHbI TakIM o6pa3OM, yTo6bl IN MOxHO 6blINO CHrTB TOJIbKO pNl NOMOu CneUaJIbHOrO IHCTpyMeHTa.
3JIeKTpNueckoe noKnIouHeHne
IyXOBblkacbl, yKOMJIeKTOBaHHbI
TpexnIOHcHbIM CeTeBBIM Ka6eJEM, paCHTaHbI Ha
fYHKUHOHPOBAHHe C NpeMeHHbIM TOKOM C
HaNPRAKeHHeM N qactOTOn 3NEKTpONITAHIA,
yKa3aHHbIM Na nacnopTHoT TaBNIuKe C daHHbIMN (CM.Hxke).
IopdoeunHeHne ceteboro ka6enr

-
OTkpoIe 3axmMhyo
Kopo6ky, HaxaB npn
NOMOuN OTBeptKn Ha
BbICTyNbIC 60KOB
KpbUkN: NOTAHNTe N
OTKpoIe KpbUkKy (CM. cxEmy). -
OTBnHTnte BnHT KaBeJIbHOrO CaJIbHnKa N BbIHbTe erO, NOdEe OTBeptKo (CM.CxEmy).
3.OTBnHTnte BnHTbI KOHTaKTOB L-N- n 3aTe m npkpenTe npoBoa nO rOBKaMn BNHTOB, COJIIOJa yBeTOByIO MapKnupOBky CnHm (N) KopuHeBbI (L) XeITo- 3eJeHbI (1一)
IopcoeHHeHne cTeBOro Ka6JIaN3dJIINK ceTN 3JNeKTponNTAHN
YctahOBtHe Ha cTeBOH Ka6eJIb HOpMaJIN3OBAHHyU WTeNCEbHyIO BnIKy, paCHTaHHyIO Ha Harpy3Ky, Yka3AHyIO Ha nacnopTHoT TaBNIuKHe (cm. c60ky). B Cnyae npramoro noKnIOueHn K CETn 3JeKTPoNITAHn Mekdy N3DeJIHem n CeTbIO Heo6xOdmo yCTaHOBtMbHorOnOJIIOChbI BbIKIOUaTeJB C MINHMaJIbHbIM pacCTOHNm Mekdy KOHTaTAMn 3 MM, paCHTaHHbI Ha daHHyIO HARpy3Ky I COOTBeTCTByIOUd NeICTBYIOUHM HopMaTINBaM (BbIKIOUaTeJIb He DoJIXeH pa3MbIKaTb IpBOOD 3a3EmJeHnA. CeTEBOH Ka6eJIb DoJIXeH 6bITb PaCNOLOXeH TAKIM O6pa3OM, UTo6bl Hn B OJHOI To4ke erO TempePAtya He npeBbIwana TempeAtypy NomeSeHn 6Oonee Yem Ha 50^
3NeKtpOMOHTeHecETOTBeTCTBeeHHocTh 3a npabnIbHOe NOKnIOueHne N3dJIeNk K3NeKtpUeCKoCetn n3a co6IIOHe Hnpabn6e3ONaCHOctn.
IpeepocyuueCTBnEHHem3JIeKtpueckoro IoDCoeDHeHNe HEO6XoDIMO npOBepNTb cneDuOee:
cTeBaP03ETKaDOnJXHa6bItBcoeINHeHc 3a3EmHeHemN COOTBetCTBOBaTb HOpMaTnBaM;
- ceteBa p03eTka DOnJxHa 6bItb pacuTaHa Ha MaKcImaJIbHyIO NOTpe6IReMyO MoUHocTb N3dEIny, yKa3aHHyIO Ha nacnOpTHo Ta6Nnue (CM. HxKe);
HapxHeCetn3eKtpOnNTAHn DOxHO HaxOHTbcB BnpedEx 3HaueHn, yKa3aHHbIX Ha nacnopTHo TaJIuYKe (CM.HUke);
- ceteBa p03eTKa DOJXHa 6bIbT coBMeCTMa CO ITeNcEhHO BnIKo N3dEnn. B npOTnbHOM Cnyae 3aMeHnte PO3eTKy INN BnIKy; He INCNoJIb3yIte yDnIHHTeIN INN TPOHNK.
I3JeNne DoJXHO 6bITb yCTaHOHeHO TaKIM
O6pa3OM, YTO6bl CeTeBOI Ka6eBn I CTeBAra po3eTKa
6blNI JERKO DOCTYNHbl.
!CeteBoi Ka6eIb n3JeJIINr He DoJIKeH 6bITb cOrHyT UIN CxKAT.
!PeryIpaHNo npOBepaTe coCToRHe cTeBOrO ka6eJI N B Cnyuae Heo6xOAnMoCTn Nopuynte er0 3ameHy TOnbKO yNtHOMOeHHbIM TexHNkAM (cM. Cepuechoe o6CnyKuaHue).
!PpOIN3BODNTeNb He HecET OTBeTCTBeHHOCTH 3a nocIeDCTBnH Heo6NHOeHNn NepeuNCJIeHHbIX Bblwe Tpe6oBaHn.
OxnaIteIbHaBeHTnJIaIaIaIaIaIaIaIaIaIaIaIaIaIaIaIaIaIaIaIaIaIaIaIaIaIaIaIaIaIaIaIaIaIaIaIaIaIaIaIaIaIaIaIaIaIaIaIaIaIaIaII
Дя NOHKeHЯ TemnepaTpybI ChapyKn DxyOBOrO WkaΦa B npouecce npiroTOBHeHry, OxJaNTeJIbHbIM BeHTNIArTO CO3dAeT NOTOK BO3DyXa MExdy nepeHne NaHbIO nDBepcE dyxOBoro WkaΦa. B nporpaMme FAST COOKING (BbICrpoe npiroTOBHeHne) BeHTNIArTO BKIOUaEcTcAB TOMaTnueckn Ype3 DecraTb MNHyT pa6Otbl DxyOBO r WkaΦa. B nporpaMme KOHDNTEPCKAAR BblNEyKA BeHTnIArTO BKIOUaEcTc ToJbKO npi pa3OrpTeOM DxyOBOM WkaΦy.
!No3aBepseHn npiroTOBneHn BeHTnIaTOp npoOnjXaet pa6OtaTb BNIOt b Do HaJIeXkaUero OxnaKeHn DyXOBKn.
OcBeueHne DyXOBoro WkaΦa
OcBeueHne DyXOBOro WkaΦa MoKTe 6bITb BKJIIOyeHO BJIIO60MOMeHT pN BbIKJIIOUeHHo DxyOBKe pN
NOMOUI KHOIIK
RS
PporpaMbl npuroTOBJeHn
!KaKdA nporpamma nMeet 3aHaHHyTo TemnepaTy pnproToBJeHna.TemnepaTypa MoKeT 6bITb HacTpoEHa BpyHyIO,OT 40^ Do 250^ B nporpamme IPNIb 3aHaHHoe 3HaueHne ABnreTcay yPOBHeM MOUHocTN, BBipaxeHHoB %.3TO TypOBeHb MoKeT 6bITb TaKke HAcTpoEH BpyHyIO.

Iporpamma TPAINUHOHAJIbHAR
DyXOBKA
B pexkme TpaDnUOHaIbHoro npiroTOBNeHnpeKOMeHnyETcNcNoJIb3OBA Tb ToIbKO OINyPOBeHb:npnncnoJIb3OBAHN HeCKoJIbKnx yPOBHeIpacpeJeHne TemnepaTypbI 6yJeTHeONTMaJIbHbIM.

Pporpamma OJHOBPEMEHHOE PnIROTOBJIEHNE
Tak kak jap yBnETCnoCToHHbIM BO BcEM DxyOBOM Wkafoy, Bo3dyx oBeCneuHbAeT ODHOpOHDoe npiroTOBHeHne NIOpyMaHbAHne npOdykTa. OndOBpeMeHHo MoKHO nCnONb3OBAbHe 60JIee DByx ypOBHe DxyOBOro WkaFa.

Iporpamma IPNJb
Nobopaunba peryIaTOp TEPMOCTAT,Ha dincnnee NOKa3bIbAIOc Bce BO3MOXHbIe yPOBHN MoUHOCTn OT 50%do 100%.BbICOKa TeMnepaTypa nJap npAmOro DeiCTBnRA rPnIra peKOMeHdyETcA dI npIroTOBJIeHn IPOdYKTOB,HxKaDIOUxxCBA B BbICOKo IOBepxHOCTHOI TeMnepaType. fOTOBtE 6JIOna c 3aKpbIToI DBepueI dYXOBOrO WkaΦa.

Поррамma 3АпЕКАКА
Coyetae OJHOHaPbAJIeHHe BByIeJIeHne Jkapa C npHyDNTeBHOU cNpKpyLaeNeB 03dyXa BHyTpN dYxOBO rkaFa.
3To npenrTcByET o6ropaHHIO NOBepxHOCTn npOyKTOB, NOBIIaA pONHKAOU cyo CNOCO6HOCT kapa.FOTOBTe 6IIOda C 3akpbItoN DBepuei dYxOBO rkaFa.

Pporpamma NUCA
DaanHaa nporpamma no3Bnonet 6bICTpo pa30rpeTB DxyOBky cOCHOBhIM KapOM, COcpeIOToeyHHbIM B ee HxHne yactn. Ecn nCNoJIb3yIOCTra HeCKoJIbKO yPOBHeN OJHOBpeMeHHO, Heo6XoIMMo MeHAre TB MecTAmn 6blOda B cepeINHe nx pInroTOBHeHn.

Ta6nua npnroTOBJeHna
2.Bb6epnte ypOBeH,
Ha KOTOpB 6yDet
yCTaHOBNeHa
BbIBNkHA
HnPaBnIOua.
Piobepn HnpaBnEne
BbKaTbBaHnCaMoH
HnPaBnIOue,
ycTaHOBnTe Ha pamy
chauJa KpenJeHne B,
a 3aTeM C.
- 3akpenTe DBe paMbI C yCTaHOBJIeHHbIMn HAnpaBJIIOUImn B CneuJaIbHbIX OTBepCTnX B CTeHKax DxyxOBOTo WkaΦa (CM. cxEmy).OTBepCTnJ IeBoHanpaBJIIOUeI paCnoJIOXKeHb CBepx, a npaBoI - CHN3y.
4. B 3aBepseHne BCTaBbTe paMbI B pacnOpHbI 3JIemHeTbI A.
!He BCTaBnTe BbIDBnKHbIe HAnpaBnIOuNe Ha 5- bI ypoBeHb.
RS
BHHMaHHe:
I3dneHcHaSeHo CnCTeMoABTomatNuecko DnaHrOCTKIN, NO3BOJIAUeBbIaBtB Bo3MOXHbIe
HeNCnpaBHOCTn. HeNCnpaBHOCTn nOKa3bIbAIOTCra Ha dncJIee NOcpeIcTBOM cJeDyUOxN COo6eHn: "F" C NocJeDyUOUM Homepom.
B 3TOM cnyucae Heo6xOdmo BbI3BaTb TexHnka n3 ceHTpa cepBnchOrO o6cnyKbAHnA.
!HnKOrda He o6paaTecb K HeynoJHMOHeHHbIM TexHnKaM.
Pn 6paueHH B LcHtp CepBnCHoro 06cnyXnBaHH Coo6uHTe:
TIN HeicnpaBHOCTN;
- MoDJIb n3dJIeNIA (MoI.)
HomepTex.nacnopta(cepHbI Ng)
3Tn daHHbIe Bbl HaJeTe Ha nacnopTHoT Ta6nUHKe, pacnoJIOXKeHHo Hn3deJIiN.