
AMG GT² - Child stroller HARTAN - Free user manual and instructions
Find the device manual for free AMG GT² HARTAN in PDF.

| Brand | Hartan |
| Model | AMG GT² |
| Device type | All-terrain stroller |
| Category | Stroller |
| Recommended minimum age | 6 months |
| Maximum weight supported | 22 kg |
| Stroller weight (approx.) | 13 kg |
| Suspension | Adjustable spring suspension (8 positions) |
| Parking brake | Locking brake with red/green button |
| Hand brake | Adjustable hand brake (ring 10 and cable 10a) |
| Front wheels | Lockable swivel wheels (lever 5) |
| Rear wheels | Fixed wheels with parking brake |
| Restraint system | Magnetic 5-point harness (buckle A) |
| Reclining backrest | Yes, 2 positions (via lever 13) |
| Adjustable footrest | Yes, 2 red safety points (15) |
| Canopy and protection bar | Removable via bayonet lock (12) |
| Height-adjustable handle | Yes, tilt sliders (9) |
| Textile materials | Öko-Tex 100 tested, machine washable at 30°C |
| Frame | Anti-corrosion treated |
| Warranty | 2 years (subject to conditions) |
| Country of manufacture | Germany |
Frequently Asked Questions - AMG GT² HARTAN
User questions about AMG GT² HARTAN
0 question about this device. Answer the ones you know or ask your own.
Ask a new question about this device
Download the instructions for your Child stroller in PDF format for free! Find your manual AMG GT² - HARTAN and take your electronic device back in hand. On this page are published all the documents necessary for the use of your device. AMG GT² by HARTAN.
USER MANUAL AMG GT² HARTAN
Phone (with area code):
e-mail:
Colour of fabric (design):
Zubehor / Accessories:
Kaufdatum / Date of purchase:
Kaufer Unterschrift
Buyer (signature)
Salesperson (name In block letters)
AMGMercedes-Benz and are subject to intellectual property protection
Owepd by Daimler AG. They are used by Hattan Kinderyasen e.K. under licence.
1 D Deutschland
6 GB United Kingdom (UK)
12 La France
18 NL Nederlands
24 DK Danmark
30 N Norge
36 S Sverige
42 FIN Suomi
48 E España
54 Italia
60 Cz Ceska republka
66 (SK) Slovensko
72 HR Hrvataks
78 UA Ukraine
84 (SLO) Slovenjije
90 TR Turkyle
96 Polska
102 RUS Poccm
Product of Germany
-
Completeness
-
Function check
Folding mechanism
Road behaviour
Vheels
Adjusting mechanism
Brakes check
Suspension check
- Intactness
Frame check
Fabric check
Plastic certs check
I have checked the product and have ascertained that it is supplied
complete, has no external, visible faults and that all functions are intact.
- I have received sufficient information concerning the product and its
functions before purchase and have been instructed on care and
maintenance.
GB United Kingdom (UK)

AMG GT2
Suitable from 6 months, up to 22kg
Under 6 months only in connection with an appropriate carrycot.
The product is not suitable to be used when jogging or skating.

Mercedes-Benz
1 Handle
2 Handlebar catch
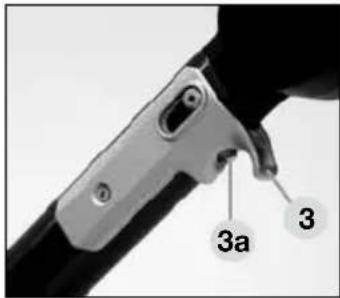
3 Closure mechanism
3a Fuse buttons
4 Wheel retention
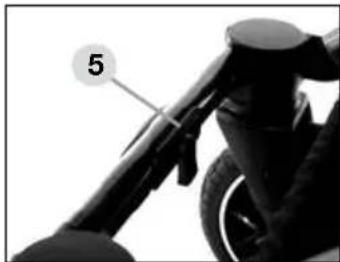
5 Lock-type-swivel wheel
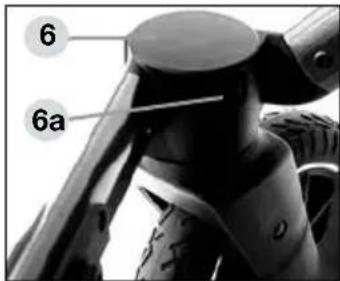
6 Swivel wheel holder
6a Push button for removing the swivel wheels
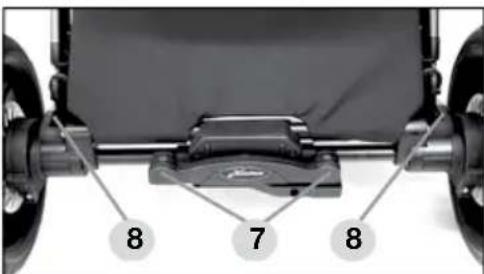
7 Parking brake
8 Adjustable suspension system
9 Handle-folding lock button
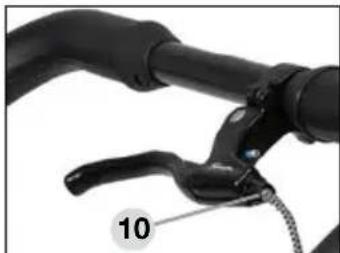
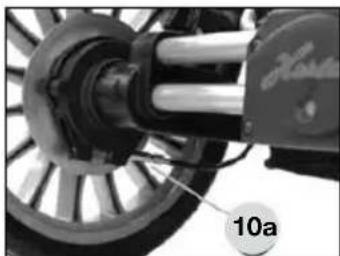
10 Readjustment of hand brake
10a Silently adjustable hood
11 Safety bar adjustment
12 Hood bar and safety bar removal
13 Tilt-adjustable backrest
14 Safety belt
15 Adjustable footrest
16 Cover extension
17 Automatic lock for upper section
18 Sun visor
19 Unlock button for top
20 Front wheel suspension
Congratulations on your purchase
You want your baby to feel safe and secure, that's why you have purchased a high-quality product. You have made an excellent choice. Products are manufactured with the greatest possible care and monitored constantly by rigorous quality control assuring that your pram will provide life-long satisfaction. The textiles used for our products have been tested for harmful substances (chemical residues) according to the industry's own, Oko-Tex-Standard 100 to guarantee that all the fabric parts of your pram are safe for your baby.
IMPORTANT! PLEASE DO NOT USE THIS PRAM BEFORE READING THE INSTRUCTIONS CAREFULLY, AND KEEP THESE INSTRUCTIONS FOR QUERIES OR FUTURE REFERENCE. YOUR CHILD'S SAFETY MAY BE AFFECTED IF YOU DO NOT FOLLOW THESE INSTRUCTIONS. If you do not understand the instructions or if you require more detailed information, contact your dealer. Please ensure that other users are also informed about the functions of the carriage and the notes on safety.
For the safety of your child
WARNING! - Before using the pram, make sure all catches are locked.
WARNING! - Before use, conduct an initial check of the carriage, and do not use it if it is damaged or if parts are torn or broken.
WARNING! - Make sure when unfolding the pram and folding it together that your child is at a safe distance, to avoid any injuries
WARNING! - Never leave your child unattended in the pram.
WARNING! - Make sure before using it that the carrycot or the seat unit or the child's car seat is correctly latched into place.
WARNING! - Negotiating stairs or steps as well as overloading may damage the pram and endanger your child.
WARNING! - When parking the pram, make sure the brake is engaged.
When using public transport, ensure the pram stands safely.
WARNING! - A pram, stroller or carrycot is not a substitute for a cradle or a bed. It is intended to be used exclusively as a means of transport.
WARNING! - Using this pram while jogging, skating, etc. can be dangerous and is therefore not allowed.
WARNING! - Do not allow children to play either near or with the pram.
WARNING! - Always use the restraint system.
WARNING! - Fix no bags, handbags or other loads to the handle, backrest or sides of the carriage, as this will affect its stability.
WARNING! - This model has been designed for 1 child.
WARNING! - A second child seat is not allowed for this model.
WARNING! - The seat unit and carrycot are not to be used for transporting in a car.
WARNING! - The rain cover may not be used when the hood is taken off (danger of suffocation). Never expose the rain cover hood to sun while the child is in the carriage (overheating).
WARNING! - Keep the carriage away from open fires or other sources of heat.
WARNING! - Remove immediately all film packaging, and do not allow your child to play with it (asphyxiation).
WARNING! - Accessories and spare or replacement parts not approved by the manufacturer must not be used.
Instructions for use
WARNING! When opening out and folding down the frame and when adjusting the back-rest, pinch-points may be caused in which fingers etc. can be trapped unless care is exercised. Ensure that your child has plenty of clearance space.
Unfolding the pushchair
Press the locking buttons of the handlebar hinge 9 on both sides and position the handlebar horizontally. Release the handlebar from the transport clips and pull the pushchair upwards.
Folding the pushchair
Remove the sports buggy insert!
Undo the locking devices 2 on both sides by pressing the release buttons 3a and pulling the locking mechanism 3 upwards.
Lift the frame and turn the front wheels inwards, so that the transport restraint can lock into position on both sides. Swing the handlebar inwards
Height-adjustable handlebar grip
Press the locking buttons of the handlebar hinge 9 on both sides and move the top part of the handlebar into the required position.
Changing the rear wheels
Release the parking brake 7. Depress push button 4 and pull the wheel off. Push the wheel right to the axle's stop. Please ensure that all wheels are locked in position correctly.
Changing the swivel wheels
To remove, press the pushbutton 6a on the inside of the swivel wheel bracket 6 and pull the wheel out of the bracket. To assemble the wheel, insert the fastening pin in the holding device, and engage it by a forcible push, which is indicated by a click sound.
Lock-type-swivel wheels
To lock the swivel wheels, fold the control lever 5 downwards, the wheels lock automatically on both sides as soon as they are in the direction of travel. To release, fold the control lever 5 into the horizontal position. On very uneven surfaces, and when going very fast, we recommend locking the swivel movement, to prevent the wheels from blocking.
Adjust the handbrake
Readjust the hand brake by means of the cable adjusting barrel 10 (above). A different brake effect on the two rear wheels can be corrected by means of the cable adjusting barrel 10a (below).
Parking brake
Push the red brake button 7 to engage the brake. Having parked the pram, try to push it to check the brake. Push the green brake button 7 to release the brake.
WARNING! Make sure the brake is always closed when placing the baby in the carriage or taking it out of it.
Adjustable suspension system
By turning the selector 8, a "hard" or "soft" position can be selected for suspension.
Hood and safety bar
By pressing the bayonet joint 12, the hood or the safety bar can be pulled out. When inserting it, make sure the safety bar locks into place correctly and be careful not to pinch any of the fabric parts. By pressing the buttons 11, the safety bar position can be changed.
WARNING! The hood bar of the sports buggy is not suitable for carrying the sports buggy.
Adjust the back rest to incline the seat frame
Tilt the adjustment lever 13 at the rear to bring the seat frame from the sitting to the lying position in two stages.
Adjusting the footrest
By pressing the two red safety buttons 15 at the same time, the footrest can be lowered. When lifting it, adjustment of positions is effected automatically.
Safety harness WARNING!
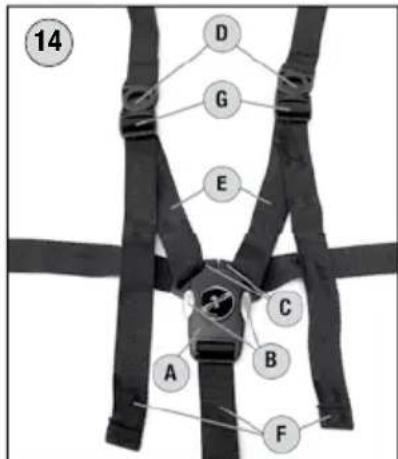
Secure your child with the 5-point belt system 14.
Make sure that the shoulder belts D are inserted and the belt fits snugly against your child. You can adjust the length and tautness of the belts with the belt ends F. You can adjust the width of the shoulder and lap belts by tilting open the quick-release slider G and pulling on the belt E.
Opening the belt: Press the two buttons B at the same time and remove the magnetic closer A. The bottom fixing C can then be removed easily.
Closing the belt: Hold together the two fixings C and attach the magnetic closer A; the fastener locks automatically.
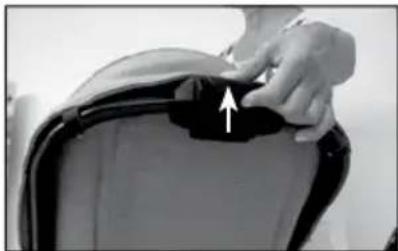
Automatic locking of the upper section
Place the seat frame on the chassis so that the two upper fastening components rest on the locking bolts provided for this purpose. Both sides of the lock mechanism 17 will automatically close when you press the seat frame down.


Instructions for use
WARNING! Ensure that the seat frame is securely in place before use!
To release the lock mechanism, press the safety button to the right of the release button on the back of the inclining seat frame and then press the release button until the release is activated.
Grasp the hoop guard with your other hand to remove the seat frame.
Suitability for the child
The seat unit is designed for a child from 6 months, and weighing up to 22kg
WARNING!
Only use this seat unit when your child can sit up on their own and from an age of 6 months.
For children under 6 months and with a maximum body weight of 9kg who cannot yet sit up or roll onto their side or support themselves on their hands and knees, only use it in combination with an appropriate baby carrier.
Checking and care instructions
All the materials we use can easily be cared for.
Care of the fabric parts
Clean soiled fabrics when dry using a clothes-brush or lukewarm water (then use hair dryer). Do not rub fabrics extensively. Remove tenacious stains using a soft detergent. All removable fabric parts may be machine washed in lukewarm water at a gentle setting and reduced agitation, at 30^ . Let's say you have encountered a heavy rain shower. Dry your carriage with the hood still on in a dry and airy room using a cloth. This prevents marking as well as the underlining fabrics from moist soaking in through the seams. As a guaranteed protection against rain, we recommend that you use our rain cover, which is either included or can be purchased at your dealer's. Our fabrics have quite a number of distinctive features. However, they are very sensitive to excessive sunlight. That's why you should park your carriage in the shade whenever possible.
Care of the chassis
The chassis requires regular care. You should clean and slightly lubricate the wheel axles at a regular 4-weeks interval. Before oiling the wheels and push-in axles, make sure these are absolutely clean and free of sand etc., in order not to compromise the proper working of the locking mechanism. Use a silicone based lubricant spray for all moving plastic parts to maintain them in an operative condition. Keep all coated and chrome-plated metal parts in dry condition, and use a finish restorer or chrome paste if necessary. Remove smaller chassis paint damages by means of a touch-up applicator. Do not use high-pressure cleaners when cleaning your carriage, due to risk of damaging the ball bearings of the wheels (greased) and other functional parts (grinding and creaking noise). Wheels: Overpressure may result in accidents and personal injuries. Replace worn plain wheel bearings and springs in time. Replace worn plain wheel bearings and springs in time. Little stones in the thread, etc. may just as well damage the floor covering. When parking the carriage in the blazing sun or cramming it in the boot at temperatures of above 40^ , the semi pneumatic tires may flatten or become deformed.
2 YEARS WARRANTY
This product is guaranteed for a period of 2 years by your contract partner. For possible submission of proof, please keep your receipt, the completed warranty card as well as the hand-over check bearing your signature for the length of the warranty period. These documents must be submitted to qualify for service under the warranty.
IN CASE OF WARRANTY CLAIM
This product is warranted against defects in materials and workmanship that existed at the time it was handed over.
THIS WARRANTY DOES NOT COVER ....
We disclaim liability for defects in the object of purchase that are beyond our control.
This especially applies to:
■ natural wear and tear (wear-related defects) and defects due to excessive stress
■ consequential defects, originally caused by neglect of defects/damages but developing into conditions necessitating a more difficult repair
defects due to improper or inappropriate use (see Instructions)
defects due to incorrect assembly or operation
■ defects due to negligent handling or lack of maintenance of the product
defects due to improper alteration of the product.
WARRANTY CLAIM — YES OR NO?
Rust: To provide a proper basic protection of the chassis, it has undergone a rust-proofing treatment. However, rust-stains may be found when lacking maintenance. This case will not be covered by the warranty.
Scratches: Scratches caused by wear and tear will not be covered by the warranty.
Mould formation: Fabric parts, having become wet, should be dried properly to prevent mould formation (see Instructions). Mould formation will not be covered by the warranty.
Bleaching of the fabrics: We confirm that the fabrics comply with the established standards. It cannot be ruled out that colours of the fabrics may fade while the parts are exposed to direct sunlight, washed too frequently, come into contact with sweat and detergents, or suffer abrasive wear (especially on those parts where the pram is handled). Consequently, colour fading is excluded from the warranty. It is unavoidable that colours sometimes differ slightly from one individual batch to the next, which is why this case will not be covered under the warranty.
Knob formation on fabrics: We recommend that you apply general clothes care. As with woollen sweaters, the knobs can easily be removed by using a clothes-brush or burling machine.
Tearing of seams, fabrics, press studs : At the time of purchase, please check carefully that all the fabric parts, seams and snap fasteners have properly been sewn and fastened. In case of a possible complaint concerning seams/defective snap fasteners, a claim must immediately be reported to your dealer after the defect has been discovered.
Wheels: As wheels used on prams will not be balanced, they may show slight run-outs ("wobbles"). Worn tires will be regarded as natural wear and tear. No claim can be raised if your pram, using pneumatic tired wheels, has a "flat". This will be attributed to extraneous causes — a small hole caused by a pointed object, or pushing the pram about when it has not got enough air in the tire. This case will not be covered by the warranty.
WHAT TO REMEMBER WHEN BUYING YOUR PRAM
Check that your pram is complete when it is handed over and no parts are missing. Check the function of all parts and confirm this by signing the hand-over check.
WHAT TO DO IN CASE OF A COMPLAINT
Call your dealer, from whom you bought the pram, to file the complaint and to discuss how to handle the matter. In case of defects concerning safety regulations, your complaint must be filed at your dealer within a 30 days period from the date the defects have occurred, otherwise these defects will not be warranted for. When handling your warranty claims, we will apply product-specific depreciation rates. We refer you to our general terms and conditions displayed at our premises.
Make sure that the pram is in a clean condition before being sent in for repair. Repairs will not be carried out on prams which are in a dirty condition.
USE, CARE AND MAINTENANCE
To maintain the original quality of your pram as a means of transportation for your child, it requires care and maintenance according to the instructions.

F La France

AMG GT2
Lock-type-swivel wheels
Lamplighet for barnet
O CEMU MORATE VODITI RACUNA PRILIKOM KUPNJE
Provjerite da li su kolica kompletna prilikom isporuke i da li nedostaju neki dijelovi. Provjerite da li sve funkcije kolica fungcioniraju u potpunosti i potvrdite ovo na listi o primopredaji.
POSTUPAK KOD REKLAMACIJE
Ta He BnMaTe 3 Hei, He nepeKoHaBwncb, 0 KoJaCKa CToiTb Ha TaJIbMax.
PerylboBaHa cnctema amOptn3auii
IobepHyBwHn nepemukay 8 b noJoxeHHN T B e p d O / M'A K O Bm MokeTe Bn6upatn dna ce6e CTynihb amOptn3auii.
Kanlwoon Ta 6amnp
Kanpooh Ta 6amnp MoxHa 3Hn HaTncHyBwn nepeMnKaay 12. Ctabny 6amnp Ha Micse, nepekoHaTeCn, 0o Bin npabnlbHo 3aikcoBaHni B Micu 3'EdHnHe NotpAnnTEkCTnblHi eIeMeHTN KoJrCKn. POnOKeHHa 6amnpa MoxHa peryIIOBaTu 3a DOnOMOrO KHOKn 11.
3BEPHTb YBARY! XomyT cKlaAdHoro BepxHy He npn3HaueHn IJnpeHeceHHcnpTnBHorO Bi3OuKa.
BiperyHIOte cnnnky, Bn6paBun 6aXaHHn Haxnl cnDInHH
IotarHtB BaXilb peryHIOBaHH 13, 0o 3HaXoNDTbcr No3aDy
CnDInHH, 0o6 o6patn neXaue Yn CnDyne NpOJKeHH.
PeryIIOBaHHn iINHIXKn
OndohacHO haTnchyBwn DiyeepBOHI KhoNkn 15, NiHixKMyoXHa onyCTHT DOHN3Y. NiDHiMaHOu N DorOpN, noLoXeHHBACTaBJIeTbCABTOMaTHUHO.
IapaHTiHe 06cLyroByBaHH He HaDaETbcra
Mn He Hecem BoiNobiaIbHocTi 3a DeΦeKTH BnRbIeHi Ha npOdyKuII, kKi E nO3a HaWM KOHTpOJeM To6To:
3BnuaHn 3Hoc npOkyu, Ta deekTu, OTPMaHi BHaCIOK HaMipHOro BkOpncTaHH
Biipa3y He nomuehi defeektn / nowkodkeHHra, knepepoctaotb y 6iibw cyTTeBI ta noTpe6yIOB cKaIHOro DOCKOHANO peMOHTy
IekeTN, 03Bnnc BHaCNIo HnpaBnHoro BNkOpuctaHH (NbiTbc iHCTpyKuIO no eKnnyatauii)
IekeTN, 3Bnnc BHaCNIoK HnpabNbHOro MoTAty Cu EKnLnyatau
■ DeΦeKtn, 3BnncBaHacniDok He6aIoro BkOpncTaHHa N BiCyTHocTi TexHiHOro o6cnyroByaHHa npOdyKu
I DeΦeKTH, 30 3'BnncB HacniDOK BHeceHHaMn B KOHcTpyKciO daHOi npOdyKci
TAPAHITHIN BUNADOK-TAK HI
Ipxa: 66eepntu waci BID ipkni, nptipno npoobnTu noRo aHTNKOp03iHy o6p6ky. Ipote nnmipki MoKyTB 3'ABTNCnPn BiCyTHOCTI TexHCHoro 6cnyroByBaHHn npOdyku II. B TAKOMy BnnaDky rapaHTiHe 6cnyroByBaHHn He HadaeTbCra.
Iopnnn: Iopnpnnn OtpmaHbHacniok 3Hocy (noctiHoro BnKOpncTahn) npdykTy He e rapaHTiHm Bnnaqkom, i Tomy rapaHTiHe ocbnyrobyBaHH He hadaetbcra.
YtboeHHn nnichBn: Pn HAMOKaHHI TeKCTINbHnx eJemeHTIB BOH nOTpe6yOToB rapHO npocuWK, 06 yHNKHyTN YtboeHHn nnichBn (DnBtbcra iNcTpyKciio no ekcnnyataci). YtboeHHn nnichBn He e rapaHTiHm BnnaKom, I TOMy rapaHTiHe oClyroByBaHHn He HaDaetbc.
BnCbitHn TkAHn: Mn CTBePckyEmo, 0c Bc TeKCTnblH eIemEHTN, BnKOpncTaHI Ha Haui npOdykuii, BnROTOBHe I 3 DoTpImaHHM BiINOBiHNX CTAHdaptIB. Ane Mn He BnKlHOaEMO MOKJIbICtB BuCbitHn KOBopIB PnHaMipHomy nepe6yBaHHi Haooi npOdykuii nI nd pRmMm COHryHM CBITLOM, YactOMy PpaHHI, KOHTAKTI 3 NOTOM qH MNUOUM 3acobAMn 4hBaHbHoro cTnpAHN (OCo6lnBO B THX MicxJe 3a KOLsCKy bepTybcr pyKaMn). TOMy BuCbitHn TkaHHn He E rapaHTiHm BnAekom. BezymOBHO, KOJbOpn Pi3Hnx napTi npOdykuII MoKyb TPOXn BiDpi3HrTnc, Ipote rapaHTiHe 06CnyroByBaHHY TaNX BnAnakx He HadaeTBCra.
YbOpHHa 3KaTyBaHHa TkaHHi: PekomeHdyEmo Bam dOtpmByTaHc3 aRaJIbHx npaBnI dOrJy 3a TkaHHaH. HanpKnaI, 3 wepctTahnx Bnpo6iB 3KaTyBaHHa IerKo MoXHa npbpaTu 3a DOnOMoroIO 3BnuAHOI uITKn dIa OJry a60 cneiaIbHorO npicToIO.
Po3xoJxHHeHH WbIB, po3PNB TKAHHH, HecnpabHicTB KHOONK: PiI qac nokynk npOdykuII, 6yNb IaCKa, yBaXHo nepeBipTe AikcTb npOuINBKN, BiDcyTHICrPo3xoJxHHeHH WbIB Ta cnpabHicTB Bcix 3acti6OK. Y pa3I BnBLeHH DeΦeKTy TaKOro nnAHy, BiDpa3Y 3BepHtBCra Do BaWorO npOdaBua.
Koneca: KaO KOleca KONsHe 36aHaHcOBaHi, II MOxE KNDaTH (BOuHTB p3HI 6OKN). 3HOC uHH He e rapaHTiHm BUNaDkOM, TAK cAmo JIKpObNTa WnHa, YH HeJdOKaHaHa, IIO MOxE PnI3BecTn Do PO3rOyBaHHK OJIaCKN. B TaKnx BUNaDkax rapaHTiHe o6CnyroByBaHH He HaJaTeBcA.
HA LIO TPE6A 3BEPHYTN YBAIY KUYIOUOHN KOJRACKY
Ipebeipte, nIOBHCIO yKOMnEeTOBaHa KOJIaCKa, kky Bn 36npaTeec npu6aTn, nn cnpabHi Bci ii eemeHTn, ta 3acBiHytB ce niDnncabwn dorobip kynibni.
IIO POBHTN Y PA3I BHNKHEHHK CKAPT
3aTelefoHnyTe Bawomy npoabuio, po3kaKtB npo npo6nemy, kya y Bac BNHKna, ta o6robopitb wJnx II bpiiweHH. Y BnnaDky BnBLeHHn defekeTIB, 10 CTocyIObCn npuyenHn npabun 6e3neKn, Bam Tpe6a noatn ckapry do BaWoro npoabua npotarom 30 dHIB 3 uacy ix BnABLeHH, iHaKwe, ue He 6yde po3raDaTncr ak rapaHTiHn BnAdoK. Otpmabwn Bawi BnMOrn CTOCOBHO rapaHTIHorO obcIyROvBaHH M n po3raJaEMo NITAHN 3MeHWeHH BAPTOCTI daHORo npOdykTy. Mn 3aBxDi CNIPAeMOcH Ha Hauwi 3araIbHi npabnla Ta yMOBu, 3 kIMMu BN MoKeTe O3HaNoMTncB H aHux MarazHax. Peped TIm, kB ViDaBAtu Bawy KoJIacKv B peMOHT, nepekoHaTeCg 10 Cci II eJeMeHTn UIncti. BpydHi KoJIacKn B pEmOHr He npimMaOTbcra.
BKNKOPNCTAHH,DOIJIAD TATEXHUYE OBCJYROBYAHHH
Kolnka-ue, B nepuy eprny, 3ac6 dny nepebeeHHB Awoi DHTH.N. Tomy, 3a7y toro, 06 36epertn II B 6e3doraHHOM cyhhi, BOHa notpe6ye noctiHoro doTay ta texHicHoro oocnyrobyaHH, BiNobIDHO do IHCTpykui no ekcnlyatauii.


AMG GT2
primeren za otroke od 6 mesecev do 22kg za mlajse od 6 mesecev s primerno nosilno turbo.
Tento vyrobok nie je urceny na beh ani na jazdu na kolieskovych korculiach ci skateboarde.

Mercedes-Benz
WADY OBJECTE GWARANCJA
GWARANCJA NIE OBEJMUJE...
TapaHTnHbI clyaH nH He?
PjAunHa: Kopnyc o6pa6oTaH coCTaBOM, npdeOTbPa7aIOUIM npOceC nOraBHeNpyxABuHbI, OTCyTcTBne 06clnyKuBaHnKoJRAckn MoKeT npNBecTu NpOBLeHIO MeC, nopAkeHHbIX PxBAChNo. Ha Takne clyaan rapaHTna He pacnpoctpaHreTc.
UapannHbI: NOBLeHHe capanH He BXoNT B ClyuH, Ha KOToPbIe pacnpocTpaHReTcra paHTn, T.K. OHN ABJIOTcHOPMaJIbHbIMn npn3HaKaMn n3HOca.
06pa3oBaHne rpn6ka: B cIyae ecnn MaTePnAe KOnaKc CInbHo npOMok, ero Heo6xoJIMO TuaTeNbHO npocuHTb, YTo6bl IpeDoTbPaTnB o6pa3oBaHne rpn6ka. IoRbIeHne rpn6ka He RaJIaETcra pArHTmHbIM Cnyaem.
BbCBeHne MaTePnaIob: Bce MaTePnaIbI, nCIOJIb3yUOIIuec B HauXn 3dJIINx, COOTBCTBYOT TeKUIM HopMaM. BcJIeCTBHe BO3DeICTBnR cONHeuHbIX LyueN I CInIeKOM qAcTOrO MbITb R He NCKLIQUeHO BbCIBaTaHne MaTePnaIa, n 3TO He RaJIeTCr npUnHnO peKlAmaIeu. He3NaHTeIbHoe OTlUHne MeJx y pa3JIuHbIMn qAChmI pOdykTa He BcERda ydaETcR n36EkaTb npn PpOn3BOODCTBE, PO3tOMy TAKNe CInUan TaKxe He ABJIaOTcPnpunHnO peKlAmaIeu.
CkTaBHaHne TkAHn: Cnyaun cKaTbIbAHne TkaHn He OTHocTc K rapaHTnHbIM Cnyaam, OHN MOYr 6bItydaJIeHbI CTaHapThbIMN cnOCo6aMn no yXOy 3a WepCTraHbIMN CNHTeTuueckmM BeuAMn, C NOMOu bIO CneuaNbHOJ uETK ININ MaUNHKN.
Pacxoxkdenne wBOB: IoKaiyIcTa, npOBepbTe Wbbl N KhoNkn npn NOKyn N3denn. B cnyae o6hApyeHn noBpeKdenn 8WBOB nIKHOONok, He3aMeDInTeJbHo O6paTntecb B Maar3HN, rEe 6blno pnpO6peTeHO n3dene.
Koneca: Tak KaK KOleca Ha KoJrAe He 6aHaHCnpyOTc, Bo3MoKeH IerKm DnC6aHaHc. CTePbIe KOleca RaJIHOCTc HAtypaJIbHbIM n3HOCOM. IpOKoJIb B KOlecax MOyT 6bITb BbI3BaHbI TOJIbKO BHeUHM BO3JeICTBnEM, NO3TOMy BCE 3TN CInuYAn He RAJIHOCTc rapaHTnHbIMN.
Kak cne dyet ce6y BeCTn B Cnyuae peknaaun
He3aMeIInTeIbHo coo6uHrE O npOBeMe B cneuaIIN3nPoBaHHb MaarH, B KOToPOM Bbl npNo6peN KOLaCKy, npeCTaBHTeJI MaarHa COo6uHrO TOM, KaK DeIcTBoBaTb DaJIbWe. Ha HEnoJaKn, CBraHaHbIe C 6e3OnacHocTbIO, O KOToPbIX He 6blIO 3aRbHeO B cneuaIIN3npOBaHHb MaarH N B TeueHne 30 dHe I c DaIbI nokynr rapaHTnE he paCnpoCTpaHReTcA.
C npoepbHocTAMn CB3aHHbIMn C o6pa60Ko peKaamaOHHbIX 3aBHeH, kacaioxxCra npdykun Haue Hnpmbi, Bbl MoKeTe O3HaKOMITbcra B UcTabe Haewero npedpntna.
Ha yTo cIeJyET 6bpaTntb BnImaHne npn nokynke.
IpoBepbTe ynaKOBky c npno6peTeHHo KOLaCKo Ha HalaUne Bcex Heo6xoJmbix 3aunacteH np60tococ6HoCTb Bcex yHKuHaJIbHbIX qacTei.
IcnoIb3OBAHne, yXoI n o6cnyxuBaHne.
Kolnka YBJIeTcR cpeCTbOM TpaHcNOpTnpOBKn BaWero pe6eHka, no3Tomy 3a Hei Heo6xoJIMO yXaJINBaTb B COOTBeTCTBnC INHCTpyKUneI NO 3KcNJaTaucn, UTO6bl COxpaHHTb ee n3HaayalbHOe KaueCTBO.
Pn OtnpabKe cIeIb 3a TeM, yTo6bl KOJIaCKa 6bla YIcTOn. rpa3HbIe KOJIaCKn Ha peMOHT He npHHMaOTcra.
ΦOPMUYIAP KOHTPOJI IPN IOKYIke
MoeJIbTeTCKOKNOLACKN
UBeT
Даразпокурки
I npOBepnKOMPJIeKTHOCTb DeTcKOJ KOJIACKN I NOJHOCTbO yIOCTOBepnIC, YTO KOJIACKa nepeDaHa MHe B NOJHOM KOMPJIeKTe N BCE ee 0yHKUIN JeICTBYOT B NOJHOM Osbeme
IyolnynIOIOCTaTOHyIO INHOpMaUIO 6 N3deJInN I npHraK CBeDeHNO yka3aHnRA NO ee 3KcNlyaTaUIN
Iopnnscb nokynatela
UtamnpoDabca/npdncb
- Product of Germany
- GB United Kingdom (UK)
- AMG GT2
- Mercedes-Benz
- Congratulations on your purchase
- For the safety of your child
- Instructions for use
- Unfolding the pushchair
- Folding the pushchair
- Height-adjustable handlebar grip
- Changing the rear wheels
- Changing the swivel wheels
- Lock-type-swivel wheels
- Adjust the handbrake
- Parking brake
- Adjustable suspension system
- Hood and safety bar
- Adjust the back rest to incline the seat frame
- Adjusting the footrest
- Safety harness WARNING!
- Automatic locking of the upper section
- WARNING! Ensure that the seat frame is securely in place before use!
- Suitability for the child
- WARNING!
- Checking and care instructions
- Care of the fabric parts
- Care of the chassis
- YEARS WARRANTY
- IN CASE OF WARRANTY CLAIM
- THIS WARRANTY DOES NOT COVER ....
- WARRANTY CLAIM — YES OR NO?
- WHAT TO REMEMBER WHEN BUYING YOUR PRAM
- WHAT TO DO IN CASE OF A COMPLAINT
- USE, CARE AND MAINTENANCE
- F La France
- Lamplighet for barnet
- O CEMU MORATE VODITI RACUNA PRILIKOM KUPNJE
- POSTUPAK KOD REKLAMACIJE
- PerylboBaHa cnctema amOptn3auii
- Kanlwoon Ta 6amnp
- PeryIIOBaHHn iINHIXKn
- IapaHTiHe 06cLyroByBaHH He HaDaETbcra
- TAPAHITHIN BUNADOK-TAK HI
- HA LIO TPE6A 3BEPHYTN YBAIY KUYIOUOHN KOJRACKY
- IIO POBHTN Y PA3I BHNKHEHHK CKAPT
- BKNKOPNCTAHH,DOIJIAD TATEXHUYE OBCJYROBYAHHH
- WADY OBJECTE GWARANCJA
- GWARANCJA NIE OBEJMUJE...
- TapaHTnHbI clyaH nH He?
- Kak cne dyet ce6y BeCTn B Cnyuae peknaaun
- ΦOPMUYIAP KOHTPOJI IPN IOKYIke
Brand : HARTAN
Model : AMG GT²
Category : Child stroller