AKZ9S 8270 FB - Electric oven WHIRLPOOL - Free user manual and instructions
Find the device manual for free AKZ9S 8270 FB WHIRLPOOL in PDF.
User questions about AKZ9S 8270 FB WHIRLPOOL
0 question about this device. Answer the ones you know or ask your own.
Ask a new question about this device
Download the instructions for your Electric oven in PDF format for free! Find your manual AKZ9S 8270 FB - WHIRLPOOL and take your electronic device back in hand. On this page are published all the documents necessary for the use of your device. AKZ9S 8270 FB by WHIRLPOOL.
USER MANUAL AKZ9S 8270 FB WHIRLPOOL
THANK YOU FOR BUYING A WHIRLPOOL PRODUCT
In order to receive a more complete assistance, please register your product on www.whirlpool.eu/register

Before using the appliance carefully read the Safety Instruction.
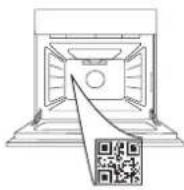
PLEASE SCAN THE QR CODE ON YOUR APPLIANCE IN ORDER TO REACH MORE INFORMATION
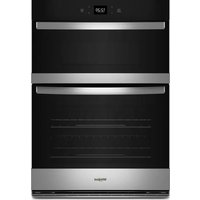
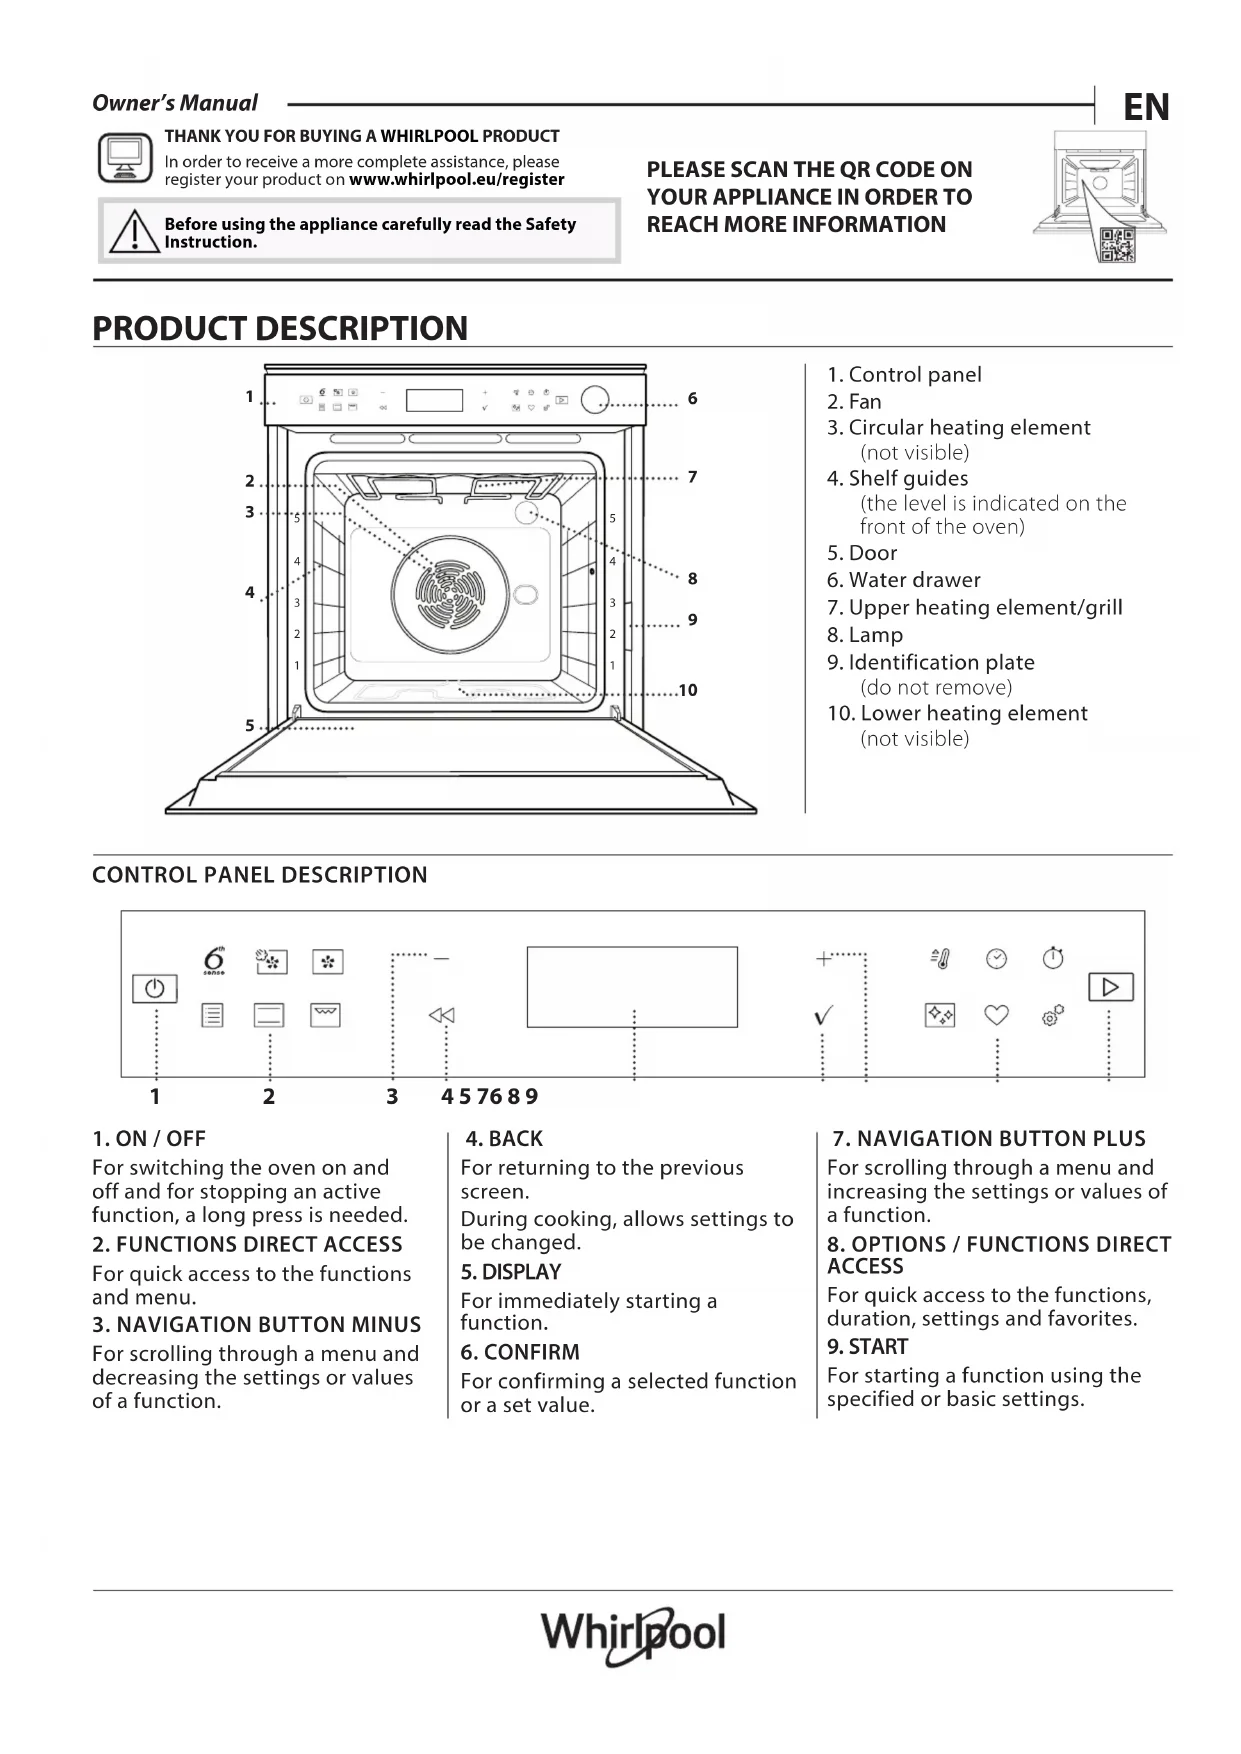
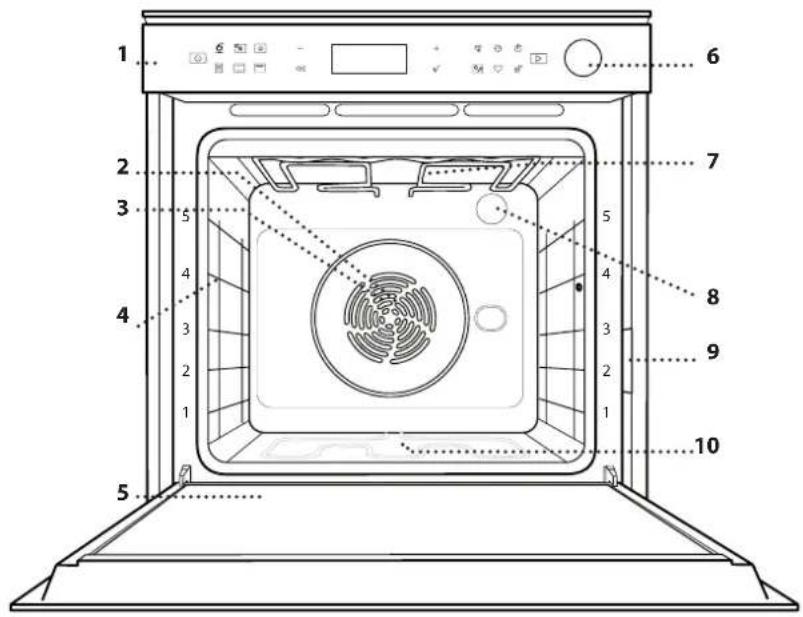
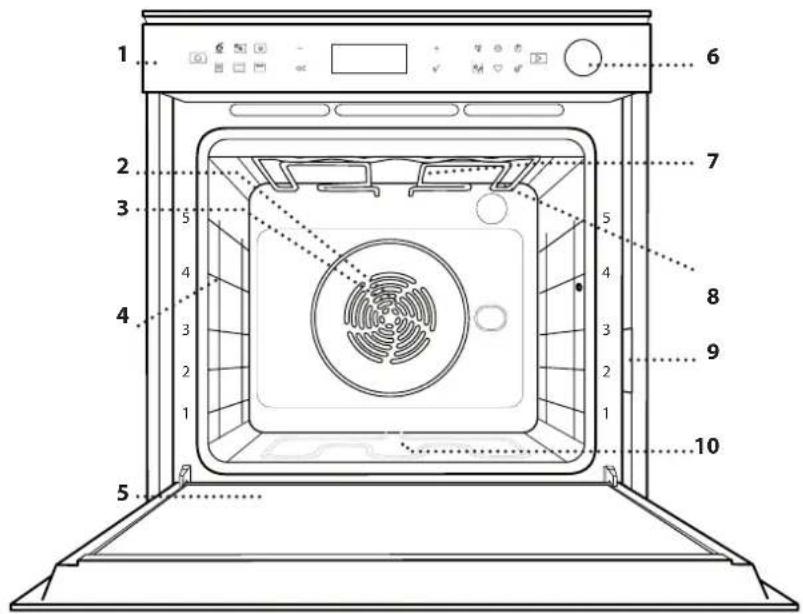
PRODUCT DESCRIPTION
text_image
Diagram of an oven with numbered parts for identification and assembly reference- Control panel
- Fan
- Circular heating element (not visible)
- Shelf guides (the level is indicated on the front of the oven)
- Door
- Water drawer
- Upper heating element/grill
- Lamp
- Identification plate (do not remove)
- Lower heating element (not visible)
CONTROL PANEL DESCRIPTION

text_image
1 2 3 4 5 7 6 8 9 6th sense - + ✓ △ √ √ √ ◆ ◆ ◆ ◆ ◆ ◆ ◆ ◆ ◆ ◆ ◆ ◆ ◆ ◆ ◆ ◆ ◆ ◆ ◆ ◆ ◆ ◆ ◆ ◆ ◆ ◆ ◆ ◆ ◆ ◆ ◆ ◆ ◆ ◆ ◆ ◆ ◆ ◆ ◆ ◆ ◆ ◆ ◆ ◆ ◆ ◆ ◆ ◆ ◆ ◆ ◆ ◉1. ON / OFF
For switching the oven on and off and for stopping an active function, a long press is needed.
2. FUNCTIONS DIRECT ACCESS
For quick access to the functions and menu.
3. NAVIGATION BUTTON MINUS
For scrolling through a menu and decreasing the settings or values of a function.
4. BACK
For returning to the previous screen.
During cooking, allows settings to be changed.
5. DISPLAY
For immediately starting a function.
6. CONFIRM
For confirming a selected function or a set value.
7. NAVIGATION BUTTON PLUS
For scrolling through a menu and increasing the settings or values of a function.
8. OPTIONS / FUNCTIONS DIRECT ACCESS
For quick access to the functions, duration, settings and favorites.
9. START
For starting a function using the specified or basic settings.
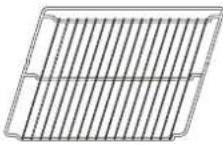
ACCESSORIES
Use to cook food or as a support for pans, cake tins and other ovenproof items of cookware.
[Figure]
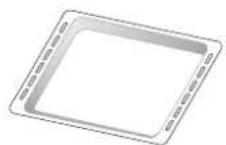
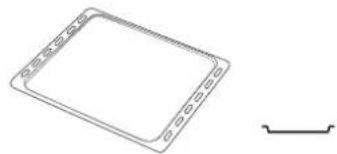
Use as an oven tray for cooking meat, fish, vegetables, focaccia, etc. or position underneath the wire shelf to collect cooking juices.
[NO TEXT]
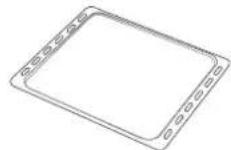
Use for cooking all bread and pastry products, but also for roasts, fish en papillotte, etc.
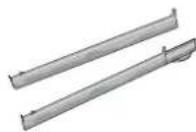
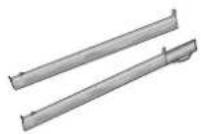
To facilitate inserting or removing accessories.
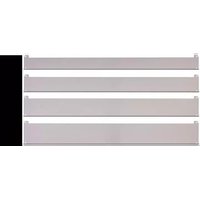
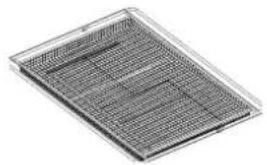
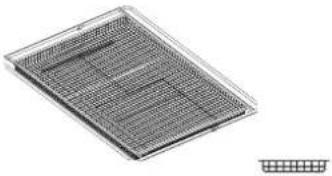
AIR FRY TRAY *
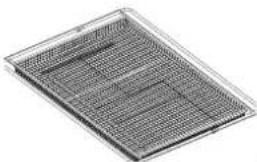
natural_image
Metallic grid-patterned panel with uniform mesh (no text or symbols)图
To be used when cooking foods with Air Fry function, with a baking tray positioned at a lower level to collect possible crumbs and drip. It can be cleaned in the dishwasher.
* Available only on certain models
The number and the type of accessories may vary depending on which model is purchased.
Other accessories can be purchased separately; for orders and information contact the after sales service or www.whirlpool.eu.
INSERTING THE WIRE SHELF AND OTHER ACCESSORIES
Insert the wire shelf horizontally by sliding it across the shelf guides, making sure that the side with the raised edge is facing upwards.
Other accessories, such as the drip tray and the baking tray, are inserted horizontally in the same way as the wire shelf.
REMOVING AND REFITTING THE SHELF GUIDES
• To remove the shelf guides, lift the guides up and then gently pull the lower part out of its seating: The shelf guides can now be removed.
• To refit the shelf guides, first fit them back into their upper seating. Keeping them held up, slide them into the cooking compartment, then lower them into position in the lower seating.
FITTING THE SLIDING RUNNERS (IF PRESENT)
Remove the shelf guides from the oven and remove the protective plastic from the sliding runners.
Fasten the upper clip of the runner to the shelf guide and slide it along as far as it will go. Lower the other clip into position. To secure the guide, press the lower portion of the clip firmly against the shelf guide. Make sure that the runners can move freely. Repeat these steps on the other shelf guide on the same level.
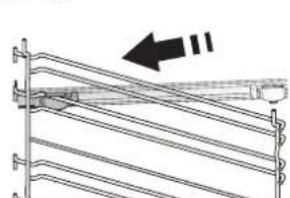
natural_image
Pure mechanical assembly diagram showing diagonal metal rods and a bracket with an arrow indicating direction (no text or symbols)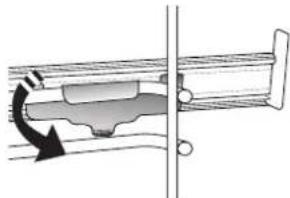
natural_image
Mechanical assembly diagram showing a piston-cranked joint with a rotating arrow indicating motion (no text or symbols)Please note: The sliding runners can be fitted on any level.
FUNCTIONS

6 ^th SENSE
These allow a fully automatic cooking for all types of food (Lasagna, Meat, Fish, Vegetables, Cakes & Pastries, Salty cakes, Bread, Pizza).
To get the best from this function, follow the indications on the relative cooking table.

FORCED AIR + STEAM
Combining the properties of steam with those of the forced air, this function allows you to cook dishes pleasantly crispy and browned outside, but at the same time tender and succulent inside. To achieve the best cooking results, we recommend to select STEAM 1 level for bread and desserts, and STEAM 2 for meat, fish and vegetables.

FORCED AIR
For cooking different foods that require the same cooking temperature on several shelves (maximum three) at the same time. This function can be used to cook different foods without odours being transferred from one food to another.

TRADITIONAL FUNCTIONS
• CONVECT BAKE
For cooking meat, baking cakes with fillings on one shelf only.
• TURBO GRILL
For roasting large joints of meat (legs, roast beef, chicken). We recommend using a drip tray to collect the cooking juices: Position the pan on any of the levels below the wire shelf and add 500 ml of drinking water.
• FROZEN BAKE
The function automatically selects the ideal cooking temperature and mode for 5 different types of ready frozen food. The oven does not have to be preheated.
• SPECIAL FUNCTIONS
» AIR FRY
This function allows you to cook French fries, chicken nuggets and more using less oil, resulting pleasantly crispy. Heating elements cycle to properly heat the cavity, while the fan circulates hot air.
Best expected cooking results can be achieved only by using an Air Fry tray (provided with some models). Position the food on the Air Fry tray in a single layer and follow Air Fry Cooking Table instructions for best performances.
Avoid using more than one tray to prevent uneven cooking.
» RISING
For optimal proving of sweet or savoury dough. To maintain the quality of proving, do
not activate the function if the oven is still hot following a cooking cycle.
» DEFROST
To speed up defrosting of food. Place food on the middle shelf. Leave food in its packaging to prevent it from drying out on the outside.
» KEEP WARM
For keeping just-cooked food hot and crisp.
» ECO FORCED AIR
For cooking stuffed roasting joints and fillets of meat on a single shelf. Food is prevented from drying out excessively by gentle, intermittent air circulation. When this ECO function is in use, the light will remain switched off during cooking. To use the ECO cycle and therefore optimise power consumption, the oven door should not be opened until the food is completely cooked.

CONVENTIONAL
For cooking any kind of dish on one shelf only.

GRILL
For grilling steaks, kebabs and sausages, cooking vegetables au gratin or toasting bread. When grilling meat, we recommend using a drip tray to collect the cooking juices: Position the tray on any of the levels below the wire shelf and add 500 ml of drinking water.

FAST PREHEAT
For preheating the oven quickly.

TIMERS
For editing function time values.

MINUTEMINDER
For keeping time without activating a function.

CLEANING
• AUTOMATIC OVEN CLEANING - PYRO
For eliminating cooking spatters using a cycle at very high temperature. Two selfcleaning cycles are available: A complete cycle (Pyro) and a shorter cycle (Pyro Eco). We recommend using the quicker cycle at regular intervals and the complete cycle only when the oven is heavily soiled.
• DRAIN
For draining the boiler in order to prevent residual water remaining in there when the appliance will not be used for a certain period of time.
• DESCALE
For removing limescale deposits from the boiler. We recommend using this function at regular intervals. If yuo do not, a message will appear on the display reminding you to clean the oven.
- SMART CLEAN
The action of the steam released during this special low-temperature cleaning cycle allows dirt and food residues to be removed with ease. Pour 200 ml of drinking water on the bottom of the oven and only activate the function when the oven is cold.

SETTINGS
For adjusting the oven settings.
When "ECO" mode is active the brightness of the display will be reduced to save energy and lamp switches off after 1 minute. It will be reactivated automatically whenever any
FIRST TIME USE
1. SELECT THE LANGUAGE
You will need to set the language and the time when you switch on the appliance for the first time: "English" will show on the display.
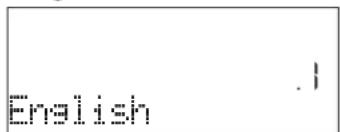
text_image
EnglishPress or to scroll through the list of available languages and select the one you require. Press √ to confirm your selection.
Please note: The language can subsequently be changed by selecting "LANGUAGE" in "SETTINGS" menu, available by pressing 🔒.
2. SET THE POWER CONSUMPTION
The oven is programmed to consume a level of electrical power that is compatible with a domestic network that has a rating of more than 3 kW (16): If your household uses a lower power, you will need to decrease this value (13).
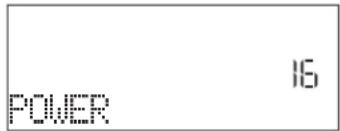
text_image
POWER 16Press or to select 16 "High" or 13 "Low" and press √ to confirm.
3. SET THE TIME
After selecting the power, you will need to set the current time: The two digits for the hour will flash on the display.
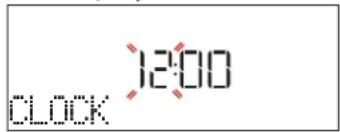
text_image
12:00 CLOCKPress or to set the current hour and press: The two digits for the minutes will flash on the display. Press + or to set the minutes and press to confirm.
Please note: You may need to set the time again following lengthy power outages. Select "CLOCK" in "SETTINGS" menu, available by pressing 🔒.
of the buttons are pressed. When "DEMO" is "On" all commands are active and menus available but the oven doesn't heat up. To deactivate this mode, access "DEMO" from "SETTINGS" menu and select "Off".
By selecting "FACTORY RESET", the product switches off and then it returns to first switch on. All settings will be deleted.

FAVORITES
For retrieving the list of 10 favorite functions.
4. SET THE WATER HARDNESS LEVEL
In order to allow the oven to work efficiently, and to guarantee that it regularly prompts the user to perform Descale cycle when needed, it is important to set the correct water hardness level. To set it, switch on the oven by pressing ⏻, press Settings and use navigation buttons + and to select "WATER HARDNESS". Press √ to confirm. Use navigation buttons + and to select the correct level for the water of your area, based on the following table:
| WATER HARDNESS LEVELS TABLE | ||||
| Level | °dHGerman degrees | °fHFrench degrees | °Clark English degrees | |
| 1 Very soft 0-6 | 0-10 0-7 | |||
| 2 Soft 7-11 11-20 | 8-14 | |||
| 3 Mid 12-16 21-29 | 15-20 | |||
| 4 Hard 17-34 30-60 | 21-42 | |||
| 5 | Very hard | 35-50 | 61-90 | 43-62 |
Press to confirm.
For Water Hardness level, "Hard" is preset.
5. HEAT THE OVEN
A new oven may release odours that have been left behind during manufacturing: this is completely normal.
Before starting to cook food, we therefore recommend heating the oven with it empty in order to remove any possible odours. Remove any protective cardboard or transparent film from the oven and remove any accessories from inside it. Heat the oven to 200 °C for around one hour, ideally using a function with air circulation (e.g. "Forced Air" or "Convection Bake").
Please note: It is advisable to air the room after using the appliance for the first time.
DAILY USE
1. SELECT A FUNCTION
Press to switch on the oven: the display will show the last running main function or the main menu.
The functions can be selected by pressing the icon for one of the main functions or by scrolling through a menu: To select an item from a menu (the display will show the first available item), press + or to select the desired one, then press √ to confirm.
2. SET THE FUNCTION
After having selected the function you require, you can change its settings. The display will show the settings that can be changed in sequence. Pressing ◀ allows you to change the previous setting again.
When the value flashes on the display, press or to—change it, then press √ to confirm and continue with the settings that follow (if possible).
In the same way, it is possible to set the grill level: There are three defined power levels for grilling: 3 (high), 2 (mid), 1 (low).
In "Forced Air + Steam" function, you can select the amount of steam from the following values: STEAM 1, STEAM 2.
Please note: Once the function has been activated, the temperature/grill level can be changed using + or -
DURATION
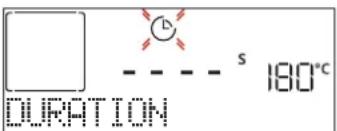
text_image
DURATION S 180°CWhen the icon flashes on the display, press or + - to set the cooking time you require and then press √ to confirm. You do not have to set the cooking time if you want to manage cooking manually (untimed): Press √ or to confirm and start the function. By selecting this mode, you cannot program a delayed start.
Please note: You can adjust the cooking time that has been set during cooking by pressing ☑: press or to amend it and then press √ to confirm.
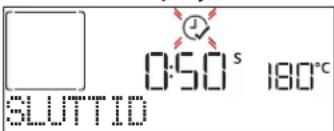
END TIME (START DELAY)
In many functions, once you have set a cooking time you can delay starting the function by programming its end time. The display shows the end time while the Ⓧ icon flashes.
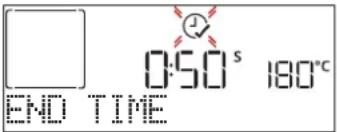
text_image
0:50 s 180°C END TIMEPress or to set the time you want cooking to end,
then press to confirm and activate the function. Place the food in the oven and close the door: The function will start automatically after the period of time that has been calculated in order for cooking to finish at the time you have set.
Please note: Programming a delayed cooking start time will disable the oven preheating phase: The oven will reach the temperature you require gradually, meaning that cooking times will be slightly longer than those listed in the cooking table. During the waiting time, you can press+ or to amend the programmed end time or press ◀ to change other settings. By pressing ⏻, in order to visualize information, it is possible to switch between end time and duration.
. 6 ^th SENSE
These functions automatically select the best cooking mode, temperature and duration to cook, roast or bake all the dishes available.
When required, simply indicate the characteristic of food to obtain an optimal result.
WEIGHT / HEIGHT / PIZZA (ROUND-TRAY-LAYERS)
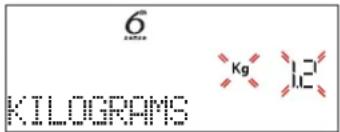
text_image
6 KiloGRAMS Kg 1.2To set the function correctly, follow the indications on the display, when prompted, and press + or to set the required value then press √ to confirm.
DONENESS / BROWNING
In some 6th Sense functions it is possible to adjust the doneness level.
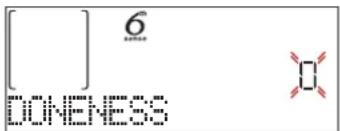
text_image
[ ] 6 DONENESSWhen prompted, press or to select the desired level between rare (-1) and well done (+1). Press √ or ▶ to confirm and start the function.
In the same way, where allowed, in some 6th Sense functions, it's possible to adjust the browning level between low (-1) and high (1).
. COOKING WITH STEAM
By selecting the "Forced Air + Steam" or one of the several 6^th Sense dedicated recipes it is possible cook any kind of food thanks to the use of the steam. Steam spreads more quickly and more evenly through food compared to just the hot air typical of Conventional Functions: this reduce cooking times, locking in food's precious nutrients and ensuring you obtain excellent, truly delicious results with all your recipes. Through the complete duration of the steam cooking the door must be kept closed.
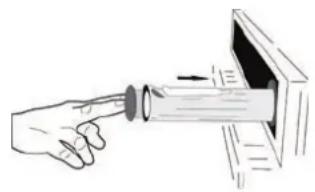
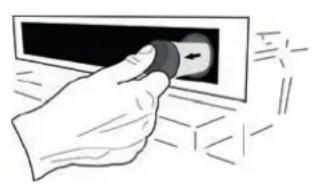
To proceed with steam cooking, it will be necessary to provide water to the boiler located inside the oven using the extractable drawer on the control panel.
When requested on the display with "ADD WATER" indications, open the drawer by pressing the tilting cap. Once extracted, open drawer's lid and slowly pour in some drinking water until the notch corresponding to the level requested on the display (LEVEL 1 - 160 ml or LEVEL 2 - 300 ml, based on selected function) is reached. In any case, do not overfill the drawer exceeding the notch indicating Level 2. Close the drawer by pushing it carefully towards the panel until completely closed. The drawer must always remain closed, except for water filling.
natural_image
Hand holding a button with an arrow, pointing at a screen (no text or symbols visible)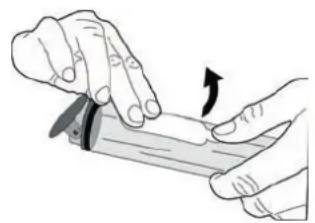
natural_image
Illustration of hands using a tool to cut or apply a surface, with an arrow indicating the motion (no text or symbols present)
natural_image
Illustration of a hand using a tool to apply material or mechanical component (no text or symbols visible)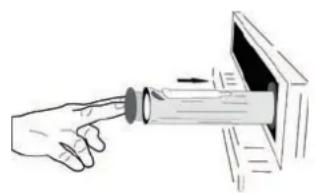
natural_image
Illustration of a hand pointing at a cylindrical object inside a device (no text or symbols)After the first filling, in case of longer cooking cycles, once water will have ran out, it could be necessary to add it again, in order to complete the cycle: the oven will prompt it in case it is needed.
Avoid to fill the drawer when the oven is switched off, or up to it is requested from the display.
We suggest emptying the drawer after the cooking steam cycle.
3. START THE FUNCTION
At any time, if the default values are those desired or once you have applied the settings you require, press ▶ to activate the function.
During the delay phase, by pressing ▶ the oven will ask if you want to skip this phase, starting immediately the function.
Please note: Once a function has been selected, the display will recommend the most suitable level for each function. At any time you can stop the function that has been activated by pressing ☐.
If the oven is hot and the function requires a specific maximum temperature, a message will shown on the display. Press ◀ to return to previous screen and select a different function or wait for a complete cooling.
4. PREHEATING
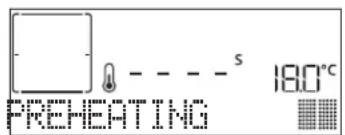
Some functions have an oven preheating phase: Once the function has started, the display indicates that the preheating phase has been activated.
text_image
PREHEATING S 180°COnce this phase has finished, an audible signal will sound and the display will indicate that the oven has reached the set temperature, requiring to "ADD FOOD". At this point, open the door, place the food in the oven, close the door and start cooking by pressing √ or ▶
Please note: Placing the food in the oven before preheating has finished may have an adverse effect on the final cooking result. Opening the door during the preheating phase will stop pause it.
The cooking time does not include a preheating phase. You can always change the temperature you want the oven to reach using + or .—
5. PAUSE COOKING / TURN OR CHECK FOOD
By opening the door, the cooking will be temporarily paused through deactivating heating elements.
To resume the cooking, close the door.
Some 6th Sense functions will require the food to be turned during cooking.

text_image
[ ] 100 180°C TURN FOODAn audible signal will sound and the display shows the action to be done. Open the door, do the action prompted by the display and close the door, then press ▶ to continue cooking.
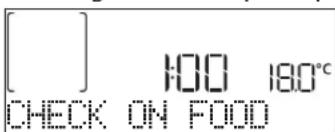
In the same way, at 10% of time before the end of cooking, the oven prompts you to check the food.
text_image
[ ] 100 180°C CHECK ON FOODAn audible signal will sound and the display shows the action to be done. Check the food, close the door and press ▶ or to continue cooking.
Please note: Press ▶ to skip these actions. Otherwise, if no action is done after a certain time the oven will continue the cooking.
6. END OF COOKING
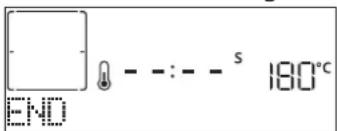
An audible signal will sound and the display will indicate that cooking is complete.
text_image
END - - : - - s 180°CPress to continue cooking in manual mode (untimed) or press + to extend the cooking time by setting a new duration. In both cases, the cooking parameters will be retained.
BROWNING
Some functions of the oven enable you to brown the surface of the food by activating the grill once cooking is complete.
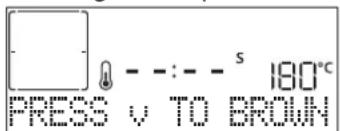
text_image
PRESS v TO BROWN S 180°CWhen the display shows the relevant message, if required press √ to start a five-minute browning cycle. You can stop the function at any time by pressing ⏻ to switch the oven off.
. FAVORITES
Once cooking is complete the display will prompt you to save the function in a number between 1 and 10 on your list of favorites.
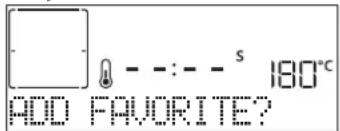
text_image
180°C ADD FAVORITE?If you would like to save a function as a favorite and store the current settings for future use, press √ otherwise, to ignore the request press .
Once has been pressed, press the or to select the number position, then press to confirm.
Please note: If the memory is full or the number chosen has already been taken, the oven will ask you to confirm overwriting the previous function.
To call up the functions you have saved at a later time, press ♥: The display will show your list of favorite functions.
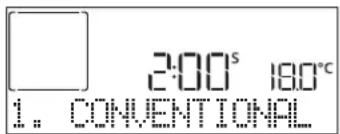
text_image
2:00s 18.0°C 1. CONVENTIONALPress or to select the function, confirm by pressing √, and then press to activate.
.CLEANING
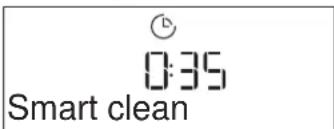
- SMARTCLEAN
Press to show "Smart Clean" on the display.
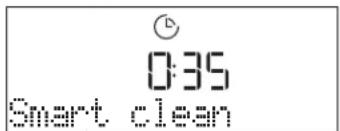
text_image
0:35 Smart cleanPress to activate the function: the display will prompt you to do all actions needed to obtain the best cleaning results: Follow the indications and then press √ when done. Once you have done all steps, when required press ▶ to activate the cleaning cycle.
Please note: It is recommended to do not open the oven door during the cleaning cycle to avoid a loss of water vapor that could get an adverse effect on the final cleaning result.
An appropriate message will start flashing on the display once the cycle has finished. Leave the oven to cool and then wipe and dry the interior surfaces with a cloth or sponge.
• AUTOMATIC CLEANING - PYRO
Do not touch the oven during the Pyro cycle. Keep children and animals away from the oven during and after (until the room has finished airing) running the Pyro cycle.
Remove all accessories - including shelf guides - from the oven before activating the function. If the oven is installed below a hob, make sure that all the burners or electric hotplates are switched off while running the self-cleaning cycle. For optimum cleaning results, remove excessive residuals inside the cavity and clean the inner door glass before using the pyrolytic function. We recommend only running the Pyro function if the appliance contains heavy soiling or gives off bad odours during cooking.
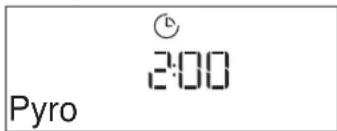
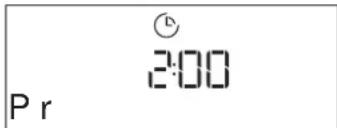
Press ☐ to show "Pyro" on the display.
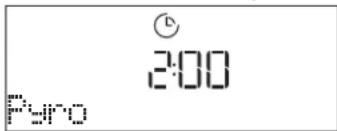
text_image
Pyro 2:00Press or to select the desired cycle, then press √ to confirm. Once a cycle has been selected, if desired, press + or to set end time (start delay), then press √ to confirm. Clean the door and remove all accessories as prompted, then close the door and press ▶ when done: the oven will begin the self-cleaning cycle, while the door locks automatically: a warning message appears on the display, along with a countdown indicating the status of the cycle in progress. Once the cycle has been completed, the door remains locked until the temperature inside the oven has returned to a safe level.
Please note: remove water from the drawer before pyro cycle activation
• DRAIN
The drain function allows the water to be drained in order to prevent stagnation in the boiler. This product has been developed in order to automatically run a drain cycle once cooking has been stopped/has ended. Approximately 30min after the stop/end of cooking, the oven will automatically drain the system, moving the residual water into the drawer (be careful not to remove the drawer after cooking). Once done, the drawer can be extracted and emptied.
We recommend emptying the drawer as soon as the drain is completed, after the cooking cycle.
If needed, a manual drain can in any case be executed by the user following the instruction below.

natural_image
Illustration of a hand using a tool to lift a cylindrical object (no text or symbols visible)Select the "Drain" function with the water drawer properly inserted in the oven, press
and wait for the cycle to automatically run. The average duration for full load drainage is about one minute. Once done, the drawer can be extracted and emptied.
Please note: to ensure that the water is cold, it is not possible to perform this activity before 30 minutes have elapsed from the last cycle (or the last time the product was powered). During this waiting time, the display will show the following feedback "WATER IS HOT"
• DESCALE
This special function, activated at regular intervals, allows you to keep the steam system in the best condition. Once the function is started, follow all the steps indicated on the display and press ▶ when done to start each phase. The average duration of the full function is around 100 minutes.
Please note: If the function is stopped at any time, the entire descaling cycle must be repeated.
The display will show you when it is time to run a Descale cycle (see the table below).
| DESCALE MESSAGE MEANING | |
| It is recommended to run a Descale cycle. | |
| Descale is mandatory. It is not possible to run a Steam cycle until a Descale cycle will be carried out. |
*considering the default value (4 - Hard) of water hardness level. The number of hours of steam cycles that must pass before the Decale messages are shown depends on the water hardness level set on the appliance.
The descaling procedure can also be performed whenever the user desires a deeper cleaning of the internal steam circuit.
Before to run the descaling phase, the appliance will check if some residual water is contained into the boiler, and a Drain cycle could be performed, if needed. In this case, you will have to empty the drawer after the Drain cycle, before continuing with the Descale Phase.
Please note: to ensure that the water is cold, it is not possible to perform this activity before 30 minutes have elapsed from the last cycle (or the last time the product was powered). During this waiting time, the display will show the following feedback "WATER IS HOT".
» PHASE 1/2: DESCALING (70 MIN)
When display will show
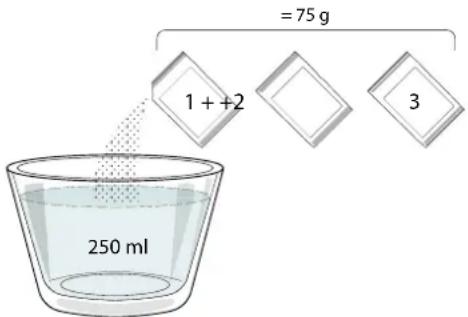
text_image
= 75 g 1 + + 2 3 250 mlOnce the descaling solution is poured inside the drawer, press ▶ to start the main descaling process. The descaling phases do not need you to stay in front of the appliance. After each phase is completed, an acoustical feedback will be played and the display will show instructions to proceed with the next phase.
Once the descaling phase has been completed, the boiler will be drained: the descaling solution used during this phase will be poured into the extractable drawer.
» PHASE 2/2: RINSING (30 min.)
To remove descale residuals from the drawer and the steam circuit, rinse cycle has to be done. When display shows
When the message "DESCALING COMPLETED" appears on the display, please press OK to confirm.
Cooking functions cannot be activated during the cleaning cycle. Please note: A message will be shown on display, to remind you to execute this operation regularly.
When Descale procedure is completed, it is suggested to dry the cavity from potential water residuals. It will be then possible to use all the steam functions.
Note: during the Descale cycle, some noise could potentially be heard since the oven pumps are activated in order to guarantee the optimal descale efficiency.
Once the maintenance cycle has started, do not remove the drawer unless requested by the appliance.
. MINUTEMINDER
When the oven is switched off, the display can be used as a timer. To activate this function, make sure that the oven is switched off and press + or :The ⏻ icon will flash on the display.
Press + or to set the length of time you require and then press √ to activate the timer.
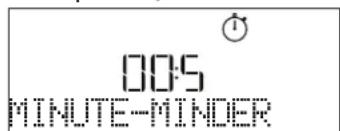
text_image
00:5 MINUTE-MINDERAn audible signal will sound and the display will indicate once the minuteminder has finished counting down the selected time.
Please note: The minuteminder does not activate any of the cooking cycles. Press + or to change the time set on the timer.
Once the minuteminder has been activated, you can also select and activate a function.
Press ⏻ to switch on the oven and then select the function you require.
Once the function has started, the timer will continue to count down independently without interfering with the function itself.
Please note: During this phase, it isn't possible to see the minuteminder (only the Ⓧ icon will be displayed), that will continue counting down in background. To retrieve the minuteminder screen press Ⓧ to stop the function that is currently active.
. KEYLOCK
To lock the keypad, press and hold for at least five seconds. Do this again to unlock the keypad.

text_image
0:30 180°C KEYLOCKPlease note: This function can also be activated during cooking. For safety reasons, the oven can be switched off at any time by pressing ⏻.
| FOOD CATEGORIES SUGGESTED QUANTITY | TURN(of cook time) | LEVEL AND ACCESSORIES | ||
| LASAGNA - 0.5 - 3 kg - | 2 | |||
| MEAT | Beef roasted 0.6 - 2 kg - | 3 | ||
| Hamburgers 1.5 - 3 cm 3/5 | 5 4 | |||
| Roasted 0.6 - 2.5 kg - | 3 | |||
| Chicken-roasted 0.6 - 3 kg - | 2 | |||
| Fillet & breast 1 - 5 cm 2/3 | 5 4 | |||
| FISH | Fish fillets 0.5 - 3 (cm) - | 3 2 | ||
| Fillets-frozen 0.5 - 3 (cm) - | 3 2 | |||
| VEGETABLES | Potatoes | 0.5 - 1.5 kg | - | 3 |
| Vegetable-roast | 0.5 - 1.5 kg | - | 3 | |
| Vegetable-gratin | one tray | - | 3 | |
| CAKES & PASTRIES | Sponge cake | 0.5 - 1.2 kg - | 3 | |
| Cookies | 0.2 - 0.6 kg - | 3 | ||
| Tart | 0.4 - 1.6kg | - | 3 | |
| Quiche | 0.8 - 1.2 kg - | 2 | ||
| PIZZA & BREAD | Thin pizza | round - tray | - | 2 |
| Thick pizza | round - tray | - | 2 | |
| Pizza- frozen | 1 - 4 layers - | 2 | ||
| Rolls 🎨 | 60 - 150 g each | - | 3 | |
| Big bread 🎨 | 0.7 - 2.0 kg - | 2 | ||
| ACCESSORIES | Wire shelf | Oven tray or cake tin on wire shelf | Drip tray / Baking tray or oven tray on wire shelf | Drip tray / Baking tray | Drip tray with 500 ml of water | Air fry |
FORCED AIR + STEAM COOKING TABLE
| RECIPE STEAM LEVEL PREHEAT TEMPERATURE (°C) | DURATION(MIN.) | SHELF AND ACCESSORIES | |||
| Shortbread / Cookies STEAM 1 Yes 140 - 150 35 - 55 | 3 | ||||
| Small cake / Muffin STEAM 1 Yes 160 - 170 30 - 40 | 3 | ||||
| Leavened cakes STEAM 1 Yes 170 - 180 40 - 60 | 2 | ||||
| Sponge cakes STEAM 1 Yes 160 - 170 30 - 40 | 2 | ||||
| Focaccia | STEAM 1 | Yes | 200 - 220 | 20 - 40 | 3 |
| Bread loaf | STEAM 1 | Yes | 170 - 180 | 70 - 100 | 3 |
| Small bread | STEAM 1 | Yes | 200 - 220 | 30 - 50 | 3 |
| Baguette | STEAM 1 | Yes | 200 - 220 | 30 - 50 | 3 |
| Roast potatoes | STEAM 2 | Yes | 200 - 220 | 50 - 70 | 3 |
| Veal / Beef / 1 kg | STEAM 2 | Yes | 180 - 200 | 60 - 100 | 3 |
| Veal / Beef / (pieces) | STEAM 2 | Yes | 160 - 180 | 60 - 80 | 3 |
| Roast Beef rare 1 kg | STEAM 2 | Yes | 200 - 220 | 40 - 50 | 3 |
| Roast Beef rare 2 kg | STEAM 2 | Yes | 200 | 55 - 65 | 3 |
| Leg of lamb | STEAM 2 | Yes | 180 - 200 | 65 - 75 | 3 |
| Stewed knuckles | STEAM 2 | Yes | 160 - 180 | 85 - 100 | 3 |
| Chicken / guinea fowl / duck 1 - 1.5 kg | STEAM 2 | Yes | 200 - 220 | 50 - 70 | 3 |
| Chicken / guinea fowl / duck (pieces) | STEAM 2 | Yes | 200 - 220 | 55 - 65 | 3 |
| Stuffed vegetables(tomatoes, courgettes, aubergines) | STEAM 2 Yes 180 - 200 | 25 - 40 | 3 | ||
| Fish fillet | STEAM 2 | Yes | 180 - 200 | 15 - 30 | 3 |
| ACCESSORIES | Wire shelf | Oven tray or cake tin on wire shelf | Drip tray / Baking tray or oven tray on wire shelf | Drip tray / Baking tray | Drip tray with 500 ml of water | Air fry |
AIR FRY COOKING TABLE
| RECIPE FUNCTION | SUGGESTED QUANTITY | PREHEAT TEMPERATURE (°C) DURATION (Min.) | SHELF AND ACCESSORIES | |||
| Frozen French Fries 650-850g |  30 25 - 30 30 25 - 30 | L4 | L1 | |||
| Homemade Fries |  | 300 - 800g Yes 200 20 - 40 | L4 | L1 | ||
| Fresh Breaded Zucchini |  | 400g Yes 200 15 - 20 | L4 | L1 | ||
| Mixed Vegetables |  | 300 - 800g Yes 200 20 - 30 | L4 | L1 | ||
| Frozen Chicken Nuggets |  | 500g Yes 200 15 - 20 | L4 | L1 | ||
| Breaded Chicken Breast |  | 1 - 4cm Yes 200 20 - 40 | L4 | L1 | ||
| Frozen Fish Sticks |  | 500g Yes 220 15 - 20 | L4 | L1 | ||
| Breaded Cutlet |  | 1 - 4cm Yes 220 20 - 50 | L4 | L1 | ||
For cooking fresh or homemade foods, spread the oil evenly.
We suggest adding an empty tray on L1 in order to collect eventual grease residual coming from the Air fry tray during the cooking.
In order to guarantee uniform cooking results, mix food halfway through the recommended cooking time.
FUNCTIONS

Conventional

Forced air

Convection bake

Grill

TurboGrill

Eco Forced air

Air Fry
COOKING TABLE
| RECIPE FUNCTION PREHEAT TEMPERATURE (°C) DURATION (MIN.) | SHELF AND ACCESSORIES | ||||||
| Leavened cakes / Sponge cakes | Yes 170 30 - 50 | 2 | |||||
| Yes 160 30 - 50 | 2 | ||||||
| Yes 160 30 - 50 | 4 | 1 | |||||
| Filled cakes(cheesecake, strudel, apple pie) | Yes 160 - 200 30 - 85 | 3 | |||||
| Yes 160 - 200 35 - 90 | 4 | 1 | |||||
| Cookies / Shortbread | Yes 150 20 - 40 | 3 | |||||
| Yes 140 30 - 50 | 4 | ||||||
| Yes 140 30 - 50 | 4 | 1 | |||||
| Yes 135 40 - 60 | 5 | 3 | 1 | ||||
| Small cakes / Muffin | Yes 170 20 - 40 | 3 | |||||
| Yes 150 30 - 50 | 4 | ||||||
| Yes 150 30 - 50 | 4 | 1 | |||||
| Yes 150 40 - 60 | 5 | 3 | 1 | ||||
| Choux buns | Yes 180 - 200 30 - 40 | 3 | |||||
| Yes | 180 - 190 | 35 - 45 | 4 | 1 | |||
| Yes | 180 - 190 | 35 - 45 * | 5 | 3 | 1 | ||
| Meringues | Yes | 90 | 110 - 150 | 3 | |||
| Yes | 90 | 130 - 150 | 4 | 1 | |||
| Yes | 90 | 140 - 160 * | 5 | 3 | 1 | ||
| Pizza / Bread / Focaccia | Yes 190 - 250 | 15 - 50 | 2 | ||||
| Yes 190 - 230 20 - 50 | 4 | 1 | |||||
| Pizza (Thin, thick, focaccia) | Yes 220 - 240 | 25 - 50 * | 5 | 3 | 1 | ||
| Frozen pizza | Yes 250 10 - 15 | 3 | |||||
| Yes 250 | 10 - 20 | 4 | 1 | ||||
| Yes 220 - 240 | 15 - 30 | 5 | 3 | 1 | |||
| Savoury pies(vegetable pie,quiche) | Yes | 180 - 190 | 45 - 55 | 3 | |||
| Yes | 180 - 190 | 45 - 60 | 4 | 1 | |||
| Yes | 180 - 190 | 45 - 70 * | 5 | 3 | 1 | ||
| Vols-au-vent / Puff pastry crackers | Yes 190 - 200 20 - 30 | 3 | |||||
| Yes | 180 - 190 | 20 - 40 | 4 | 1 | |||
| Yes | 180 - 190 | 20 - 40 * | 5 | 3 | 1 | ||
| RECIPE | FUNCTION | PREHEAT | TEMPERATURE (°C) | DURATION (Min.) | SHELF AND ACCESSORIES |
| Lasagne / Flans / Baked pasta / Cannelloni | Yes 190 - 200 45 - 65 | 3 | |||
| Lamb / Veal / Beef 1 kg Yes 190 - 200 80 - 110 | 3 | ||||
| Chicken / Rabbit / Duck 1 kg Yes 200 - 230 50 - 100 | 3 | ||||
| Turkey / Goose 3 kg Yes 190 - 200 80 - 130 | 2 | ||||
| Baked fish / en papillote (fillets, whole) | Yes 180 - 200 40 - 60 | 3 | |||
| Stuffed vegetables (tomatoes, courgettes, aubergines) | Yes 180 - 200 50 - 60 | 2 | |||
| Toast | — | 3 (High) | 3 - 6 | 5 | |
| Fish fillets / Steaks | — | 2 (Mid) | 20 - 30 ** | 4 3 | |
| Sausages / Kebabs / Spare ribs / Hamburgers | — | 2 - 3 (Mid - High) | 15 - 30 ** | 5 4 | |
| Roast chicken 1-1.3 kg | — | 2 (Mid) | 55 - 70 *** | 2 1 | |
| Leg of lamb / Shanks | — | 2 (Mid) | 60 - 90 *** | 3 | |
| Roast potatoes | — | 2 (Mid) | 35 - 55 *** | 3 | |
| Vegetable gratin | — | 3 (High) | 10 - 25 | 3 | |
| Complete meal: Fruit tart (level 5) / lasagne (level 3) / meat (level 1) | Yes | 190 | 40 - 120 * | 5 3 1 | |
| Lasagna & Meat | Yes | 200 | 50 - 100 * | 4 1 | |
| Meat & Potatoes | Yes | 200 | 45 - 100 * | 4 1 | |
| Fish & Vegetables | Yes | 180 | 30 - 50 * | 4 1 | |
| Stuffed roasting joints | — | 200 | 80 - 120 * | 3 | |
| Cuts of meat (rabbit, chicken, lamb) | — 200 | 50 - 100 * | 3 | ||
* Estimated length of time: dishes can be removed from the oven at different times depending on personal preference.
** Turn food halfway through cooking.
*** Turn food two thirds of the way through cooking (if necessary).
HOW TO READ THE COOKING TABLE
The table lists the best function, accessories and level to use to cook different types of food.
Cooking times start from the moment food is placed in the oven, excluding preheating (where required).
Cooking temperatures and times are approximate and depend on the amount of food and the type of accessory used.
Use the lowest recommended settings to begin with and, if the food is not cooked enough, then switch to higher settings.
Use the accessories supplied and preferably darkcoloured metal cake tins and baking trays. You can also use Pyrex or stoneware pans and accessories, but bear in mind that cooking times will be slightly longer.
| ACCESSORIES | Wire shelf | Oven tray or cake tin on wire shelf | Drip tray / Baking tray or oven tray on wire shelf | Drip tray / Baking tray | Drip tray with 500 ml of water | Air fry |
CLEANING AND MAINTENANCE
Make sure that the oven has cooled down before carrying out any maintenance or cleaning. Do not use steam cleaners.
Do not use wire wool, abrasive scourers or abrasive/corrosive cleaning agents, as these could damage the surfaces of the appliance.
Wear protective gloves. The oven must be disconnected from the mains before carrying out any kind of maintenance work.
EXTERIOR SURFACES
. Clean the surfaces with a damp microfibre cloth. If they are very dirty, add a few drops of pH-neutral detergent. Finish off with a dry cloth.
. Do not use corrosive or abrasive detergents. If any of these products inadvertently comes into contact with the surfaces of the appliance, clean immediately with a damp microfibre cloth.
INTERIOR SURFACES
. After every use, leave the oven to cool and then clean it, preferably while it is still warm, to remove any deposits or stains caused by food residues To dry any condensation that has formed as a result of cooking foods with a high water content, let the oven to cool completely and then wipe it with a cloth or sponge.
. Activate the "Smart Clean" function for optimum cleaning of the internal surfaces.
. Clean the glass in the door with a suitable liquid detergent.
. The oven door can be removed to facilitate cleaning.
ACCESSORIES
Soak the accessories in a washing-up liquid solution after use, handling them with oven gloves if they are still hot. Food residues can be removed using a washing-up brush or a sponge.
WATER DRAWER MAINTENANCE
Caution: The water drawer is not suitable for dishwasher use: risk of damage!
At the end of each cooking cycle with steam, after about 30 min the oven automatically performs a drain cycle lasting about one minute, thus transferring all the water in the system to the extractable drawer.
Once completed the auto-drain, proceed as follows:
- Press the top of the drawer front cap, indicated with a recess, to pull out the handle
- Grasp the handle and pull out the water drawer.
- Remove the lid of the water drawer.
- Empty the water drawer and clean it.
- Dry the different components by using a soft cloth.
- If necessary, allow the drawer to air dry without closing it with the lid.
- Replace the water drawer lid.
- Re-insert the washed and dried removable water drawer into its housing making sure to push it all the way down
- Press the bottom of the drawer front cap to reposition the handle.
Note: If needed, a manual drain cycle can be performed: press the Cleaning icon ☑ on the UI panel and by navigating with the + and - buttons, select the Drain option and press the icon √ to start. The oven will drain the water in the system, conveying it to the extractable drawer.
Note: Avoid to leave the water in the system more than 2 days.
Use only room temperature water when filling the water drawer: hot water may affect the operation of the steam system. Use only drinking water.
BOILER
To ensure that the oven always works at optimum performance and to help prevent the build-up of limescale deposits over time, we recommend using the "Drain" and "Descale" functions regularly.
After a long period of non-use of the "Forced Air + Steam" function, it is highly suggested to activate a cooking cycle with the empty oven by filling completely the tank.
REPLACING THE LIGHT
- Disconnect the oven from the power supply.
- Unscrew the cover from the light, replace the bulb and screw the cover back on the light.
- Reconnect the oven to the power supply.
Please note: 40 W/230 \~ V type G9, T300°C halogen bulbs. The bulb used in the product is specifically designed for domestic appliances and is not suitable for general room lighting within the home. Light bulbs are available from our After-sales Service.
- If using halogen bulbs, do not handle them with your bare hands as your fingerprints could cause damage. Do not use the oven until the light cover has been refitted.
REMOVING AND REFITTING THE DOOR
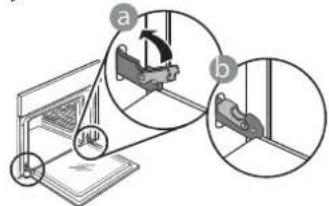
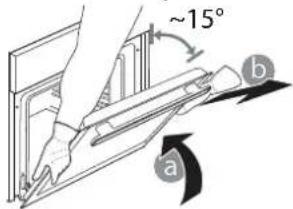
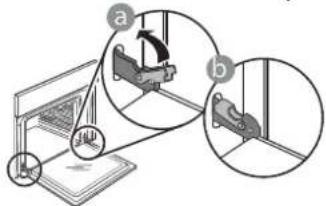
- To remove the door, open it fully and lower the catches until they are in the unlock position.

text_image
Diagram illustrating a mechanical or electrical setup with labeled components and directional arrows, likely illustrating a system or motion sequence.- Close the door as much as you can. Take a firm hold of the door with both hands – do not hold it by the handle.
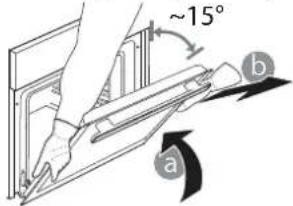
Simply remove the door by continuing to close it while pulling it upwards at the same time until it is released from its seating. Put the door to one side, resting it on a soft surface.
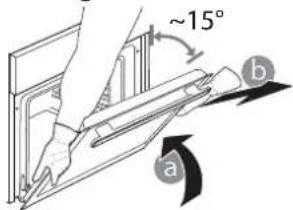
text_image
~15° a b-
Refit the door by moving it towards the oven, aligning the hooks of the hinges with their seating and securing the upper part onto its seating.
-
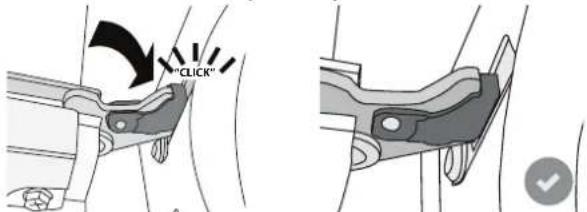
Lower the door and then open it fully. Lower the catches into their original position: Make sure that you lower them down completely.
text_image
Diagram illustrating a mechanical assembly or disassembly process with labeled components and directional arrowsApply gentle pressure to check that the catches are in the correct position.

text_image
"CLICK"- Try closing the door and check to make sure that it lines up with the control panel. If it does not, repeat the steps above: The door could become damaged if it does not work properly.
TROUBLESHOOTING
| PROBLEM POSSIBLE CAUSE SOLUTION | ||
| The oven is not working. | Power cut.Disconnection from the mains. | Check for the presence of mains electrical power and whether the oven is connected to the electricity supply.Turn off the oven and restart it to see if the fault persists. |
| The display shows the letter "F" followed by a number or letter. | Oven failure. | Contact you nearest Client After-sales Service Centre and state the number following the letter "F". |
| The oven does not heat up.The function does not start. | "DEMO" mode is running. Access "DEMO" from "SETTINGS" and select "Off". | |
| The light switches off. "ECO" mode is "On". | Access "ECO" from "SETTINGS" and select "Off". | |
| The door will not open. Cleaning cycle in progress. | Wait for the function to finish and for the oven to cool down. | |
| Drain pump activation some minutes after end/stop of steam cycle | Expected automatic water drain No action needed. | |
Policies, standard documentation and additional product information can be found by:
• Using the QR code in your appliance
• Visiting our website docs.whirlpool.eu
• Alternatively, contact our After-sales Service (See phone number in the warranty booklet). When contacting our After-sales Service, please state the codes provided on your product's identification plate.


MERCI D'AVOIR ACHETÉ UN PRODUIT WHIRLPOOL
text_image
1 2 3 4 5 7 6 8 9 6th sense - + ✓ +/-1. ON/OFF
natural_image
Metallic grid-patterned metal grate or filter structure (no text or symbols visible)图
natural_image
Pure mechanical assembly diagram showing parallel rods and a bracket with an arrow indicating direction (no text or symbols)
natural_image
Mechanical assembly diagram showing a piston-cranked joint with rotational arrow indicating motion (no text or labels)text_image
2:00s 180°C 1. CONVECTION NATURELLEtext_image
2:00 Net Lower Puronatural_image
Illustration of a hand using a tool to press or install a mechanical component (no text or symbols visible)Convection naturelle

Chaleur Pulsée

REEMPLACER L'AMPOULE
text_image
Diagram illustrating a mechanical assembly or disassembly process with labeled parts (a and b) and directional arrows indicating movement.text_image
Diagram illustrating a mechanical setup with labeled components and directional arrows, likely illustrating a motion or assembly process.natural_image
Simple line drawing of a rectangular plate with vertical lines, no text or symbols presentnatural_image
Simple line drawing of a square frame with a separate curved line on the right side (no text or symbols)natural_image
Simple line drawing of a square frame with rounded corners and a small curved line on the right side (no text or symbols)natural_image
Technical illustration of a mesh grid device with a small inset showing a grid pattern (no text or symbols)natural_image
Technical illustration showing two mechanical assembly steps: one with a spring-loaded component and the other with a sliding mechanism (no text or symbols)chemical
Chemical structure diagram showing a chilogram with labeled Kg and I,2 groupstext_image
v PER DORATURA S 180°Ctext_image
2:00s 180°C 1. STATICOnatural_image
Illustration of a hand using a tool to press or install a mechanical component (no text or symbols visible)text_image
Diagram illustrating a mechanical or electrical setup with labeled components and directional arrows, likely illustrating a system or motion sequence.text_image
Diagram illustrating a mechanical assembly or disassembly process with labeled components and directional arrowstext_image
1 2 3 4 5 7 6 8 9 6th sense - + ✓ +/-1. ВКЛ./ИЗКЛ
natural_image
Simple line drawing of a rectangular plate with vertical slats, no text or symbols presentnatural_image
Simple line drawing of a square frame with a separate curved line on the right side (no text or symbols)natural_image
Simple line drawing of a square frame with rounded corners and a separate curved line on the right (no text or symbols)natural_image
Technical illustration of a grid-patterned rectangular component with a small inset showing a mesh detail (no text or symbols)natural_image
Hand holding a knob on a device (no text or symbols visible)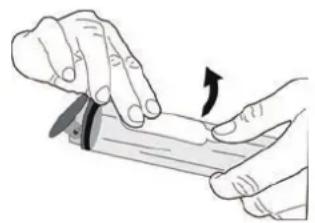
natural_image
Illustration of hands using a tool to apply a curved arrow (no text or symbols present)
natural_image
Illustration of a hand using a tool to press or install a mechanical component (no text or symbols visible)
natural_image
Illustration of a hand pointing at a device with an arrow indicating direction (no text or symbols)Press ☐ to show "ВКЛЮЧЕНО" on the display.
text_image
Pyro 2:00natural_image
Illustration of a hand using a tool to press or install a mechanical component (no text or symbols visible)text_image
Diagram illustrating a mechanical or electrical setup with labeled components and directional arrows, likely illustrating a system or motion sequence.text_image
Diagram illustrating a mechanical setup with labeled components and directional arrows, likely illustrating a motion or assembly process.ZAHVALJUJEMO VAM NA KUPOVINI PROIZVODA WHIRLPOOL
Kako bismo vam mogli pružiti potpuniju pomoć, registrirajte svoj uređaj na adresi www.whirlpool.eu/register

Pažljivo pročitajte sigurnosne upute prije upotrebe uređaja.
SKENIRAJTE QR KOD NA SVOM UREĐAJU DA BISTE DOBILI VIŠE INFORMACIJA
OPIS PROIZVODA
text_image
1 2 3 4 5 6 7 8 9 10 5natural_image
Simple line drawing of a rectangular plate with vertical lines, no text or symbols presentnatural_image
Simple line drawing of a square frame with a separate curved line on the right side (no text or symbols)Upotrebljava se kao plitica za pećnicu za pečenje mesa, ribe, povrća, focaccia i sl. ili se postavlja ispod žičane rešetke za prikupljanje sokova pečenja.
PLITICA ZA PEČENJE KLIZNE VODILICE*

natural_image
Simple line drawing of a square frame with rounded corners and a separate curved line on the right (no text or symbols)Upotrebljava se za pečenje kruha i peciva, ali i pečenki, ribe u ovitku itd.

natural_image
3D rendering of a rectangular grid-patterned panel with a small inset showing a grid pattern (no text or symbols)Upotrebljava se za kuhanje namirnica s pomoću funkcije Air Fry (Prženje na zraku), s limom za pečenje na donjoj razini da bi se prikupile moguće mrvice i sokovi. Može se prati u perilici posuđa.
* Dostupno samo na određenim modelima
Broj komada i vrsta dodatnog pribora može varirati, ovisno o kupljenom modelu.
Ostali dodatni pribor može se odvojeno kupiti. Za narudžbe i informacije obratite se službi postprodaje ili www.whirlpool.eu.
UMETANJE ŽIČANE REŠETKE I OSTALOG PRIBORA
Rešetku vodoravno umetnite tako da je kliznete kroz vodilice rešetke pazeći da je strana s podignutim rubom okrenuta prema gore.
Ostali dodatni pribor kao što je plitica za prikupljanje sokova i plitica za pečenje, postavlja se vodoravno, na isti način kao i rešetka.
UKLANJANJE I PONOVNO POSTAVLJANJE VODILICA REŠETKI
natural_image
Technical illustration showing two mechanical assembly steps: one with a rotating arrow and the other with a curved arrow (no text or symbols)text_image
SAT 12:00chemical
Chemical structure diagram showing KILOGRAMI with labeled Kg and I2 groupsFunkcija se ispravno postavlja tako da se prate informacije na zaslonu. Kada se to zatraži, pritisnite + ili za postavljanje tražene vrijednosti i zatim pritisnite √ za potvrdu.
STUPANJ PRIPREME / ZAPEČENA KORICA
U nekim funkcijama 6th Sense može se prilagoditi stupanj pripreme.
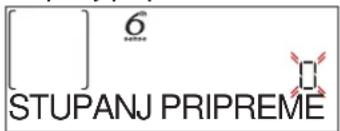
text_image
[ ] 6 STUPANJ PRIPREMEKada je gotovo, pritisnite ili da-biste odabrali željenu razinu u rasponu od slabije pečeno (-1) do dobro pečeno (+1). Pritisnite √ ili za potvrdu i pokrenite funkciju.
• SMARTCLEAN (PAMETNO ČIŠĆENJE)
Pritisnite da bi se na zaslonu prikazalo „Smart Clean“.
text_image
0:35 Smart cleannatural_image
Illustration of a hand using a tool to press or install a mechanical component (no text or symbols visible)Odaberitefunkciju „Drain” (Ispuštanje) kad je ladica za vodu ispravno umetnuta u pećnicu, pritisnite ▶ i pričekajte da se ciklus automatski pokrene. Potrebno je prosječno oko jedne minute za ispuštanje cijelog punjenja. Kad se završi, ladica se može izvaditi i isprazniti.
text_image
00:5 MJERAC VREMENAtext_image
Diagram illustrating a mechanical or electrical setup with labeled components and directional arrows, likely illustrating a system or motion sequence.- Zatvorite vrata koliko god to možete. Čvrsto uhvatite vrata s obje ruke; ne držite ih za ručku. Vrata jednostavno skinite tako da ih nastavljate zatvarati dok ih istovremeno vučete prema gore dok se ne otpuste iz ležišta. Stavite vrata sa strane, oslanjajući ih na meku površinu.

text_image
~15° a b-
Ponovno postavite vrata pomičući ih prema pećnici, poravnavajući kuke šarki s ležištima i učvršćujući gornji dio na njegovo ležište.
-
Spustite vrata pa ih otvorite do kraja. Šarke spustite u njihov početni položaj: provjerite jeste li ih do kraja spustili.

text_image
Diagram showing mechanical assembly steps with labeled components a and b, including a component labeled 'JL' and a highlighted section.natural_image
Simple line drawing of a rectangular plate with vertical lines, no text or symbols presentnatural_image
Simple line drawing of a square frame with a separate curved line on the right side (no text or symbols)natural_image
Simple line drawing of a square frame with decorative border and a separate curved line on the right (no text or symbols)natural_image
Exterior view of a rectangular metal grate or filter structure with a small grid pattern on the right side (no text or symbols)natural_image
Technical diagram showing two mechanical assembly configurations with directional arrows indicating motion (no text or symbols present)text_image
TEPLOTA - - : - 200°Cchemical
Chemical structure diagram showing a kilogram with labeled atoms and bondsnatural_image
Illustration of a hand using a tool to lift a cylindrical object (no text or symbols visible)text_image
Diagram showing mechanical assembly steps with labeled components a and b, including a laptop and mechanical parts.text_image
Diagram showing mechanical assembly with labeled parts a and b, including a rotating component and a close-up view of the assembly.TAK FORDI DU HAR K∅BT ET WHIRLPOOL PRODUKT
RIST DRYPBAKKE BAGEPLADE GLIDESKINNER \*
2......
natural_image
Rectangular metal grate or filter structure with uniform grid pattern (no text or symbols)图
INDSÆT RIST OG ANDET TILBEH∅R
natural_image
Pure mechanical diagram showing a ladder with spring and connecting rod (no text or symbols)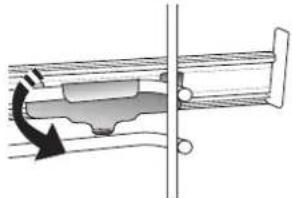
natural_image
Mechanical assembly diagram showing a piston-cranked joint with a rotating arrow indicating motion (no text or labels)natural_image
Illustration of a hand using a tool to lift a cylindrical object (no text or symbols visible)» FASE 1/2: AFKALKNING (70 MIN)
text_image
Diagram illustrating a mechanical or electrical setup with labeled components and directional arrows, likely illustrating a system or motion.text_image
Diagram illustrating a mechanical assembly or mounting process with labeled components and directional arrowstext_image
Diagram of an oven with numbered parts for identification and assembly referencenatural_image
Simple line drawing of a rectangular grid with vertical lines, no text or symbols presentnatural_image
Simple line drawing of a square frame with a separate curved line on the right side (no text or symbols)natural_image
Simple line drawing of a square frame with rounded corners and a separate curved line on the right (no text or symbols)natural_image
Exterior view of a rectangular grid-patterned panel with a small inset showing a grid-like structure (no text or symbols)natural_image
Technical diagram showing two mechanical assembly states: one with a rotating arrow and the other with a curved arrow (no text or symbols)text_image
12:00 KELLtext_image
KESTUS S 180°Ctext_image
[ ] 6 KUPSUSnatural_image
Hand holding a knob on a device screen (no text or symbols visible)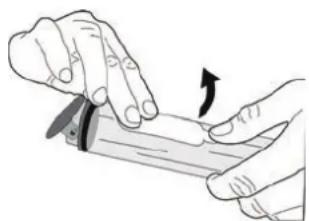
natural_image
Illustration of hands using a tool to apply a physical procedure (no text or symbols visible)
natural_image
Illustration of a hand holding a tool with a curved handle, no text or symbols present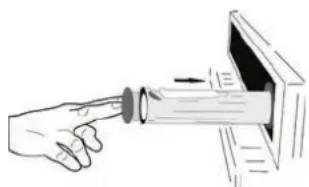
natural_image
Illustration of a hand inserting a lens into a device (no text or symbols)natural_image
Illustration of a hand using a tool to press or install a mechanical component (no text or symbols visible)text_image
Diagram illustrating a mechanical or robotic device with labeled parts (a and b) and directional arrows indicating motion or movement.text_image
Diagram illustrating a mechanical setup with labeled components and directional arrows, likely illustrating a motion or assembly process.text_image
Diagram of an oven with numbered parts for identification and assembly reference8. VALINNAT / SUORA PÄÄSY TOIMINTOIHIN
natural_image
Metallic grid-patterned panel or filter structure (no text or symbols visible)图
natural_image
Pure mechanical assembly diagram showing diagonal metal rods and a bracket (no text or symbols)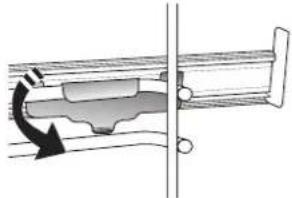
natural_image
Mechanical assembly diagram showing a piston-cranked joint with rotational arrow indicating force (no text or labels)PERINTEISET TOIMINNOT
• KONVEKTIOUUNI
text_image
12:00 KELLOtext_image
[ ] δ KYPSSYYSTH303. TOIMINNON KÄYNNISTYS
• SMARTCLEAN-PUHDISTUSTOIMINTO
text_image
2:00 Pyrolyssipund.natural_image
Illustration of a hand using a tool to apply liquid onto a cylindrical object (no text or symbols visible)AIR FRY -KYPSENNYSTAULUKKO
KYPSENNYSTAULUKON LUKEMINEN
text_image
Diagram illustrating a mechanical or electrical setup with labeled components and directional arrows, likely illustrating a system or motion sequence.text_image
Diagram showing mechanical assembly with labeled parts a and b, including a component labeled 'JL' and a highlighted section.natural_image
Metallic grid-patterned panel with uniform mesh (no text or symbols)[NO TEXT]
natural_image
Pure mechanical diagram showing a ladder with spring and connecting rod, no text or symbols present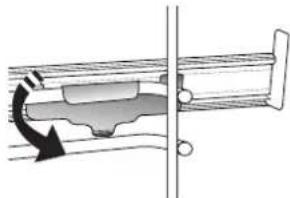
natural_image
Mechanical assembly diagram showing a rotating component with a curved arrow indicating motion (no text or symbols)chemical
Chemical structure diagram showing a kilogramm with labeled K and I atoms and their respective Kg and I,2 groupstext_image
Pi I is 2:00natural_image
Illustration of a hand using a tool to apply liquid onto a cylindrical object (no text or symbols visible)text_image
Diagram illustrating a mechanical assembly or disassembly process with labeled parts a and b, showing directional arrows and component placement.text_image
Diagram illustrating a mechanical assembly or mounting process with labeled components and directional arrowsnatural_image
Simple line drawing of a rectangular plate with vertical lines, no text or symbols presentnatural_image
Simple line drawing of a square frame with a separate curved line on the right side (no text or symbols)natural_image
Simple line drawing of a rectangular frame with side notches and a separate curved line on the right (no text or symbols)CEPŠANAS AR GAISU
PAPLĀTE*
natural_image
Close-up of a perforated metal grate or filter plate (no text or symbols visible)
natural_image
Diagram of a mechanical or structural assembly with parallel rods and a directional arrow (no text or symbols)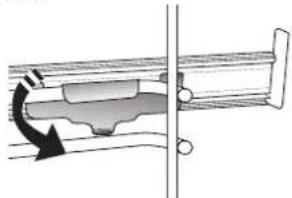
natural_image
Mechanical assembly diagram showing a rotating component with directional arrow (no text or labels)chemical
Chemical structure diagram showing a kilogram of K and a potassium ion (Kg) with two oxygen atoms, likely representing a kilogram or potassium ion.text_image
[ ] 6 GATAVĪBAnatural_image
Illustration of a hand using a tool to lift or press a cylindrical object (no text or symbols visible)text_image
Diagram illustrating a mechanical or electrical setup with labeled components and directional arrows, likely illustrating a system or motion sequence.text_image
Diagram illustrating a mechanical assembly or disassembly process with labeled components and directional arrowsnatural_image
Metallic grid-patterned rectangular object with no visible text or symbolsnatural_image
Pure mechanical assembly diagram showing parallel rods and a bracket with an arrow indicating direction (no text or symbols)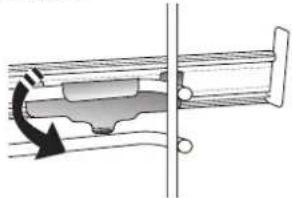
natural_image
Mechanical assembly diagram showing a piston-cranked joint with a rotating arrow indicating motion (no text or labels)text_image
12:00 LAIKRODIStext_image
TRUKMÈ S 180°Cchemical
Chemical structure diagram showing a kilogramal aluminum complex with labeled Kg and I2 groupsnatural_image
Illustration of a hand using a tool to lift or press a cylindrical object (no text or symbols visible)text_image
Diagram illustrating a mechanical or electrical setup with labeled components and directional arrows, likely illustrating a system or motion sequence.text_image
Diagram illustrating a mechanical assembly or mounting process with labeled components and directional arrowsTAKK FOR AT DU KJ∅PTE ET WHIRLPOOL-PRODUKT
text_image
Diagram of an oven with numbered parts for identification and assembly referencenatural_image
Simple line drawing of a rectangular grid with vertical lines, no text or symbols presentnatural_image
Simple line drawing of a square frame with a separate curved line on the right side (no text or symbols)natural_image
Simple line drawing of a rectangular frame with rounded corners and a separate curved line on the right (no text or symbols)natural_image
Exterior view of a rectangular grid-patterned panel with a small inset showing a mesh structure (no text or symbols)SETTE INN GLIDESKINNENE (HVIS AKTUELT)
natural_image
Technical diagram showing two mechanical assembly states: one with a rotating arrow and the other with a curved arrow (no text or symbols)text_image
12:00 KLOKKESLUTTID (UTSATT START)
For mange funksjoner, när du först har stilt inn steketiden kan du utsette start av funksjonen ved å programmere sluttiden. Display viser sluttiden mens ➕ ikonet blinker.
text_image
0:50 s 180°C SLUTTID. TILBEREDNING MED DAMPING
natural_image
Hand holding a button on a device (no text or symbols visible)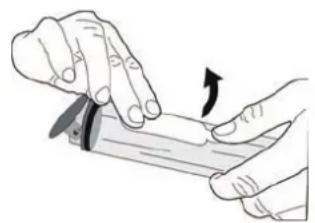
natural_image
Illustration of hands holding a tool with an arrow indicating rotation (no text or symbols)
natural_image
Illustration of a hand using a tool to press or install a cylindrical object (no text or symbols visible)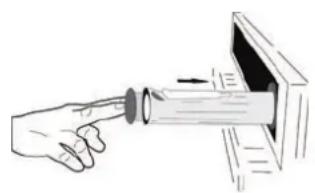
natural_image
Hand pointing at a cylindrical object inside a device (no text or symbols visible)text_image
[ ] 100 180°C SJEKK MATENnatural_image
Illustration of a hand using a tool to apply or install a cylindrical component (no text or symbols visible)» FASE 1/2: AVKALKING (70 MIN)
VEDLIKEHOLD AV VANNSKUFF
text_image
Diagram illustrating a mechanical or electrical setup with labeled components and directional arrows, likely illustrating a system or motion sequence.- Lukk døren så godt du kan. Ta godt tak i døren med begge hender – ta ikke i håndtaket. Fjern ganske enkelt døren ved å fortsette å lukke den mens du drar den oppover samtidig til den frigjøres fra sin plass. Sette døren til den ene siden, la den hvile på et bløtkokt underlag.
text_image
~15° a btext_image
Diagram illustrating a mechanical assembly or mounting process with labeled components and directional arrowsnatural_image
Simple line drawing of a rectangular plate with vertical lines, no text or symbols presentnatural_image
Simple line drawing of a square frame with a separate curved line on the right side (no text or symbols)natural_image
Simple line drawing of a square frame with rounded corners and a small curved line on the right side (no text or symbols)natural_image
Technical illustration of a grid-patterned metal grate or filter structure (no text or symbols)natural_image
Technical illustration showing two mechanical assembly steps: one with a rotating arrow and the other with a curved arrow (no text or symbols)KONIEC (OPÓŻNIONY START)
text_image
KONIEC 0:50 s 180°Cchemical
Chemical structure diagram showing a kilogram with labeled K, g, and 1,2 groupstext_image
[ ] 100 180°C SPRAWDZ POTRAWEtext_image
2:00s 18.0°C 1. KON ENCJONALNEnatural_image
Illustration of a hand using a tool to lift or press a cylindrical object (no text or symbols visible)text_image
Diagram illustrating a mechanical or electrical setup with labeled components and directional arrows, likely illustrating a system or motion sequence.text_image
Diagram illustrating a mechanical setup with labeled components and directional arrows, likely illustrating a motion or assembly process.VĂ MULȚUMIM CĂ AȚI ACHIZIȚIONAT UN PRODUS WHIRLPOOL
text_image
1 2 3 4 5 7 6 8 9 6th sense - + ✓1. PORNIT / OPRIT
natural_image
Simple line drawing of a rectangular plate with vertical lines, no text or symbols presentnatural_image
Simple line drawing of a square frame with dashed lines and a separate curved line (no text or symbols)natural_image
Simple line drawing of a square frame with rounded corners and a separate curved line on the right (no text or symbols)natural_image
Technical illustration of a rectangular grid-patterned panel with a small inset showing a mesh structure (no text or symbols)natural_image
Diagram of a mechanical or structural assembly with diagonal lines and a black arrow indicating direction (no text or symbols)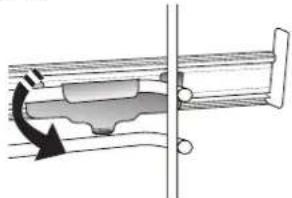
natural_image
Mechanical assembly diagram showing a piston-cranked joint with rotational arrow indicating motion (no text or labels)4. SETAREA DURITĂȚII APEI
text_image
DURATĂ S 180°Ctext_image
2:00s 180°C 1. CONVENTIONALnatural_image
Illustration of a hand using a tool to lift or press a cylindrical object (no text or symbols visible)text_image
Diagram illustrating a mechanical assembly or disassembly process with labeled parts (a and b) and directional arrows indicating movement.text_image
Diagram illustrating a mechanical assembly with labeled parts (a) and (b), showing a device with a lever mechanism.HVALA NA KUPOVINI WHIRLPOOL PROIZVODA
Kako biste dobili kompletniju podršku, registrujte svoj proizvod na adresi www.whirlpool.eu/register

natural_image
Simple line drawing of a rectangular plate with vertical lines, no text or symbols presentnatural_image
Simple line drawing of a square plate with dashed lines and a separate curved line (no text or symbols)Koristi se kao pleh za pečenje mesa, ribe, povrća, fokače itd. ili je možete postaviti ispod žičane rešetke ako želite da prikupite saft od pečenja.
PLEH ZA PEČENJE KLIZNE VOĐICE*
natural_image
Simple line drawing of a square frame with rounded corners and a small curved line on the right side (no text or symbols)Koristi se za pečenje svih vrsta hleba i peciva, kao i pečenja, ribe u sopstvenom soku itd.
Da bi olakšale postavljanje ili uklanjanje dodatnog pribora.
PLEH ZA PRŽENJE VAZDUHOM*
natural_image
Exterior view of a rectangular metal grate or filter structure with a small inset grid pattern (no text or symbols)Koristi se za pripremu hrane pomoću funkcije prženja vazduhom, tako što je pleh za pečenje postavljen na niži nivo radi prikupljanja mogućih mrvica ili masnoće.
natural_image
Pure mechanical assembly diagram showing diagonal metal rods and a bracket with an arrow indicating direction (no text or symbols)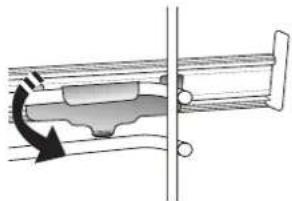
natural_image
Mechanical assembly diagram showing a piston-cranked joint with a rotating arrow indicating motion (no text or symbols)text_image
SAT 12:00Pritisnite ili da-podesite trenutni sat i pritisnite ✓ : Na ekranu će početi da trepere dve brojke koje označavaju minute.
Pritisnite + ili da podesite minute i pritisnite da √ potvrdite.
Obratite pažnju na sledeće: Može biti potrebno da ponovo podesite vreme nakon dužih prekida u napajanju električnom energijom. Izaberite „SAT“ u meniju „PODEŠAVANJA“, koji je dostupan pritiskom nae ^p .
4. PODEŠAVANJE NIVOA TVRDOĆE VODE
Da biste omogućili efikasan rad pećnice i obezbedili da ona redovno traži od korisnika da izvrši ciklus uklanjanja kamenca kada je to potrebno, važno je da podesite odgovarajući nivo tvrdoće vode. Da biste ga podesili, uključite pećnicu pritiskom na ☐, zatim pritisnite dugme za podešavanja ☎ i koristite dugmad za navigaciju + i da biste izabrali opciju „WATER HARDNESS“ (Tvrdoća vode). Pritisnite √ za potvrdu. Koristite dugmad za navigaciju + i da biste izabrali odgovarajući nivo za vodu u vašem području na osnovu sledeće tabele:
| TABELA NIVOA TVRDOĆE VODE | ||||
| Nivo | °dHNemačkistepen | °fHFrancuskistepen | °ClarkEngleskistepen | |
| 1 | Veomameka | 0-6 0-10 | 0-7 | |
| 2 Meka | 7-11 11 | -20 8-14 | ||
| 3 Srednja | 12-16 | 21-29 | 15-20 | |
| 4 Tvrda | 1 | 7-34 | 30-60 21-42 | |
| 5 | Veomatvrda | 35-50 | 61-90 43- | 62 |
Pritisnite √a potvrdu.
text_image
TRAJANJE S 180°Cchemical
Chemical structure diagram showing a kilogram of K and two potassium ions (Kg) with electron configuration labelsDa biste pravilno podesili funkciju, sledite indikacije na ekranu, kada je potrebno, i pritisnite + ili da biste podesili željenu vrednost, a zatim pritisnite √ za potvrdu.
STEPEN KUVANJA / ZAPEČENA KORICA
• SMARTCLEAN (PAMETNO ČIŠĆENJE)
Pritisnite da prikažete „Smart Clean“ na ekranu.

text_image
0:35 Smart cleanPritisnite da aktivirate funkciju: na ekranu se prikazuju sve radnje koje je potrebno da obavite za postizanje najboljih rezultata čišćenja: Sledite uputstva i zatim pritisnite √ kada završite. Kada obavite sve korake, kada se pojavi zahtev pritisnite ▶ da biste aktivirali ciklus čišćenja.
Obratite pažnju na sledeće: Preporučuje se da ne otvarate vrata pećnice tokom ciklusa čišćenja, kako biste sprečili gubitak vodene pare što može imati kontraefekat na konačan rezultat čišćenja.
Kada se ciklus završi, na ekranu će početi da treperi odgovarajuća poruka. Pustite pećnicu da se ohladi, a zatim obrišite i osušite unutrašnje površine krpom ili sunđerom.
• AUTOMATSKO ČIŠĆENJE - PYRO
Ne dodirujte pećnicu tokom ciklusa Pyro. Decu i životinje držite dalje od pećnice tokom i nakon (dok se prostorija ne provetri) ciklusa Pyro (pirolize).
Uklonite sav dodatni pribor – uključujući vođice – iz pećnice pre aktiviranja funkcije. Ako je pećnica postavljena ispod aspiratora, vodite računa da svi gorionici ili električne ringle budu isključene tokom obavljanja ciklusa samočišćenja. Za optimalne rezultate čišćenja, uklonite ostatke iz pećnice i očistite unutrašnje staklo na vratima pomoću pirolitičke funkcije. Preporučujemo pokretanje funkcije Pyro samo ako uređaj sadrži tvrde naslage ili ukoliko se tokom pečenja stvaraju neprijatni mirisi. Pritisnite ☑ da prikažete „Pyro“ na displeju.
text_image
Pr 2:00Pritisnite ili da-izaberete željeni ciklus, a zatim pritisnite √ za potvrdu. Nakon izbora ciklusa, po želji, pritisnite + ili za podešavanje vremena završetka (odlaganje pokretanja), a zatim pritisnite √ za potvrdu. Očistite vrata i uklonite sav dodatni pribor kako je zatraženo, zatim zatvorite vrata i pritisnite ▶ kada završite: pećnica će započeti ciklus samočišćenja, dok se vrata automatski zaključavaju: poruka upozorenja se pojavljuje na displeju, zajedno sa odbrojavanjem koje pokazuje status ciklusa koji je u toku. Kada se ciklus završi, vrata ostaju zaključana dok se temperatura u pećnici ne spusti na bezbedan nivo.
Obratite pažnju na sledeće: uklonite vodu iz fioke pre aktiviranja ciklusa Pyro (Piroliza)
• ISPUŠTANJE VODE
Ova funkcija omogućava odvod vode da bi se sprečilo njeno zadržavanje u kotlu. Ovaj proizvod je razvijen radi automatskog pokretanja ciklusa ispuštanja vode kada se priprema hrane zaustavi/završi. Približno 30
min nakon zaustavljanja/završetka pripreme hrane, pećnica će automatski ispustiti vodu iz sistema, premeštajući preostalu vodu u fioku (pazite da ne uklonite fioku nakon pripreme hrane). Po završetku, fioka se može izvući i isprazniti.
Preporučujemo da se fioka isprazni čim se ispuštanje vode završi, nakon ciklusa pripremanja hrane. Ako je potrebno, korisnik u svakom slučaju može izvršiti ručno ispuštanje vode pridržavajući se uputstava u nastavku.

natural_image
Illustration of a hand using a tool to apply material or mechanical component (no text or symbols visible)Izaberite funkciju „Ispuštanje vode“ dok je fioka za vodu pravilno umetnuta u pećnicu, pritisnite ▶ i sačekajte da se ciklus automatski pokrene. Prosečno trajanje potpunog ispuštanja vode iznosi oko jednog minuta. Po završetku, fioka se može izvući i
isprazniti.
text_image
Diagram illustrating a mechanical or electrical setup with labeled components and directional arrows, likely illustrating a system or motion sequence.- Zatvorite vrata koliko god je moguće. Čvrsto držite vrata sa obe ruke – ne držite ih za dršku. Jednostavno skinite vrata tako što ćete nastaviti da ih zatvarate dok ih istovremeno povlačite nagore i oslobađate iz njihovog ležišta. Položite vrata da leže na jednoj strani, na mekanoj površini.
text_image
~15° a b-
Ponovo postavite vrata tako što ćete ih podići ka pećnici, poravnajte kuke sa šarki sa ležištem i postavite gornji deo vrata u njihovo ležište.
-
Spustite vrata, a potom ih potpuno otvorite. Spustite kvačice na njihovu prvobitnu poziciju: Proverite da li ste ih spustili potpuno.
text_image
Diagram illustrating a mechanical assembly or mounting process with labeled components and directional arrowsNežno ih pritisnite kako biste se uverili da su kvačice u dobrom položaju.
text_image
"CLICK"- Pokušajte da zatvorite vrata i proverite da li su u istoj ravni sa kontrolnom tablom. Ukoliko nisu, ponovite gore opisane korake: Vrata se mogu oštetiti ukoliko nisu nameštena kako treba.
OTKLANJANJE PROBLEMA
| PROBLEM MOGUĆ UZROK REŠENJE | ||
| Pećnica ne radi. | Nestanak struje.Isključenje iz električne mreže. | Proverite da li postoji dovod električne energije i da li je pećnica priključena na električnu mrežu.Isključite pećnicu i ponovo je uključite kako biste proverili da li je kvar i dalje prisutan. |
| Na ekranu se prikazuje slovo „F“ uz slovo ili broj. | Kvar pećnice. | Kontaktirajte najbliži Postprodajni servis za klijente i recite im broj koji se pojavljuje uz slovo „F“. |
| Pećnica se ne zagreva.Funkcija se ne pokreće. | „DEMO“ režim je pokrenut. | Pristupite opciji „DEMO“ preko „PODEŠAVANJA“ i izaberite „isključeno“. |
| Svetlo se isključuje. „ECO“ režim je uključen. | Pristupite opciji „ECO“ preko „SETTINGS“ (Podešavanja) i izaberite „isključeno“. | |
| Vrata se ne otvaraju. Ciklus čišćenja u toku. | Sačekajte da se funkcija završi i da se pećnica ohladi. | |
| Aktiviranje pumpe za ispuštanje vode nekoliko minuta nakon zaustavljanja/ završetka ciklusa kuvanja na pari | Očekivano automatsko ispuštanje vode | Nije potrebna nikakva radnja. |
Smernice, standardna dokumentacija i dodatne informacije o proizvodu se mogu naći:
• Korišćenje QR koda na uređaju
• sa naše internet stranice docs.whirlpool.eu
- Takođe, možete kontaktirati naš postprodajni servis (broj se nalazi u garantnoj knjižici). Prilikom kontaktiranja našeg postprodajnog servisa, navedite šifru koja se nalazi na pločici za identifikaciju proizvoda.


ĎAKUJEME, ŽE STE SI KÚPILI VÝROBOK WHIRLPOOL
text_image
Diagram of an oven with numbered parts for identification and assembly referencenatural_image
Simple line drawing of a rectangular plate with vertical lines, no text or symbols presentnatural_image
Simple line drawing of a square frame with dashed lines and a separate curved line (no text or symbols)natural_image
Simple line drawing of a square frame with a small curved line on the right side (no text or symbols)natural_image
Exterior view of a rectangular metal grate or filter structure with a small inset grid pattern (no text or symbols)natural_image
Technical illustration of a mechanical assembly with two views showing internal components (no text or symbols)Upozornenie: Posuvné bežce možno nasadit' na hociktorej úrovni.
FUNKCIE

6^th SENSE
text_image
TEPLOTA - - : - 200°Cchemical
Chemical structure diagram showing a kilogram with labeled atoms and bondsnatural_image
Hand inserting a button into a device (no text or symbols visible)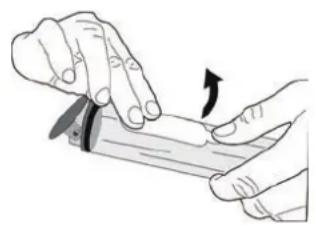
natural_image
Illustration of hands holding a tool with an arrow indicating rotation (no text or symbols)
natural_image
Illustration of a hand using a tool to press or install a mechanical component (no text or symbols visible)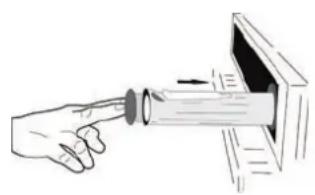
natural_image
Illustration of a hand pointing at a device with a magnified view (no text or symbols)text_image
PRIDAT K OBL'UB?natural_image
Illustration of a hand using a screwdriver to measure a cylindrical object (no text or symbols present)text_image
Diagram illustrating a mechanical or electrical setup with labeled components and directional arrows, likely illustrating a system or motion sequence.text_image
Diagram illustrating a mechanical assembly or mounting process with labeled components and directional arrowsnatural_image
Simple line drawing of a rectangular grid with vertical lines, no text or symbols presentnatural_image
Simple line drawing of a square frame with a separate curved line on the right side (no text or symbols)natural_image
Simple line drawing of a rectangular frame with rounded corners and a separate curved line on the right (no text or symbols)natural_image
3D rendering of a grid-patterned rectangular panel with a small inset showing a grid pattern (no text or symbols)natural_image
Diagram of a mechanical or structural assembly with parallel rods and a directional arrow (no text or symbols)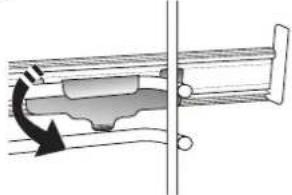
natural_image
Technical diagram of a mechanical assembly with directional arrows indicating motion (no text or symbols)text_image
TRAJANJE S 180°Cchemical
Chemical structure diagram showing a kilogram with labeled atoms and bondstext_image
[ ] 6 KUHANOSTnatural_image
Illustration of a hand using a tool to apply or install a mechanical component (no text or symbols visible)text_image
Diagram illustrating a mechanical or electrical setup with labeled components and directional arrows, likely illustrating a system or motion sequence.text_image
Diagram illustrating a mechanical assembly or mounting process with labeled components and directional arrowsZ nežnim pritiskom preverite, ali sta zaporna vzvoda v pravilnem položaju.

text_image
"CLICK"TACK FÖR ATT DU HAR KÖPT EN PRODUKT FRÅN WHIRLPOOL
natural_image
Metallic grid-patterned panel or filter structure (no text or symbols visible)图
natural_image
Pure diagram of a mechanical or electrical component with parallel lines and a black arrow indicating direction (no text or symbols)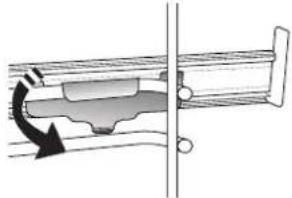
natural_image
Diagram of a mechanical assembly with a rotating component and a vertical line (no text or symbols)Observera: De rörliga skenorna kan monteras på alla nivåer.
FUNKTIONER

6^th SENSE
AVSLUTNINGSTID (FÖRDRÖJD START)
text_image
VAL.I v = BROWN S 180°Ctext_image
© 2:00 Puronatural_image
Illustration of a hand using a tool to apply material or mechanical component (no text or symbols visible)text_image
Diagram illustrating a mechanical or electrical setup with labeled components and directional arrows, likely illustrating a system or motion sequence.text_image
Diagram showing mechanical assembly steps with labeled components a and b, including a component labeled 'JL' and a highlighted section.text_image
1 2 3 4 5 7 6 8 9 6th sense - + ✓ △ ○ × ↑ ◆ ◇ ♥ ● ▶natural_image
Metallic grid-patterned panel with no visible text or symbols
natural_image
Pure mechanical assembly diagram showing parallel rods and a bracket with an arrow indicating direction (no text or symbols)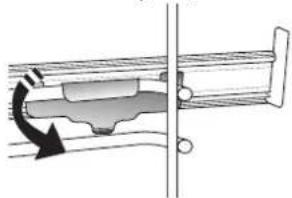
natural_image
Diagram of a mechanical component with a curved arrow indicating rotation or force direction (no text or symbols)natural_image
Hand holding a knob on a device screen (no text or symbols visible)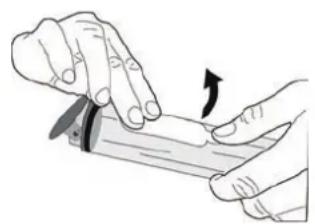
natural_image
Illustration of hands using a tool to cut or apply a piece of paper (no text or symbols visible)
natural_image
Illustration of a hand using a tool to press or install a mechanical component (no text or symbols visible)