
Camedia D230 - Camera OLYMPUS - Free user manual and instructions
Find the device manual for free Camedia D230 OLYMPUS in PDF.
User questions about Camedia D230 OLYMPUS
0 question about this device. Answer the ones you know or ask your own.
Ask a new question about this device
Download the instructions for your Camera in PDF format for free! Find your manual Camedia D230 - OLYMPUS and take your electronic device back in hand. On this page are published all the documents necessary for the use of your device. Camedia D230 by OLYMPUS.
USER MANUAL Camedia D230 OLYMPUS
natural_image
Line drawing of a Olympus digital camera with lens and buttons (no text or symbols on body)ENGLISH (Pages 2 to 33)
FRANÇAIS (Pages 34 to 65)
Thank you for purchasing an Olympus digital camera. Before you start to use your new camera, please read these instructions carefully to enjoy optimum performance and a longer service life. Keep this manual in a safe place for future reference.
For customers in USA
Declaration of conformity
Model Number: C-2/D-230
Trade Name: OLYMPUS
Responsible Party: Olympus America Inc.
Address: 2 Corporate Center Drive, Melville, New York
11747-3157 U.S.A.
Telephone Number: 631-844-5000
Tested To Comply With FCC Standards FOR HOME OR OFFICE USE
This device complies with Part 15 of the FCC rules. Operation is subject to the following two conditions:
(1) This device may not cause harmful interference.
(2) This device must accept any interference received, including interference that may cause undesired operation.
For customers in Canada
This Class B digital apparatus meets all requirements of the Canadian Interference-Causing Equipment Regulations
For customers in Europe

“CE” mark indicates that this product complies with the European requirements for safety, health, environment and customer protection.
TRADEMARKS
- Windows ^ is a registered trademark of Microsoft Corporation in the United States of America and in other countries.
● Macintosh is a registered trademark of Apple Computers, Inc.
● Other brand names and product names mentioned in this manual are trademarks or registered trademarks of their respective owners.
CONTENTS
★ This symbol indicates pages recommended for reading by first-time users.
★ These pages show how to take pictures and how to play them back.
Sections marked with 📋 are described on the CD-ROM only.
CAMERA OPERATION
PREPARATION 6
Names of parts 6
Monitor indications ....
Attaching the strap 7
Loading the batteries ★ 7
Selecting commercially available batteries or the AC adapter 8
Inserting the SmartMedia card ★ 8
Turning the camera ON/OFF 9
When taking pictures 9
When playing back pictures 10
Menu screen flow ......
Setting the date and time ★ 10
TAKING PICTURES 11
Holding the camera ....
Taking pictures 11
Taking pictures using the viewfinder ★.... 11
Taking pictures using the monitor 11
When to use the viewfinder and the monitor ....
The function of the memory gauge ....
The function of the green lamp and the orange lamp ......
Focus lock ....
PLAYING BACK PICTURES 12
Checking recorded images ( playback) ★ 12
Quick view (double-click playback in the Record mode) ....
Erasing an image ★ 12
Protecting important images ★ 13
RECORDING FUNCTIONS 14
Using the arrow pad ....14
Flash 14,
Macro mode 14
Digital tele mode 15
Exposure compensation 15
Self-timer 16
Sequence mode 17
Fixed focus 17
Spot metering mode 18
White balance 19
Image quality 20
Sharpness
Contrast
PLAYBACK FUNCTIONS 21
Index playback 21,
Close-up playback 21
Auto playback 22
Erasing all images 22
OTHER FUNCTIONS 23
Recording and playing back movies 23
Panorama mode ....
Monochrome (black and white) images ....
Sepia images ....
Resizing
Rotating
Muting the beep tones 25
Formatting a new card 26
Rec view 27
Clear settings 27,
Displaying image information 28
Monitor brightness 28
Print reserve ....
TROUBLESHOOTING 29
Error messages 29
Problems
Specifications 30
Index
CONNECTING THE CAMERA TO A PC
Flow
For Windows (98/Me/2000) users ......
For Macintosh (OS9) users ....
Finding PC connection method (for other OS users) 32
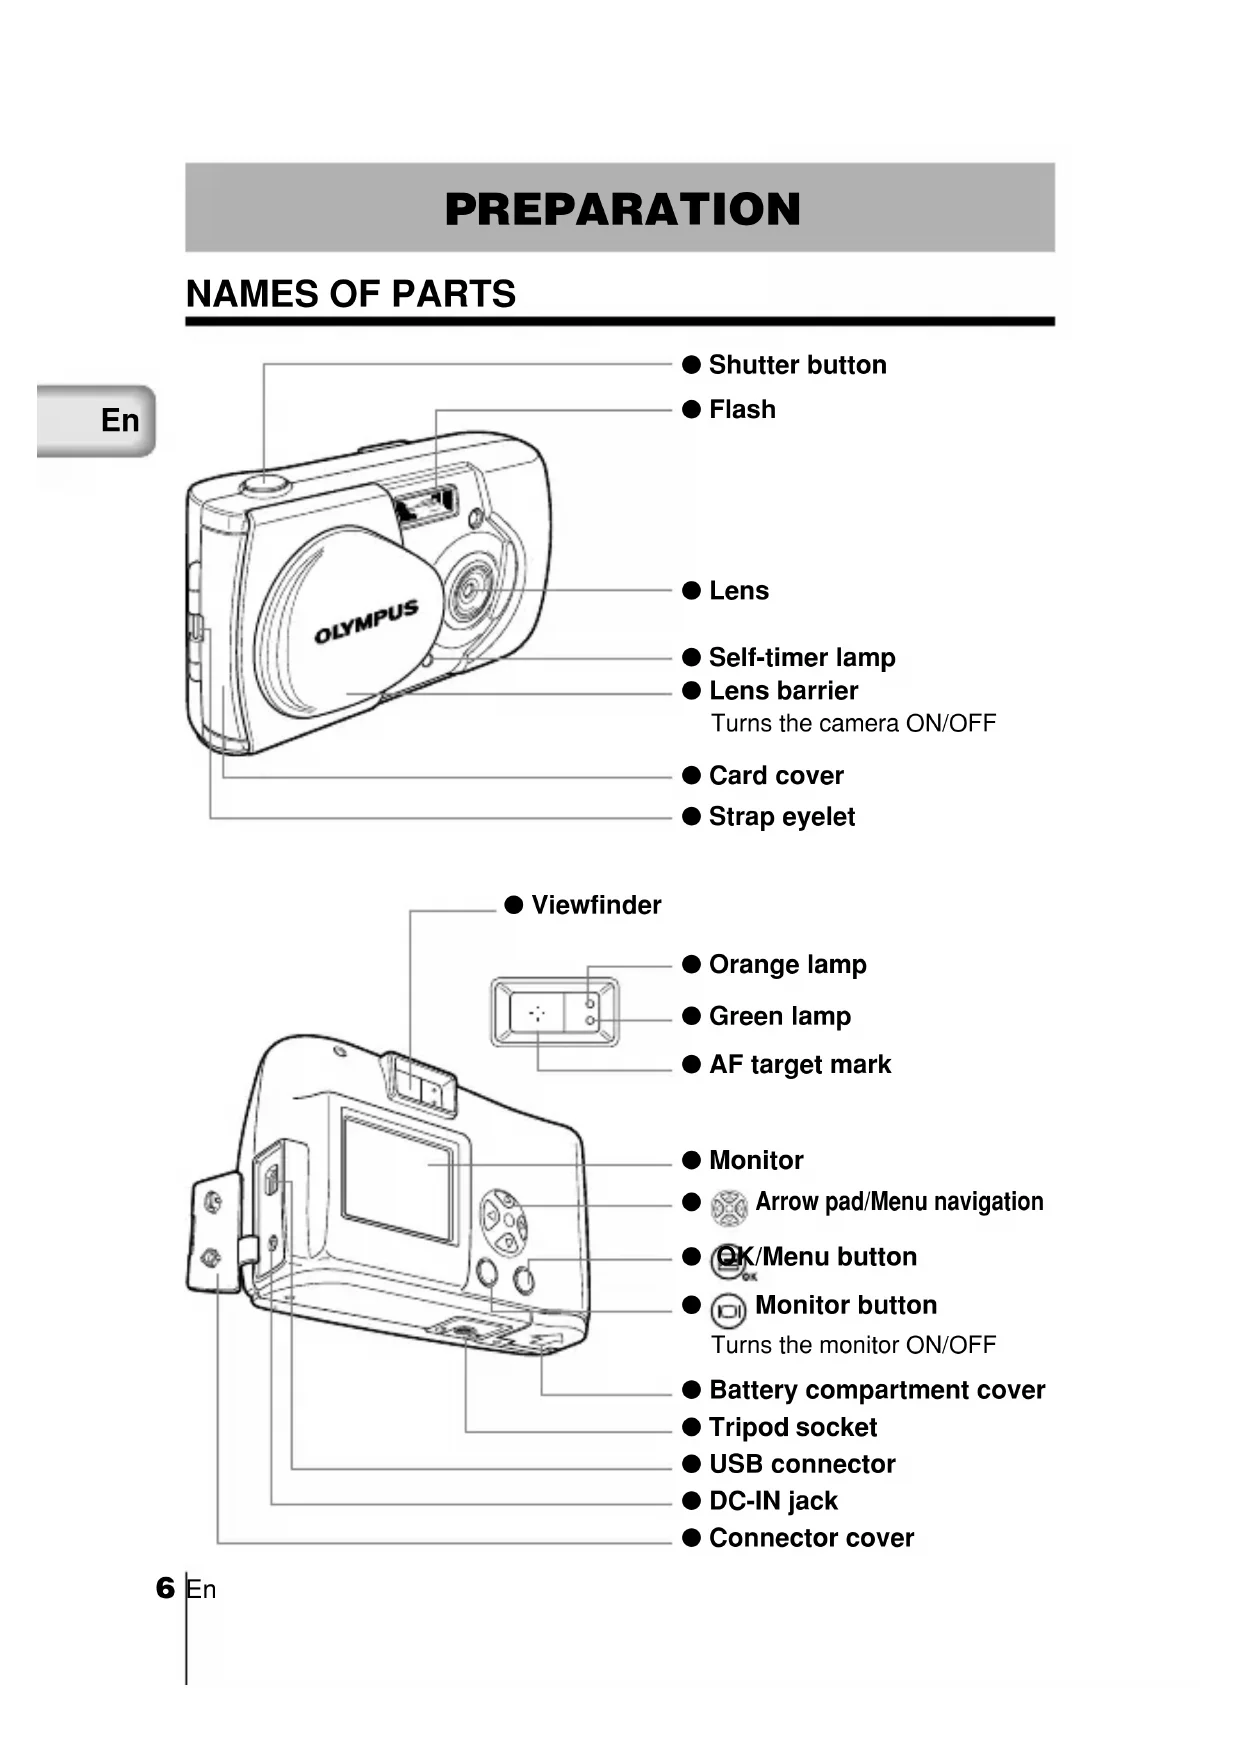
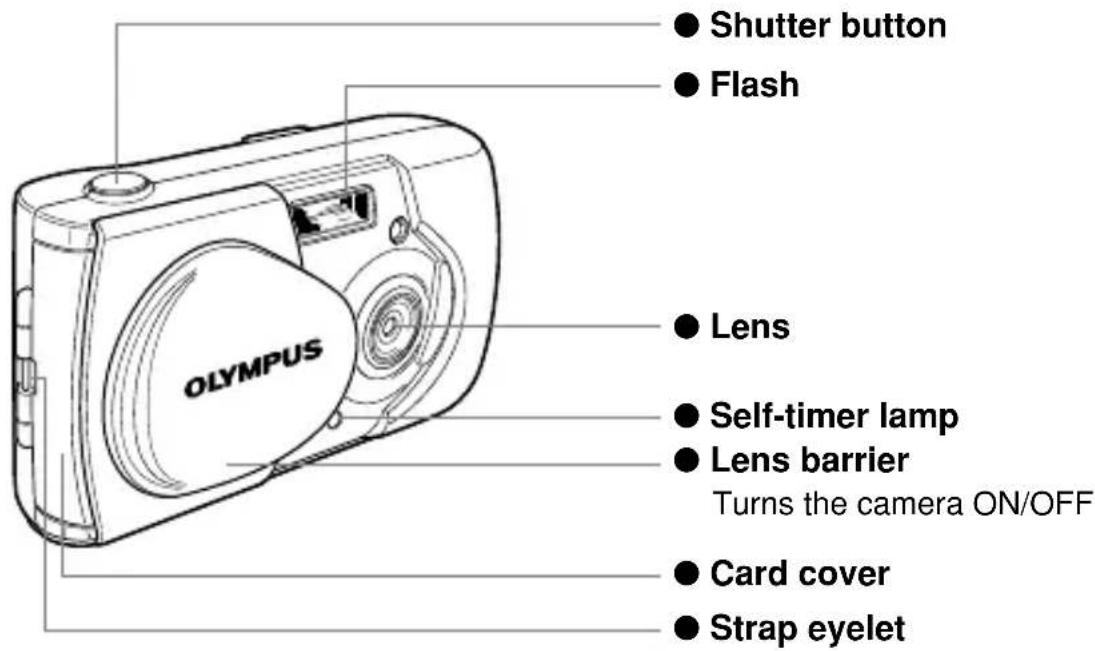
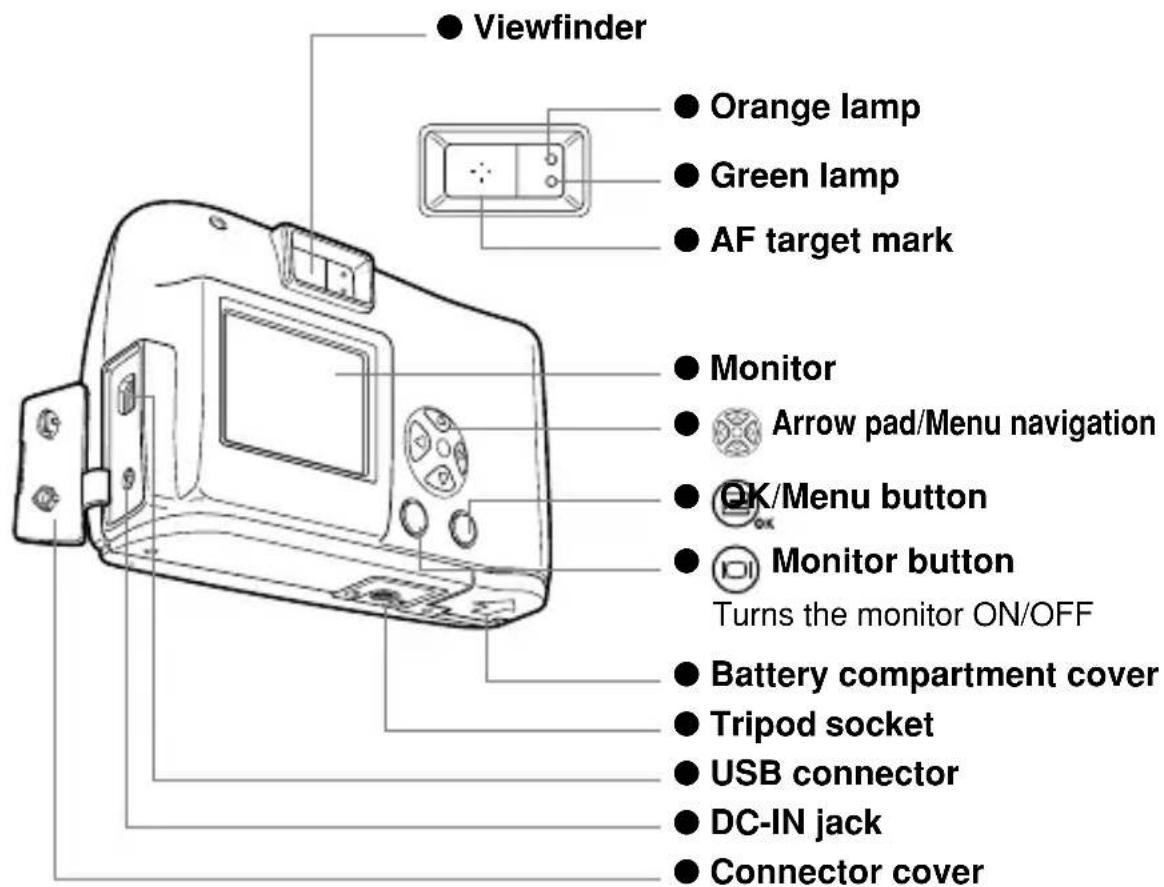
PREPARATION
NAMES OF PARTS
En
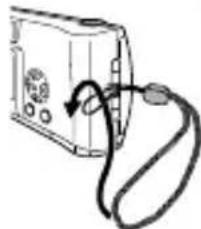
ATTACHING THE STRAP
1 Pass the short end of the strap through the eyelet.
2 Pass the long end of the strap through the loop.
3 Pull tight and check that the strap is securely attached.
natural_image
Simple line drawing of a device with a cable and indicator lights, no text or symbols present.
Attach the strap correctly as instructed above. Olympus can not provide warranty or assume any liability for damage resulting from the camera being accidentally dropped because the strap has not been attached correctly.
En
LOADING THE BATTERIES
1 Check the following.
• The lens barrier is closed.
• The orange lamp is off.
• The monitor is off.
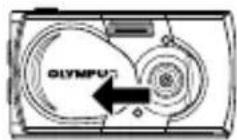
2 Slide the battery compartment cover toward Ⓐ and lift it up in the direction of Ⓑ.
3 Insert the batteries as shown, making sure that they are correctly oriented.
4 Push down the battery compartment cover in the direction of Ⓐ and close firmly by pressing the 🔊 mark in the direction of Ⓓ until it clicks.


- If the camera is left for about 1 hour with the batteries removed, all the settings will revert to the default settings.
- When powering the camera by batteries, if the batteries start to run low, the battery indication will be displayed in red. When the batteries are close to exhaustion, the LCD monitor turns off and the green lamp and the orange lamp blink simultaneously.
Battery status

flowchart
graph LR
    A["Lights (green)<br>Adequate power remaining."] --> B["Blinks (red)<br>Batteries are running low. Replace with new batteries."]
    B --> C["Green and orange lamps blink<br>Batteries are completely exhausted. Replace with new batteries."]
    C --> D["No display"]
SELECTING COMMERCIALLY AVAILABLE BATTERIES OR THE AC ADAPTER
The following batteries or AC adapter can be used in addition to the included battery. Choose the battery that fits your purpose.
LITHIUM BATTERY PACK (NON-RECHARGEABLE)
The CR-V3 lithium battery pack features a long service life which is convenient when traveling.
NiMH BATTERIES (RECHARGEABLE)
The NiMH batteries from Olympus are rechargeable and economical. You can recharge them overnight, and their high low-temperature resistance makes them effective in cold areas.
AA ALKALINE BATTERIES
If the battery power runs out, you can replace it with AA alkaline batteries which are easily available anywhere.
The number of recordable images varies depending on the brand of battery and the conditions of use. Turn the monitor off whenever possible to save the batteries.
AC ADAPTER
The optional Olympus CAMEDIA AC adapter enables you to power the camera from a household electrical outlet.

- If the batteries run out while the camera is connected to another device (such as a computer), the data may be damaged. Olympus recommends that you use an AC adapter when the camera will be turned on for long periods of time. However, do not disconnect or plug in the AC adapter while the camera is connected to a PC.
- Do not connect or disconnect the batteries or the AC adapter when the camera is turned on as this may affect the camera settings.
- Do not use manganese or commercially available lithium batteries.
INSERTING THE SMARTMEDIA CARD
Pictures taken by the camera are stored on a SmartMedia card.
1 Check the following.
- The lens barrier is closed.
• The orange lamp is off. - The monitor is off.
2 Open the card cover.
3 Insert the SmartMedia card in the direction shown in the figure.
There is a mark inside the card cover indicating the direction in which the card should be inserted.
4 Close the cover securely until it clicks.
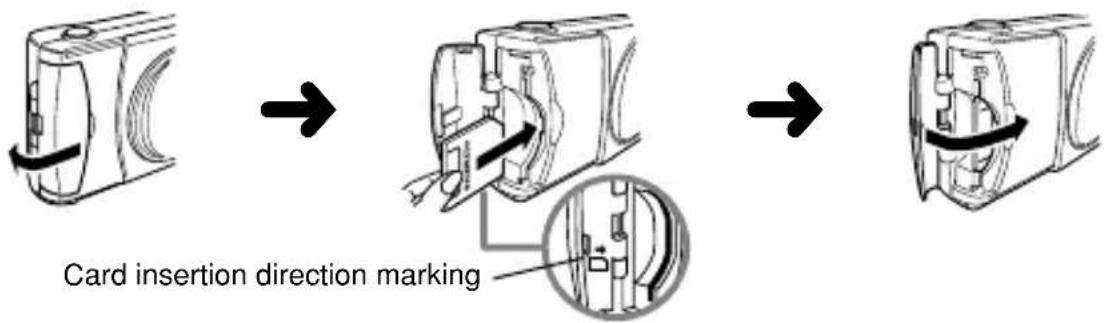
REMOVING THE SMARTMEDIA CARD
To remove the card, hold the card with your fingertips, and pull it out.
NUMBER OF RECORDABLE IMAGES
The approximate number of recordable images is shown in the table below. See "Image quality" (p.20).
| Cardmemory capacity\Image quality | SHQ HQ SQ1 SQ2 | |
| 8MB 5 16 29 47 | ||
| 16MB 11 32|58 90 | ||
| 32MB 23 64|117 180 | ||
| 64MB 46 128 234 362 | ||
| 128MB 92 257 469 725 |

This camera may not be able to recognize a SmartMedia card that is not manufactured by Olympus or a card which has been formatted on another device such as a PC. To avoid problems, you should format each card before using it on this camera. See "Formatting a new card" (p.26).

- Never attempt to open the card cover or remove the SmartMedia card or batteries while the camera power is on. Otherwise, the image data on the card may be destroyed. Remember that it is impossible to restore image data once it has been destroyed.
- A SmartMedia card is a precision device. Do not apply excessive force or shock to it. Hold the card by the edges. Do not touch the gold-colored metallic parts.
- Some of the camera functions are disabled if a write protect seal is attached to the SmartMedia card. When you use these functions, remove the seal from the card.
- Refer to the instructions accompanying the provided SmartMedia card for details on how to handle it.
TURNING THE CAMERA ON/OFF
WHEN TAKING PICTURES
Turning the camera on:
Open the lens barrier.
The camera turns on in the Record mode.
Turning the camera off: Close the lens barrier.
The camera turns off.
WHEN PLAYING BACK PICTURES
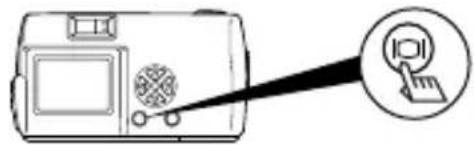
Turning the monitor on:
Press the 📄 button with the lens barrier closed.
The camera turns on in the Play mode and the monitor turns on.

natural_image
Illustration of a digital camera with a screen and antenna, connected to a cursor icon (no text or symbols)Turning the monitor off:
Press the 📄 button.
The camera and the monitor turns off.
natural_image
Line drawing of a digital camera with a pointing screen and a circular icon (no text or symbols)
When the camera is powered by batteries, it turns off automatically when no operation has been performed for 1 minute. You need to turn the camera on again.
SETTING THE DATE AND TIME
1 Press the button.
The monitor turns on.
2 Press the button.
The monitor shows the Play menu.
3 Select [SETUP] using the / buttons and press the button.
4 Select [ ] using the √ buttons and press the button.
5 Select the date format "Y-M-D (Year-Month-Day)", "M-D-Y (Month-Day-Year)" or "D-M-Y (Day-Month-Year)" using the ▼ / buttons, and press the ▶ button.
The monitor shows date setting screen.
6 Set the first figure using the / buttons and press the button.
The cursor moves to the next figure.
7 Repeat until the date and time settings are set.
8 Press the button when the clock shows 00 seconds.
The date and time setting is completed.
9 Press the button.
The monitor turns off.

If the camera is left for about 1 hour with the batteries removed, the date and time settings may be canceled and revert to the default settings. Make sure that the date and time settings are correct before taking an important picture.

The date and time can be set both in the Record mode and the Play mode using the same procedure.
TAKING PICTURES
TAKING PICTURES
You can use either the viewfinder or the monitor.
Whichever you choose, you can take pictures simply by pressing the shutter button.
When you take pictures, the images are recorded on the SmartMedia card in the camera.
TAKING PICTURES USING THE VIEWFINDER
1 Open the lens barrier.
Slide the lens barrier open until it clicks.
2 Determine the image composition by positioning the AF target mark over the subject in the viewfinder.
3 Press the shutter button halfway.
(This condition is called half-pressed.)
The green lamp on the right of the viewfinder lights up. You will hear an operation sound, but no picture is being taken.
The exposure and focus are locked while the shutter button is pressed halfway.
You will hear an operation sound, but no picture is being taken.
If the green lamp blinks, focus may be incorrect. Release your finger from the shutter button, hold the camera securely and half-press the button again.
See "Focus lock" (☐).
4 Press the shutter button fully.
(This condition is called full-pressed.)
The picture is taken.
TAKING PICTURES USING THE MONITOR
1 Open the lens barrier.
2 Press the 📄 button.
The monitor turns on.
Press the ⏻ button again to turn the monitor off.
3 Determine the image composition by observing your subject in the monitor.
4 Press the shutter button to take a picture in the same way as you would when using the viewfinder.
See "Taking pictures using the viewfinder" (19.11).

- The green lamp or the orange lamp on the right of the viewfinder may light or blink before or after taking pictures or when the shutter button is pressed halfway. See “The function of the green lamp and the orange lamp” (☐).
- When the memory gauge is full, no more images can be taken. Wait a few seconds until the memory gauge goes off before taking any more pictures. See “The function of memory gauge” (☐).
- Please use the close-up playback to check for details such as hand shake or focusing. See “Close-up playback” (p.21).
- It takes longer to record a picture when the monitor is used.

• Always press the shutter button gently. If you press too hard, the camera may move and the image will be blurred.
- Never attempt to open the card cover or remove the AC adapter or batteries while the orange lamp is blinking. Otherwise, the image you have just shot will not be saved. Existing data on the SmartMedia card may also be destroyed.
- When alkaline batteries are used, the number of recordable images varies widely depending on the brand and operation environment. Turn the monitor off whenever you are not taking pictures, or when you are using the viewfinder to compose your shot.
You can play back images one by one on the monitor.
1 Press the button with the lens barrier closed.
The monitor turns on in the Play mode and shows the last picture you took. (Single-image playback)
2 Press the / buttons.
Press the button to play back the previous image and the button to play back the next image.
3 Press the button to stop playing back the image.
The monitor and the camera turn off.

When the camera turns on, the monitor may light for an instant and show an image for a short time. This is not a malfunction.
ERASING AN IMAGE
1 Close the lens barrier and press the button.
The camera turns on in the Play mode.
2 Press the / buttons and play back the image you want to erase.
See "Checking recorded images" (p.12).
3 Press the button for more than 1 second.
The monitor shows the single-image erase menu.
4 Select [ ErASE] using the / button and press the button.
The selected image is erased.


Erasure is also possible by pressing the button while the image you want to erase is displayed and selecting [ ] on the Play menu.

- Erasure is not possible if the image to be erased is protected or a write protect seal is attached to the SmartMedia card. Unprotect the image or remove the write protect seal on the SmartMedia card before attempting to erase the image.
- Once erased, images can not be restored. Check each image before erasing to avoid accidentally erasing images you want to keep.
PROTECTING IMPORTANT IMAGES
Important images can be protected against accidental erasure.
1 Close the lens barrier and press the 📄 button.
The camera turns on in the Play mode.
2 Press the / buttons to display the image you want to protect.
See "Checking recorded images" (p. 12).
3 Press the button for more than 1 second.
The selected image is protected and the symbol is displayed at the top right of the image.
To cancel protection, display the image with the O _T symbol and press the
button for more than 1 second.

- Protection is also possible by pressing the button while the image you want to protect is displayed and selecting [ ] on the Play menu.
- The protect setting is saved even after the camera is turned off.

- Protected images can not be erased by "Erasing an image" or "Erasing all images", but they can be erased by formatting the card.
- Images on a SmartMedia card with a write protect seal attached can not be protected.
RECORDING FUNCTIONS
USING THE ARROW PAD
FLASH
The flash is designed to fire automatically when the flash setting is AUTO (default setting) and you take pictures under low light conditions or against strong backlight. You can change the flash mode to suite different shooting situations.
1 Open the lens barrier.
The camera turns on in the Record mode.
2 Press the button.
The monitor shows the current flash mode.
3 To change the setting, press the button until the appropriate flash mode is displayed.
The mode changes in the following sequence each time the ▶ button is pressed:
[0][5][4][★] ★○
4 Take a picture.

- You can set the flash mode by selecting [ on the Camera menu.
- The flash working distance is approximately 0.2 m \~ 3.5 m/0.7 ft \~11.5 ft.
- All the flash settings returns to AUTO mode (default setting) when the clear settings value is [RESET] and the lens barrier is closed. See “Clear settings” (1p27).

- The orange lamp blinks while the flash is charging. You can take a picture at this time, but the flash will not fire. To use the flash, wait until the orange lamp goes off before pressing the shutter button.
- When taking pictures at close range using the flash, the appropriate brightness may not be achieved and there may be pronounced shadows as a result.
- The flash can not be used in the Sequence mode, the Panorama mode and the Movie mode.
MACRO MODE
The Macro mode is recommended when shooting a subject at distances of 10 cm \~ 50 cm/4 in \~ 1.6 ft.
1 Open the lens barrier.
The camera turns on in the Record mode.
2 Press the button.
The monitor shows the current Macro mode [OFF].
3 When the current Macro mode display indicates [OFF], press the button once again.

The Macro mode is set and the monitor turns on.
4 Take a picture by composing the subject using the monitor.

The Macro mode is canceled when the clear settings value is [RESET] and the lens barrier is closed. See “Clear settings” (p.27).

- When using the Macro mode, keep the distance between the camera and the subject at a distance of more than 10cm (4 in).
- If you try to take a picture at a distance of less than 10 cm (4 in), the autofocus will not work properly even though the shutter button is pressed.
- In macro shooting, shadows may be conspicuous or correct exposure may not be achieved. Always check the images on the monitor after macro shooting.
DIGITAL TELE MODE
This mode enables you to enlarge the image to magnifications 1.6×, 2×, 2.5×, 3.2×, 4× and 5×.
The image quality needs to be set to SQ2 to magnify 3.2×, 4× or 5×. See "Image quality" (p. 20).
1 Open the lens barrier.
The camera turns on in the Record mode.
2 Press the button.
The monitor automatically turns on, and the image is displayed in size of 1.6×.
3 Press the / buttons looking at the monitor.
The image can be magnified in the sequence [1.6×][2.0×][2.5×][3.2×][4.0×][5.0×] each time the △ button is pressed, and the image is zoomed out in the sequence [4.0×][3.2×][2.5×][2.0×][1.6×] No display(1.0) each time the ▽ button is pressed.
4 Take a picture by looking at the monitor.

- Press the button to turn the monitor off and cancel the Digital tele mode.
- The image may be of a lower resolution and appear grainy when the Digital tele mode is used.
- The Digital tele mode can not be used in the Movie mode.
EXPOSURE COMPENSATION
Although the camera's exposure is set automatically, you can vary it to change the image brightness in the range of ± 2 stops in 0.5-stop steps.

- Use this function to obtain correct brightness (exposure) when there is significant contrast (difference in brightness) in the image.
- Set a [+] value to make the image brighter and a [-] value to make it darker.
1 Open the lens barrier.
The camera turns on in the Record mode.
2 Press the button.
The monitor shows the Camera menu.
3 Select [CAMERA] using the / buttons and press the button.

4 Select [ + ] using the √ buttons and press the

5 Adjust the exposure compensation setting using the and press the 🔊 button.

/ buttons
Press ⬇ [−] to darken image or ⬆ [+] to brighten image.
The exposure compensation setting is now completed.
Press the Ⓗ button again to exit the menu.
6 Take a picture.
Note
- The setting of exposure compensation returns to ±0.0 (default setting) when the clear settings value is [RESET] and the lens barrier is closed. See “Clear settings” (C27).
- When the exposure is corrected, the brightness of the image displayed on the monitor also changes. However, the variation may be less noticeable when the subject is dark. In this case, check the recorded image to confirm that exposure is satisfactory.
- If the flash is used, the image brightness (exposure) may differ from the intended brightness (exposure).
- The exposure compensation can not correct the image brightness if the surroundings of the subject are extremely bright or dark.

SELF-TIMER
You can shoot images using the self-timer function. Fix the camera securely on a tripod, etc., before shooting. The self-timer is useful for taking commemorative pictures including the photographer.
1 Open the lens barrier.
The camera turns on in the Record mode.
2 Press the button.
The monitor shows the Camera menu.
3 Select [CAMERA] using the / buttons and press the button.
4 Select [DRIVE] using the / buttons and press the button.
5 Select [ SELF-TIMER] using the □ buttons and press the button.
The self-timer setting is now completed.
Press the 📄 button again to exit the menu.
6 Press the shutter button.
The self-timer lamp on the front of the camera lights up for 10 seconds and then blinks for 2 seconds, before the picture is taken.

- The self-timer is canceled automatically after the picture is taken.
- To cancel the self-timer after the shutter button has been pressed, press the button.
SEQUENCE MODE
The Sequence mode allows you to take a rapid succession of still images by pressing and holding the shutter button (up to 8 images at approx. 1.2 frames per second). You can choose the best image from a series of sequential shots. When you have found your best shot, you can also erase the rest of the images. See “Erasing an image” (p. 12).
1 Open the lens barrier
The camera turns on in the Record mode.
2 Press the button.
The monitor shows the Camera menu.
3 Select [CAMERA] using the ▼ / △ buttons, and press the ▶ button.
4 Select [DRIVE] using the / buttons, and press the button.
5 Select [ ☐ SEQUENCE] using the ⏻ buttons and press the

The sequence mode setting is now completed.
Press the Ⓗ button again to exit the menu.
6 Take pictures. (Press the shutter button and keep it pressed. Recording will stop when the shutter button is released.)

- The sequence mode is canceled when the clear settings value is [RESET] and the lens barrier is closed. See "Clear settings" (p.27).
• The flash can not be used in this mode.
- To prevent camera shake, the maximum shutter speed is limited to 1/30 second. As a result, dark subjects may appear darker than in other shooting modes.
- After sequence shooting, a longer time than usual may be required to save images to the SmartMedia card.
- The maximum number of images that can be shot in succession varies, depending on the image quality and the number of recordable images on the SmartMedia card, etc.

Do not open the card cover or remove the AC adapter, batteries or SmartMedia card while the orange lamp on the right of the viewfinder is blinking. Doing so could destroy image data stored on the card.
FIXED FOCUS
This function is useful for shooting distant scenes that are difficult to bring into focus, such as taking pictures of large fire work displays.
To achieve more effective image at night, set the flash to the Night Scene mode in addition. See "Flash" (p.14).
En
1 Open the lens barrier.
The camera turns on in the Record mode.
2 Press the button.
The monitor shows the Camera menu.
3 Select [CAMERA] using the / buttons and press the button.
4 Select [FOCUS] using the ▽ / buttons and press the button.
5 Select [ ∞] using the 🔊 buttons and press the button=
The fixed focus setting is now completed.
Press the 📄 button again to exit the menu.
6 Take a picture.
Note
The fixed focus is canceled after 1 picture is taken and the Focus mode returns to AUTO (default setting).
SPOT METERING MODE
Your subject may appear dark when it is against a bright background. In this case, change the metering setting to SPOT. The camera calculates the exposure using only the lighting information at the center of the viewfinder without it being affected by the background light.
Note
Metering settings
ESP (The light in the center of the viewfinder and in the surrounding area are measured separately to obtain the optimum exposure. (No mark is displayed on the LCD monitor)
SPOT (☐): Only the light in the center of the viewfinder is measured to obtain the correct exposure for the subject.
1 Open the lens barrier.
The camera turns on in the Record mode.
2 Press the button.
The monitor shows the Camera menu.
3 Select [CAMERA] using the / buttons and press the button.
4 Select [ ◆ ] using the √ buttons and press the button.
5 Select [ SPOT] using the ∨ buttons and press the button.
The spot metering setting is now completed.
Press the 📄 button again to exit the menu.
6 Position the AF target mark over the subject in the viewfinder, and take a picture.
Note
The metering mode returns to ESP (default setting) when the clear settings value is [RESET] and the lens barrier is closed. See "Clear settings" (p.27).
WHITE BALANCE
This camera incorporates electronic circuitry to automatically adjust color hues so that they appear more natural (auto white balance control circuit). If the auto white balance does not produce accurate results due to weather or lighting conditions, you can control the white balance manually.

White balance settings
Auto (AUTO) : The white balance is controlled automatically.
(No mark is displayed on the LCD monitor)
Clear Sky (●) Outdoors under a clear sky.
Cloudy Sky ( ). Outdoors under a cloudy sky.
Incandescent Lamp (-) Under incandescent lighting.
Fluorescent Lamp (Under fluorescent lighting.
1 Open the lens barrier.
The camera turns on in the Record mode.
2 Press the button.
The monitor shows the Camera menu.
3 Select [PICTURE] using the / buttons and press the button.
4 Select [WB] using the buttons and press the button.
5 Select [AUTO], [ ], [ ], [ ] or [ ] using the / buttons and press the button.

The white balance setting is now completed.
Press the 📄 button again to exit the menu.
6 Take a picture.

- The white balance setting returns to AUTO (default setting) when the clear settings value is [RESET] and the lens barrier is closed. See "Clear settings" (p.27).
- Under a combination of artificial and natural lighting or under fluorescent lighting, natural hues may be difficult to achieve on the AUTO mode.
- To obtain an image coloring that resembles what you see under incandescent lighting, set the white balance mode to [✿]

- Under special light source conditions, the white balance control circuitry may not work completely as intended.
- When the flash is fired with a white balance setting other than AUTO, be sure to check the color tone on the monitor to check if the white balance value set is optimal.
- When the flash is fired with a white balance setting other than AUTO, colors may appear different in the resulting images from the colors you see on the monitor.
Set the image quality before shooting.
Note
Image quality settings
| SHQ(Super High Quality) | Select this mode if you wish to print a high-quality or large-size print of the image or if you want to retouch it on a PC.Excellent image quality, but the number of recordable images is reduced. It takes a longer time to record the image. (1600 × 1208 pixels^*) |
| HQ(High Quality) | This mode is ideal when you need to print out images after viewing them on your PC screen.Standard image quality. This is the default image quality setting. (1600 × 1200 pixels^*) |
| SQ(Standard Quality) | Select this mode when you want to attach the image to e-mail; simply view it on your PC screen.Lesser image quality, but the number of recordable images is increased.SQ1 (1024 × 768 pixels^*) SQ2 (640 × 480 pixels^*) |
* The term “pixel” stands for “picture element”. The image is comprised of up to 2 million pixels.
1 Open the lens barrier.
The camera turns on in the Record mode.
2 Press the button.
The monitor shows the Camera menu.
3 Select [PICTURE] using the / buttons and press the button.
4 Select [ ] using the ▽ buttons and press the button
5 Select [SHQ], [HQ], [SQ1] or [SQ2] using the / buttons and press the button.
The image quality setting is now completed.
Press the Ⓗ button again to exit the menu.
6 Take a picture.
Note
- The image quality setting returns to HQ (default setting) when the clear settings value is [RESET] and the lens barrier is closed. See “Clear settings” (1927).
- The number of recordable images varies depending on the image quality setting.
- The number of pixels is almost the same for HQ and SHQ, but the compression rate is lower for SHQ, resulting in clearer images when enlarged. SHQ also takes longer to record and play back images than HQ.
- When you select a image quality with higher image quality than the current mode and the number of recordable images remaining is low, the monitor may display a warning mark. This means that there is not enough memory on the SmartMedia card for the selected image quality. Select another image quality.
PLAYBACK FUNCTIONS
INDEX PLAYBACK
The playback can be changed from the Single-image playback to the Index playback. This mode is useful when you are looking for a particular image.
1 Close the lens barrier and press the 📄 button.
The monitor turns on in the Play mode and shows the last picture taken. (Single-image playback).
2 Press the button to display the Index playback.
3 Press the ▶ button to move the green frame to the next image and the ◀ button to move the frame to the previous image.
4 Press the △ button.
The monitor goes back to the Single-image playback mode.
CLOSE-UP PLAYBACK
Images can be played back in 4 levels of magnification: 1.5×, 2×, 2.5× and 3×. This function is convenient when you want to check details in the picture taken.
1 Close the lens barrier and press the 📄 button.
The camera turns on in the Play mode.
2 Press the button.
The image will be magnified in the sequence [1.5×][2.0×][2.5×][3.0×] each time the ⚠ button is pressed.
3 Press the button on the close-up playback screen to enable scroll mode.
Scroll up, down, left or right using the / / buttons to display the area you want to see.
Press the 📄 button again to exit scroll mode.
4 Press the button after exiting scroll mode to return to normal view (1.0×) of the single-image playback screen.
Note
- Close-up playback is not possible for movies. Select a still picture.
- The menu is not displayed by pressing the button during Close-up playback. To display the menu, return to normal view (1.0×) of the single-image playback.
AUTO PLAYBACK
You can view images stored on the card automatically in their stored order as a "slide show". This function is useful when you want to view images in sequence.
1 Close the lens barrier and press the Ⓐ button.
The camera turns on in the Play mode.
2 Press the button.
The monitor shows the Play menu.
3 Select [PLAY] using the / buttons and press the button.
4 Select [ ] using the 🎨 buttons and press the button.
5 Select [START] using the ▼ / buttons and press the button.
Auto Playback starts by displaying each image for 3 seconds.
To cancel Auto playback, press the ☐ button. Press the ☐ button again to exit the menu.
Note
- If you display the Play menu while the monitor shows a movie, [ ] appears instead of [ ] Auto playback can only be started when a still picture is displayed.
- If the camera is powered by the batteries on the Auto Playback mode, it will turn off automatically if left unoperated for about 30 minutes.
ERASING ALL IMAGES
1 Close the lens barrier and press the button.
The camera turns on in the Play mode.
2 Press the button.
The monitor shows the Play menu.
3 Select [SETUP] using the / buttons and press the button.
4 Select [ ] using the ▽ buttons and press the button.
5 Select [ ALL ERASE] using the /buttons and press the
button.
6 Select [ ALL ERASE] using the ▼ buttons to and press the
button.
All the images are erased.

- Protected images can not be erased.
- If a write protect seal is attached to the SmartMedia card, the images on the card can not be erased.
- Erased images can not be restored. Check each image before erasing to avoid accidentally erasing images you want to keep.
OTHER FUNCTIONS
You can take movies as well as still pictures with this camera. Movies can be played back or saved separately as still pictures using the Index function.
RECORDING MOVIES
1 Open the lens barrier.
The camera turns on in the Record mode.
2 Press the button.
The monitor shows the Camera menu.
3 Select [CAMERA] using the / buttons and press the button.
4 Select [DRIVE] using the ▼ / buttons and press the button.
5 Select [ MOVIE] using the 7 buttons and press the button.
The Movie mode setting is now completed, and the monitor automatically turns on.
Press the 📄 button again to exit the menu.
6 Record movies by looking at the monitor. Press the shutter button to start recording. Press the shutter button again to stop recording.
The remaining recordable time is displayed in seconds on the monitor.
Note
• The flash and Digital tele can not be used in the Movie mode.
- It takes longer to save movies.
- The recordable time varies depending on the memory capacity of the SmartMedia card.
• Sound recording is not possible.
- Images may be recorded slightly smaller than they appear during recording.
TO CANCEL MOVIE MODE
1 Press the button.
The monitor turns off and Movie mode is canceled.
Note
The Movie mode is canceled when the clear settings value is [RESET] and the lens barrier is closed. See "Clear settings" (p.27).
CHANGING THE QUALITY AND SIZE OF A MOVIE
There are two image quality settings (HQ and SQ) for recording movies.
Note
Image quality settings
| HQ(High Quality) | Recording time (sec.) is reduced.Max. recording time for one movie: 15 seconds ^4 (320 × 240 pixels ^*2 ) |
| SQ(Standard Quality) | Recording time (sec.) is increased.Max. recording time for one movie: 60 seconds ^4 (160 × 120 pixels ^*2 ) |
*1 The recording time for a movie varies according to the remaining card memory.
*2 The term "pixel" stands for "picture element".
1 Select Movie mode and press the button. The monitor shows the Camera menu.
2 Select [PICTURE] using the / buttons and press the button.
3 Select [ ◀•] using the Ⓞ buttons and press the button
4 Select [HQ] or [SQ] using the button.
The image quality setting is now completed.
Press the ☐ button again to exit the menu.
5 Record a movie.
Note
- The image quality of still pictures remains the same even when the quality of movies change.
- The image quality setting of movies returns to HQ (default setting) when the clear settings value is [RESET] and the lens barrier is closed. See “Clear settings” (19527).
PLAYING BACK MOVIES
1 Close the lens barrier and press the button. The camera turns on in the Play mode.
2 Press the / buttons to display the movie you want to see (indicated by a symbol) and press the button. The monitor shows the Play menu.
3 Select [PLAY] using the / buttons and press the button.
4 Select [ ] using the 🔊 buttons and press the button
5 Select [START] using the ▼ / buttons and press the button.
When the movie playback ends, the first frame of the movie will be displayed. To play it back again press the button. To stop playing back and cancel the Movie playback mode, press the button.
PAUSING MOVIE PLAYBACK AND REVIEWING SPECIFIC MOVIE FRAMES
You can temporarily stop a movie at any frame during playback by pressing any button on the 🎨 arrow pad (pause status).
The following operations are possible while the movie image is paused:
| Press button Forward | playback resumes from paused frame. |
| Press and hold button | Fast-forward playback. |
| Press button Reverse | replays starts from paused frame. |
| Press and hold button | Fast-rewind playback. |
| Press button First movie | frame is displayed. |
| Press button Last movie | frame is displayed. |

To play back another movie, first press the button twice to cancel the Movie playback mode. Then select the desired movie indicated by the symbol and select [again from the menu to view.
CREATING AN INDEX OF SEPARATE MOVIE FRAMES
The Movie index mode allows 9 image frames to be selected automatically and saved as a separate still image.
1 Close the lens barrier and press the 📄 button. The camera turns on in the Play mode.
2 Press the / buttons to display the movie you want to see (indicated by a symbol) and press the button. The monitor shows the Play menu.
3 Select [EDIT] using the / buttons and press the button.
4 Select [ INDEX] using the 📁 buttons and press the button.
5 Select [ INDEX] using the k7 buttons and press the button.
The movie is displayed in an index display of still pictures. The index image is saved as separate image from the original movie.

- You can not select the first and last frame of a movie.
- The interval between the frames that are automatically picked out varies depending on the recording time of the movie.
- The Movie index mode can create only a 9-image display.
MUTING THE BEEP TONES
This function enables you to turn off the beep tones.
1 Open the lens barrier.
The camera turns on in the Record mode.
2 Press the button.
The monitor shows the Camera menu.
3 Select [SETUP] using the / buttons and press the button.

4 Select [ ■] using the 🔊 buttons and press the button.
5 Select [OFF] using the ▽ / buttons and press the button.
The beep tones are turned off.
Press the ☐ button again to exit the menu.

- The beep tones setting remains when the lens barrier is closed.
• The beep tones can also be set from the Play menu.
FORMATTING A NEW CARD
This function enables you to format the SmartMedia card. Any images on the card can be erased when the card is formatted.

• Before operating, insert the card.
- When using a card from a manufacturer other than Olympus or a card which is formatted or used with devices other than this camera (such as a PC), be sure to format the card on this camera. Olympus CAMEDIA brand SmartMedia cards do not require formatting.
1 Close the lens barrier and press the button.
The camera turns on in the Play mode.
2 Press the button.
The monitor shows the Play menu.
3 Select [SETUP] using the / buttons and press the button.

4 Select [ ] using the ↗ buttons and press the button.
5 Select [ ↑ FORMAT] using the ⏻ buttons and press the button.

6 Select [ ↑ FORMAT] using the ⏻ buttons and press the button.

The card is formatted. Once started, formatting can not be cancelled.

You can also format a card from the Camera menu.

- Formatting erases all images on the SmartMedia card including those which are protected. When formatting a previously used card, check each image before formatting to avoid accidentally erasing image you want to keep. Once a card is formatted, images previously stored on that card can not be restored.
- Do not open the card cover or remove the batteries during formatting as this may cause a card malfunction.
- A card with a write protect seal attached can not be formatted. Remove the seal before formatting it. Do not reuse the removed write protect seal.
After each picture is taken, the image is displayed on the LCD monitor for a few seconds for you to view.
1 Open the lens barrier.
The camera turns on in the Record mode.
2 Press the button.
The monitor shows the Camera menu.
3 Select [SETUP] using the / buttons and press the button.
4 Select [REC VIEW] using the button.
5 Select [ON] using the ▼ / buttons and press the button.
ON: The monitor briefly shows the last image you took once shooting is completed.
OFF: The camera is ready to take the next picture immediately after shooting is completed.
The Rec view setting is now completed.
Press the ☐ button again to exit the menu.
Note
The Rec view mode remains when the lens barrier is closed.
CLEAR SETTINGS
You can choose to keep the shooting-related settings, such as the flash mode and image quality settings, as they are for the next picture or return to the default settings when the camera is turned off. If you do not want to change the settings to suit the weather or subject, select [HOLD] to keep current settings. This conveniently avoids having to re-enter settings each time the camera is used (as would be the case if the settings are cleared). For details of the settings, see “Clear settings value” (☐).
1 Open the lens barrier.
The camera turns on in the Record mode.
2 Press the button.
The monitor shows the Camera menu.
3 Select [SETUP] using the / buttons and press the button.
4 Select [ ] using the √ buttons and press the button.
5 Select [HOLD] using the ▼ / buttons and press the button. By selecting [HOLD], you can keep the current settings.
Press the button again to exit the menu.
Note
The clear settings remains when the lens barrier is closed.
DISPLAYING IMAGE INFORMATION
This function enables you to display or not to display the image information on the monitor while the image is played back. If you select [ON], the information is displayed for 3 seconds. For details of the information displayed, see "Monitor indications" (☐).
1 Close the lens barrier and press the 📄 button.
The camera turns on in the Play mode.
2 Press the button.
The monitor shows the Play menu.
3 Select [PLAY] using the / buttons and press the button.
4 Select [INFO] using the ▼ / buttons and press the button.
5 Select [ON] using the ▼ / buttons and press the button.
The image information is displayed on the image.
Press the ⏻ button again to exit the menu.
Note
- The image information display setting returns to [OFF] (default setting) when the clear settings value is [RESET] and the camera is turned off. See "Clear settings" (127).
- Only ON, and □ are displayed after 3 seconds, regardless of whether image information display setting is set to [ON] or [OFF].
MONITOR BRIGHTNESS
If the monitor is hard to see, you can adjust it to suit the surrounding brightness.
1 Close the lens barrier and press the 📋 button.
The camera turns on in the Play mode.
2 Press the button.
The monitor shows the Play menu.
3 Select [SETUP] using the / buttons and press the button.
4 Select [ ☐] using the ⏻ buttons and press the button.
5 Adjust the brightness of the monitor using the / buttons and
press the ⏱ button.
[+] makes the monitor brighter and [-] makes it darker.
6 Press the button.
The monitor brightness setting is now complete.
Press the ☐ button again to to exit the menu.
Note
The monitor brightness setting remains when the camera is turned off.
TROUBLESHOOTING
ERROR MESSAGES
| Warning/Monitor display | Meaning Action | |
 NO CARD NO CARD | Card is not inserted or recognized. | Insert a card or, if it is already inserted, remove and insert it again. |
 CARD ERROR CARD ERROR | Shooting, playback and erasure are not possible. | Clean the card's connector with a piece of cleaning paper and format the card again. A card that can not be formatted is unusable. |
 WRITE PROTECT WRITE PROTECT | Writing data to the card is prohibited. | If you want to save images on the card, remove the write protect seal. (See the instructions provided with the SmartMedia card.) |
 CARD FULL CARD FULL | No more images can be taken because the number of recordable images has reached 0. | Replace the card or erase unwanted images. |
 NO PICTURE NO PICTURE | Playback is impossible. | You are trying to play back a card on which no images have been recorded. |
 PICTURE ERROR PICTURE ERROR | The image can not be viewed. | The image file in use is not compatible with the camera. |
Product type: Digital camera (for recording and playback)
Recording system
Still images: Digital recording, compatible with JPEG (based on DCF) and DPOF industry standards Movie: QuickTime Movie and JPEG standard
Recording medium: SmartMedia card
(4MB, 8MB, 16MB, 32MB, 64MB, 128MB)
No. of recordable frames: SHQ/Approx. 11, HQ/Approx. 32,
SQ1/Approx. 58, SQ2/Approx. 90
(When using 16MB card)
Sequence mode: Approx. 1.2 frames/sec., 8 or more (HQ)
Erasure: Single-frame erase/All frames erase
No. of Effective pixels: Approx. 1,960,000 pixels
Image pickup device: 1/2.7 inch CCD solid-state image pickup device Approx. 2,140,000 pixels (gross)
No. of Recording pixels: 1,600 × 1,208 pixels (SHQ mode)
1,600 × 1,200 pixels (HQ mode)
1,024 × 768 pixels (SQ1 mode)
640 × 480 pixels (SQ2 mode)
White balance: Full-auto TTL, with preset (Clear Sky, Cloudy
Sky, Incandescent Lamp, Flourescent Lamp)
Lens: Olympus lens 5.5mm, f2.8, 5 elements in 4
groups
(equivalent to 36mm lens with 35mm camera)
Photometric system: Digital ESP metering system with imager,
Spot Metering
Exposure control system: Programmed auto exposure
Shutter speed*: 2 to 1/800 sec. (used with mechanical shutter)
*Manual setting is not available
Shooting range: 0.5 m to ∞/1.6 ft to ∞ (Standard mode)
0.1 m to 0.5 m/0.4 ft to 1.6 ft (Macro mode)
Viewfinder: Optical, real image viewfinder (with AF target
mark) and LCD monitor
LCD monitor: 1.5 inch TFT color LCD monitor
No. of monitor screen pixels: Approx. 114,000 pixels
On-screen display: Date/Time, frame number, protect, image quality, battery level, file number, print reserve, menu, etc.
Flash recharging time: Approx. 9 sec. or less (at normal temperature with new batteries)
Flash working range: 0.2 m to 3.5 m/0.7 ft to 11.5 ft
Flash modes: Auto (automatic flash activation in low light and backlight), red-eye, flash off, fill in, night scene, night scene/red-eye
Focus: Auto-focus
Self-timer: Approx. 12 sec. delay
External connector: DC input terminal, USB interface (storage-class) Auto-connect
Date and time: Recorded simultaneously with image data
Auto calendar: Automatic adjustment in range of 1981 to 2031
Calendar power source: Backup by a built-in capacitor
Card function: DPOF-compatible print reservation, Panorama assembly (Olympus CAMEDIA brand only)
Operating environment
Temperature: 0^ C to 40^ C/ 32^ F to 104^ F (operating) -20^ C to 60^ C/ -4^ F to 140^ F (storage)
Humidity: 30% to 90% (operating) 10% to 90% (storage)
Power supply: Two AA alkaline batteries, AA nickel metal hydride batteries or AA NiCd batteries. Or one CR-V3 lithium battery pack (LB-01 manufactured only by Olympus), or optional AC adapter. AA manganese batteries or commercially available AA lithium batteries can not be used.
Dimensions: 110(W) × 62(H) × 35(D) mm
(excluding protorusions)
Weight: 165g/0.36lb (without batteries and card)
Design and specifications are subject to change without any notice or obligation on the part of the manufacturer.
FINDING PC CONNECTION METHOD
The USB cable supplied with the camera cannot be used with the following OSs.
Windows 95 / Windows NT / Mac OS other than Mac OS9
By using a supplied SmartMedia card and a floppy disk adapter or PC card adapter (optional), you can transfer image data to the PC.
En
Does your PC have a USB interface (is there a USB port marked on your PC) ?
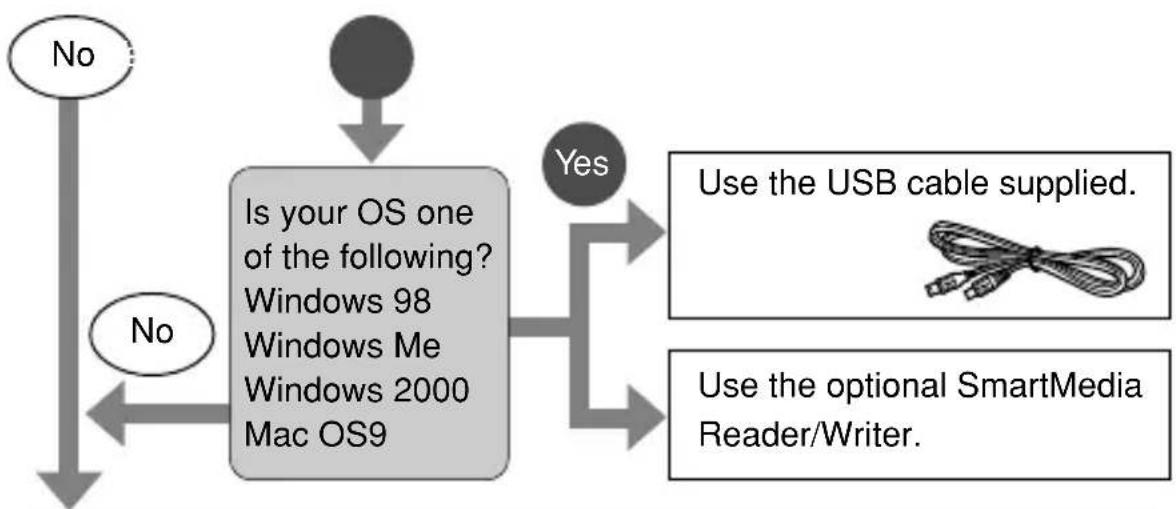
flowchart
graph TD
    A["No"] --> B{Is your OS one of the following? Windows 98 Windows Me Windows 2000 Mac OS9}
    B -->|Yes| C["Use the USB cable supplied."]
    B -->|No| D["No"]
    C --> E["Use the optional SmartMedia Reader/Writer."]
Does your PC have a built-in floppy disk drive?

flowchart
graph TD
    A["No"] --> B["Use the optional FlashPath floppy disk adapter."]
Does your PC have a built-in PC card slot?
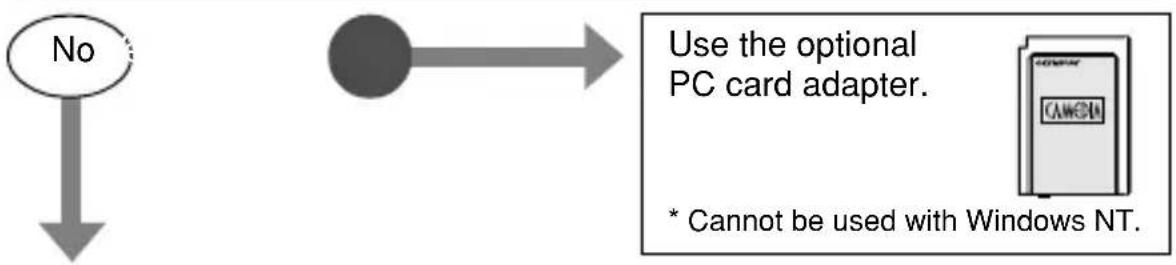
flowchart
graph TD
    A["No"] --> B["User"]
    B --> C["Use the optional PC card adapter."]
    C --> D["* Cannot be used with Windows NT."]
Consult your local Olympus representative.
En
Introduction
Partie responsible: Olympus America Inc.
Adresse: 2 Corporate Center Drive, Melville, New York 11747-3157 U.S.A.
natural_image
Simple line drawing of a device with a cable and connector (no text or symbols)

natural_image
Illustration of a digital camera with a globe and a pointing finger icon (no text or symbols)natural_image
Line drawing of a camera with a globe and pointer icon (no text or symbols)
10% – 90% (stockage)
natural_image
Simple line drawing of a portable electronic device with cables and ports (no text or symbols)

natural_image
Illustration of a digital camera with a pointing cursor icon (no text or symbols)
natural_image
Illustration of a digital camera with a pointing cursor icon (no text or symbols)
Responsible: Olympus America Inc.
natural_image
Simple line drawing of a portable electronic device with a cable and indicator lights (no text or symbols)

natural_image
Illustration of a digital camera with a screen and mouse, connected to a cursor icon (no text or symbols)Apagar el monitor:
natural_image
Diagram of a digital camera with a pointing screen and a cursor icon (no text or symbols)Nota
The date and time setting is completed.
natural_image
Simple line drawing of a portable electronic device with cables and a connector (no text or symbols)

natural_image
Illustration of a digital camera with a screen and antenna, connected to a mouse cursor (no text or symbols)關閉顯示器…
按 📄 键。
電源切斷,顯示器熄滅。
natural_image
Line drawing of a digital camera with a pointing screen and a cursor icon (no text or symbols)
San-Ei Building, 22-2, Nishi Shinjuku 1-chome, Shinjuku-ku, Tokyo, Japan
Customer support: Tel. 0426-42-7499 Tokyo
OLYMPUS AMERICA INC.
Two Corporate Center Drive, Melville, NY 11747-3157, U.S.A.
Tel. 631-844-5000
Technical Support (USA):
24/7 online automated help: http://support.olympusamerica.com/
Phone customer support: Tel. 1-888-553-4448 (Toll-free)
Our Phone customer support is available from 8 am to 10 pm
(Monday to Friday) ET
E-Mail: distec@olympus.com
Olympus software updates can be obtained at: http://olympus.com/digital/
OLYMPUS OPTICAL CO. (EUROPA) GMBH.
Premises/Goods delivery: Wendenstraße 14-18, 20097 Hamburg, Germany
Tel. 040-237730
Letters: Postfach 10 49 08, 20034 Hamburg, Germany
Hotline Numbers for customers in Europe:
Tel. 01805-67 10 83 for Germany
Tel. 00800-67 10 83 00 for Austria, Belgium, Denmark, France,
Netherlands, Norway, Sweden, Switzerland,
United Kingdom
Tel. +49 180 5-67 10 83 for Finland, Italy, Luxemburg, Portugal, Spain,
Czech Republic
Tel. +49 40-237 73 899 for Greece, Croatia, Hungary and the Rest of
Europe
Our Hotline is available from 9 am to 6 pm (Monday to Friday)
E-Mail: di.support@olympus-europa.com
© 2001 OLYMPUS OPTICAL CO., LTD.
Printed in Japan
1AG6P1P1145-- VT297701