
82100 - Dehumidifier KORONA - Free user manual and instructions
Find the device manual for free 82100 KORONA in PDF.
| Product Type | Portable Dehumidifier |
| Brand | Korona |
| Model | 82100 |
| Refrigerant | R290 (58 g) |
| Supply Voltage | 220-240 V ~ 50 Hz |
| Power Consumption | 370 W |
| Airflow Rate | 180 m³/h |
| Operating Temperature Range | 5 °C to 38 °C |
| Minimum Room Area | 4 m² |
| Filter | Washable, clean every 2 weeks |
| Programs | Auto Mode, Continuous Mode (Laundry Drying), Sleep Mode |
| Timer | 1 to 24 hours |
| Child Safety | Key Lock (LOCK) |
| Continuous Drainage | Possible with included drainage hose |
| Warranty | 2 years |
| Maintenance | Regular cleaning of filter and unit |
| Drainage | Internal tank with full tank indicator |
| Protection Rating | IPX0 |
Frequently Asked Questions - 82100 KORONA
User questions about 82100 KORONA
0 question about this device. Answer the ones you know or ask your own.
Ask a new question about this device
Download the instructions for your Dehumidifier in PDF format for free! Find your manual 82100 - KORONA and take your electronic device back in hand. On this page are published all the documents necessary for the use of your device. 82100 by KORONA.
USER MANUAL 82100 KORONA
KORONA electric GmbH, Sundern/Germany
www.korona-electric.de
Read these instructions carefully before assembling and/or operating the appliance. Keep these instructions including receipt and, if possible, the box with the internal packing. When passing on the appliance to a third party, make sure to include these instructions for use.
INTENDED USE
This appliance is intended for household use only and not for commercial, industrial or outdoor use. Other use not recommended may cause fire, electric shock or injury.
Safety:
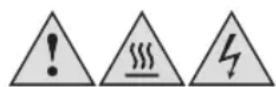
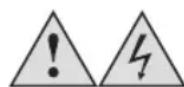
This symbol identifies hazards which may cause injuries!
This symbol identifies electric shock hazards!

This symbol identifies tips and information.

IMPORTANT
This portable device must always be stored and transported in an upright position. In case of doubt, let the unit rest for at least 24 hours before using it.
REFRIGERANT
The refrigerant used in this mobile dehumidifier is R290. The refrigerant used is less than 1kg and is in a closed refrigerant circuit.
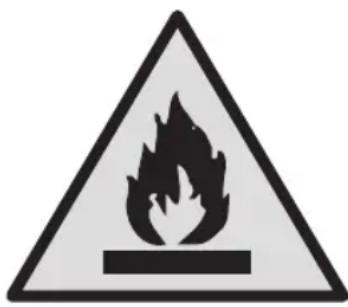
Caution, risk of fire! R290

WARNING:
- Appliance shall be installed, operated and stored in a room with a floor area larger than 4m^2
- Do not use means to accelerate the defrosting process or to clean, other than those recommended by the manufacturer.
- The appliance shall be stored in a room without continuously operating ignition sources (for example: open flames, an operating gas appliance or an operating electric heater).
- Do not pierce or burn.
- Be aware that refrigerants do not have any odour.
- Any person who works on the refrigerant circuit must be able to provide proof of qualification from an industry-accredited body that demonstrates its competence in the safe handling of refrigerants using a procedure known in the industry.
- Service work should only be carried out in accordance with the manufacturer's specifications. If the support of other people is required for the maintenance and repair work, the person trained in handling flammable refrigerants should constantly monitor the work.
General Safety Instructions
- Manufacturer takes no responsibility for any damage caused by incorrect use.
- Incorrect or improper use can damage the appliance and cause injuries to the user.
- Before connecting this appliance to the mains, make sure your local voltage matches the technical data of the appliance. Otherwise the appliance may overheat and get damaged.
Caution! Danger of electric shock!
- Never put the appliance, cord or plug into water or any other liquid.
- Do not use the appliance near a sink or wash basin.
- Do not use the appliance with wet hands.
- Do not use the appliance outdoors.
An electric appliance is not a toy!
- Never leave the appliance unattended during use.
- This appliance can be used by children aged from 8 years and above and persons with reduced physical, sensory or mental capabilities or lack of experience and knowledge if they have been given supervision or instruction concerning the use of the appliance in a safe way and understand the hazards involved. Children shall not play with the appliance. Cleaning and user maintenance shall not be made by children unless they are supervised.
- Keep the appliance and its cord out of reach of children less than 8 years.
- Always unplug your appliance when it is not in use, and before cleaning.
-
Always pull the plug - not the cord.
-
Keep the appliance and the cord well away from any hot surfaces to avoid any damage to the appliance.
- Do not run cord under carpeting. Make sure the cord may not inadvertently be pulled or cause anyone to trip when in use.
- Do not allow the cord to hang over sharp edges.
- Do not bend the cord or wind it round the appliance.
Do not use the appliance,
- if the cord is damaged.
- in case of malfunction.
-
if the appliance was dropped or is damaged otherwise. Have it checked and, if necessary, repaired by a qualified person/Customer Service. Never attempt to make any modifications to or repair the appliance yourself.
-
Only use accessories evaluated for use with this appliance.
- Never attempt to drive any objects into the appliance.
- Never attempt to open the housing yourself!
- The appliance is not intended to be operated by means of an external timer or separate remote-control system.
Special Safety Instructions
Warning! To avoid the possibility of injury/damage to the appliance, electric shock and risk of burns.
- Only use the appliance for its intended purpose and as described in this manual.
- The appliance is only suitable for indoor use and is not suitable for other applications.
-
Appliance shall be installed, operated and stored in a room with a floor area larger than 4m^2
-
Do not operate your dehumidifier in an extremely humid or wet environment, e.g. bathroom or laundry room.
- If you have any questions regarding the electrical installation, follow the instructions of the manufacturer, and if necessary, ask a professional electrician to install it.
- Place the appliance on an even, dry and stable surface and make sure to adhere to a safety distance of 50~cm around and above the appliance.
-
Never place or operate the unit where it could be subject to:
-
Heat sources such as radiators, heat registers, stoves or other products that produce heat
-
Direct sunlight
- Excessive dust
- Mechanical vibration or shock
- Lack of ventilation
-Uneven surfaces,to avoid the tipping of the appliance during use -
Only operate the appliance with a filter in place
-
Never cover the ventilation slots and make sure that the appliance is kept in a well ventilated place.
- Do not place any heat sources and magnetic objects near or on top of the appliance and make sure that the surrounding environment shall be dry and free of damp.
- The device must be stored so that it is not damaged.
Provide occasional ventilation during use. Do not direct airflow at fireplaces or other heat related sources as this could cause flare ups or make units run excessively. Do not climb on or place objects on the unit. Do not hang objects off the unit. Do not place containers with liquids on the unit. Turn off the appliance at the power source when it will not be used for an extended period of time. Periodically check the condition of the unit's installation accessories for any damage. Do not apply heavy pressure to the radiator fins of
the unit. Operate the unit with air filter in place. Do not block or cover the intake grille, discharge area and outlet ports. Ensure that any electrical/electronic equipment is one yard away from the unit. Do not use or store flammable gases near the unit. CAUTION! Avoid Injury or damage to the unit or other property.
SCOPE OF DELIVERY
1 Portable Dehumidifier
1 Drainage hose
1 Instruction Manual
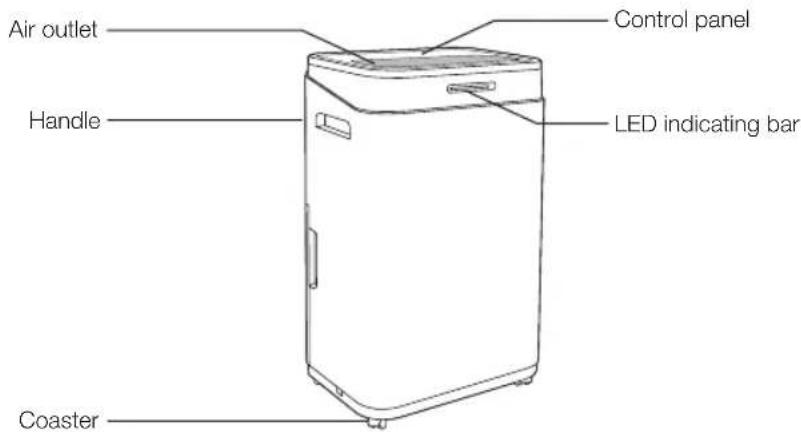
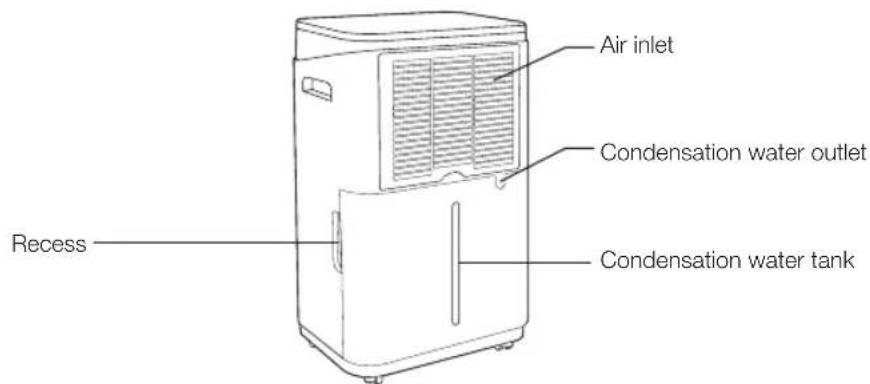
PRODUCT DESCRIPTION
Control Panel
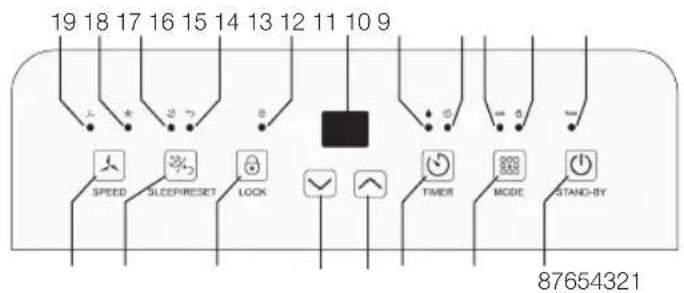
- Fan SPEED button
2.SLEEP/RESET button
3.Key LOCK button - button
- button
- TIMER button
- MODE button
- ON/STAND-BY button
- Power-LED
-
LED continuous mode
-
LED Auto mode
- Timer LED
- Water full LED
- Display
- Key lock LED
- Reset LED
- Sleep mode LED
- LED, high fan speed
- LED, low fan speed
BEFORE FIRST USE
- Remove all packaging material and check whether the appliance is complete and that all accessories are included.
Fully unwind the power cord. - Let the appliance rest for 24 hrs in upright position.

If any items are damaged or missing, contact your dealer or customer service.

Warning: Plastic bags are a danger to toddlers and babies, therefore keep them away to avoid
INSTALLATION

Warning: This appliance should only be connected to a properly installed wall socket (earthed) and not be operated by any means of an external timer or separate remote control system.
Place the appliance on an even, dry and stable surface and close to a properly installed wall socket.

Adhere to a safety distance of at least 50~cm above and around the appliance.
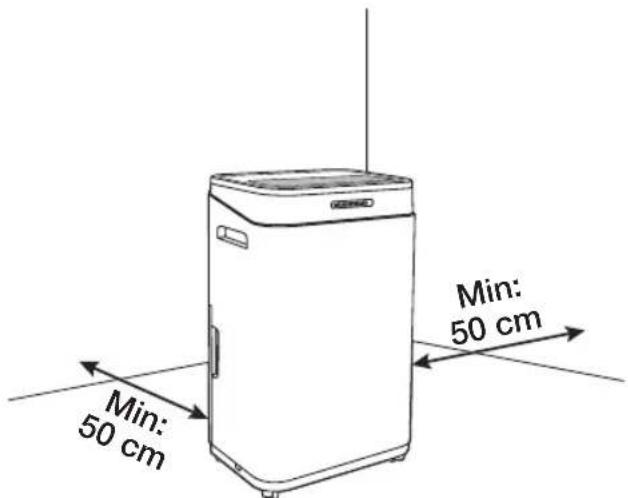
Place the appliance at a suitable area. The room must be bigger than 4m^2
OPERATION

The appliance can be operated via the control panel only.
TURNING THE APPLIANCE ON / OFF
- Connect the appliance to a properly installed wall socket and make sure your local voltage matches the technical data of the appliance.
- A signal tone sounds and all LEDs light up.
- Press the ON/STAND-BY (8) button; the device activates the last used mode and the current rel. air humidity is shown on the display (14).
If you use the appliance for the first time it is the Auto (11) mode. The indicator light of the chosen mode lights up. You can easily turn or move the appliance with the sturdy castor wheels. -
If the timer has been activated, the device switches off permanently after the time (1-24 hours).
-
If the value for the preset relative humidity has been reached in the Auto (12) program, the compressor switches off and the fan continues to run further. If the value is exceeded, the device switches on again.
- The device switches off when the condensation water tank is full or removed. If the tank is incorrectly inserted or if the condensation water tank has been removed, the Water full LED (13) flashes and an acoustic signal sounds when the device is switched on.
- Turn off the appliance by pushing the on / STAND-BY (8) button.
- After use, disconnect the appliance from the mains.
OPERATING MODE AND STATUS DISPLAYS
Humidity level is indicated by the LED indicating bar by 3 different LED light colors:
Blue : Humidity < 45%
Green: 45% ≤ Humidity ≤ 65%
Red : Humidity > 65%
- Error codes E0, E2, CL, CH, LO, HI: Red
The various operating states are shown on the LEDs in the control panel.
Please note the following table:
| LED Meaning | |
| Power LED (9) Device is connected to the mains | |
| LED continuous mode (10) | Device operates in continuous mode, i.e. permanent |
| LED mode Auto (11) | A value for air humidity is preset: if it is reached the compressor switches off, if it is exceeded the compressor switches on again. |
| Timer -LED (12) Timer is activated; if the timer is deactivated, the LED is off | |
| Water full LED (13) Water tank is full and must be emptied | |
| Key lock LED (15) Key lock is activated | |
| Reset LED (16) Filter needs to be cleaned. Deactivate the Reset LED by pressand-hold the SLEEP/RESET button for 3s. | |
| Sleep mode LED (17) Sleep mode is activated | |
| LED, high fan level (18) High fan level | |
| LED, low fan speed (19) | Low fan speed |
SELECT PROGRAM
The device has different programs.
- Press the respective button to set the desired program. The corresponding LED shows the setting.
SPECIFY THE TARGET VALUE FOR AIR HUMIDITY
In the Auto mode you have to set the target value for the desired humidity.
- Press the MODE button until the Auto LED lights up and use the / buttons to set the desired humidity in 5% steps between 30% and 80% . The set value is shown on the display for approx. 5 seconds.
Continuous mode - laundry drying
Press the MODE button until the continuous mode LED lights up.
This setting enables a very low level of humidity to be reached since there is continuous dehumidification. A target value for air humidity can therefore not be set.
Note: The minimum air humidity that can be reached in this operating mode depends on factors such as the room size or the ambient temperature, etc. There is therefore no minimum value that can be achieved.
Fan strength
- Press the SPEED button to choose between high or low fan strength.
Sleep mode
-
Press the SLEEP/RESET button to activate the sleep function. The device switches to the quietest and most energy-saving mode. The corresponding LED lights up.
-
Press the SLEEP/RESET button again to deactivate the function. The corresponding LED turns out.
Timer function
The device is equipped with a timer that can be activated in any operating mode and in standby mode.
Times from 1-24 hours can be selected in 1-hour steps. After the set time has elapsed, the device is switched on or switched to standby.
- Press the TIMER button during operation mode or in standby. The timer LED lights up and the time flashes in the display.
- Press the buttons to set an on or off time from 1 to 24 hours. The selected time flashes on the display for approx. 5 seconds.
- To end the timer before, press the TIMER button and then press the buttons until 00 appears on the display. The timer is now deactivated and after toggling the display the timer LED turns off.
Parental controls
The device is equipped with a child lock to prevent children from accidentally switching the device on or off or changing settings. When the childproof lock is activated, all buttons on the device have no function.
- Press the LOCK button for approx. 3 seconds. A signal tone sounds and the corresponding LED lights up. The child lock is now activated.
- Press the LOCK button again for approx. 3 seconds to deactivate the childproof lock. A signal tone sounds and the LED turns off.
CLEANING AND CARE
Clean the appliance and filters regularly to maximize performance and efficiency, and to prolong the appliance's life.
Before cleaning, always switch off the appliance and disconnect it from the mains. Never reliance in water. Danger! Electric Shock!
- Clean the appliance using a soft damp cloth.

Never use alcohol, gasoline, and/or any other aggressive cleaning agents/hard objects that may damage the appliance exterior. Never spray water directly onto the unit.
To remove dust between the vents, use a soft brush or carefully use the vacuum cleaner.
EMPTYING THE WATER TANK
The device has an internal water collection tank. Once, the capacity of water tank is reached, the appliance stops operating and the water tank LED on the control panel lights up.
In order to empty the water tank, turn off the appliance and disconnect it from the mains.
- Place the appliance device on an elevation, and place a bucket or any other kind of container underneath the drainage.

ATTENTION:
- Keep the appliance upright and carefully move the appliance to avoid water spillage over the brim of the water collection tank.
- If the capacity of the used bucket is not enough to collect all the water, reattach the lid to the drainage hole, empty the bucket and repeat the steps until the water tank is completely empty.
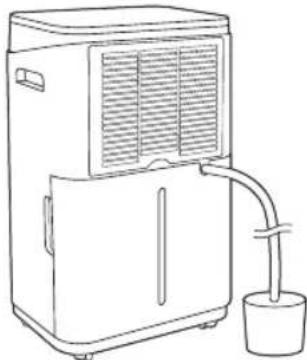
CONTINUOUS DRAINAGE
- Turn off the appliance and disconnect it from the mains.
- Properly attach the drainage hose to the condensation water outlet and make sure that the end of the hose is placed into a proper water collection container, e.g. bucket or bigger.
- Turn on the appliance and follow the steps as described in this manual.
Cleaning the Filter
For an optimal result, clean the filter every two weeks, and replace it at least 1x per year, or more often is necessary.
The filter should also be cleaned before storing it for a longer period of time or after it hadn't been used over a prolonged period of time.
- Switch off the appliance and disconnect it from the mains.
- Reach into the recess and remove the air inlet grille with filter. Pull the filter out of the air inlet grille.
- Rinse the filter with lukewarm water, or if necessary, let it soak for a while in soapy water and rinse again to get rid of any cleaning residue.


Before reattaching the filter make sure that it is properly dry otherwise this may cause an electric injury to the user due to water entering the appliance.

STORAGE
Keep the appliance away from children and store it in a clean and dry place.
If you are not going to use the appliance for an extended period of time:
- Switch off the unit and disconnect it from the mains.
- Drain the water from the water tank.
Clean the filters.
PROBLEM SOLVING
| Problem Inspection / cause Solut | on | ||
| The unit is not operating. Check the | power connection. Insert the power plug securely into the wall outlet. | ||
| Check if the water level indicator lights up? | Empty the water tank and reinstall correctly. | ||
| Check the room temperature. The range of operating temperature is 5-38 °C. | |||
| There is little formation of condensate. | Check the air filter for dirt. Clean the air filter as necessary. | ||
| Check if the air duct is blocked. To clear the obstacle. | |||
| Check if the room temperature is below 20 °C. | This is normal. Low humidity in low temperature environment. | ||
| Set humidity level is higher than current humidity value. | Set the humidity level below current humidity value. | ||
| Water Leakage | Overflow while moving the unit. | Empty the water tank before transport. | |
| Check if the drain hose is kinked or bends. | Straighten the hose to avoid a trap existing. | ||
| Excessive Noise | Check if the unit is securely positioned. | Place the unit on horizontal and firm ground. | |
| Check if any loose, vibrating parts. | Secure and tight the parts. | ||
| Noise sounds like water flowing. | Noise comes from flowing refrigerant. This is normal. | ||
| Error code | E0 | Connection problem between main PCB board and display board. | Check the connection wire between them. |
| E2 | Humidity sensor dampened or failure. | Clean or replace the humidity sensor. | |
| CL | Display when Room temperature is below 5 °C. | Normal. The compressor stops, and the fan keeps running. | |
| CH | Display when Room temperature is above 38 °C. | Normal. The compressor stops, and the fan keeps running. | |
| LO | Display when Room relative humidity is below 20 %rH. | Normal. The compressor stops, and the fan keeps running. | |
| HI | Display when Room relative humidity is above 90 %rH. | Normal. The compressor and the fan keep running. | |
Disposal Instructions

Waste electrical devices marked with this sign must not be disposed of with your household waste, but are to be collected separately. Therefore, please return this device at the end of its life cycle to special collection points for disposal or your local dealer.
Refrigerants must be evacuated and disposed of by a qualified specialist in accordance with federal and local regulations before the appliance is scraped.
Your portable Dehumidifier 82100 is packed in a retail box. Such boxes are recyclable waste, i.e. they are reusable or recyclable.
TECHNICAL DATA
Voltage: 220-240V~50Hz
Rated input power: 370W (30 °C, rF 80%)
Permissible Excessive operating pressure: Suction 0.7MPa / Discharge 3.2MPa
Max Allowable Pressure: 3.2MPa
Air Flow: 180m³/h
Refrigerant: R290 / 58g
Protection class:
Ingress protection: IPX0
Technical data subject to change!

Guarantee:
This product is guaranteed against defects in materials and workmanship for a period of 2 years.
This guarantee is not valid:
- if the appliance has not been used in accordance to the instructions
for damages due to wear and tear (batteries, etc.) - for damages known by customer at time of purchase
for damages caused by owner
This guarantee does not affect your statutory right, nor any legal right you may have as a customer under applicable national legislation governing the purchase of goods.
In order to assert his/her right in a guarantee case during the guaranteed period, the customer must provide evidence of the date of purchase (receipt).
The guarantee is to be asserted against
KORONA electric GmbH, Sundern/Germany.
Telephone Hotline: +49 2933 90284-80
Mail: service@korona-electric.de web: www.korona-electric.de
within 2 years after the date of purchase. In case of guarantee the customer is given the right to get the appliance repaired at our own or at an authorized shop. Further rights (due to guarantee case) are not given to the customer.
Handleiding
KORONA electric GmbH, Sundern/Germany.

- INTENDED USE
- Safety:
- REFRIGERANT
- Caution, risk of fire! R290
- WARNING:
- General Safety Instructions
- Caution! Danger of electric shock!
- An electric appliance is not a toy!
- Do not use the appliance,
- Special Safety Instructions
- Warning! To avoid the possibility of injury/damage to the appliance, electric shock and risk of burns.
- SCOPE OF DELIVERY
- BEFORE FIRST USE
- INSTALLATION
- OPERATION
- TURNING THE APPLIANCE ON / OFF
- OPERATING MODE AND STATUS DISPLAYS
- SELECT PROGRAM
- SPECIFY THE TARGET VALUE FOR AIR HUMIDITY
- Continuous mode - laundry drying
- Fan strength
- Sleep mode
- Timer function
- Parental controls
- CLEANING AND CARE
- EMPTYING THE WATER TANK
- ATTENTION:
- CONTINUOUS DRAINAGE
- Cleaning the Filter
- STORAGE
- Guarantee:
- Handleiding
Brand : KORONA
Model : 82100
Category : Dehumidifier