
MMW04 - Lawn mower MPM - Free user manual and instructions
Find the device manual for free MMW04 MPM in PDF.

User questions about MMW04 MPM
0 question about this device. Answer the ones you know or ask your own.
Ask a new question about this device
Download the instructions for your Lawn mower in PDF format for free! Find your manual MMW04 - MPM and take your electronic device back in hand. On this page are published all the documents necessary for the use of your device. MMW04 by MPM.
USER MANUAL MMW04 MPM
TALUO, 2017, KITI OHTF (21) RA
P. AUK, KAPIM, M2SINF = -KAPIN,3 RINKINYS
TONDFUSE - VERZORGINGSSET
MASZYNKAIDOS RZYZENIA W-OSOW+ZISTAW PELL,GNACJNY
MASINA DE TUNS + SET DE INCHIRPE
natural_image
Product photo of a hairbrush and electric toothbrush tool in a black tray (no text or symbols visible)cz NAVOD K OBSLUZE 3
DE BEDIENUNGSANLEITUNG 9
EE KASUTUSIUHEND 16
EN USER MANUAL 22
ES MANUAL DE INSTRUCCIONES 28
FR MANUEL DE L'UTILISATEUR 35
HU HASZNALATI UTASITAS 42
IT MANUALE D'USO 48
LT VARTOTOJO VADOVAS 55
LV LIETOTAJA ROKASGRAMATA 61
NL CEBRUIKERSI HANDLEING 67
PL NSTRUKCIA OBSLUGI 74
RO MANUAL DE UTILIZARE 81
RU ИНСТРУКЦИЯ ПО ОБСЛУЖИЗАГИЮ 88
SK POUŽIVATEľSKA PRÍBUČKA 96
UA ГОСИЕ ИК КОРИСТУВАЧА 102
MPM and S.A.
BEZPEČNOSTNÍ POKYNY PRO UŽIVATELE
natural_image
Product photo of a pair of electric toothbrushes with cutouts, shown from different angles (no text or symbols visible)natural_image
Metallic mechanical component with a curved body and an arrow indicating force or movement (no text or symbols)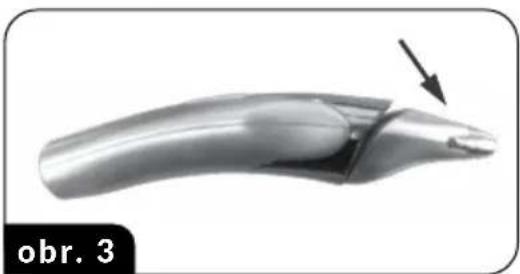
natural_image
Close-up of a metallic tool or component with an arrow pointing to a cut section (no text or symbols visible)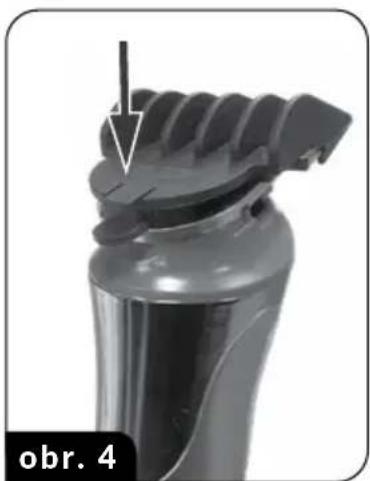
natural_image
Close-up of a mechanical component with a pointed tip and threaded edge, labeled 'obr. 4' (no other text or symbols visible)natural_image
Illustration of hands using a tool to adjust or install a mechanical component, with no visible text or symbols.natural_image
Illustration of three hand car wheel levers in action, showing motion and fluid flow (no text or symbols)natural_image
Technical line drawing of a mechanical component with a bolted tip and housing (no text or symbols)TECHNICKÉ PARAMETRY
natural_image
Product photo of a handbrush with multiple cutaway views (no text or symbols visible)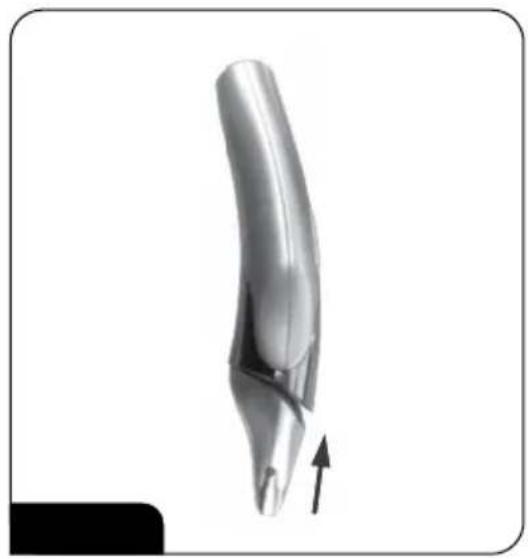
natural_image
Metallic object with a curved, elongated body and an arrow indicating direction (no text or symbols)natural_image
Close-up of a metallic object with a curved handle and an arrow pointing to a feature, labeled 'Abb. 3' (no other text or symbols)natural_image
Close-up of a mechanical component with a pointed tip and textured surface, labeled 'Abb. 4' (no other text or symbols)natural_image
Illustration of hands using a tool to adjust or remove a mechanical component (no text or symbols visible)natural_image
Illustration of three hand car wheel levers in action, showing motion and fluid flow (no text or symbols)natural_image
Technical line drawing of a mechanical component with a threaded fitting and housing (no text or symbols)TECHNISCHE DATEN
natural_image
Product photo of Joonis 1 J charging tool with multiple disassembled components (no text or symbols visible)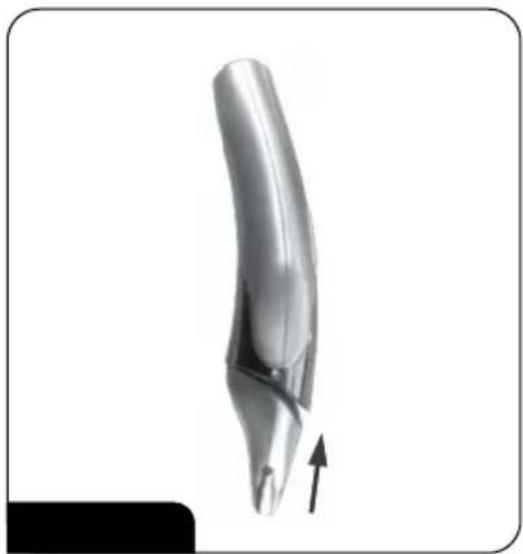
natural_image
Metallic mechanical component with a curved body and an arrow indicating motion (no text or symbols)natural_image
Close-up of a curved metallic object with an arrow pointing to a feature, labeled 'Joonis 3' (no other text or symbols)natural_image
Close-up of a mechanical component with a highlighted section and label 'Joonis 4' (no other text or symbols visible)natural_image
Technical line drawing of a mechanical component with a screw-like protrusion and a base housing (no text or symbols)TEHNILISED SPETSIFIKATSIOONID
-Read the user's manual carefully before use.
-Do not hold the device in wet hands!
-Store the device away from water!
-Do not submerge the device, charger in water or other liquids!
- Be extra careful when there are children near the device or when their hair is clipped!
- Do not hang the cable on sharp edges and do not allow it to touch hot surfaces.
- Do not use damaged device, also when the cable or plug is damaged – in such a case return the device to be repaired in an authorised service point.
- Using accessories which are not recommended by the manufacturer may cause device damage, fire or bodily harm.
- Do not use the device with damaged or broken comb and when there are teeth missing in the blades, as it may cause harm.
-Do not use the clipper during a bath!
-Never leave the device on without supervision!
-Do not put the device on hot surfaces!
-The device is intended only for home use.
- Do not use the device for other aims than the ones it was intended for.
-Do not insert anything between the device blades.
-Before use, check whether the blades are correctly set.
- Do not use the clipper near water in baths, basins or other receptacles, as well as in wet rooms.
- This device may be used by children of at least 8, and by people with compromised physical or mental capacity, or people with no experience and knowledge of the equipment, if there is a provided supervision or instruction regarding the equipment in a safe way, so that the hazards related with it are understood. Children should not perform cleaning or maintenance of the device without supervision.
-Store the device and its cable in a place inaccessible for children below 8.
-In order to ensure additional protection, it is recommended to install residual current devices (RDC) with rated activation
differential voltage not exceeding 30 mA. In this scope, contact electricity professional.
- Do not pull the charger from the network socket by pulling on the cable.
-Do not connect the charger to the socket with wet hands.
-Do not use the device on open air. - Clipping blades are very sharp. Stay careful during assembly, disassembly and cleaning. Do not touch moving blade elements during the device operation!
-Do not clean the blades in the water.
-Change clipping attachments only when the hair clipper is off.
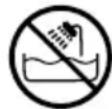
WARNING! Do not use this device near water.
- WARNING! Do not use this equipment near baths, showers, swimming pools and similar water receptacles.
-WARNING! Do not allow the charger to get wet!
- Use only the mains adapter provided. It generates the low voltage required for this device.
- Only use the device to trim hair on the head, facial hair and body hair.
- Store, use and charge the appliance at a temperature between 15^ C and 35^ C
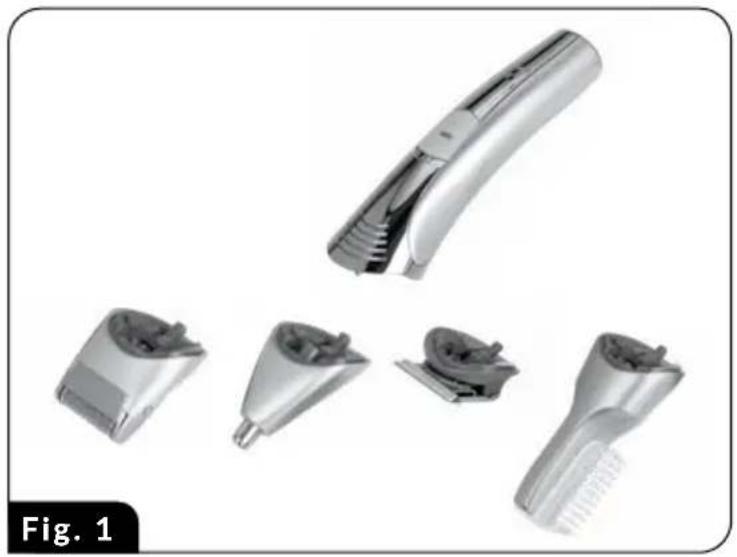
OVERVIEW
- Trimmer body
- Power switch
- CHARGE power adapter indicator light
- Power adapter input
- Hair cutting head
- Nose & ear trimmer head
- Jaw shaving head
-
Body hair trimmer head
-
Trimming control attachment
- 3 mm trimming comb
- 6 mm trimming comb
- 10 mm trimming comb
- Power adapter
- Comb
- Brush
- Blade oil
- Trimmer & accessories cradle
CHARGING THE TRIMMER BATTERY
- Before using this hair trimmer for the first time, charge it for at least 5 hours.
- Before charging for the first time, make sure that the hair trimmer is powered off.
- Connect the power adapter cable to the power adapter input (4).
- Connect the power adapter (13) to a mains outlet.
- The CHARGE indicator light (3) is on which means that the power adapter is connected to the mains and the hair trimmer is charged.
-Do not charge the battery for more than 6 hours.
- The hair trimmer has a NiMH battery without the 'memory effect'; this means it can be charged while the hair trimmer is powered on.
- The hair trimmer can work cordlessly for 45 minutes when fully charged.
- When the hair trimmer starts running noticeably more slowly, connect the power adapter to recharge the battery.
- Standard battery charging should not be longer than 4 hours - disconnect the charger after 4 hours of charging.
OPTIMISING THE BATTERY LIFE:
- Follow this procedure two times a year. Discharge the battery completely by starting the hair trimmer and leaving it to stop completely on its own.
- Do not leave the power adapter connected to a mains outlet if you are not charging the hair trimmer.
- If you did not use the hair trimmer for a long time, recharge it for at least 6 hours before use.
CAUTION! Do not start the device while charging the battery.
INSTALLING AND REMOVING TRIMMER HEADS
- Align the base of the head (5), (6), (7) or (8) to the receptacle on the hair trimmer body (Fig. 1). Engage the head pin in the respective socket in the hair trimmer body and press down the head to the body to secure it (Fig. 2).
natural_image
Product assembly of a handheld hairbrush with multiple cutaway views (no text or symbols visible)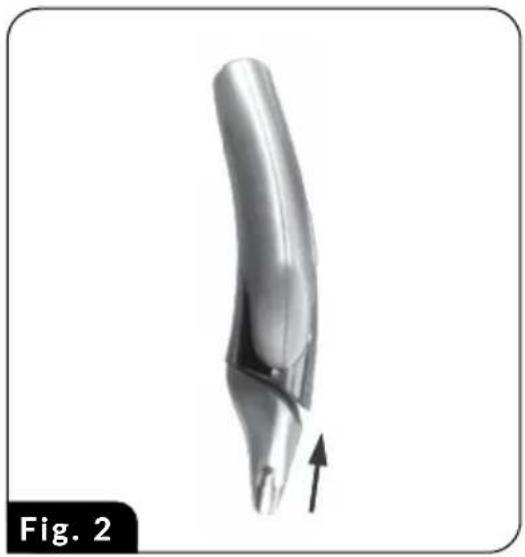
natural_image
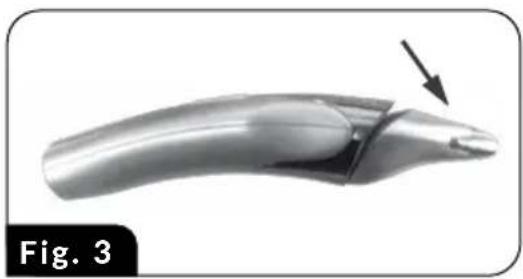
3D rendered object resembling a curved, elongated structure with an arrow indicating direction (no text or symbols)- The head is removed by pushing it away from the body at approximately 45^ (Fig. 3).
CAUTION! Install / detach each head with the hair trimmer powered off.
USING THE HAIR TRIMMER: TRIMMING HEAD HAIR
CAUTION! Oil the blade of the head (5) before the first use (see CLEANING AND MAINTENANCE).
- The hair must be completely dry before trimming. Comb your hair in the direction of their growth.
- Attach the head hair head (5).
natural_image
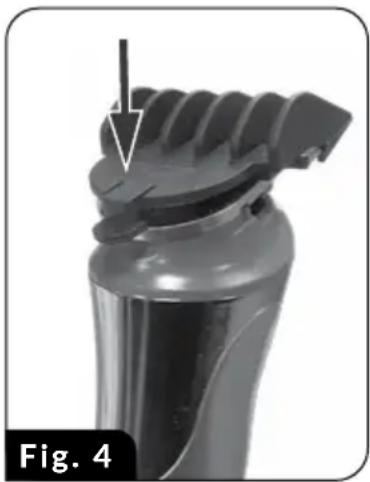
Close-up of a metallic tool or component with an arrow pointing to a cut section (no text or symbols visible)- Choose one of the three trimming combs and attach it to the installed head (Fig. 4). There are three trimming combs (10), (11), and (12) to choose from with the following trimming length options, respectively: 3, 6 and 10 mm. Release the tab at the end of the trimming comb to detach it from the head.
- Start the hair trimmer by sliding the Power switch (2) toward the head.
CAUTION! Always work by moving the hair trimmer in the direction opposite to that of the hair growth; otherwise the trimming performance will be poor. Work in slow, steady passes.
- Move the hair trimmer over the top of the head in each pass to trim all hair to an equal length.
- Keep the flat bottom of the trimming comb sliding along the scalp to trim the hair to an equal length.
- For the best trimming effect with curly, sparse or long and thin hair, use the comb (14) included with the product to bring the hair toward the hair trimmer blade.
- Frequently remove clippings from the trimming comb and the hair comb.
- Precise trimming and shaving above the neck and around the ears do not require a trimming comb. Mind these guidelines, however:
- Without a trimming comb, the hair trimmer will shave away all hair it engages, leaving the skin bald.
- Comb down the hair tips over the ears before trimming the hairline around them.
- Work with the hair trimmer at an angle at which only one edge of the blade touches the hair.
- Carefully trim off the hair at the ends and keep the hairline near the ears.
-
Hold the hair trim bottom side up and work in downward passes to trim the hairline on the back of the neck and the sideburns.
-
When done, turn off the hair trimmer by sliding the Power switch (2) away from the head.
natural_image
Close-up of a mechanical component with a pointed tip and textured surface, labeled 'Fig. 4' (no readable text or symbols)USING THE HAIR TRIMMER: NOSE & EAR TRIMMER HEAD
- Install the nose & ear trimmer head (6).
- Start the hair trimmer by sliding the Power switch (2) toward the head.
- Carefully place the tip of the trimmer head in the nostril or in the ear.
- Move the hair trimmer up and down gently while twisting it to the left and right. This will help remove unwanted hair effectively.
CAUTION! The trimmer head cuts the hair (instead of pulling it). This does not leave the delicate skin in the nose and the hears sore. Do not use the nose & ear trimmer head on other body parts.
- Do not push the nose & ear trimmer head too deep into the nostril or the ear (5 mm deep is enough).
- When done, turn off the hair trimmer by sliding the Power switch (2) away from the head.
USING THE HAIR TRIMMER: JAW SHAVING HEAD
- Install the jaw shaving head (7).
- Start the hair trimmer by sliding the Power switch (2) toward the head.
- Bring the hair trimmer close enough to the face for the jaw shaving head to touch the facial hair.
- Work in gentle and short passes for a better shaving effect. Use your other hand to keep the facial skin taut; this helps keep the short hair away from the skin and make shaving easier.
CAUTION! The jaw shaving head is for modelling the stubble and shaving small patches on the face.
- When done, turn off the hair trimmer by sliding the Power switch (2) away from the head.
USING THE HAIR TRIMMER: BODY HAIR TRIMMER HEAD
CAUTION! Oil the blade of the head (8) before the first use (see CLEANING AND MAINTENANCE).
- Install the body hair trimmer head (8). It is suitable for trimming the beard too.
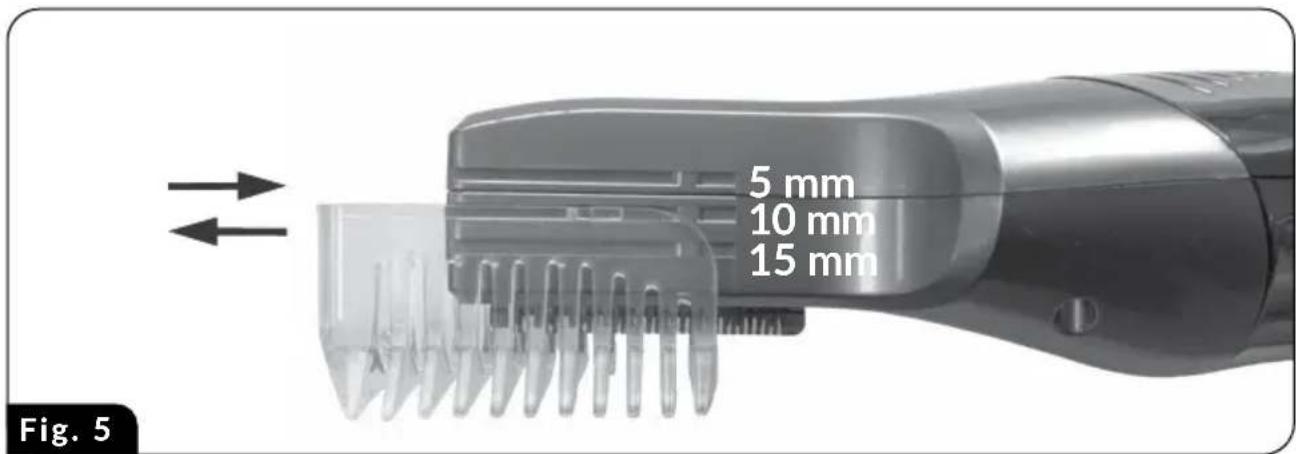
- Install the trimming control attachment (9) at the suitable trimming length on the body hair trimmer head (8). The trimming control attachment can be installed in one of the grooves to choose one of the trimming lengths: 5, 10 or 15 mm (Fig. 5).
- Start the hair trimmer by sliding the Power switch (2) toward the head.
- Bring the concave side of the trimming control attachment close to the body and work in passes by moving the attachment over the hair and in the direction of their growth. Work in slow and careful passes.
- Monitor the volume of hair clippings. If there is too much of hair caught in the trimming control attachment (9), stop trimming and clean it.
- If you want to shave the hair completely, use the body hair trimmer head (8) without the trimming control attachment (9). Finish off with the jaw shaving attachment (7).
- When done, turn off the hair trimmer by sliding the Power switch (2) away from the head.
CLEANING AND MAINTENANCE
CAUTION! Never immerse the hair trimmer (1) and/or the power adapter (13) in water or other liquids.
CAUTION! Clean the hair trimmer and all included accessories after every use.
CAUTION! Do not use sharp objects, abrasive pastes, sol- vents and other strong chemicals for cleaning, as they can damage the hair trimmer.
- Clean the hair trimmer body with a damp cloth. Remove persistent grime with a damp cloth and some detergent.
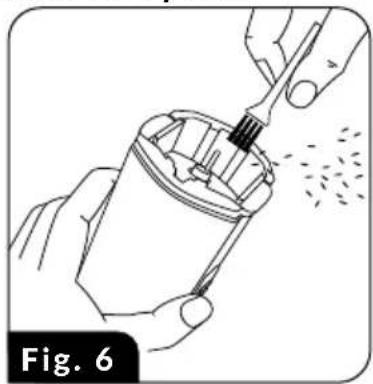
- Every time you remove a head, clean the head base and the hair trimmer receptacle (Fig. 6) with the brush (15).
natural_image
Illustration of hands using a tool to remove or spray material from a container (no text or symbols)- Rinse the head (5) / (6) / (7) gently under running water after each use. See Fig. 7. Once rinsed, the head must be completely dry before use.
CAUTION! Never immerse the head (5) / (6) / (7) completely in water.
- Clean the body hair trimmer head (8) dry and with the brush (15).
- Clean the inside of the jaw shaving head (7) with the brush (15). Access the inside of the jaw shaving head by removing the metal film guard which is disengaged by releasing the two latches on both sides. Reattach the metal film guard before use. Frequently lubricate the heads with a drop or two of the blade oil (16).

natural_image
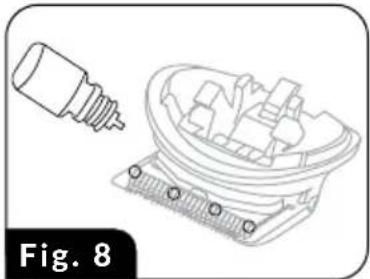
Illustration of three stages of a robotic arm gripping a car, with motion lines indicating movement and fluid (no text or symbols)- Before the first use and after every five trimming sessions, lubricate the blade (Fig. 8) of the hair cutting head (5) and the body hair trimming head (8). Do not use hair oils, machine grease, or any lubricants with petroleum or solvents.
- Keep the hair trimmer in a dry place, away from sunlight.
NOTE! The battery the appliance is equipped with contains substances, which may result in environment pollution. Before disposal of the appliance remove the battery. Do not dispose the appliance. Provide it to a special disposing center in order to have it utilized. In this way one help to protect the natural environment.
natural_image
Technical line drawing of a mechanical component with a disassembled part and housing (no text or symbols)TECHNICAL SPECIFICATIONS
See the product nameplate for technical specifications.
CE
CAUTION! MPM reserves the right to modify the product specifications.
Proper disposal of the product (waste electrical and electronic equipment)
Marking on the product indicates that after the service-life of the product expires, it should not be disposed with other type of municipal waste. Used equipment may have a negative impact on the environment and health of people due to potentially containing hazardous substances, mixtures and components. Mixing electric waste with other types of waste or disassembling those in an unprofessional manner may cause a release of substances that are hazardous to the environment and health.
Used equipment should be handed-over to a point for collection of electric waste. In order to obtain detailed information regarding the electric waste collection points, the user should contact the municipal point of electric waste collection or used equipment processing department.
natural_image
Product photo of a pair of electric toothbrushes with cutouts, shown from different angles (no text or symbols visible)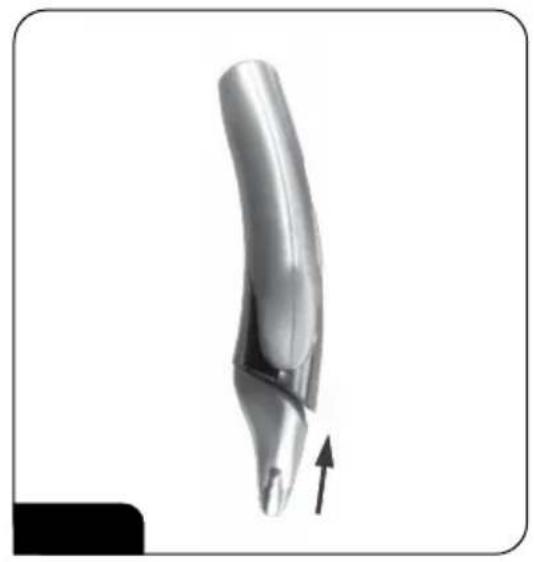
natural_image
Metallic curved object with a black arrow pointing to its base, no visible text or symbolsnatural_image
3D rendered image of a curved metallic object with an arrow pointing to a feature, labeled 'Fig. 3' (no text or symbols on the object itself)natural_image
Close-up of a black mechanical component with a white arrow pointing to a textured surface (no text or symbols visible)natural_image
Illustration of hands using a tool to adjust or install a mechanical component, labeled 'Fig. 6' (no text or symbols on the diagram itself)natural_image
Illustration of three stages of a hand turning a car, showing motion and fluid flow (no text or symbols)natural_image
Technical line drawing of a mechanical component with a threaded fastener and housing (no text or symbols)DATOS TÉCNICOS
natural_image
Product photo of a hairbrush with multiple cutaway views (no text or symbols visible)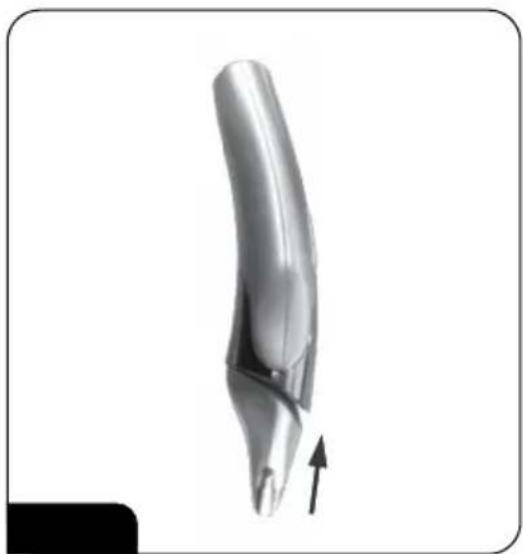
natural_image
3D rendered metallic object with a curved, elongated body and an arrow indicating upward motion (no text or symbols)natural_image
3D rendered image of a curved metallic object with an arrow pointing to a feature, labeled 'fig. 3' (no text or symbols on the object itself)natural_image
Close-up of a mechanical component with a pointed tip and textured surface, labeled 'fig.4' (no readable text or symbols)natural_image
Illustration of hands using a tool to remove or displace material from a container (no text or symbols)natural_image
Illustration of three stages of a robotic arm gripping a tool, with no visible text or symbolsnatural_image
Technical line drawing of a mechanical component with a disassembled part and housing (no text or symbols)CARACTÉRISTIQUES TECHNIQUES
natural_image
Product photo of a pair of electric toothbrushes with cutouts, labeled '1. ábra 2.' (no text or symbols on the products themselves)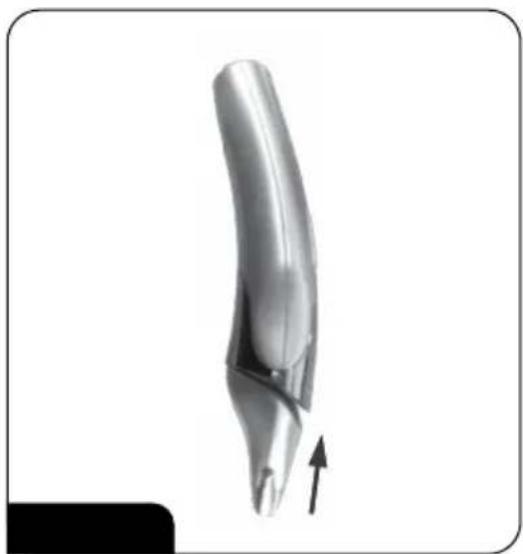
natural_image
Metallic object with a curved, elongated body and an arrow indicating upward motion (no text or symbols)natural_image
Technical line drawing of a mechanical component with a threaded fitting and housing (no text or symbols)MÜSZAKI ADATOK
natural_image
Product images of a hairbrush and its accessories, showing exploded view with no visible text or symbols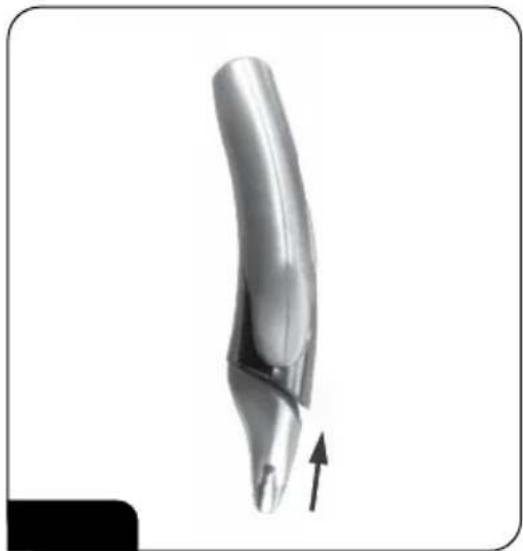
natural_image
Metallic curved object with an arrow indicating upward motion, no visible text or symbolsnatural_image
3D rendered image of a curved metallic object with an arrow pointing to a feature, labeled 'Fig. 3' (no text or symbols on the object itself)natural_image
Close-up of a black mechanical component with a pointed tip and arrow indicator (no text or symbols)natural_image
Illustration of hands using a tool to adjust or remove a mechanical component (no text or symbols visible)natural_image
Illustration of three stages of a hand turning a car, showing motion and fluid flow (no text or symbols)natural_image
Technical line drawing of a mechanical component with a threaded fastener and housing (no text or symbols)DATI TECNICI
natural_image
Product photo of a pair of electric hair trimers with cutouts, shown from different angles (no text or symbols visible)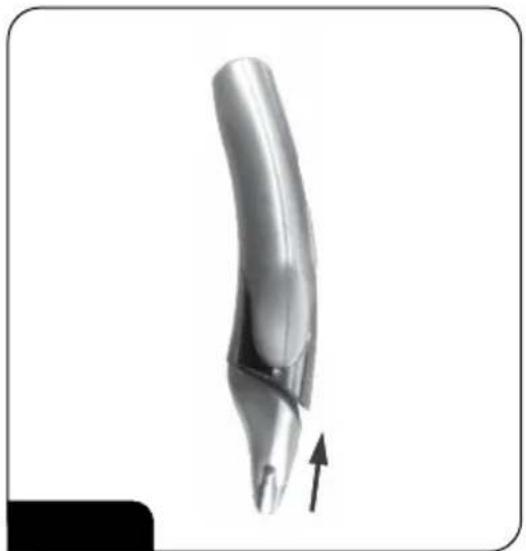
natural_image
3D rendered metallic object with a curved, elongated body and an arrow indicating upward motion (no text or symbols)natural_image
Close-up of a curved metallic object with an arrow pointing to a feature, labeled '3 pav.' (no other text or symbols)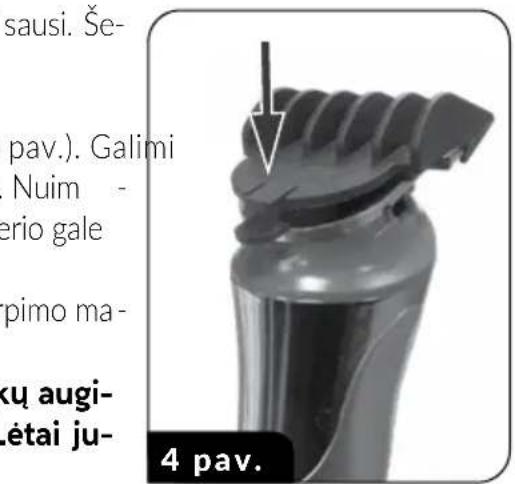
natural_image
Illustration of hands using a tool to adjust or install a mechanical component, labeled 'Fig. 6' (no text or symbols on the diagram itself)natural_image
Three-step illustration showing hand cleaning a car with water spray, no text or symbols presentnatural_image
Technical line drawing of a mechanical component with a bolted tip and housing (no text or symbols)TECHNINIAI DUOMENYS
natural_image
Product photo of a hairbrush with multiple cutaway views (no text or symbols visible)
natural_image
3D rendered metallic object with a curved, elongated body and an arrow pointing to it (no text or symbols)natural_image
Close-up of a metallic tool with a curved handle and an arrow pointing to a cut section (no text or symbols on the object itself)natural_image
Close-up of a black mechanical component with a pointed tip and textured surface, labeled '4. att.' (no other text or symbols)natural_image
Illustration of hands using a tool to adjust or install a mechanical component (no text or symbols visible)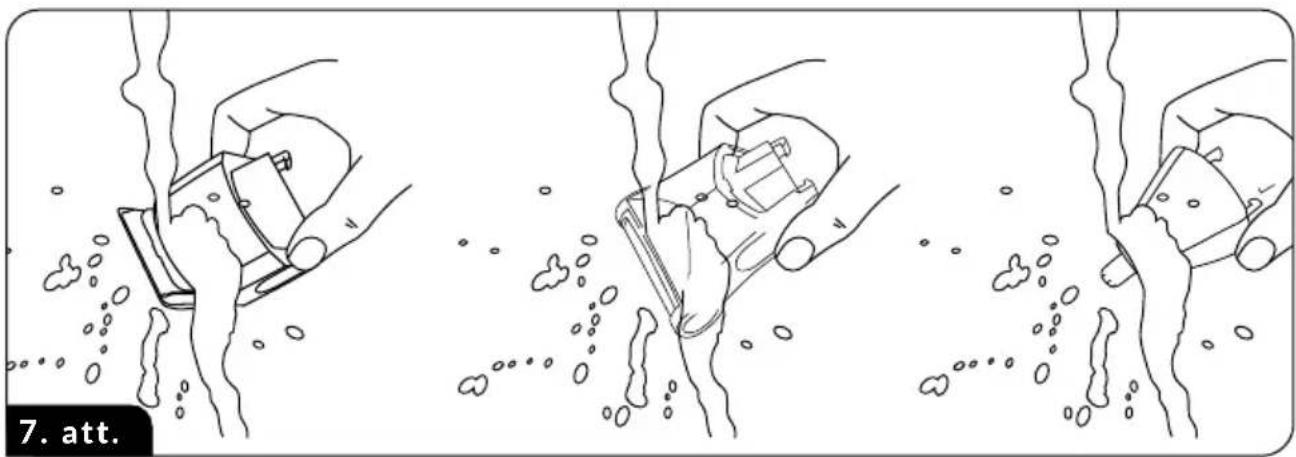
natural_image
Three-step illustration showing hand turning a car with water spray, no text or symbols presentnatural_image
Technical line drawing of a mechanical component with a threaded fitting and housing (no text or symbols)TEHNISKIE DATI
BESCHRIJVING VAN HET APPARAAT
natural_image
Product images of a pair of electric toothbrushes, showing different designs and mounting features (no text or symbols visible)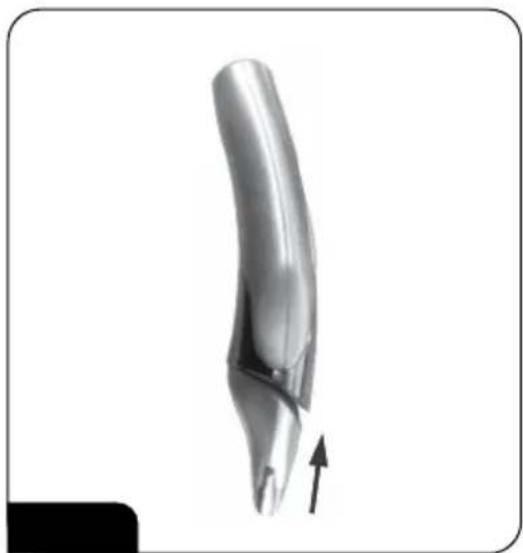
natural_image
Metallic mechanical component with a curved body and an arrow indicating force or movement (no text or symbols)natural_image
3D rendered image of a curved metallic object with an arrow pointing to a cut section (no text or symbols)natural_image
Close-up of a mechanical component with a pointed tip and threaded edge, labeled 'Fig. 4' (no text or symbols on the object itself)natural_image
Illustration of hands using a tool to adjust or remove a mechanical component (no text or symbols visible)natural_image
Three-step illustration showing a hand holding a car with water spray, before and after cleaning (no text or symbols)natural_image
Technical line drawing of a mechanical component with a threaded end and housing (no text or symbols)natural_image
Product photo of a pair of electric toothbrushes with different designs, no visible text or symbols on the main objects.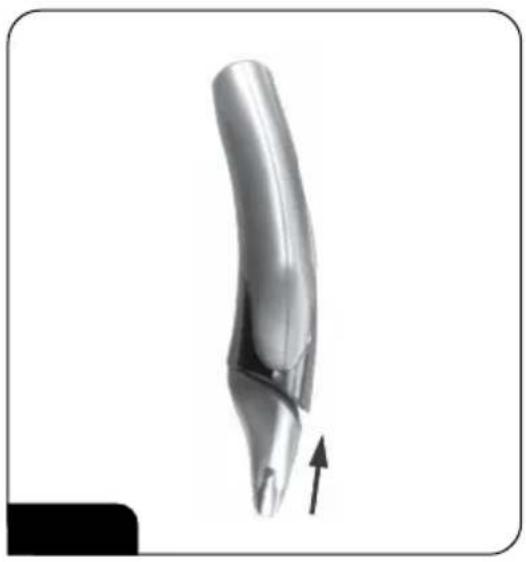
natural_image
3D rendered mechanical component with a curved body and an arrow indicating direction (no text or symbols)natural_image
Close-up of a metallic tool or connector with an arrow pointing to a cut section, labeled 'rys. 3' at the bottom (no other text or symbols)natural_image
Close-up of a mechanical component with a white arrow pointing to a textured surface (no text or symbols visible)natural_image
Illustration of hands using a tool to adjust internal components with particles (no text or symbols)natural_image
Three-step illustration showing a hand holding a car with water droplets, then cleaning the surface (no text or symbols)natural_image
Technical line drawing of a mechanical component with a threaded fastener and housing (no text or symbols)DANE TECHNICZNE
natural_image
Product images of a hand-operated hairbrush and its accessories, showing exploded view (no text or symbols)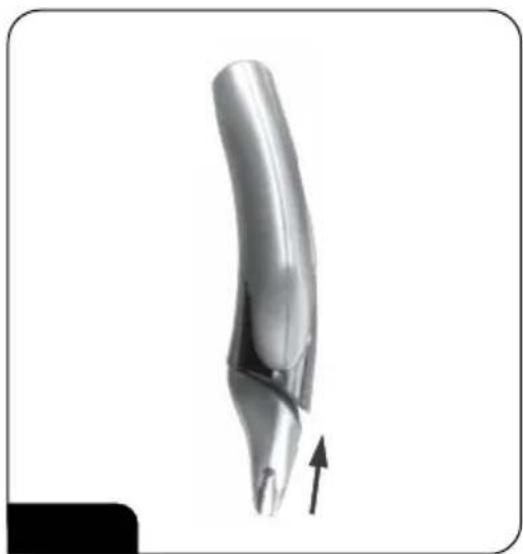
natural_image
3D rendered mechanical component with an arrow indicating force or movement (no text or symbols)- Capul selectat, instalat este demontat prin apăsarea acestuia la un unghi de aproximativ 45° (Fig. 3).
natural_image
Close-up of a metallic object with a curved handle and an arrow pointing to a feature, labeled 'Fig. 3' (no text or symbols on the object itself)UTILIZAREA CLIPPERULUI – TUNTEREA PĂRULUI
natural_image
Close-up of a mechanical component with a pointed tip and textured surface, labeled 'Fig. 4' (no text or symbols on the object itself)natural_image
Illustration of hands using a tool to adjust or install a mechanical component, with no visible text or symbols.natural_image
Illustration of three stages of a hand holding a car, showing motion and fluid flow (no text or symbols)natural_image
Technical line drawing of a mechanical component with a threaded fastener and housing (no text or symbols)DATE TEHNICE
natural_image
Product photo of a pair of electric toothbrushes with cutouts and accessories (no text or symbols visible)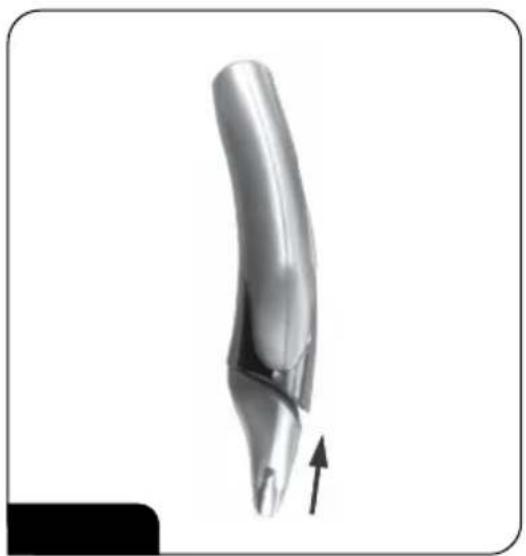
natural_image
3D rendered metallic object with a curved, elongated body and an arrow indicating upward motion (no text or symbols)natural_image
Close-up of a metallic tool or connector with an arrow pointing to a cut section (no text or symbols visible)natural_image
Close-up of a mechanical component with a pointed tip and arrow indicator (no text or symbols)natural_image
Illustration of hands using a tool to adjust or install a mechanical component, with no visible text or symbols.natural_image
Three-step illustration showing hand cleaning a car with water spray, no text or symbols presentnatural_image
Technical line drawing of a mechanical component with a threaded fastener and housing (no text or symbols)natural_image
Product photo of a pair of electric toothbrushes with cutouts, shown from different angles (no text or symbols visible)
natural_image
3D rendered image of a metallic object with an arrow indicating direction (no text or symbols)natural_image
Close-up of a metallic tool or component with an arrow pointing to a cut section (no text or symbols visible)natural_image
Close-up of a mechanical component with a threaded tip and arrow indicator (no text or symbols)POUŽÍVANIE HOLIACEHO STROJČEKA - ZASTRIHÁVAČ NOSA A UŠI
natural_image
Illustration of hands using a tool to remove or disperse material from a container (no text or symbols)- Po použití hlavicu (5), (6), (7) jemne opláchnite pod tečúcou vodou podla obr. 7. Hlavy musia pred opätovným použitím úplne vyschnút.
POZOR! Nikdy neponárajte holiace hlavy (5), (6), (7) úplne do vody.
natural_image
Three-step illustration showing hand cleaning a car with water spray, no text or symbols presentnatural_image
Technical line drawing of a mechanical component with a screw-like tip and housing (no text or symbols)TECHNICKÉ PARAMETRE
natural_image
Product photo of a pair of electric toothbrushes with different designs, shown from exploded and assembled views (no text or symbols visible)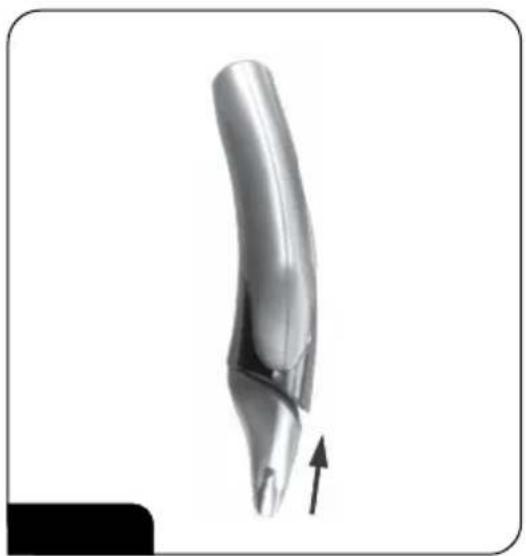
natural_image
3D rendered image of a metallic object with an arrow indicating direction (no text or symbols)natural_image
3D rendered image of a curved metallic object with an arrow pointing to a cut section, labeled 'рис. 3' (no text or symbols on the object itself)natural_image
Close-up of a mechanical component with a white arrow pointing to a textured surface (no text or symbols visible)natural_image
Illustration of hands using a tool to adjust or install a mechanical component, with no visible text or symbols.natural_image
Three-step illustration of a hand holding a car, with water splashing and bubbles rising (no text or symbols)natural_image
Technical line drawing of a mechanical component with a threaded fastener and housing (no text or symbols)Legible signature of the buyer