
DVP1064 - Portable DVD Player LENCO - Free user manual and instructions
Find the device manual for free DVP1064 LENCO in PDF.
| Product Type | Portable DVD Player |
| Brand | Lenco |
| Model | DVP1064 |
| Power Supply (Mains) | 100-240 V AC, 50/60 Hz |
| Power Supply (Adapter) | Input 9-12 V DC |
| Power Consumption | < 12 W |
| Battery | Lithium-ion 7.4 V |
| Battery Charging Time | 3 to 4 hours |
| Screen | TFT Screen (size not specified) |
| Playable Formats | DVD, VCD, CD, MP3, JPEG, MPEG4 |
| Connections | USB, SD/MMC, AV output, HDMI output, coaxial output, headphone jack |
| Tuner | Integrated DVB-T (HD) |
| Functions | Play, pause, search, zoom, repeat, programming, subtitles, multilingual audio |
| Vehicle Mounting | Yes (straps and mounting bag) |
| Maintenance | Soft dry cloth, no solvent |
| Safety | Class 1 laser product, do not open the casing |
| Weight | Approximately 0.8 kg |
| Dimensions | Approximately 260 x 190 x 30 mm |
| Operating Temperature | 0 °C to 35 °C |
| Operating Humidity | 5% to 90% |
| Video System | NTSC / PAL |
| Laser | Semiconductor, 650 nm |
| Warranty | According to European legislation |
| Repairability | Refer to qualified personnel |
Frequently Asked Questions - DVP1064 LENCO
User questions about DVP1064 LENCO
0 question about this device. Answer the ones you know or ask your own.
Ask a new question about this device
Download the instructions for your Portable DVD Player in PDF format for free! Find your manual DVP1064 - LENCO and take your electronic device back in hand. On this page are published all the documents necessary for the use of your device. DVP1064 by LENCO.
USER MANUAL DVP1064 LENCO
natural_image
Lenco portable TV with a family photo displayed on its screen, accompanied by a remote control (no visible text or symbols)USER MANUAL PORTABLE DVD
HANDLEIDING DRAAGBARE DVD-SPELER
BENUTZERHANDBUCH TRAGBARER DVD-PLAYER
MODE D'EMPLOI LECTEUR DVD PORTABLE
MANUAL DEL USUARIO DVD PORTÁTIL
Index
English 3
Nederlands....23
Deutsch 43
Français 63
Español 83
English
CAUTION:
Usage of controls or adjustments or performance of procedures other than those specified herein may result in hazardous radiation exposure.
KEEP THESE INSTRUCTIONS IN MIND:
- Do not cover or block any ventilation openings. When placing the device on a shelf, leave 5 cm (2") free space around the whole device.
- Install in accordance with the supplied user manual.
- Keep the device away from heat sources such as radiators, heaters, stoves, candles and other heat-generating products or naked flame. The apparatus can only be used in moderate climates. Extremely cold or warm environments should be avoided. Working temperature between 0° and 35°C.
- Avoid using the device near strong magnetic fields.
- Electrostatic discharge can disturb normal usage of this device. If so, simply reset and restart the device following the instruction manual. During file transmission, please handle with care and operate in a static-free environment.
- Warning! Never insert an object into the product through the vents or openings. High voltage flows through the product and inserting an object can cause electric shock and/or short circuit internal parts. For the same reason, do not spill water or liquid on the product.
- Do not use in wet or moist areas such as bathrooms, steamy kitchens or near swimming pools.
- The apparatus shall not be exposed to dripping or splashing and make sure that no objects filled with liquids, such as vases, are placed on or near the apparatus.
- Do not use this device when condensation may occur. When the unit is used in a warm wet room with damp, water droplets or condensation may occur inside the unit and the unit could maybe not work properly; let the unit stand in power OFF for 1 or 2 hours before turning on the power: the unit should be dry before getting any power.
- Although this device is manufactured with the utmost care and checked several times before leaving the factory, it is still possible that problems may occur, as with all electrical appliances. If you notice smoke, an excessive build-up of heat or any other unexpected phenomena, you should disconnect the plug from the main power socket immediately.
- This device must operate on a power source as specified on the specification label. If you are not sure of the type of power supply used in your home, consult your dealer or local power company.
- Keep away from rodents. Rodents enjoy biting on power cords.
- To clean the device, use a soft dry cloth. Do not use solvents or petrol based fluids. To remove severe stains, you may use a damp cloth with dilute detergent.
- The supplier is not responsible for damage or lost data caused by malfunction, misuse, modification of the device or battery replacement.
- Do not interrupt the connection when the device is formatting or transferring files. Otherwise, data may be corrupted or lost.
- If the unit has USB playback function, the usb memory stick should be plugged into the unit directly. Don't use an usb extension cable because it can cause interference resulting in failing of data.
- The rating label has been marked on the bottom or back panel of the apparatus.
- This device is not intended for use by people (including children) with physical, sensory or mental disabilities, or a lack of experience and knowledge, unless they're under supervision or have received instructions about the correct use of the device by the person who is responsible for their safety.
- This product is intended for non professional use only and not for commercial or industrial use.
-
Make sure the unit is adjusted to a stable position. Damage caused by using this product in an unstable position vibrations or shocks or by failure to follow any other warning or precaution contained within this user manual will not be covered by warranty.
-
Never remove the casing of this apparatus.
-
Never place this apparatus on other electrical equipment.
-
Do not allow children access to plastic bags.
-
Only use attachments/accessories specified by the manufacturer.
-
Refer all servicing to qualified service personnel. Servicing is required when the apparatus has been damaged in any way, such as the power supply cord or the plug, when liquid has been spilled or objects have fallen into the apparatus, when the apparatus has been exposed to rain or moisture, does not operate normally, or has been dropped.
-
Prolonged exposure to loud sounds from personal music players may lead to temporary or permanent hearing loss.
-
If the product is delivered with power cable or AC power adaptor :
-
If any trouble occur, disconnect the AC power card and refer servicing to qualified personnel.
- To completely disconnect the power input, the mains plug of the apparatus shall be disconnected from the mains, as the disconnect device is the mains plug of apparatus.
- Don't step on or pinch the power adaptor. Be very careful, particularly near the plugs and the cable's exit point. Do not place heavy items on the power adaptor, which may damage it. Keep the entire device out of children's reach! When playing with the power cable, they can seriously injure themselves.
● Unplug this device during lightning storms or when unused for a long period.
● The socket outlet must be installed near the equipment and must be easily accessible. - Do not overload ac outlets or extension cords. Overloading can cause fire or electric shock.
● Devices with class 1 construction should be connected to a main socket outlet with a protective earthed connection.
● Devices with class 2 construction do not require a earthed connection.
● Always hold the plug when pulling it out of the main supply socket. Do not pull the power cord. This can cause a short circuit. -
Do not use a damaged power cord or plug or a loose outlet. Doing so may result in fire or electric shock.
-
If the product contains or is delivered with a remote control containing coin / cell batteries: Warning:
-
“Do not ingest battery, Chemical Burn Hazard” or equivalent working.
● [The remote control supplied with] This product contains a coin / button cell battery is swallowed, it can cause severe internal burns in just 2 hours and can lead to death. - Keep new and used batteries away from children.
- If the battery compartment does not close securely, stop using the product and keep it away from children.
-
If you think batteries might have been swallowed or placed inside any part of the body, seek immediate medical attention.
-
Caution about the use of Batteries:
-
Danger of explosion if battery is incorrectly replaced. Replace only with the same or equivalent type.
- Battery cannot be subjected to high or low extreme temperatures, low air pressure at high altitude during use, storage or transportation.
- Replacement of a battery with an incorrect type that can result in an explosion or the leakage of flammable liquid or gas.
- Disposal of a battery into fire or a hot oven, or mechanically crushing or cutting of a battery, that can result in an explosion.
- Leaving a battery in an extremely high temperature surrounding environment that can result in an explosion or that leakage of flammable liquid or gas.
- A battery subjected to extremely low air pressure that may result in an explosion or the leakage of flammable liquid or gas.
- Attention should be drawn to the environmental aspects of battery disposal.
INSTALLATION
- Unpack all parts and remove protective material.
- Do not connect the unit to the mains before checking the mains voltage and before all other connections have been made.
WARNING
Class 1 Laser Product
CLASS 1 LASER PRODUCT APPAREIL À LASER DE CLASSE 1 PRODUCTO LASER DE CLASE 1
This product contains a low power laser device.
CAUTION INVISIBLE LASER RADIATION WHEN OPEN AND INTERLOCKS DEFEATED. AVOID EXPOSURE TO BEAM

Warning : Do not touch the lens.

WARNING: When participating in the traffic listening to a personal music player can make the listener less aware of potential dangers such as approaching cars.

WARNING: To prevent possible hearing damage, do not listen at high volume levels for long periods.
Power supply adaptor (For EU only)
Manufacturer: Mass Power Electronic Limited
Model number: S018-1A090150VE
Use only the power supply listed in the user instructions
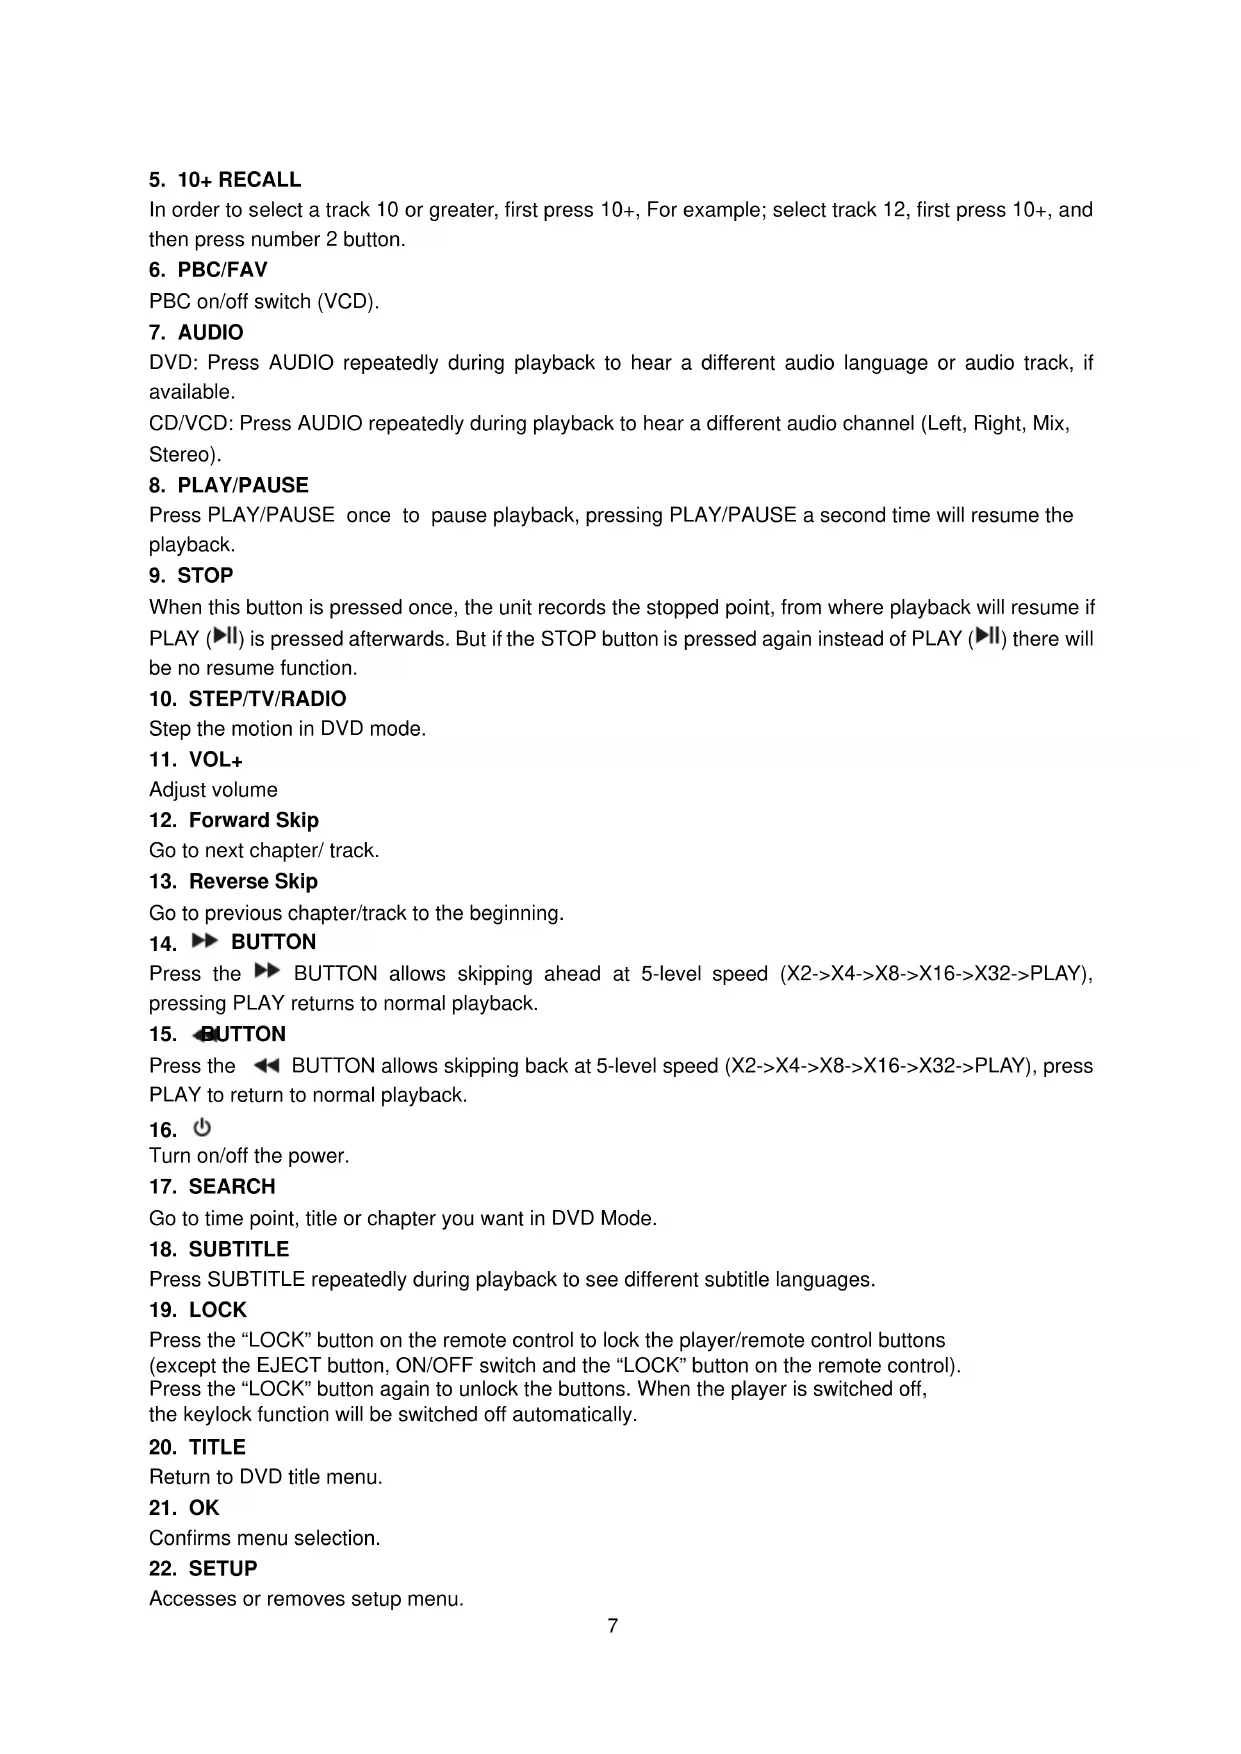
Identification of Controls
Main Unit
- PLAY/ PAUSE
- STOP
- SOURCE
- VOL-
- VOL+
- MENU
- ▲/▼/◄/► (up/down/right/left)
Select an item in the menu. OK key confirms menu selection.
when playing, VCD, DVD, if available:
right: next track
left: previous track
up: fast forward
down: fast reverse
-
OK
-
OPEN
-
SETUP
-
SD/MMC
-
USB
-
AV OUT
-
Earphone Socket
-
COAXIAL
-
ON/OFF
-
DC IN 9-12V
-
ANT
-
HDMI
-
Battery Charging Indicator
Illuminates green flashing when the battery is charging. Illuminates green when the battery is fully charged.
- Power Indicator
Illuminates red when the unit is switched on.
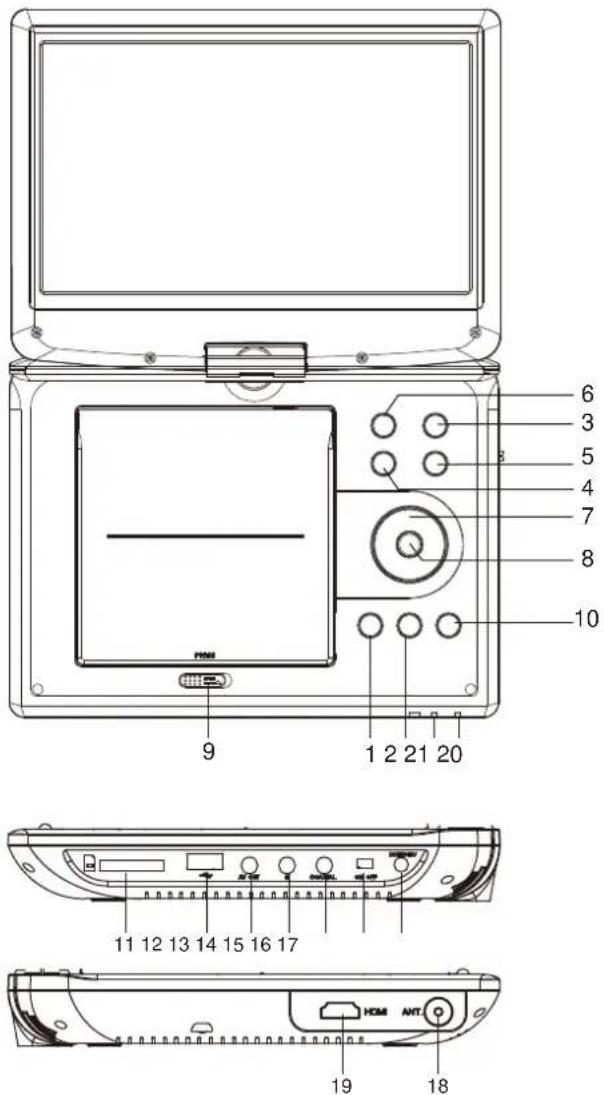
Identification of Controls
- SOURCE
DVD/CARD/USB.
- MUTE
Disable Audio output.
- 0-9 NUMBER BUTTON
Selects numbered items in a menu.
- INFO
To display the playtime and status information.
5. 10+ RECALL
In order to select a track 10 or greater, first press 10+, For example; select track 12, first press 10+, and then press number 2 button.
6. PBC/FAV
PBC on/off switch (VCD).
7. AUDIO
DVD: Press AUDIO repeatedly during playback to hear a different audio language or audio track, if available.
CD/VCD: Press AUDIO repeatedly during playback to hear a different audio channel (Left, Right, Mix, Stereo).
8. PLAY/PAUSE
Press PLAY/PAUSE once to pause playback, pressing PLAY/PAUSE a second time will resume the playback.
9. STOP
When this button is pressed once, the unit records the stopped point, from where playback will resume in PLAY (▶II) is pressed afterwards. But if the STOP button is pressed again instead of PLAY (▶II) there will be no resume function.
10. STEP/TV/RADIO
Step the motion in DVD mode.
11. VOL+
Adjust volume
12. Forward Skip
Go to next chapter/ track.
13. Reverse Skip
Go to previous chapter/track to the beginning.
14. ▶▶ BUTTON
Press the ▶ BUTTON allows skipping ahead at 5-level speed (X2->X4->X8->X16->X32->PLAY), pressing PLAY returns to normal playback.
15. BUTTON
Press the ◀ BUTTON allows skipping back at 5-level speed (X2->X4->X8->X16->X32->PLAY), press PLAY to return to normal playback.
16. ⏻
Turn on/off the power.
17. SEARCH
Go to time point, title or chapter you want in DVD Mode.
18. SUBTITLE
Press SUBTITLE repeatedly during playback to see different subtitle languages.
19. LOCK
Press the "LOCK" button on the remote control to lock the player/remote control buttons (except the EJECT button, ON/OFF switch and the "LOCK" button on the remote control). Press the "LOCK" button again to unlock the buttons. When the player is switched off, the keylock function will be switched off automatically.
20. TITLE
Return to DVD title menu.
21. OK
Confirms menu selection.
22. SETUP
Accesses or removes setup menu.
23. VOL-
Adjust volume
24. REPEAT
Press REPEAT during playback to select a desired repeat mode.
DVD: you can play select repeat chapter/title/all.
CD/VCD: you can select repeat track/all.
Mp3: you can select repeat shuffle/random/single/repeat one/repeat folder/folder.
25. SLOW
Press Slow repeatedly to enter slow playback, and cycle between different speeds. The speeds are 1/2, 1/4, 1/8, 1/16, and normal.
26. PROGRAM
DVD/VCD/CD: The program function enables you to store your favourite tracks from the disc. Press the PROGRAM button, then PROGRAM MENU will appear on screen, now you can use the number key to direct input the titles, chapters or tracks number and select PLAY option. TO resume normal playback, press PROGRAM and select clear program option on the program menu, press PROGRAM again to exit program menu, Mp3 has function Folder/File list.
27. ZOOM
DVD/VCD: Use ZOOM to enlarge or shrink the video image.
- Press ZOOM during playback or still playback to activate the Zoom function. The square frame appears briefly in the right bottom of the picture.
- Each press of the ZOOM button changes the TV screen in the following sequence:
2X size → 3X size → 4X size → 1/2 size → 1/3 size → 1/4size → normal size
JPEG: Use ZOOM to enlarge or shrink the picture.
- Press 'ZOOM'.
- Used " " to enlarge, or " " to shorten the picture.
Use the ▲▼◀▶ button to move through the zoomed picture.
28. RED/GREEN/YELLOW/BLUE KEY
Some specific function in DVB mode.
Mounting in the Vehicle
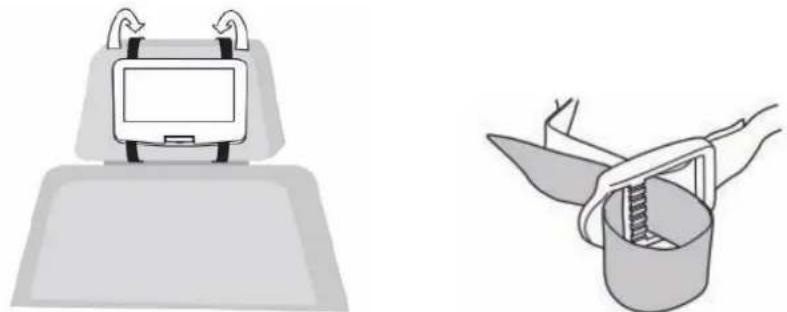
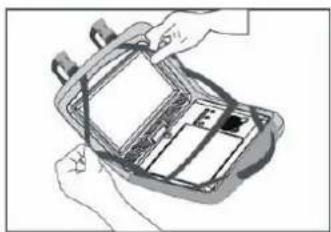
Use the supplied car mounting straps to install the DVD player on the back of the vehicle's headrests. Tightly wrap the mounting strap around the headrest.
- Slide the ends of the straps through the pin slots in the back of the DVD player.

natural_image
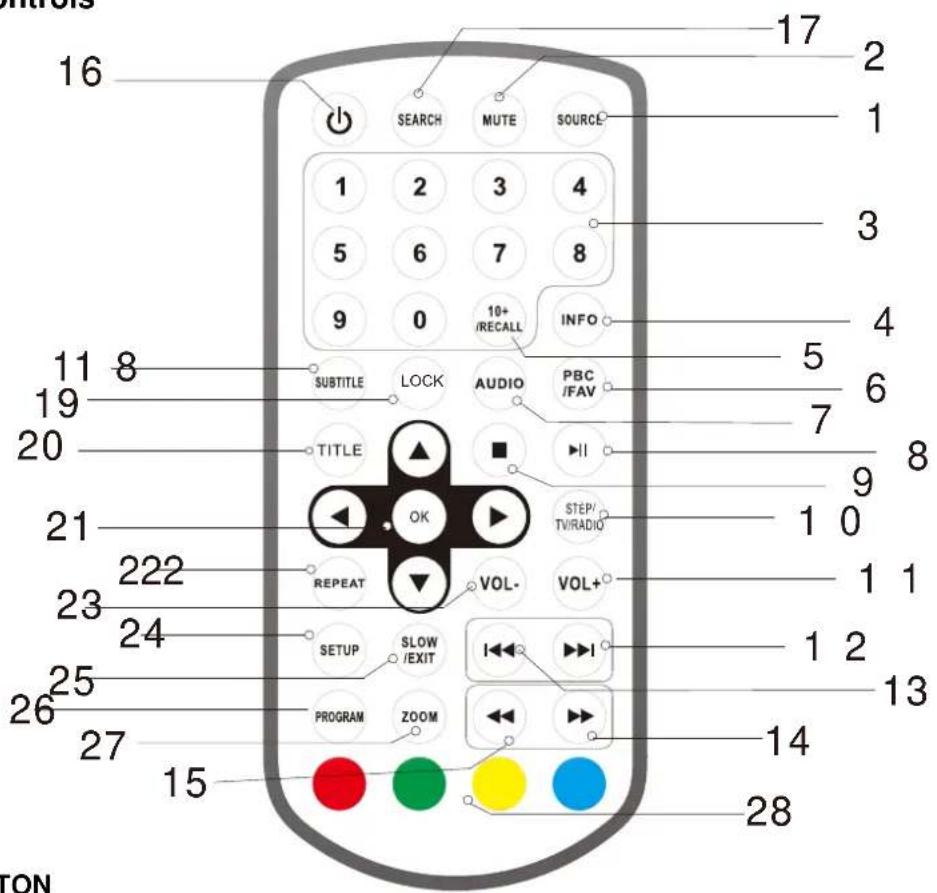
Three-step sequence showing a white electronic device with black straps, connected by arrows indicating assembly (no text or symbols visible)- Swivel the display 180^ clockwise and then fold it down with the display facing out.
flowchart
graph LR
    A["Computer"] -->|180° rotation| B["Table"]
    B --> C["Monitor"]
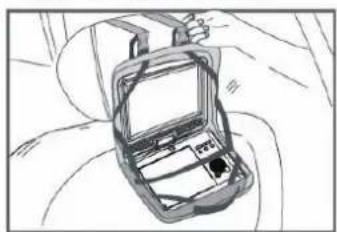
- Whilst one person holds the DVD player in place, pass the straps around the headrest. Secure the player by passing the ends of the straps through the clips and tightening them.
natural_image
Two technical illustrations: one showing a device with a handle, the other showing a bucket being lifted by a tool (no text or symbols present)Important: Always ensure the straps are tight before commencing any journey
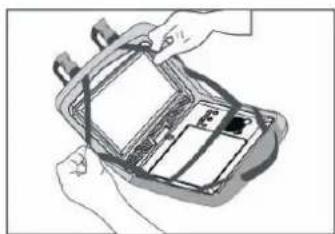
Mounting Bag
- Insert the unit into bag as shown
natural_image
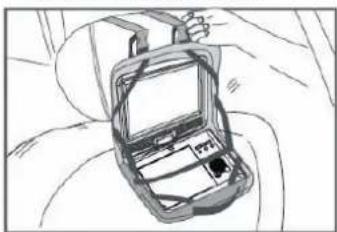
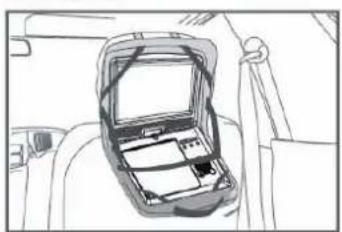
Illustration of hands installing or adjusting a device into a tray (no text or symbols visible)- Take straps and hook up the neck headrest of the seat as shown.
natural_image
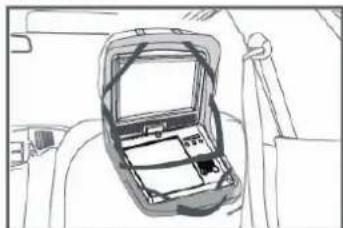
Line drawing of a car with a hand on top, showing no text or symbols- Adjust the straps tightly so that the unit is secured.
natural_image
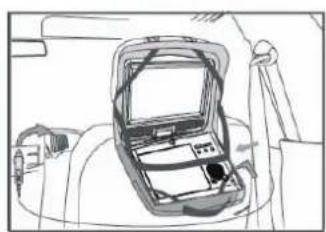
Top-down line drawing of a car interior showing dashboard and seatbelt (no text or symbols)- Connect the 12V car plug as shown.
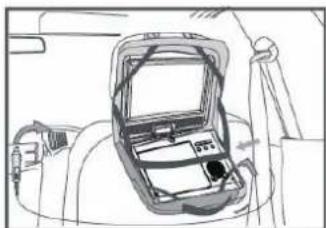
natural_image
Interior view of a car showing the dashboard and seat area (no text or symbols visible)CAUTION: Using other car plugs could damage the unit.
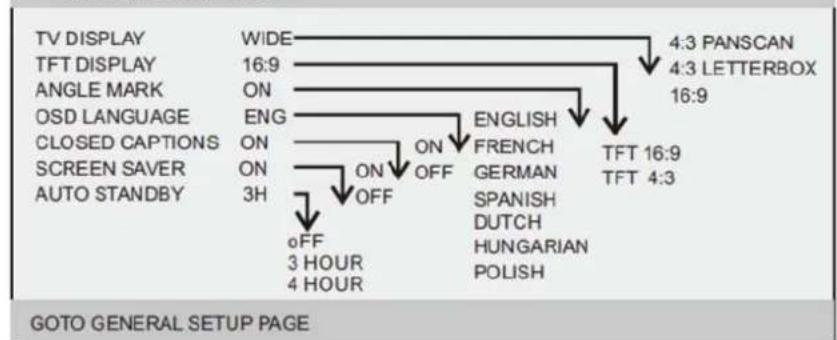
SETUP Menu Setting
General Setup Page
Press SETUP to get the setup menu. Use direction buttons ▲▼◀▶ to select the preferred item. After finishing the settings, press SETUP again to normal display.
The following menu items can be changed:
GENERAL: selects the GENERAL PAGE menu.
AUDIO: selects the AUDIO PAGE menu.
VIDEO: selects the VIDEO PAGE menu.
PREFERENCE: selects the PREFERENCE PAGE menu.
General Setup Page
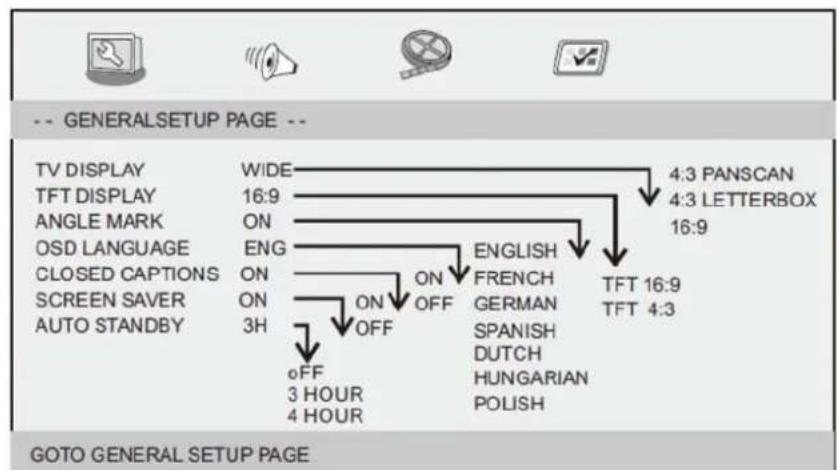
TV DISPLAY: selects the aspect ratio of the playback picture.
4:3 PANSCAN: if you have a normal TV and want both sides of the picture to be trimmed or formatted to fit your TV screen.
4:3 LETTERBOX: if you have a normal TV. In this case, a wide picture with black bands on the upper and lower portions of the TV screen will be displayed.
16:9: wide screen display.
TFT DISPLAY
Selects the aspect ratio during playback.
Angle Mark
Displays current angle setting information on the right hand corner of the TFT screen if available on the disc.
OSD Language
You can select your own preferred language settings.
Closed Captions
Closed captions are data that are hidden in the video signal of some discs. Before you select this function, please ensure that the disc contains closed captions information and your TV set also has this function.
Screen Saver
This function is used to turn the screen saver On or Off.
Auto Standby
This function is used to select auto standby settings after 3 or 4 hours.
3 HOURS: the unit will turn to standby mode after 3 hours if there is no interaction from user within this period of time.
4 HOURS: the unit will turn to standby mode after 4 hours if there is no interaction from user within this period of time.
OFF: the auto standby function is disabled, and unit will stay in "on" mode even if no interaction from user.
Audio Setup Page
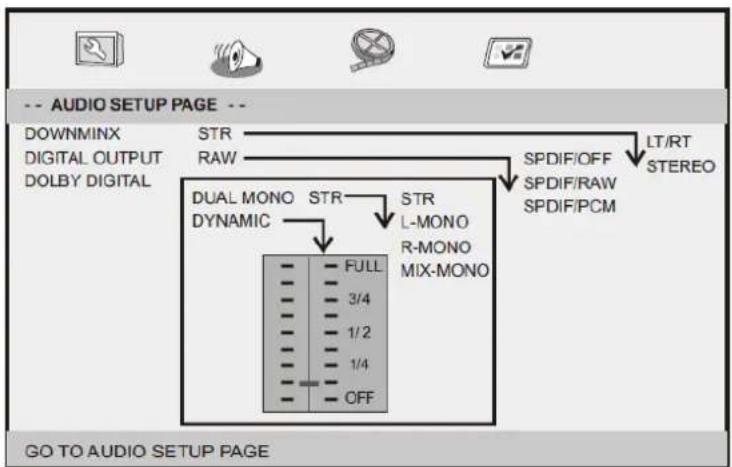
Downmix
This option allows you to set the stereo analog output of your DVD Player.
LT/RT: Select this option if your DVD Player is connected to a Dolby Pro Logic decoder.
Stereo: Select this option when output delivers sound from only the two front speakers.
Digital Output
The function is used to select the SPDIF Output: SPDIF Off, SPDIF/RAW, SPDIF/PCM.
SPDIF Off: Turns off the SPDIF output.
SPDIF/RAW: If you have connected your DIGITAL AUDIO OUT to a multi-channel decoder/receiver.
SPDIF/PCM: Only if your receiver is not capable of decoding multi-channel audio.
Dolby digital
The options included in Dolby Digital Setup are: 'Dual Mono' and 'Dynamic'.
Dual Mono
Stereo: The Left mono sound will send output signals to the Left speaker and the Right mono sound will send output signals to the Right speaker.
L-Mono: The Left mono sound will send output signals to the Left speaker and the Right speaker.
R-Mono: The Right mono sound will send output signals to the Left speaker and the Right speaker.
Mix-Mono: The Left and the Right mixed mono sound will send output signals to the Left and the Right speakers.
Dynamic
Dynamic range compression.
Video Setup Page
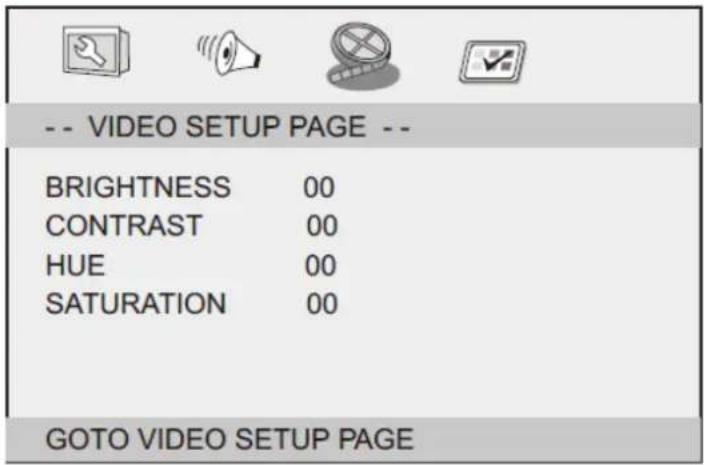
Brightness, Contrast, Hue, Saturation: setting the video quality.
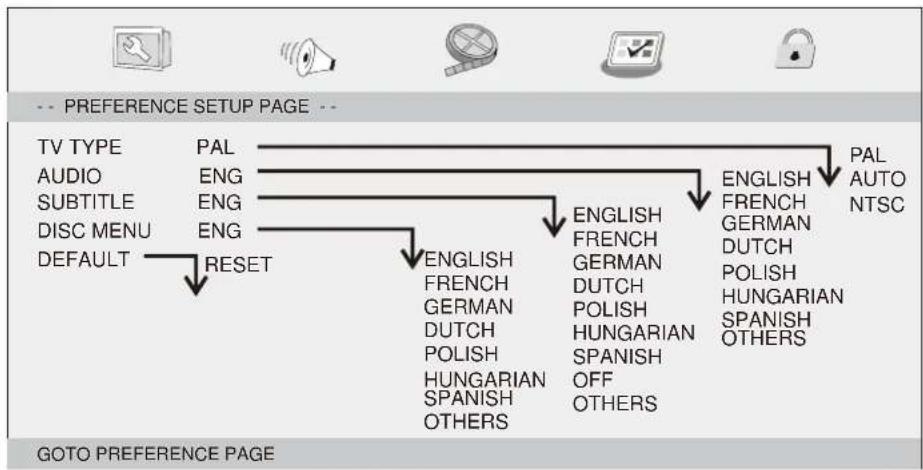
Preference Page
flowchart
graph TD
    A["TV TYPE"] --> B["PAL"]
    C["AUDIO"] --> D["ENG"]
    E["SUBTITLE"] --> F["ENG"]
    G["DISC MENU"] --> H["ENG"]
    I["DEFAULT"] --> J["RESET"]
    K["ENGLISH"] --> L["FRENCH"]
    K --> M["GERMAN"]
    K --> N["DUTCH"]
    K --> O["POLISH"]
    K --> P["HUNGARIAN"]
    K --> Q["SPANISH"]
    K --> R["OTHERS"]
    S["ENGLISH"] --> T["FRENCH"]
    S --> U["GERMAN"]
    S --> V["DUTCH"]
    S --> W["POLISH"]
    S --> X["HUNGARIAN"]
    S --> Y["SPANISH"]
    S --> Z["OTHERS"]
    AA["PAL AUTO NTSC"] --> AB["ENGLISH FRENCH"]
    AA --> AC["GERMAN DUTCH"]
    AA --> AD["POLISH"]
    AA --> AE["HUNGARIAN SPANISH OTHERS"]
TV Type
Selecting the colour system that corresponds to your TV when AV outputs. This DVD Player is compatible with both NTSC and PAL.
PAL - Select this if the connected TV is a PAL system. It will change the video signal of a NTSC disc and output in PAL format.
NTSC-Select this if the connected TV is an NTSC system. It will change the video signal of a PAL disc and output in NTSC format.
Auto: Change the video signal output automatically according to the playing disk format.
Audio: Selects a language for audio (if available).
Subtitle: Selects a language for subtitle (if available).
Disc Menu: Selects a language for disc menu (if available).
Default: Back to the factory setting.
Parameters and specifications Electronical parameters
| Item Standard requirement | ||
| Power requirements | : AC 100-240 V, 50/60 Hz | |
| Power consumption | :<12W | |
| Operating humidity | : 5 % to 90 % | |
| Output | VIDEO OUT | : 1 Vp-p (75Ω) |
| AUDIO OUT | : 1.4 Vrms (1 KHz, 0 dB) | |
| Audio | : Speaker: 1WX2, Headphones output | |
System
| Laser | :Semiconductor laser, wavelength 650 nm |
| Signal system | : NTSC / PAL |
| Frequency response | : 20Hz to 20 kHz(1dB) |
| Signal-to-noise ratio | :More than 80 dB (ANALOG OUT connectors only) |
| Dynamic range | :More than 85 dB (DVD/CD) |
Note: Design and specifications are subject to change without prior notice.
Battery Parameters
Battery Specifications:
Output: 7.4V
Charge/Discharge Time:
Standard charge time: 3h \~ 4h
Storage and work circumstances:
-
Storage circumstances Temperature Humidity
6 months -20°C\~+45°C 65±20%
1 week -20°C\~+45°C 65±20% -
Work circumstances Temperature Humidity
Standard charge 0°C\~+45°C 65±20%
Standard discharge -20°C\~+65°C 65±20%
First Time Installation
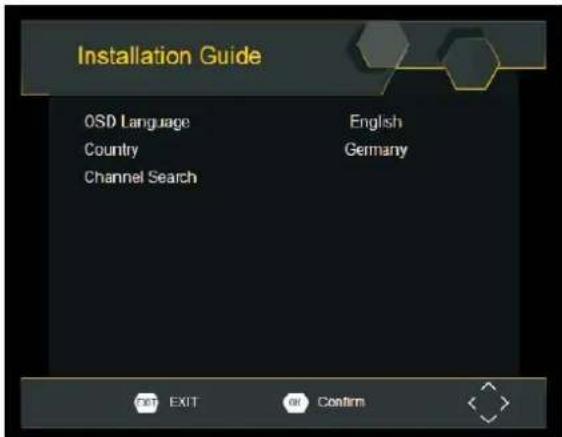
After all connections have been made properly, switch on TV and make sure the receiver is connected to the Main Power. Press Power button to switch receiver on. If you are using the receiver for the first time or restored to Factory Default, the Main Menu will appear on your TV screen.
(1) Select [OSD Language] and press RIGHT/LEFT key to select a language.
(2) Select [Country] and press RIGHT/LEFT key to select your country of residence.
(3) Select [Channel Search] and press RIGHT or OK key to begin Automatic channel search.
(4) Once channel tuning is complete, you are now ready to watch TV.
Basic Operation
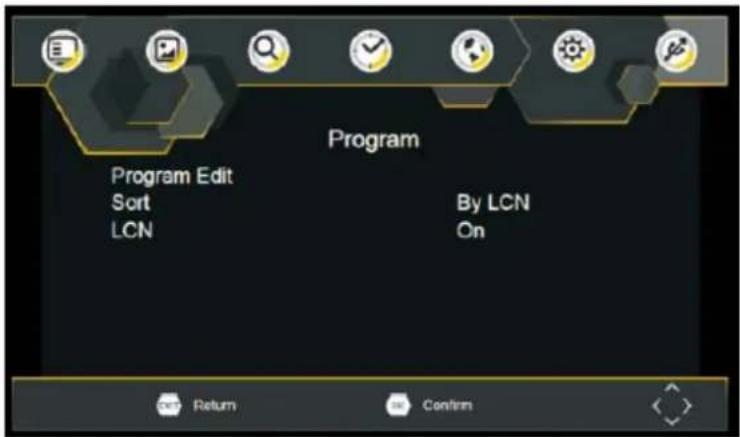
Program Manage Settings
To access the Menu, press the SETUP button and select [Program]. The Menu provides options to adjust the Program Manage Settings. Select an option and press OK or RIGHT to adjust that setting. Press the EXIT button to exit the Menu.
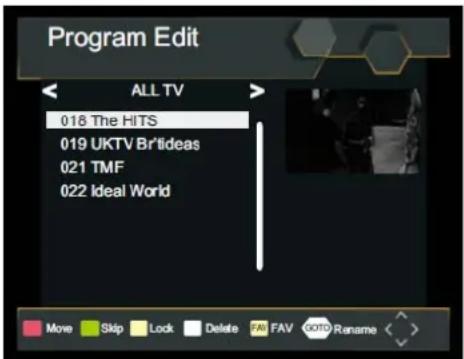
Program Edit
To edit your program preferences (lock, skip, favourite, move or delete), you will need to enter the Program Edit Menu. Password not required at first use, only after lock channel, you can enter the default password '000000' to access.
Set Favourite Program/s
You can create a shortlist of favourite programs that you can easily access. Set Favourite TV or Radio program:
- Select the preferred program then press the FAVOURITE button. A heart-shaped symbol will appear and the program is marked as a favourite.
- Repeat the previous step to select more Favourite programs.
- To confirm and exit the Menu, press the EXIT key.
Disable Favourite TV or Radio Program:
Press the FAV buton on the Remote Control with the heart-shaped symbol.
View Favourite Programs:
- Press the Fav button and the Favourite Menu will appear.
- Press UP/DOWN to select your Favourite Programs.
- Press OK to select your favourite program.
Delete a TV or Radio Program/s
- Select the Program and then press the BLUE button, A message will appear. Press OK to delete the program.
- Repeat the previous step to select more programs to delete.
Skip TV or Radio Program/s
- Select the program you would like to skip and press the GREEN button, A skip symbol is displayed. The program is marked as a skip.
- Repeat the previous step to select more programs.
- To confirm and exit the menu, press EXIT key.
Disable a skip TV or Radio Program:
Press the GREEN button on the skip program with the skip symbol.
Move a TV or Radio Program/s
- Select the preferred program then press the RED button. A move symbol will appear.
- Press UP/DOWN to move the program.
- Press OK to confirm.
- Repeat the above steps to move more channels.
Lock Program/s
You can lock selected programs for restricted view.
Lock a TV or Radio Program:
- Select the preferred program then press the YELLOW button. A lock-shaped symbol is displayed. The program is now marked as locked.
- Repeat the previous step to select more programs.
- To confirm and exit the menu, press the EXIT button.
- Press the YELLOW button to disable the locked program.
- To view the locked program, you will be required to enter either the default, or the modified Password. (refer to system settings "Set Password")
Sort
Sort your channels from the following options:
[LCN] - Sort the channels in ascending order.
[Name] - Sort the channels in alphabetical order.
[Service ID] - Sort the channels according to the station.
LCN (Logical channel number)
Set LCN on or off.
Video Setting
To access the Menu, press SETUP then select [Picture]. The Menu provides options to adjust the video settings. Press UP/DOWN to select an option and press RIGHT/LEFT to adjust that setting. Press EXIT to exit the menu.
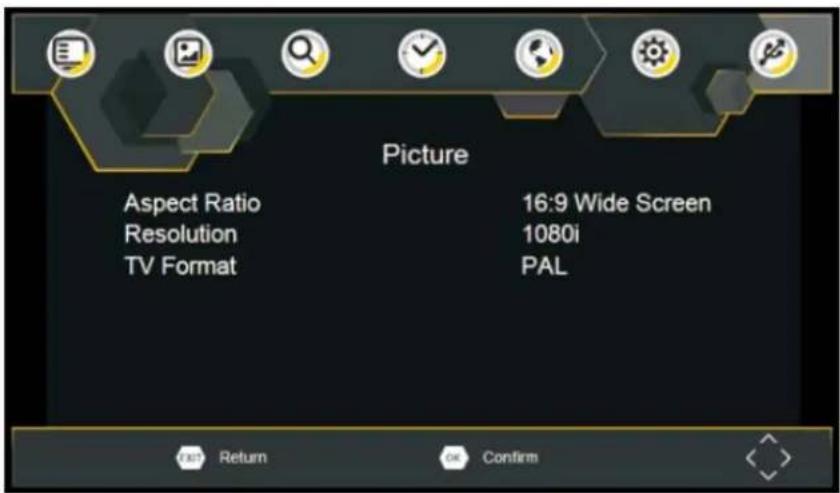
Aspect Ratio
You must set the display format to either 4:3 PanScan, 4:3 Letter Box, 4:3 Full, 16:9 Wide Screen, 16:9 PillarBox or Auto to get the maximum display when watching TV.
Resolution
If the video does not appear correctly, change the setting. This setting is to match the most common setting for HDMI.
[576i] for PAL system TV.
[576P]: for PAL system TV.
[720P]: for NTSC or PAL system TV.
[1080I]: for NTSC or PAL system TV.
[1080P]: for NTSC or PAL system TV.
TV format
If the video does not appear correctly, you need to change the settings. This should match the most common setting for TVs in your country.
[NTSC]: for NTSC system TV.
[PAL]: for PAL system TV.
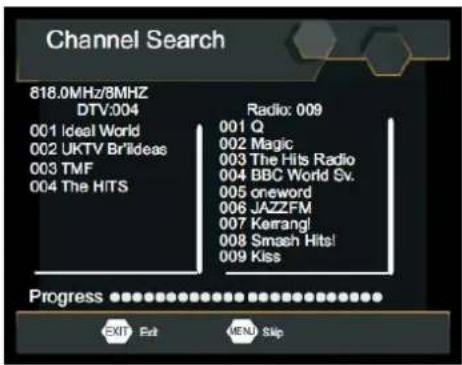
Channel Search
To access the menu, press SETUP and select [Search Channel]. The Menu provides options to adjust the Search Channel settings. Select an option and press RIGHT/LEFT to adjust the settings. Press EXIT to exit the Menu.
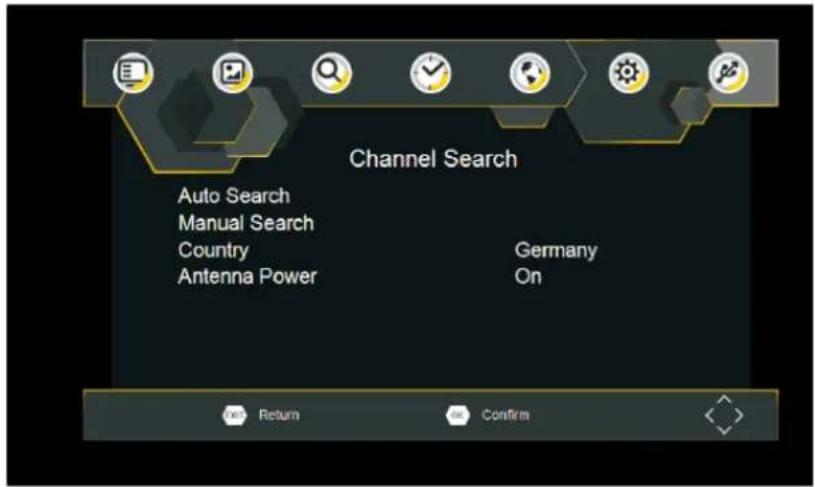
Auto Search
Search and install all channels automatically. This option overwrites all preset channels.
-
Select [Auto Search] and press OK or RIGHT to start channel search.
-
To cancel channel search, press EXIT.
Manual Search
Install new channels manually. This option adds new channels without changing the current channels list.
- Select [Manual Search] then press OK or RIGHT. The channel search screen will appear.
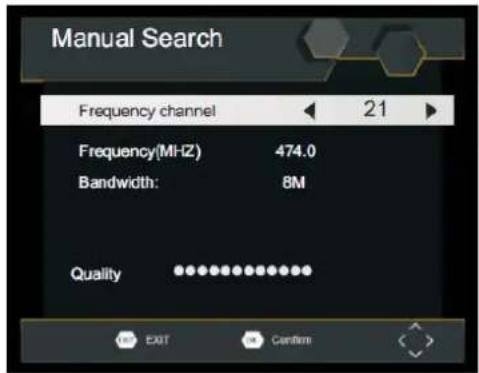
- Press the RIGHT/LEFT key to select the channel frequency.
- Press OK to start searching channels.
If a channel is found, it is saved and added to the channels list. If channels can't be found, then exit the menu.
Country
Select your country of residence.
Antenna Power
Supply Power to Antenna.
Time Setting
To access the Menu, press MENU then select [Time]. The Menu provides options to adjust the time settings. Press UP/DOWN to select an option and press RIGHT/LEFT to adjust the settings. Press EXIT to exit the menu.

Time offset
Select auto or manual for GMT offset adjustments.
Country Region
Country Region is set automatically when you set the country at channel search menu.
Time Zone
Select the Time Zone Offset when [Time Offset] is set to Manual.
Option
To access the Menu, press SETUP and select [Option]. The menu provides options to adjust the OSD Language, Subtitle Language and Audio Language. Select an option and press RIGHT/LEFT to adjust the setting. Press EXIT to exit The Menu.
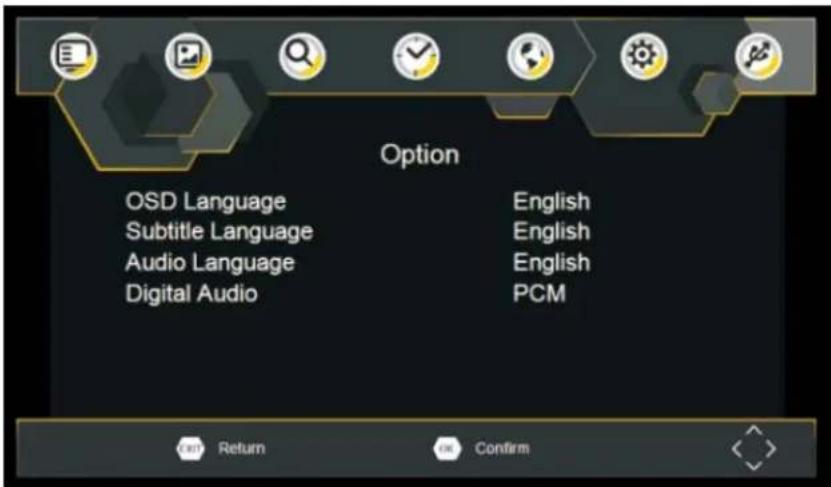
OSD Language
Select an OSD language.
Audio Language
Select the preferred audio language for watching TV channels. If the language is not available, the default program language will be used.
Subtitle Language
Select the preferred subtitle language.
Digital Audio
Set the desired audio format at the HDMI slot: PCM, Raw HDIM On, Raw HDMI Off, Off (if available).
System Setting
To access the Menu, press SETUP and select [System]. The menu Provides options to adjust the system settings. Press the UP/DOWN key to select an option and press RIGHT/LEFT to adjust the setting. Press EXIT to exit the Menu.
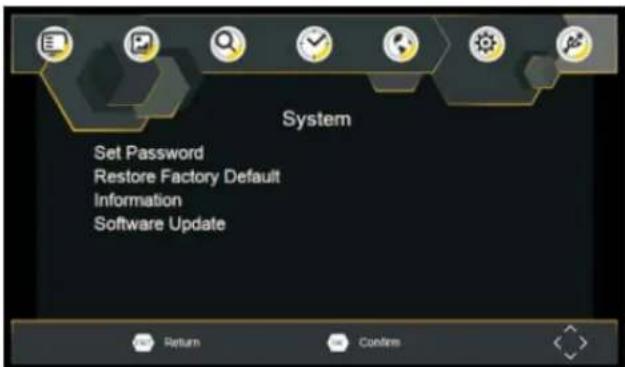
Set Password
Set or change the password for Locked programs. Enter your old Password or the default password '000000'. You will then be asked to enter your new password. To confirm re-enter your new password. Once it is confirmed, press EXIT to exit the Menu.
Master password '888888'
Reset your Set Top Box to the Default Factory Settings. In Main Menu select [Restore Factory Default] and press OK or RIGHT to select. Enter your password or the default password '000000' and press OK to confirm. This option will delete all preset channels and settings.
Information
View model, hardware and software information.
Software update
Software update
USB
To access the Menu, press the SETUP button and select USB.
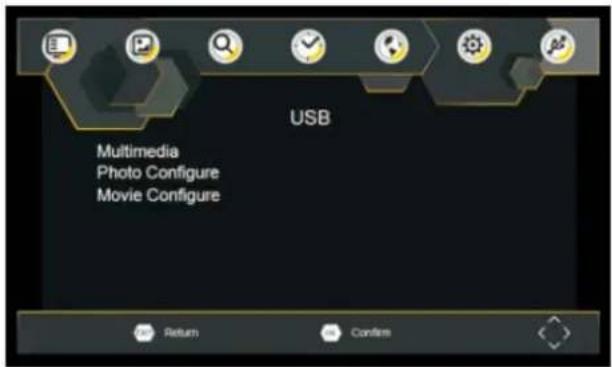
Multimedia
Switch to USB mode and plug in USB to view files.
Photo Configure
Set the parameters for viewing photographs.
Movie Configure
Set the parameters for displaying movie subtitles.
Technical Specifications
| Item | Sub Item | Parameter |
| Tuner | Input Frequency | 170~230MHz470~860MHz |
| RF Input level | -79dBm(T), -75dBm(T2) | |
| IF Bandwidth 7MHz and 8MHz | ||
| Modulation | QPSK, 16QAM, 64QAM, 128QAM(T2), 256QAM(T2) | |
| Video | Decoder Format | MPEG4 AVC/H.264 HP@L4HEVC/H.265 HT@L4MPEG2 MP@ML.HL |
| Output Format 480i, 480p,576i, 576P, 720P, 1080i, 1080P, 4:3 and 16:9 | ||
| Output Port HDMI | ||
Troubleshooting
| Problem Potential Reasons What to do | ||
| No picture Power isn't connected Connect the power | ||
| The power switch is not on Switch on the power | ||
| Screen shows “No Signal” | DVB-T cable not connected Plug in the DVB-T cable | |
| Incorrect setting | Reset setting | |
| No sound from speaker | Sound on mute Turn off mute function | |
| Incorrect sound track | Try another sound track | |
| Only sound, no image on the screen | No or incorrect connection with AV cable | Make sure cables are connected correctly |
| The program is a radio program | Presskey to shift into TV mode | |
| Remote Control is not responding | The battery is exhausted | Change battery |
| Remote Control is not facing or close enough to the Set Top Box | Adjust the position of the Remote Control and move closer to the unit | |
| The image stopped suddenly or mosaic | The signal is too weak | Strengthen the signal |
Remark about reception of HD channels: the reception of HD DVB-T channels requires a better signal than normal SD quality channels. For that reason the TV should be positioned at places where the reception quality is higher. If the reception is not strong enough, the image of HD channels can be interrupted or from bad quality.
Important remarks for the reception of the TV channels :
- The base of the antenna is magnetic; for a better reception of the TV signal, if available, put the base of the antenna on a metallic surface like the bodywork of a car, a fridge, a heating...
- The DVP-1064 can only receive non encrypted free TV channels.
1. Guarantee
Lenco offers service and warranty in accordance to European law, which means that in case of repairs (both during and after the warranty period) you should contact your local dealer.
Important note: It is not possible to send products that need repairs to Lenco directly.
Important note: If this unit is opened or accessed by a non-official service center in any way, the warranty expires.
This device is not suitable for professional use. In case of professional use, all warranty obligations of the manufacturer will be voided.
2. Disclaimer
Updates to Firmware and/or hardware components are made regularly. Therefore some of the instruction, specifications and pictures in this documentation may differ slightly from your particular situation. All items described in this guide for illustration purposes only and may not apply to particular situation. No legal right or entitlements may be obtained from the description made in this manual.
3. Disposal of the Old Device

natural_image
Symbol of a trash bin crossed out by two crossed lines, with a solid black rectangle below (no text or labels)This symbol indicates that the relevant electrical product or battery should not be disposed of as general household waste in Europe. To ensure the correct waste treatment of the product and battery, please dispose them in accordance to any applicable local laws of requirement for disposal of electrical equipment or batteries. In so doing, you will help to conserve natural resources and improve standards of environmental protection in treatment and disposal of electrical waste (Waste Electrical and Electronic Equipment Directive).
4. CE Marking
Hereby, Lenco Benelux B.V., Thermiekstraat 1a, 6361 HB Nuth, The Netherlands, declares that this product is in compliance with the essential EU directive requirements.
The declaration of conformity may be consulted via techdoc@commaxxgroup.com

5. Service
For more information and helpdesk support, please visit www.lenco.com
Lenco Benelux BV, Thermiekstraat 1a, 6361 HB, The Netherlands.
Nederlands
LET OP:
natural_image
Warning symbol with black triangular background and central sunburst pattern (no text)natural_image
Three-step sequence showing a white electronic device with black straps, connected by arrows (no text or symbols visible)flowchart
graph LR
    A["Computer with 180° rotation"] --> B["Computer with 180° rotation"]
    B --> C["Computer with 180° rotation"]
natural_image
Two grayscale illustrations: one showing a device with a handle, the other showing a bucket being lifted by a tool (no text or symbols)natural_image
Illustration of hands installing or adjusting a device inside a container (no text or symbols visible)natural_image
Top-down line drawing of a car interior with no visible text or symbolsnatural_image
Top-down line drawing of a car interior showing the dashboard and seat area (no text or symbols)natural_image
Top-down line drawing of a car interior showing dashboard and seat area (no text or symbols)natural_image
Four icons representing computer, speaker, film reel, and checkmark (no text or symbols)GENERALSETUP PAGE --

flowchart
graph TD
    A["TV DISPLAY"] --> B["WIDE"]
    C["TFT DISPLAY"] --> D["16:9 ON"]
    E["ANGLE MARK"] --> F["ENG"]
    G["OSD LANGUAGE"] --> H["ON"]
    I["CLOSED CAPTIONS"] --> J["ON"]
    K["SCREEN SAVER"] --> L["ON"]
    M["AUTO STANDBY"] --> N["3H"]
    O["OFF 3 HOUR 4 HOUR"] --> P["ON OFF"]
    Q["ON OFF"] --> R["ON OFF"]
    S["ENGLISH FRENCH GERMAN SPANISH DUTCH HUNGARIAN POLISH"] --> T["TFT 16:9 TFT 4:3"]
    U["4:3 PANSCAN 4:3 LETTERBOX 16:9"] --> V["4:3 PANSCAN"]
TFT DISPLAY (TFT-SCHERM)
OSD Language (OSD Taal)
U kunt uw eigen gewenste taalinstellingen selecteren.
Closed Captions (Ondertitels)
Program Edit (Programma bewerken)
Resolution (Resolutie)
OSD Language (OSD Taal)
natural_image
Simple line drawing of a trash bin with crossed lines indicating no waste or discharge (no text or symbols)
natural_image
Warning symbol with black triangle and radiating lines, no text or numbers presentnatural_image
Sequence of three images showing a white electronic device with black straps, connected by arrows indicating motion (no text or symbols visible)flowchart
graph LR
    A["Computer with 180° rotation"] --> B["Device with rotation arrow"]
    B --> C["Monitor"]
natural_image
Simple line drawing of a computer monitor with scroll arrows on top (no text or symbols)
natural_image
Illustration of a hand pouring liquid into a container with a handle (no text or symbols)natural_image
Illustration of hands installing or adjusting a device into a tray (no text or symbols visible)natural_image
Line drawing of a car interior with open trunk and roof, no text or symbols presentnatural_image
Line drawing of a car interior showing the dashboard and seat area (no text or symbols)natural_image
Line drawing of a car interior frame with no visible text or symbolsACHTUNG
Programm bearbeiten
Time Zone (Zeitzone)
OSD Language (OSD-Sprache)
natural_image
Simple line drawing of a trash bin with crossed lines indicating no waste or prohibition (no text or symbols)
natural_image
Warning symbol with black triangular background and central explosion-like pattern (no text)natural_image
Three-step sequence showing a white electronic device with black straps, connected by arrows (no text or symbols visible)flowchart
graph LR
    A["Computer with 180° rotation"] --> B["Table with 180° rotation"]
    B --> C["Computer"]
natural_image
Two grayscale illustrations: one showing a device with a handle, the other showing a bucket being lifted by a hand (no text or symbols)- Insert the unit into bag as shown.
natural_image
Illustration of hands holding a device with a tray and internal compartments (no text or symbols visible)- Take straps and hook up the neck headrest of the seat as shown.
natural_image
Line drawing of a car interior with open trunk and seat, no text or symbols present- Adjust the straps tightly so that the unit is secured.
natural_image
Line drawing of a car interior showing the rear compartment with open trunk and seat (no text or symbols)- Connect the 12V car plug as shown.
natural_image
Line drawing of a car interior showing dashboard, steering wheel, and seatbelt (no text or symbols)CAUTION: Using other car plugs could damage the unit.
Menu configuration
Page Configuration Générale
natural_image
Four icons representing computer, speaker, film reel, and checkmark (no text or symbols)GENERALSETUP PAGE --
flowchart
graph TD
    A["TV DISPLAY"] --> B["WIDE"]
    C["TFT DISPLAY"] --> D["16:9 ON"]
    E["ANGLE MARK"] --> F["ENG"]
    G["OSD LANGUAGE"] --> H["ON"]
    I["CLOSED CAPTIONS"] --> J["ON"]
    K["SCREEN SAVER"] --> L["ON"]
    M["AUTO STANDBY"] --> N["3H"]
    O["OFF"] --> P["3 HOUR"]
    O --> Q["4 HOUR"]
    R["ON/OFF"] --> S["OFF"]
    T["ENGLISH"] --> U["FRENCH"]
    V["GERMAN"] --> W["SPANISH"]
    X["HUNGARIAN"] --> Y["HUTCH"]
    Z["ON/OFF"] --> AA["ON/OFF"]
    AB["ON/OFF"] --> AC["ON/OFF"]
    AD["ON/OFF"] --> AE["ON/OFF"]
    AF["ON/OFF"] --> AG["ON/OFF"]
    AH["ON/OFF"] --> AI["ON/OFF"]
    AJ["ON/OFF"] --> AK["ON/OFF"]
    AL["ON/OFF"] --> AM["ON/OFF"]
    AN["ON/OFF"] --> AO["ON/OFF"]
    AP["ON/OFF"] --> AQ["ON/OFF"]
    AR["ON/OFF"] --> AS["ON/OFF"]
    AT["4:3 PANSCAN"] --> AU["4:3 LETTERBOX"]
    AV["TFT 16:9"] --> AW["TFT 4:3"]
Modif. prog.
Time offset (Décal. hor.)
OSD Language (Langue OSD)
natural_image
Simple line drawing of a trash bin with crossed lines indicating no waste or discharge (no text or symbols)natural_image
Warning symbol with black triangular background and central explosion (no text or numbers)natural_image
Three-step sequence showing a white electronic device with black straps, connected by arrows indicating transformation (no text or symbols visible)flowchart
graph LR
    A["Computer with 180° rotation"] --> B["Computer with 180° rotation"]
    B --> C["Computer with 180° rotation"]
natural_image
Two grayscale illustrations: one showing a device with a handle, the other showing a bucket being inserted into a container (no text or symbols)natural_image
Illustration of hands installing or adjusting a device inside a tray (no text or symbols visible)natural_image
Top-down line drawing of a car with visible dashboard and seat, no text or symbols presentnatural_image
Top-down line drawing of a car interior showing the rear compartment with internal compartments (no text or symbols)natural_image
Top-down line drawing of a car interior showing the dashboard and seat area (no text or symbols)ATENCIÓN:
Dual Mono (Mono dual)
Edit prog
Fije LCN en on u off.
Time offset (Fin hora)
natural_image
Simple line drawing of a trash bin with crossed lines indicating no waste or discharge (no text or symbols)
- Index
- English
- CAUTION:
- KEEP THESE INSTRUCTIONS IN MIND:
- INSTALLATION
- WARNING
- Class 1 Laser Product
- Identification of Controls
- Main Unit
- 10+ RECALL
- PBC/FAV
- AUDIO
- PLAY/PAUSE
- STOP
- STEP/TV/RADIO
- VOL+
- Forward Skip
- Reverse Skip
- ▶▶ BUTTON
- BUTTON
- ⏻
- SEARCH
- SUBTITLE
- LOCK
- TITLE
- OK
- SETUP
- VOL-
- REPEAT
- SLOW
- PROGRAM
- ZOOM
- RED/GREEN/YELLOW/BLUE KEY
- Mounting in the Vehicle
- Mounting Bag
- SETUP Menu Setting
- General Setup Page
- TFT DISPLAY
- Angle Mark
- OSD Language
- Closed Captions
- Screen Saver
- Auto Standby
- Audio Setup Page
- Downmix
- Digital Output
- Dolby digital
- Dual Mono
- Dynamic
- TV Type
- Parameters and specifications Electronical parameters
- Basic Operation
- Program Manage Settings
- Program Edit
- Set Favourite Program/s
- Delete a TV or Radio Program/s
- Skip TV or Radio Program/s
- Move a TV or Radio Program/s
- Lock Program/s
- Sort
- LCN (Logical channel number)
- Video Setting
- Aspect Ratio
- Resolution
- TV format
- Channel Search
- Auto Search
- Manual Search
- Country
- Antenna Power
- Time Setting
- Time offset
- Country Region
- Time Zone
- Option
- Audio Language
- Subtitle Language
- Digital Audio
- System Setting
- Set Password
- Information
- Software update
- USB
- Multimedia
- Photo Configure
- Movie Configure
- Guarantee
- Disclaimer
- Disposal of the Old Device
- CE Marking
- Service
- Nederlands
- LET OP:
- TFT DISPLAY (TFT-SCHERM)
- OSD Language (OSD Taal)
- Closed Captions (Ondertitels)
- Program Edit (Programma bewerken)
- Resolution (Resolutie)
- Programm bearbeiten
- Time Zone (Zeitzone)
- OSD Language (OSD-Sprache)
- Menu configuration
- Page Configuration Générale
- Modif. prog.
- Time offset (Décal. hor.)
- OSD Language (Langue OSD)
- Dual Mono (Mono dual)
- Edit prog
- Time offset (Fin hora)
Brand : LENCO
Model : DVP1064
Category : Portable DVD Player