
ClipHit - Battery KORG - Free user manual and instructions
Find the device manual for free ClipHit KORG in PDF.

| Product Type | Portable Electronic Drum Kit (Clip Drum Kit) |
| Brand | Korg |
| Model | ClipHit |
| Power Supply | 4 AA alkaline batteries (included) or DC 9V power adapter (optional) |
| Battery Life | Approximately 6 hours (depending on batteries and usage) |
| Dimensions (W x D x H) | 163 x 173 x 101 mm |
| Weight | 453 g (without batteries) |
| Built-in Speaker | 2 W, 3 inches |
| Clip Inputs | 3 jacks (CLIP 1, CLIP 2, CLIP 3) for sensor clips |
| Pedal Inputs | 2 jacks (PEDAL 1, PEDAL 2) for footswitch |
| Auxiliary Audio Input | AUX IN jack (3.5 mm stereo mini jack) |
| Headphone Output | Headphone jack (3.5 mm stereo mini jack) |
| Controls | 4 LEVEL controls (CLIP 1-3, PEDAL 1), VOLUME control, SOUND selector, power switch |
| Sound Selection | Multiple preset drum kits (select by dial) |
| Auto Power-Off Function | Yes, after approximately 30 minutes of inactivity (can be disabled) |
| Included Accessories | 3 sensor clips (jaw width 30 mm, cables 1.5 m), 1 footswitch pedal (cable 1.6 m), 4 AA batteries, user manual |
| Available Options | DC 9V power adapter, additional PS-3 footswitch |
| Maintenance | Clean with a dry cloth; do not use liquids or flammable products |
| Precautions | Avoid exposure to sunlight, moisture, dust, vibrations, and magnetic fields |
| Warranty | Valid only in the country of purchase; keep the receipt |
Frequently Asked Questions - ClipHit KORG
User questions about ClipHit KORG
0 question about this device. Answer the ones you know or ask your own.
Ask a new question about this device
Download the instructions for your Battery in PDF format for free! Find your manual ClipHit - KORG and take your electronic device back in hand. On this page are published all the documents necessary for the use of your device. ClipHit by KORG.
USER MANUAL ClipHit KORG
ENGLISH Owner's Manaul. 3
Precautions. 3
Parts and their functions. 4
Installing batteries.. 6
Connections. 6
Turning the power on/off. 7
Performing. 7
Specifications. 8
Functions of a pedal connected to the PEDAL 2 jack (^*1)
| DRUM KIT | PEDAL 2 ON/OFF switches between sounds (*2) | PEDAL 2 ON/OFF switches between sounds (*3) | PEDAL 2 adjusts the volume (*4) | ||
| CLIP 1 | CLIP 2 | CLIP 3 | |||
| STANDARD 1 | CLOSED/OPEN | ||||
| STANDARD 2 | HI-HAT | - | - | PEDAL HH-HAT | Linked with CLIP 1 (*5) |
| STANDARD 3 | |||||
| ROCK 1 | CLOSED/OPEN | PEDAL HH-HAT | Linked with CLIP 1 (*5) | ||
| ROCK 2 | HI-HAT | - | - | ||
| ROCK 3 | - | KICK | Linked with PEDAL 1 (*6) | ||
| POP 1 | CLOSED/OPEN | ||||
| POP 2 | HI-HAT | - | - | PEDAL HH-HAT | Linked with CLIP 1 |
| POP 3 | |||||
| PERCUSSION | COWBELL/TIMBALE | CONGA HI MUTE/OPEN | CONGA LOW MUTE/OPEN | X | - |
| EFX | - | - | - | CAT | Linked with CLIP 1 |
- : No change (disabled) X: Does not sound (*7)
1 Fr: Fonctions de la pedale branchée à la prise PEDAL 2
De: Funktionen eines an die PEDAL
2-Buchs angeschlossenen Pedals
Es: Funciones de un pedal conectado a jack PEDAL 2
2 Fr: La fonction ON/OFF de la pedale branchée à PEDAL 2 permet d'alterner entre les sons
De: PEDAL 2 ON/OFF schaltet zwischen Sounds um
Es: PEDAL 2 ON/OFF cambia entre sonidos
ENGLISH Owner's Manaul
Thank you for purchasing the Korg CLIPHIT Clip Drum Kit. With CLIPHIT, you can attach the included clips (with built-in sensors) to familiar objects and use them as a drum kit.
To help you get the most out of your new instrument, please read this manual carefully.
Precautions
Location
Using the unit in the following locations can result in a malfunction.
In direct sunlight
- Locations of extreme temperature or humidity
- Excessively dusty or dirty locations
- Locations of excessive vibration
- Close to magnetic fields
Power supply
Please connect the designated AC adapter to an AC outlet of the correct voltage. Do not connect it to an AC outlet of voltage other than that for which your unit is intended.
Interference with other electrical devices
Radios and televisions placed nearby may experience reception interference. Operate this unit at a suitable distance from radios and televisions.
Handling
To avoid breakage, do not apply excessive force to the switches or controls.
Care
If the exterior becomes dirty, wipe it with a clean, dry cloth. Do not use liquid cleaners such as benzene or thinner, or cleaning compounds or flammable polishes.
Keep this manual
After reading this manual, please keep it for later reference.
Keeping foreign matter out of your equipment
Never set any container with liquid in it near this equipment. If liquid gets into the equipment, it could cause a breakdown, fire, or electrical shock. Be careful not to let metal objects get into the equipment. If something does slip into the equipment, unplug the AC adapter from the wall outlet. Then contact your nearest Korg dealer or the store where the equipment was purchased.
THE FCC REGULATION WARNING (for USA)
NOTE: This equipment has been tested and found to comply with the limits for a Class B digital device, pursuant to Part 15 of the FCC Rules. These limits are designed to provide reasonable protection against harmful interference in a residential installation. This equipment generates, uses, and can radiate radio frequency energy and, if not installed and used in accordance with the instructions, may cause harmful interference to radio communications. However, there is no guarantee that interference will not occur in a particular installation. If this equipment does cause harmful interference to radio or television reception, which can be determined by turning the equipment off and on, the user is encouraged to try to correct the interference by one or more of the following measures:
Reorient or relocate the receiving antenna.
- Increase the separation between the equipment and receiver.
- Connect the equipment into an outlet on a circuit different from that to which the receiver is connected.
- Consult the dealer or an experienced radio/TV technician for help.
If items such as cables are included with this equipment, you must use those included items.
Unauthorized changes or modification to this system can void the user's authority to operate this equipment.

Notice regarding disposal (EU only)
When this "crossed-out wheeled bin" symbol is displayed on the product, owner's manual, battery, or battery package, it signifies that when you wish to dispose of this product, manual, package or battery

you must do so in an approved manner. Do not discard this product, manual, package or battery along with ordinary household waste. Disposing in the correct manner will
prevent harm to human health and potential damage to the environment. Since the correct method of disposal will depend on the applicable laws and regulations in your locality, please contact your local administrative body for details. If the battery contains heavy metals in excess of the regulated amount, a chemical symbol is displayed below the "crossed-out wheeled bin" symbol on the battery or battery package.
Parts and their functions
1. Clip input jacks:
CLIP 1, CLIP 2, CLIP 3
Connect the included clips here. From the left, these are the CLIP 1, CLIP 2, and CLIP 3 jacks. For more details on the sounds played by each clip, refer to the "Drum Kit List."
2. Pedal input jack: PEDAL 1
3. Pedal input jack: PEDAL 2
Connect the included or optional (separately sold) pedal switches here. The PEDAL 1 jack is used mainly to play the bass drum; the PEDAL 2 jack is used mainly to switch the hi-hat between open and closed. Please refer to the "Drum Kit List" for more information.
Nothing other than the included or optional clips or pedal switches can be connected to the jacks described above.
4. LEVEL dials:
CLIP 1, CLIP 2, CLIP 3, PEDAL 1
These adjust the volume of each instrumental part in the drum kit.
Note The volume adjustment of the PEDAL 2 jack differs depending on the drum kit that's selected. Refer to the "Functions of a pedal connected to the PEDAL 2 jack" section for more information.
5. VOLUME knob
This adjusts the volume of all instrumental parts.

You can't adjust the volume from the AUX IN jack.
6. Sound selector
This selects a drum kit. Selecting a drum kit changes the sound of each instrumental part. Refer to the "Drum Kit List" for additional information.
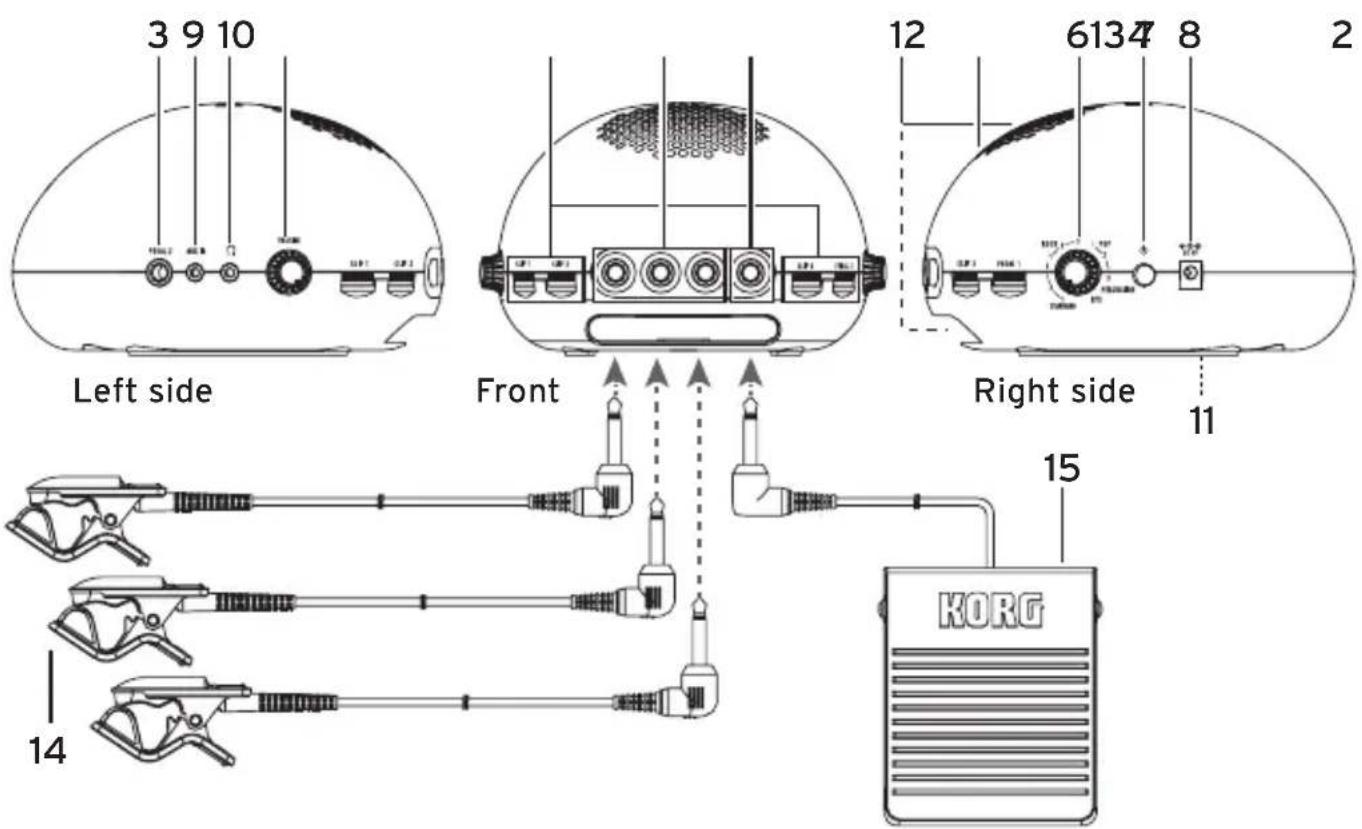
7. Power button
This turns the power on. Long-press the button to turn the power on/off. When the power is on, the power indicator in the speaker area will be lit up. Refer to "Turning the power on/off" for more information.
8. DC 9V jack
If you're using an AC adapter, connect the optional (separately sold) AC adapter to this DC 9V jack and connect the other side to an electrical outlet.
Be sure that the power is off before you connect the AC adapter.
Use only the specified AC adapter.
9. AUX IN jack
Connect a stereo mini-phone plug here. This lets you add input sound from an audio player or other source device. Use this jack when you want to perform along with the audio input. Adjust the volume on the audio source device.
Be sure that the power is off before any devices are connected.
10. Headphone jack
This jack is where you would connect headphones equipped with a stereo mini-phone plug.
To protect your hearing, avoid listening at high volume for extended periods of time when using headphones.
11. Battery compartment
If you're using batteries, install AA
alkaline batteries here. Refer to the
"Installing batteries" section for addi
tional information.
12. Internal speaker
The sound of your performance is output from the internal speaker.
If headphones are connected to the
headphone jack, sound is not output from the internal speaker.
This speaker that's built into this instrument contains a magnet. Do not place it near memory cards, hard drives or medical devices that might be affected by magnetism.
Do not insert your finger or any foreign object into the bass-reflex port located at the bottom of the CLIPHIT. Doing so may cause malfunction or injury.
13. Power indicator
When the power is on, the indicator in the speaker section will be lit up.
14. Clips (x3)
These are clips with built-in sensors. Connect each clip to a clip input jack of the CLIPHIT unit, and attach the clip to a magazine or other object at hand. Refer to the "Attaching the clips to objects" section for more information. When you strike the object, the clip sends the sound (vibration) to the CLIPHIT unit. The CLIPHIT uses that sound to trigger the sounds of the drum kit.
Do not strike the clip itself.
The electrical connection of the clip cable may fail if you wrap the cable around the object or pull it strongly.
If you leave the clip attached for an extended period of time, it might leave a surface mark when you detach it. Depending on the age of the object or the state of its finish, it could be damaged regardless of the length of time.
15. Pedal switch
Connect this to a pedal input jack. By pressing the pedal switch, you can play a bass drum (kick) or switch the hi-hat between open and closed positions.
Take care that the pedal switch does not mar the floor or other surface when you step on it.
Note The pedal switch only changes the on/off state. Stepping on the pedal more or less strongly does not change the volume, nor can you produce a half-open hi-hat sound by holding the pedal partially down.
Installing batteries
Detach the battery cover that's located on the bottom panel, and install four AA alkaline batteries.
When the batteries run low, the power indicator in the speaker section blinks. Low batteries might also cause noise to be heard, or the sound to be interrupted. If such symptoms occur, install fresh batteries as soon as possible.
Be sure that the power is off when you replace the batteries.
Take care that each battery is oriented correctly.
Don't mix partially-used batteries with new batteries, and don't mix batteries of differing types.
Depleted batteries should be immediately removed from the unit. Leaving depleted batteries in the battery compartment may cause malfunctions (the batteries may leak). You should also remove the batteries if you don't expect to use the unit for an extended period of time.
- Detach the battery cover located on the bottom panel.
Place a cushion or other similar soft object underneath the ClipHit so the unit doesn't become unstable.
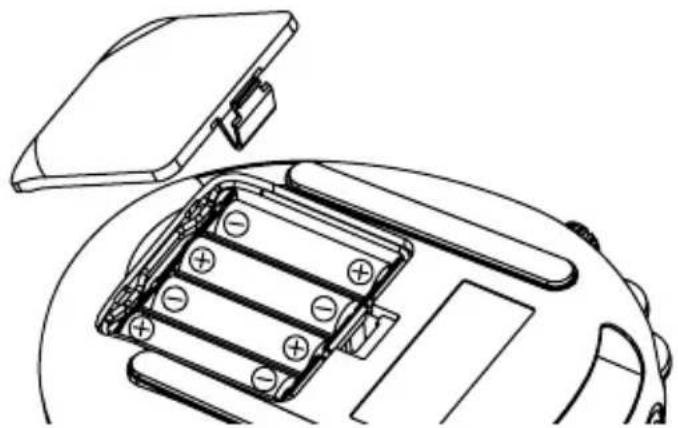
- Making sure that you observe the correct polarity (+, -) , install four AA alkaline batteries.
- Attach the battery cover.
Connections
Connecting the clips and pedal switch to the CLIPHIT
- Turn the CLIPHIT's VOLUME knob and each LEVEL knob all the way to the left so that the volume is minimized.
- Make sure that the CLIPHIT is powered-off (the power indicator is unlit).
- Connect the three included clips to the three jacks CLIP 1, CLIP 2, and CLIP 3, which are located on the left side of the front panel.
- If you want to use the included pedal switch to play the bass drum or another sound, connect it to the PEDAL 1 jack located on the right side of the front panel.
Tip If you want to use the pedal switch to control the hi-hat's open/closed state, connect it to the PEDAL 2 jack located on the left side of the CLIPHIT.
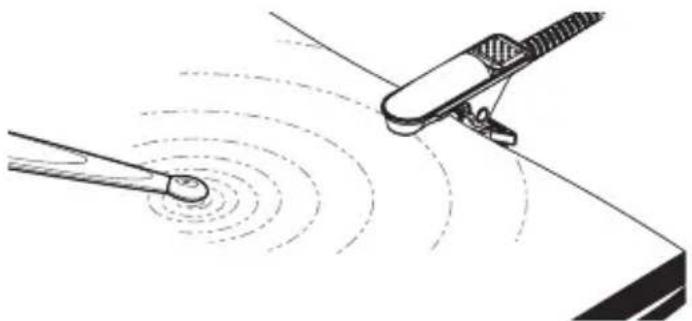
Attaching the clips to objects
- Turn the VOLUME knob (or the corresponding LEVEL dial) all the way to the left to minimize the volume, and attach the clip to an object.
The CLIPHIT unit itself and the objects where the clips are attached should be placed on a flat and stable surface. Be careful that the clips do not come loose during your performance. Route the cables so that they do not catch on your hands or feet.
Although the clip can be attached to a wide variety of objects, you should be aware of your surroundings, and refrain from attaching it in ways that would inconvenience others. Since it is possible for the clip to deform or scratch the object where it's attached, please use caution when attaching it.
Detaching the clips
- Turn the VOLUME knob (or the corresponding LEVEL dial) all the way to the left to minimize the volume, and detach the clip from the object.
Do not pull on the jaws of the clip when detaching it from the object. Doing so may damage the clip or the object. Be sure to open the clip when detaching it.
Turning the power on/off
Before turning the power on/off, you must minimize the volume by turning the VOLUME knob all the way to the left.
- Long-press the power button to turn the power on or off.
To turn the power on, hold down the button until the power indicator is lit up. To turn the power off, hold down the button until the power indicator is unlit.
Auto power-off function
The CLIPHIT has an auto power-off function. The auto power-off function automatically turns the power off when approximately thirty minutes have elapsed since the unit was last used.
Note Input from the AUX IN jack is an exception. The auto power-off function will still turn on even if there is input via AUX IN. With the factory settings, the auto power-off function is enabled. You can disable (or enable) this function if you like. Proceed as follows.
Note The setting of the auto power-off function is remembered even when you turn off the power.
1. Make sure that the power is off.
2. While holding down the pedal switch that's connected to the PEDAL 1 jack, long-press the power button to turn the power on.
The current auto power-off setting (enabled or disabled) is indicated as follows.
Enabled: Blinking with long illumination
Disabled: Blinking with short illumination (Power indicator)
- The setting changes each time you press the pedal switch.
- When you hold down the pedal switch for three seconds or longer, the current setting is memorized, and the unit starts up in its normal state.
Performing
- Make sure that the clips and pedal switch(es) are connected, and that the power is on.
- Turn the VOLUME knob to adjust the volume appropriately.
- Turn the sound selector to select a drum kit.
- Turn the LEVEL dials to adjust the volume of each instrumental part.
While striking the object where each clip is attached, or pressing the pedal switch, turn each LEVEL dial to adjust the overall volume balance.
Note The volume of the instrumental part that's sounded by each clip varies according to the force of your strike, with the setting of each LEVEL dial as its upper limit. Parts played by a pedal switch, such as the bass drum, always sound at the volume specified by the LEVEL dial, regardless of how strongly you press the pedal.
The settings of the LEVEL dials are not remembered for each individual drum kit. The settings are always the actual current settings of the LEVEL dials.
5. When you've finished adjusting the volume, perform by striking the objects where the clips are attached and step
ping on the pedal switch.
Tip For drum kits such as STANDARD 1, striking the CLIP 1 object while holding down the pedal connected to the PEDAL 2 jack produces the closed hi-hat sound. If you strike the object while the pedal is released, the open hi-hat sound is heard. The foot-close sound is heard when you press the pedal.

Specifications
Drum Kits: 11
Controls: LEVEL dial x 4,
VOLUME knob,
SOUND selector,
Power button
Connections:CLIP input jack x3
PEDAL input jack x 2,
AUX IN jack (3.5mm / 1/8")
stereo mini jack),
DC 9V jack,
Headphone jack (3.5mm / 1/8")
stereo mini jack)
Amp output / speaker:
2 Watts, 3"
Power supply: 4 AA-size alkaline batteries or
Optional AC adapter (DC 9 V,

Battery life : Approximately 6 hours (Battery
life will vary depending on the
batteries used and on the
conditions of use.)
Dimensions (W× D× H)
163 x 173 x 101 mm /
6.42 x 6.81 x3.98 inches
Weight: 453g / 15.98oz
(Excluding batteries)
Included items:
Owner's manual,
Clips x3 (clip opening width
30 mm, cable length 1.5 m:
equivalent to CM-200
contact microphone),
Pedal switch x1 (cable length
1.6 m: PS-3 pedal switch),
4 AA-size alkaline batteries
Options (sold separately):
PS-3 Pedal switch,
AC adapter (DC 9V,
- Specifications and appearance are subject to change without notice for improvement.
IMPORTANT NOTICE TO CONSUMERS
This product has been manufactured according to strict specifications and voltage requirements that are applicable in the country in which it is intended that this product should be used. If you have purchased this product via the internet, through mail order, and/or via a telephone sale, you must verify that this product is intended to be used in the country in which you reside.
WARNING: Use of this product in any country other than that for which it is intended could be dangerous and could invalidate the manufacturer's or distributor's warranty.
Please also retain your receipt as proof of purchase otherwise your product may be disqualified from the manufacturer's or distributor's warranty.