
ROG Strix Radeon RX 570 OC - Graphic card ASUS - Free user manual and instructions
Find the device manual for free ROG Strix Radeon RX 570 OC ASUS in PDF.
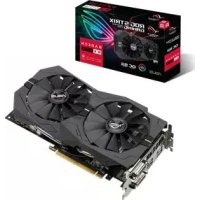


| Product Type | Graphics Card |
| Brand | ASUS |
| Model | ROG Strix Radeon RX 570 OC |
| GPU | AMD Radeon RX 570 |
| Architecture | Polaris 20 |
| GPU Frequency (OC mode) | Up to 1244 MHz |
| Video Memory | 4GB or 8GB GDDR5 |
| Interface | PCI Express 3.0 x16 |
| Cooling | Dual fan with heatsink |
| Power Connectors | 1 x 8-pin PCIe |
| Video Outputs | 1 x HDMI 2.0, 1 x DisplayPort 1.4, 1 x DVI-D |
| Maximum Resolution | 7680 x 4320 (4K) |
| Multi-Display Support | Up to 3 displays |
| RGB Lighting | Yes, AURA Sync |
| Software Included | ASUS GPU Tweak, ASUS AURA, XSplit Gamecaster |
| Dimensions (approx.) | 280 x 130 x 45 mm |
| Weight (approx.) | 800g |
| Recommended PSU | 500W minimum power supply |
| Safety | Unplug the power before installation; use an anti-static wrist strap |
| Maintenance | Clean the fans with compressed air; avoid moisture and dust |
| Repairability | Not user-serviceable; contact ASUS support |
Frequently Asked Questions - ROG Strix Radeon RX 570 OC ASUS
User questions about ROG Strix Radeon RX 570 OC ASUS
0 question about this device. Answer the ones you know or ask your own.
Ask a new question about this device
Download the instructions for your Graphic card in PDF format for free! Find your manual ROG Strix Radeon RX 570 OC - ASUS and take your electronic device back in hand. On this page are published all the documents necessary for the use of your device. ROG Strix Radeon RX 570 OC by ASUS.
USER MANUAL ROG Strix Radeon RX 570 OC ASUS
Drivers and Utilities
Installation Guide
E15279
Revised Edition V6
March 2019
Copyright © 2019 ASUSTeK Computer Inc. All Rights Reserved.
No part of this manual, including the products and software described in it, may be reproduced, transmitted, transcribed, stored in a retrieval system, or translated into any language in any form or by any means, except documentation kept by the purchaser for backup purposes, without the express written permission of ASUSTeK Computer Inc. ("ASUS").
Product warranty or service will not be extended if: (1) the product is repaired, modified or altered, unless such repair, modification of alteration is authorized in writing by ASUS; or (2) the serial number of the product is defaced or missing.
ASUS PROVIDES THIS MANUAL "AS IS" WITHOUT WARRANTY OF ANY KIND, EITHER EXPRESS OR IMPLIED, INCLUDING BUT NOT LIMITED TO THE IMPLIED WARRANTYES OR CONDITIONS OF MERCHANTABILITY OR FITNESS FOR A PARTICULAR PURPOSE. IN NO EVENT SHALL ASUS, ITS DIRECTORS, OFFICERS, EMPLOYEES OR AGENTS BE LIABLE FOR ANY INDIRECT, SPECIAL, INCIDENTAL, OR CONSEQUENTIAL DAMAGES (INCLUDING DAMAGES FOR LOSS OF PROFITS, LOSS OF BUSINESS, LOSS OF USE OR DATA, INTERRUPTION OF BUSINESS AND THE LIKE), EVEN IF ASUS HAS BEEN ADVISED OF THE POSSIBILITY OF SUCH DAMAGES ARISING FROM ANY DEFECT OR ERROR IN THIS MANUAL OR PRODUCT.
SPECIFICATIONS AND INFORMATION CONTAINED IN THIS MANUAL ARE FURNISHED FOR INFORMATIONAL USE ONLY, AND ARE SUBJECT TO CHANGE AT ANY TIME WITHOUT NOTICE, AND SHOULD NOT BE CONSTRUED AS A COMMITMENT BY ASUS. ASUS ASSUMES NO RESPONSIBILITY OR LIABILITY FOR ANY ERRORS OR INACCURACIES THAT MAY APPEAR IN THIS MANUAL, INCLUDING THE PRODUCTS AND SOFTWARE DESCRIBED IN IT.
Products and corporate names appearing in this manual may or may not be registered trademarks or copyrights of their respective companies, and are used only for identification or explanation and to the owners' benefit, without intent to infringe.
Contents
Notices. 5
Safety information 6
About this guide 7
- Support CD information 8
- VGA drivers 9
2.1 Installing the VGA drivers 9 2.2 Uninstalling the VGA drivers 10
- ASUS GPU Tweak utility 11
3.1 Installing ASUS GPU Tweak 11 3.2 Uninstalling ASUS GPU Tweak 12
- ASUSAPRP 13
4.1 Installing ASUS APRP 13 4.2 Uninstalling ASUS APRP 14
- XSplit Gamecaster 15
5.1 Installing XSplit Gamecaster 15 5.2 Uninstalling XSplit Gamecaster 16
- ASUS AURA 17
6.1 Installing ASUS AURA 17 6.2 Uninstalling ASUS AURA 18
- Other information 19
7.1 Browse the Support CD 19 7.2 Contact Information 19 7.3 Viewing the Readme file 20
Appendix: Basic troubleshooting 21
Notices
Federal Communications Commission Statement
This device complies with Part 15 of the FCC Rules. Operation is subject to the following two conditions:
- This device may not cause harmful interference.
- This device must accept any interference received, including interference that may cause undesired operation.
This equipment has been tested and found to comply with the limits for a Class B digital device, pursuant to Part 15 of the FCC Rules. These limits are designed to provide reasonable protection against harmful interference in a residential installation. This equipment generates, uses, and can radiate radio frequency energy and, if not installed and used in accordance with the manufacturer's instructions, may cause harmful interference to radio communications. However, there is no guarantee that interference will not occur in a particular installation. If this equipment does cause harmful interference to radio or television reception, which can be determined by turning the equipment off and on, the user is encouraged to try to correct the interference by one or more of the following measures:
- Reorient or relocate the receiving antenna.
- Increase the distance between the equipment and receiver.
- Connect the equipment to an outlet on a circuit different from that to which the receiver is connected.
- Consult the dealer or an experienced radio/TV technician for help.
The use of shielded cables for connection of the monitor to the graphics card is required to assure compliance with FCC regulations. Changes or modifications to this unit not expressly approved by the party responsible for compliance could void the user's authority to operate this equipment.
Canadian Department of Communication Statement
This digital apparatus does not exceed the Class B limits for radio noise emissions from digital apparatus set out in the Radio Interference Regulations of the Canadian Department of Communications.
This Class B digital apparatus complies with Canadian ICES-003.
REACH
Complying with the REACH (Registration, Evaluation, Authorisation, and Restriction of Chemicals) regulatory framework, we published the chemical substances in our products at the ASUS REACH website at http://csr.asus.com/english/REACH.htm
Macrovision Corporation Product Notice
This product incorporates copyright protection technology that is protected by method claims of certain U.S. patents and other intellectual property rights owned by Macrovision Corporation and other rights owners. Use of this copyright protection technology must be authorized by Macrovision Corporation, and is intended for home and other limited viewing uses only, unless otherwise authorized by Macrovision Corporation. Reverse engineering or disassembly is prohibited.
Safety information
Electrical safety
- When adding or removing devices to or from the system, ensure that the power cables for the devices are unplugged before the signal cables are connected. If possible, disconnect all power cables from the existing system before you add a device.
- Make sure that your power supply is set to the correct voltage in your area. If you are not sure about the voltage of the electrical outlet you are using, contact your local power company.
- If the power supply is broken, do not try to fix it by yourself. Contact a qualified service technician or your retailer.
Operation safety
- Before installing devices on your motherboard, carefully read all the manuals that came with the package.
- Before using the product, make sure all cables are correctly connected and the power cables are not damaged. If you detect any damage, contact your dealer immediately.
- To avoid short circuits, keep paper clips, screws, and staples away from connectors, slots, sockets and circuitry.
- Avoid dust, humidity, and extreme temperature. Do not place the product in any area where it may be exposed to moisture.
- Place the product on a stable surface.
- If you encounter technical problems with the product, contact a qualified service technician or your retailer.
About this guide
Conventions used in this guide
To make sure that you perform certain tasks properly, take note of the following symbols used throughout this manual.
WARNING: Information to prevent injury to yourself when completing a task.

CAUTION: Information to prevent damage to the components when completing a task.
IMPORTANT: Information that you MUST follow to complete a task.

NOTE: Useful tips and additional information for completing a task.
Where to find more information
Refer to the following sources for additional information and for product and software updates.
1. ASUS Websites
The ASUS websites worldwide (https://www.asus.com/) provide updated information on ASUS hardware and software products. The ASUS websites are listed in the ASUS Contact Information on the inside front cover of this installation guide.
2. Optional Documentation
Your product package may include optional documentation, such as warranty flyers, that may have been added by your dealer. These documents are not part of the standard package.
1. Support CD information
The support CD contains the drivers and utilities for your VGA card. Click the icons on the support CD's main menu to install software, obtain ASUS contact information, browse CD contents, or view the Readme file.
- The screens in this manual are for reference only and may not exactly match what you see on your screen.
- The device driver and utility in the support CD apply only to specific ASUS VGA card models.
- You may need administrator rights to install the drivers and utilities. See your Windows® 10 / 8.1 / 8 / 7 documentation for details.
- The contents of the support CD are subject to change at any time without notice. Visit the ASUS website at www.asus.com for updates.
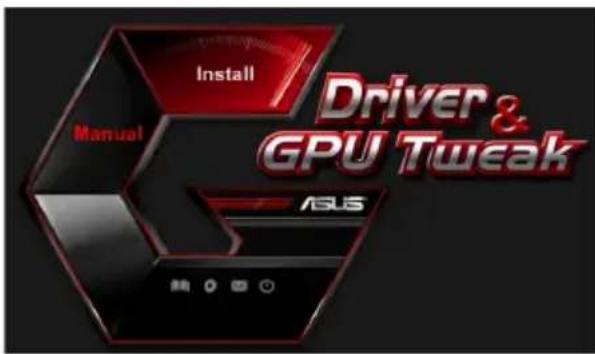
Insert the CD into your computer's optical drive. If Autorun is enabled, the Main Menu launches automatically.
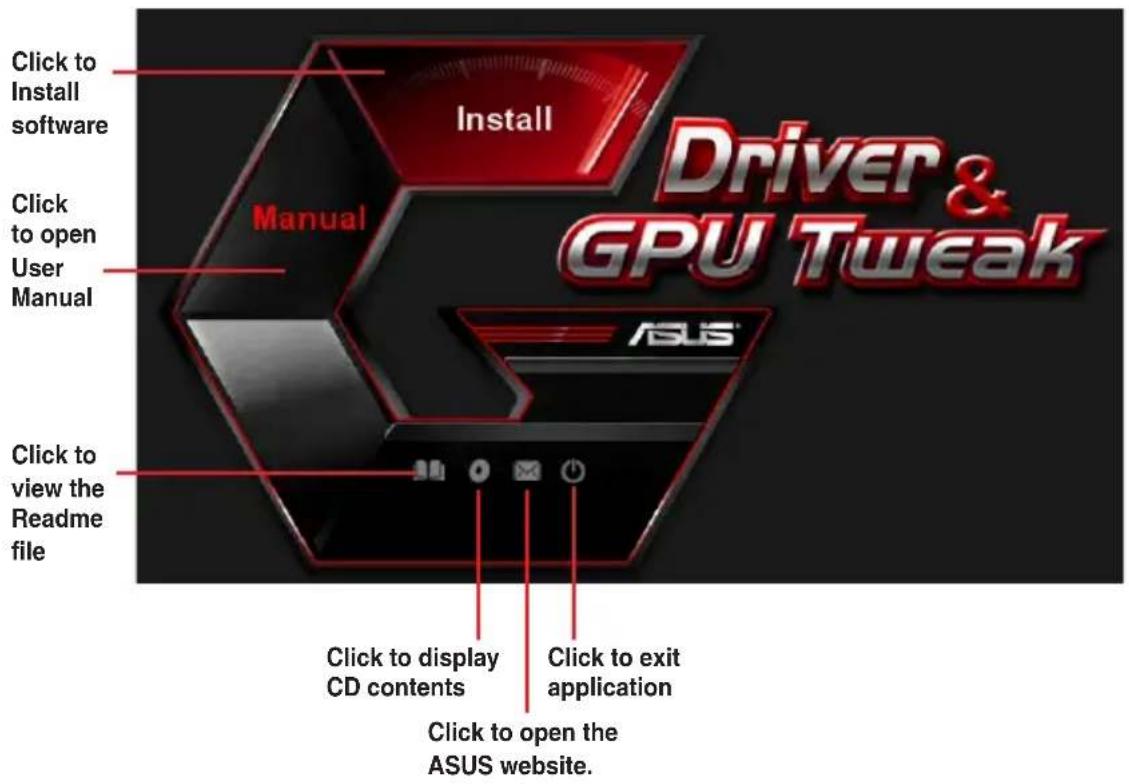

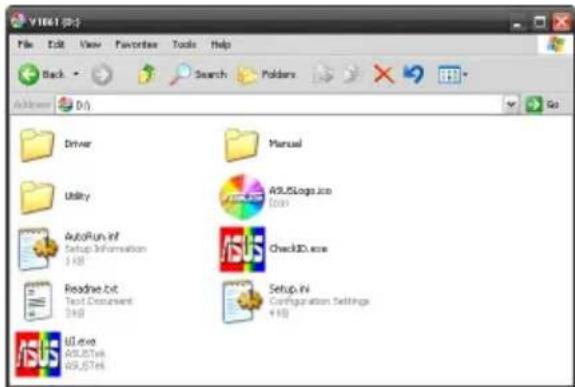
If Autorun is NOT enabled on your computer, browse the contents of the support CD to locate the file UI.exe. Double-click the UI.exe to run the support CD installation program.
2. VGA drivers
The VGA driver is the software program that makes the device work with your operating system. After physically installing your graphics card, use any of the recommended methods in this section to install, update, or remove the VGA driver.
If you are replacing an old graphics card with a new ASUS graphics card, uninstall the old display driver from your system.
2.1 Installing the VGA drivers
2.1.1 Installing the VGA drivers in Windows 10/8.1/8/7 (64-bit)
To install the VGA driver in Windows® 10 / 8.1 / 8 / 7 (64-bit):
- Insert the support CD into your optical drive.
- If Autorun is enabled, the main menu appears automatically. If Autorun is disabled, run UI.exe from the root directory of your support CD.
- From the main menu, click Install.
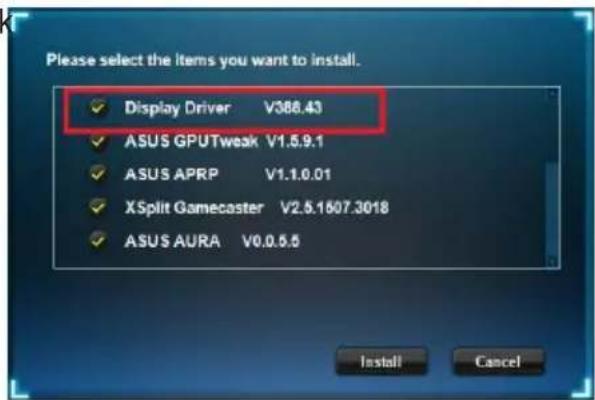
- Select Display Driver and click the Install button.
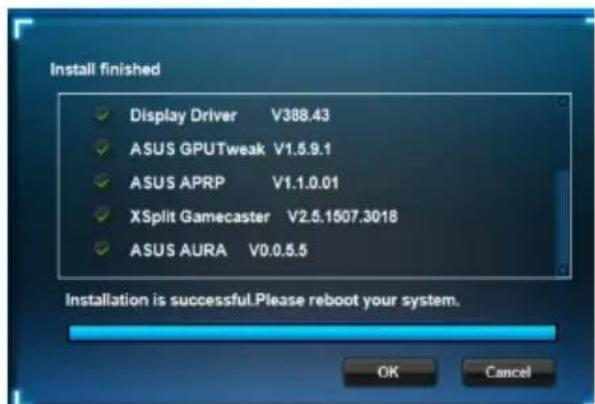
- Once installation is complete, click OK to reboot the system.
2.2 Uninstalling the VGA drivers
2.2.1 Uninstalling the VGA drivers in Windows 10/8.1/8/7 (64-bit)
To remove the VGA drivers in Windows® 10 / 8.1 / 8 / 7 (64-bit):
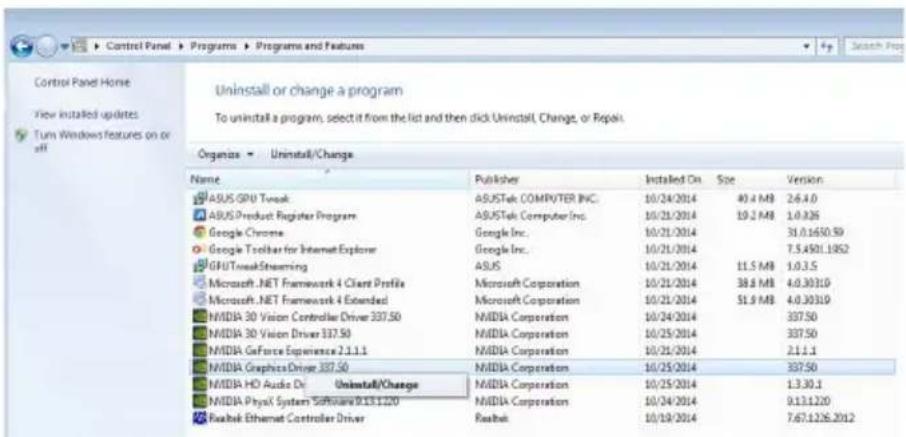
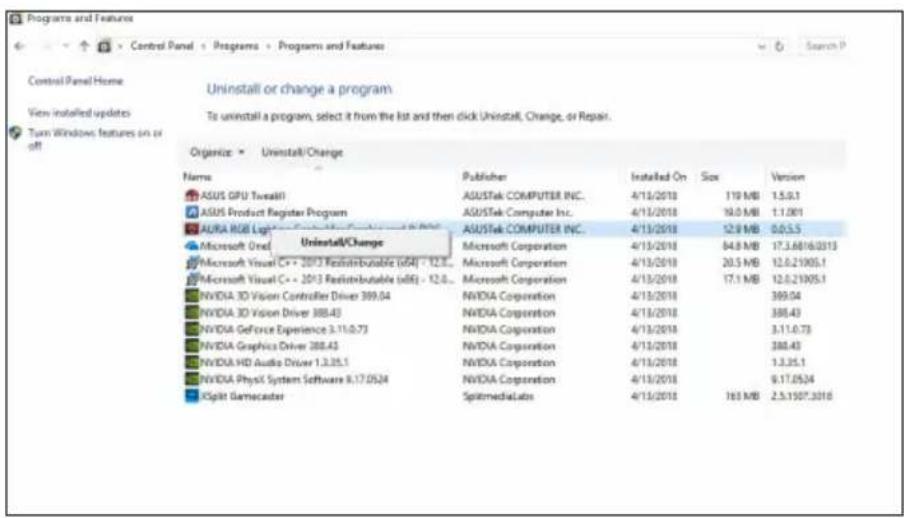
- Click Start > Control Panel > Programs > Programs and Features, select Graphics driver. Click Uninstall.
3. ASUS GPU Tweak utility
ASUS GPU Tweak utility allows you to monitor and optimize the settings of your ASUS Graphics card.
3.1 Installing ASUS GPU Tweak
3.1.1 Installing ASUS GPU Tweak in Windows 10/8.1/8/7 (64-bit)
To install ASUS GPU Tweak in Windows® 10 / 8.1 / 8 / 7 (64-bit):
- Insert the support CD into your optical drive.
- If Autorun is enabled, the main menu appears automatically. If Autorun is disabled, run UI.exe from the root directory of your support CD.
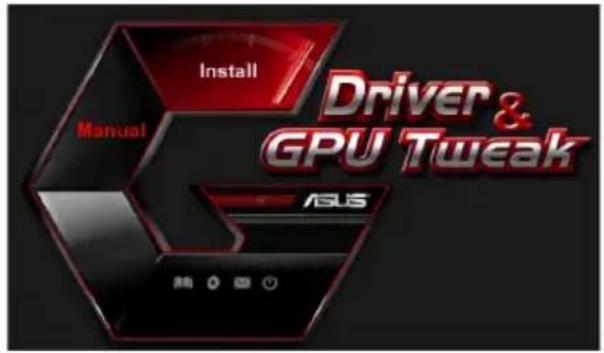
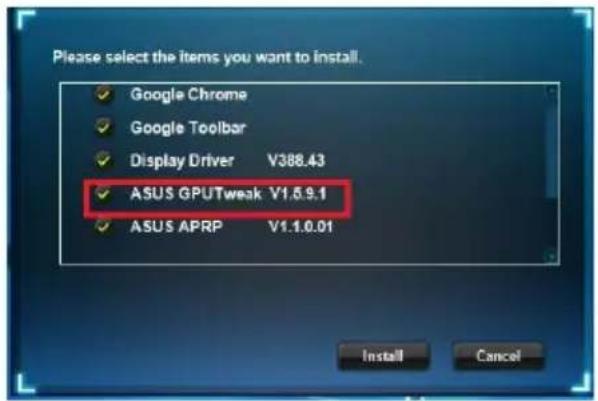
- From the main menu, click Install. Select ASUS GPU Tweak and click the Install button.
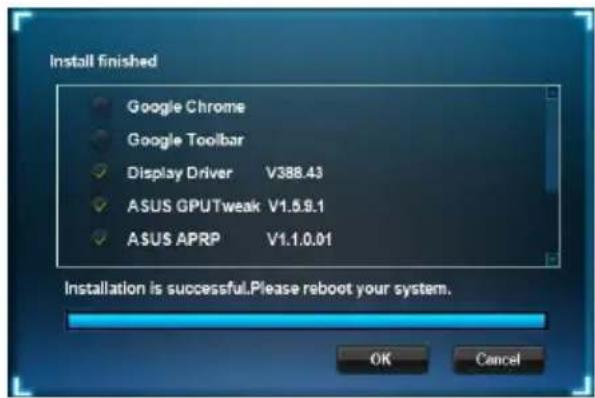
- Once installation is complete, click OK.
3.2 Uninstalling ASUS GPU Tweak
3.2.1 Removing ASUS GPU Tweak in Windows 10/8.1/8/7 (64-bit)
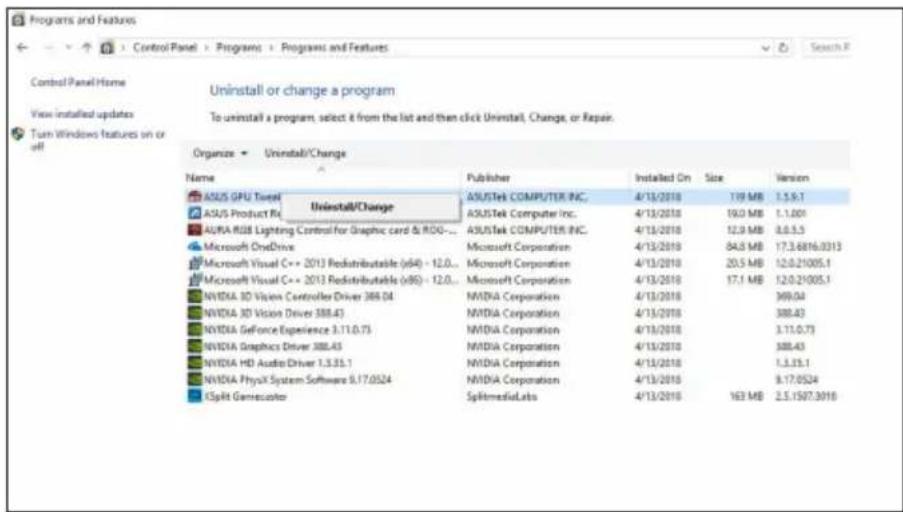
To remove ASUS GPU Tweak in Windows® 10 / 8.1 / 8 / 7 (64-bit):
- Click Start > Control Panel > Programs > Programs and Features, select ASUS GPU Tweak. Click Uninstall.
4. ASUS APRP
4.1 Installing ASUS APRP
4.1.1 Installing ASUS APRP in Windows 10 / 8.1 / 8 / 7 (64-bit)
To install ASUS APRP in Windows® 10 / 8.1 / 8 / 7 (64-bit):
- Insert the support CD into your optical drive.
- If Autorun is enabled, the main menu appears automatically. If Autorun is disabled, run UI.exe from the root directory of your support CD.
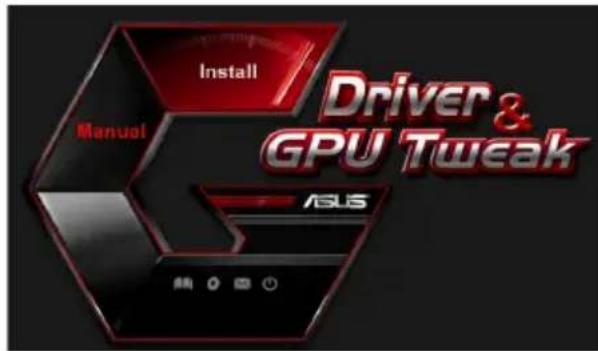
- From the main menu, click Install.
Select ASUS APRP and click the Install button.
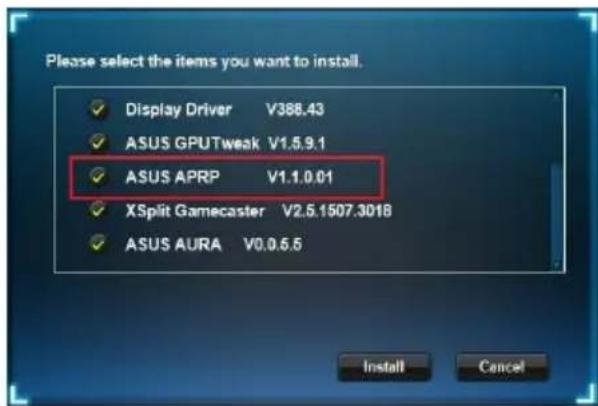
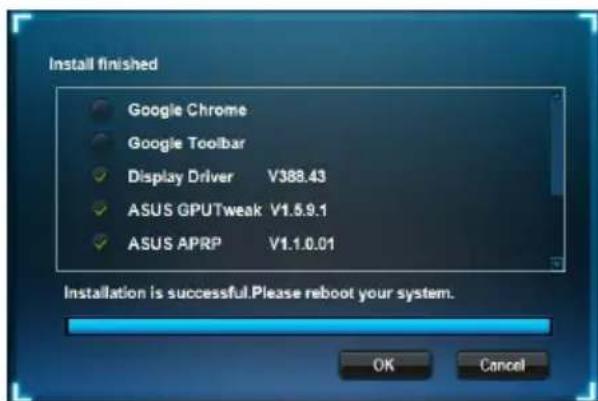
- Once installation is complete, click OK.
4.2 Uninstalling ASUS APRP
4.2.1 Removing ASUS APRP in Windows 10/8.1/8/7 (64-bit)
To remove ASUS APRP in Windows® 10 / 8.1 / 8 / 7 (64-bit):
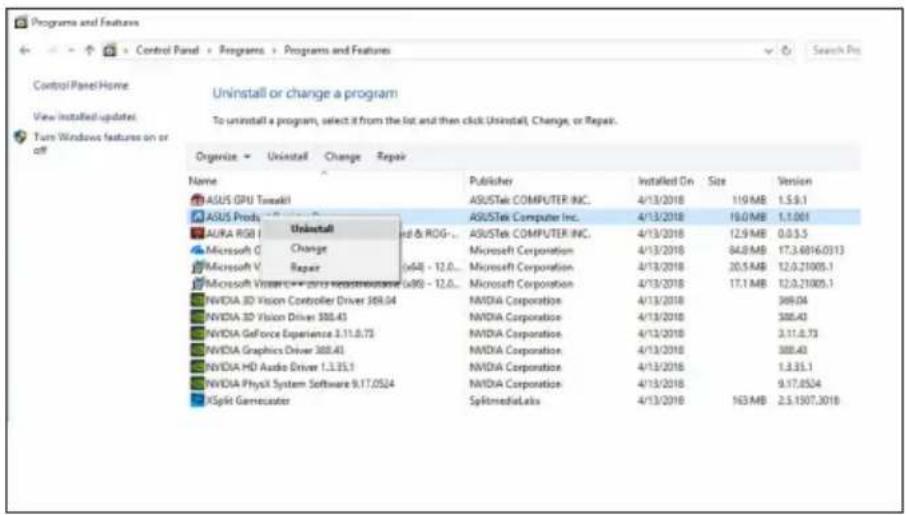
- Click Start > Control Panel > Programs > Programs and Features, select ASUS APRP. Click Uninstall.
5. XSplit Gamecaster
5.1 Installing XSplit Gamecaster
5.1.1 Installing XSplit Gamecaster in Windows 10/8.1/8/7 (64-bit)
To install XSplit Gamecaster in Windows® 10 / 8.1 / 8 / 7 (64-bit):
- Insert the support CD into your optical drive.
- If Autorun is enabled, the main menu appears automatically. If Autorun is disabled, run UI.exe from the root directory of your support CD.
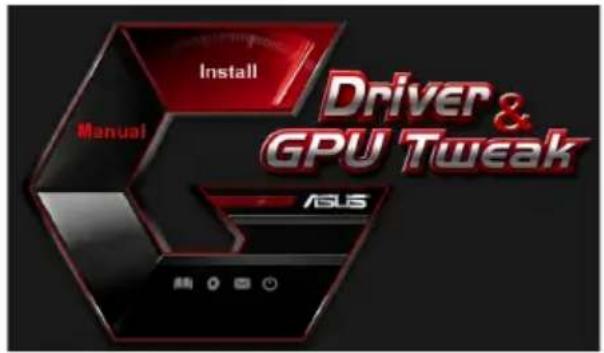
- From the main menu, click Install.
Select XSplit Gamecaster and click the Install button.
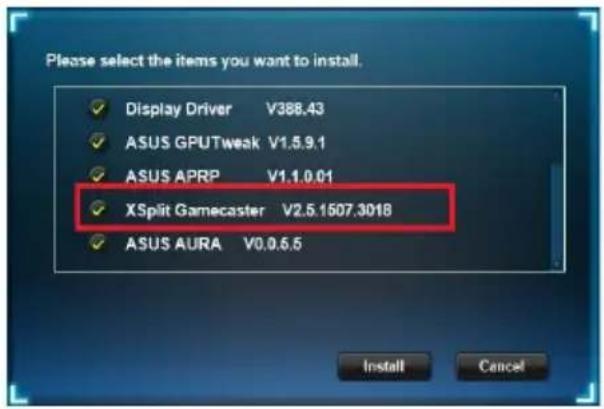
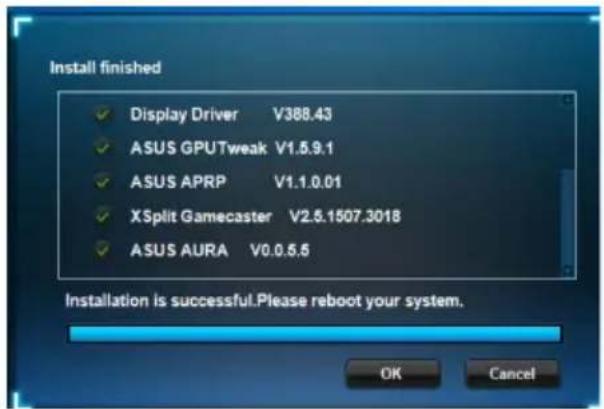
- Once installation is complete, click OK.
5.2 Uninstalling XSplit Gamecaster
5.2.1 Removing XSplit Gamecaster in Windows 10/8.1/8/7 (64-bit)
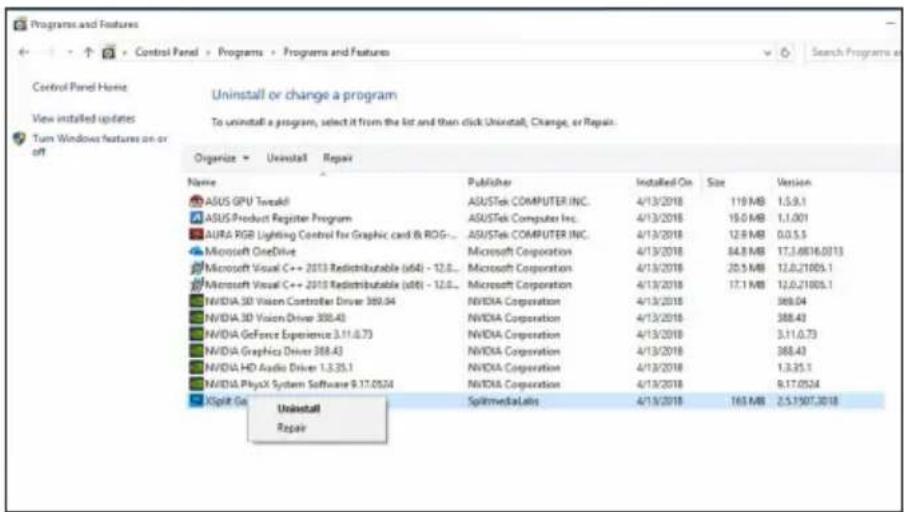
To remove XSplit Gamecaster in Windows® 10 / 8.1 / 8 / 7 (64-bit):
- Click Start > Control Panel > Programs > Programs and Features, select XSplit Gamecaster. Click Uninstall.
6. ASUS AURA
6.1 Installing ASUS AURA
6.1.1 Installing ASUS AURA in Windows 10 / 8.1 / 8 / 7 (64-bit)
To install ASUS AURA in Windows® 10 / 8.1 / 8 / 7 (64-bit):
- Insert the support CD into your optical drive.
- If Autorun is enabled, the main menu appears automatically. If Autorun is disabled, run UI.exe from the root directory of your support CD.
- From the main menu, click Install.
Select ASUS AURA and click the Install button.
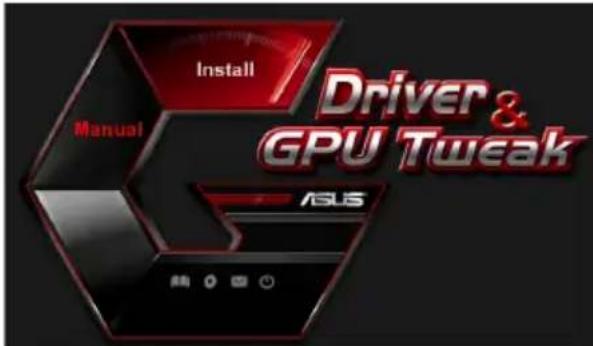
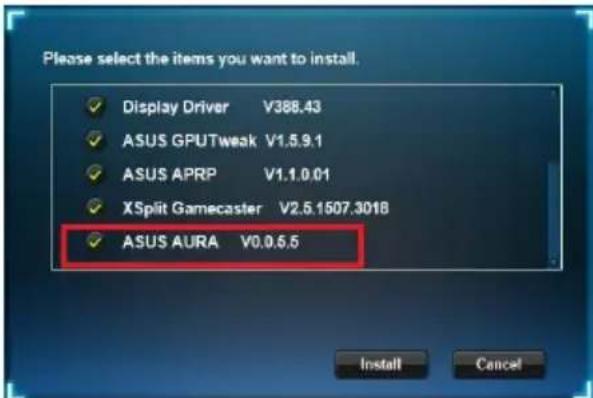
- Once installation is complete, click OK.
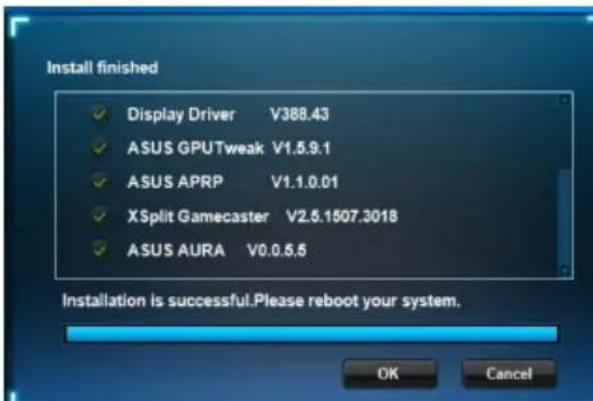
6.2 Uninstalling ASUS AURA
6.2.1 Removing ASUS AURA in Windows 10/8.1/8/7 (64-bit)
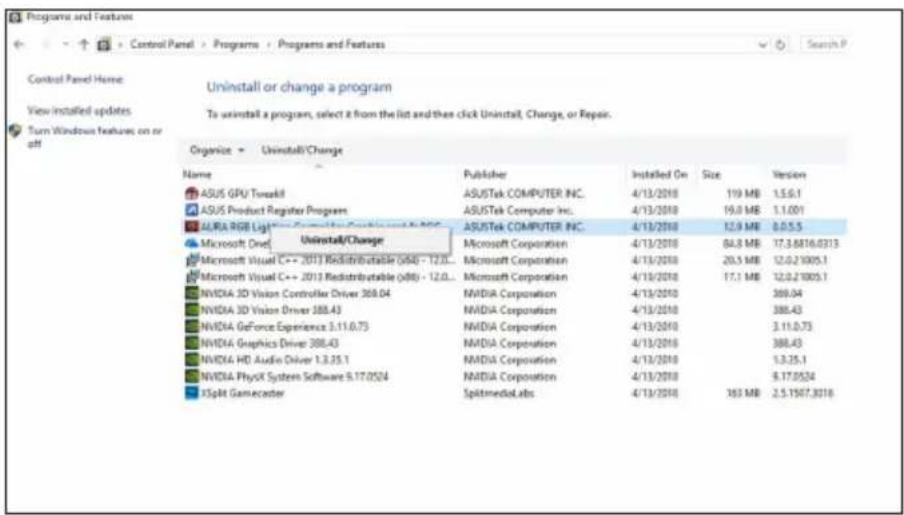
To remove ASUS AURA in Windows® 10 / 8.1 / 8 / 7 (64-bit):
- Click Start > Control Panel > Programs > Programs and Features, select ASUS AURA. Click Uninstall.
7. Other information
7.1 Browse the Support CD
To browse the support CD:
- Insert the support CD into your optical drive.
- If Autorun is enabled, the main menu appears automatically. If Autorun is disabled, run UI.exe from the root directory of your support CD.
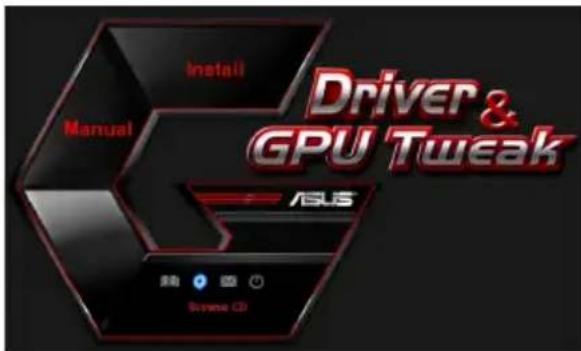
- From the main menu, click Browse CD to view the contents of the CD.
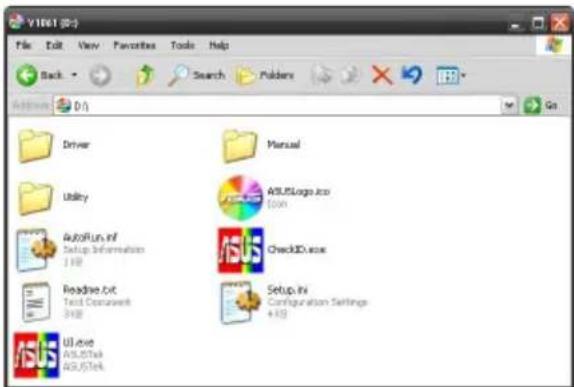
7.2 Contact Information
- Insert the support CD into your optical drive.
- If Autorun is enabled, the main menu appears automatically.
If Autorun is disabled, run UI.exe from the root directory of your support CD.
- From the main menu, click Contact Us to open the ASUS website for additional information.
7.3 Viewing the Readme file
To view the Readme file:
- Insert the support CD into your optical drive.
- If Autorun is enabled, the main menu appears automatically. If Autorun is disabled, run UI.exe from the root directory of your support CD.
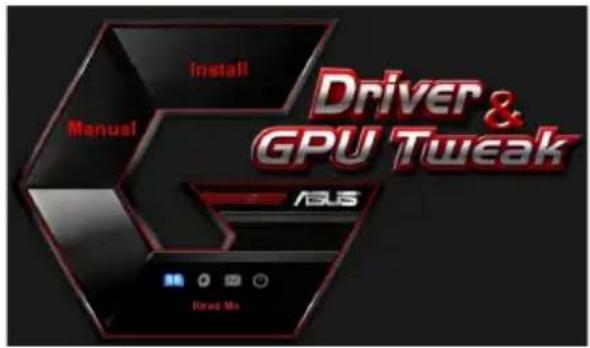
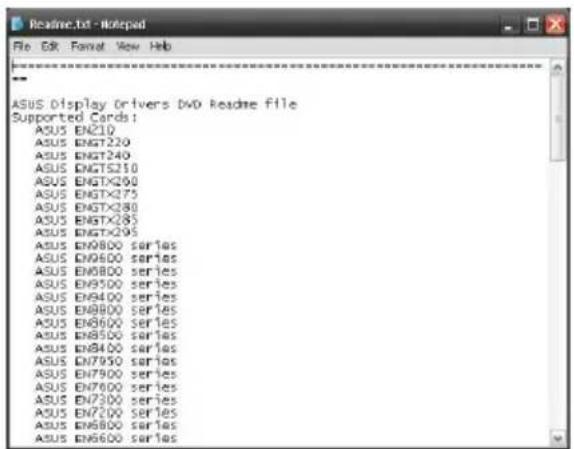
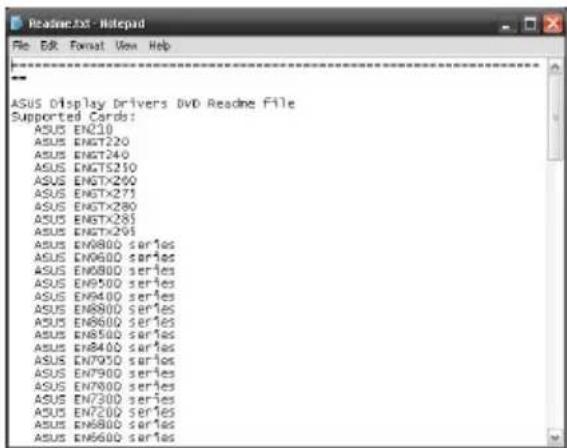
- From the main menu, click Read Me to display the Readme text file.
Appendix: Basic troubleshooting
If you encounter any of the following scenarios after installing your graphics card, try performing one of the possible solutions before calling for technical support.
If you still have some issues with the product, please visit https://www.asus.com/support for more information.
| Problem No display after the card is installed | |
| Cause Your card might not be properly installed. Solution Make sure that the card is not tilted or skewed on the slot. | |
| Cause Your monitor might not be properly connected. Solution Make sure that the signal cable is properly connected to your monitor and graphics card. | |
| Cause Your graphics card is not supported by your motherboard. Solution Check the technical documentation that came with your motherboard and check the required specifications for your graphics card (e.g. AGP voltage requirement). | |
| Cause The graphics card's auxiliary power is not connected. Solution Make sure that the auxiliary power cables are properly connected with the power supply unit. | |
| Cause Insufficient power supply. Solution Make sure that your power supply unit can provide the minimum power requirement to your system. | |
| Cause Incorrect motherboard hardware system settings (e.g. system control panel connections). Solutions • Make sure that the system control panel cables are connected properly (e.g. power switch, reset). • Make sure that your CPU, CPU fan and/or memory DIMMs are in good working condition and are connected properly. | |
| Problem Wrong color balance | |
| Cause Your card might not be properly installed. Solution Make sure that the card is not tilted or skewed on the slot. | |
| Cause Your video controls might not be properly set. Solution • Manually configure your video controls to your desired settings. • Configure your graphics card display resolution in Dis-play properties. | |
| Cause There may be unsupported graphics card drivers installed in your system. Conflicts may occur with graphics card drivers from different vendors. Solution • Remove any unused graphics card drivers installed on your system. • Install the graphics card driver from the support CD that came with your graphics card package. | |
| Cause The graphics card's auxiliary power is not connected. Solution Make sure that the auxiliary power cables are properly connected to the power supply unit. | |
| Cause If your monitor comes with BNC connectors, the port con-nections may be incorrect. Solution Make sure that all BNC connectors are connected properly to its corresponding port. | |
| Cause Your monitor software settings might be incorrect. Solution Configure your monitor to supported display settings. | |
| Cause Your monitor might not be properly connected. Solution Make sure that the signal cable is properly connected to your monitor and graphics card. | |
| Problem The screen image is garbled | |
| Cause Your monitor cannot support the selected display setting. Solution Make sure that your monitor can support your desired display setting. Refer to the technical documentation that came with your monitor. | |
| Cause Your graphics card cannot support the desired system setting. Solution Make sure that your graphics card can support your desired display setting. See the specifications table that came with this graphics card package. | |
| Cause Some graphics driver files might be corrupt. Solution Remove your current graphics drivers and reinstall the graphics drivers from the support CD. | |
| Cause Poor heat dissipation inside the chassis. Solution Make sure that the chassis fan, CPU, and heatsink with fan, and/or the graphics card GPU fan are working properly. | |
| Cause GPU or VGA memory overclocked beyond optimal working conditions. Solutions Restore default frequency settings of GPU and VGA memory. |

Other problems that you might encounter can be related to other parts or accessories (e.g., motherboard, power supply unit, LCD/CRT) of your system.
ASUS
Graphics Card
Drivers and Utilities
Installation Guide
T15279
Sixth Edition
March 2019
Copyright © 2019 ASUSTeK Computer Inc. All rights reserved.
Federal Communications Commission Statement
This device complies with Part 15 of the FCC Rules. Operation is subject to the following two conditions:
This device may not cause harmful interference, and this device must accept any interference received, including interference that may cause undesired operation.
This equipment has been tested and found to comply with the limits for a Class B digital device, pursuant to Part 15 of the FCC Rules. These limits are designed to provide reasonable protection against harmful interference in a residential installation. This equipment generates, uses, and can radiate radio frequency energy and, if not installed and used in accordance with the manufacturer's instructions, may cause harmful interference to radio communications. However, there is no guarantee that interference will not occur in a particular installation. If this equipment does cause harmful interference to radio or television reception, which can be determined by turning the equipment off and on, the user is encouraged to try to correct the interference by one or more of the following measures:
Reorient or relocate the receiving antenna. Increase the distance between the equipment and receiver. Connect the equipment to an outlet on a circuit different from that to which the receiver is connected. Consult the dealer or an experienced radio/TV technician for help.
The use of shielded cables for connection of the monitor to the graphics card is required to assure compliance with FCC regulations. Changes or modifications to this unit not expressly approved by the party responsible for compliance could void the user's authority to operate this equipment.
Canadian Department of Communication Statement
This digital apparatus does not exceed the Class B limits for radio noise emissions from digital apparatus set out in the Radio Interference Regulations of the Canadian Department of Communications.
This Class B digital apparatus complies with Canadian ICES-003.
ASUS REACH
Federal Communications Commission Statement
This device complies with Part 15 of the FCC Rules. Operation is subject to the following two conditions:
This device may not cause harmful interference, and this device must accept any interference received, including interference that may cause undesired operation.
This equipment has been tested and found to comply with the limits for a Class B digital device, pursuant to Part 15 of the FCC Rules. These limits are designed to provide reasonable protection against harmful interference in a residential installation. This equipment generates, uses, and can radiate radio frequency energy and, if not installed and used in accordance with manufacturer's instructions, may cause harmful interference to radio communications. However, there is no guarantee that interference will not occur in a particular installation. If this equipment does cause harmful interference to radio or television reception, which can be determined by turning the equipment off and on, the user is encouraged to try to correct the interference by one or more of the following measures:
Reorient or relocate the receiving antenna. - Increase the distance between the equipment and receiver. - Connect the equipment to an outlet on a circuit different from that to which the receiver is connected. - Consult the dealer or an experienced radio/TV technician for help.
The use of shielded cables for connection of the monitor to the graphics card is required to assure compliance with FCC regulations. Changes or modifications to this unit not expressly approved by the party responsible for compliance could void the user's authority to operate this equipment.
Canadian Department of Communication Statement
This digital apparatus does not exceed the Class B limits for radio noise emissions from digital apparatus set out in the Radio Interference Regulations of the Canadian Department of Communications.
This class B digital apparatus complies with Canadian ICES-003.
ASUS REACH
Statement from the Canadian Department of Communications
FCC (Federal Communications Commission) Declaration
To install VGA drivers in Windows® 10 / 8.1 / 8 / 7 (64-bit):
To uninstall VGA drivers in Windows® 10 / 8.1 / 8 / 7 (64-bit):
Copyright © 2019 ASUSTeK Computer Inc. All Rights Reserved.
Windows 10 / 8.1 / 8 / 7 (64-bit) ASUS AURA to tell
Installation instructions
UA15279
IOnOBHeHe BuaHnB Bepcia6
Bepesb2019
Copyright © 2019 ASUSTeK COMPUTER INC. All rights reserved.
No part of this manual, including the products and software described in it, may be reproduced, transmitted, transcribed, stored in a retrieval system, or translated into any language in any form or by any means, except documentation kept by the purchaser for backup purposes, without the express written permission of ASUSTeK COMPUTER INC. ("ASUS").
Product warranty or service will not be extended if: (1) the product is repaired, modified or altered without the written permission of ASUS; or (2) the serial number of the product is defaced or missing.
ASUS provides this manual "as is" without warranty of any kind, either express or implied, including but not limited to the implied warranties or conditions of merchantability or fitness for a particular purpose. In no event shall ASUS, its directors, officers, employees or agents be liable for any indirect, incidental, special, consequential or punitive damages (including but not limited to loss of profits, loss of business, loss of use or data, interruption of business), even if ASUS has been advised of the possibility of such damages arising from any defect or error in this manual or product.
Specifications and information contained in this manual are furnished for informational use only, and are subject to change at any time without notice, and should not be construed as a commitment by ASUS. ASUS assumes no responsibility or liability for any errors or inaccuracies that may appear in this manual, including the products and software described in it.
Product names and corporate names appearing in this manual may or may not be registered trademarks or copyrights of their respective companies, and are used for identification or explanation and to the owners' benefit, without intent to infringe.
Contents
Safety information 292
- About this manual 293
- Information about the driver CD 294
VGA drivers 295
- 2.1 Installing the VGA driver 296
2.2 Using the VGA driver 297
- ASUS PRP 300
4.1 Introduction ASUS PRP 300 4.2 Installation ASUS PRP 301
- XSplit Gamecaster 302
5.1 Install XSplit Gamecaster 302 5.2 Uninstall XSplit Gamecaster 303
- ASUS AURA 304
6.1 Install ASUS AURA 304 6.2 Uninstall ASUS AURA 305
- Additional information 306
7.1 Support CD 306 7.2 Contact information 306 7.3 Online support 307
Appendix. Troubleshooting 308
Notices
Federal Communications Commission Statement (FCC)
This device complies with Part 15 of the FCC Rules. Operation is subject to the following two conditions:
- This device may not cause harmful interference; and
- This device must accept any interference received, including interference that may cause undesired operation.
This equipment has been tested and found to comply with the limits for a Class B digital device, pursuant to Part 15 of the FCC Rules. These limits are designed to provide reasonable protection against harmful interference in a residential installation. This equipment generates, uses and can radiate radio frequency energy and, if not installed and used in accordance with the instructions, may cause harmful interference to radio communications. However, there is no guarantee that interference will not occur in a particular installation. If this equipment does cause harmful interference to radio or television reception, which can be determined by turning the equipment off and on, the user is encouraged to try to correct the interference by one or more of the following measures:
- Change or replace the antenna. Increase the distance between the antenna and the device. - Connect the equipment to an outlet on a circuit different from that to which the receiver is connected. Consult the dealer or an experienced radio/TV technician for help.
Use of shielded cable for connecting the monitor to the graphics card is necessary to ensure compliance with FCC rules. Changes or modifications to this unit not expressly approved by the party responsible for compliance could void the user's authority to operate this equipment.
Canadian Department of Communications statement
This digital apparatus does not exceed the Class B limits for radio noise emissions from digital apparatus set out in the Radio Interference Regulations of the Canadian Department of Communications.
This Class B digital apparatus complies with Canadian ICES-003.
REACH
Complying with the REACH (Registration, Evaluation, Authorization, and Restriction of Chemicals) regulatory framework, we disclose the chemical substances in our products at ASUS REACH website http://csr.asus.com/english/REACH.htm.
Macrovision Corporation Notice
This product incorporates copyright protection technology that is protected by U.S. patents and other intellectual property rights. Use of this copyright protection technology must be authorized by Macrovision Corporation and is intended for home and other limited viewing uses only unless otherwise authorized by Macrovision Corporation. Reverse engineering or disassembly is prohibited.
Safety information
Electrical safety
- When adding or removing devices to or from the system, ensure that all power cables are unplugged before connecting signal cables. If possible, disconnect all power cables from the existing system before adding a new device.
- Ensure that the power voltage is set correctly for your location. If you are unsure of the voltage in your electrical outlet, contact your local power company. If the power supply is damaged, do not attempt to fix it yourself. Contact a qualified service technician or your dealer.
Operation safety
- Before installing the motherboard, carefully read the manuals that come with the package.
- Before using the product, make sure that all cables are correctly connected and that there is no damage to the cables. If any damage is found, contact your dealer immediately.
- To prevent short circuits, keep screws, bolts, and brackets away from all circuits, connectors, and electronic components. Do not expose the product to dust, moisture, or extreme temperatures. Do not place the product in areas where it may get wet. Place the product on a stable surface.
- If technical problems arise with the product, contact a qualified specialist or your dealer.
User Guide
Terms used in this guide.
To ensure correct execution of certain tasks, note the following symbols used in this guide.
WARNING: Information to prevent injury to yourself when trying to complete a task.

CAUTION: Information to prevent damage to components when trying to complete a task.
IMPORTANT: Information that you must take into account to complete a task.

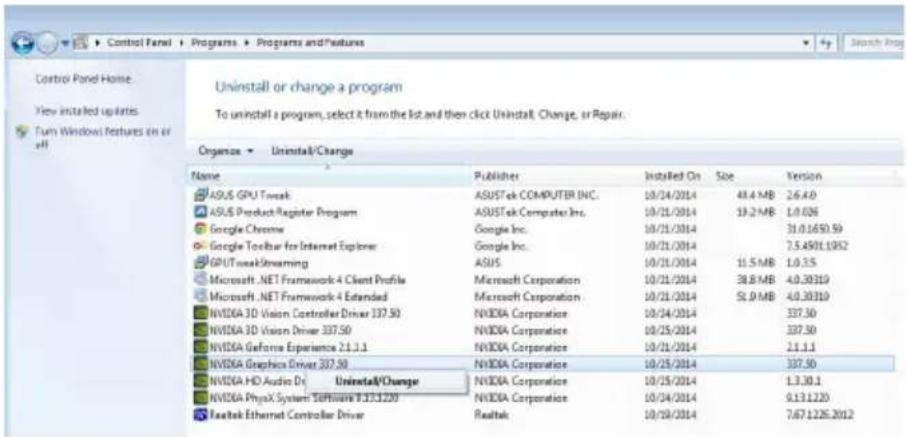
2.2 Uninstalling
2.2.1 Uninstalling the VGA driver in Windows 10/8.1/8/7 (64-bit)
To uninstall the VGA driver in Windows 10/8.1/8/7 (64-bit):
Click Start > Control Panel > Programs > Programs and Features, select the program you want to uninstall. After selecting, click Uninstall.
3. Using ASUS GPU Tweak
The ASUS GPU Tweak utility allows you to monitor and optimize the settings of your ASUS graphics card.
3.1 Installing ASUS GPU Tweak
3.1.1 Installing ASUS GPU Tweak in Windows 10 / 8.1 / 8 / 7 (64-bit)
To install ASUS GPU Tweak in Windows 10 / 8.1 / 8 / 7 (64-bit):
- Insert the CD into the optical drive. If autorun is enabled, the main menu appears automatically.
If autorun is disabled, run UI.exe from the root menu on the CD.
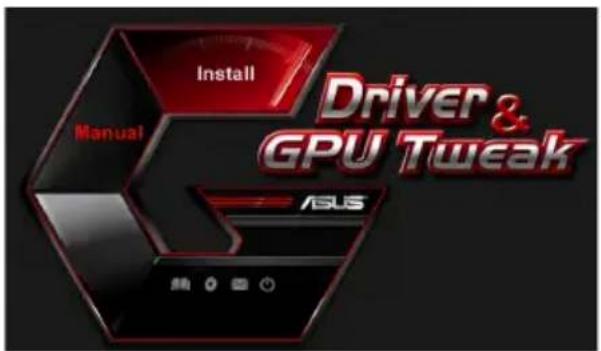
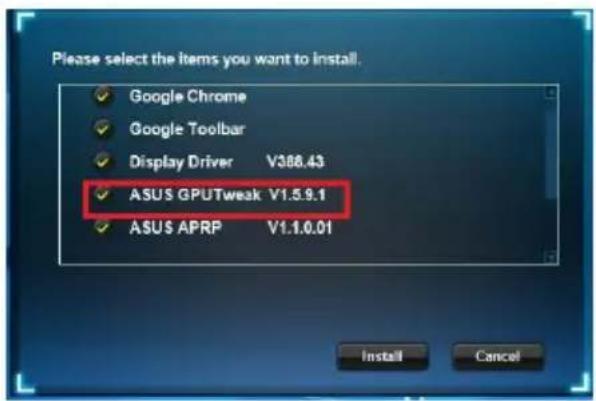
- In the main menu, click Install.
Select ASUS GPU Tweak and click the Install button.
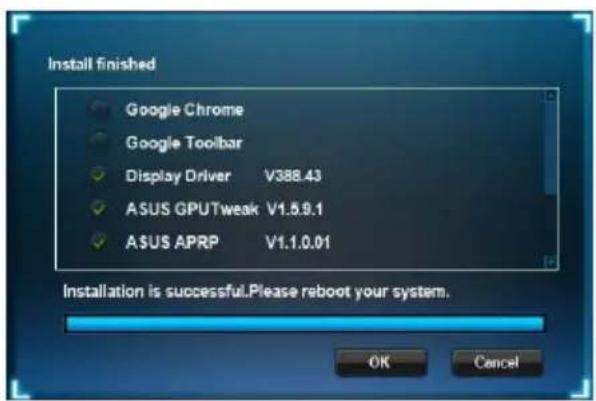
- When installation is complete, click OK.
3.2 Uninstalling ASUS GPU Tweak
3.2.1 Uninstalling ASUS GPU Tweak in Windows 10/8.1/8/7 (64-bit)
To uninstall ASUS GPU Tweak in Windows 10/8.1/8/7 (64-bit):
- Click Start > Control Panel > Programs > Programs and Features, select ASUS GPU Tweak. Click Uninstall.
4. ASUS APRP
4.1 Installing ASUS APRP
4.1.1 Installing ASUS APRP in Windows 10/8.1/8/7 (64-bit)
To install ASUS APRP on Windows® 10 / 8.1 / 8 / 7 (64-bit):
- Insert the support CD into the optical drive. 2. If autorun is enabled, the main menu appears automatically.
If autorun is not enabled, run UI.exe from the root menu on the support CD.
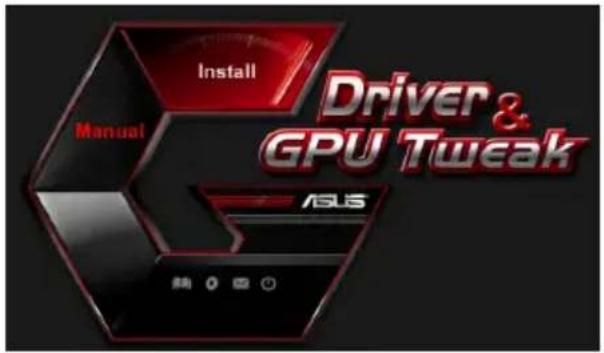
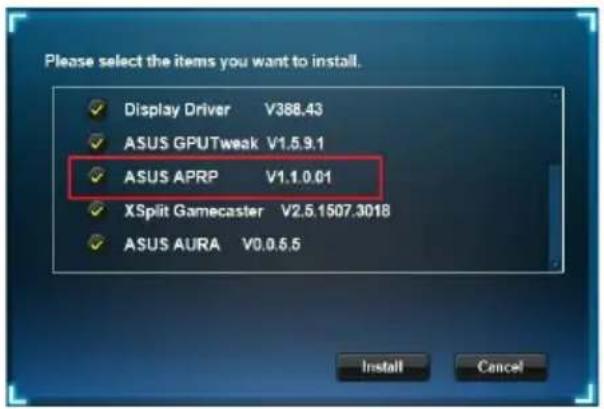
- In the main menu, click Install (Install).
Select ASUS APRP and click the Install (Install) button.
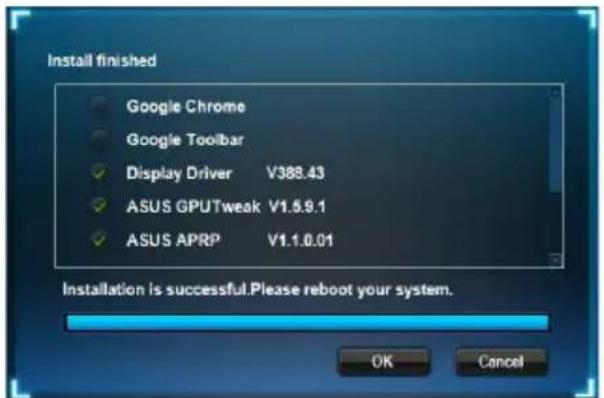
- When the installation is complete, click OK.
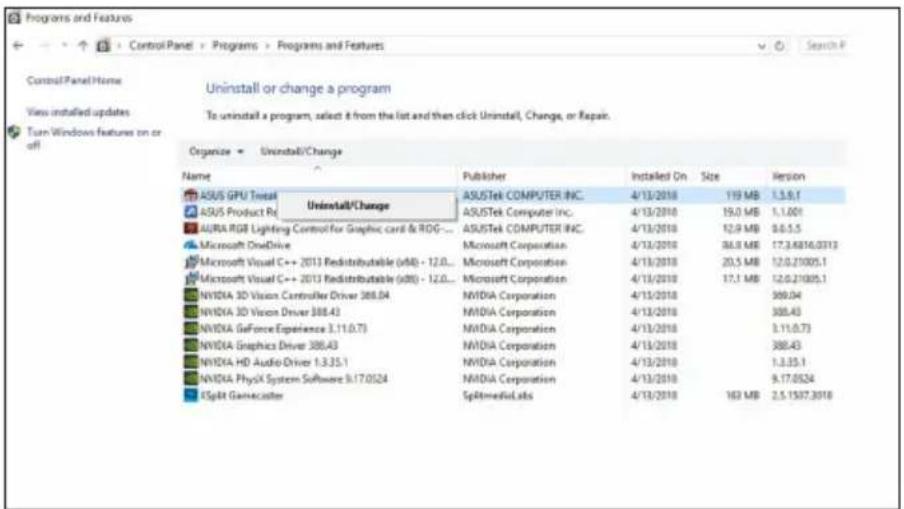
4.2 Uninstalling ASUS APRP
4.2.1 Uninstalling ASUS APRP on Windows® 10 / 8.1 / 8 / 7 (64-bit)
To uninstall ASUS APRP on Windows 10/8.1/8/7 (64-bit):
- Click Start (Start) > Control Panel (Control Panel) > Programs (Programs) > Programs and Features (Programs and Features), select ASUS APRP. Click Uninstall (Uninstall).
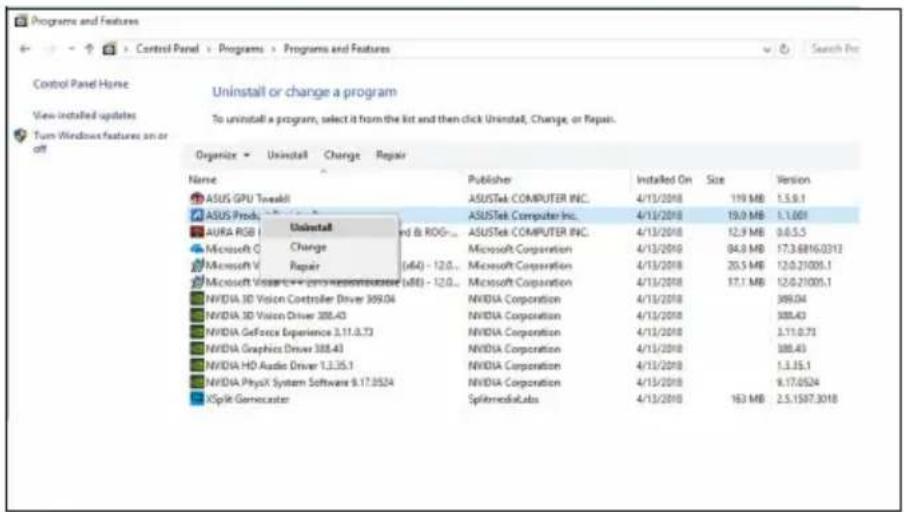
5. XSplit Gamecaster
5.1 Installing XSplit Gamecaster
5.1.1 Installing XSplit Gamecaster on Windows 10/8.1/8/7 (64-bit)
To install XSplit Gamecaster on Windows® 10 / 8.1 / 8 / 7 (64-bit):
- Insert the support CD into the optical drive. 2. If autorun is enabled, the main menu appears automatically.
If Autorun is disabled, run UI.exe from the root menu on the CD.
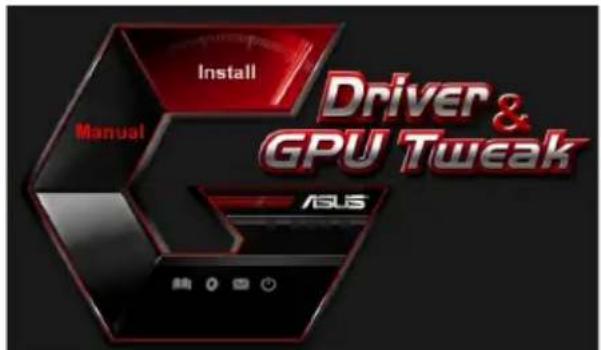
- In the main menu, click Install.
Select XSplit Gamecaster and click Install.
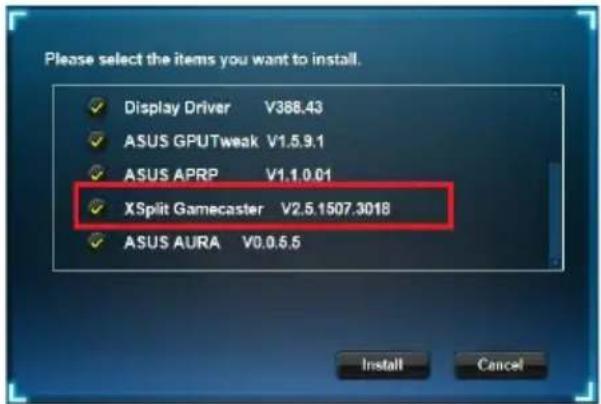
- When the installation is complete, click OK.
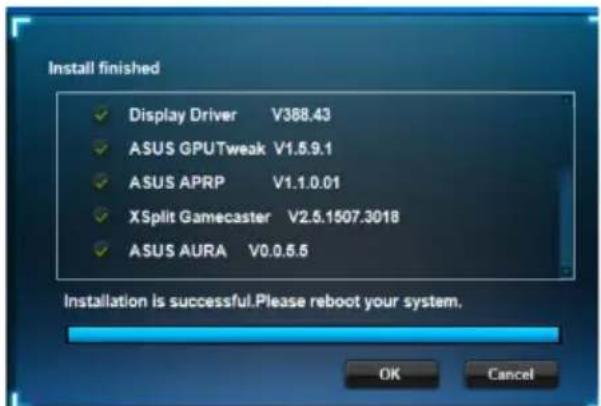
5.2 Uninstalling XSplit Gamecaster
5.2.1 Uninstalling XSplit Gamecaster in Windows® 10 / 8.1 / 8 / 7 (64-bit)
To uninstall XSplit Gamecaster in Windows® 10 / 8.1 / 8 / 7 (64-bit):
- Click Start > Control Panel > Programs > Programs and Features, select XSplit Gamecaster. Click Uninstall.
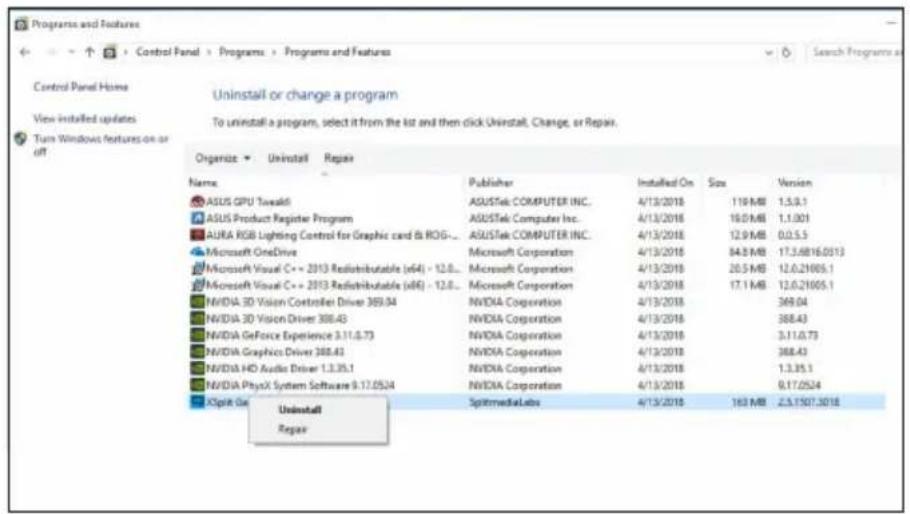
6. ASUS AURA
6.1 Installing ASUS AURA
6.1.1 Installing ASUS AURA in Windows 10 / 8.1 / 8 / 7 (64-bit)
To install ASUS AURA in Windows 10 / 8.1 / 8 / 7 (64-bit):
- Insert the CD into the optical drive. 2. If Autorun is enabled, the main menu appears automatically.
If Autorun is disabled, run UI.exe from the root menu on the CD.
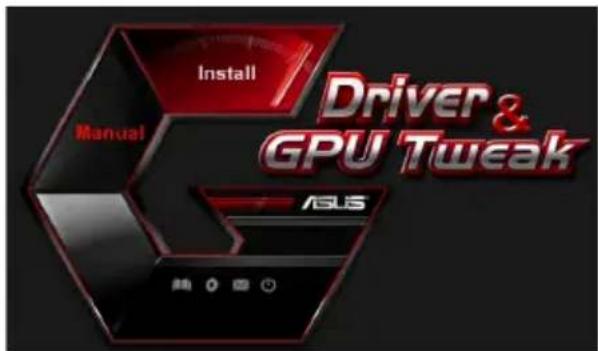
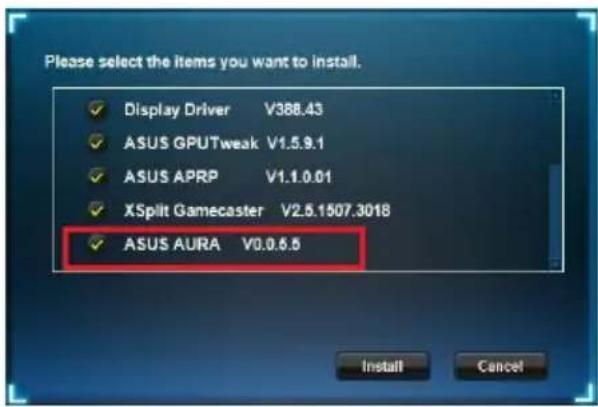
- In the main menu, click Install.
Run ASUS AURA and click Install.
- When the installation is complete, click OK.
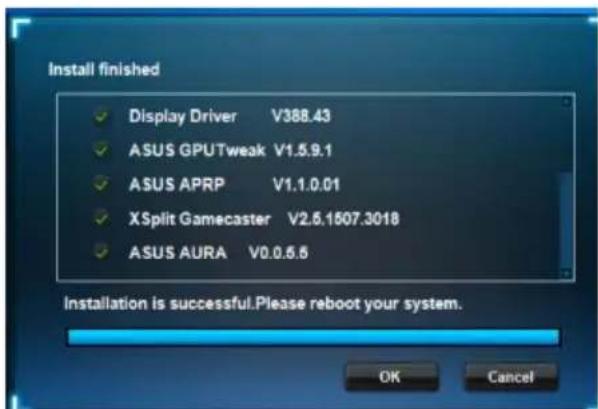
6.2 Uninstalling ASUS AURA
6.2.1 Uninstalling ASUS AURA in Windows 10 / 8.1 / 8 / 7 (64-bit)
To uninstall ASUS AURA in Windows 10/8.1/8/7 (64-bit):
- Click Start > Control Panel > Programs > Programs and Features, select ASUS AURA. Click Uninstall.
- In the main menu, click Browse CD to view the contents of the CD.
7.2 Contact information
- Insert the support CD into the optical drive. 2. If Autorun is enabled, the ASUS VGA driver installation screen appears automatically.
If Autorun is not enabled, run the file UI.exe from the root directory of the support CD.
- In the main menu, click Contact Us to go to the ASUS website and learn more.
7.3 Viewing the readme file
To view the readme file:
- Insert the support CD into the optical drive. 2. If Autorun is enabled, the ASUS VGA driver installation screen appears automatically.
If Autorun is not enabled, run the file UI.exe from the root directory of the support CD.
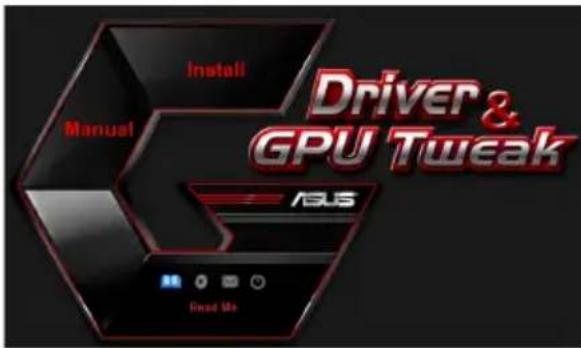
- You can find more information in the Read Me (startup) file.
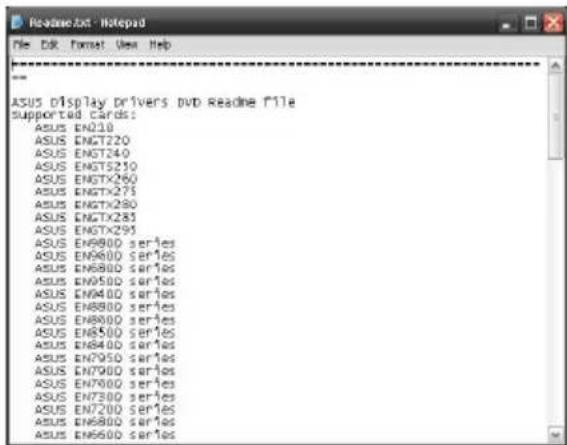
The screen will display the following message.
Appendix. Troubleshooting
If any of the problems listed above occur after installing the adapter, try restarting the computer, calling the technical support hotline, or performing one of the possible operations.
If all these troubleshooting steps fail, contact the support service at https://www.asus.com/support for more information.
Copyright © 2019 ASUSTeK Computer Inc. All rights reserved.
Copyright © 2019 ASUSTeK Computer Inc. All rights reserved.
No part of this manual, including the products and software described in it, may be reproduced, transmitted, transcribed, stored in a retrieval system, or translated into any language in any form or by any means, except documentation kept by the purchaser for backup purposes, without the express written permission of ASUSTeK COMPUTER INC. ("ASUS").
The warranty does not apply if: (1) the product has been repaired, modified, or altered without the written permission of ASUS; (2) the serial number of the product is damaged, illegible, or missing.
ASUS PROVIDES THIS MANUAL "AS IS" WITHOUT WARRANTY OF ANY KIND, EITHER EXPRESS OR IMPLIED, INCLUDING BUT NOT LIMITED TO THE IMPLIED WARRANTIES OR CONDITIONS OF MERCHANTABILITY OR FITNESS FOR A PARTICULAR PURPOSE. IN NO EVENT SHALL ASUS, ITS DIRECTORS, OFFICERS, EMPLOYEES OR AGENTS BE LIABLE FOR ANY INDIRECT, SPECIAL, INCIDENTAL, OR CONSEQUENTIAL DAMAGES (INCLUDING DAMAGES FOR LOSS OF PROFITS, LOSS OF BUSINESS, INABILITY TO USE OR LOSS OF DATA, INTERRUPTION OF BUSINESS AND THE LIKE), EVEN IF ASUS HAS BEEN ADVISED OF THE POSSIBILITY OF SUCH DAMAGES ARISING FROM ANY DEFECT OR ERROR IN THIS MANUAL OR PRODUCT.
The technical specifications and information contained in this manual are provided for informational purposes only. They are subject to change at any time without notice and should not be construed as a commitment on the part of ASUS. ASUS assumes no responsibility or liability for any errors or inaccuracies that may appear in this manual, including the products and software described in it.
Product names and corporate names mentioned in this manual may be registered trademarks or copyrighted by their respective companies. They are used for identification purposes only.
Contents
Notices 358 Safety information 359 About this manual 360
- Information about the package contents 361 2. Graphics card drivers 362
2.1 Installing VGA Drivers 362 2.2 Uninstalling VGA Drivers 363
- ASUS GPU Tweak 364
3.1 Installing ASUS GPU Tweak 364 3.2 Uninstalling ASUS GPU Tweak 365
- ASUS AURA 366
4.1 Installing ASUS AURA 366 4.2 Uninstalling ASUS AURA 367
- XSplit Gamecaster 368
5.1 Installing XSplit Gamecaster 368 5.2 Uninstalling XSplit Gamecaster 369
- ASUS AURA 370
6.1 Installing ASUS AURA 370 6.2 Uninstalling ASUS AURA 371
7. Other Information 372
7.1 Viewing the Compact Disc 372 7.2 Contact Information 372 7.3 Viewing the Readme File 373
Appendix: Common Problems 374
Notices
FCC Statement
This device complies with Part 15 of the FCC Rules. Operation is subject to the following conditions:
This device should not cause interference, and the operation of the device may be affected by external interference, including interference that causes undesirable operating modes.
This equipment has been tested and found to comply with the limits for a Class B digital device, pursuant to Part 15 of the FCC Rules. These limits are designed to provide reasonable protection against harmful interference in a residential installation. This equipment generates, uses, and can radiate radio frequency energy and, if not installed and used in accordance with the instructions, may cause harmful interference to radio communications. However, there is no guarantee that interference will not occur in a particular installation. If this equipment does cause harmful interference to radio or television reception, which can be determined by turning the equipment off and on, the user is encouraged to try to correct the interference by one or more of the following measures:
- Reorient or relocate the receiving antenna. Increase the separation between the equipment and receiver. Connect the equipment into an outlet on a circuit different from that to which the receiver is connected.
- Consult the dealer or an experienced radio/TV technician for help.
Use shielded cables for connection of the monitor to the graphics card - this ensures compliance with FCC requirements. Changes or modifications not expressly approved by the party responsible for compliance could void the user's authority to operate this equipment.
FCC Department of Communications Certification
This digital device does not exceed the Class B limits for radio noise emissions from digital devices set out in the rules of the Department of Communications.
This digital device Class B complies with Canadian ICES-003.
REACH
In accordance with the EU REACH regulation (Registration, Evaluation, Authorization, and Restriction of Chemicals), a list of chemical substances contained in ASUS products is available on the ASUS REACH website: http://csr.asus.com/english/REACH.htm
Macrovision Corporation Notice
This product incorporates copyright protection technology that is protected by U.S. patents and other intellectual property rights owned by Macrovision Corporation and other rights holders. Use of this copyright protection technology must be authorized by Macrovision Corporation and is intended for home and other limited viewing uses only, unless otherwise authorized by Macrovision Corporation. Reverse engineering or disassembly is prohibited.
Safety Information
Electrical Safety
- Before connecting or disconnecting system components, ensure that the power cables are disconnected. If possible, disconnect all power cables from the system before installing the device.
- Ensure that the mains voltage is within acceptable limits. If you are unsure about the type of power supply in your home, consult your local power company.
- If the power supply is faulty, do not attempt to repair it yourself. Contact a qualified technician or your dealer.
User Safety Rules
- Before installing the device on your motherboard, carefully read all the provided manuals.
- Before using the product, verify that all cables are properly connected and that the power cables are not damaged. If you discover any damage, contact your dealer immediately.
- To avoid short circuits, keep screws, paper clips, and other metal objects away from connectors, slots, and circuits.
- Avoid dust, humidity, and extreme temperatures. Do not place the product where it may get wet.
- Install the product on a stable surface. In case of technical problems with the device, contact a qualified service center specialist or your dealer.
About this Manual
Symbols Used in this Manual
This manual contains notes and warnings that you need to read for successful task completion.
CAUTION: Information about actions that may cause damage to equipment, data loss, or minor injury.

CAUTION: Information about actions that may cause damage to equipment.
IMPORTANT: Information that you should follow when performing a task.

Tips and Supplementary Information to Help You Complete Tasks.
Finding More Information
Refer to the following sources for additional information and for software updates.
1. ASUS Websites
The ASUS website (https://www.asus.com/) provides updated information on ASUS hardware and software. The ASUS website is listed in the contact information on the inside cover of this manual.
2. Optional Documentation
Your product package may include optional documentation, such as warranty cards, that may be added by your dealer. These documents are not part of the package.
1. Information on the Support CD
The support CD contains drivers and utilities for the VGA card. From the main menu of the support CD, you can install the software, obtain ASUS contact information, or view the contents of the support CD for the ReadMe file.
All images are for reference only and may differ from what you see on your screen. Some drivers and utilities on the support CD are supported only by specific models of ASUS video cards. Installing drivers and utilities may require administrator privileges. For more information, see the documentation for Windows 10/8.1/8/7. The contents of the support CD are subject to change without notice. Updates can be found on the ASUS website at www.asus.com.
Insert the support CD into the optical drive of your computer. If autorun is enabled, the main menu will appear automatically.
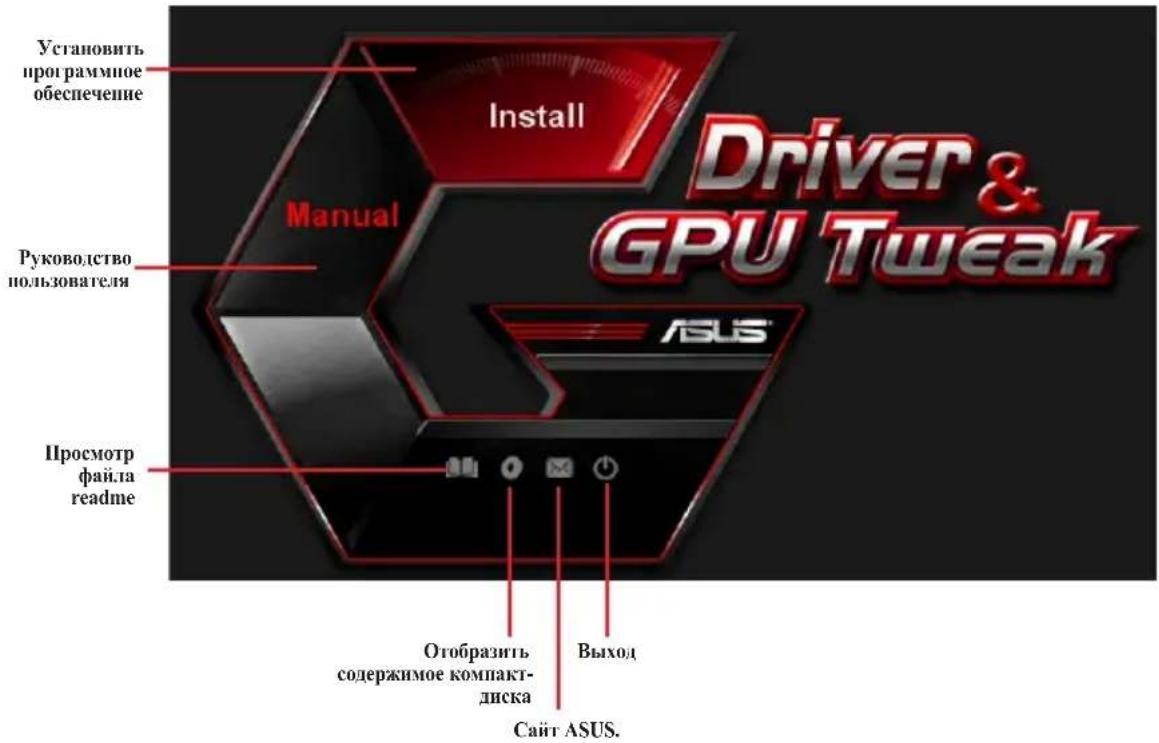

If autorun is disabled, run the file UL.exe from the CD. Double-click UL.exe to launch the menu.
The ASUS GPU Tweak utility allows you to control and adjust the settings for optimal performance of your ASUS video card.
3.1 Installing ASUS GPU Tweak
3.1.1 Installing ASUS GPU Tweak on Windows 10 / 8.1 / 8/7 (64-bit)
Support CD
- Insert the CD into the optical drive.
- If autorun is enabled, the installation menu appears. If autorun is disabled, run the UI.exe file from the root directory of the CD.
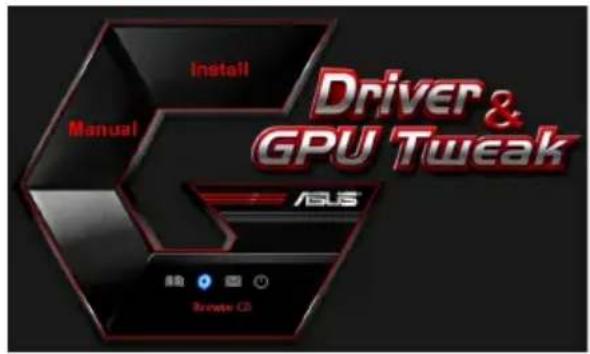
- In the main menu, click Browse CD to view the contents of the CD.

7.2 Contact Information
- Insert the CD into the optical drive.
- If autorun is enabled, the installation menu appears.
If autorun is disabled, run the UI.exe file from the root directory of the CD.
- In the main menu, click Contact Us to go to the ASUS website and view additional information.
7.3 Viewing the readme file
To view the readme file, follow these instructions:
- Insert the CD into the optical drive.
- If autorun is enabled, the installation menu appears.
If autorun is disabled, run the UI.exe file from the root directory of the CD.
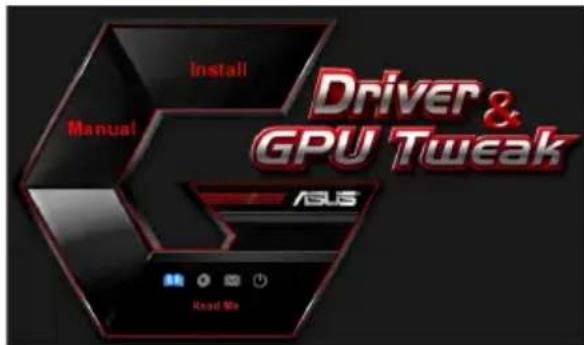
- In the main menu, click Read Me to view the readme file.



- DRIVERS AND UTILITIES
- COPYRIGHT © 2019 ASUSTEK COMPUTER INC. ALL RIGHTS RESERVED
- CONTENTS
- NOTICES
- FEDERAL COMMUNICATIONS COMMISSION STATEMENT
- CANADIAN DEPARTMENT OF COMMUNICATION STATEMENT
- REACH
- MACROVISION CORPORATION PRODUCT NOTICE
- SAFETY INFORMATION
- ELECTRICAL SAFETY
- OPERATION SAFETY
- ABOUT THIS GUIDE
- CONVENTIONS USED IN THIS GUIDE
- WHERE TO FIND MORE INFORMATION
- ASUS WEBSITES
- OPTIONAL DOCUMENTATION
- SUPPORT CD INFORMATION
- VGA DRIVERS
- INSTALLING THE VGA DRIVERS
- INSTALLING THE VGA DRIVERS IN WINDOWS 10/8.1/8/7 (64-BIT)
- UNINSTALLING THE VGA DRIVERS
- UNINSTALLING THE VGA DRIVERS IN WINDOWS 10/8.1/8/7 (64-BIT)
- ASUS GPU TWEAK UTILITY
- INSTALLING ASUS GPU TWEAK
- INSTALLING ASUS GPU TWEAK IN WINDOWS 10/8.1/8/7 (64-BIT)
- UNINSTALLING ASUS GPU TWEAK
- REMOVING ASUS GPU TWEAK IN WINDOWS 10/8.1/8/7 (64-BIT)
- ASUS APRP
- INSTALLING ASUS APRP
- INSTALLING ASUS APRP IN WINDOWS 10 / 8.1 / 8 / 7 (64-BIT)
- UNINSTALLING ASUS APRP
- REMOVING ASUS APRP IN WINDOWS 10/8.1/8/7 (64-BIT)
- XSPLIT GAMECASTER
- INSTALLING XSPLIT GAMECASTER
- INSTALLING XSPLIT GAMECASTER IN WINDOWS 10/8.1/8/7 (64-BIT)
- UNINSTALLING XSPLIT GAMECASTER
- REMOVING XSPLIT GAMECASTER IN WINDOWS 10/8.1/8/7 (64-BIT)
- ASUS AURA
- INSTALLING ASUS AURA
- INSTALLING ASUS AURA IN WINDOWS 10 / 8.1 / 8 / 7 (64-BIT)
- UNINSTALLING ASUS AURA
- REMOVING ASUS AURA IN WINDOWS 10/8.1/8/7 (64-BIT)
- OTHER INFORMATION
- BROWSE THE SUPPORT CD
- CONTACT INFORMATION
- VIEWING THE README FILE
- APPENDIX: BASIC TROUBLESHOOTING
- ASUS
- GRAPHICS CARD
- ASUS REACH
- STATEMENT FROM THE CANADIAN DEPARTMENT OF COMMUNICATIONS
- FCC (FEDERAL COMMUNICATIONS COMMISSION) DECLARATION
- FEDERAL COMMUNICATIONS COMMISSION STATEMENT (FCC)
- CANADIAN DEPARTMENT OF COMMUNICATIONS STATEMENT
- MACROVISION CORPORATION NOTICE
- USER GUIDE
- TERMS USED IN THIS GUIDE
- UNINSTALLING
- UNINSTALLING THE VGA DRIVER IN WINDOWS 10/8.1/8/7 (64-BIT)
- USING ASUS GPU TWEAK
- INSTALLING ASUS GPU TWEAK IN WINDOWS 10 / 8.1 / 8 / 7 (64-BIT)
- UNINSTALLING ASUS GPU TWEAK IN WINDOWS 10/8.1/8/7 (64-BIT)
- INSTALLING ASUS APRP IN WINDOWS 10/8.1/8/7 (64-BIT)
- UNINSTALLING ASUS APRP ON WINDOWS® 10 / 8.1 / 8 / 7 (64-BIT)
- INSTALLING XSPLIT GAMECASTER ON WINDOWS 10/8.1/8/7 (64-BIT)
- UNINSTALLING XSPLIT GAMECASTER IN WINDOWS® 10 / 8.1 / 8 / 7 (64-BIT)
- UNINSTALLING ASUS AURA IN WINDOWS 10 / 8.1 / 8 / 7 (64-BIT)
- APPENDIX. TROUBLESHOOTING
- FCC STATEMENT
- FCC DEPARTMENT OF COMMUNICATIONS CERTIFICATION
- USER SAFETY RULES
- ABOUT THIS MANUAL
- SYMBOLS USED IN THIS MANUAL
- FINDING MORE INFORMATION
- INFORMATION ON THE SUPPORT CD
- INSTALLING ASUS GPU TWEAK ON WINDOWS 10 / 8.1 / 8/7 (64-BIT)
Brand : ASUS
Model : ROG Strix Radeon RX 570 OC
Category : Graphic card