
W7461X3EU - Washing machine NEFF - Free user manual and instructions
Find the device manual for free W7461X3EU NEFF in PDF.
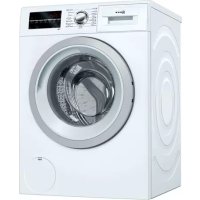



| Product type | Washing machine |
| Brand | Neff |
| Model | W7461X3EU |
| Washing capacity | 9 kg |
| Maximum spin speed | 1600 rpm |
| Dimensions (H x W x D) | 85 x 60 x 65 cm |
| Net weight | 75 kg |
| Power supply | 230 V, 50 Hz, 10 A |
| Water consumption | 45 L per cycle |
| Energy class | A |
| Washing programs | Cotton, synthetics, delicates, wool, quick, etc. |
| Options | Delayed start, child lock, prewash, extra rinse |
| Noise level (wash/spin) | 50 dB / 75 dB |
| Routine maintenance | Cleaning the filter, detergent drawer, and door seal |
| Safety | Child lock, leak protection, secure door |
| Spare parts available | Top, control panel, detergent drawer, door, seal, pump, etc. |
| Repairability | Detailed repair manual for part replacement |
| Loading type | Front-load |
| Display | LED screen |
Frequently Asked Questions - W7461X3EU NEFF
User questions about W7461X3EU NEFF
0 question about this device. Answer the ones you know or ask your own.
Ask a new question about this device
Download the instructions for your Washing machine in PDF format for free! Find your manual W7461X3EU - NEFF and take your electronic device back in hand. On this page are published all the documents necessary for the use of your device. W7461X3EU by NEFF.
USER MANUAL W7461X3EU NEFF
3.2 Replacing the facade panel 7
3.2.1 Removing the facade panel 7 3.2.2 Installing the facade panel 7
3.3 Replacing the seal for the front door 8
3.3.1 Removing the seal for the front door 3.3.2 Installing the seal for the front door 8
3.4 Replacing the seal of the front door 9
3.4.1 Removing the seal of the front door 9 3.4.2 Installing the seal of the front door 9
3.5 Replacing the door 10
3.5.1 Removing the door 10 3.5.2 Installing the door 10
3.6 Replacing the door components 11
3.6.1 Removing the door components 11 3.6.2 Installing the door components 11
3.7 Replacing the door seal 12
3.7.1 Removing the door seal 12 3.7.2 Installing the door seal 15
3.8 Replacing the door lock 16
3.8.1 Removing the door lock 16 3.8.2 Installing the door lock 17
3.9 Replacing the drum lighting 18
3.9.1 Mounting the lighting on the drum 18 3.9.2 Mounting the lighting on the drum 18
Safety symbols and images that provide information about the type of danger.
The following safety symbols are used in this document:
| Симboл за орасост за чужения | ОвноPre dedупраздітелно сьобсято Орасост от[elekntrочко наpopжени Риск OT[eк科研院所 |
| Орасost от[nорязвany |
About this document
| Симbol 3a onachoct 3начени | Опachoct ot пемарази Опachoct ot горец поьрхости |
| Опachoct ot симно магнисто плел Опachoct ot неюни рашу лычени |
Table 2: Safety symbols
1.2.3 Structure of the warnings
The warnings in this document have a standardized structure.

DANGER
Immediate danger!
Imminent danger/warning
Measures to prevent danger.
Special warning indicating electric shock, live parts under voltage. Follow the instructions to avoid danger.

DANGER
Risk of electric shock from live parts under voltage!
Electric shock
1.2.4 Tools
Tools required for assembly and disassembly:
| Оьш симвов Зачени | |
| I | Иденихицаре на спесиален сбBet(TEKCT w/ллграфика) |
| I | Иденихицаре на постс сбBet (само TEKCT) |
| I | Иденихицаре на врьзka Кьм Вideо урок |
| I | Иденихицаре на необхочимite И-стру金融市场 |
| I | Иденихицаре на необхочимite поедырпелейу沧обия |
| I | Иденихицаре на усанове (ako ..., Тогава ... ) |
| I | Иденихицаре на рezупат |
| [Стар] | Иденихицаре на Клиочни睁ь soth |
| [00123456] | Иденихицаре на Каталожен Homep |
| [Статус] | Иденихицаре на по��аизяп Тект/ празорец (на диспега на урда) |
Table 3: Tools

Instructions and aids
| посочае Порожасту Изображения | |
| Помошен Истру- мент [15000155] | Исттумент за разхлабва- н на пл actмов части |
| Отberека Торх T20 С OTВОР [00340764] | 100 Мm, 3a винтоve сPreдп- ан ecифт |
| Динамометрич= Клоч [15000441] | Динамометрич= Клоч 20 - 100 Nm |
| Плеса OTberека [00340854] | Врьх 3,5 mm x 0,6 mm x 100 mm, 3aшиtna Изолаця 1000 V AC |
| Плеса OTberека [00340855] | Врьх 5,5 mm x 1,0 mm x 125 mm, 3aшиtna Изолаця 1000 V AC |
| Клеси с Истовide- ни челюсти, по- ытл [00341269] | Дылжина 200 MM |
| Клеси розачки [00342182] | Дылжина: 200 MM |
| посочане Робости Изобрахения | ||
| Комбийразан Клич [00340811] | гейнERY Kлич 10°mm, M6 | |
| Combination wrench [00340814] | гейнERY Kлич 13°mm, M8 | |
| Комбийразан Клич [00340817] | гейнERY Kлич 17 mm, M10. | |
| Комбийразан Клич [15000459] | гейнERY Kлич 16°mm, M10 | |

Repair
3.1 Attaching the work lamp
Special tools:
Torx screwdriver TX20, opening 6.30 mm (1/4") 152 mm, for screws [00341272]
Removal:
Remove the plug from the socket. Remove the plug from the power supply.
3.1.1 Attaching the work lamp
1. Screw in the screws (1). 2. Push the work lamp towards the plug of the device (2). 3. Place the work lamp on top (3), so that it attaches.
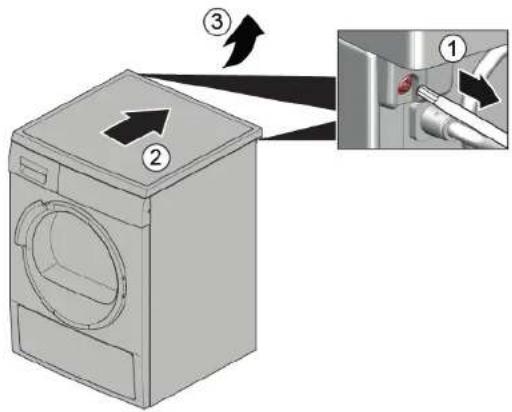
3.1.2 Mounting the work lamp
Mount in reverse order.

3.2 Safety precautions

CAUTION
Sharp edges on the housing
Emergency stop
Wear protective gloves.

WARNING
Use on inclined surfaces!
Risk of injury/emergency stop
Secure the device before use.

CAUTION
Risk of falling parts if screws are loose!
Emergency stop button
Secure the component so it does not fall.
ATTENTION
Check the oil level regularly!
Damage to parts or to the client's home, e.g.
10.
Secure the components so that they do not fall.
Inspection:
The device is disconnected from the power supply. The device is disconnected from the water supply. The working area is clean.→6 The seal for the first preparation is clean.→8
3.2.1 Installing the dispenser
- 1. Remove the protective caps (1).
2. Loosen the fastening elements (2,3).
2. Loosen the hose connection of the control valve. 3. Install the dispenser.
3.2.2 Mounting the dispenser
Mount the return.

Repair
3.3 Replacing the seal for the first preparation
Inspection:
The level is switched off. The level is disconnected from the power supply.
3.3.1 Removing the switch for the first preparation
- Interpret the switch for the first preparation. 2.1. Press the button on the cover (1).
2. Remove the switch for the first preparation (2).
3.3.2 Installing the switch for the first preparation
Install in reverse order.
Repair
3.4 Removing the cover of the switch for the first preparation
Warning:
The level is switched off. The level is disconnected from the power supply. The switch for the first preparation is removed. → 8
3.4.1 Removing the cover of the switch for the first preparation
1. Loosen the fastening elements.
2. Remove the cover of the switch for the first preparation.
3.4.2 Installing the cover of the switch for the first preparation
Install in reverse order.

3.5 Opening the door

CAUTION
Open the door carefully!
Moving/Handling the door
Do not touch the door area.
Wear protective gloves.
Requirement:
The device is disconnected from the power supply. The device is disconnected from the water supply. The door is open.
3.5.1 Opening the door
1.

CAUTION
Risk of injury from parts falling due to loose screws! Damaged parts of the device in the customer's home, e.g. the floor. Secure the component. This way it will not fall.

CAUTION
Risk of injury from parts falling due to loose screws!
Adjust the parts. Secure the component so that it does not fall.
Tighten the screws (1).
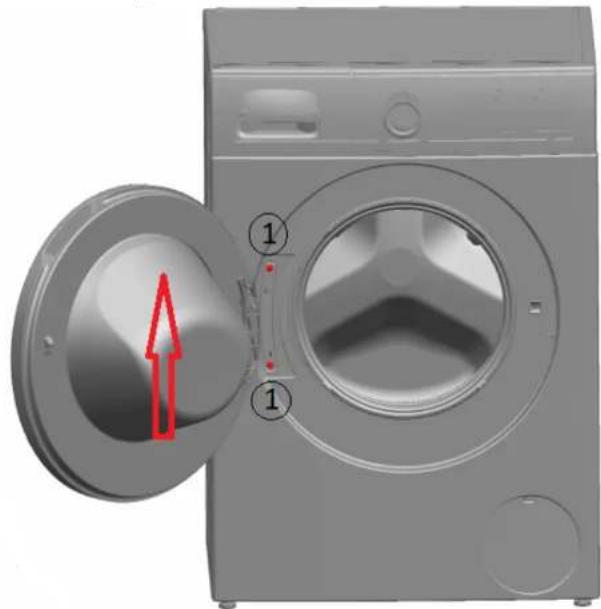
2. Pull the gate upward.
3.5.2 Mounting the gate
Mounting the gate in reverse.

Repair
3.6 Removing the gate components
CAUTION
Open the flaps!
Cutting/crushing hazard. Do not touch the flap area. Wear protective gloves.
Requirement:
Disconnect the power supply. Disconnect from the mains. The gate is closed. → 10
3.6.1 Removing the gate components
Fold the gate outward.
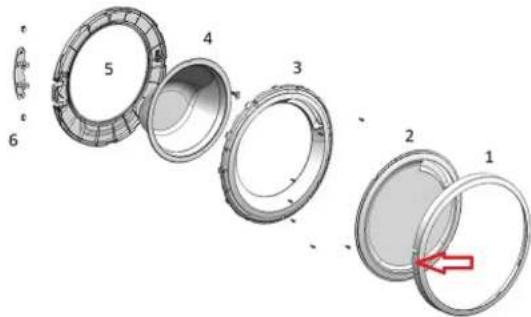
3.6.2 Mounting the gate components
Attention: refer to the instructions.

Repair
3.7 Removing the door hinges

CAUTION
Risk of injury from falling parts during disassembly.
Wear protective gloves.

CAUTION
Risk of injury from falling parts during disassembly of screws!
Secure the parts to prevent them from falling.
Secure the component so that it does not fall.
CAUTION!
Risk of injury from falling parts during disassembly of screws! Before removing the parts, secure them to prevent them from falling.
Secure the component so that it does not fall.
Removal:
Remove the locking pin. Remove the locking pin from the hinge pin. Then remove the hinge pin. →8 The door is removed. →10 The hinge is removed. →19
3.7.1 Adjustment of the door closer
1.


WARNING
Call for qualified personnel!
Risk of injury/damage from improper adjustment
Secure the door against closing.
Open the door fully.
- Loosen the screws in the lower part of the hinge arm (1).
3. Adjust the closing force.

Repair
- Remove the screws from the mounting plate (2).5.1. Loosen the screws on the back of the door (1).
Risk of falling parts if not installed correctly!
Damage or injury to the door.
Adjust the closing force of the door closer 3.4 mm.
Mount the return.

According to the manufacturer, the user must not be forgotten to be provided with the spare parts for the gate, including the repair instructions in accordance with Regulation (EU) 2019/2023. In order to ensure safety, the gate operator must undergo an electrical safety check by a qualified electrician before being put into operation. This must be done in accordance with the national regulations and standards.
DANGER
Risk of electric shock from live parts!
Danger to life from electric shock due to improper repair
Electrical equipment must only be repaired by qualified electricians. After repair, a safety check must be carried out in accordance with VDE 0701 and in compliance with national regulations.
CAUTION
Sharp edges on the housing and moving parts can cause injury.
WARNING
Improperly secured moving parts can cause fractures or injuries. Secure moving parts before working on them.
CAUTION
Risk of falling parts when removing screws! Secure moving parts. Tighten components so they cannot fall.
CAUTION!
Risk of falling parts when removing screws! Secure the moving parts on the gate leaf. Tighten components so they cannot fall.
m3nckbaHe:
YpeBt en3KNIOueHOT 3axpaHBAHeTO. YpeBt en3KIOHcH OT BOIOCHA6dIeNTHaT MaPexa. Ypeinte ca CBO6oHHO IOCTbHN. TogHnT paoboteH nnot e CBaneH.→6 ΦacadHnT nHaHe cBaJIeH. BpaTaTa e cBanHe.→10 O6Tgauunr npbctHe cBaeH. PpeHnT nHeI e cBaeH. YnnbTheHHeTo Ha BpaTaTa e CbaNeHO.
3.8.1 CbānHe Ha KlnouankaTa Ha BpaTaTa
- N3knHoye Te Uencena Ha KInouaAnkata Ha BpaTaTa. 2.Ocbo6oJeTe KIOHAnKaTa Ha BpaTata.
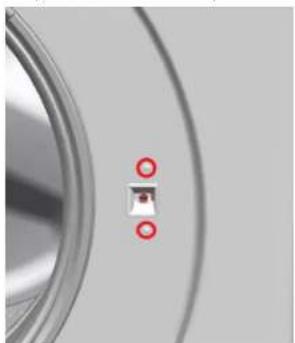
3.CbaneTe KIOHuaKata Ha BpaTata.

PemOH
3.8.2 MoHTmpeHa KJIIOUaJIkAraHa BpaTaTa
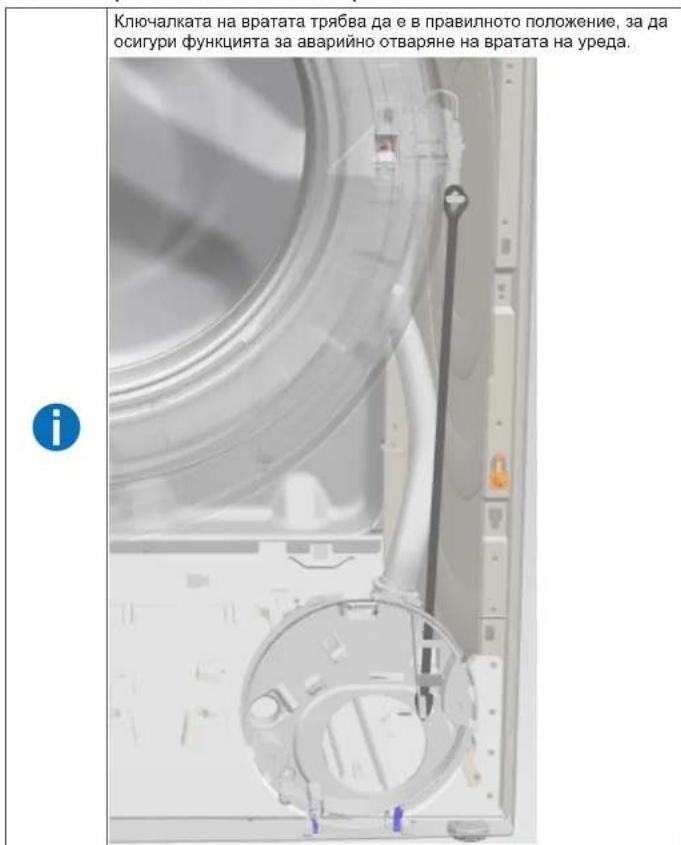
MOHTnpaTBeBobpaTeHpe.
Pmck OT naaun Yactn nopadn pa3XnaeHN BnHTOBe!
PobpeHa Ha npyHua Tn Ha ypeHa Hb DOMa Ha KHeHTa, HAp. dbHo
TO.
3akpenete KOMnoHeHTa, Taka He Ha He naHe.
N3nCKBaHe:
YpeIbTe I3KIIIOeHOT 3axpaHBAHeTO. YpeBt en3KIOHcH OT BODOCHA6DHTENHATA MPexa. Upeinte ca cbo6nHO doctbnH. TOpHnT pa6oTeH nOte cBaneH,→6 Yekmedketo3a nepinHH npenapat e caneho.-8 ФасадиТ NaHEn e cBaine.
3.9.1 CbJIHe Ha ocBtIeHHeTo Ha 6apa6aHa
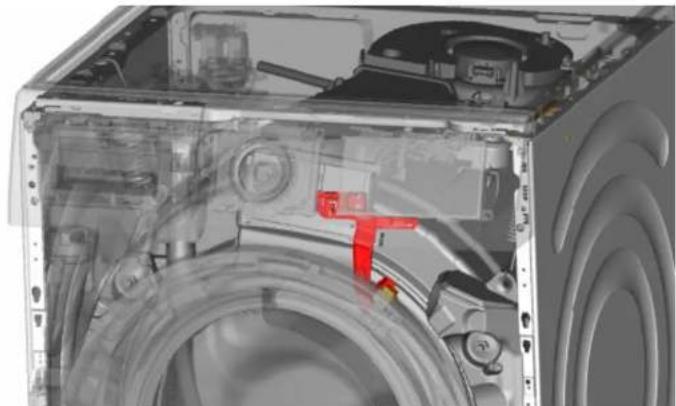
- Connect the drum to the water supply. 2. Disconnect the electrical connections. 3. The drum lighting is switched on.
3.9.2 Mounting the drum lighting
Mount in reverse order.

Repair
3.10 Removing the pump cover
Warning:
Disconnect the power supply. Disconnect from the water supply.
3.10.1 Removing the pump cover
Remove the screws, noting their positions (2,3).
8. Remove the cover.
3.11.2 Mounting the pressure switch
Mount in reverse order.
Risk of falling parts.
Secure individual components against falling.

Danger of falling parts due to loose screws!
Damage to other parts of the appliance or household items of the customer, e.g., floors.
Secure the individual components before starting work.
Requirement:
Make sure to secure the appliance against slipping.


Risk of falling parts due to loose screws!
Personal injury due to falling parts.
Make sure to secure the component against falling.

Risk of falling parts due to loose screws!
Make sure to secure the component against falling.
Presetting:
- Open the pump cover.

- Remove the pump cover.
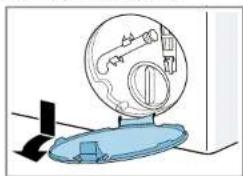
Make sure to secure the appliance against slipping.
Make sure to secure the component against falling.

Repair

NOTE!
Risk of falling parts due to loose screws!
Make sure to secure the component against falling.
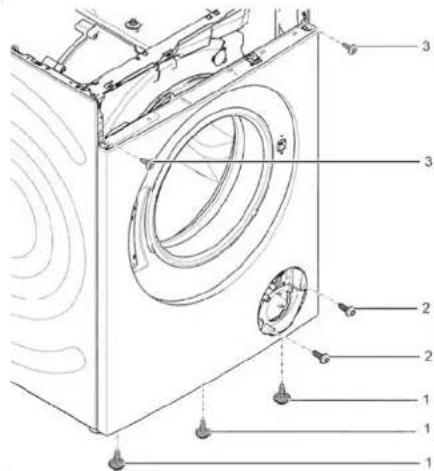
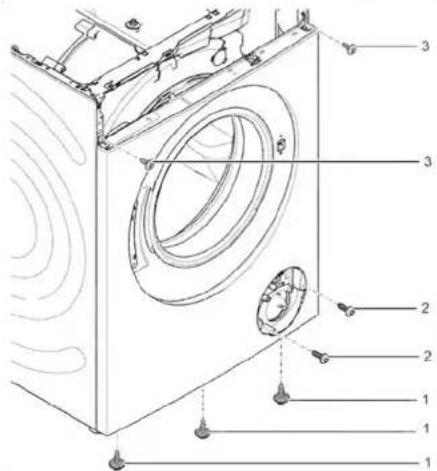
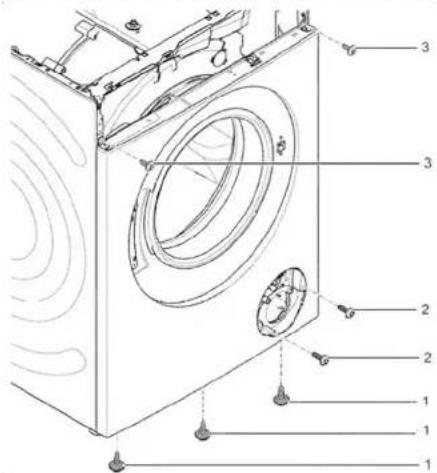
Remove the screws on the front, starting from the bottom and working up (2, 3).
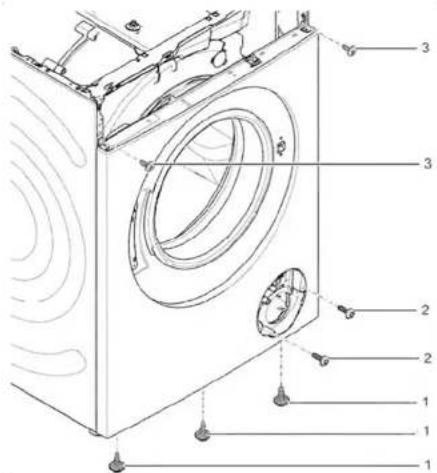
- Remove the front panel.
3.11.2 Installing the front panel
Repair hints - Washing machine
1 Concerning this document. 108
1.1 Important information 108 1.1.1 Purpose 108 1.2 Explanation of symbols 108 1.2.1 Danger levels.. 108 1.2.2 Hazard symbols 108 1.2.3 Structure of the warnings.. 109 1.2.4 General symbols 109
Tools and aids 110
Repair 111
3.1 Replacing worktop 111 3.1.1 Removing worktop 111 3.1.2 Installing worktop 111 3.2 Replacing fascia panel 112 3.2.1 Removing fascia panel 112 3.2.2 Installing fascia panel 112
3.3 Replacing detergent drawer 113
3.3.1 Removing detergent drawer 113 3.3.2 Installing detergent drawer 113
3.4 Replacing detergent drawer handle 114
3.4.1 Removing detergent drawer handle 114 3.4.2 Installing detergent drawer handle 114
3.5 Replacing door 115
3.5.1 Removing door 115 3.5.2 Installing door 115 3.6 Replacing door components 116 3.6.1 Removing door components 116 3.6.2 Installing door components 116
3.7 Replacing door seal 117
3.10 Replacing pump cover 124
3.10.1 Removing pump cover 124 3.10.2 Installing pump cover 124
3.11 Replacing front panel 125
3.11.1 Removing front panel 125 3.11.2 Installing front panel 127
Concerning this document
1.1 Important information
1.1.1 Purpose
These repair hints support consumer to repair appliances by himself according to the applicable eco-design regulation (as of 03/2021).
They contain information how to exchange defined spare parts including warnings and risks.
In case of questions, please contact our customer service. We will only be liable for damages if the repair hints have been followed properly.
1.2 Explanation of symbols
1.2.1 Danger levels
The warning levels consist of a symbol and a signal word. The signal word indicates the severity of the danger.
Table 1: Danger levels
| Warning level Meaning | |
| Danger | Non-observation of the warning message will result in death or serious injuries. |
| Warning | Non-observation of the warning message could result in death or serious injuries. |
| Caution | Non-observation of the warning message could result in minor injuries. |
| Notice | Non-observation of the warning message could result in damage to property. |
1.2.2 Hazard symbols
Hazard symbols are symbolic representations which give an indication of the kind of danger.
The following hazard symbols are used in this document:
| Hazard symbol Meaning | |
| ! | General warning message |
| Danger from electrical voltage | |
| Risk of explosion | |
| Danger of cuts | |
| Danger of crushing |
Concerning this document
| Hazard symbol Meaning | |
| Danger from hot surfaces | |
| Danger from strong magnetic field | |
| Danger from non-ionizing radiation |
Table 2: Hazard symbols
1.2.3 Structure of the warnings
Warnings in this document have a standardised appearance and a standardised structure.
Danger
Type and source of danger!
Possible consequences of ignoring the danger / warning.
Measures and prohibitions for preventing the danger.
The following example shows a warning that warns against electric shock due to live parts. The measure for avoiding the danger is mentioned.
Danger
Risk of electric shock due to live parts!
Death by electrocution
- Disconnect appliances from electrical supply at least 60 seconds before starting repairs.
1.2.4 General symbols
The following general symbols are used in this document:
| Gen. symbol Meaning | |
| 1 | Identification of a special tip (text and/or graphic) |
| i | Identification of a simple tip (only text) |
| Identification of a link to a video tutorial |
Table 3: General symbols
| Gen. symbol Meaning | |
| Identification of required tools | |
| Identification of required preconditions | |
| Identification of a condition (if ..., then ...) | |
| Identification of a result | |
| [Start] Identification of a key or button | |
| [00123456] Identification of a material number | |
| Status Identification of displayed text / window (in the appliance's display) | |

Tools and aids
| Designation Details Images | ||
| Auxiliary tool [15000155] | Tool for loosening out of plastic parts | |
| Screwdriver Torx T20 with bore hole [00340764] | 100 mm, for screws with safety pin | |
| Torque spanner [15000441] | Torque spanner 20 - 100 Nm | |
| Slot screwdriver [00340854] | Blade 3.5 mm x 0.6 mm x 100 mm, Protective Insulation 1000 V AC | |
| Slot screwdriver [00340855] | Blade 5.5 mm x 1.0 mm x 125 mm, Protective Insulation 1000 V AC | |
| Needle-nose pliers, angled pattern [00341269] | Length 200 mm | |
| Side-cutting pliers [00342182] | Length: 200 mm | |
| Designation Details Images | ||
| Combination wrench [00340811] | Wrench size 10°mm, M6 | |
| Combination wrench [00340814] | Wrench size 13°mm, M8 | |
| Combination wrench [00340817] | Wrench size 17 mm, M10 | |
| Combination wrench [15000459] | Wrench size 16°mm, M10 | |

Repair
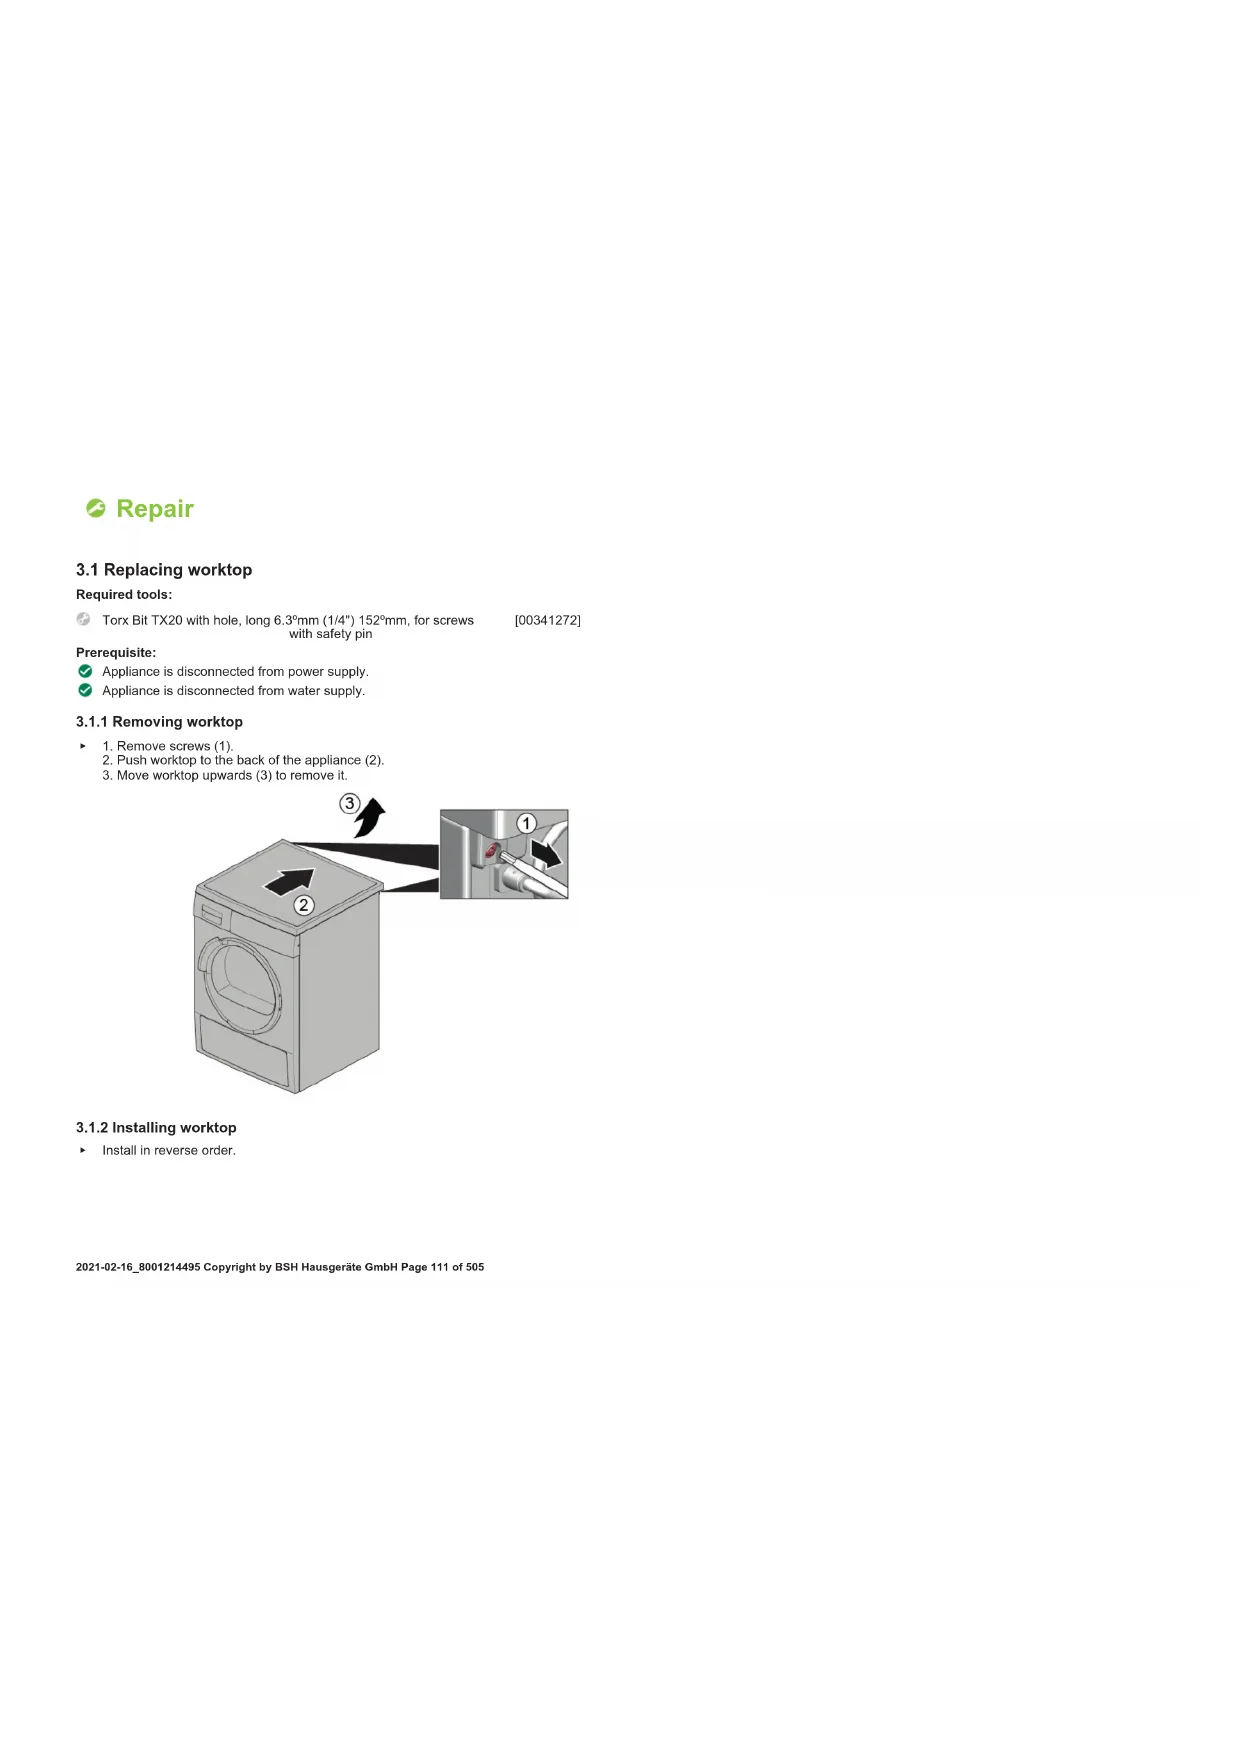
3.1 Replacing worktop
Required tools:
Torx Bit TX20 with hole, long 6.3 mm (1/4") 152 mm, for screws [00341272] with safety pin
Prerequisite:
Appliance is disconnected from power supply. Appliance is disconnected from water supply.
3.1.1 Removing worktop
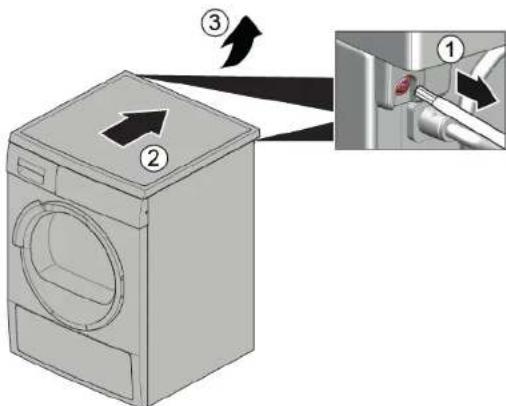
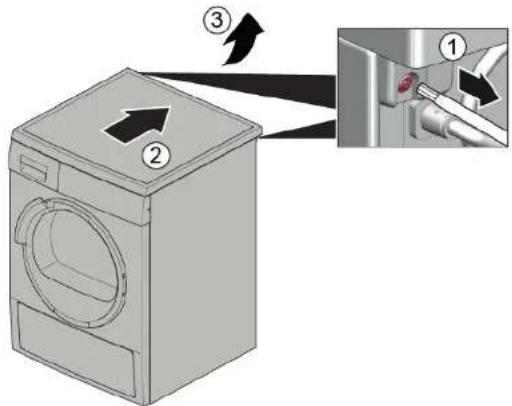
- Remove screws (1).
- Push worktop to the back of the appliance (2).
- Move worktop upwards (3) to remove it.
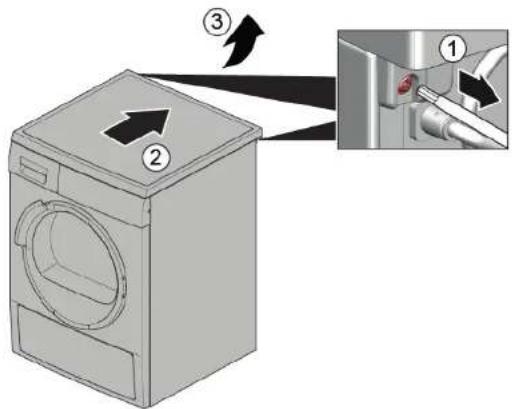
3.1.2 Installing worktop
Install in reverse order.

Repair
3.2 Replacing fascia panel

Sharp housing edges!
Cut injuries
Wear protective gloves.

Slipping of tilted appliances!
Bone fractures / crush injuries
Secure appliances against slipping.

Risk of falling parts due to released screws!
Injury because of falling parts
Secure component from falling down.
Damage to other parts of the appliance or at customer's home e.g. bot
tom.
Secure component from falling down.
Prerequisite:
Appliance is disconnected from power supply. Appliance is disconnected from water supply. Worktop has been removed. See page 111. Detergent drawer has been removed. See page 113.
3.2.1 Removing fascia panel
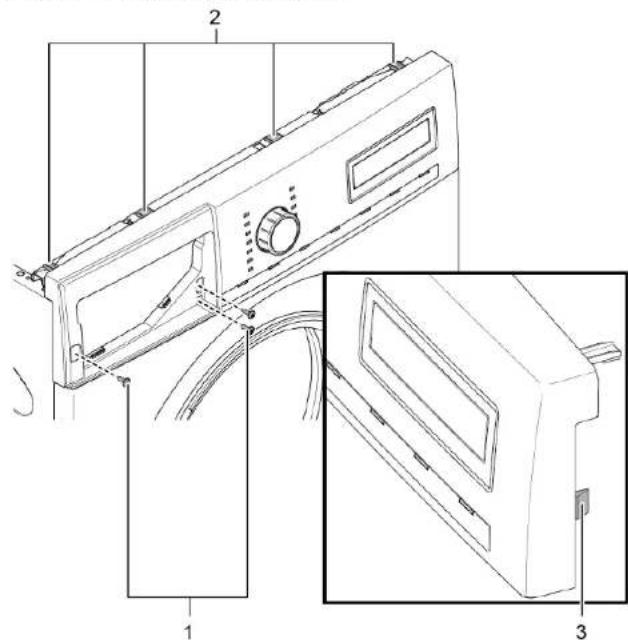
- Remove screws (1).
- Release catch elements (2, 3).
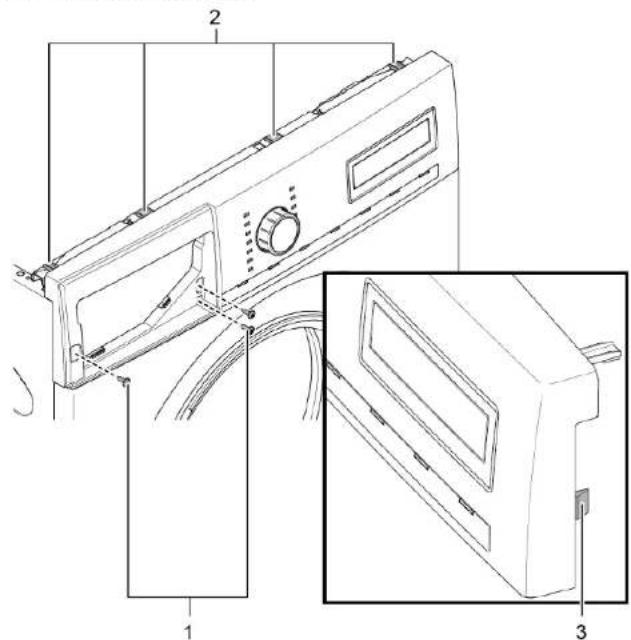
- Release plug contact of control unit.
- Remove fascia panel.
3.2.2 Installing fascia panel
Install in reverse order.

Repair
3.3 Replacing detergent drawer
Prerequisite:
Appliance is disconnected from power supply. Appliance is disconnected from water supply.
3.3.1 Removing detergent drawer
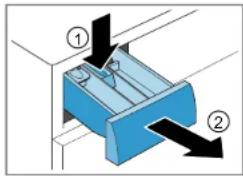
- Pull out detergent drawer. 2.1. Press down on insert (1)
2. Remove detergent drawer (2).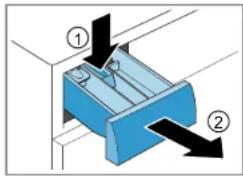
3.3.2 Installing detergent drawer
Install in reverse order.

Repair
3.4 Replacing detergent drawer handle
Prerequisite:
Appliance is disconnected from power supply. Appliance is disconnected from water supply. Detergent drawer has been removed. See page 113.
3.4.1 Removing detergent drawer handle
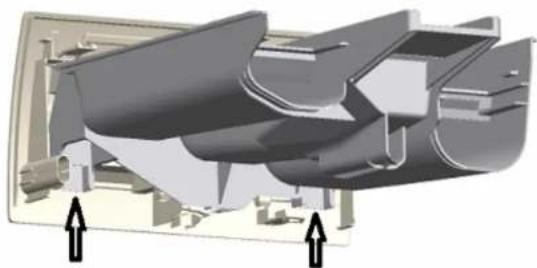
- Release catch elements.
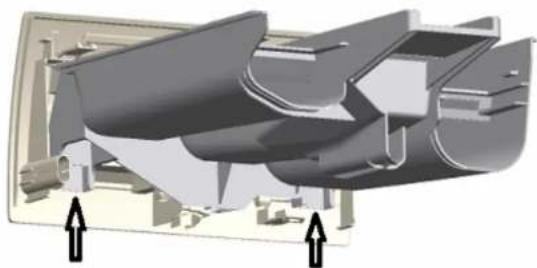
- Remove detergent drawer handle.
3.4.2 Installing detergent drawer handle
Install in reverse order.

Repair
3.5 Replacing door


Caution
Open hinge area!
Finger crushing / entrapment
Do not reach into the hinge area.
Wear protective gloves.
Prerequisite:
Appliance is disconnected from power supply. Appliance is disconnected from water supply. Door is opened.
3.5.1 Removing door
1.

Notice
Risk of falling parts due to released screws!
Damage to other parts of the appliance or at customer's home, e.g., bottom.
- Secure component from falling down.

Ca
Risk of falling parts due to released screws!
Injury because of falling parts.
- Secure component from falling down.
Remove screws (1).
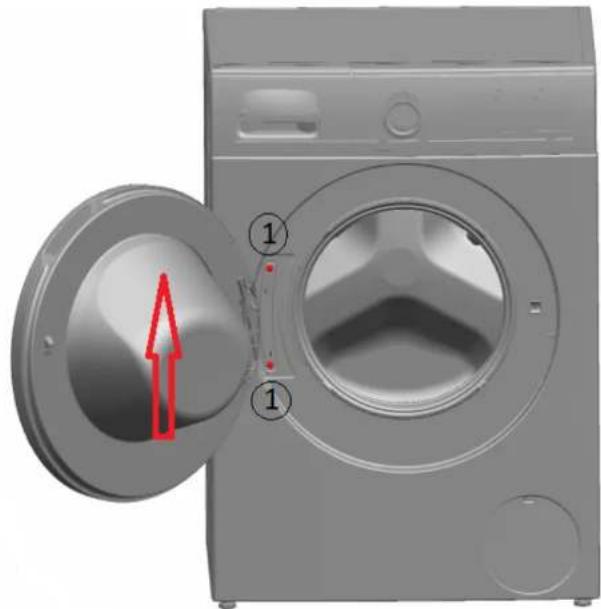
- Remove door upwards.
Install in reverse order.

Repair
3.6 Replacing door components
Caution
Open hinge area!
Finger crushing / entrapment. Do not reach into the hinge area. Wear protective gloves.
Prerequisite:
The appliance is disconnected from the power supply. The appliance is disconnected from the water supply. The door has been removed. See page 115.
3.6.1 Removing door components
Disassemble the door from outside to inside.
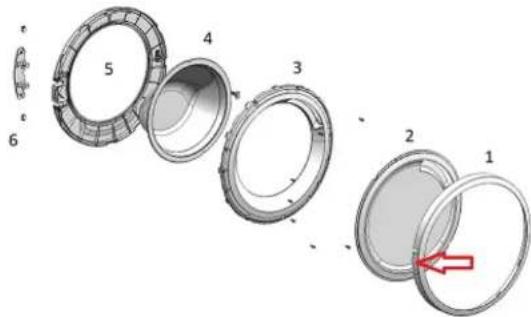
3.6.2 Installing door components
Install in reverse order.

Repair
3.7 Replacing door seal

Caution
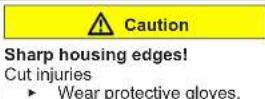
Sharp housing edges!
Cut injuries
Wear protective gloves.

Caution
Risk of falling parts due to released screws!
Injury because of falling parts.
- Secure component from falling down.
Notice
Risk of falling parts due to released screws!
Damage to other parts of the appliance or at customer's home e.g. bot
tom.
Secure component from falling down.
Prerequisite:
Appliance is disconnected from power supply. Appliance is disconnected from water supply. Detergent drawer has been removed. -> Page 113 Door has been removed. -> Page 115 Pump cover has been removed. -> Page 124
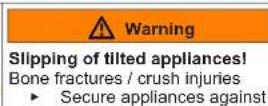
Slipping of tilted appliances! Bone fractures / crush injuries Secure appliances against slipping.
Lift up appliance at front.
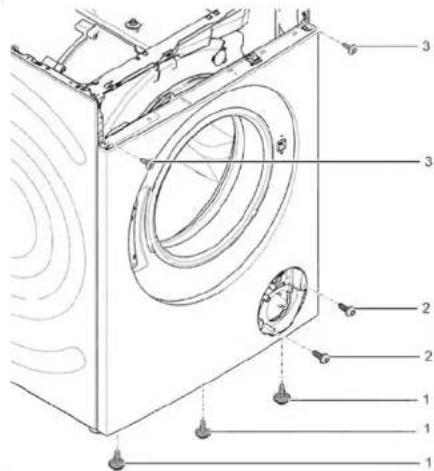
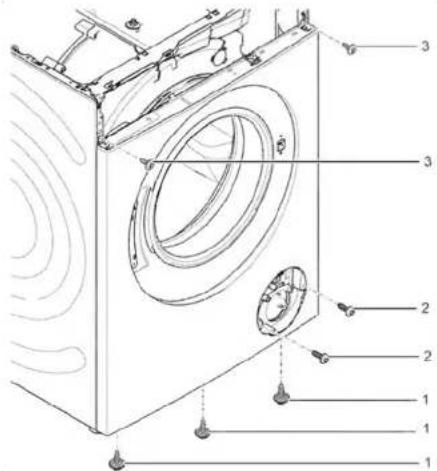
- Release screws at bottom of front panel (1).
- Lower appliance down.

Repair
- Remove screws in pump area (2). 5. 1. Release screws at back of appliance (1).
- Remove worktop (2, 3).

Repair
6.1. Remove screws (1).
- Release the cat elements of the fascia panel (2, 3).
- Release the screws of the dispenser housing.
7. Remove the fascia panel.
- Remove the drum light holder at the top.
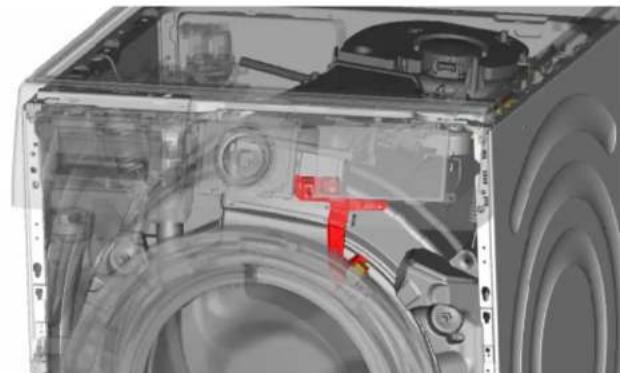
9.
Notice
Risk of damaged surface! The surface of the appliance can be scratched by using wrong tools. Only use plastic tools to replace the tension ring.
Remove the tension ring from the gasket with a plastic tool.
- Release the door seal from the front panel.
- Release the cable connector from the door lock.

Repair
- Release the screws on top of the front panel (3).
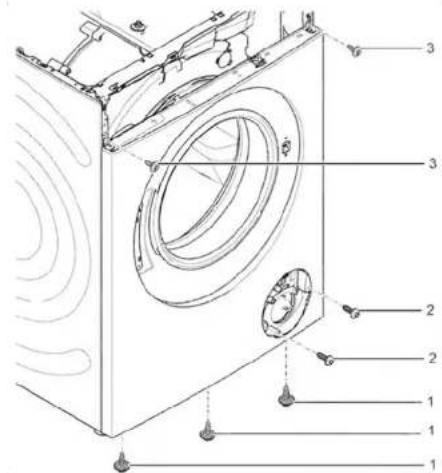
- Remove the front panel.
- Release all hose connections.
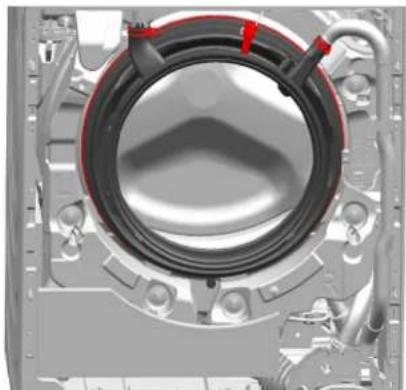
- Remove door seal.
Risk of falling parts due to incorrect installation! Injury or damage to the appliance.
Tighten tension ring of boot gasket with 3.4 Nm.
Install in reverse order.

Repair
3.8 Replacing door lock
As a manufacturer, we are obliged to provide consumers with the spare part door lock including repair instructions in accordance with Regulation (EU) 2019/2023. However, we would like to point out that after replacing a door lock, an electrotechnical safety test by a qualified electrician is required before the device is put into operation. This person must be verifiably qualified according to the country-specific laws, regulations and standards.

Risk of electric shock due to live parts!
Danger to life through electric shock in case of improper repair. After the repair, have a safety test according to VDE 0701 or country-specific regulations performed.

Sharp housing edges!
Cut injuries
Wear protective gloves.

Slipping of tilted appliances!
Bone fractures / crush injuries
Secure appliances against slipping.

Risk of falling parts due to released screws!
Injury because of falling parts.
- Secure component from falling down.

Risk of falling parts due to released screws!
Damage to other parts of the appliance or at customer's home, e.g., bottom.
- Secure component from falling down.
Prerequisite:

Appliance is disconnected from power supply.

Appliance is disconnected from water supply.
Appliance is freely accessible. Worktop has been removed. → Page 111. Fascia panel has been removed. Door has been removed. → Page 115. Tension ring has been removed. Front panel has been removed. Door seal has been removed.
- Disconnect door lock plug.
- Release door lock.
3. Remove door lock.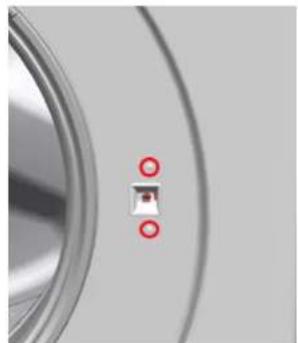

Repair
Install in reverse order.

Repair
3.9 Replacing drum light
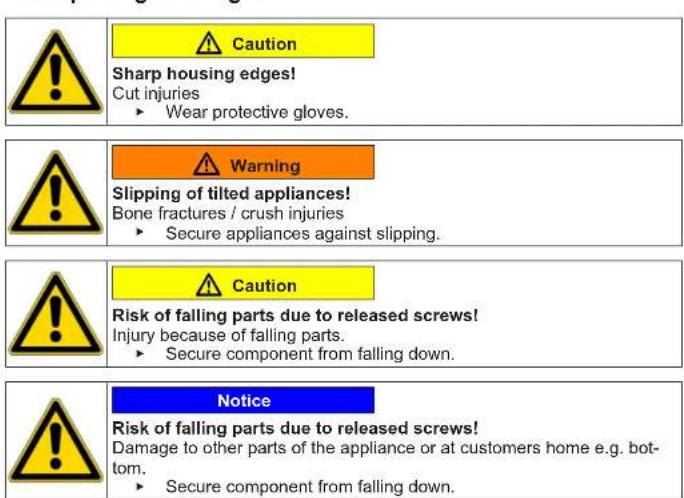
Prerequisite:
Appliance is disconnected from power supply. Appliance is disconnected from water supply. Appliance is freely accessible. Worktop has been removed. (See page 111) Detergent drawer has been removed. (See page 113) Fascia panel has been removed.
3.9.1 Removing drum light
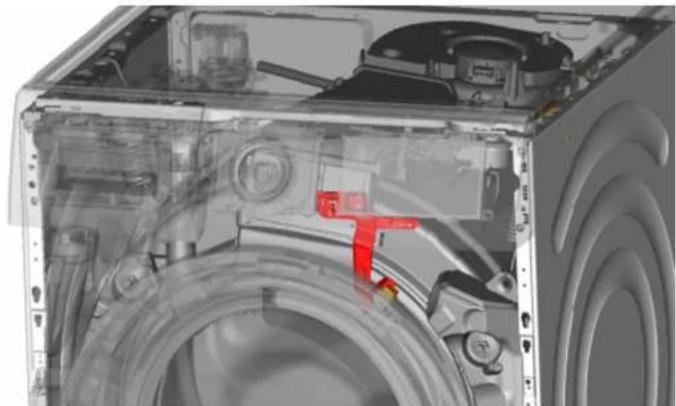
- Pull drum light holder out of appliance.
- Disconnect electrical connections.
- Remove drum light from drum light holder.
3.9.2 Installing drum light
Install in reverse order.

Repair
3.10 Replacing pump cover
Prerequisite:
The appliance is disconnected from the power supply. The appliance is disconnected from the water supply.
3.10.1 Removing pump cover
- Open the pump cover.
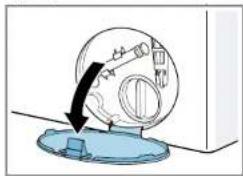
- Remove the pump cover.
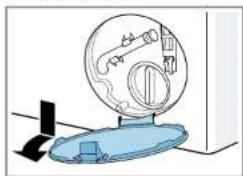
3.10.2 Installing pump cover
Install in reverse order.

Repair
3.11 Replacing front panel
Prerequisite:
The appliance is disconnected from the power supply. The appliance is disconnected from the water supply. The detergent drawer has been removed. (See page 113) The door has been removed. (See page 115) The door seal has been removed. The pump cover has been removed. (See page 124)
3.11.1 Removing front panel
1.

Lift up the appliance at the front.
- Remove the screws at the bottom (1).
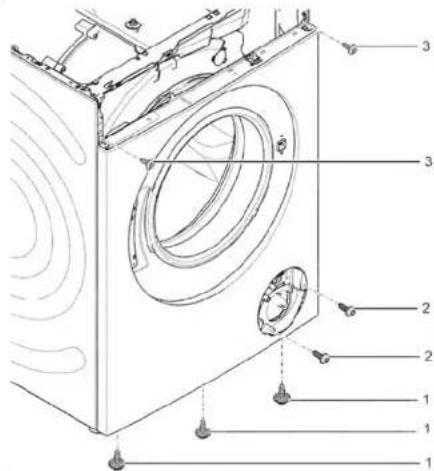
- Lower appliance down.

Repair
4.1. Remove screws (1).
- Push worktop to the back of the appliance (2).
- Move worktop upwards (3) to remove it.
5.1. Remove screws (1).
- Release catch elements (2, 3).
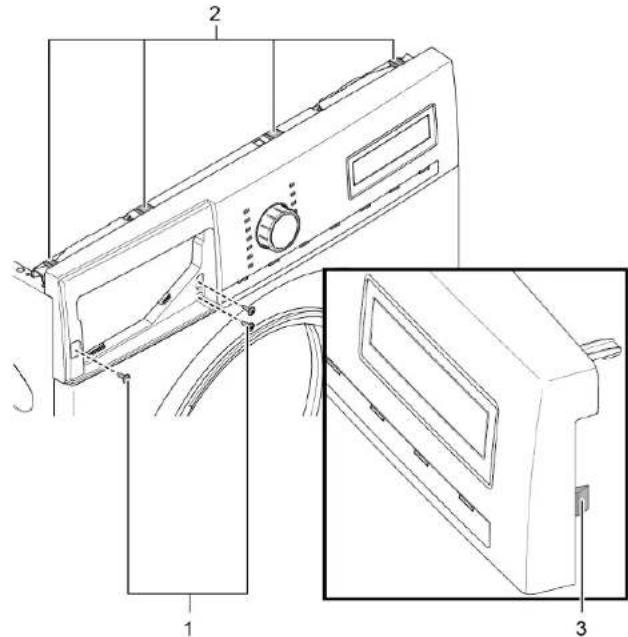
- Remove fascia panel.
7.

Caution
Risk of falling parts due to released screws! Injury because of falling parts.
Secure component from falling down.

Repair
Notice
Risk of falling parts due to released screws! Damage to other parts of the appliance or at customers home e.g. bottom.
Remove screws at the front, starting from the bottom and working up (2, 3).
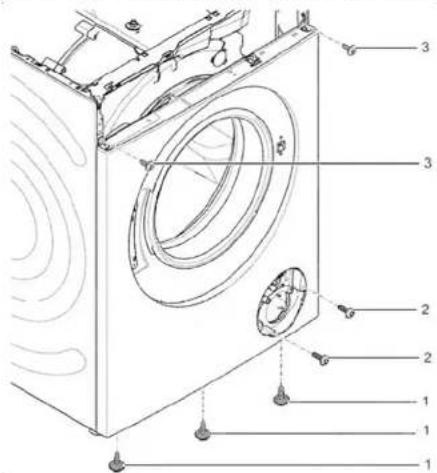
- Remove the front panel.
3.11.2 Installing the front panel
Install in reverse order.
1 About this document 129
1.1 Important information 129 1.1.1 Purpose 129 1.2 Explanation of symbols 129 1.2.1 Safety 129 1.2.2 Warning symbols 129 1.2.3 Structure of warnings 130 1.2.4 General symbols 130
Tools and aids 131
Repair 132
3.1 Replacing the top panel 132 3.1.1 Removing the top panel 132 3.1.2 Installing the top panel 132 3.2 Replacing the front panel 133 3.2.1 Removing the front panel 133 3.2.2 Installing the front panel 133
3.3 Replacing the detergent drawer 134
3.3.1 Removing the detergent drawer 134 3.3.2 Installing the detergent drawer 134
3.4 Replacing the detergent drawer handle 135 3.4.1 Removing the detergent drawer handle 135 3.4.2 Installing the detergent drawer handle 135 3.5 Replacing the door 136 3.5.1 Removing the door 136 3.5.2 Installing the door 136 3.6 Replacing door parts 137 3.6.1 Removing door parts 137 3.6.2 Installing door parts 137 3.7 Replacing the door gasket 138 3.7.1 Removing the door gasket 138 3.7.2 Installing the door gasket 141 3.8 Replacing the door lock 142 3.8.1 Removing the door lock 142 3.8.2 Installing the door lock 143 3.9 Replacing the drum light 144
3.9.1 Removing the drum light 144 3.9.2 Installing the drum light 144
3.10 Replacing the pump cover 145
3.10.1 Removing the pump cover 145 3.10.2 Installing the pump cover 145
3.11 Replacing the front panel 146
3.11.1 Removing the front panel 146 3.11.2 Installing the front panel 148
About this document
1.1 Important information
1.1.1 Purpose
These repair instructions support the consumer in independently repairing devices in accordance with the applicable Ecodesign Regulation (03/2021).
Table 1: Safety devices
1.2.2 Safety symbols
DANGER
Risk of electric shock due to live parts!
- Remove the front panel.
3.11.2 Installing the front panel

- ABOUT THIS DOCUMENT
- STRUCTURE OF THE WARNINGS
- DANGER
- TOOLS
- INSTRUCTIONS AND AIDS
- REPAIR
- ATTACHING THE WORK LAMP
- MOUNTING THE WORK LAMP
- SAFETY PRECAUTIONS
- CAUTION
- WARNING
- ATTENTION
- INSPECTION
- INSTALLING THE DISPENSER
- MOUNTING THE DISPENSER
- REPLACING THE SEAL FOR THE FIRST PREPARATION
- REMOVING THE SWITCH FOR THE FIRST PREPARATION
- INSTALLING THE SWITCH FOR THE FIRST PREPARATION
- REMOVING THE COVER OF THE SWITCH FOR THE FIRST PREPARATION
- INSTALLING THE COVER OF THE SWITCH FOR THE FIRST PREPARATION
- OPENING THE DOOR
- REQUIREMENT
- MOUNTING THE GATE
- REMOVING THE GATE COMPONENTS
- MOUNTING THE GATE COMPONENTS
- REMOVING THE DOOR HINGES
- REMOVAL
- ADJUSTMENT OF THE DOOR CLOSER
- M3NCKBAHE
- CBĀNHE HA KLNOUANKATA HA BPATATA
- PEMOH
- MOHTMPEHA KJIIOUAJIKARAHA BPATATA
- N3NCKBAHE
- CBJIHE HA OCBTIEHHETO HA 6APA6AHA
- MOUNTING THE DRUM LIGHTING
- REMOVING THE PUMP COVER
- MOUNTING THE PRESSURE SWITCH
- PRESETTING
- NOTE
- INSTALLING THE FRONT PANEL
- REPAIR HINTS - WASHING MACHINE
- CONCERNING THIS DOCUMENT
- IMPORTANT INFORMATION
- PURPOSE
- EXPLANATION OF SYMBOLS
- DANGER LEVELS
- HAZARD SYMBOLS
- GENERAL SYMBOLS
- TOOLS AND AIDS
- REPLACING WORKTOP
- PREREQUISITE
- REMOVING WORKTOP
- INSTALLING WORKTOP
- REPLACING FASCIA PANEL
- REMOVING FASCIA PANEL
- INSTALLING FASCIA PANEL
- REPLACING DETERGENT DRAWER
- REMOVING DETERGENT DRAWER
- INSTALLING DETERGENT DRAWER
- REPLACING DETERGENT DRAWER HANDLE
- REMOVING DETERGENT DRAWER HANDLE
- INSTALLING DETERGENT DRAWER HANDLE
- REPLACING DOOR
- REMOVING DOOR
- NOTICE
- CA
- REPLACING DOOR COMPONENTS
- OPEN HINGE AREA
- REMOVING DOOR COMPONENTS
- INSTALLING DOOR COMPONENTS
- REPLACING DOOR SEAL
- REMOVE SCREWS (1)
- REPLACING DOOR LOCK
- REPLACING DRUM LIGHT
- REMOVING DRUM LIGHT
- INSTALLING DRUM LIGHT
- REPLACING PUMP COVER
- REMOVING PUMP COVER
- INSTALLING PUMP COVER
- REPLACING FRONT PANEL
- REMOVING FRONT PANEL
- SAFETY SYMBOLS
Brand : NEFF
Model : W7461X3EU
Category : Washing machine