
TMU950 - Printer EPSON - Free user manual and instructions
Find the device manual for free TMU950 EPSON in PDF.
| Product type | Serial impact dot matrix printer |
| Model | Epson TM-U950 |
| Dimensions (H × W × D) | 194.5 × 251 × 298 mm |
| Weight | Approximately 5.6 kg |
| Power supply | +24 VDC ±10%, 2.0 A minimum (max. 240 VA) |
| Print method | Impact dot matrix, 9-pin printhead |
| Print speed (high speed) | Up to 311 characters/s (7 × 9) |
| Print width | Roll paper: 61.1 mm; slip: 135.6 mm |
| Number of characters per line (default) | Roll: 30 (9×9) or 40 (7×9); slip: 66 (9×9) or 88 (7×9) |
| Supported paper types | Roll paper (single ply), single sheets (plain, carbon, carbonless) |
| Copy capacity (sheets) | Original + 4 (at 20-40°C) or + 1 to 3 (at 5-40°C) |
| Ribbon | Epson ERC-31 cartridge (life approx. 4.5 million characters) |
| Receive buffer | 32 bytes or 2 KB (selectable via DIP switch) |
| Interfaces | Serial (RS-232) and parallel (Centronics) |
| Control panel | Keys: Receipt Feed, Journal/Slip Feed; Indicators: POWER, ERROR, RECEIPT OUT, JOURNAL OUT, SLIP |
| Special functions | Automatic two-side printing (receipt + journal), optional MICR reader, auto cutter |
| Maintenance | Regular cleaning of print head and MICR mechanism (every 6000 passes or once a month) |
| Safety | Immediate power off if smoke, odor, or abnormal noise; do not disassemble or modify the device |
| Operating temperature | 5 °C to 40 °C |
| Operating humidity | 30% to 80% RH |
| Mechanical life | 7,500,000 lines |
| Print head life | 150 million characters |
| MTBF | 180,000 hours |
Frequently Asked Questions - TMU950 EPSON
User questions about TMU950 EPSON
0 question about this device. Answer the ones you know or ask your own.
Ask a new question about this device
Download the instructions for your Printer in PDF format for free! Find your manual TMU950 - EPSON and take your electronic device back in hand. On this page are published all the documents necessary for the use of your device. TMU950 by EPSON.
USER MANUAL TMU950 EPSON
| SW Function ON OFF | |||
| 1-1 | Data word length | 7 bits | 8 bits |
| 1-2 Parity Enabled Disabled | |||
| 1-3 Parity selection Even odd | |||
| 1-4 ~ 1-5 | Transmission speed (see table below) | ||
| 1-6 Dis play module connection | Connected Not connected | ||
| 1-7 | Data receive error | Ignored | Prints “?” |
| 1-8 Handshaking XON/XOFF DTR/DSR | |||
Transmission speed
| Speed | 1-4 1-5 | |
| 1200 | ON | ON |
| 2400 | OFF | ON |
| 4800 | ON | OFF |
| 9600 | OFF | OFF |
| SW Function ON OFF | |||
| 2-1 | Auto line feed | Always enabled | Always disabled |
| 2-2 | Receive buffer | 32 bytes | 2048 bytes |
| 2-3 Font selection (default) | 9 × 9 | 7 × 9 | |
| 2-4 Carriage speed default | Low | High | |
| 2-5 Handshaking (BUSY) | Receive buffer full | Offline or receive buffer full | |
| 2-6 | Internal use | Fixed | — |
| 2-7 I/F pin 6 reset Enabled | Disabled | ||
| 2-8 | I/F pin 25 reset | Enabled | Disabled |
Parallel interface
| SW Function | Condition ON OFF | ||
| 1-1 ~ 1-5 | Undefined | — | — |
| 1-6 | Internal use | — | Fixed |
| 1-7 ~ 1-8 | Undefined | — | — |
| SW Function ON OFF | |||
| 2-1 | Auto line feed | Always enabled | Always disabled |
| 2-2 | Receive buffer | 32 bytes | 2048 bytes |
| 2-3 Font selection (default) | 9 × 9 | 7 × 9 | |
| 2-4 Carriage speed default | Low | High | |
| 2-5 Handshaking (BUSY) | Receive buffer full | Offline or receive buffer full | |
| 2-6 | Internal use | Fixed | — |
| 2-7 | Undefined | — | — |
| 2-8 | Internal use | Fixed | — |
All rights reserved. No part of this publication may be reproduced, stored in a retrieval system, or transmitted in any form or by any means, electronic, mechanical, photocopying, recording, or otherwise, without the prior written permission of Seiko Epson Corporation. No patent liability is assumed with respect to the use of the information contained herein. While every precaution has been taken in the preparation of this book, Seiko Epson Corporation assumes no responsibility for errors or omissions. Neither is any liability assumed for damages resulting from the use of the information contained herein.
Neither Seiko Epson Corporation nor its affiliates shall be liable to the purchaser of this product or third parties for damages, losses, costs, or expenses incurred by purchaser or third parties as a result of: accident, misuse, or abuse of this product or unauthorized modifications, repairs, or alterations to this product, or (excluding the U.S.) failure to strictly comply with Seiko Epson Corporation's operating and maintenance instructions.
Seiko Epson Corporation shall not be liable against any damages or problems arising from the use of any options or any consumable products other than those designated as Original Epson Products or Epson Approved Products by Seiko Epson Corporation.
Depending on the area, the interface cable may be included with the product. If so, use that cable.
Seiko Epson Corporation shall not be held liable for any damage resulting from electromagnetic interference that occurs from the use of any interface cables other than those designated as Epson approved products.
EPSON is a registered trademark of Seiko Epson Corporation. Exceed Your Vision is a registered trademark or trademark of Seiko Epson Corporation. All other trademarks are the property of their respective owners and used for identification purpose only.
NOTICE: The contents of this manual are subject to change without notice.
Seiko Epson Corporation 1995, 1998, 2001. All rights reserved.
Safety Precautions
This section presents important information intended to ensure safe and effective use of this product. Please read this section carefully and store it in an accessible location.

WARNING:
Shut down your equipment immediately if it produces smoke, a strange odor, or unusual noise. Continued use may lead to fire. Immediately unplug the equipment and contact your dealer or a Seiko Epson service center for advice.
Never attempt to repair this product yourself. Improper repair work can be dangerous.
Never disassemble or modify this product. Tampering with this product may result in injury or fire.
Be sure to use the specified power source. Connection to an improper power source may cause fire.
Do not allow foreign matter to fall into the equipment. Penetration by foreign objects may lead to fire.
If water or other liquid spills into this equipment, unplug the power cord immediately, and then contact your dealer or a Seiko Epson service center for advice. Continued usage may lead to fire.
Do not use aerosol sprayers containing flammable gas inside or around this product. Doing so may cause fire.
Do not connect a telephone line to the drawer kick-out connector or the display module connector; otherwise, the printer and the telephone line may be damaged.

CAUTION:
Do not connect cables in ways other than those mentioned in this manual. Different connections may cause equipment damage and burning.
Be sure to set this equipment on a firm, stable, horizontal surface. The product may break or cause injury if it falls.
Do not use in locations subject to high humidity or dust levels. Excessive humidity and dust may cause equipment damage or fire.
Do not place heavy objects on top of this product. Never stand or lean on this product. Equipment may fall or collapse, causing breakage and possible injury.
Take care not to injure your fingers on the manual cutter
- When you remove printed paper
- When you perform other operations such as loading/replacing roll paper
To ensure safety, unplug this product before leaving it unused for an extended period.
Caution Labels
The caution labels on the product indicate the following precautions.

CAUTION:
The print head is hot.
Restriction of Use
When this product is used for applications requiring high reliability/safety, such as transportation devices related to aviation, rail, marine, automotive, etc.; disaster prevention devices; various safety devices, etc.; or functional/ precision devices, etc.; you should use this product only after giving consideration to including fail-safes and redundancies into your design to maintain safety and total system reliability. Because this product was not intended for use in applications requiring extremely high reliability/safety, such as aerospace equipment, main communication equipment, nuclear power control equipment, or medical equipment related to direct medical care, etc., please make your own judgment on this product's suitability after a full evaluation.
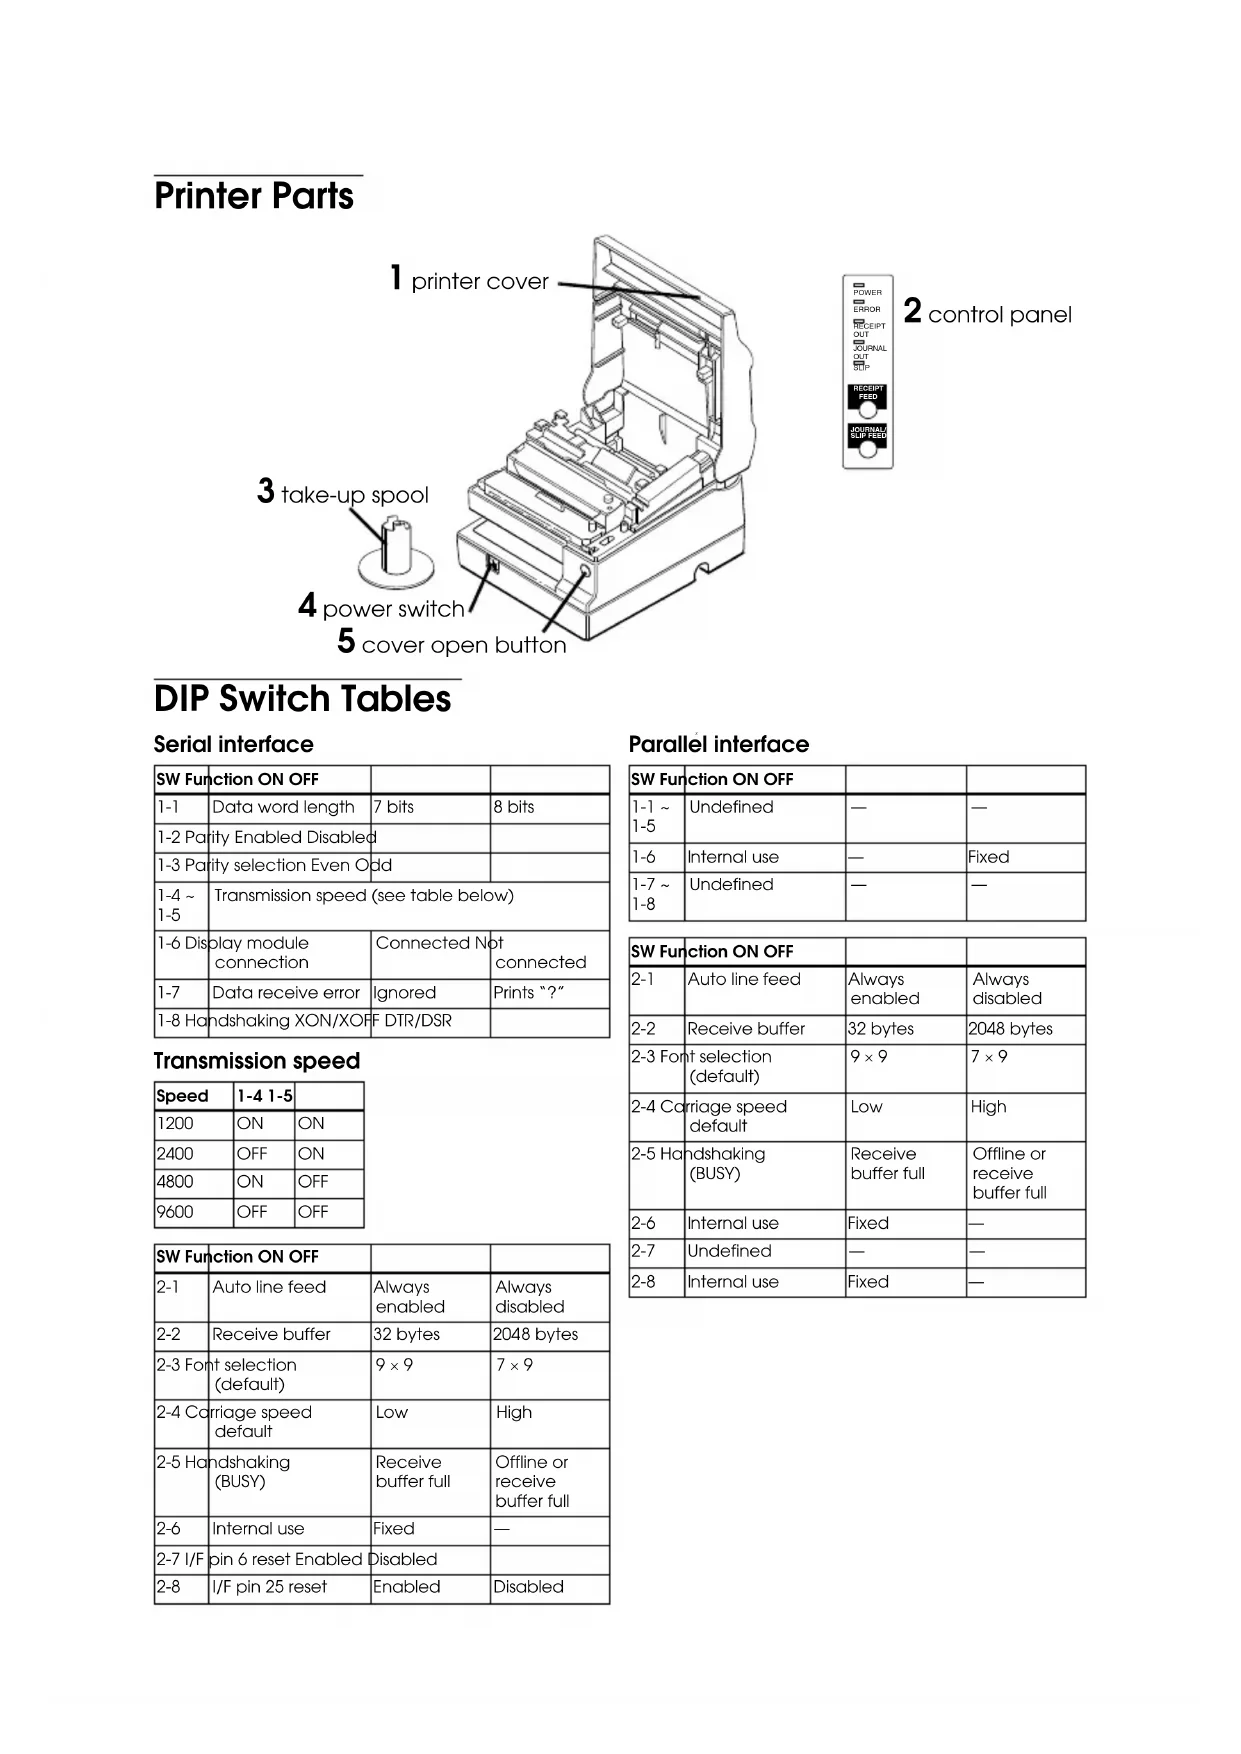
Unpacking
The following items are included with the standard specification printer. If any item is damaged, contact your dealer.
□Printer
Paper rolls (2)
Ribbon cassette
Power switch cover
Take-up spool
Caution label
Downloading Drivers, Utilities, and Manuals
Drivers, utilities, and manuals can be downloaded from one of the following URLs.
For customers in North America, go to the following web site: http://www.epsonexpert.com/ and follow the on-screen instructions.
For customers in other countries, go to the following web site:
http://download.epson-biz.com/?service=pos
Control Panel
RECEIPT FEED button
Press to feed receipt paper; hold down to feed continuously.
JOURNAL/SLIP FEED button
In roll paper mode, feeds the journal roll. In slip mode (when the SLIP LED is on or flashing and slip paper is inserted), feeds slip paper.
POWER LED
On when the printer is on.
ERROR LED
Indicates an error.
RECEIPT OUT LED
Indicates a receipt paper near end or out.
JOURNAL OUT LED
Indicates a journal roll paper near end or out.
SLIP LED
Indicates slip mode. Flashes while waiting for a slip to be inserted or removed.
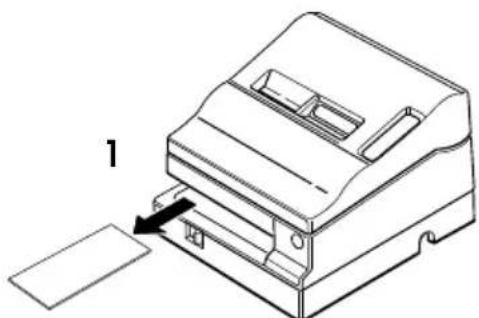
Removing the Transportation Damper
The printer is protected during shipping by a transportation damper that you must remove before turning on the printer.
Pull the damper out, as shown in illustration 1.
Note:
Before shipping the printer, reinstall the transportation damper.
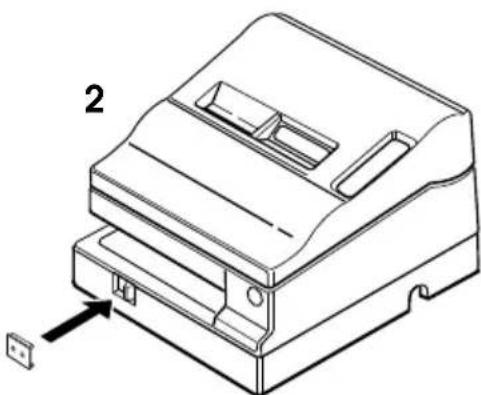
Using the Power Switch Cover

WARNING:
If an accident occurs with the power switch cover attached, unplug the power cord immediately. Continued use may cause fire.
The enclosed power switch cover ensures that the power switch is not pressed accidentally. To use this cover, install it as shown in illustration 2.
Installing the Paper Rolls
Note:
Use only paper rolls that meet the specifications.
- Make sure the leading edge of the paper is straight.
- Turn on the printer and open the printer cover.
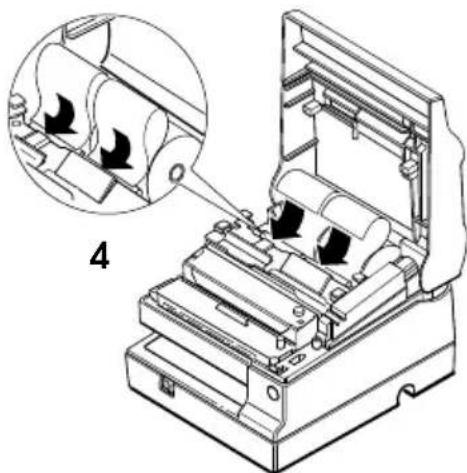
- Insert paper rolls on both the receipt and journal sides of the printer, as shown in illustration 3. (The journal roll is on the right in this illustration.)
- For each roll, insert the tip of the paper into the paper inlet and push it in until it is automatically detected and fed into the printer. See illustration 4.
- Tear off the receipt paper on the cutter. If the paper was not fed far enough, press the RECEIPT FEED button to feed additional paper.
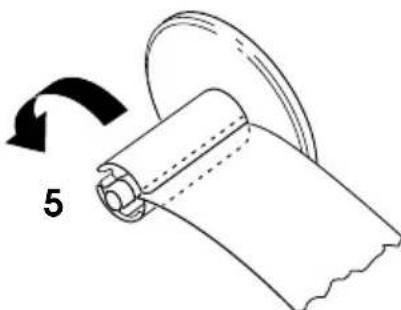
- Insert the tip of the journal paper into the groove in the take-up spool and rotate the spool two or three times to secure the paper. See illustration 5. If not enough paper was fed, press JOURNAL/SLIP FEED to feed more.
- Install the take-up spool and close the printer cover.
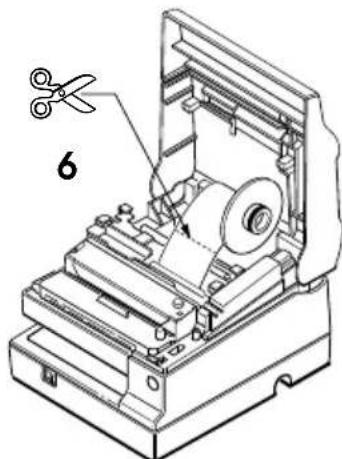
- To remove the journal paper roll, first lift the take-up spool and cut the paper. Then remove the take-up spool. See illustration 6.
- For either a journal or receipt paper roll, next press the release lever (marked PRESS) on the appropriate side of the printer, pull out the paper, and remove the roll.

Inserting Slip Paper
Notes:
Do not use wrinkled, folded, or curled paper.
Use only slip paper that matches the printer's specifications.
To prevent paper jams, install both paper rolls in the printer even if you plan to print only on slip paper.
-
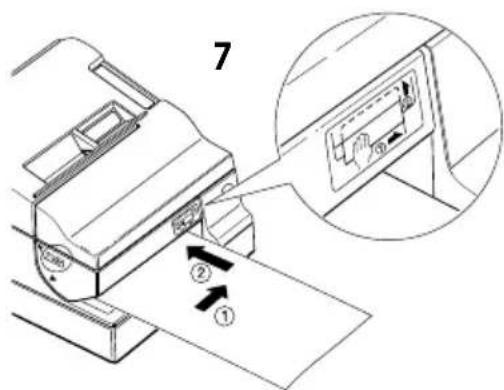
When the SLIP LED flashes, insert slip paper, using the right edge of the slip paper inlet as a guide. See illustration 7.
-
When the printer detects the paper, it automatically draws it in and begins printing.

CAUTION:
Be sure to put the caution label exactly in the position shown. If you put it another place, such as over the slip paper inlet, the printer may be damaged.
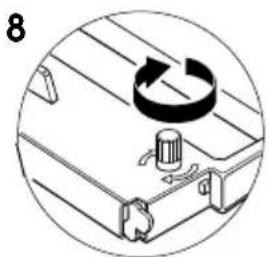
Installing a Ribbon
Use the EPSON ERC-31. The use of any ribbon cassettes other than those approved by Epson may damage the printer and will void the warranty.
- Turn the printer on and open the ribbon cover.
- Turn the ribbon cassette's knob 2 or 3 times in the direction of the arrow in illustration 8 to take up any slack.
- Insert the ribbon in the printer and rotate the cassette's knob 2 or 3 more times to place the ribbon in the correct position.
- Make sure the ribbon is installed in front of the print head without wrinkles or creases.
- To remove the ribbon cassette, grasp the ribbon cassette's tab and pull it out of the printer.
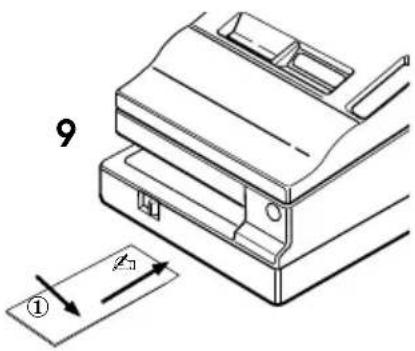
Using the MICR Reader (Option)
The optional, factory-installed magnetic ink character recognition (MICR) reader lets the printer read MICR ink on personal checks.

CAUTION:
To prevent paper jams, be sure both paper rolls are installed. Do not insert checks with staples in them; do not insert wrinkled checks.
-
The SLIP light flashes.
-
Insert the check face down, with the MICR characters on the right-hand side.
-
Insert the check straight into the inlet, using the right edge of the inlet as a guide, as far as the check will go. See illustration 9.
-
The printer starts drawing the check in. Let go of the check immediately. The SLIP LED goes from blinking to on.
-
When MICR reading is complete, the printer ejects the check and the SLIP LED starts blinking again.
-
Remove the check by pulling it straight out (not at an angle). The SLIP LED goes off.
Cleaning the Optional MICR Mechanism
Clean the MICR head and MICR roller every 6000 passes or once a month.
Note:
If you encounter frequent MICR reading errors, use the procedure below.
For the MICR head
Use a moistened cleaning sheet, such as PRESAT brand (KIC) "Check Reader Cleaning Card" or an equivalent commercially available cleaning sheet.
For the MICR feed roller
Use an adhesive cleaning sheet available from Epson. Contact your dealer.
Cleaning procedure
Use this procedure for both cleaning sheets.
- Load both paper rolls into the printer; then turn off the power.
- Open the front cover and turn the power back on while holding down the JOURNAL/SLIP button.
- Press the JOURNAL/SLIP button 3 times.
- Close the front cover (the SLIP LED flashes).
English
- Follow the instructions on the cleaning sheet. You will insert the cleaning sheet the same way you insert a normal check.
- When the sheet is ejected, remove it from the printer; then turn off the power.
Troubleshooting
| LEDs on the control panel do not come on |
| Check the power cable and power outlet. If the outlet is controlled by a switch or timer, use another outlet. |
| ERROR LED is on (not flashing) with no printing |
| If RECEIPT OUT or JOURNAL OUT is on, a paper roll is not installed or nearly out. If these LEDs are off, the cover is not closed properly. |
| ERROR LED is flashing with no printing (and no paper jam) |
| The print head may be overheated. Printing resumes after the print head cools. If this does not occur, turn the printer off for 10 seconds and then back on. If there is still a problem, contact a qualified servicer. |
| The printer appears to be printing, but nothing is printed |
| Check ribbon installation and ribbon wear. |
| A line of dots is missing |
The print head may be damaged. Stop printing and contact a qualified servicer.
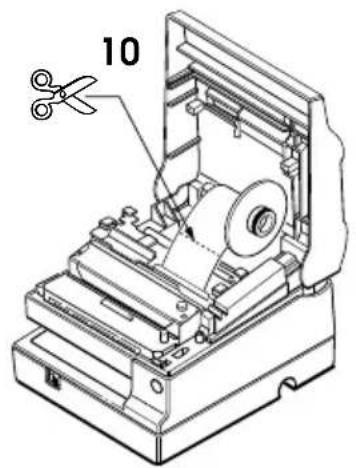
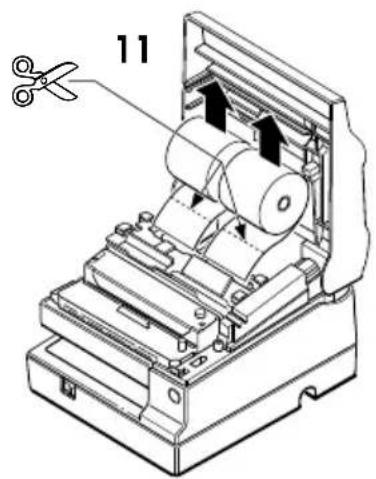
Removing Jammed Paper


CAUTION:
Do not touch the print head because it can be very hot after printing.
- Turn the printer off and open the printer cover.
- For a journal roll paper jam, cut with scissors or a knife, as shown in illustration 10, and remove the take-up spool.
-
Cut the paper from the paper rolls as shown in illustration 11.
-
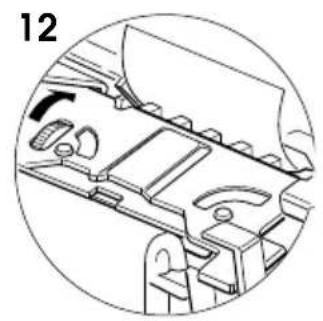
If paper is caught in the automatic cutter, open the cutter blade by turning the gear in the direction shown in illustration 12.
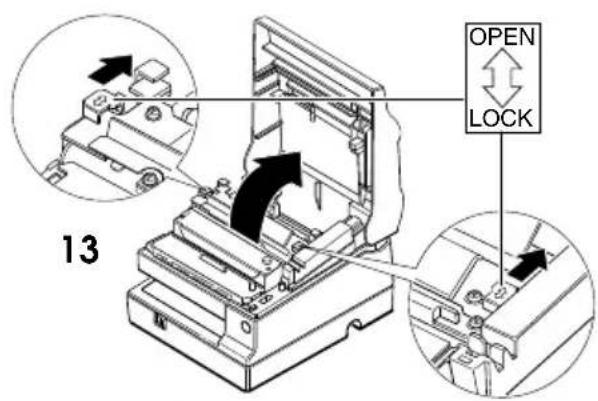
- Move the OPEN LOCK lever on each side of the printer in the direction shown in illustration 13; the cutter opens automatically.
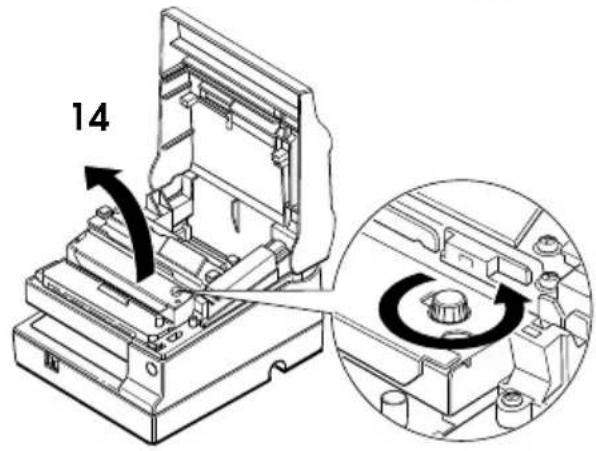
6.Pull the paper out gently. If it tears,remove any pieces. - If necessary, remove the print head cover. Loosen the screw on the right as shown in illustration 14. (Replace it by sliding the tab in the slot, and fasten the screw.)
- After clearing all paper, close and lock the cutter unit (lock both locks), and reinstall the paper rolls.
TM-U950 Specifications
| Printing method Serial impact | dot matrix |
| Head wire configuration | 9-pin vertical line, wire pitch 0.353 mm {1/72"}, 0.29 mm {0.01"} wire diameter |
| Printing direction Bidirectional | al, minimum distance printing |
| Printing width Roll paper: 61.1 mm {2.41"}; slip paper: 135.6 mm {5.34"} | |
| Characters per line (default) | 9 × 9: roll paper = 30; slip paper = 667 × 9: roll paper = 40; slip paper = 88 |
| Character spacing (default) | 9 × 9: 3 dots (half dots); 7 × 9: 2 dots (half dots) |
| Print speed | High-speed — 9 × 9: 233 characters/second7 × 9: 311 characters/second |
| Low-speed — 9 × 9: 200 characters/second7 × 9: 267 characters/second | |
| Paper feed speed Approx. 60.3 ms/line (4.23 mm {1/6"} feed);Approx. 86.36 mm/second {3.4" /second} continuous feed | |
| Line spacing (default) 4.23 mm {1/6"} | |
| Number of characters Alphanumeric characters: 95; International characters: 32Extended graphics: 128 × 9 pages (including space pages) | |
| Character structure | 9 × 9 or 7 × 9 |
| Paper roll (single-ply) Size: Width: 69.5 ± 0.5 mm {2.74 ± 0.02"}Maximum outside diameter: 83 mm {3.27"}Paper roll spool inside diameter: 10 mm {0.39"} or more | |
| Slip paper Normal, carbon-copy, and pressure-sensitive | |
| Number of copies for slip | Original + 4 (at 20 to 40°C {68 to 104°F})Original + 1 to 3 copies (at 5 to 40°C {41 to 104°F}) |
| Total slip thickness | 0.09 to 0.36 mm {0.0035 to 0.0141"} |
| Ribbon cassette | ERC-31 |
| Buffer size | 32 bytes or 2 KB, depending on the DIP switch setting |
| Supply voltage*1 | +24 VDC ± 10% |
| Current consumption (at 24V) | Printing receipt and journal paper (40 columns):Mean: Approx. 1.8 A (alananmeric characters)Peak: Approximately 8.0 AFeeding slip paper to the print start position or MICR reading:Mean: Approx. 2.3 A for approx. 1.4 seconds |
| Life | Mechanism: 7,500,000 linesPrint head: 150 million charactersRibbon: 4,500,000 charactersMICR: 240,000 passes |
| MTBF | 180,000 hours |
| MCBF | 18,000,000 lines |
| Temperature | Operating: 5 to 40°C {41 to 104°F}Storage: -10 to 50°C {14 to 122°F}, except for ribbon |
| Humidity | Operating: 30 to 80% RHStorage: 30 to 90% RH |
| Overall dimensions | 194.5 × 251 × 298 mm {7.7 × 9.9 × 11.7"} (H × W × D) |
| Weight (mass) | Approximately 5.6 kg {12.3 lb} |
*1: Be sure to use a safety-standards-applied power source that meets the following specifications. Rated output: 24 V/2.0 A or more, Maximum output: 240 VA or less
TM-U950
Bedienungsanleitung
Copyright © 1995, 1998, 2001 Seiko Epson Corporation, Nagano, Japan.
Sicherheitshinweise
Copyright © 1995, 1998, 2001 by Seiko Epson Corporation, Nagano, Japan.
JOURNAL/SLIP FEED-knop
- Safety Precautions
- WARNING:
- CAUTION:
- Caution Labels
- Restriction of Use
- Unpacking
- Downloading Drivers, Utilities, and Manuals
- Control Panel
- RECEIPT FEED button
- JOURNAL/SLIP FEED button
- POWER LED
- ERROR LED
- RECEIPT OUT LED
- JOURNAL OUT LED
- SLIP LED
- Removing the Transportation Damper
- Using the Power Switch Cover
- Installing the Paper Rolls
- Inserting Slip Paper
- Notes:
- Installing a Ribbon
- Using the MICR Reader (Option)
- Cleaning the Optional MICR Mechanism
- Cleaning procedure
- English
- Troubleshooting
- Removing Jammed Paper
- TM-U950
- Bedienungsanleitung
- Sicherheitshinweise
- JOURNAL/SLIP FEED-knop
Brand : EPSON
Model : TMU950
Category : Printer