
DSRPD170P - Camcorder SONY - Free user manual and instructions
Find the device manual for free DSRPD170P SONY in PDF.
User questions about DSRPD170P SONY
0 question about this device. Answer the ones you know or ask your own.
Ask a new question about this device
Download the instructions for your Camcorder in PDF format for free! Find your manual DSRPD170P - SONY and take your electronic device back in hand. On this page are published all the documents necessary for the use of your device. DSRPD170P by SONY.
USER MANUAL DSRPD170P SONY
DSR-PD150/IPD150P DSR-PD170/IPD170P DSR-250/250P Auto Logo Insert for Copyright Protection
Operating Instructions GB
Mode d'emploi FR
The auto logo insert function is designed for copyright protection. Using this function, a registered still image is always inserted on a moving picture to assure copyright protection.
Once you set the auto logo insert function to active:
- You can insert a still image recorded in a "Memory Stick" onto a moving picture.
- You cannot shoot if you remove the "Memory Stick" that the registered logo file is stored in.
- You need your password to deactivate this function.
You can secure a copyright of a picture shot by your camcorder on the functions above.
Before using this function
Do not forget your password!
If you forget your password, the memory of the camcorder must be formatted. There is a charge for it even if your camcorder is still under guarantee.
Do not remove the battery pack, the AC Adaptor, or the "Memory Stick" while registering the logo!
Otherwise, the "Memory Stick," image data, or setting information on the LOGO INS item may be damaged, and moreover, this will cause serious damage of the camcorder.
The following functions do not work when the auto logo insert function is active:
-Progressive mode (DSR-PD150/PD150P/250/250P)
-Progressive recording mode (DSR-PD170/PD170P)
Memory mix
- All the functions in memory mode
- Even though you set the POWER switch to MEMORY, the camcorder works in CAMERA mode (DSR-PD150/PD150P/PD170/PD170P)
- Even though you set the MEMORY/CAMERA/VTR selector to MEMORY, the camcorder works in CAMERA mode (DSR-250/250P)
- All the functions that are used with the "Memory Stick" in VCR mode (DSR-PD150/ PD150P/PD170/PD170P) or in VTR mode (DSR-250/250P)
The DSR-PD170/PD170P is the model used for illustration purposes. Any differences in operation are clearly indicated in the text, for example, "DSR-PD170/PD170P only."
Table of contents
Introduction - Auto Logo Insert 2
Preparing a logo file 3
Registering your password 4
Registering a still image to be used as a logo 6
Deactivating the auto logo insert function 10
Changing or resetting the setup 11
Precautions concerning the auto logo insert function. 13
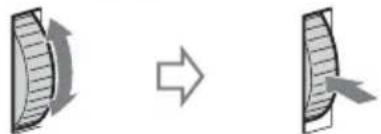
To insert a logo file on a moving picture, there are two ways: one uses the luminancekey setting and the other uses the chroma setting.
Preparation 1 Creating a logo file
Create a logo file at 640 × 480 dots (VGA size).
Luminancekey (LUMINANCE)
Makes a brighter portion of a still image transparent, then records a moving picture on that portion. When you use luminancekey to insert a logo file, the background (transparent portion) of the logo file must be created in white, and the ratio setting of the RGB signal must be as follows: R = 255 , G = 255 , and B = 255 . If an image has a brighter portion other than the background, that portion may be transparent.
Chroma (CHROMA)
Makes a blue portion of a still image transparent, then records a moving picture on that portion. When you use chroma to insert a logo file, the background (transparent portion) of the logo file must be created in blue, and the ratio setting of an RGB signal must be as follows: R = 0 , G = 0 , and B = 255 . If an image has a blue portion other than the background, that portion may be made transparent.
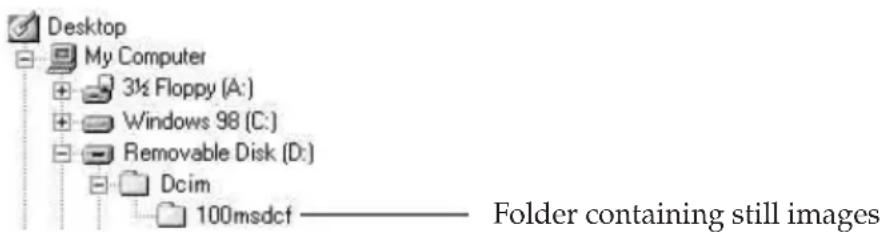
Preparation 2 Saving a logo file in the "Memory Stick" format
Convert a logo file format to the "Memory Stick" format, and save it in the 100msDCF folder, using the supplied application, PictureGear. (For DSR-PD170/PD170P models, PictureGear is optional.)
Notes
- The portion of a still image that is displayed on the LCD screen or in the viewfinder is 90% of the original image. So, the portion near the edges may not be displayed.
- The resolution of a still image that is created using the chromakey setting is about 360 × 480 dots.
Usable file formats for a logo file
You can only use JPEG format files of 640 × 480 dots (VGA size) that correspond to the "Memory Stick" format. However, you can use the following file format images by converting them to "Memory Stick" format files using the supplied application, PictureGear: TIFF, BITMAP, GIF, PNG, and DVF. (For DSR-PD170/PD170P models, PictureGear is optional.)
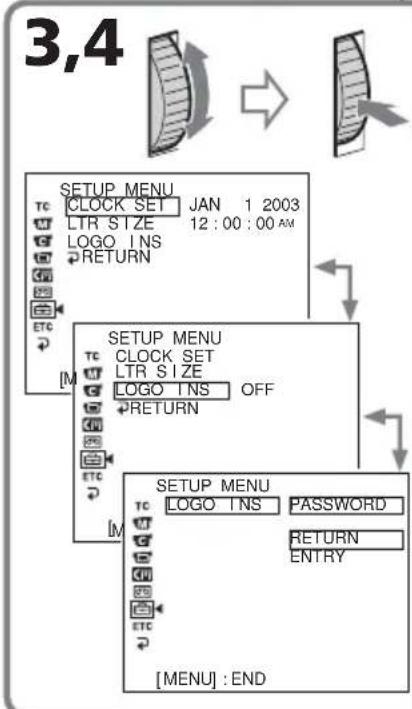
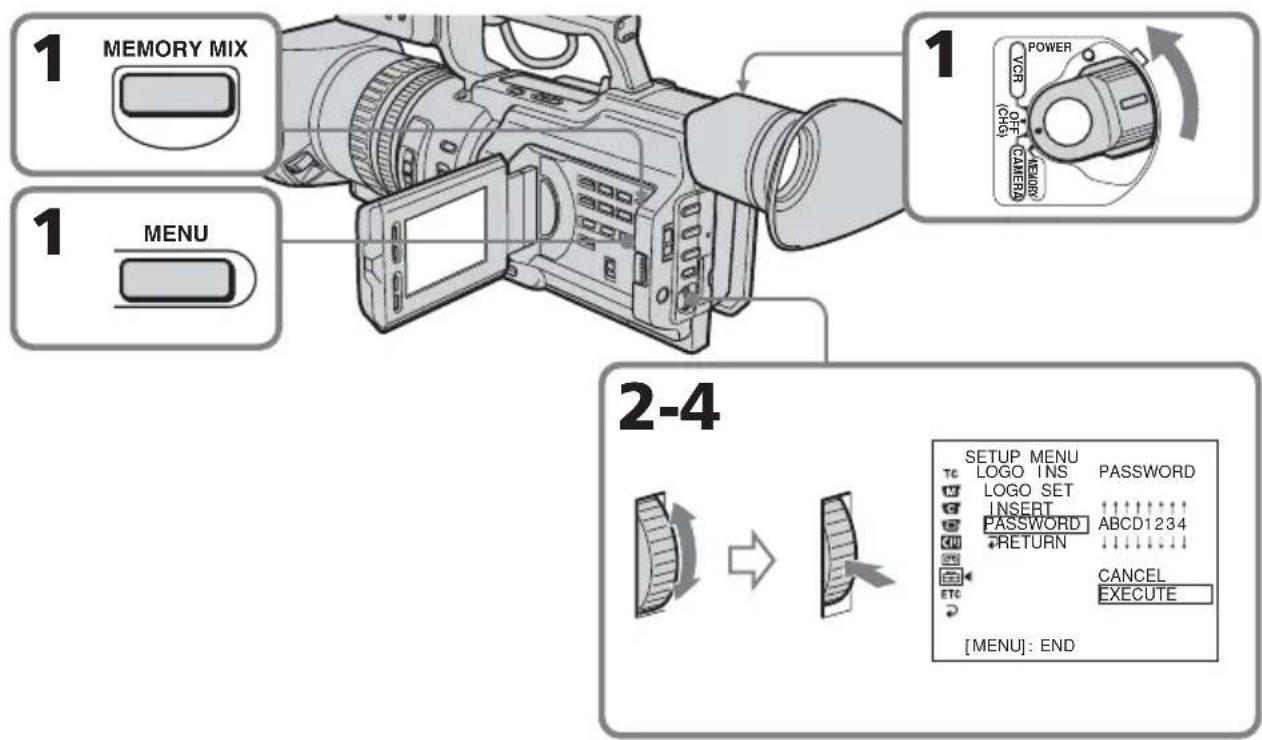
You have to register your password (maximum eight digits) before using the auto logo insert function. Once you set your password, you need to enter your password to access LOGO INS in the menu setting, and to set, change, or deactivate the setting.
(1) DSR-PD150/PD150P/PD170/PD170P: While holding down MEMORY MIX, set the POWER switch from OFF (CHG) to CAMERA. Keep pressing MEMORY MIX for about five seconds.
DSR-250/250P: Set the MEMORY/CAMERA/VTR selector to MEMORY and while holding down MEMORY MIX, set the POWER switch to ON. Keep pressing MEMORY MIX for about five seconds.
(2) DSR-PD150/PD150P/PD170/PD170P: Press MENU to display the menu.
DSR-250/250P: Push the CUSTOM PRESET/MENU switch in the MENU direction and release it to display the menu.
(3) Turn the SEL/PUSH EXEC dial to select 品 then press the dial.
(4) Turn the SEL/PUSH EXEC dial to select LOGO INS, then press the dial.
(5) Turn the SEL/PUSH EXEC dial to select NEW ENTRY, then press the dial.
(6) Turn the SEL/PUSH EXEC dial to select the desired character, then press the dial. The character you select is entered, and the cursor moves to the next column.
(7) Repeat step 6 to enter characters into other columns.
(8) Turn the SEL/PUSH EXEC dial to select EXECUTE, then press the dial.
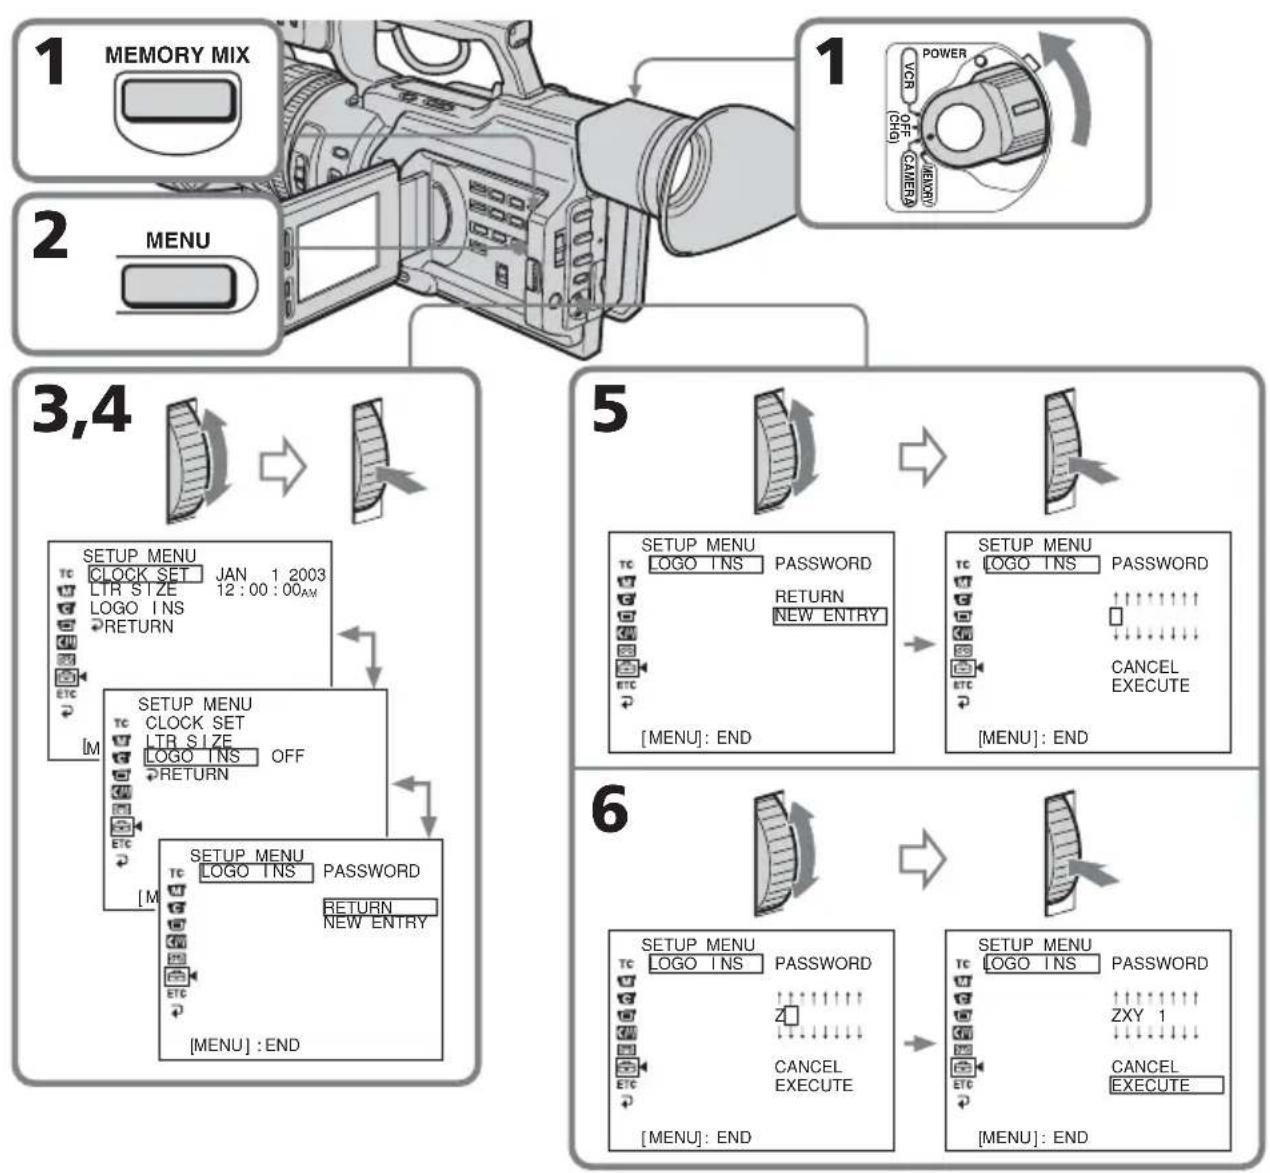
To cancel the setting of the password
Select CANCEL in step 8, then press the SEL/PUSH EXEC dial.
Do not forget your password
If you forget your password, you cannot change the LOGO INS setting. In this case, the memory of the camcorder must be formatted. Formatting must be done by qualified personnel only and there is a charge for it even if your camcorder is still under guarantee. For details consult your Sony dealer or local authorized Sony service facility.
On password characters
Do not select an easy password. A password must be difficult to unscramble.
When accessing the LOGO INS item
You cannot do any recording.
On characters you can use as your password
Each time you turn the SEL/PUSH EXEC dial, the character changes as follows: (blank) A B ... Z (blank) 0 1 ... 9 (blank) ...
- You cannot set all eight columns to blank. If you do, "ALL BLANK" appears on the LCD screen or in the viewfinder.
Registering a still image to be used as a logo
Select a still image from a "Memory Stick."
Selecting a still image
Before operating
Insert the "Memory Stick" on which the desired still image is recorded, into your camcorder.
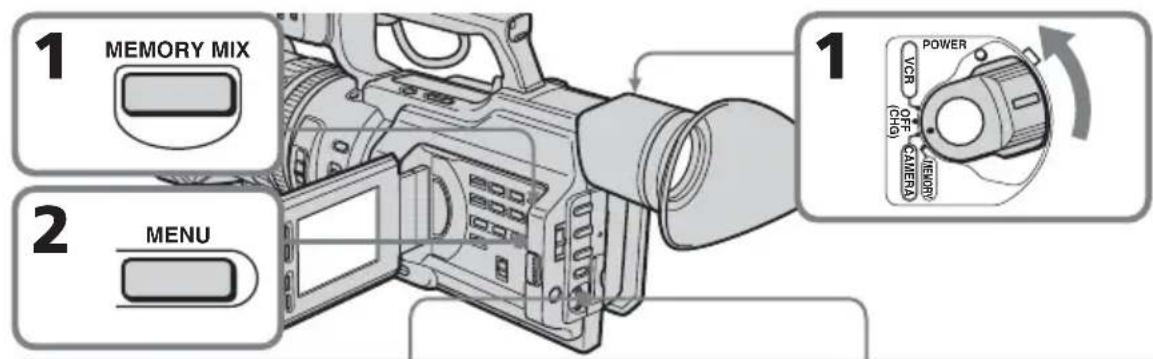
(1) DSR-PD150/PD150P/PD170/PD170P: While holding down MEMORY MIX, set the POWER switch from OFF (CHG) to CAMERA. Keep pressing MEMORY MIX for about five seconds.
DSR-250/250P: Set the MEMORY/CAMERA/VTR selector to MEMORY and while holding down MEMORY MIX, set the POWER switch to ON. Keep pressing MEMORY MIX for about five seconds.
(2) DSR-PD150/PD150P/PD170/PD170P: Press MENU to display the menu.
DSR-250/250P: Push the CUSTOM PRESET/MENU switch in the MENU direction and release it to display the menu.
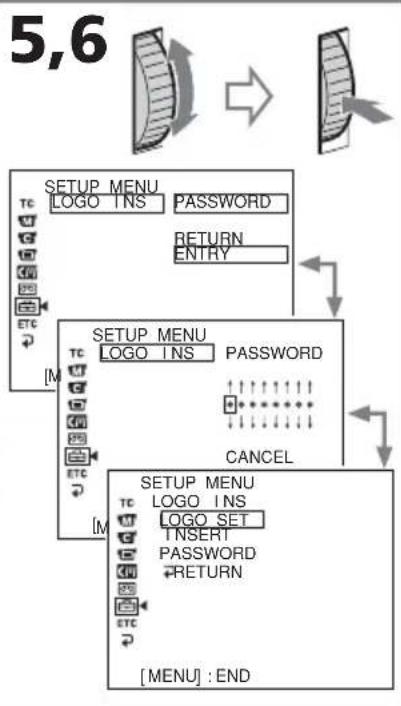
(3) Turn the SEL/PUSH EXEC dial to select, then press the dial.
(4) Turn the SEL/PUSH EXEC dial to select LOGO INS, then press the dial.
(5) Turn the SEL/PUSH EXEC dial to select ENTRY, then press the dial.
(6) Enter your password. Turn the SEL/PUSH EXEC dial to select EXECUTE, then press the dial.
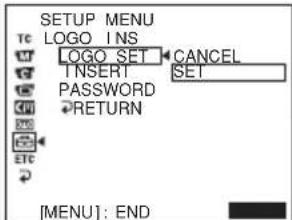
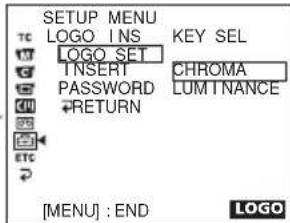
(7) Turn the SEL/PUSH EXEC dial to select LOGO SET, then press the dial.
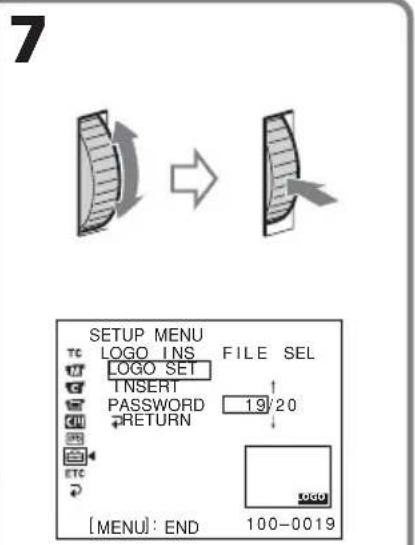
(8) Turn the SEL/PUSH EXEC dial to select the desired image, then press the dial.
The selected image is displayed on the LCD screen or in the viewfinder at full size.
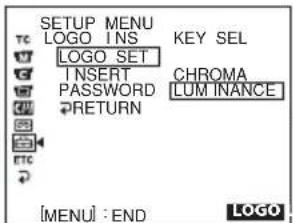
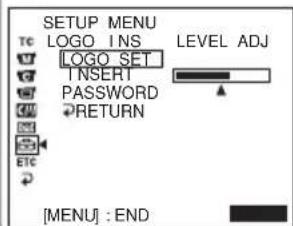
(9) Set up CHROMA or LUMINANCE. Select CHROMA when the background of the image is blue, and select LUMINANCE when the background is white.
① Turn the SEL/PUSH EXEC dial to select CHROMOA or LUMINANCE, then press the dial.
② Turn the SEL/PUSH EXEC dial to set up LEVEL ADJ, then press the dial.
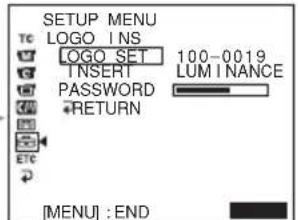
(10) Turn the SEL/PUSH EXEC dial to select SET, then press the dial.
The data file name of the image, the level of CHROMALUMINANCE, and the indication of CHROMOR LUMINANCE are displayed on the LCD screen or in the viewfinder.
10
8


9

1

②
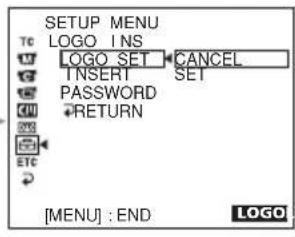
To cancel registering the logo
Select CANCEL in step 10, then press the SEL/PUSH EXEC dial.
Once you register the logo
INSERT is automatically set to ON in the menu settings, and the logo will be inserted.
Notes
- Do not remove the battery pack, the AC Adaptor, or the "Memory Stick" while registering the logo data. Otherwise, the "Memory Stick" or image data in it may be damaged, and moreover, this will cause serious damage of the camcorder.
- The setting of the auto logo insert function will be kept until you set LOGO INS to OFF in the menu settings.
- When INSERT is set to ON, you cannot do any recording if the "Memory Stick" in which the registered logo is recorded is not inserted, and the following mode and functions will not be active:
-Progressive mode (DSR-PD150/PD150P/250/250P)
-Progressive recording mode (DSR-PD170/PD170P)
Memory mix
- All the functions in memory mode
- All the functions that are used with the "Memory Stick" in VCR mode (DSR-PD150/ PD150P/PD170/PD170P) or in VTR mode (DSR-250/250P)
- Even though you set the POWER switch to MEMORY, the camcorder works in CAMERA mode (DSR-PD150/PD150P/PD170/PD170P).
- Even though you set the MEMORY/CAMERA/VTR selector to MEMORY, the camcorder works in CAMERA mode (DSR-250/250P).
If you enter an incorrect password
"INCORRECT PASSWORD" will be displayed.
When the selected image cannot be displayed
"FILE OPEN ERROR" will be displayed.
Depending on the background color of the image
Choose "CHROMA" when the background color is blue, or "LUMINANCE" when the background color is white.
Deactivating the auto logo insert function
Once you set LOGO INS to ON in the menu settings, information on the LOGO INS setup will be retained until you set it to OFF.
(1) Follow steps 1 to 6 on page 6.
(2) Turn the SEL/PUSH EXEC dial to select INSERT, then press the dial.
(3) Turn the SEL/PUSH EXEC dial to select OFF, then press the dial.

To insert the logo
Select ON in step 3, then press the SEL/PUSH EXEC dial.
Changing or resetting the setup
Changing your password
(1) Follow steps 1 to 6 on page 6.
(2) Turn the SEL/PUSH EXEC dial to select PASSWORD, then press the dial.
(3) Turn the SEL/PUSH EXEC dial to select CHANGE, then press the dial.
(4) Enter the new password, and turn the SEL/PUSH EXEC dial to select EXECUTE, then press the dial.
To cancel changing your password
Select CANCEL in step 4, then press the SEL/PUSH EXEC dial.
Note
If you enter "CLEARALL" in step 4, the entire setup will be cleared (p. 12).
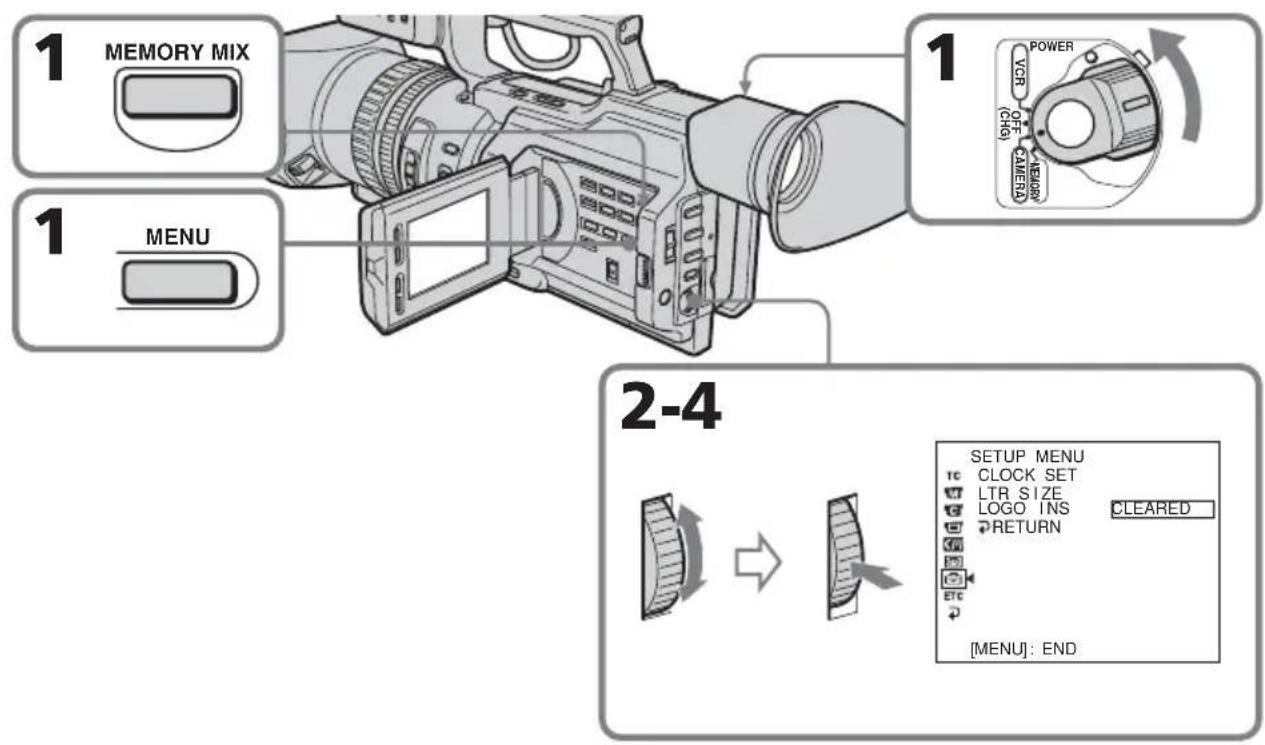
Resetting the entire setup for the auto logo insert function
This procedure resets the entire setup for LOGO INS.
(1) Follow steps 1 to 6 on page 6.
(2) Turn the SEL/PUSH EXEC dial to select PASSWORD, then press the dial.
(3) Turn the SEL/PUSH EXEC dial to select CHANGE, then press the dial.
(4) Enter "CLEARALL," and turn the SEL/PUSH EXEC dial to select EXECUTE, then press the dial. "CLEARED" is indicated on the screen, and the entire setup will be reset.
To cancel resetting
Select CANCEL in step 3, then press the SEL/PUSH EXEC dial.
Precautions concerning the auto logo insert function
Follow the precautions below.
-
Do not forget your password. If you forget your password, the memory of the camcorder must be formatted. There is a charge for it even if your camcorder is still under guarantee.
-
Do not remove the battery pack, the AC Adaptor, or the "Memory Stick" while registering the logo. Otherwise, the "Memory Stick," image data, or setting information on the LOGO INS item may be damaged, and moreover, this will causes serious damage of the camcorder.
-
Do not break or lose the "Memory Stick" that the registered logo is recorded. We recommend that you make a backup copy and save it to another "Memory Stick" or to your PC.
-
We recommend that you set the write-protect tab on the "Memory Stick" to LOCK.
On the warning messages
When the following messages appear on the LCD screen or in the viewfinder, their probable causes and remedies are as follows:
LOGO NOT INSERTED
The logo is not inserted properly, or the "Memory Stick" is not inserted that has the logo data.
Check if the "Memory Stick" is inserted properly, or insert the "Memory Stick" with logo data.
LOGOSYSTEMERROR
The data setting of the logo insert system is corrupted.
Consult your Sony dealer or local authorized Sony service facility.
Printed on 70% or more recycled paper using VOC (Volatile Organic Compound)-free vegetable oil based ink.
Printed in Japan