
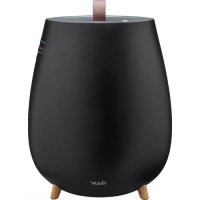
Beam mini - Humidifier DUUX - Free user manual and instructions
Find the device manual for free Beam mini DUUX in PDF.
| Product type | Smart ultrasonic humidifier |
| Brand | Duux |
| Model | Beam Mini |
| Weight | 1.5 kg |
| Power supply | Mains, 220-240 V |
| Power consumption | 28 W |
| Water tank capacity | 3 L |
| Recommended area | 30 m² |
| Maximum mist output | 300 ml/h |
| Maximum runtime | 20 h |
| Power cord length | 1.5 m |
| Main materials | ABS, PP |
| Number of mist settings | 3 (Low, Medium, High) |
| Operating modes | Manual, Auto, Timer (1h/2h/4h/8h) |
| Built-in hygrostat | Yes, adjustable from 40% to 90% |
| Aroma tray | Yes (with sponge, Duux aromas recommended) |
| Water filter | Yes (filter bag, replace every 3 to 6 months) |
| Remote control | Yes (CR2032 battery included) |
| App control | Yes (Duux app, Wi-Fi) |
| Water level indicator | Yes (E1 alert) |
| Automatic shut-off | Yes (timer and empty tank) |
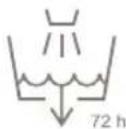
| Recommended cleaning | Every 3 days; diluted vinegar for descaling |
| Replacement parts | Filter bag (ref. DXHUC05), aroma tray |
| Model number | DXHU12/13 |
Frequently Asked Questions - Beam mini DUUX
User questions about Beam mini DUUX
0 question about this device. Answer the ones you know or ask your own.
Ask a new question about this device
Download the instructions for your Humidifier in PDF format for free! Find your manual Beam mini - DUUX and take your electronic device back in hand. On this page are published all the documents necessary for the use of your device. Beam mini by DUUX.
USER MANUAL Beam mini DUUX

natural_image
Abstract geometric logo with white triangular and cross-like shapes on teal background (no text or symbols)Beam mini
Smart ultrasonic humidifier
user manual | gebruikershandleiding | Bedienungsanleitung | manual de usuario | manuel d'utilisation
duux ^*
Thank you for choosing Duux.
We're so glad you decided to read the instructions to your new Duux air humidifier! Many users casually dismiss instructions and seek to figure it out on their own. But studies show that people who read instructions will get up to speed more quickly and efficiently than those who poke around with trial and error.
At Duux we believe in the importance of a comfortable and healthy living environment. Enhancing your wellbeing by designing appealing, functional and effective products is the passion that drives us every day. With our range of innovative air treatment products we aim to provide you the best possible indoor air quality.
Dry skin, dry throat or regular headaches? Chances are the air inside your home is too dry. Meet Beam mini, the versatile high-capacity humidifier with a minimal footprint. Its large water tank capacity of 3 liters and high mist output of 300 ml/h ensure optimum performance. Filling the Beam is easy thanks to its top filling capability. And its built-in hygrostat and built-in temperature sensor work wonders when it comes to ease of use. Connect it to the Duux smart app to use and control your Beam Mini from anywhere in the world. Read this manual carefully to get the most out of your Beam Mini smart ultrasonic humidifier.
Table of Content
- Product overview 4
- Installation and use 5
- Functions 9
- Maintenance 12
- Technical specifications 15
- FAQ 16
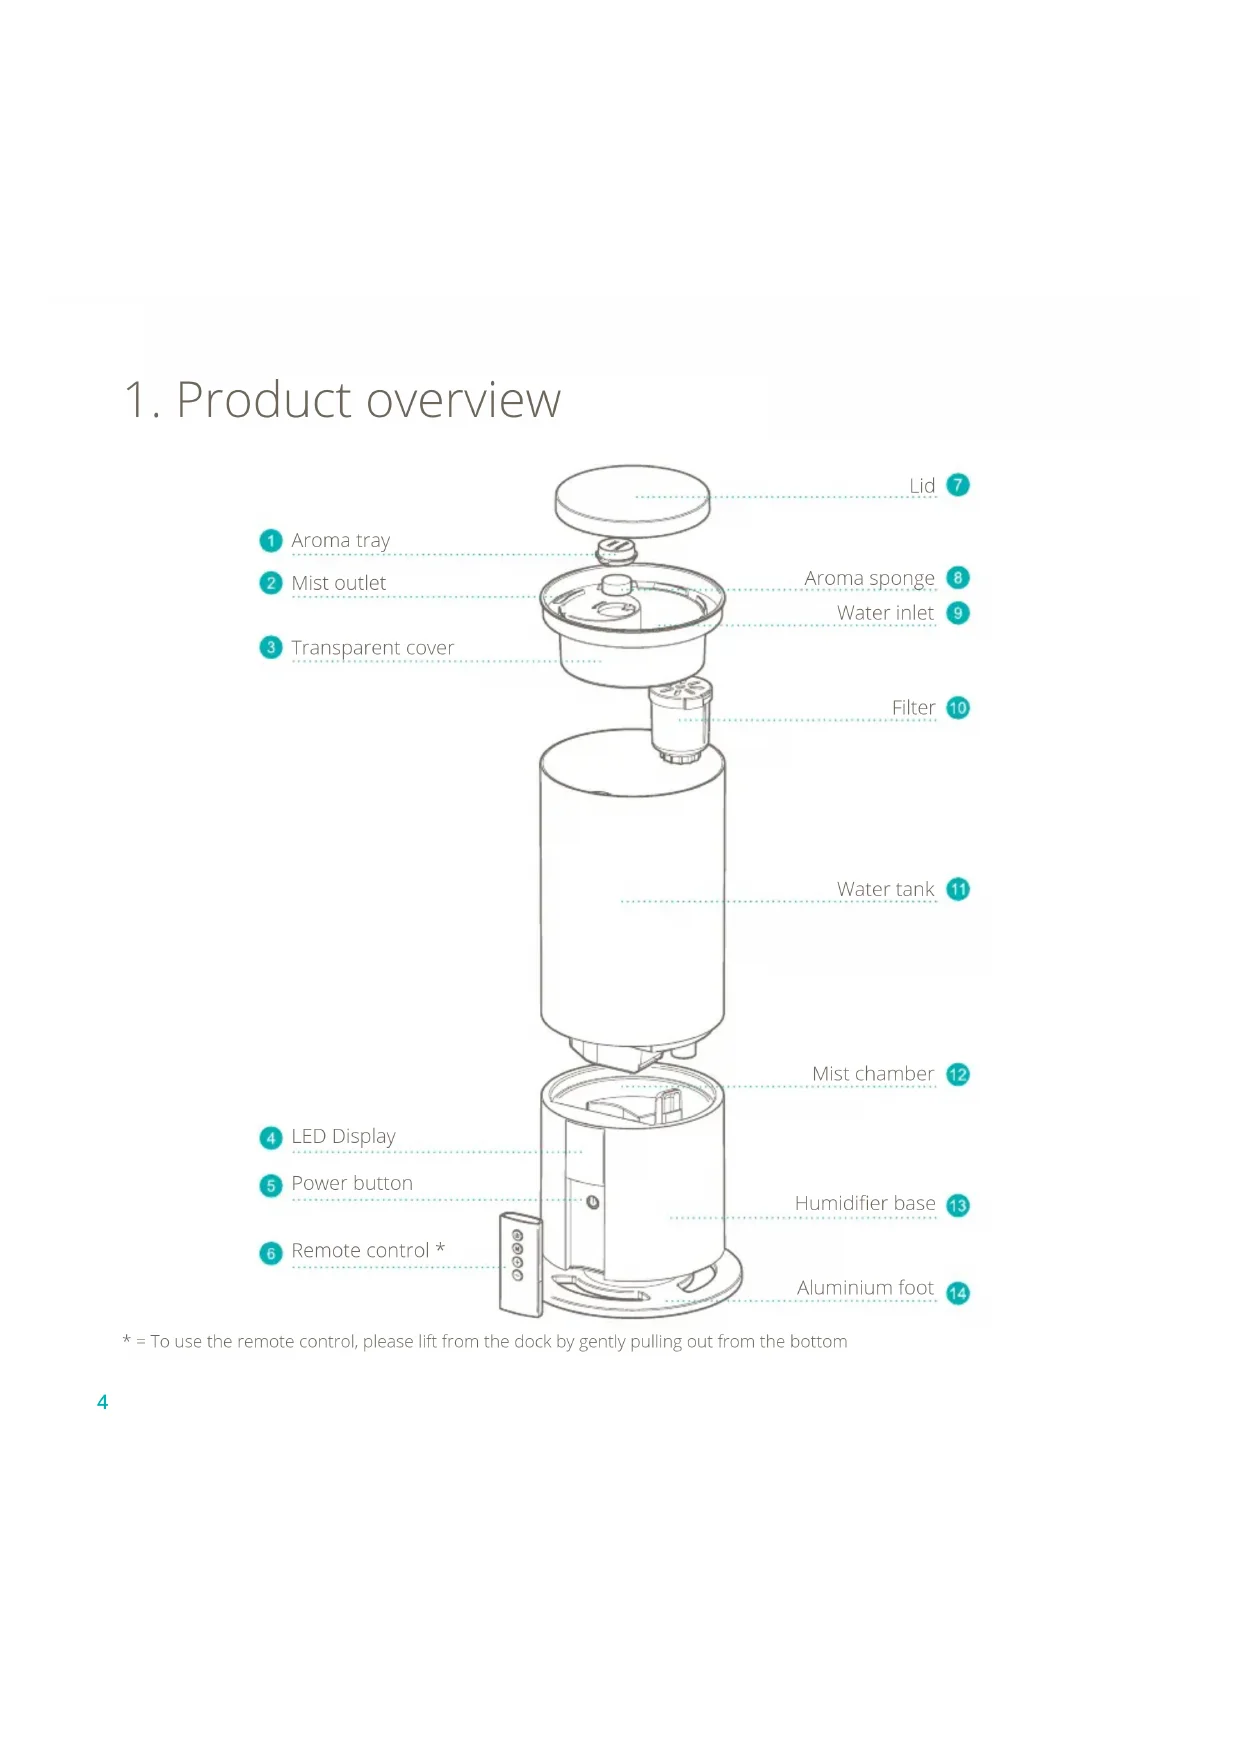
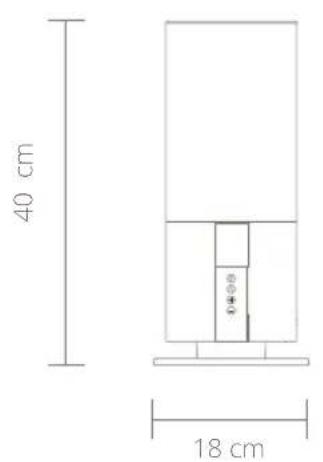
1. Product overview
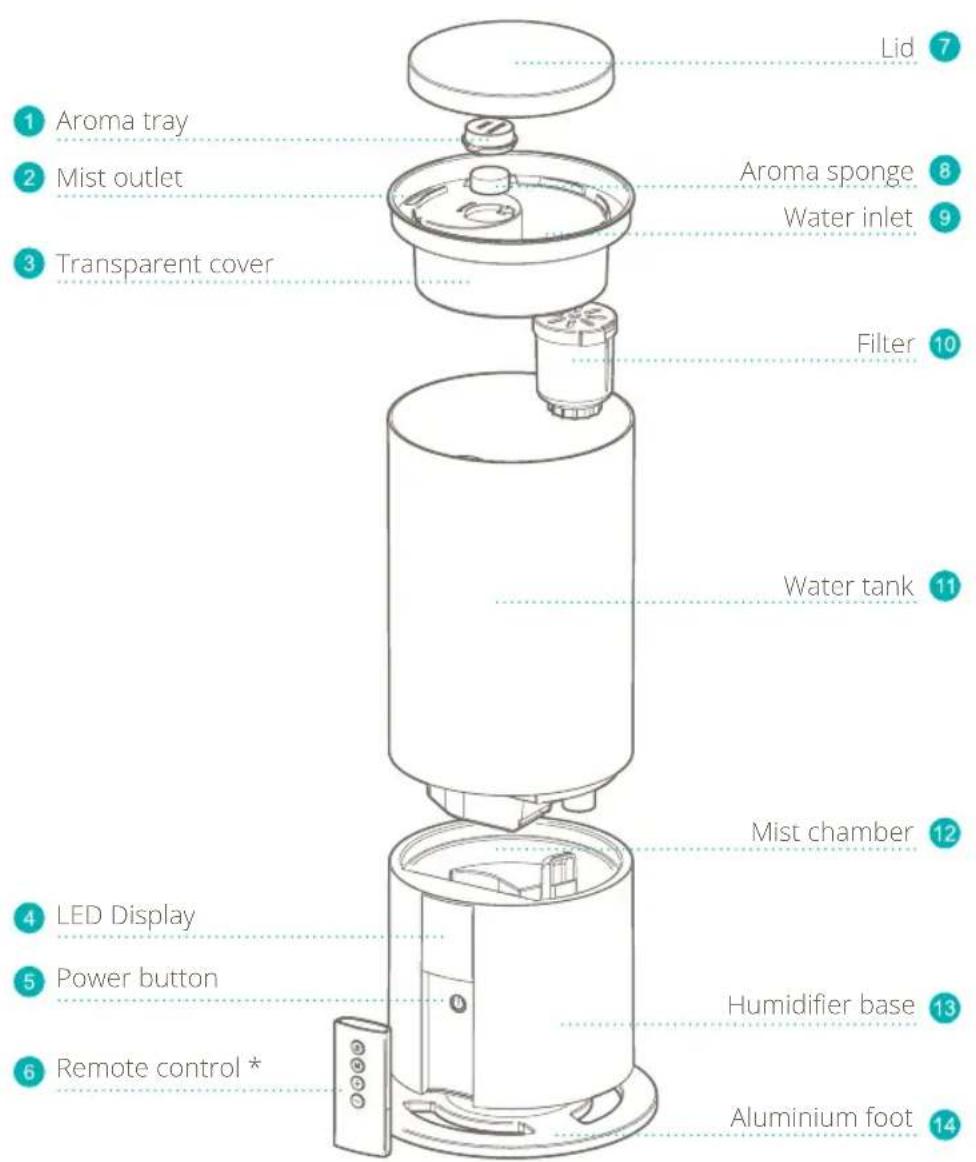
* = To use the remote control, please lift from the dock by gently pulling out from the bottom
2. Installation and use
IMPORTANT: Before using the device, please carefully read the entire instruction manual and the separately included warning sheet.
⚠ WARNING: Micro-organisms that may be present in the water or in the environment where the appliance is used or stored, can grow in the water reservoir and be blown in the air causing very serious health risks when the water is not renewed and the tank is not cleaned properly every 3 days.
General cautions
- When using electrical appliances, basic precautions should always be followed to reduce the risk of fire, electric shock and injury.
- For indoor use only. Do not use in commercial, industrial or outdoor environments.
- Do not use the device in the vicinity of flammable or explosive substances or fuels.
- Never use any paint, cleaning sprays, anti-insect sprays or similar near the unit; this could deform the plastic or cause electrical damage.
• Always turn off and unplug the power cord when not in use, servicing, cleaning or moving the device. -
Do not route the power cord or adaptor under rugs, carpets or furniture. This may damage the cord/adaptor or cause it to overheat, creating a fire hazard.
-
Do not route the power cord in or through doorways or areas where the cord may be damaged or create a tripping hazard.
- Only use the device in the upright position on a flat level surface (even during transport) and at least 50cm from any objects.
- Check the voltage on the device label before use. Only connect the device to sockets that correspond to the voltage of the device. If you are unsure whether your connections meet the requirements, consult an electrician or your electricity supplier.
- Do not disassemble and repair the appliance without authorization.
- If the power cord is damaged - in order to avoid danger - it must be replaced by the manufacturer or its maintenance department and not by yourself.
- If there is any abnormality, please unplug the power cord immediately and have it repaired by the manufacturer or its maintenance department.
• Regularly clean the dust on the power cord plug. - Unplug the device during filling and cleaning.
- When unplugging the power cord, hold the power plug instead of pulling the power cord.
- Do not cover the air inlet and the mist outlet with items such as towels.
-
This is not a toy. To avoid accidents, keep it away from babies and children. Do not put it in a crib, stroller or playpens. Please do not let children and babies play with the device.
-
Do not add aromas or similar substances to the water tank of the device.
- Do not use in the kitchen.
- Please keep away from heat sources and avoid direct sunlight.
- This appliance can be used by children aged from 8 years and above and persons with reduced physical, sensory or mental capabilities or lack of experience and knowledge if they have been given supervision or instruction concerning use of the appliance in a safe way and understand the hazards involved. Children shall not play with the appliance. Cleaning and user maintenance shall not be made by children without supervision.
- Be aware that high humidity levels may encourage the growth of biological organisms in the environment.
- Do not permit the area around the humidifier to become damp or wet. If dampness occurs, turn the output of the humidifier down. If the humidifier output volume cannot be turned down, use the humidifier intermittently. Do not allow absorbent materials, such as carpeting, curtains, drapes, or tablecloths, to become damp.
- Never leave water in the reservoir when the appliance is not in use.
• Empty and clean the humidifier before storage. Clean the humidifier before next use.
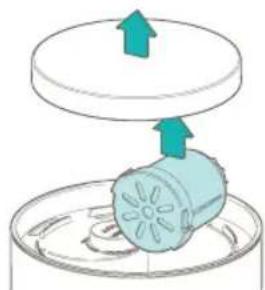
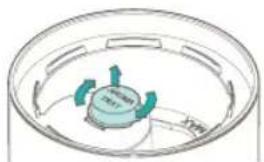
Placing the filter
- Remove the device from its packaging. Store the packing materials for future transportation and storage.
- Take the lid 7f and take out the filter . 10
natural_image
Diagram showing a blue cylindrical object with arrows pointing upward above it, placed on a circular base (no text or symbols)- Remove the plastic seal from the filter.
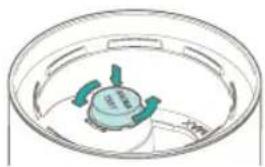
- Take out the transparent cover 3
natural_image
Illustration of a cylindrical container with a blue arrow indicating upward motion (no text or symbols)- Position the filter in bottom of the water tank over the valve.
- Push and turn the filter counter clockwise to fix in place.
natural_image
Simple line drawing of a sun partially covered in a dome, with no text or symbols present.- Place the transparent cover 3 and lid back on top of the watertank 11
Installing the remote control
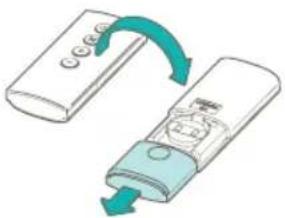
- Flip the remote and open the battery cover by pressing and sliding it backwards.
natural_image
Illustration of a remote control device with a scroll arrow indicating rotation (no text or symbols)-
Place the battery in the correct orientation. TIP: When the buttons are facing down, the '+' -side of the battery should face up.
-
Slide the battery cover back in place until you hear an audible 'click'.
NOTE:
• Only use 1x CR2032 battery.
• Safely dispose empty batteries.
- Remove the battery if the remote control is to be stored unused for a long period of time.
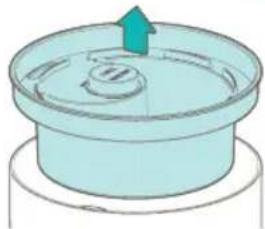
Filling the water tank
WARNING: Only fill with cold or lukewarm water. Hot or boiling water will damage the device.
- Unplug the power cord and take off the lid . 7
- Fill the water tank with water using a watering can or container.

natural_image
Diagram of a mechanical component with a teal arrow indicating downward motion (no text or symbols)WARNING: Do not exceed the "MAX" level on the transparent cover.
- Place back the lid and make sure it fits properly.
- Plug the device back in the power outlet.
- You may now turn on the device.
NOTE: Always unplug the power cord when filling the water tank.
NOTE: When using the device for the first time, the water may have a slight smell and discoloration. This is normal and not harmful for your health.
NOTE: We recommend using distilled or clear tap water to prevent the growth of bacteria and scale inside the water tank.
Using aroma
WARNING: Never deposit aroma directly into the water tank.
WARNING: Never use oil based aromas.
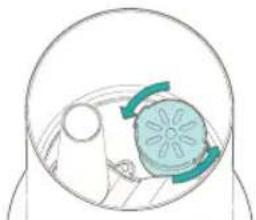
- Rotate the aroma tray ①ock wise and lift it to remove it from the transparent cover ③
natural_image
3D diagram of a circular container with internal components and directional arrows, no readable text or symbolsTIP: The 'lock closed and 'lock open' icons on the transparent cover help to rotate the tray in the right direction.
- Flip the aroma tray and add a few drops of Duux Aroma to the aroma sponge inside the tray.

- Place the aroma tray 1 lock in the transparent cover 2 and rotate it counter clockwise to lock it in place.
natural_image
Simple line drawing of a circular container with three green and blue blades, no text or symbols present.NOTE: The 'lock open and 'lock closed icons on the transparent cover help to position the aroma tray before locking it in place.
First use
- Make sure the power cord is plugged in the power outlet. The device will make a "beep" sound.
- Press the button to turn on the device. The display will light up.
- The display will switch between the current temperature and relative humidity, showing each for 5 seconds.
- The default mist output is set to medium.
NOTE: You can also turn on the device using the ○ touch button on the humidifier base 13 located behind the remote control.
3. Functions
Control panel / remote control

NOTE: The remote control is the main control panel to operate the device. When not in use, we recommend placing the remote control back in the holder in the base.
Display

Buttons

Power button
Remote
Press the button once to turn on the device. It will continue operation in the last active mode - manual or auto.
Press the ☑ again to turn the device off. It will go to stand-by mode and will remember the last operation mode – manual or auto. If there is an active timer, it will be cleared.
Humidifier base
Press the touch button once to turn on the device. It will continue operation in the last active mode – manual or auto.
If the is device turned on in manual mode, each additional press will increase the mist output level by one step. Pressing the touch button when the mist output level is high will turn the device off. If there is an active timer, it will be cleared.
Else, if the device is turned on in auto mode, an additional press will put the device back to manual mode with the highest mist output level. Pressing the touch again will turn the device off. If there is an active timer, it will be cleared.
Mode button
Use the button to active/deactivate the auto mode or set a timer.
Press the button to cycle through the modes:
Auto mode and Timer mode.
The selected mode icon will illuminate on the display. Use the + and buttons to change the setting. To confirm the changes, wait for ±3 seconds or press the button again.
Note: If the display shows – the chosen mode won't activate or will be deactivated after confirmation.
For more information on functions, see chapter Functions.
+/ Increase/decrease button
The behaviour of the increase / decrease buttons depends on the mode that is being set.
- Manual mode: Increase or decrease mist output level.
• Auto mode: Increase or decrease the desired relative humidity level. - Timer mode: Increase or decrease the timer with 1 hour increments.
Functions
Manual mode
In Manual mode users can select the desired mist output.
Use the + and buttons to select the desired mist output. The mist output level bars will change accordingly. There are three mist output levels:
Low
Medium
High
Auto mode
In auto mode users can set the built-in hygrostat to their desired relative humidity level. If the ambient relative humidity drops below the desired level, the mist output will automatically turn on. It will continue to operate in the chosen mist output level until the hygrostat level is reached.
Before turning on auto mode, select the desired mist output level in Manual mode using the and — buttons. Press the button until the indicator illuminates on the display. Press the and — buttons to set the hygrostat to the desired relative humidity level.
Note: The mist output level can't be changed when the mode is active.
The desired relative humidity level can be set between 40% and 90% with increments of 5%. When you go below 40% or above 90%, the display will show — — and auto mode will be deactivated. The following sequence shows the steps and how they cycle. — — > 40% > 45% > 50% > [...] > 90% > → 40%

Timer
Press the button until the indicator illuminates on the display. Use the + and buttons to increase or decrease the timer hours in the following sequence: 1h > 2h > 4h > 8h > OFF.
Once the timer is activated, the device will automatically shut down after the set timer has been completed.
Display brightness
The display will automatically dim after the last touch or press.

Refill water indicator
When the water level becomes too low to produce mist, the device will make three "beep"-sounds and the display will show the red indicator in combination with an E1 notification. Please follow the steps explained in Filling the water tank. When the water tank is refilled you may plug in the power cord and turn on the device.
Display notifications
The following notification may show on the display:
- E1: The water level in the mist chamber is 1200 low to produce mist.
• E2: The water tank is not placed on the humidifier base 13 - E3: If this notification shows, please contact your nearest service provider.

Wifi
- Scan the QR code below or search for "Duux app" in the App Store or Google Play Store and download the application.
- Once installed, please log in or create a Duux app account and follow the steps to complete the registration.
- Open the Duux app and click "add duux device" on the main screen, or use the "+" button in the top right corner to add a new device.
- Search for "Beam mini".
- Follow the instructions in the app on how to complete the pairing process.
Apple
App store

Android
Play store

Note: To disconnect a device that is already connected to Wifi, press and hold the button for ±3 seconds. The Wifi will disconnect and the 📤 indicator starts flashing and will look for devices to pair with.
4. Maintenance
▲ Important: Be sure to remove the power plug from the outlet before carrying out maintenance.
⚠️ Important: Do not soak or immerse the power plug or the device in water.
Water replacement
In order to maintain the best performance of the humidifier, the water in the water tank and the water tank itself should be cleaned every 3 days.
Cleaning
- Please use a soft cloth to wipe the dust off the body. If the surface is too dirty, it is better to wipe it clean with a damp cloth mixed with neutral detergent.
- Do not use chemical solvents, gasoline, polishing powder, etc. to clean the surface of the device. Do not place the device or any of its parts in the dishwasher to clean.
- Please use a soft cloth to clean the following parts regularly:
- Aroma Tray
- 3 transparent cover
• -7d - filter
- Water Tank
- Mist Chamber
- If regular cleaning can't remove the scale on the inside of the water tank 12nd mist chamber, we recommend the following steps:
- Mix vinegar with lukewarm water in a 1:10 ratio.
- Use this mixture to clean the necessary components.
- Gently scrub the surfaces with a soft brush until the scale is removed.
- Rinse with tap water to remove any residue.
⚠️ Important: Never let the components soak in the mixture for more than 5 minutes.
Filter
The filter bag needs to be replaced every 3 to 6 months, depending on usage and water hardness (art. no. DXHUC05)
Storage
When the appliance is not used for a long time, please clean all the components and properly dry them. Put them into the original box and store them in a dry place.
Spare parts
Spare parts and accessories can be requested at the point of purchase or local distributor.
The smart and powerful humidifier with minimal footprint
5. Technical specifications
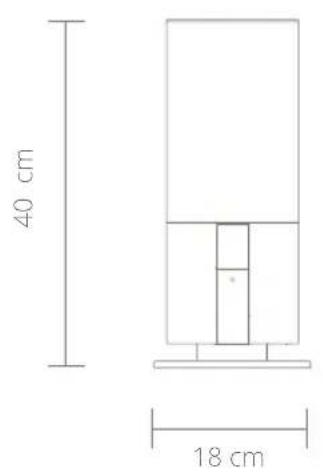
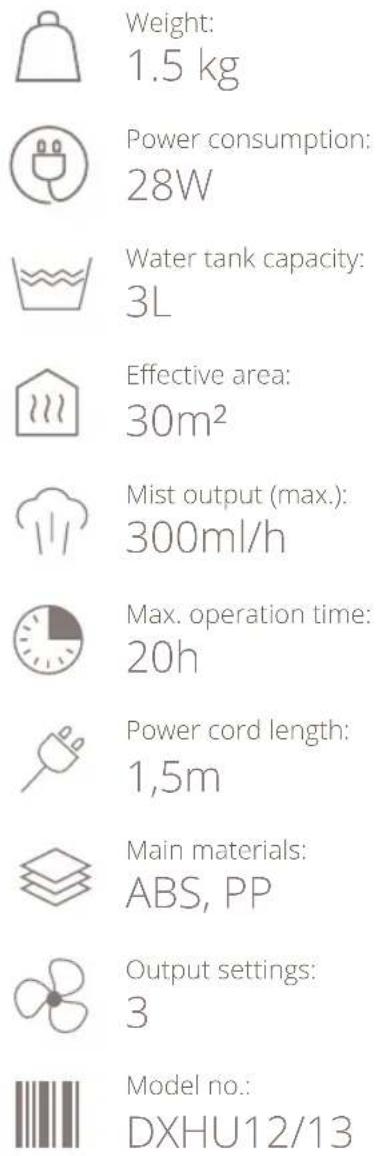
Weight:
1.5 kg
Power consumption:
28W
Water tank capacity:
3L
Effective area:
30m^2
Mist output (max.):
300ml/h
Max. operation time:
20h
Power cord length:
1,5m
Main materials:
ABS, PP
Output settings:
3
Model no.:
DXHU12/13
The appearance and specification of the device may be changed without notice.
6. FAQ
: Q The power/water supply indicator does not light up and mist does not come out.
: A Insert the power plug all the way to the back of the socket or check if there is a power cut.
: Q The power/water supply indicator is red and the power is off, even though the power button has been pressed.
: A There is not enough water. Please fill the water tank with water.
: Q Strange noises accompany the use of the product.
: A A "burbling" sound comes out of the main body. This sound is the sound of water being supplied from the water tank to the main body and does not mean the product is defective.
: Q A strange noise can be heard from the removed water tank.
: A When you remove an empty or nearly-empty water tank from the main body, an abnormal sound from the water tank can be heard. This sound is related to pressure within the water tank and does not mean the product is defective.
: Q Mist can't be seen even when the power is connected.
: A Is the power/water supply display flashing red? There is insufficient water, if it is flashing red. Please fill the water tank with water.
: A The mist may not be visible depending on the balance between the room temperature and humidity.
: Q The floor is wet / There is a water leakage.
: A Is the floor wet due to excessive humidity? Wet floors from mist can occur due to the room environment and conditions of use. Please switch the mist volume to minimum output or AUTO mode.
: Q When do I need to replace the filter bag?
: A Depending on use and water quality (hardness), we advise to replace the filter bag every 3 to 6 months.
Disposal
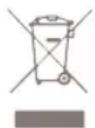
The European directive 2012 / 19 / CE on Waste Electrical and Electronic Equipment (WEEE), requires that old household electrical appliances must not be disposed in the normal unsorted municipal waste stream. Old appliances must be collected separately in order to optimize the recovery and recycling of the materials they contain and reduce the impact on human health and the environment. The crossed out “wheeled bin” symbol on the product reminds you of your obligation, that when you dispose of the appliance it must be separately collected. Consumers should contact their local authority or retailer for information concerning the correct disposal of their old appliance.
Simplified EU declaration of conformity
Hereby, Duux declares that this environmental control radio equipment is in compliance with Directive 2014/53/EU. The full text of the EU Declaration of Conformity is available at the following internet address: www.duux.com/doc
natural_image
Diagram of a mechanical component with two upward arrows indicating motion, no text or symbols presentnatural_image
Simple line drawing of a circular container with a green upward arrow indicating top view (no text or symbols)natural_image
Simple line drawing of a person inside a dome-shaped container with a flower-like shape on the wall (no text or symbols)natural_image
3D diagram of a container with a blue arrow pointing downward, showing internal components (no text or symbols)natural_image
Diagram of a circular container with internal components and directional arrows, no readable text or symbols present.natural_image
Simple line drawing of a circular container with three green and blue blades, no text or symbols present.Android
Play store

natural_image
Diagram of a mechanical component with two upward arrows indicating motion or force, no text or symbols present.natural_image
Simple line drawing of a circular basin with a green arrow indicating upward motion (no text or symbols)natural_image
Diagram of a human head with a circular object and green arrows indicating rotation or movement (no text or symbols)natural_image
Illustration of a remote control device with a scroll wheel and directional arrows indicating rotation (no text or symbols)natural_image
Diagram of a 3D object with a teal arrow pointing downward, no text or symbols presentnatural_image
Diagram of a circular container with internal components and directional arrows, no readable text or symbols present.natural_image
Simple line drawing of a circular container with three green blades and a central fan (no text or symbols)Android
Play store

natural_image
Diagram of a mechanical component with two upward arrows indicating motion, no text or symbols presentnatural_image
Illustration of a cylindrical container with a green upward arrow indicating flow or movement (no text or symbols)natural_image
Simple line drawing of a human head with a circular object inside, no text or symbols presentnatural_image
Illustration of a remote control device with a blue handle and teal scroll, showing a curved arrow indicating rotation (no text or symbols present)natural_image
3D diagram of a container with a central sphere and a teal arrow pointing downward (no text or symbols)natural_image
Diagram of a circular container with internal components and directional arrows, no readable text or symbols present.natural_image
Diagram of a circular device with three green blades and a central blue component, no text or symbols present.Android
Play store

natural_image
Diagram of a mechanical component with upward arrows indicating motion or force, no text or symbols presentnatural_image
Simple line drawing of a cylindrical container with a central drain and an upward arrow, no text or symbols present.natural_image
Diagram of a human head with a sun and a circular object, no text or symbols presentnatural_image
Illustration of a remote control device with a scroll arrow indicating rotation (no text or symbols)natural_image
Diagram of a teal arrow pointing downward through a circular container with a small object inside (no text or symbols)natural_image
Diagram of a circular container with internal components and directional arrows, no readable text or symbols present.natural_image
Simple line drawing of a circular container with internal components (no text or symbols)Designed in The Netherlands bij Duux BV. Made in P.R.C. Duux BV, P.O. Box 145, 5400 AC Uden Netherlands, www.duux.com
© 2021 Duux. All rights reserved.
DUUX® is a trademark of Duux BV, registered in the EU and other countries.
The brand cited belongs exclusively to the respective owners.
Specifications are subject to modification without notice.
duux®
IMDXHU1213_V1


- Beam mini
- Thank you for choosing Duux.
- Table of Content
- Product overview
- Installation and use
- General cautions
- Placing the filter
- Installing the remote control
- NOTE:
- Filling the water tank
- Using aroma
- First use
- Functions
- Buttons
- Power button
- Remote
- Humidifier base
- Mode button
- +/ Increase/decrease button
- Functions
- Manual mode
- Auto mode
- Timer
- Display brightness
- Refill water indicator
- Display notifications
- Wifi
- Maintenance
- Water replacement
- Cleaning
- Filter
- Storage
- Spare parts
- The smart and powerful humidifier with minimal footprint
- Technical specifications
- FAQ
- Disposal
- Simplified EU declaration of conformity
Brand : DUUX
Model : Beam mini
Category : Humidifier