
BWK 1607 - Wine cellar QLIMA - Free user manual and instructions
Find the device manual for free BWK 1607 QLIMA in PDF.
| Product type | Wine cellar |
| Brand | Qlima |
| Model | BWK 1607 |
| Dimensions (W x H x D) | 145 x 865 x 471 mm |
| Net weight | 19 kg |
| Net capacity | 20 litres (approximately 6 bottles) |
| Energy class | A |
| Annual energy consumption | 135 kWh/year |
| Temperature range | 5 to 18 °C |
| Power supply | 220-240 V / 50 Hz / 1 Ph |
| Refrigerant type | R600a (16 g) |
| Noise level | 44 dB(A) |
| Climate class | N (16-32 °C) |
| Interior lighting | LED (0.25 W) |
| Reversible door | Yes, with provided kit |
| Safety lock | Yes, with key |
| Adjustable feet | Yes |
| Functions | Electronic control, open door alarm, temperature alarm |
| Maintenance | Clean interior with warm water; replace carbon filter every 6 months |
| Safety | Earthing required; do not cover ventilation openings |
| Warranty | 24 months |
Frequently Asked Questions - BWK 1607 QLIMA
User questions about BWK 1607 QLIMA
0 question about this device. Answer the ones you know or ask your own.
Ask a new question about this device
Download the instructions for your Wine cellar in PDF format for free! Find your manual BWK 1607 - QLIMA and take your electronic device back in hand. On this page are published all the documents necessary for the use of your device. BWK 1607 by QLIMA.
USER MANUAL BWK 1607 QLIMA
For safety reasons, please read this manual carefully before operating. Persons who are not familiar with this manual must not use this appliance. We strongly recommend keeping this manual in a safe place for future reference.
A. Do not use a damaged cable.
B. Do not clamp or bend the cable.
C. Do not place unevenly.
D. Do not place in front of an open window.
E. Do not bring in contact with chemicals.
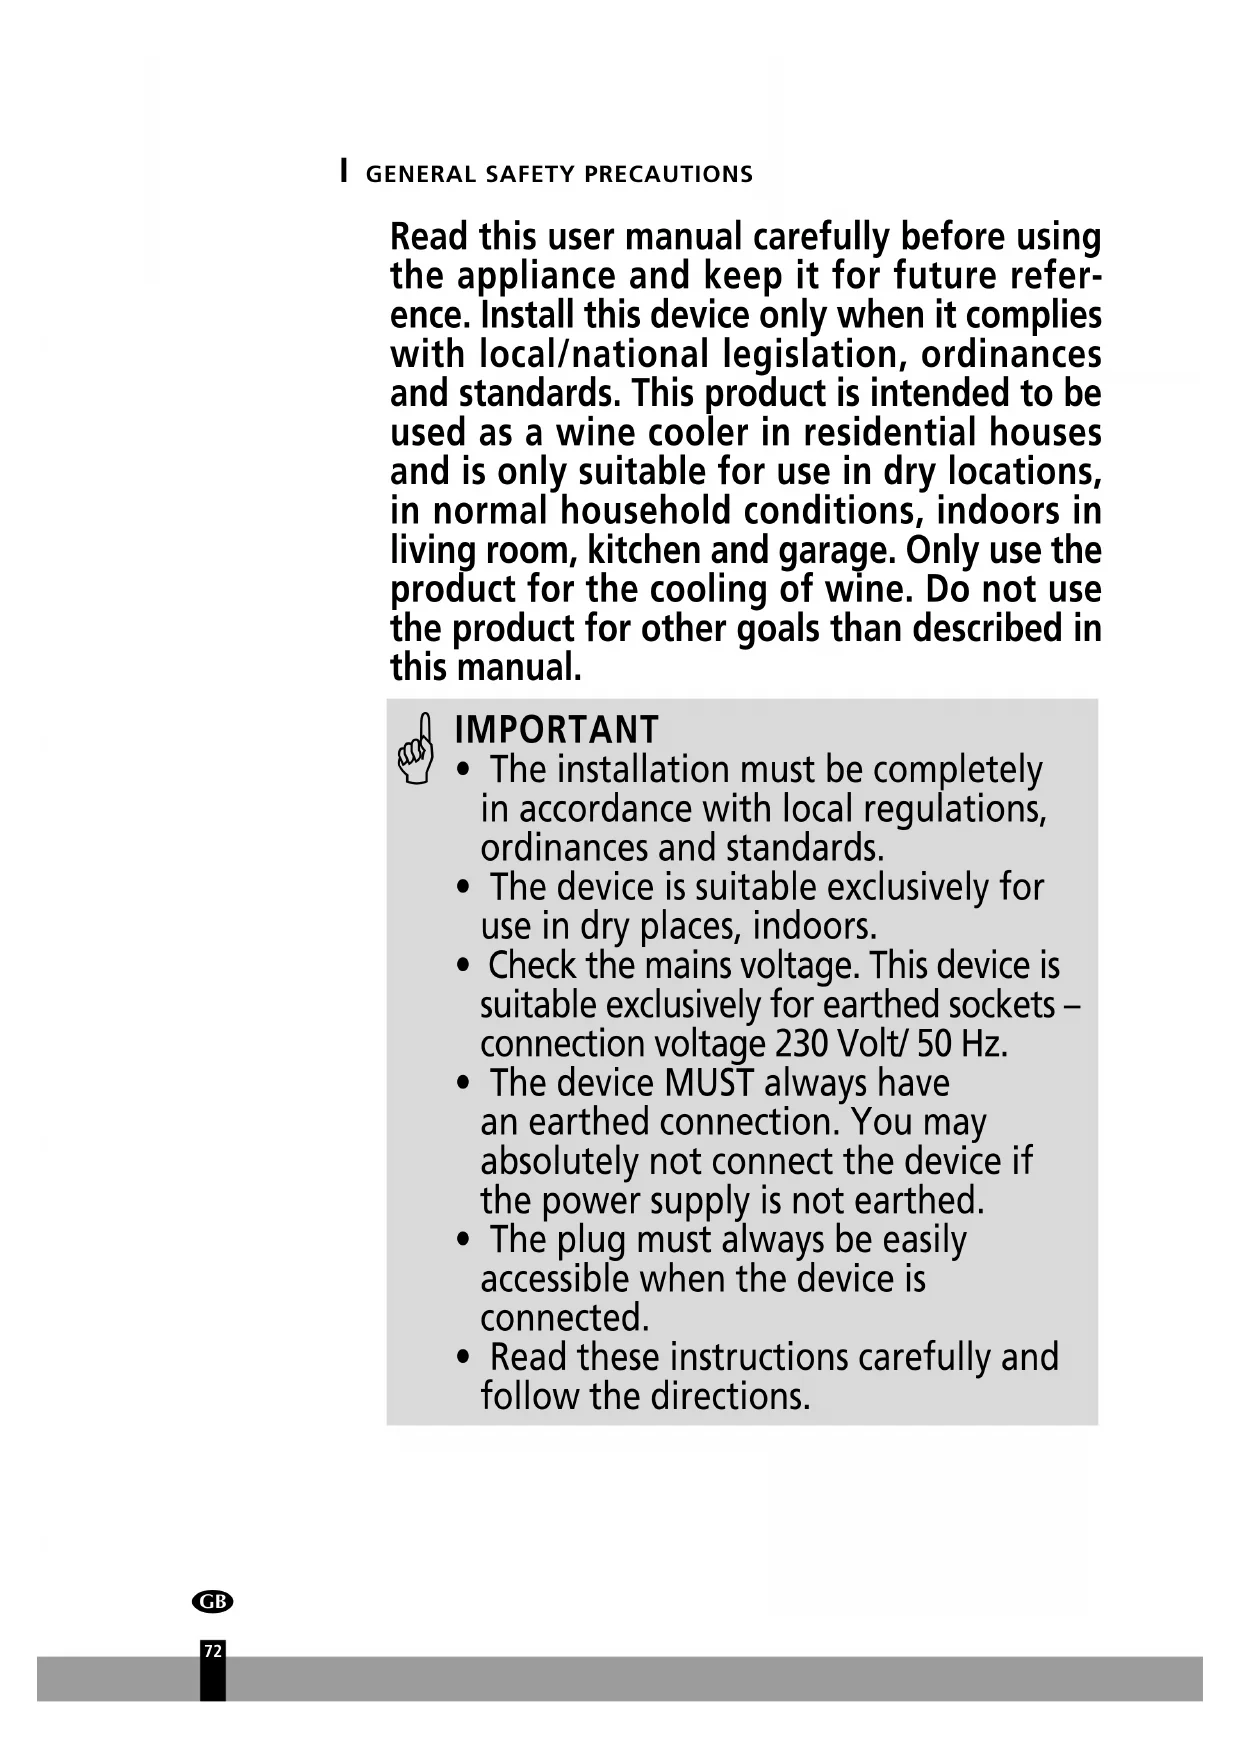
F. Do not place near a heat source.
G. Do not immerse in water.
H. Do not spill.

A
B
C
SICUREZZA
INTERN VEDLIGEHOLDELS

Read this user manual carefully before using the appliance and keep it for future reference. Install this device only when it complies with local/national legislation, ordinances and standards. This product is intended to be used as a wine cooler in residential houses and is only suitable for use in dry locations, in normal household conditions, indoors in living room, kitchen and garage. Only use the product for the cooling of wine. Do not use the product for other goals than described in this manual.

IMPORTANT
- The installation must be completely in accordance with local regulations, ordinances and standards.
- The device is suitable exclusively for use in dry places, indoors.
- Check the mains voltage. This device is suitable exclusively for earthed sockets - connection voltage 230 Volt/ 50 Hz.
- The device MUST always have an earthed connection. You may absolutely not connect the device if the power supply is not earthed.
- The plug must always be easily accessible when the device is connected.
- Read these instructions carefully and follow the directions.
Before connecting the device, check that:
- The connection voltage corresponds to that on the type plate.
- The socket and power supply are suitable for the device.
- The plug on the cable fits the socket.
- The device is on a stable and flat surface.
Have the electrical installation checked by a recognised expert if you are not sure that everything is in order.
- The wine cooler is a safe device, manufactured in accordance with CE safety standards. Nevertheless, as with every electrical device, exercise caution when using it.
- Never cover the air inlets and outlets.
Always take the plug out of the socket before cleaning or replacing the device or a part of the device. - Always consider the safety of children in the vicinity of this device, as with every electrical device.
- Always have any repairs – beyond regular maintenance – carried out by a recognised service engineer. Failure to do so may lead to invalidation of the guarantee.
Always take the plug out of the socket when the device is not in use. - A damaged electricity cable may only be replaced by the supplier or an authorised person/service point.

- This appliance is not intended for use by persons (including children) with reduced physical, sensory or mental capabilities, or lack of experience and knowledge, unless they have been given supervision or instruction concerning use of the appliance by a person responsible for their safety.
- Children should be supervised to ensure that they do not play with the appliance.
- This appliance can be used by children aged from 8 years and above and persons with reduced physical, sensory or mental capabilities or lack of experience and knowledge if they have been given supervision or instruction concerning use of the appliance in a safe way and understand the hazards involved.
Children shall not play with the appliance. - Cleaning and user maintenance shall not be made by children without supervision.

ATTENTION!
- Never use the device with a damaged power cord, plug, cabinet or control panel. Never trap the power cord or allow it to come into contact with sharp edges.
- Failing to follow the instructions may lead to nullification of the guarantee on this device.
WARNING!
- Keep ventilation openings - in the appliance enclosure or in the built-in structure - clear of obstruction.
- Do not use mechanical devices or other means to accelerate the defrosting process, other than those recommended by the manufacturer.
- Do not damage the refrigerant circuit.
- Do not use electrical appliances inside the storage compartments of the appliance, unless they are of the type recommended by the manufacturer.
- Do not store explosive substances such as aerosol cans with a flammable propellant in this appliance.
BEFORE USING YOUR WINE COOLER FOR THE FIRST TIME:
Make sure the wine cooler stays in an upright position during transportation. After removing the appliance from its packaging, make sure it is in good condition. If there are any issues with the wine cooler, please contact an authorized service center immediately.
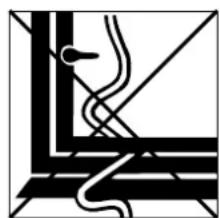
- Place the appliance on a level floor surface that will be strong enough to support it when it is at full capacity. To level the wine cooler adjust the leveling feet located at the bottom of the appliance.
- Do not use this wine cooler in applications for which it is not intended. Damage that occurs from improper use or from unauthorized repairs will void the warranty.
- For proper air circulation, please maintain a 50mm minimum clearance in between the back of the wine cooler and the wall.
- Do not operate this wine cooler in excessively moist or humid environments.
- Keep the wine cooler away from direct sunlight.
- Keep the wine cooler away from hazardous materials or combustible/flammable substances.

CAUTION:
- DANGER: RISK OF CHILD ENTRAPMENT: An empty wine cooler can be dangerous to children. Remove any latches, lids, locks, and/or doors from unused or discarded appliances to prevent child entrapment and suffocation. Never allow children to operate, play with or crawl inside this appliance.
II COMPONENTS
Pic. 1
III INSTALLATION AND OPERATION
Unpacking and cleaning the wine cooler
- Remove the exterior and interior packing materials.

-
Let the appliance stand upright for approximately 12 hours before connecting it to the power source, which helps to reduce the possibility of a cooling-system malfunction from handling during transportation.
-
Use a soft cloth to clean the interior surface with lukewarm water.
-
Install the door handle provided with the appliance by following these steps: pic. 2
-
Remove the gasket at the inner side of the door to expose the two screw holes.
- Install the handle tightly with the screws and washers provided
- Tidy and restore the gasket
Installation
Pic. 3
BWK 1622
- After installed wine cellar into cooler, please adjust limited block (a) close to cooler (e)
- Please fix the 3 pcs screws through the limited block (a) screw hold into cooler (e), pic. 4
Reverse the door swing (Only BWK 1607, BWK 1618, and BWK 1651) Remarks:
The instruction is based on a unit with right door hinge installed already.
To reverse the door from right hinge to left hinge, you need to get ready 2 new spare parts: an upper left hinge, and a bottom left hinge. Both these left hinges plus accompanying screws are included inside the package with the wine cooler. All removed parts must be saved to do the door reinstallation, except those remarked with "Disused".
1 Open the door, and loosen the 2 screws ① and ② . (pic. 5-1).
2 Carefully remove the door from the upper right hinge ④ and prevent it from scratching. Take out the support rod ③ from the door hinge hole. (pic. 5-2).
3 Pull out the ⑥ decorating plastic plugs covering the reserved hinge screw holes at the front left corner of the cabinet and move them to the right side
4 Unscrew the upper right hinge (Disused) and bottom left hinge (Disused) from the cabinet. (pic. 5-3). Install the upper left hinge and bottom left hinge to the left side of the cabinet. Make sure that the screws are tightened. (pic. 5-4).
5 Put the door upside down and install it to the left hinges by following the opposite steps of taking down of the door as described above.
6 Cover the hinge screw holes on the right side with the ⑥ decorating plastic bolts
Working climate
- The appliance is designed for operating from SN/N climate (see below climate class chart). It is recommended to maintain the ambient around 22 - 25^ which helps the appliance working with low power consumption.
| Climate Class A | Ambient Temp. |
| SN 10 - 32 °C | |
| N 16 - 32 °C | |
| ST 18 - 38 °C | |
| T 18 - 43 °C |
- If the ambient temperature is above or below the designed climate range, the performance of the unit may be affected. For example, the appliance operating in extreme cold or hot conditions may cause interior temperatures to fluctuate, and the temperature set 4 - 22^ may not be reached sometimes.
Wine storage
- The standard shelves are optimized for 750ml Bordeaux bottle storage. The maximum loaded bottles may vary subject to the different size or dimension of the wine bottles you store, as well as the shelves quantity pre-installed in the Wine cooler. (pic. 7)
- There are two designs for the pull-out shelves:
- The shelves are without telescopic rails, but with a plastic stopper on each sides of the shelf track to prevent bottles from falling.
- The shelves are with telescopic rails, which has stoppers by themselves.
- To prevent damaging the door gasket, make sure to have the door opened fully all the way before pulling the shelves out.
- Should the wine cooler be left empty for long periods we suggested that the appliance is unplugged, and after careful cleaning, leave the door ajar to allow air to circulate inside the cabinet in order to avoid possible condensation, mold or bad smell forming.
Energy saving tips
- The appliance should be located away from heat producing appliances, and away from direct sunlight.
- Ensure that the unit is adequately ventilated. Never cover air vents.
- Only open the door when necessary. Avoid leaving the door open for long periods or opening/closing the door frequently.
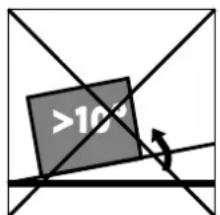
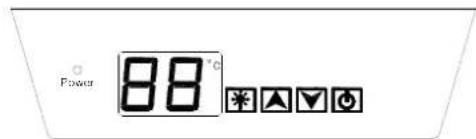
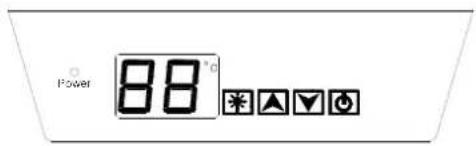
Operation Control Panel
BWK 1607 Single Zone
Lighting Display Windows ^ C /°F interchange
BWK 1618 Single Zone

Temp.up Temp.Down Power
Temperature setting
The temperature setting range is 5 - 22^ (BWK 1607, 5 - 18^
- Directly touch the mark or to set the Wine Cooler temperature as you want.
- The first touch on mark or will recall the previous set temperature displayed in the digital window. If the appliance runs after a power failure (or unplugging), the previous set temperature does not exist and is replaced by the default temperature at 12^ .
- Touch the mark to increase the set temperature by 1^ . On the contrary, touch the mark to decrease the set temperature by 1^ .
- The digital will change to display the real temperature of the inside cabinet after 10 seconds without being touched.
Operation
Control Panel
BWK 1622
Single Zone
Overtime Open the Door Alarm
- When you forget to close the door or the door is not closed completely, the buzzer alarms after 5 minutes. Please close the door completely and avoid the cold energy was lost.
Temperature Alarm
- If inner temperature is higher than 23^ , The "HI" is shown in display panel, and the buzzer alarm after one hour continuously. It informs that the inner temperature is too high, please check the reason.
- If inner temperature is lower than 0^ , The "LO" is shown in display panel, and the buzzer alarm and the malfunction indicator light lights at the same time.
- When removing any of these shelves out of the rail compartment, tilt the shelf as per the pic. 8 and simply pull out.
Operation
Control Panel
BWK 1651
FWK 16110
FWK 16154
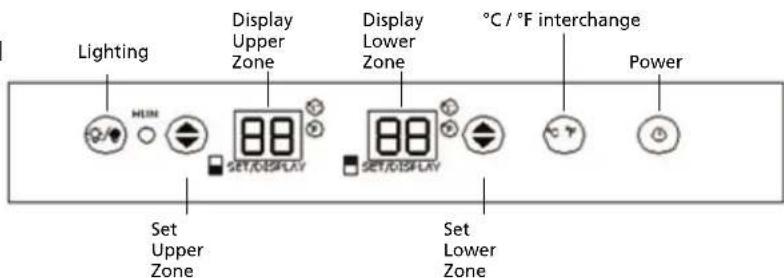
Dual Zone
Power On/Off
- When the appliance is plugged in to a power outlet, it powers on automatically.
- Touch the power mark to turn off (or turn on) the appliance.
Temperature setting
- The temperature setting ranges are 5 - 12^ for the upper zone and 12 - 22^ for the bottom zone.
-
Press for desired zone once. The display with digital flashing indicates the zone ready for temperature setting.
-
Press to set the desired temperature. The temperature will increase 1^ for each time the button is pressed. When the top value for the zone is reached, it will continue from the lowest value of the zone.
- After 5 seconds the display will switch back to show actual temperature
Operation Control Panel
FWK 16177 Dual Zone
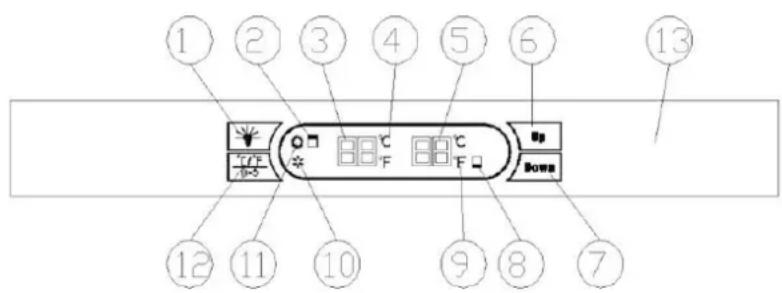
| 1 Lighting 8 Lower zone | ||
| 2 Upper zone 9 °C / °F | ||
| 3 Temperature upper zone | 10 | Light "Compressor working" |
| 4 °C / °F 11 Light "Heating working" | ||
| 5 Temperature lower zone 12 °C / °F interchange | ||
| 6 Setting "Up" | ||
| 7 Setting "Down" |
Power On/Off
- When the appliance is plugged in to a power outlet, it powers on automatically. To power OFF, the plug have to be unplugged.
Temperature setting
- The temperature setting ranges are 5 - 12^ for the upper zone and 12 - 22^ for the bottom zone.
- Chose zone to adjust by pressing once on: "UP" for upper zone "DOWN" for lower zone The display with digital flashing indicates the zone ready for temperature setting.
- Press "UP" or "DOWN" to set the desired temperature. The temperature will change 1^ for each time the button is pressed. After 5 seconds, the display will switch back to show actual temperature in the zone.

Warning
- To avoid breaking the compressor, please do not turn on the appliance again within 5 minutes after you turn it off.
- If the unit is unplugged, power lost, or turned off, you must wait 3 to 5 minutes before restarting the unit. If you attempt to restart before this time delay, the Wine cooler will not start.
Interior lighting On/Off
- Touch the lighting button to turn on (or turn off) the interior cool LED lighting.
-
The lighting will be continuously on if it is not turned off except for FWK 16177 where it will automatically switch off after 20 minutes. BWK 1607 & BWK 1622 where it will automatically switch off after 10 minutes.
-
For BWK 1607 & BWK 1622, If you want the LED light to remain on continuously, this is possible. Please press and hold the "LIGHT" button for 5 seconds, the display will show "LP". After 4 seconds the display will revert back to normal and the light will remain on until manually switched off. If you want to revert back and conserve energy (recommended), please press and hold the "LIGHT" button for 5 second, the display will show "LF", after 4 seconds the display will revert back to normal, and the light will automatically switch off after 10 minutes.
Note!
- The first time to use the appliance or to restart the appliance after having been shut off for a long time, you may find a few degrees variance between the set temperature and the displayed temperature. It is normal and everything of the appliance will be in the order after a few hours running.
Temperature display
- The temperature is displayed in digital, which is the best way to be read out. The digital is shown, as the set temperature when you are setting the temperature, and it will change to be the real temperature of the inside cabinet after 5 seconds without being touched.
- When the temperature probe is out of order, the display window will show with "HH" or "LL" instead of a digital figure while continuous buzz sound will be heard. In case of this happens, this appliance is considerably designed to keep periodical running of compressor and fans which helps to keep the coldness of the inside cabinet to protect your stored wines.

Warning
To avoid destroying your stored wines, it is strongly recommended to have the appliance repaired immediately, as the spare periodical running can not ensure the appliance to achieve the temperature you have set.
Selecting Fahrenheit or Celsius
Touch the button ^ CP ,you can interchange the Fahrenheit (^) and Celsius display (^)
For BWK1618 the interchange is done by at the same time pressing "+" and "-" for 5 seconds
Security lock
- Lock is an optional function. If your Wine cooler has such function, a key should be attached inside the packing of this Manual.
- Insert the key into the lock and turn it counter-clockwise to unlock the door. To lock it, please follow the reversed operation. Please save the key well.

INTERNAL MAINTENANCE

Your cabinet is easy to operate and has proven its reliability; it will provide long-lasting satisfaction if you follow the simple maintenance and cleaning operations listed below:
- Shut off the power supply before cleaning the unit's cabinet.
- Remove all wines and storage shelves.
- Clean the unit's interior with a warm water and neutral detergent solution.
- Thoroughly dry all surfaces.
- Replace the activated charcoal filter in the upper ventilation hole of the cabinet half a year (your dealer keeps this accessory in stock).
- Remove dust from the condenser (metal screen on the back of the cabinet) twice a year.
- Make sure the power cord is unplugged before cleaning the back of your cabinet, or before moving it.
- Clean the inside of your cabinet thoroughly once a year, after unplugging and unloading it (use wet cloth and a mild cleaning item, then rinse carefully)

Note:
a. Do not use abrasive cleaners to clean the wine cooler.
b. Use mild, soapy water to clean the unit's door seal.
c. To ensure efficient operation, also thoroughly clean the back and bottom of the wine cooler. Make sure the power supply is turned off prior to cleaning the back and bottom of the wine cooler.
Moving the wine cooler
- Remove all items.
- Securely tape down all loose items (shelves) inside your appliance.
- Turn the adjustable leg up to the base to avoid damage.
- Tape the door shut.
- Be sure the appliance stays secure in the upright position during transportation. Protect also the outside of appliance with a blanket, or similar item.
V TROUBLE SHOOTING
Before calling for service, review the chart below first yourself
| Problem Possible cause | Measure |
| The Wine cooler does not operate | Not plugged in. |
| The appliance is turned off. | |
| The circuit breaker tripped or a blown fuse | |
| The Wine cooler is not cold enough | Check the temperature control setting. |
| External environment may require a higher setting. The door is opened too frequently. | |
| The door is not closed completely. | |
| The door gasket does not seal properly. | |
| Automatically turn-on and turn-off frequently | The room temperature is hotter than normal. |
| A large amount of contents has been added to the Wine cooler. | |
| The door is opened too frequently. The door is not closed completely. | |
| The temperature control is not set correctly. The door gasket does not seal properly. | |
| The lighting does not work | Not plugged in. |
| The circuit breaker tripped or a blown fuse. The lighting is turned off. | |
| Too much vibration | Check to assure that the appliance is level. |
| Check to assure no parts inside the cabinet or in the compressor chamber are loose. | |
| The Wine cooler seems to make too much noise | The rattling noise may come from the flow of the refrigerant, which is normal. |
| As each cycle ends, you may hear gurgling sounds caused by the flow of refrigerant. | |
| Contraction and expansion of the inside walls may cause popping and crackling noises. | |
| The appliance is not level. | |
| The door will not close properly. | The wine COOLER is not level. |
| The door was reversed and not properly installed. The gasket is dirty. | |
| The shelves are out of position. | |
| The display window is shown with "HH" or "LL" instead of a digital figure, and/or with continuous buzz sound. | The temperature probe is out of order. |
| Dew on the surface of cabinet | The surface of wine cabinet especially the glass door will appear some frost if the cabinet is installed in a damp room. This is due to the moisture in the air coming into contact with the cabinet. Please wipe it away with dry cloth. |
VI GUARANTEE CONDITIONS
The wine cooler is supplied with a 24-month guarantee, commencing on the date of purchase. All material and manufacturing defects will be repaired or replaced free of charge within this period. The following rules apply:
- We expressly refuse all further damage claims, including claims for collateral damage.
- Repairs to or replacement of components within the guarantee period will not result in an extension of the guarantee.
- The guarantee is invalidated if any modifications have been made, non genuine parts are fitted or repairs are carried out by third parties.
- Components subject to normal wear, such as the filter, are not covered by the guarantee.
- The guarantee is valid only when you present the original, dated purchase invoice and if no modifications have been made.
- The guarantee is invalid for damage caused by neglect or by actions that deviate from those in this instruction booklet.
- Transportation costs and the risks involved during the transportation of the wine cooler or wine cooler components shall always be for the account of the purchaser.
- Damage caused by not using suitable Qlima filters is not covered by the guarantee.
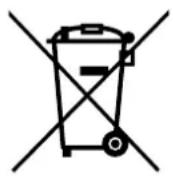
Do not dispose of electrical appliances as unsorted municipal waste, use separate collection facilities. Contact your local government for information regarding the collection systems available. If electrical appliances are disposed of in landfills or dumps, hazardous substances can leak into the groundwater and get into the food chain, damaging your health and well-being. When replacing old appliances with new once, the retailer is legally obligated to take back your old appliance for disposal at least for free of charge. Do not throw batteries into the fire, where they can explode or release dangerous liquids. If you replace or destroy the remote control, remove the batteries and throw them away in accordance with the applicable regulations because they are harmful to the environment.
Waste electrical products should not be disposed with household waste. Please recycle where facilities exist. Check with your local authority or retailer for recycling advice.
VII TECHNICAL DATA/PRODUCT FICHE
| Brand | Qlima | Qlima | Qlima |
| Type | BWK 1607 | BWK 1618 | BWK 1622 |
| Category of household refrigeration appliance | |||
| Energy efficiency Class | A | A | A |
| Mains V/Hz/ph | |||
| Annual energy consumption (kWh/yr) | 135 | 116 | 139 |
| Nett storage volume (liters) | 20 | 58.5 | 54 |
| Design temperature of other compartments | |||
| Frost free compartments | no | no | no |
| Power cut safe (hours) | |||
| Freezing capacity (kg/24 hrs) | |||
| Climate class | N | N/SN | N |
| Air borne sound emission (dB (A) re 1 pW) | 44 | 40 | 43 |
| Usage | Build in | Build in | Build in |
| Intended use | This appliance | ||
| Min.-Max. storage temperature (℃) | 5-18 | 5-22 | 4-18 |
| Power consumption (kWh/24h) | 0.37 | 0.317 | 0.38 |
| Power consumption lamp (W) | 0.25 | 0.5 | 0.7 |
| Current nom. (A) | 0.5 | 1 | 0.5 |
| Compressor type | Reciprocating | Rotary | Reciprocating |
| Refrigerant type (gr) | R600a / 16 gr. | R600a / 18 gr. | R600a / 23 gr. |
| Dimensions (w x h x d) (mm) | 145 x 865 x 471 | 295 x 870 x 575 | 590 x 455 x 557 |
| Weight (kg) | 19 | 31.5 | 27 |
| Unit protection | |||
| Insulation blowing gass | |||
16177
| B B | C C | |||
| 220-240/50/1 | ||||
| 200 | 183 239 | 252 | ||
| 135 | 275 386 | 440 | ||
| not applicable | ||||
| no | no | no | no | |
| not applicable | ||||
| not applicable | ||||
| ST/T | N/ST | N/ST | N/ST | |
| 43 | 40 | 40 | 40 | |
| Build in | Free Standing | Free Standing | Free Standing | |
| is intended to be used exclusively for the storage of wine | ||||
| Up 5-12 Low 12-22 | Up 5-12 Low 12-22 | Up 5-12 Low 12-22 | Up 5-12 Low 12-22 | |
| 0.55 | 0.50 | 0.66 | 0.69 | |
| 0.5 | 0.8 | 0.8 | 0.8 | |
| 1.4 | 1.6 | 1.6 | 1.6 | |
| Rotary | Rotary | Rotary | Rotary | |
| R600a / 43 gr. | R600a / 52 gr. | R600a / 58 gr. | R600a / 58 gr. | |
| 595 x 870 x 575 | 598 x 1200 x 690 | 598 x 1600 x 690 | 598 x 1923 x 690 | |
| 43 | 69 | 82 | 100 | |
| IP X0 | ||||
| Cyclopentane | ||||
VEDLIKEHOLD INNVENDIG

The temperature setting range is 5 - 22^ (BWK 1607, 5 - 18^
- Directly touch the mark or to set the Wine Cooler temperature as you want.
- The first touch on mark or will recall the previous set temperature displayed in the digital window. If the appliance runs after a power failure (or unplugging), the previous set temperature does not exist and is replaced by the default temperature at 12^ .
- Touch the mark to increase the set temperature by 1^ . On the contrary, touch the mark to decrease the set temperature by 1^ .
- The digital will change to display the real temperature of the inside cabinet after 10 seconds without being touched.
Kontrollpanel
BWK 1622
1 temperaturzon
Larm vid öppen dorr
m = 311
be is intended to be used exclusively for the storage of wine
| Up 5-12 Low 12-22 | Up 5-12 Low 12-22 | Up 5-12 Low 12-22 | Up 5-12 Low 12-22 | |
| 0.55 | 0.50 | 0.66 | 0.69 | |
| 0.5 | 0.8 | 0.8 | 0.8 | |
| 1.4 | 1.6 | 1.6 | 1.6 | |
| Rotary | Rotary | Rotary | Rotary | |
| R600a / 43 gr. | R600a / 52 gr. | R600a / 58 gr. | R600a / 58 gr. | |
| 595 x 870 x 575 | 598 x 1200 x 690 | 598 x 1600 x 690 | 598 x 1923 x 690 | |
| 43 | 69 | 82 | 100 | |
| IP X0 | ||||
| Cyclopentane | ||||
Distributed in Europe by PVG Holding B.V.
Benoligen Sie weite Informationen oder treten Probleme auf, besuchen Sieitte unsere Website www.qima.com, oder setzen sie sich mit unserem Kundendienst in Verbindung (Telefonnummer auf www.qima.com).
For alle yderligere opysniger ell er ved eventuelle problemer med apparatet henvises til www.qima.com eller det lokale Kundecenter (telefonumre findes i www.qima.com).
Si necesita informacion o si Tiene algo problema, visite nuestra pagina Web www.qlima.com, o pongase en contacto con el service客户提供 (hallar el numero de Telefono en www.qlima.com).
Si you souhaitez obtenir des informations supplémentaires ou si you rencontrez un probleme, rendez-vous sur notre site Web (www.qlima.com) ou contactez notre service client (vous trouvezez l'adresse et numero de téléphone sur www.qlima.com).
Jos halu at huoapua, lisietoja tai laiteen kanssa tulee ongelmia, tutustu verkkosivustoon osoitteessa www.qima.com tai kysy nevoa PVG kuluttajapalvelukeskuksesta (www.qima.com).
If you need information or if you have a problem, please visit the our website (www.qlima.com) or contact our sales support (you find its phone number on www.qlima.com)
Per informazioni e in caso di problemi, visitate il site Web www.qlima.com oppure contattate il Centro Assistenza Clienti (per conoscere il numero di telefono, consultate www.qlima.com).
Hvis du trenger informasjon, ellr his du har et problem med produkt, kan du gtil netsidene www.qlima.com. Alternativt kan du kontakte med PVG' forbrukertjeneste (telefonummeret i www.qlima.com).
Nls u inatmatie nodig hebt of als u een probleem heb, bezoek dan de onze website (www.qlima.com) of neem contact op met de afding sales support (adres en telefoon op www.qlima.com).
Se necessitar de informacoes ou se tiver problemas, visite o Web site www.qlima.com ou contacte o Centro de Assistencia (nromo de telephone o www.qlima.com)
W przypadiu problemow i w celu uzyskania szcegolowych informaci odwiedz strone internetowq Qlima dostepnaj pod adresem www.qlima.com lub skontakuj sig z Centrum kontaktow Qlima (www.qlima.com)
Odu behover service ell information er har problem med apparaten kan du besoka www.qima.com ell kontakta Qima kundtjanst (du hittar Telefonumret pa www.qima.com).
Cite dadne informacie, obici sptno mesto podjetna na naslovu www.qlima.com aliPoklicite na telefonsko (www.qlima.com).
Daha fazla bilgiye ihtiay duyarsaniz veya bir sorunla karsilasirsaniz, www.qlima.com adresindeki Qlma Internet sitesini ziyaret edin veya ulkenizde bulunan Qlma muster merkeziyle iletisim kurun (telefon numarasini: www.qlima.com).

- SICUREZZA
- INTERN VEDLIGEHOLDELS
- IMPORTANT
- ATTENTION!
- WARNING!
- BEFORE USING YOUR WINE COOLER FOR THE FIRST TIME:
- CAUTION:
- II COMPONENTS
- III INSTALLATION AND OPERATION
- Unpacking and cleaning the wine cooler
- Installation
- BWK 1622
- Reverse the door swing (Only BWK 1607, BWK 1618, and BWK 1651) Remarks:
- Working climate
- Wine storage
- Energy saving tips
- Operation Control Panel
- BWK 1607 Single Zone
- BWK 1618 Single Zone
- Temperature setting
- Operation
- Overtime Open the Door Alarm
- Temperature Alarm
- Power On/Off
- Warning
- Interior lighting On/Off
- Note!
- Temperature display
- Selecting Fahrenheit or Celsius
- Security lock
- INTERNAL MAINTENANCE
- Note:
- Moving the wine cooler
- V TROUBLE SHOOTING
- VI GUARANTEE CONDITIONS
- VEDLIKEHOLD INNVENDIG
- Kontrollpanel
- Larm vid öppen dorr
- Distributed in Europe by PVG Holding B.V.
Brand : QLIMA
Model : BWK 1607
Category : Wine cellar