
SCAW 5.00 B2 - Camcorder SILVERCREST - Free user manual and instructions
Find the device manual for free SCAW 5.00 B2 SILVERCREST in PDF.

| Product Type | Camcorder |
| Brand | SilverCrest |
| Model | SCAW 5.00 B2 |
| Image Sensor | CMOS 5 megapixels |
| Lens | F3.2 f=5.7 mm |
| Screen | Color TFT LCD 7.5 cm (foldable, 270° rotation) |
| Video Resolutions | QVGA, WVGA, 720p, 1080p (up to 60 fps) |
| Photo Resolutions | 1M, 2M, 5M, 7M (interpolated), 16M (interpolated) |
| Digital Zoom | 10x (2x lossless, then digital) |
| Memory | Internal 128 MB, SD/SDHC card up to 32 GB (Class 6) |
| Waterproof | Up to 3 m, 60 minutes max |
| Power Supply | Li-ion battery CA NP-40 3.7 V, 1200 mAh; charger 100-240 V |
| Dimensions (L x H x D) | 55 x 67.5 x 121 mm |
| Weight (without battery) | Approx. 289 g |
| Connectivity | HDMI, USB/AV, charger port |
| Main Functions | Video and photo recording, macro mode, underwater mode, stabilizer, motion detection, self-timer, burst, date stamp |
| Maintenance and Cleaning | Clean with soft cloth; after underwater use, rinse with clean water and dry completely before opening |
| Safety | Do not expose to heat sources, do not open underwater, use only recommended accessories |
| Warranty | 3 years (conditions in manual) |
| Included Software | TotalMedia HDCam (Windows XP/Vista/7) |
Frequently Asked Questions - SCAW 5.00 B2 SILVERCREST
User questions about SCAW 5.00 B2 SILVERCREST
0 question about this device. Answer the ones you know or ask your own.
Ask a new question about this device
Download the instructions for your Camcorder in PDF format for free! Find your manual SCAW 5.00 B2 - SILVERCREST and take your electronic device back in hand. On this page are published all the documents necessary for the use of your device. SCAW 5.00 B2 by SILVERCREST.
USER MANUAL SCAW 5.00 B2 SILVERCREST
G
HD Camcorder
User manual and service information
IAN79938
IAN79938
CH
Deutsch. 2
Francais 92
Italiano 182
English 272
Inhalt
Specifications techniques 99
Specifications techniques
Cher client, chere clientele,
Technical specifications 279
Safety instructions 281
Operating Environment 282
Water-resistance 283
Note on mains disconnection 283
Children and persons with disabilities 283
Charger and battery pack 284
Warning: risk of explosion! 284
Cables 285
Controls and buttons 286
Front 286
Top 286
Back 286
Left side 287
Right side 287
Bottom 287
Before you start 288
Charging the battery in the charger 288
Charging the battery pack while in the camcorder 290
Inserting the battery pack 291
Inserting a memory card 292
Write-protecting the SD memory card. 295
Getting started 296
Opening the display 296
Overview of function buttons 297
Switching the camcorder on and off 298
Selecting the Operating Mode 299
Setting the menu language 299
Setting the date and time 300
Recording 301
Recording movies 301
Movie mode display 302
Macro mode 304
304
Taking pictures 304
The Photo Mode Display 305
Playback 306
Movie playback 306
The Movie Playback Mode Display 307
Photo playback 309
The Photo Playback Mode 310
Using under water. 311
Settings for use under water 313
Cleaning after using under water 313
314
Setup Menu. 314
Setup menu icons 315
Language 316
Date / Time 316
Format 317
Default 317
Auto power off 318
Mains frequency 319
TV Standard 319
Beep 320
Information 320
HDMI Standard 321
Movie menu 322
Movie menu icons 322
White Balance 323
Resolution 324
Effect 325
Quality 325
Stabilizer 326
Video lamp 327
EV (Exposure compensation) 328
Traffic mode (loop recording) 329
Motion detect 330
Date Stamp 331
Pre-record 331
Lapse video 332
Movie playback menu 333
Movie playback menu icons 333
Deleting a movie 333
334
Lock One 335
Lock All 335
Slideshow 336
Photo menu 337
Photo Menu Icons. 337
Resolution 338
Continuous Shooting 338
Self-timer 339
Date Stamp 340
Face Detection 340
Photo playback menu 341
Photo playback menu icons 341
Delete one photo 341
Delete all photos 342
Lock One 342
Lock All 342
Slideshow 342
DPOF one 342
DPOF All 343
Connectors and Sockets 344
Viewing recordings on a television 344
Connecting via the HDMI Cable 344
Connecting via the USB/AV Cable 345
Transferring recordings to a computer 345
Using the USB port 346
Using a card reader 347
Software 347
System Requirements 347
Installing the software 348
Uninstalling the software 348
The main screen 348
Selecting the language 349
Editing recordings 349
Viewing recordings. 349
Importing recordings 351
Selecting navigation view 352
Preview window 352
Import 353
Merge videos 353
Creating an AVCHD Disk 354
Cutting video clips 355
Upload to YouTube 355
Upload to Facebook 355
Photo album 355
Album page 356
Troubleshooting 357
Maintenance/cleaning. 358
Maintenance 358
Cleaning 358
Environmental regulations and disposal information 358
Conformity Notes 359
Warranty and service information 359
Trademark information
HDMI, the HDMI logo and High-Definition Multimedia Interface are trademarks or registered trademarks of HDMI Licensing, LLC in the USA and other countries.
Microsoft Windows is a registered trademark of Microsoft Corporation, USA.
SD and SDHC are registered trademarks.
USB is a registered trademark.
Other names and product can be trademarks or registered trademarks of their respective owners.
Introduction
Thank you for purchasing this SilverCrest SCAW 5.00 B2 camcorder. This compact camcorder which is water-resistant to depths of up to 3m features a large, fold-out 16:9 colour display with a 7.5cm diagonal that can be rotated by up to 270^ . The camcorder is perfect for mobile use. It allows you to capture wonderful memories at any time.
Intended Use
Your camcorder is a Consumer Electronics device and is designed exclusively for recording and playing back movies and pictures. Any use other than that mentioned above does not correspond to the intended use. The device may only be used for private purposes, not for industrial or commercial ones. In its default configuration, this product has not been designed for medical, life-saving, rescue or life preservation purposes.
This device fulfils all relevant standards and directives relating to CE Conformity. If any changes are made to the equipment other than those endorsed by the manufacturer, compliance with these standards and directives can no longer be guaranteed. Only use the accessories recommended by the manufacturer.
Observe the regulations and laws in the country of use.
Package contents
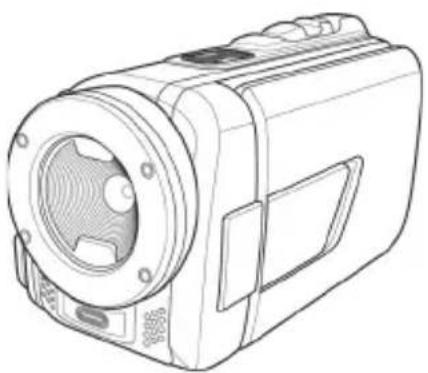

SCAW 5.00 B2 camcorder HWAN CHYUN ENTERPRISE CO., LTD
DJ04V20500A charger

2 FUJI Electronics(Shenzhen) Co., Ltd.
Power cable
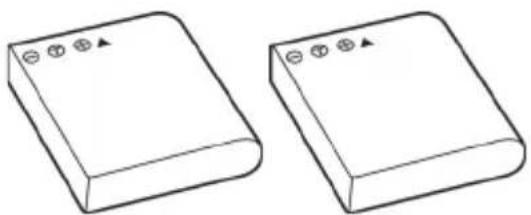
CA NP-40 battery packs

SD memory card, 4GB (not shown)
CD-ROM (not shown)
Bag (not shown)
User manual (not shown)
Technical specifications
| Capture sensor 5 megapixels CMOS | |
| Lens | F3.2 f=5.7 mm |
| Colour LCD Display 7.5-cm TFT LCD | |
| Shutter speed Movie: 1/30s | ~ 1/2000s Photo: 1/8s ~ 1/4000s |
| Photo mode resolutions 1M | (1280x960) 2M (1920x1080), 5M (2592x1944), 7M (3648x2052, interpolated), 16M (4616x3462, interpolated) |
| Movie mode resolutions | QVGA 30fps (320x240), WVGA 30fps (848x480), WVGA 60fps (848x480), 720p 30fps (1280x720), 720p 60fps (1280x720), 1080p 30fps (1920 x 1080) |
| Digital zoom in Photo mode | 10x (up to 2x lossless, then conventional digital zoom) |
| Digital zoom in Movie mode | 10x (up to 2x lossless, then conventional digital zoom / for 1080p 8x digital zoom only) |
| File format | Movie: H.264 as AVI Photo: JPEG |
| White Balance Automatic, Daylight, Cloudy, Fluorescent, Tungsten | |
| Effects Normal, Black and white, Sepia | |
| Self-timer 2s, 10s | |
| Video lamp Range max. 1m | |
| Memory 128 MB internal flash memory (partially used by the operating system), SD memory card reader max. 32 GB, SD(HC) Class 6 | |
| SD memory card (provided) | 4 GB |
| TV Out PAL, NTSC, HDMI | |
| Power supply Rechargeable lithium-ion battery CA NP-40 3.7 V, 1200 mAh Manufacturer: FUJI Electronics(Shenzhen) Co.,Ltd. | |
| Charger | Manufacturer: HWAN CHYUN ENTERPRISE CO., LTD Model: DJ04V20500A Input voltage: AC 100-240V, 50/60Hz, 0.07A Output voltage: 4.2 V -500 mA |
| Operating temperature 0°C - 35°C | |
| Operating humidity max. 85 % rel. humidity | |
| Microphone Built-in | |
| Speaker Built-in | |
| Dimensions 55 x 67.5 x 121 mm (W x H x D without hand strap) | |
| Weight approx. 289g (without battery) | |
The technical specifications and design can be changed without prior notice.
Safety instructions
Before you use this device for the first time, please read the following notes and heed all warnings, even if you are familiar with handling electronic devices. Always check that the product works correctly.
Keep this manual with the instructions in a safe place for future reference.
If you sell the device or pass it on, it is essential that you also hand over this manual.

This symbol denotes important information for the safe operation of the product and user safety.
This symbol denotes further information on the topic.
- Do not try to open the housing or modify the product. You could get an electric shock. Maintenance and repairs should only be carried out by qualified technicians.
- Do not point the camcorder at the sun or other sources of intense light. Doing so could damage your eyesight.
- Never activate the flash near the eyes of persons or animals. This is especially dangerous for children. The flash is dangerous to the eyesight. When using the flash, stand at least one metre (3 feet) away from your subject.
- Only use the charger cradle supplied or the USB interface cable to recharge the battery pack of the device.
- Only operate this device with the battery pack supplied in order to avoid overheating, deformation of the casing, fire, electric shocks, explosion and other hazards.
- Before opening the battery/memory card compartment and/or the ports cover, wait for the camcorder to dry completely. Have an absorbent cloth ready when opening the covers and remove any water and dirt around the covers.
Always make sure that:
the device is not positioned near a direct heat source (e.g. radiator);
the device is not exposed to direct sunlight or bright artificial light;
the device is never placed near magnetic fields (e.g. speakers);
- there are no fire sources (e.g. burning candles) on or near the device;
- no foreign bodies enter the device;
- no liquid enters the opened battery/memory card compartment or the connecting ports;
- the device is not subjected to major temperature fluctuations as this may cause condensation of the humidity in the air;
the device is not subjected to excessive shocks or vibrations.
- the battery/memory card compartment is never opened during recording. This could damage any images already recorded.
- the battery/memory card compartment or the ports cover is never opened while under water. This could damage the device and any images already recorded.
Operating Environment
This device can be used at temperatures between 0^ and 35^ .
- Keep the device and its accessories away from dust, heat and direct sunlight, and avoid any exposure to vibration and shock. Be careful not to drop the camcorder. This could damage it.
- Do not store the device or its accessories at hot places. High temperatures can reduce the lifetime of electronic devices, damage rechargeable batteries and deform or melt plastic components.
If water accidentally enters the camcorder or other problems arise when you are using it under water:
- Take the camcorder out of the water immediately.
- Dry the camcorder.
- Have the camcorder inspected by authorised technicians or service personnel.
Water-resistance
- The camcorder is water-resistant up to a depth of 3m . To guarantee its water-resistance, do not use the camcorder longer than 60 minutes under water at a time.
The accessories supplied are not water-resistant. The camcorder is not dust-proof. - The water-resistance of this camcorder applies to salt and fresh water. It does not apply to any cleaners, chemicals, solvents or water in public swimming pools. Liquids of this kind must be wiped off the camcorder immediately.

Note on mains disconnection
The charger supplied consumes electrical energy even if there is no battery inserted. Therefore, disconnect the charger from the wall outlet when it is not in use. In order to disconnect the charger from the mains completely, unplug the power cord from the wall outlet. The wall outlet where the device is connected must be easily accessible so that the power cord can be pulled out quickly in the event of an emergency. Unplug the power cord from the mains when there is the possibility of a thunderstorm or if you will not be using the device for a while (e.g. when you go on holiday) in order to prevent the risk of fire. Never hold the power cord with wet hands as this may cause a short circuit or electric shock.

Children and persons with disabilities
Do not allow children or persons with disabilities to use electrical devices when not under supervision. They may not comprehend the potential risks. Batteries and small parts are potential choking hazards. Keep batteries out of the reach of small children. If a battery is swallowed, seek medical help immediately. Keep all packaging film away from children as it may cause suffocation.

Charger and battery pack
Always insert the battery pack with the correct polarity. Please note the chapter on "Charging the battery in the charger" on page 288 and "Inserting the battery pack" on page 291. Never throw a battery pack into a fire. Remove the battery pack if you do not plan to use the device for a while.
Unplug the power cord from the mains before removing the battery pack from the charger or disconnecting the charger from the power cord.

Warning: risk of explosion!
Improper use could cause explosions or leaks. Only replace the battery pack with an identical model or a type recommended by the manufacturer. Never replace batteries in an explosion-sensitive environment. Inserting or removing the batteries could cause a spark which could trigger an explosion. Explosion-sensitive areas are normally (but not always) labelled. These include fuel storage areas such as below deck on a boat, fuel line or tank areas, environments where the air contains inflammable substances (e.g. cereals, dust or metal powder) and any areas where you should normally switch off your car engine.
Respect the environment. Old batteries must not be disposed of with domestic waste. They must be handed in at a collection point for waste batteries.

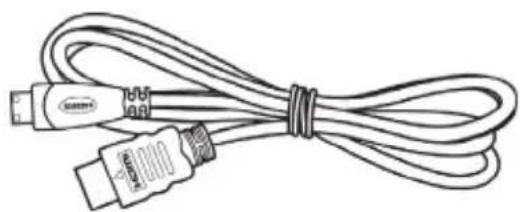
Cables
Always hold cables by the plug and never pull on the cable itself. Never hold the power cord with wet hands as this may cause a short circuit or electric shock. Never place the device, furniture or other heavy objects on the cable and make sure that the cord does not get trapped, especially near the plug and sockets. Never tie knots in the cable and do not tie it to other cables. All cables should be laid so that nobody can trip over them or be obstructed by them. A damaged power cord can cause a fire or electric shock. Check the power cord from time to time. Do not use adapters or extension cables that do not meet the required safety standards.
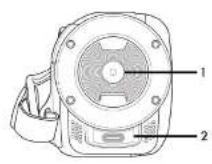
Controls and buttons
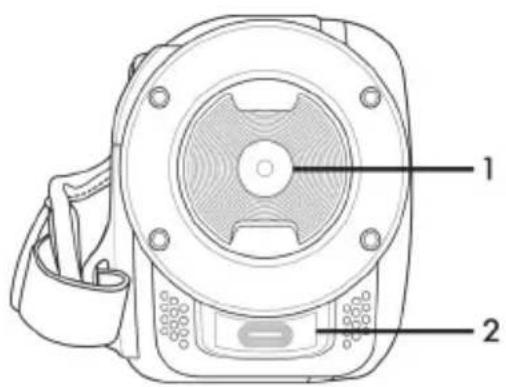
Front
1 Lens
2 LED light
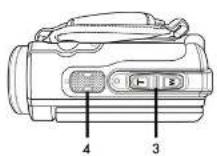
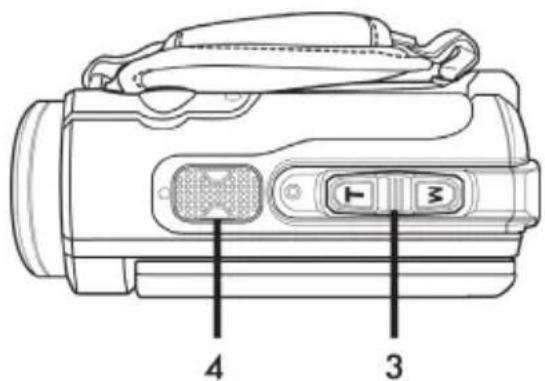
Top
3 Zoom/Volume adjustment button
4 Microphone
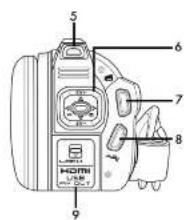
Back
5 Power indicator
6 Navigation buttons
7 Recording button (shutter)
8 Diving mode button
HDMI output, USB, AV and charger port
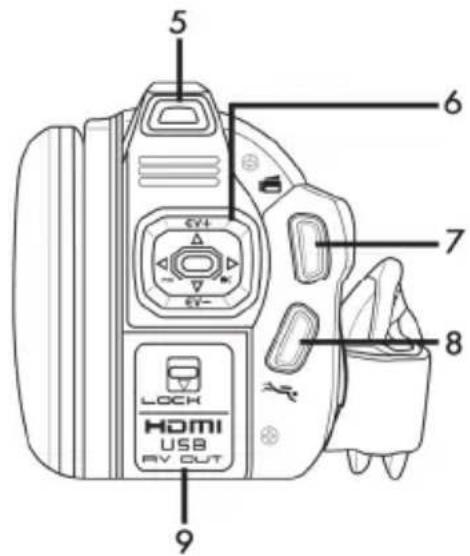
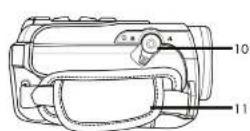
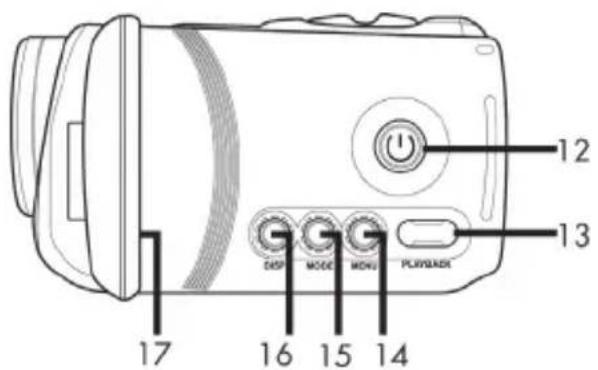
Left side
10 Macro switch
11 Hand strap
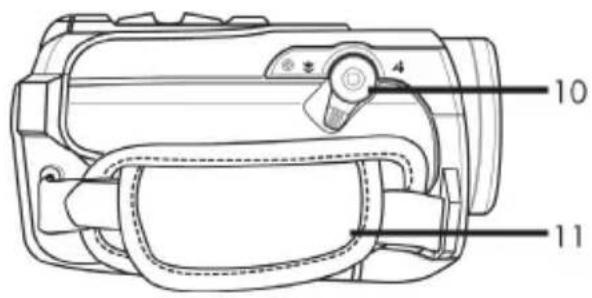
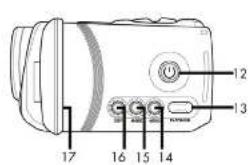
Right side
12 On/Off button
13 Playback button (PLAYBACK)
14 Menu button (MENU)
15 Mode button (MODE)
16 Display button (DISP)
17 Display
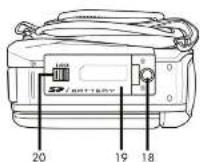
Bottom
18 Tripod mount
19 Battery / memory card compartment
Battery / memory card
20 compartment unlock catch (LOCK)

Before you start
The camcorder functions with a rechargeable lithium-ion (CA NP-40) battery pack. On delivery, the battery pack is not charged. Please charge the battery pack before using the device for the first time.

To operate the camera, only use the CA NP-40 rechargeable lithium-ion battery pack from FUJI Electronics (Shenzhen) Co., Ltd..
Charging the battery in the charger
Insert the battery pack in the charger cradle so that the [+] and [-] contacts match on the battery pack and charger cradle.
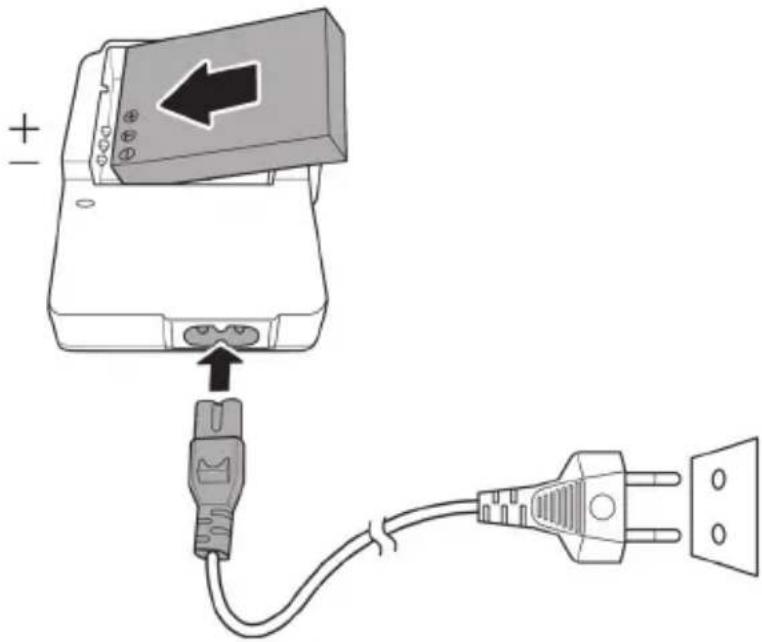
Make sure that the battery pack clicks into place on the charger. Next, connect the power cord to the charger and plug the power cord into a wall outlet.

Remove the battery pack from the camera when you do not plan to use it for a long time.
When charging, the battery pack and charging device become warm. This is not a malfunction.
The status light on the charging cradle is orange while the battery is charging. When the charging process is complete, the status light goes green. You can then insert the battery pack into the camcorder. Depending on the charge level, the battery pack can take up to 3 hours to charge.

If the light stays green when you insert the battery pack, it is already fully charged on not correctly inserted. In this case, check the polarity.
Charging the battery pack while in the camcorder
It is also possible to recharge the camcorder battery pack via the USB power of a computer. To do this, you will need the USB/AV cable supplied.
- Insert the battery pack into the camcorder (see page 291).
- Use the USB/AV cable supplied to connect the camcorder to an available USB port on a computer.
- Please make sure that your camcorder is switched off. If the device is switched on, its battery pack will not recharge. If necessary, press the On/Off button (12) to switch the camcorder off.
- The power indicator (5) goes orange during charging. The power indicator goes out when the charging process is complete.

Some computers do not supply USB power while they are turned off. If the camcorder power light does not come on, make sure your computer is switched on.

In addition to the options above, you can also connect the camcorder to an external USB power adapter (not supplied) in order to charge the battery pack or power the camcorder. To do this, you will need the USB/AV cable supplied. You can purchase a suitable 5V USB power adapter with at least 2A from any electronics retail outlet.
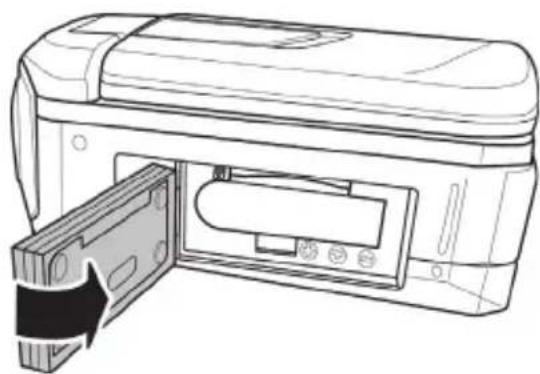
Inserting the battery pack
When the battery pack is fully charged, insert it into the camcorder. Proceed as follows:
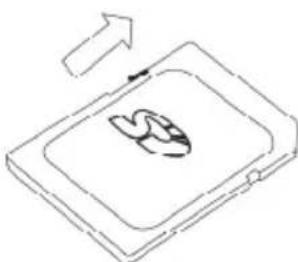
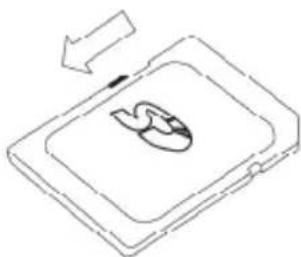
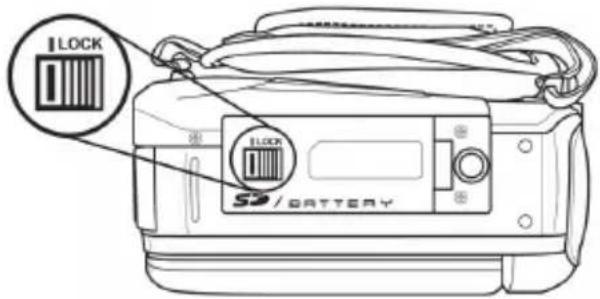
Open the battery/memory card compartment (19) by sliding the battery/memory compartment unlock catch (LOCK) (20) to the left in the direction of the arrow (see figure).
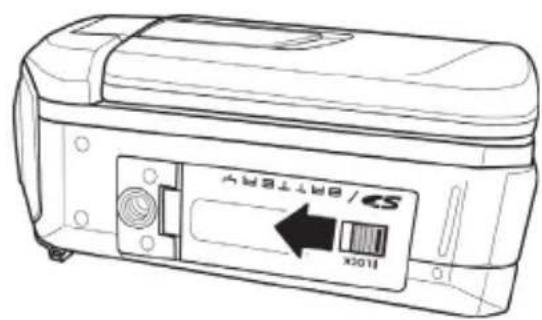

If you have been using the camcorder under water, before opening the battery/memory card compartment and/or the ports cover, wait for the camcorder to dry completely. Have an absorbent cloth ready when opening the covers and remove any water and dirt around the covers.

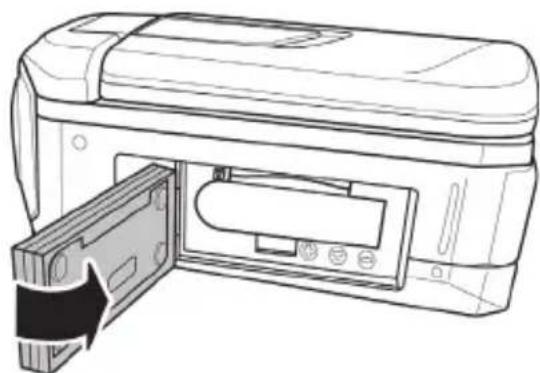
The battery/memory card compartment (19) opens up so you can insert the battery pack. Make sure that the [+] and [-] contact markings on the battery pack and in the battery/memory card compartment match. When inserting the battery pack, press the lock downwards and make sure that it clicks in place.

When removing the battery pack, press the battery lock slightly downwards in order to release the battery pack.
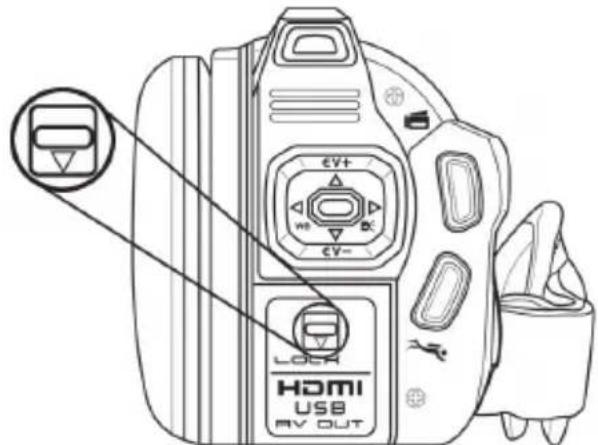
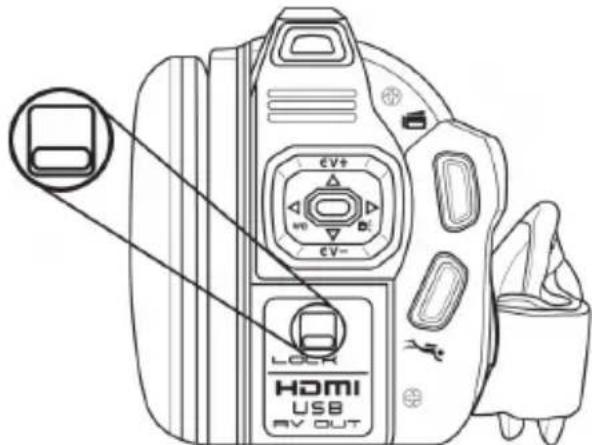
Close the battery/memory card compartment (19) cover and press it downwards until it clicks in place.

Check that the battery/memory compartment has been closed properly to make sure it is water-resistant.
closed properly not closed properly

Inserting a memory card
Using the SD memory card supplied, you can increase the camcorder's storage capacity for your movies and photos. If a memory card is inserted, all the content recorded is saved onto
it. If there is no memory card inserted, your photos and movies are saved to the camcorder's internal memory.

Power the device off before you insert or remove a memory card.
Open the battery/memory card compartment (19) by sliding the battery/memory compartment unlock catch (LOCK) (19) to the left in the direction of the arrow (see figure).
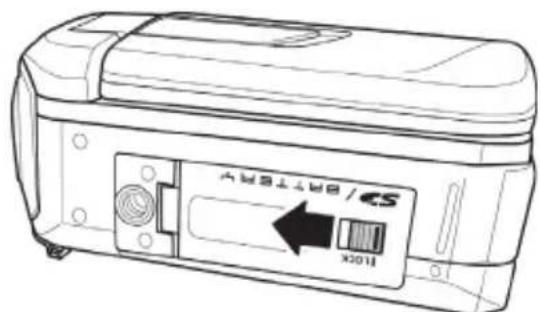

If you have been using the camcorder under water, before opening the battery/memory card compartment and/or the ports cover, wait for the camcorder to dry completely. Have an absorbent cloth ready when opening the covers and remove any water and dirt around the covers.
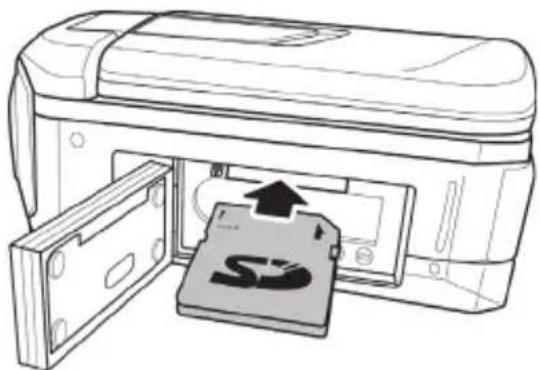
Then insert the memory card with the metal contacts facing forwards into the card slot. The label must face upwards. Slide the card fully into the slot until it clicks into place.

To remove the memory card, open the battery/memory card compartment (19) and gently press on the inserted card. This is then ejected slightly so that you can get hold of it and remove it.
Close the battery/memory card compartment (19) cover and press it downwards until it clicks in place.

Make sure that the battery/memory compartment has been closed properly, in order for the device to be water-resistant.
closed properly not closed properly

If the memory card or the internal memory is full, the message "Memory full!" appears on the display (17). The movie currently being recorded is saved and the recording stopped.
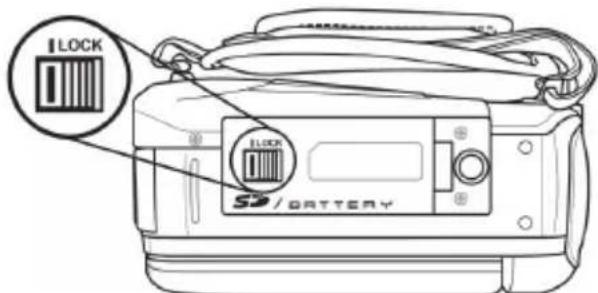
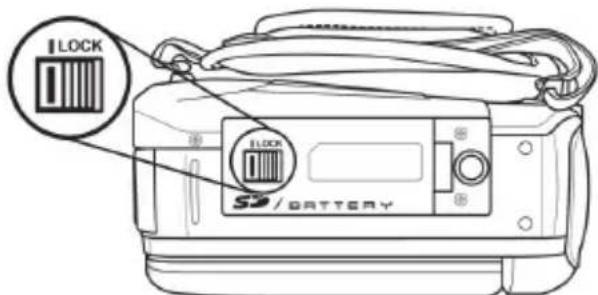
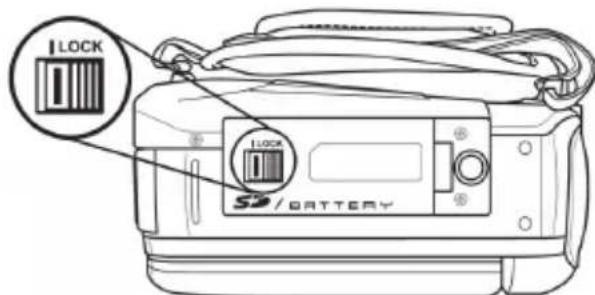
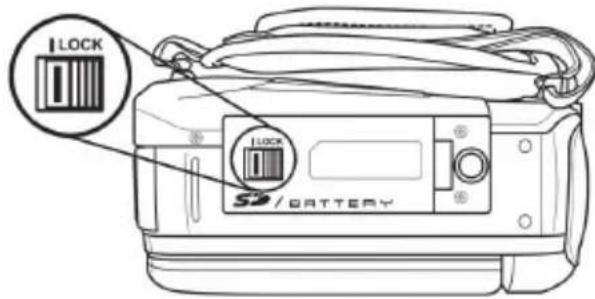
Write-protecting the SD memory card
The SD memory card comes with a write-protection tab. When write-protection is enabled (see the figure below right) you can only view existing movies and pictures, not delete or edit them. It is also not possible to record any new movies or pictures onto the memory card.
Write-protection disabled Write-protection enabled

When you insert a write-protected memory card, the message "Sd card is locked!" appears on the display (17).
Getting started
Opening the display
Open the display (17) and then rotate it into the required position.
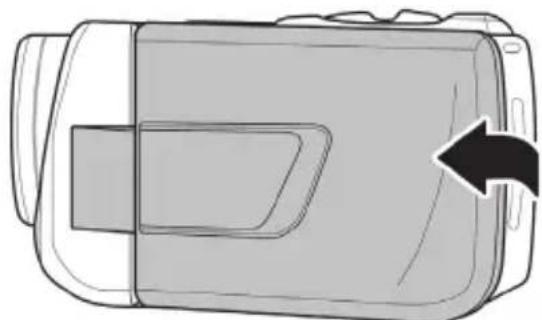
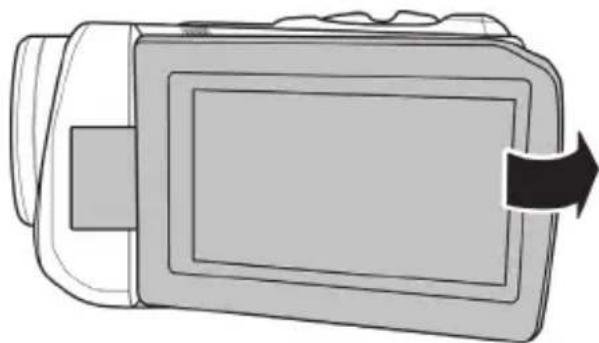
Once the display (17) is folded out 90^ it can be rotated in both directions.

You can also rotate the display (17) so it faces forwards. The picture orientation is adjusted automatically. When rotated about 180^ , display can be folded back flush against the camera casing.
Overview of function buttons
| Name | Button | Function |
| On/Off button (12) | Press this button to switch the camcorder on or off. | |
| Macro switch (10) | This switch lets you toggle between close-up recordings (macro mode) and portrait/landscape captures | |
| Zoom / Volume adjustment button (3) | • In Movie/Photo mode, press the T zoom button (telephoto) to enlarge the subject or press the W zoom button (wide-angle) to make it smaller. • In Movie playback mode, this buttons lets you adjust the playback volume. | |
| Navigation buttons (6) | • Press the left/right navigation button to select a menu item. Press the centre navigation button to confirm your selection. • In Movie/Photo mode, press the up/down buttons to set the Exposure correction (EV). Press the centre navigation button to confirm your selection. | |
| Record button (7) | • Press this button in Movie mode to start or stop recording. • Press this button in Photo mode to take a picture. | |
| Diving mode button (8) | Press this button to enable or disable diving mode. This enables or disables a special underwater white balance. | |
| Playback button (13) | Press this button to open the playback function for the current operating mode (Photo or Movie mode). | |
| Menu button (14) | MENU | Press the Menu button to open the menu for the current operating mode. |
| Mode button (15) | MODE | Press this button to toggle between the different operating modes (Movie, Photo and Setup). |
| Display button (16) | DISP | This button lets you show or hide information about the current settings (icons) for the selected mode or turn off the display. |
Switching the camcorder on and off
- Press the On/Off button (12) to switch the camcorder on. The power light (5) goes green.
- Press the On/Off button (12) to switch the camcorder off. The power light (5) then goes out.

When you open the display (17), the camcorder switches itself on automatically. When you close the cover, it switches itself back off again, providing you are not recording a movie.
The following table shows an overview of the different statuses of the power indicator (5):
| Colour | Description |
| Green | Powered on |
| Flashing orange/green Recording | in progress |
| Orange Data processing in progress | |
| Flashing green | Photo self-timer enabled |
| Fast flashing green Photo self-timer | enabled, last 2 seconds |
Selecting the Operating Mode
Press the Mode button (15) several times to toggle between the different operating modes (Video, Photo and Setup). An icon for the operating mode currently selected appears in the upper-left corner of the display (17): Movie or Photo mode. As soon as the setup menu appears, the live preview is disabled and only the menu is visible.
Setting the menu language
- Open the camcorder display (17). The device switches on automatically.
- Press the Mode button (15) twice. The Setup menu appears.

The first icon ABC (Language) is highlighted.
- Press the centre navigation button (6) to confirm your selection.
- Use the right or left navigation button (6) to select the menu language you want.
- Press the centre navigation button (6) to confirm your selection.
- Press the Mode button (15) to quit the setup menu and return to recording mode.

Any highlighted icons are animated.
Setting the date and time

If you are still in the menu, you can skip the first two steps and select the Date / Time icon directly.
- Open the camcorder display (17). The device switches on automatically.
- Press the Mode button (15) twice. The Setup menu appears.
Use the right or left navigation button (6) to select the Date / Time icon - Press the centre navigation button (6) to confirm your selection.
2012/01/01 12:00
- Next, you can set the year.
- Press the up/down navigation buttons (6) to set the desired value.
- Press the right navigation button (6) to toggle between the year, month, day, hours and minutes fields. Please note that you will have to enter the time in 24-hour format.
Each value (year, month, day, hours and minutes) can be set using the up/down navigation buttons (6). - Press the centre navigation button (6) to confirm the setting.
- Press the Mode button (15) to quit the setup menu and return to recording mode.
Recording
Recording movies
- Open the display (17) and then rotate it to the position you require. The device switches on automatically. The camcorder automatically initialises in Movie mode.
- Press the Record button (7) to start recording. The power light (5) flashes green and orange during recording.
- Use the zoom / volume adjustment button (3) while recording to zoom in or out of the picture view. Press the T zoom button (telephoto) to enlarge the subject or press the W zoom button (wide-angle) to make it smaller.
While recording, you can press the Playback button (13) to capture up to 3 pictures (snapshots). - You can pause a movie recording by pressing the Menu button (14) and resume it by pressing the button again.
- Press the Record button (7) to stop recording. The power light (5) goes green.
- During recording, different icons may appear on the display (17) to inform you about the current settings. You can show or hide those icons and switch the display on and off by pressing the Display button (16).

You can view the snapshots taken during movie recording via Photo playback mode.
Movie mode display
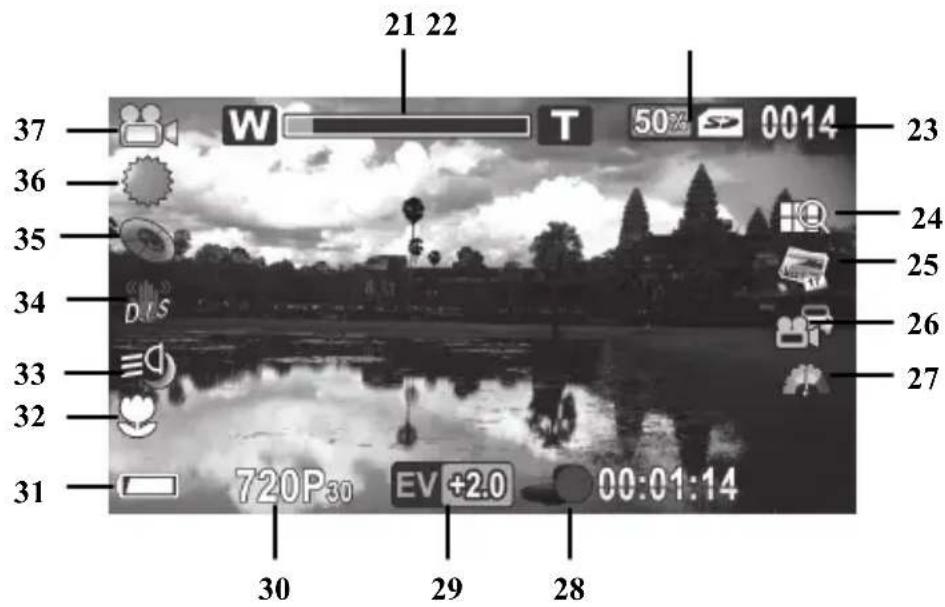
| No. | Icon* | Description |
| 21 | Zoom indicator | |
| 22 | free memory (expressed in %) / used memory | |
| 23 | 0014 0/3 | Number of recordings saved Number of snapshots saved *1 |
| 24 | Movie quality | |
| 25 | Date Stamp | |
| 26 | Traffic mode (loop recording) | |
| Pre-record | ||
| Time-lapse video | ||
| 27 | Motion detect | |
| 28 | Time recorded | |
| 29 | Exposure compensation | |
| 30 | Resolution | |
| 31 | Battery capacity | |
| 32 | Macro mode | |
| 33 | Video lamp | |
| 34 | Stabilizer | |
| 35 | Effect | |
| 36 | White Balance | |
| 37 | Operating mode: Movie mode | |
- The icons may vary depending on the selected setting.
^ 1 The number of snapshots is only displayed during movie recording.
Macro mode
The camcorder features a macro function allowing you to focus on very close subjects. This allows you to position the lens as close as 20-21 cm (8 inches) from the subject.
To enable macro mode, slide the Macro switch (10) to the position. The macro mode icon is shown on the display (17).
Portrait/landscape recordings
When recording subjects at distances of 1m or more, please use the Portait/landscape setting. To do this, slide the macro switch (10) into the position. The portrait/landscape icon is shown on the display (17).
Taking pictures
- Open the display (17) and then rotate it to the position you require. The device switches on automatically. The camcorder automatically initialises in Movie mode automatically.
- Press the Mode button (15) once to toggle to Photo mode.
- The macro switch (10) lets you toggle between close-up recordings (macro mode) and portrait/landscape captures.
- Use the zoom / volume adjustment button (3) to zoom in or out of the picture view. Press the T zoom button (telephoto) to enlarge the subject or press the W zoom button (wide-angle) to make it smaller.
- Press the Record button (7) to take a picture. The power light (5) goes orange when saving.

You can use the Photo menu to adjust picture quality settings like exposure compensation or white balance. The settings are shown on the display (17). Press the Menu button (14) to display the Photo menu. A detailed description can be found on page 337.
- In Photo mode, different icons may appear on the display (17) informing you about the current settings. You can show or hide these icons and switch the display (17) on and off by pressing the Display button (16).
The Photo Mode Display
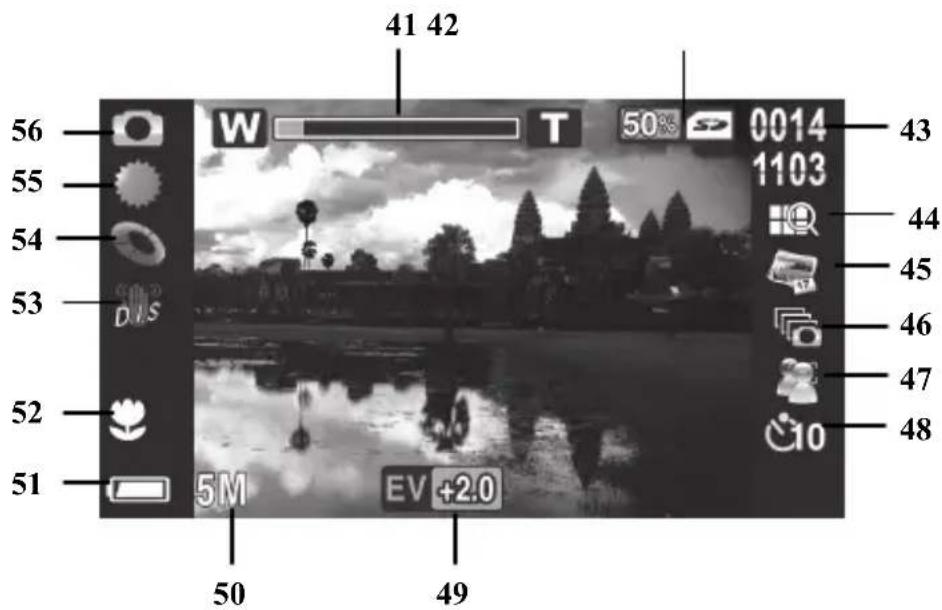
| No. | Icon* | Description |
| 41 | Zoom indicator | |
| 42 | free memory (in | %)/used memory |
| 43 | Number of recordings saved / remaining | |
| 44 | Picture quality | |
| 45 | Date Stamp | |
| 46 | Continuous Shooting | |
| 47 | Face Detection | |
| 48 | Self-timer | |
| 49 | Exposure compensation | |
| 50 | Resolution | |
| 51 | Battery capacity | |
| 52 | Macro mode | |
| 53 | Stabilizer | |
| 54 | Effect | |
| 55 | White Balance | |
| 56 | Operating mode: Photo mode | |
- The icons may vary depending on the settings selected.
Playback
Movie playback
You can press the Playback button (13) in Movie mode to open playback mode.
The icon in the top left corner of the display (17) indicates that movie playback mode is selected. Press the playback button (13) again to return to Movie mode.
In playback mode, different icons may appear on the display (17) informing you about the current settings. You can show or hide these icons by pressing the Display button (16).

If you press the Display button, additional information, such as the resolution and the date and time of the recording, is shown. Press the Display button again to hide all the icons.
The Movie Playback Mode Display
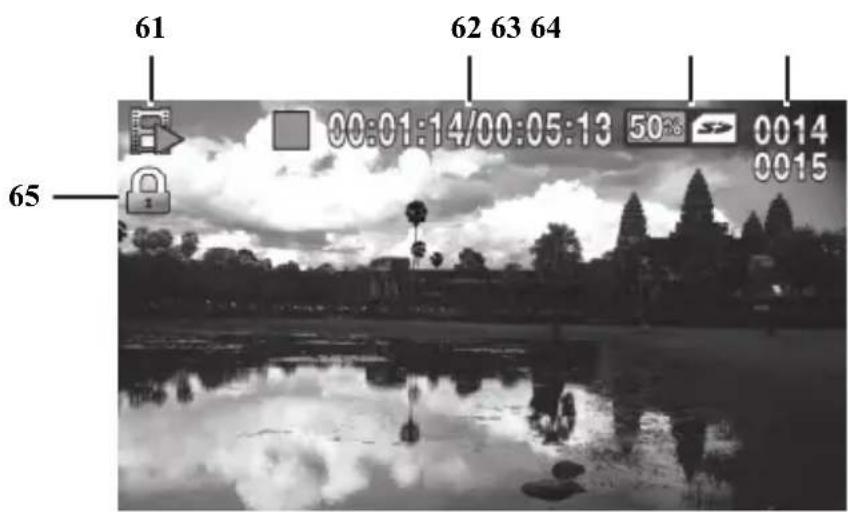
| No. | Icon | Description |
| 61 | Playback mode | |
| 62 | Elapsed time / total recording time | |
| 63 | free memory (in%) / used memory | |
| 64 | 0014 0015 | current movie number / total number of movies |
| 65 | File protection |
The following features are available in Playback mode:
Use the right or left navigation button (6) to select the movie you want.
- Press the centre navigation button (6) to play the selected movie.
You can use the zoom / volume adjustment button (3) to adjust the playback volume.
The following functions are available during movie playback:
- Press the Menu button (14) to pause playback. Press the Menu button (14) again to resume playback.
- For rewind or fast forward, press and hold the left or right navigation button (6) for a moment. Pressing the button again gradually increases the speed to max. 8x.
- To stop playback, press the centre navigation button (6).
Photo playback
You can press the Playback button (13) in Photo mode to open playback mode.
The icon in the top left corner of the display (17) indicates that photo playback mode is selected. Press the playback button (13) again to return to photo mode.
In playback mode, different icons may appear on the display (17) informing you about the current settings. You can show or hide those icons by pressing the Display button (16).

If you press the Display button, additional information, such as the resolution and the date and time of the recording, is shown. Press the Display button again to hide all the icons.
The following features are available in Playback mode:
Use the right or left navigation buttons (6) in playback mode to select a picture.
- You can use the zoom/volume button (3) to show a 4 or 9 picture thumbnail view of the selected photos by pressing the W zoom button (wide angle) twice. Next, you can select a picture from this thumbnail view by pressing the navigation buttons (6). The selected image is outlined in red. Press the centre navigation button (6) to show the selected picture in full-screen view.
- You can use the zoom/volume button (3) to gradually enlarge (max. 16x) the picture area by pressing and/or holding the T zoom button (Telephoto). Press the navigation buttons (6) to select the desired picture area from the enlarged picture section. You can use the zoom/volume button (3) to gradually reduce the picture area again by pressing and/or holding the W zoom button (wide angle). Or press the centre navigation button (6) to exit zoom mode.
The Photo Playback Mode
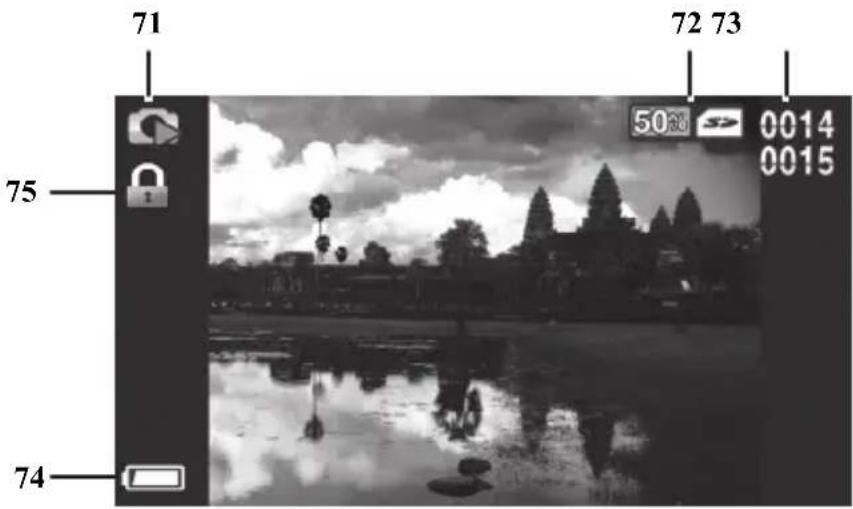
| No. | Icon | Description |
| 71 Photo playback | ||
| 72 free memory (in %) / used memory | ||
| 73 0014 0015 | current photo number / total number of photos | |
| 74 Battery capacity | ||
| 75 File protection | ||
Using under water
Please note the following when using the camcorder under water, e.g. when diving.

Make sure that your camcorder does shows no signs of damage.

Double-check that the battery/memory card compartment (19) and the ports cover (9) are properly closed and that there is no dirt or sand between the covers. This ensures that the device is water-resistant.
closed properly not closed properly

Always carry out this check indoors, never at the beach or in the water.

Make sure that the battery/memory card compartment (19) and the ports cover (9) are never opened while under water. This can damage the device and any images already recorded on it.
- The camcorder is water-resistant up to a depth of 3m .
- To guarantee its water-resistance, do not use the camcorder for longer than 60 minutes under water at a time.
- Only use the camcorder in water of temperatures of between 0^ and 40^ .
- The water-resistance of this camcorder applies to salt and fresh water only. It does not apply to any cleaners, chemicals, solvents or water in public swimming pools. Liquids of this kind must be wiped off the camcorder immediately.
- Avoid excessive vibration or shaking under water. There could be a risk that the battery/memory card compartment cover (19) or the ports cover (9) comes open. This can damage the device and any images already recorded.
Settings for use under water
To use under water, you need to enable diving mode by pressing the Diving mode button (8). Press this button to enable or disable diving mode. This enables or disables a special underwater white balance.
When diving mode is enabled, a large diving icon appears on the display for a few seconds.
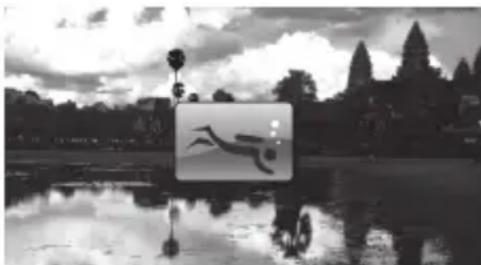
A smaller version of the icon () is then shown in the bottom right corner of the display.

Diving mode is available for both Photo and Video modes.
Cleaning after using under water
Clean the camcorder after every time it is used under water.

Make sure that your camcorder shows no signs of damage.
After using the camcorder under water, clean it with tap water. To do this, submerge in tap water for about 10 minutes to remove, for example salt residues.
- Then use a soft cloth to dry the camcorder and the lens.
- Place the camcorder in a cool, well-ventilated place to dry. Avoid any direct sunlight.
- Before opening the battery/memory card compartment (19) and/or the ports cover (9), wait for the camcorder to dry completely. Have an absorbent cloth ready when opening the covers and remove any water and dirt around the covers.
Menu
The camcorder uses different menus that provide various settings for the different modes. There is also a setup menu allowing you to set the preferences for your camcorder.

Some menu icons appear different depending on the configuration. The icons show the settings selected.

Any highlighted icons are animated.
Setup Menu
The setup menu lets you adjust the camcorder preferences.
- Open the camcorder display (17). The device switches on automatically.
- Press the Mode button (15) twice. The setup menu is then displayed.


When you have made all the changes you want, , press the Mode button (15) to quit the setup menu and return to recording mode.

To quit a setup menu item without making any changes, press the Menu button (14).
Setup menu icons
| ABC | Language To select the menu language. |
| JUL | Date / Time To set the date and time. |
| MAY | Format To format the memory card. |
| CJ | Default Restores the factory-default settings. |
| Auto power off To select an automatic power off timeout. | |
| Hz | Frequency To set the electrical power supply (AC) frequency. |
| TV | TV standard To select the TV standard. |
| Beep To turn the acoustic signals on or off. | |
| Information Shows information about saved photos/movies and about the memory. | |
| HDMI | HDMI Standard To select the HDMI standard. |
Language
Set the display language for the menu here.
Use the right or left navigation button (6) to select the ABC icon.
- Press the centre navigation button (6) to confirm your selection.
Use the right or left navigation button (6) to select the menu language you want.
- Press the centre navigation button (6) to confirm your selection.
Date / Time
This lets you set the date and time. Proceed as follows:
Use the right or left navigation button (6) to select the icon.
- Press the centre navigation button (6) to confirm your selection.

- Next you can set the year.
- Press the up/down navigation buttons (6) to set the desired value.
- Press the right navigation button (6) to toggle between the year, month, day, hours and minutes fields. Please note that you have to enter the time in 24-hour format.
Each value (year, month, day, hours and minutes) can be set using the up/down navigation buttons (6). - Press the centre navigation button (6) to confirm the setting.
- Press the Mode button (15) to quit the setup menu and return to recording mode.
Format
This function lets you delete all contents from your memory card and internal memory and renew the file saving structure.

Warning! All movies and pictures saved will be deleted and cannot be restored. Make sure that all recordings you want to keep have been backed up to a different medium.

To format the internal memory, you first have to remove the memory card (if one is inserted). It is only possible to format the internal memory if there are no memory cards inserted.
| SYMBOL | Indicates that the SD card will be formatted. |
| MEM | Indicates that the internal memory will be formatted. |
The following settings are available:
| × | Does not format. |
| ✓ | Formats the indicates storage medium. |
Use the right or left navigation button (6) to select the desired setting.
Press the centre navigation button (6) to confirm your selection.
Default
All device parameters (e.g. the menu language) are reset to their factory-default settings. This does not erase any data from your memory card.

icon.
Use the right or left navigation button (6) to select the icon.
- Press the centre navigation button (6) to confirm your selection.
The following settings are available:
| × | Does not apply any changes. |
| ✓ | Resetsethe device to the factory-default values. |
- Use the right or left navigation button (6) to select the setting you want.
- Press the centre navigation button (6) to confirm your selection.
Auto power off
You can get the device to power off automatically after a certain time to save battery. If no buttons are pressed during the preset time, the device powers off automatically. To switch the camcorder back on, press the On/Off button (12).
Use the right or left navigation button (6) to select the icon.
- Press the centre navigation button (6) to confirm your selection.
The following settings are available:
| X | Auto PowerOff disabled |
| Y | Power off after 1 minute |
| Z | Power off after 5 minutes |
- Use the right or left navigation button (6) to select the setting you want.
- Press the centre navigation button (6) to confirm your selection.
Mains frequency
Select the mains frequency to avoid any interference from fluorescent lighting. A mains frequency of 50Hz is used across Europe; in America the mains uses a frequency of 60Hz .
Use the right or left navigation button (6) to select the Hz icon.
- Press the centre navigation button (6) to confirm your selection.
The following settings are available:
| 50Hz | 50 Hz |
| 60Hz | 60 Hz |
Use the right or left navigation button (6) to select the desired setting.
- Press the centre navigation button (6) to confirm your selection.
TV Standard
Choose between the PAL or NTSC television standards. NTSC is the standard used in America and Japan, PAL is used in Europe. This setting only applies for playback via the video cable.
Use the right or left navigation button (6) to select the icon.
- Press the centre navigation button (6) to confirm your selection.
The following settings are available:
| NTSC | NTSC |
| PAL | PAL |
Use the right or left navigation button (6) to select the setting you want.
- Press the centre navigation button (6) to confirm your selection.
Beep
Here, you can set whether or not the camcorder makes a sound every time you press a button. This option also enables or disables the power-on sound at the same time.
Use the right or left navigation button (6) to select the icon.
- Press the centre navigation button (6) to confirm your selection.
The following settings are available:
| × | Disables the beep. |
| ✓ | Enables the beep. |
Use the right or left navigation button (6) to select the desired setting.
- Press the centre navigation button (6) to confirm your selection.
Information
Shows information about storage space. The number of stored photos/movies and information about the internal memory and SD card status is shown.
Use the right or left navigation button (6) to select the icon.
- Press the centre navigation button (6) to confirm your selection.
The following settings are available:
| Shows information about the SD card. | |
| Shows information about the internal memory. |
Use the right or left navigation button (6) to select the storage medium you want.
- Press the centre navigation button (6) to confirm your selection.
An information view appears. This view shows the number of photos/movies saved and information about the selected storage medium (internal memory or SD card).
- Press the Menu button (14) to exit the view.
HDMI Standard
Select the HDMI standard that you would like to use.
Use the right or left navigation button (6) to select the icon.
- Press the centre navigation button (6) to confirm your selection.
The following settings are available:
| 720P HOMI | 720P |
| 1080i HOMI | 1080i |
- Use the right or left navigation button (6) to select the setting you want.
- Press the centre navigation button (6) to confirm your selection.
Movie menu
To open the Movie menu, press the Menu button (14) while in Movie mode.
Movie menu icons
| White Balance Adjustment to ambient lighting conditions. | |
| Resolution The recording size in pixels. | |
| Effect To select colour presets. | |
| Quality To select the recording quality. | |
| Stabilizer Toggles the stabilizer on or off. | |
| Video lamp Switches the video lamp on or off. | |
| EV (Exposure compensation) To select the exposure compensation. | |
| Traffic mode (loop recording) Switches the loop recording on or off. | |
| Motion detect If this function is enabled, the camcorder will start recording a movie as soon as it detects movement. | |
| Date Stamp Toggles the date stamp function on or off. | |
| Pre-record The recording starts 3 seconds before the record button (7) is pressed. | |
| Lapse video For time-lapse video recordings. |
White Balance
White balance is used to determine a colour temperature suitable for the current lighting conditions. Select one of the preset options or use the Automatic setting.
Use the right or left navigation button (6) to select the icon.
- Press the centre navigation button (6) to confirm your selection.
The following settings are available:
| Auto | Automatic |
| Daylight | |
| Cloudy | |
| Fluorescent | |
| Tungsten |
Use the right or left navigation button (6) to select the setting you want.
- Press the centre navigation button (6) to confirm your selection.

It is also possible to adjust the white balance by pressing the left navigation button (6) in recording mode.
Resolution
The resolution determines the size of the recording in pixels. As a general rule: the higher the resolution, the more storage space is required.
Use the right or left navigation button (6) to select the icon.
- Press the centre navigation button (6) to confirm your selection.
The following settings are available:
| 320 240 30FPS | Low resolution of 320 x 240 pixels and 30 fps frame rate |
| 848 460 30FPS | Medium resolution of 848 x 480 pixels. 30 frames per second (fps) frame rate. |
| 848 460 60FPS | Medium resolution of 848 x 480 pixels. 60 frames per second (fps) frame rate. |
| 1280 720 30FPS | High resolution of 1280 x 720 pixels and a high 30 fps frame rate |
| 1280 720 60FPS | High resolution of 1280 x 720 pixels and a high 60 fps frame rate |
| 1920 1080 30FPS | High resolution of 1920 x 1080 pixels and a high 30 fps frame rate |
Use the right or left navigation button (6) to select the desired setting.
- Press the centre navigation button (6) to confirm your selection.
Effect
You can record using different presets.
Use the right or left navigation button (6) to select the icon.
- Press the centre navigation button (6) to confirm your selection.
The following settings are available:
| Normal setting |
| Black and white |
| Sepia |
Use the right or left navigation button (6) to select the setting you want.
- Press the centre navigation button (6) to confirm your selection.

The "Sepia" setting creates a black and white picture with a brown colour tint. This makes the picture look older.
Quality
The Quality setting determines the compression ratio of the movie recorded when saved onto the memory card or internal memory. You can store more movies or longer ones with a higher compression rate (normal quality).
You can record using the quality presets Normal ( ) and High ( ). To do this, select the relevant icon.
Use the right or left navigation button (6) to select the icon.
- Press the centre navigation button (6) to confirm your selection.
The following settings are available:
| High quality | |
| Normal quality |
Use the right or left navigation button (6) to select the setting you want.
Press the centre navigation button (6) to confirm your selection.
Stabilizer
You can enable the stabilizer to reduce "shaky" pictures.
Use the right or left navigation button (6) to select the icon.
- Press the centre navigation button (6) to confirm your selection.
The following settings are available:
| × | Disables the stabilizer. |
| ✓ | Enables the stabilizer. |
Use the right or left navigation button (6) to select the setting you want.
- Press the centre navigation button (6) to confirm your selection.
Video lamp
Here you can turn the video lamp on or off.
Use the right or left navigation button (6) to select the icon.
- Press the centre navigation button (6) to confirm your selection.
The following settings are available:
| Switches the LED light (2) off. | |
| Switches the LED light (2) on. | |
| Enables Night mode. This increases the camcorder's light sensitivity. |
Use the right or left navigation button (6) to select the setting you want.
- Press the centre navigation button (6) to confirm your selection.

It is also possible to switch on the video lamp by pressing the right navigation button (6) in recording mode.

The video lamp has a range of 1 m.
EV (Exposure compensation)
You can set the exposure value depending on the light conditions around the subject. Select a positive value if you want to record a subject in the dark. Select a negative value if the subject is very bright or luminous (e.g. a computer or a television screen) or when recording in backlit (e.g. front-on sunlight) conditions.
Use the right or left navigation button (6) to select the icon.
- Press the centre navigation button (6) to confirm your selection.

- Press the up/down navigation buttons (6) to set the value you want (-2.0/2.0).
- Press the centre navigation button (6) to confirm your selection.

It is also possible to set the exposure compensation by pressing the up/down navigation button (6) in recording mode.
Traffic mode (loop recording)
Use this function to enable or disable loop recording (Traffic mode).
Use the right or left navigation button (6) to select the icon.
- Press the centre navigation button (6) to confirm your selection.
The following settings are available:
| × | Disables loop recording. |
| Enables loop recording. | |
| Enables loop recording and rotates the view by 180°. |
Use the right or left navigation button (6) to select the setting you want.
- Press the centre navigation button (6) to confirm your selection.

A new file is automatically created after 10 minutes.

Data is overwritten automatically as soon as the memory card or the internal memory is full. The oldest data is overwritten first. If you do not wish to delete or overwrite any recorded data, please make a backup copy or swap the memory card.

Please connect an external USB power adapter (not supplied) when enabling this function if you intend to record over an extended period. To do this, you will need the USB/AV cable supplied.
Motion detect
Motion detect starts recording automatically as soon as the camcorder detects movement.
Use the right or left navigation button (6) to select the icon.
- Press the centre navigation button (6) to confirm your selection.
The following settings are available:
| Disables motion detect. |
| Enables motion detect with low sensitivity. |
| Enables motion detect with medium sensitivity. |
| Enables motion detect with high sensitivity. |
Use the right or left navigation button (6) to select the setting you want.
- Press the centre navigation button (6) to confirm your selection.

Please connect an external USB power adapter (not supplied) when enabling this function if you intend to record for an extended period. To do this, you will need the USB/AV cable supplied.

If you wish to disable motion detection during a recording, first stop recording by pressing the Record button (7) and then press the Menu button (14).
Date Stamp
This function allows you to show the date and time of the recording in the bottom right corner of a video.
Use the right or left navigation button (6) to select the icon.
- Press the centre navigation button (6) to confirm your selection.
The following settings are available:
| × | Disables the date stamp. |
| ✓ | Enables the date stamp. |
Use the right or left navigation button (6) to select the setting you want.
- Press the centre navigation button (6) to confirm your selection.

After the date stamp has been enabled, it is not possible to remove it from the recording. You should therefore check if the date and time are properly set prior to recording.
Pre-record
If this function is enabled, recording starts 3 seconds before you press the Record button (7) to start recording.
Use the right or left navigation button (6) to select the icon.
- Press the centre navigation button (6) to confirm your selection.
The following settings are available:
| × | Disables the Pre-record function. |
| ✓ | Enables the Pre-record function. |
-
Use the right or left navigation button (6) to select the setting you want.
-
Press the centre navigation button (6) to confirm your selection.
Lapse video
This function allows you to record time-lapse videos.
Use the right or left navigation button (6) to select the icon.
- Press the centre navigation button (6) to confirm your selection.
The following settings are available:
| Disables the time-lapse video recording. |
| The device records one image per second. |
| The device records one image every 5 seconds. |
| The device records one image every 30 seconds. |
- Use the right or left navigation button (6) to select the setting you want.
- Press the centre navigation button (6) to confirm your selection.

Please connect an external USB power adapter (not supplied) when enabling this function if you intend to record over an extended period. To do this, you will need the USB/AV cable supplied. You can purchase a suitable 5V USB power adapter with at least 2A from any electronics retail outlet.
Movie playback menu
To open the Movie playback menu, press the Menu button (14) while in movie record mode.
Movie playback menu icons
| 1 | Delete a movie recording To delete the selected movie. |
| Delete all movie recordings Deletes all movies. | |
| Protect a movie recording Protects your recordings against accidental deletion. | |
| Protect all movie recordings Protects your recordings against accidental deletion. |
Deleting a movie
Use this option to delete a single movie.

Warning! Once a recording has been deleted, it cannot be restored.

Use the right or left navigation button (6) to select the 1icon.
Press the centre navigation button (6) to confirm your selection.
Use the right or left navigation button (6) to select the movie you want to delete.
Press the centre navigation button (6) to confirm your selection.
- A safety prompt will appear.
The following settings are available:
| × | Does not apply any changes. |
| Deletes the selected recording. |
Use the right or left navigation button (6) to select the setting you want.
- Press the centre navigation button (6) to confirm your selection.
Deleting all movie recordings
All saved movies can be deleted in one go. This does not delete any photos you have taken.

Warning! Once a recording is deleted, it cannot be restored.
Use the right or left navigation button (6) to select the icon.
Press the centre navigation button (6) to confirm your selection.
The following settings are available:
| × | Does not apply any changes. |
| ✓ | Deletes all movies. |
Use the right or left navigation button (6) to select the setting you want.
- Press the centre navigation button (6) to confirm your selection.
Lock One
Here, you can protect one recording to avoid accidental deletion.
Use the right or left navigation button (6) to select the icon.
- Press the centre navigation button (6) to confirm your selection.
Use the right or left navigation button (6) to select the movie you want to protect.
- Press the centre navigation button (6) to enable or disable the protection.

Protected movies appear with a icon on the display (17).
Lock All
Here you can protect all recordings to avoid accidental deletion.
Use the right or left navigation button (6) to select the icon.
- Press the centre navigation button (6) to confirm your selection.
The following settings are available:
| × | Does not apply any changes. |
| © | Protects all movies. |
| © | Unlocks all previously protected movie recordings. |
Use the right or left navigation button (6) to select the setting you want.
- Press the centre navigation button (6) to confirm your selection.

Protected videos appear with a icon on the display (17).
Slideshow
This function allows you to play all recorded movies in sequence.
Use the right or left navigation button (6) to select the icon.
- Press the centre navigation button (6) to confirm your selection.
The following settings are available:
| × | Disables slideshow. |
| ✓ | Enables slideshow. |
Use the right or left navigation button (6) to select the setting you want.
- Press the centre navigation button (6) to confirm your selection.

You can press the Menu button (14) to pause playback and the centre navigation button (6) to stop it.
Photo menu
To open the Photo menu, press the Menu button (14) while in Photo mode.
Photo Menu Icons
| White Balance Adaptation to ambient lighting conditions. | |
| Resolution The recording size in pixels. | |
| Effect To select colour presets. | |
| Quality To select the recording quality. | |
| Stabilizer Toggles the stabilizer on or off. | |
| Continuous Shooting Switches continuous shooting on or off. | |
| Self-timer To delay the recording. | |
| Date Stamp Toggles the date stamp function on or off. | |
| Face Detection Switches face detection on or off. |

Most function settings in Photo mode are identical to those in Movie mode (see the chapter "Movie Menu" starting from page 322). Therefore, in the following, we will describe only those functions that are different in Photo mode.
Resolution
The resolution determines the size of the recording in pixels. As a general rule: the higher the resolution, the more storage space is required.
Use the right or left navigation button (6) to select the icon.
- Press the centre navigation button (6) to confirm your selection.
The following settings are available:
| 1M | Low resolution of 1280 x 960 pixels |
| 2M | Medium resolution of 1920 x 1080 pixels |
| 5M | Medium resolution of 2592 x 1944 pixels |
| 7M | Higher resolution of 3648 x 2052 pixels (interpolated) |
| 16M | High resolution of 4616 x 3462 pixels (interpolated) |
Use the right or left navigation button (6) to select the setting you want.
- Press the centre navigation button (6) to confirm your selection.
Continuous Shooting
This function allows you to take three consecutive photos by pressing the Record button (7).
Use the right or left navigation button (6) to select the icon.
- Press the centre navigation button (6) to confirm your selection.
The following settings are available:
| × | Disables continuous shooting. |
| ✓ | Enables continuous shooting. |
Use the right or left navigation button (6) to select the setting you want.
Press the centre navigation button (6) to confirm your selection.
Self-timer
The self-timer delays the capture for a preset time after the Record button (7) is pressed. This allows you to participate in the photo (e.g. for a group photo).
Use the right or left navigation button (6) to select the icon.
- Press the centre navigation button (6) to confirm your selection.
The following settings are available:
| × | Self-timer disabled. |
| 2SEG | The photo is taken 2 seconds after the shutter button is pressed. |
| 10SEG | The photo is taken 10 seconds after the shutter button is pressed. |

For self-timer recordings, we recommend rotating the display by 180^ .
Date Stamp
This function allows you to show the date and time of the recording in the bottom right corner of a picture.
Use the right or left navigation button (6) to select the icon.
- Press the centre navigation button (6) to confirm your selection.
The following settings are available:
| × | Disables the date stamp. |
| ✓ | Enables the date stamp. |
Use the right or left navigation button (6) to select the setting you want.
- Press the centre navigation button (6) to confirm your selection.

After the date stamp has been enabled, it is not possible to remove it from the recording. You should therefore check if the date and time are properly set prior to recording.
Face Detection
This function detects faces and optimises the capture accordingly.
Use the right or left navigation button (6) to select the icon.
- Press the centre navigation button (6) to confirm your selection.
The following settings are available:
| × | Disables face detection. |
| ✓ | Enables face detection. |
Use the right or left navigation button (6) to select the setting you want.
- Press the centre navigation button (6) to confirm your selection.
Photo playback menu
To open the Photo playback menu, press the Menu button (14) while in Photo playback mode.
Photo playback menu icons
| 1 | Delete one photo Deletes the selected photo. |
| Delete all photos Deletes all photos. | |
| Lock One Protects your pictures against accidental deletion. | |
| Lock All Protects your pictures against accidental deletion. | |
| Autplay Plays all pictures as a slideshow. | |
| DPOF | Set printing properties for one picture Set number of printouts for a photo. |
| DPOF | Set printing properties for all photo Set number of printouts for all photos. |
Delete one photo
This allows you to delete a single photo. This function works in the same way as the Delete function for movie playback (see page 333).
Delete all photos
All saved photos are deleted at once. Any movies recorded are not deleted.
This function works in the same way as the Delete function for movie playback (see page 334).
Lock One
This setting is equivalent to the Lock setting for movie playback (see page 335).
Lock All
This setting is equivalent to the Lock setting for movie playback (see page 335).
Slideshow
This setting is equivalent to the viewing mode setting for movie playback (see page 336).
DPOF one
DPOF (Digital Print Order Format) allows you to select an image to be printed from your camcorder and then specify how many prints you would like.
Use the right or left navigation button (6) to select the icon.
- Press the centre navigation button (6) to confirm your selection.
Use the right or left navigation button (6) to select the photo you want.
- Press the centre navigation button (6) to confirm your selection.

-
Press the up/down navigation buttons (6) to set the number of prints. The number will be shown in the bottom left corner of the display (see the figure).
-
Press the centre navigation button (6) to confirm your selection.
- A security prompt appears.
The following settings are available:
| × | Does not apply any changes. |
| ✓ | Applies the setting for the selected photo. |
Use the right or left navigation button (6) to select the setting you want.
Press the centre navigation button (6) to confirm your selection.
DPOF All
This option lets you apply the previously set number of printouts to all photos or to delete the settings assigned for all photos at once.
Use the right or left navigation button (6) to select the icon.
- Press the centre navigation button (6) to confirm your selection.
The following settings are available:
| × | Does not apply any changes. |
| DPOF | Deletes the assigned settings for all photos. |
| DPOF | Applies the previously set number of printouts to all photos. |
Use the right or left navigation button (6) to select the setting you want.
- Press the centre navigation button (6) to confirm your selection.
Connectors and Sockets
Viewing recordings on a television
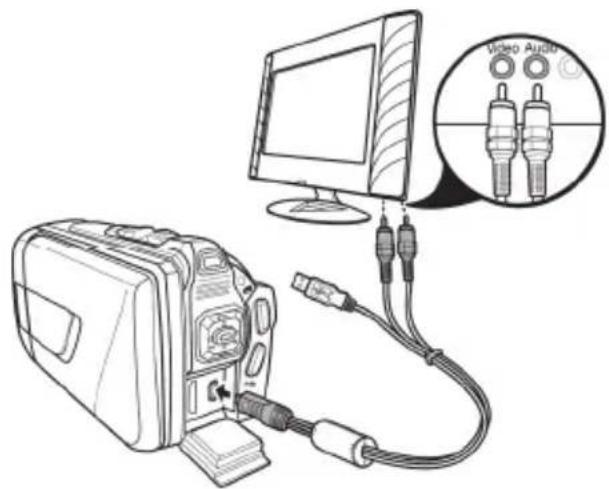
Any recordings that you can view on the camcorder display (17) can also be played on a normal television. The television set needs to have an appropriate Video In connector.
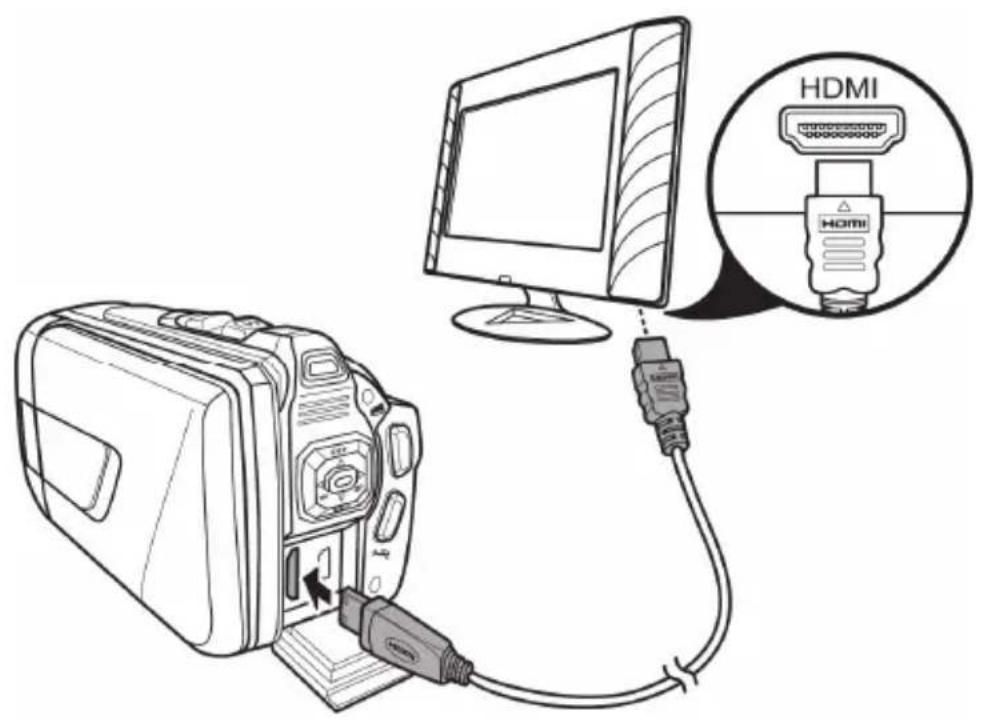
Depending on the connectors available on the television, you can use the USB/AV cable or the HDMI cable. The HDMI cable provides digital images and sound and therefore the best quality.
Simply operate the device as usual. For instance, enable the Autopoly (slideshow) function to view all photos in sequence.
Connecting via the HDMI Cable
Connecting via the USB/AV Cable
Transferring recordings to a computer
There are two ways of copying recordings from the camcorder to a computer:
by connecting the device to a computer via the USB/AV cable
by inserting the memory card into a card reader

It is not possible to transfer data from a computer to the camcorder. The copy function only allows data transfer from the camcorder to the computer.

Be careful when renaming any folders and files. Do NOT try to change the folder or file names stored on the device from the computer or you may not be able to play back any files contained here on your camcorder.
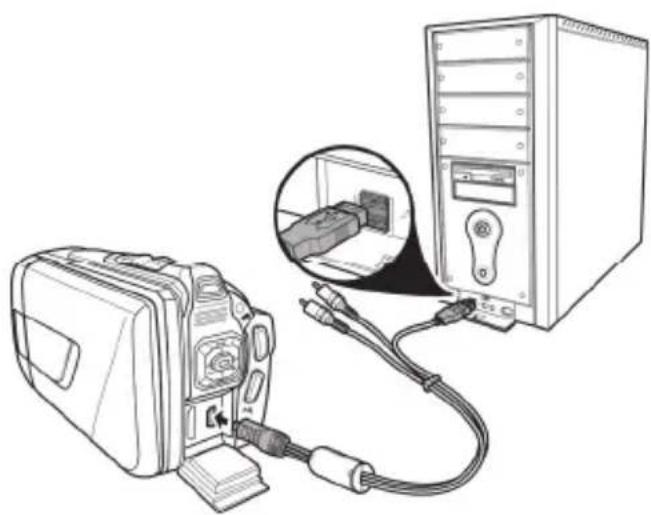
Once you have copied your files or folders to the computer, you can rename or edit them on the computer.
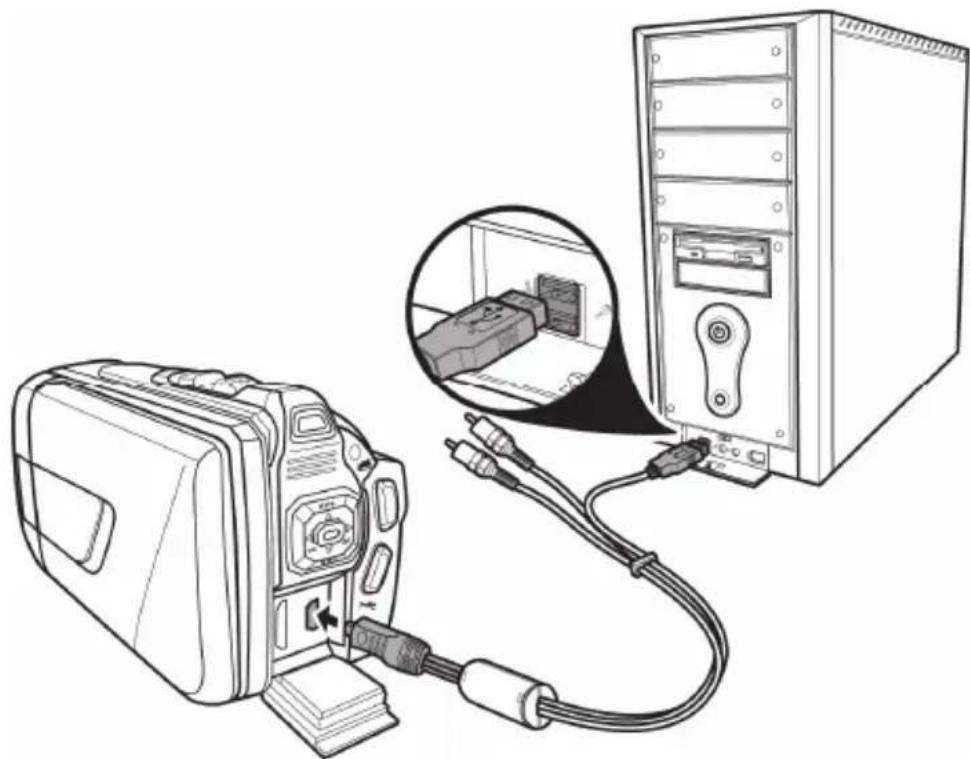
- Use the USB cable supplied to connect your camcorder to the computer, as shown in the diagram.
- Switch the camcorder on.
Using a card reader
If your computer has a card reader which is compatible with SD memory cards, you can read the contents of the memory card directly. Remove the memory card from the camcorder while it is switched off.
- Insert the memory card into the card reader on your computer (normally labelled SD/MMC).
- The PC will add the memory card contents under the drive letter representing the card reader in My Computer.
- Open My Computer on your PC and double-click on the drive representing the card reader.
- All recorded files can be found in a subfolder of the folder "DCIM" on this drive.
- Now you can copy the recorded files from the camcorder into a folder of your choice on the computer's hard disk.
Software
The software supplied allows you to edit and play your recordings.
System Requirements
Operating system: Windows XP or Windows Vista or Windows 7
CPU: Intel/AMD Dual-Core processor or higher
RAM: At least 1GB
Graphics adapter: DirectX 9 or DirectX 10-compatible (recommended)
Interface: USB 1.1 or higher
Memory: At least 2GB free hard disk space
Installing the software
The software provided is on the CD-ROM supplied. To install the software, you first need to connect the camcorder to the computer using the USB cable.
- Use the USB cable to connect the camcorder to your computer. Then switch the camcorder on.
- Insert the CD-ROM supplied into the CD or DVD drive of your computer.
The CD will launch automatically. Then follow the on-screen instructions to install.

If the setup programme does not start automatically or you accidentally cancel it, you can launch the file "TotalMedia HDCam.exe" manually.
Uninstalling the software
To uninstall the software, please use the Uninstall Wizard found in the Control Panel of your operating system.
The main screen

| 1 | Navigation bar with multiple view options |
| 2 | The preview window shows previews and further information. |
| 3 | ToolBar for accessing the most common functions |
Selecting the language
You can change the language of the software interface.
From the main dialog, click: >Options
Preferences
- Select the language you want from the list and click "OK" to confirm.
- A message appears that a restart is required. Click "OK" to confirm the message.
- Then start the application again.
Editing recordings
Viewing recordings
Use the USB cable to connect the camcorder to your computer. Then switch the camcorder on.
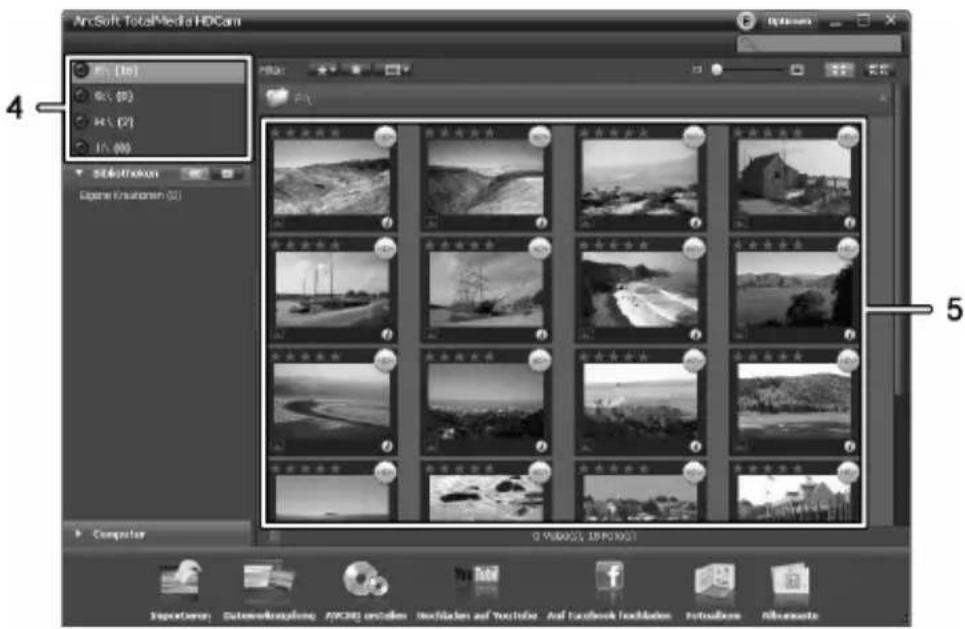
| 4 | Drive display and selection |
| 5 | Recordings stored on the selected drive |
The following options are available:
From the navigation (4), select the drive for which you want to display the contents.
- Click on the star icon to rate the current recording.
- Click on the info icon to show further information on the current recording.
- To display a recording in a new window, double-click on it. In the display window, click the arrow icons or use the arrow keys on your keyboard to display the previous or next recording.
- To view a movie recording, double-click on it. The video window contains Stop □, Play □ and Pause □ icons. Click the arrow icons □ or use the arrow keys on your keyboard to display the previous or next video.
- To delete a recording, click the bin icon Confirm the prompt which appears by pressing "OK" in order to delete the recording.
Importing recordings
You can use the Import function to archive your recordings. The recordings are copied to your computer. Once you have imported your recordings, you do not need to connect the camcorder to view them.
Select all recordings that you want to import from the drive selected and click "Import" on the bottom toolbar.
A window with a user prompt appears. To import the selected recordings, select the "Import selected scenes" option. You can choose to import all or only all new recordings.
If necessary, enter a folder name or use the default name.
Click "OK" to confirm.

Depending on the number of recordings, it can take a while to copy the files.
Selecting navigation view
There are different options for opening your imported recordings. In the libraries, you can sort them by folder name or date.
- Click on the folder icon to sort by folder name.
- Click on the calendar icon to sort by folder date.
To open My Computer, click the Computer button. Here you can find all the drives installed on your computer. For example, this allows you to access any recordings stored on a CD-ROM.
Preview window
The preview window gives you various options for sorting and editing your recordings.

Shows all recordings according to their rating.

Shows all recordings that have not been imported yet.

Here you can filter to display only pictures, only movies or all recordings.

Drag the slider to adjust the display size for your recordings.

Shows recordings only.

Shows the recordings with more information.

You can enter a keyword to search for here.
Toolbar

Import Imports all recordings from any connected devices.

Merge videos Creates films from your video recordings.

Create AVCHD Burns your movie files onto an AVCHD disk.

Upload to YouTube Uploads videos to your YouTube account.

Upload to Facebook Uploads videos to your Facebook account.

Photo album Creates a photo album from your pictures.

Album page Creates a page (e.g. an invitation card) from your pictures.

The icon entitled "YouKu" links to an Asian video portal and is not suitable for use in European countries.
Import
See page 351 - Importing recordings.
Merge videos
Merge videos lets you merge multiple video clips to make a film.
- Click the merge videos icon
to show the video editing timeline.
Drag the video clips you want onto the timeline at the bottom of the window. - Click the "Next" button to start the process.
- Enter the storage path on your computer and then click "Save".
Creating an AVCHD Disk

AVCHD (Advanced Video Codec High Definition) is an innovative digital standard with high resolution and brilliant picture and sound quality. This format allows you to record onto writeable DVD disks and play back on suitable Blu-ray players. It is a good addition to an HDTV television set.
Not all players support playback from self-recorded AVCHD disks.
- Insert a DVD±R, DVD±R DL, DVD±RW or DVD-RAM disk into your DVD drive.
- Click the Create AVCHD Disk icon to open the disk compilation workspace.
Drag the video clips you want onto the timeline at the bottom of the window. - Click the "Next" button to start the process.
- Select the drive and folder from your hard disk and click "OK".

To use this function your computer must have a DVD drive capable of writing one of the following media types: DVD±R, DVD±R DL, DVD±RW or DVD-RAM
Cutting video clips
You can remove any unwanted sections from your video clips. From the video recordings overview, click on the scissors icon the playback window appears for the recording currently selected.
- Navigate to the beginning of the scene that you want to cut. Then click
- Navigate to the end of the scene that you wish to cut. Then click
- Start cutting by clicking the confirmation icon
The section is cut and a new clip is created without the selection.
Upload to YouTube
- Click on the YouTube upload icon.
Drag the video recording you want onto the timeline at the bottom of the window. - Click "Next".
- Enter your username and password and then click "Login".
- Follow the YouTube on-screen instructions.
Upload to Facebook
- Click on the Facebook upload icon
Drag the video recording you want onto the timeline at the bottom of the window. - Click "Next".
- Enter your e-mail address and password and click "Login".
- Then follow the Facebook on-screen instructions.
Photo album
This option allows you to create an album consisting of multiple photos. There are also several templates that you can use.
- Click the Photo album icon
Drag the pictures you want onto the bar at the bottom of the window. - Click "Next".
The programme "ArcSoft Print Creations" launches automatically. - Choose a category and then a template from the application. To do this, double-click on the template you want.
Album page
This option allows you to create an album page consisting of one or more photos. There are also several templates that you can use.
- Click the Album page icon
Drag the pictures you want onto the bar at the bottom of the window. - Click "Next".
The programme "ArcSoft Print Creations" launches automatically. - Choose a category and then a template from the application. To do this, double-click on the template you want.
Troubleshooting
You can solve most common problems yourself using the table below. If the problem persists after checking the suggested solutions, please contact our Service Hotline (see page 361). Do not attempt to repair the product yourself.
| Problem | Solution |
| Unable to power the camcorder on. | The battery pack is empty. Recharge the battery. |
| The camcorder suddenly powers off. | The battery pack is empty. Recharge the battery. |
| The camcorder suddenly powers off. | Auto power off is enabled. Check the settings (see page 318). |
| The camcorder fails to respond and cannot be switched off. | Remove the battery pack for a few seconds and re-insert it. |
| Unable to disable motion detect. | The device is still recording. First stop recording by pressing the Recording button (7) and then press the Menu button (14). (See page 330). |
Maintenance/cleaning
Maintenance
Repairs are required if this device has been damaged in any way: for example, if the charger or the housing of the SCAW 5.00 B2 is damaged, if liquid or objects have penetrated the device or if the product does not work normally or has been dropped. If you notice any smoke, unusual noise or strange smells, switch off the device immediately and unplug the power cord from the power supply. If this occurs, the device should no longer be used and should be inspected by an expert. All repairs must be carried out by qualified service personnel.
Cleaning
- Use a soft, lint-free cloth for cleaning.
- Do not use any cleaners, detergents or solvents, as these may enter the housing and cause permanent damage to the product.

Please read the notes on "Cleaning after using under water usage" on page 313.
Environmental regulations and disposal information

Devices marked with this symbol are subject to European Directive 2002/96/EC. All electrical and electronic devices must be disposed of separately from household waste at official disposal centres.
Avoid damage to the environment and risks to your personal health by disposing of the device properly. For further information about proper disposal, contact your local government, disposal bodies or the shop where you bought the device.
Dispose of all packaging in an environmentally-friendly manner.
Cardboard packaging can be taken to paper recycling containers or public collection points
for recycling. Any film or plastic contained in the packaging should be taken to your public collection points for disposal.
Respect the environment. Old batteries do not belong in with domestic waste. They must be handed in at a collection point for waste batteries. Please note that batteries must be disposed of fully discharged at appropriate collection points for old batteries. If disposing of batteries which are not fully discharged, take precautions to prevent short circuits.
Conformity Notes
CE This device and its accessories as supplied have been tested and approved for compliance with the basic and other relevant requirements of the EMC Directive 2004/108/EC, as well as the Low-voltage Directive 2006/95/EC. The corresponding Declaration of Conformity can be found at the end of this User Manual.
Warranty and service information
Warranty of TARGA GmbH
Dear Customer,
This device is sold with three years warranty from the date of purchase. In the event of product defects, you have legal rights towards the seller. These statutory rights are not restricted by our warranty as described below.
Warranty conditions
The warranty period commences upon the date of purchase. Please keep the original receipt in a safe place as it is required as proof of purchase. If any material or manufacturing faults occur within three years of purchase of this product, we will repair or replace the product free of charge as we deem appropriate.
Warranty period and legal warranty rights
The warranty period is not extended in the event of a warranty claim. This also applies to replaced and repaired parts. Any damage or defects discovered upon purchase must be reported immediately when the product has been unpacked. Any repairs required after the warranty period will be subject to charge.
Scope of warranty
The device was carefully manufactured in compliance with stringent quality guidelines and subjected to thorough testing before it left the works. The warranty applies to material and manufacturing faults. This warranty does not cover product components which are subject to normal wear and which can therefore be regarded as wearing parts, or damage to fragile components such as switches, rechargeable batteries or components made of glass. This warranty is void if the product is damaged, incorrectly used or serviced. To ensure correct use of the product, always comply fully with all instructions contained in the user manual. The warnings and recommendations in the user manual regarding correct and incorrect use and handling of the product must always be observed and complied with. The product is solely designed for private use and is not suitable for commercial applications. The warranty is rendered void in the event of incorrect handling and misuse, if it is subjected to force, and also if any person other than our authorised service technicians interfere with the device. No new warranty period commences if the product is repaired or replaced.
Submitting warranty claims
To ensure speedy handling of your complaint, please note the following:
Before using your product for the first time, please read the enclosed documentation or online help carefully. Should any problems arise which cannot be solved in this way, please call our hotline.
- Always have your receipt, the product article number as well as the serial number (if available) to hand as proof of purchase.
- If it is not possible to solve the problem on the phone, our hotline support staff will initiate further servicing procedures depending on the fault.

Service

Phone: 0207-3650744
E-Mail: service.GB@targa-online.com

Phone: 01-2421583
E-Mail: service.IE@targa-online.com

Phone: 800-62175
E-Mail: service.MT@targa-online.com

Phone: 800-92496
E-Mail: service.CY@targa-online.com
IAN:79938

Manufacturer
Please note that the following address is not a service address. First contact the service point stated above.
TARGA GmbH
Coesterweg 45
59494 Soest
Germany
C E
EU Declaration of Conformity
Address:
Targa GmbH
Coesterweg 45
59494 Soest, Germany
Product: Digital Camcorder
Model: SilverCrest SCAW 5.00 B2
Identification number: IAN 79938
The product complies with the requirements of the following European directives:
2004/108/EC Electromagnetic Compatibility
2006/95/EC Low Voltage
2011/65/EU Restriction of the use of certain hazardous substances in electrical and electronic equipment
Compliance was proved by the application of the following standards:
EMC: EN 55022 : 2010
EN 55024:2010
EN 61000-3-3:2008
EN 61000-3-2:2006 + A2:2009
Soest, 13 November 2012
Matthias Klauke, Managing Director


- Inhalt
- Specifications techniques
- Getting started 296
- Recording 301
- Playback 306
- Using under water. 311
- 314
- Connectors and Sockets 344
- Software 347
- Troubleshooting 357
- Maintenance/cleaning. 358
- Environmental regulations and disposal information 358
- Conformity Notes 359
- Warranty and service information 359
- Trademark information
- Introduction
- Intended Use
- Package contents
- Technical specifications
- Safety instructions
- Operating Environment
- Water-resistance
- Note on mains disconnection
- Children and persons with disabilities
- Charger and battery pack
- Warning: risk of explosion!
- Cables
- Controls and buttons
- Front
- Top
- Back
- Left side
- Right side
- Bottom
- Before you start
- Charging the battery in the charger
- Charging the battery pack while in the camcorder
- Inserting the battery pack
- Inserting a memory card
- Write-protecting the SD memory card
- Getting started
- Opening the display
- Switching the camcorder on and off
- Selecting the Operating Mode
- Setting the menu language
- Setting the date and time
- Recording
- Recording movies
- Movie mode display
- Macro mode
- Portrait/landscape recordings
- Taking pictures
- Playback
- Movie playback
- The Movie Playback Mode Display
- Photo playback
- The Photo Playback Mode
- Using under water
- Settings for use under water
- Cleaning after using under water
- Menu
- Setup Menu
- Language
- Date / Time
- Format
- Default
- Auto power off
- Mains frequency
- TV Standard
- Beep
- Information
- HDMI Standard
- Movie menu
- White Balance
- Resolution
- Effect
- Quality
- Stabilizer
- Video lamp
- EV (Exposure compensation)
- Traffic mode (loop recording)
- Motion detect
- Date Stamp
- Pre-record
- Lapse video
- Movie playback menu
- Movie playback menu icons
- Deleting a movie
- Deleting all movie recordings
- Lock One
- Lock All
- Slideshow
- Photo menu
- Continuous Shooting
- Self-timer
- Face Detection
- Delete one photo
- Delete all photos
- DPOF one
- DPOF All
- Connectors and Sockets
- Viewing recordings on a television
- Transferring recordings to a computer
- Using a card reader
- Software
- System Requirements
- Installing the software
- Uninstalling the software
- The main screen
- Selecting the language
- Editing recordings
- Viewing recordings
- Importing recordings
- Selecting navigation view
- Preview window
- Toolbar
- Import
- Merge videos
- Creating an AVCHD Disk
- Cutting video clips
- Upload to YouTube
- Upload to Facebook
- Photo album
- Album page
- Troubleshooting
- Maintenance/cleaning
- Maintenance
- Cleaning
- Environmental regulations and disposal information
- Conformity Notes
- Warranty and service information
- Warranty of TARGA GmbH
- Warranty conditions
- Warranty period and legal warranty rights
- Scope of warranty
- Submitting warranty claims
- Service
- IAN:79938
- Manufacturer
- C E
- EU Declaration of Conformity
- Address:
Brand : SILVERCREST
Model : SCAW 5.00 B2
Category : Camcorder